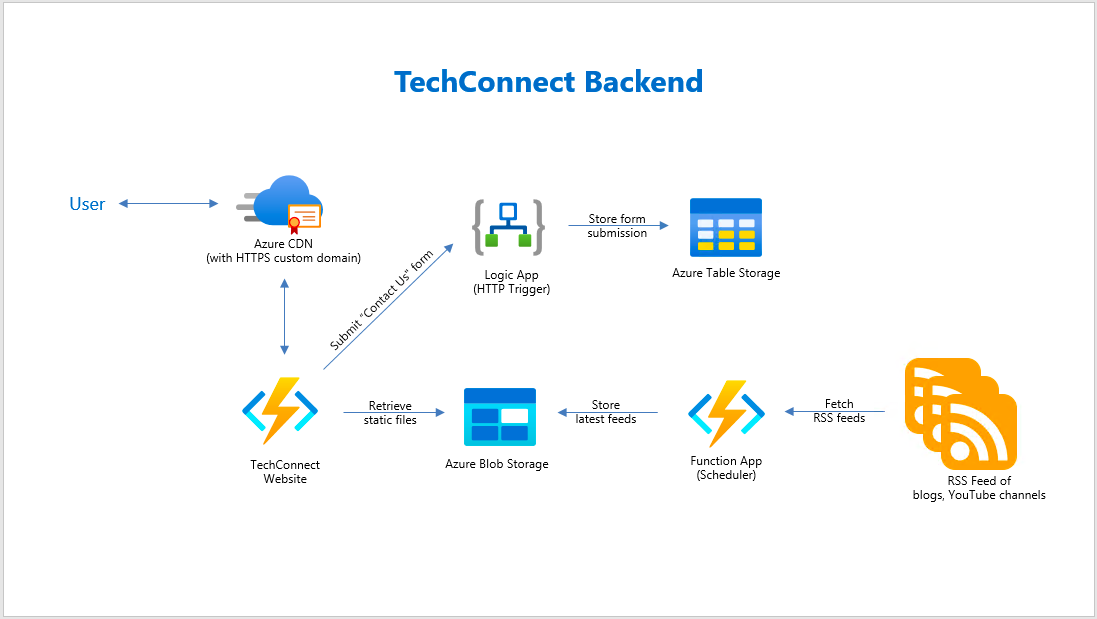
Recently, I was asked to cut down the cost of hosting an ASP .NET Core website on Azure. The website is originally hosted on Azure Web App so there is a fixed cost to it that we need to pay per month. Hence, the first solution that comes to my mind is to move it from Web App to Function because the website is a static website and it is not expecting large group of visitors in any given point of time.
So why do I choose to use Azure Function? Unlike the Web Apps, Functions provide the Consumption Plan where instances of the Functions host are dynamically added and removed based on the number of incoming events. This serverless plan scales automatically, and we are billed only when the Functions are running. Hence, when we switch to use Azure Function to serve the static website with the Consumption Plan, we will be able to save significantly.
Serve Static Content with Azure Function
How do we serve static website with Azure Functions?
There are many online tutorials about this but none of them that I found are based on the latest Azure Portal GUI in 2020. So hopefully my article here will help people out there who are using the latest Azure Portal.
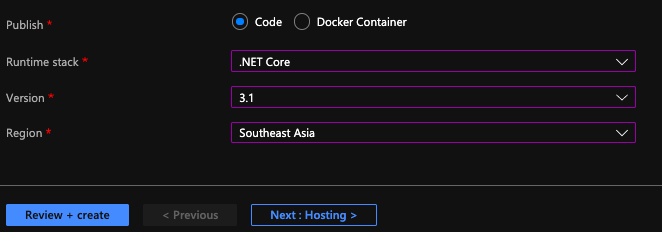
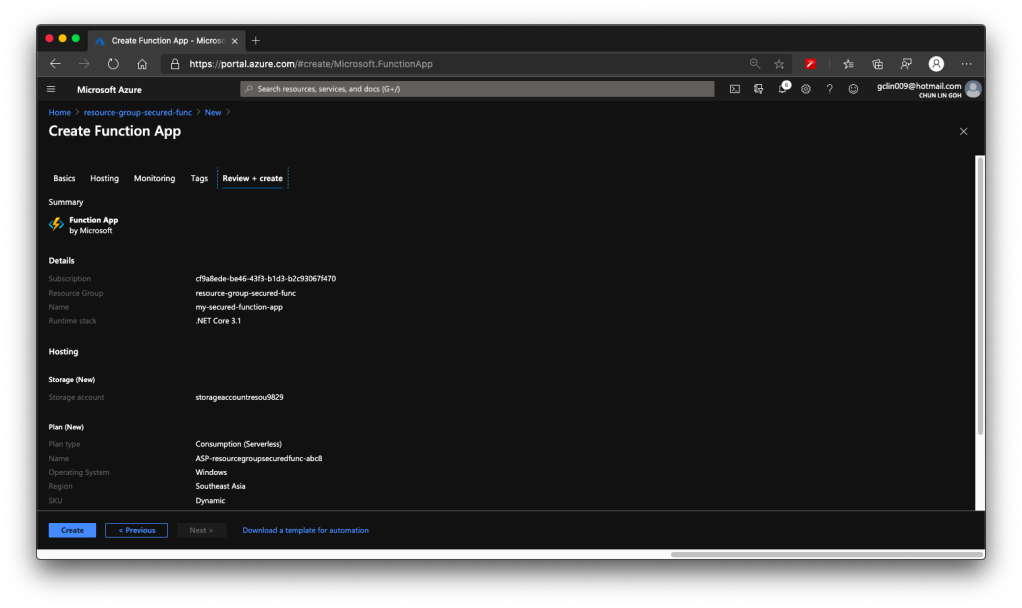
The following screenshot shows the setup of my Azure Function.
[Image Caption: Azure Function with .NET Core 3.1.]
After that, we will create a HTTP triggered function in the Azure Function.
Then for the Function itself, we can add the following code in run.csx.
using Microsoft.AspNetCore.Mvc;

public static async Task<IActionResult> Run(HttpRequest req, ILogger log){

    string pathValue = req.Path.Value;

    ...

    return new FileStreamResult(
        File.OpenRead(
            @"d:\home\site\wwwroot\web-itself\website\index.html"),
            "text/html; charset=UTF-8");
}
The pathValue helps the Function to be able to serve different web pages based on different value in the URL path. For example, /page1 will load page1.html and /page2 will load page2.html.
If the Function you build is only to serve a single HTML file, then you can just directly return the FileStreamResult without relying on the pathValue.
Configure the Route Template
To have the pathValue working as expected, we first need to configure the route template of the Function. To do so, we can head to the Integration tab of the Function, as shown in the screenshot below.
[Image Caption: Editing the Route Template.]
For the Route Template, we set it to be “web-itself/{page?}” because web-itself is the name of our Function in this case. The question mark in the “{page?}” means that the page is an optional argument in the URL.
So why do we have to include the Function name “web-itself” in the Route Template? The values, according to the documentation, should be a relative path. Since, by default, the Function URL is “xxx.azurewebsites.net/api/web-itself”, so the relative path needs to start from “web-itself”.
Also, since this is going to be an URL of our website, we can change the authorisation level to be “Anonymous” and set GET as the only accepted HTTP method.
Upload the Static Files
So where do we upload the static files to? As the code above shows, the file actually sit in the d:\home\site\wwwroot. How do we upload the static files to this directory?
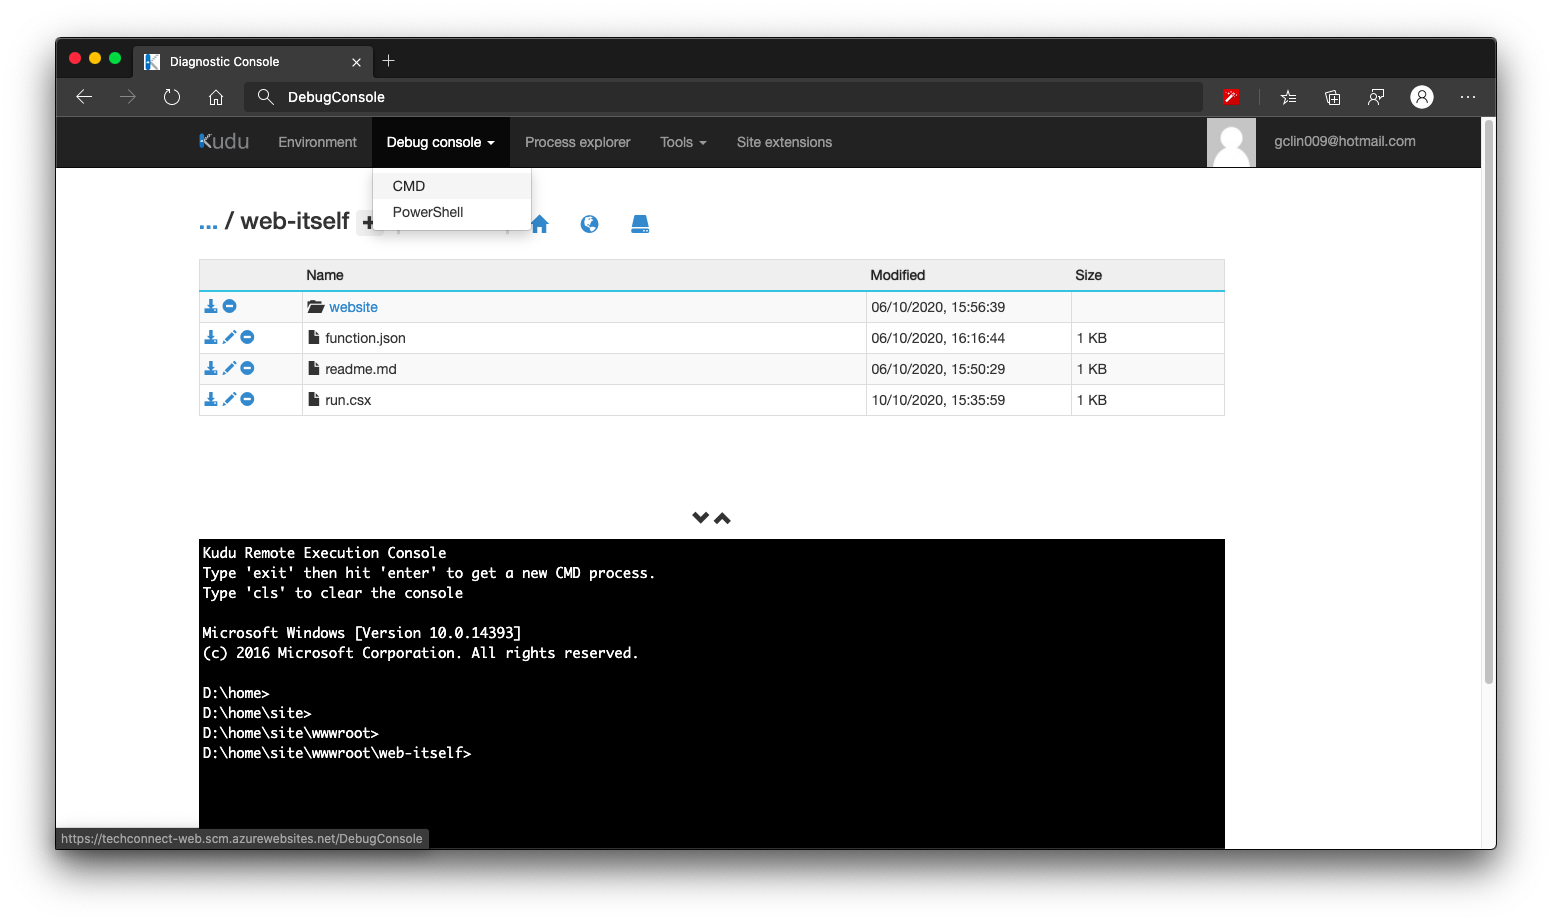
We need to head to the Kudu console of the Azure Function, and click on the CMD menu item, as shown below. By the way, Kudu console can be found under Development Tools > Advanced Tools > Go of the Azure Function on the Portal.
[Image Caption: Kudu console of the Azure Function.]
We then navigate to the folder which keeps the run.csx of the Function (which is web-itself in my case here). Then we can create a folder called website, for example, to host our static content. What we need to do after this is just uploading the HTML files to this website folder.
Handle JavaScript, CSS, and Other Static Files
How about other static files such as JavaScript, CSS, and images?
Yes, we can use the same way above to serve these files. However, that might be too troublesome because each of them has different MIME Type we need to specify.
So another way of doing that is to store all these files on Azure Storage. So the links in the HTML will be absolute URLs to the files on the Azure Storage.
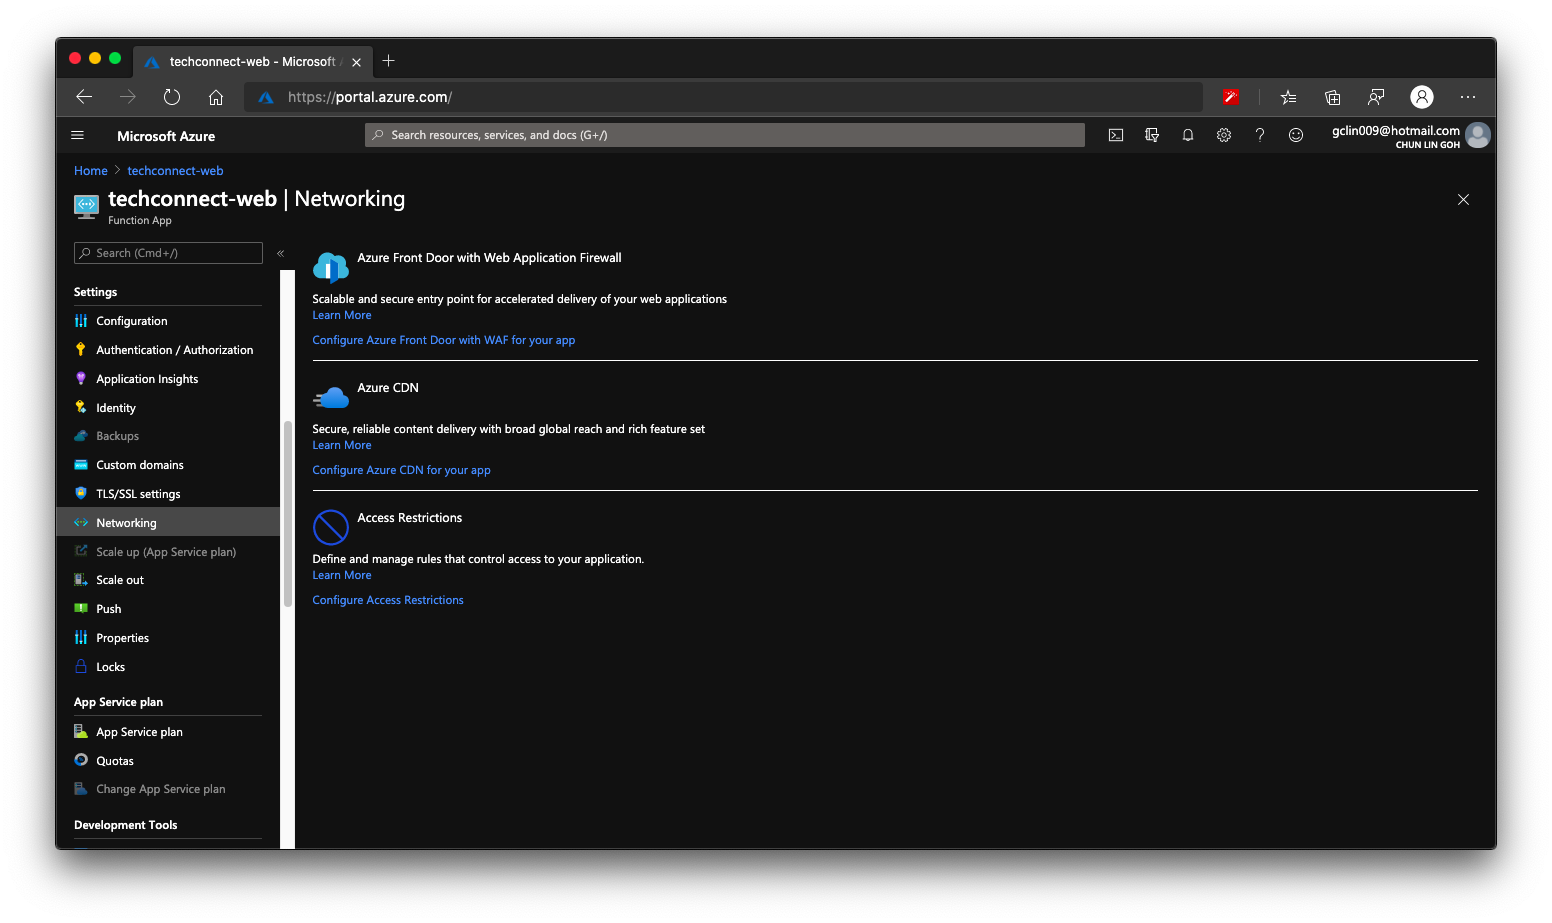
Finally we can enable Azure CDN for our Azure Function. So that if next time we need to move back to host our web pages on Azure Web App or even Azure Storage, we don’t have to change our CNAME again.
[Image Caption: Both Azure CDN and Azure Front Door is available in Azure Functions.]
[This post is updated on 19th July 2020 to reflect the latest UI of both Azure Portal and Postman. I’d like to take this chance to correct some of my mistakes made in earlier post, as friendly pointed out by readers in the comment section.]
Today is the first working day of a new year. Today is the second half of year 2020 where I have been instructed to work from home for months. I thus decided to work on a question raised previously by the senior developer in my previous job back in 2018: How do we authenticate an Azure Function?
The Azure Function that I’m discussing here is the Azure Function app with .NET Core 3.1 runtime stack and published as Code instead as Docker Container.
🎨 Creating a new Function that will be deployed on Windows. 🎨
The whole Function creation process takes about 2 minutes. Once it is successfully created, we can proceed to add a new function to it. In this case, we are going to choose a HTTP trigger, as shown in the screenshot below. We choose to use a HTTP trigger function because later we will show only authenticated users can get the results when sending a POST request to this function.
🎨 Creating a function which runs when it received an HTTP request. 🎨
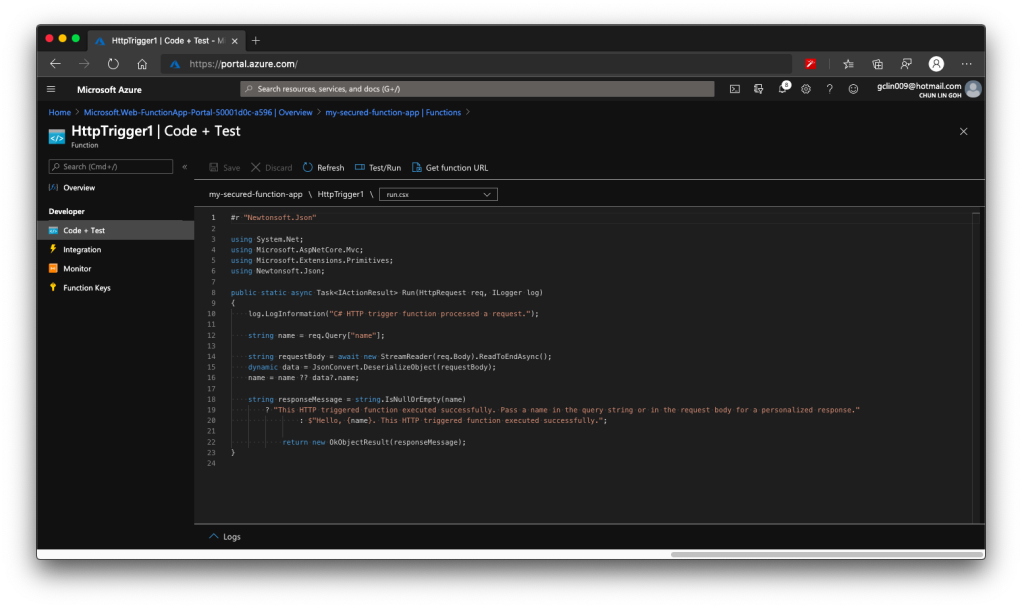
Once the trigger is created, we will see that there is a default C# code template given which will return the caller a greeting message if a name is provided in the body of HTTP request (or through query string).
🎨 Default template code for HTTP Trigger. 🎨
HTTP Methods and Function Keys
Before we continue, there are a few things we need to handle. The steps below are optional but I think they are useful for the readers.
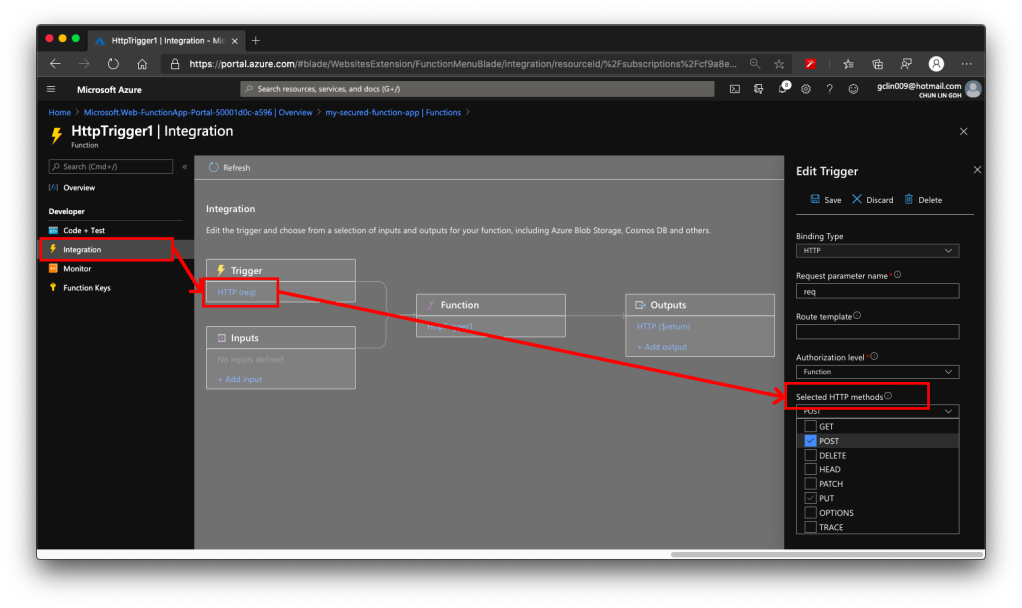
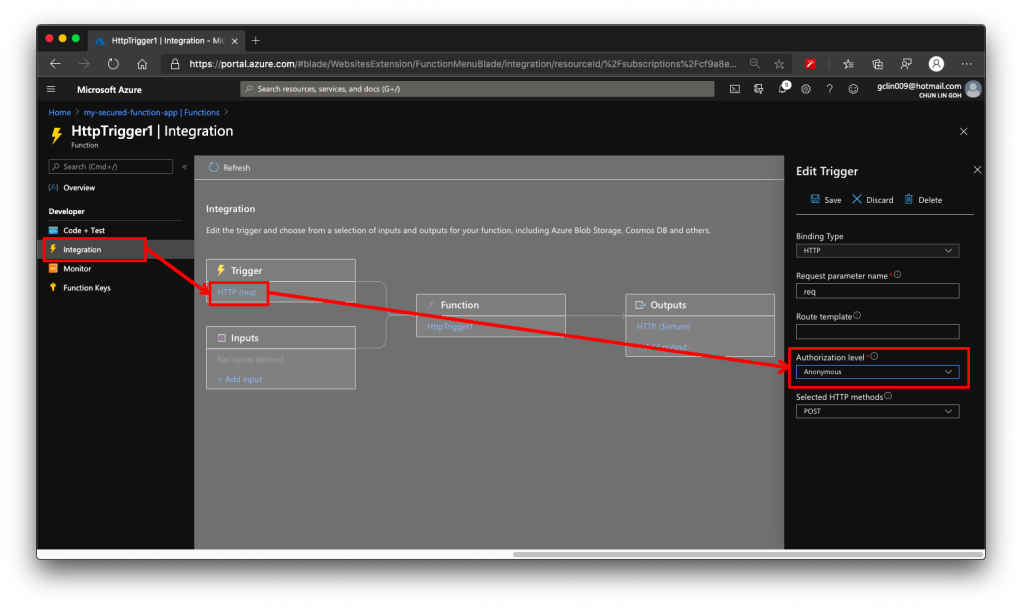
Firstly, by default, the Function accepts both GET and POST requests. If you would like to only allow POST request, changing only the C# codes above is not going to help much. The correct way is to choose the accepted HTTP methods for this Function under its “Integration” section, as shown in the screenshot below.
🎨 This shows where to locate the “Selected HTTP methods”. 🎨
In our case, since we will only accept POST request, we will tick only the POST option.
As you notice in the “Authorization level” dropdown which is right above the “Selected HTTP methods”, it currently says “Function”. Later we must change this but for now we keep it as it is. If you would like to manage the Function Key, or checkout the default one, you can find the keys in the “Function Keys” section of the Function.
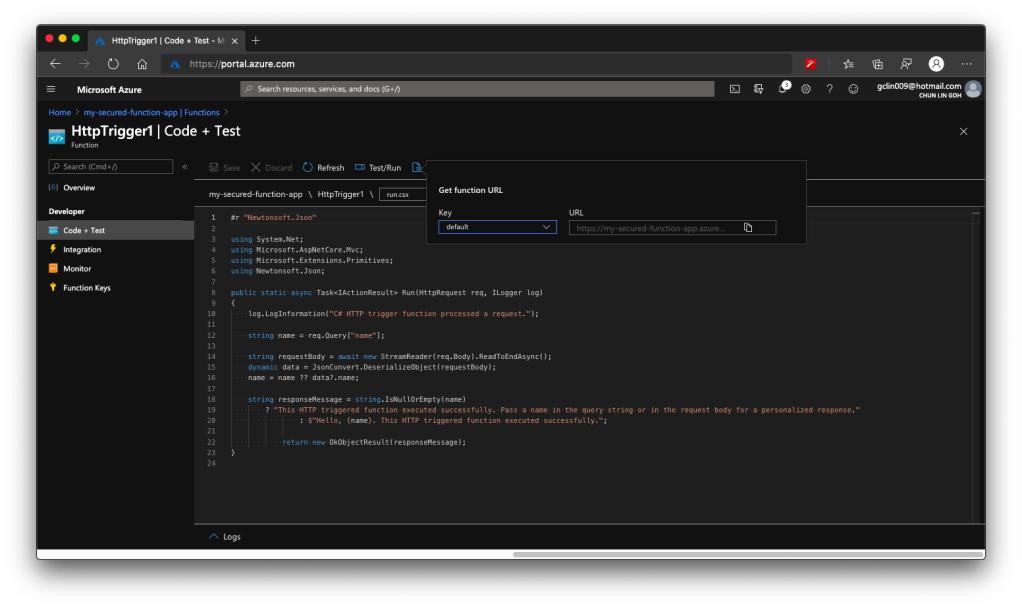
Secondly, what is the URL of this Function? Unlike the previous version of Azure Function, the URL of the Function can be retrieved at both the Overview section and the Code + Test section of the Function. However, the URL in the Overview section has no HTTPS, so we will be using the HTTPS URL found in Code + Test, as shown in the screenshot below.
🎨 Getting the function URL (in HTTPS). 🎨
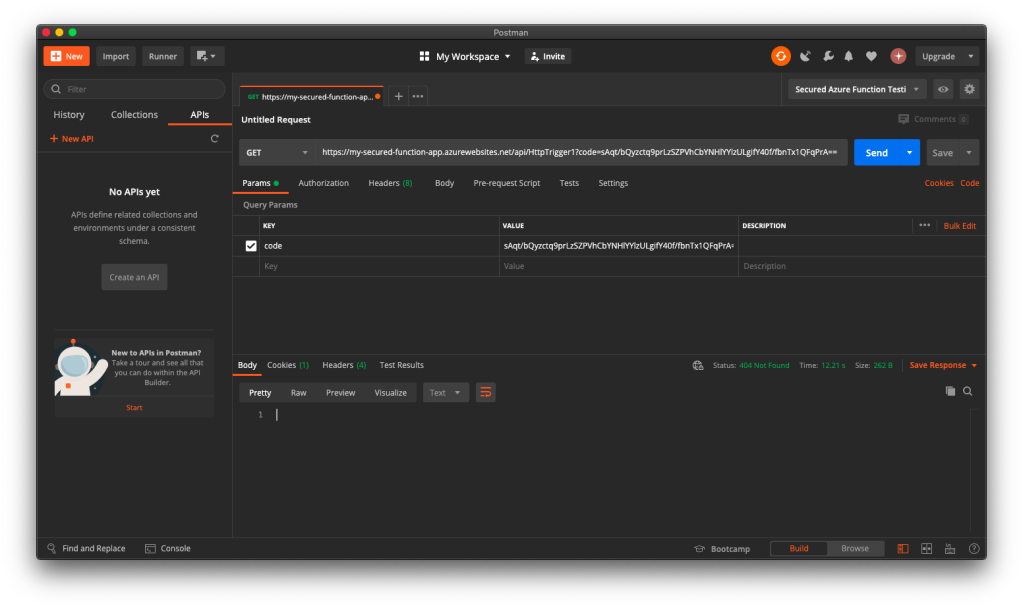
Now if we send a GET request to the Function, we shall receive 404 Not Found, as shown in the following screenshot, because we only open for POST requests.
🎨 GET request sent to our Function will now be rejected. 🎨
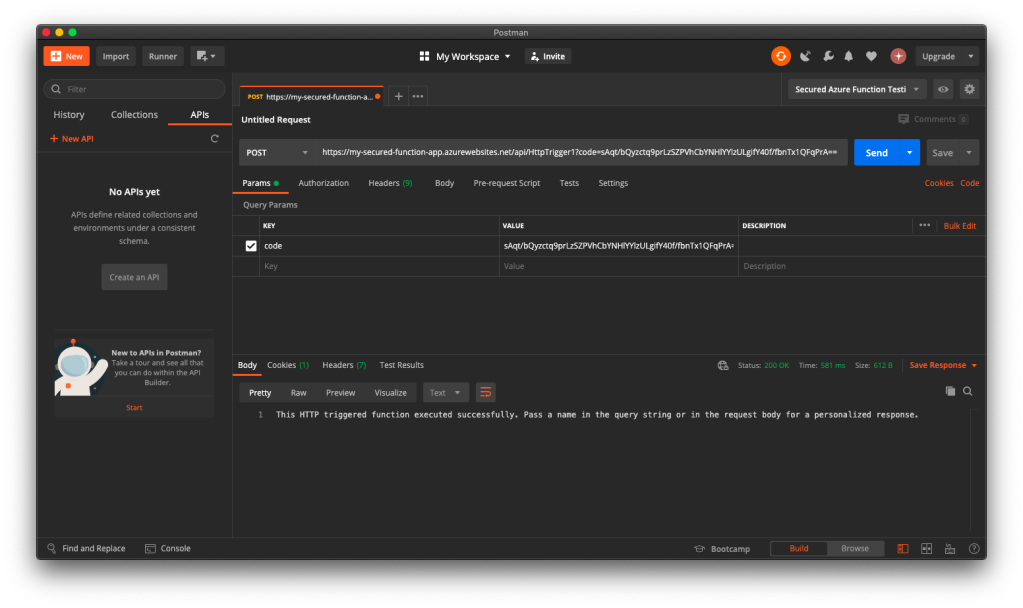
Thus, when we send another HTTP request but make it to be a POST request, we will receive the message that is found in the C# codes in the Function, as shown in the following screenshot.
🎨 Yay, the POST requests are allowed. 🎨
Now, everyone can send a POST request and get the message as long as they know the Function Key. So how do we add Authentication to this Function?
Authorization Level for the Function
Remember in the earlier section above, we talked about the Authorization Level of the Function? It has three options: Function, Admin, and Anonymous.
We must change the Authorization Level of the Function to be “Anonymous”, as shown in the screenshot below. This is because for both “Function” and “Admin” levels, they are using keys. What we need here is user-based authentication, hence we must choose “Anonymous” instead.
🎨 Without setting the Authorization Level to be Anonymous, the Azure AD authorisation will not work as expected. 🎨
This step is very important because if we forgot to change the Authorization Level to “Anonymous”, the Function will still need the Function Key as the query string even though the request comes in with a valid access token.
Enable App Service Authorization
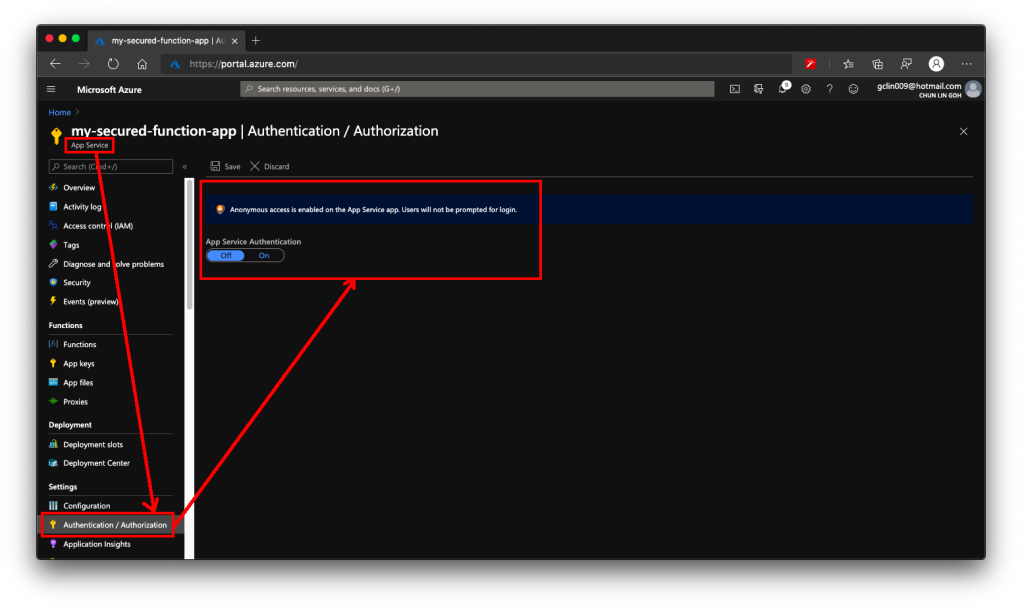
After that, we need to visit the App Service of the Function App to turn on App Service Authentication. This feature is at App Service level instead of the Function itself. So please pay attention to where to look for the feature.
🎨 This is the place to turn on the “App Service Authentication” for the Function app. 🎨
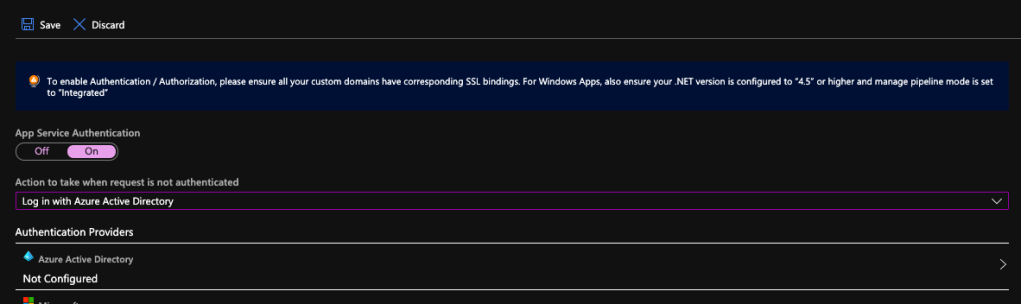
After the Authentication is turned on, we need to specify “log in with Azure Active Directory” as the action to be taken when the request is not authenticate, as illustrated below. This step is also very important because if we forgot to change it and “Allow Anonymous requests (no action)”, then no matter whether we set the Authentication Providers or not, people can still access the Function. Hence, please remember to change this setting accordingly.
🎨 Turning on App Service Authentication. 🎨
Next, please click on the Azure Active Directory which is listed as one of the Authentication Providers. It is currently labelled as “Not Configured”. Don’t worry, we will now proceed to configure it.
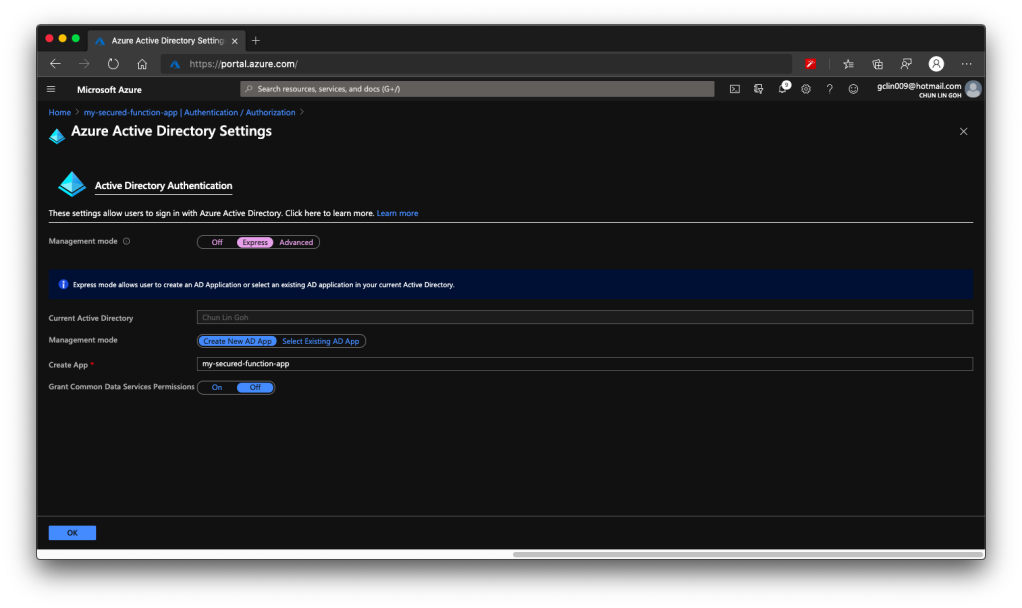
Firstly, we choose the Express mode as management mode. Then we can proceed to create a new Azure AD. The Portal then will help us to setup a new AD Application (or choose from existing AD Application). You can go to Advanced directly if you are experienced with Azure AD.
You should now see the page which looks like what is shown in the following screenshot.
🎨 Creating a new Azure AD Application for the Function in an easy way. (Waypoint 1) 🎨
There is one thing that may catch your attention. It is the last item in the page called “Grant Common Data Service Permissions”. Common Data Service, or CDS, is Microsoft way of providing a secure and cloud-based storage option for our data. There is a one-hour Microsoft online course about CDS, you can take the course to understand more. Grace MacJones, Microsoft Azure Customer Engineer, also gave us a short-and-sweet explanation about this setting on GitHub.
We basically can leave everything as default in the page and proceed to click the “OK” button at the bottom of the page.
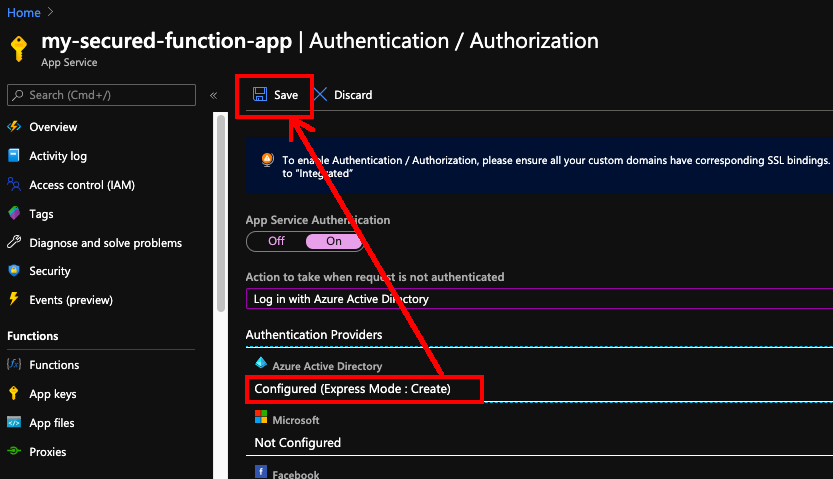
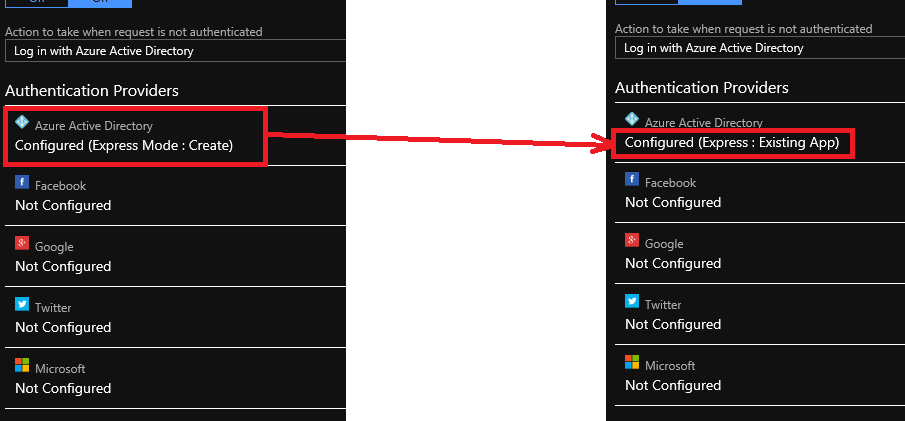
After this, the Azure AD will be labelled as “Configure (Express Mode: Create)”. We can then proceed to save the changes.
🎨 Do not forget to save the settings! 🎨
After the settings are saved, we can refresh the page and realising the Azure AD is now labelled as “Configure (Express: Existing App)”. That means the Azure AD app has been created successfully.
🎨 The status of Azure AD for the Function is updated. 🎨
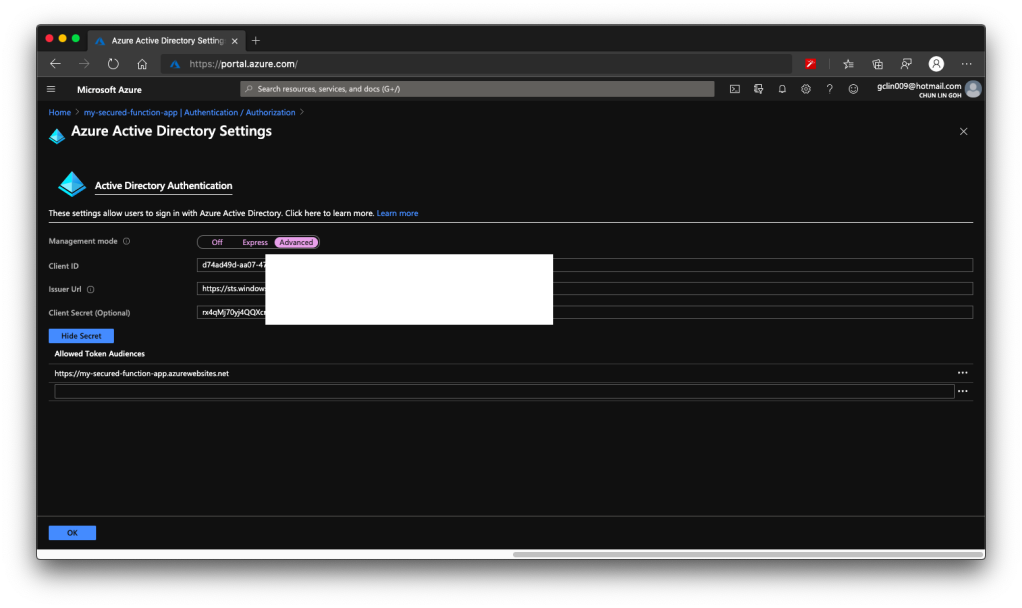
Now, click in to the Azure AD under the Authentication Providers list again. We will be brought to the section where we specified the management node earlier. Instead of choosing Express mode, now we can proceed to choose the Advanced mode.
We will then be shown with Client ID, Issuer Url, and Client Secret, as shown in the following screenshot. According to Ben Martens’ advise, we have to add one more record, which is the domain URL of the Function, to the “Allowed Token Audiences” list to make Azure AD work with this Function, as shown in the following screenshot. (This step is no longer needed with the new interface since October 2019 so I strikethrough it)
🎨 Getting the Azure AD important parameters. 🎨
When you leave this page, the Azure Portal may prompt you to save it. You can choose not to save it. It is optional. If you save it, the Azure AD mode will be changed from Express to Advanced and this will not affect our setup.
Testing on Postman
Now, let’s test our setup above.
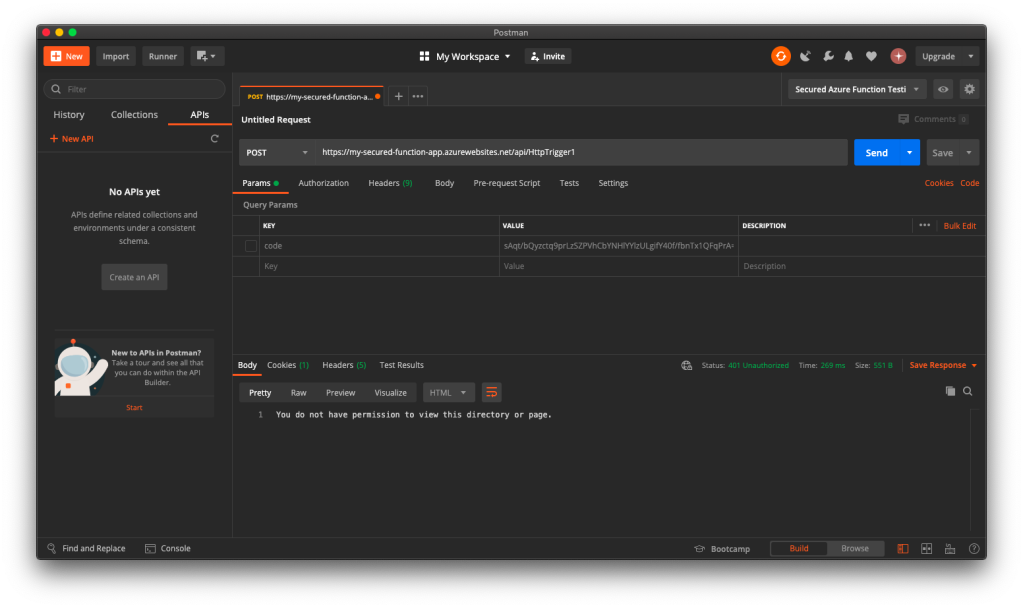
When we send the same POST request to the Function again (with the code query string removed since it’s no longer necessary), this time with the App Service Authorization enabled for the Function App, we will no longer be able to get the same message back. Instead, we are told to be 401 Unauthorised and “You do not have permission to view this directory or page”, as shown in the screenshot below.
🎨 Yup, we are unauthorised now. 🎨
Now, let’s try to authenticate ourselves.
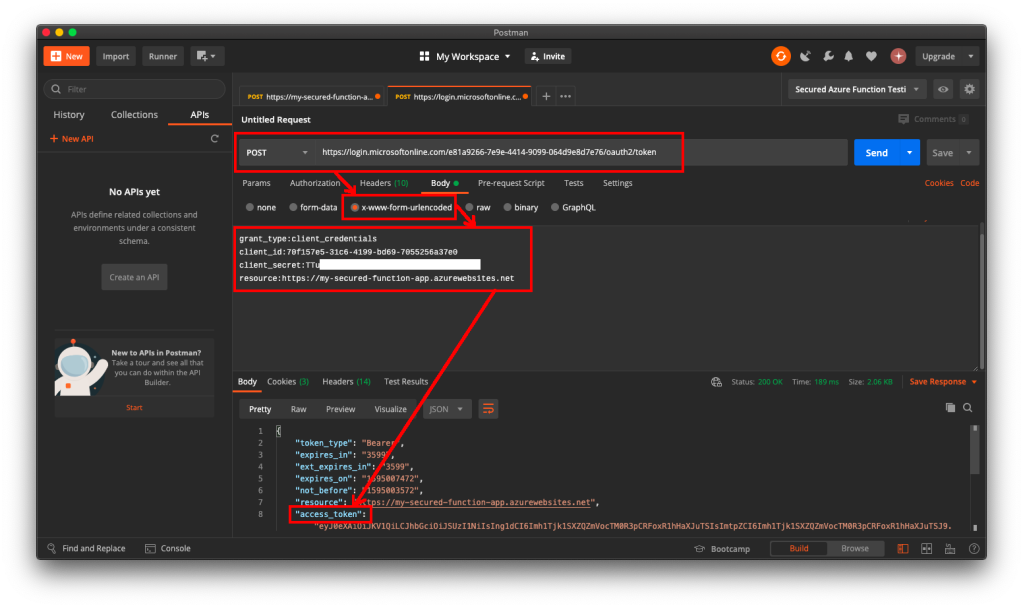
To do so, we will make a POST request with the body containing Grant Type, Client ID, Client Secret, and Resource to the following URL: https://login.microsoftonline.com/<Tenant ID>/oauth2/token to retrieve the access token, as shown in the following screenshot.
🎨 Yesh, we got the access token. 🎨
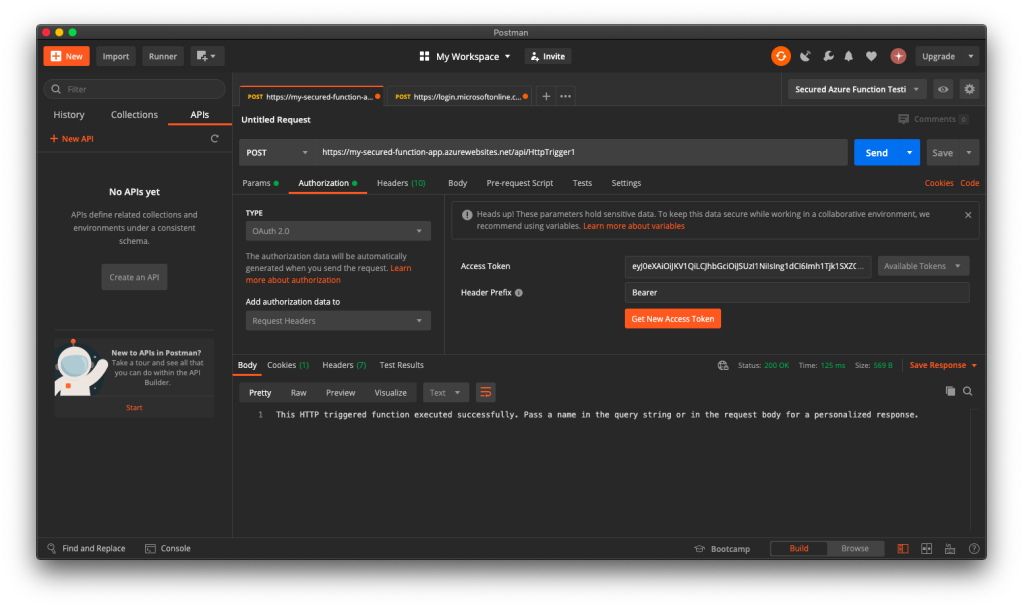
If we use the access token to send POST request to our Function, we will be told that we are now authorised and the message found in C# code is presented to us, as shown in the following screenshot.
🎨 Yay, we can access our Function again! 🎨
Conclusion
If you would like to get the claims in the Azure Function, you can refer to the following code which loops through all the claims. If you would like to allow a certain client app to call the Azure Function, you can check for the value of the claim having “appid” as its type.
That’s all it takes to setup a simple authentication for Azure Function with Azure AD. If you find anything wrong above, feel free to correct me by leaving a message in the comment section. Thanks!