Recently, I was asked to cut down the cost of hosting an ASP .NET Core website on Azure. The website is originally hosted on Azure Web App so there is a fixed cost to it that we need to pay per month. Hence, the first solution that comes to my mind is to move it from Web App to Function because the website is a static website and it is not expecting large group of visitors in any given point of time.
So why do I choose to use Azure Function? Unlike the Web Apps, Functions provide the Consumption Plan where instances of the Functions host are dynamically added and removed based on the number of incoming events. This serverless plan scales automatically, and we are billed only when the Functions are running. Hence, when we switch to use Azure Function to serve the static website with the Consumption Plan, we will be able to save significantly.
Serve Static Content with Azure Function
How do we serve static website with Azure Functions?
There are many online tutorials about this but none of them that I found are based on the latest Azure Portal GUI in 2020. So hopefully my article here will help people out there who are using the latest Azure Portal.
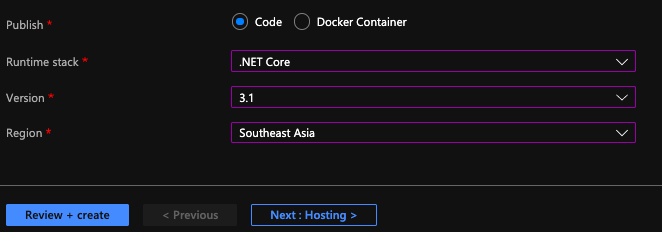
The following screenshot shows the setup of my Azure Function.
[Image Caption: Azure Function with .NET Core 3.1.]
After that, we will create a HTTP triggered function in the Azure Function.
Then for the Function itself, we can add the following code in run.csx.
using Microsoft.AspNetCore.Mvc;

public static async Task<IActionResult> Run(HttpRequest req, ILogger log){

    string pathValue = req.Path.Value;

    ...

    return new FileStreamResult(
        File.OpenRead(
            @"d:\home\site\wwwroot\web-itself\website\index.html"),
            "text/html; charset=UTF-8");
}
The pathValue helps the Function to be able to serve different web pages based on different value in the URL path. For example, /page1 will load page1.html and /page2 will load page2.html.
If the Function you build is only to serve a single HTML file, then you can just directly return the FileStreamResult without relying on the pathValue.
Configure the Route Template
To have the pathValue working as expected, we first need to configure the route template of the Function. To do so, we can head to the Integration tab of the Function, as shown in the screenshot below.
[Image Caption: Editing the Route Template.]
For the Route Template, we set it to be “web-itself/{page?}” because web-itself is the name of our Function in this case. The question mark in the “{page?}” means that the page is an optional argument in the URL.
So why do we have to include the Function name “web-itself” in the Route Template? The values, according to the documentation, should be a relative path. Since, by default, the Function URL is “xxx.azurewebsites.net/api/web-itself”, so the relative path needs to start from “web-itself”.
Also, since this is going to be an URL of our website, we can change the authorisation level to be “Anonymous” and set GET as the only accepted HTTP method.
Upload the Static Files
So where do we upload the static files to? As the code above shows, the file actually sit in the d:\home\site\wwwroot. How do we upload the static files to this directory?
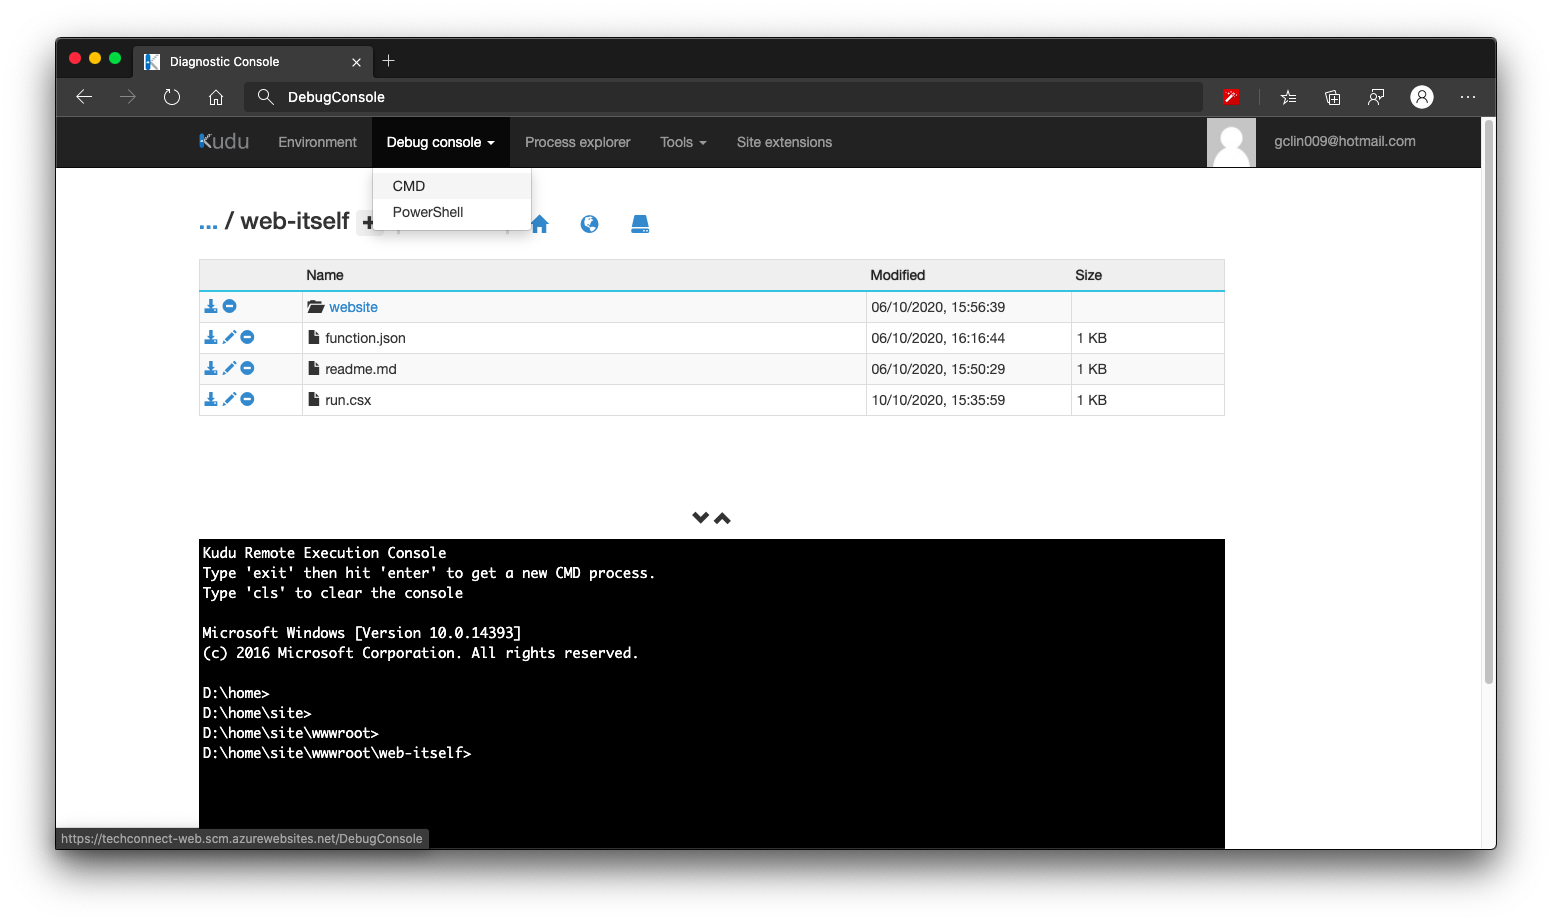
We need to head to the Kudu console of the Azure Function, and click on the CMD menu item, as shown below. By the way, Kudu console can be found under Development Tools > Advanced Tools > Go of the Azure Function on the Portal.
[Image Caption: Kudu console of the Azure Function.]
We then navigate to the folder which keeps the run.csx of the Function (which is web-itself in my case here). Then we can create a folder called website, for example, to host our static content. What we need to do after this is just uploading the HTML files to this website folder.
Handle JavaScript, CSS, and Other Static Files
How about other static files such as JavaScript, CSS, and images?
Yes, we can use the same way above to serve these files. However, that might be too troublesome because each of them has different MIME Type we need to specify.
So another way of doing that is to store all these files on Azure Storage. So the links in the HTML will be absolute URLs to the files on the Azure Storage.
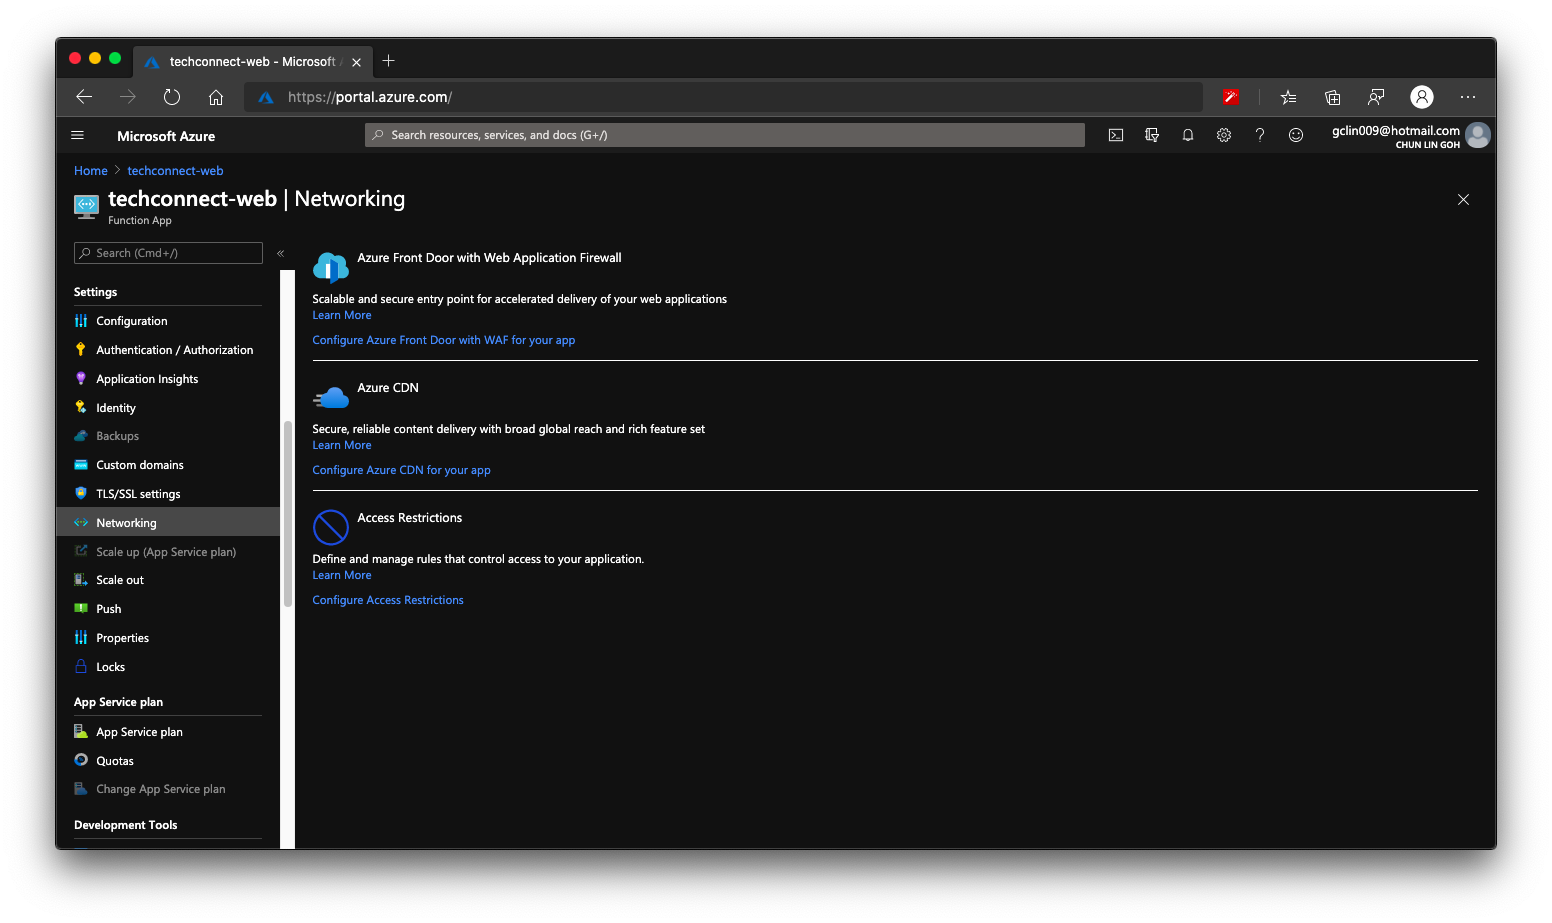
Finally we can enable Azure CDN for our Azure Function. So that if next time we need to move back to host our web pages on Azure Web App or even Azure Storage, we don’t have to change our CNAME again.
[Image Caption: Both Azure CDN and Azure Front Door is available in Azure Functions.]
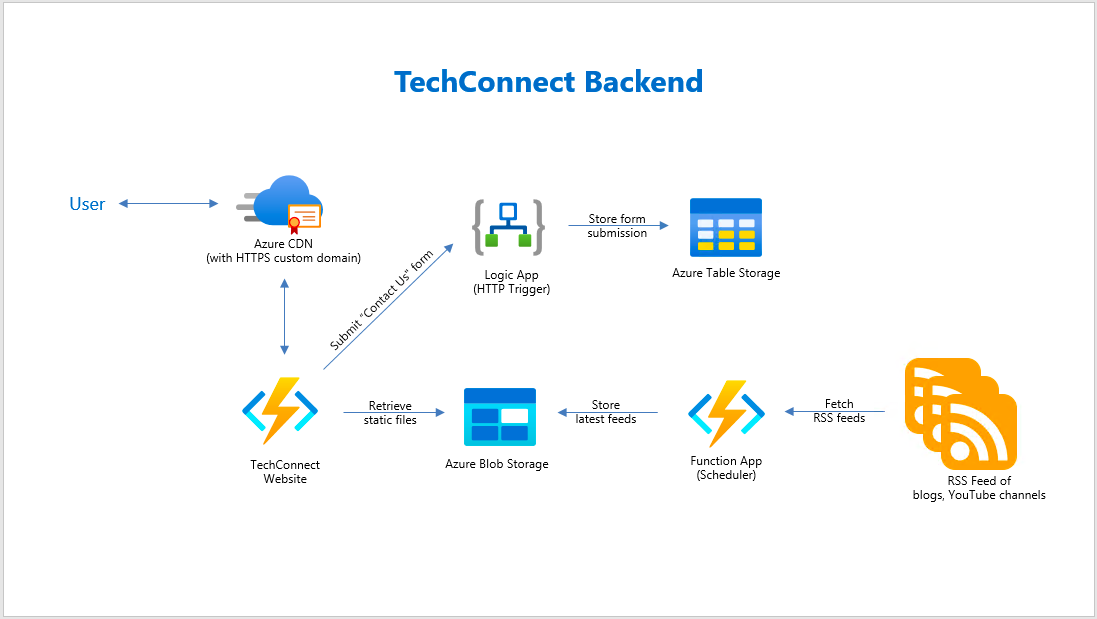
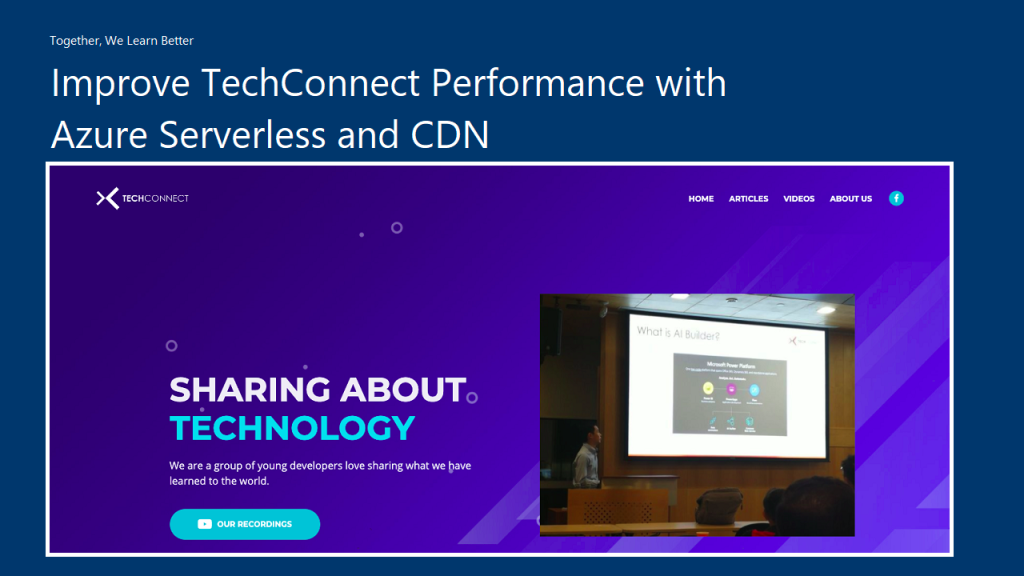
In the August meetup of Azure Community Singapore (ACS), Dileepa Rajapaksa shared with us approaches that we could take to modernise our apps with FaaS (Function as a Service) in Azure where he talked about Azure Functions. After his talk, I decided to share how we could use the knowledge of serverless as well as CDN to help improving our website performance.
The website that we are going to work on today is called TechConnect. It’s a website showing the work done by four of my friends and myself, including our blog posts and YouTube videos. It currently consists of three pages:
In the Articles page, we will list down the most recent blog posts written by all of us. WordPress, Dev.to, and Medium are the three main blog platforms that five of us use. Hence, in order to retrieve the blog posts from these different platforms, we choose to rely on their RSS feed which is available in all the platforms we use.
However, the RSS feed schema varies across different blog platforms. Hence, we have a simple C# program to process the RSS feed and store them as JSON array into a JSON file on Azure Storage. For example, when we are reading the RSS feed from a WordPress blog, we will have the following code to handle its blog post entries.
XNamespace media = "http://search.yahoo.com/mrss/";

var items = xDoc.Descendants("item")
            .Select(i => new BlogFeed {
                Id = i.Element("link").Value,
                Author = blogAuthor,
                Title = i.Element("title").Value,
                ThumbnailUrl = i.Descendants(media + "content").Where(img => !img.Attribute("url").Value.Contains("gravatar.com")).FirstOrDefault()?.Attribute("url").Value,
                Description = i.Element("description").Value,
                PublishedAt = DateTimeOffset.ParseExact(i.Element("pubDate").Value.Replace("GMT", "+00:00"), "ddd, dd MMM yyyy HH:mm:ss zzz", CultureInfo.InvariantCulture)
            })
            .ToList();
Now, where should we put this code at? We can put it in the website project so that every visit to the Articles page will read the feeds from different blogs and do the aggregation. This works fine but it’s going to take a long time to load the web page. For every visit, the web server needs to make several calls over the network to different blog posts to retrieve the RSS feed and then process it before displaying the blog posts on the Articles page.
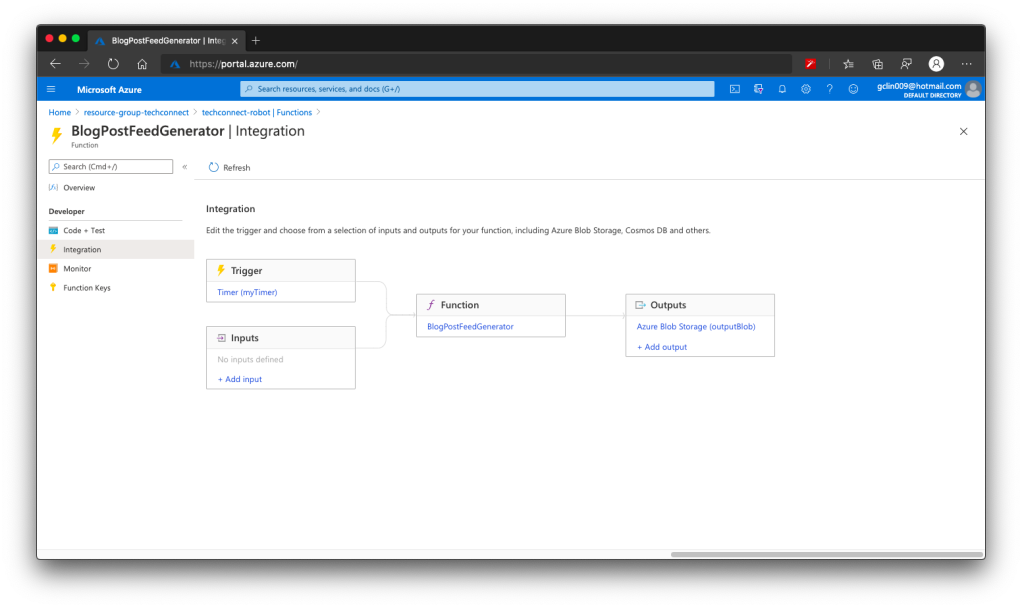
The way we choose is to use Azure Function to retrieve the RSS feed from all the blogs we have in a scheduled manner. We don’t update our blogs frequently, the blogs are at most updated two to three times per day. Hence, we use the time-triggered Azure Function with a call frequency of 6 hours to run the codes above. After each call, the Azure Function will store the info of the latest blog posts into a JSON file and upload it to Azure Storage.
🎨 The workflow of the Azure Function to generate feeds of latest blog posts. 🎨
It’s the same for YouTube videos feed in the Videos page. We can also process the RSS feed from our YouTube channels to retrieve the latest videos information using the codes below.
Since we also don’t publish new videos frequently in a day, we have Azure Function to process the YouTube RSS feeds with the codes above and store the information of our latest videos into a JSON file on Azure Storage.
Azure CDN
There is an advantage of storing the latest blog posts and videos information on Azure Storage, i.e. introducing the Azure CDN (Content Delivery Network). Azure CDN is a global CDN solution for delivering content from the closest POP server and thus accelerate the content delivery of a website.
With Azure CDN, we can cache static objects loaded from the Azure Storage as well.
🎨 PageSpeed Insights for the homepage of TechConnect. 🎨
Azure CDN Standard from Microsoft and Akamai
There are three companies offering CDN service in Azure, i.e. Microsoft, Akamai, and Verizon. So far I have only tried out the Azure CDN Standard from Microsoft and Akamai. Eventually the product that I use for TechConnect is Azure CDN Standard from Microsoft.
Why? This is because out of the three companies, Microsoft is the only one providing features that allow me to easily perform the following operations.
Performing URL Rewrite/Redirect;
Updating Cache Header/Settings;
Customising rule-based content delivery.
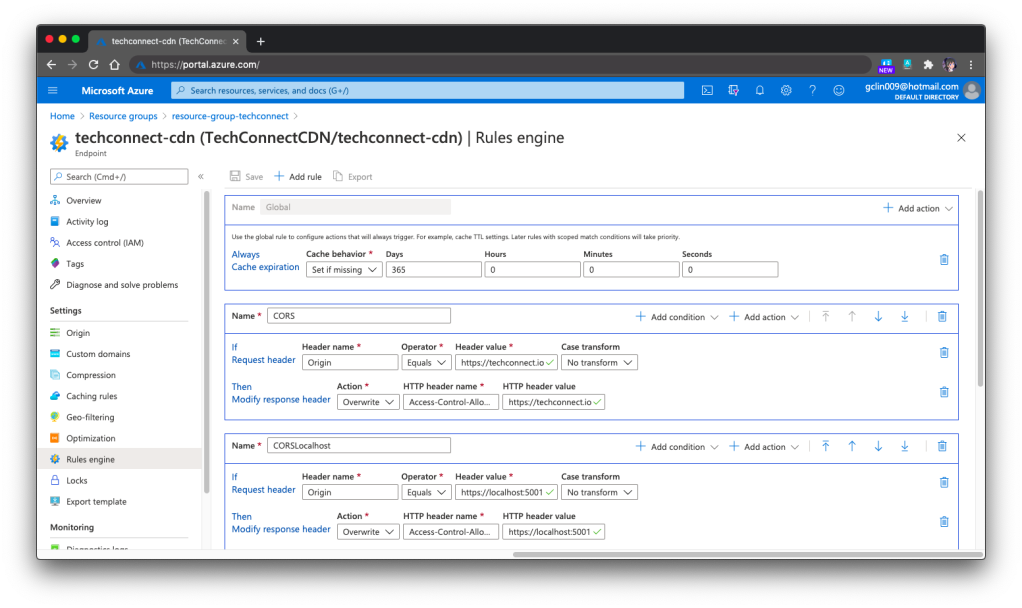
🎨 Configuring cache expiration and CORS (for production and localhost) in Rules Engine of the Azure CDN Standard from Microsoft. 🎨
These features are currently only available in Azure CDN Standard from Microsoft, but not from Akamai and Verizon. However, if you are willing to pay more to upgrade Azure CDN Standard from Verizon to its Premium edition, then you still can enjoy the features above.
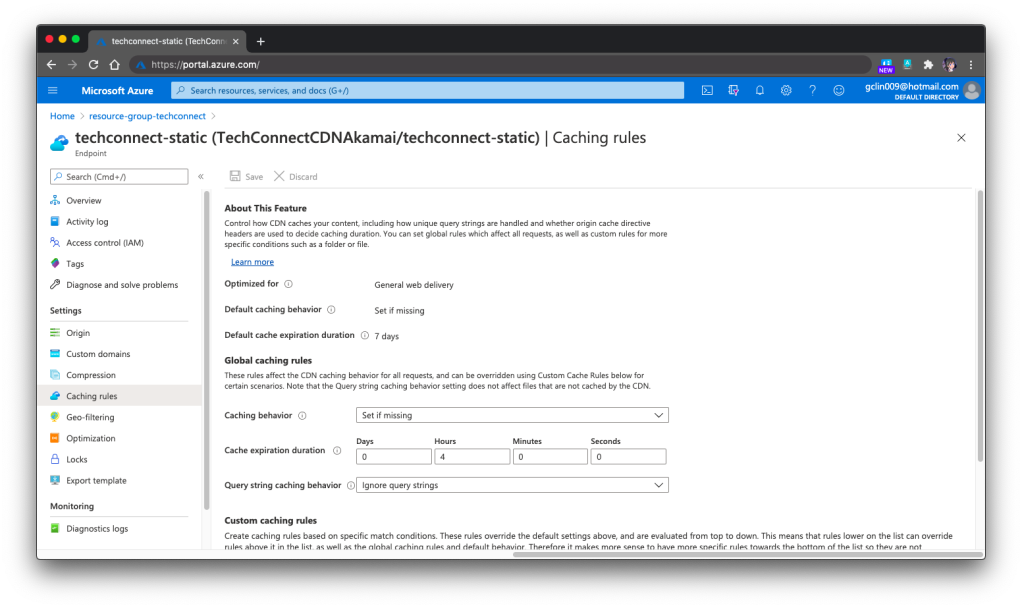
In the previous screenshot, you will notice that there is this Global Rule on top of other rules. The cache expiration is being set there. However, for the Akamai version, we need to set the cache expiration differently under Caching Rules, as shown in the following screenshot.
🎨 Global caching rules settings in Azure CDN Standard from Akamai. 🎨
In the Akamai version, we can set the Custom Caching Rules as well, as shown above. For the Microsoft version, we can do that as well under its rule-based engine.
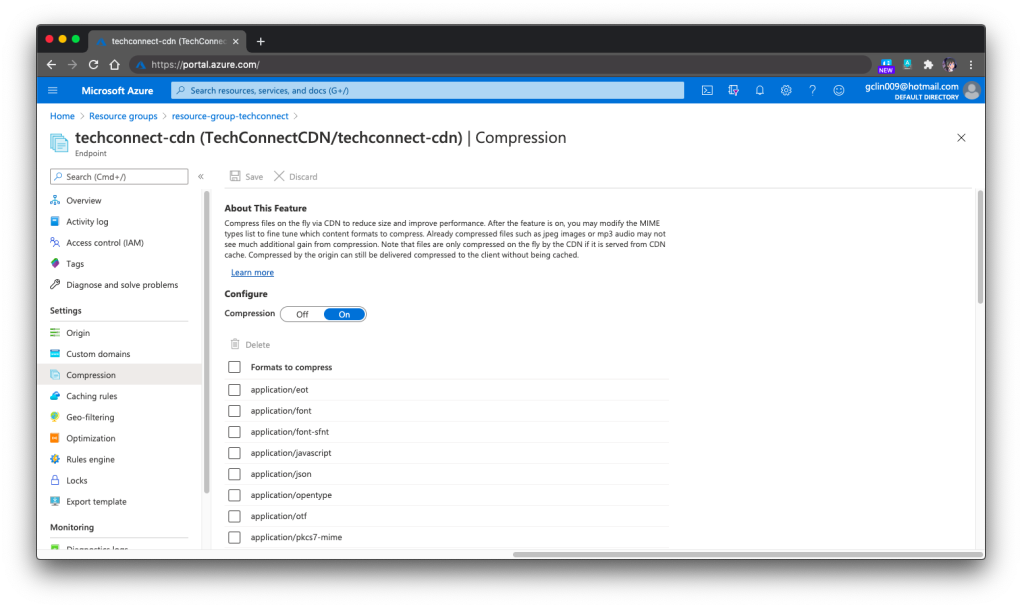
One last important feature that I would like to share is specifying the files that need to be compressed on the fly via Azure CDN so that the performance can be improved. This compression feature is the same in both Microsoft and Akamai versions.
🎨 Compression of files via Azure CDN. 🎨
Azure CDN with Custom Domain and HTTPS
Besides static content, we can also integrate our Azure Web App with Azure CDN. Under the Networking section of a web app, we are able to configure Azure CDN for our web app directly.
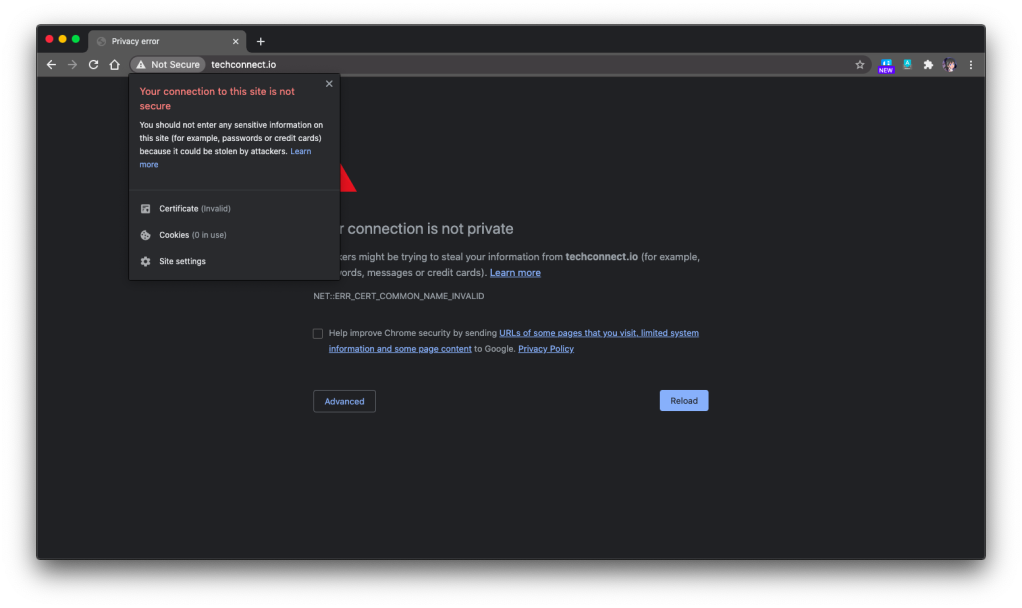
However, there is one important thing to take note if you have a custom domain for the web app and it needs to be HTTPS. Marvin, Eng Teong, and I were trying to set it up with the free SSL cert from SSL For Free, the free cert just did not work with the Azure CDN, as shown in the following screenshot. So far we still have no idea why. If you happen to know the reason, please let me know. Thank you!
🎨 Insecured connection to the website via Azure CDN. 🎨
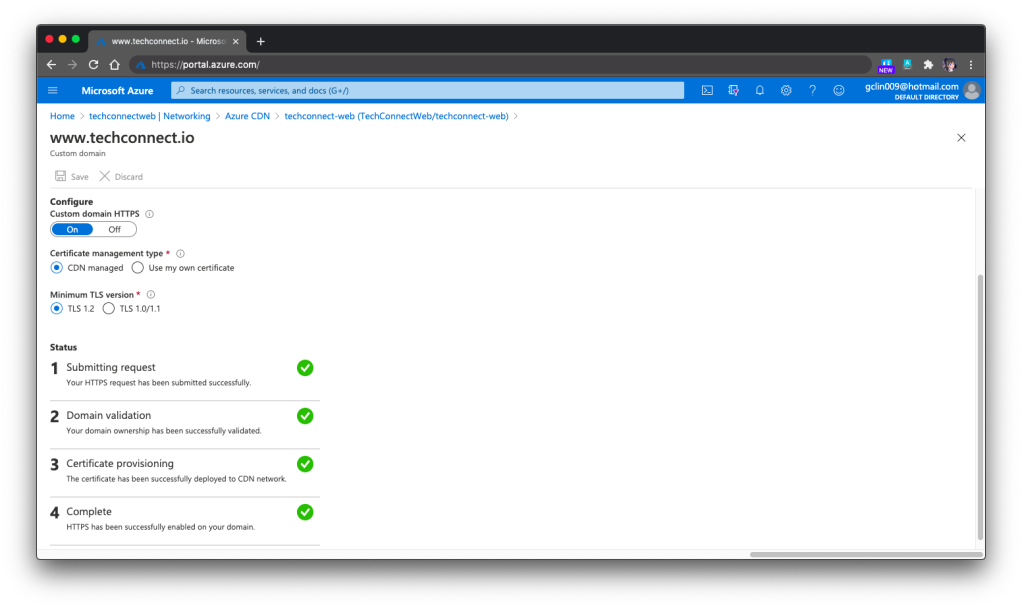
For https://www.techconnect.io, we successfully setup the HTTPS for Azure CDN of TechConnect using the CDN-managed certificates. Hence, currently visitors have to visit the website through https://www.techconnect.io.
🎨 Successfully setup HTTPS for our custom domain with www. 🎨
One more thing that we need to take note of is that if we choose to bring our own certificates for Azure CDN, that those certificates must be stored in Azure Key Vault first.
However, after storing the certificates in the Key Vault, we also need to remember to setup the right permissions for the Azure CDN to access those certificates in the Key Vault. To do so, we need to run the following command in Azure CLI or Azure Cloud Shell to create a new Azure Service Principal for that purpose.
This command is normally available in the HTTPS setup page of the Azure CLI. So simply have your administrator of the directory to run the command above will be fine.
Here, I’d also like to thank Eng Teong for helping me in this step.
Simple Contact Us Form with Logic App
For the Contact Us form on the TechConnect homepage, it’s a perfect example of small little things that is crucial in a system but can be solved with easy solution. Of course, we can use some ready-made solutions available in the market to help us manage the Contact Us form. However, that means we rely on 3rd party services and our data most likely will not be with us.
So, if you are looking for a simpler solution, I’d like to recommend you to give Azure Logic Apps a try.
Here, I will not go through the details about Logic App and steps on how to set it up. There are plenty of tutorials about this online. Instead, I will share with you our design of Logic App for the Contact Us form on TechConnect.
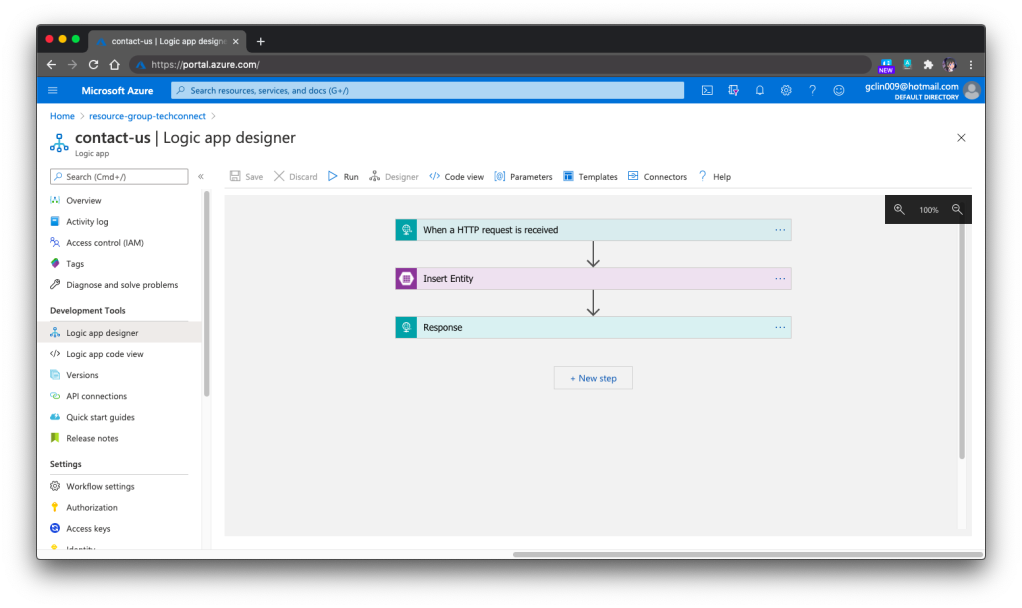
Our Logic App is HTTP triggered. Once it receives a POST request, it will validate the request body against the schema provided. If the request is valid, it will proceed to insert the form submission to the Azure Table Storage, a NoSQL key-value store. Finally, it will return a HTTP 200 back.
🎨 The overall design of our Logic App for TechConnect Contact Us form. 🎨
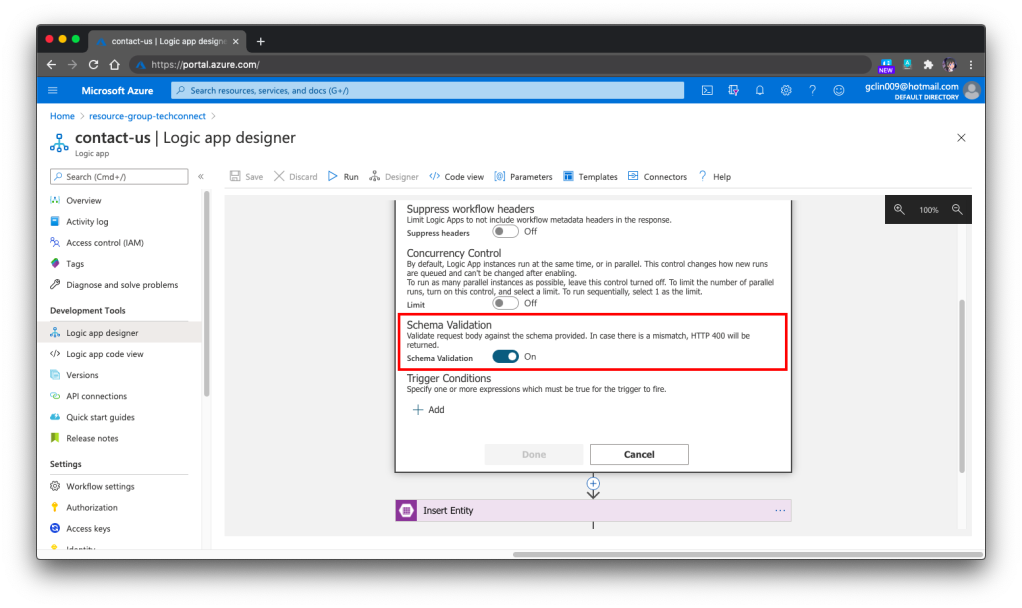
Just now we mention about schema validation for the HTTP request body but how to do so? It turns out that it’s pretty straightforward, just need to turn on the feature in the Settings of the 1st Step, as shown in the following screenshot.
🎨 Turned on the Schema Validation for HTTP requests. 🎨
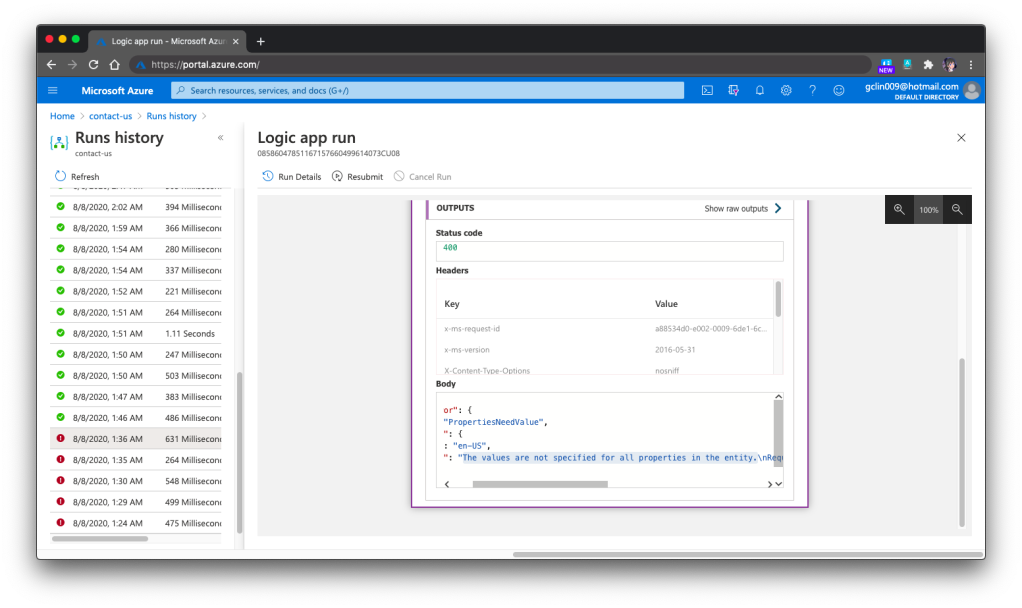
Finally, we need to talk a bit about how to debug the Logic Apps. One the Azure Portal, there is a very helpful tool for debugging and tracing purposes. The tool is called the Runs History which is available right in the Logic App Overview page. You can refer to the official Microsoft Docs for more details about it.
🎨 Run History and the message on why the selected Run failed. 🎨
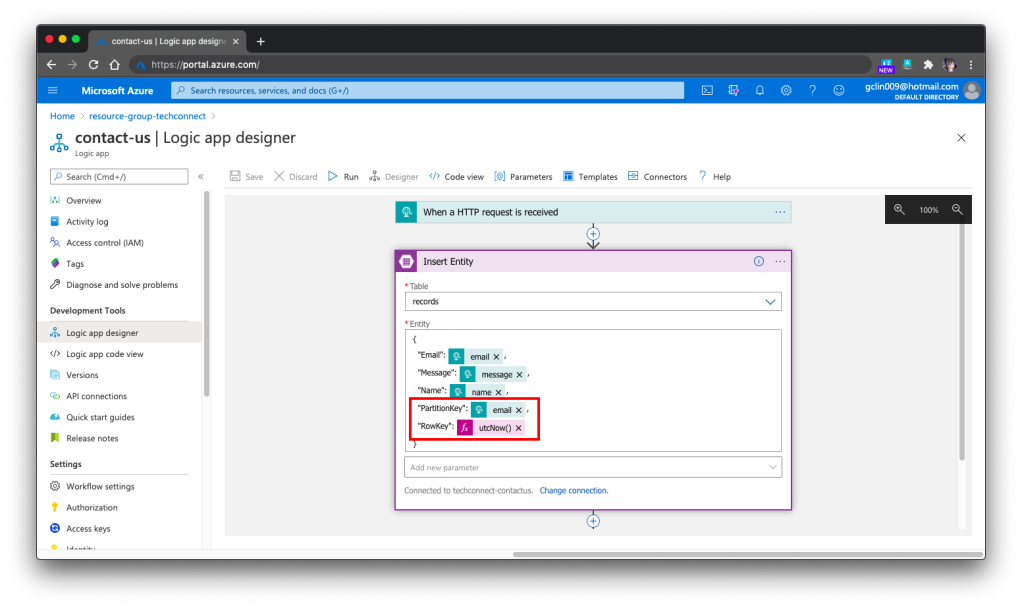
For example, when we omitted the PartitionKey and RowKey in the Step 2, we would see Step 3 is not executed in the Run History and it stopped at the Step 2. Then the detail error message will be available there to give us more info, as shown in the screenshot above.
Conclusion
That’s all for the weekend project that I did with the help from my friends, Marvin and Eng Teong.
Lastly, please visit our TechConnect website and say hi to us! =D
In our previous article, we have successfully imported realistic but not real patient data into the database in our Azure API for FHIR. Hence, the next step we would like to go through in this article is how to write a user-friendly dashboard to show those healthcare data.
For frontend, there are currently many open-source web frontend frameworks for us to choose from. For example, in our earlier project of doing COVID-19 dashboard, we used the Material Design from Google.
In this project, in order to make our healthcare dashboard to be consistent with other Microsoft web apps, we will be following Microsoft design system.
In web app development projects, we always come to situations where we need to add a button, a dropdown, a checkbox to our web apps. If we are working in a large team, then issues like UI consistency across different web apps which might be built using different frontend frameworks are problems that we need to solve. So what FAST Framework excites me is solving the problem with Web Components that can be used with any different frontend frameworks.
🎨 Rob Eisenberg’s (left most) first appearance on Jon Galloway’s (right most) .NET Community Standup with Daniel Roth (top most) and Steve Sanderson from the Blazor team. (Source: YouTube) 🎨
Web Components can be integrated well with major frontend frameworks, such as Angular, Blazor, Vue, etc. We can drop Web Components easily to ASP .NET web projects too and we are going to do that in our healthcare dashboard project.
In the FAST Framework, the Web Component that corresponds to the design system provider is called the FASTDesignSystemProvider. Its design system properties can be easily overridden by just setting the value of the corresponding property in the provider. For example, by simply changing the background of the FASTDesignSystemProvider from light to dark, it will automatically switch from the light mode to the dark mode where corresponding colour scheme will be applied.
🎨 FAST Framework allows our web apps to easily switch between light and dark modes. 🎨
UI Fabric and Fluent UI Core
In August 2015, Microsoft released the GA of Office UI Fabric on GitHub. The goal of having Office UI Fabric is to provide the frontend developers a mobile-first responsive frontend framework, similar like Bootstrap, to create the web experiences.
The Office UI Fabric speaks the Office Design Language. As long as you use any Office-powered web app, such as Outlook or OneDrive, the Office web layout should be very familiar to you. So by using the Office UI Fabric, we can easily make our web apps to have Office-like user interface and user experience.
🎨 OneDrive web with the Office design. 🎨
In order to deliver a more coherent and productive experience, Microsoft later released Fluent Framework, another cross-platform design system. Also, to move towards the goal of simplified developer ecosystem, Office UI Fabric later evolved into Fluent UI as well in March 2020.
Fluent UI can be used in both web and mobile apps. For web platform, it comes with two options, i.e. Fabric UI React and Fabric Core.
Fabric UI React is meant for React application while Fabric Core is provided primarily for non-React web apps or static web pages. Since our healthcare dashboard will be built on top of ASP .NET Core 3.1, Fabric Core is sufficient in our project.
However, due to some components, such as ms-Navbar and ms-Table, are still only available in Office UI Fabric but not the Fabric Core, our healthcare dashboard will use both the CSS libraries.
Azure CDN
A CDN (Content Delivery Network) is a distributed network of servers that work together to provide fast delivery of the Internet content. Normally, they are distributed across the globe so that the content can be accessed by the users based on their geographic locations so that users around the world can view the same high-quality content without slow loading time. Hence, it is normally recommended to use CDN to serve all our static files.
Another reason of us not to host static files in our web servers is that we would like to avoid extra HTTP requests to our web servers just to load only the static files such as images and CSS.
To use Azure CDN, firstly, we need to store all the necessary static files in the container of our Storage account. We will be using back the same Storage account that we are using to store the realistic but not real patient data generated by Synthea(TM).
Secondly, we proceed to create Azure CDN.
Thirdly, we add an endpoint to the Azure CDN, as shown in the following screenshot, to point to the container that stores all our static files.
🎨 The origin path of the CDN endpoint is pointing to the container storing the static files. 🎨
Finally, we can access the static files with the Azure CDN endpoint. For example, to get the Office Fabric UI css, we will use the following URL.
Similar as the Azure Function we deployed in the previous article, we will send GET request to different endpoints in the Azure API for FHIR to request for different resources. However, before we are able to do that, we need to get Access Token from the Azure Active Directory first. The steps to do so have been summarised in the same previous article as well.
Since we need application settings such as Authority, Audience, Client ID, and Client Secret to retrieve the access token, we will store them in appsettings.Development.json for local debugging purpose. When we later deploy the dashboard web app to Azure Web App, we will store the settings in the Application Settings.
We will then create a class which will be used to bind to the AzureApiForFhirSettings.
public class AzureApiForFhirSetting {
    public string Authority { get; set; }
    public string Audience { get; set; }
    public string ClientId { get; set; }
    public string ClientSecret { get; set; }
}
Finally, to setup the binding, we will need to add the following line in Startup.cs.
// This method gets called by the runtime. Use this method to add services to the container.
public void ConfigureServices(IServiceCollection services)
{
    services.AddOptions();
    services.Configure<AzureApiForFhirSetting>(Configuration.GetSection("AzureApiForFhirSetting"));
    ...
    services.AddControllersWithViews();
}
After that, we will apply dependency injection of IOption to the classes that we need to use the configuration, as shown in the following example.
public class AzureApiForFhirService : IAzureApiForFhirService
{
    private readonly AzureApiForFhirSetting _azureApiForFhirSetting;

    public AzureApiForFhirService(IOptions<AzureApiForFhirSetting> azureApiForFhirSettingAccessor)
    {
        _azureApiForFhirSetting = azureApiForFhirSettingAccessor.Value;
    }

    ...
}
Once we can get the access token, we will be able to access the Azure API for FHIR. Let’s see some of the endpoints the API has.
Azure API for FHIR: The Patient Endpoint
To retrieve all the patients in the database, it’s very easy. We simply need to send a GET request to the /patient endpoint. By default, the number of records returned by the API is 10 at most. To retrieve the next 10 records, we need to send another GET request to another URL link returned by the API, as highlighted in the red box in the following example screenshot.
🎨 The “self” URL is the API link for the current 10 records. 🎨
Once we have all the patients, we then can list them out in a nice table designed with Office UI Fabric, as shown in the following screenshot.
🎨 Listing all the patients in the Azure API for FHIR database. 🎨
When we click on the link “View Profile” of a record, we then can get more details about the selected patient. To retrieve the info of a particular patient, we need to pass the ID to the /patient endpoint, as shown in the following screenshot, which is highlighted in a red box.
🎨 Getting the info of a patient with his/her ID. 🎨
Where can we get the patient’s ID? The ID is returned, for example, when we get the list of all patients.
So after we click on the “View Profile”, we will then be able to reach a Patient page which shows more details about the selected patient, as shown in the following screenshot.
🎨 We can also get the address together with its geolocation data of a patient. 🎨
Azure API for FHIR: The Other Endpoints
There are many resources available in the Azure API for FHIR. Patient is one of them. Besides, we also have Condition, Encounter, Observation, and so on.
To get entries from the endpoints corresponding to the three resources listed above is quite straightforward. However, if we directly send a GET request to, let’s say, /condition, what we will get is all the Condition records of all the patients in the database.
In order to filter based on the patient, we need to add a query string called patient to the endpoint URL, for example /condition?patient=, and then we append the patient ID to the URL.
Then we will be able to retrieve the resources of that particular patient, as shown in the following screenshot.
🎨 It’s interesting to see COVID-19 test record can already be generated in Synthea. 🎨
So far I have only tried the four endpoints. The /observation endpoint is very tricky because the values that it return can be most of the time a single number for a measurement. However, it will also returns two numbers or text for some other measurement. Hence, I have to do some if-else checks on the returned values from the /observation endpoint.
🎨 The SARS-Cov-2 testing result is returned as a text instead of number. 🎨
Source Code of the Dashboard
That’s all for the healthcare dashboard that I have built so far. There are still many exciting features we can expect to see after we have integrated with the Azure API for FHIR.