Recently, I was asked to cut down the cost of hosting an ASP .NET Core website on Azure. The website is originally hosted on Azure Web App so there is a fixed cost to it that we need to pay per month. Hence, the first solution that comes to my mind is to move it from Web App to Function because the website is a static website and it is not expecting large group of visitors in any given point of time.
So why do I choose to use Azure Function? Unlike the Web Apps, Functions provide the Consumption Plan where instances of the Functions host are dynamically added and removed based on the number of incoming events. This serverless plan scales automatically, and we are billed only when the Functions are running. Hence, when we switch to use Azure Function to serve the static website with the Consumption Plan, we will be able to save significantly.
Serve Static Content with Azure Function
How do we serve static website with Azure Functions?
There are many online tutorials about this but none of them that I found are based on the latest Azure Portal GUI in 2020. So hopefully my article here will help people out there who are using the latest Azure Portal.
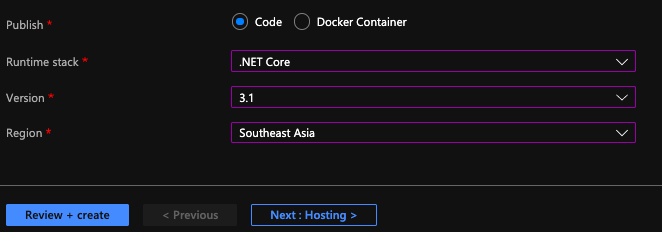
The following screenshot shows the setup of my Azure Function.
[Image Caption: Azure Function with .NET Core 3.1.]
After that, we will create a HTTP triggered function in the Azure Function.
Then for the Function itself, we can add the following code in run.csx.
using Microsoft.AspNetCore.Mvc;

public static async Task<IActionResult> Run(HttpRequest req, ILogger log){

    string pathValue = req.Path.Value;

    ...

    return new FileStreamResult(
        File.OpenRead(
            @"d:\home\site\wwwroot\web-itself\website\index.html"),
            "text/html; charset=UTF-8");
}
The pathValue helps the Function to be able to serve different web pages based on different value in the URL path. For example, /page1 will load page1.html and /page2 will load page2.html.
If the Function you build is only to serve a single HTML file, then you can just directly return the FileStreamResult without relying on the pathValue.
Configure the Route Template
To have the pathValue working as expected, we first need to configure the route template of the Function. To do so, we can head to the Integration tab of the Function, as shown in the screenshot below.
[Image Caption: Editing the Route Template.]
For the Route Template, we set it to be “web-itself/{page?}” because web-itself is the name of our Function in this case. The question mark in the “{page?}” means that the page is an optional argument in the URL.
So why do we have to include the Function name “web-itself” in the Route Template? The values, according to the documentation, should be a relative path. Since, by default, the Function URL is “xxx.azurewebsites.net/api/web-itself”, so the relative path needs to start from “web-itself”.
Also, since this is going to be an URL of our website, we can change the authorisation level to be “Anonymous” and set GET as the only accepted HTTP method.
Upload the Static Files
So where do we upload the static files to? As the code above shows, the file actually sit in the d:\home\site\wwwroot. How do we upload the static files to this directory?
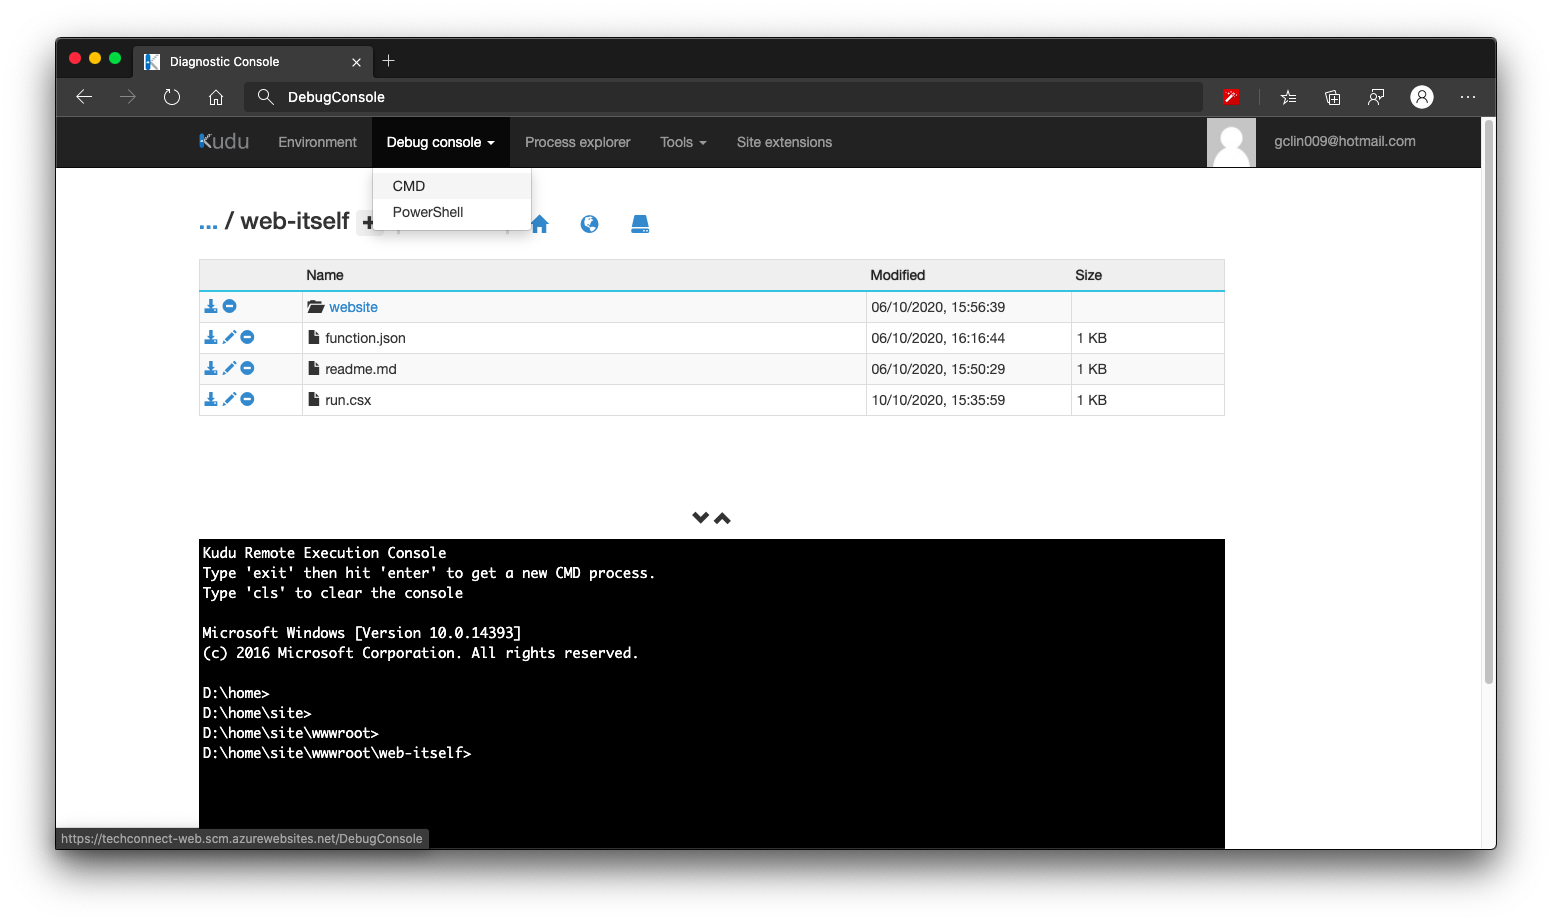
We need to head to the Kudu console of the Azure Function, and click on the CMD menu item, as shown below. By the way, Kudu console can be found under Development Tools > Advanced Tools > Go of the Azure Function on the Portal.
[Image Caption: Kudu console of the Azure Function.]
We then navigate to the folder which keeps the run.csx of the Function (which is web-itself in my case here). Then we can create a folder called website, for example, to host our static content. What we need to do after this is just uploading the HTML files to this website folder.
Handle JavaScript, CSS, and Other Static Files
How about other static files such as JavaScript, CSS, and images?
Yes, we can use the same way above to serve these files. However, that might be too troublesome because each of them has different MIME Type we need to specify.
So another way of doing that is to store all these files on Azure Storage. So the links in the HTML will be absolute URLs to the files on the Azure Storage.
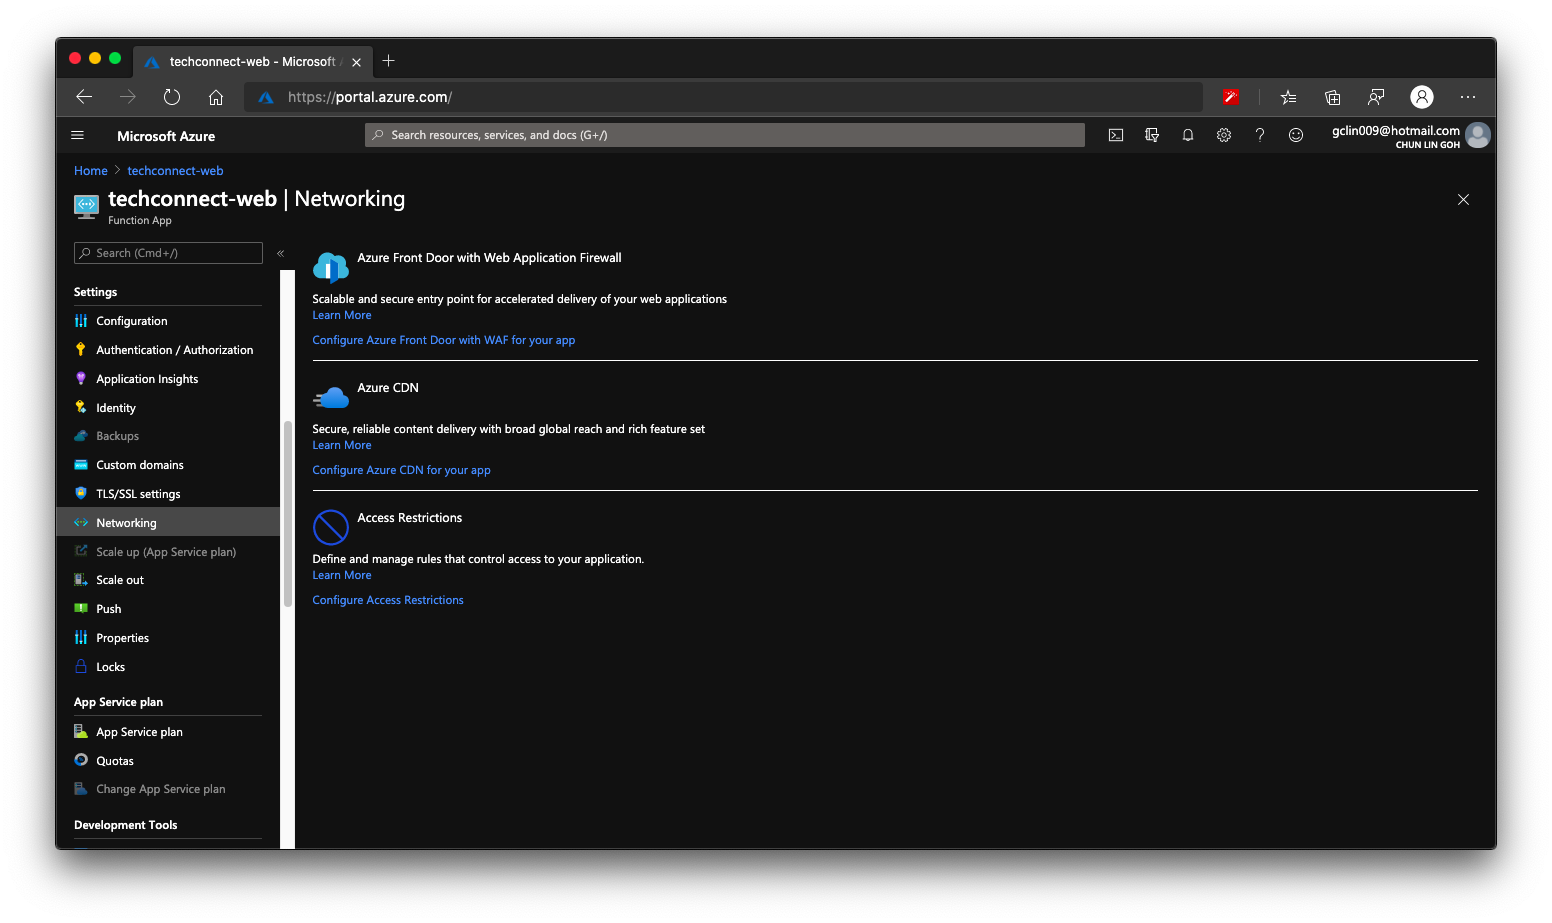
Finally we can enable Azure CDN for our Azure Function. So that if next time we need to move back to host our web pages on Azure Web App or even Azure Storage, we don’t have to change our CNAME again.
[Image Caption: Both Azure CDN and Azure Front Door is available in Azure Functions.]
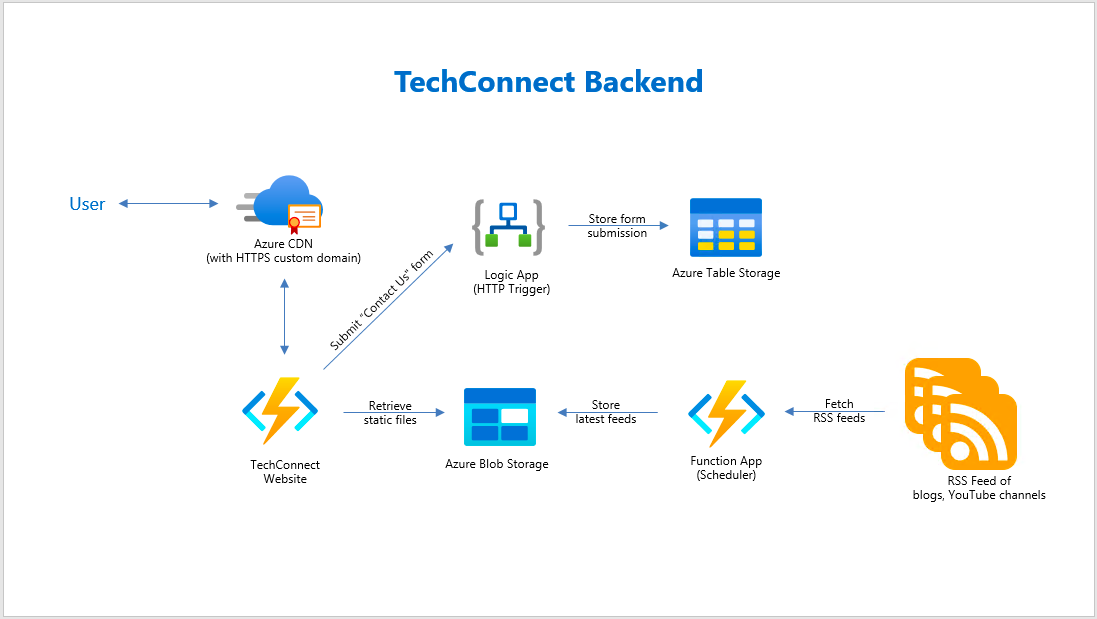
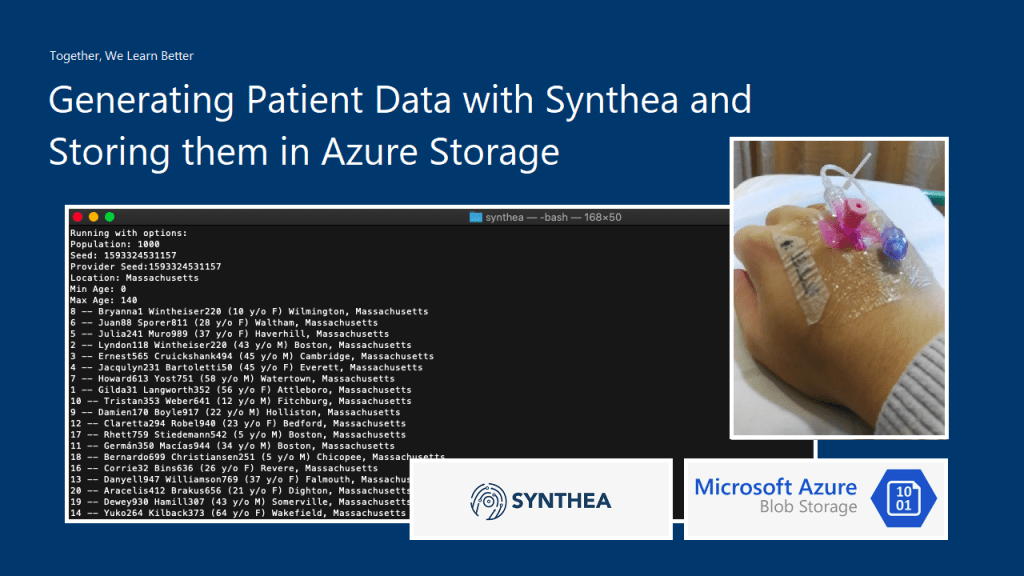
In the previous article, we talked about how to generate realistic but not real patient data using Synthea(TM) and then also how to store them securely in Azure Storage.
Setup Azure API for FHIR®
Today, we will continue the journey. The first step we need to do is to setup the Azure API for FHIR®.
🎨 The architecture of the system we are going to setup in this article. 🎨
The Azure API for FHIR® is a managed, standards-based, and healthcare data platform available on Azure. It enables organisations to bring their clinical health data into the cloud based on the interoperable data standard FHIR®. The reason why we choose to use it is because security and privacy features are embedded into the service. As customers, we own and control the patient data, knowing how it is stored and accessed. Hence, it’s a PaaS that enables us build healthcare data solution easily.
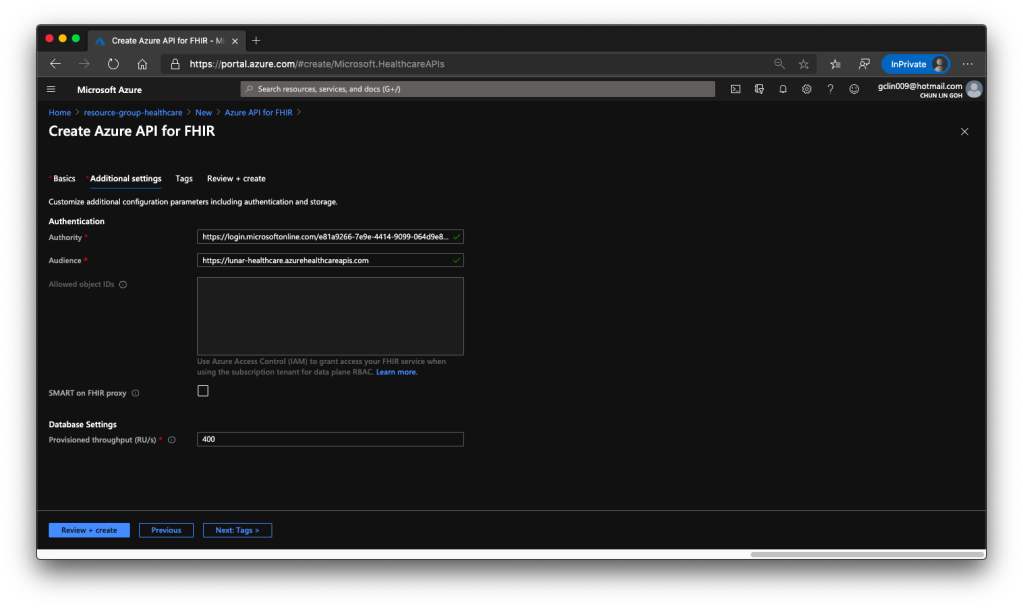
When we are setting up the Azure API for FHIR®, we need to specify the version of FHIR® we are going to use. Currently there are only four milestone releases of FHIR®. The latest version, R4, was released in December 2018. On Azure, we can only choose either R4 or STU3 (which is the third release). We will go for R4.
🎨 Default values of authentication and database settings when we’re creating the API. 🎨
For the Authentication of the API service, we will be using Azure Access Control (IAM) which is the default option. Hence, we will use the Authority and Audience default values.
When we are setting up this API service, we also need to specify the throughput of the database which will be used to store the imported patient data later.
After we click on the button to create the API service, it will take about 5 minutes to successfully deploy it on Azure.
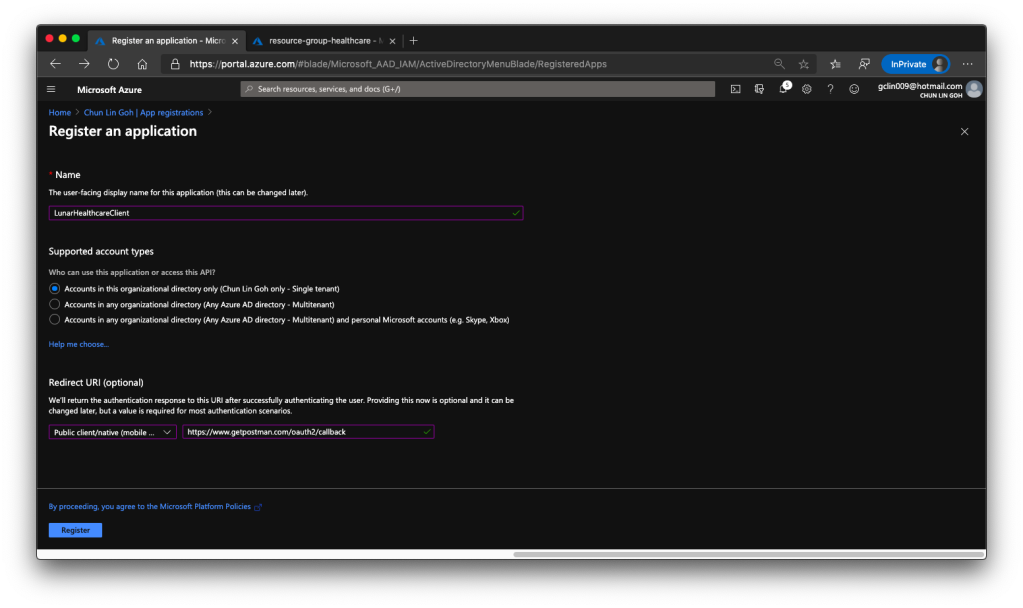
The following screenshot shows how we register the client application with a redirect URI pointing to https://www.getpostman.com/oauth2/callback which will help us to test the connectivity via Postman later.
🎨 Registering a client application. 🎨
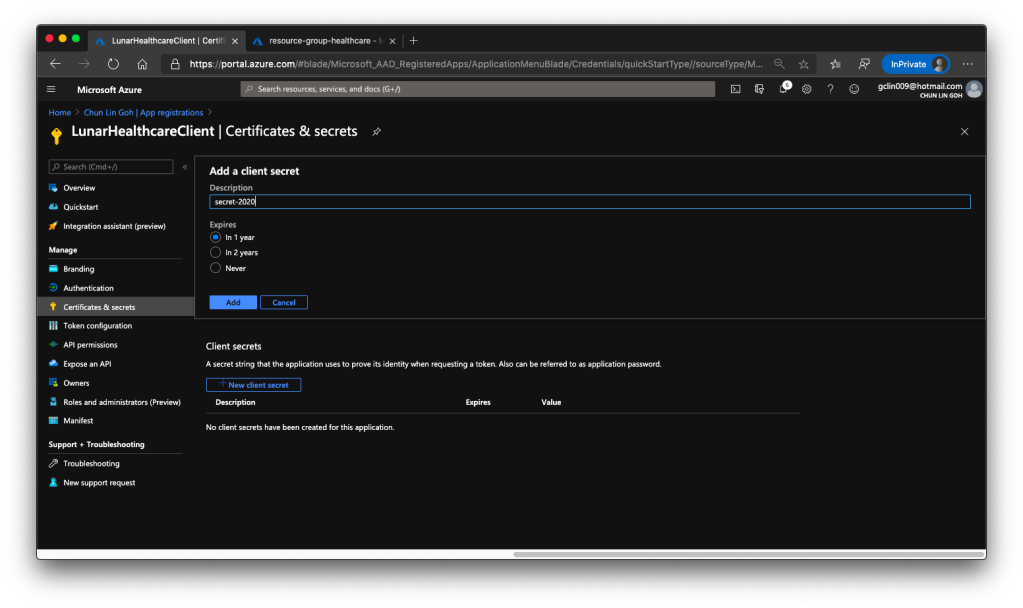
Once the client application is created we need to proceed to create a client secret, as shown in the following screenshot, so that later we can use it to request a token.
🎨 Creating a client secret which will expire one year later. 🎨
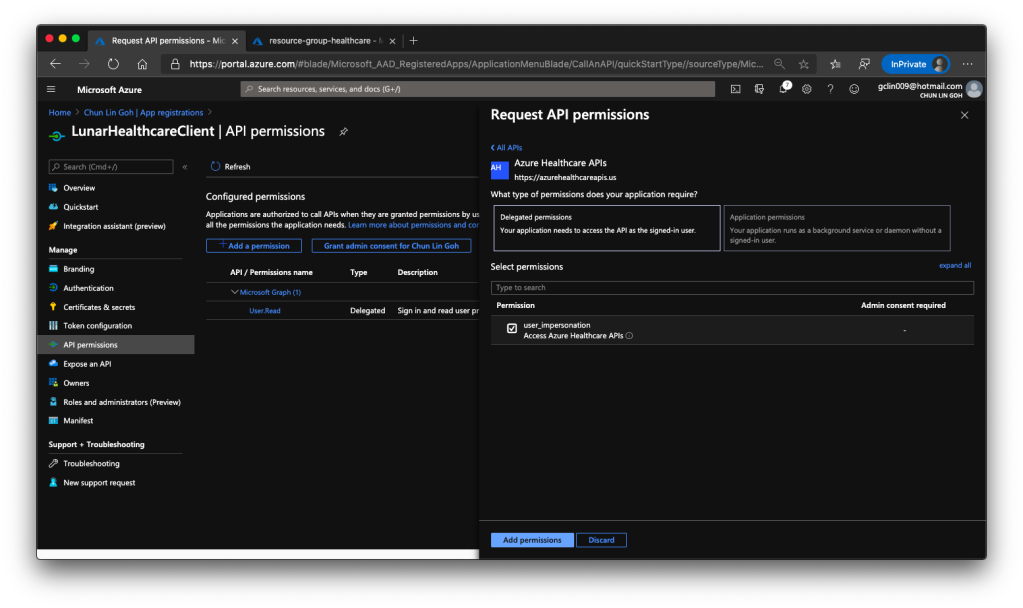
Then we have to allow this client application to access our Azure API for FHIR®. There are two things we need to do.
Firstly, we need to grant the client application a permission called user_impersonation from the Azure Healthcare APIs, as shown in the screenshot below.
🎨 Granting API permissions. 🎨
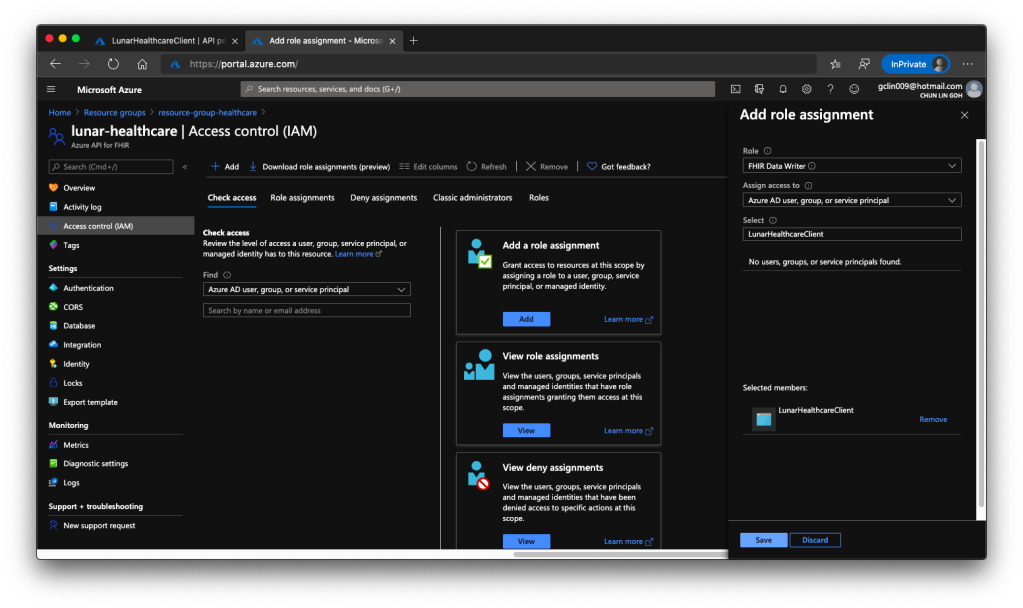
Secondly, we need to head back to our Azure API for FHIR® to enable this client application to access it, as shown in the following screenshot.
🎨 Adding the client application to have the role FHIR® Data Writer. 🎨
The reason we choose only “FHIR Data Writer” role is because this roles enable both read and write access to the API. Once the role is successfully added, we shall see something similar as shown in the screenshot below.
🎨 The client application can now read and write FHIR® data. 🎨
Test the API with Postman
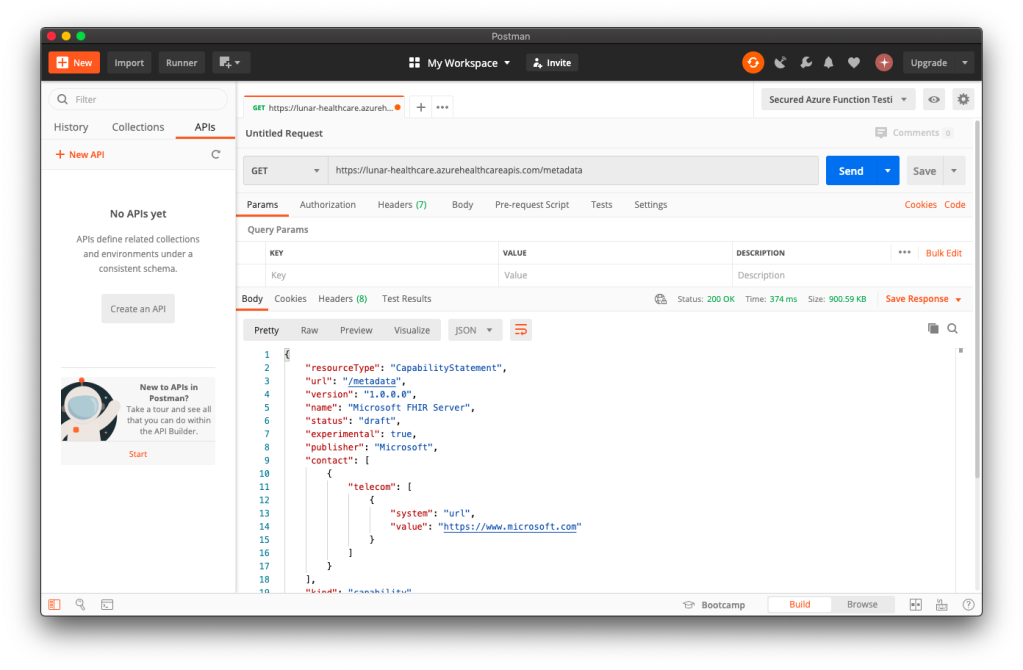
To make sure our Azure API for FHIR® is running well, we can visit its metadata link without any authentication. If it is running smoothly, we shall see something as shown in the following screenshot.
🎨 Yay, our Azure API for FHIR® is running! 🎨
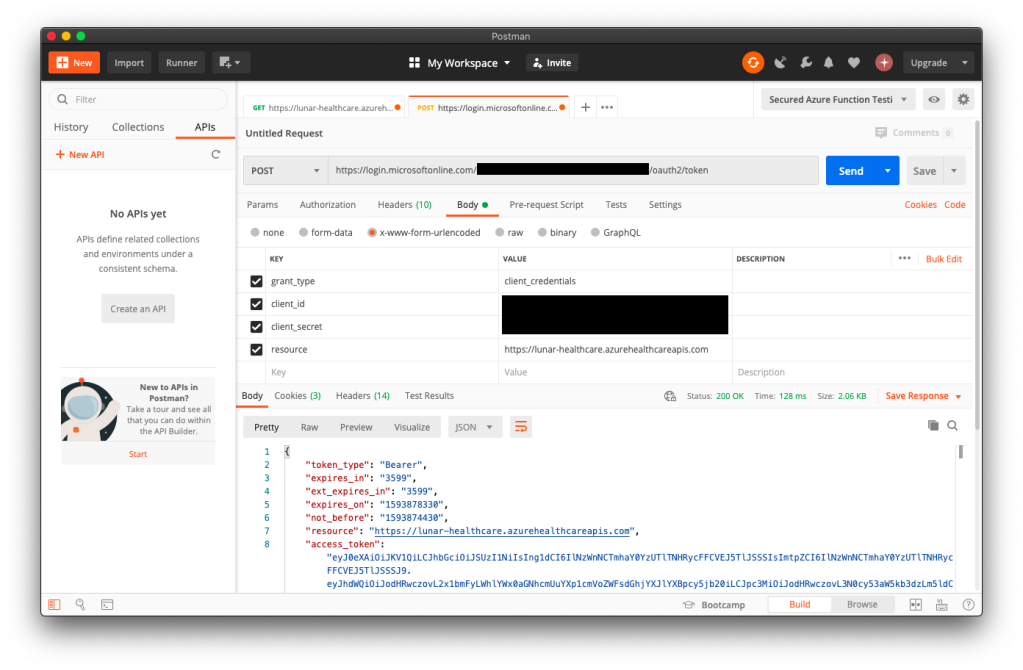
To access the patient data, we need to authenticate ourselves. In order to do so, we first need to get an access token from the client application in Azure Active Directory. We do so by making a POST request to the following URL https://login.microsoftonline.com/<tenant-id>/oauth2/token.
As shown in the following screenshot, the Tenant ID (and also Client ID) can be found at the Overview page of the client application. The resource is basically the URL of the Azure API for FHIR®.
🎨 Successfully retrieved the access_token! 🎨
Once we have the access token, we then can access the Patient endpoint, as shown in the following screenshot.
🎨 Michael Hansen on Azure Friday with Scott Hanselman to talk about Azure API for FHIR®. (Source: YouTube) 🎨
Import Data from Azure Storage
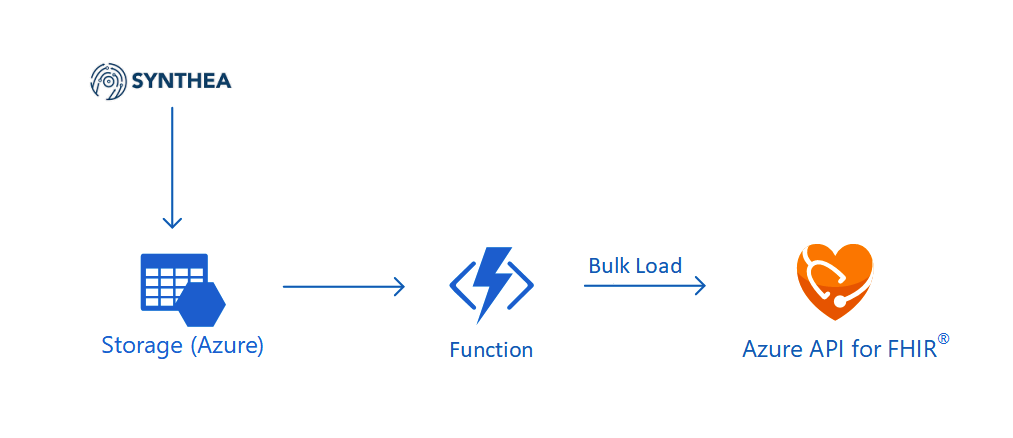
Now that we have the realistic but real patient data in the Azure Storage and we have the Azure API for FHIR® with a SQL database. So the next step that we need to do is pump the data into the SQL database so that other clients can consume the data through the Azure API for FHIR®. In order to do so, we will need a data importer.
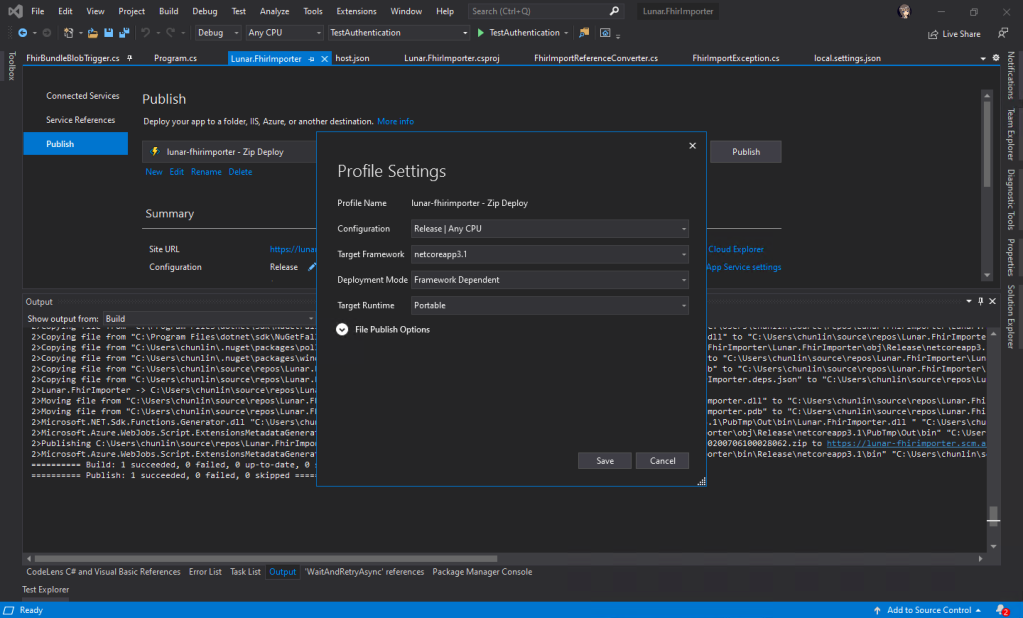
Firstly, we will create an Azure Function which will do the data import. There is an official sample on how to write this Function. I didn’t really follow the deployment steps given in the README of the project. Instead, I created a new Azure Function project in the Visual Studio and published it to the Azure. Interestingly, if I use VS Code, the deployment will fail.
🎨 I could not publish Azure Function from local to the cloud via VS Code. 🎨
In Visual Studio, we will be creating a C# function which will run whenever a new patient data is uploaded to the container. Then the same function will remove the patient data from the Azure Storage once the data is fully updated.
🎨 Publish successful on Visual Studio 2019. 🎨
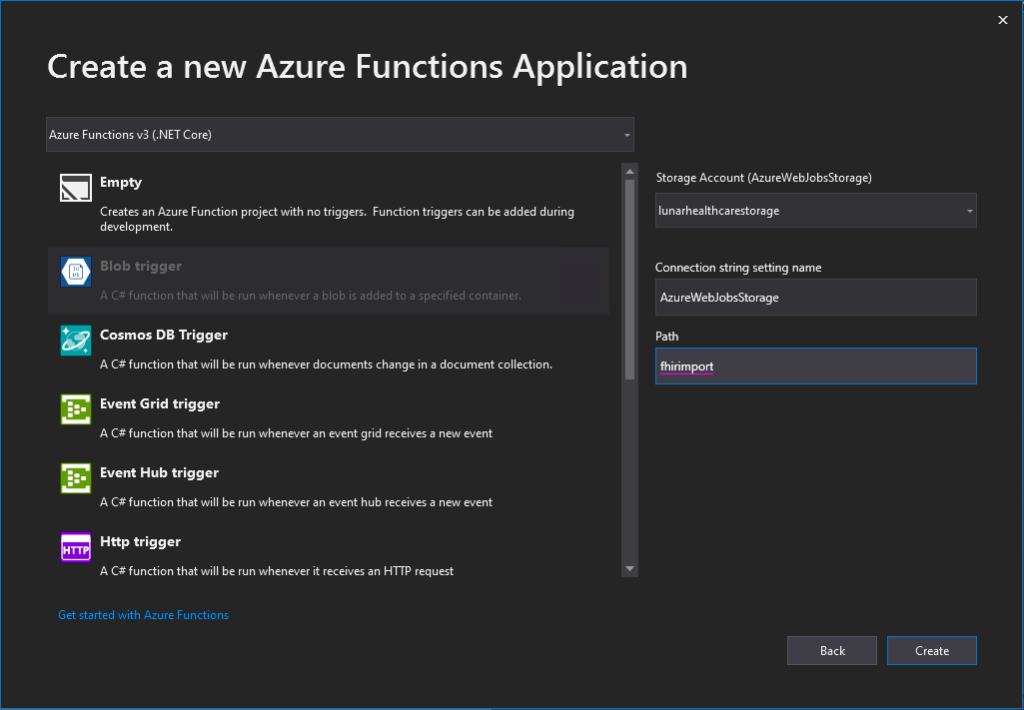
When we are creating a new Azure Function project on Visual Studio, for the convenience later, it’s better we use back the Azure Storage that we use for storing the realistic but not real patient data for our Azure Function app storage as well, as shown in the following screenshot. Thus, the Connection Setting Name will be AzureWebJobsStorage and the Path will point to the container storing our patient data (I recreated the container from syntheadata used in previous article to fhirimport in this article).
🎨 Creating new Azure Functions application. 🎨
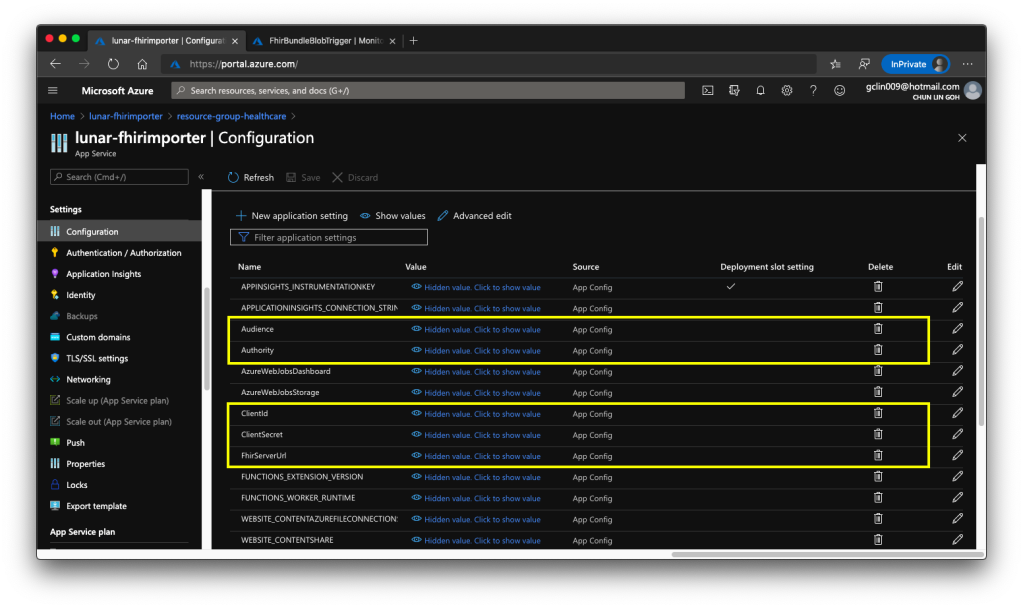
After the deployment is successful, we need to add the following application settings to the Azure Function.
Audience: <found in Authentication of Azure API for FHIR®>
Authority: <found in Authentication of Azure API for FHIR®>
ClientId: <found in the Overview of the Client App registered>
ClientSecret: <found in the Certificates & secrets of the Client App>
FhirServerUrl: <found in the Overview of Azure API for FHIR®>
🎨 We need to add these five application settings correctly. 🎨
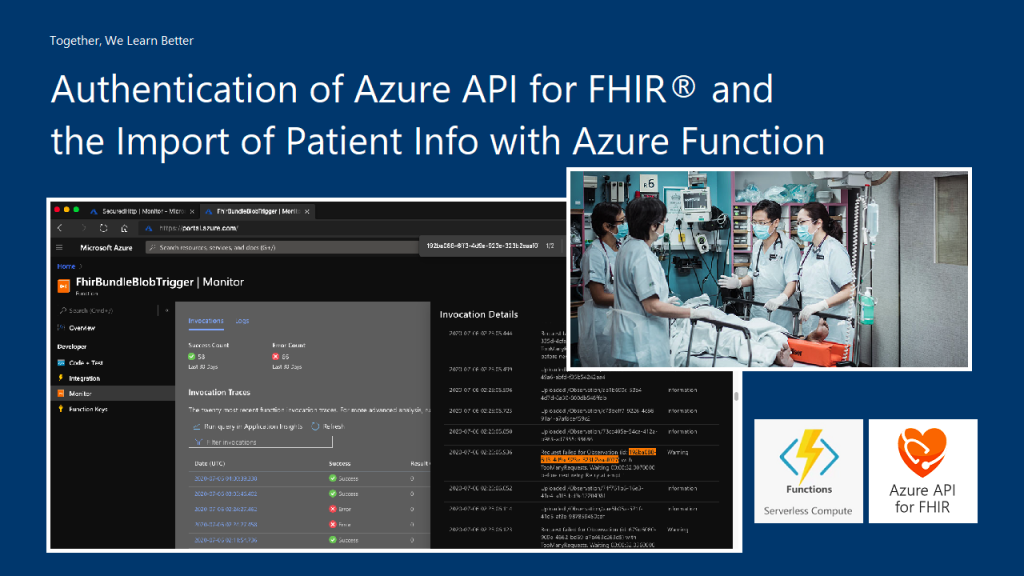
After that, in order to help us diagnose problems happening in each data import, it’s recommended to integrate Application Insights to our Azure Function. After that, we can use ILogger to log information, warnings, or errors in our Azure Function, for example
log.LogWarning($"Request failed for {resource_type} (id: {id}) with {result.Result.StatusCode}.");
Then with Application Insights, we can easily get the log information from the Azure Function in its Monitor section.
🎨 Invocation details of the Azure Function. 🎨
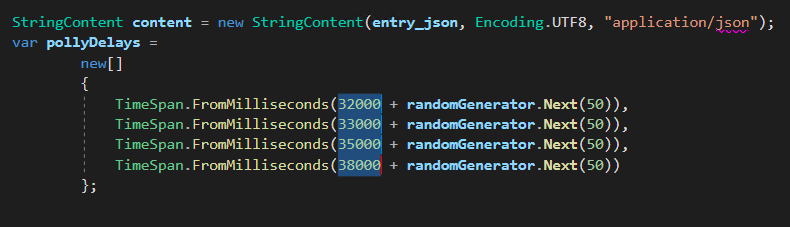
From the official sample code, I made a small change to the waiting time between each try of the request to the Azure API for FHIR®, as shown in the following screenshot.
In the FhirBundleBlobTrigger.cs, I increased the waiting time to have extra 30 seconds because the original waiting time is short that sometimes the data import will fail.
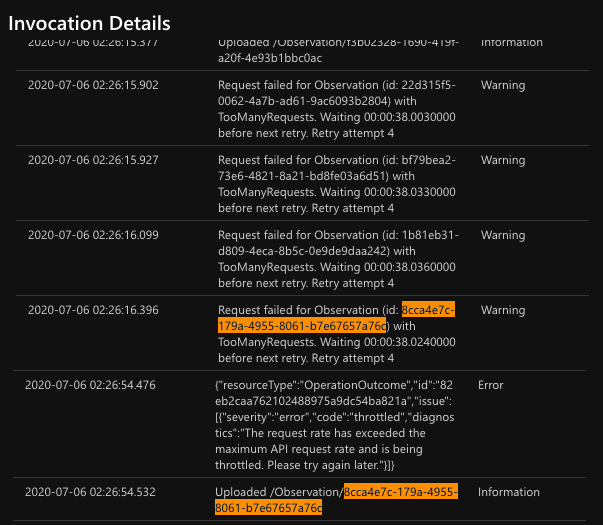
In the following screenshot, the Observation data can only be uploaded after 5 attempts. In the mean time, our request rate has exceeded the maximum API request rate and thus has been throttled too. So we cannot make calls to Azure API for FHIR® too frequent.
🎨 Five attempts with the same request with throttling happens. 🎨
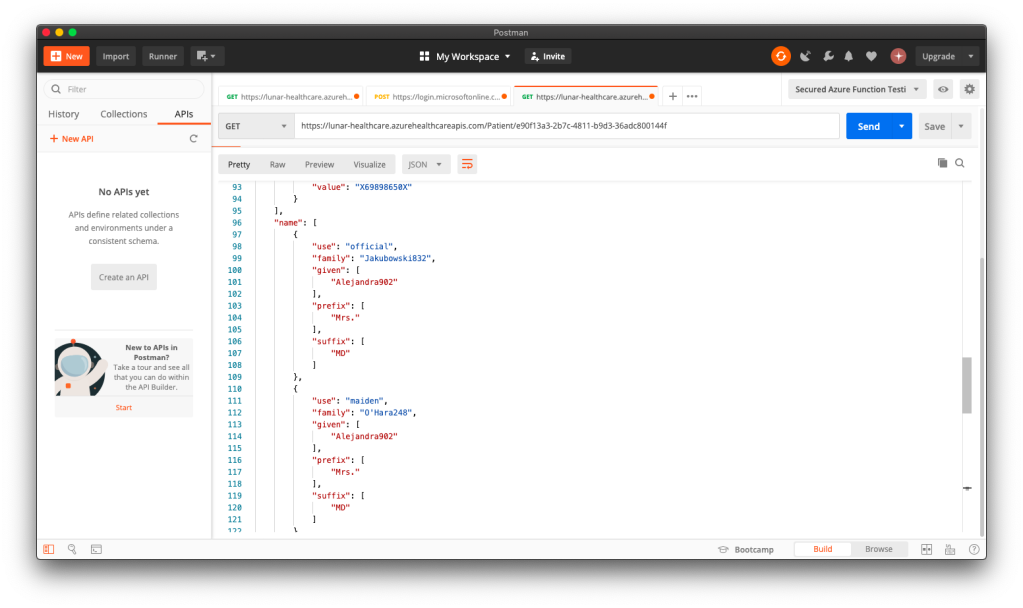
Now, when we make a GET request to the Patient endpoint of Azure API for FHIR® with a certain ID, we will be able to get the corresponding patient data back on Postman.
🎨 Successfully retrieved the patient data from the API service. 🎨
Yup, so at this stage, we have successfully imported data generated by Synthea(TM) to the Azure API for FHIR® database.
Almost two years ago, I was hospitalised in Malaysia for nearly two weeks. After I returned to Singapore, I was then sent to another hospital for medical checkup which took about two months. So I got to experience the hospital operations in two different countries. Since then I always wondered how patient data was exchanged within the healthcare ecosystem.
One of the HL7 standards that we will be discussing in this article is called the FHIR® (Fast Health Interop Resources), an interoperability standard intended to facilitate the exchange of healthcare information between organisations.
🎨 Michael Hansen, Principal Program Manager in Microsoft Healthcare NExT, introduced Synthea on Azure Friday. (Source: YouTube) 🎨
Synthea(TM): A Patient Simulator
Before we deploy the Azure API for FHIR, we need to take care of an important part of the system, i.e. the data source. Of course, we must not use real patient data in our system to demo. Fortunately, with a mock patient data generator, called Synthea(TM), we are able to generate synthetic, realistic patient data.
🎨 Examples of generating patient data using Synthea(TM). 🎨
The following is part of the results when I executed the command with parameter -p 1000.
🎨 Realistic but not real patient data from Synthea(TM). 🎨
Azure Storage Setup
With the patient data generated locally, we now can proceed to upload it to the Azure Storage so that the data can later be input to the Azure API for FHIR.
Here, we will be using the Blob Storage where Blob stands for Binary Large Object. A blob can be any type of file, even virtual machine disks. The blob storage is optimised for storing massive amount of data. Hence, it is suitable to store the JSON files that Synthea(TM) generates.
There are two main default access tiers for StorageV2 Azure Storage, i.e. Hot and Cold. Hot Tier is for storage accounts expected to have frequent data access, while Cold Tier is the opposite of it. Hence, Hot Tier will have lower data access cost as compared to the Cold Tier while Hot Tier will have the highest storage cost.
Since the data stored in our Storage account here is mainly to input into the Azure API for FHIR eventually and we will not keep the data long in the Storage account, we will choose the Hot Tier here.
🎨 Creating new storage account with the Hot Tier. 🎨
For the Replication, it’s important to take note that the data in our Storage account is always replicated in the primary data centre to ensure durability and high availability. We will go with the LRS option, which is the Locally Redundant Storage.
With the LRS option, our data is replicated within a collection of racks of storage nodes within a single data center in the region. This will save our data when the failure only happens on a single rack. We choose this option not only because it is the cheapest Replication but also the lifespan of our data is very short in the Storage account.
Azure Storage – Security and Access Rights
Let’s imagine we need people from different clinics and hospitals, for example, to upload their patient data to our Azure Storage account. Without building them any custom client, would we able to do the job by just setting the correct access rights?
Permissions for a container in Storage account (Source: Microsoft Docs)
Yes, we can. We can further control the access to our blob container in the Storage account. For example, in the container importdata where all the JSON files generated by Synthea(TM) will be uploaded to, we can create a Stored Access Policy for that container which allows only Create and List, as shown in the screenshot below.
🎨 Adding a new Stored Access Policy for the container. 🎨
With this Stored Access Policy, we then can create a Shared Access Signature (SAS). A SAS is a string that contains a security token, and it can be attached to an URL to an Azure resource. Even though here we will use it for our Storage account, but in fact, SAS is available to other Azure services as well. If you remember my previous article about Azure Event Hub, we’re using SAS token too in our mobile app.
I will demo with Microsoft Azure Storage Explorer instead because I can’t do the similar thing on the Azure Portal.
🎨 Creating a Shared Access Signature (SAS) for the container. 🎨
There will be a URI generated after the SAS is created. This is the URI that we will share with those who have the patient data to upload.
With the SAS URI, they can choose to connect to Azure Storage with that URI, as shown in the screenshot below.
🎨 Connecting to Azure Storage with SAS URI. 🎨
Once the SAS URI is correctly provided, they can then connect to the Azure Storage.
🎨 There is a need to make sure we are only connecting to resources we trust. 🎨
Now the other parties can continue to upload the patient data to the Azure Storage. Since we already make sure the actions that they can do are only Create and List, they cannot delete files or overwrite the existing file, as shown in the following screenshot.
🎨 Deletion of file is prohibited according to the Shared Access Policy. 🎨
At this point of time, I suddenly realised that, I could not upload new file too. Why is it so? Isn’t Create access right has been already given?
It turns out that, we need to also allow Read access right to allow the uploading of file. This is because during the upload process, Azure Storage will need to check the existence of the file. Without Read access right, it can’t do so, according to the log file downloaded from the Azure Storage Explorer. This actually surprised me because I thought List should do the job, not Read.
🎨 The container importdata has RCL as its access policy. 🎨
Azure Storage: Monitoring and Alerting
In Azure Storage, some of the collected metrics are the amount of capacity used as well as transaction metrics about the number of transactions and the amount of time taken for those transactions. In order to proactively monitor our Storage account and investigate problems, we can also set alerts on those metrics.
Metrics are enabled by default and sent to the Azure Monitor where the data will be kept for 3 months (93 days).
In Azure Monitor, the Insights section provides an overview of the health of our Storage accounts, as shown below.
🎨 General view of the health of the Storage account. 🎨
Finally, to create Alerts, we just need to head back to the Monitoring section of the corresponding Storage account. Currently, besides the classic version of the Monitoring, there is a new one, as shown in the following screenshot.
🎨 New Alerts page. 🎨
With this, we can setup alerts such as informing us whenever the used capacity is over a certain threshold over a certain period of time. However, how would we receive the Alerts? Well, there are quite a few ways that we can choose under the Action Group.
🎨 Setting up email and SMS as alert channels in the Action Group. 🎨
Next Step
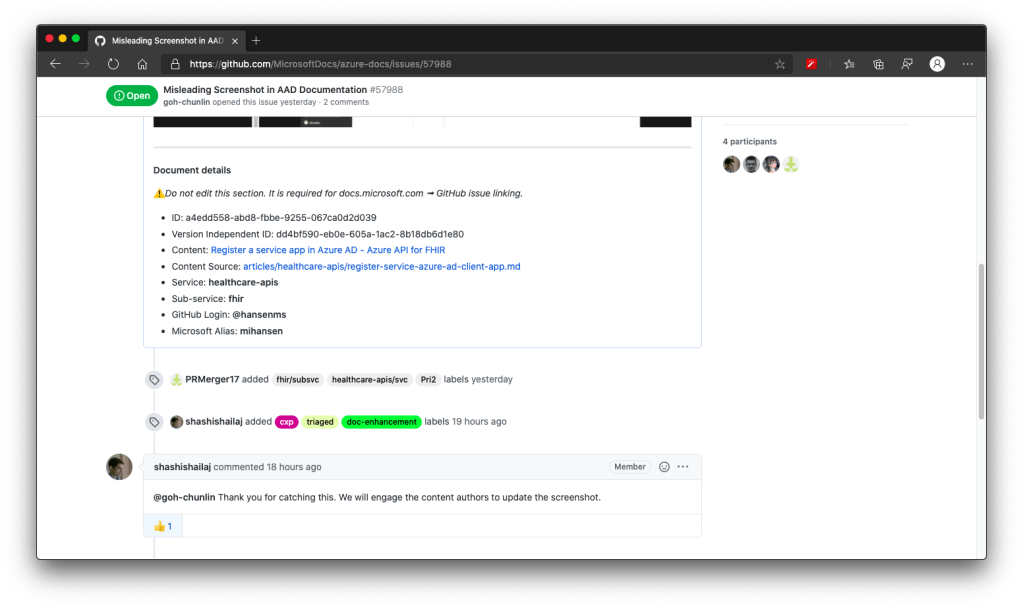
That’s all for the setup of input storage for our Azure API for FHIR. Currently, the official documentation of Azure API for FHIR has certain issues. I have reported to Microsoft on GitHub. Once the issues are fixed, we will proceed to see how we can import the data into the Azure API for FHIR.
🎨 Discussing the documentation issues with Shashi Shailaj on GitHub. 🎨
Software testing makes sure that the software is doing exactly what it is supposed to do and it also points out all the problems and errors found in the software. Hence, involving testing as early as possible and as frequent as possible is a key to build a quality software which will be accepted by the customers or the clients.
There are many topics I’d love to cover about testing. However, in this article, I will only focus on my recent learning about setting up automated GUI testing for my UWP program on Windows 10.
Appium
One of the key challenges in testing UWP app is to do the GUI testing. In the early stage, it’s possible to do that manually by clicking around the app. However, as the app grows larger, testing it manually is very time consuming. After sharing my thoughts with my senior Riza Marhaban, he introduced me a test automation framework called Appium.
Together with Windows App Driver which enables Appium by using new APIs added in Windows 10 Anniversary Edition, we can use them to do GUI test automation on Windows apps. The following video demonstrates the results of GUI testing with Appium in my demo project Lunar.Paint.Uwp.
Here, I will list down those great tutorials about automated GUI testing of UWP apps using Appium which are ranked top in Google Search:
Some of them were written about four years ago when Barack Obama was still the President of the USA. In addition, none of them continues the story with DevOps. Hence, my article here will talk about GUI testing with Appium from the beginning of a new UWP project until it gets built on Azure DevOps.
🎨 Barack Obama served as the 44th president of the United States from 2009 to 2017. (Image Credit: CBS News) 🎨
Getting Started with Windows Template Studio for UWP
Here, I will start a new UWP project using Windows Template Studio.
🎨 Configuring the Testing of the UWP app with Win App Driver. 🎨
There is one section in the project configuration called Testing, as shown in the screenshot above. In order to use Appium, we need to add the testing with Win App Driver feature. After that, we shall see a Test Project suffixed with “Tests.WinAppDriver” being added.
By default, the test project has already come with necessary NuGet packages, such as Appium.WebDriver and MSTest.
🎨 NuGet packages in the test project. 🎨
Writing GUI Test Cases: Setup
The test project comes with a file called BasicTest.cs. In the file, there are two important variables, i.e. WindowsApplicationDriverUrl and AppToLaunch.
The WindowsApplicationDriverUrl is pointing to the server of WinAppDriver which we will install later. Normally we don’t need to change it as the default value will be “http://127.0.0.1:4723”.
The AppToLaunch variable is the one we need to change. Here, we need to replace the part before “!App” with the Package Family Name, which can be found in the Packaging tab of the UWP app manifest, as shown in the screenshot below.
🎨 Package Family Name 🎨
Take note that there is a line of comment right above the AppToLaunch variable. It says, “The app must also be installed (or launched for debugging) for WinAppDriver to be able to launch it.” This is a very important line. It means when we are testing locally, we need to make sure the latest of our UWP app is deployed locally. Also, it means that the UWP app needs to be available on the Build Agent which we will talk about in later part of this article.
To access this button, in the test code, we can do like the following.
var welcomeScreenEnterButton = AppSession.FindElementByAccessibilityId("WelcomeScreenEnterButton");
Of course, if we want to have an AccessibilityId which is different from the Name of the XAML control (or the XAML control doesn’t have a Name), then we can specify the AccessibilityId in the XAML directly as follows.
Then to access this button, in the test code, we need to use EnterButton instead.
var welcomeScreenEnterButton = AppSession.FindElementByAccessibilityId("EnterButton");
Writing GUI Test Cases: AccessibilityName
The method above works well with XAML controls which are having simple text as the content. If the content property is not string, for example if the XAML control is a Grid that consists of many other XAML controls or the XAML control is a custom user control, then Appium will fail to detect the control with the AccessibilityId with the following exception message “OpenQA.Selenium.WebDriverException: An element could not be located on the page using the given search parameters”.
Thanks to GeorgiG from UltraPay, there is a solution to this problem. As GeorgiG pointed out in his post on Stack Overflow, the workaround is to overwrite the AutomationProperties.Name with a non-empty string value, such as “=”.
Then in the test cases, I can easily access the Grid with the following code.
var welcomeScreen = AppSession.FindElementByAccessibilityId("WelcomeScreen");
Writing GUI Test Cases: Inspect Tool
The methods listed out above work fine for the XAML controls in our program. How about for the prompt? For example, when user clicks on the “Open” button and an “Open” window is prompted. How do we instruct Appium to react to that?
🎨 Launched the “Inspect” tool from the Developer Command Prompt for VS 2019. 🎨
Next, we can mouse over the Open prompt to find out the AccessibilityId of the GUI element that we need to access. For example, the AccessibilityId of the area where we key in the file name is 1148, as shown in the screenshot below.
🎨 Highlighted in red is the AccessibilityId of the File Name text input area. 🎨
This explains why in the test cases, we have the following code to access it.
var openFileText = AppSession.FindElementByAccessibilityId("1148");
Now, we have done our software test locally. How do we make the testing to be part of our build pipeline on Azure DevOps?
This turns out to be quite a complicated setup. Here, I setup the build pipeline based on the .NET Desktop pipeline in the template.
🎨 .NET Desktop build pipeline. 🎨
Next, we need to make sure the pipeline is building our solution with VS2019 on Windows 10 at least. Otherwise, we will receive the error “Error CS0234: The type or namespace name ‘ApplicationModel’ does not exist in the namespace ‘Windows’ (are you missing an assembly reference?)” in the build pipeline.
🎨 The “Agent Specification” of the pipeline needs to be at least “windows-2019”. 🎨
Now, if we queue our pipeline again, we will encounter a new error which states that “Error APPX0104: Certificate file ‘xxxxxx.pfx’ not found.” This is because for UWP app, we need to package our app with a cert. However, by default, the cert will not be committed to the Git repository. Hence, there is no such cert in the build pipeline.
To solve this problem, we need to first head to the Library of the Pipelines and add the following Variable Group.
🎨 This is basically the file name of the cert and its password. 🎨
Take note that, the required cert is now still not yet available on the pipeline. Hence, we need to upload the cert as one of the Secured Files in the Library as well.
🎨 Uploaded pfx to the Azure DevOps Pipeline Library. 🎨
So, how to we move this cert from the Library to the build pipeline? We need the following task.
🎨 Download secure file from the Library. 🎨
This is not enough because the task will only copy the cert to a temporary storage on the build agent. However, when the agent tries to build, it will still be searching for the cert in the project folder of our UWP app, i.e. Lunar.Paint.Uwp.
Hence, as shown in the screenshot above, we have two more powershell script tasks to do a little more work.
With these three new tasks, the build task should be executed correctly.
🎨 Build solution task. 🎨
Here, my BuildPlatform is x64 and the BuildConfiguration is set to release. Also in the MSBuild Arguments, I specify the PackageCertificatePassword because otherwise it will throw an error in the build process saying “[error]C:\Program Files (x86)\Microsoft Visual Studio\2019\Enterprise\MSBuild\Microsoft\VisualStudio\v16.0\AppxPackage\Microsoft.AppXPackage.Targets(828,5): Error : Certificate could not be opened: Lunar.Paint.Uwp_TemporaryKey.pfx.”
Introduction of WinAppDriver to the Build Pipeline
Okay, so how do we run the test cases above on Azure DevOps?
Actually, it only requires the following five steps as highlighted in the following screenshot.
🎨 The five steps for GUI testing. 🎨
Firstly, we need to start the WinAppDriver.
Secondly, we need to introduce two tasks after it to execute some PowerShell scripts. Before showing what they are doing, we need to recall one thing.
Remember the one line of comment above the AppToLaunch variable in our test project? It says, “The app must also be installed (or launched for debugging) for WinAppDriver to be able to launch it.” Hence, we must install the UWP app using the files in AppxPackages generated by the Build task. This is what the two Powershell tasks are doing.
The first Powershell task is to import the cert to the store.
The second task, as shown in the following screenshot, is to install the UWP app using Add-AppDevPackage.ps1. Take note that here we need to do SilentContinue else it will wait for user interaction and cause the pipeline to be stuck.
🎨 Run the PowerShell file generated by Build Solution task directly to install our UWP app. 🎨
At the point of writing this article, the Windows Template Studio automatically sets the Targeting of the UWP app to be “Windows 10, version 2004 (10.0; Build 19041)”. However, the Azure DevOps pipeline is still not yet updated to Windows 10 v2004, so we should lower the Target Version to be v1903 and minimum version to be v1809 in order to have the project built successfully on the Azure DevOps pipeline.
Thirdly, we will need the test with VsTest. This task exists in the default template and nothing needs to be changed here.
Fourthly, we need to stop the WinAppDriver.
That’s all. Now when the Build Pipeline is triggered, we can see the GUI test cases are being run as well.
🎨 Yay, our GUI test cases are being tested successfully. 🎨
In addition, Azure DevOps will also give us a nice test report for each of our builds, as shown in the following the screenshot.
🎨 Test report in Azure DevOps. 🎨
Conclusion: To Be Continued
Well, this is actually just the beginning of testing journey. I will continue to learn more about software testing especially in the DevOps part and share with you all in the future.
Feel free to leave a comment here to share with other readers and me about your thoughts. Thank you!