Recently, we are working on a project which needs a long-running service for processing CPU-intensive data. We choose to build a .NET worker service because with .NET, we are now able to make our service cross-platform and run it on Amazon ECS, for example.
Setup
To simplify, in this article, we will be running the following code as a worker service.
using Microsoft.Extensions.Hosting;

using NLog;

using NLog.Extensions.Logging;


Console.WriteLine("Hello, World!");


var builder = Host.CreateApplicationBuilder(args);


var logger = LogManager.Setup()

    .GetCurrentClassLogger();


try

{

    builder.Logging.AddNLog();


    logger.Info("Starting");


    using var host = builder.Build();

    await host.RunAsync();

}

catch (Exception e)

{

    logger.Error(e, "Fatal error to start");

    throw;

}

finally

{

    // Ensure to flush and stop internal timers/threads before application-exit (Avoid segmentation fault on Linux)

    LogManager.Shutdown();

}
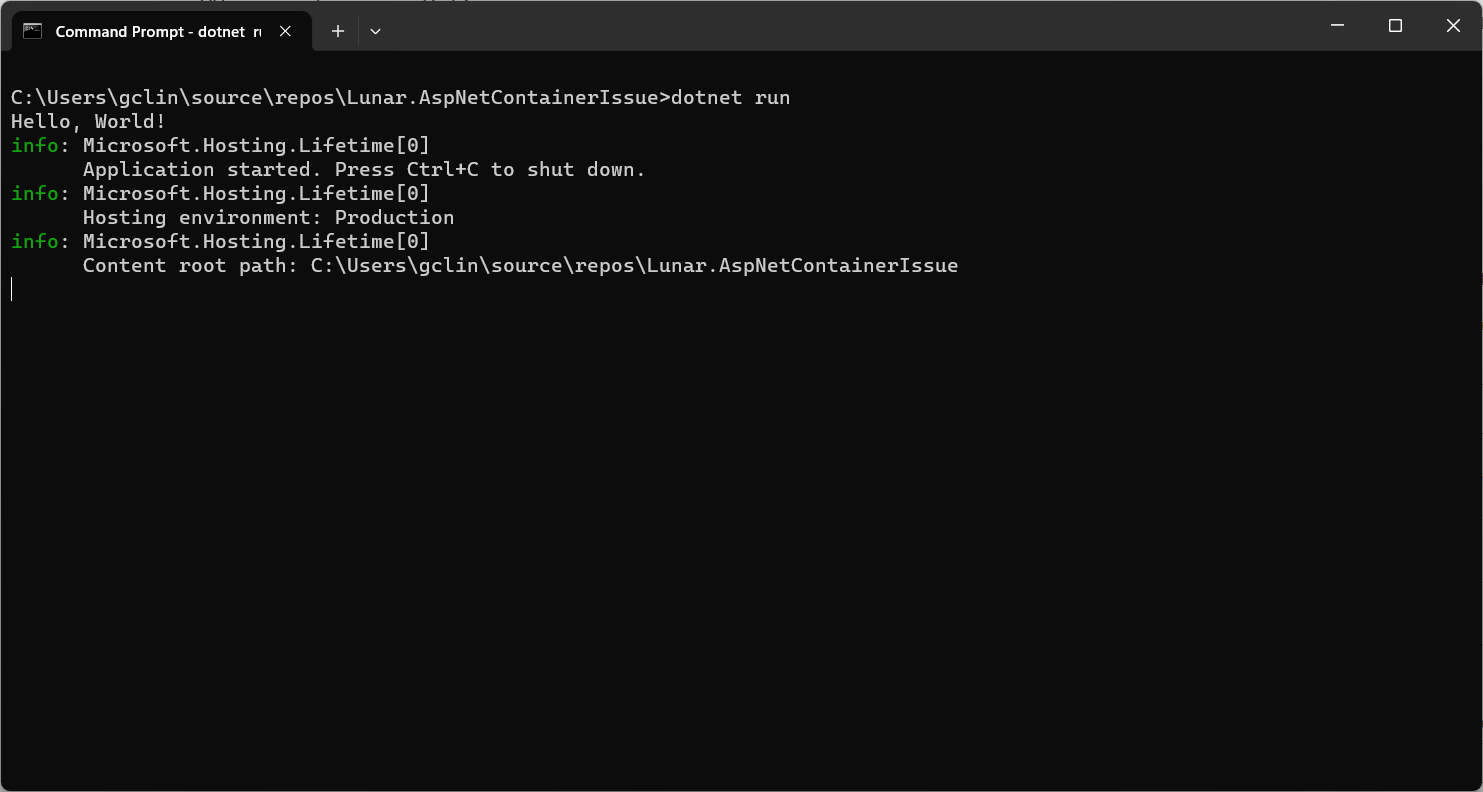
So, if we run the code above locally, we should be seeing the following output.
The output of our simplified .NET worker service.
In this project, we are using the NuGet library NLog.Extensions.Logging, thus the NLog configuration is by default read from appsettings.json, which is provided below.
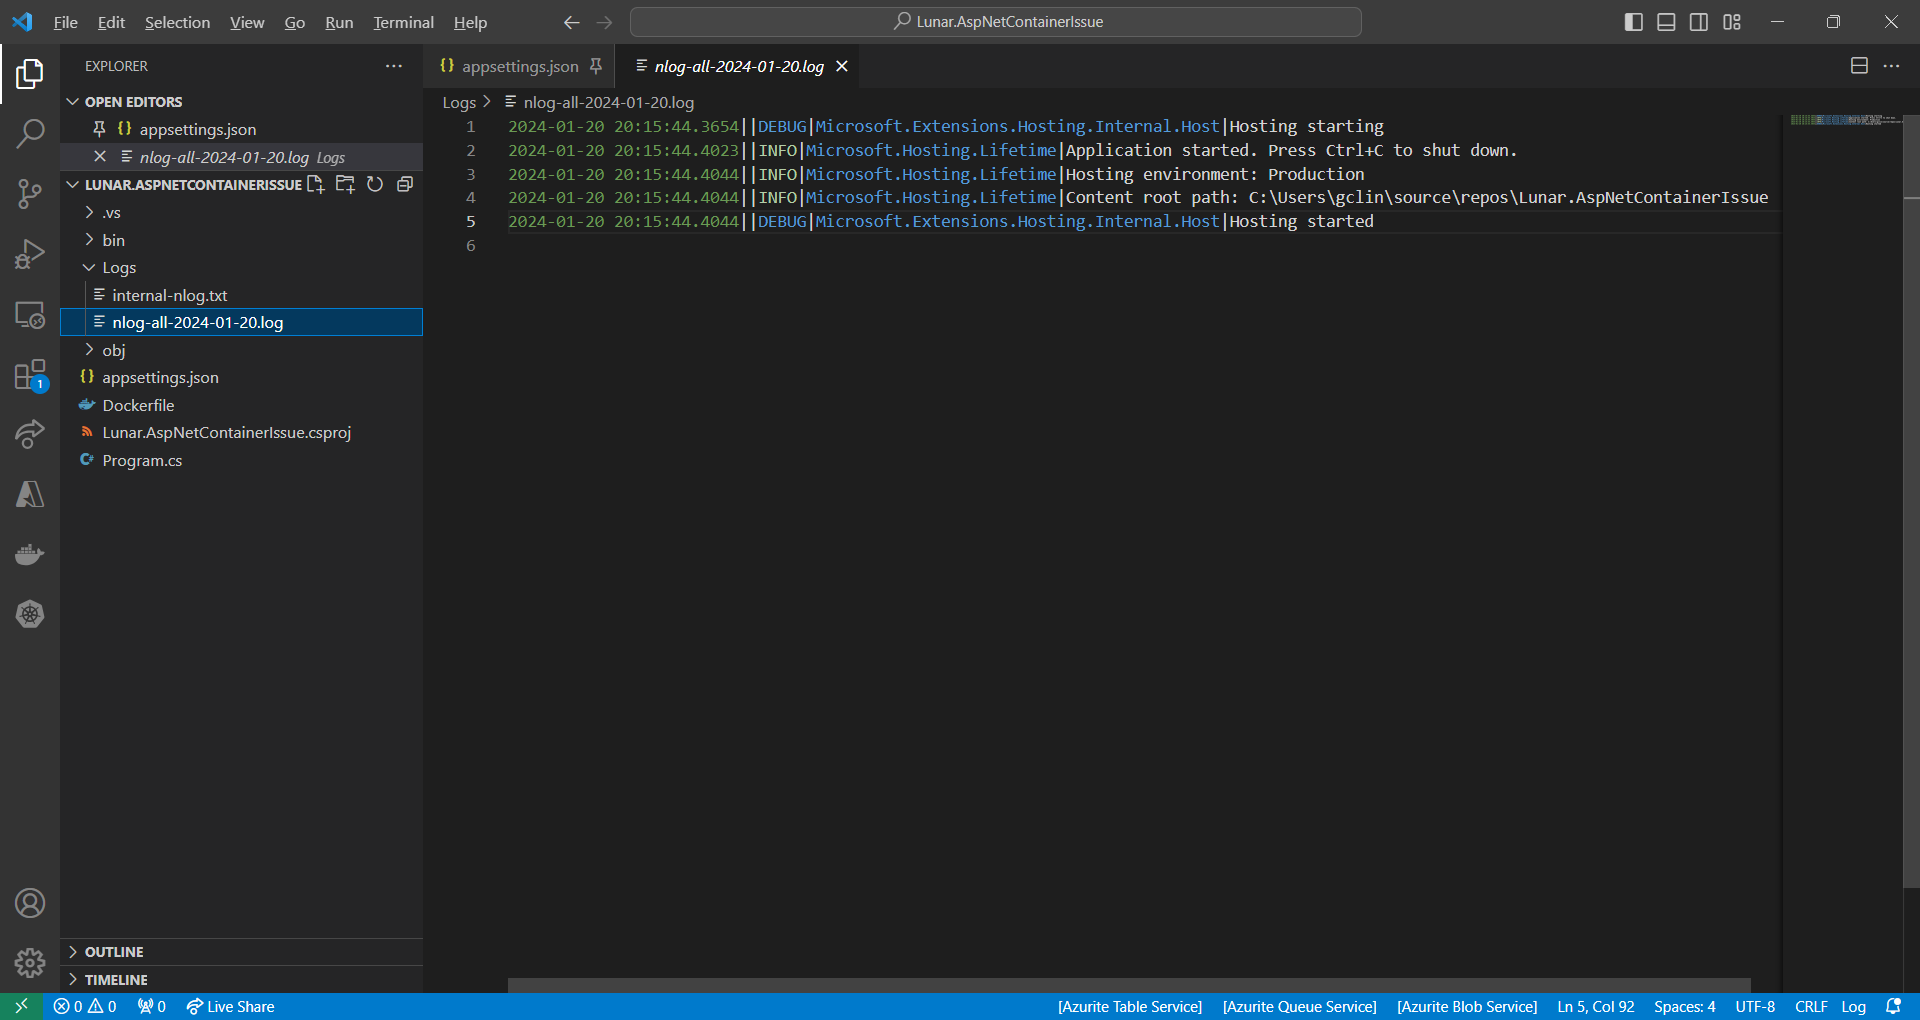
So, we should be having two log files generated with one showing something similar to the output on the console earlier.
The log file generated by NLog.
Containerisation and the Issue
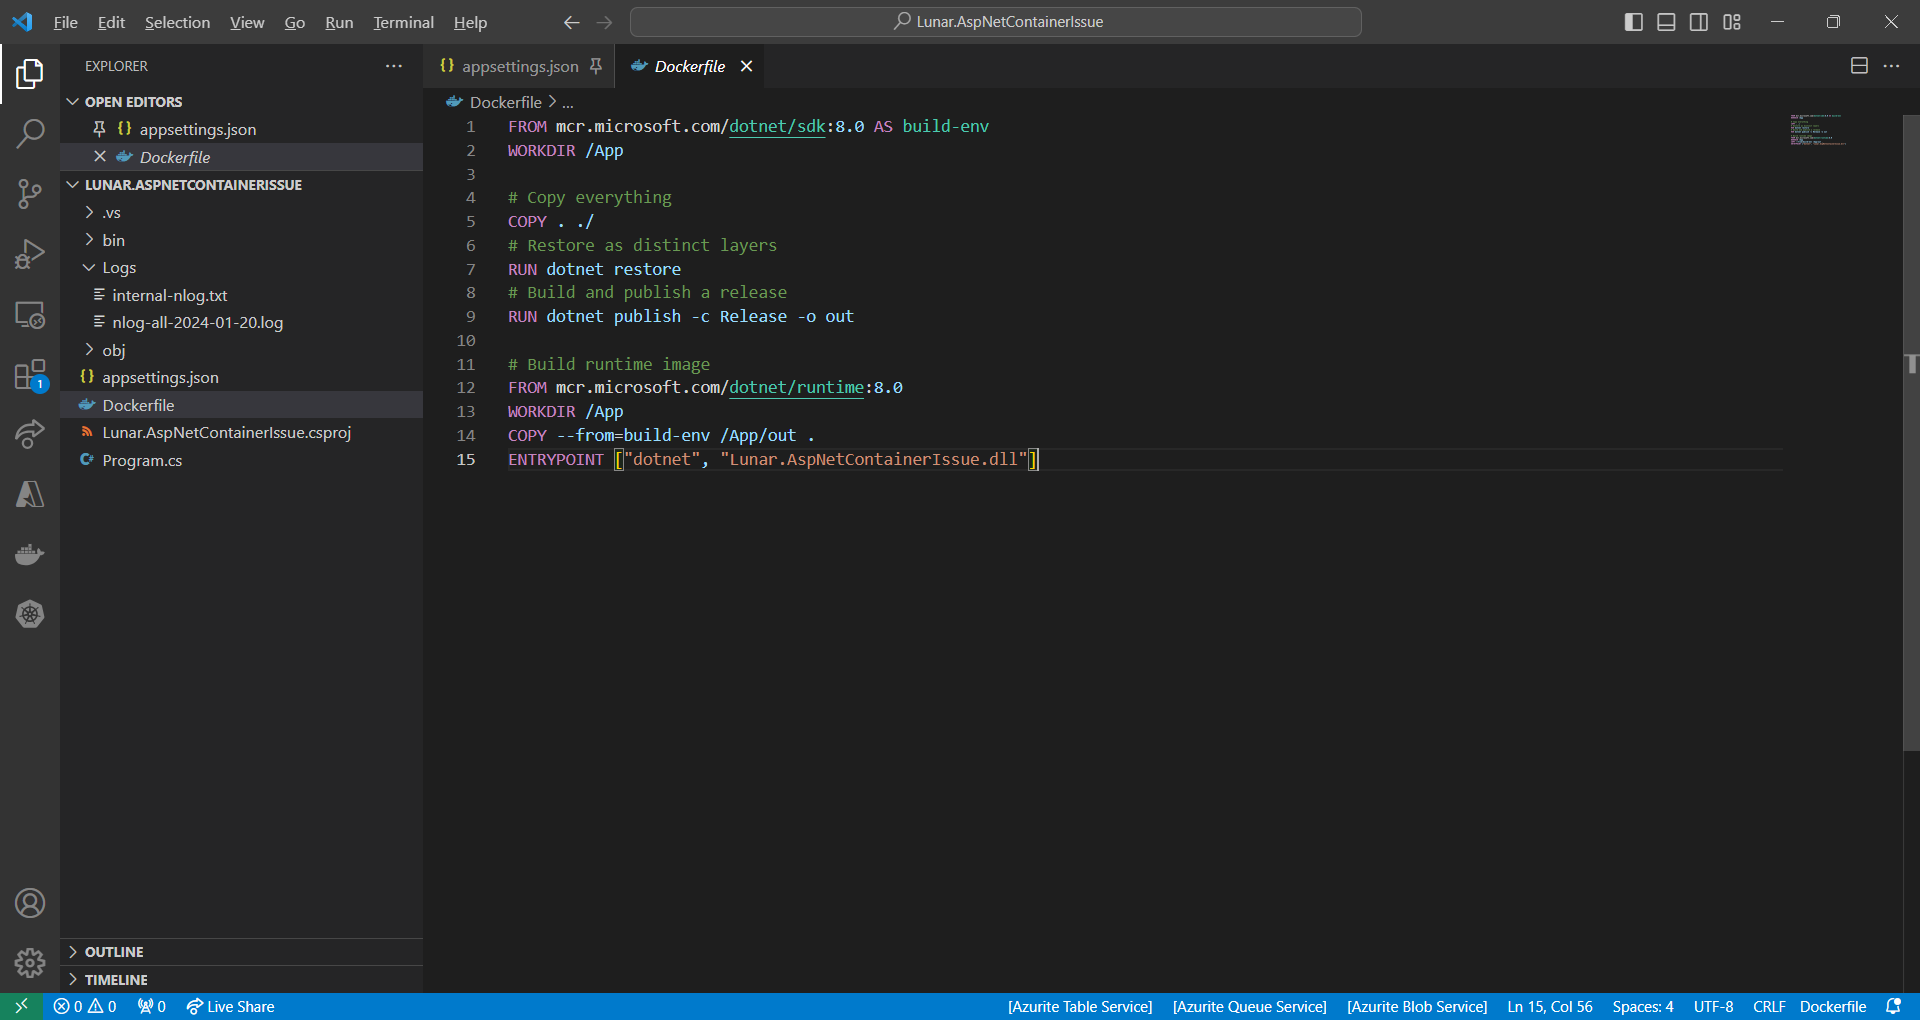
Since we will be running this worker service on Amazon ECS, we need to containerise it first. The Dockerfile we use is simplified as follows.
Simplified version of the Dockerfile we use.
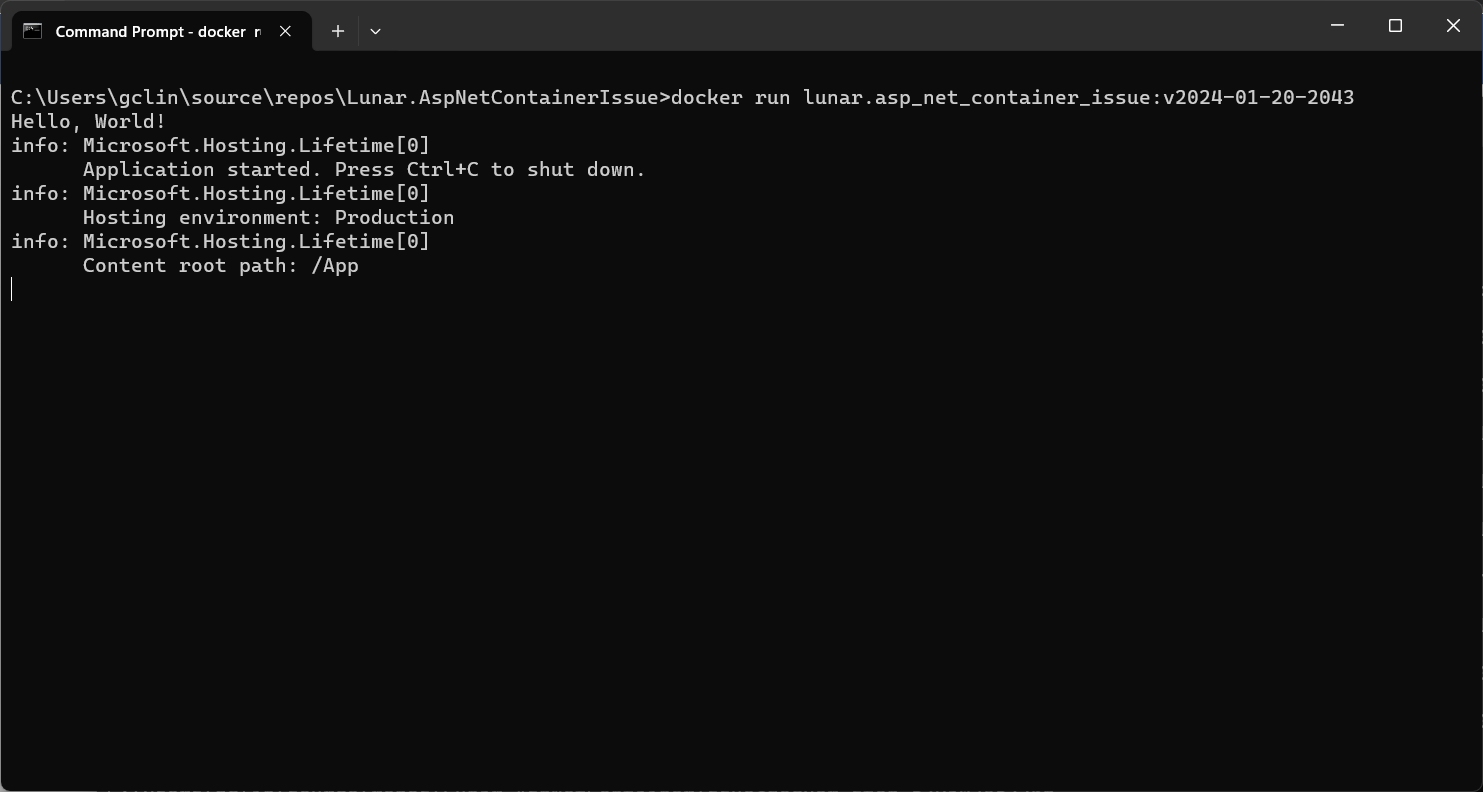
However, when we run the Docker image locally, we receive an error, as shown in the screenshot below, saying “You must install or update .NET to run this application.” However, aren’t we already using .NET runtime as stated in our Dockerfile?
No framework is found.
In fact, if we read the error message clearly, it is the ASP .NET Core that it could not find. This confused us for a moment because it is a worker service project, not a ASP .NET project. So why does it complain about ASP .NET Core?
We accidentally include the NLog.Web.AspNetCore NuGet package which supports only ASP .NET Core platform. This library is not used in our worker service at all.
NLog.Web.AspNetCore supports only ASP .NET platform.
So, after we remove the reference, we can now run the Docker image successfully.
WRAP-UP
That’s all for how we solve the issue we encounter when developing our .NET worker service.
KOSD, or Kopi-O Siew Dai, is a type of Singapore coffee that I enjoy. It is basically a cup of coffee with a little bit of sugar. This series is meant to blog about technical knowledge that I gained while having a small cup of Kopi-O Siew Dai.
By default, Azure Storage already supports TLS 1.2 on public HTTPS endpoints. However, for some companies, they are still using TLS 1.0 or 1.1. Hence, to maintain their connections to Azure Storage, they have to update their OS and apps to support TLS 1.2.
About TLS
The history of TLS can be traced back to SSL.
SSL stands for “Secure Sockets Layer,” and it was developed by Netscape in the 1990s. SSL was one of the earliest cryptographic protocols developed to provide secure communication over a computer network.
SSL has been found to have several vulnerabilities over time, and these issues have led to its deprecation in favor of more secure protocols like TLS. In 2019, TLS 1.0 was introduced as an improvement over SSL. Nowadays, while the term “SSL” is still commonly used colloquially to refer to the broader category of secure protocols, it typically means TLS.
When we see “https://” in the URL and the padlock icon, it means that the website is using either TLS or SSL to encrypt the connection.
While TLS addressed some SSL vulnerabilities, it still had weaknesses, and over time, security researchers identified new threats and attacks. Subsequent versions of TLS, i.e. TLS 1.1, TLS 1.2, and TLS 1.3, were developed to further enhance security and address vulnerabilities.
Why TLS 1.2?
By the mid-2010s, it became increasingly clear that TLS 1.2 was a more secure choice, and we were encouraged to upgrade our systems to support it instead. TLS 1.2 introduced new and stronger cipher suites, including Advanced Encryption Standard (AES) cipher suites, providing better security compared to older algorithms.
Older TLS versions (1.0 and 1.1) are deprecated and removed to meet regulatory standards from NIST (National Institute of Standards and Technologies). (Photo Credit: R. Jacobson/NIST)
The coexistence of TLS 1.2 and TLS 1.3 is currently part of a transitional approach, allowing organisations to support older clients that may not yet have adopted TLS 1.3.
Before we enabling that, we should setup logging to make sure that our Azure policy is working as intended. Here, we will be using Azure Monitor.
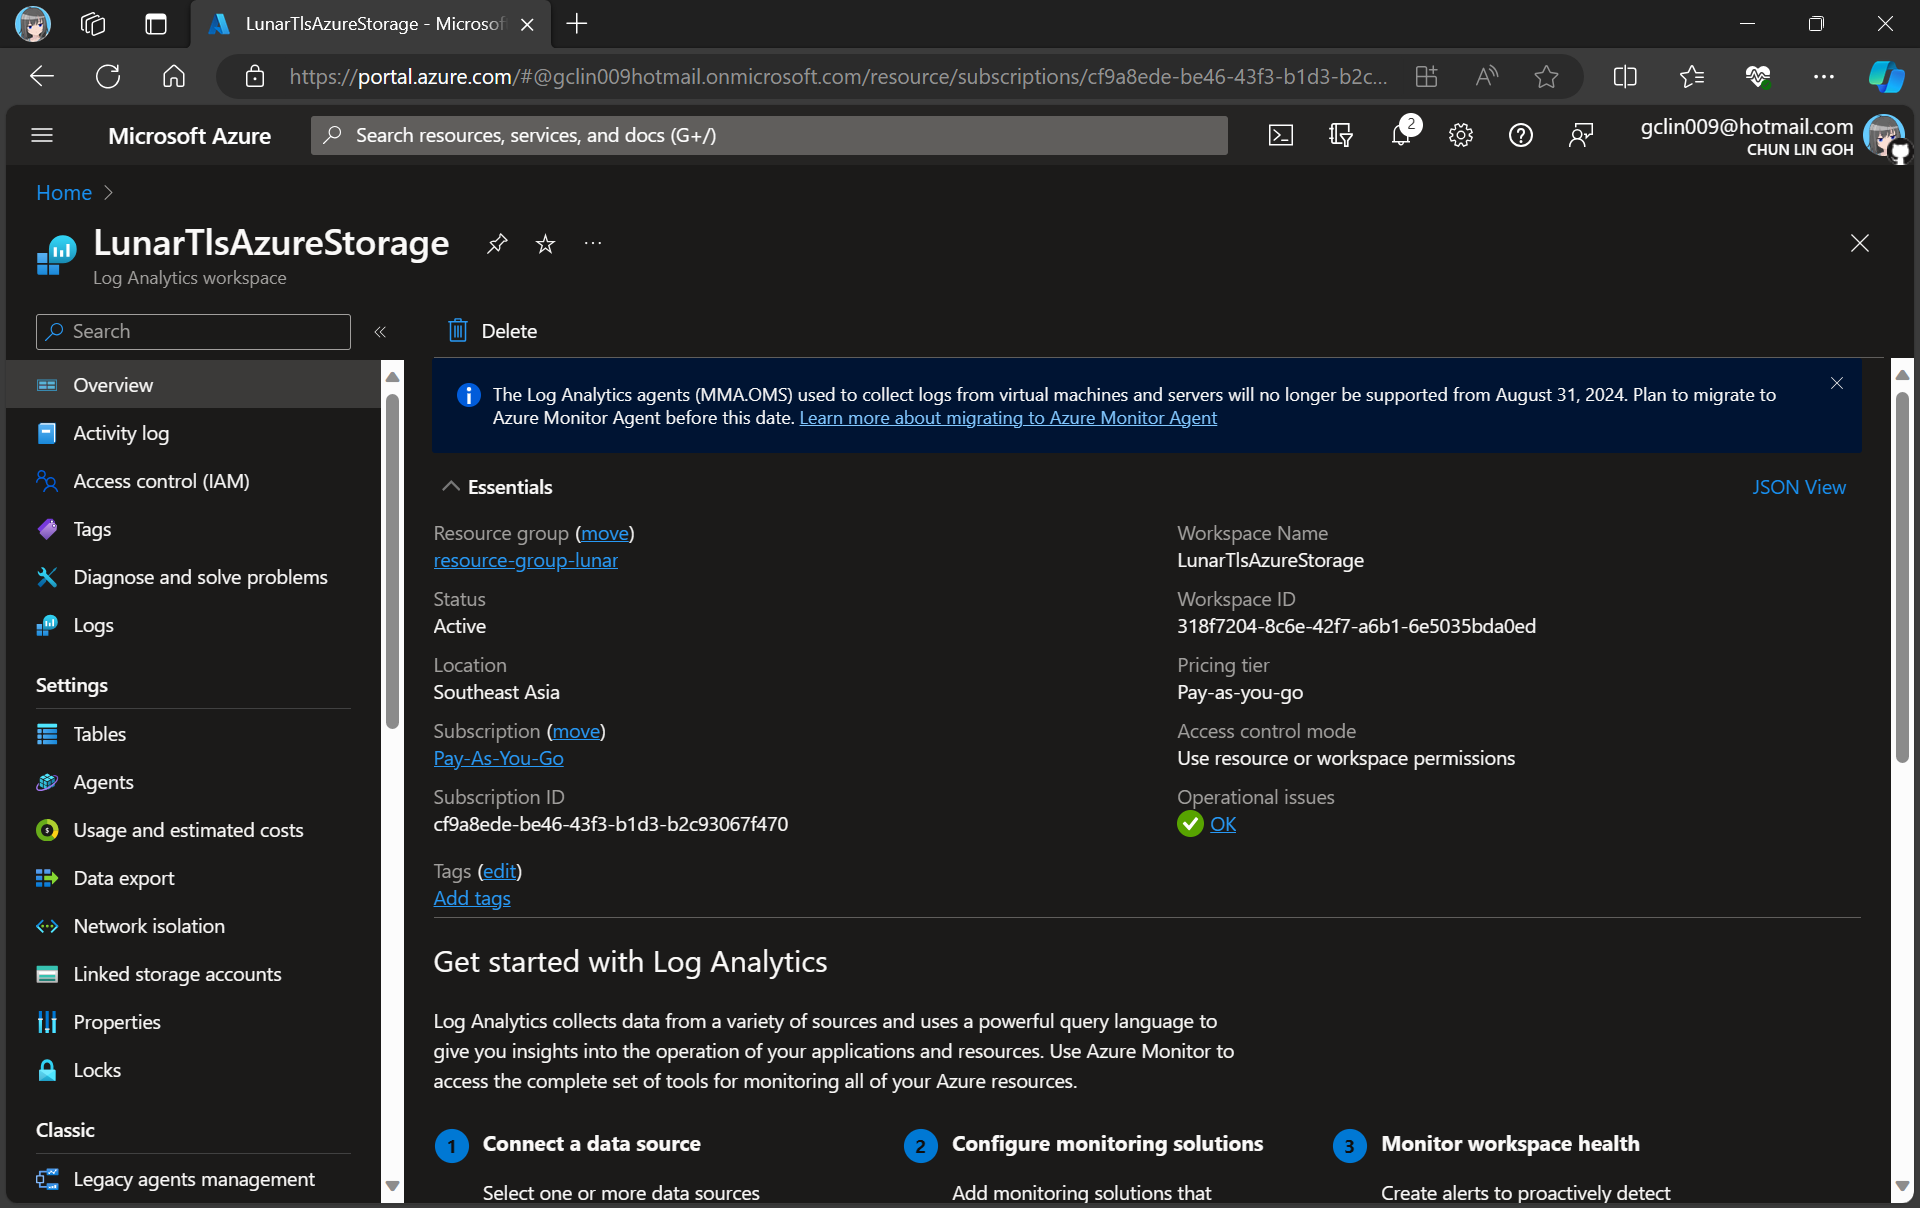
For demonstration purpose, we will create a new Log Analytics workspace called “LunarTlsAzureStorage”.
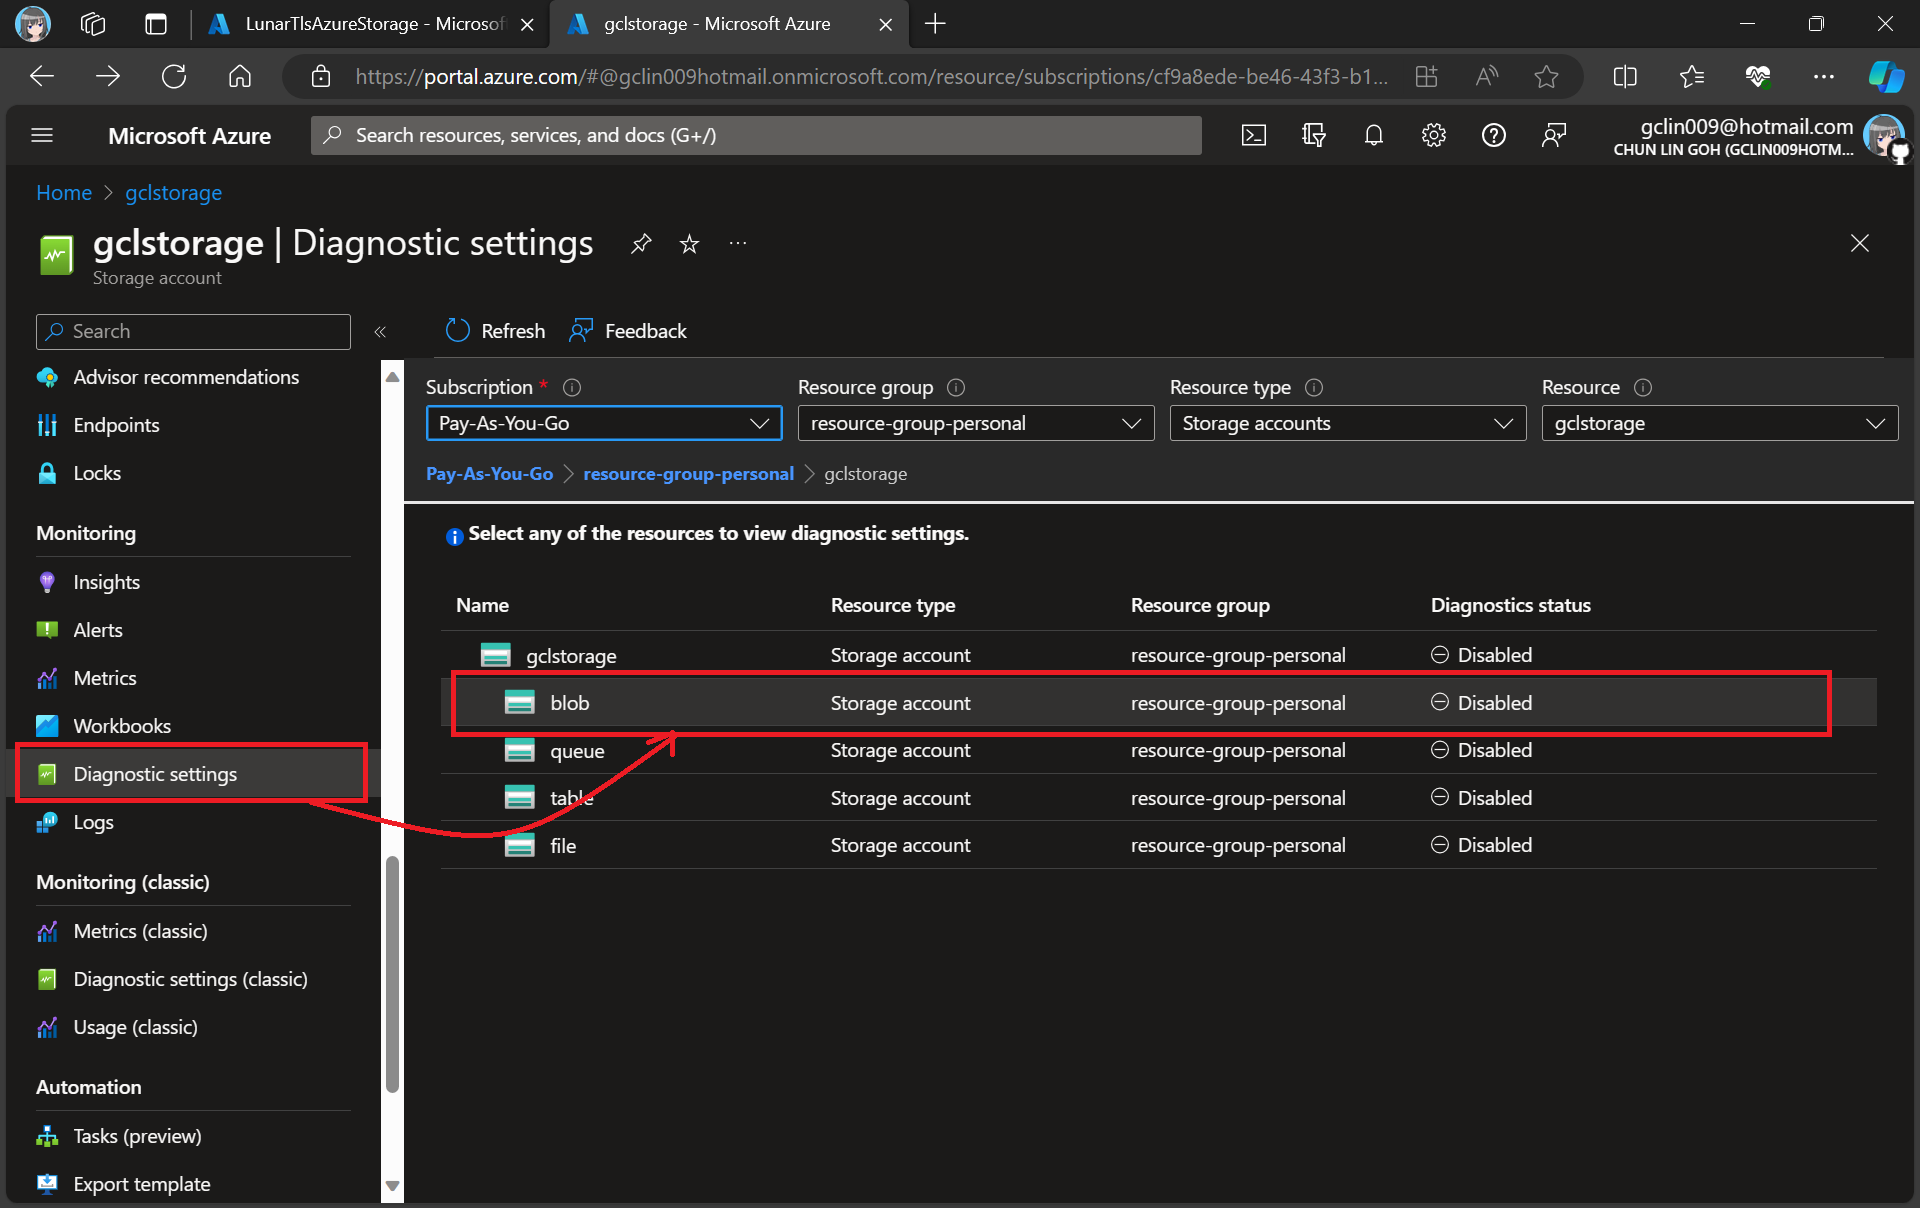
In this article, we will only be logging requests for the Blob Storage, hence, we will be setting up the Diagnostic of the Storage Account as shown in the screenshot below.
Adding new diagnostic settings for blob.
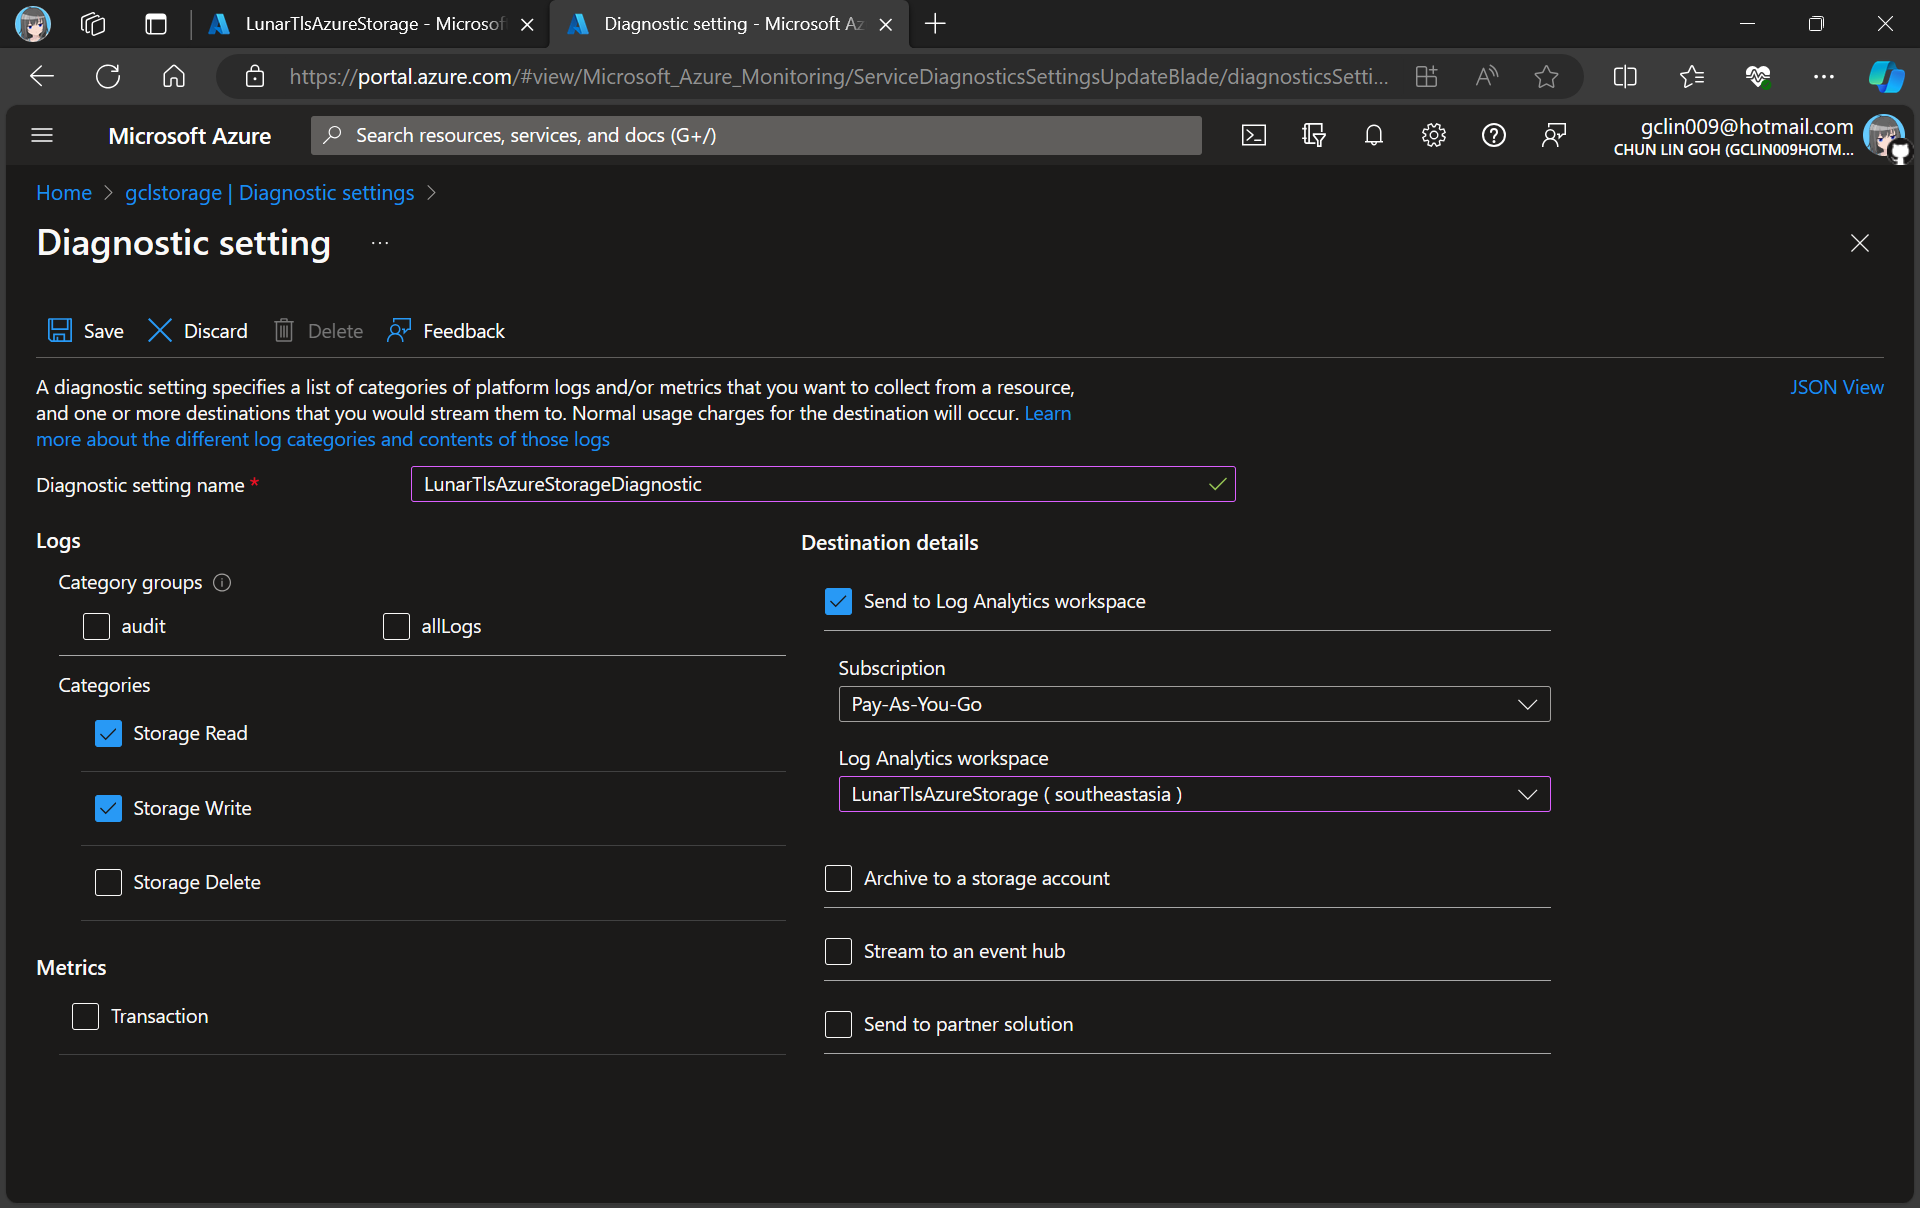
In the next step, we need to specify that we would like to collect the logs of only read and write requests of the Azure Blob Storage. After that, we will send the logs to Log Analytics we have just created above.
Creating a new diagnostic setting for our blob storage.
After we have created the diagnostic setting, requests to the storage account are subsequently logged according to that setting.
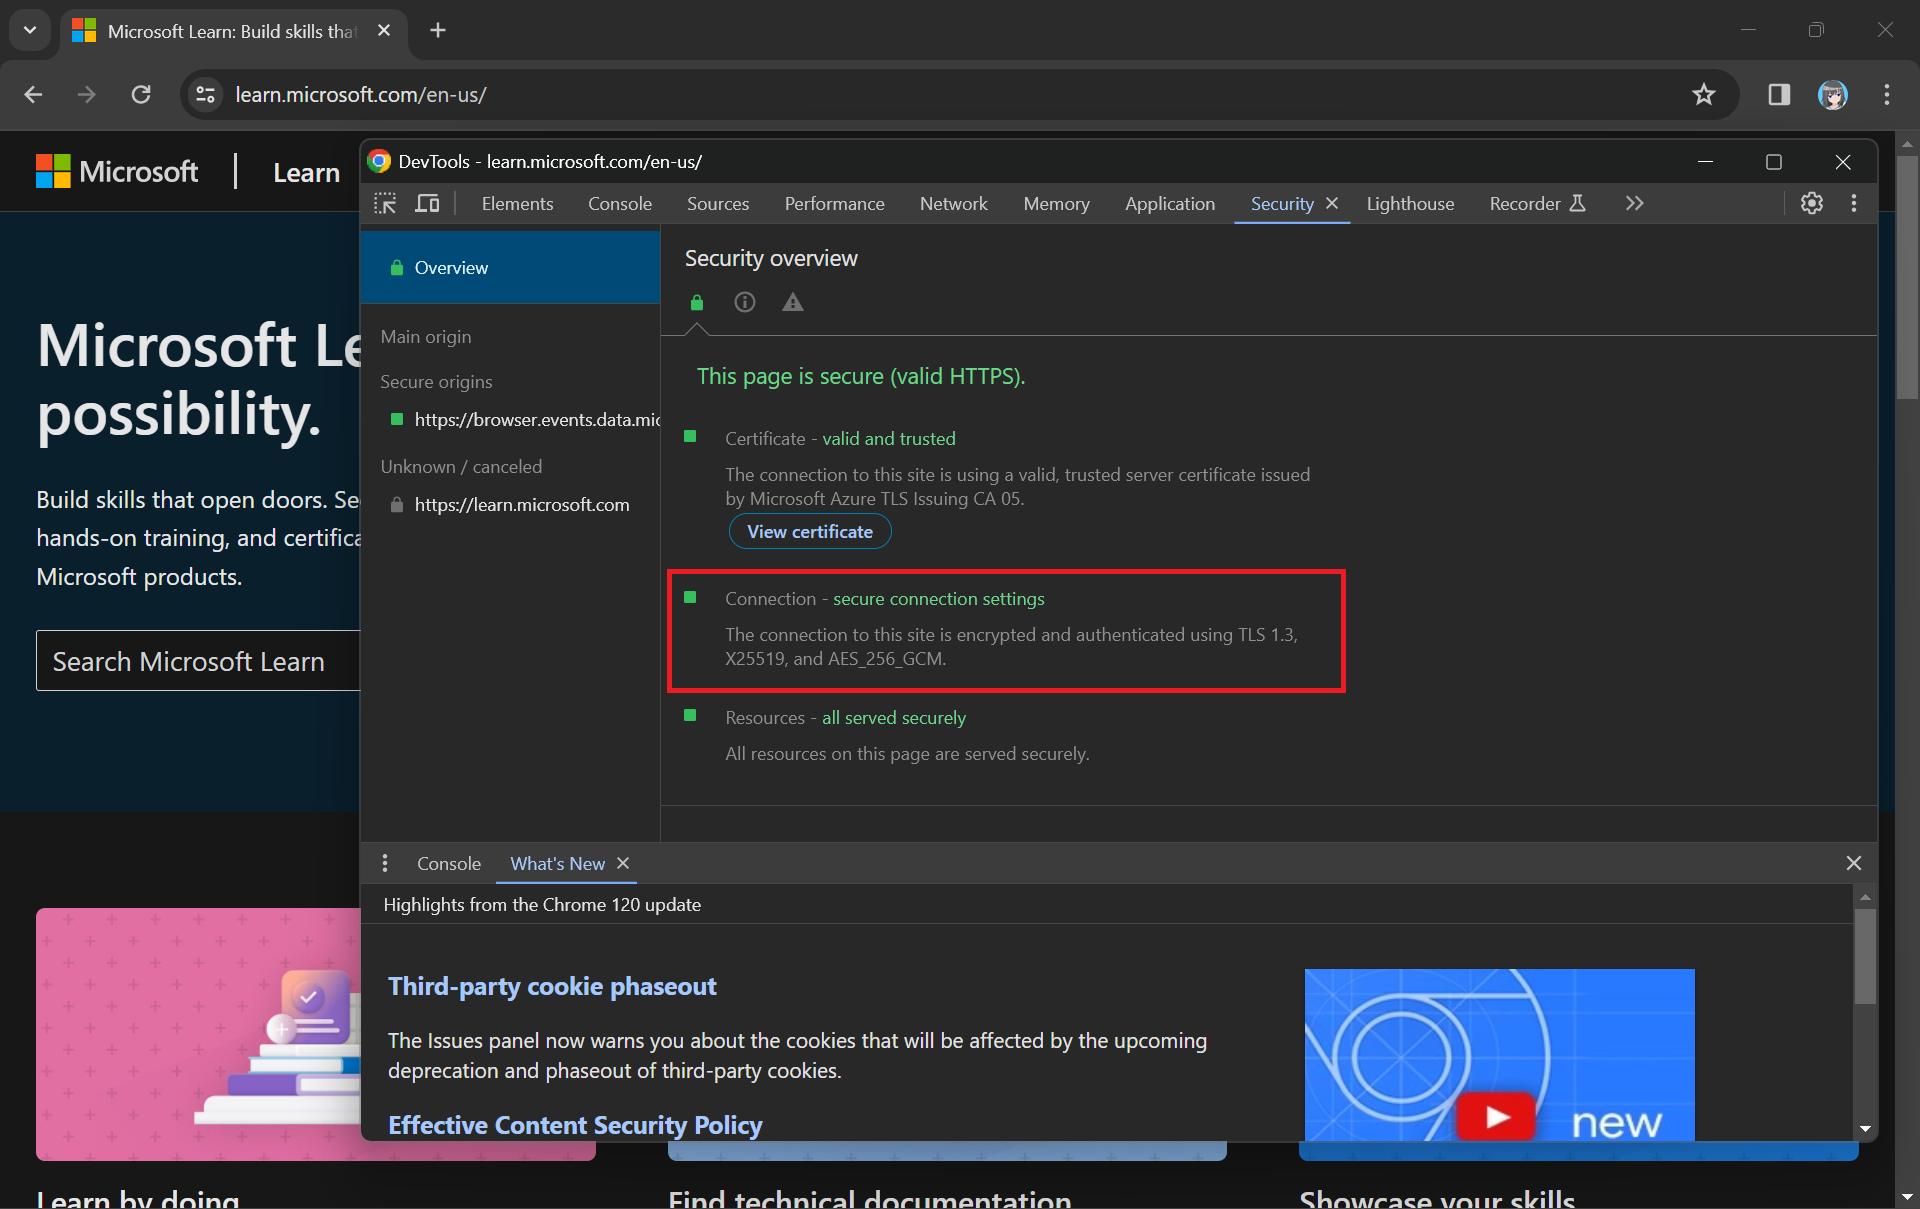
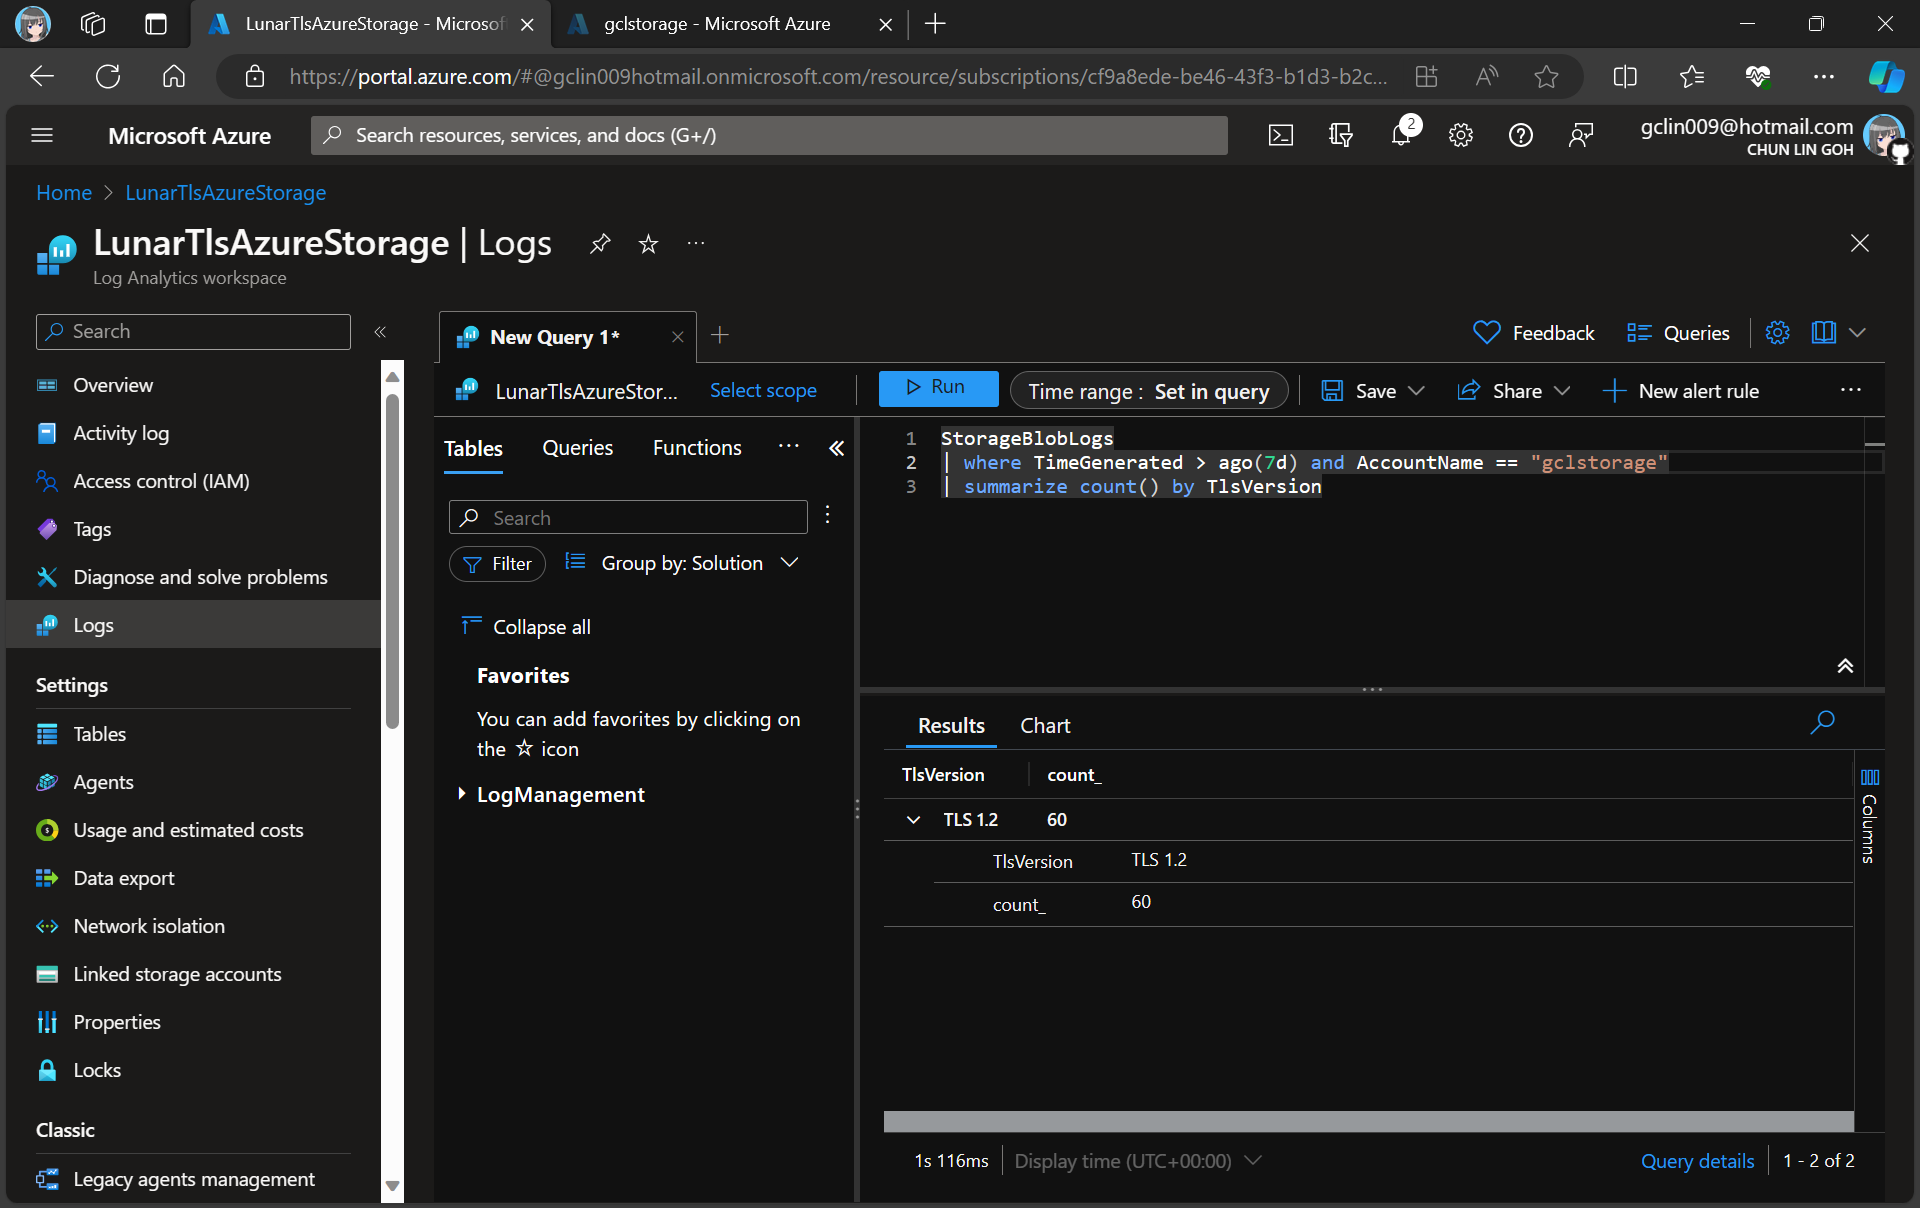
As demonstrated in the following screenshot, we use the query below to find out how many requests were made against our blob storage with different versions of TLS over the past seven day.
There are only TLS 1.2 requests for the “gclstorage” blob storage.
Verify with Telerik Fiddler
Fiddler is a popular web debugging proxy tool that allows us to monitor, inspect, and debug HTTP traffic between our machine and the Internet. Fiddler can thus be used to inspect and analyze both TLS and SSL requests.
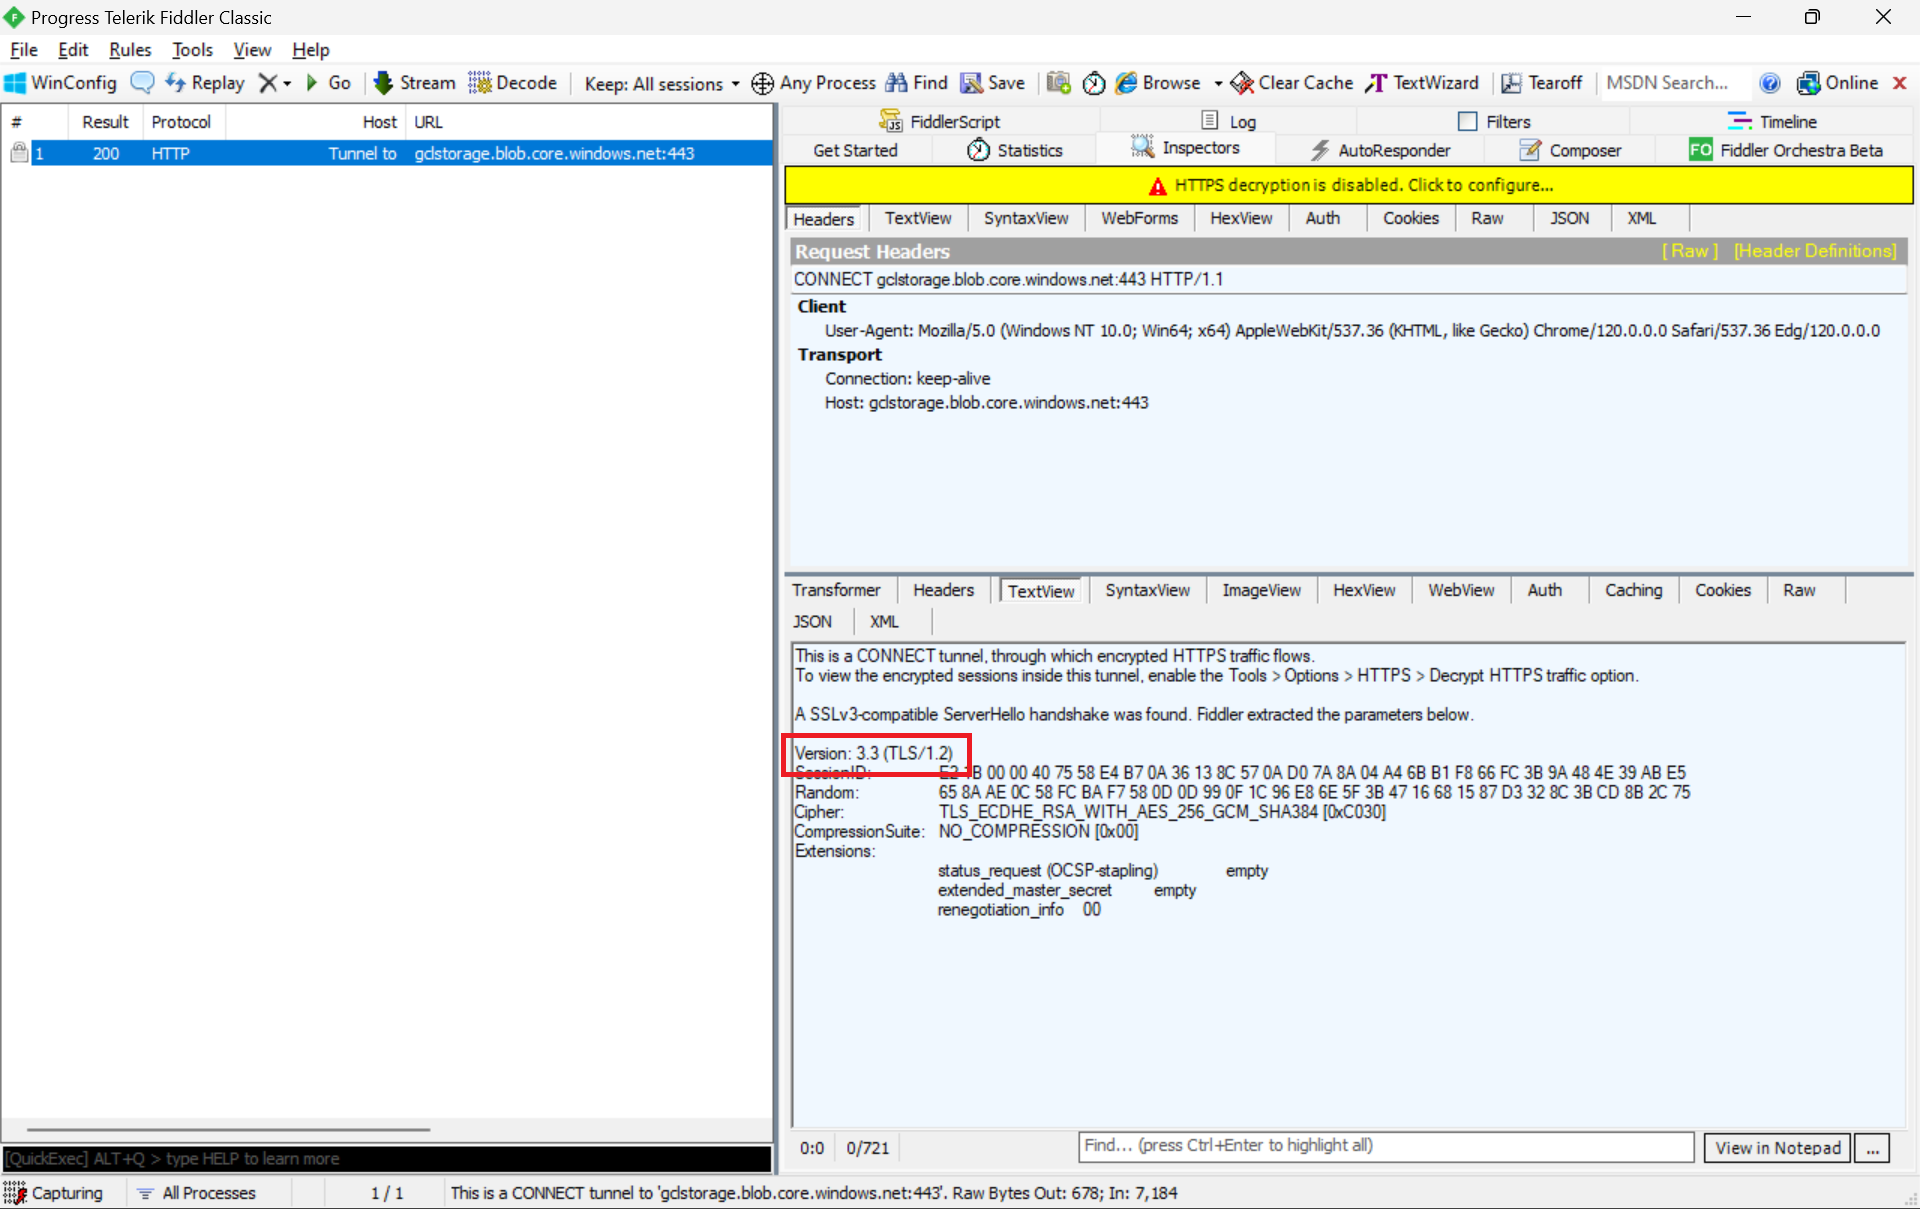
We can refer to the Fiddler trace to confirm that the correct version of TLS 1.2 was used to send the request to the blob storage “gclstorage”, as shown in the following screenshot.
TLS 1.2 is SSL 3.3, thus the version there states that it is version 3.3.
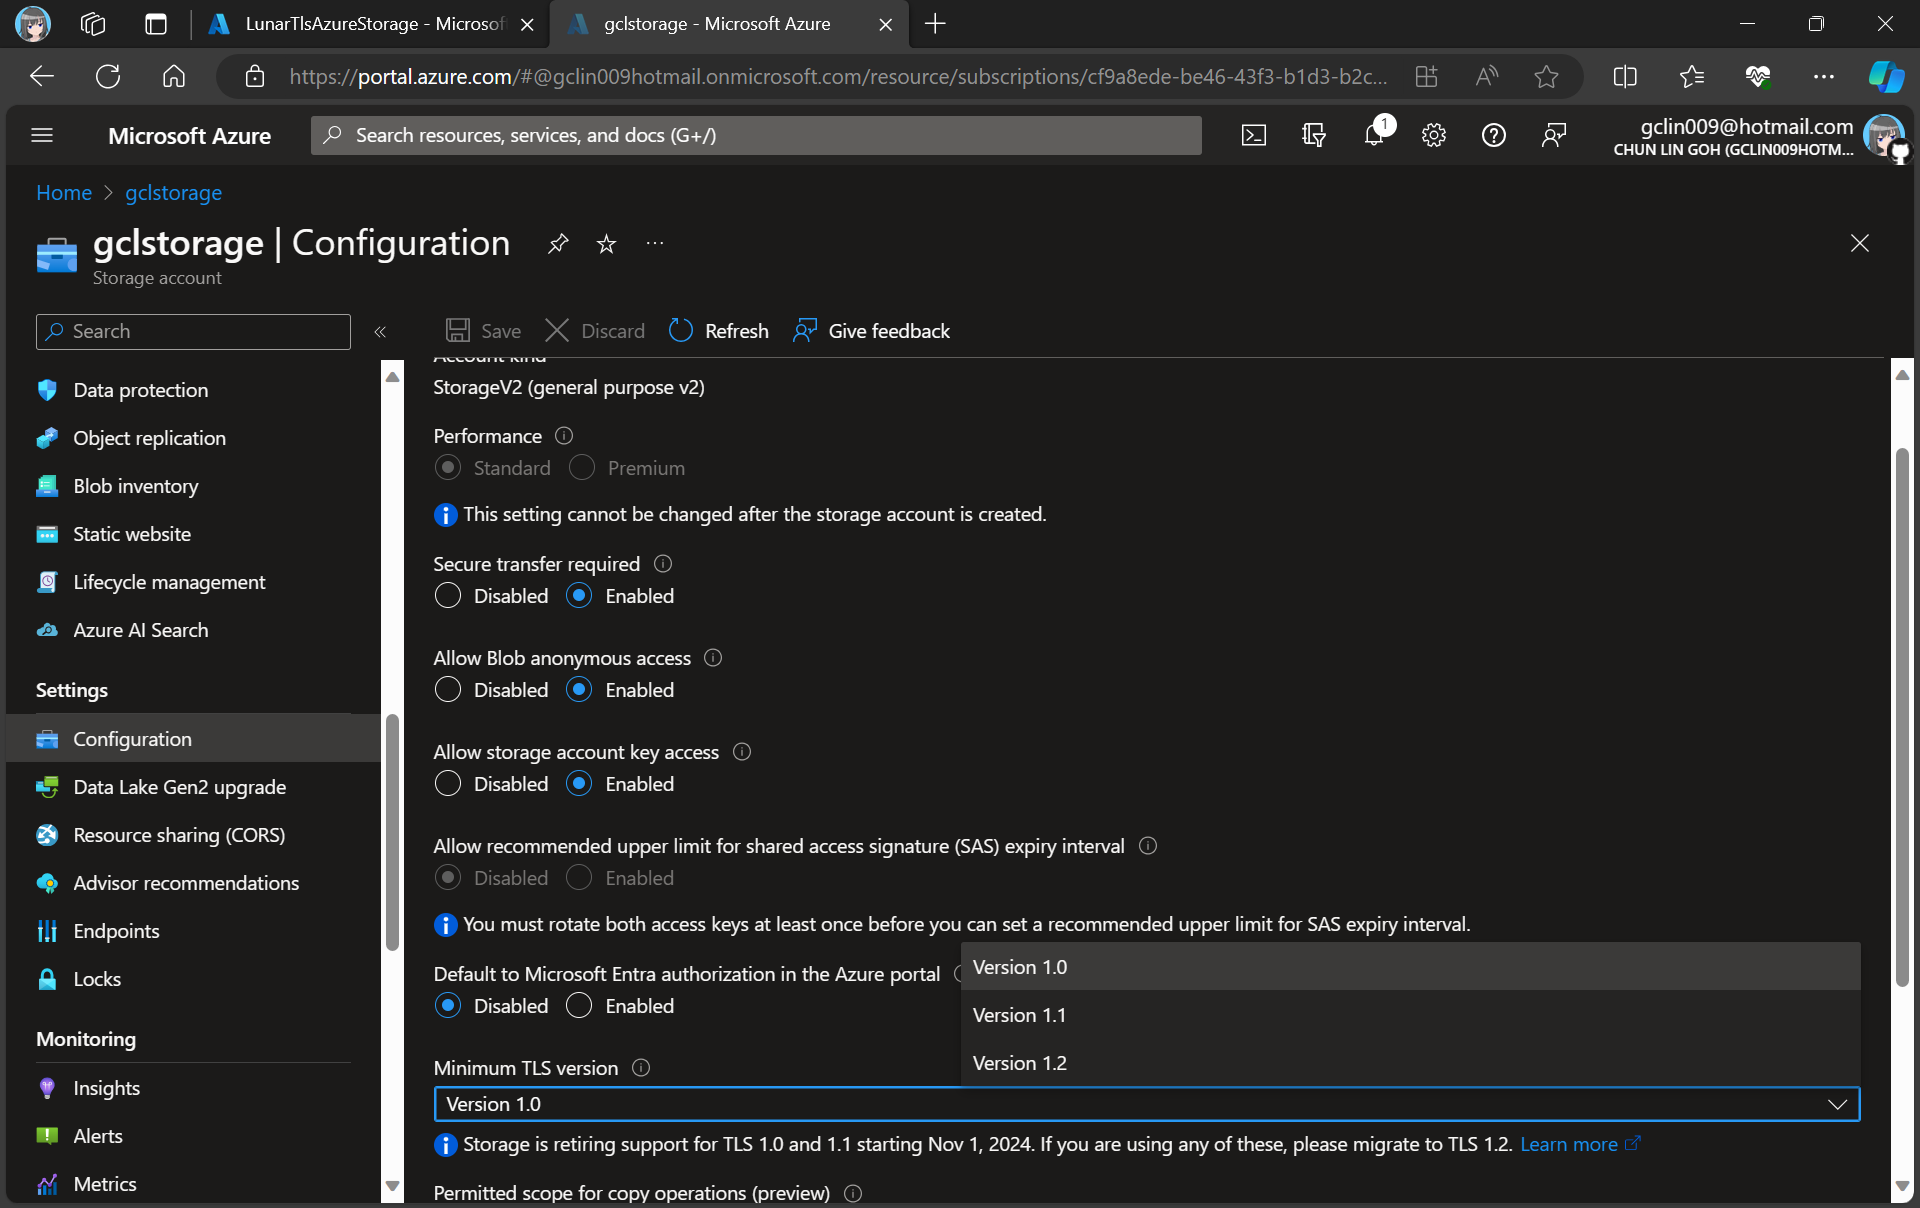
Enforce the Minimum Accepted TLS Version
Currently, the minimum TLS version accepted by storage account is set to TLS 1.0 by default before November 2014.
We at most can only set Version 1.2 for the minumum TLS version.
In advance of the deprecation date, we can enable Azure policy to enforce minimum TLS version to be TLS 1.2. Hence, we can now update the value to 1.2 so that we can reject all requests from clients that are sending data to our Azure Storage with an TLS 1.0 and 1.1.
Thus, if we are running our apps on the latest Windows servers, then the latest TLS should be automatically used by our apps without any configuration from our side.
In fact, according to the TLS best practices guide from Microsoft, we should not specify the TLS version. Instead, we shall configure our code to let the OS decide on the TLS version for us.
Wrap-Up
Enhancing the security stance for Windows users, as of September 2023, the default configuration of the operating system will deactivate TLS versions 1.0 and 1.1.
As developers, we should ensure that all apps and services running on Windows are using up-to-date versions that support TLS 1.2 or higher. Hence, prior to the enforcement of TLS updates, we must test our apps in a controlled environment to verify compatibility with TLS 1.2 or later.
While TLS 1.0 and 1.1 will be disabled by default, it is also good to confirm these settings and ensure they align with your security requirements.
By taking these proactive measures, we should be able to have a seamless transition to updated TLS versions, maintaining a secure computing environment while minimising any potential disruptions to applications or services.
Beginning with Windows 2000, Microsoft Windows operating systems have been shipped with a data protection interface known as DPAPI (Data Protection Application Programming Interface). DPAPI is a simple cryptographic API. It doesn’t store any persistent data for itself; instead, it simply receives plaintext and returns cyphertext.
In the code above, instead of storing key at the default location, which is %LOCALAPPDATA%, we store it on a network drive by specifying the path to the UNC Share.
The code above shows how we can store keys on a UNC share. If we head to the directory \server\shared\directory\, we will be seeing an XML file with content similar as what is shown below.
As we can see, the key <masterKey> itself is in an unencrypted form.
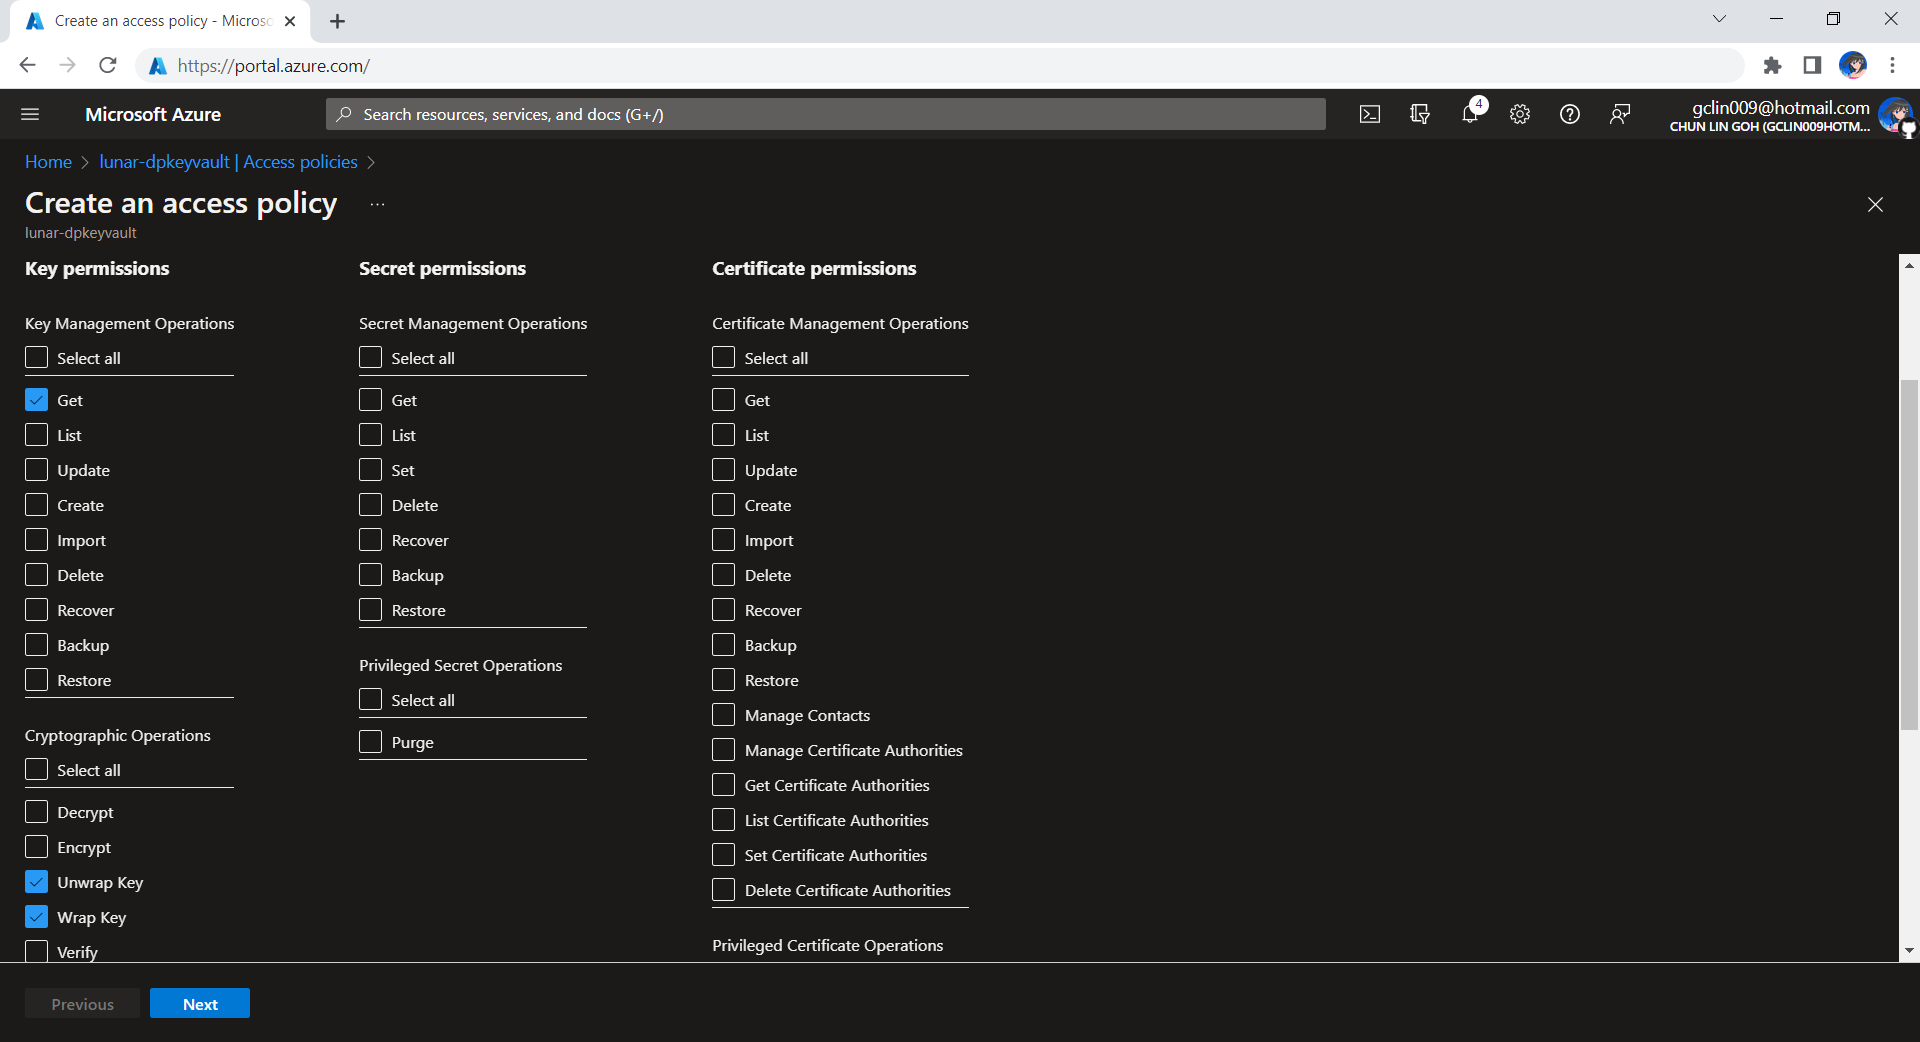
Hence, in order to protect the data protection key ring, we need to make sure that the storage location should be protected as well. Normally, we can use file system permissions to ensure only the identity under which our web app runs has access to the storage directory. Now with Azure, we can also protect our keys using Azure Key Vault, a cloud service for securely storing and accessing secrets.
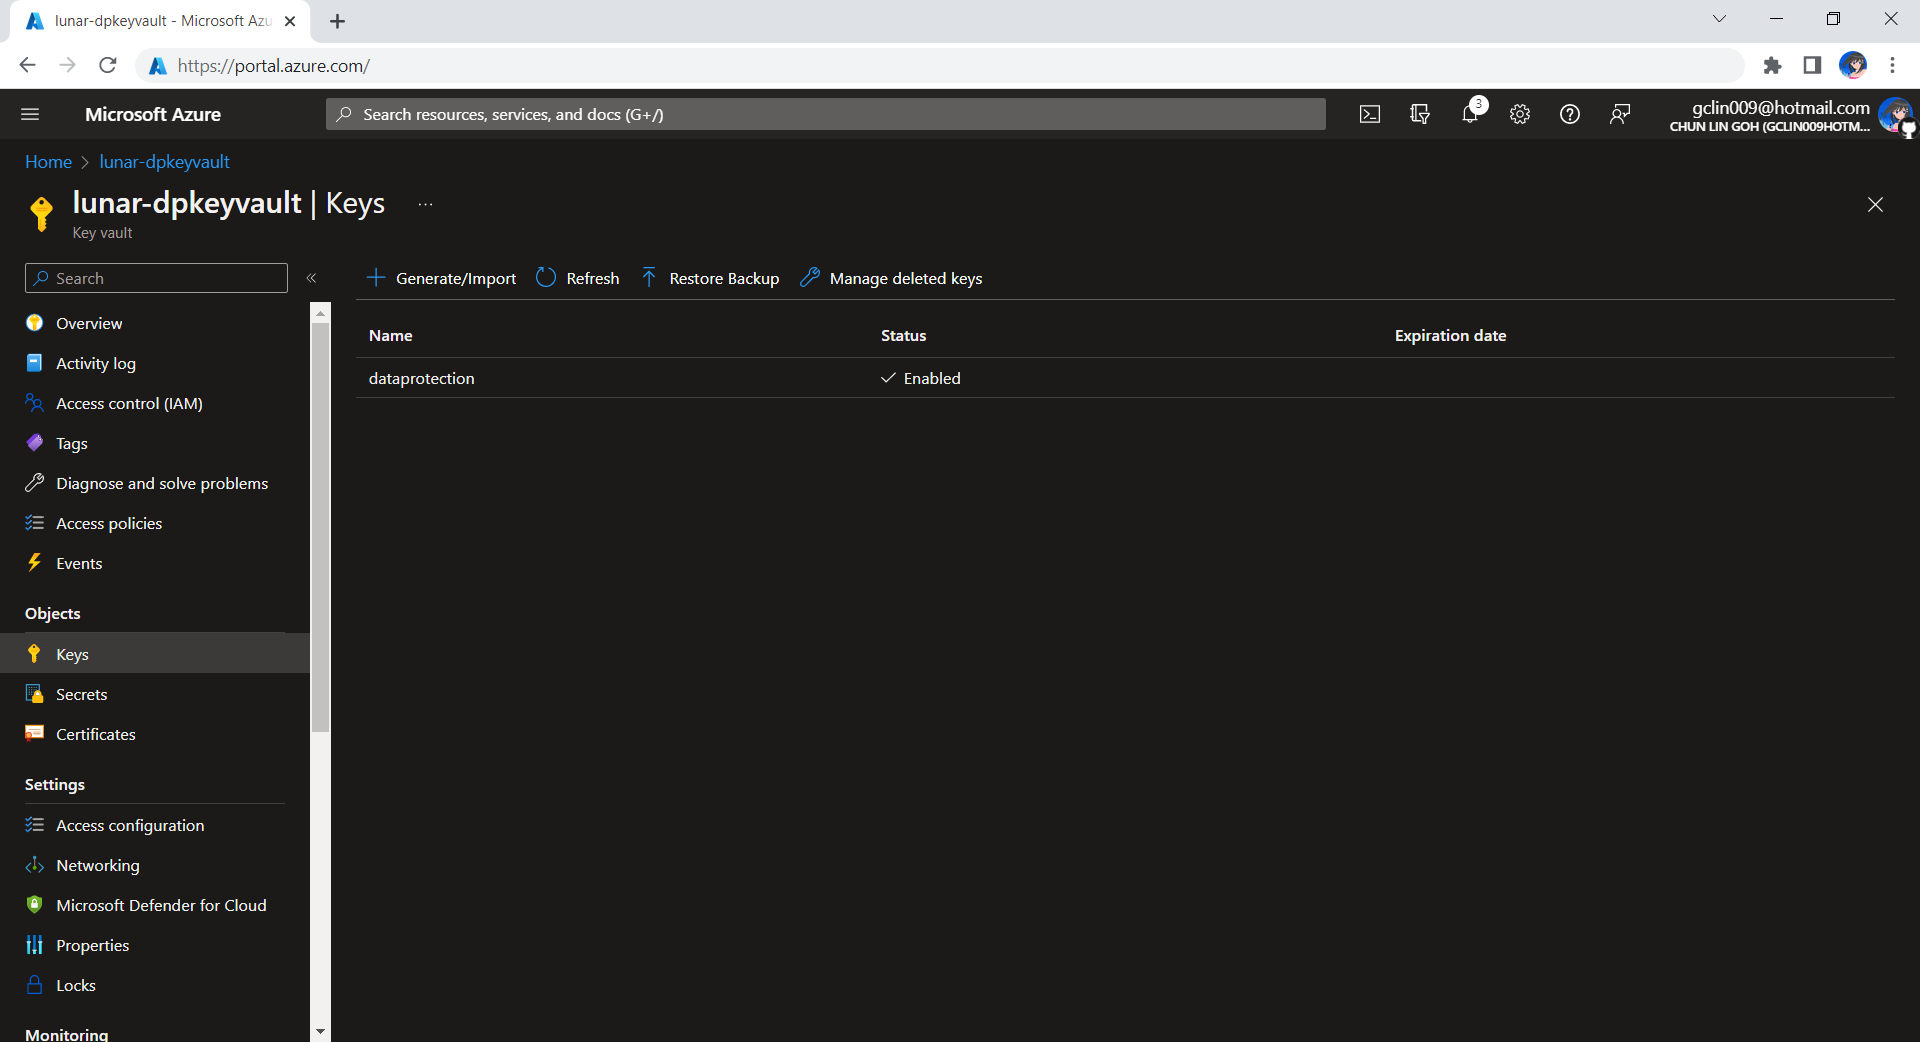
The approach we will take is to first create an Azure Key Vault called lunar-dpkeyvault with a key named dataprotection, as shown in the screenshot below.
Created a key called dataprotection on Azure Key Vault.
The credential can be a ClientSecretCredential object or DefaultAzureCredential object.
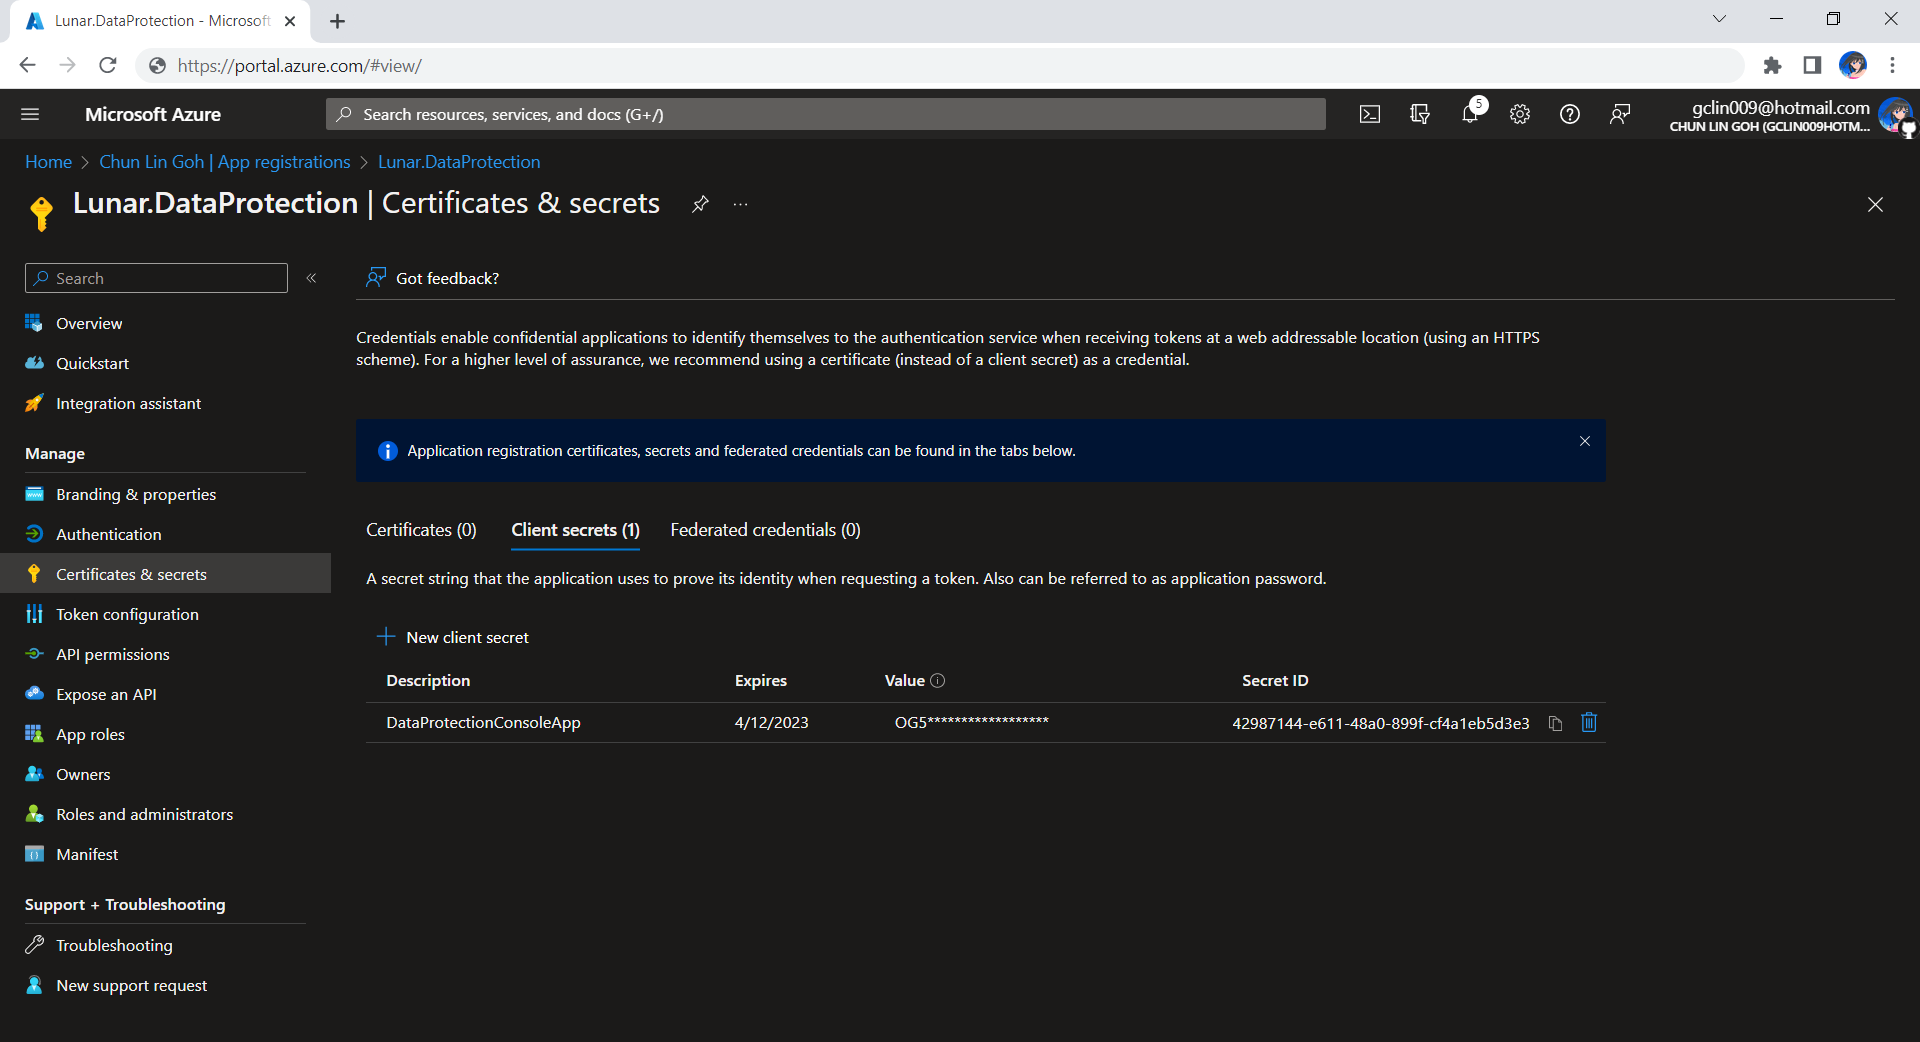
Tenant Id, Client Id, and Client Secret can be retrieved from the App Registrations page of the app having the access to the Azure Key Vault above. We can use these three values to create a ClientSecretCredential object.
Now, if we check again the newly generated XML file, we shall see there won’t be <masterKey> element anymore. Instead, it is replaced with the content shown below.
<encryptedKey xmlns="">
    <!-- This key is encrypted with Azure Key Vault. -->
    <kid>https://lunar-dpkeyvault.vault.azure.net/keys/dataprotection/...</kid>
    <key>HSCJsnAtAmf...RHXeeA==</key>
    <iv>...</iv>
    <value>...</value>
</encryptedKey>
Key Lifetime
We shall remember that, by default, the generated key will have a 90-day lifetime. This means that the app will automatically generate a new active key when the current active key expires. However, the retired keys can still be used to decrypt any data protected with them.
To create a protector, we need to specify Purpose Strings. A Purpose String provides isolation between consumers so that a protector cannot decrypt cyphertext encrypted by another protector with different purpose.
Previously, we have seen how we could containerise our ASP .NET Core 6.0 web app and manage it with docker commands. However, docker commands are mainly for only one image/container. If our solution has multiple containers, we need to use docker-compose to manage them instead.
docker-compose makes things easier because it encompasses all our parameters and workflow into a configuration file in YAML. In this article, I will share my first experience with docker-compose to build mutli-container environments as well as to manage them with simple docker-compose commands.
To help my learning, I will create a simple online message board where people can login with their GitHub account and post a message on the app.
We will start with a solution in Visual Studio with two projects:
WebFrontEnd: A public-facing web application with Razor pages;
MessageWebAPI: A web API project.
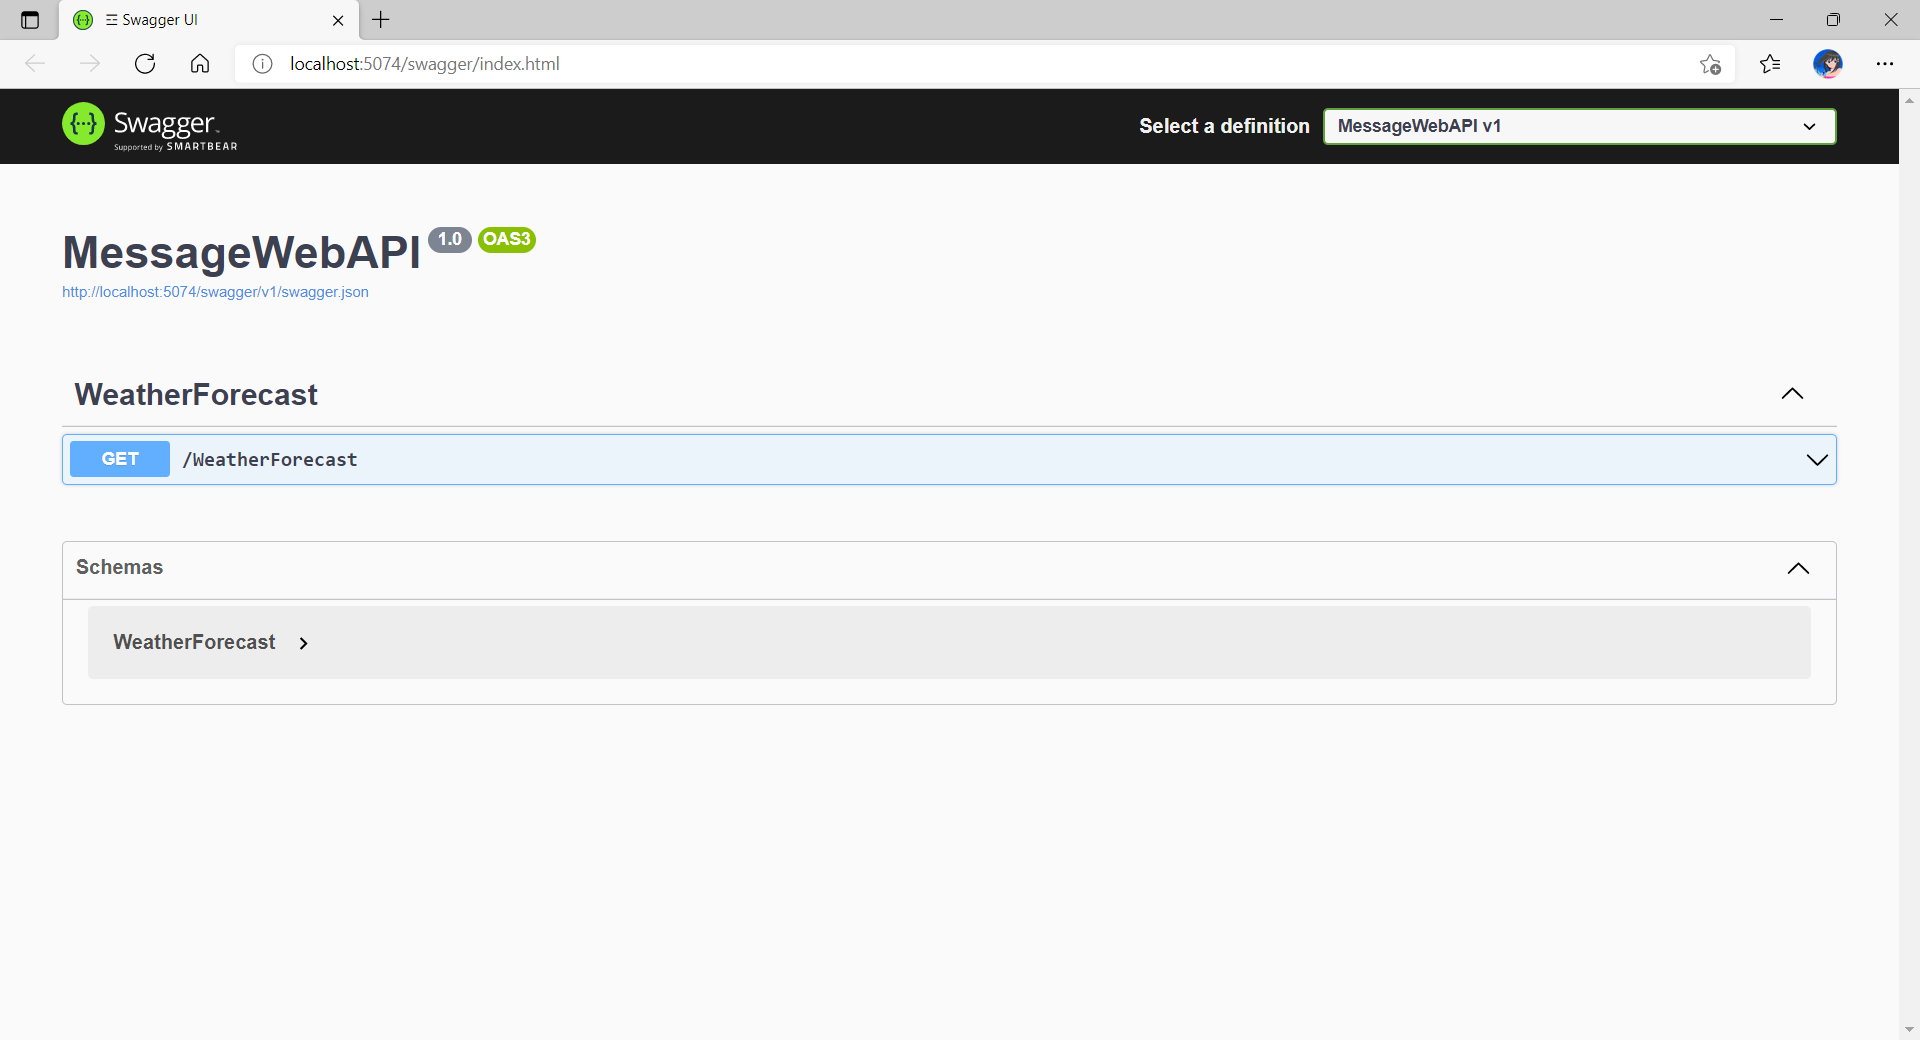
By default, the web API project will have a simple GET method available, as shown in the Swagger UI below.
Default web API project created in Visual Studio will have this WeatherForecast API method available by default.
Now, we can make use of this method as a starting point. Let’s have the our client, WebFrontEnd, to call the API and output the result returned by the API to the web page.
var request = new System.Net.Http.HttpRequestMessage();
request.RequestUri = new Uri("http://messagewebapi/WeatherForecast");

var response = await client.SendAsync(request);

string output = await response.Content.ReadAsStringAsync();
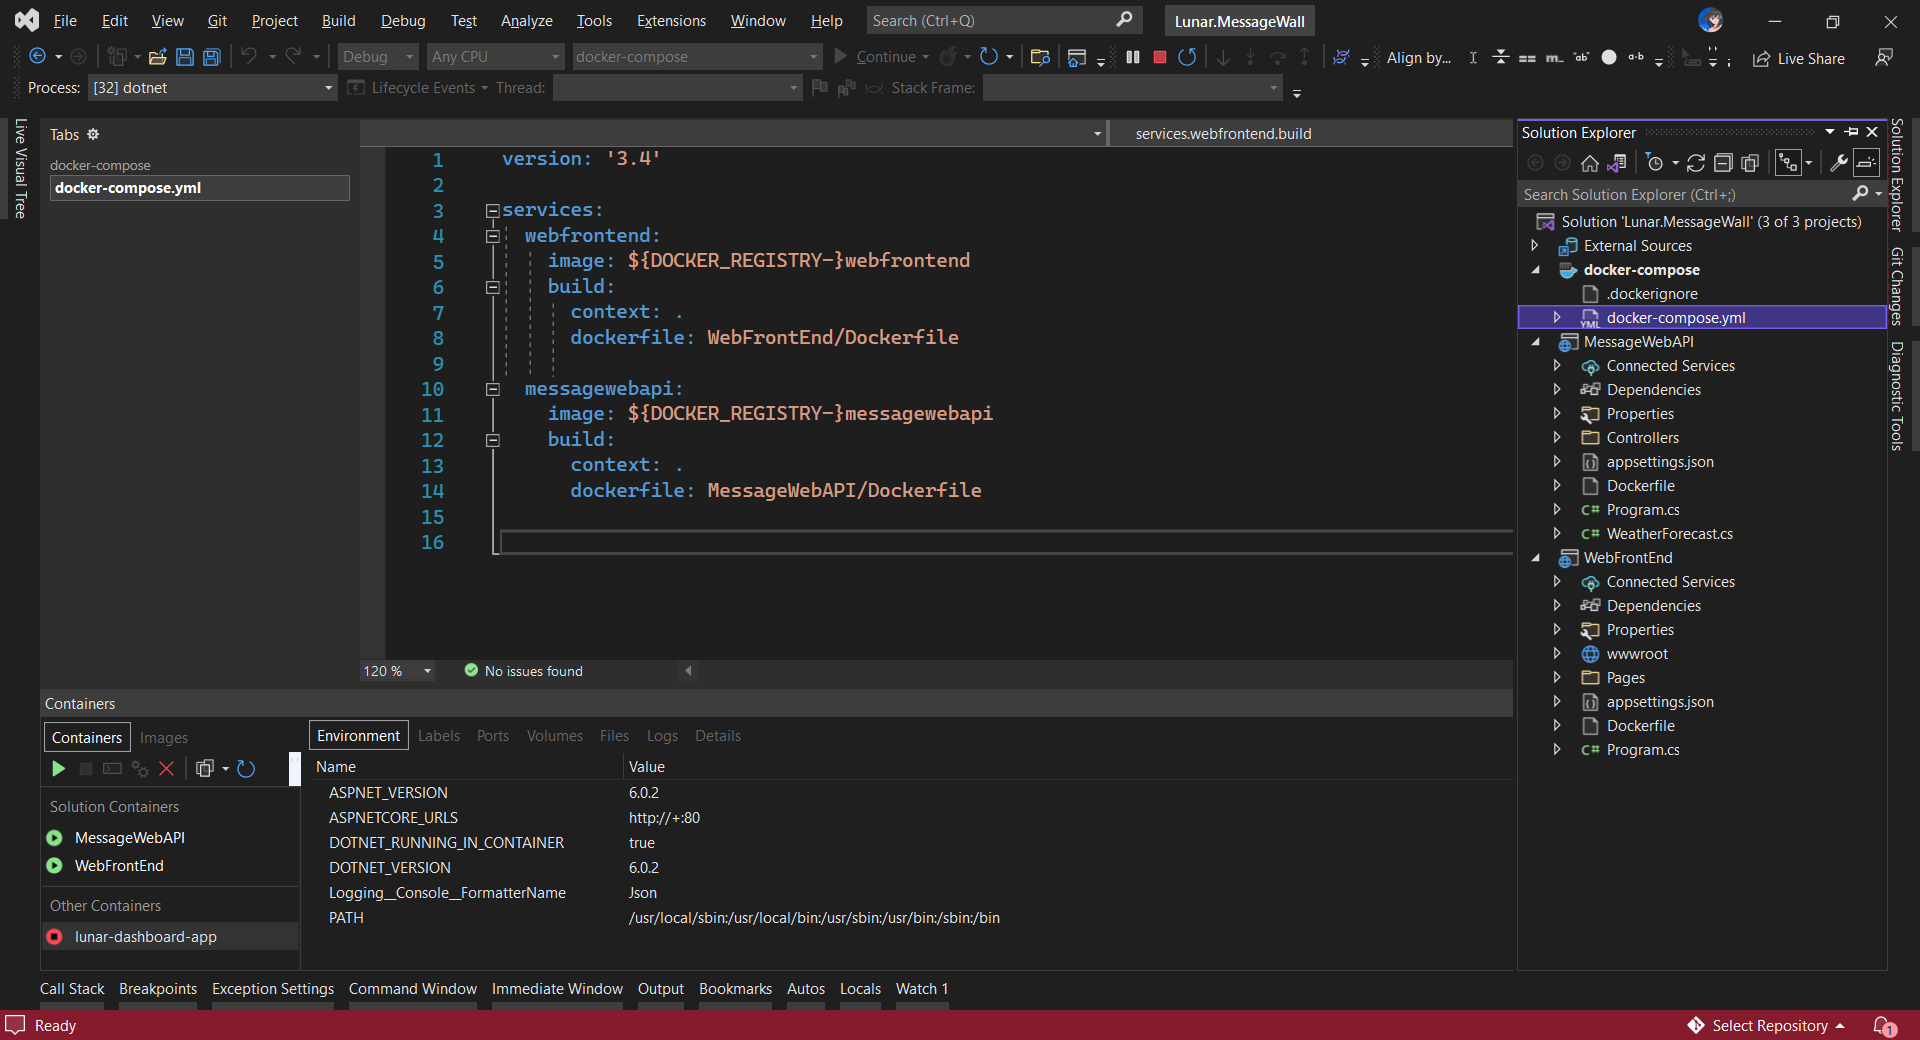
In both projects, we will add Container Orchestrator Support with Linux as the target OS. Once we have the docker-compose YAML file ready, we can directly run our docker compose application by simply pressing F5 in Visual Studio.
The docker-compose YAML file for our solution.
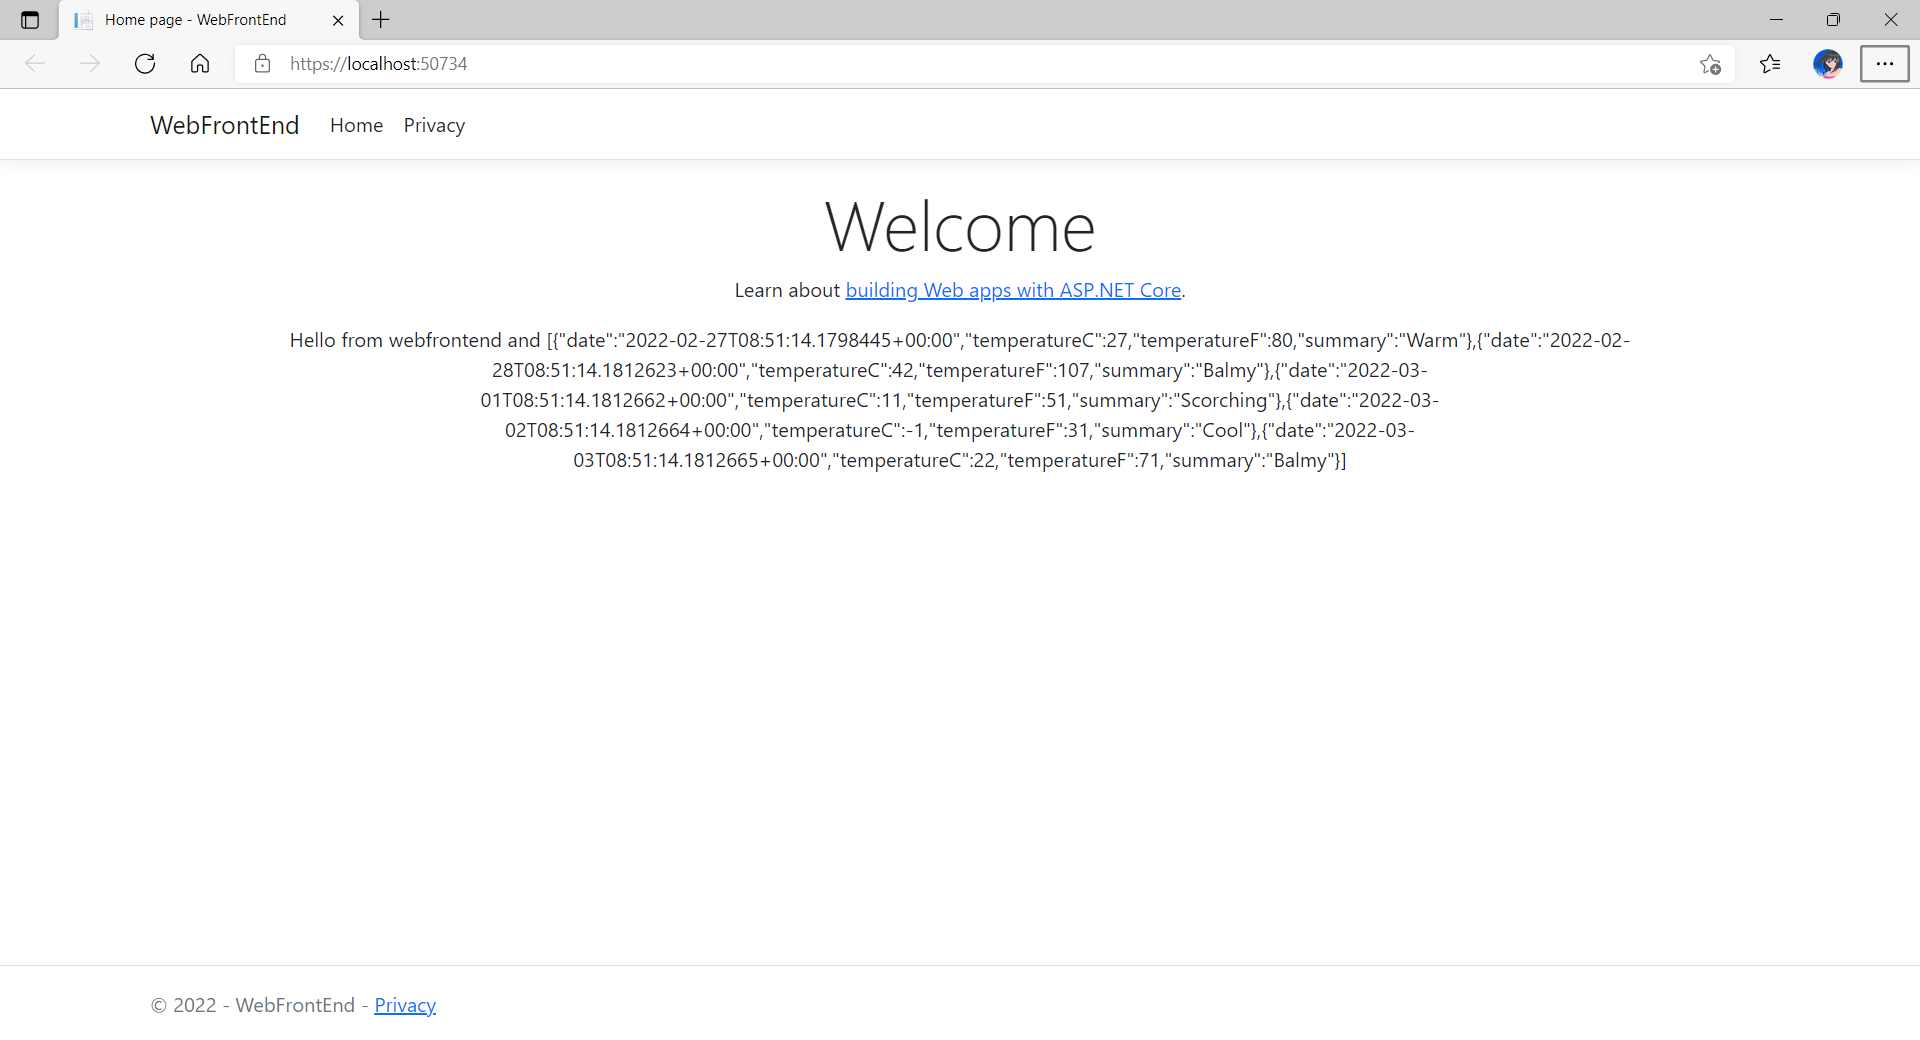
Now, we shall be able to see the website output some random weather data returned by the web API.
Congratulations, we’re running a docker compose application.
Configure Authentication in Web App
Our next step is to allow users to login to our web app first before they can post a message on the app.
It’s usually a good idea not to build our own identity management module because we need to deal with a lot more than just building a form to allow users to create an account and type their credentials. One example will be managing and protecting our user’s personal data and passwords. Instead, we should rely on Identity-as-a-Service solutions such as Azure Active Directory B2C.
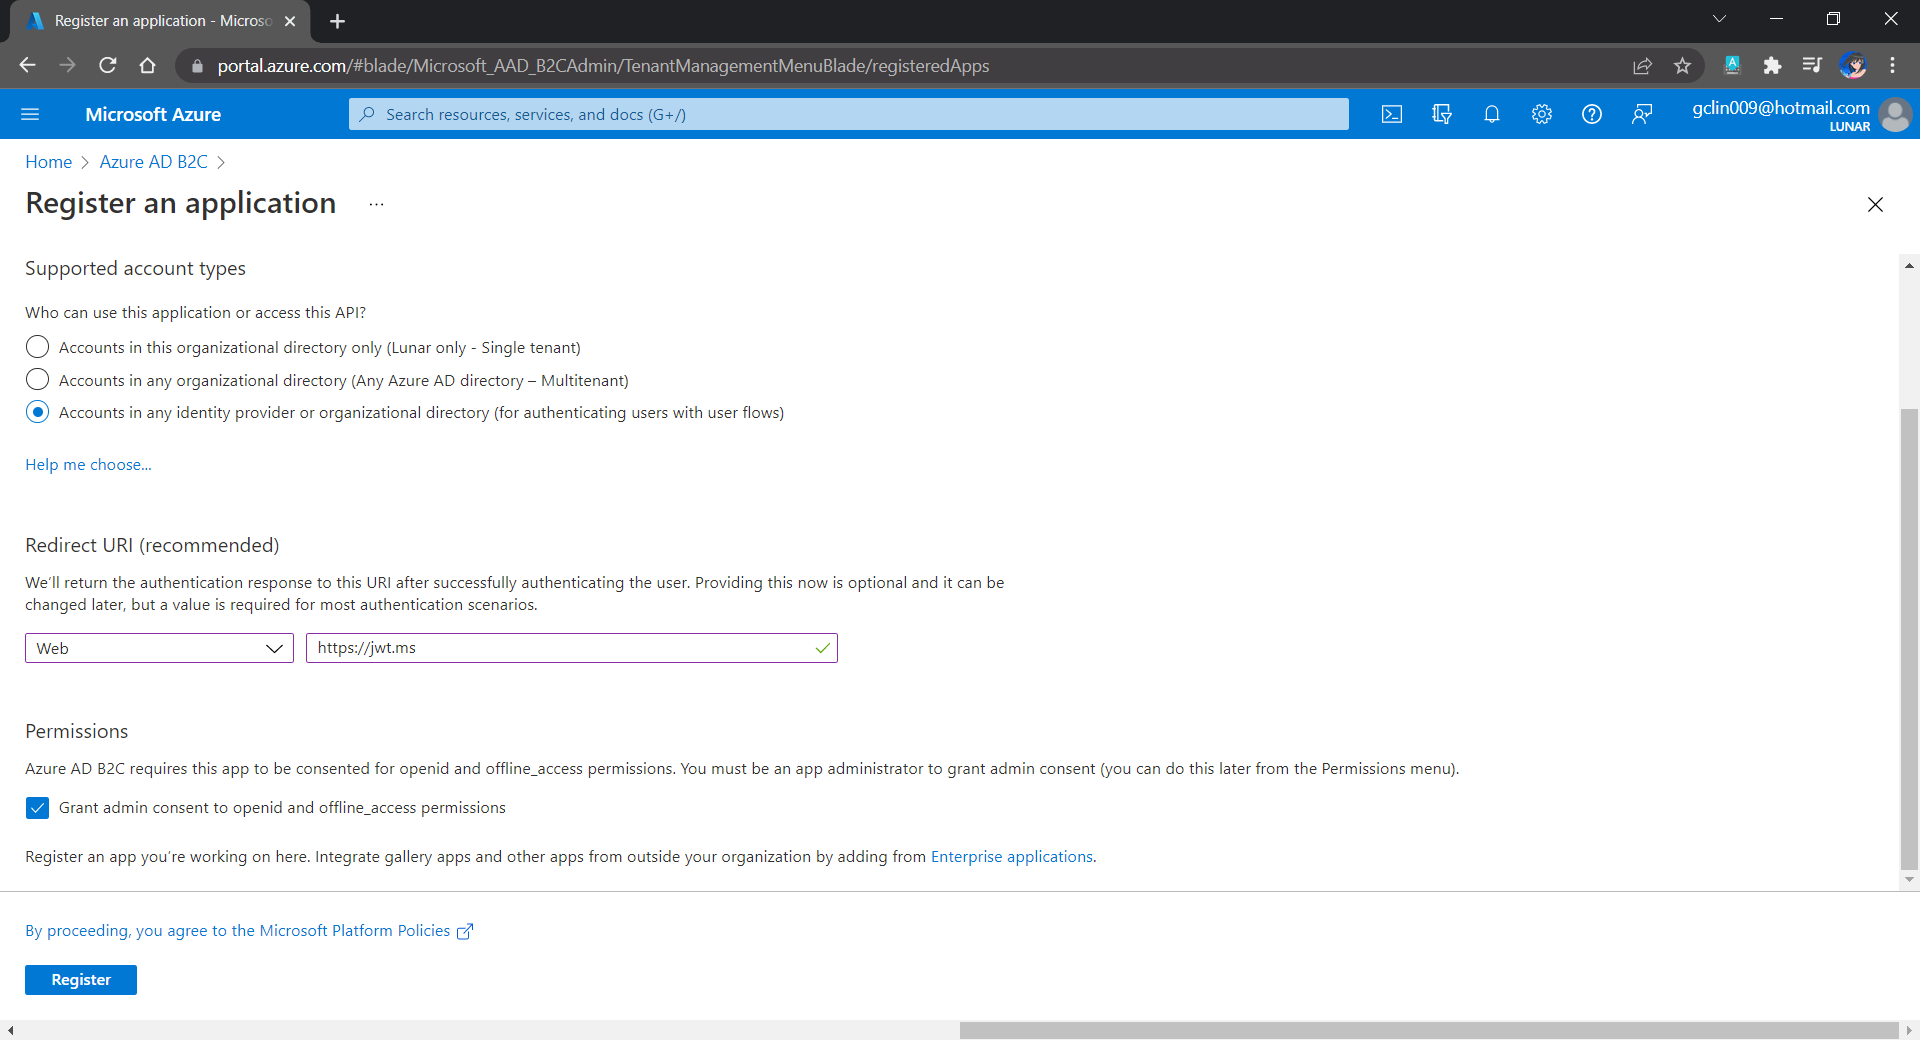
Firstly, we will register our web app in our Azure AD B2C tenant.
Normally for first-timers, we will need to create a Azure AD B2C tenant first. However, there may be an error message saying that our subscription is not registered to use namespace ‘Microsoft.AzureActiveDirectory’. If you encounter this issue, you can refer to Adam Storr’s article on how to solve this with Azure CLI.
Once we have our Azure AD B2C tenant ready (which is Lunar in my example here), we can proceed to register our web app, as shown below. For testing purposes, we set the Redirect URI to https://jwt.ms, a Microsoft-owned web application that displays the decoded contents of a token. We will update this Redirect URL in the next section below when we link our web app with Azure AD B2C.
Registering a new app “Lunar Message Wall” under the Lunar Tenant.
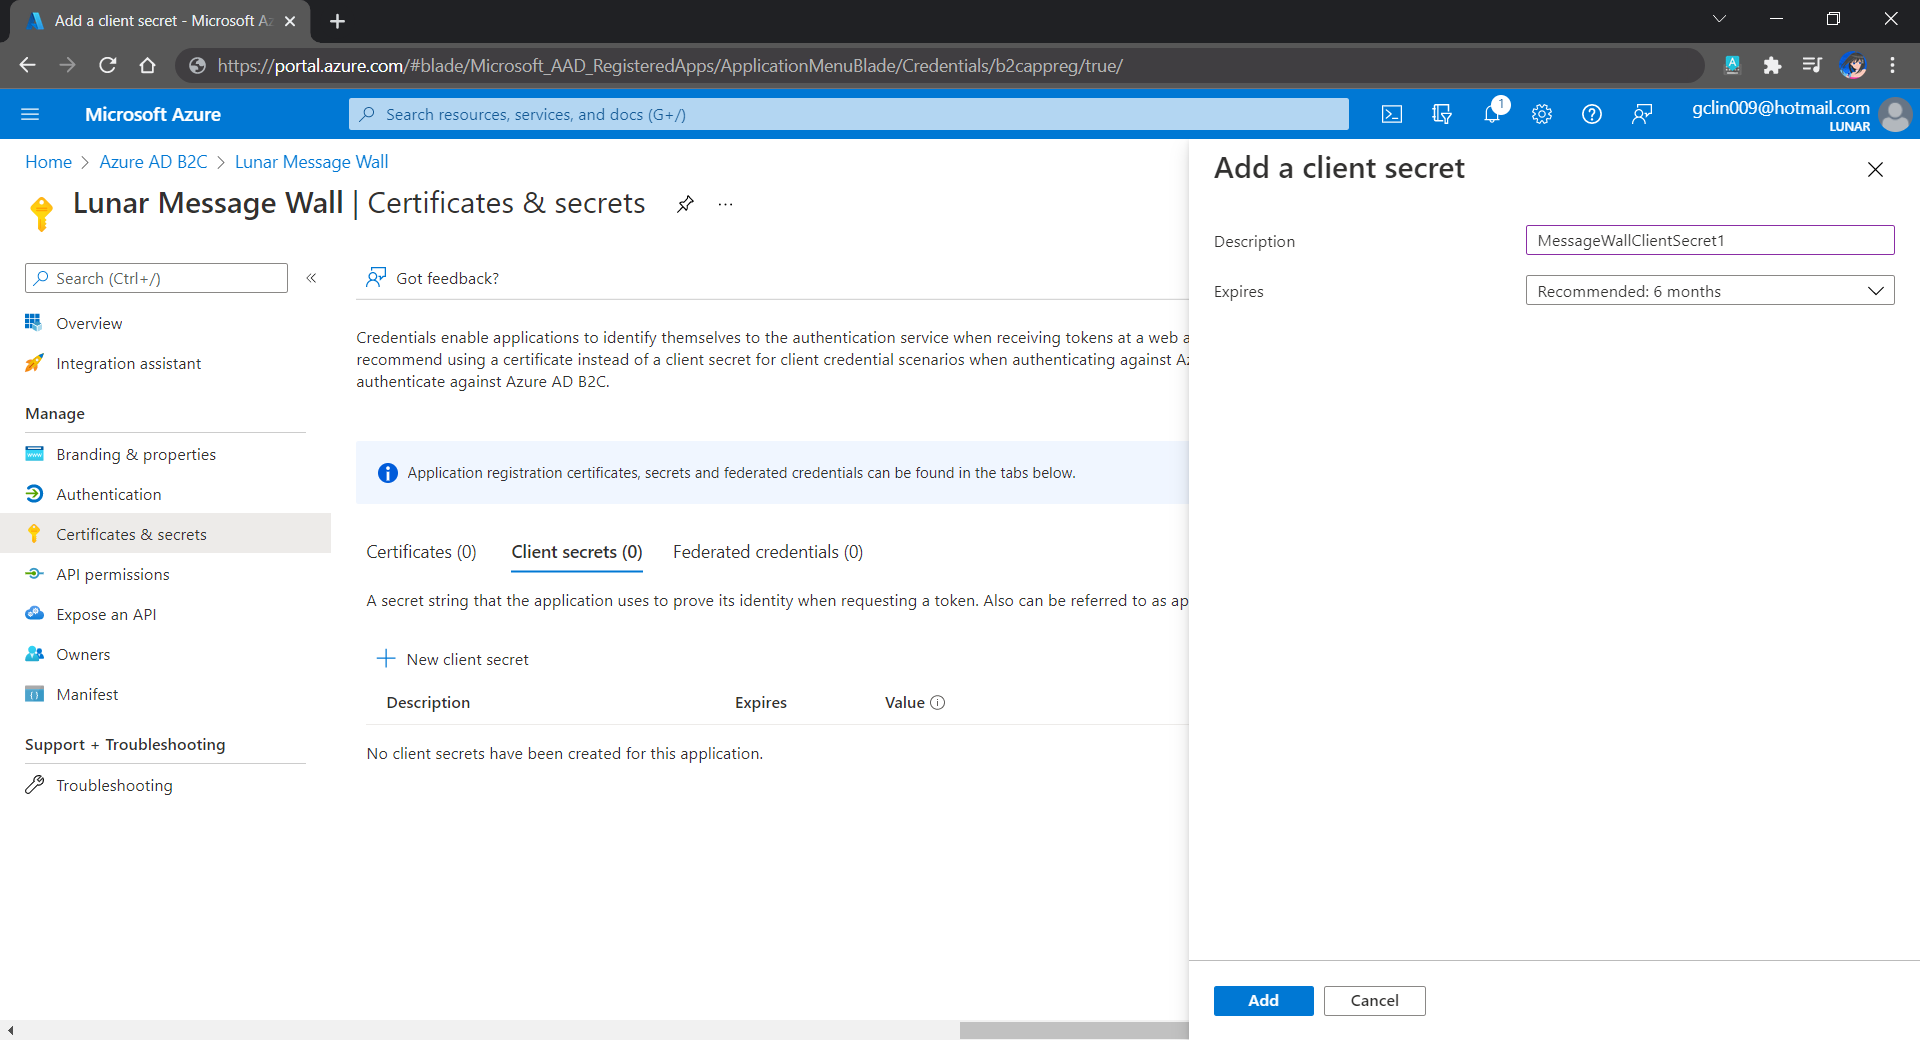
Secondly, once our web app is registered, we need to create a client secret, as shown below, for later use.
Secrets enable our web app to identify itself to the authentication service when receiving tokens. In addition, please take note that although certificate is recommended over client secret, currently certificates cannot be used to authenticate against Azure AD B2C.
Adding a new client secret which will expire after 6 months.
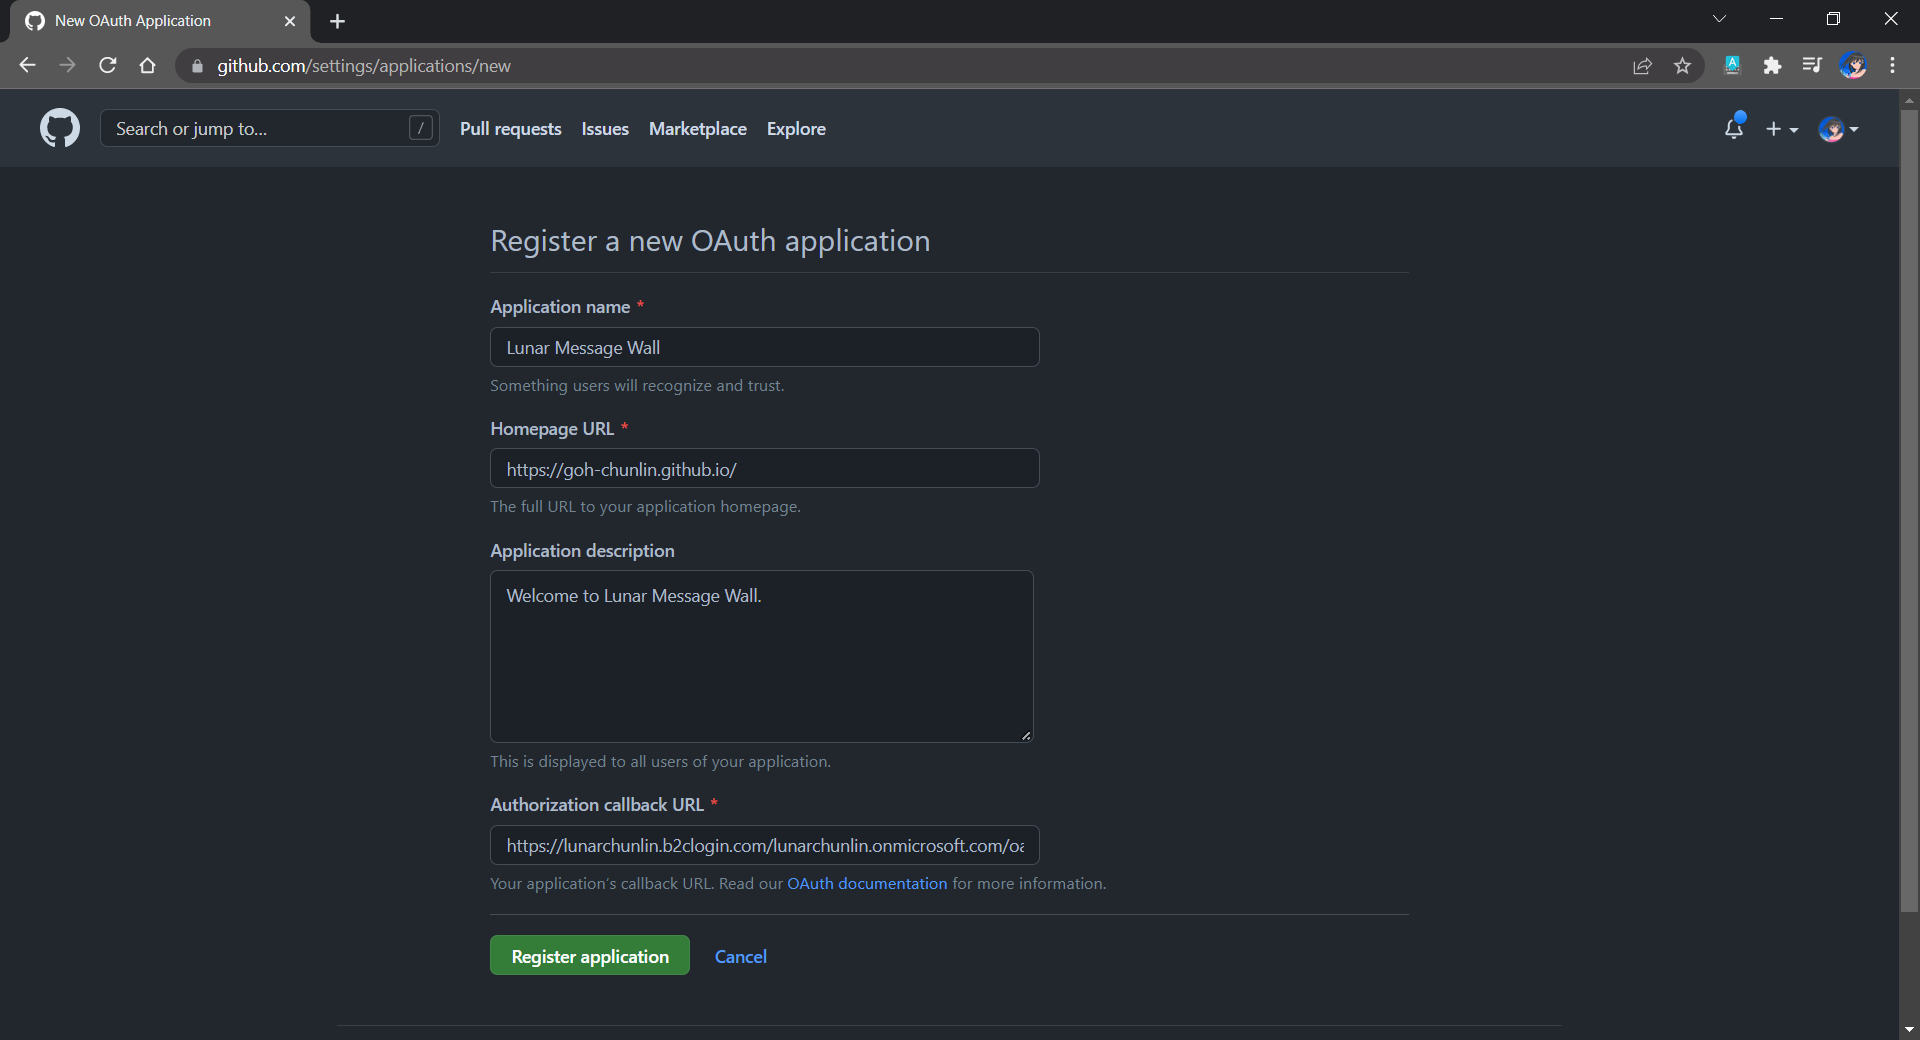
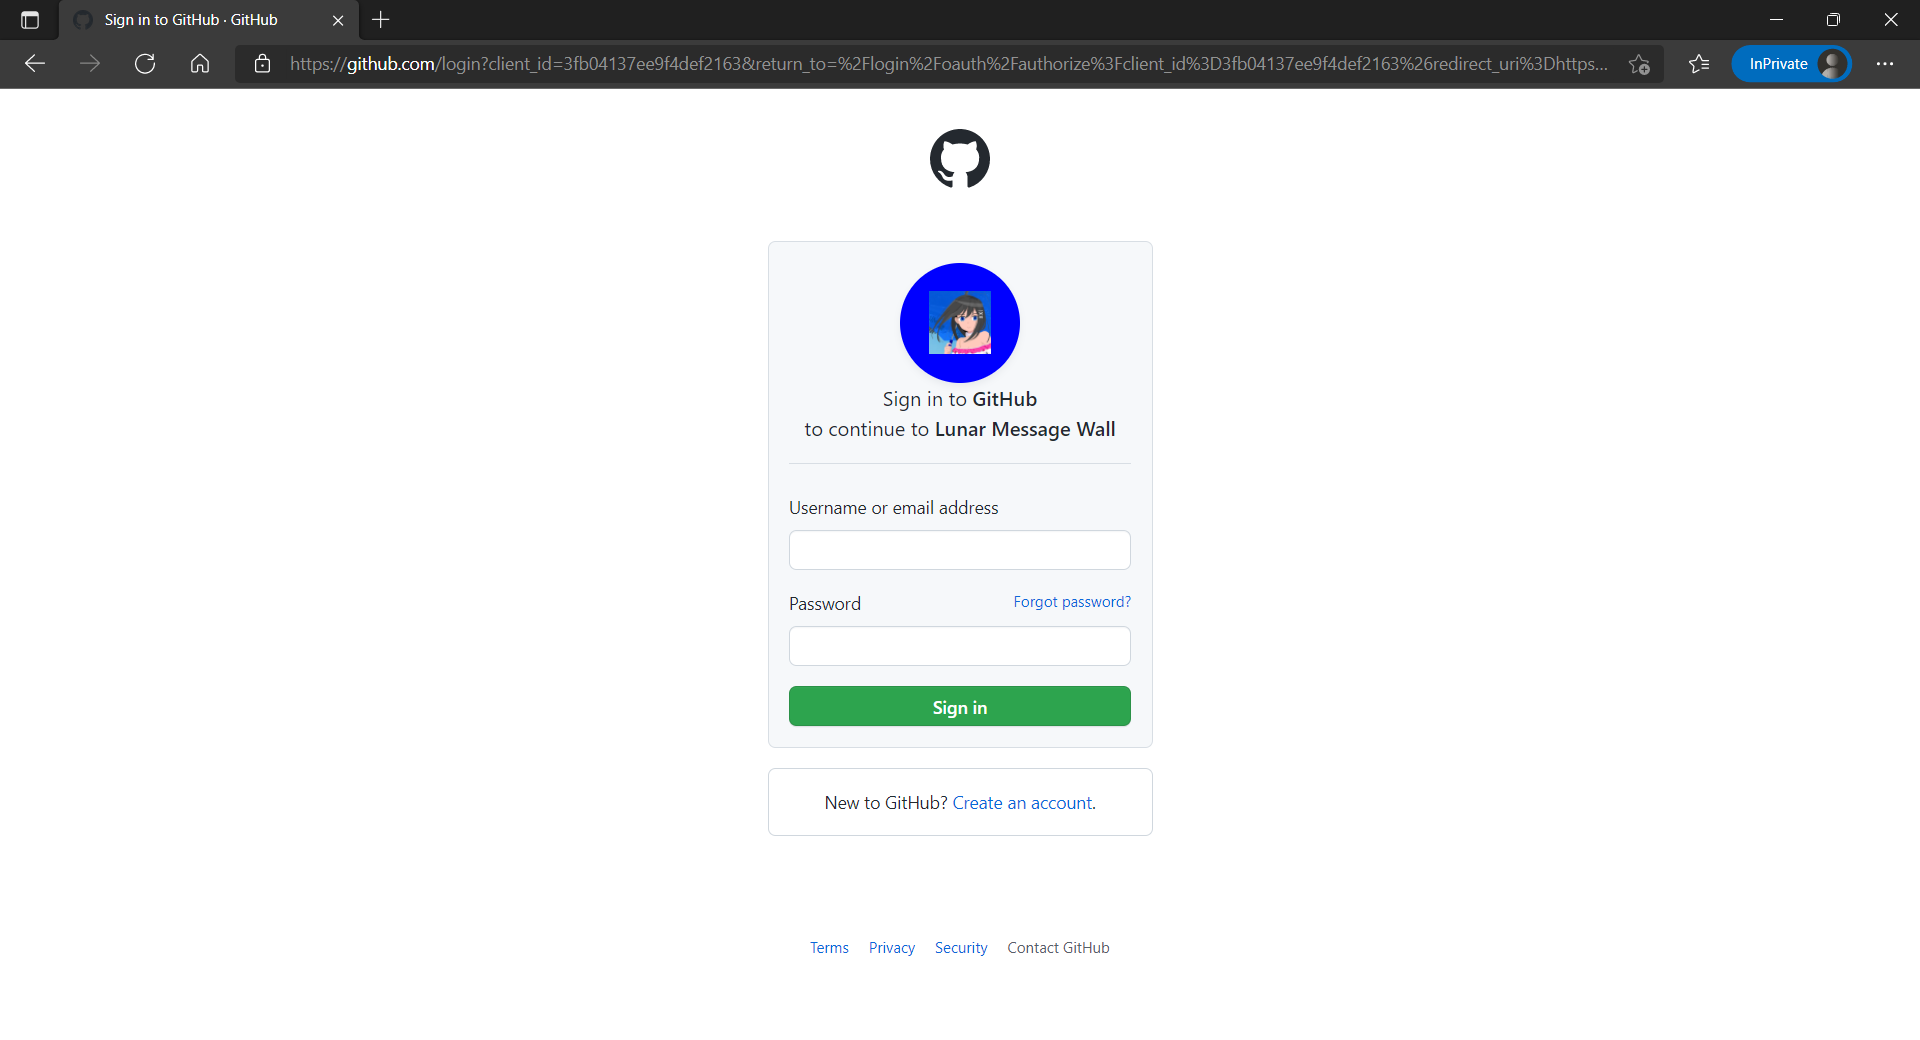
Thirdly, since we want to allow user authentication with GitHub, we need to create a GitHub OAuth app first.
The Homepage URL here is a temporary dummy data.
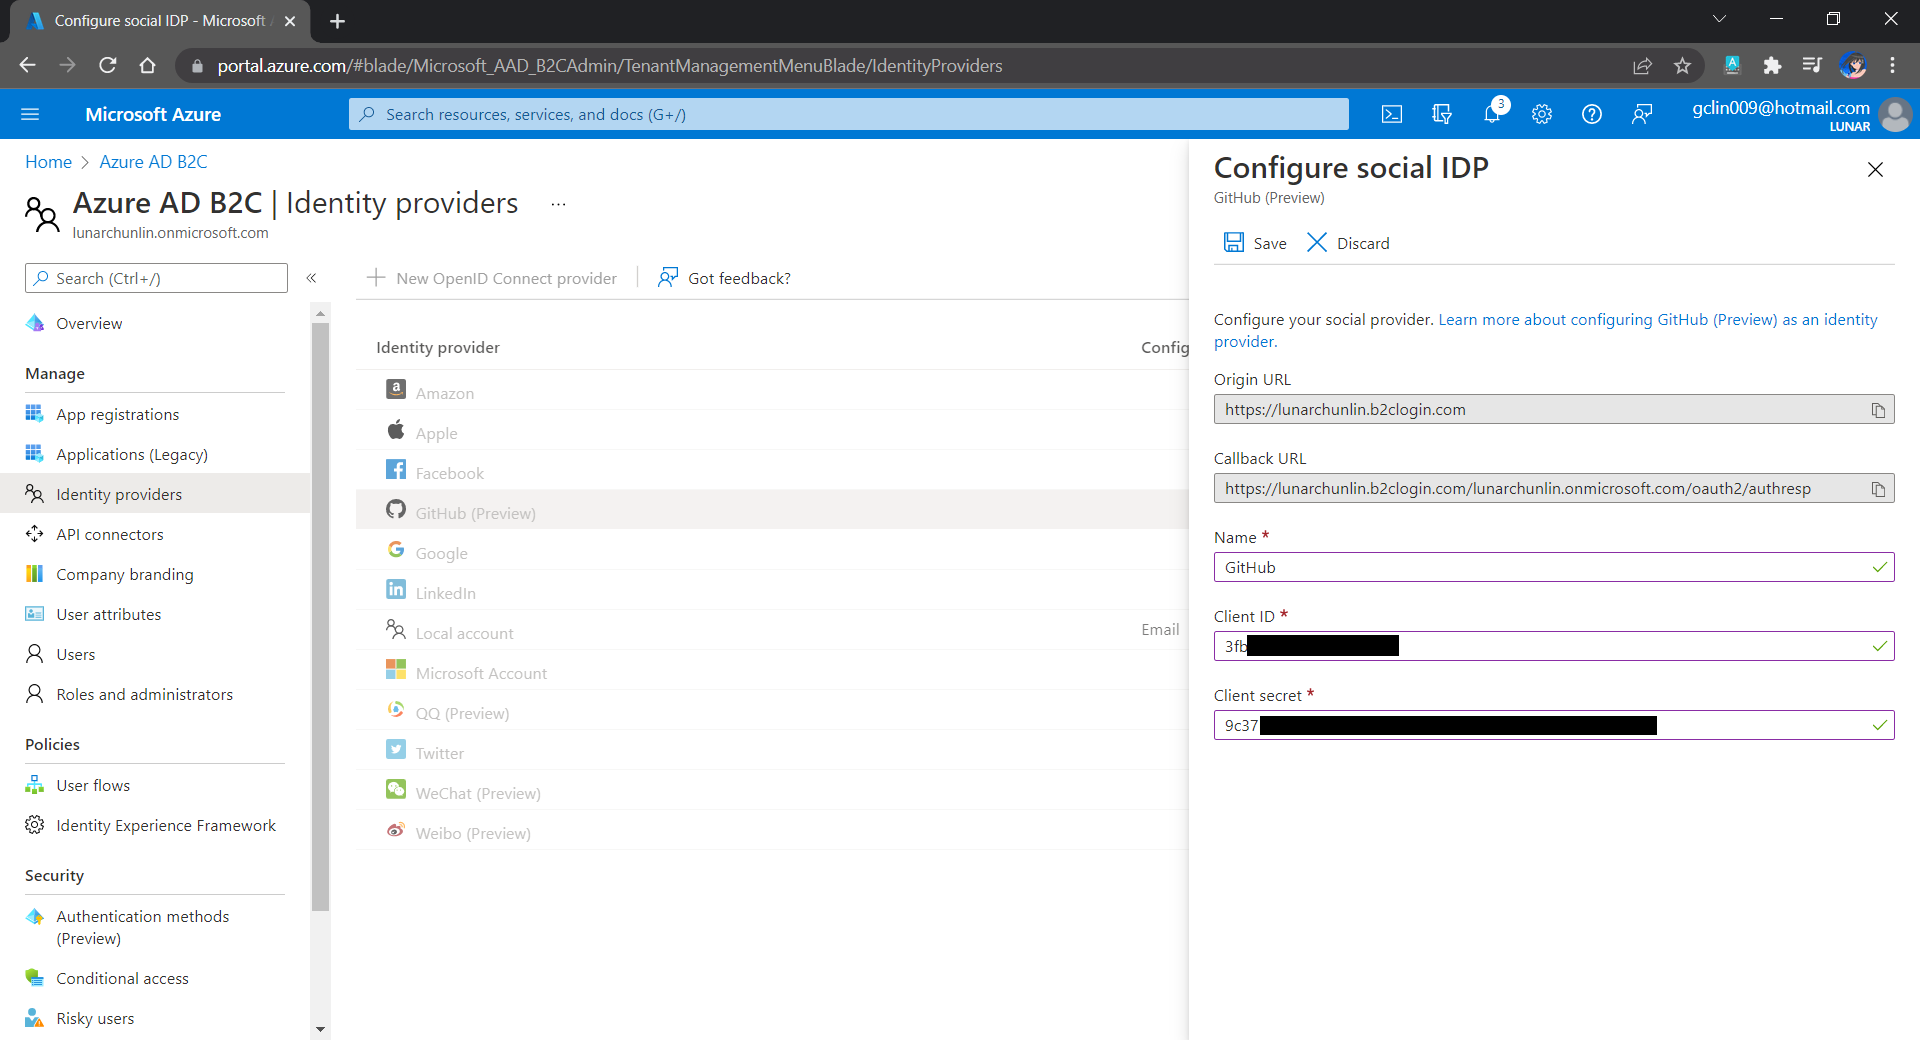
After we have registered the OAuth app on GitHub, we will be provided a client ID and client secret. These two information are needed when we configure GitHub as the social identity provider (IDP) on our Azure AD B2C, as shown below.
Configuring GitHub as an identity provider on Azure AD B2C.
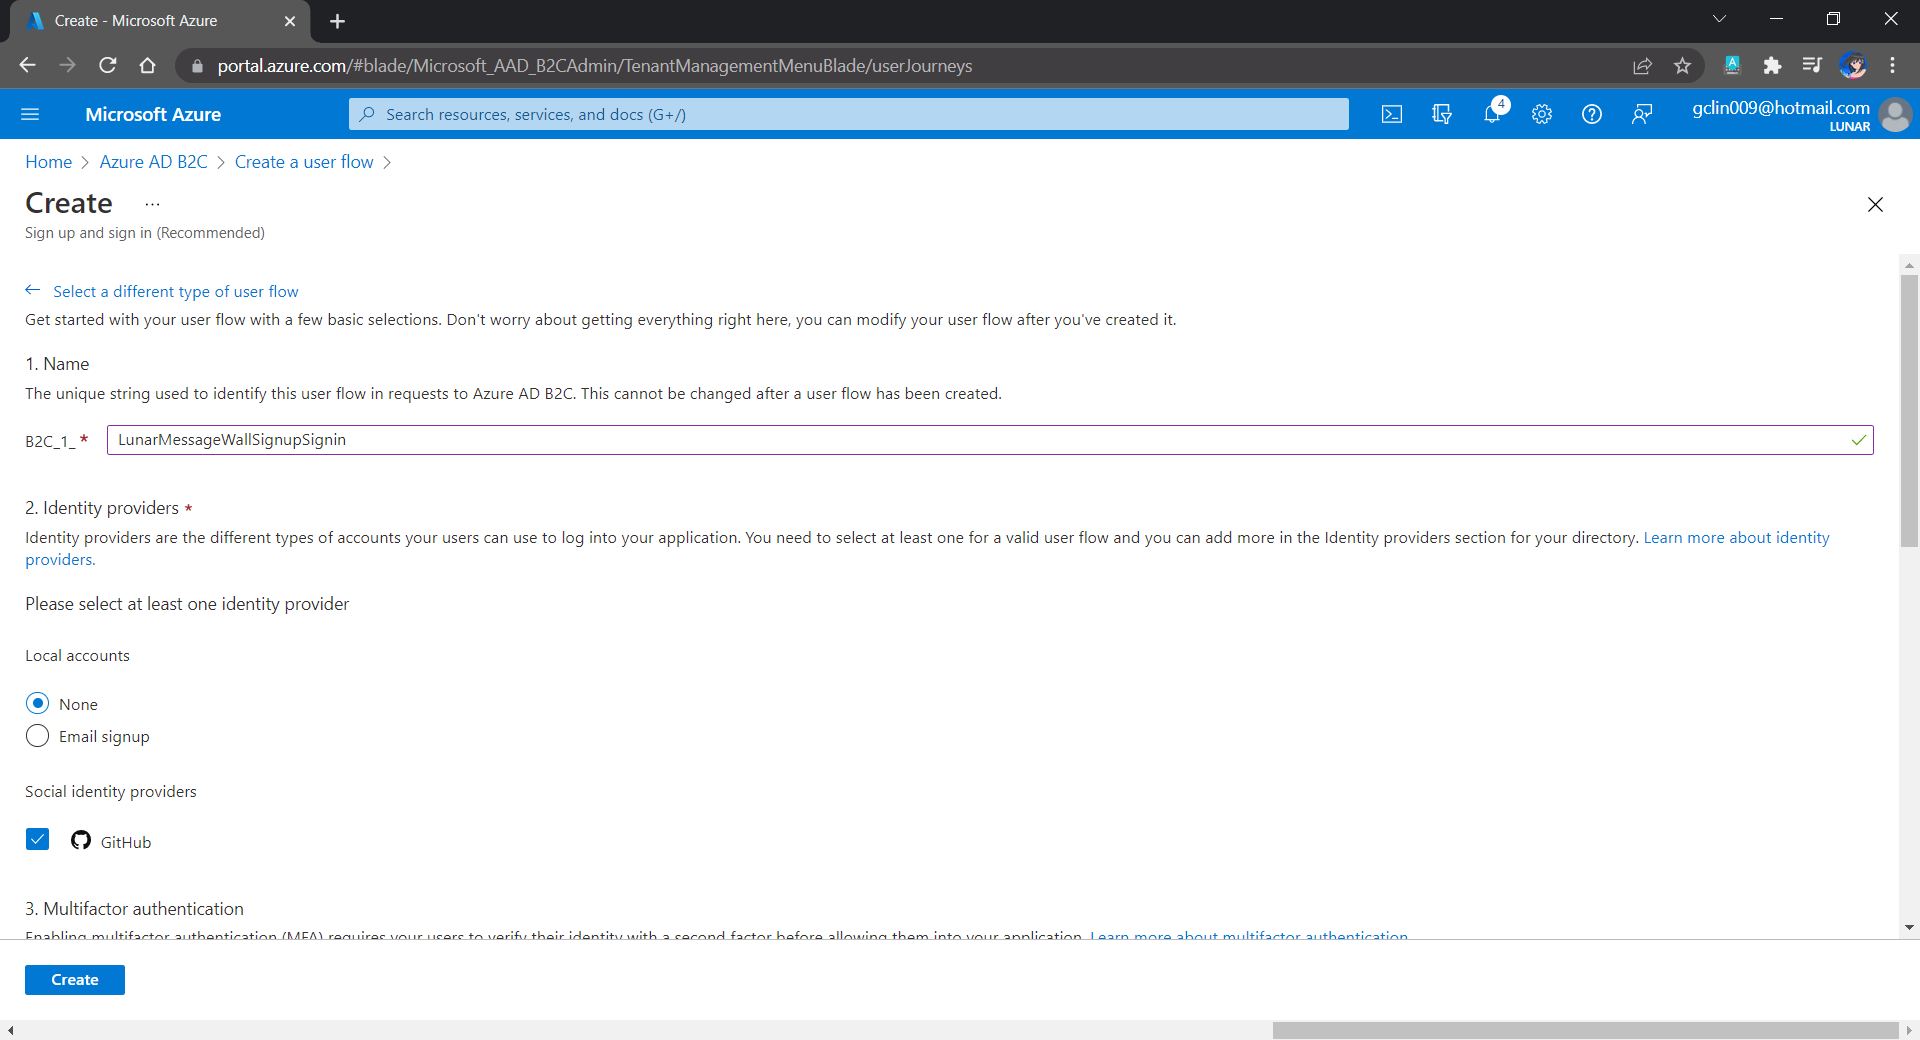
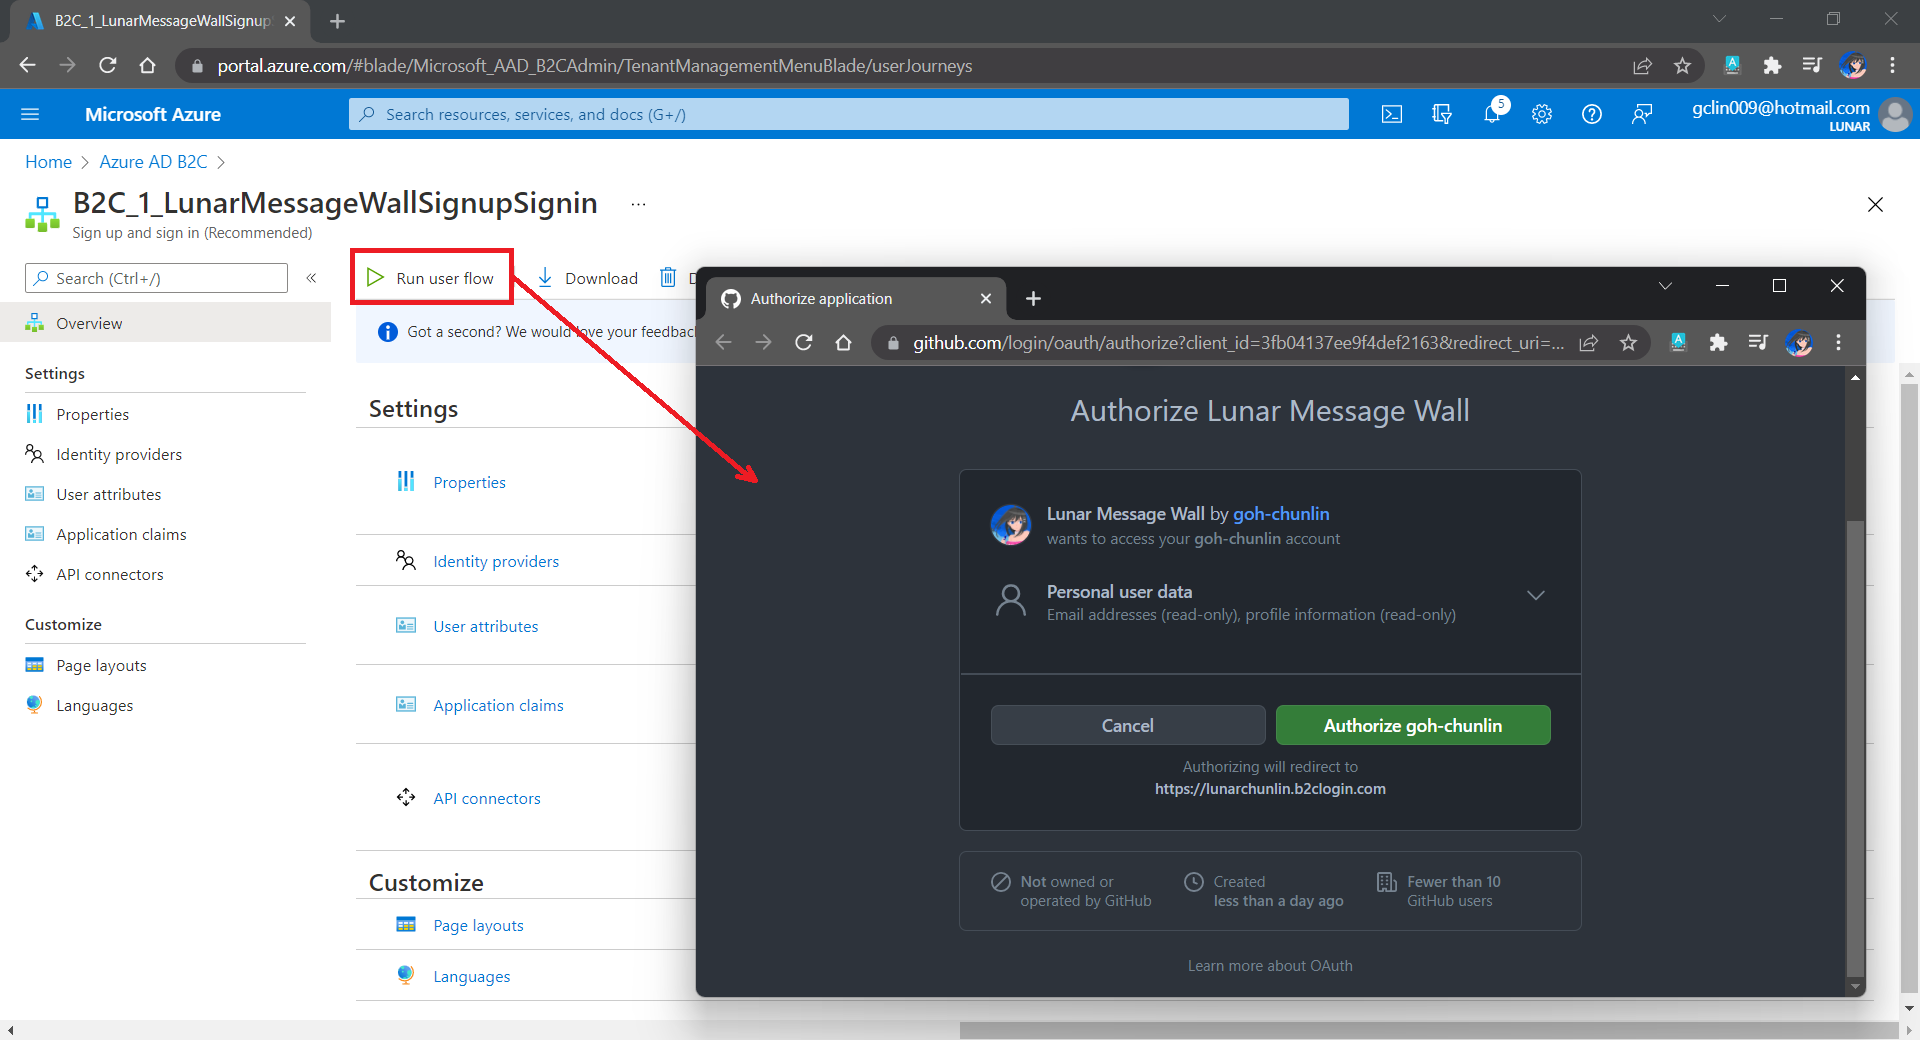
Fourthly, we need to define how users interact with our web app for processes such as sign-up, sign-in, password reset, profile editing, etc. To keep thing simple, here we will be using the predefined user flows.
For simplicity, we allow only GitHub sign-in in our user flow.
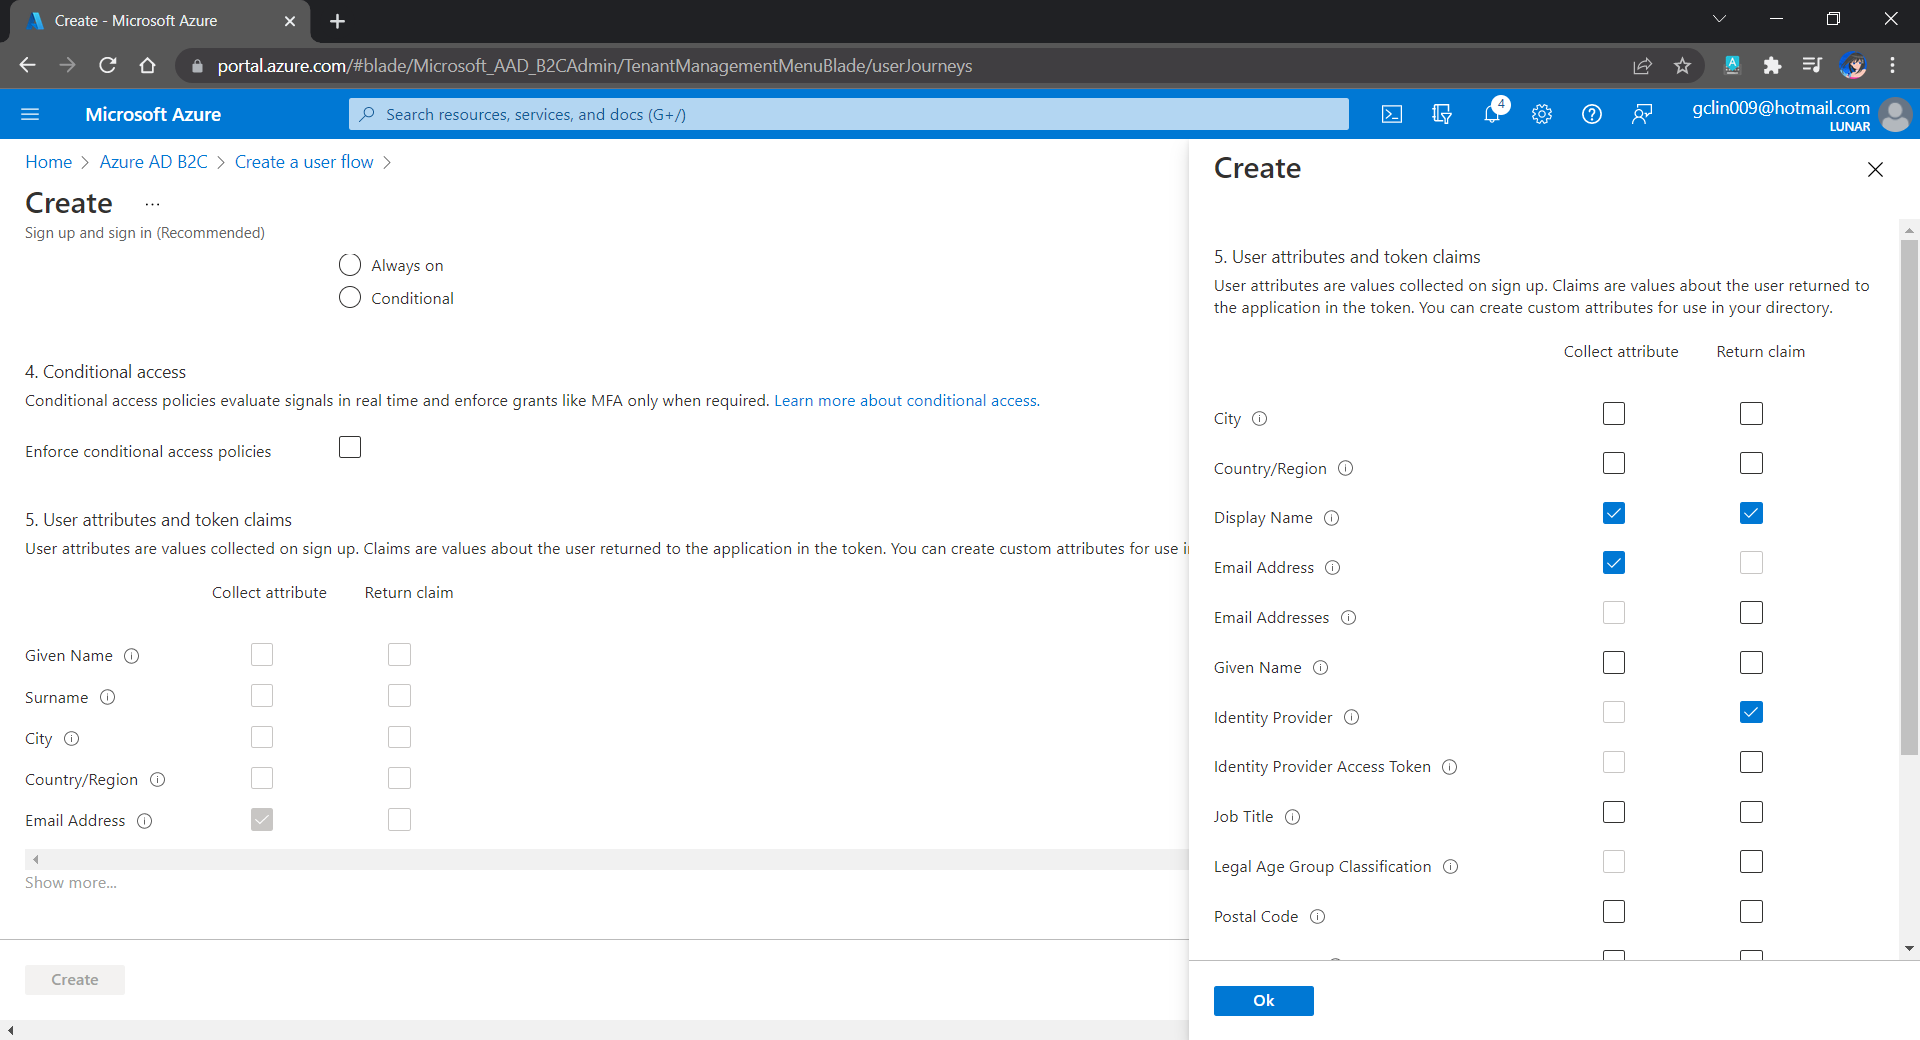
We can also choose the attributes we want to collect from the user during sign-up and the claims we want returned in the token.
User attributes and token claims.
After we have created the user flow, we can proceed to test it.
In our example here, GitHub OAuth app will be displayed.
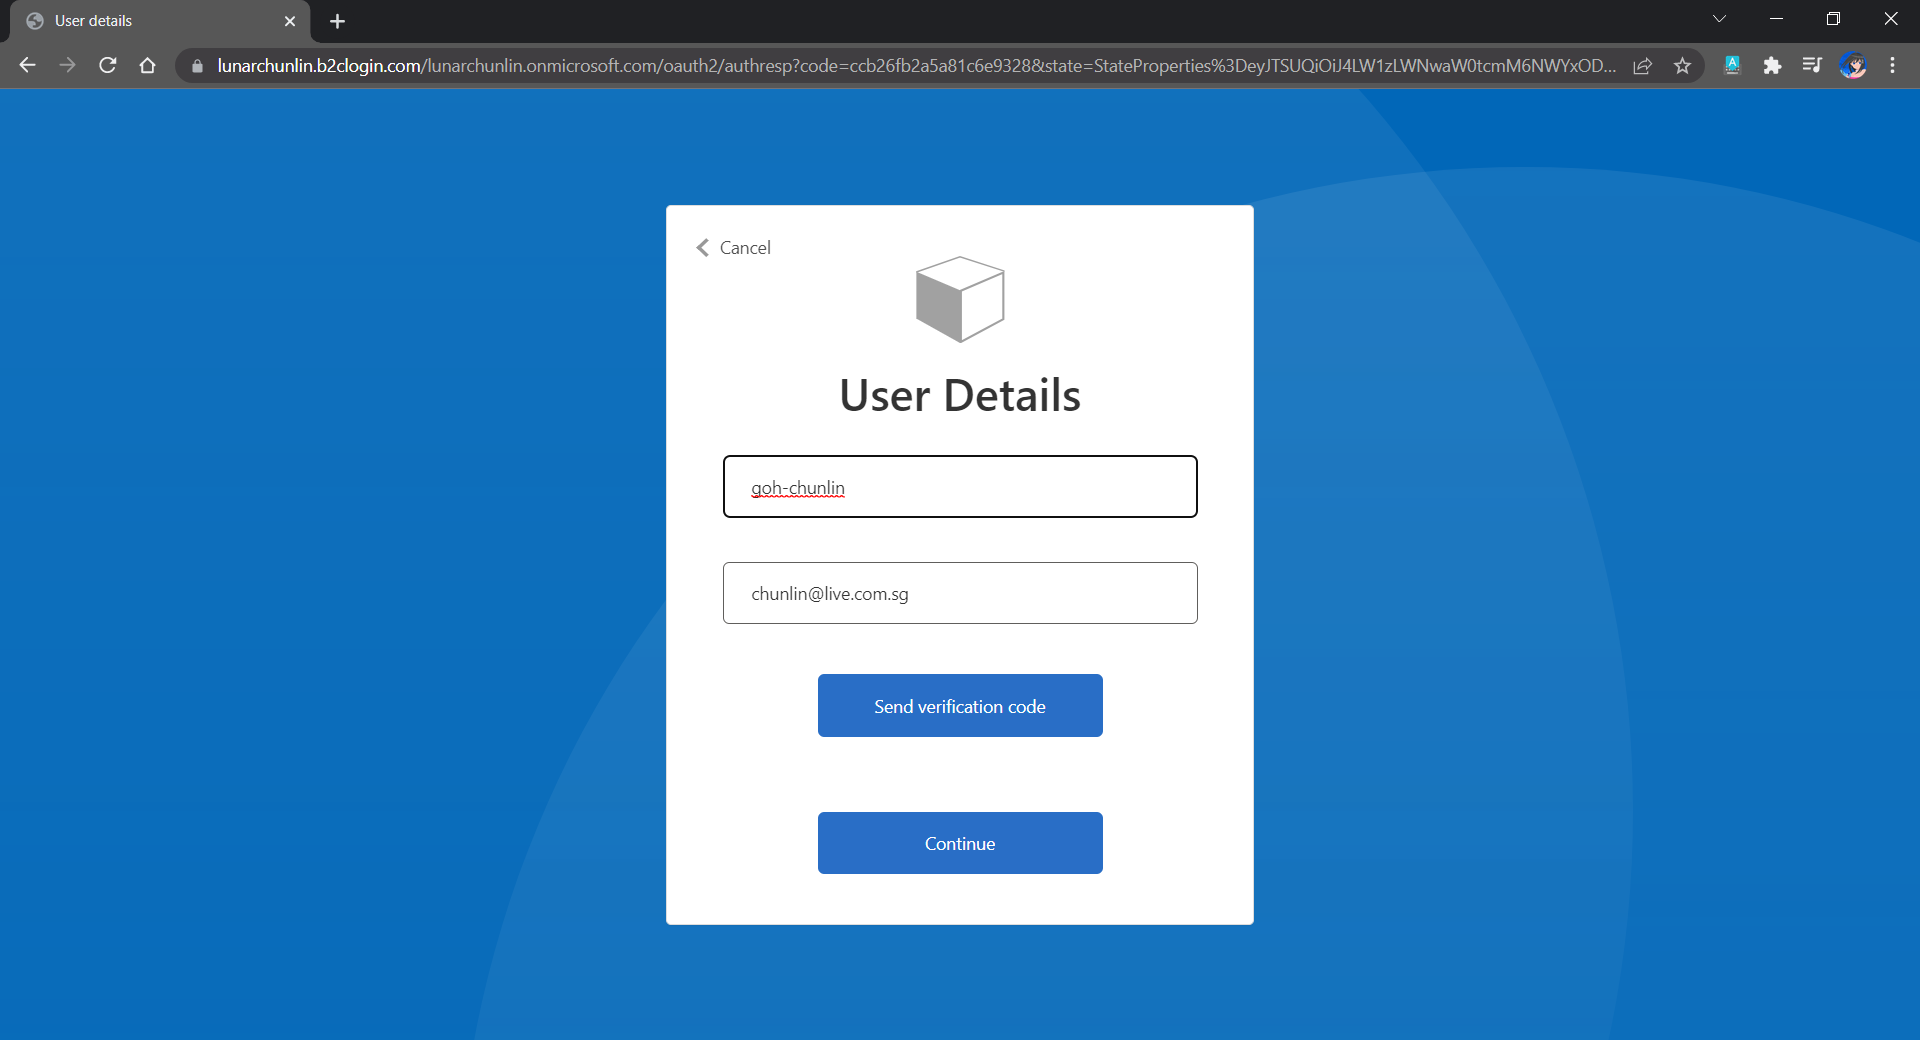
Since we specify in our user flow that we need to collect the user’s GitHub display name, there is a field here for the user to enter the display name.
The testing login page from running the user flow.
Setup the Authentication in Frontend and Web API Projects
Now, we can proceed to add Azure AD B2C authentication to our two ASP.NET Core projects.
We will be using the Microsoft Identity Web library, a set of ASP.NET Core libraries that simplify adding Azure AD B2C authentication and authorization support to our web apps.
dotnet add package Microsoft.Identity.Web
The library configures the authentication pipeline with cookie-based authentication. It takes care of sending and receiving HTTP authentication messages, token validation, claims extraction, etc.
For the frontend project, we will be using the following package to add GUI for the sign-in and an associated controller for web app.
dotnet add package Microsoft.Identity.Web.UI
After this, we need to add the configuration to sign in user with Azure AD B2C in our appsettings.json in both projects (The ClientSecret is not needed for the Web API project).
With the help of the Microsoft.Identity.Web.UI library, we can also easily build a sign-in button with the following code. Full code of it can be seen at _LoginPartial.cshtml.
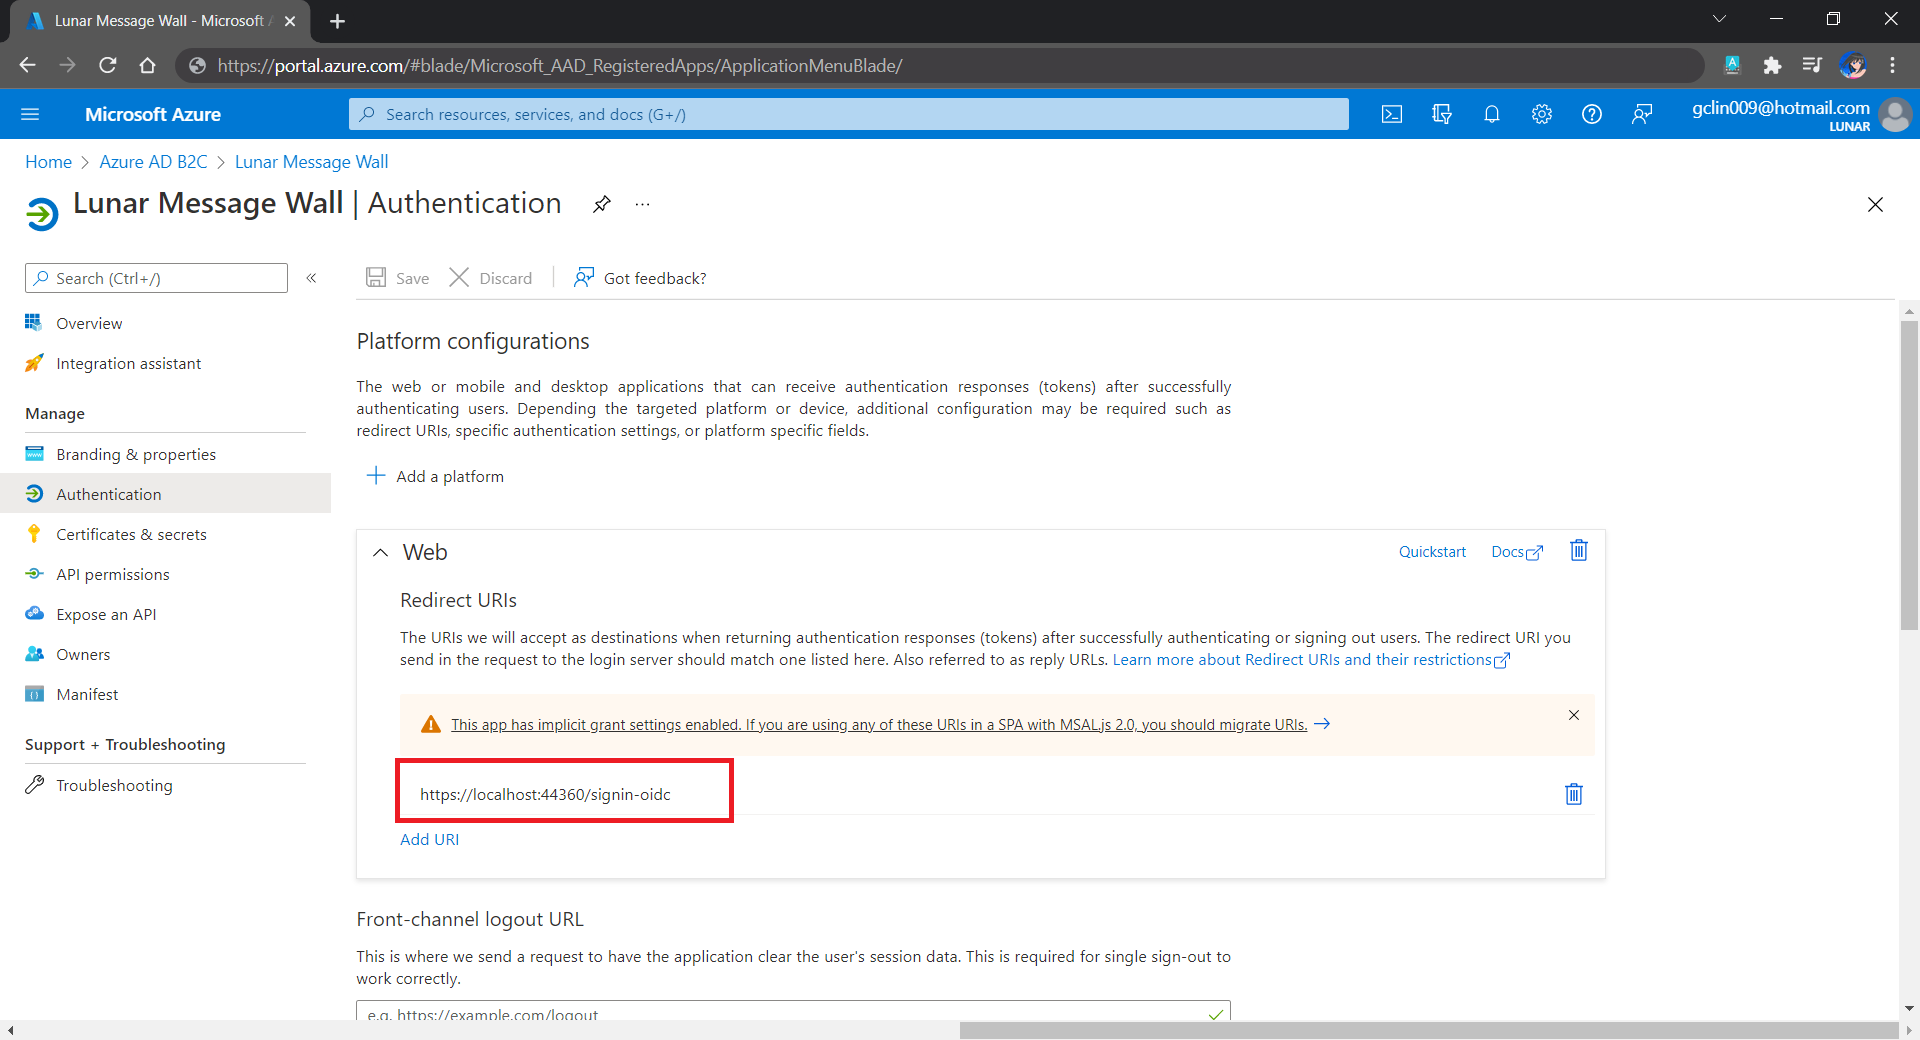
Now, it is time to update the Redirect URI to the localhost. Thus, we need to make sure our WebFrontEnd container has a permanent host port. To do so, we first specify the ports we want to use in the launchsettings.json of the WebFrontEnd project.
Since we need to store the messages submitted by the users, we will need a database. Here, we use PostgresSQL, an open-source, standards-compliant, and object-relational database.
To run the PostgresSQL with docker-compose we will update our docker-compose.yml file with the following contents.
In our case, only the Web API will interact with the database. Hence, we need to make sure that the db service is started before the messagewebapi. In order to specify this relationship, we will use the depends_on option.
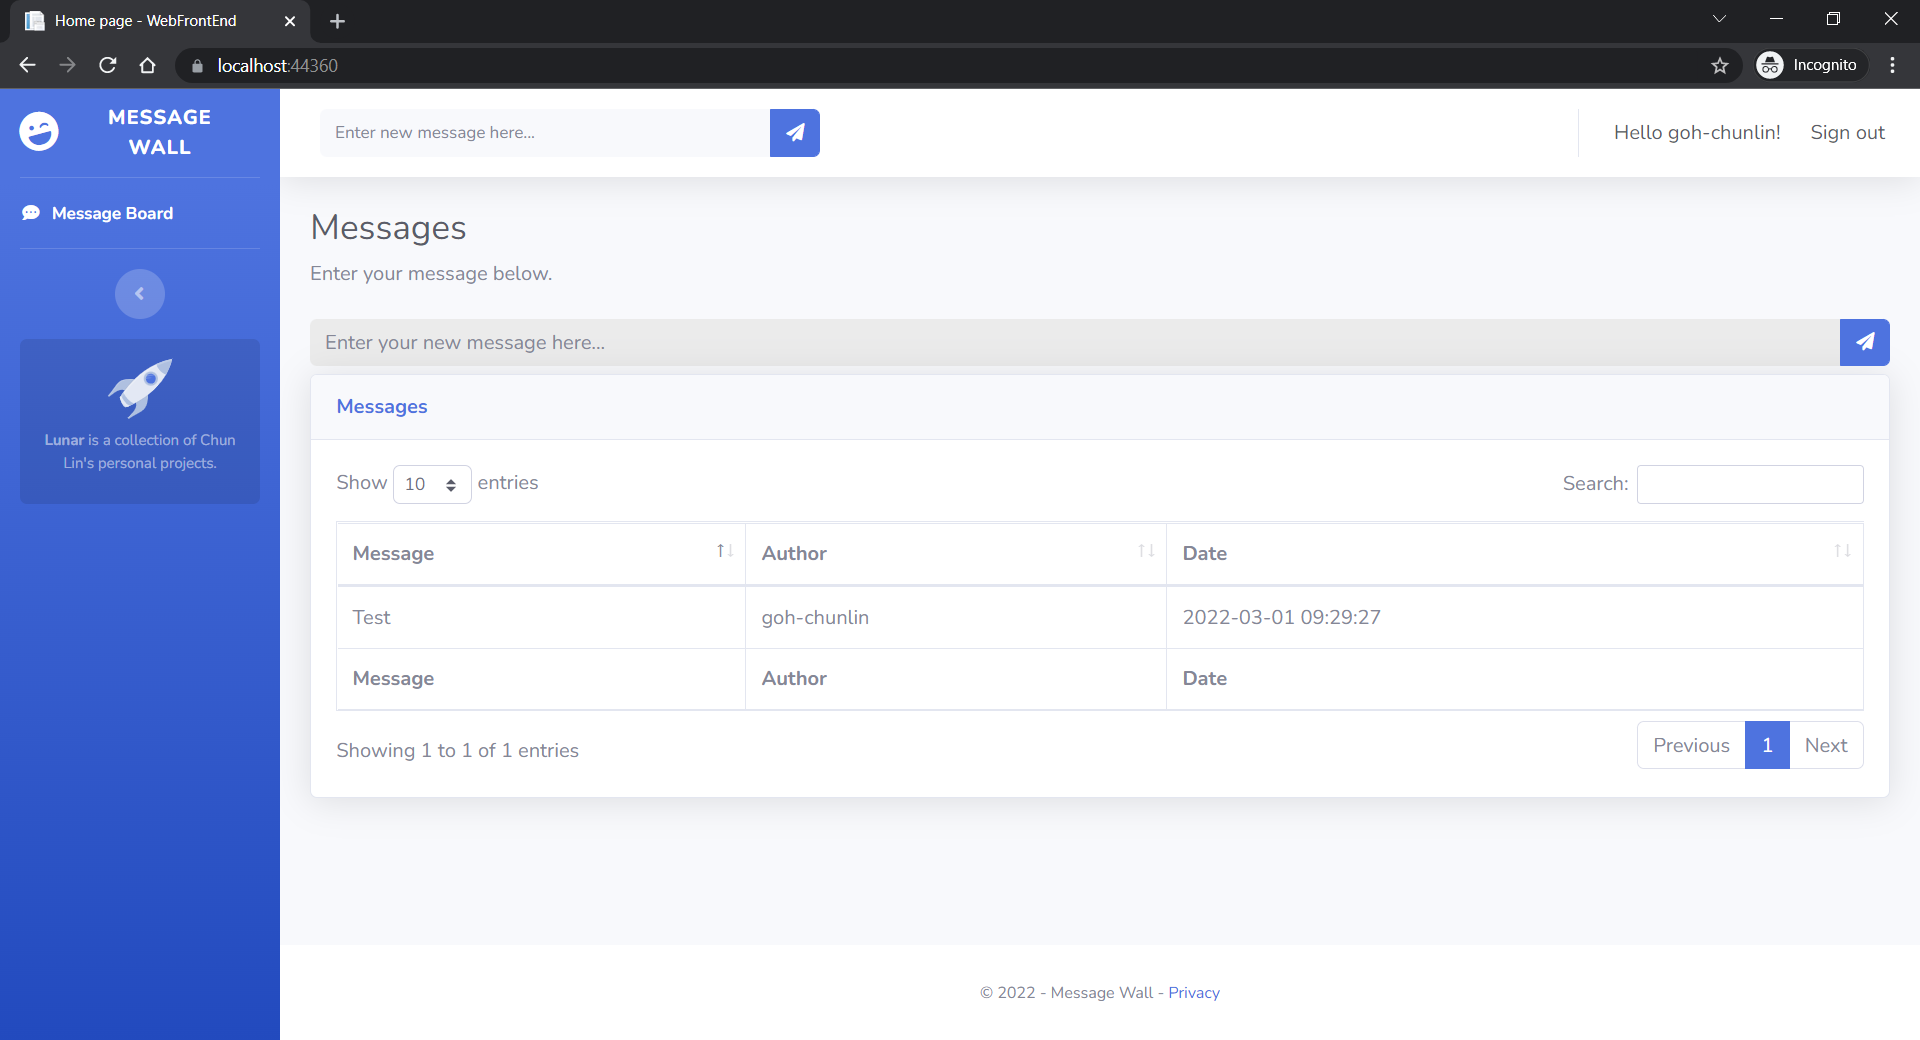
User’s messages can now be stored and listed on the web page.
Next Step
This is just the very beginning of my learning journey of dockerising ASP .NET Core solution. In the future, I shall learn more in this area.