
Getting TCP listener to run on Microsoft Azure is always an interesting topic to work on. Previously, I did one experimental TCP listener on Azure Cloud Service and it works quite well.
Today, I’d like to share with you my another experiment which is hosting a TCP Listener on Microsoft Azure with Service Fabric.
Step 0: Installing Service Fabric SDK
Most of the time, it’s better to run the Visual Studio 2017 in Administrator mode otherwise debugging and deployment of Service Fabric applications may have errors.
Before we can start a new Service Fabric application project on Visual Studio, we first need to make sure Service Fabric SDK is installed.
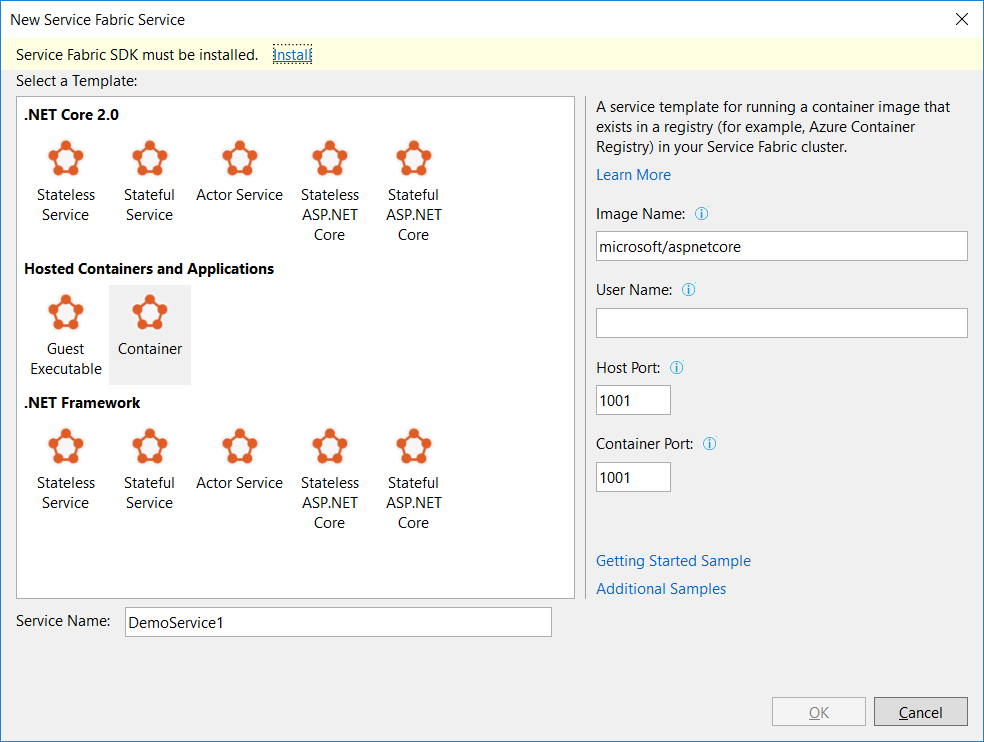
The template that I use is Stateless Service under .NET Core 2.0. This project template is to create a stateless reliable service with .NET Core.
Step 1: Add TCP Endpoint
In the ServiceManifest.xml of the PackageRoot folder of the application project, we need to specify an endpoint that our TCP Listener will be listening to. In my case, I am using port 9005. So I need to add an endpoint as shown below in the ServiceManifest.xml.
<Endpoint Name="TcpEndpoint" Protocol="tcp" Port="9005"/>
Step 2: Create Listeners
In the StatelessService class, there is a CreateServiceInstanceListeners method that we can override to create TCP listeners with the following codes.
protected override IEnumerable CreateServiceInstanceListeners()
{
    var endpoints = Context.CodePackageActivationContext.GetEndpoints()
        .Where(endpoint => endpoint.Protocol == EndpointProtocol.Tcp)
        .Select(endpoint => endpoint.Name);

    return endpoints.Select(endpoint => new ServiceInstanceListener(
        serviceContext => new TcpCommunicationListener(serviceContext, ServiceEventSource.Current, endpoint), endpoint));
}
Then in the RunAsync method, which is the main entry point for our service instance, we can simply include the code for TCP Listener to receive and send message to the clients.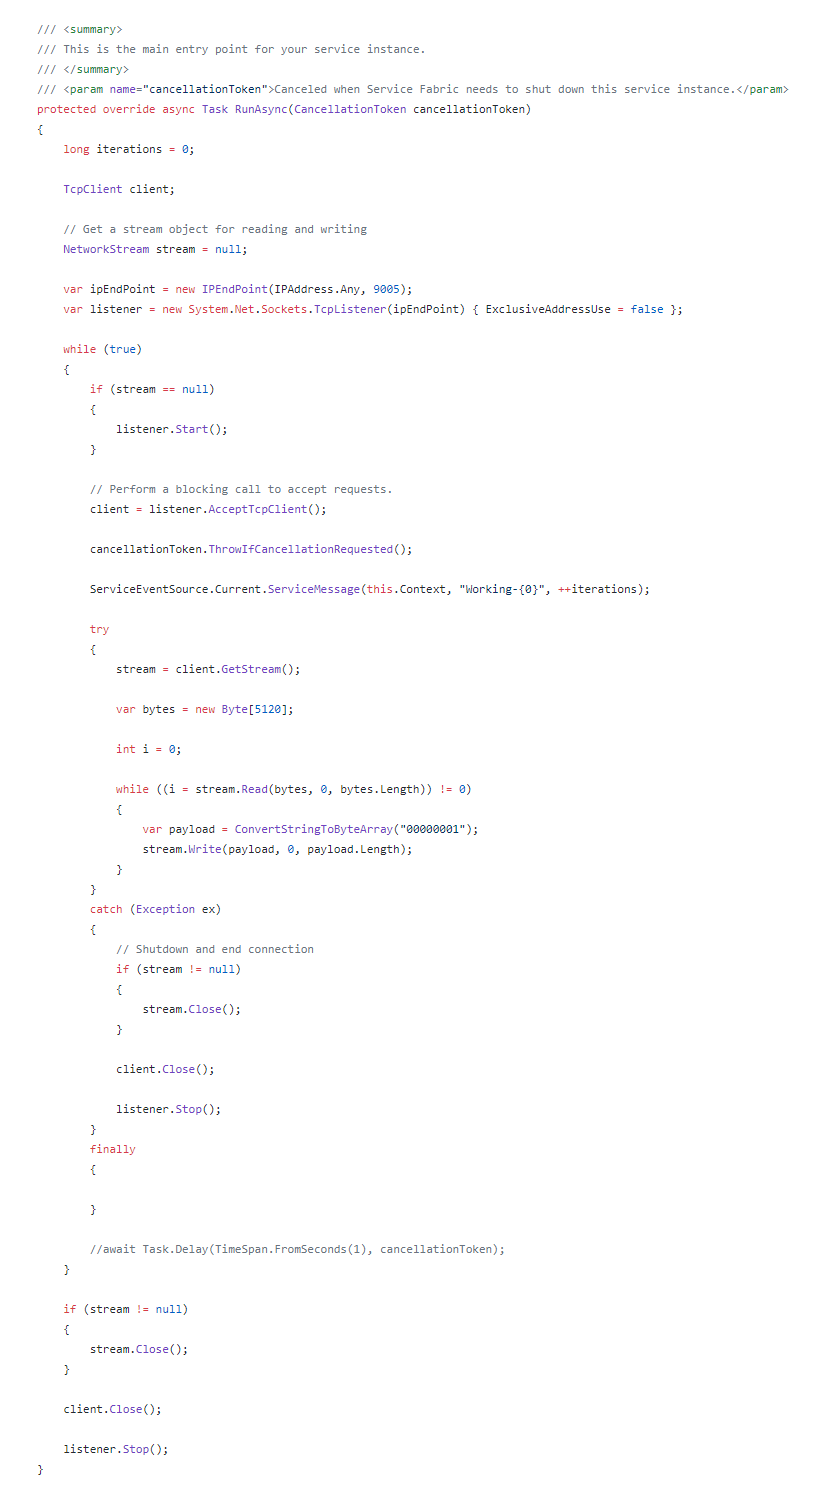
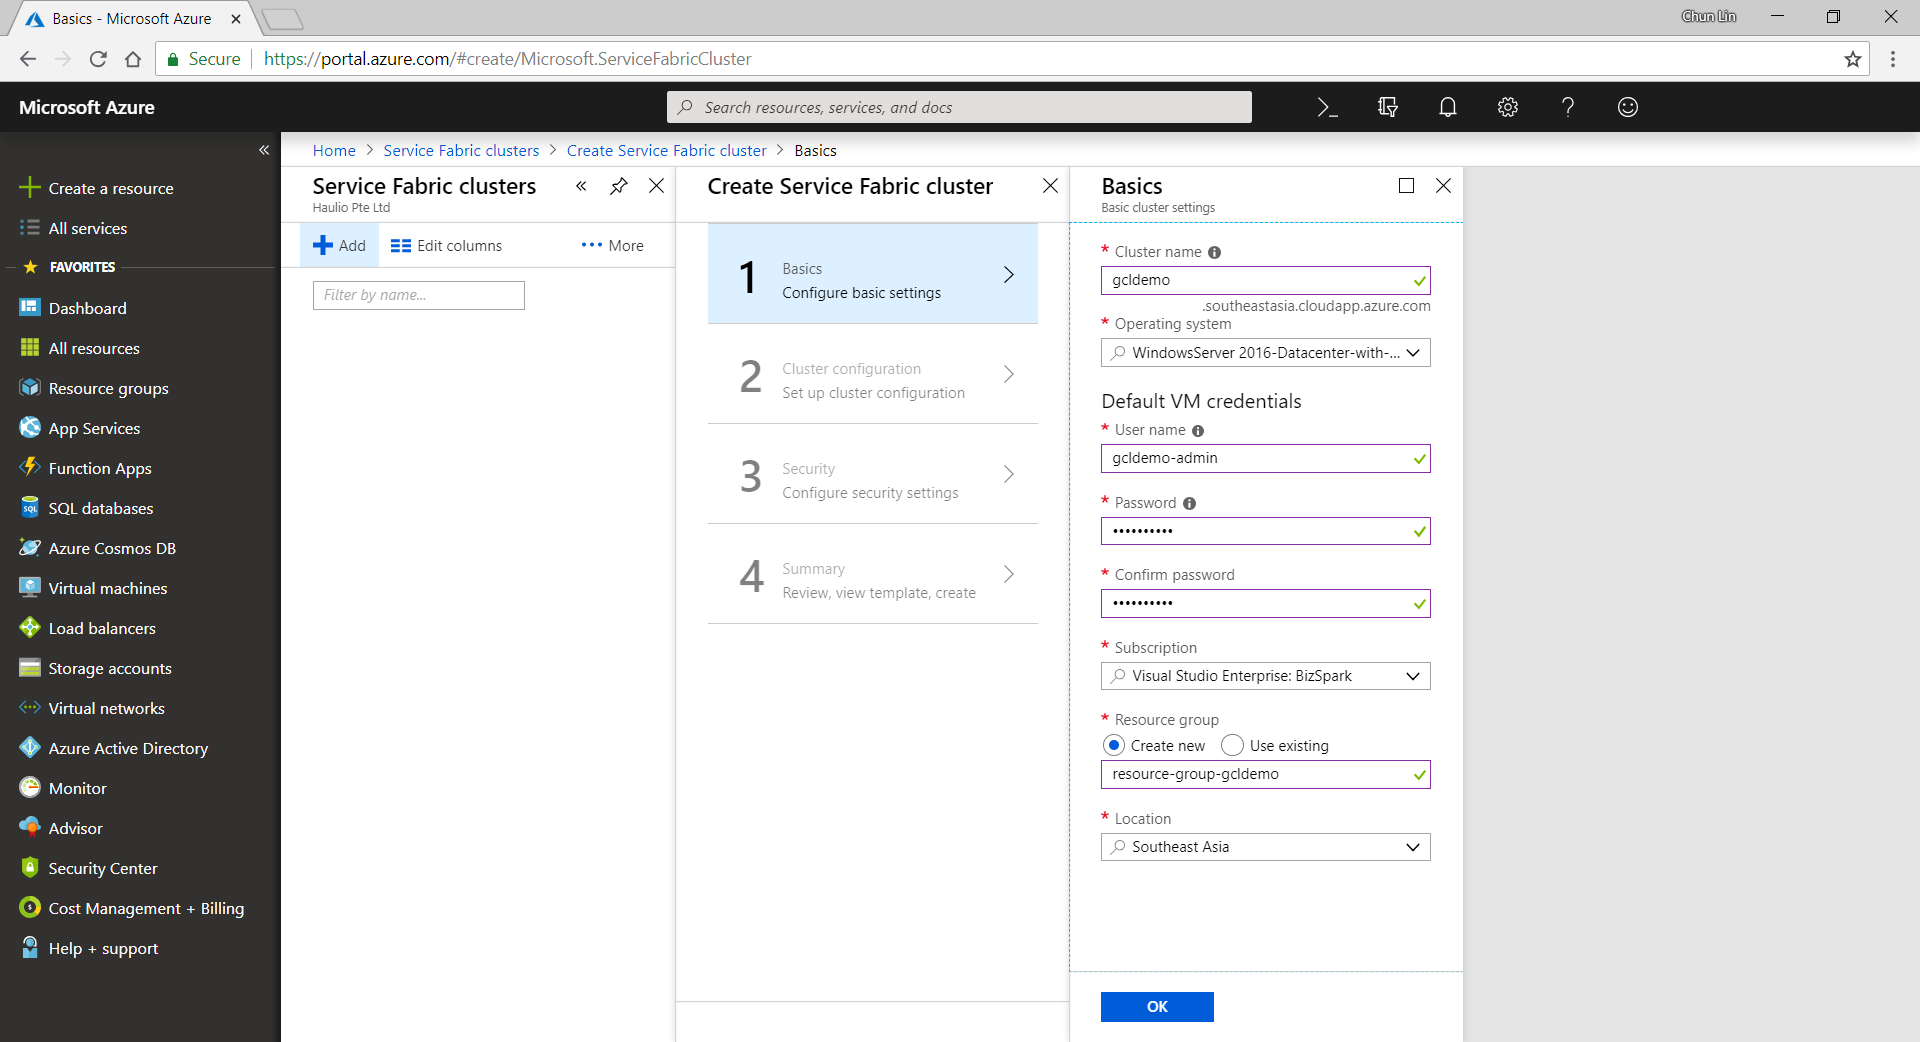
Step 3: Create Service Fabric Cluster
There are a few simple steps for us to follow in order to create a new Service Fabric cluster on Microsoft Azure.
Firstly, we need to specify some basic information, such as cluster name, OS, and default VM credentials.
Secondly, we need to define Node Types. Node types can be seen as equivalent to the roles in Cloud Service. Node types define the VM sizes, the number of VMs, and their properties. Every node type that is defined in a Service Fabric cluster maps to a virtual machine scale set.
We can start with only one node type. The portal will then prompt us to select one VM size. By default, it only shows three recommended sizes. If you would like to find out more other specs with lower price, please click on “View All”.
I once use A0 (which coasted USD 14.88) for experimental purpose. However, it turns out that the newly created service fabric cluster is totally not connectable with a status saying “Upgrade service unreachable”. The funny thing is that the status was only shown after everything in the resource group is setup successfully which strangely took about one hour plus to finish. So I wasted about one hour for that. Hence, please use at least the recommended size for the VM.

A very interesting point to take note is that, there is a checkbox for us to configure advance settings for node type, as shown in the following screenshot. The default values here will affect things such as the Service Fabric dashboard URL we use later. It’s fine to leave them as default.

Thirdly, we need to configure the security settings by specifying which Key Vault to use. If you don’t have any suitable key vault, then it will take about one minute to create a new key vault for you. After the new key vault is created, you may be prompted with an error stopping you to proceed, as shown in the following screenshot.

To fix the error, we first need to visit the Key Vaults page. After that, we need to find out the key vault we just created above. Then we proceed to tick the corresponding checkbox to enable the key vault access to Azure VM for deployment, as shown in the following screenshot.

Now, if we got back to the Step 3 of the service fabric cluster setup, we can get rid of the error message by re-selecting the key vault. After keying a certificate name, we will need to wait for 30 seconds for validation. Then we will be given a link to download our certificate for later use.

This marks the end of our service fabric cluster setup. What we need to do is just to click on the “Create” button.
The creation process took about 40 minutes to complete. It actually went through many stages which are better described in the article “Azure Service Fabric Cluster – Deployment Issues”, written by Cosmin Muscalu.
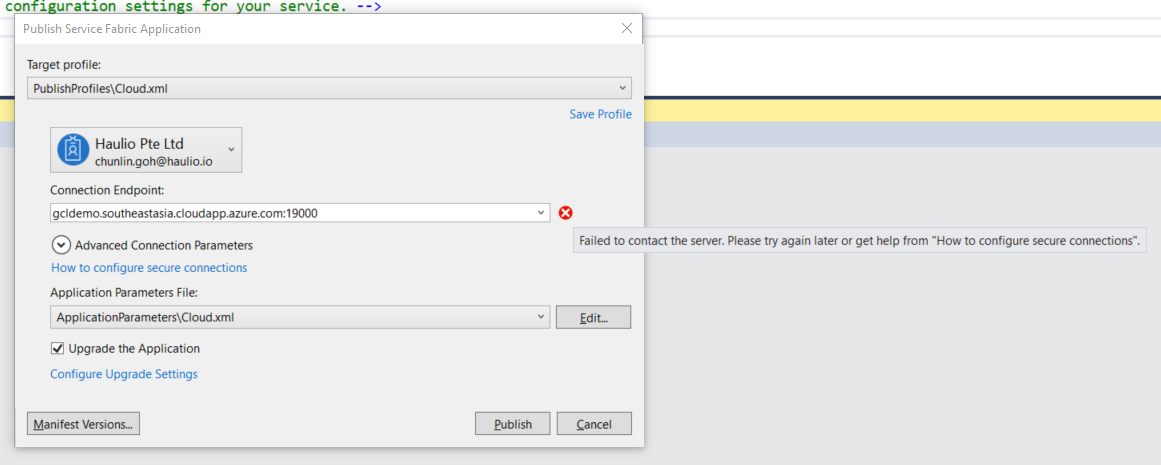
Step 4: Publish App from Visual Studio
After the service fabric cluster is done, we can proceed to publish our application to it.
In the Solution Explorer, we simply need to right-click on the Service Fabric project and choose Publish, as shown in the following image.

A window will popup and prompt us that the Connection Endpoint is not valid, as shown below.
Now, according to the article from the link “How to configure secure connection”, we have to install the certificate that we downloaded earlier from Azure Portal in Step 2.
Since there is no password for the pfx file, we simply need to accept all default settings while importing the certificate.
Now if we go back to the Publish window, we will see a green tick icon appearing at the side of the Connection Endpoint. Now, we are good to proceed to do a publish. The deployment of a simple TCP Listener normally takes less than one minute to finish.
Step 5: Open Port Access
After the deployment is done, we need to open up the 9005 port that we specified above in Step 2. To do so, we need to visit the Load Balancer used by the service fabric cluster to add a new rule for the port 9005 to be accessible from public.
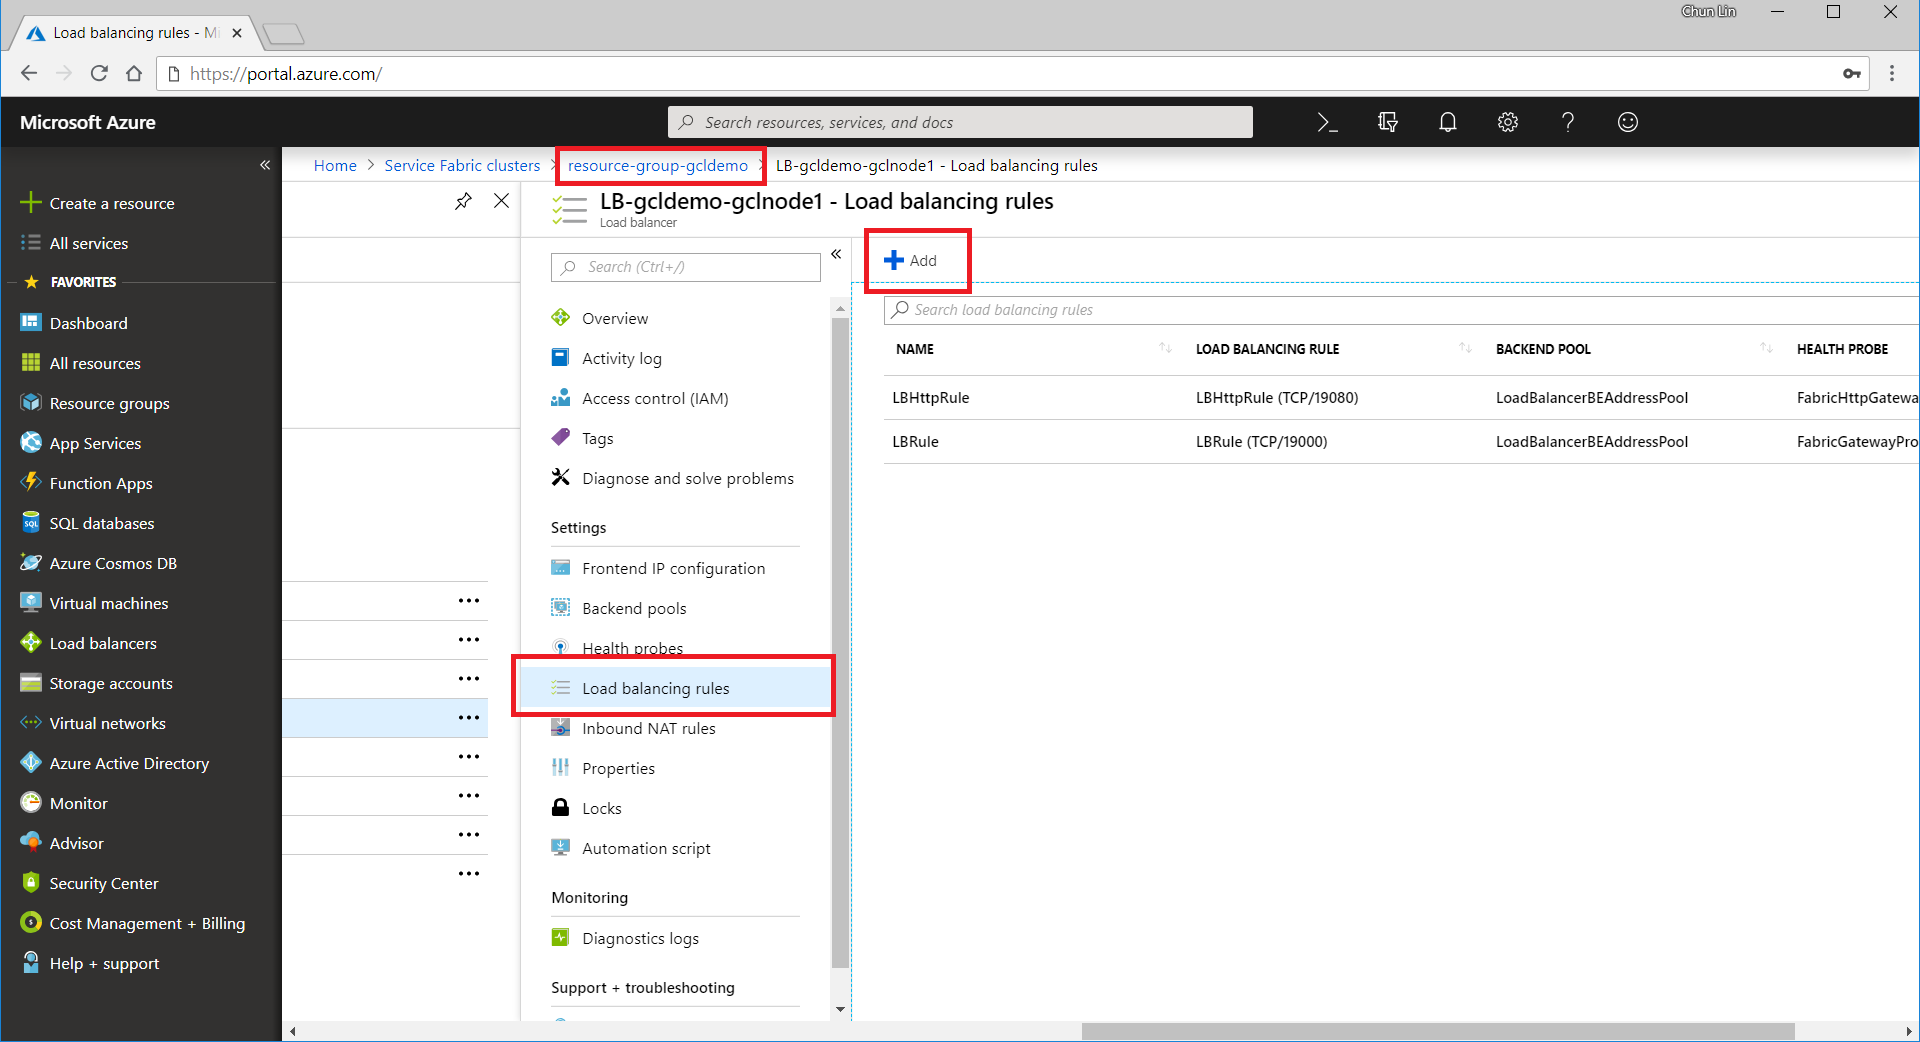
The process of adding a new rule normally takes about three minutes to complete.
Please take note that we need to note down the Public IP Address of our load balancer as well.
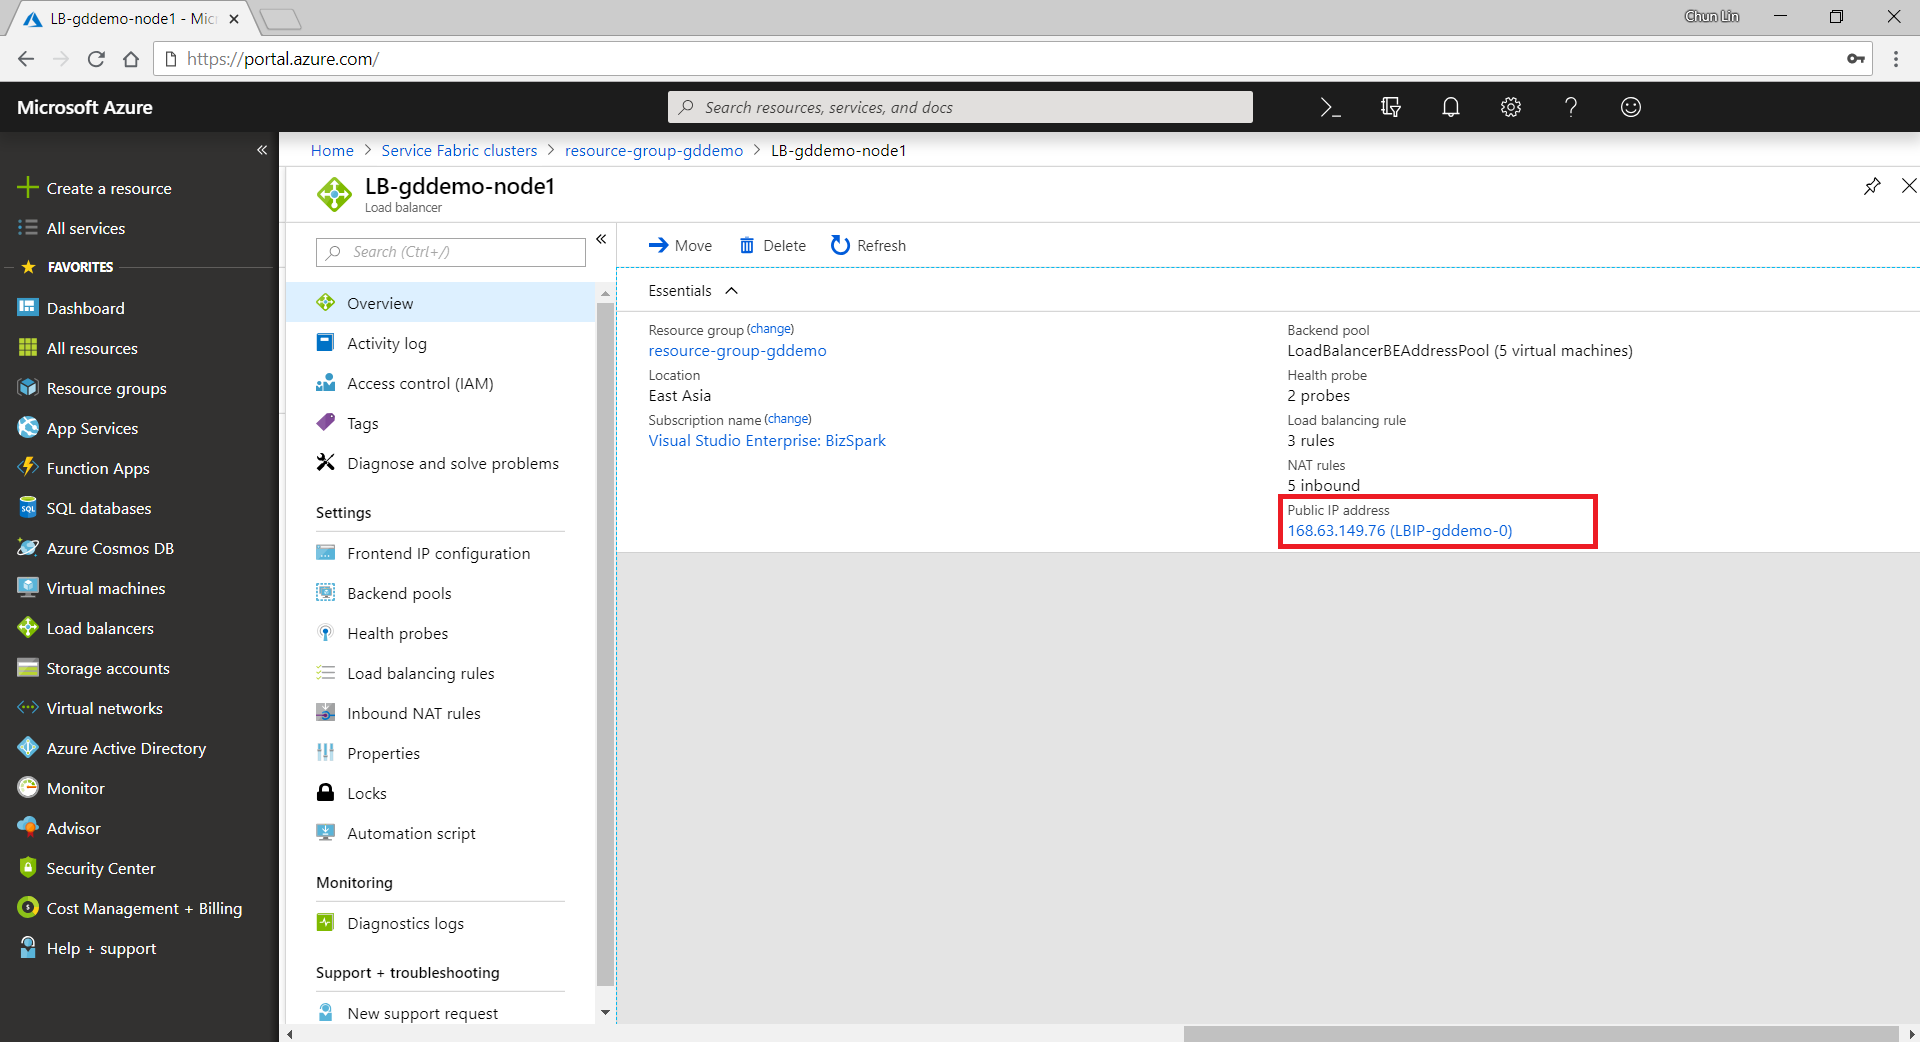
Step 6: Open Up Service Fabric Explorer
Finally, we need to open up the Explorer for our service fabric cluster. To do so, we can retrieve the dashboard URL in the Overview panel of the service fabric cluster.
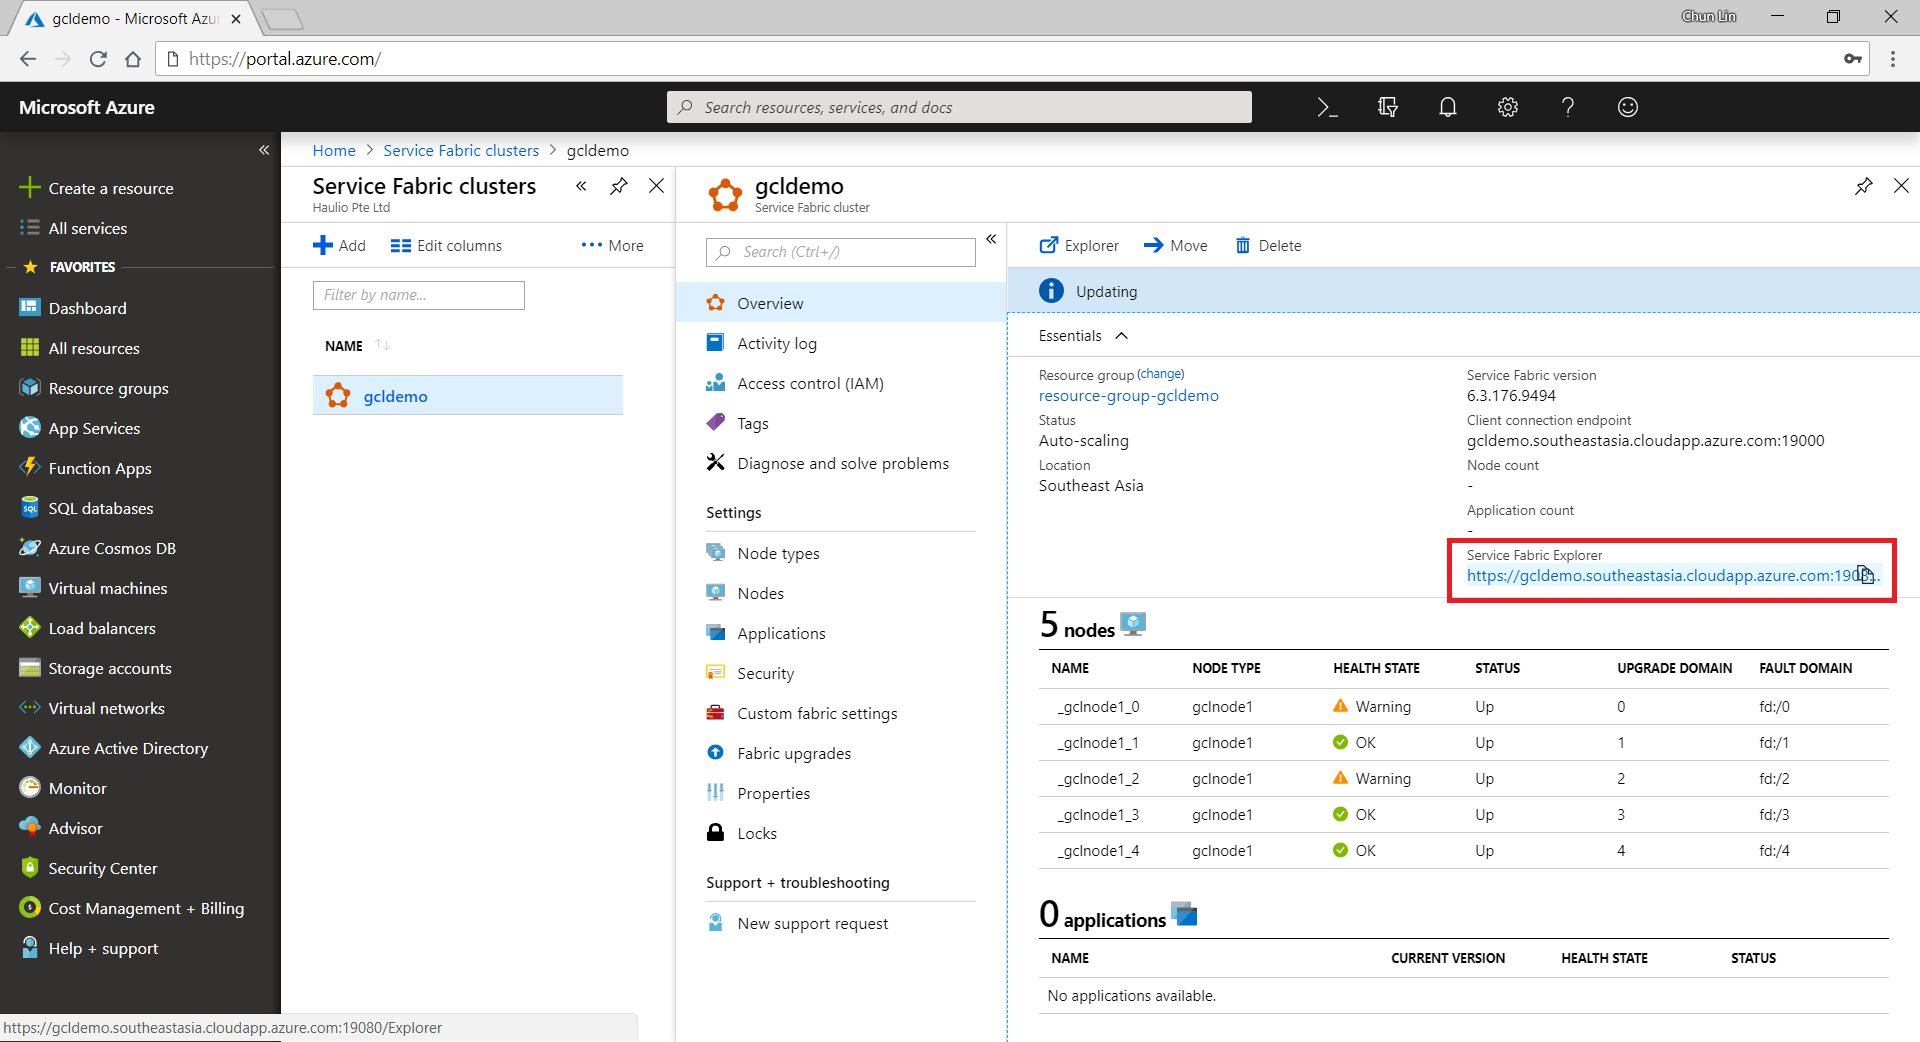
To access the Explorer, we first need to select a certificate that we downloaded earlier to authenticate ourselves to the Explorer, as shown in the screenshot below.

Step 7: Communicate with TCP Listener
Now, if we build a simple TCP client to talk to the server at the IP address of the load balancer that we noted down earlier, we can easily send and receive response from the server, as shown in the screenshot below.

So yup, that’s all for a very simple TCP Listener which is hosted on Microsoft Azure.
I will continue to research more about this topic with my teammates so that I can find out more about this cool technology.

what is the “TcpCommunicationListener” here. from where can i find the relevant implementation
Sorry for the late reply, Amal.
You can find the code about TcpCommunicationListener at https://stackoverflow.com/questions/38739024/setting-up-tcp-on-azure-service-fabric
Regards,
Chun Lin
So now that you have used both service fabric and the Azure Cloud Service worker Role. Which one do oyu think is easier to scale and mantain?
I just read a discussion on Microsoft Docs about Cloud Service. Some of them pointed out that “We need to make it more clear for our customers that by sticking with/choosing Cloud Services they are committing to a legacy platform which will not receive significant feature updates going forward.” (https://github.com/MicrosoftDocs/azure-docs/issues/11861#issuecomment-427452081)
So, please choose Service Fabric or VMs.
Chun Lin are you able to share your VS project? I am having a hard time following along since some of the code is in a jpg picture and there is no method call RunAsync in the stateless template.
Thanks.
Sorry for the late reply, Jackson.
Since it is a project in my previous work and I had left the place last year, so I couldn’t share the codes now. I will try to redo the project and share it on GitHub soon.
Regarding your question about not having anything calling RunAsync, it is actually called when the listener is listening. Details can be found here: https://docs.microsoft.com/en-us/azure/service-fabric/service-fabric-reliable-services-lifecycle#stateless-service-startup
I would love to be able to download the code as well. Thanks for a great solution.
Thanks, John!
I will do my best on that but with recent higher workload recently in both work and personal learning project for this year. I will update you all once I finish the new code.
Chun lin, Hope you are doing well, Please give me some details that what to do when we are going to have more than (500 +) GPS devices to be connected to my server? How to identify each?
Hi Dhruv Vala,
For the device we’re using in our team, each of the device will send over data payload with device identity attached. Hence, we can easily identify the devices.
However, now, for such a scenario, I’m thinking using Azure IoT Hub and Stream Analytics seems to be a more scalable method. The reason I’m now looking into this setup is because they can handle the storage efficiently instead of configuring the storage channel ourselves.
More about Azure IoT Hub here: https://docs.microsoft.com/en-us/azure/architecture/reference-architectures/iot
Hope this helps!
My friend also would like me to introduce you to look into this documentation: https://docs.microsoft.com/en-us/samples/azure-samples/service-fabric-dotnet-iot/service-fabric-iot-sample/