Using Docker and Kubernetes without Docker Desktop on Windows 11

Last week, my friend who is working on a microservice project at work suddenly messaged me saying that he realised Docker Desktop is no longer free.

Docker Desktop is basically an app that can be installed on our Windows machine to build and share containerised apps and microservices. It provides a straightforward GUI to manage our containers and images directly from our local machine.

Docker Desktop also includes a standalone Kubernetes server running locally within our Docker instance. It is thus very convenient for the developers to perform local testing easily using Docker Desktop.

Despite Docker Desktop remaining free for small businesses, personal use, education, and non-commercial open source projects, it now requires a paid subscription for professional use in larger businesses. Consequently, my friend expressed a desire for me to suggest a fast and free alternative for development without relying on Docker Desktop.

Install Docker Engine on WSL

Before we continue, we need to understand that Docker Engine is the fundamental runtime that powers Docker containers, while Docker Desktop is a higher-level application that includes Docker Engine. Hence, Docker Engine can also be used independently without Docker Desktop on local machine.

Fortunately, Docker Engine is licensed under the Apache License, Version 2.0. Thus, we are allowed to use it in our commercial products for free.

In order to install Docker Engine on Windows without using Docker Desktop, we need to utilise the WSL (Windows Subsystem for Linux) to run it.

Step 1: Enable WSL

We have to enable WSL from the Windows Features by checking the option “Windows Subsystem for Linux”, as shown in the screenshot below.

After that, we can press “OK” and wait for the operation to be completed. We will then be asked to restart our computer.

If we already have WSL installed earlier, we can update the built-in WSL to the Microsoft latest version of WSL using the “wsl –update” command in Command Prompt.

Later, if we want to shutdown WSL, we can run the command “wsl –shutdown”.

Step 2: Install Linux Distribution

After we restarted our machine, we can use the Microsoft Store app and look for the Linux distribution we want to use, for example Ubuntu 20.04 LTS, as shown below.

We then can launch Ubuntu 20.04 LTS from our Start Menu. To find out the version of Linux you are using, you can run the command “wslfetch”, as shown below.

For the first timer, we need to set the Linux username and password.

Step 3: Install Docker

Firstly, we need to update the Ubuntu APT repository using the “sudo apt update” command.

After we see the message saying that we have successfully updated the apt repository, we can proceed to install Docker. Here, the “-y” option is used to grant the permission to install required packages automatically.

When Docker is installed, we need to make a new user group with the name “docker” by utilising the below-mentioned command.

Docker Engine acts as a client-server application with a server that has a long-running daemon process dockerd. dockerd is the command used to start the Docker daemon on Linux systems. The Docker daemon is a background process that manages the Docker environment and is responsible for creating, starting, stopping, and managing Docker containers.

Before we can build images using Docker, we need to use dockerd, as shown in the screenshot below.

Step 4: Using Docker on WSL

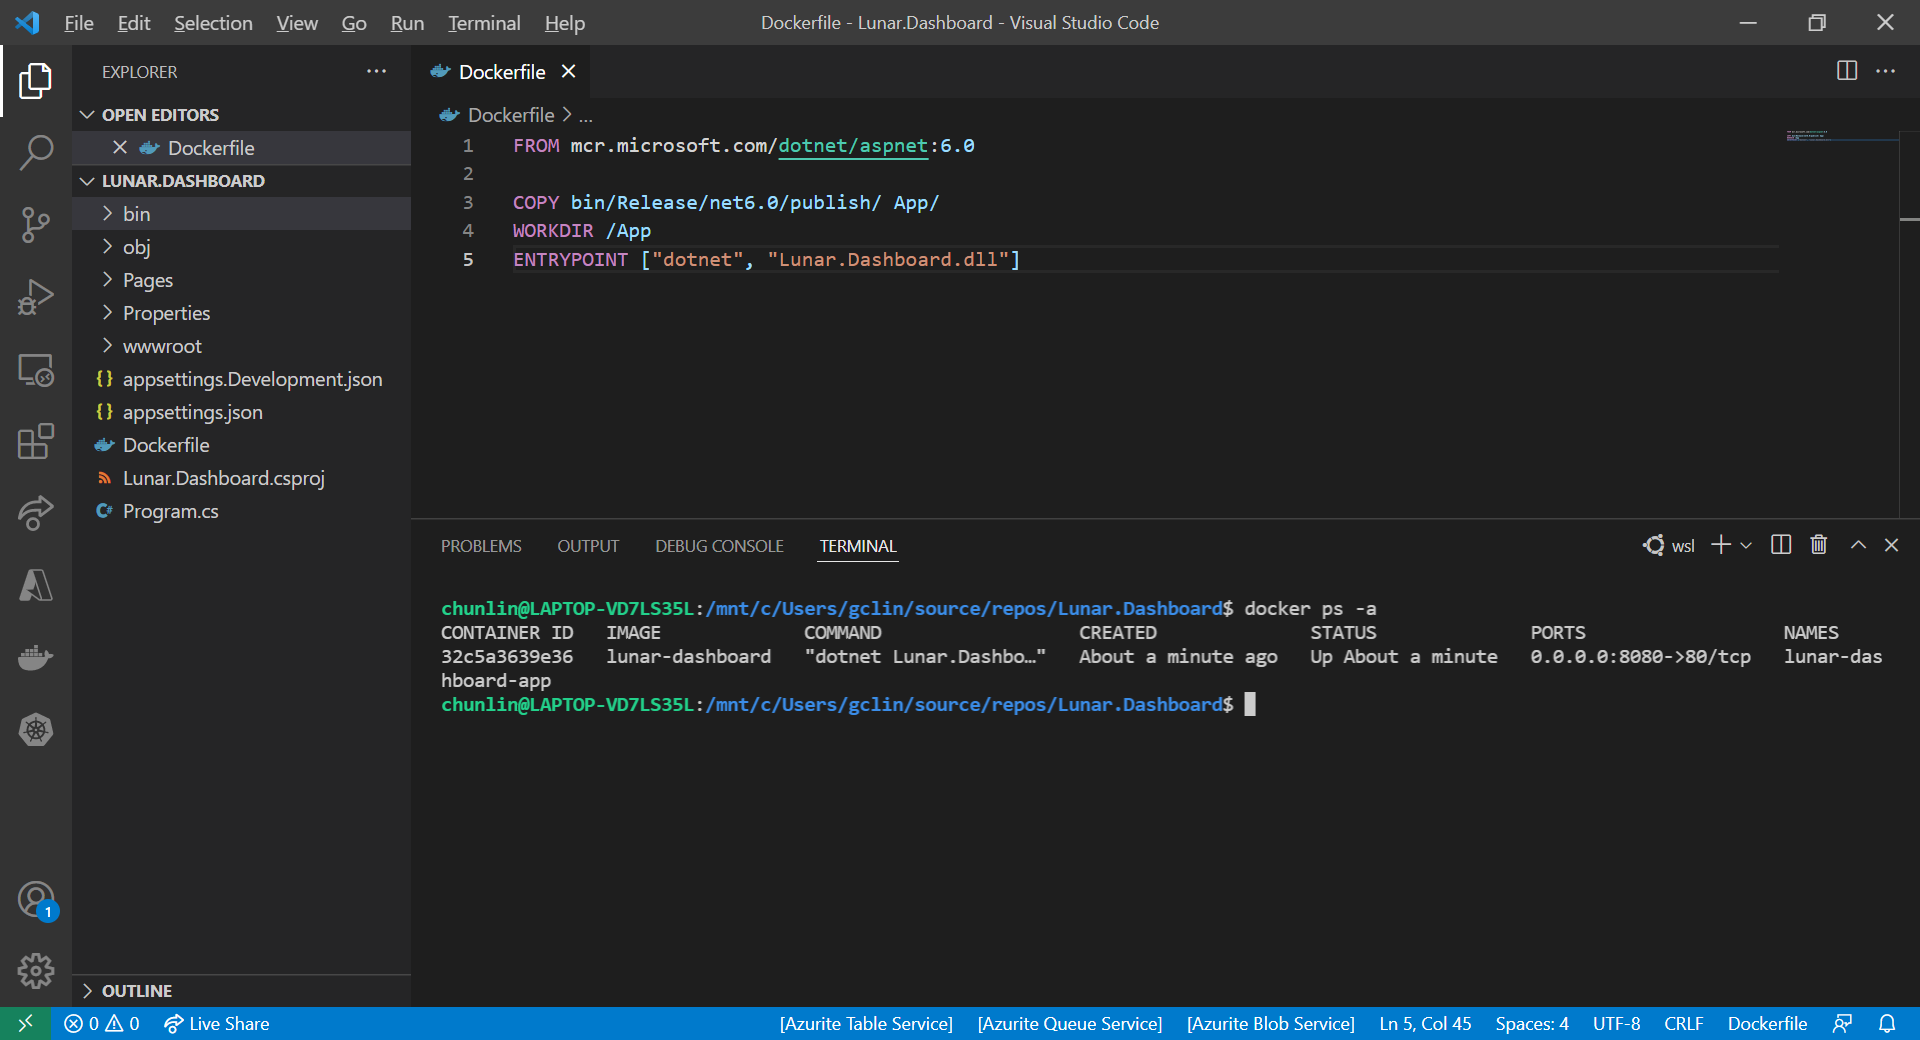
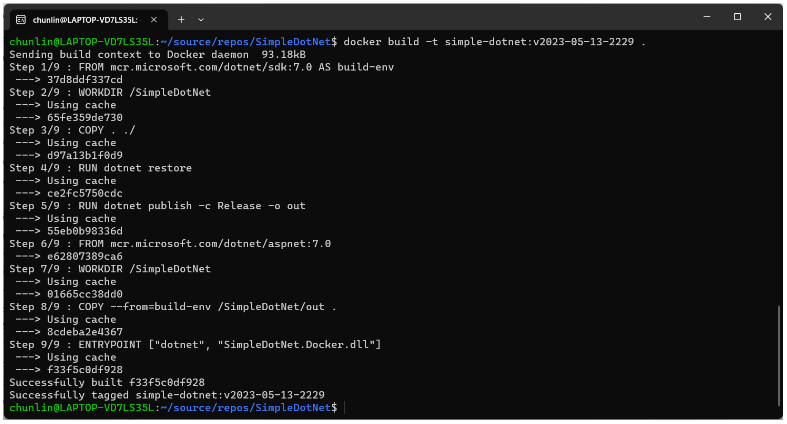
Now, we simply need to open another WSL terminal and execute docker commands, such as docker ps, docker build, etc.

With this, we can now push our image to Docker Hub from our local Windows machine.

Configure a local Kubernetes

Now if we try to run the command line tool, kubectl, we will find out that the command is still not yet available.

We can use the following commands to install kubectl.

$ curl -LO https://storage.googleapis.com/kubernetes-release/release/`curl -s https://storage.googleapis.com/kubernetes-release/release/stable.txt`/bin/linux/amd64/kubectl


$ chmod +x ./kubectl


$ sudo mv ./kubectl /usr/local/bin/kubectl


$ kubectl version --client

The following screenshot shows what we can see after running the commands above.

After we have kubectl, we need to make Kubernetes available on our local machine. To do so, we need to install minikube, a local Kubernetes. minikube can setup a local Kubernetes cluster on macOS, Linux, and Windows.

To install the latest minikube stable release on x86-64 Linux using binary download:

$ curl -LO https://storage.googleapis.com/minikube/releases/latest/minikube-linux-amd64

$ sudo install minikube-linux-amd64 /usr/local/bin/minikube

The following is the results of running the installation of minicube. We also run the minicube by executing the command “minikube start”.

We can now run some basic kubectl commands, as shown below.

References

[KOSD] Dockerise an ASP .NET Core 6.0 Web App

Let’s assume now we want to dockerise a new ASP .NET Core 6.0 web app project that we have locally.

Now, when we build and run the project, we should be able to view it on localhost as shown below.

The default homepage of a new ASP .NET Core web app.

Before adding the .NET app to the Docker image, first it must be published with the following command.

dotnet publish --configuration Release
Build, run, and publish our ASP .NET Core web app.

Create the Dockerfile

Now, we will create a file named Dockerfile in directory containing the .csproj and open it in VS Code. The content of the Dockerfile is as follows.

FROM mcr.microsoft.com/dotnet/aspnet:6.0

COPY bin/Release/net6.0/publish/ App/
WORKDIR /App
ENTRYPOINT ["dotnet", "Lunar.Dashboard.dll"]

A Dockerfile must begin with a FROM instruction. It specifies the parent image from which we are building. Here, we are using mcr.microsoft.com/dotnet/aspnet:6.0, an image contains the ASP.NET Core 6.0 and .NET 6.0 runtimes for running ASP.NET Core web apps.

The COPY command tells Docker to copy the publish folder from our computer to the App folder in the container. Then the current directory inside of the container is changed to App with the WORKDIR command.

Finally, the ENTRYPOINT command tells Docker to configure the container to run as an executable.

Docker Build

Now that we have the Dockerfile, we can build an image from it.

In order to perform docker build, we first need to navigate the our project root folder and issue the docker build command, as shown below.

docker build -t lunar-dashboard -f Dockerfile .

We assign a tag lunar-dashboard to the image name using -t. We then specify the name of the Dockerfile using -f. The . in the command tells Docker to use the current folder, i.e. our project root folder, as the context.

Once the build is successful, we can locate the newly created image with the docker images command, as highlighted in the screenshot below.

The default docker images command will show all top level images.

Create a Container

Now that we have an image lunar-dashboard that contains our ASP .NET Core web app, we can create a container with the docker run command. 

docker run -d -p 8080:80 --name lunar-dashboard-app lunar-dashboard

When we start a container, we must decide if it should be run in a detached mode, i.e. background mode, or in a foreground mode. By default the container will be running in foreground.

In the foreground mode, the console that we are using to execute docker run will be attached to standard input, output and error. This is not what we want. What we want is after we start up the container, we can still use the console for other commands. Hence, the container needs to be in detached mode. To do so, we use the -d option which will start the container in detached mode.

We then publish a port of the container to the host with -p 8080:80, where 8080 is the host port and 80 is the container port.

Finally, we name our container lunar-dashboard-app with the --name option. If we do not assign a container name with the --name option, then the daemon will generate a random string name for us. Most of the time, the auto-generated name is quite hard to remember, so it’s better for us to give a meaningful name to the container so we can easily refer the container later.

After we run the docker run command, we should be able to find our newly created container lunar-dashboard with the docker ps command, as shown in the following screenshot. The option -a is to show all containers because by default docker ps will show only containers which are running.

Our container lunar-dashboard is now running.

Now, if we visit the localhost at port 8080, we shall be able to see our web app running smoothly.

This web app is hosting on our Docker container.

Running Docker on Windows 11 Home

You may notice that I am using WSL (Windows Subsystem for Linux). This is because to install Docker Desktop, which includes the Docker Engine that builds and containerise our apps, on Windows, we need to have Hyper-V feature enabled. However, Hyper-V is available only on Windows 10/11 Pro, Enterprise, and Education.

Hence, I have no choice but to use WSL, which runs a Linux kernel inside of a lightweight utility VM. WSL provides a mechanism for running Docker (with Linux containers) on the Windows machine.

For those who are interested to read more about this, please refer to a very detailed online tutorial about how to run Docker with WSL, written by Padok SRE Baptiste Guerin.

References

KOSD, or Kopi-O Siew Dai, is a type of Singapore coffee that I enjoy. It is basically a cup of coffee with a little bit of sugar. This series is meant to blog about technical knowledge that I gained while having a small cup of Kopi-O Siew Dai.