Let’s assume now we want to dockerise a new ASP .NET Core 6.0 web app project that we have locally.
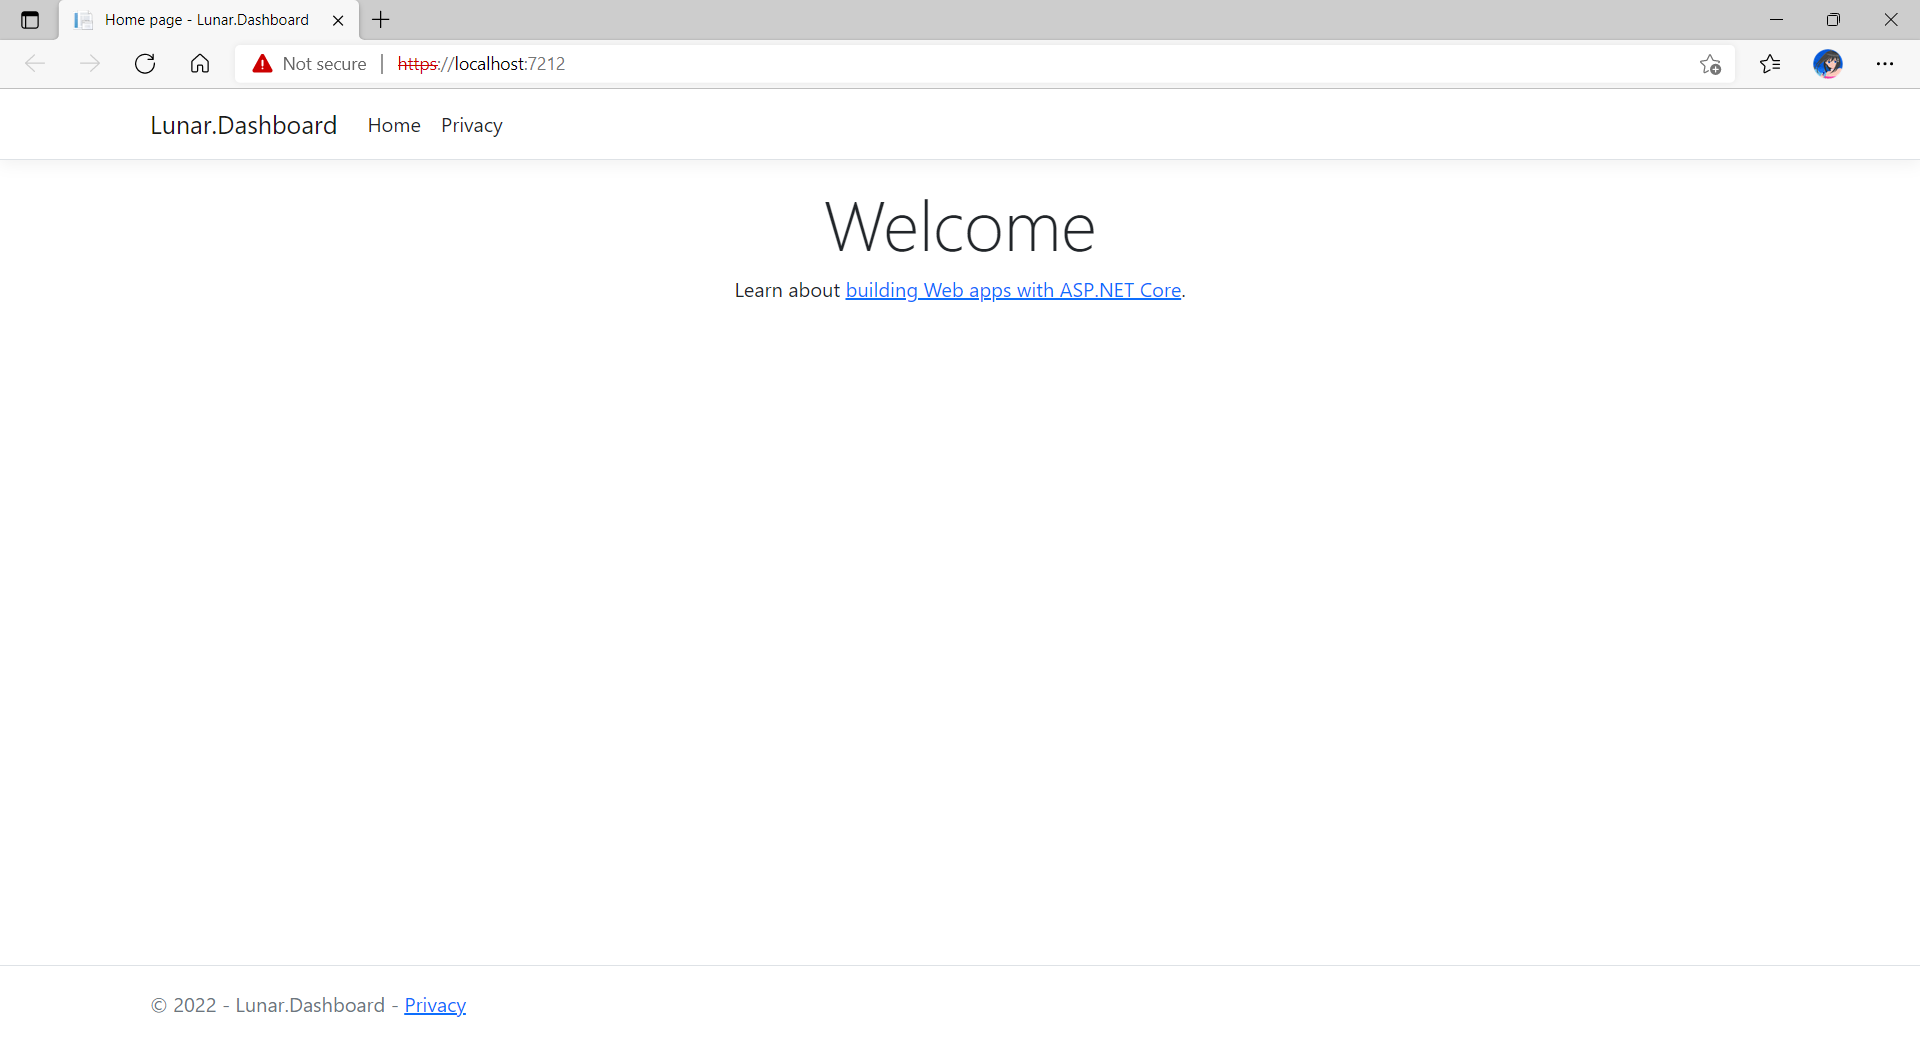
Now, when we build and run the project, we should be able to view it on localhost as shown below.
The default homepage of a new ASP .NET Core web app.
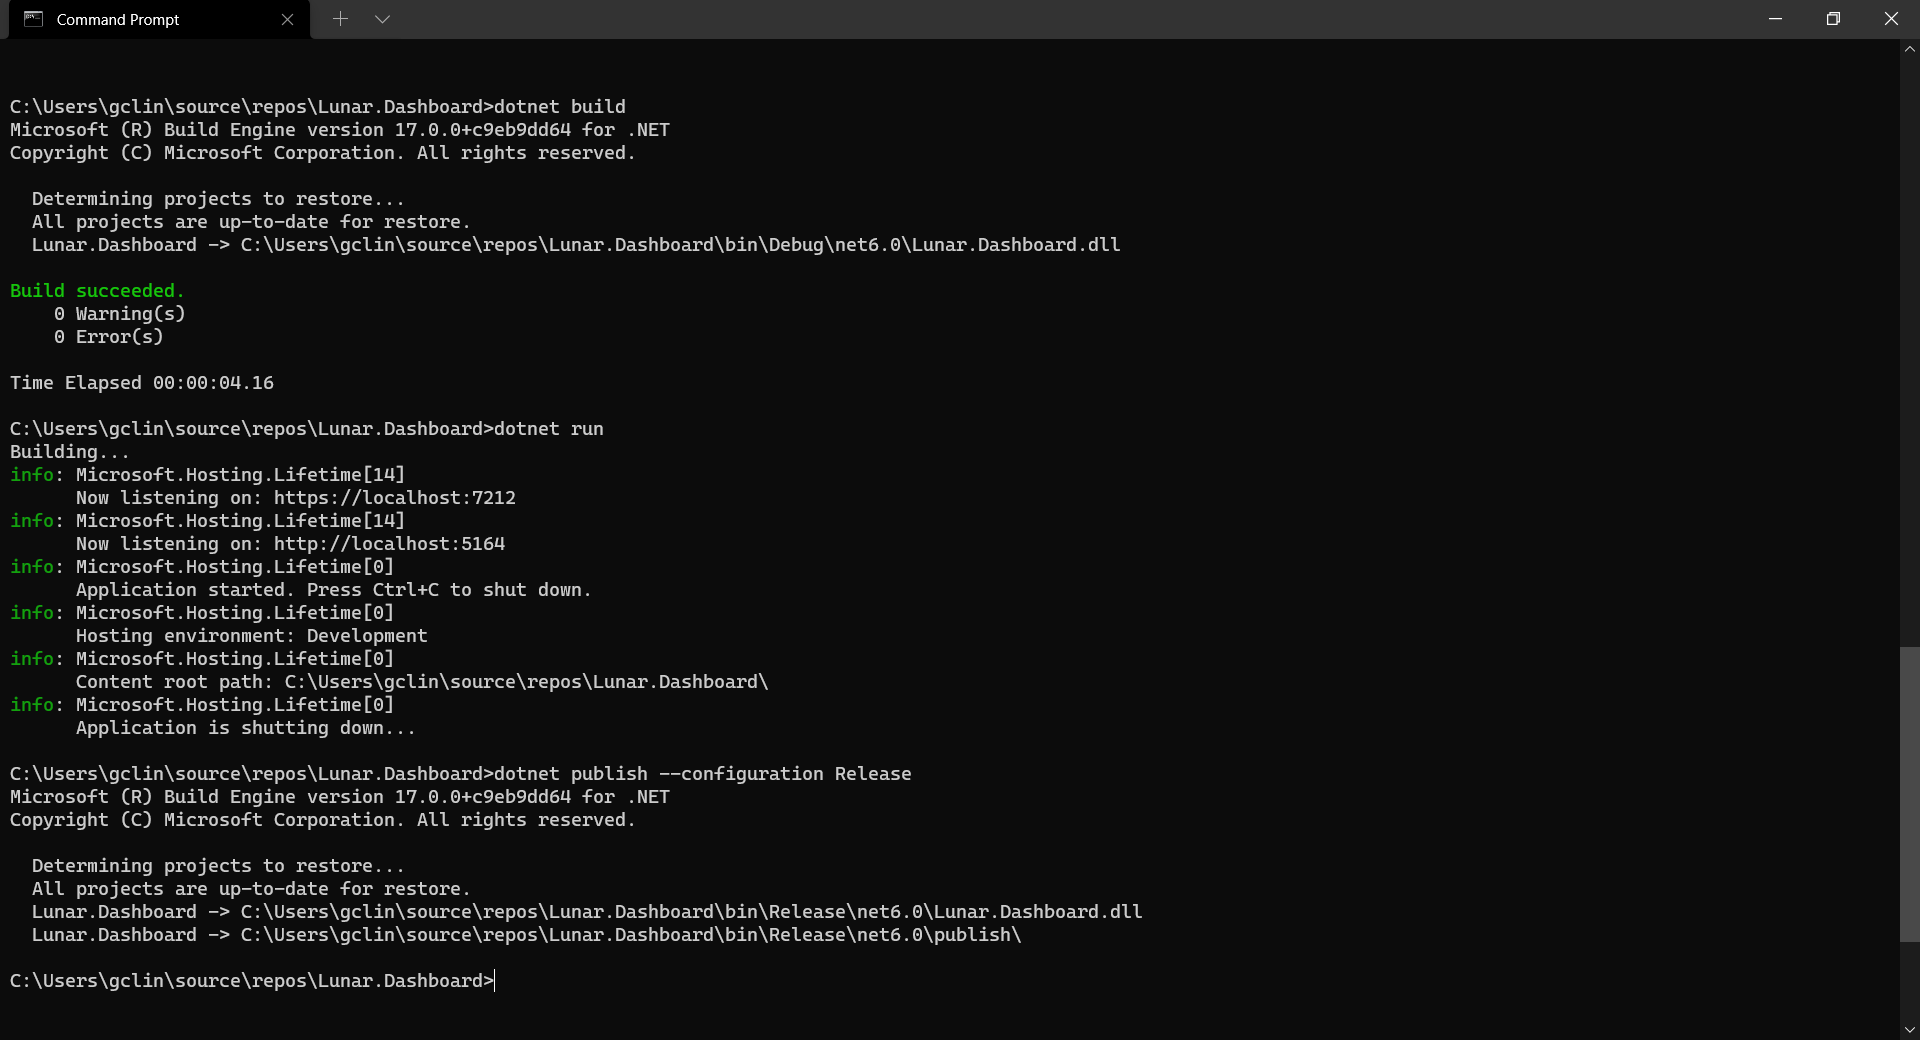
Before adding the .NET app to the Docker image, first it must be published with the following command.
dotnet publish --configuration Release
Build, run, and publish our ASP .NET Core web app.
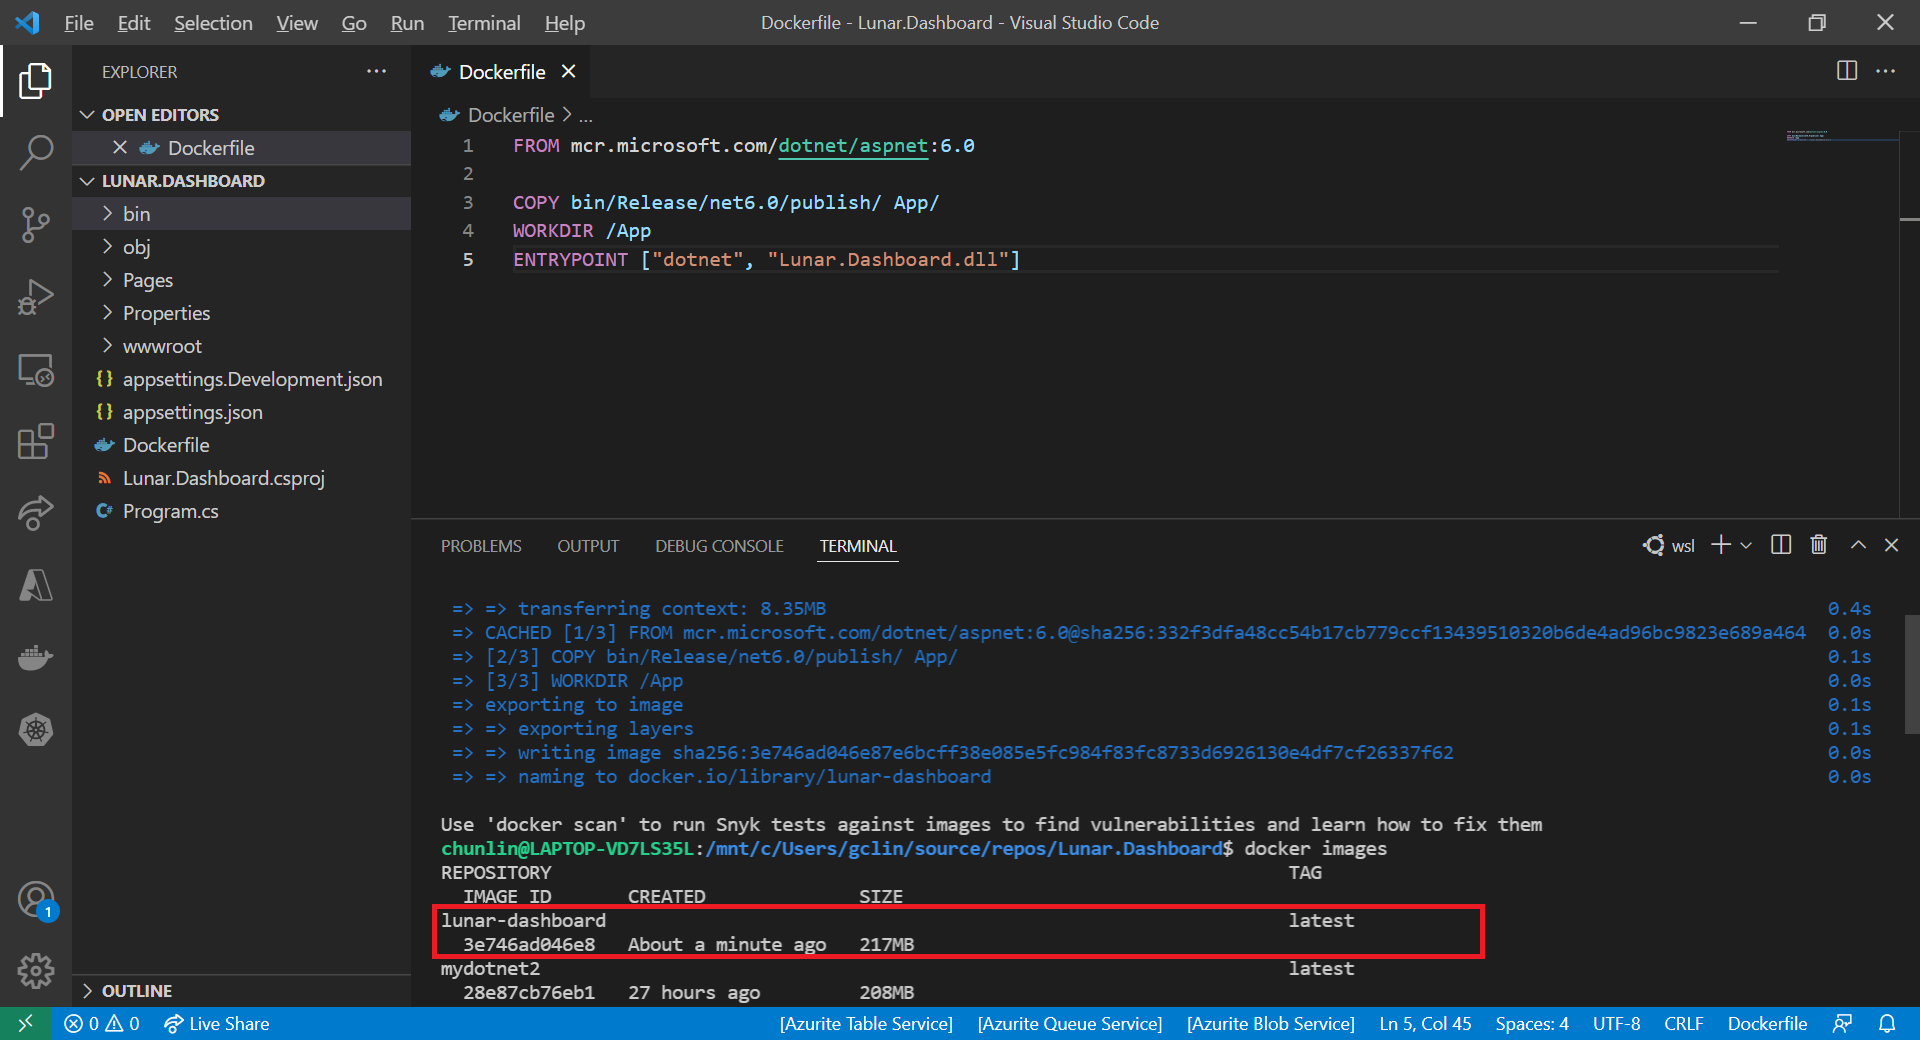
Create the Dockerfile
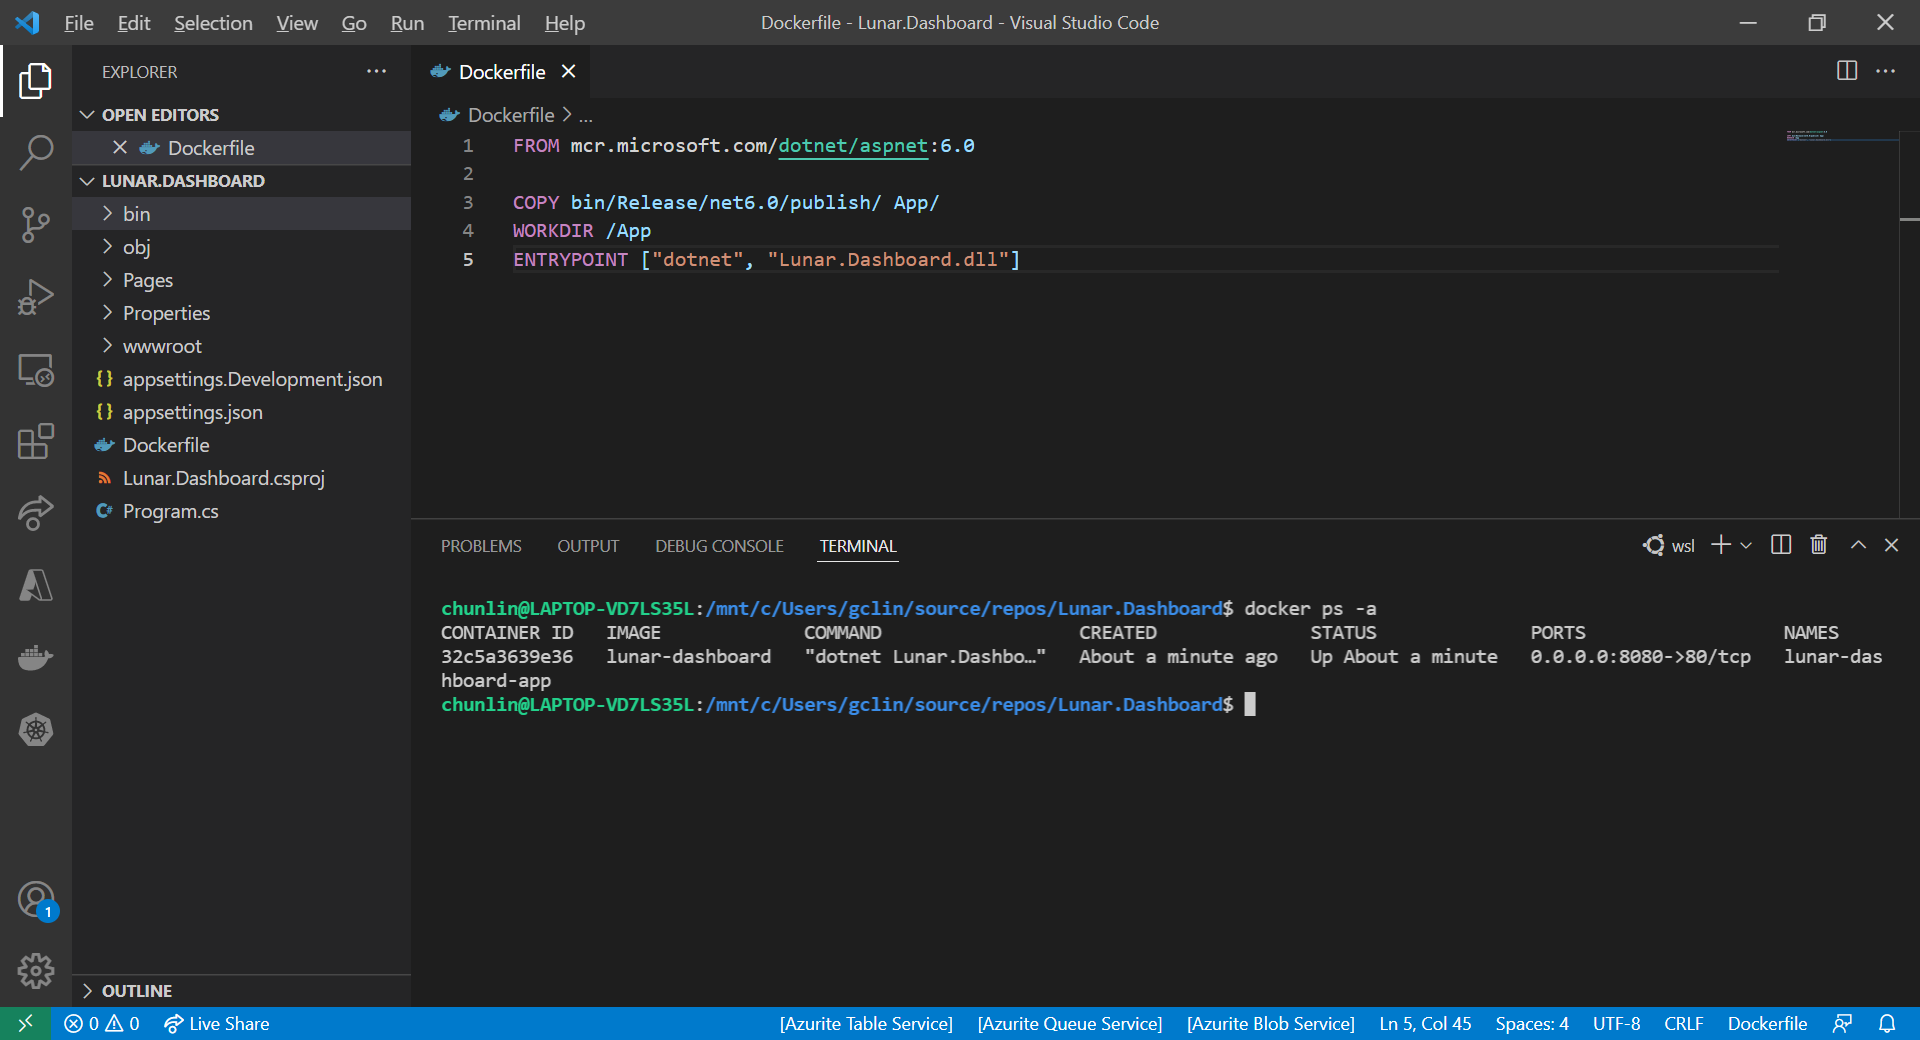
Now, we will create a file named Dockerfile in directory containing the .csproj and open it in VS Code. The content of the Dockerfile is as follows.
FROM mcr.microsoft.com/dotnet/aspnet:6.0

COPY bin/Release/net6.0/publish/ App/
WORKDIR /App
ENTRYPOINT ["dotnet", "Lunar.Dashboard.dll"]
A Dockerfile must begin with a FROM instruction. It specifies the parent image from which we are building. Here, we are using mcr.microsoft.com/dotnet/aspnet:6.0, an image contains the ASP.NET Core 6.0 and .NET 6.0 runtimes for running ASP.NET Core web apps.
The COPY command tells Docker to copy the publish folder from our computer to the App folder in the container. Then the current directory inside of the container is changed to App with the WORKDIR command.
Finally, the ENTRYPOINT command tells Docker to configure the container to run as an executable.
Docker Build
Now that we have the Dockerfile, we can build an image from it.
In order to perform docker build, we first need to navigate the our project root folder and issue the docker build command, as shown below.
docker build -t lunar-dashboard -f Dockerfile .
We assign a tag lunar-dashboard to the image name using -t. We then specify the name of the Dockerfile using -f. The . in the command tells Docker to use the current folder, i.e. our project root folder, as the context.
Once the build is successful, we can locate the newly created image with the docker images command, as highlighted in the screenshot below.
The default docker images command will show all top level images.
Create a Container
Now that we have an image lunar-dashboard that contains our ASP .NET Core web app, we can create a container with the docker run command.
docker run -d -p 8080:80 --name lunar-dashboard-app lunar-dashboard
When we start a container, we must decide if it should be run in a detached mode, i.e. background mode, or in a foreground mode. By default the container will be running in foreground.
In the foreground mode, the console that we are using to execute docker run will be attached to standard input, output and error. This is not what we want. What we want is after we start up the container, we can still use the console for other commands. Hence, the container needs to be in detached mode. To do so, we use the -d option which will start the container in detached mode.
We then publish a port of the container to the host with -p 8080:80, where 8080 is the host port and 80 is the container port.
Finally, we name our container lunar-dashboard-app with the --name option. If we do not assign a container name with the --name option, then the daemon will generate a random string name for us. Most of the time, the auto-generated name is quite hard to remember, so it’s better for us to give a meaningful name to the container so we can easily refer the container later.
After we run the docker run command, we should be able to find our newly created container lunar-dashboard with the docker ps command, as shown in the following screenshot. The option -a is to show all containers because by default docker ps will show only containers which are running.
Our container lunar-dashboard is now running.
Now, if we visit the localhost at port 8080, we shall be able to see our web app running smoothly.
Hence, I have no choice but to use WSL, which runs a Linux kernel inside of a lightweight utility VM. WSL provides a mechanism for running Docker (with Linux containers) on the Windows machine.
KOSD, or Kopi-O Siew Dai, is a type of Singapore coffee that I enjoy. It is basically a cup of coffee with a little bit of sugar. This series is meant to blog about technical knowledge that I gained while having a small cup of Kopi-O Siew Dai.
Recently with music-streaming services like Spotify and YouTube Music getting popular, one may ask whether it’s possible to setup personal music-streaming service. The answer is yes.
There is a solution called Subsonic, which is developed by Sindre Mehus. However, Subsonic is no longer open source after 2016. Hence, we would talk about another open-source project inspired by Subsonic, i.e. Airsonic. According the the official website, the goal of Airsonic is to provide a full-featured, stable, self-hosted media server based on the Subsonic codebase that is free, open source, and community driven. So, let’s see how we can get Airsonic up and running on Azure.
Ubuntu on Microsoft Azure
Azure Virtual Machines supports running Linux and Windows. Airsonic can be installed on both Linux and Windows too. Since Linux is an open-source software server, it will be cheaper to run it on Azure than a Windows server.
Currently, Azure supports common Linux distributions including Ubuntu, CentOS, Debian, Red Hat, SUSE. Here, we would choose to use Ubuntu because it certainly has the upper hand when it comes to documentation and online help which makes finding OS-related solutions to easy. In addition, Ubuntu is updated frequently with LTS (Long Term Support) version released once every two years. Finally, if you are users of Debian-style distributions, Ubuntu will be a comfortable pick.
Ubuntu LTS and interim releases timeline. (Source: ubuntu.com)
Azure VM Size, Disk Size, and Cost
We should deploy a VM that provides the necessary performance for the workload at hand.
For the OS disk type, instead of the default Premium SSD option, we will go for Standard SSD because it is not only a lower-cost SSD offering, but also more suitable for our audio application which is lightly used.
Remove Public Inbound Ports and Public IP Address
It’s not alright to have SSH port exposed to the Internet because there will be SSH attacks. Hence, we will remove the default public inbound ports. This will make all traffic from the Internet will be blocked. Later we will need to use a VPN connection instead to connect to the VM.
Remove all public inbound ports.
By default, when we create a VM on Azure Portal, there will be a public IP address given. It’s always recommended to not have public IP bound to the VM directly even there is only a single VM. Instead, we should deploy a load balancer in front of the VM and then have the VM bound to the load balancer. This will eventually make our life easier when we want to scale out our VM.
To not have any public IP address assigned to the VM, as shown in the screenshot below, we need to change the value of Public IP to “None”.
It is important to plan how our VM is intended to be accessed on the VNet before creating the actual VM.
The VNet configuration that we will be setting up for this project.
Since we have removed all the inbound public ports for the VM, we need to communicate with the VM through VPN. Hence, we currently need to have at least two subnets where one is for the VM and another one is for the VPN Gateway. We will add the subnet for VPN Gateway later. Now, we just do as follows.
Configuring VNet for our new VM.
Setup Point-to-Site (P2S) VPN Connection
There are already many tutorials available online about how to setup P2S VPN on Azure, for example the one written by Dishan Francis in Microsoft Tech Community, so I will not talk about how to setup the VPN Gateway on Azure. Instead, I’d like to highlight that P2S Connection is not configurable on Azure Portal if you are choosing the Basic type of the Azure VPN Gateway.
Once the VM deployment is successful, we can head to where the VNet it is located at. Then, we add the VPN Gateway subnet as shown in the screenshot below. As you can see, unlike the other subnets, the Gateway Subnet entry always has its name fixed to “GatewaySubnet” which we cannot modify.
Specifying the subnet address range for the VPN Gateway.
Next, we create a VPN Gateway. Since we are using the gateway for P2S, the type of VPN needs to be route-based. The gateway SKU that we chose here is the lowest cost, which is VpnGw1. Meanwhile, the Subnet field will be automatically chosen once we specify our VNet.
Creating a route-based VPN gateway.
The VPN gateway deployment process takes about 25 minutes. So while waiting for it to complete, we can proceed to create self-sign root and client certificates. Only root cert will be used in setting up the VPN Gateway here. The client certificate is used for installation on other computers which need P2S connections.
Configuring Point-to-site. Saving of this will take about 5 minutes.
Now, we can download the corresponding VPN client to our local machine and install it. With this, we will get to see a new connection having our resource group name as its name available as one of the VPN connections on our machine.
A new VPN connection available to connect to our VM.
We can then connect to our VM using its private IP address, as shown in the screenshot below. Now, at least our VM is secured in the sense that its SSH port is not exposed to the public Internet.
We will not be connected with our VM through PuTTY SSH client if the corresponding VPN is disconnected.
Upgrade Ubuntu to 20.04 LTS
Once we have successfully connected to our VM, if we are using the Ubuntu 18.04 provided on Azure, then we will notice a message reminding us that there is a newer LTS version of Ubuntu available, which is Ubuntu 20.04, as shown in the screenshot below. Simply proceed to upgrade it.
New release of Ubuntu 20.04.2 LTS is available now.
Set VM Operating Hours
Since in cloud computing, we pay for what we use. Hence, it’s important that our VMs are only running when it’s necessary. If the VM doesn’t need to run 24-hour everyday, then we can configure its auto start and stop timings. For my case, I don’t listen to music when I am sleeping, so I will turn off the audio server between 12am to 6am.
To start and stop our VM at a scheduled time of the day, we can use the Tasks function, which is still in preview and available under Automation section of the VM. It will create two Logic Apps which will not automatically start or stop the VM.
Changed the Logic Apps generated by the auto-power-off-VM template to send POST request to the powerOff endpoint directly.
Install Airsonic and Run as Standalone Programme
Since our VM will be automatically stopped and started everyday, it’s better to integrate Airsonic programme with Systemd so that Airsonic will be automatically run on each boot. There is a tutorial on how to set this up in the Airsonic documentation, so I will not describe the steps here. However, please remember to install Open JDK 8 too because Airsonic is based on Java to run.
Checking the airsonic.service status.
By default, Airsonic will be available at the port 8080 and it is listening on the path /airsonic. If the installation is successful, with our VPN connection connected, then we shall be able to see the following login screen in our first visit. Please immediately change the password as instructed for security purpose.
Basic SKU public IP address supports a dynamic as the default IP address assignment method. This means that a public IP address will be released from a resource when the resource is stopped (or deleted). The same resource will receive a different public IP address on start-up next time. If this is not what you expect, you can choose to use a static IP address to ensure it remains the same.
We now need to attach our VM to the backend pool of the load balancer, as shown in the following screenshot.
Attaching VM to the backend pool of the Azure Load Balancer.
After that, in order to allow Airsonic to be accessible from the public Internet, we shall set an inbound NAT (Network Address Translation) rule on the Azure Load Balancer. Here since I have only one VM, I directly set the VM as the target and setup a custom port mapping from port 80 to port 8080 (8080 is the default port used by Airsonic), as shown below.
A new inbound NAT rule has been set for the Airsonic VM.
Also, at the same time, we need to allow port 8080 in the Network Interface of the VM, as highlighted in the screenshot below.
Note: The VM airsonic-main-02 shown in the screenshot is the 2nd VM that I have for the same project. It is same as airsonic-main VM.
Allow inbound port 8080 on the Airsonic VM.
Once we have done all these, we can finally access Airsonic through the public IP address of the load balancer.
Enjoy the Music
By default, the media folder that will be used by Airsonic is at /var/music, as shown below. If this music folder does not exist yet, simply proceed to create one.
Airsonic will scan the media folder every day at 3am by default.
While waiting for lunch, it’s nice to do some warmups. Setting a server overseas seems a pretty cool warmup to do for developers, right? Recently, my friend recommended me to try out Vultr which provide cloud servers. So today, I’m going to share how I deploy a Ubuntu server which is located in Tokyo, a city far away from where I am now.
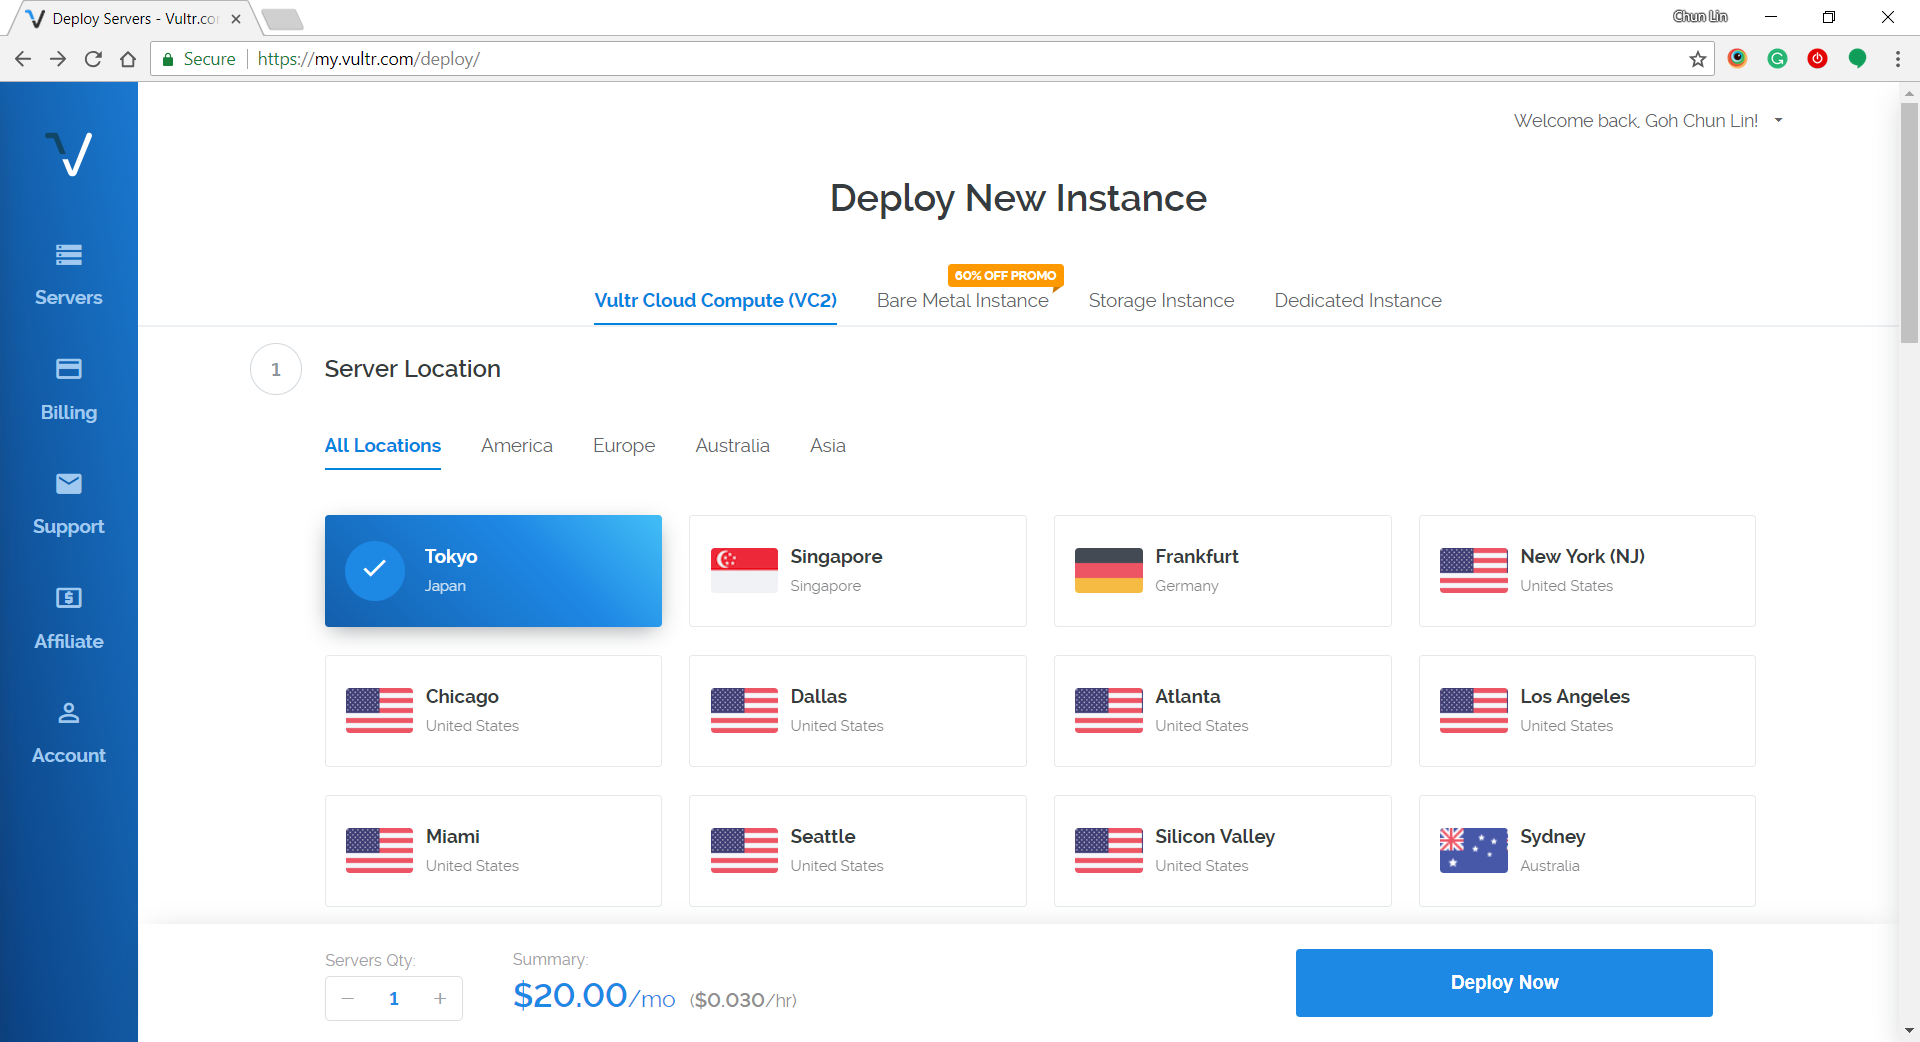
Step 1: Choosing Server Location
Vultr is currently available in many cities in popular countries such as Japan, Singapore, Germany, United States, Australia, etc.
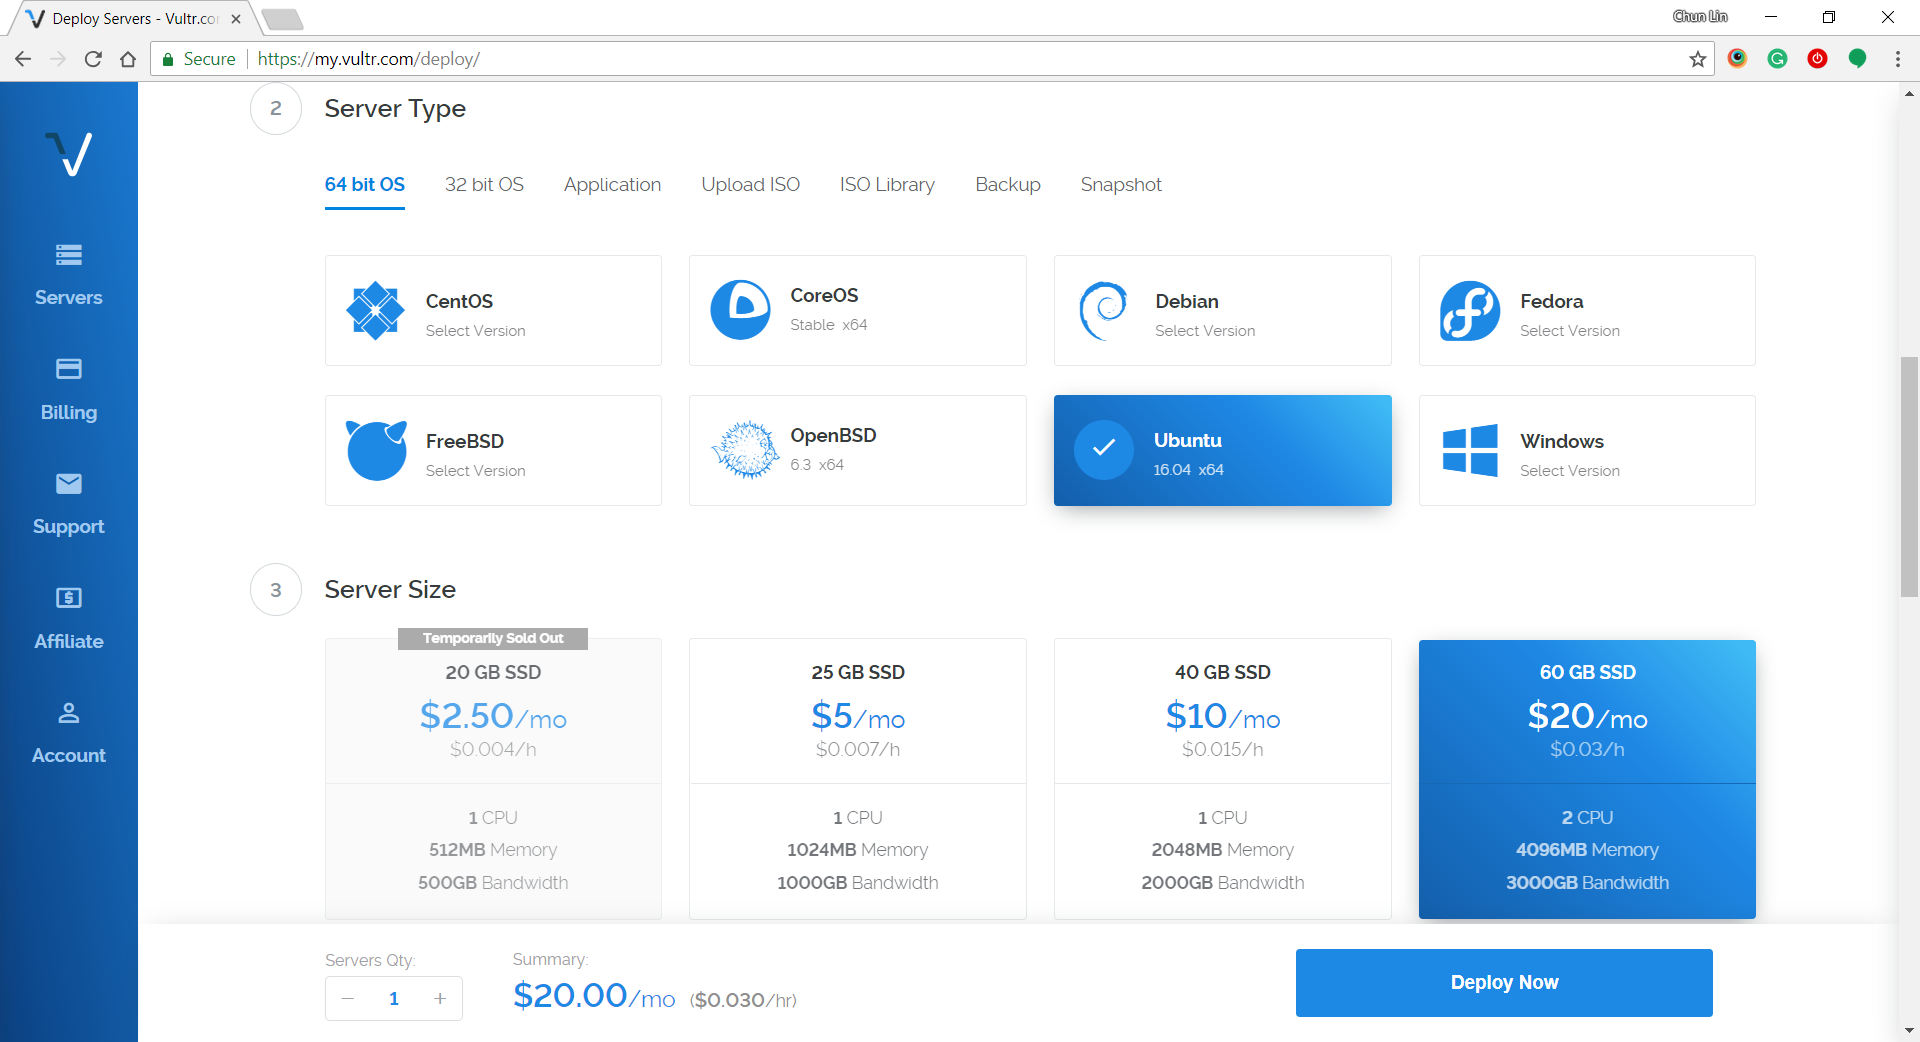
Step 2: Choosing Server Type and Size
Subsequently, we will be asked to select the type and size for the server. Here, I choose 60 GB SSD server with Ubuntu 16.04 x64 installed. I tried with Ubuntu 17.10 x64 before but I couldn’t successfully RDP into it. Then the latest Ubuntu 18.04 x64 is not yet tried by me. So ya, we will stick to using Ubuntu 16.04 x64 in this article.
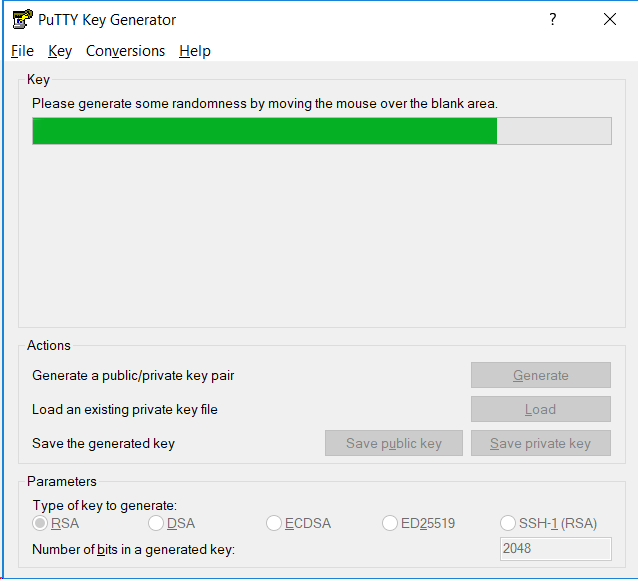
The steps for creating SSH key on Windows with PuTTYgen is as follows.
Firstly, we need to click on the “Generate” button on PuTTYgen.
Secondly, once the Public Key is generated, we need to enter a key passphrase for additional security.
Thirdly, we click on the “Save Private Key” button to save the private key on somewhere safe.
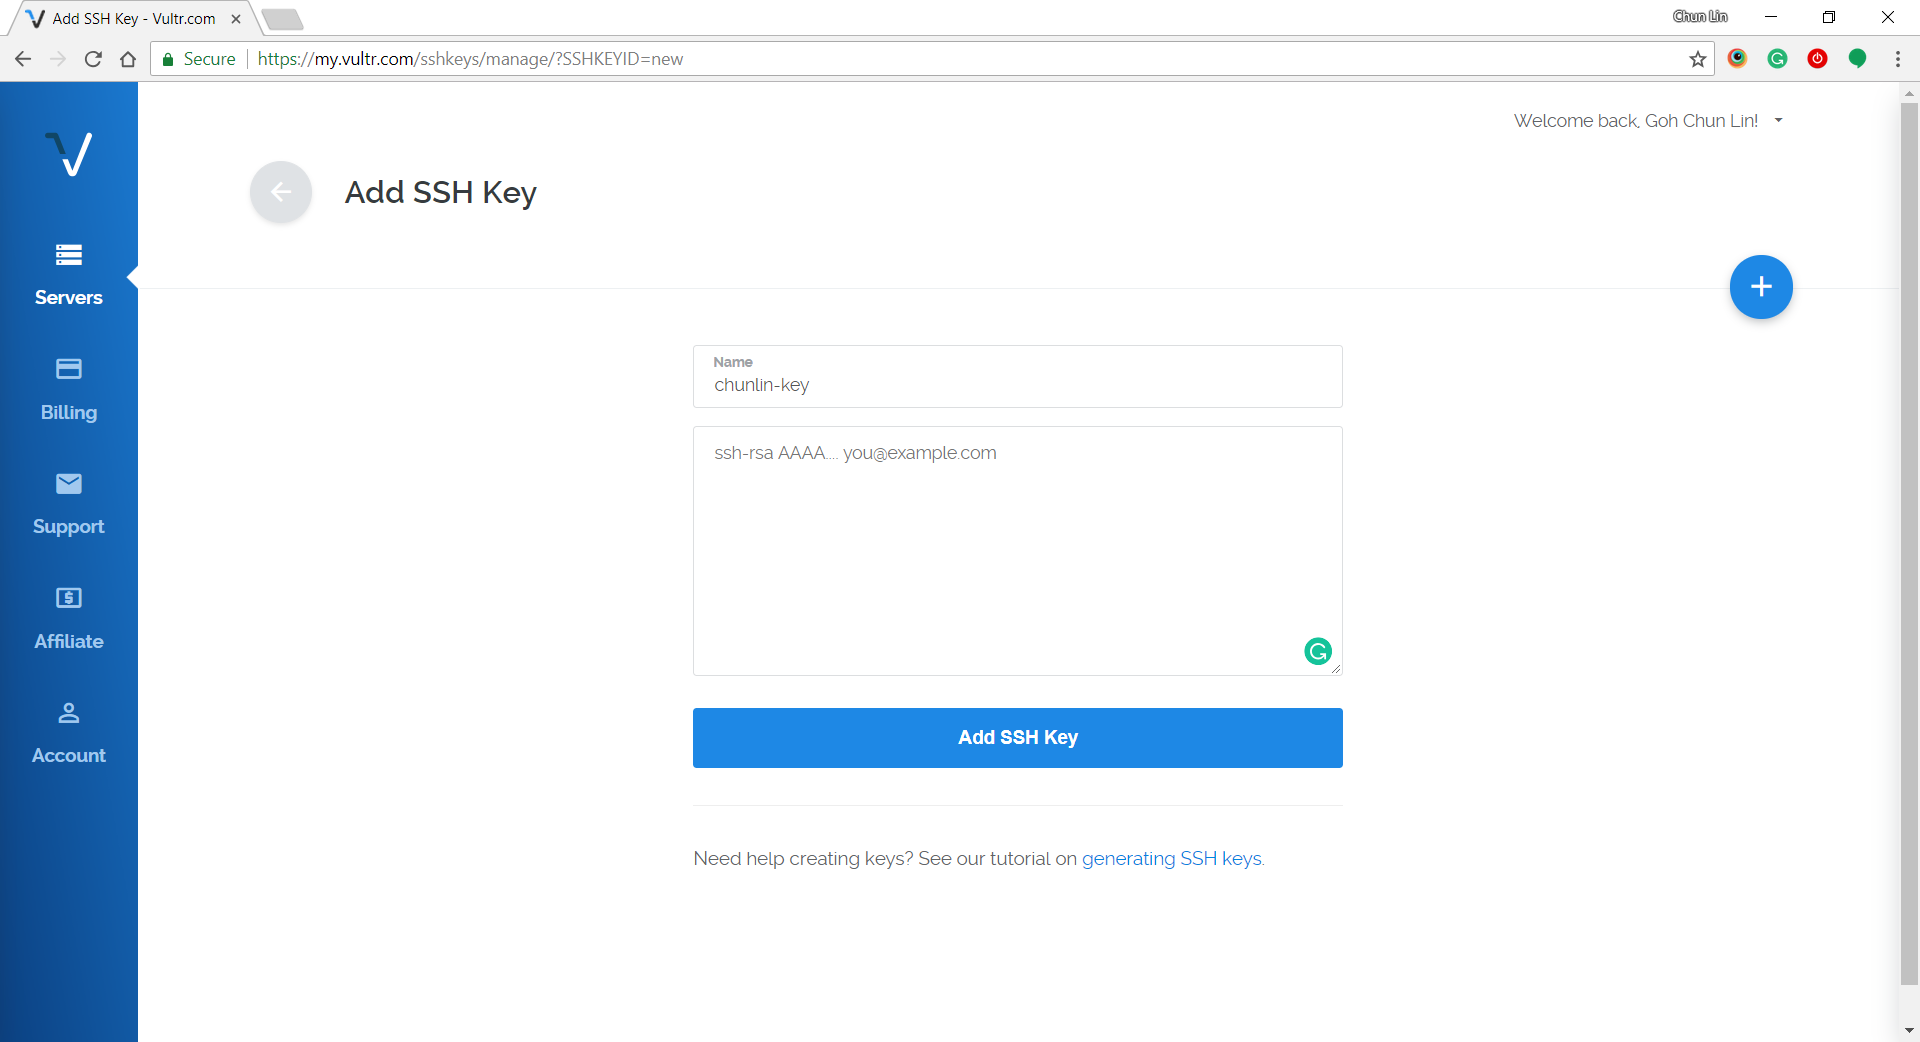
Fourthly, we copy all of the text in the Public Key field and paste it to the textbox in Vultr under the “Add SSH Key” section.
Step 4: Naming and Deployment
Before we can deploy the server, we need to key in the hostname for the new server.
After we have done that, then we can instruct Vultr to deploy the server by clicking on the “Deploy Now” button at the bottom of the page.
Within 5 minutes, the server should finish installing and booting up.
Step 5: Getting IP Address, Username, and Password
In order to get the user credential to access the server, we need to click on the “Server Details” to view the IP address, username, and password.
Step 6: Updating Root Password
The default password is not user-friendly. Hence, once we login to the server via PuTTY, we need to immediately update the root password using the command below for our own good.
# passwd
Step 7: Installing Ubuntu Desktop
Firstly, let’s do some updating for the packages via the following commands.
# sudo apt-get update
# sudo apt-get upgrade
This will take about 2 minutes to finish.
Then we can proceed to install the default desktop using the following command.
# sudo apt-get install ubuntu-desktop
This will take about 4 minutes to finish. Take note that at this point of time Unity will be the desktop environment.
After that, we update the packages again.
# sudo apt-get update
Step 8: Installing Text Editor
We are going to change some configurations later, so we will need to use a text editor. Here, I’ll use the Nano Text Editor by installing it first.
After it is installed successfully, please run the following command. This is to tell the Ubuntu server to know that Xfce has been chosen to replace Unity as desktop environment.
echo xfce4-session >~/.xsession
Step 11: Inspect xrdp Settings
We need to configure the xrdp settings by editing the startwm.sh in Nano Text Editor.
nano /etc/xrdp/startwm.sh
We need to edit the file by changing entire of the file content to be as follows.
if [ -r /etc/default/locale ]; then
 . /etc/default.locale
 export LANG LANGUAGE
fi

startxfce4
Then we need to restart xrdp.
# sudo service xrdp restart
After that, we restart the server.
# reboot now
Step 12: Connecting with Remote Desktop Client
After the server has been restarted, we can access the server with Windows Remote Desktop Client.
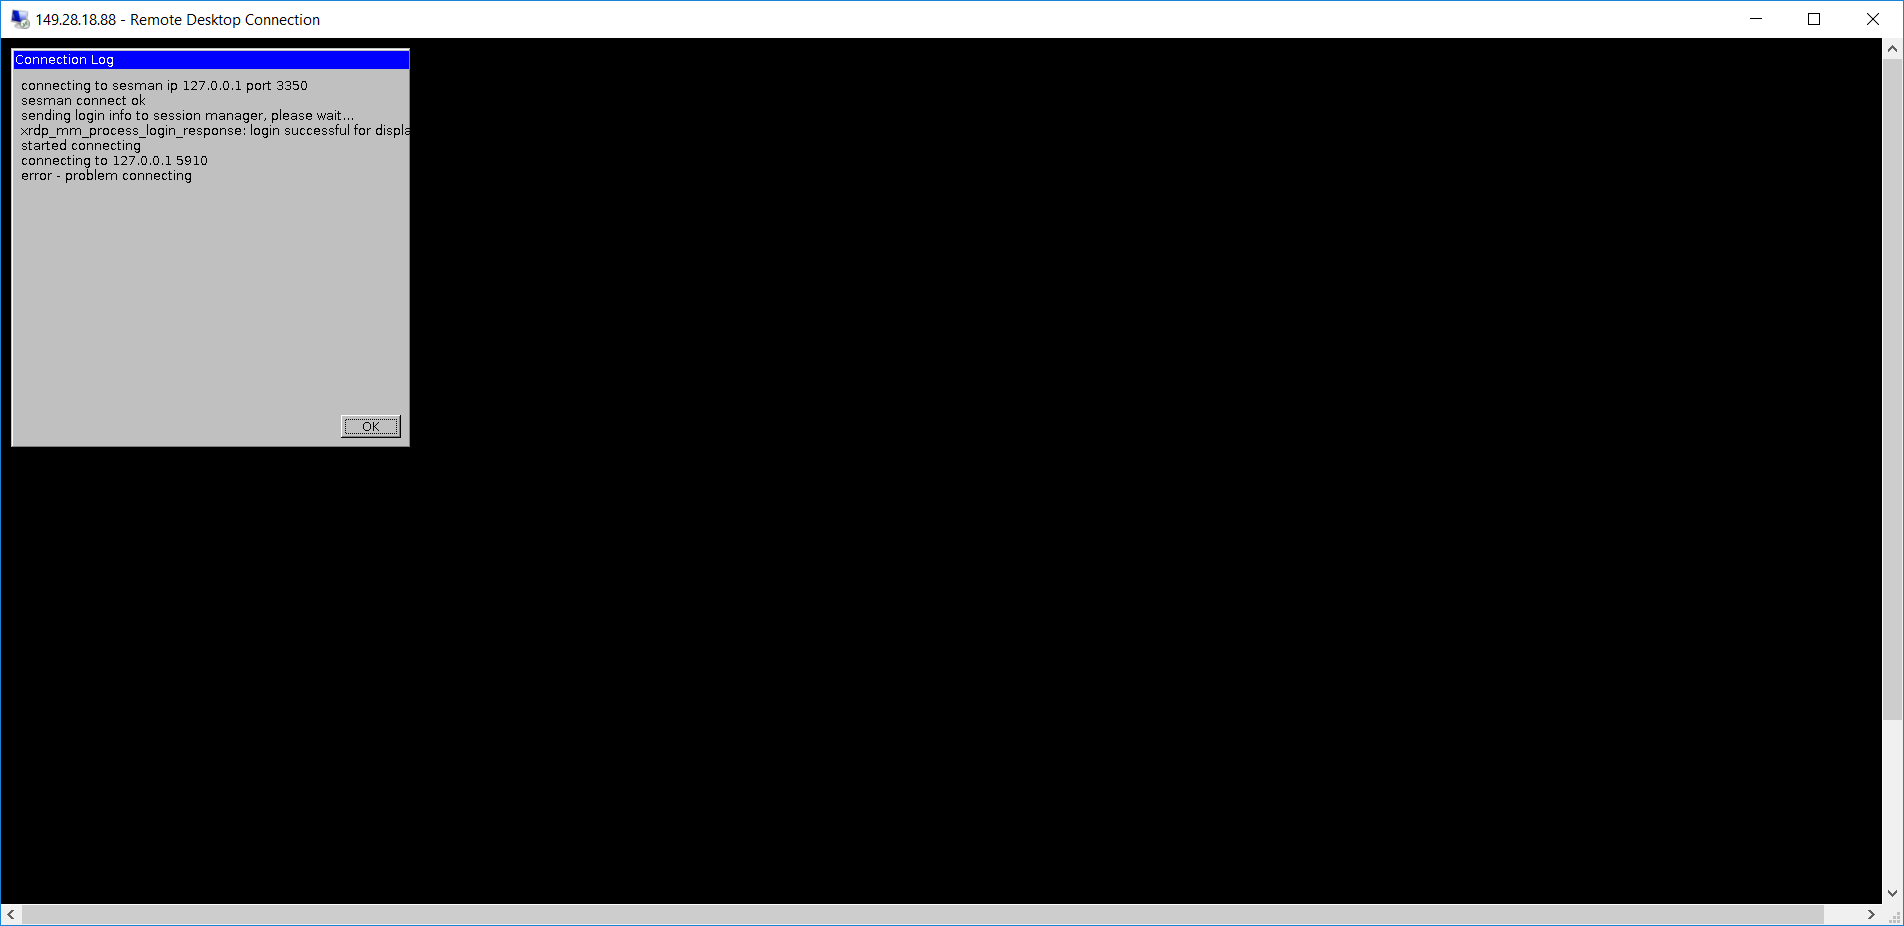
At this point of time, some of you may encounter error when logging in via RDP. The error will be saying things as follows.
Connecting to sesman IP 127.0.0.1 port 3350
sesman connect ok
sending login info to session manager, please wait...
xrdp_mm_process_login_response:login successful for display
started connecting
connecting to 127.0.0.1 5910
error-problem connecting
Problem of connecting via xrdp.
As pointed out in one of the discussion threads on Ask Ubuntu, the problem seems to be xrdp, vnc4server, and tightvncserver are installed in the wrong order. So in order to fix that, we just need to remove them and re-install them in a correct order with the following set of commands.