Setup Ubuntu Server at Tokyo and Transform it to Desktop with RDP Installed

vultr-ubuntu-xrdp-xfce

While waiting for lunch, it’s nice to do some warmups. Setting a server overseas seems a pretty cool warmup to do for developers, right? Recently, my friend recommended me to try out Vultr which provide cloud servers. So today, I’m going to share how I deploy a Ubuntu server which is located in Tokyo, a city far away from where I am now.

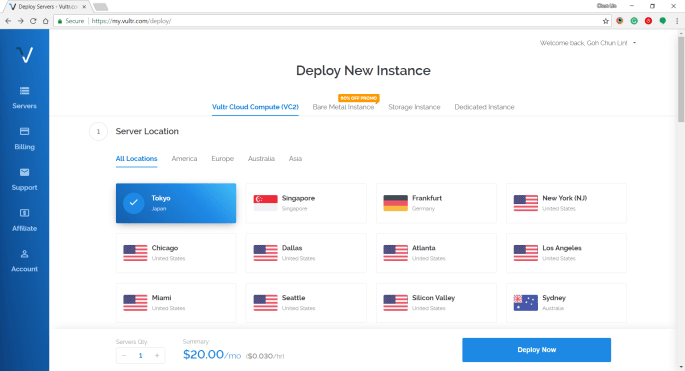
Step 1: Choosing Server Location

Vultr is currently available in many cities in popular countries such as Japan, Singapore, Germany, United States, Australia, etc.

server-location.png

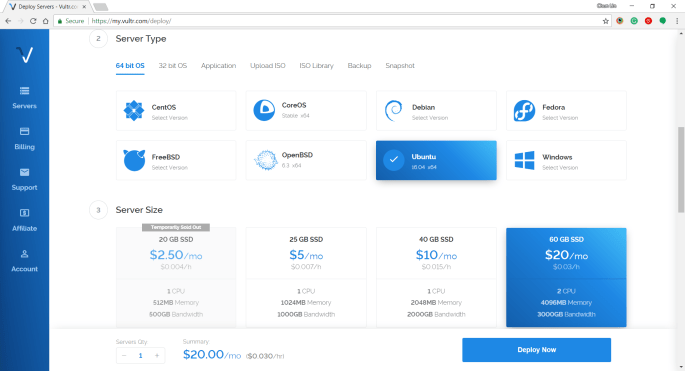
Step 2: Choosing Server Type and Size

Subsequently, we will be asked to select the type and size for the server. Here, I choose 60 GB SSD server with Ubuntu 16.04 x64 installed. I tried with Ubuntu 17.10 x64 before but I couldn’t successfully RDP into it. Then the latest Ubuntu 18.04 x64 is not yet tried by me. So ya, we will stick to using Ubuntu 16.04 x64 in this article.

vultr-ubuntu-pricing.png

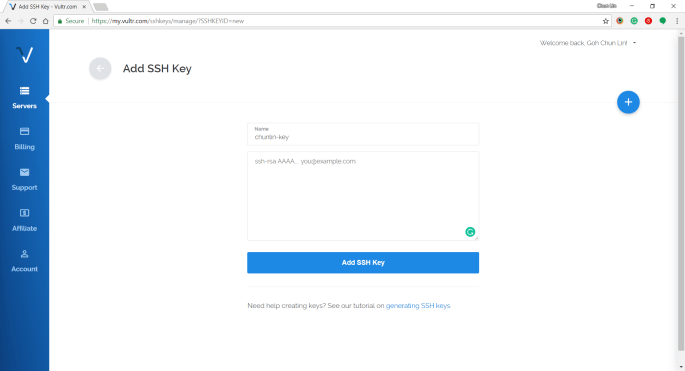
Step 3: Uploading SSH Key

Vultr is friendly to provide us a tutorial about generating SSH Keys on Windows and Linux.

The steps for creating SSH key on Windows with PuTTYgen is as follows.

Firstly, we need to click on the “Generate” button on PuTTYgen.

generate-key-pair.png

Secondly, once the Public Key is generated, we need to enter a key passphrase for additional security.

Thirdly, we click on the “Save Private Key” button to save the private key on somewhere safe.

Fourthly, we copy all of the text in the Public Key field and paste it to the textbox in Vultr under the “Add SSH Key” section.

adding-ssh-key.png

Step 4: Naming and Deployment

Before we can deploy the server, we need to key in the hostname for the new server.

After we have done that, then we can instruct Vultr to deploy the server by clicking on the “Deploy Now” button at the bottom of the page.

Within 5 minutes, the server should finish installing and booting up.

Step 5: Getting IP Address, Username, and Password

In order to get the user credential to access the server, we need to click on the “Server Details” to view the IP address, username, and password.

Step 6: Updating Root Password

The default password is not user-friendly. Hence, once we login to the server via PuTTY, we need to immediately update the root password using the command below for our own good.

# passwd

Step 7: Installing Ubuntu Desktop

Firstly, let’s do some updating for the packages via the following commands.

# sudo apt-get update
# sudo apt-get upgrade

This will take about 2 minutes to finish.

Then we can proceed to install the default desktop using the following command.

# sudo apt-get install ubuntu-desktop

This will take about 4 minutes to finish. Take note that at this point of time Unity will be the desktop environment.

After that, we update the packages again.

# sudo apt-get update

Step 8: Installing Text Editor

We are going to change some configurations later, so we will need to use a text editor. Here, I’ll use the Nano Text Editor by installing it first.

# sudo apt-get install nano

Step 9: Installing xrdp

xrdp is an open source Remote Desktop Protocol (RDP) server which provides a graphical login to remote machines. This helps us to connect to the server using Microsoft Remote Desktop Client.

sudo apt-get install xrdp

Step 10: Changing to Use Xfce Desktop Environment

We will then proceed to install Xfce which is a lightweight desktop environment for UNIX-like operating systems.

sudo apt-get install xfce4

After it is installed successfully, please run the following command. This is to tell the Ubuntu server to know that Xfce has been chosen to replace Unity as desktop environment.

echo xfce4-session >~/.xsession

Step 11: Inspect xrdp Settings

We need to configure the xrdp settings by editing the startwm.sh in Nano Text Editor.

nano /etc/xrdp/startwm.sh

We need to edit the file by changing entire of the file content to be as follows.

if [ -r /etc/default/locale ]; then
 . /etc/default.locale
 export LANG LANGUAGE
fi

startxfce4

Then we need to restart xrdp.

# sudo service xrdp restart

After that, we restart the server.

# reboot now

Step 12: Connecting with Remote Desktop Client

After the server has been restarted, we can access the server with Windows Remote Desktop Client.

rdp

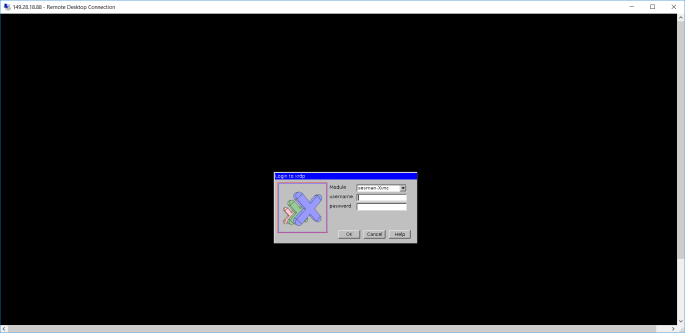
At this point of time, some of you may encounter error when logging in via RDP. The error will be saying things as follows.

Connecting to sesman IP 127.0.0.1 port 3350
sesman connect ok
sending login info to session manager, please wait...
xrdp_mm_process_login_response:login successful for display
started connecting
connecting to 127.0.0.1 5910
error-problem connecting
problem-connecting.png
Problem of connecting via xrdp.

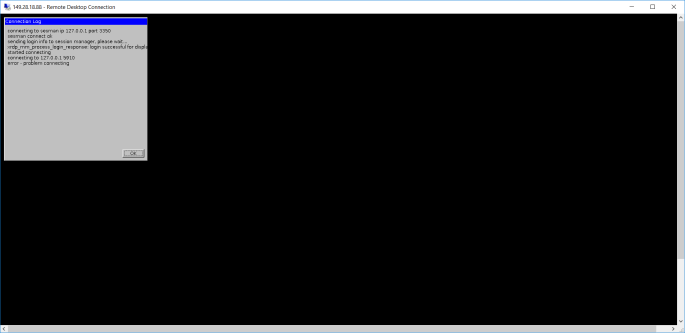
As pointed out in one of the discussion threads on Ask Ubuntu, the problem seems to be xrdp, vnc4server, and tightvncserver are installed in the wrong order. So in order to fix that, we just need to remove them and re-install them in a correct order with the following set of commands.

# sudo apt-get remove xrdp vnc4server tightvncserver
# sudo apt-get install tightvncserver
# sudo apt-get install xrdp
# sudo service xrdp restart

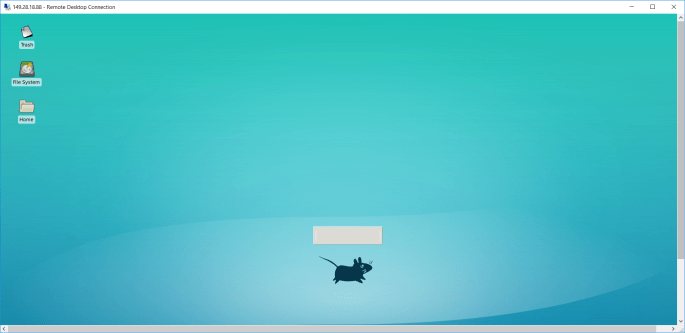
After the server is restarted, we should have no problem accessing our server via RDP client on Windows.

success.png

References


[KOSD Series] Ready ML Tutorial One

kosd-azure-machine-learning.png

During the Labour Day holiday, I had a great evening chat with Marvin, my friend who had researched a lot about Artificial Intelligence and Machine Learning (ML). He guided me through steps setting up a simple ML experiment. Hence, I decided to note down what I had learned on that day.

The tool that we’re using is Azure Machine Learning Studio. What I had learned from Marvin is basically creating a ML experiment through drag-and-dropping modules and connecting them together. It may sound simple but for a beginner like me, it is still important to understand some key concepts and steps before continuing further in the ML field.

Azure ML Studio

Azure ML Studio is a tool for us to build, test, and deploy predictive analytics on our data. There is a detailed diagram about the capability of the tool, which can be downloaded here.

ml_studio_overview_v1.1.png
Capability of Azure ML Studio (Credits: Microsoft Azure Docs)

Step 0: Defining Problem

Before we began, we need to understand why we are using ML for?

Here, I’m helping a watermelon stall to predict how many watermelon they can sell this year based on last year sales data.

Step 1: Preparing Data

As shown in the diagram above, the first step is to import the data into the experiment. So, before we can even start, we need to make sure that we have at least a handful of data points.

data.png
Daily sales of the watermelon stall and the weather of the day.

Step 2: Importing Data to ML Studio

With the data points we now have, we then can import them to ML Studio as a Dataset.

datasets.png
Datasets available in Azure ML Studio.

Step 3: Preprocessing Data

Firstly, we need to perform a cleaning operation so that missing data can be handled properly without affecting our results later.

Secondly, we need to “Select Columns in Dataset” so that only selected columns will be used in the subsequent operations.

Step 4: Splitting Data

This step is to help us to separate data into training and testing sets.

Step 5: Choosing Learning Algorithm

Since we are now using the model to predict number of watermelons the stall can sell, which is a number, we’ll use Linear Regression algorithm, as recommended. There is a cheat sheet from Microsoft telling us which algorithm we need to choose based on different scenarios. You can also download it here.

machine-learning-algorithm-cheat-sheet-small_v_0_6-01.png
Learning algorithm cheat sheet. (Image Credits: Microsoft Docs)

Step 6: Partitioning and Sampling

Sampling is an important tool in machine learning because it reduces the size of a dataset while maintaining the same ratio of values. If we have a lot of data, we might want to use only the first n rows while setting up the experiment, and then switch to using the full dataset when you build our model.

Step 7: Training

After choosing the learning algorithm, it’s time for us to train the data.

Since we are going to predict the number of watermelons sold, we will select the column, as shown in the following screenshot.

train.png
Select the one column that we need to predict in Train Model module.

Step 8: Scoring

Do you still remember that we split our data into two sets in Step 4 above? Now, we need to connect output from Split Data module and output from Train Data module to the Score module as inputs. Doing this step is to score prediction for our regression model.

Step 9: Evaluating

We finally have to generate scores over our training data, and evaluate the model based on the scores.

Step 10: Deploying

Now that we’ve completed the experiment set up, we can deploy it as a predictive web service.

predictive-experiment.png
Generated predictive experiment.

With that deployed, we then can easily predict how many watermelons can be sold on a future date, as shown in the screenshot below.

testing.png
Yes, we can sell 25 watermelons on 7th May if the temperature is 32 degrees!

Conclusion


This is just the very beginning of setting up a ML experiment on Azure ML Studio. I am still very new to this AI and ML stuff. If you spot any problem in my notes above, please let me know. Thanks in advance!

References:


KOSD, or Kopi-O Siew Dai, is a type of Singapore coffee that I enjoy. It is basically a cup of coffee with a little bit of sugar. This series is meant to blog about technical knowledge that I gained while having a small cup of Kopi-O Siew Dai.

[KOSD Series] Read-only Users for Azure SQL Databases

kosd-azure-sql-ms-sql-server-management-studio.png

It’s quite common that Business Analyst will always ask for the permission to access the databases of our systems to do data analysis. However, most of the time we will only give them read-only access. With on-premise MS SQL Server and SQL Management Studio, it is quite easily done. However, how about for those databases hosted on Azure SQL?

Login as Server Admin

To make things simple, we will first login to the Azure SQL Server as Server admin on SQL Management Studio. The Server Admin name can be found easily on Azure Portal, as shown in the screenshot below. Its password will be the password we use when we create the SQL Server.

sql-server-admin.png
Identifying the Server Admin of an Azure SQL Server. (Source: Microsoft Azure Docs)

Create New Login

By default, the master database will be the default database in Azure SQL Server. So, once we have logged in, we simply create the read-only login using the following command.

CREATE LOGIN <new-login-id-here>
    WITH PASSWORD = '<password-for-the-new-login>' 
GO

Alternatively, we can also right-click on the “Logins” folder under “Security” then choose “New Login…”, as shown in the screenshot below. The same CREATE LOGIN command will be displayed.

new-login.png
Adding new login to the Azure SQL Server.

Create User

After the new login is created, we need to create a new user which is associated with it. The user needs to be created and granted read-only permission in each of the databases that the new login is allowed to access.

Firstly, we need to expand the “Databases” in the Object Explorer and then look for the databases that we would like to grant the new login the access to. After that, we right-click on the database and then choose “New Query”. This shall open up a new blank query window, as shown in the screenshot below.

new-query-to-create-user.png
Opening new query window for one of our databases.

Then we simply need to run the following query for the selected database in the query window.

CREATE USER <new-user-name-here> FROM LOGIN <new-login-id-here>;

Please remember to run this for the master database too. Otherwise we will not be able to login via SQL Management Studio at all with the new login because the master database is the default database.

Grant Read-only Permission

Now for this new user in the database, we need to give it a read-only permission. This can be done with the following command.

EXEC sp_addrolemember 'db_datareader', '<new-user-name-here>';

Conclusion

Repeat the two steps above for the remaining databases that we want the new login to have access to. Finally we will have a new login that can read from only selective databases on Azure SQL Server.

References


KOSD, or Kopi-O Siew Dai, is a type of Singapore coffee that I enjoy. It is basically a cup of coffee with a little bit of sugar. This series is meant to blog about technical knowledge that I gained while having a small cup of Kopi-O Siew Dai.

[KOSD Series] Discussion about Cosmos DB Performance

KOSD, or Kopi-O Siew Dai, is a type of Singapore coffee that I enjoy. It is basically a cup of coffee with a little bit of sugar. This series is meant to blog about technical knowledge that I gained while having a small cup of Kopi-O Siew Dai.

kosd-cosmos-db.png

During a late dinner with my friend on 12 January last month, he commented that he encountered a very serious performance problem in retrieving data from Cosmos DB (pka DocumentDB). It’s quite strange because, in our IoT project which also stores millions of data in Cosmos DB, we never had this problem.

Two weeks later, on 27 January, he happily showed me his improved version of the code which could query the data in about one to two seconds.

Yesterday, after having a discussion, we further improved the code. Hence, I’d like to write down this learning experience here.

try-cosmos-db.png
Try Azure Cosmos DB today!

Preparation

Due to the fact that we couldn’t demonstrate using the real project code, I thus created a sample project getting data from database and collection on my personal Azure Cosmos DB account. The database contains one collection which has 23,967 records of Student data.

The Student class and the BaseEntity class that it inherits from are as follows.

public class Student : BaseEntity
{
    public string Name { get; set; }

    public int Age { get; set; }

    public string Description { get; set; }
}
public abstract class BaseEntity
{
    [JsonProperty(PropertyName = "id")]
    public string Id { get; set; }

    public string Type { get; set; }

    public DateTime CreatedAt { get; set; } = DateTime.Now;
}

You may wonder why I have Type defined.

Type and Cost Saving

The reason of having Type is that, before DocumentDB was rebranded as Cosmos DB in May 2017, the DocumentDB pricing is based on collections. Hence, the more collection we have in the database, the more we need to pay.

confused-about-documentdb-pricing.png
DocumentDB was billed per collection in the past. (Source: Stack Overflow)

To overcome that, we squeeze the different types of entities in the same collection. So, in the example above, let’s say we have three classes — Students, Classroom, Teacher that inherit from BaseEntity, then we will put the data of the three classes in the same collection.

Then here comes a problem: How do we know which document in the collection is Student, Classroom or Teacher? There is where the property Type will help us. So in our example above, the possible value for Type will be Student, Classroom, and Teacher.

Hence, when we add a new document through repository design pattern, we have the following method.

public async Task<T> AddAsync(T entity)
{
    ...

    entity.Type = typeof(T).Name;

    var resourceResponse = await _documentDbClient.CreateDocumentAsync(UriFactory.CreateDocumentCollectionUri(_databaseId, _collectionId), entity);

    return resourceResponse.StatusCode == HttpStatusCode.Created ? (dynamic)resourceResponse.Resource : null;
}

Original Version of Query

We used the following code to retrieve data of a class from the collection.

public async Task<IEnumerable<T>> GetAllAsync(Expression<Func<T, bool>> predicate = null)
{
    var query = _documentDbClient.CreateDocumentQuery<T>(UriFactory.CreateDocumentCollectionUri(_databaseId, _collectionId));

    var documentQuery = (predicate != null) ?
        (query.Where(predicate)).AsDocumentQuery():
        query.AsDocumentQuery();

    var results = new List<T>();
    while (documentQuery.HasMoreResults)
    {
        results.AddRange(await documentQuery.ExecuteNextAsync<T>());
    }

    return results.Where(x => x.Type == typeof(T).Name).ToList();
}

This query will run very slow because the line where it filters the class is after querying data from the collection. Hence, in the documentQuery, it may already contain data of three classes (Student, Classroom, and Teacher).

Improved Version of Query

So one obvious way is to move the line of filtering by Type above. The improved version of code now looks as such.

public async Task<IEnumerable<T>> GetAllAsync(Expression<Func<T, bool>> predicate = null)
{
    var query = _documentDbClient
        .CreateDocumentQuery<T>(UriFactory.CreateDocumentCollectionUri(_databaseId, _collectionId))
        .Where(x => x.Type == typeof(T).Name);

    var documentQuery = (predicate != null) ?
        (query.Where(predicate)).AsDocumentQuery():
        query.AsDocumentQuery();

    var results = new List<T>();
    while (documentQuery.HasMoreResults)
    {
        results.AddRange(await documentQuery.ExecuteNextAsync<T>());
    }

    return results;
}

By doing so, we managed to reduce the query time significantly because all the actual filtering will be done at Cosmos DB side. For example, there was one query I managed to reduce the query time of it from 1.38 minutes to 3.42 seconds using the 23,967 records of Student data.

Multiple Predicates

The code above however has a disadvantage. It cannot accept multiple predicates.

I thus changed it to be as follows so that it returns IQueryable.

public IQueryable<T> GetAll()
{
    return _documentDbClient
        .CreateDocumentQuery<T>(UriFactory.CreateDocumentCollectionUri(_databaseId, _collectionId))
        .Where(x => x.Type == typeof(T).Name);
}

This has another inconvenience is there whenever I call GetAll, I need to remember to load the data with HasMoreResults as shown in the code below.

var studentDocuments = _repoDocumentDb.GetAll()
    .Where(s => s.Age == 8)
    .Where(s => s.Name.Contains("Ahmad"))
    .AsDocumentQuery();

var results = new List<T>();
while (studentDocuments.HasMoreResults)
{
    results.AddRange(await studentDocuments.ExecuteNextAsync<T>());
}

Conclusion

This is just an after-dinner discussion about Cosmos DB between my friend and me. If you have any better idea of designing repository for Cosmos DB (pka DocumentDB), please let us know. =)