I have been using Visual Studio 2019 to develop desktop and mobile applications using Xamarin. I could successfully deploy my Xamarin UWP app to Microsoft Store until I upgraded my Visual Studio 2019 to 16.10.2.
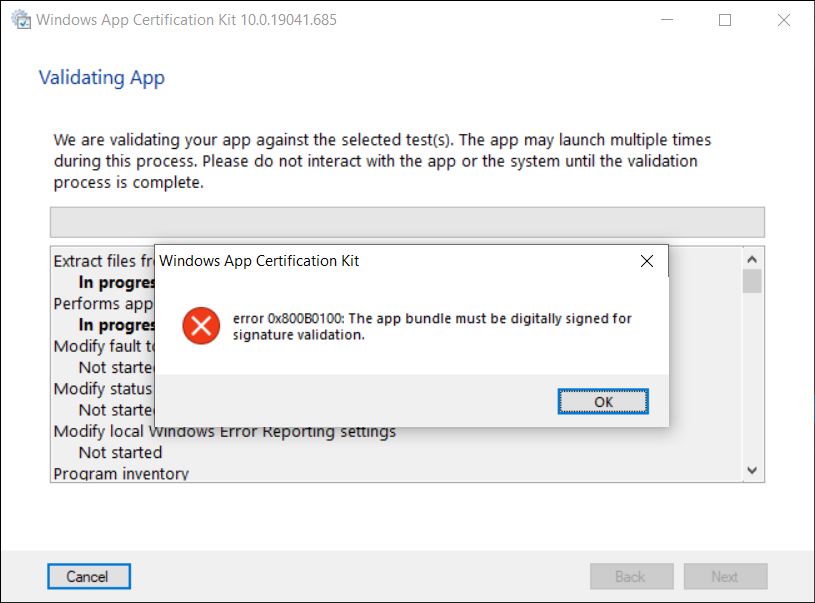
Normally, before we can publish our UWP app to Microsoft Store, we need to launch WACK (Windows App Certification Kit) to validate our app package. However, in VS2019 16.10.2 (and onwards), there will be an error occurs, as shown in the screenshot below, and the validation cannot be completed.
Error 0x800B0100 in Windows App Certification Kit (WACK).
MSBuild Project Build Output
Since my code is the same, so the first thing that I suspect is that the new updates in Visual Studio 2019 are causing this issue. Hence, I changed the verbosity of the project build output to Diagnostic, as shown below. This will help us understand better about what’s happening during the build.
Setting MSBuild project build output verbosity.
By comparing the current build output with the one using the previous version of Visual Studio 2019, I realised that there is something new in the current build ouput. The parameter GenerateTemporaryStoreCertificate is set to false while BuildAppxUploadPackageForUap is true, as shown below.
1>Target "_RemoveDisposableSigningCertificate: (TargetId:293)" in file "C:\Program Files (x86)\Microsoft Visual Studio\2019\Preview\MSBuild\Microsoft\VisualStudio\v16.0\AppxPackage\Microsoft.AppXPackage.Targets" from project "...UWP.csproj" (target "_GenerateAppxPackage" depends on it):
1>Task "RemoveDisposableSigningCertificate" skipped, due to false condition; ('$(GenerateTemporaryStoreCertificate)' == 'true' and '$(BuildAppxUploadPackageForUap)' == 'true') was evaluated as ('false' == 'true' and 'true' == 'true').
1>Done building target "_RemoveDisposableSigningCertificate" in project "...UWP.csproj".: (TargetId:293)
Online Discussions
Meanwhile, there are only two discussion threads online about this issue.
Few days later, on 1st of July 2021, another developer Tautvydas Zilys also reported a similar issue as Nick Stevens’. Interestingly, the same Microsoft engineer, James Parsons, replied to them with the similar answer, i.e. adding the following property in their project file to set GenerateTemporaryStoreCertificate to true.
That’s all to fix the issue. I hope this article, which is also the 3rd in the world discussing about this Visual Studio 2019 problem, is helpful to other Xamarin UWP developers who are running into the same problem.
KOSD, or Kopi-O Siew Dai, is a type of Singapore coffee that I enjoy. It is basically a cup of coffee with a little bit of sugar. This series is meant to blog about technical knowledge that I gained while having a small cup of Kopi-O Siew Dai.
This afternoon, I decided to take a look at Orchard Core, an open-source CMS (Content Management System) built on top of an ASP .NET Core application framework.
Since it is open-source, I easily forked its repository from Github and then checked out its dev branch.
After waiting for less than one minute to get all the Nuget packages restored in the project, I set OrchardCore.Cms.Web as the default project. Then I tried to run it but it failed with tons of errors. One of the major errors is “Assembly location for Razor SDK Tasks was not specified”. According to online discussion, it turns out that .NET Core 2.2 is needed.
After downloading the correct SDK, the projects are now successfully built with the following web page pops out as a result.
Take note that, as shown in the screenshot above, when I fill in Table Prefix, it will throw me exception saying that “SqlException: Invalid object name ‘OrchardroadDocument’” during the setup stage, as shown in the following screenshot.
Hence, the best way to proceed is to not enter anything to the Table Prefix textbox. Then we will be able to setup our CMS successfully. Once we log in to the system as Super User, we can proceed to configure the CMS.
Yup, this concludes my first attempt with the new Orchard Core CMS. =)
In my previous post, I shared about the way to connect Android app with IdentityServer4 using AppAuth for Android. However, that way will popup a login page on a web browser on phone when users are trying to login to our app. This may not be what the business people want. Sometimes, they are looking for a customized native login page on the app itself.
To do so, we can continue to make use of IdentityServer4.
In this setup, I will be using in-memory configuration.
As a start, I need to introduce a new ApiResource with the following codes in the Startup.cs of our IdentityServer project.
var availableResources = new List<ApiResource>();
...
availableResources.Add(new ApiResource("mobile-app-api", "Mobile App API Main Scope"));
...
services.AddIdentityServer()
    ...
    .AddInMemoryApiResources(availableResources)
    .AddInMemoryClients(new ClientStore(Configuration).GetClients())
    .AddAspNetIdentity<ApplicationUser>();
Identity Server Setup: Defining New Client
As the code above shows, there is a ClientStore that we need to add a new client to with the following codes.
public class ClientStore : IClientStore
{
    ...

    public IEnumerable<Client> GetClients()
    {
        var availableClients = new List<Client>();

        ...

        availableClients.Add(new Client
        {
            ClientId = "mobile-app-api",
            ClientName = "Mobile App APIs",
            AllowedGrantTypes = GrantTypes.ResourceOwnerPassword,
            ClientSecrets = { new Secret(Configuration["MobileAppApi:ClientSecret"].Sha256()) },
            AllowedScopes = { "mobile-app-api" }
        });

        return availableClients;
    }
}
Configuring Services in Web API
In the Startup.cs of our Web API project, we need to update it as follows.
Besides the step above, we also need to make sure the following one line “app.UseAuthentication()” in the Startup.cs. Without this, we cannot make the authentication and authorization to work in our Web API project.
Receiving Username and Password to Return Access Token
We also need to add a new controller to receive username and password which will in return tell the mobile app whether the login of the user is successful or not. If the user is logged in successfully, then an access token will be returned.
[Route("api/[controller]")]
public class AuthenticateController : Controller
{
    ...
    [HttpPost]
    [Route("login")]
    public async Task<ActionResult> Login([FromBody] string userName, string password)
    {
        var disco = await DiscoveryClient.GetAsync("<URL of the identity server>");
        var tokenClient = new TokenClient(disco.TokenEndpoint, "mobile-app-api", Configuration["MobileAppApi:ClientSecret"]);
        var tokenResponse = await tokenClient.RequestResourceOwnerPasswordAsync(userName, password, "mobile-app-api");

        if (tokenResponse.IsError)
        {
            return Unauthorized();
        }

        return new JsonResult(tokenResponse.Json);
    }
    ...
}
Securing our APIs
We can now proceed to protect our Web APIs with [Authorize] attribute. In the code below, I also try to return the available claims via the API. The claims will tell the Web API who is logging in and calling the API now via the mobile app.
[HttpGet]
[Authorize]
public IEnumerable<string> Get()
{
    var claimTypesAndValues = new List<string>();

    foreach (var claim in User.Claims)
    {
        claimTypesAndValues.Add($"{ claim.Type }: { claim.Value }");
    }

    return claimTypesAndValues.ToArray();
}
Conclusion
This project took me two days to find out how to make the authentication works because I misunderstand how IdentityServer4 works in this case. Hence, it is always important to fully understand the things on your hands before working on them.
Do not give up! (Source: A Good Librarian Like a Good Shepherd)
For those ASP .NET web developers, Identity Server should be quite familiar to them especially they are looking for SSO solution.
After successfully integrating Identity Server in our ASP .NET Core MVC web applications, it is now time for us to research about how our mobile app can be integrating with IdentityServer4 too.
Background
We have two types of users. The admin will be logging in to the system via our web application. The normal staff will log in to the system via mobile app. Different sets of features are provided for both web and mobile apps.
Setting up Client on Identity Server
To begin, we need to add new client to the MemoryClients of Identity Server.
The version of AppAuth for Android is v0.7.0 at the point of time this post is written. To install it for our app, we first need to set it in build.gradle (Module: app).
Android Setup: Post Authorization and Refresh Token
According to the code in the LoginAuthActivity.java, if the login fails, the user will be brought back to the Login Activity. However, if it succeeds, the user can then reach to another activities in the app which require user to login first. We can also then get Access Token, Refresh Token, and ID Token from authManager. With the Access Token, we then can access our backend APIs.
private class TokenTimer extends TimerTask {
    ...

    @Override
    public void run() {

        if(MyApp.Token == null)
            return;

        final AuthManager authManager = AuthManager.getInstance(TokenService.this);

        final AuthState authState = authManager.getAuthState();


        if(authState.getNeedsTokenRefresh()) {
            //Get New Token

            ClientSecretPost clientSecretPost = new ClientSecretPost("driver008!");
            final TokenRequest request = authState.createTokenRefreshRequest();
            final AuthorizationService authService = authManager.getAuthService();

            authService.performTokenRequest(request, clientSecretPost, new AuthorizationService.TokenResponseCallback() {
                @Override
                public void onTokenRequestCompleted(@Nullable TokenResponse response, @Nullable AuthorizationException ex) {
                    if(ex != null){
                        ex.printStackTrace();
                        return;
                    }
                    authManager.updateAuthState(response,ex);
                    MyApp.Token = authState.getIdToken();
                }
            });

        }

    }
}
Conclusion
Yup, that’s all for integrating the Identity Server in an Android App to provide a seamless login experience to our users. If you find any mistake in this article, kindly let me know in the comment section. Thanks in advance!