Personal OneDrive Music Player on Raspberry Pi with a Web-based Remote Control (Part 1)

There are so much things that we can build with a Raspberry Pi. It’s always my small little dream to have a personal music player that sits on my desk. With the successful setup of the Raspberry Pi 3 Model B few weeks ago, it’s time to realise that dream.

Project GitHub Repository

The complete source code of the music player program on the Raspberry Pi mentioned in this article can be found at https://github.com/goh-chunlin/Lunar.Music.RaspberryPi.

Project Objective

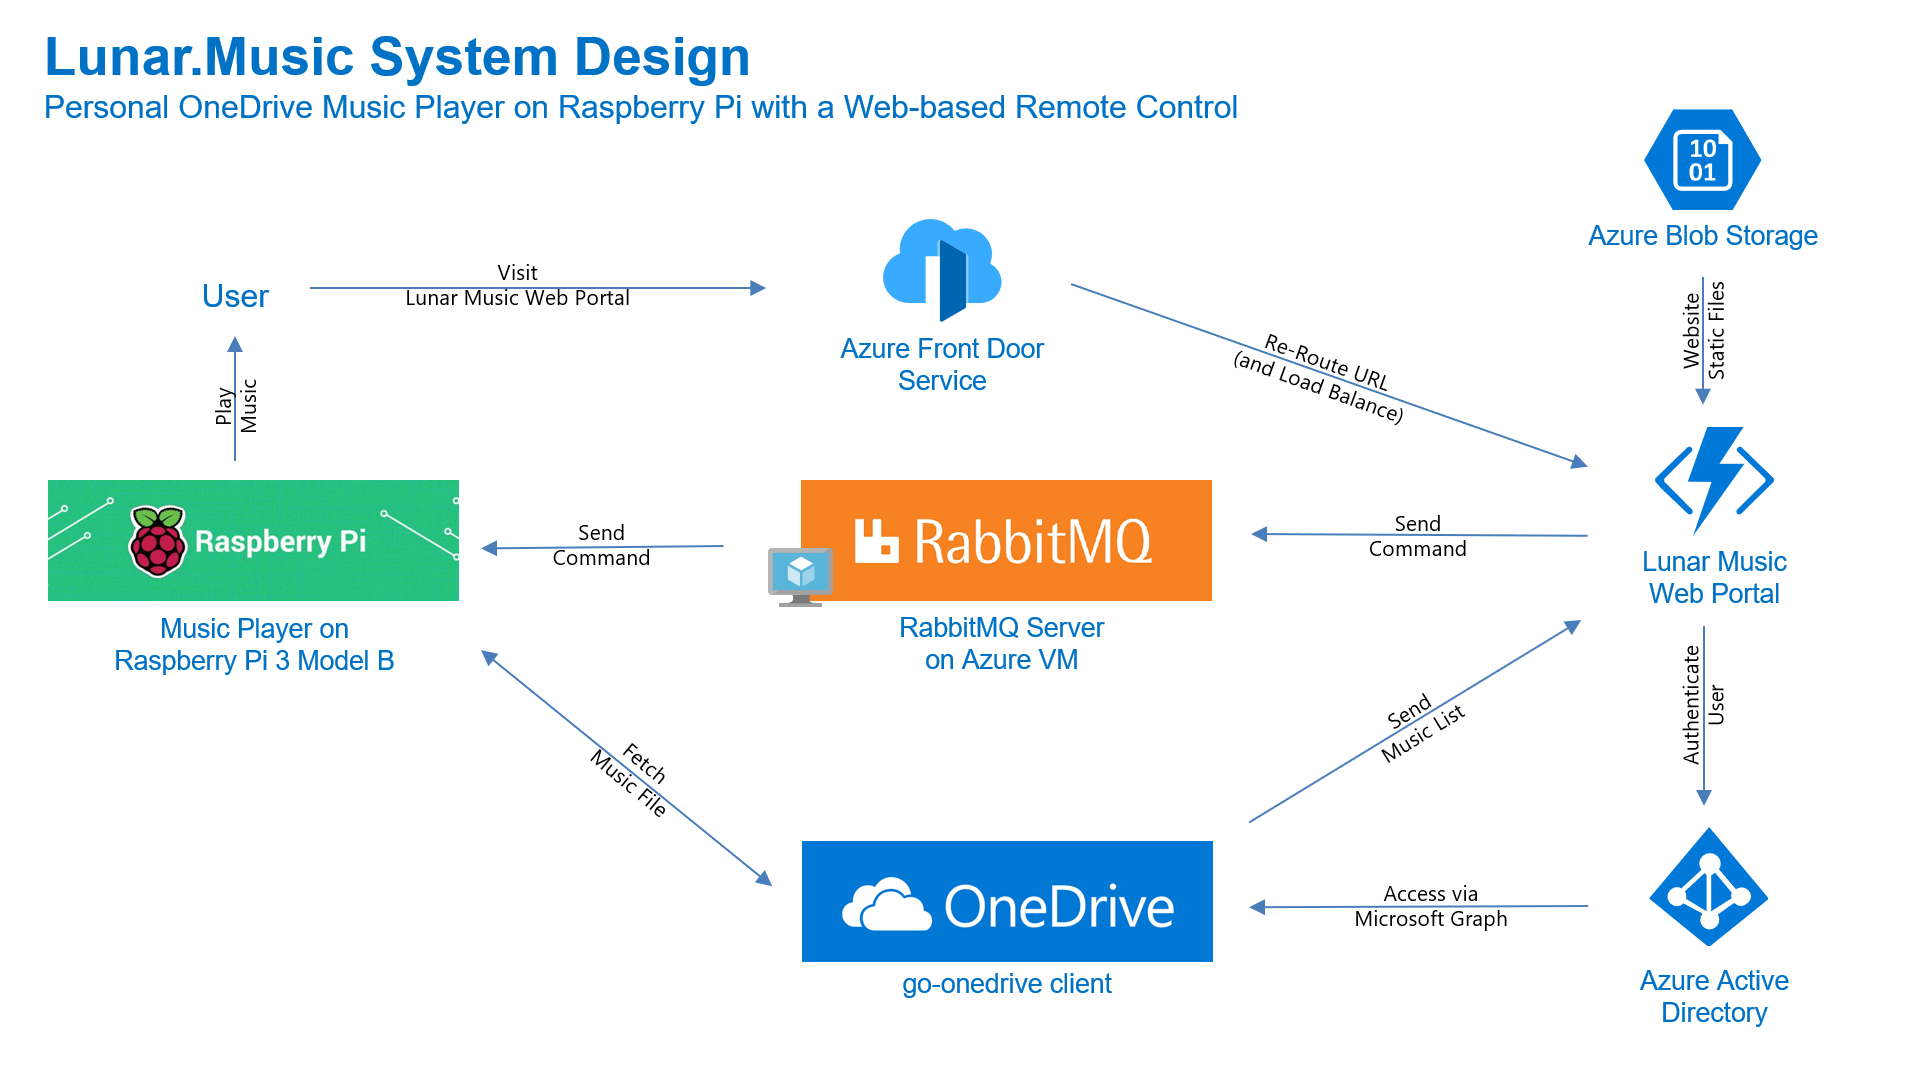
In this article and the next, I will be sharing with you the journey of building a personal music player on Raspberry Pi. The end product will just be like Spotify on Google Nest Hub where we can listen to our favourite music not on our computer or smart phone but on another standalone device, which is Raspberry Pi in this case.

In this project, there is no monitor or any other displays connected to my Raspberry Pi. So the output is simply music and songs. However, since there is no touch screen for user to interact with the Raspberry Pi like how Google Nest Hub does, we will need to use a web app which acts as the remote control of the Raspberry Pi music player. With the web app, user will be able to scan through the playlist and choose which music or song to play.

A month in, I barely use the Google Nest Hub Max (yet I still recommend it)
[Image Caption: Spotify on Google Nest Hub (Image Credit: Android Authority)]

In addition, while Google Nest Hub has its music streamed from Spotify, the music that our Raspberry Pi music player will use is available on our personal OneDrive Music folder. In the next article, I will talk more about how we can use Azure Active Directory and Microsoft Graph API to connect with our personal OneDrive service.

So with this introduction, we can confirm that the objective of this project is to build a music player on a Raspberry Pi which can be controlled remotely via a web app to play music from OneDrive.

[Image Caption: System design of this music player together with its web portal.]

We will only focus on the setup of Raspberry Pi and RabbitMQ server in this Part 1 of the article. In the Part 2, which can be found by clicking here, we will continue to talk about the web portal and how we access the OneDrive with Microsoft Graph and go-onedrive client.

Installing Golang on Raspberry Pi

The music player that we are going to build is using Golang. The reason of choosing Golang is because it’s easy to work with, especially integrating with the RabbitMQ server.

To install Golang on a Raspberry Pi, we can simply use the following command.

$ sudo apt-get install golang

However, please take note that the version of the Golang downloaded is not the latest one. So the alternative way of doing it is download the package from the Golang official website with the following commands.

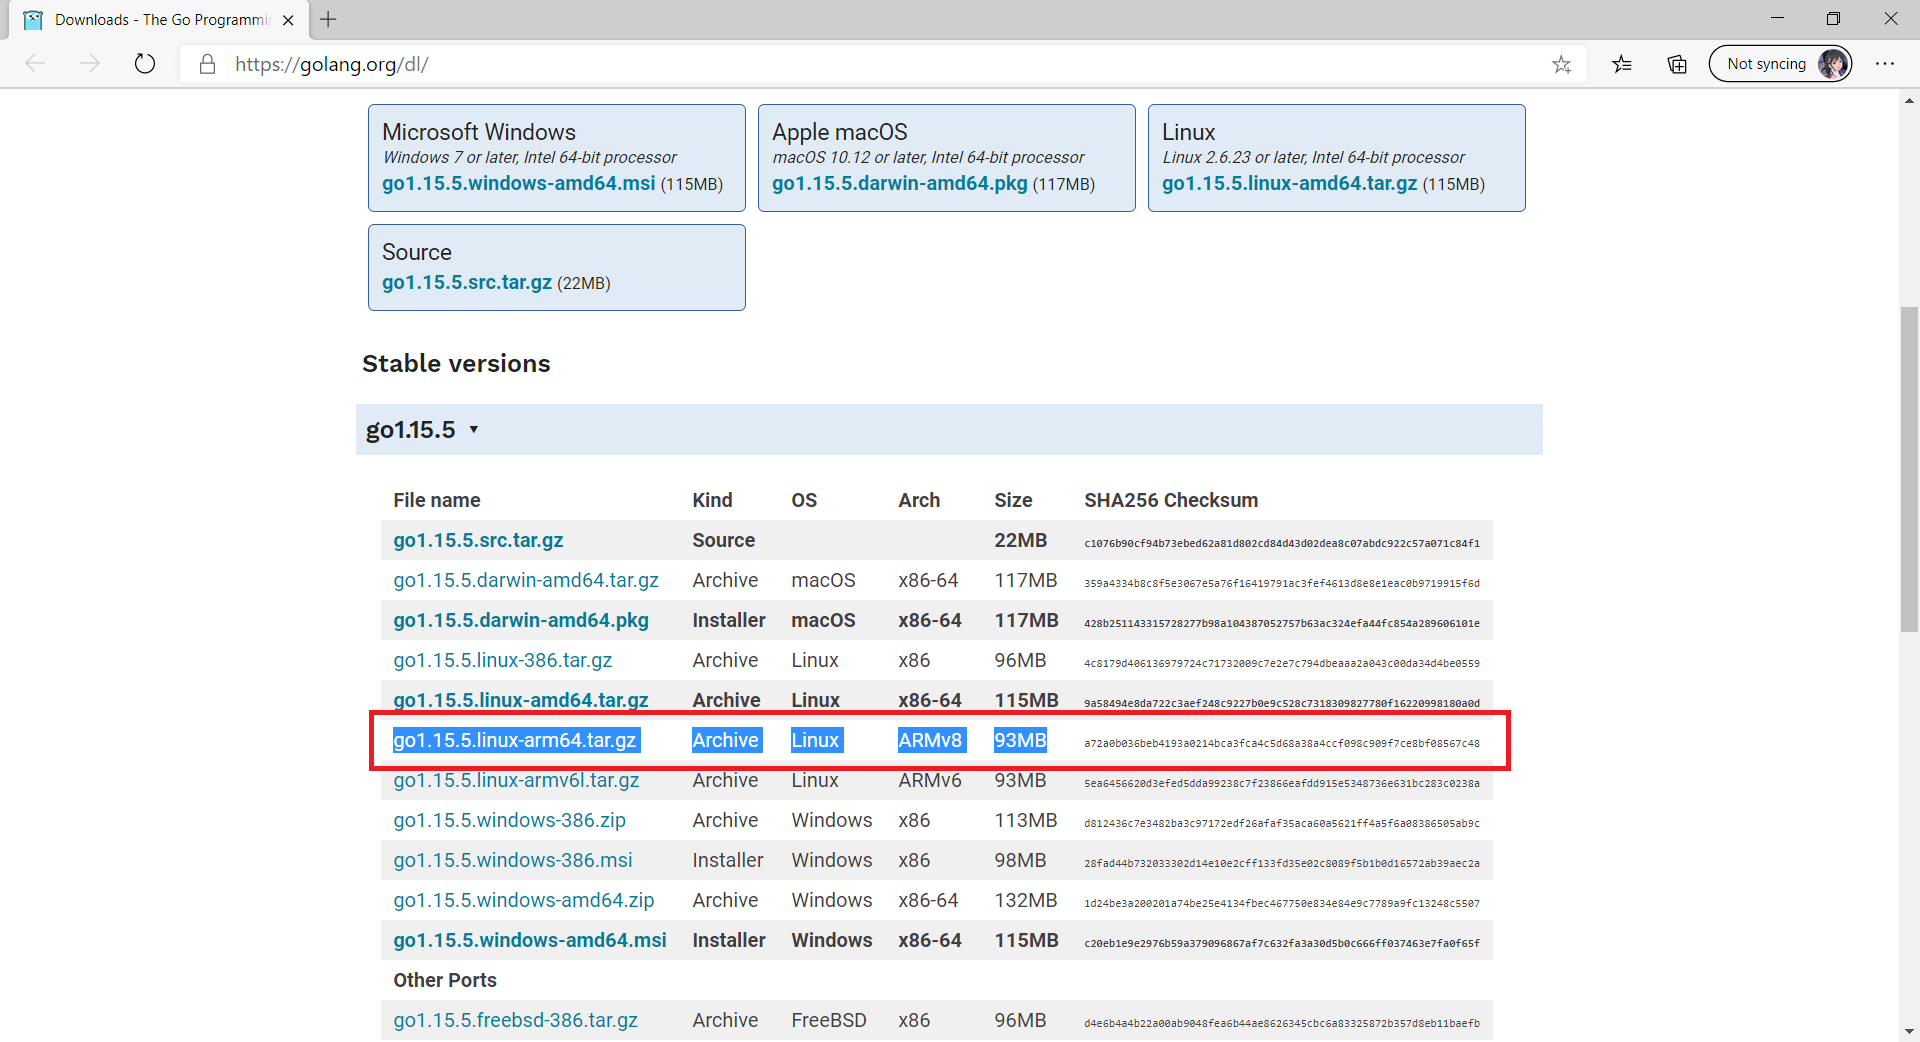
Since the Raspberry Pi 3 Model B is having a 64-bit ARMv8 CPU and the latest Golang version is 1.15.5, according to the Golang website, what we need to download is the highlighted one in the following screenshot. Hence, we can run the following commands.

$ wget https://golang.org/dl/go1.15.5.linux-arm64.tar.gz
$ sudo tar -C /usr/local -xzf go1.15.5.linux-arm64.tar.gz
$ rm go1.15.5.linux-arm64.tar.gz
[Image Caption: Finding the correct package to download for Raspberry Pi 3 Model B.]

Now we have Golang installed on our Raspberry Pi, we can proceed to build the music player.

Music Player on Raspberry Pi

The multimedia player used in this project is the VLC Media Player which is not only free and open-source but also cross-platform. The reason VLC Media Player is chosen is also because it has nvlc, a command-line ncurses interface to play an MP3. Hence, to play an MP3 with nvlc, we just need to run the following command.

$ nvlc <mp3_file> --play-and-exit

The –play-and-exit flag is added to make sure that the VLC will exit once the particular music is finished.

Also, we can use Go exec command to execute the command above. For example, if we have an MP3 file called song and it’s stored in the directory songFileRoot, then we can play the MP3 file with the following codes.

cmd := exec.Command("nvlc", song, "--play-and-exit")

cmd.Dir = songFileRoot
cmd.Stdout = os.Stdout
cmd.Stderr = os.Stdout

if err := cmd.Run(); err != nil {
    fmt.Println("Error:", err)
}

Messaging, RabbitMQ, and Remote Controlling Via Web App

Now we need a communication channel for our web app to tell the Golang programme above which MP3 file to play.

A common way is to use HTTP and REST to communicate. That will require us to design some RESTful HTTP APIs and turn our Raspberry Pi to be a web server so that the web app can invoke the APIs with HTTP request.

Using RESTful API sounds great and easy but what if the Raspberry Pi is not responding? Then our web app has to implement some sort of reconnection or failover logic. In addition, when our web app makes a call to the API, it will be blocked waiting for a response. Finally, due to the nature of RESTful API, there will always be some coupling of services.

This makes me turn to an alternative way, which is messaging which is loose coupling and asynchronous. Using messaging with message brokers like RabbitMQ helps a lot with scalability too.

Here RabbitMQ is used because is a popular light-weight message broker and it’s suitable for general-purpose messaging. Also, I like how RabbitMQ simply stores messages and passes them to consumers when ready.

It’s also simple to setup RabbitMQ on a cloud server too. For example, now on Microsoft Azure, we can just launch a VM running Ubuntu 18.04 LTS and follow the steps listed in the tutorials below to install RabbitMQ Server on Azure.

RabbitMQ supports several messaging protocols, directly and through the use of plugins. Here we will be using the AMQP 0-9-1 which we have Golang client support for it as well.

How about the message format? Basically, to RabbitMQ, all messages are just byte arrays. So, we can store our data in JSON and serialise the JSON object to byte array before sending the data via RabbitMQ. Hence, we have the two structs below.

type Command struct {
    Tasks []*Task `json:"tasks"`
}

type Task struct {
    Name    string   `json:"name"`
    Content []string `json:"content"`
}

With this, we then can publish the message via RabbitMQ as follows.

ch, err := conn.Channel()
...
err = ch.Publish(
    "",     // exchange
    q.Name, // routing key
    false,  // mandatory
    false,  // immediate
    amqp.Publishing{
        ContentType: "application/json",
        Body:        body,
    }
)

When the message is received at Raspberry Pi side, we simply need to de-serialise it accordingly to get the actual data.

Now, by connecting both the Raspberry Pi music player and the web app to the RabbitMQ server, both of them can communicate. We will then make our app web app as a sender to send the music filename over to the music player on the Raspberry Pi to instruct it to play the music.

Transferring OneDrive Music to Raspberry Pi

The music is stored on personal OneDrive Music folder online. Hence, it’s not a wise idea to always let our Raspberry Pi to stream the music from OneDrive every time the same music is chosen. Instead, we shall download only once to the Raspberry Pi right before the first time of a music is playing.

Hence, in our music player programme, we have a data file called playlist.data which keeps track of the OneDrive Item ID and its local file name on the Raspberry Pi. Once the music is successfully downloaded to the Raspberry Pi, a new line of record as shown below will be appended to the data file.

121235678##########music.mp3

Hence for the subsequent play of the same music, the music player programme will scan through the data file and play the local MP3 file instead of downloading it again from OneDrive.

func isDriveItemDownloaded(driveItemId string) bool {
    isMusicFileDownloaded := false

    dataFile, err := os.Open("playlist.dat")

    defer dataFile.Close()

    if err == nil {
        scanner := bufio.NewScanner(dataFile)
        scanner.Split(bufio.ScanLines)

        for scanner.Scan() {
            line := scanner.Text()
            if !isMusicFileDownloaded && 0 == strings.Index(line, driveItemId) {
                lineComponents := strings.Split(line, "##########")
                playSingleMusicFile(lineComponents[1])
                isMusicFileDownloaded = true
            }
        }
    }
    return isMusicFileDownloaded
}

Launch the Music Player Automatically

With our music player ready, instead of having us to launch it manually, could we make it run on our Raspberry Pi at startup? Yes, there are five ways of doing so listed on the Dexter Industry article. I choose to modify the .bashrc file which will run the music player when we boot up the Raspberry Pi and log in to it.

$ sudo nano /home/pi/.bashrc

In the .bashrc file, we simply need to append the following lines where we will change directory to the root of the music player programme. We cannot simply just run the programme just yet. We need to make sure two things.

Firstly, we need to make our music player run in the background. Doing so is because we want to continue to use the shell without waiting for the song finishes playing. So we can simply add the & to the end of the command so that the music player programme will start in the background.

Secondly, since we login to the Raspberry Pi using SSH, when we start a shell script and then logout from it, the process will be killed and thus cause the music player programme to stop. Hence, we need nohup (no hang up) command to catch the hangup signal so that our programme can run even after we log out from the shell.

# auto run customised programmes
cd /home/pi/golang/src/music-player
nohup ./music-player &

USB Speaker and ALSA

Next, we need to connect our Raspberry Pi to a speaker.

I get myself a USB speaker from Sim Lim Square which uses a “C-Media” chipset.. Now, I simply need to connect it to the Raspberry Pi.

[Image Caption: C-Media Electronics Inc. is a Taiwan computer hardware company building processors for audio devices.]

Next, we can use lsusb, as shown below, to display information about USB buses in Raspberry Pi and the devices connected to them. We should be able to locate the speaker that we just connect.

$ lsusb
Bus 001 Device 004: ID ... C-Media Electronics, Inc. Audio Adapter
Bus 001 Device 003: ID ...
...

Hence now we know that the USB speaker is successfully picked up by the Raspberry Pi OS.

We can then proceed to list down all soundcards and digital audio devices with the following command.

$ aplay -l
**** List of PLAYBACK Hardware devices ****
card 0: Headphones...
  Subdevices: 8/8
  Subdevices #0: ...
  ...
card 1: Set [C-Media USB Headphone Set], device 0: USB Audio [USB Audio]
  ...

Now we also know that the USB speaker is at the Card 1. With this info, we can set the USB speaker as the default audio device by editing the configuration file of ALSA, the Advanced Linux Sound Architecture. ALSA is used for providing kernel driven sound card drivers.

$ sudo nano /usr/share/alsa/alsa.conf

The following two lines in the file are the only lines we need to update to be as follows in the file. The reason we put “1” for both of them because the USB speaker is using card 1, as shown above. So the number may be different for your device. For more information about this change, please refer to the ALSA Project page about setting default device.

defaults.ctl.card 1
defaults.pcm.card 1

Finally, if you would like to adjust the volume of the speaker, you can use alsamixer. Alsamixer is an ncurses mixer program for use with ALSA soundcard drivers.

$ alsamixer

There is a very good article about setting up USB speaker on Raspberry Pi by Matt on raspberrypi-spy.co.uk website. Feel free to refer to it if you would like to find our more.

Next: The Web-Based Remote Control and OneDrive

Since now we’ve already successfully setup the music player on the Raspberry Pi, it’s time to move on to see how we can control it from a website and how we can access our personal OneDrive Music folder with Azure AD and Microsoft Graph.

When you’re ready, let’s continue our journey here: https://cuteprogramming.wordpress.com/2020/11/21/personal-onedrive-music-player-on-raspberry-pi-with-a-web-based-remote-control-part-2/.

References

The code of the music player described in this article can be found in my GitHub repository: https://github.com/goh-chunlin/Lunar.Music.RaspberryPi.

Controlling Raspberry Pi with Surface Dial

Last week, I got a Surface Dial from Riza Marhaban because the device looks cool.

Microsoft always produces cool products such as the Zune music player, Windows Mobile, Nokia Lumia phone, etc. However, most of them are discontinued and are now difficult to be found in the market. Even though I hope that Surface Dial won’t have a similar fate as them, I still decide to get one before anything happen to it.

If you are not sure what Surface Dial is, previously, I had shared in another blog post about how we could use Surface Dial in our UWP applications on Windows 10. I have also found a video, which I attach it below, about how people do amazing music with Surface Dial on Windows.

Using Surface Dial Outside of Windows

Many exciting examples online seem to show that we can only use Surface Dial on Windows. Well, that is not true.

Starting from Linux 4.19 released on 22nd October 2018, Surface Dial is supported. Fortunately, if we are using the standard Raspberry Pi OS update/upgrade process, the Linux kernel we have in our Raspberry Pi should be the latest stable version. So that means we can connect Surface Dial to, for example, our Raspberry Pi 3 Model B too.

I use Raspberry Pi 3 Model B as example here because that is the only one that I have now and I have previously set it up with the latest Raspberry Pi OS. Another reason of using Raspberry Pi 3 Model B is because it comes with built-in Bluetooth 4.1.

Pair and Connect Surface Dial to Raspberry Pi

After we SSH into the Raspberry Pi, we will use the bluetoothctl command to pair the Raspberry Pi with a bluetooth device which is a Surface Dial in this case.

$ sudo bluetoothctl

On a smart phone, for example, when we are pairing the phone with a Bluetooth device, we always need to go through an authentication where we will be prompted for a password or asked whether we would like to connect to the Bluetooth device. So how is that being done using bluetoothctl?

Within the bluetoothctl, we need to first register something called Agent. Agent is what manages the Bluetooth “pairing code” and we set the Agent to be the Default Agent.

[bluetooth]# agent on
Agent registered
[bluetooth]# default-agent 
Default agent request successful

Next, we will scan for the nearby Bluetooth devices with the following command. Since the Surface Dial is made by default discoverable, the device name “Surface Dial” is visible together with its Bluetooth address.

[bluetooth]# scan on
Discovery started
[NEW] Device XX:XX:XX:XX:XX:XX Surface Dial

Now we can then pair and connect to the Surface Dial using its Bluetooth address.

[bluetooth]# pair XX:XX:XX:XX:XX:XX
...
[bluetooth]# connect XX:XX:XX:XX:XX:XX
Attempting to connect to XX:XX:XX:XX:XX:XX
[CHG] Device XX:XX:XX:XX:XX:XX Connected: yes 

Now we have Surface Dial successfully connected to our Raspberry Pi. Yay!

Exploring /dev/input

The /dev directory contains all the device files for all the devices connected to our Raspberry Pi. Then we have an input subdirectory in /dev which holds the files for various input devices such as mouse and keyboard or in our case, the Surface Dial.

[Image Caption: The content of /dev/input on my Raspberry Pi.]

With so many event files, how do we know which events are for which input devices? To find that out, we just need to use the following command.

$ cat /proc/bus/input/devices

Then we will see something as follows. The following is the output on my Raspberry Pi.

 I: Bus=0003 Vendor=0d8c Product=000c Version=0100 
 N: Name="C-Media USB Headphone Set  "
 ...
 H: Handlers=kbd event0
 ...

 I: Bus=0005 Vendor=045e Product=091b Version=0108
 N: Name="Surface Dial System Multi Axis"
 ...
 H: Handlers=event1 
 ...
  
 I: Bus=0005 Vendor=045e Product=091b Version=0108
 N: Name="Surface Dial System Control"
 ...
 H: Handlers=kbd event2  
 ...

So based on the Handlers, we know that event1 and event2 bind to the Surface Dial.

Input Event Messages

The event binary messages are C structs, we need to be able to delimit individual messages and decode them. Unless you are, for example, using the beta test of the Raspberry Pi OS, normally we are recommended to use 32-bit OS for Raspberry Pi. On 32-bit platforms, the event messages have 16 bytes each. On 64-bit platforms, the event timestamp is 16 bytes and thus each event message has 24 bytes each.

[Image Caption: Event message size in 32-bit and 64-bit platforms.]

Reading Surface Dial Input Events with Golang

There are three basic actions we can do on Surface Dial, i.e. turn left, turn right, and click. Now we know that the events generated by these actions from Surface Dial can be found in the event1, so what we need to do is just to find a way to read device input events from /dev/input/event1.

There are many ways of doing that. There are online documentations on how to do it in Python with evdev and C# on .NET Core. I didn’t try them out. Instead what I try is to write a simple Golang application to process the event messages. In 2017, Janczer had successfully read and parsed the event messages with Golang.

However, Janczer was working on a 64-bit platform so today I’m going to share how to change the code to work on a Raspberry Pi running on a 32-bit OS.

package main
import (
"bytes"
"encoding/binary"
"fmt"
"os"
"time"
)
func main() {
f, err := os.Open("/dev/input/event1")
if err != nil {
panic(err)
}
defer f.Close()
b := make([]byte, 16)
for {
f.Read(b)
fmt.Printf("%b\n", b)
sec := binary.LittleEndian.Uint32(b[0:8])
t := time.Unix(int64(sec), 0)
fmt.Println(t)
var value int32
typ := binary.LittleEndian.Uint16(b[8:10])
code := binary.LittleEndian.Uint16(b[10:12])
binary.Read(bytes.NewReader(b[12:]), binary.LittleEndian, &value)
fmt.Printf("type: %x\ncode: %d\nvalue: %d\n", typ, code, value)
}
}

Now, when I turn or press on the Surface Dial, I will be able to see the output as shown in the screenshot below. I run the program three times so that I can easily demonstrate the outputs for turning Surface Dial clockwise, turning it counter-clockwise, and clicking it, respectively.

[Image Caption: Event messages sent from the Surface Dial to Raspberry Pi.]

With this, now it’s up to us to make the best out of the combination of Raspberry Pi and Surface Dial.

References

Headless Raspberry Pi 3 Model B SSH Setup on macOS

Image Source: Circuit Board

Two years ago when I visited Microsoft Singapore office, their engineers, Chun Siong and Say Bin, gave me Satya Nadella’s book, Hit Refresh, as well as a Raspberry Pi 3 as gift.

In fact I also got another Raspberry Pi from my brother few years ago and it was running on Windows 10 IoT. It is now in my office together with monitor, keyboard, and mouse. Due to the covid lockdown, I am not allowed to go back to office yet. Hence, I think it’s time to see how we can setup this new Raspberry Pi for headless SSH access with my MacBook.

The method I use here is the headless approach which is suitable if you don’t have access to the GUI to set up a wireless LAN on the Raspberry Pi. Hence, you don’t need to connect monitor, external keyboard, or mouse to the Raspberry Pi at all.

[Image Caption: Enjoying tea break with Chun Siong (Left 1) and Say Bin (Right 2) in October 2018.]

Step 0: Things to Purchase

Besides the Raspberry Pi, we also need to get some other things ready first before we can proceed to setup the device. Most of the things here I bought from Challenger.

Item 1: Toshiba microSDHC UHS-I Card 32GB with SD Adapter

Raspberry Pi uses a microSD card as a hard drive. We can either use a Class 10 microSD card or UHS for Ultra High Speed. Here we are using UHS Class 1. The reason why we do not choose anything greater than 32GB is also because according to the SD specifications, any SD card larger than 32GB is an SDXC card and has to be formatted with the exFAT filesystem which is not supported yet by the Raspberry Pi bootloader. There is of course solutions for this if more SD space is needed for your use cases, please read about it more on Raspberry Pi documentation. The microSD card we choose here is a 32GB SDHC using FAT32 file system which is supported by the Raspberry Pi, so we are safe.

Item 2: USB Power Cable

All models up to the Raspberry Pi 3 require a microUSB power connector (Raspberry Pi 4 uses a USB-C connector). If your Raspberry Pi doesn’t come with the power supply, you can get one from the official website which has the official universal micro USB power supply recommended for Raspberry Pi 1, 2, and 3.

Item 3: Cat6 Ethernet Cable (Optional)

It’s possible to setup Raspberry Pi over WiFi because Model 3 B comes with support of WiFi. However to play safe, I also prepare an Ethernet cable. In the market now, we can find Cat6 Ethernet cable easily which is suitable for transferring heavy files and communication with a local network.

Item 4: USB 2.0 Ethernet Adapter (Optional)

Again, this item is optional if you don’t plan to setup the Raspberry Pi through Ethernet cable and you are not using a machine like MacBook which doesn’t have an Ethernet port.

Step 1: Flash Raspbian Image to SD Card

With the SD card ready, we can now proceed to burn the OS image to it. Raspberry Pi OS (previously called Raspbian) is the official operating system for all models of the Raspberry Pi. There are three types of Raspberry Pi OS we can choose from. Since I don’t need to use the desktop version of it, I go ahead with the Raspberry Pi OS Lite, which is also the smallest in size. Feel free to choose the type that suits your use case most.

[Image Caption: There are three types of Raspberry Pi OS for us to choose.]

Take note that here the Raspberry Pi OS is already based on Debian Buster, which is the development codename for Debian 10 released in July 2019.

After downloading the zip file to MacBook, we need to burn the image to the SD card.

Since the microSD card we bought above comes with the adapter, so we can easily slot them into the MacBook (which has a SD slot). To burn the OS image to the SD card, we can use Etcher for macOS.

[Image Caption: To use Etcher is pretty straight forward.]

The first step in Etcher is to select the Raspberry Pi OS zip file we downloaded earlier. Then we select the microSD card as the target. Finally we just need to click on the “Flash!” button.

After it’s done, we may need to pull out the SD card from our machine and then plug it back in in order to see the image that we flash. On MacBook, it is appears as a volume called “boot” in the Finder.

Step 2: Enabling Raspberry Pi SSH

To enable SSH, we need to place an empty file called “ssh” (without extension) in the root of the “boot” with the following command.

touch /Volumes/boot/ssh

This will later allow us to login to the Raspberry Pi over SSH with the username pi and password raspberry.

Step 3: Adding WiFi Network Info

Again, we need to place a file called “wpa_supplicant.conf” in the root of the “boot”. Then in the file, we will put the following as its content.

network={
    ssid="NETWORK-NAME"
    psk="NETWORK-PASSWORD"
}

The WPA in the file name stands for WiFi Protected Access, a security and security certification program built by the Wi-Fi Alliance® to secure wireless computer networks.

The wpa_supplicant is a free software implementation of an IEEE 802.11i supplicant (To understand what supplicant is, please read here). Using wpa_supplicant to configure WiFi connection on Raspberry Pi is going to be straightforward.

Hence, in order to setup the WiFi connection on the Raspberry Pi, now we just need to specify our WiFi network name (SSID) and its password in the configuration of the wpa_supplicant.

Step 3a: Buster Raspberry Pi Onwards

[Image Caption: The new version of Raspberry Pi OS, Buster, was released in June 2019.]

However, with the latest Buster Raspberry Pi OS release, we must also add a few more lines at the top of the wpa_supplicant.conf as shown below.

ctrl_interface=DIR=/var/run/wpa_supplicant GROUP=netdev
update_config=1
network={
    ssid="NETWORK-NAME"
    psk="NETWORK-PASSWORD"
}

The “ctrl_interface” is for the control interface. When it’s specified, wpa_supplicant will allow external programs to manage wpa_supplicant. For example, we can use wpa_cli, a WPA command line client, to interact with the wpa_supplicant. Here, “/var/run/wpa_supplicant” is the recommended directory for sockets and by default, wpa_cli will use it when trying to connect with wpa_supplicant.

In the Troubleshooting section near the end of this article, I will show how we can use wpa_cli to scan and list network names.

In addition, access control for the control interface can be configured by setting the directory to allow only members of a group to use sockets. This way, it is possible to run wpa_supplicant as root (since it needs to change network configuration and open raw sockets) and still allow GUI/CLI components to be run as non-root users. Here we allow only members of “netdev” who can manage network interfaces through the network manager and Wireless Interface Connection Daemon (WICD).

Finally, we have “update_config”. This option is to allow wpa_supplicant to overwrite configuration file whenever configuration is changed. This is required for wpa_cli to be able to store the configuration changes permanently, so we set it to 1.

Step 3b: Raspberry Pi 3 B+ and 4 B

According to the Raspberry Pi documentation, if you are using the Raspberry Pi 3 B+ and Raspberry Pi 4 B, you will also need to set the country code, so that the 5GHz networking can choose the correct frequency bands. With the country code, it looks something as such. 

country=SG
ctrl_interface=DIR=/var/run/wpa_supplicant GROUP=netdev
update_config=1
network={
ssid="NETWORK-NAME"
psk="NETWORK-PASSWORD"
}

The first line is setting the country in which the device is used. Its value is the country code following ISO 3166 Alpha-2 country code. Here I put SG because I am now in Singapore.

Take note that, Raspberry Pi 3 B doesn’t support 5GHz WiFi networks. It only can work with 2.4GHz WiFi networks.

In the place where I am staying, we have a dual-band router. It uses two bands: 2.4GHz and 5GHz. So my Raspberry Pi can only connect to the 2.4GHz WiFi network.

By the way, 5GHz WiFi or 5G WiFi has nothing to do with the 5G mobile network. =)

Trump bans Huawei 5G in the U.S.
[Image Caption: 5GHz WiFi, or normally referred to as “5G WiFi”, has nothing to do with the new 5G mobile network that is widely discussed now. The 5G in mobile network stands for “5th Generation” instead. (Image Source: CityNews News 1130)]

Step 4: Boot the Raspberry Pi

Now we can eject the SD card from our MacBook and plug it into the Raspberry Pi. After that, we proceed to power on the Raspberry Pi after plug the USB power cable into it.

By default, the hostname of a new Raspberry Pi is raspberrypi. Hence, before we proceed, we need to remove all the keys belonging to raspberrypi.local with the following command, just so that we have a clean start.

ssh-keygen -R raspberrypi.local

Don’t worry if you get a host not found error for this command.

Of course, if you know the Raspberry Pi IP address, you can use its IP address as well instead of “raspberrypi.local”.

Next, let’s login to the Raspberry Pi with the following commands using the username and password in the Step 2 above.

ssh pi@raspberrypi.local

Step 5: Access Raspberry Pi Successfully

Now we should be able to access the Raspberry Pi (If not, please refer to the Troubleshooting section near the end of this article).

Now we have to do a few additional configurations for our Raspberry Pi using the following command.

sudo raspi-config
[Image Caption: Configuration Tool of our Raspberry Pi.]

Firstly, we need to change the password by selecting the “1 Change User Password” item as shown in the screenshot above. Don’t use the default password for security purposes.

Secondly, we also need to change the hostname of the device which is under the “2 Network Options” item. Don’t always use the default hostname else we will end up with many Raspberry Pi using the same “raspberrypi” as the hostname.

Thirdly, under the “4 Localisation Options”, please make sure the Locale (by default should be UTF-8 chosen), Time Zone, and WLAN Country (should be the same we set in Step 3b) are correct.

[Image Caption: Since I am in Singapore, so I choose “Asia” here.]

Finally, if you are also on a new image, we are recommended to expand the file system under the “7 Advanced Options” item.

[Image Caption: Ensuring all of the SD card storage is available to the OS.]

Now we can proceed to reboot our Raspberry Pi with the following command.

sudo reboot

Step 6: Get Updates

After the Raspberry Pi is successfully rebooted, please login to the device again to do updates with the following commands.

sudo apt-get update -y
sudo apt-get upgrade -y

After this, if you would like to switch off the Raspberry Pi, please shut it down properly with the following command else it may corrupt the SD card.

sudo shutdown -h now
[Image Caption: It’s important that our Raspberry Pi gets a clean shutdown else there may be a variety of issues including corruption of our SD card and file system. (Image Source: BC Robotics)]

Troubleshooting WiFi Connection

When I first started connecting to the Raspberry Pi over WiFi, the connection always fails. That’s why in the end I chose to connect the Raspberry Pi with my laptop through Ethernet cable first before I could do some troubleshooting.

Connecting with Ethernet Cable

To connect to the Raspberry Pi via Ethernet cable, we just need to make sure that in the Network settings of our MacBook, the Ethernet connection status is connected, as shown in the following screenshot.

[Image Caption: Connected!]

We also have to make sure that we have “Using DHCP” selected for “Configure IPv4” option. Finally, we also need to check that the “Location” at the top of the dialog box has “Automatic” selected for this Ethernet network configuration.

That’s all to setup the Ethernet connection between the Raspberry Pi and our MacBook.

Troubleshooting the WiFi Connection

If you also have problems in WiFi connection even after you have rebooted the Raspberry Pi, then you can try the following methods after you can access the Raspberry Pi through Ethernet cable.

  1. To get the network interfaces:
    ip link show
  2. To list network names (SSID):
    iwlist wlan0 scan | grep ESSID
  3. To edit or review the WiFi settings on the Raspberry Pi:
    sudo nano /etc/wpa_supplicant/wpa_supplicant.conf
  4. To show wireless devices and their configuration:
    iw list

In the output of iwlist wlan0 frequency command, we can see that all broadcasting WiFi channels are having frequency in the 2.4GHz range, as shown in the following screenshot. Hence we know that the Raspberry Pi 3 Model B can only do 2.4GHz.

[Image Caption: Raspberry Pi 3 Model B does not support 5GHz WiFi networks.]

This is a very crucial thing to take note of because I wrongly set the SSID of a 5GHz WiFi network in the WPA Supplicant configuration file and the Raspberry Pi could not connect to the WiFi network at all.

We can also use wpa_cli to scan and list the network names, as shown in the following screenshot.

[Image Caption: Using wpa_cli to scan for the network.]

In the above scan results, you can see that there are 12 networks that the Raspberry Pi can pick up, the frequency that they are broadcasting on (again, it is shown in the range of 2.4GHz), the signal strength, the security type, and network name (SSID).

You may ask why I need to specify the interface in the wpa_cli command. This is because wpa_cli default interface is actually not the correct WiFi interface the Raspberry Pi has. As shown in the command “ip link show”, we are using wlan0 for WiFi connection. However, if we don’t specify the interface in wpa_cli, then we will get the following issue.

[Image Caption: Oh no, no network results found in the scan_result.]

This is the problem discussed in the Arch Linux forum and solved in February 2018.

Conclusion

That’s all to get my Raspberry Pi up and running. Please let me know in comment section if you have any doubts about the steps listed above.

Here, I’d like to thank Mitch Allen for writing the great tutorial on how to setup Raspberry Pi over WiFi. His tutorial also includes instructions for Windows users, so if you are on Windows, please refer to his tutorial as well.

References

Entertainment Hub Version 1

I received my first Raspberry Pi back in October, ten days after I ordered it online. After that I brought it back to my home in Kluang, Malaysia. The reason is that I would like to setup a home theatre with the help of Raspberry Pi. Hopefully in near future, I can have a complete entertainment hub setup for my family. Thus, I name this project, the Entertainment Hub.

Gunung Lambak, the highest point in Kluang.

Getting Raspberry Pi

Raspberry Pi is a credit-card-sized computer. According to the official website, it is designed to help the students to learn programming with lower cost. To understand more about Raspberry Pi, you can read its detailed FAQ. By saving S$1 per day, I easily got myself a new Raspberry Pi Model B (with 8GB SD card) after 2 months.

Entertainment Hub Project

Before the use of Raspberry Pi, I was using a Wireless 1080p Computer to HD Display Kit from IOGEAR to stream video from my laptop to the home TV. It requires a one-time installation of both the software and drivers on the laptop before I can use its wireless USB transmitter to connect between the PC and the wireless receiver which is connected to the TV with HDMI. Afer the installation, whenever I want to show the videos stored in external hard disk on the big screen, I always first need to switch on the receiver at TV side and then plug in the wireless USB transmitter on laptop. Now with the use of Raspberry Pi, I can easily browse the videos directly on the TV.

I only worked on the Entertainment Hub when I was at home. Also due to the fact that I only went back to home on Saturday and I would need to go back to Singapore on the following day, I didn’t really got much time to work on the project. Hence, I finally got video to show on the TV only after four times of travelling back to home.

Connecting External Hard Disk to Raspberry Pi

Before I started this project, I thought connecting an external hard disk directly to the Raspberry Pi would be enough. However, it turned out that it’s not the case. When I connected the external hard disk to the Raspberry Pi directly, the USB optical mouse, which was connected to another USB port of the Raspebrry Pi, lost its power. After doing some searches online, I found that it was most probably due to the fact that the Raspberry Pi didn’t have enough power to power up both the hard disk and the optical mouse at the same time.

The USB hard disk I have is 2.5” Portable HDD (Model: IM100-0500K) from Imation. After finding out that Raspebrry Pi had insufficient power for the portal hard disk, I chose to get a powered USB hub. Fortunately, there are nice people done a lot of tests on many, many USB hubs to find out which powered USB hubs are best to use together with Raspberry Pi. They posted a useful list of working powered USB hubs online for us to use as a guideline when choosing USB hub for Raspberry Pi. I bought the Hi-Speed USB 2.0 7-Port Hub by Belkin at Funan. Even though the model isn’t same as the one in the list, the USB hub works fine in my case.

To find out if Raspberry Pi can detect the portable hard disk or not, simply use the following command.

sudo blkid

If the external hard disk can be detected, then a similar results as follows should be printed.

/dev/sda1: LABEL=”HDD Name” UUID=”xxxxxxxxxxxxxxxxxx” TYPE=”ntfs”

Luckily my Raspberry Pi can auto detect the external hard disk and then can mount it automatically.

Entertainment Hub Version 1 Structure

Enjoy Movies on Raspberry Pi

After successfully mounting the external hard disk on Raspberry Pi, I just need to browse to the folders on the hard disk to pick the video files and then play them using OMXPlayer, a video player pre-installed on Raspberry Pi. As I used HDMI cable to connect Raspberry Pi and TV, so by using the following command, both audio and video can be successfully transferred to the TV.

omxplayer -o hdmi -r video.flv

The reason of having -r here is to adjust video framerate and resolution. Without it, not only the video won’t be displayed in full screen on TV, but there also won’t be any audio from TV.

When I first used omxplayer, it showed a black screen after I closed the program. There are online documentation and solution about this issue as well. For me, after I rebooted the Raspberry Pi, the issue disappeared.

Watching Movie with Help of Raspberry Pi
Watching movie with the help of Raspberry Pi.

Dad’s Help in the Project

The case of my Raspberry Pi is designed and made by my Dad. I am very happy and thankful that my Dad helped making a case for my Raspberry Pi. Usually the case of Raspberry Pi is box-shaped. However, the case I have here is a cylinder. So my Raspberry Pi looks special. =)

A closer look of my Raspberry Pi.

Future Work

With this little success of having movies played on Raspberry Pi, the first part of the Entertainment Hub is done. Now, there are more things needed to be done in order to make it more user friendly and robust. First of all, there needs a playlist support. Secondly, the ability of replaying the videos. Thirdly, a better GUI to select videos, instead of just a command-line UI. All of these depend on how fast I learn to program an app in Raspberry Pi.

Let’s look forward to completion of this project.