Learning Postman Flows and Newman: A Beginner’s Journey

For API developers, Postman is a popular tool that streamlines the process of testing APIs. Postman is like having a Swiss Army knife for API development as it allows developers to interact with APIs efficiently.

In March 2023, Postman Flows was officially announced. Postman Flows is a no-code visual tool within the Postman platform designed to help us create API workflows by dragging and dropping components, making it easier to build complex sequences of API calls without writing extensive code.

Please make sure Flows is enabled in our Postman Workspace.

Recently, my teammate demonstrated how Postman Flows works, and I’d like to share what I’ve learned from him in this article.

Use Case

Assume that there is a list of APIs that we need to call in sequence every time, then we can make use of Postman Flows. For demonstration purpose, let’s say we have to call the following three AWS APIs for a new user registration.

We will first need to define the environment variables, as shown in the following screenshot.

We keep the 
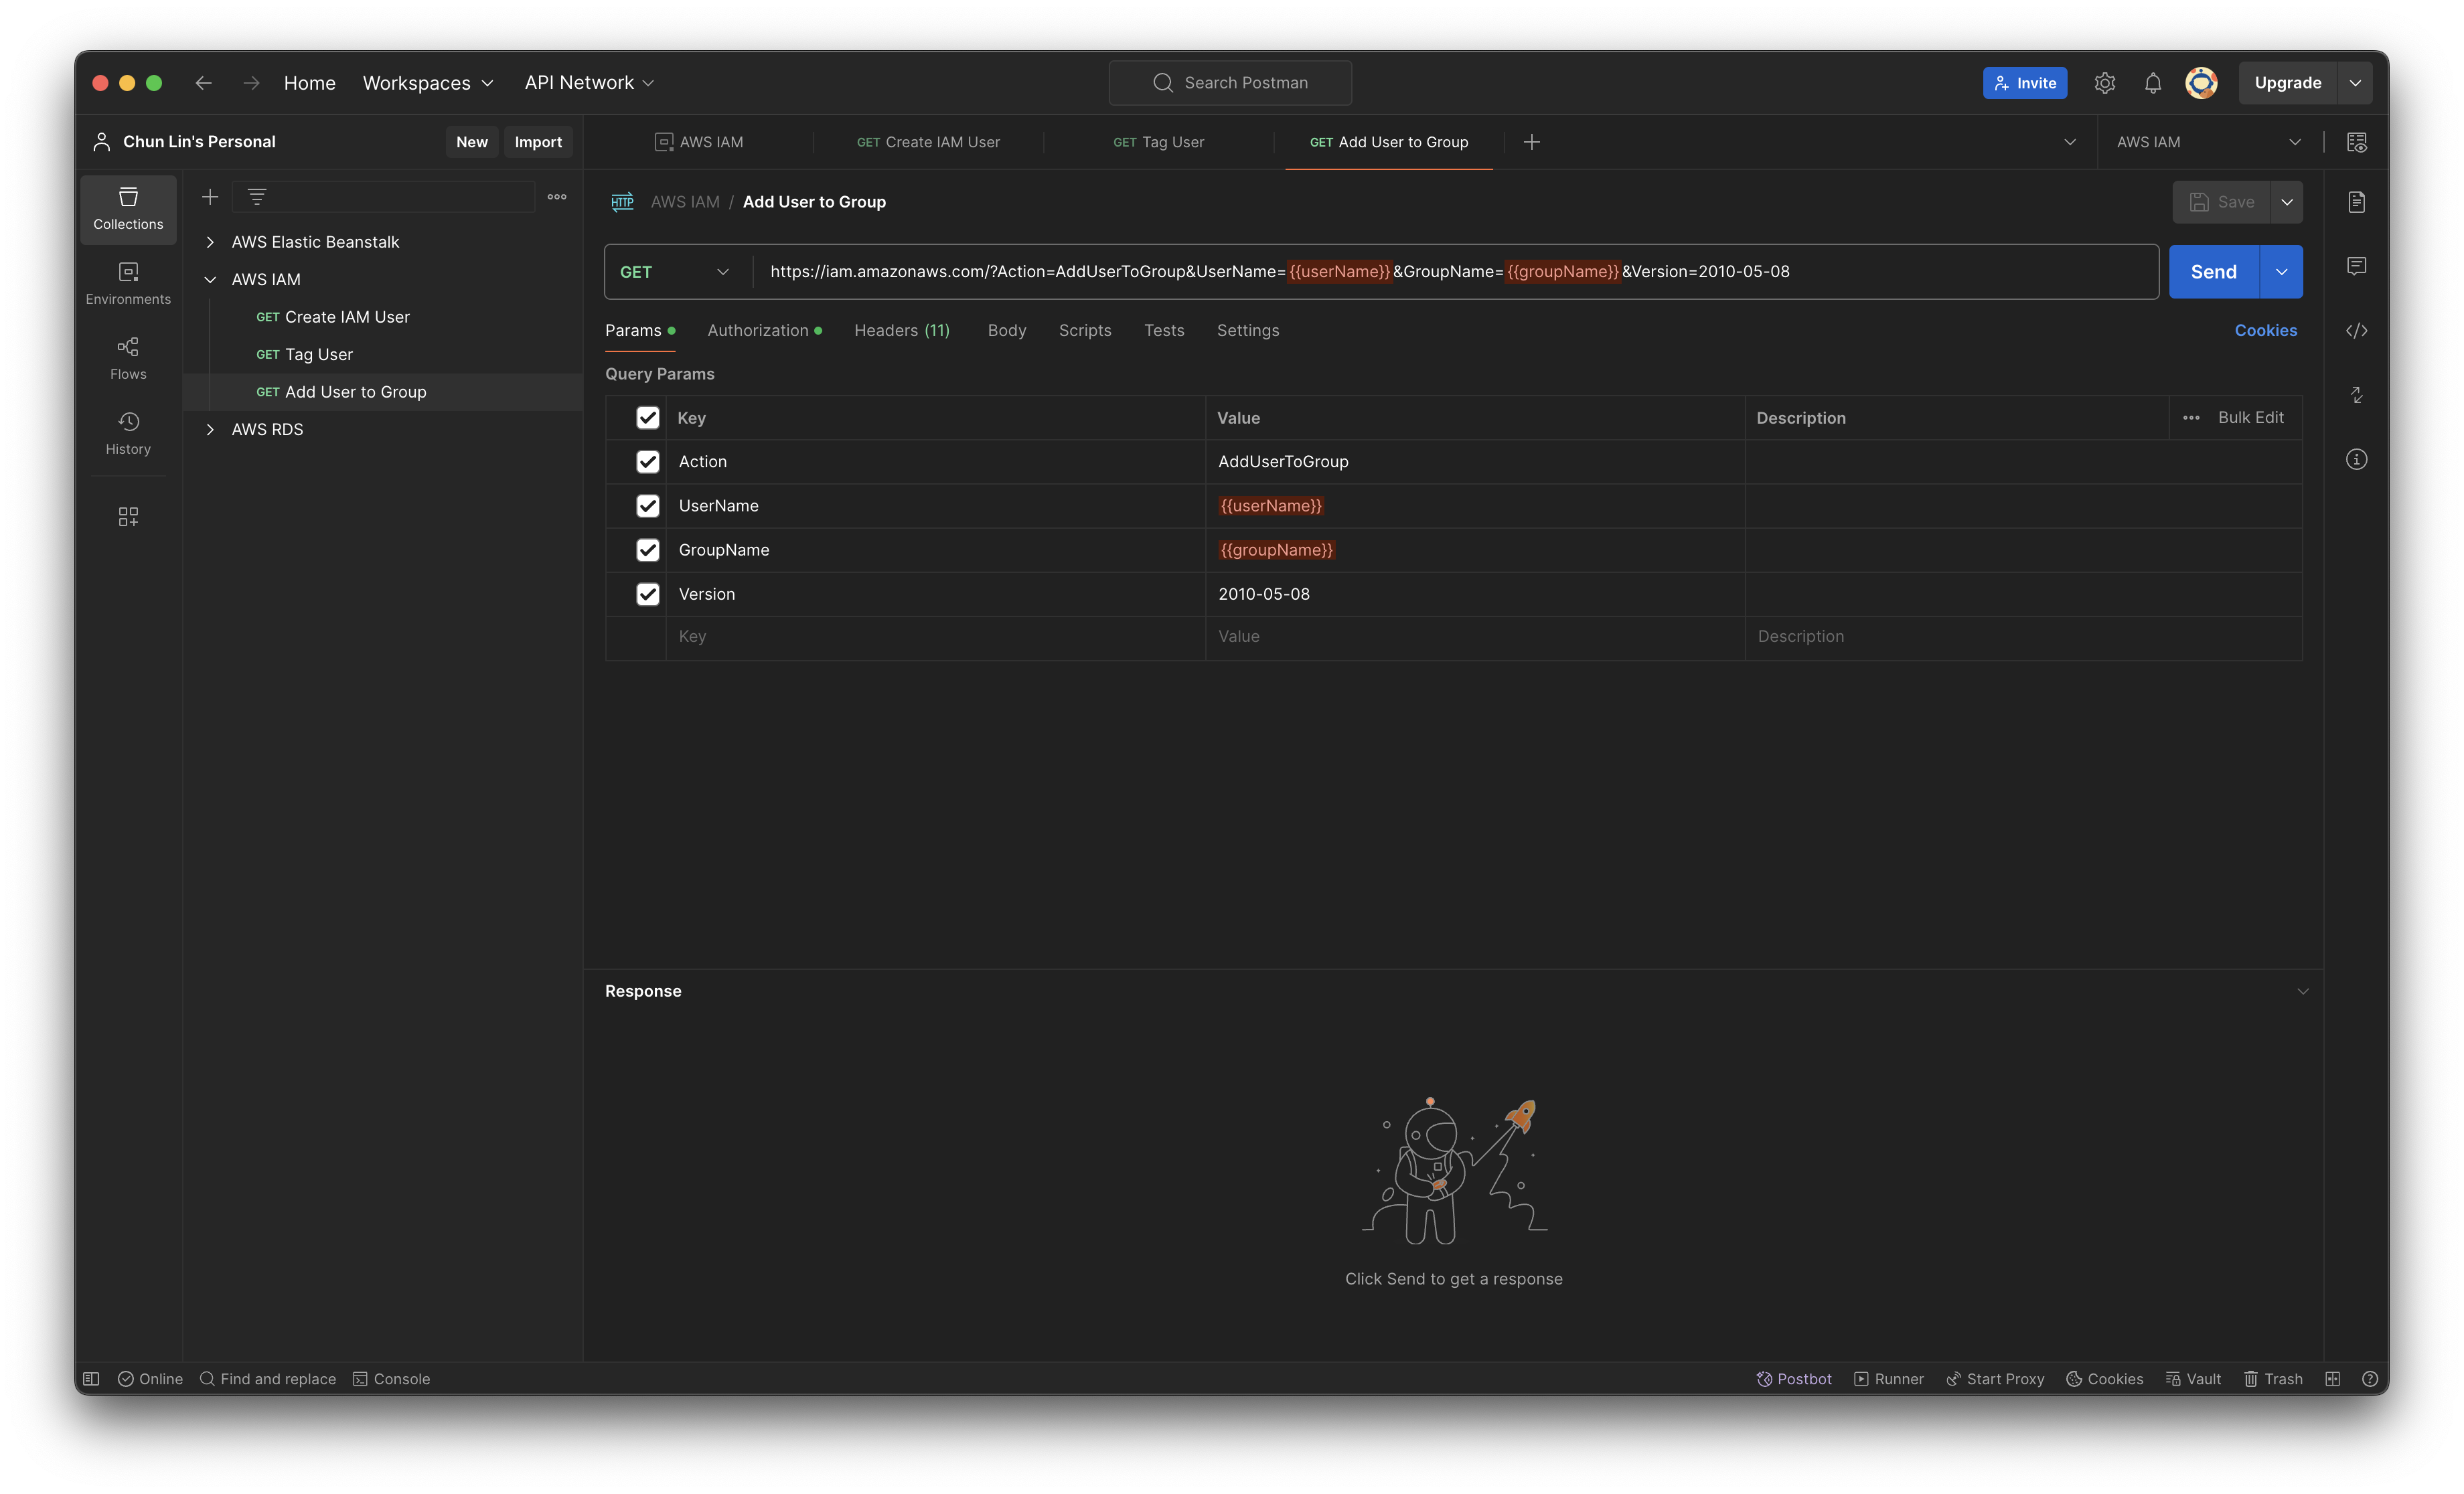
region variable to be empty because the region of IAM setup should be Global.

Next, we will setup the three API calls. For example, to create a new user on AWS, we need to make an HTTP GET request to the IAM base URL with CreateUser as the action, as shown in the following screenshot.

The UserName will be getting its value from the variable userName.

To tag the user, for example assigning the user above to a team in the organisation, we can do so by setting TagUser as the action, as shown in the screenshot below. The team that the user will be assigned to is based on their employee ID, which we will discuss later in this article.

The teamName is a variable with value determined by another variable.

Finally, we will assign the user to an existing user group by setting AddUserToGroup as its action.

The groupName must be having a valid existing group name in our AWS account.

Create the Flow

As demonstrated in the previous section, calling the three APIs sequentially is straightforward. However, managing variables carefully to avoid input errors can be challenging. Postman Flows allows us to automate these API calls efficiently. By setting up the Flow, we can execute all the API requests with just a few clicks, reducing the risk of mistakes and saving time.

Firstly, we will create a new Flow called “AWS IAM New User Registration”, as shown below.

Created a new Flow.

By default, it comes with three options that we can get started. We will go with the “Send a request” since we will be sending a HTTP GET request to create a user in IAM. As shown in the following screenshot, a list of variables that we defined earlier will be available. We only need to make sure that we choose a correct Environment. The values of service, region, accessKey, and secretKey will then be retrieved from the selected Environment.

Choosing the environment for the block.

Since the variable userName will be used in all three API calls, let’s create a variable block and assign it a value called “postman03”.

Created a variable and assigned a string value to it.

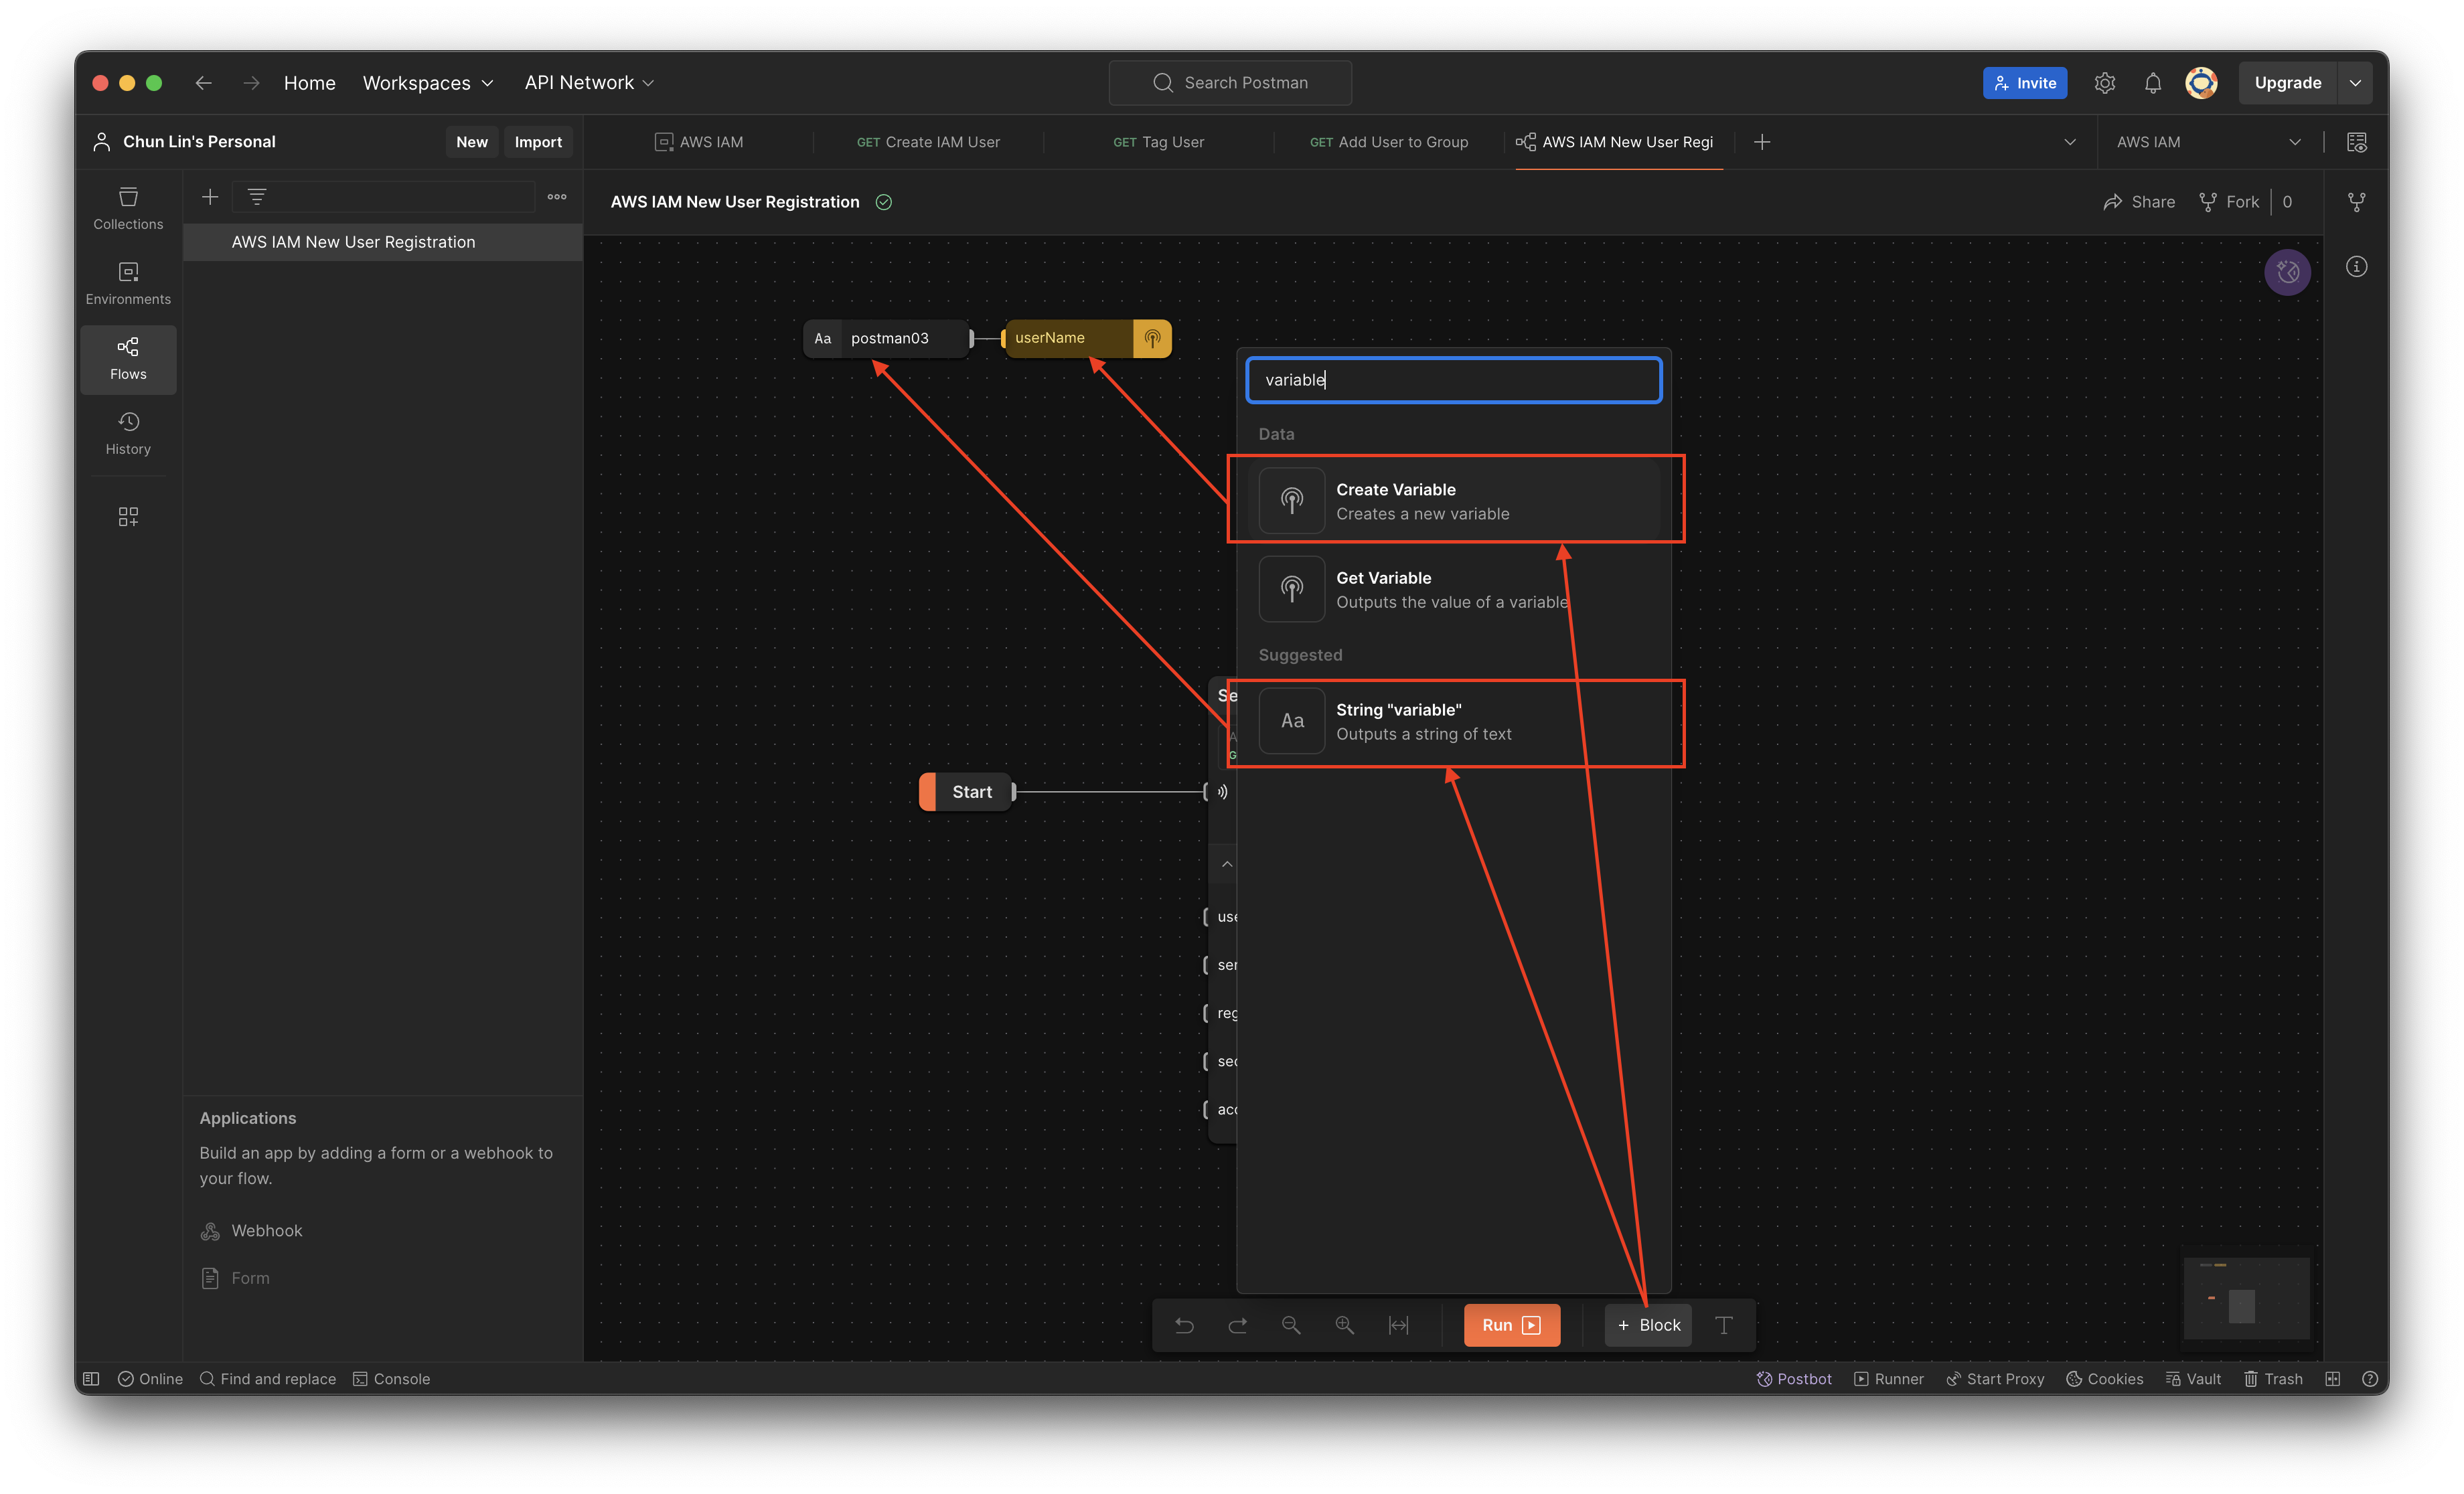
Next, we simply need to tell the API calling block to assign the value of userName to the field userName.

Assigning variable to the query string in the API call.

Now if we proceed to click on the “Run” button, by right, the call should respond with HTTP 200 and relevant info returned from AWS, as demonstrated below.

Yes, the user “postman03” is created successfully on AWS IAM.

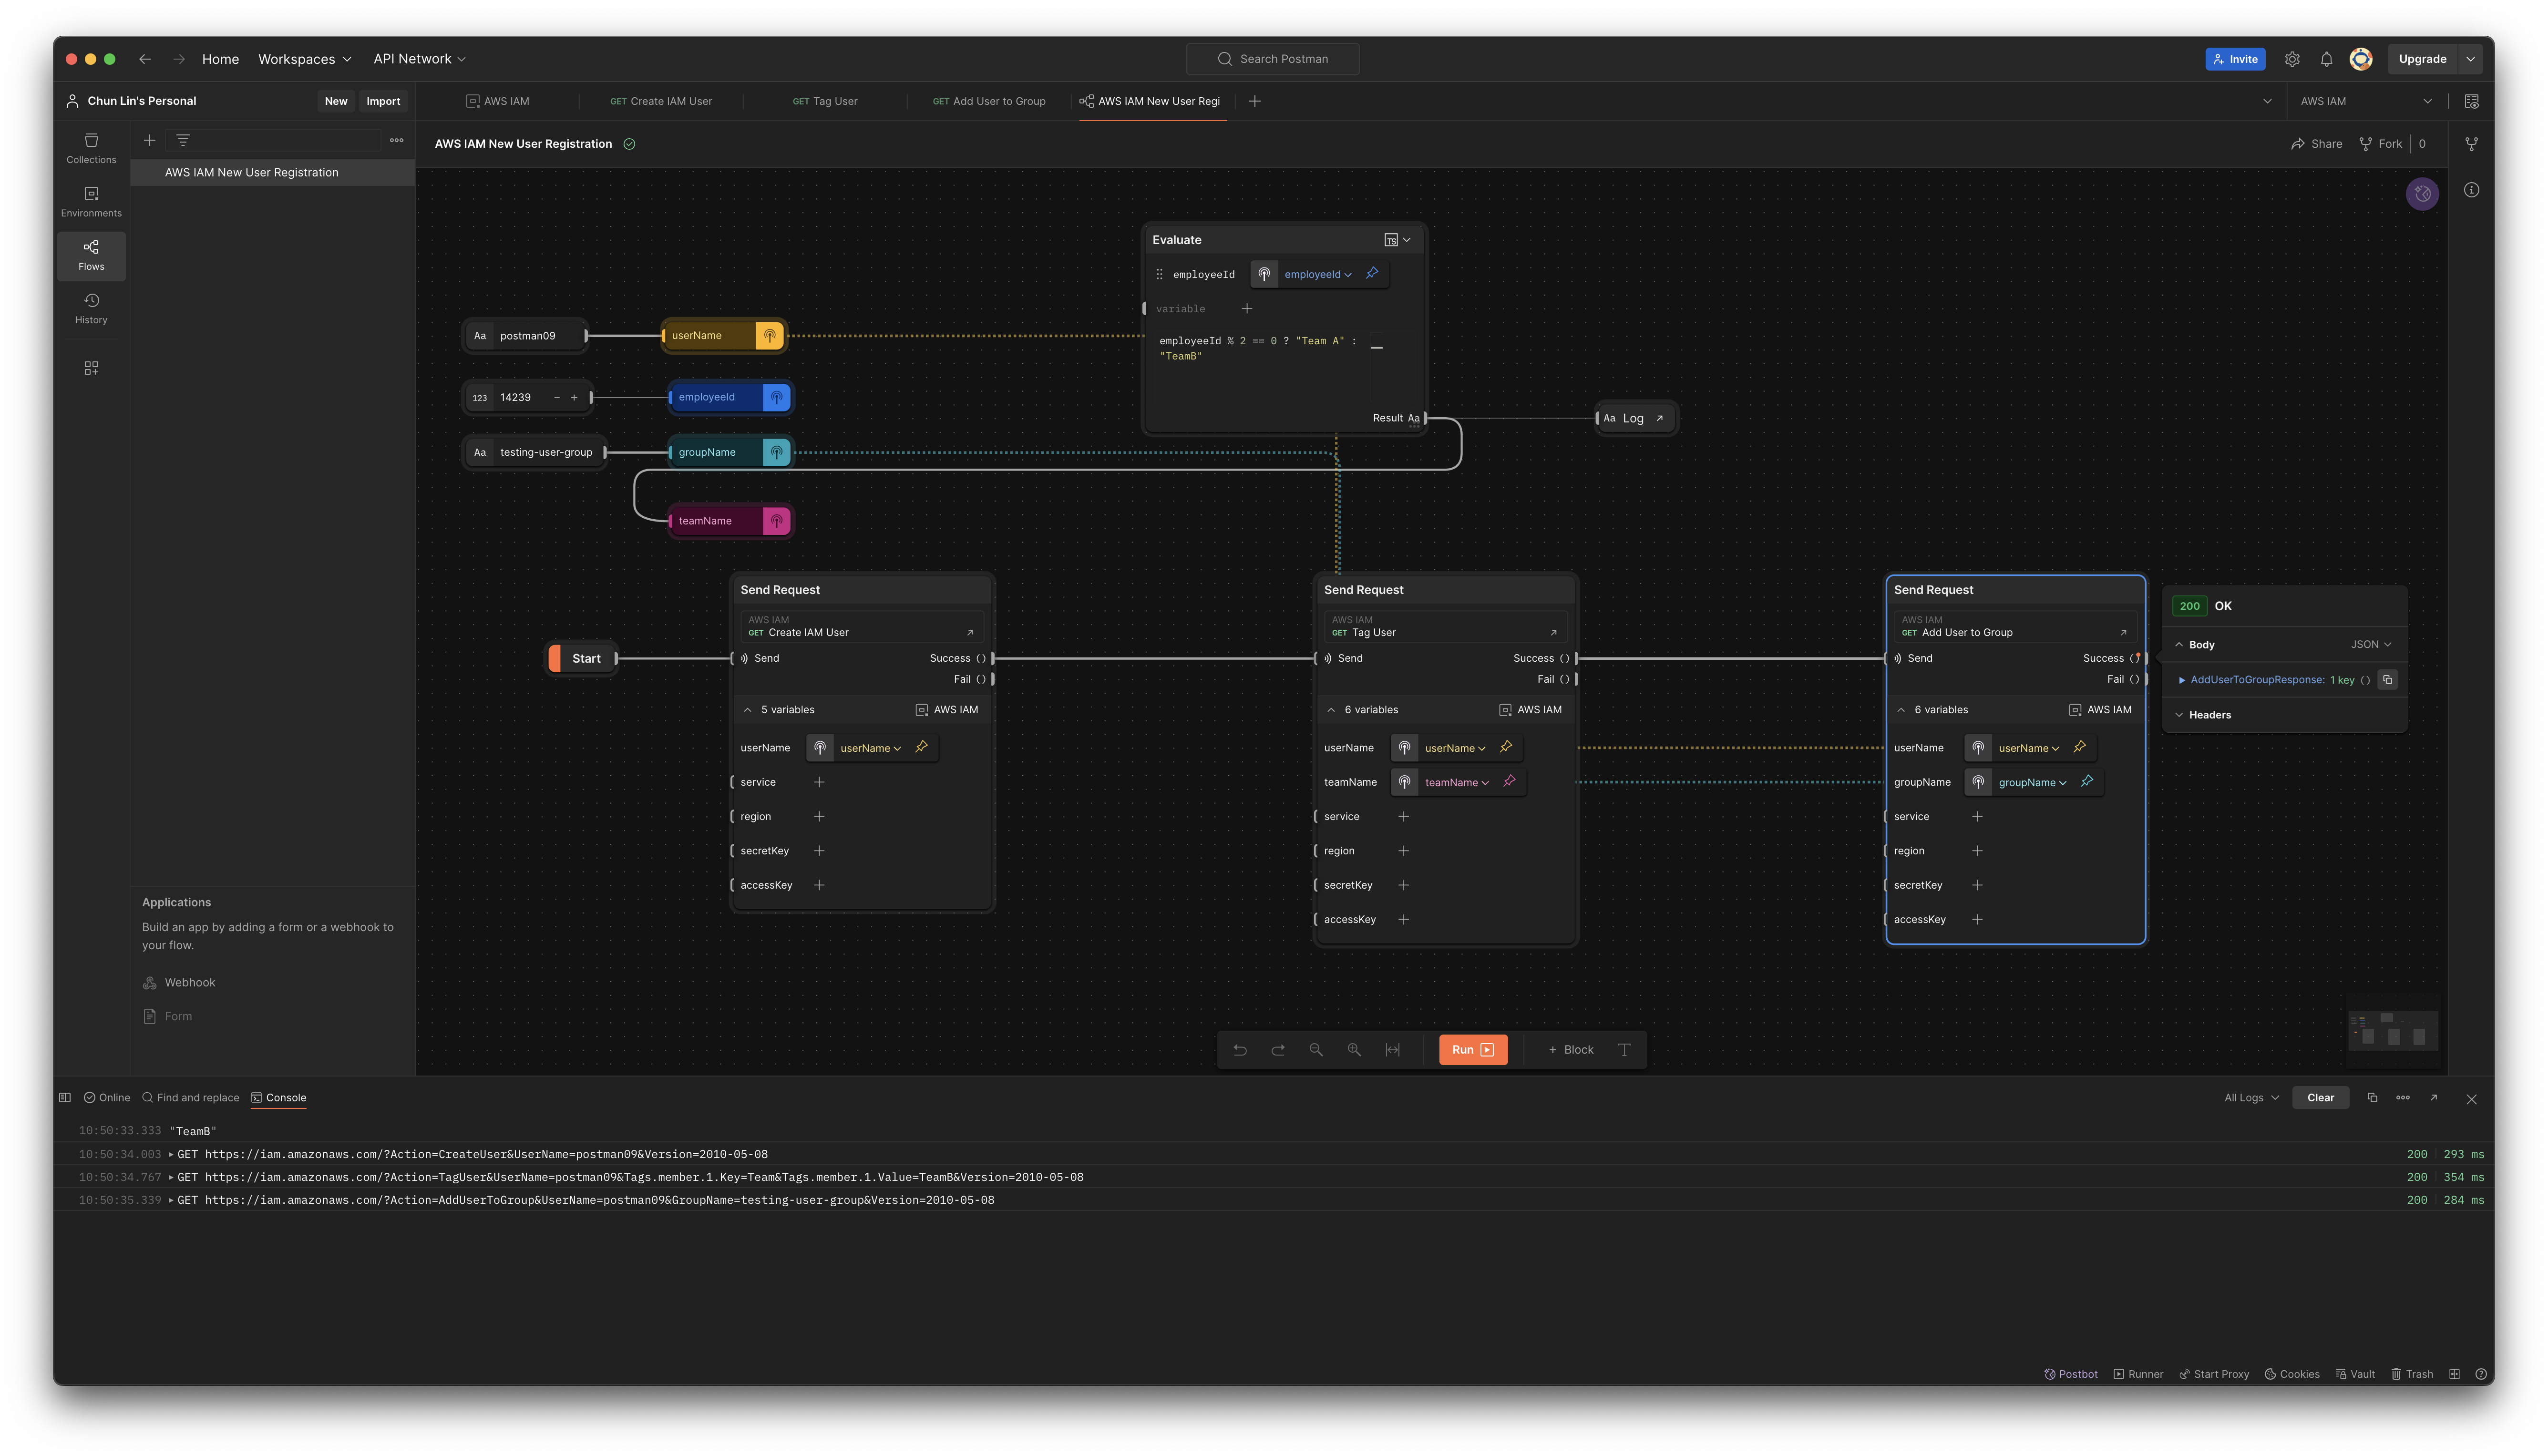
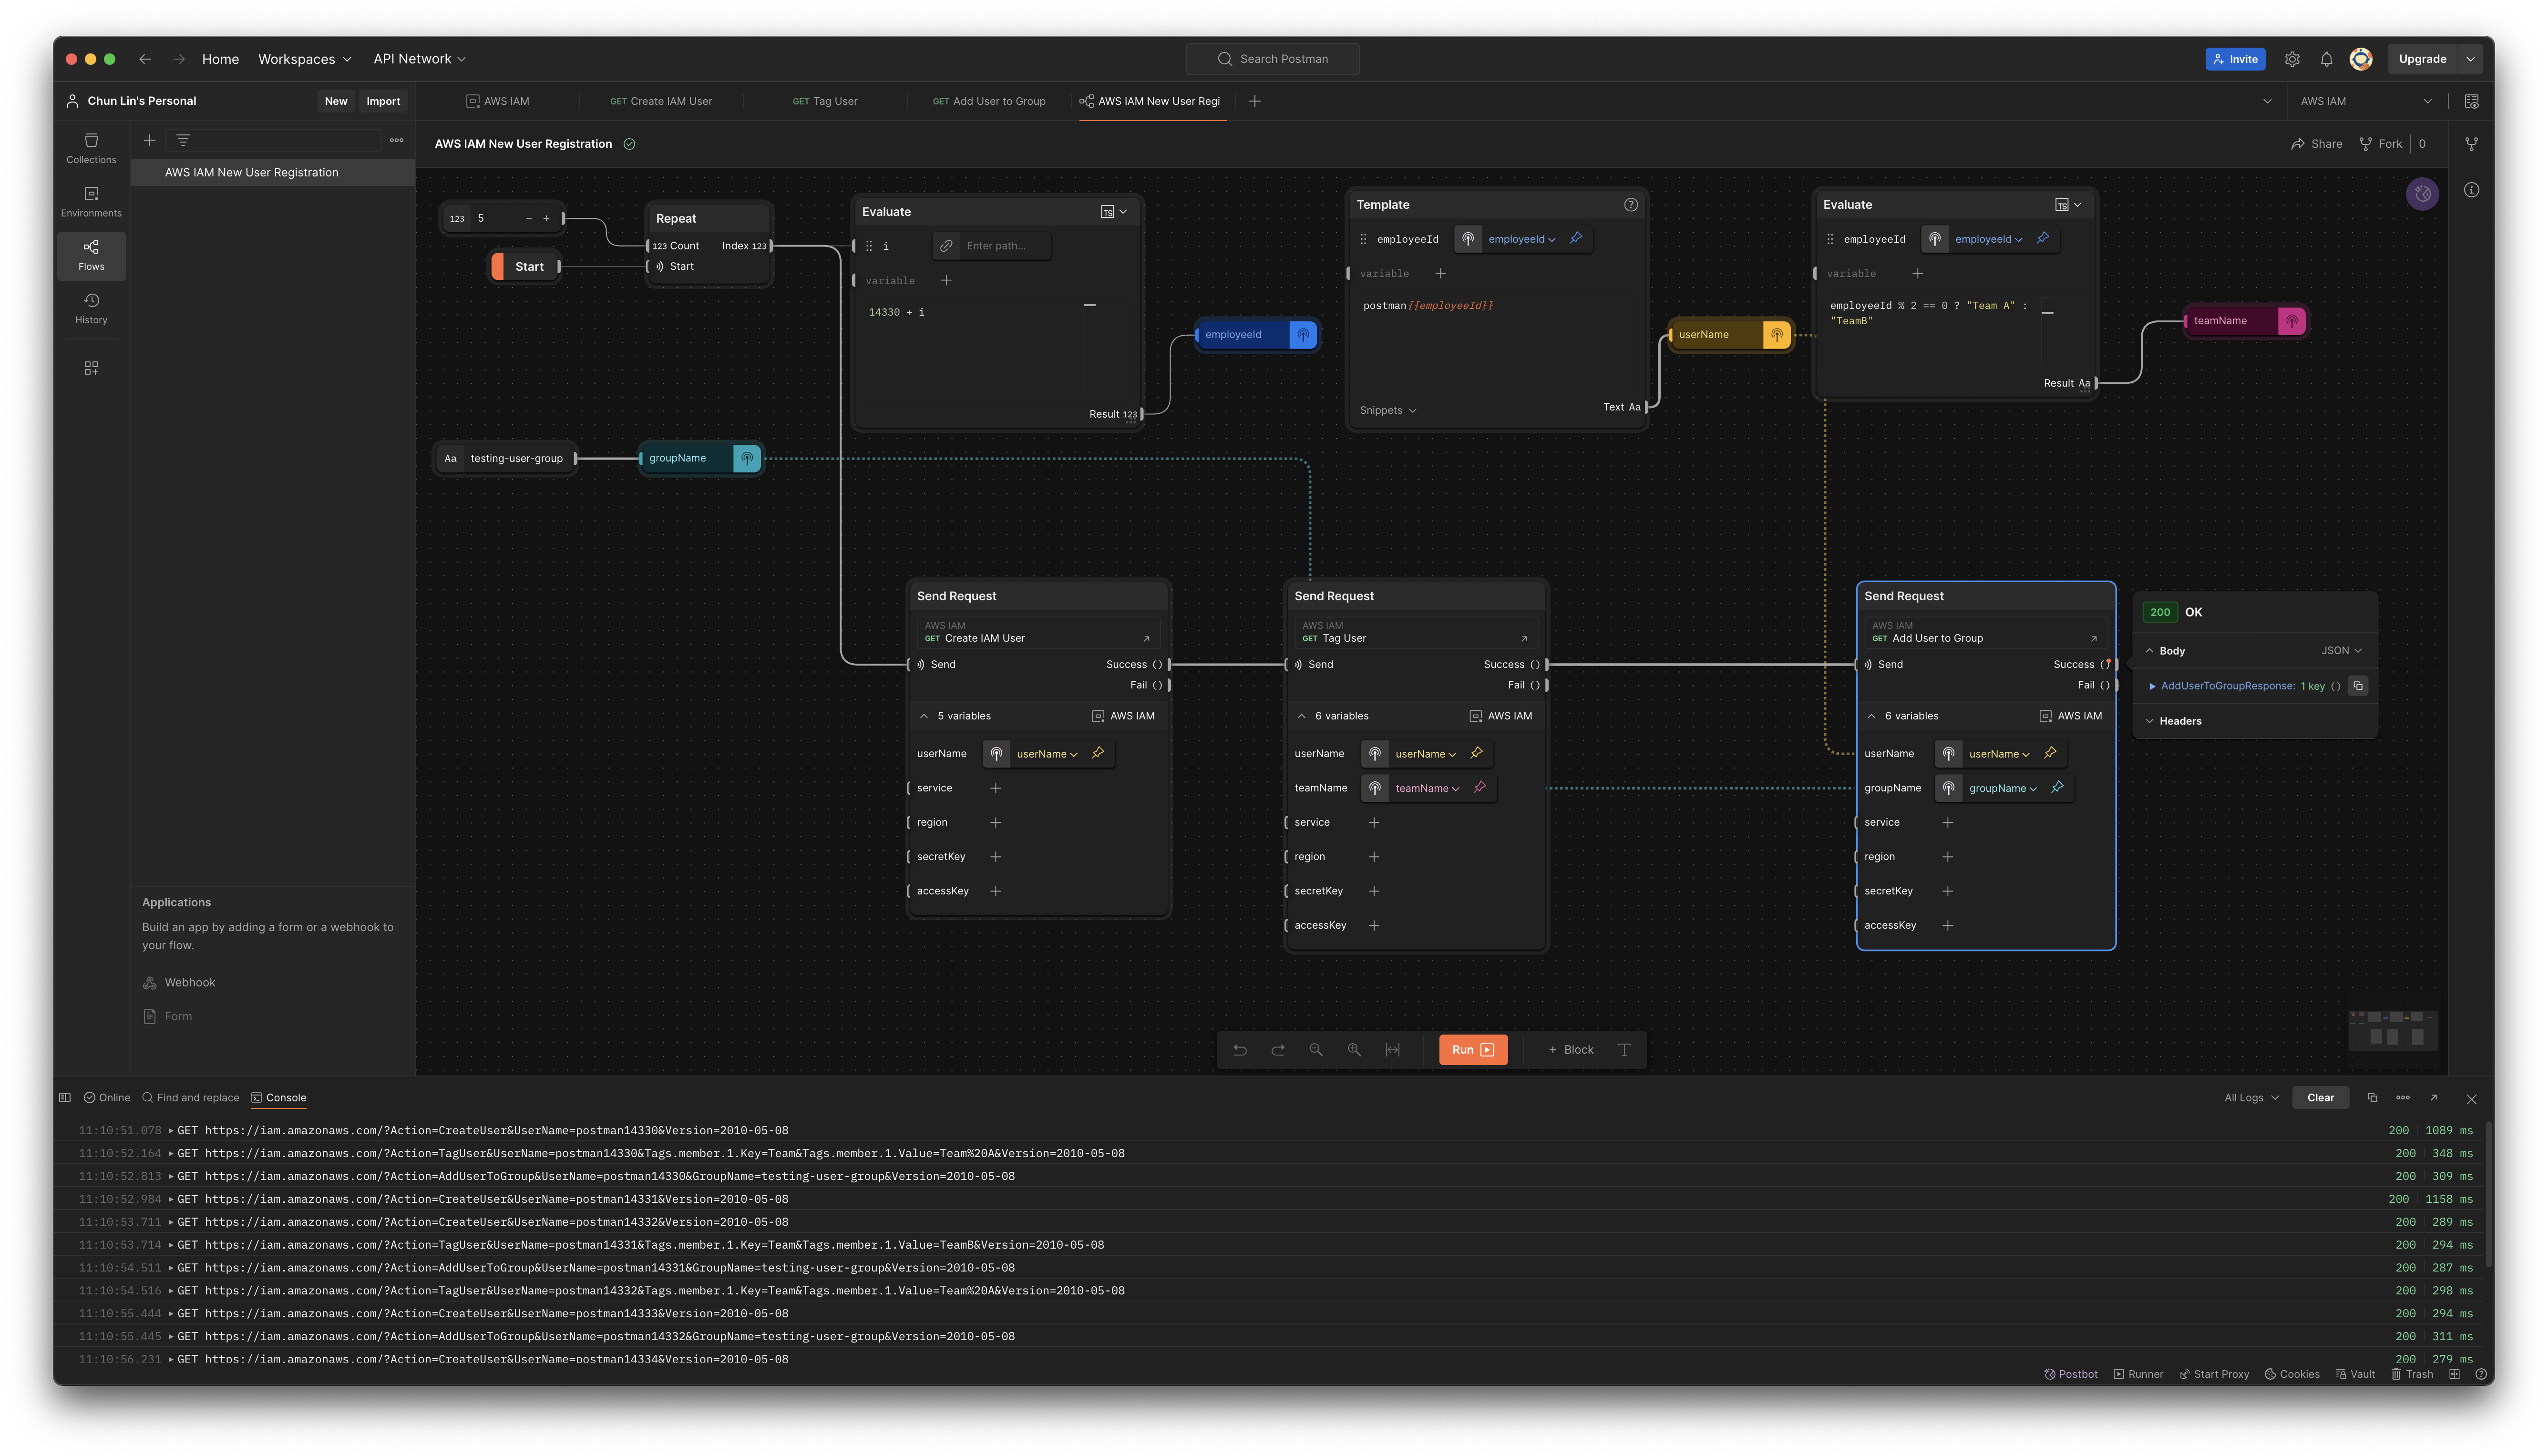
With the success of user creation, the next step is to call the user tagging API. In this API, we will have two variables, i.e. userName and teamName. Let’s assume that the teamName is assigned based on whether the user’s employeeId is an even or odd number, we can design the Flow as shown in the following screenshot.

With two different employeeId, the teamNames are different too.

As shown in the Log, when we assign an even number to the user postman06, the team name assigned to it is “Team A”. However, when we assign an odd number to another user postman07, its team name is “Team B”.

Finally, we can complete the Flow with the third API call as shown below.

The groupName variable is introduced for the third API call.

Now, we can visit AWS Console to verify that the new user postman09 is indeed assigned to the testing-user-group.

The new user is assigned to the desired user group.

The Flow above only can create one new user in every Flow execution. By using the Repeat block which takes a numeric input N and iterates over it from 0 to N - 1, we can create multiple users in a single run, as shown in the following updated Flow.

This flow will create 5 users in one single execution.

Variable Limitation in Flows

Could we save the response in a variable that allows us to reuse its value in other Flow? We would guess this is possible with variables in Postman.

Postman supports variables at different scopes, in order from broadest to narrowest, these scopes are: global, collection, environment, data, and local.

The variable with the broadest scope in Postman is the global variables which are available throughout a workspace. So what we can do is actually storing the response in the global variables.

To do so, we need to update our request in the Collection. One of the snippets provided is actually about setting a global variable, so we can use it. For example, we add it to the post-response script of “Create IAM User” request, as shown in the screenshot below.

Postman provides snippets to help us quickly generate boilerplate code for common tasks, including setting global variables.

Let’s change the boilerplate code to be as follows.

pm.globals.set("my_global", pm.response.code);

Now, if we send a “Create IAM User” request, we will notice that a new global variable called my_global has been created, as demonstrated below.

The response code received is 400 and thus my_global is 400.

However, now if we run our Flow, we will realise that my_global is not being updated even though the response code received is 200, as illustrated in the following screenshot.

Our global variable is not updated by Flow.

Firstly, we need to understand that nothing is wrong with environments or variables. The reason why it did not work is because the variables just work differently in Flows from how they used to work in the Collection Runner or the Request Tab, as explained by Saswat Das, the creator of Postman Flows.

According to Saswat, global variables and environment variables are now treated as read-only values in the Flows, and any updates made to them through script are not respected.

So the answer to the question whether we can share variable across different Flows earlier is simply a big no by design currently.

Do It with CLI: Newman

Is there any alternative way that we can use instead of relying on the GUI of Postman?

Another teammate of mine from the QA team recently also showed how Newman, a command-line Collection Runner for Postman, can help.

A command-line Collection Runner is basically a tool that allows users to execute API requests defined in Postman collections directly from the command line. So, could we use Newman to do what we have done above with Postman Flows as well?

Before we can use Newman, we first need to export our Collection as well as the corresponding Environment. To do so, firstly, we click on the three dots (…) next to the collection name and select Export. Then, we choose the format (usually Collection v2.1 is recommended) and click Export. Secondly, we proceed to click on the three dots (…) next to the environment name and select Export as well.

Once we have the two exported files in the same folder, for example a folder canned “experiment.postman.newman”, we can run the following command.

$ newman run aws_iam.postman_collection.json -e aws_iam.postman_environment.json --env-var "userName=postman14462" --env-var "teamName=teamA" --env-var "groupName=testing-user-group"

While Newman and Postman Flows can both be used to automate API requests, they are tailored for different use cases: Newman is better suited for automated testing, integration into CI/CD pipelines, and command-line execution. Postman Flows, on the other hand, is ideal for visually designing the workflows and interactions between API calls.

References

Authenticate an Azure Function with Azure Active Directory

[This post is updated on 19th July 2020 to reflect the latest UI of both Azure Portal and Postman. I’d like to take this chance to correct some of my mistakes made in earlier post, as friendly pointed out by readers in the comment section.]

Today is the first working day of a new year. Today is the second half of year 2020 where I have been instructed to work from home for months. I thus decided to work on a question raised previously by the senior developer in my previous job back in 2018: How do we authenticate an Azure Function?

The authentication tool that I am using is the Azure Active Directory (Azure AD). Azure AD provides an identity platform with enhanced security, access management, scalability, and reliability for connecting users with all our apps.

Setting up Azure Function

The Azure Function that I’m discussing here is the Azure Function app with .NET Core 3.1 runtime stack and published as Code instead as Docker Container.

🎨 Creating a new Function that will be deployed on Windows. 🎨

The whole Function creation process takes about 2 minutes. Once it is successfully created, we can proceed to add a new function to it. In this case, we are going to choose a HTTP trigger, as shown in the screenshot below. We choose to use a HTTP trigger function because later we will show only authenticated users can get the results when sending a POST request to this function.

🎨 Creating a function which runs when it received an HTTP request. 🎨

Once the trigger is created, we will see that there is a default C# code template given which will return the caller a greeting message if a name is provided in the body of HTTP request (or through query string).

🎨 Default template code for HTTP Trigger. 🎨

HTTP Methods and Function Keys

Before we continue, there are a few things we need to handle. The steps below are optional but I think they are useful for the readers.

Firstly, by default, the Function accepts both GET and POST requests. If you would like to only allow POST request, changing only the C# codes above is not going to help much. The correct way is to choose the accepted HTTP methods for this Function under its “Integration” section, as shown in the screenshot below.

🎨 This shows where to locate the “Selected HTTP methods”. 🎨

In our case, since we will only accept POST request, we will tick only the POST option.

As you notice in the “Authorization level” dropdown which is right above the “Selected HTTP methods”, it currently says “Function”. Later we must change this but for now we keep it as it is. If you would like to manage the Function Key, or checkout the default one, you can find the keys in the “Function Keys” section of the Function.

Secondly, what is the URL of this Function? Unlike the previous version of Azure Function, the URL of the Function can be retrieved at both the Overview section and the Code + Test section of the Function. However, the URL in the Overview section has no HTTPS, so we will be using the HTTPS URL found in Code + Test, as shown in the screenshot below.

🎨 Getting the function URL (in HTTPS). 🎨

Now if we send a GET request to the Function, we shall receive 404 Not Found, as shown in the following screenshot, because we only open for POST requests.

🎨 GET request sent to our Function will now be rejected. 🎨

Thus, when we send another HTTP request but make it to be a POST request, we will receive the message that is found in the C# codes in the Function, as shown in the following screenshot.

🎨 Yay, the POST requests are allowed. 🎨

Now, everyone can send a POST request and get the message as long as they know the Function Key. So how do we add Authentication to this Function?

Authorization Level for the Function

Remember in the earlier section above, we talked about the Authorization Level of the Function? It has three options: Function, Admin, and Anonymous.

We must change the Authorization Level of the Function to be “Anonymous”, as shown in the screenshot below. This is because for both “Function” and “Admin” levels, they are using keys. What we need here is user-based authentication, hence we must choose “Anonymous” instead.

🎨 Without setting the Authorization Level to be Anonymous, the Azure AD authorisation will not work as expected. 🎨

This step is very important because if we forgot to change the Authorization Level to “Anonymous”, the Function will still need the Function Key as the query string even though the request comes in with a valid access token.

Enable App Service Authorization

After that, we need to visit the App Service of the Function App to turn on App Service Authentication. This feature is at App Service level instead of the Function itself. So please pay attention to where to look for the feature.

🎨 This is the place to turn on the “App Service Authentication” for the Function app. 🎨

After the Authentication is turned on, we need to specify “log in with Azure Active Directory” as the action to be taken when the request is not authenticate, as illustrated below. This step is also very important because if we forgot to change it and “Allow Anonymous requests (no action)”, then no matter whether we set the Authentication Providers or not, people can still access the Function. Hence, please remember to change this setting accordingly.

🎨 Turning on App Service Authentication. 🎨

Next, please click on the Azure Active Directory which is listed as one of the Authentication Providers. It is currently labelled as “Not Configured”. Don’t worry, we will now proceed to configure it.

Firstly, we choose the Express mode as management mode. Then we can proceed to create a new Azure AD. The Portal then will help us to setup a new AD Application (or choose from existing AD Application). You can go to Advanced directly if you are experienced with Azure AD.

You should now see the page which looks like what is shown in the following screenshot.

🎨 Creating a new Azure AD Application for the Function in an easy way. (Waypoint 1) 🎨

There is one thing that may catch your attention. It is the last item in the page called “Grant Common Data Service Permissions”. Common Data Service, or CDS, is Microsoft way of providing a secure and cloud-based storage option for our data. There is a one-hour Microsoft online course about CDS, you can take the course to understand more. Grace MacJones, Microsoft Azure Customer Engineer, also gave us a short-and-sweet explanation about this setting on GitHub.

We basically can leave everything as default in the page and proceed to click the “OK” button at the bottom of the page.

After this, the Azure AD will be labelled as “Configure (Express Mode: Create)”. We can then proceed to save the changes.

🎨 Do not forget to save the settings! 🎨

After the settings are saved, we can refresh the page and realising the Azure AD is now labelled as “Configure (Express: Existing App)”. That means the Azure AD app has been created successfully.

🎨 The status of Azure AD for the Function is updated. 🎨

Now, click in to the Azure AD under the Authentication Providers list again. We will be brought to the section where we specified the management node earlier. Instead of choosing Express mode, now we can proceed to choose the Advanced mode.

We will then be shown with Client ID, Issuer Url, and Client Secret, as shown in the following screenshot. According to Ben Martens’ advise, we have to add one more record, which is the domain URL of the Function, to the “Allowed Token Audiences” list to make Azure AD work with this Function, as shown in the following screenshot. (This step is no longer needed with the new interface since October 2019 so I strikethrough it)

🎨 Getting the Azure AD important parameters. 🎨

When you leave this page, the Azure Portal may prompt you to save it. You can choose not to save it. It is optional. If you save it, the Azure AD mode will be changed from Express to Advanced and this will not affect our setup.

Testing on Postman

Now, let’s test our setup above.

When we send the same POST request to the Function again (with the code query string removed since it’s no longer necessary), this time with the App Service Authorization enabled for the Function App, we will no longer be able to get the same message back. Instead, we are told to be 401 Unauthorised and “You do not have permission to view this directory or page”, as shown in the screenshot below.

🎨 Yup, we are unauthorised now. 🎨

Now, let’s try to authenticate ourselves.

To do so, we will make a POST request with the body containing Grant Type, Client ID, Client Secret, and Resource to the following URL:
https://login.microsoftonline.com/<Tenant ID>/oauth2/token to retrieve the access token, as shown in the following screenshot.

🎨 Yesh, we got the access token. 🎨

If we use the access token to send POST request to our Function, we will be told that we are now authorised and the message found in C# code is presented to us, as shown in the following screenshot.

🎨 Yay, we can access our Function again! 🎨

Conclusion

If you would like to get the claims in the Azure Function, you can refer to the following code which loops through all the claims. If you would like to allow a certain client app to call the Azure Function, you can check for the value of the claim having “appid” as its type.

foreach(var claim in principal.Claims)
{
    log.LogInformation($"CLAIM TYPE: {claim.Type}; CLAIM VALUE: {claim.Value}");
}

That’s all it takes to setup a simple authentication for Azure Function with Azure AD. If you find anything wrong above, feel free to correct me by leaving a message in the comment section. Thanks!

References