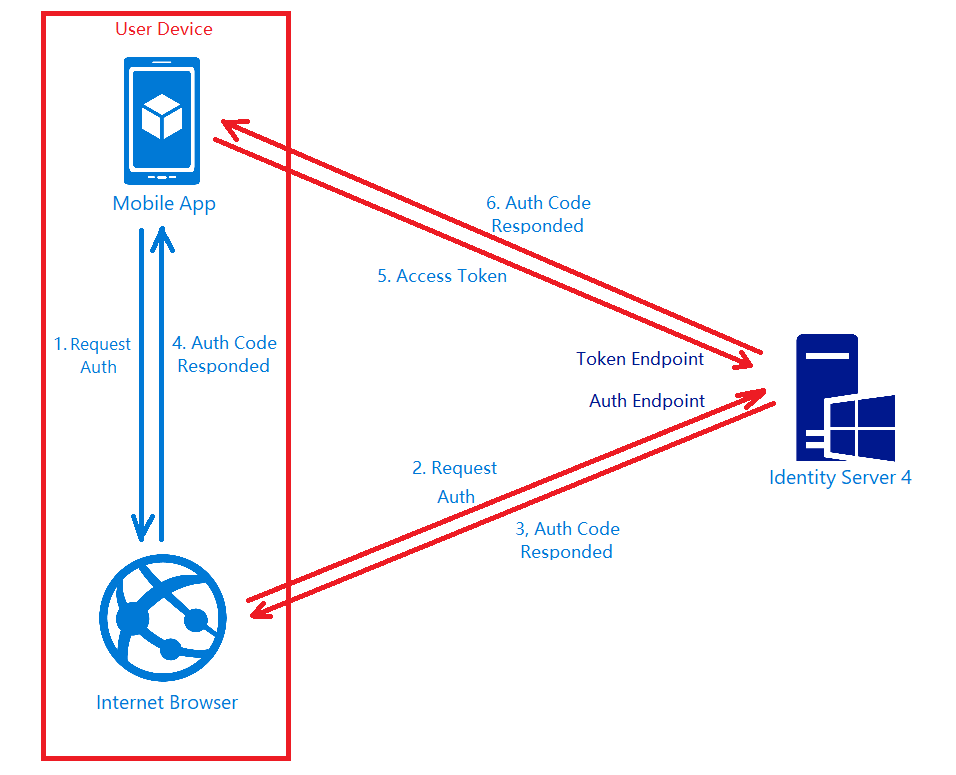
In my previous post, I shared about the way to connect Android app with IdentityServer4 using AppAuth for Android. However, that way will popup a login page on a web browser on phone when users are trying to login to our app. This may not be what the business people want. Sometimes, they are looking for a customized native login page on the app itself.
To do so, we can continue to make use of IdentityServer4.
IdentityServer4 has a grant which is called Resource Owner Password Grant. It allows a client to send username and password to the token service and get an access token back that represents that user. Generally speaking, it is not really recommended to use the AppAuth way. However, since the mobile app is built by our own team, so using the resource owner password grant is okay.
Identity Server Setup: Adding New API Resource
In this setup, I will be using in-memory configuration.
As a start, I need to introduce a new ApiResource with the following codes in the Startup.cs of our IdentityServer project.
var availableResources = new List<ApiResource>();
...
availableResources.Add(new ApiResource("mobile-app-api", "Mobile App API Main Scope"));
...
services.AddIdentityServer()
    ...
    .AddInMemoryApiResources(availableResources)
    .AddInMemoryClients(new ClientStore(Configuration).GetClients())
    .AddAspNetIdentity<ApplicationUser>();
Identity Server Setup: Defining New Client
As the code above shows, there is a ClientStore that we need to add a new client to with the following codes.
public class ClientStore : IClientStore
{
    ...

    public IEnumerable<Client> GetClients()
    {
        var availableClients = new List<Client>();

        ...

        availableClients.Add(new Client
        {
            ClientId = "mobile-app-api",
            ClientName = "Mobile App APIs",
            AllowedGrantTypes = GrantTypes.ResourceOwnerPassword,
            ClientSecrets = { new Secret(Configuration["MobileAppApi:ClientSecret"].Sha256()) },
            AllowedScopes = { "mobile-app-api" }
        });

        return availableClients;
    }
}
Configuring Services in Web API
In the Startup.cs of our Web API project, we need to update it as follows.
public void ConfigureServices(IServiceCollection services)
{
    services.AddMvc();

    services.AddAuthorization();

    services.AddAuthentication("Bearer")
    .AddIdentityServerAuthentication(options =>
    {
        options.Authority = "<URL of the identity server>";
        options.RequireHttpsMetadata = true;
        options.ApiName = "mobile-app-api";
    });

    services.Configure<MvcOptions>(options =>
    {
        options.Filters.Add(new RequireHttpsAttribute());
    });
}
Configuring HTTP Request Pipeline in Web API
Besides the step above, we also need to make sure the following one line “app.UseAuthentication()” in the Startup.cs. Without this, we cannot make the authentication and authorization to work in our Web API project.
public void Configure(IApplicationBuilder app, IHostingEnvironment env)
{
    ...
    app.UseAuthentication();
    app.UseMvc();
}
Receiving Username and Password to Return Access Token
We also need to add a new controller to receive username and password which will in return tell the mobile app whether the login of the user is successful or not. If the user is logged in successfully, then an access token will be returned.
[Route("api/[controller]")]
public class AuthenticateController : Controller
{
    ...
    [HttpPost]
    [Route("login")]
    public async Task<ActionResult> Login([FromBody] string userName, string password)
    {
        var disco = await DiscoveryClient.GetAsync("<URL of the identity server>");
        var tokenClient = new TokenClient(disco.TokenEndpoint, "mobile-app-api", Configuration["MobileAppApi:ClientSecret"]);
        var tokenResponse = await tokenClient.RequestResourceOwnerPasswordAsync(userName, password, "mobile-app-api");

        if (tokenResponse.IsError)
        {
            return Unauthorized();
        }

        return new JsonResult(tokenResponse.Json);
    }
    ...
}
Securing our APIs
We can now proceed to protect our Web APIs with [Authorize] attribute. In the code below, I also try to return the available claims via the API. The claims will tell the Web API who is logging in and calling the API now via the mobile app.
[HttpGet]
[Authorize]
public IEnumerable<string> Get()
{
    var claimTypesAndValues = new List<string>();

    foreach (var claim in User.Claims)
    {
        claimTypesAndValues.Add($"{ claim.Type }: { claim.Value }");
    }

    return claimTypesAndValues.ToArray();
}
Conclusion
This project took me two days to find out how to make the authentication works because I misunderstand how IdentityServer4 works in this case. Hence, it is always important to fully understand the things on your hands before working on them.