It’s quite common that Business Analyst will always ask for the permission to access the databases of our systems to do data analysis. However, most of the time we will only give them read-only access. With on-premise MS SQL Server and SQL Management Studio, it is quite easily done. However, how about for those databases hosted on Azure SQL?
Login as Server Admin
To make things simple, we will first login to the Azure SQL Server as Server admin on SQL Management Studio. The Server Admin name can be found easily on Azure Portal, as shown in the screenshot below. Its password will be the password we use when we create the SQL Server.
Identifying the Server Admin of an Azure SQL Server. (Source: Microsoft Azure Docs)
Create New Login
By default, the master database will be the default database in Azure SQL Server. So, once we have logged in, we simply create the read-only login using the following command.
CREATE LOGIN <new-login-id-here>
    WITH PASSWORD = '<password-for-the-new-login>'
GO
Alternatively, we can also right-click on the “Logins” folder under “Security” then choose “New Login…”, as shown in the screenshot below. The same CREATE LOGIN command will be displayed.
Adding new login to the Azure SQL Server.
Create User
After the new login is created, we need to create a new user which is associated with it. The user needs to be created and granted read-only permission in each of the databases that the new login is allowed to access.
Firstly, we need to expand the “Databases” in the Object Explorer and then look for the databases that we would like to grant the new login the access to. After that, we right-click on the database and then choose “New Query”. This shall open up a new blank query window, as shown in the screenshot below.
Opening new query window for one of our databases.
Then we simply need to run the following query for the selected database in the query window.
CREATE USER <new-user-name-here> FROM LOGIN <new-login-id-here>;
Please remember to run this for the master database too. Otherwise we will not be able to login via SQL Management Studio at all with the new login because the master database is the default database.
Grant Read-only Permission
Now for this new user in the database, we need to give it a read-only permission. This can be done with the following command.
Repeat the two steps above for the remaining databases that we want the new login to have access to. Finally we will have a new login that can read from only selective databases on Azure SQL Server.
KOSD, or Kopi-O Siew Dai, is a type of Singapore coffee that I enjoy. It is basically a cup of coffee with a little bit of sugar. This series is meant to blog about technical knowledge that I gained while having a small cup of Kopi-O Siew Dai.
There are some startups and SMEs hosting their databases on AWS. However, most of them choose to use Amazon EC2 because doing so is similar to running a SQL Server on-premise at data centres. So, to them, it’s something that they are familiar with back in the old days. However, doing so actually increases their cost of hosting services on AWS. The companies also need to hire experts to do database administration such as database backup and recovery and OS patching.
Starting from May 2014, Amazon RDS also provides a highly available database solution with the synchronous Multi-AZ replication for MS SQL. Multi-AZ deployments for MS SQL database instances use SQL Server Mirroring.
Asia Pacific (Sdyney): Supported for DB instances in VPCs only;
Asia Pacific (Tokyo): Supported for DB instances in VPCs only;
South America (São Paulo): Supported for all DB instance classes except m1/m2.
It’s quite unfortunate that Singapore Region is one of them.
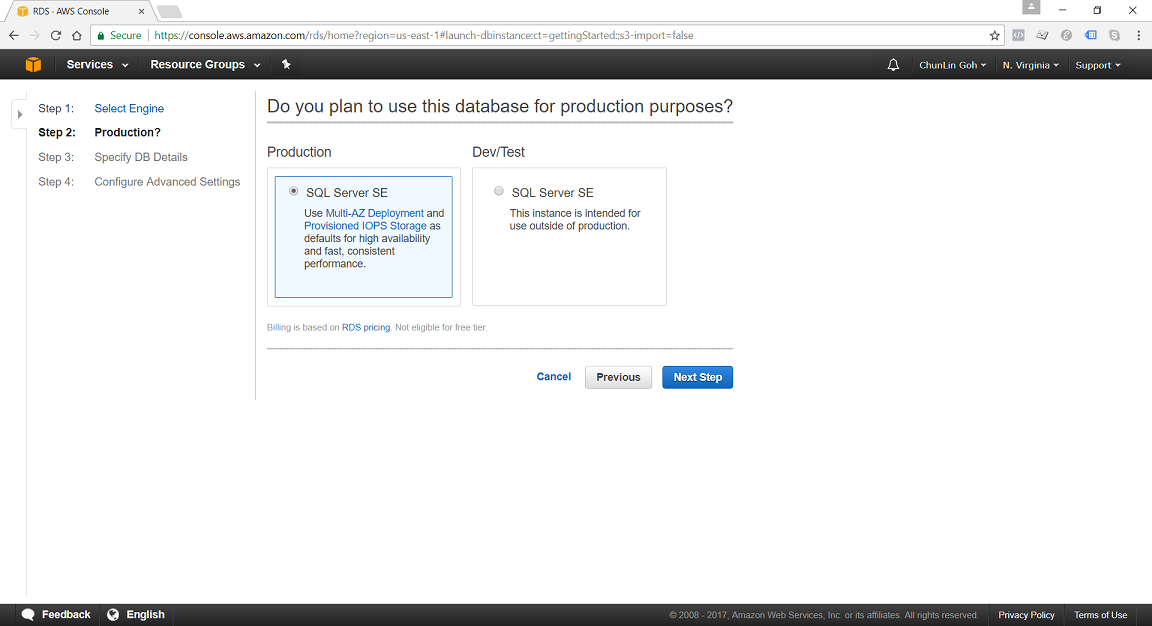
In N. Virginia Region, we’re able to specify to use Multi-AZ Deployment in Production SQL Server SE.
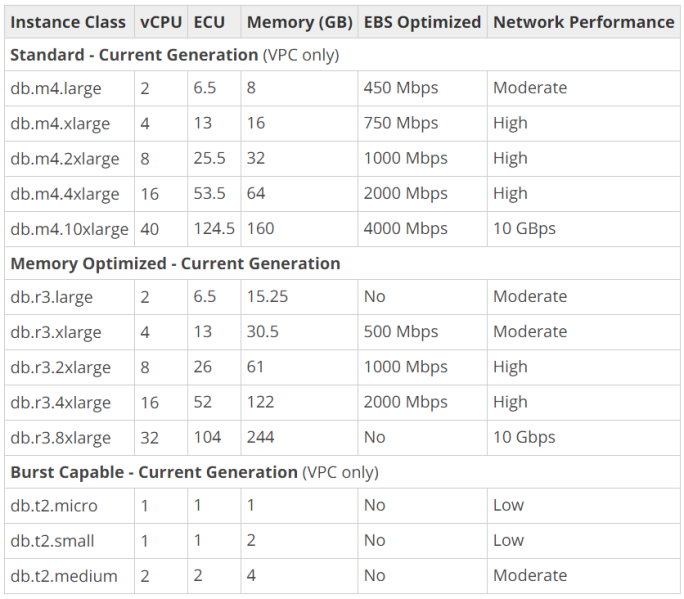
DB Instance Class
We can specify the DB Instance Class that allocates the computational, network, and memory capacity required by planned workload of the database instance.
Standard (db.m4) instances offer a balance of compute, memory, and network resources, and are a good choice for many applications.
Memory Optimized (db.r3) instances are designed to deliver fast performance for workloads that process large data sets in memory. The instances are well suited for the applications, such as high performance relational databases, in-memory analytics, and enterprise applications (for example, Microsoft SharePoint).
Burst Capable (db.t2) instances are instances that provide baseline performance level with the ability to burst to full CPU usage.
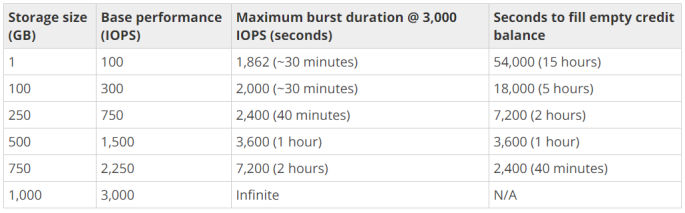
General Purpose (SSD) storage, aka gp2, offers cost-effective storage which is suitable for a broad range of database workloads. Hence, it’s ideal for small to medium-sized databases. It provides baseline of 3 IOPS/GB and ability to burst to 3,000 IOPS for extended periods of time. Its volume can range from 20GB to 4TB for MS SQL database instances. However, provisioning less than 100 GB of General Purpose (SSD) storage for high throughput workloads could result in higher latencies upon exhaustion of the initial General Purpose (SSD) I/O Credit balance.
Provisioned IOPS (SSD) storage, aka io1, is suitable for I/O intensive database workloads which pay attention to storage performance and consistency in random access I/O throughput. It provides flexibility to provision I/O ranging from 1,000 to 30,000 IOPS. MS SQL can have provisioned IOPS volumes between 100GB (Express/Web edition) or 200GB (Standard/Enterprise edition) and 4TB.
For General Purpose (SSD) storage, the DB instance has an initial I/O Credits balance of 5.4 million. When the storage requires more than the base performance I/O level, it uses I/O credits in the credit balance to burst to the required performance level, up to a maximum of 3,000 IOPS. If the storage uses all of its I/O credit balance, its maximum performance will remain at the base performance level until I/O demand drops below the base level and unused credits are added to the I/O credit balance at the baseline performance rate of 3 IOPS/GB of volume size. Hence, we can use the formula below to calculate the Burst Duration.
Thus, for production application that requires fast and consistent I/O performance, it’s recommended to use Provisioned IOPS (SSD) storage that is optimized for I/O intensive, online transaction processing workloads that have consistent performance requirements. Note that we cannot decrease storage allocated for a DB instance.
For MS SQL Server, Amazon RDS does not currently support increasing storage. Hence, we need to provision storage based on anticipated future storage growth. If we predict it wrongly, then we need to increase the storage of an existing SQL Server DB instance by first exporting the data, creating a new database instance with increased storage, and then importing the data into the new database instance.
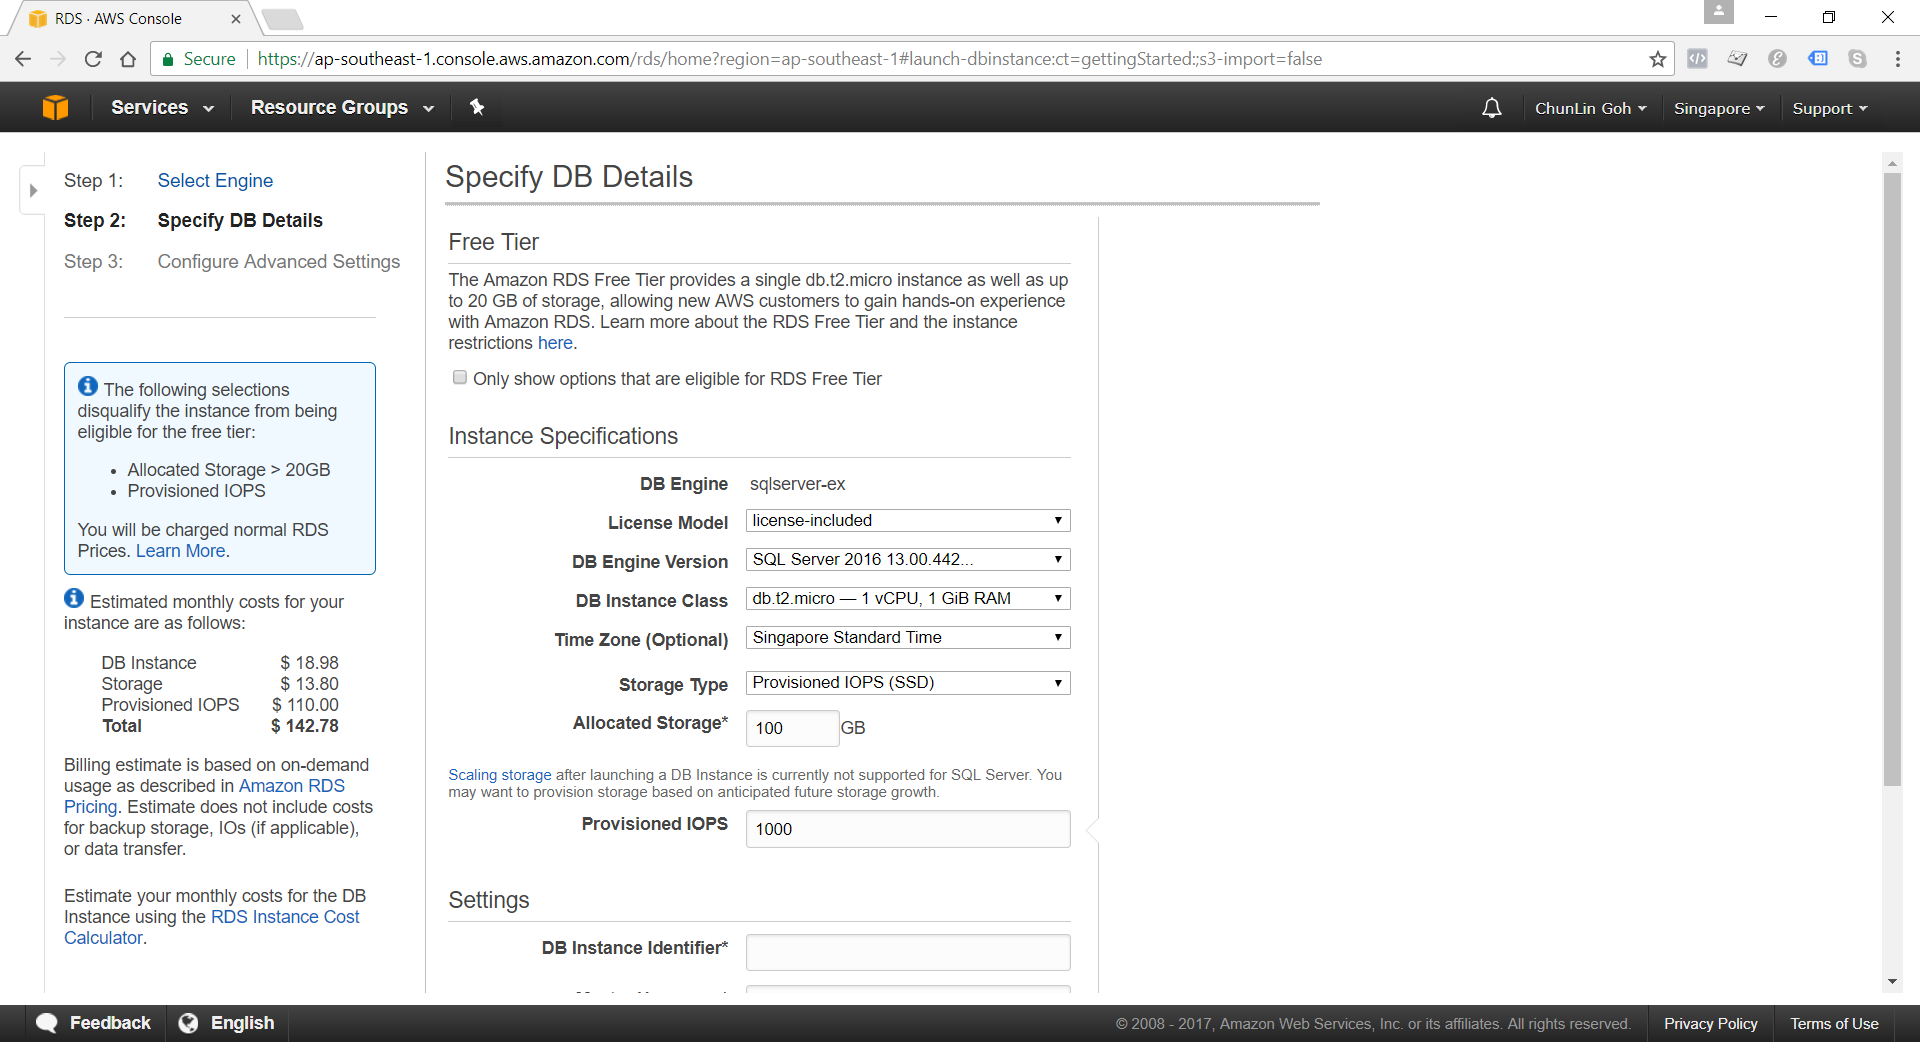
Specifying Database Instance Specification
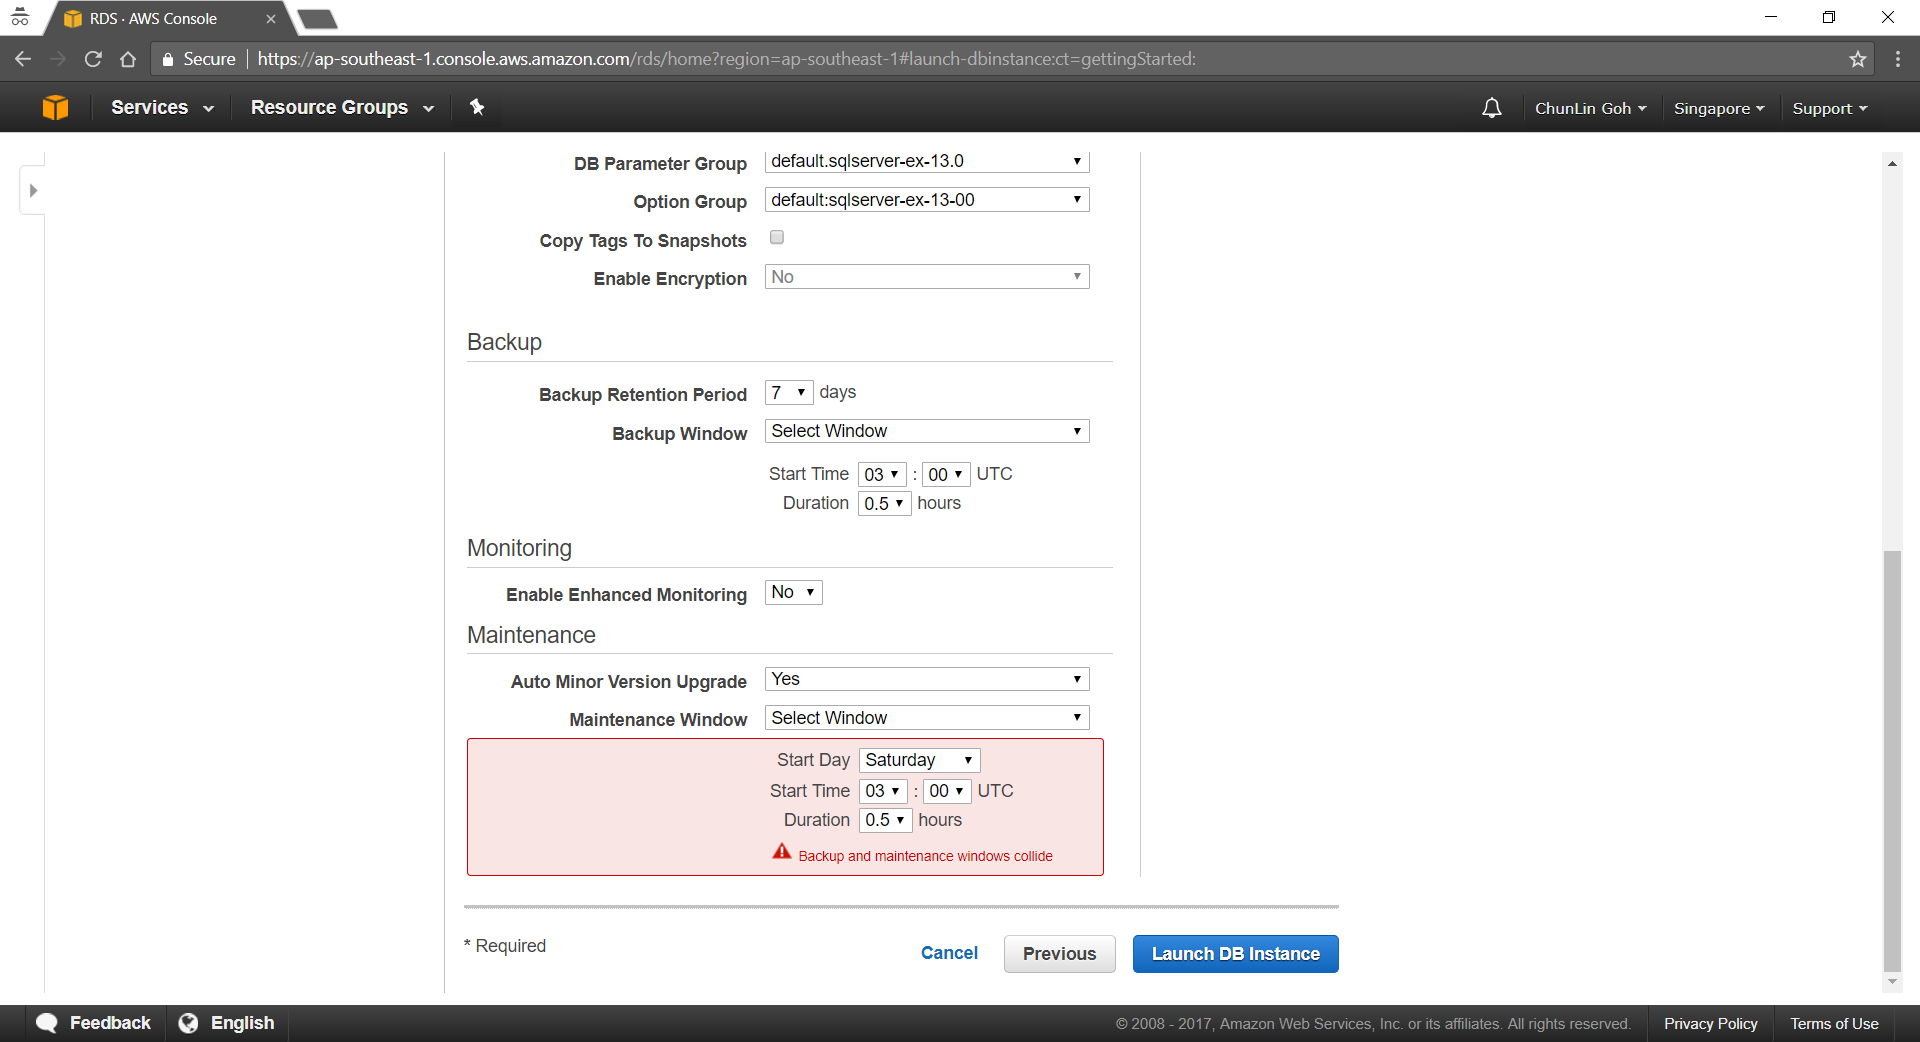
After understanding key concepts above, we can then proceed to setup our database instance.
Although there is Free Tier available but allocating storage > 20GB or adding provisioned IOPS will disqualify the databse instance from being eligible for the Free Tier.
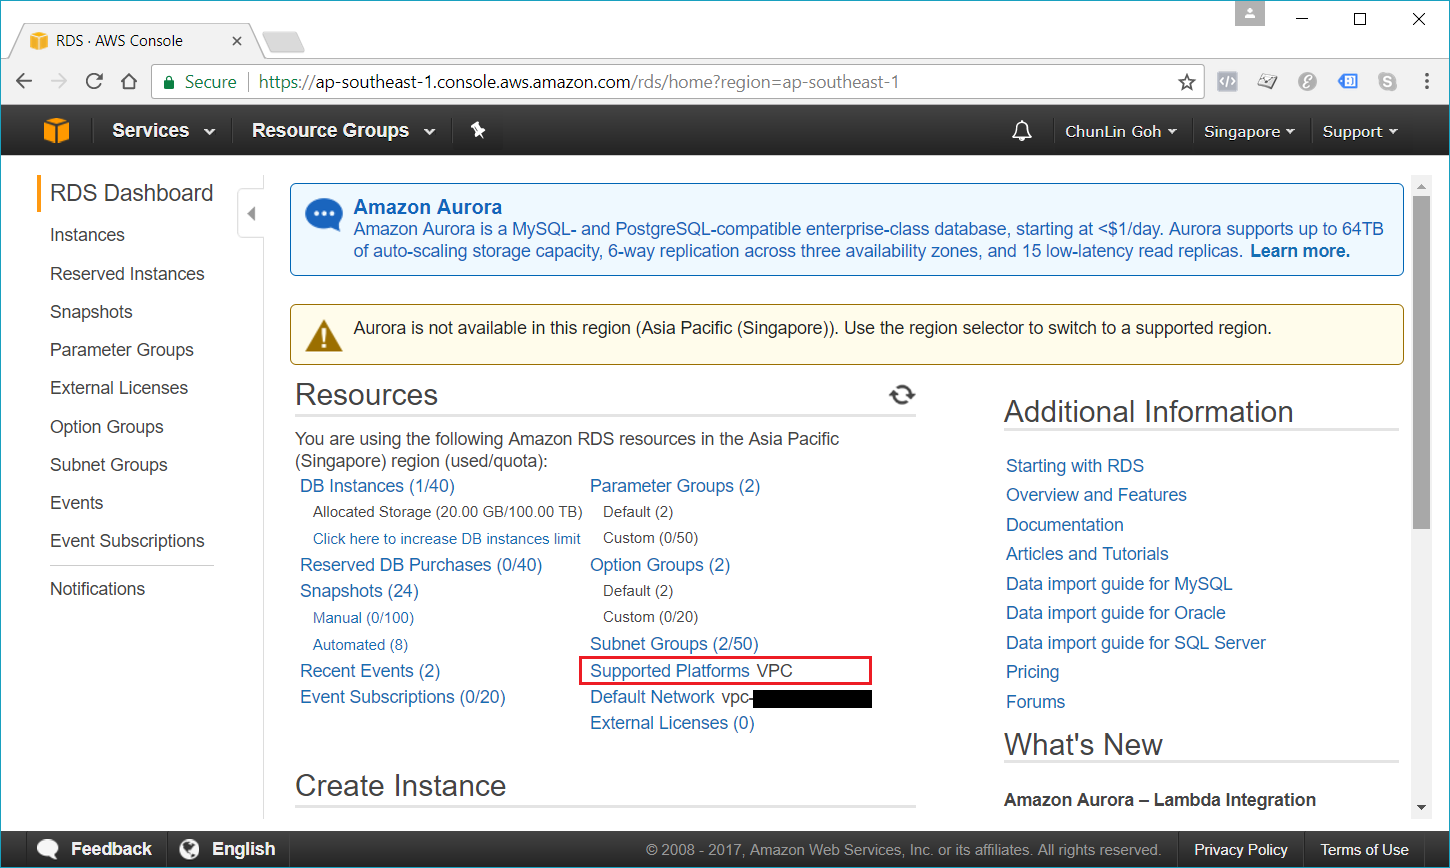
Nowadays, if we are creating a database instance in a region that we have not used before, we normally are already on the EC2-VPC platform.
We are already on EC2-VPC platform.
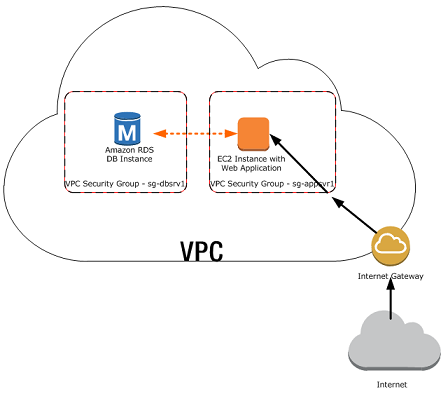
There are many scenarios for accessing a database instance in a VPC. Today, I will only focus on having an EC2 web server to access the database instance in the same VPC.
A database instance in a VPC accessed by an EC2 instance in the same VPC (Source: AWS Documentation)
In such scenario, Amazon RDS database instance normally needs to be available to the web server, and not to the public Internet. Hence, we can create a VPC with both public and private subnets. The web server will be hosted in the public subnet so that it is accessible by the public. The database instance is hosted in the private subnet so that it won’t be available to the public Internet, providing greater security.
The Security Group used to restrict access to the database instances can have a custom rule that allows TCP access using the port 1433 and an IP address we will use to access the database instance for development or other purposes. In addition, we also need to set the Public Accessible option to Yes first (It is recommended to set the option to No for production database instance to limit the potential thread with no public routes).
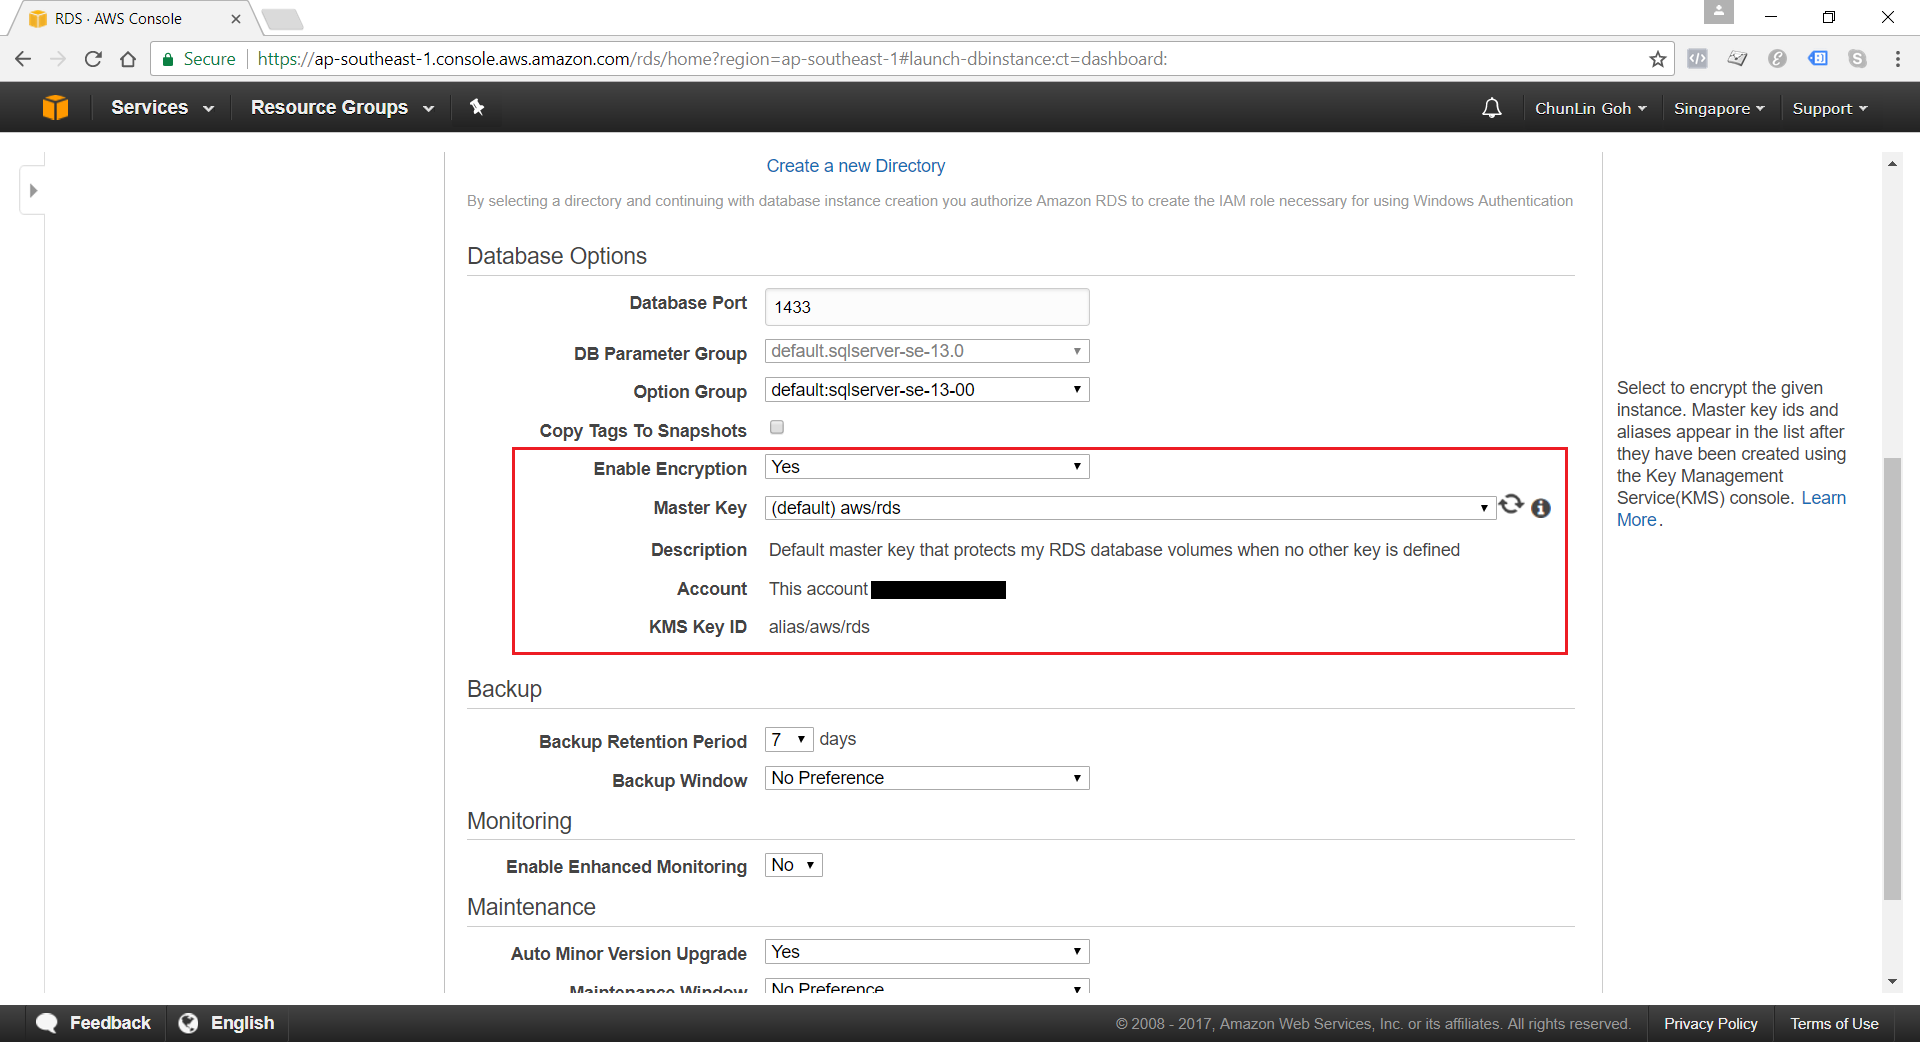
Encryption of Database Instances using Key Management Service (KMS)
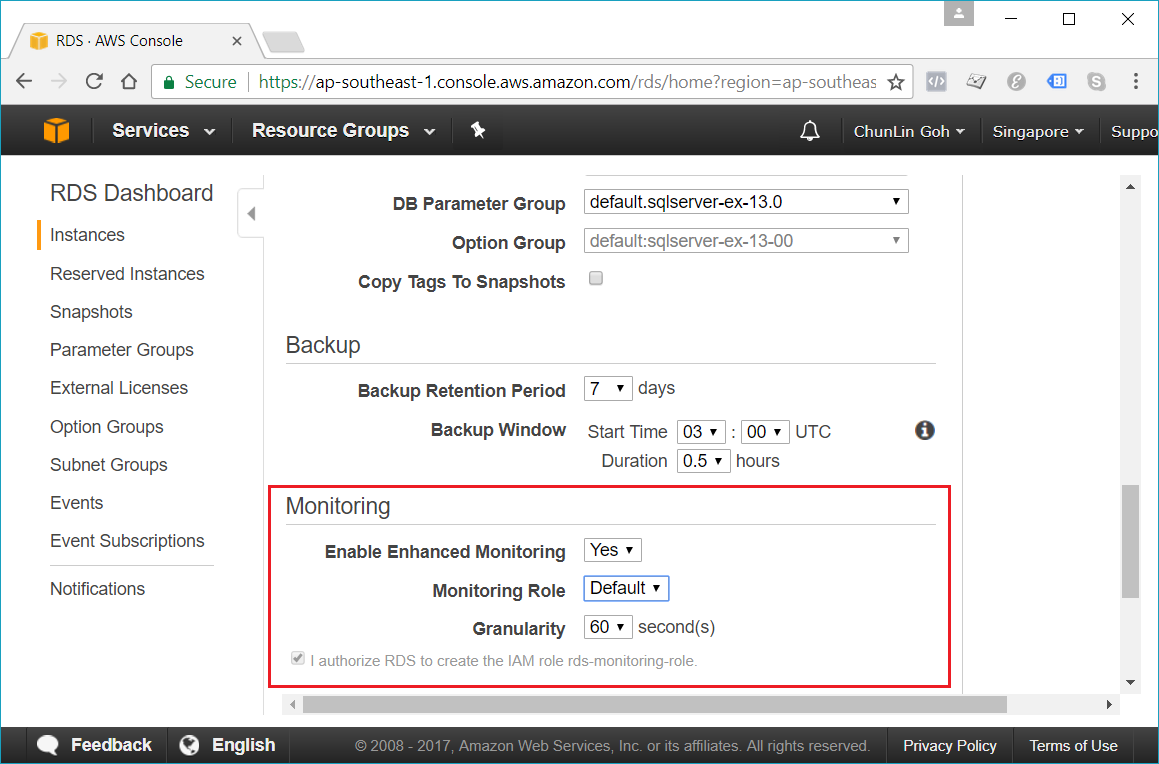
Enhanced monitoring requires permission to act on our behalf to send OS metric information to CloudWatch Logs.
Conclusion
It’s true that AWS allows us to deploy our MS SQL Server database on either Amazon RDS and Amazon EC2. However, it’s very crucial to analyze our needs and our application before deciding which one to use. In general, it is still recommended to consider Amazon RDS first so that developers can focus on high-level tasks and business logic implementation.
That’s all for my first trip to Amazon RDS. As a frequent user of Microsoft Azure, I never host MS SQL Server on AWS platform. So, if there is any mistake made in this article, kindly feedback to me. Thanks in advance!
When your database is big, sometimes just its backup will be around 20GB in size already. Hence, keeping them on disk is always not a solution even though Microsoft Azure provides a data disk with 1TB.
Hence, Chun Siong from Microsoft Singapore suggested my company to try out this service to store our database backups. It turns out that it can be easily done in just 3 steps.
Step 1: Create Azure Storage Account and Retrieve Access Keys
To create a new Azure Storage Account, I simply login to the Azure Management Portal and then choose the Quick Create option of the Storage under Data Services section. I am able to specify the affinity group and replication rule for the Storage Account.
Creating a Storage Account.
After the Storage is created, I can retrieve access keys which will be used later in SQL Server to access the Storage Account.
Retrieve the access keys to the Storage Account.
Finally, I just need to create a Container in the Storage Account. All the database backup files will be put inside the Container later.
Created a container in the Storage Account.
Step 2: Create SQL Server Credentials
I then execute the following T-SQL statement to create credentials so that SQL Server later can connect to the Storage Account.
The Storage Account access key here can be either Primary or Secondary access key retrieved in Step 1 above.
Step 3: Backup Database
I create a scheduled job in SQL Server Agent to do backup of my database daily. The URL is the URL of the container created in Step 1.
BACKUP DATABASE mydatabase
TO URL = 'https://chunlindbbackup.blob.core.windows.net/dbbackup/mydatabase_' + REPLACE(CONVERT(VARCHAR ,GETDATE(),126) ,':','_')+ '.bak'
WITH CREDENTIAL = 'mycredential', INIT, NAME = 'Backup of Database mydatabase'
So yup, now the database backups will be stored on the Storage Account directly.
Restore Database Backup from Azure Storage
To restore a database backup from Storage Account, if the backup file is small, I can just simply execute the following T-SQL statements. The URL of the database backup can be found in the Container in Azure Management Portal.
RESTORE DATABASE mydatabase_test
FROM URL = 'https://chunlindbbackup.blob.core.windows.net/dbbackup/mydatabase_2014-10-14T13_16_01.243.bak'
WITH RECOVERY,
MOVE 'mydatabase_db_Data' TO 'F:\db\mydatabase_test_Data.mdf',
MOVE 'mydatabase_db_Log' TO 'F:\db\mydatabase_test_Log.ldf',
CREDENTIAL = 'mycredential'
GO
Unfortunately, the backup that I have is too big. So, I can only download it from Azure Management Portal to the database server first before restoring the database. The download is quite fast.
Download backup file from Storage Account
In case, you wonder why I do not use tool like Azure Storage Explorer, no, it did not work. It would crash also if the backup file was too big.
There are two options available in Microsoft Azure to host our SQL database. One is the well-known Azure SQL Database, an implementation of Platform as a Service for a relational database service in the cloud. The other one option is introduced after the new Infrastructure as a Service capabilities of Microsoft Azure. It is now possible to easily deploy instances of MS SQL Server in Azure Virtual Machine.
Azure SQL Database or SQL Server in Azure VM?
Personally, I prefer to directly deploy SQL Server in the virtual machine. At least the entire process looks about the same as what I have already done in our on-premise database server. So, having SQL Server deployed on Azure virtual machine actually means that the developers do not need to make huge changes to our existing applications. In addition, it’s also because migrating existing applications to the cloud normally needs to emulate on-premises behaviour. In short, choosing SQL Server in Azure virtual machine saves the time on migration.
Choose “SQL Server 2012” image to deploy MS SQL Server on the new virtual machine.
The following table shows the pricing of each edition running on Azure VM as well as the disk sizes available. Here I only pay attention to the memory intensive instances, i.e. A5, A6, and A7. They have larger RAM and disk sizes for the virtual machine and they are thus considered optimal for hosting databases and other high-throughput application. The data shown in the table is applicable for virtual machines deployed in Asia Pacific Southeast, i.e. Singapore.
Asia Pacific Southeast (Singapore) VM pricing for each edition of SQL Server (screenshot taken on 20 April 2014)
Connect to SQL Server Database Engine on Azure VM
After the virtual machine is up and running, we can immediately RDP in to the VM. Then in there, we just need to launch Microsoft SQL Server Management Studio to access the database with the Windows Authentication.
Running SQL Server Management Studio on the virtual machine.
Open TCP Port 1433
SQL Server typically uses TCP port 1433 for remote connections to the database. So, we need to add an endpoint as well as to open the port in the virtual machine firewall for this. However, to avoid security attack, it’s recommended to specify a different Public Port when creating the endpoint in Azure.
1433: A TCP port normally used by MS SQL Server for remote connection to the database.
SQL Server Authentication
We need to change the server authentication to “SQL Server and Windows Authentication mode”. This enables us to create logins in SQL Server which are not based on Windows user accounts. Both the login ID and passwords will be stored in the SQL Server. This allows SQL Server to continue supporting our third-party applications that require SQL Server Authentication. After that, we just right-click on the server in Microsoft SQL Server Management Studio Object Explorer to restart the server.
SQL Server and Windows Authentication Mode
Connecting Application to the SQL Server
To connect your ASP .NET web application with the database, in web.config, you can just key in the server name, port number together with login ID and password in the following connection string that is used to connect the instance of the SQL Server running on Azure VM.