Few days ago, some of our teammates discovered that the SQL files they tried to pull from our GitHub repo had encoding issue. When they did git pull, there would be an error saying “fatal: failed to encode ‘…/xxxxx.sql’ from UTF-16-LE-BOM to UTF-8”.
In addition, on GitHub, the SQL files we committed to the GitHub are all marked as binary files. Thus we couldn’t view the changes we made to those files in the commit.
Cause of the Issue
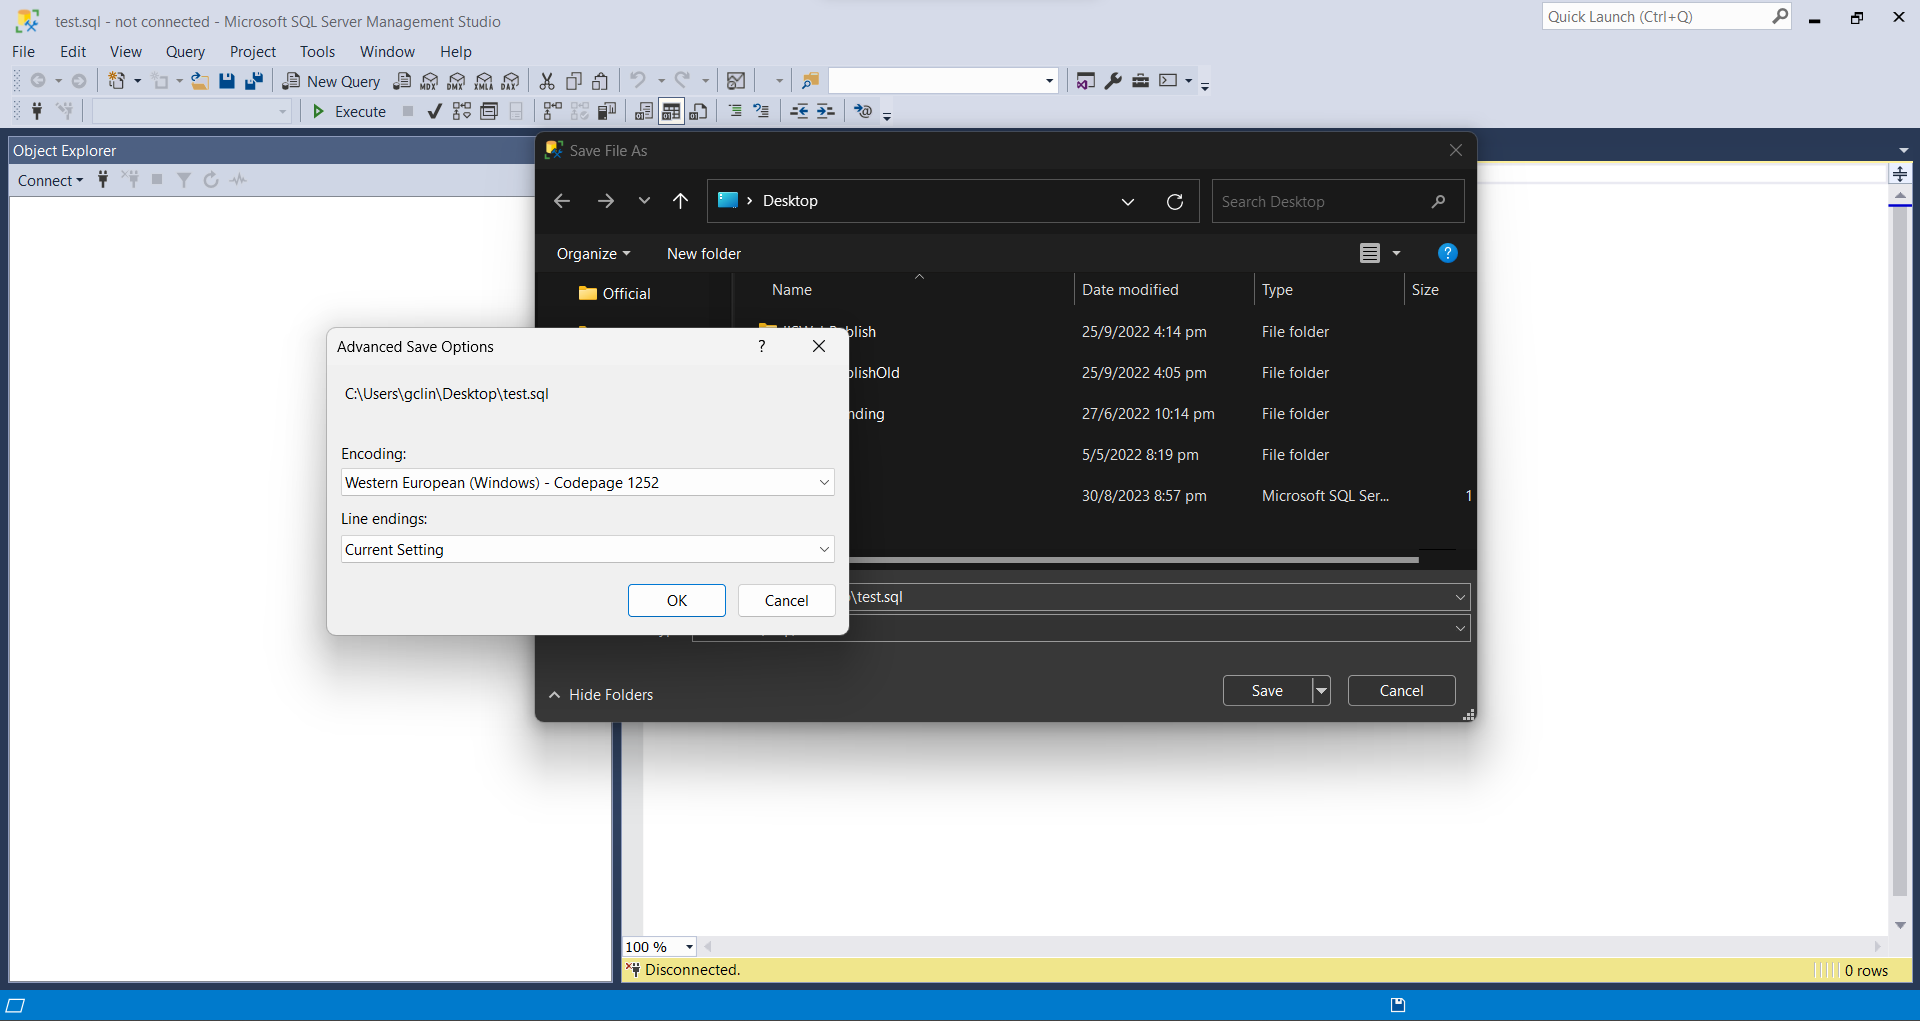
It turns out that those SQL files are generated from SQL Server Management Studio (SSMS).
Default file encoding of SSMS is Western European (Windows) – Codepage 1252.
The way to resolve this issue is to force the file to use UTF-8 encoding. We can run the following PowerShell script to change the encoding of all SQL files in a given directory and its subdirectories.
KOSD, or Kopi-O Siew Dai, is a type of Singapore coffee that I enjoy. It is basically a cup of coffee with a little bit of sugar. This series is meant to blog about technical knowledge that I gained while having a small cup of Kopi-O Siew Dai.
Last week, a developer in our team encountered an interesting question in his SQL script on SQL Server 2019. For the convenience of discussion, I’ve simplified his script as follow.
DECLARE @NUM AS TINYINT = 0
DECLARE @VAL AS VARCHAR(MAX) = '20.50'

SELECT CASE @NUM WHEN 0 THEN CAST(@VAL AS DECIMAL(10, 2))
                 WHEN 1 THEN CAST(@VAL AS DECIMAL(10, 4))
                 ELSE -1
       END AS Result
The result he expected was 20.50 because @NUM equals to 0, so by right the first result expression should be executed. However, the truth is that it returned 20.5000 as if the second result expression which is casting @VAL into a decimal value with a scale of 4 was run.
All data type conversions allowed for SQL Server system-supplied data types (Image Source: Microsoft Learn)
Data Precendence
While the above chart illustrates all the possible explicit and implicit conversions, we still do not know the resulting data type of the conversion. For our case above, the resulting data type depends on the rules of data type precedence.
Since DECIMAL has a higher precedence than INT, hence we are sure that the script above will result in a DECIMAL output with the highest scale, i.e. DECIMAL(10, 4). This explains why the result of his script is 20.5000.
Conclusion
Now, if we change the script above to be something as follows, we should receive an error saying “Error converting data type varchar to numeric”.
DECLARE @NUM AS TINYINT = 0
DECLARE @VAL AS VARCHAR(MAX) = '20.50'

SELECT CASE @NUM WHEN 0 THEN 'A'
                 WHEN 1 THEN CAST(@VAL AS DECIMAL(10, 4))
                 ELSE -1
       END AS Result
Yup, that’s all about our discussion about the little bug he found in his script. Hope you find it useful. =)
KOSD, or Kopi-O Siew Dai, is a type of Singapore coffee that I enjoy. It is basically a cup of coffee with a little bit of sugar. This series is meant to blog about technical knowledge that I gained while having a small cup of Kopi-O Siew Dai.
I was recently asked about how to unit test stored procedures before deploying to servers. Unfortunately, there are not much discussions about unit testing stored procedures, especially with tools like SSDT and Azure DevOps. Hence, I decide to write this walkthrough to share my approach to this issue.
According to The Art of Unit Testing, a unit test is an automated piece of code that invokes the unit of work being tested, and then checks some assumptions about a single end result of that unit.
Without unit testing, one has no choice but to rely on system and integration tests which are normally performed in the later stage of the SDLC. Some teams may even resort to the troublesome way, i.e. manually testing the end product they’re developing to invoke their codes.
Unit testing of stored procedures is also very crucial. If the bugs in stored procedures are not caught in the early stage of development, it is very challenging to rollback the data changes that have been made to the database.
With SSDT, we can work directly with a connected database instance on/off-premise. We can use SSDT Transact-SQL design capabilities to build, debug, maintain, and refactor databases. In this article, we will be using SSDT to create unit tests that verify the behavior of several stored procedures.
Create a New Database Project
In this article, we will assume that we have an existing database hosted on Azure SQL server.
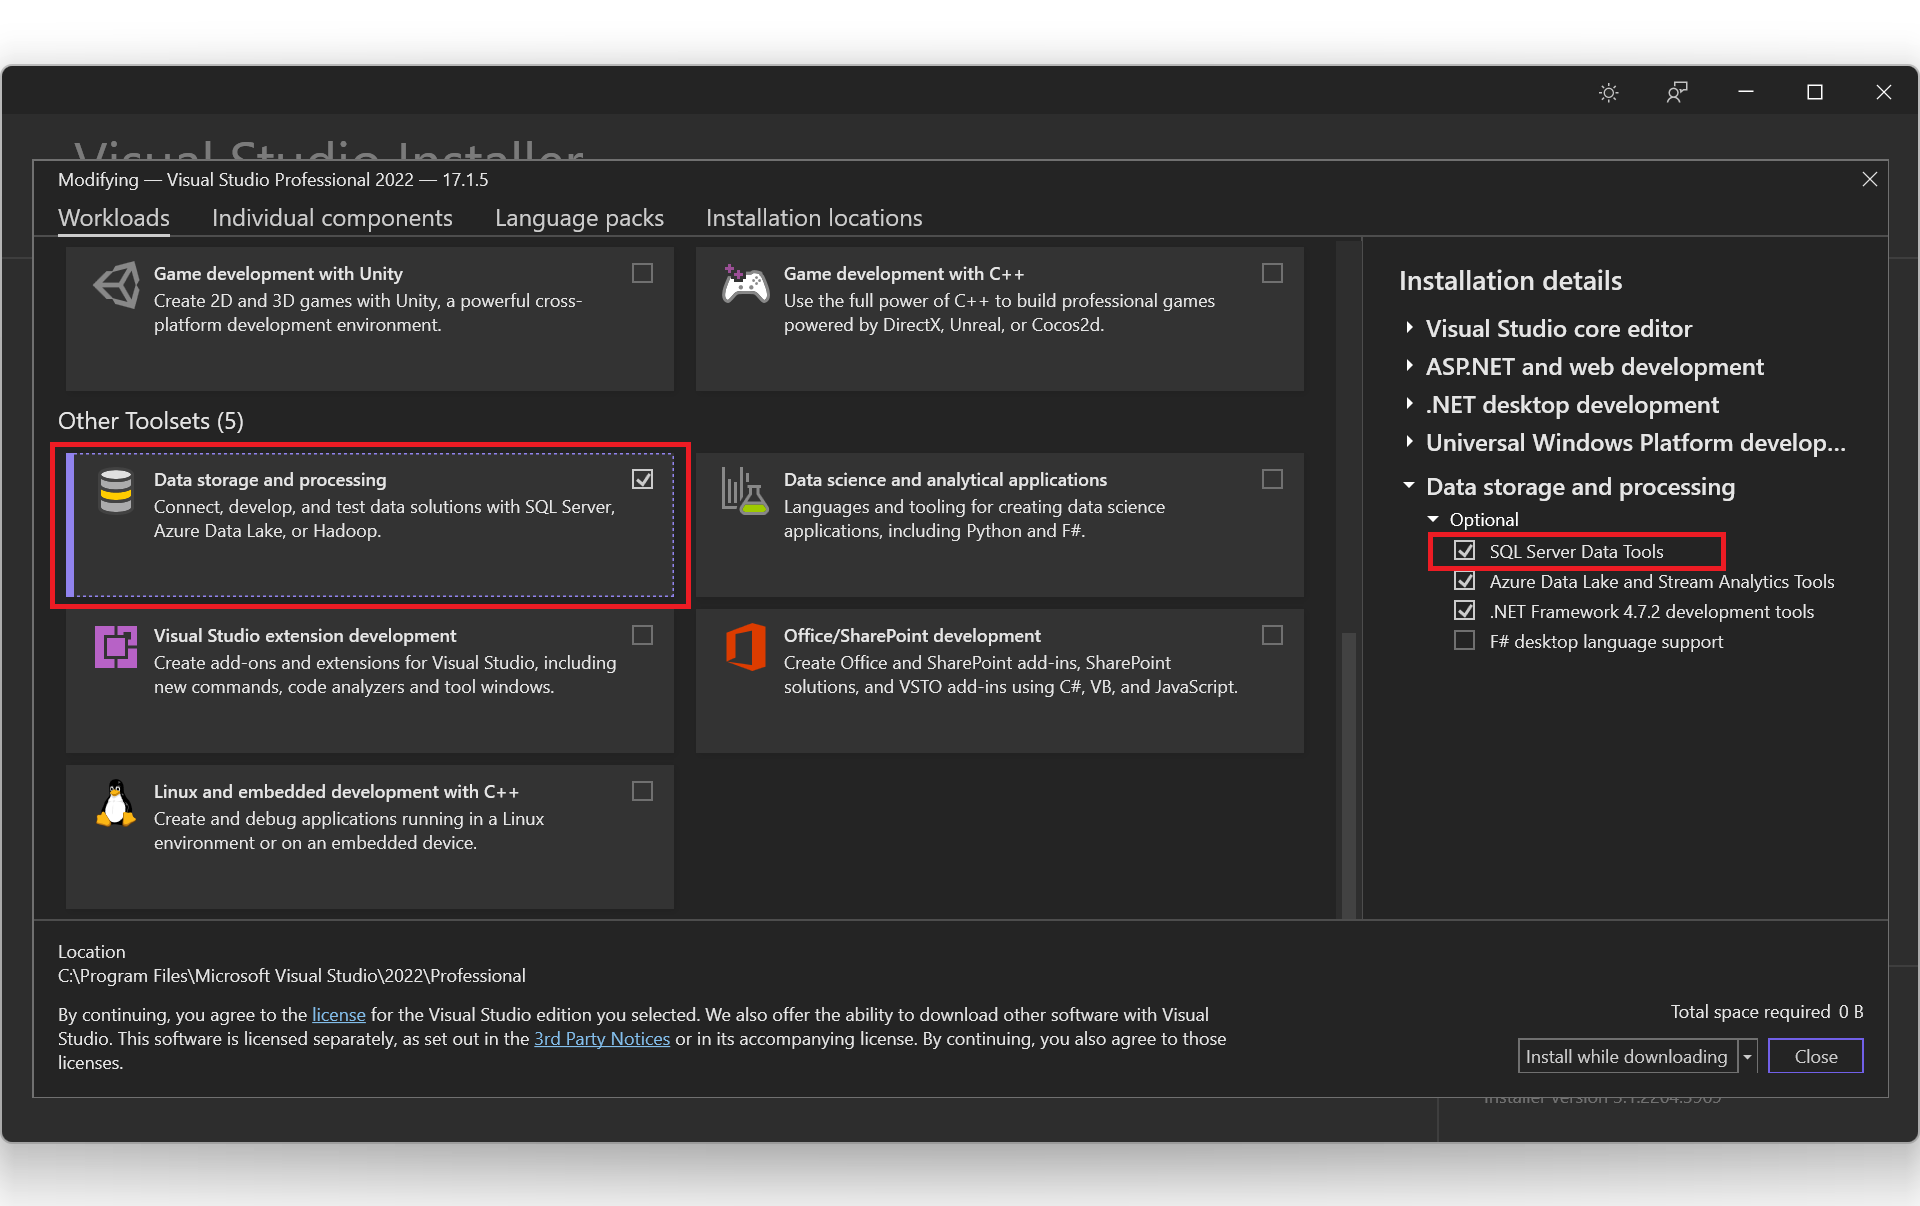
Firstly, as shown in the screenshot below, we need to create a new database project in order to import database schema and stored procedures from the database on Azure.
Creating a new SQL Server Database project on VS 2022.
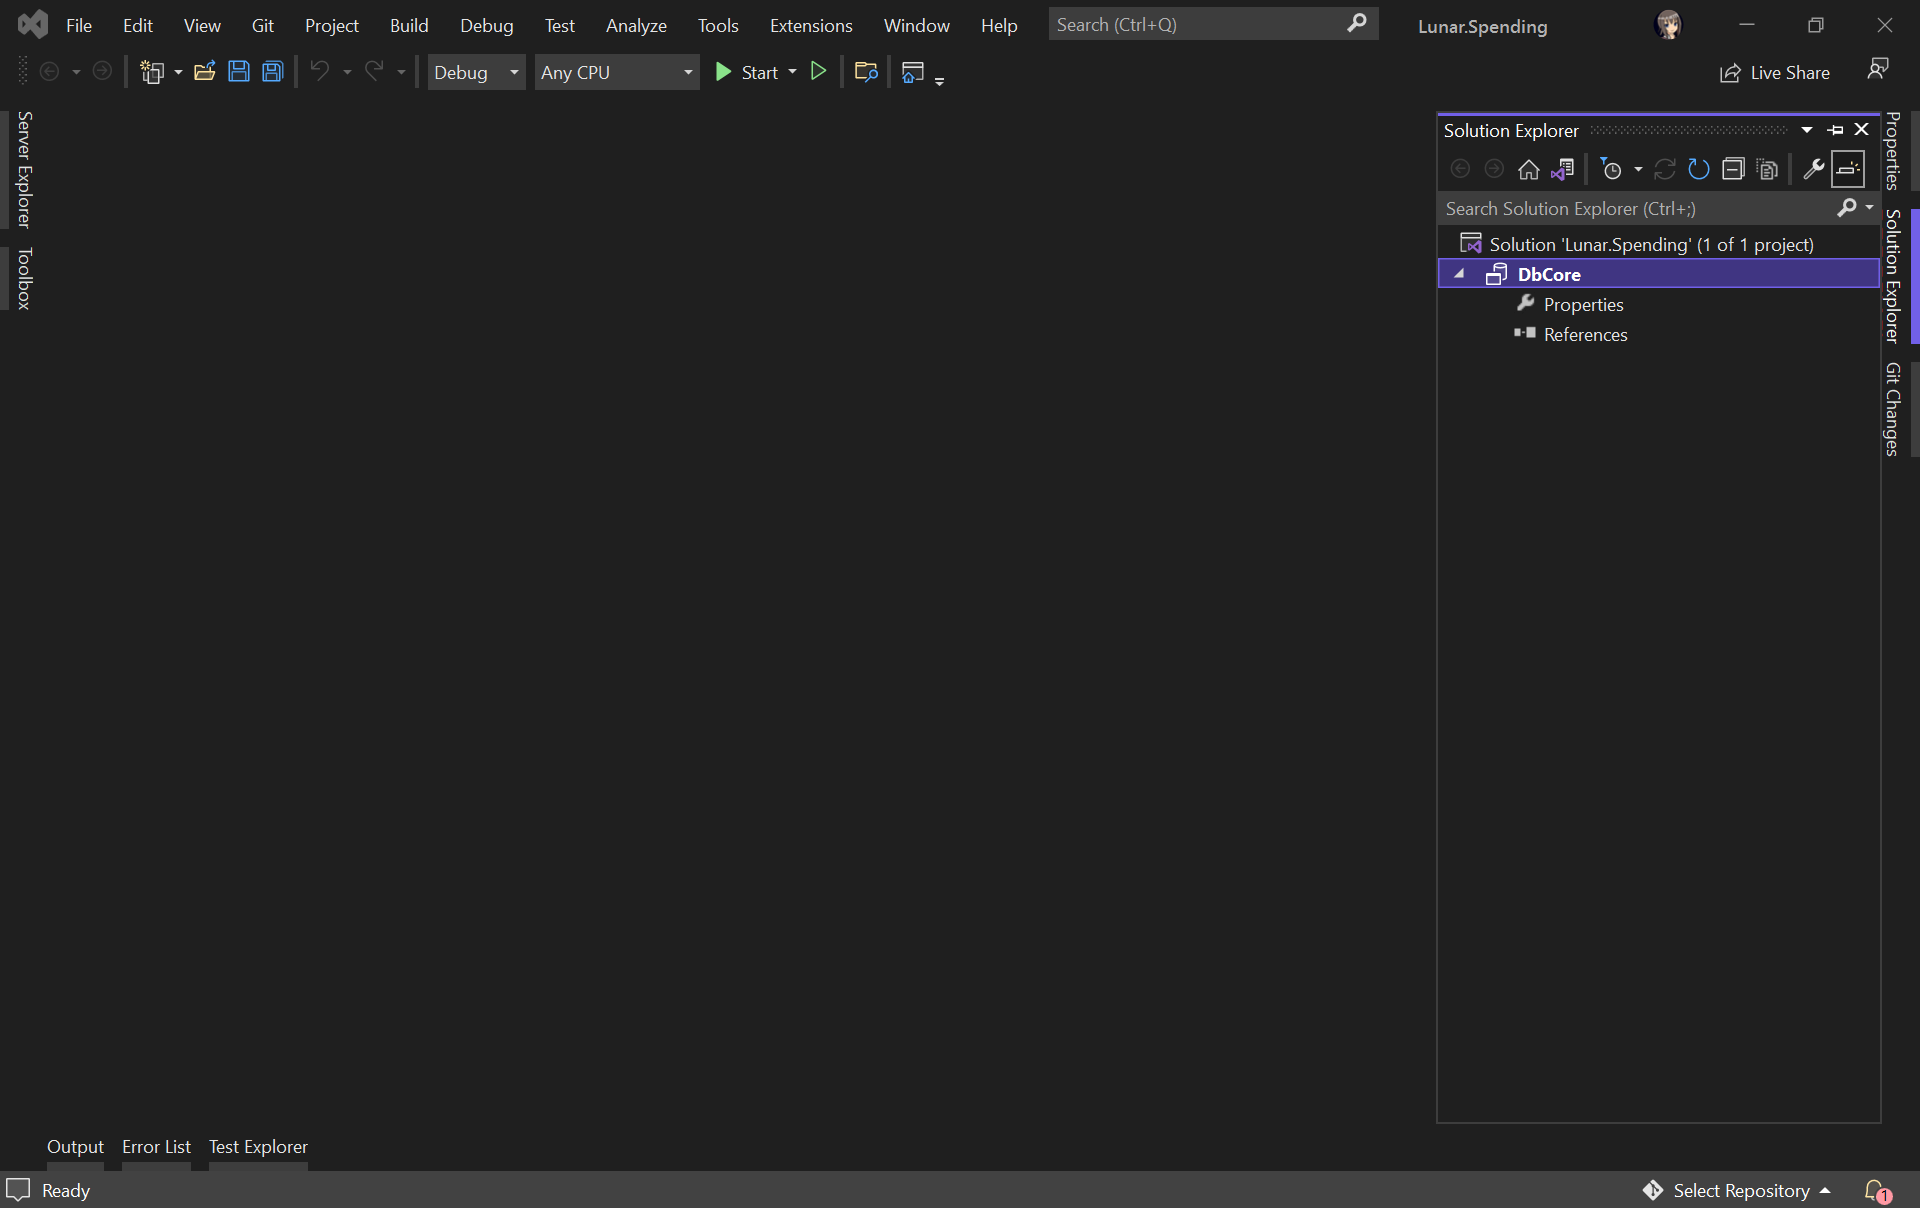
Let’s name our project DbCore. We will then see a simple DbCore project shown in our Solution Explorer, as demonstrated in the screenshot below.
The database project is successfully created.
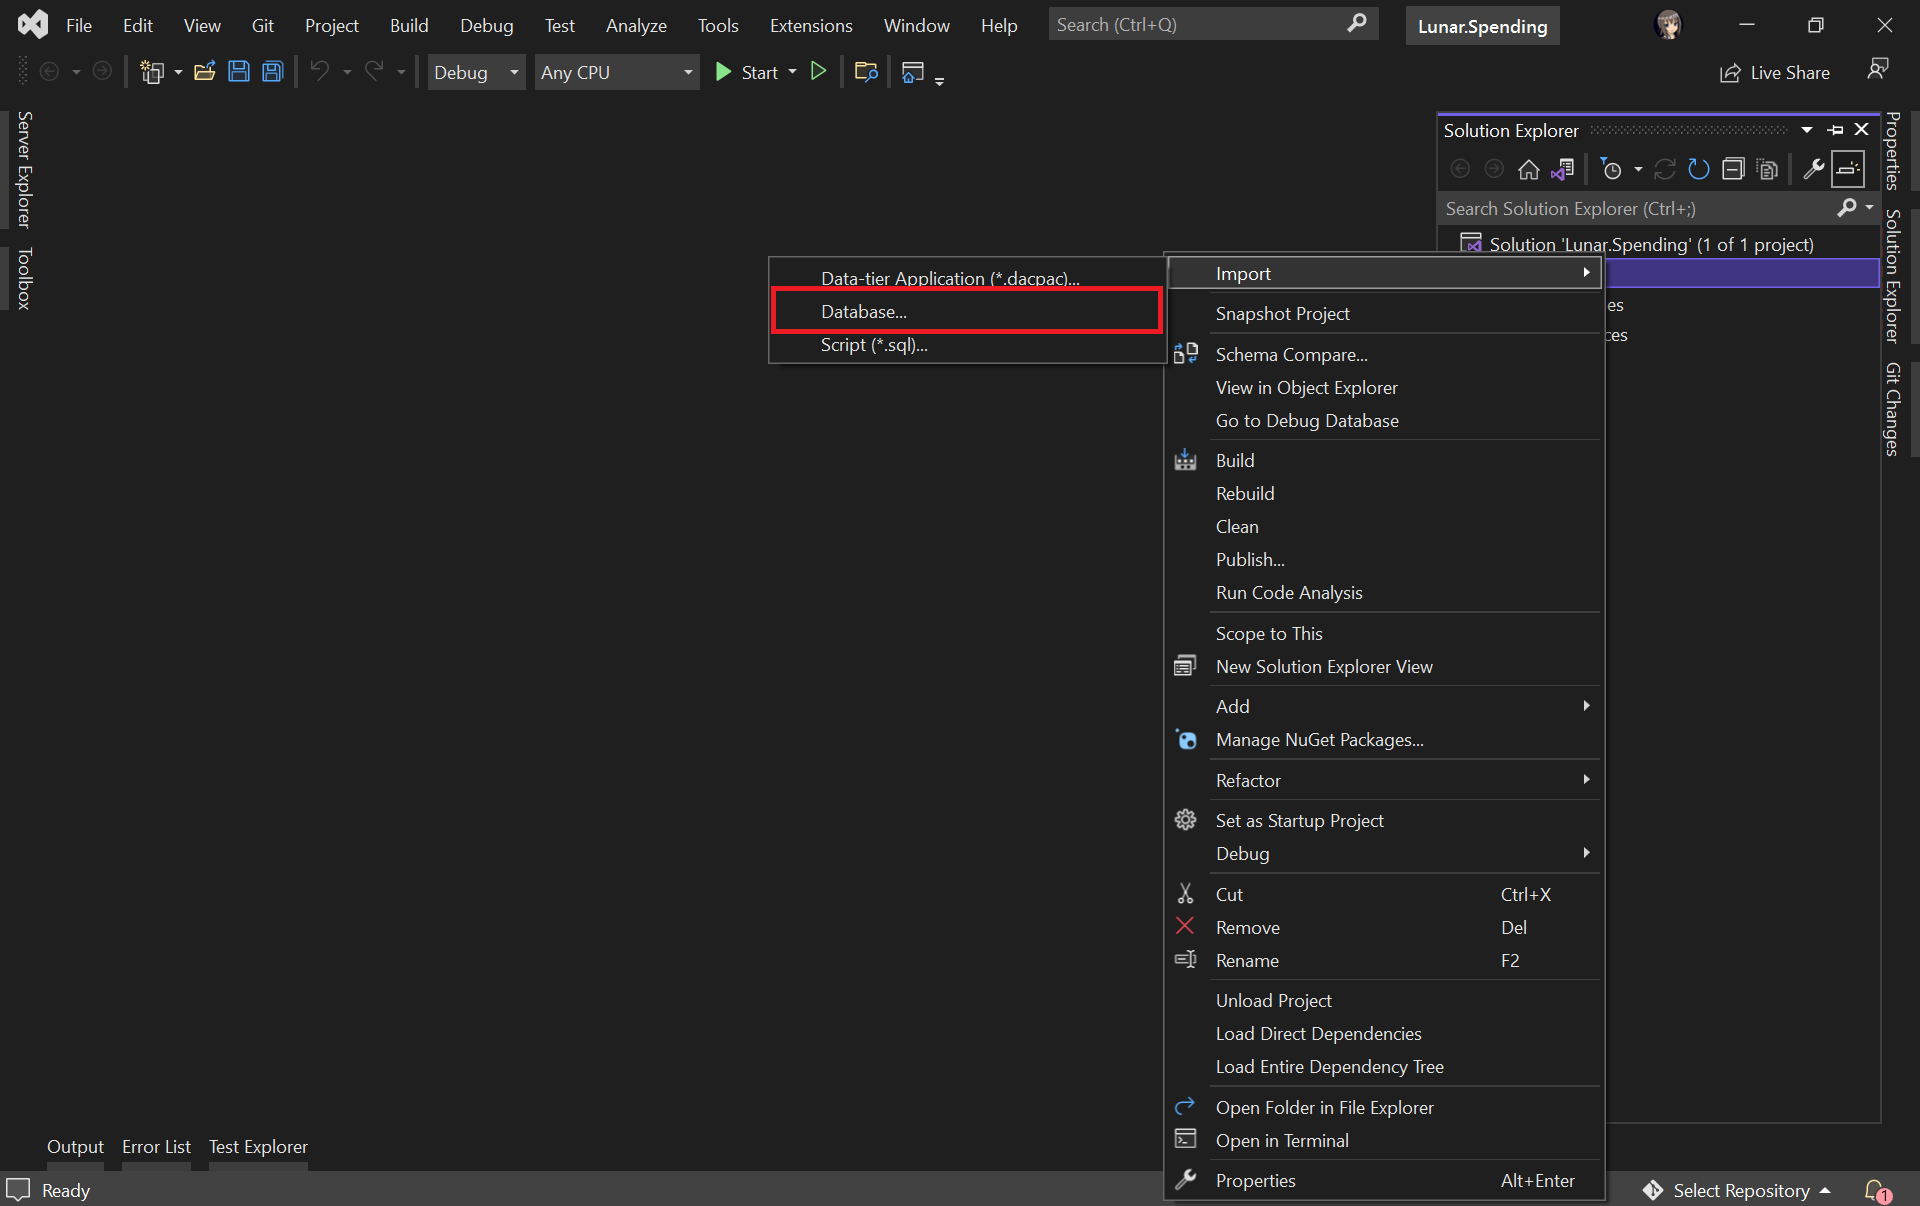
Next, we will import our Azure database into the database project by right-clicking on it in the Solution Explorer.
Select the “Database…” option to import from existing Azure database.
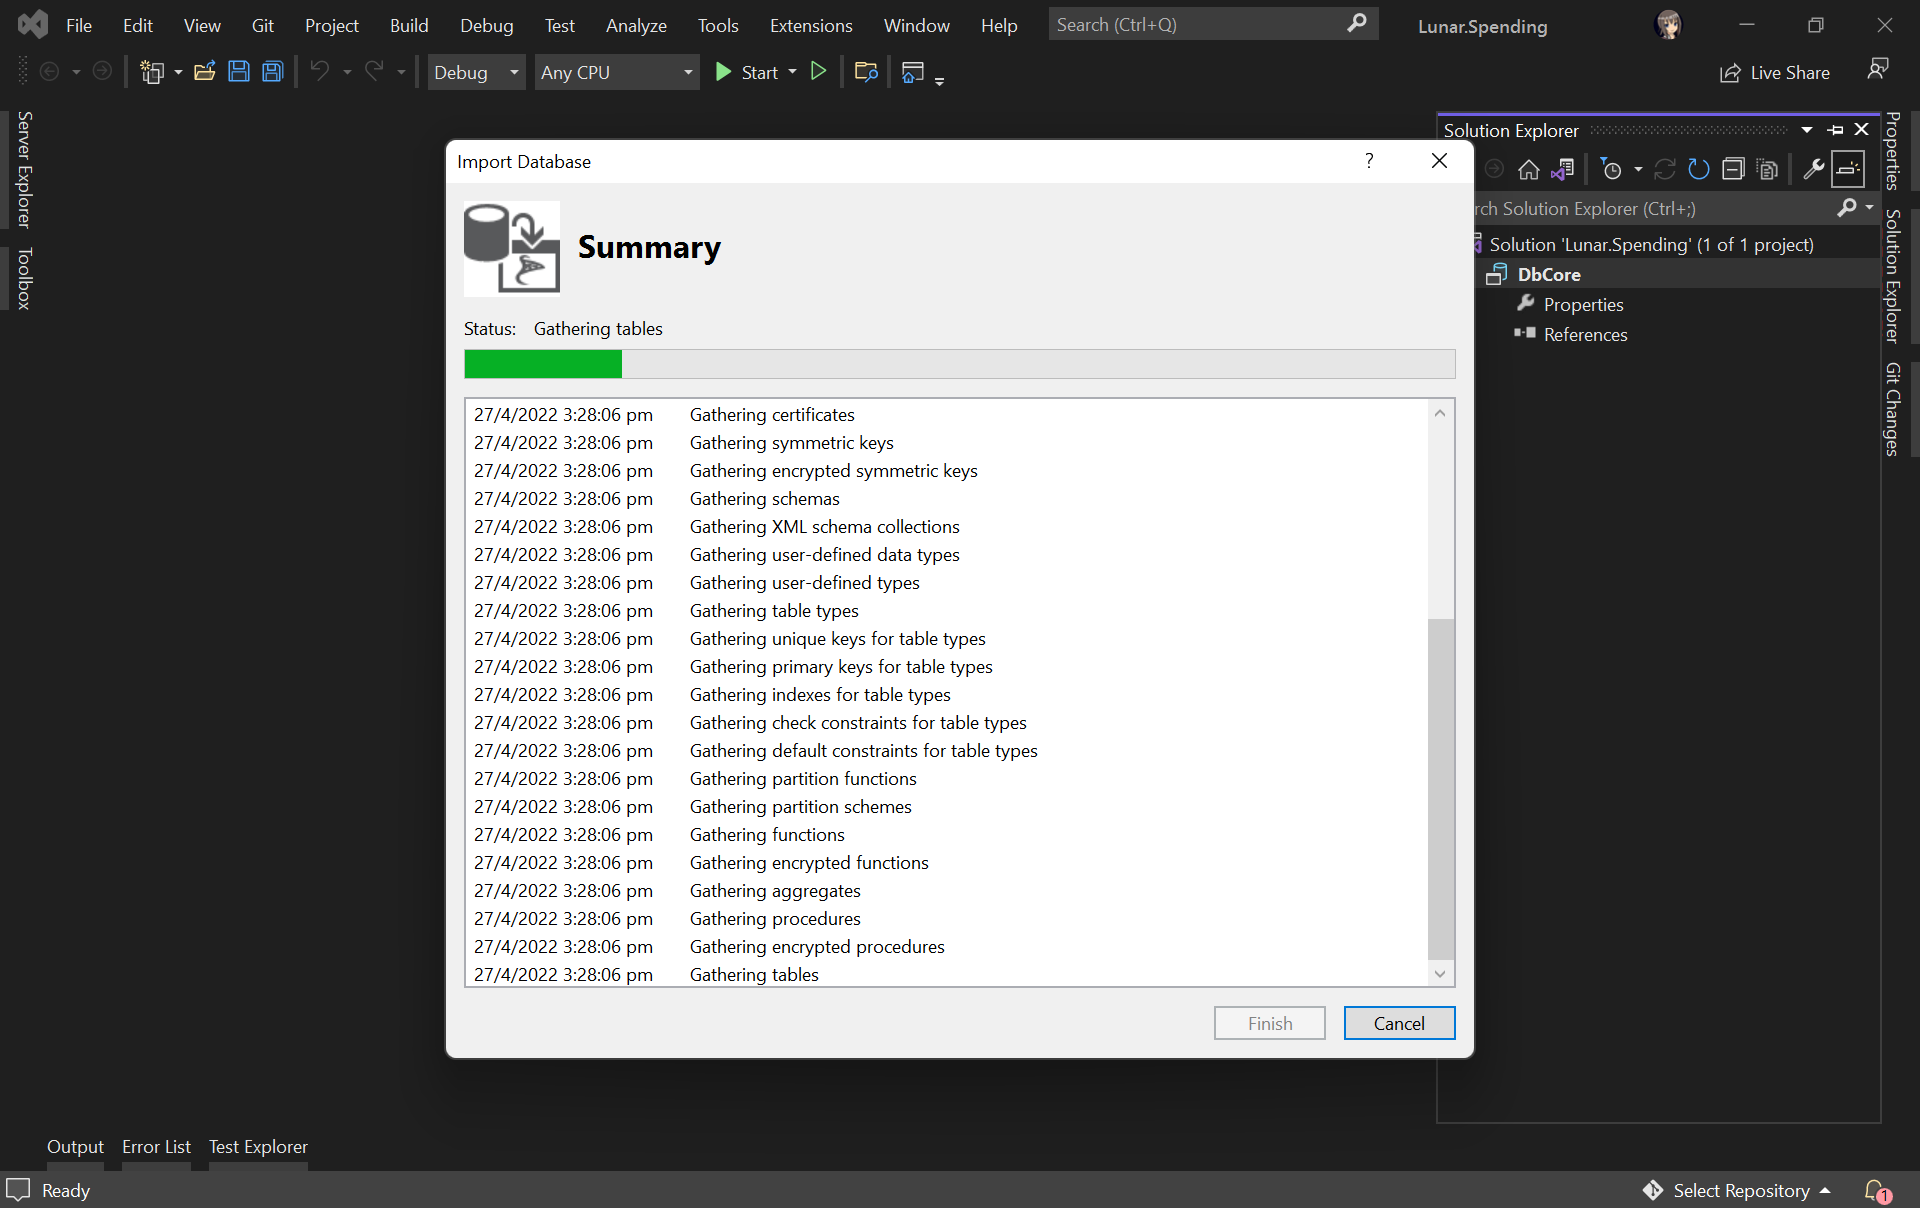
The widget will then import the data from the Azure database based on the given connection string, as shown below.
Importing database to our database project.
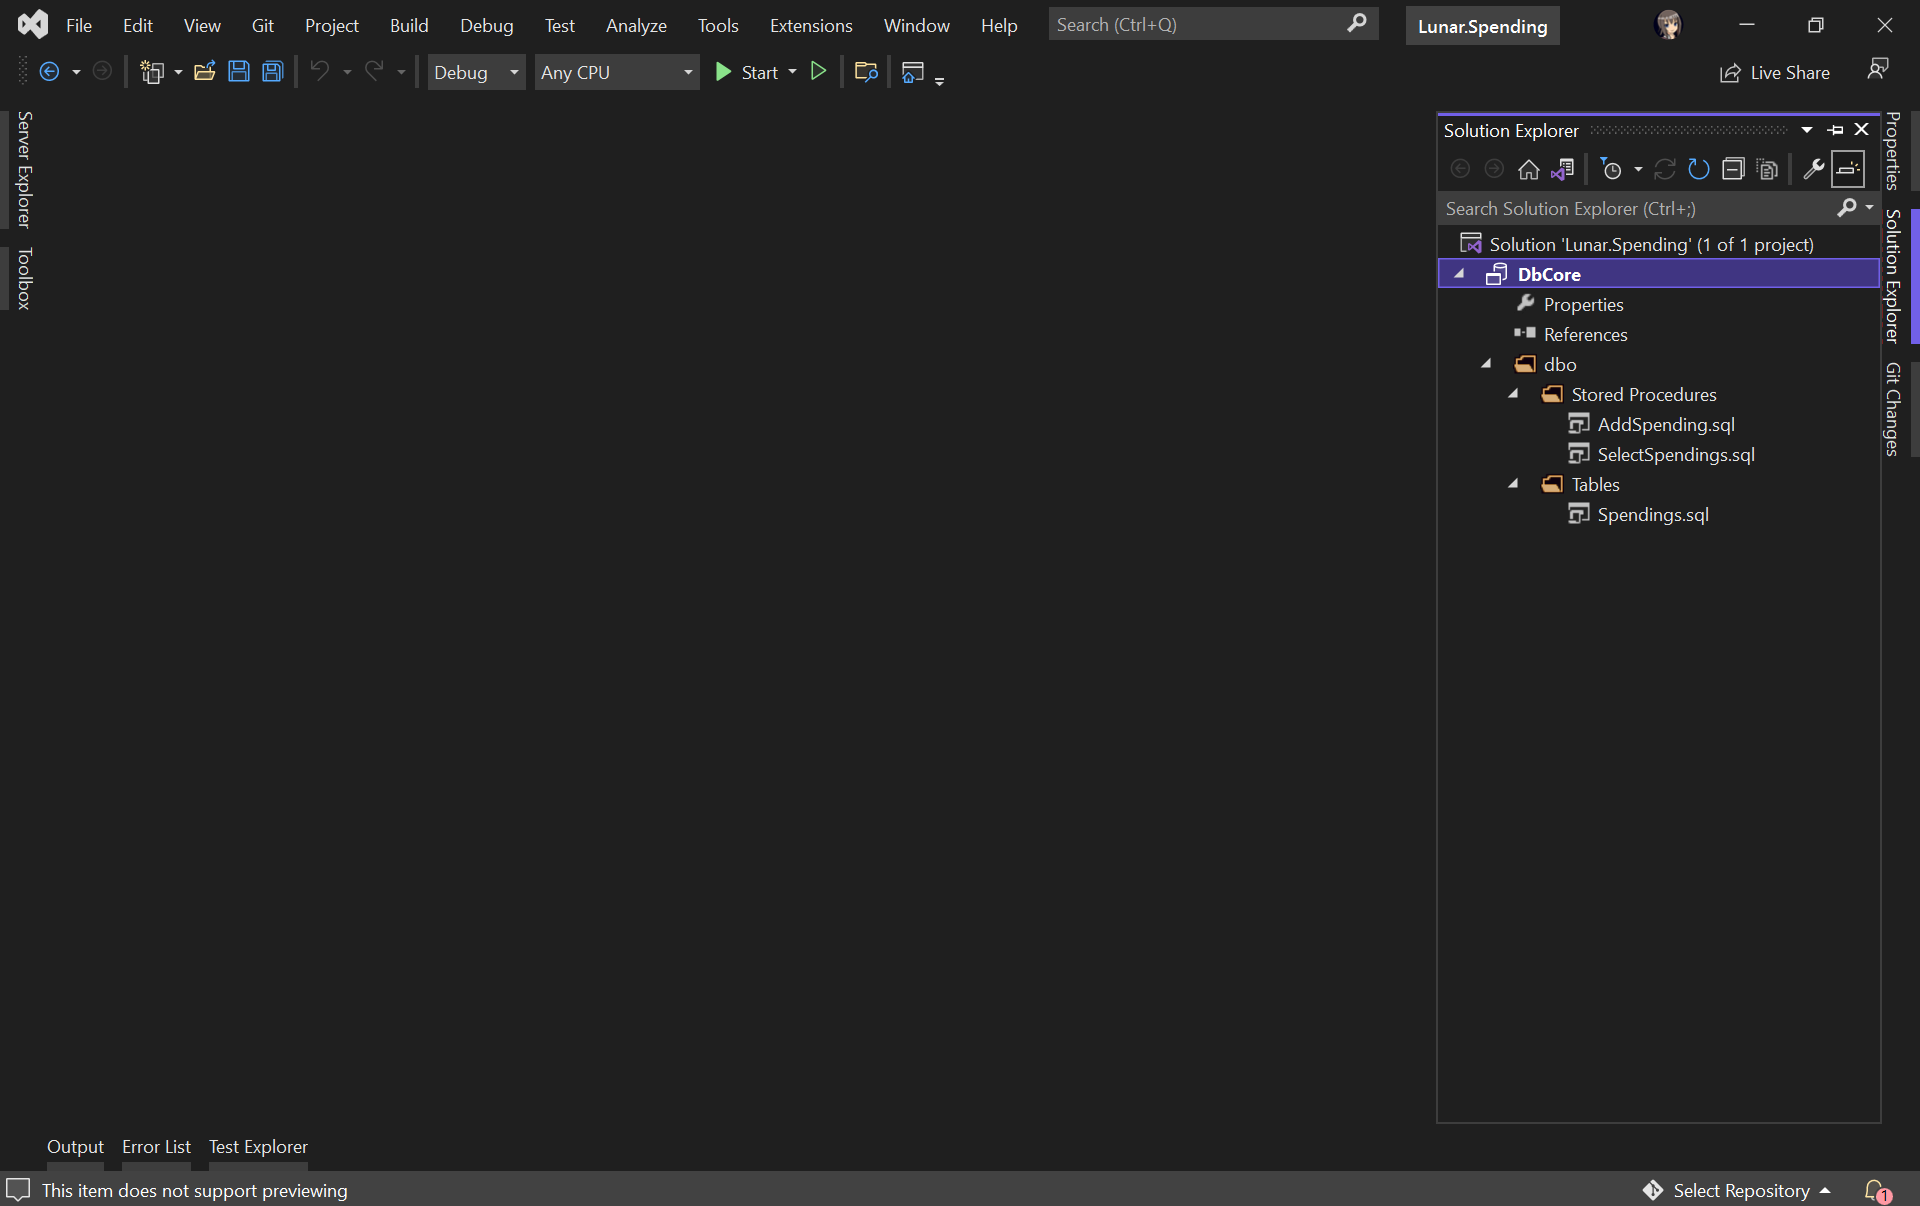
Once the import is done, we shall see our tables and stored procedures listed under the dbo directory in Solution Explorer, as shown below.
Table and stored procedures are successfully imported!
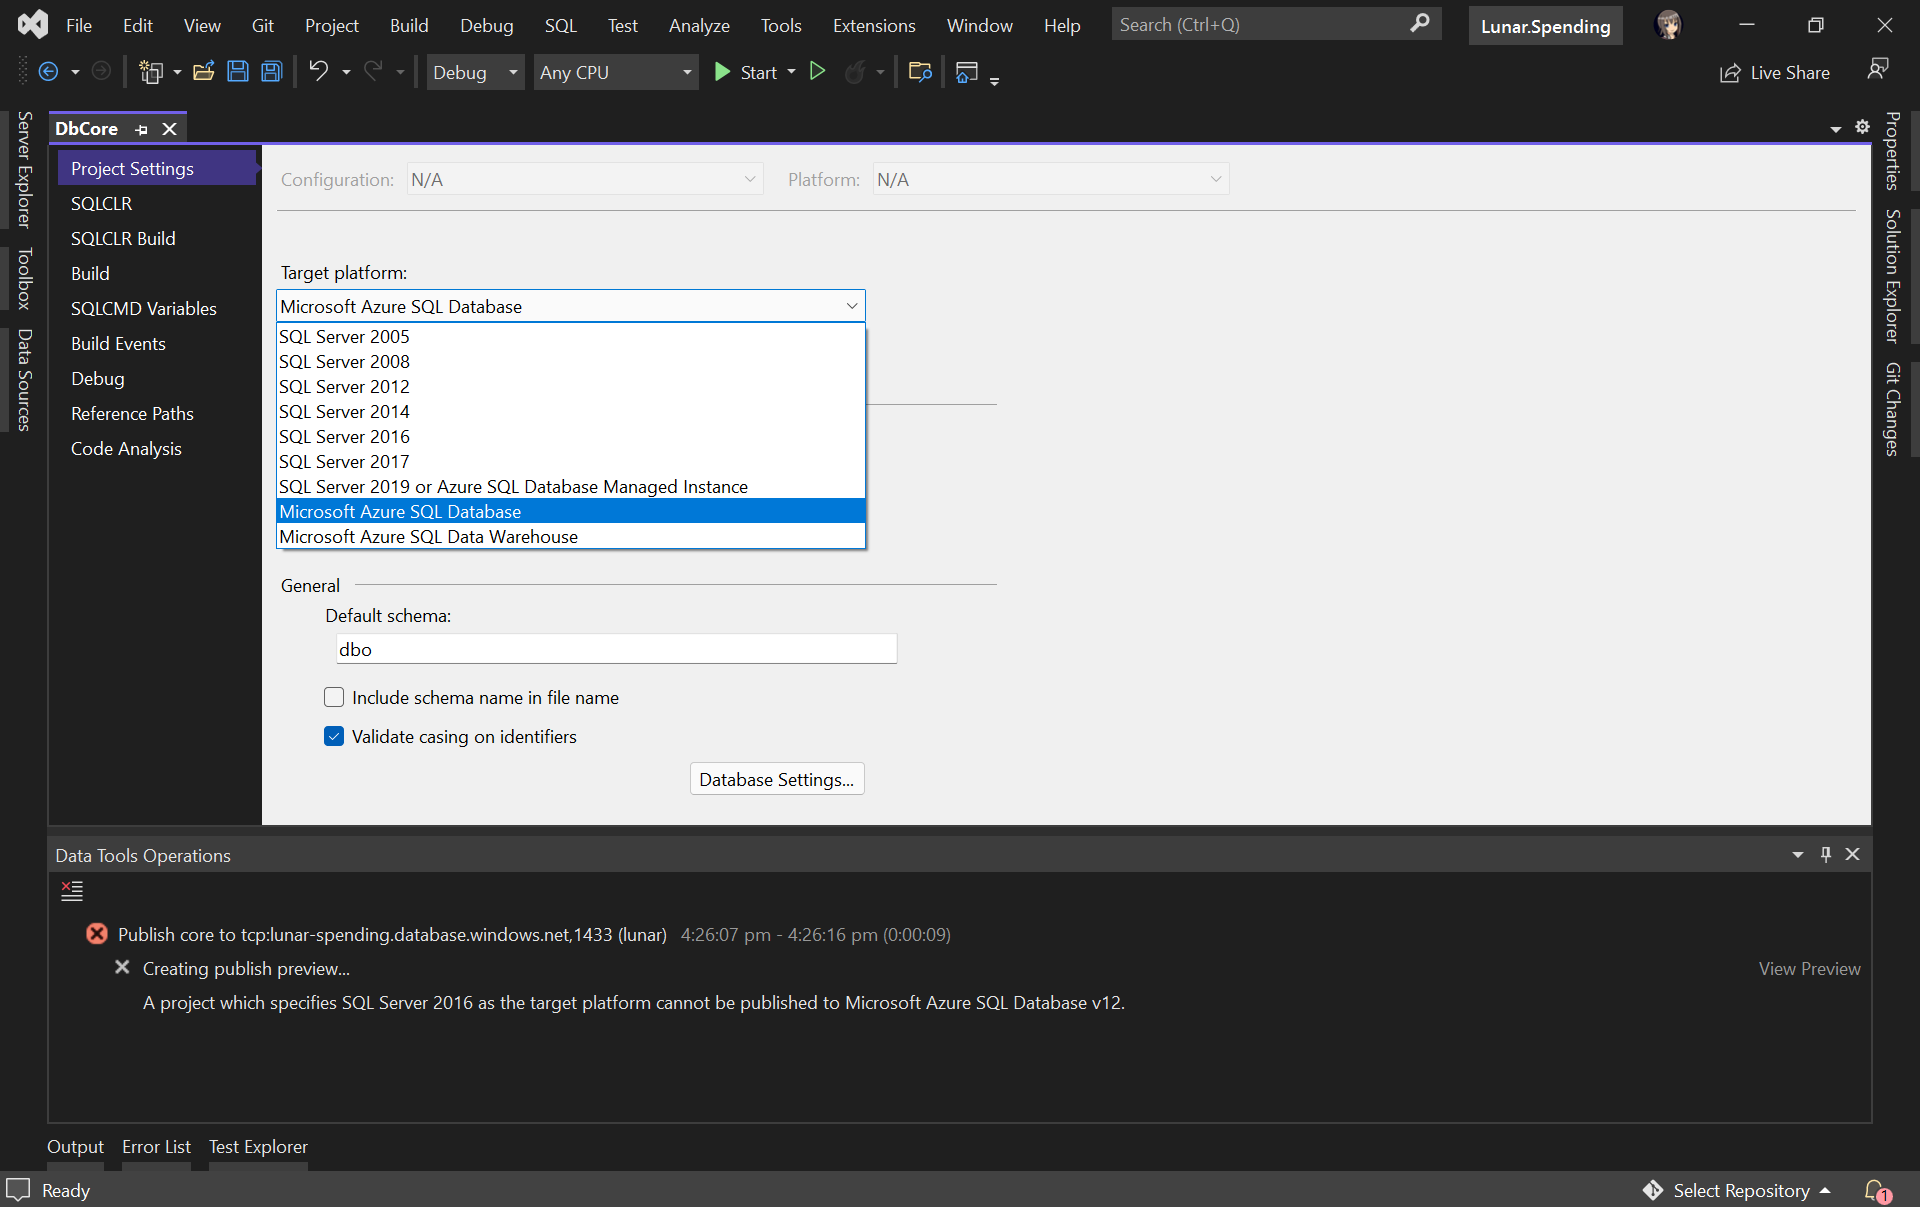
Before we continue, we need to edit the Target Platform of our database project accordingly, as shown in the following screenshot, otherwise we will not be able to publish the database later.
Changing the target platform to avoid the publish error.
Create Unit Test for Stored Procedure
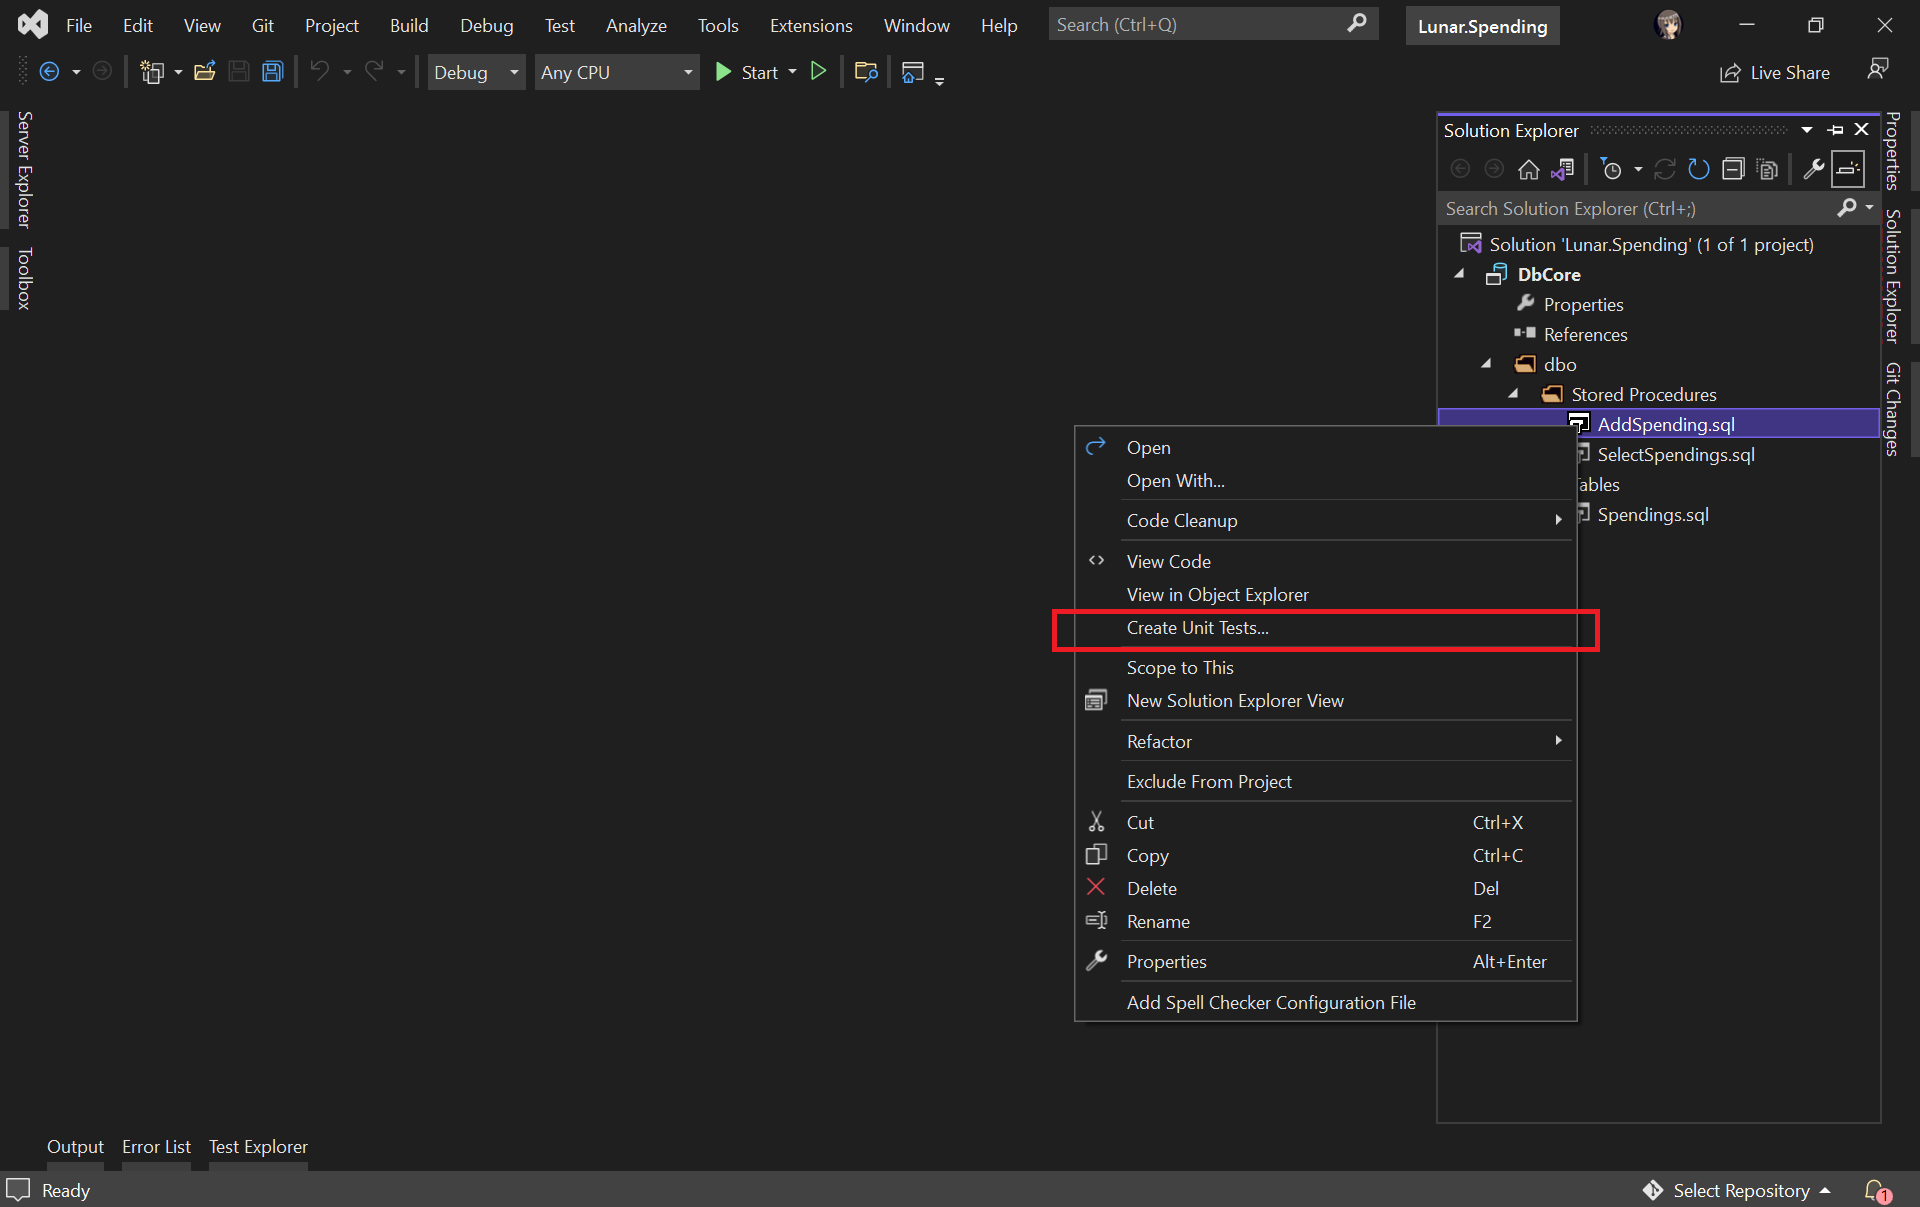
Let’s say we would like to unit test the AddSpending stored procedure. What we need to do is simply right-clicking the AddSpending stored procedure and then click on the “Create Unit Tests…” option, as demonstrated below.
Adding unit test for a selected stored procedure.
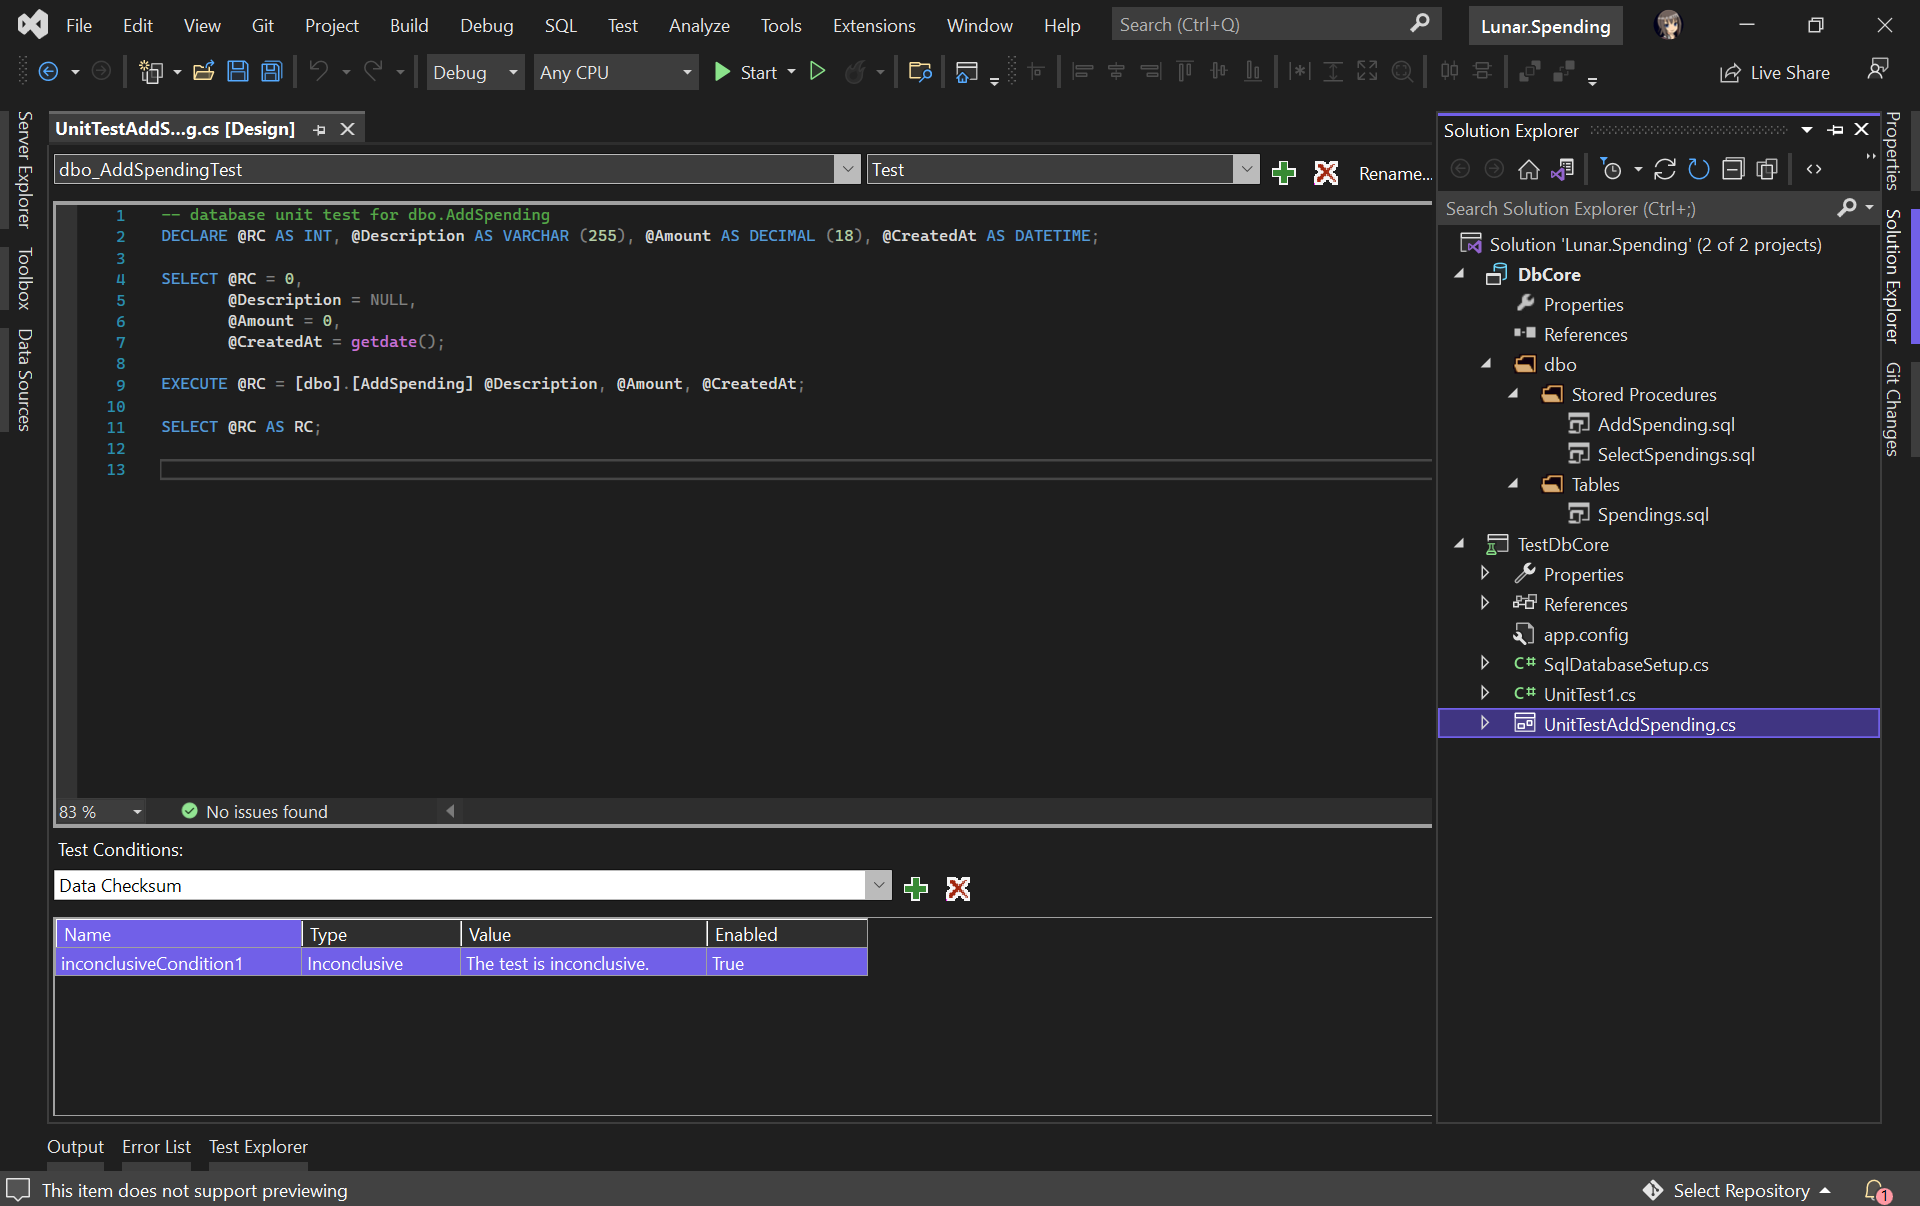
We will then be asked for the connection string of the database that the unit test project will be connecting to. Once the project has been successfully created, we will be given a template unit test as follows.
A boilerplate code of stored procedure unit test.
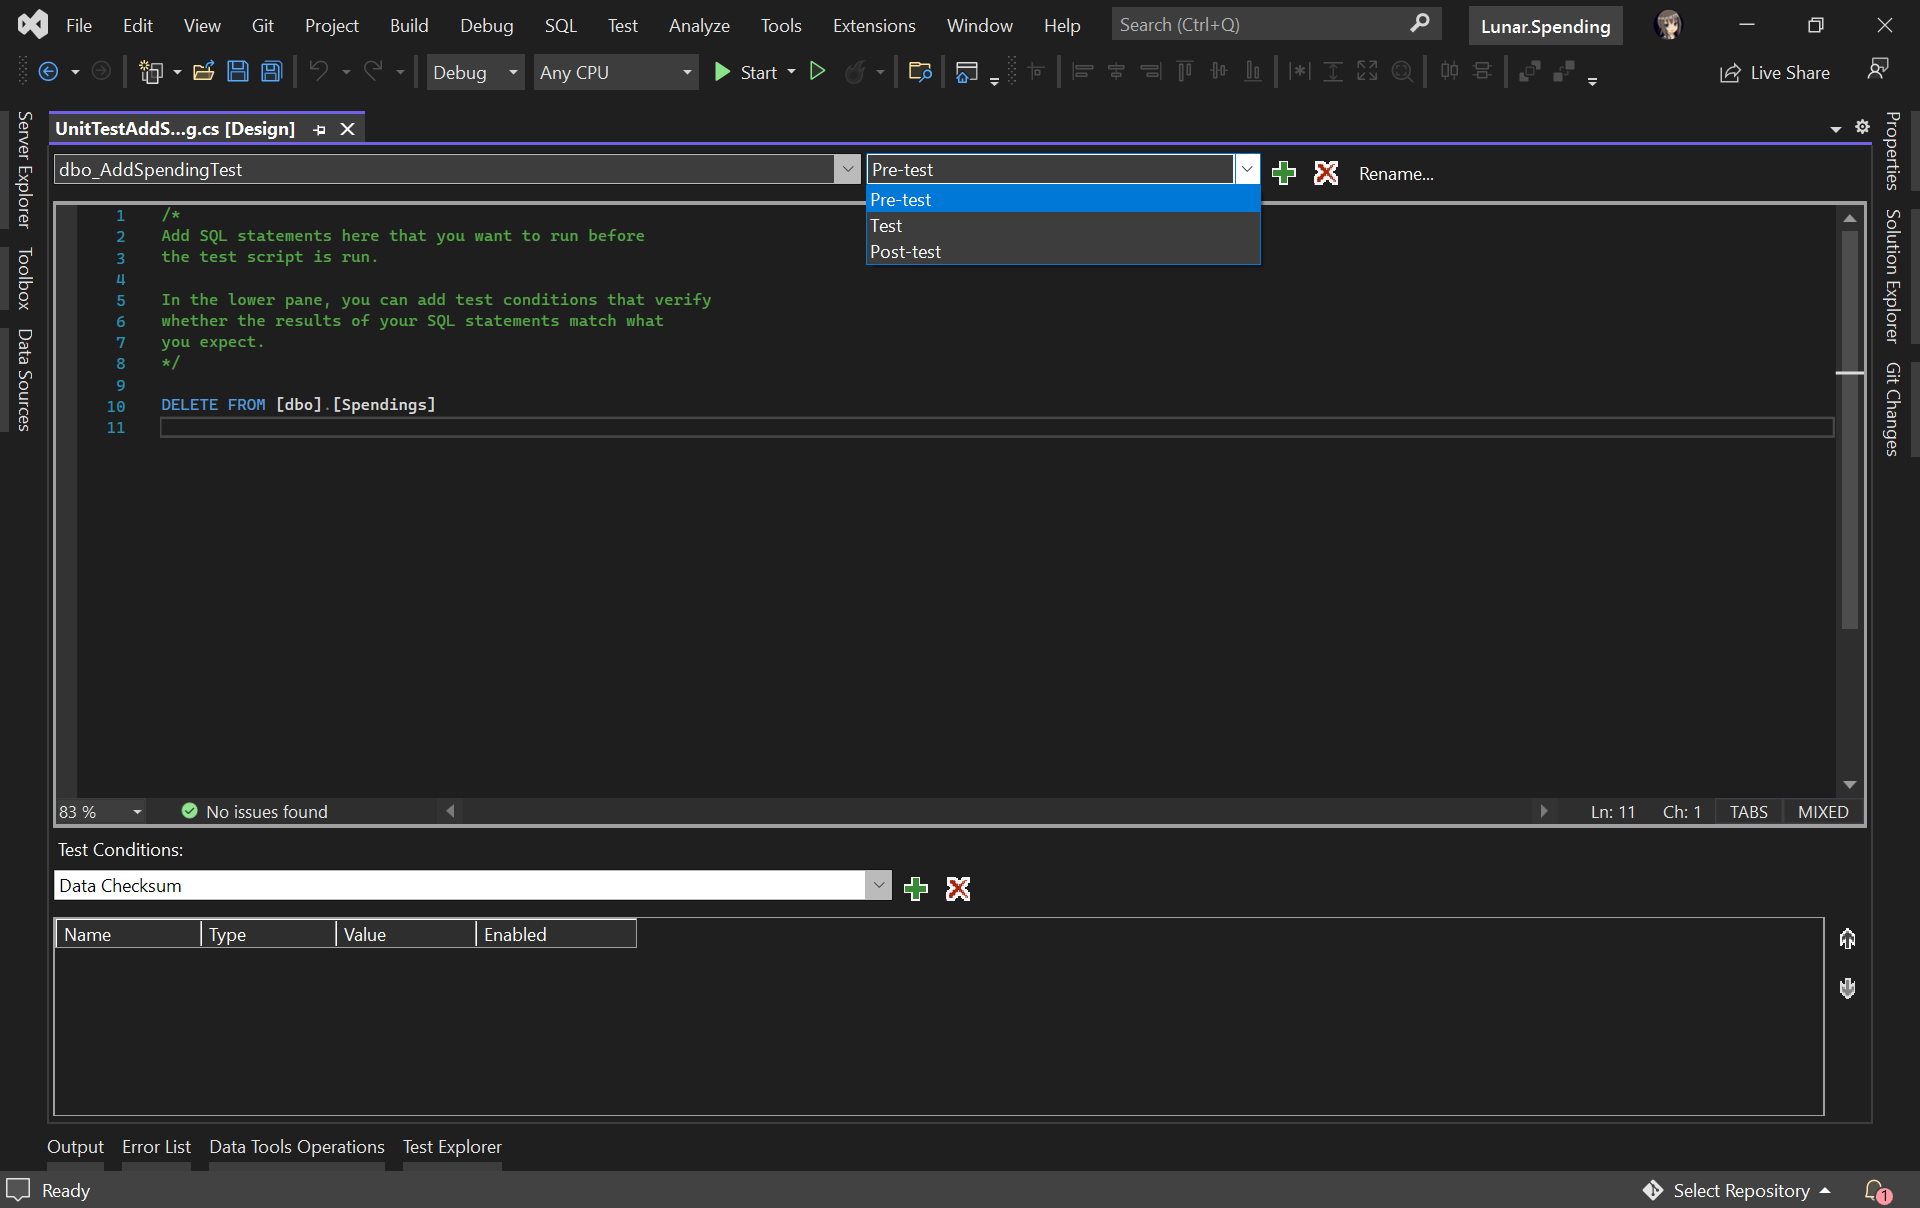
We can include pre and post test SQL statements which will be run before and after the test script is executed, respectively.
For example, we would like to have a clean Spendings table before the unit test runs, we can have the following SQL script to delete all rows in the table.
Pre-test script will be run before the test script.
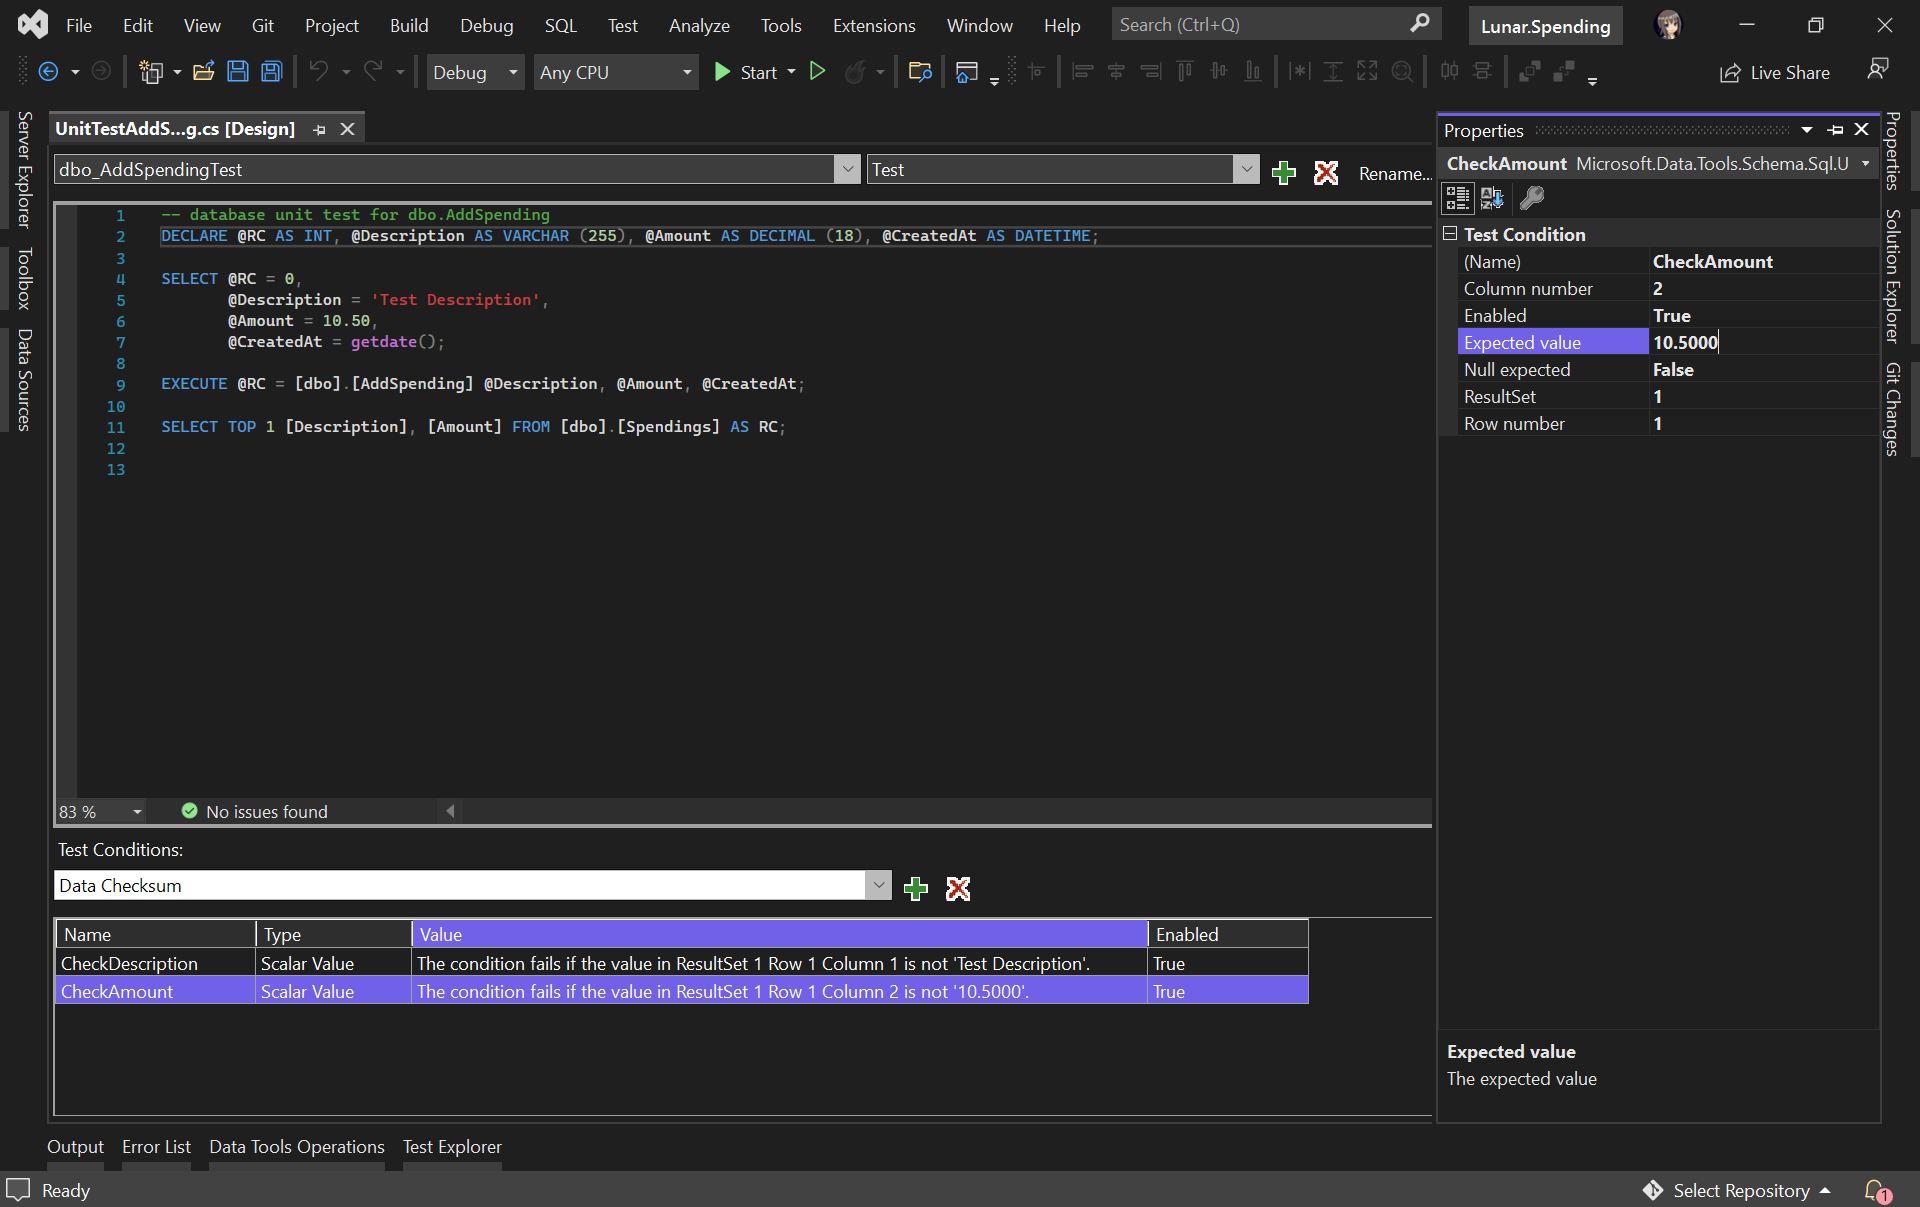
In our test script, we will test to see if the description and amount can be stored correctly in the database. Hence, we need to specify two Test Conditions to verify the two columns, as shown in the following screenshot.
RC means Return Code. It can later be used in a test case assertion.
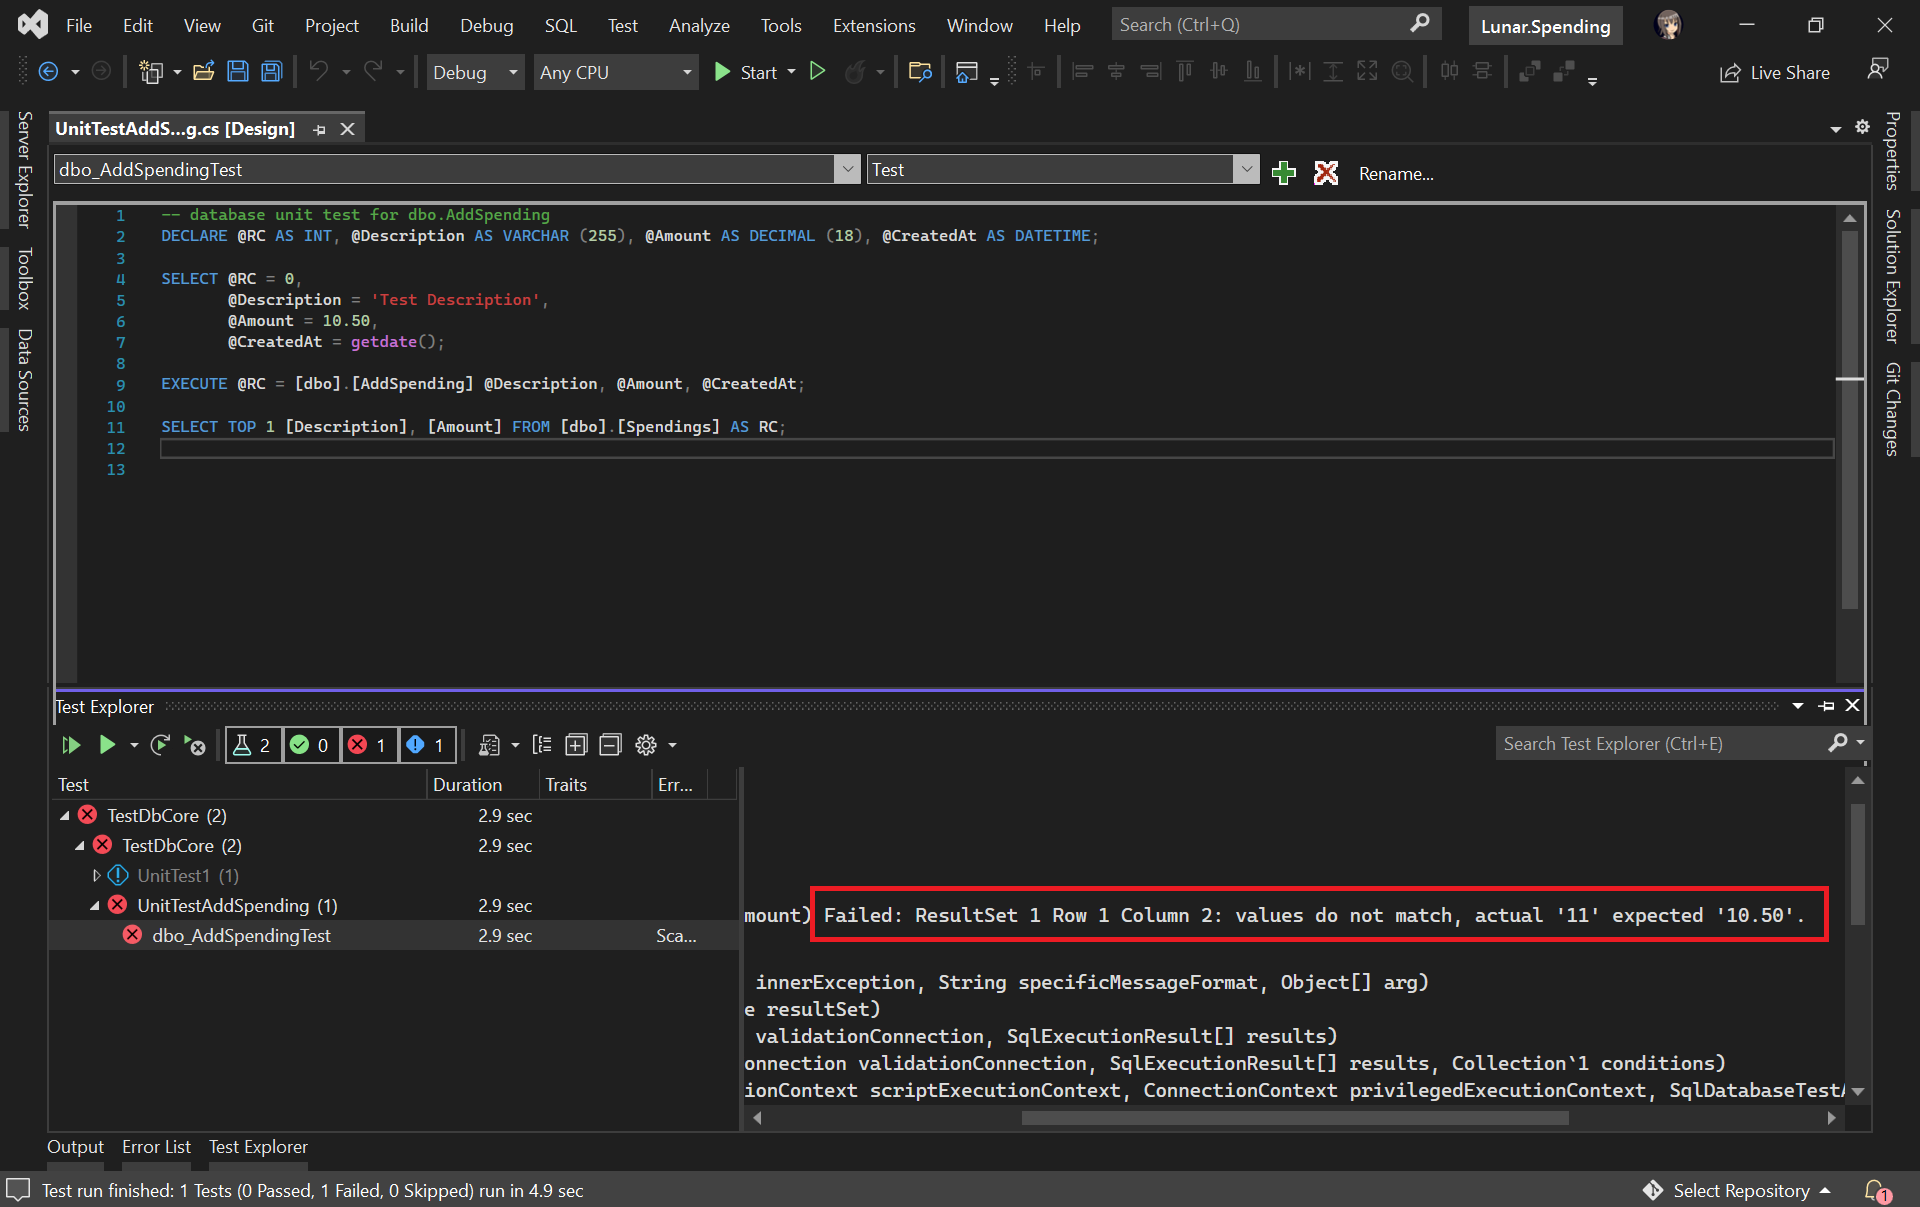
Now, we can run our very first unit test with the Test Explorer to see if our stored procedure has any issue or not.
The test case fails. We shall check why the number is rounded up.
It turns out that this bug is caused by wrong data type used for the Amount column. Now we can proceed to fix it.
The test passed after we fixed the issue in our table schema and stored procedure.
Getting Ready for Publishing Database
As we discussed earlier, unit testing is not only about writing a piece of code to test our unit of work, but also making it to be automatically testable.
Hence, our next move is to automate the build, test, and release of our database.
Firstly, we shall make sure the source code of our projects is on GitHub (or any source control supported in Azure DevOps).
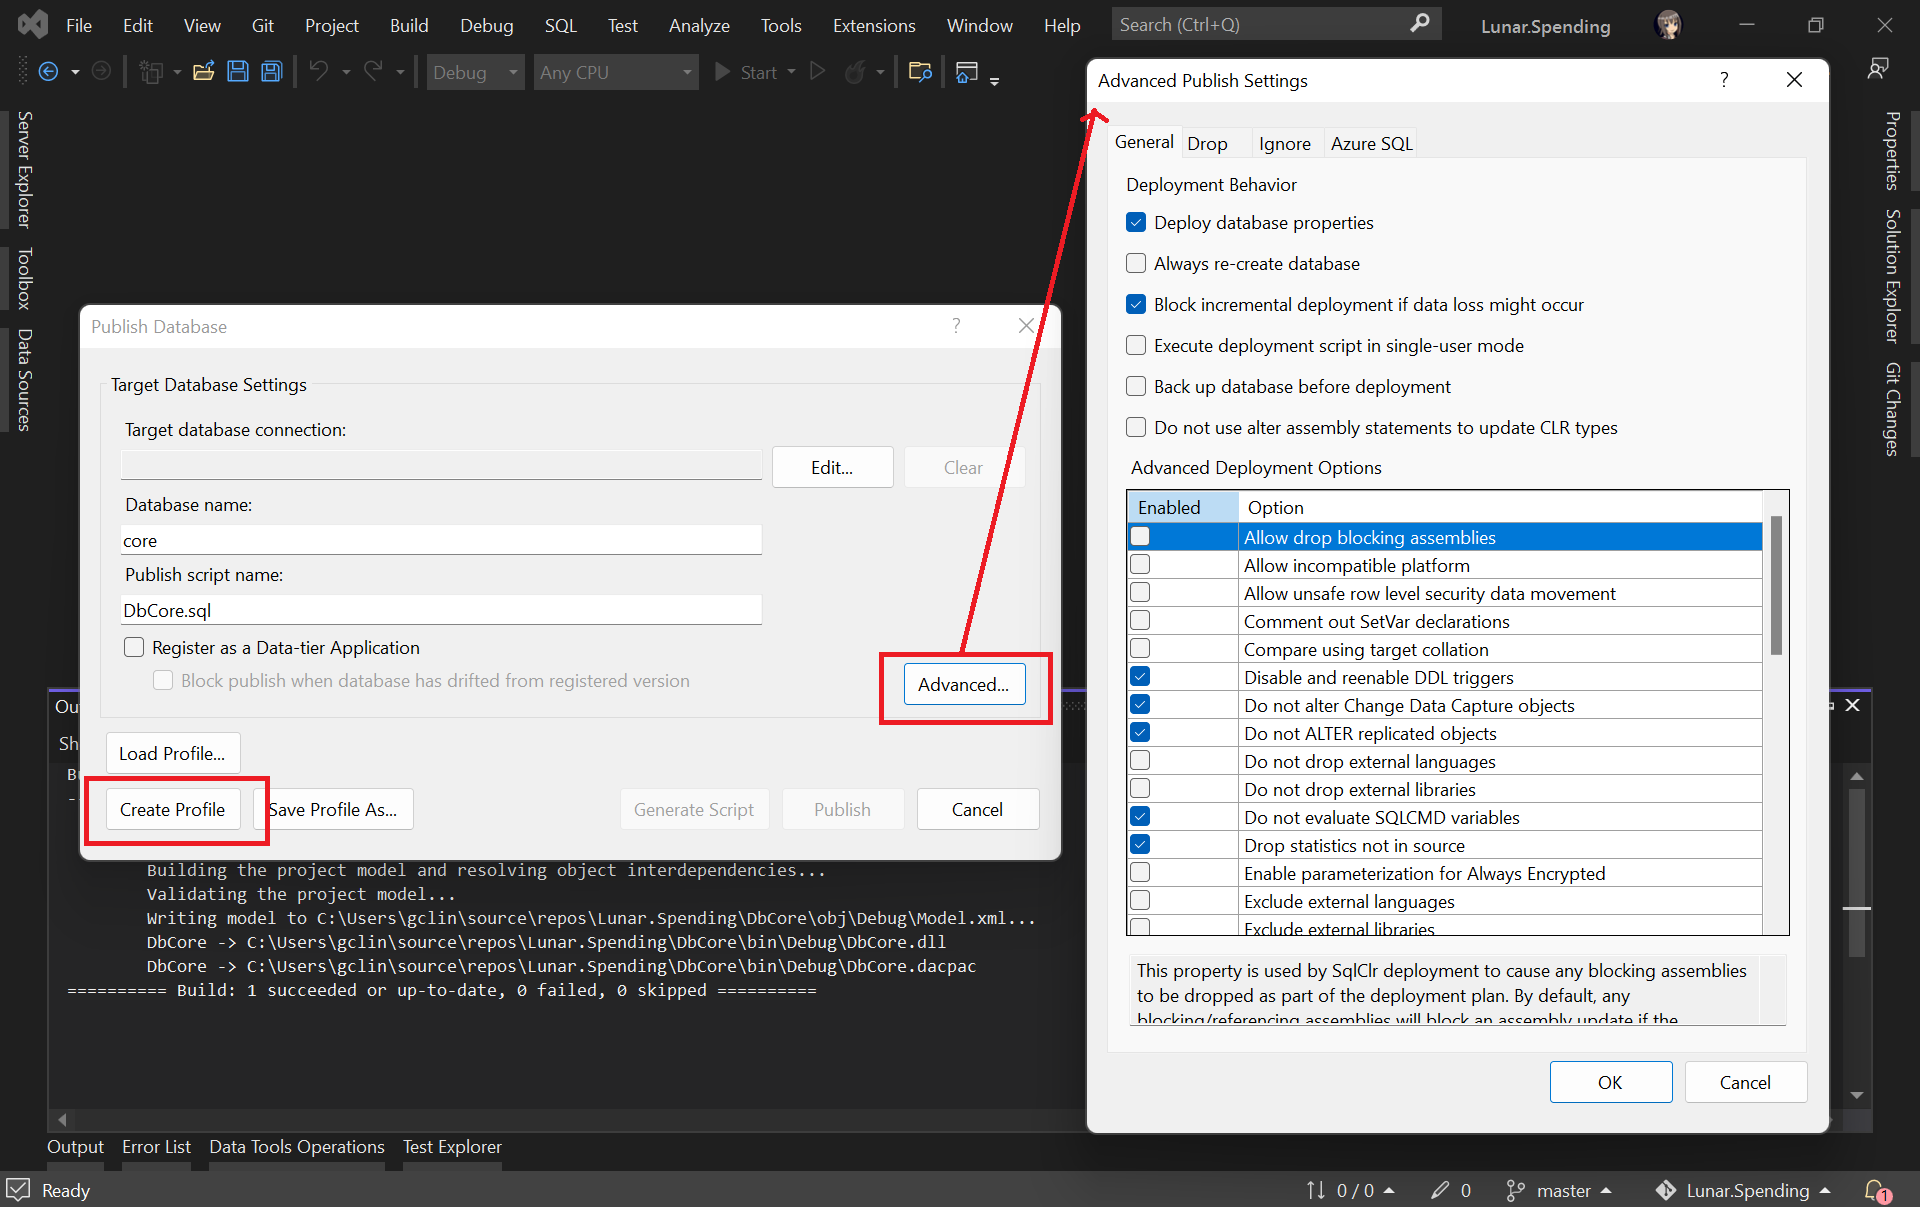
Secondly, we need to create the Publish Profile of our database. To do so, we simply right click on database project and choose the “Publish…” option. There will be a window popped out, as shown below.
Configuring the Publish Profile of our database.
As shown in the screenshot above, there are many settings that can be configured, including Azure SQL related settings. After configuring them accordingly, please click on the “Create Profile” button. Once it is grayed out, it means that the profile has been generated successfully. We can then proceed to close the popped-out window.
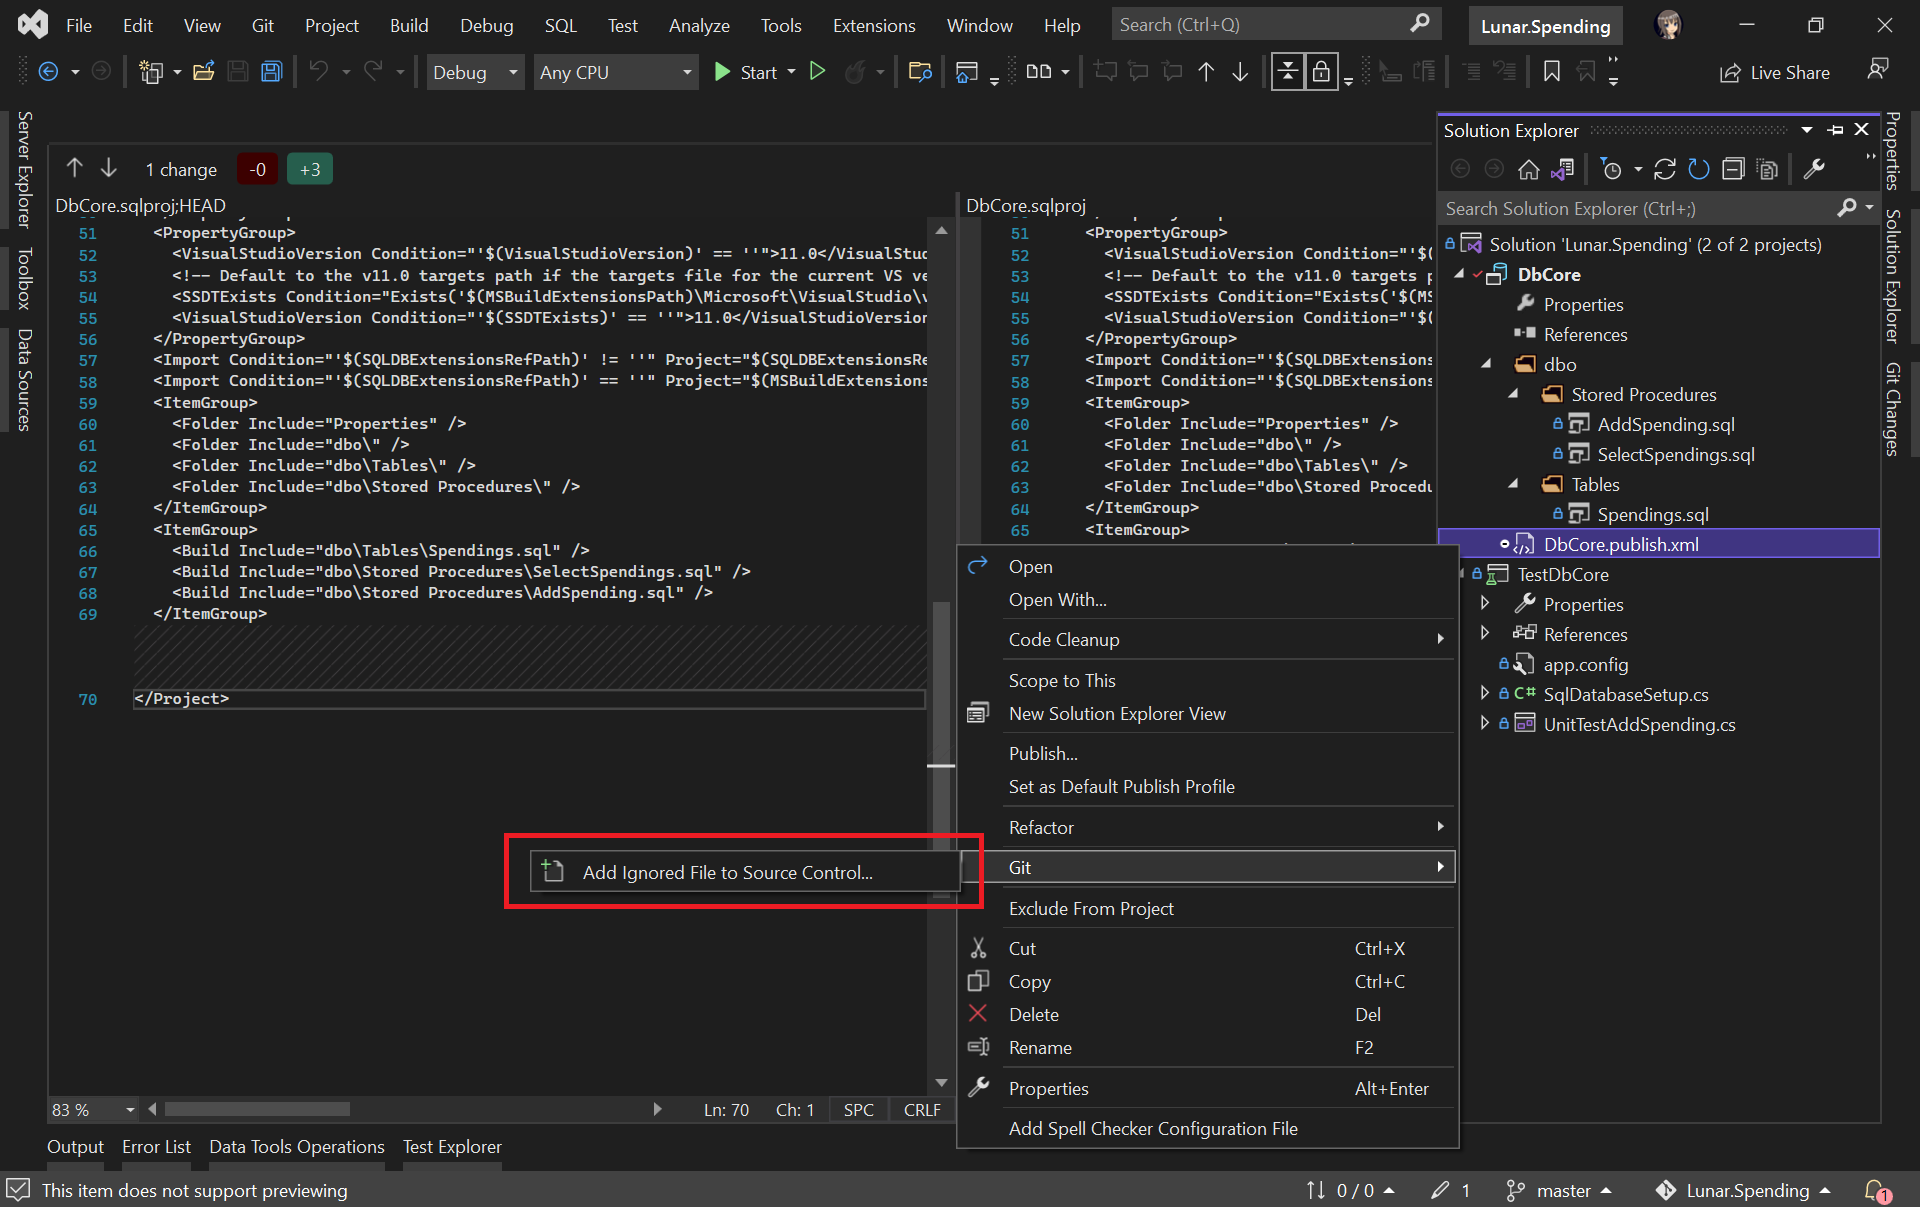
Please make sure the generated Database Profile file is included in the source control. Kindly add it to Git if it is not, as shown in the screenshot below. This is because this file is needed in our Azure DevOps build pipeline later.
Please make sure our Database Profile is included in source control.
Finally, let’s create a project on Azure DevOps which will host the build and release pipelines for our automatic database deployment.
We will configure our project to have only the Pipelines service on Azure DevOps.
Setup Build Pipeline
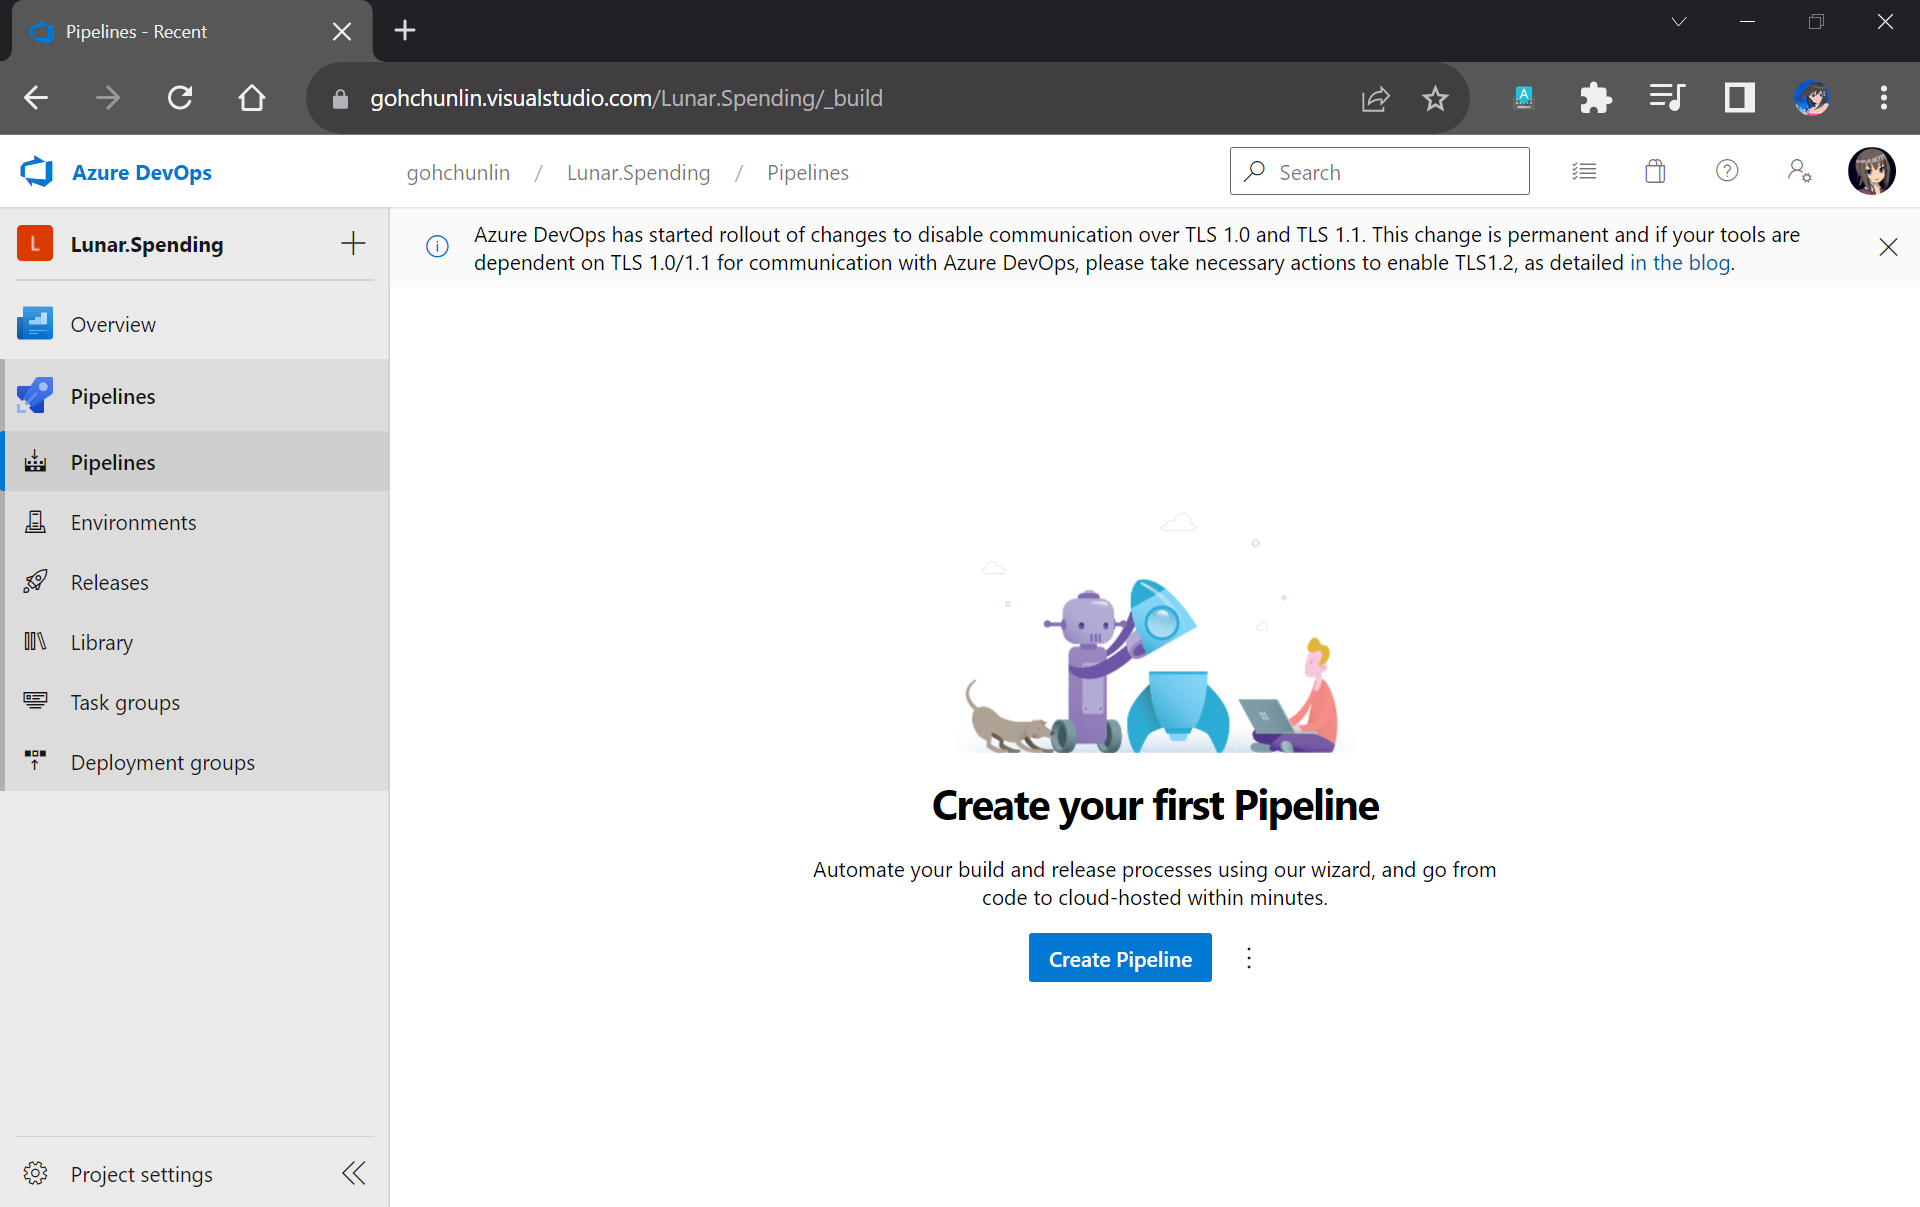
Once we have created our project on Azure DevOps, we can proceed to create our Build Pipeline.
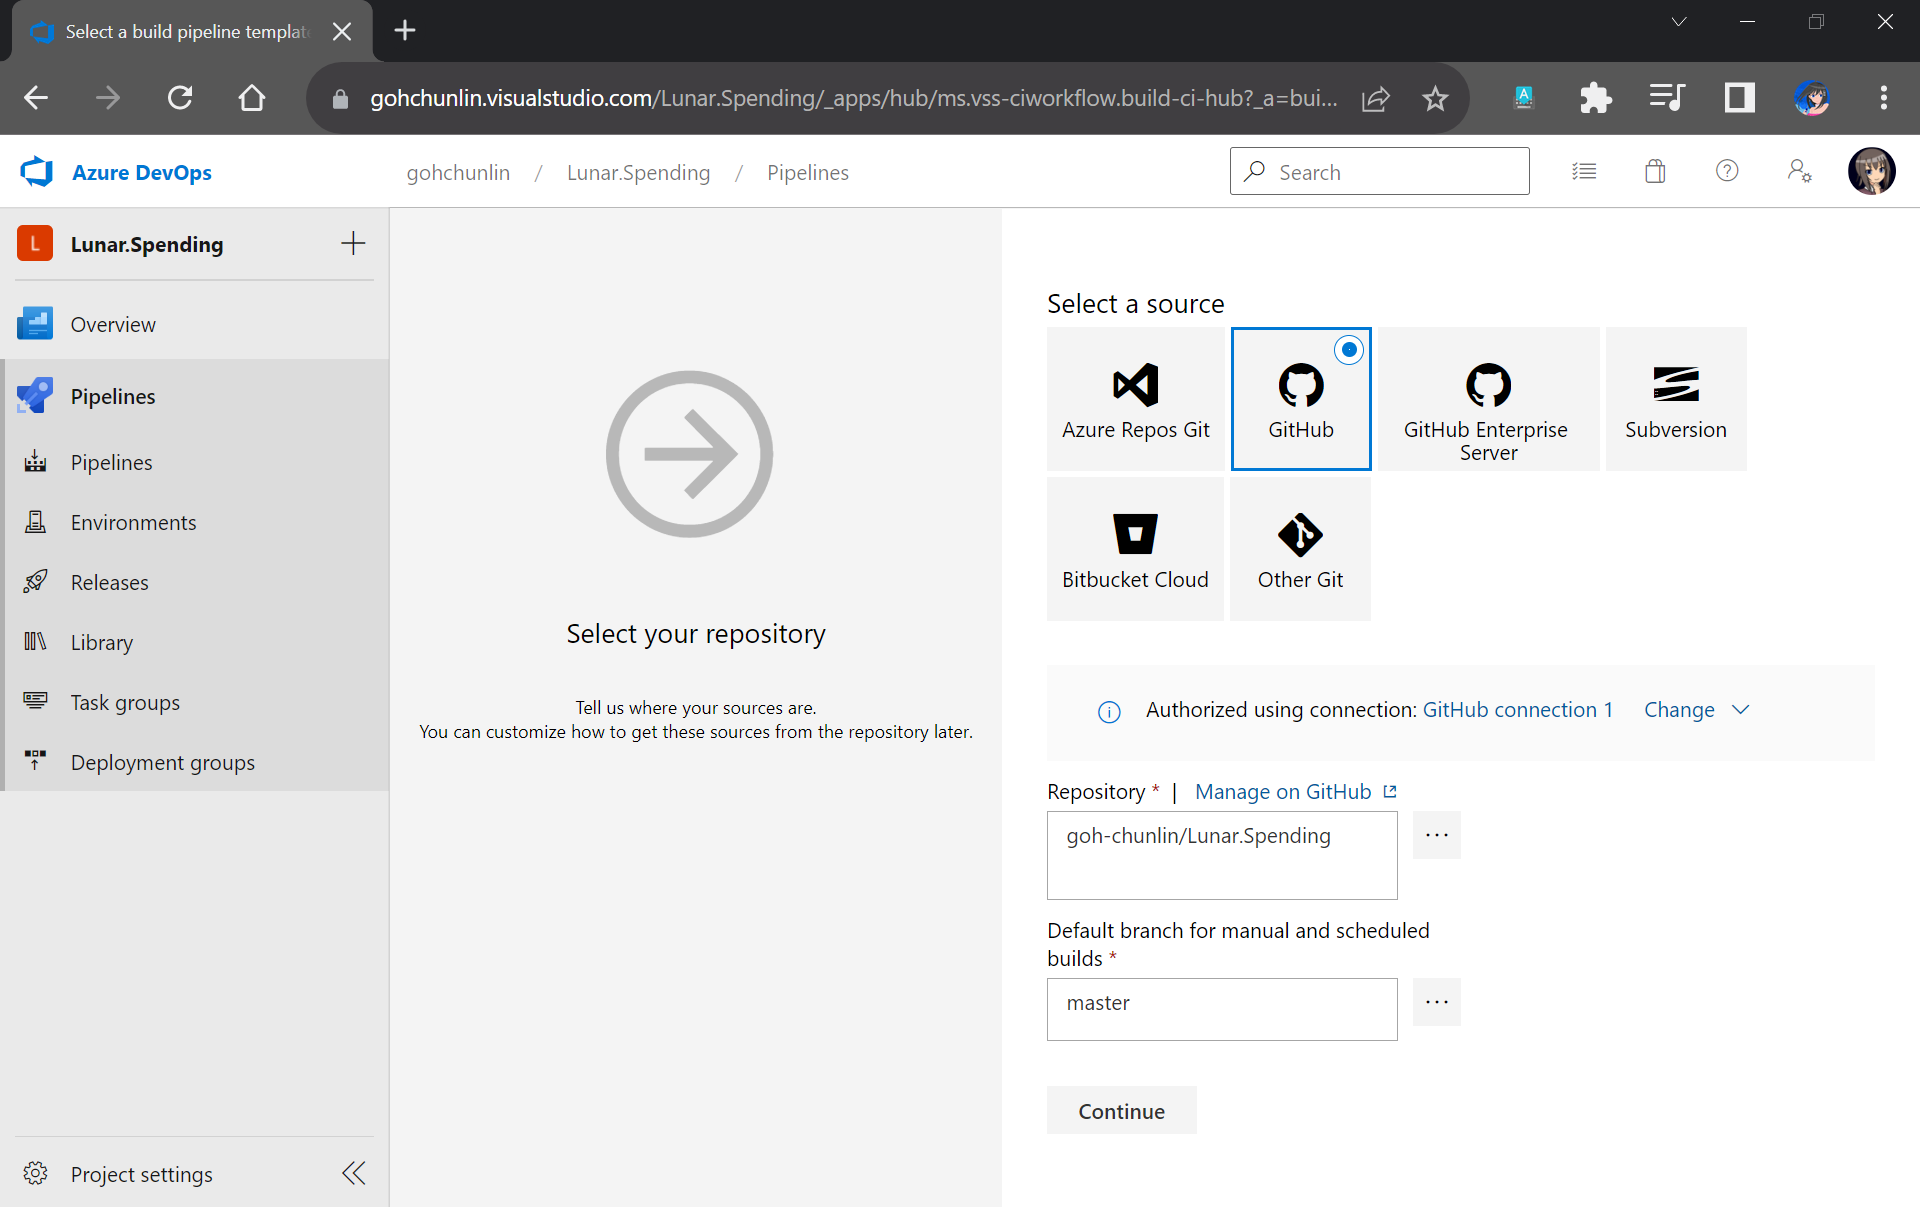
Firstly, we need to specify the code repository we are using. Since our code sists on GitHub, we will connect Azure DevOps with our project on GitHub as shown in the screenshot below.
Please remember to select the correct branch too.
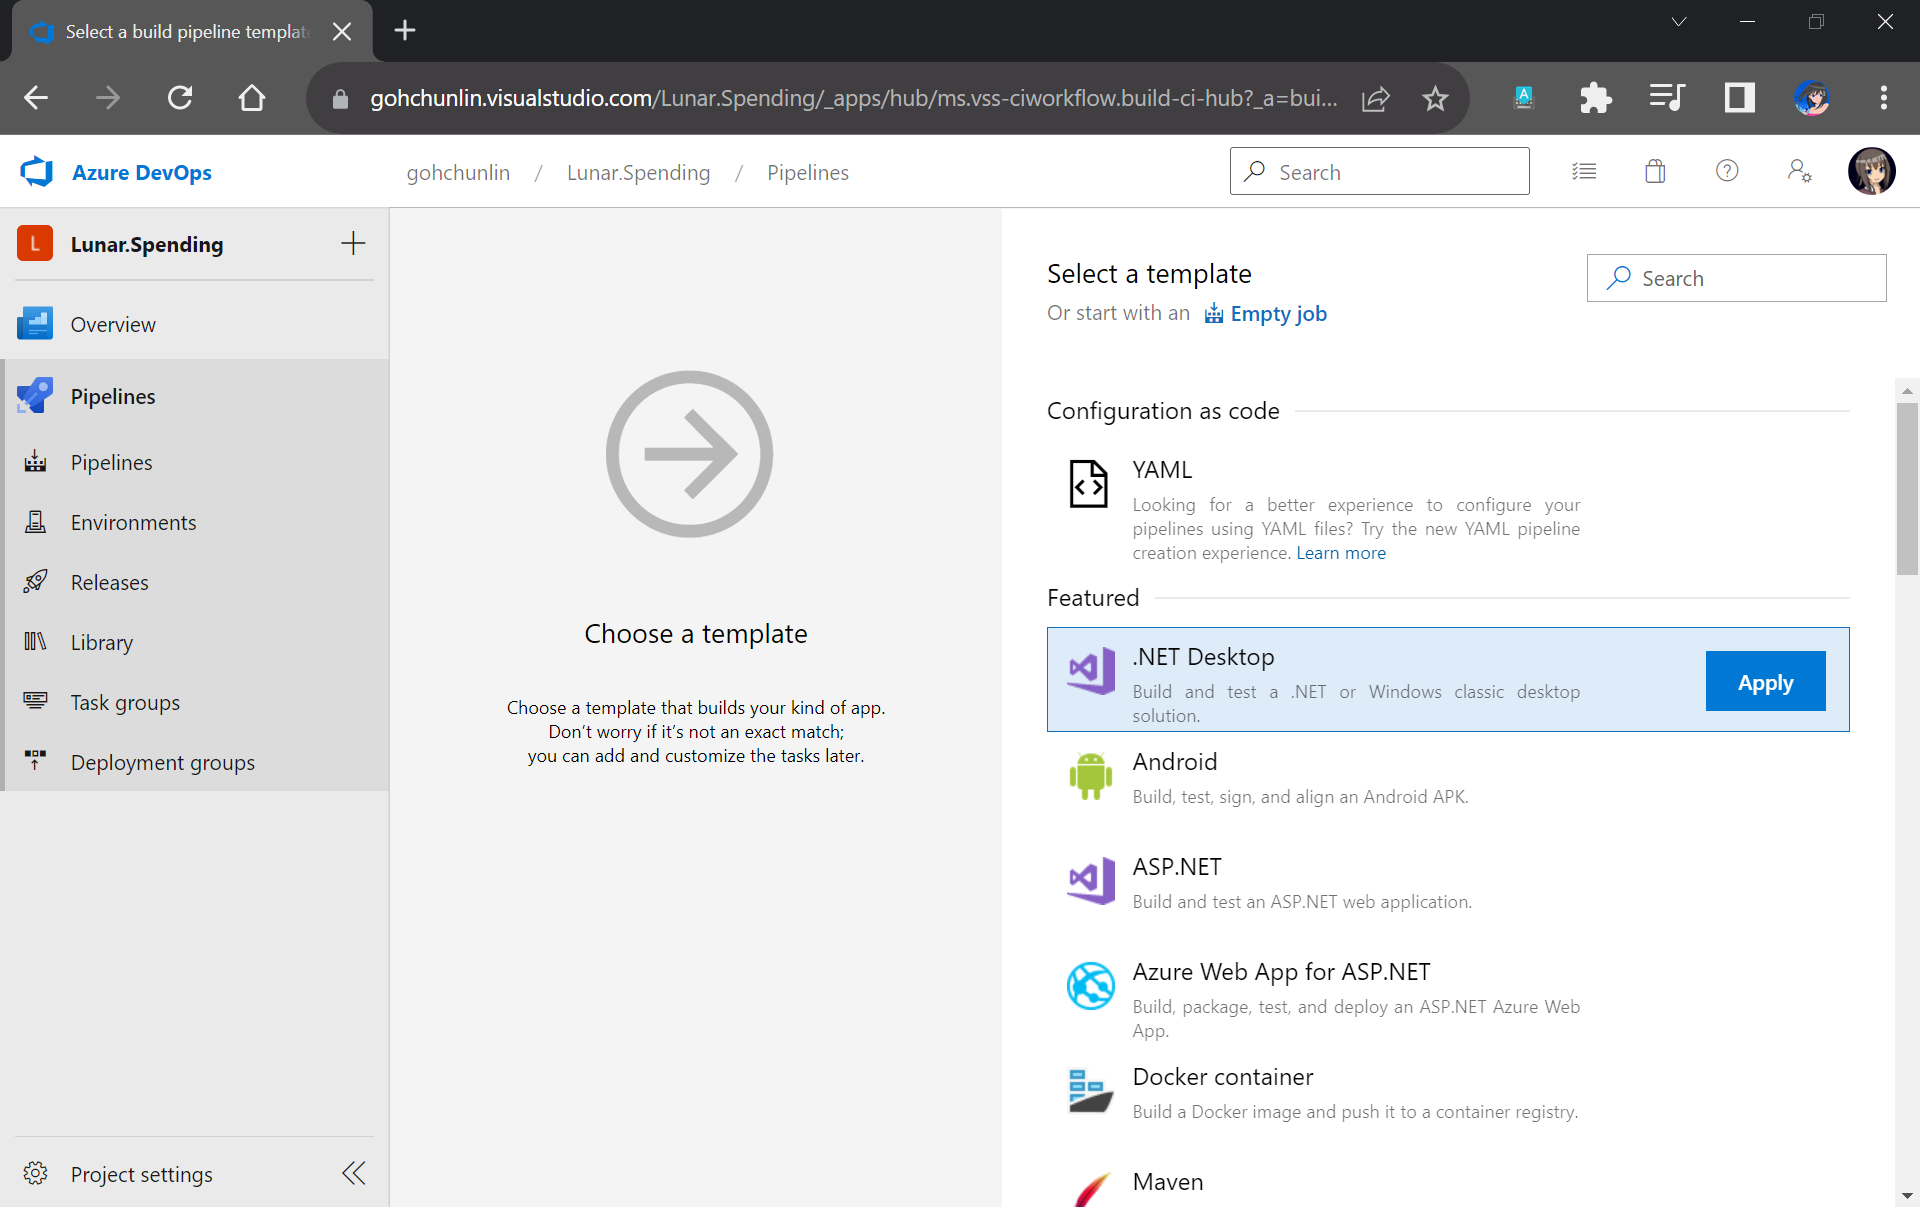
Next, we will start off from the .NET Desktop template. The reason why we choose this template is because it contains many tasks that we can use in our database build pipeline.
We will make use of the .NET Desktop template for our database build pipeline.
We need to make sure that “windows-2022” (Windows Sever 2022 with VS2022 installed), which is the latest version as of now, is chosen in the Agent Specification field. I have tried with the default “windows-2019” option before and there would be an error message “Error CS0234: The type or namespace name ‘Schema’ does not exist in the namespace ‘Microsoft.Data.Tools’ (are you missing an assembly reference?)”.
Please update to use windows-2022 as our build agent or else there would be issues later.
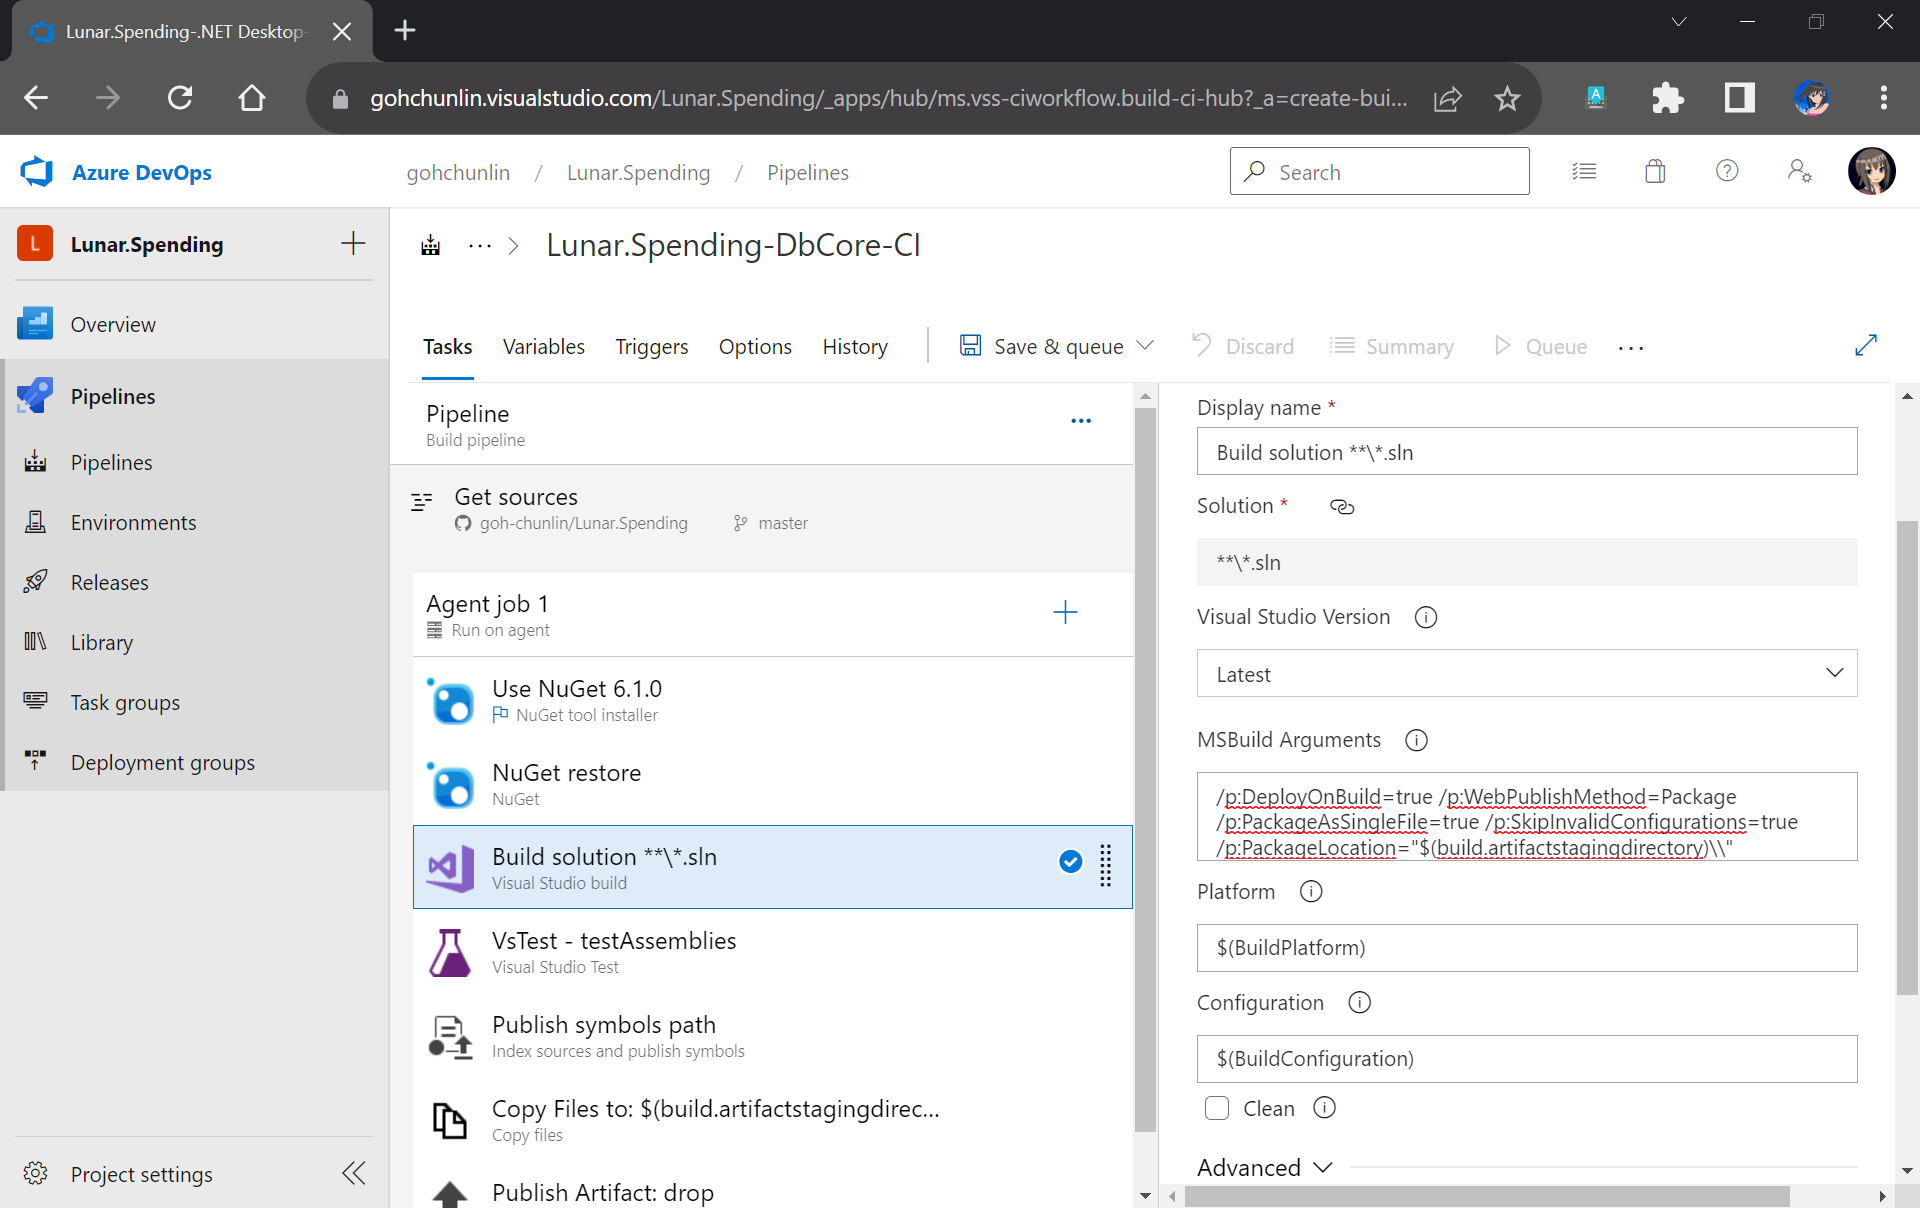
Next, we need to update the version of NuGet to be the latest, which is now 6.1.0.
After that, we move on to the third task in the pipeline which is building our Solution in Release mode with the following MSBuild Arguments on Any CPU.
We will remove the VsTest from the Build Pipeline because it will be proper to run the unit tests after changes have been deployed to the database. Otherwise, we will still be testing against the old schema and old stored procedures. Hence, we will add the testing task in the Release pipeline instead.
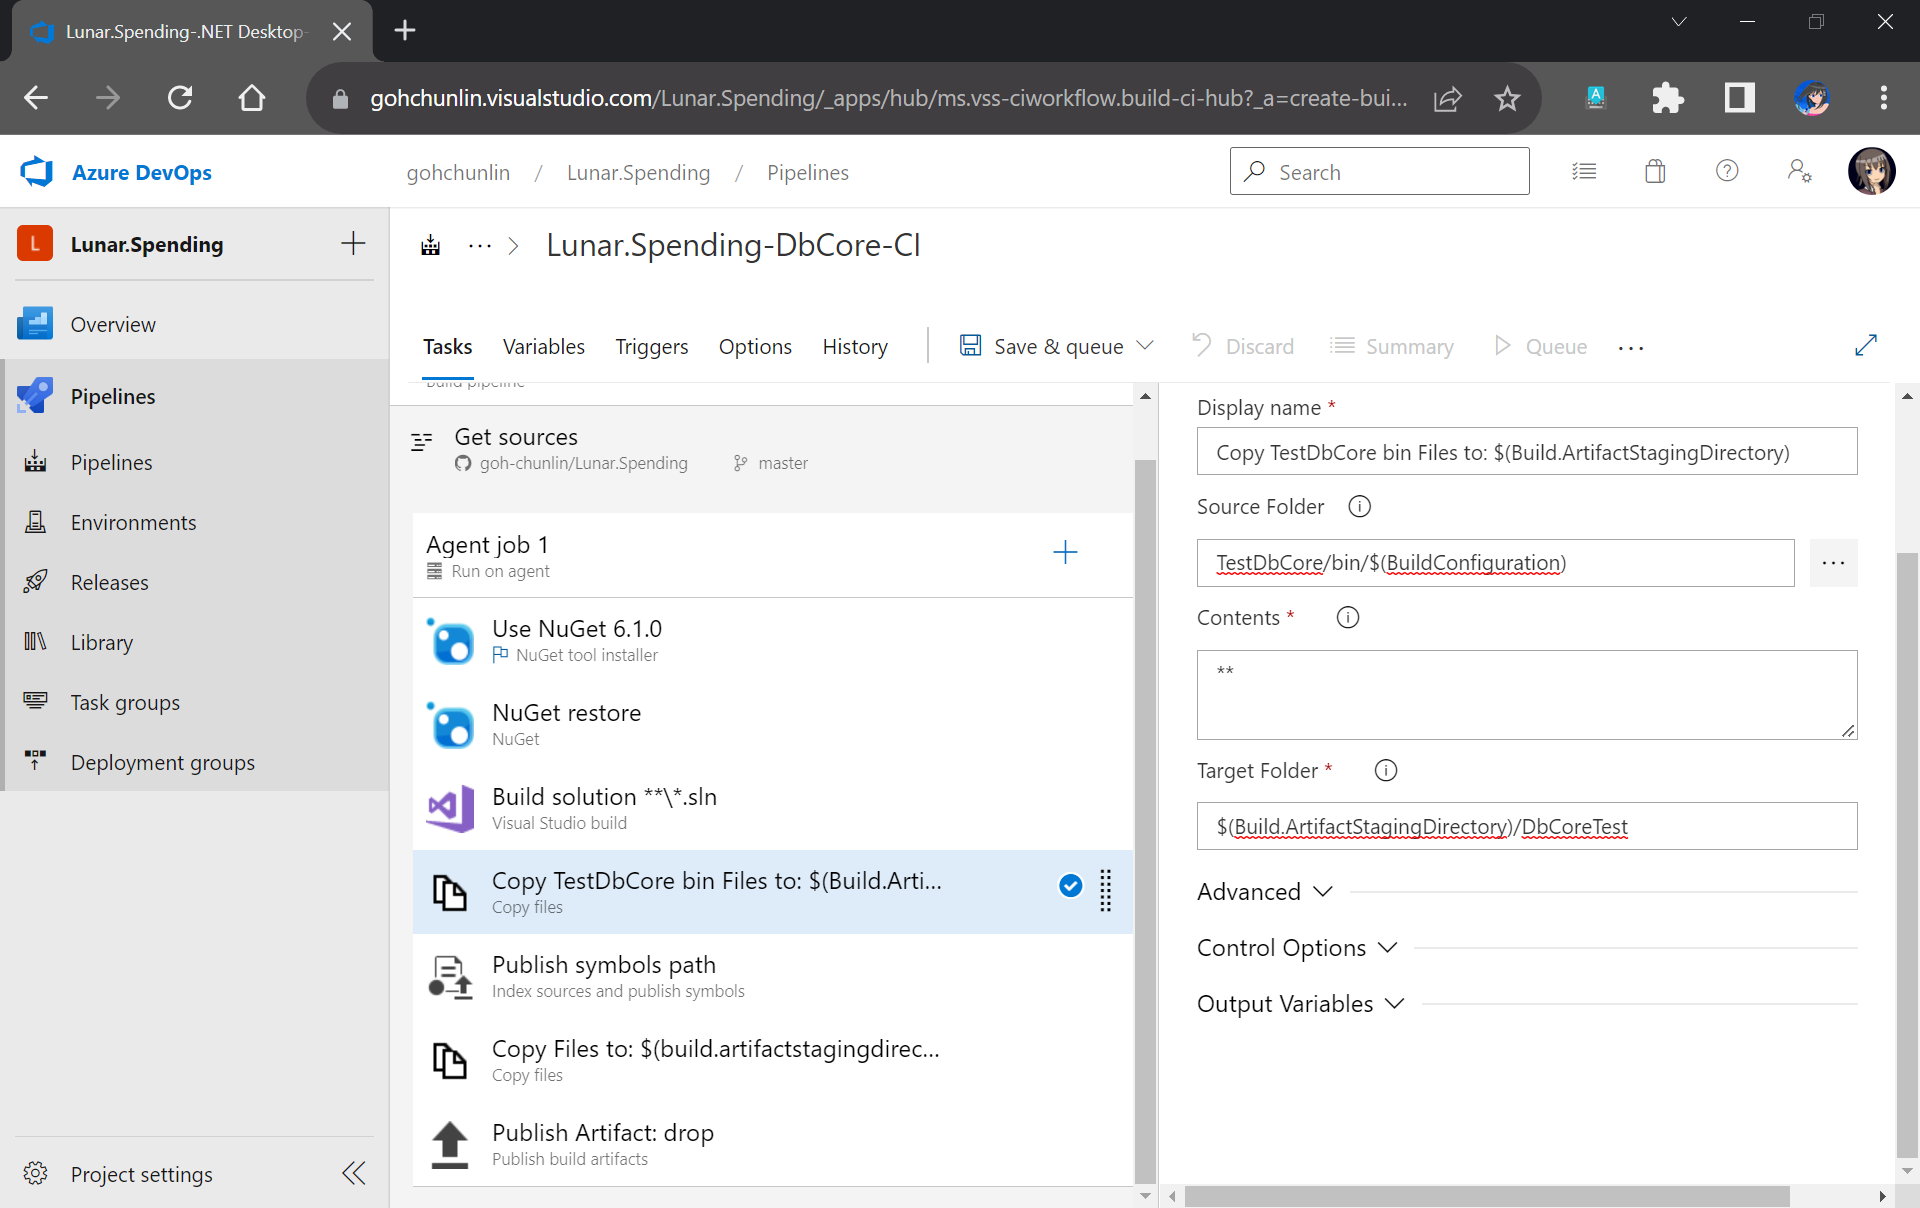
Now, since the testing will be done in the Release Pipeline instead, we shall create a task to copy the assemblies of TestDbCore project to the Build Artifact so that the assemblies can be used in the Release Pipeline later. Thus, we will add a new task “Copy Files” as shown in the screenshot below.
TestDbCore assemblies and other relevant files will be copied to DbCoreTest folder in the Build Artifact.
We will also remove the next task, which is publishing symbols because it is not necessary.
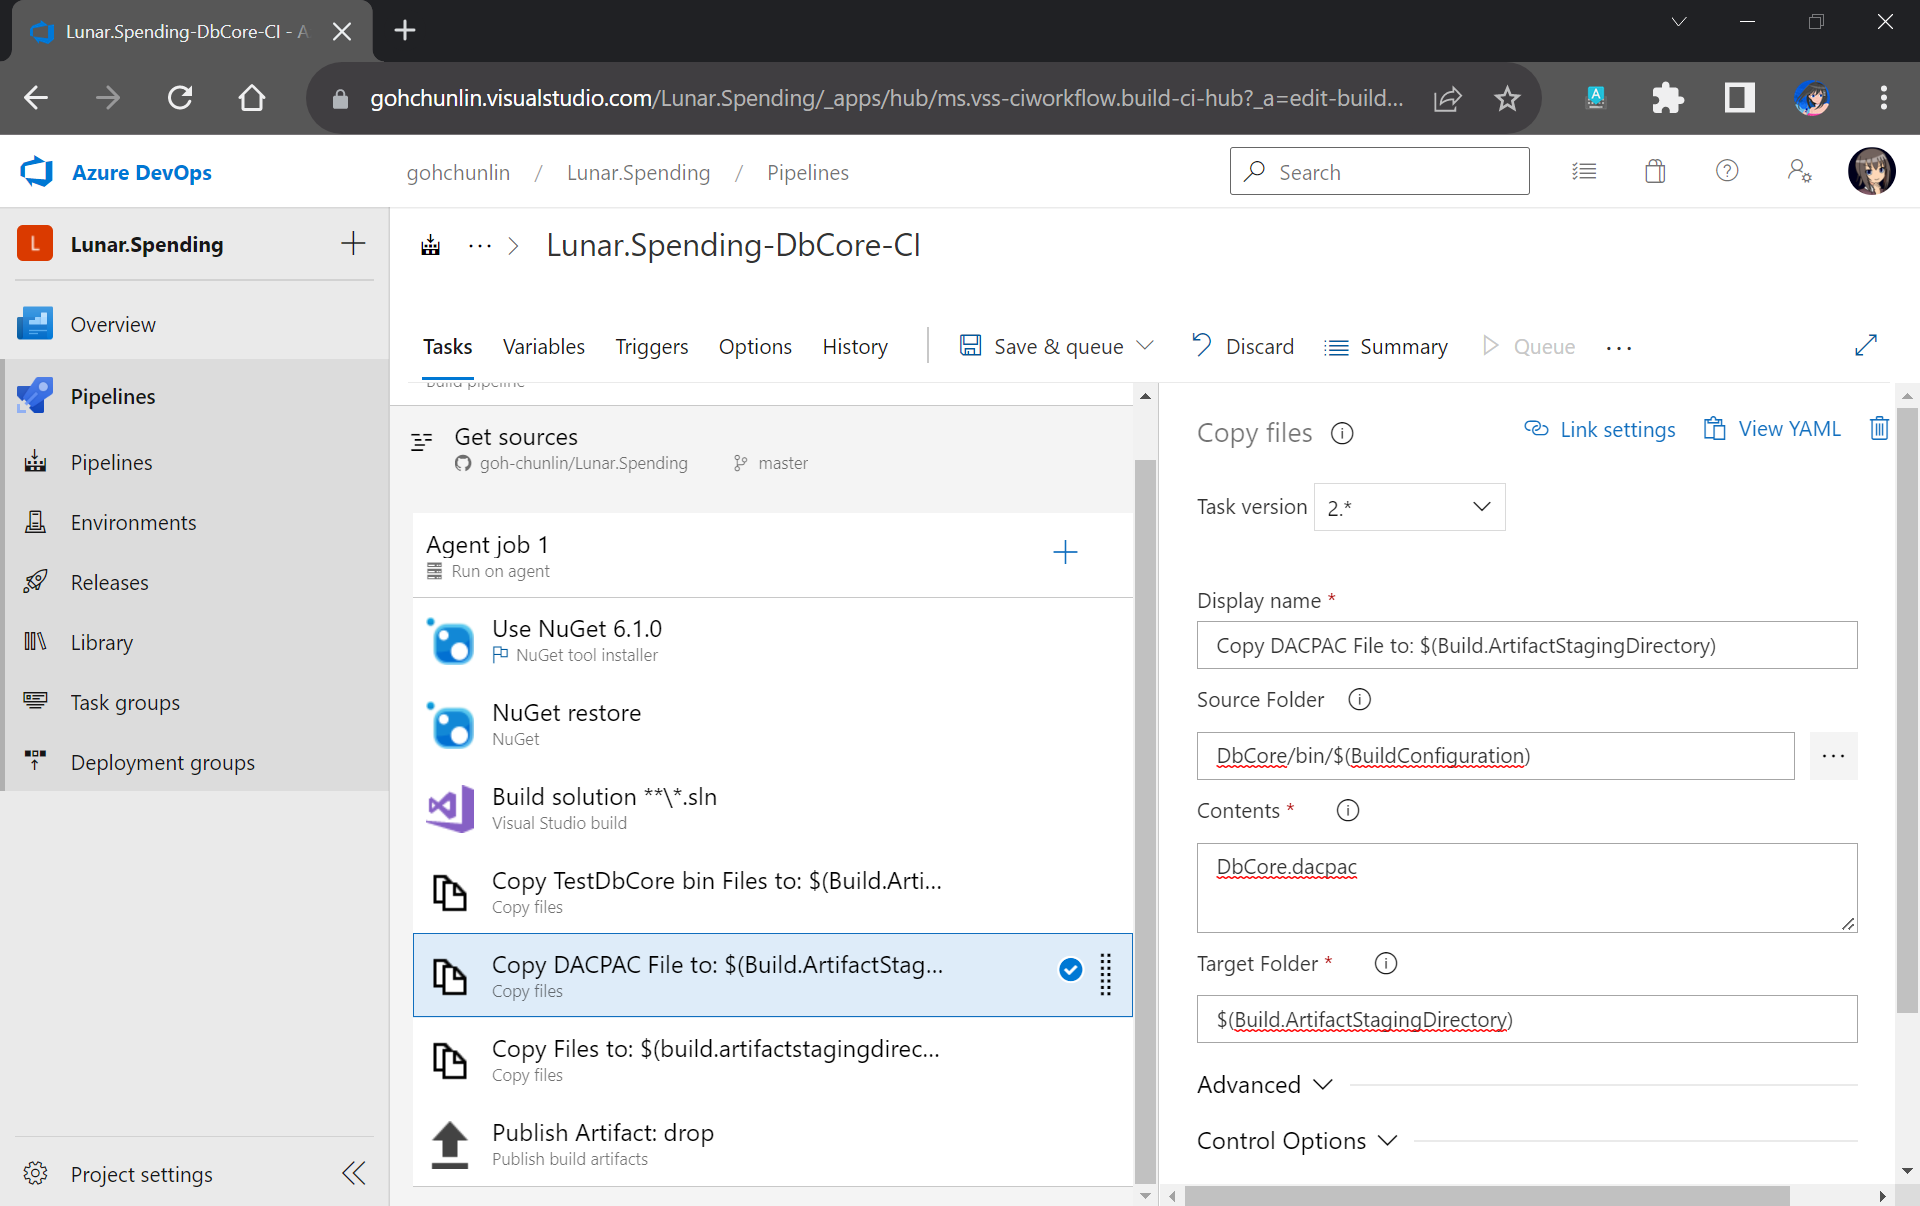
After that, we will add a new task to copy DACPAC file, which is generated during Build, to the Build Artifact, as shown in the following screenshot.
DACPAC file is needed to deploy our database to an existing instance of Azure SQL database.
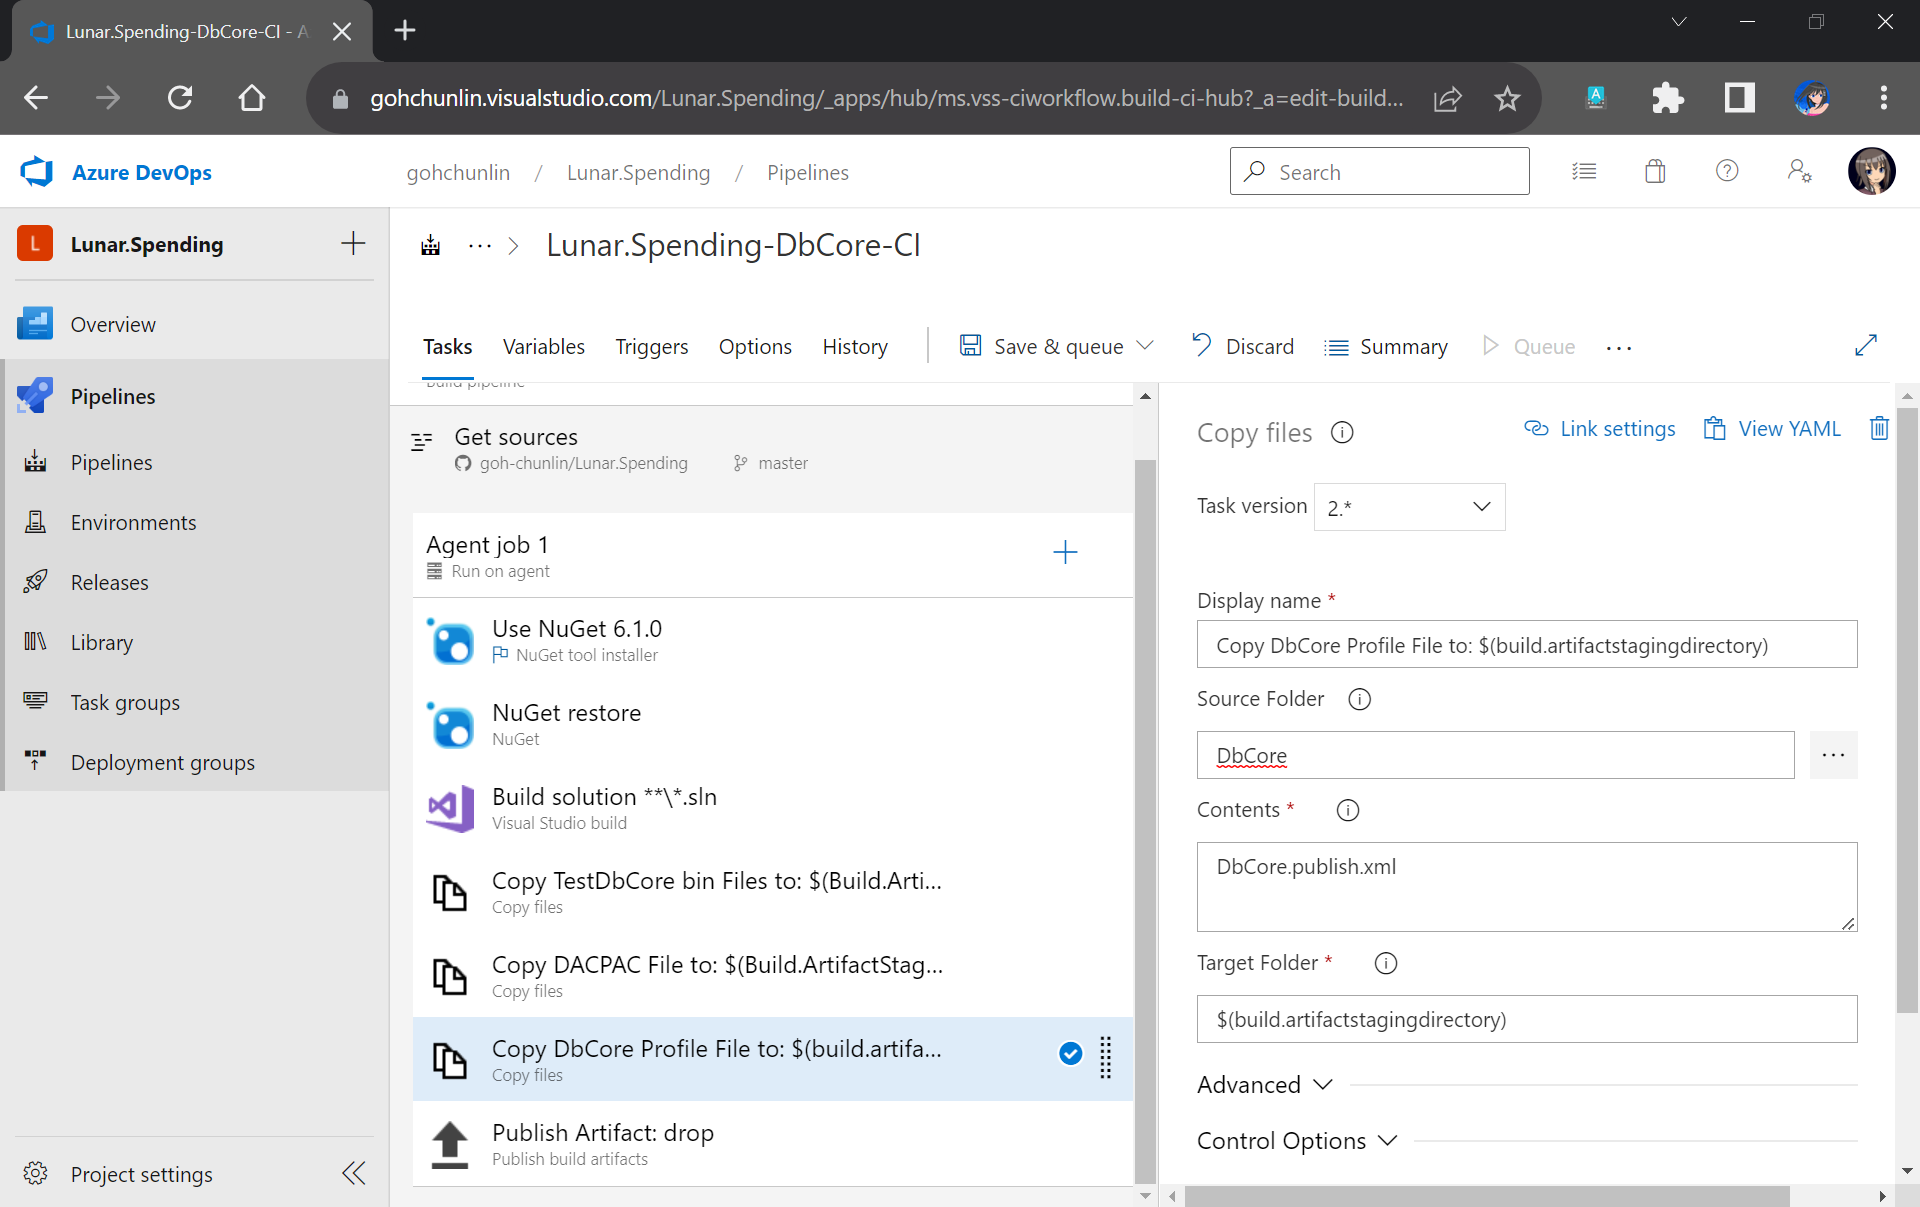
Another file we need to copy is our Database Profile. This is the reason why earlier we have to make sure the profile file needs to be in the source control.
The database publish profile needs to be copied to the Build Artifact directory as well.
There is nothing to change for the Publish Artifact task. So, we can now move on to enable the Continuous Integration for the Build Pipeline, as shown in the screenshot below.
We can enable the continuous CI under the Triggers section of our Build Pipeline.
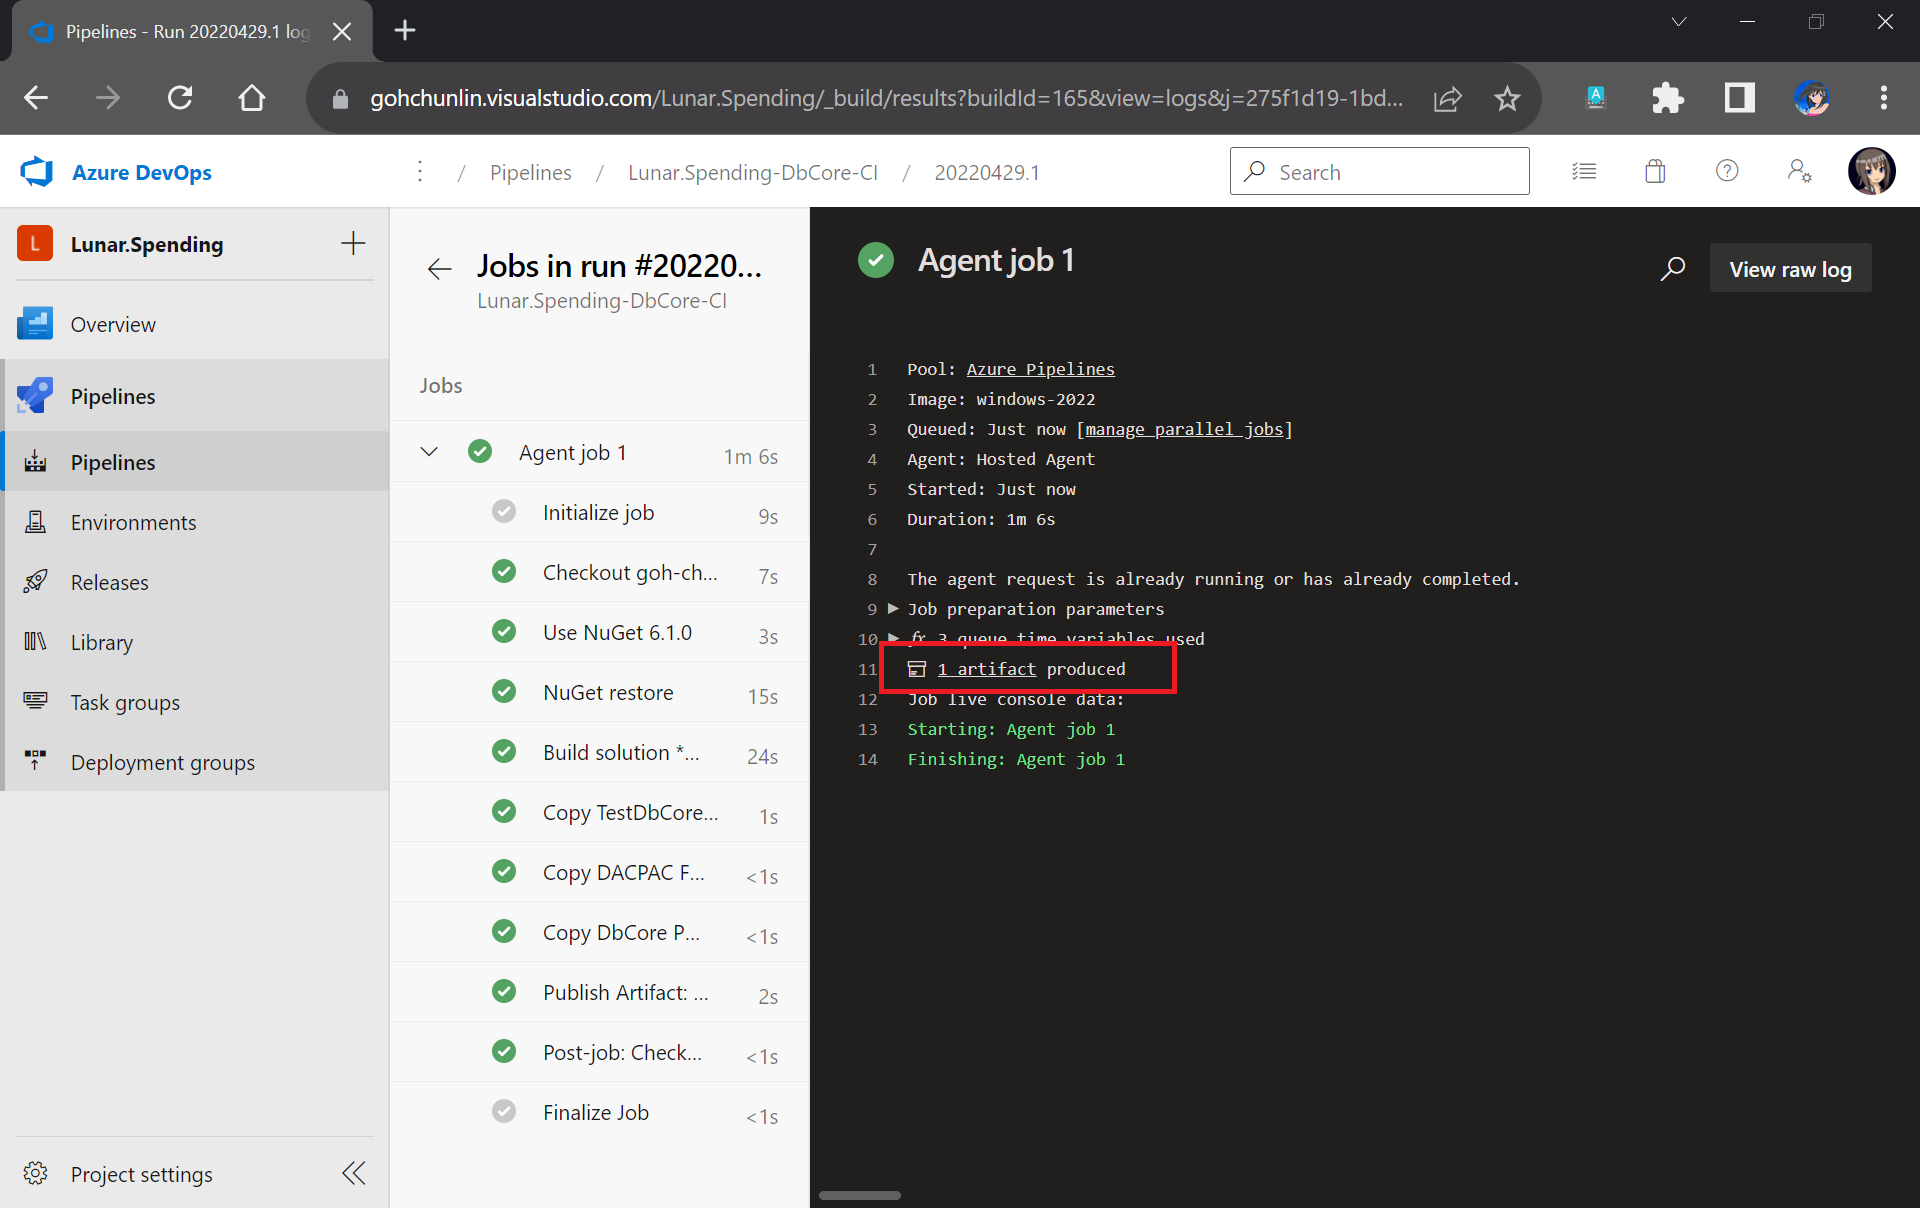
Finally, we can save and queue our Build Pipeline. If the build is successful, we will be able to see a Build Artifact produced, as shown in the screenshot below.
Build is successfully executed!
Setup Release Pipeline
In order to automatically deploy our database changes after the database project and unit test project are built successfully, we need to configure the Release Pipeline.
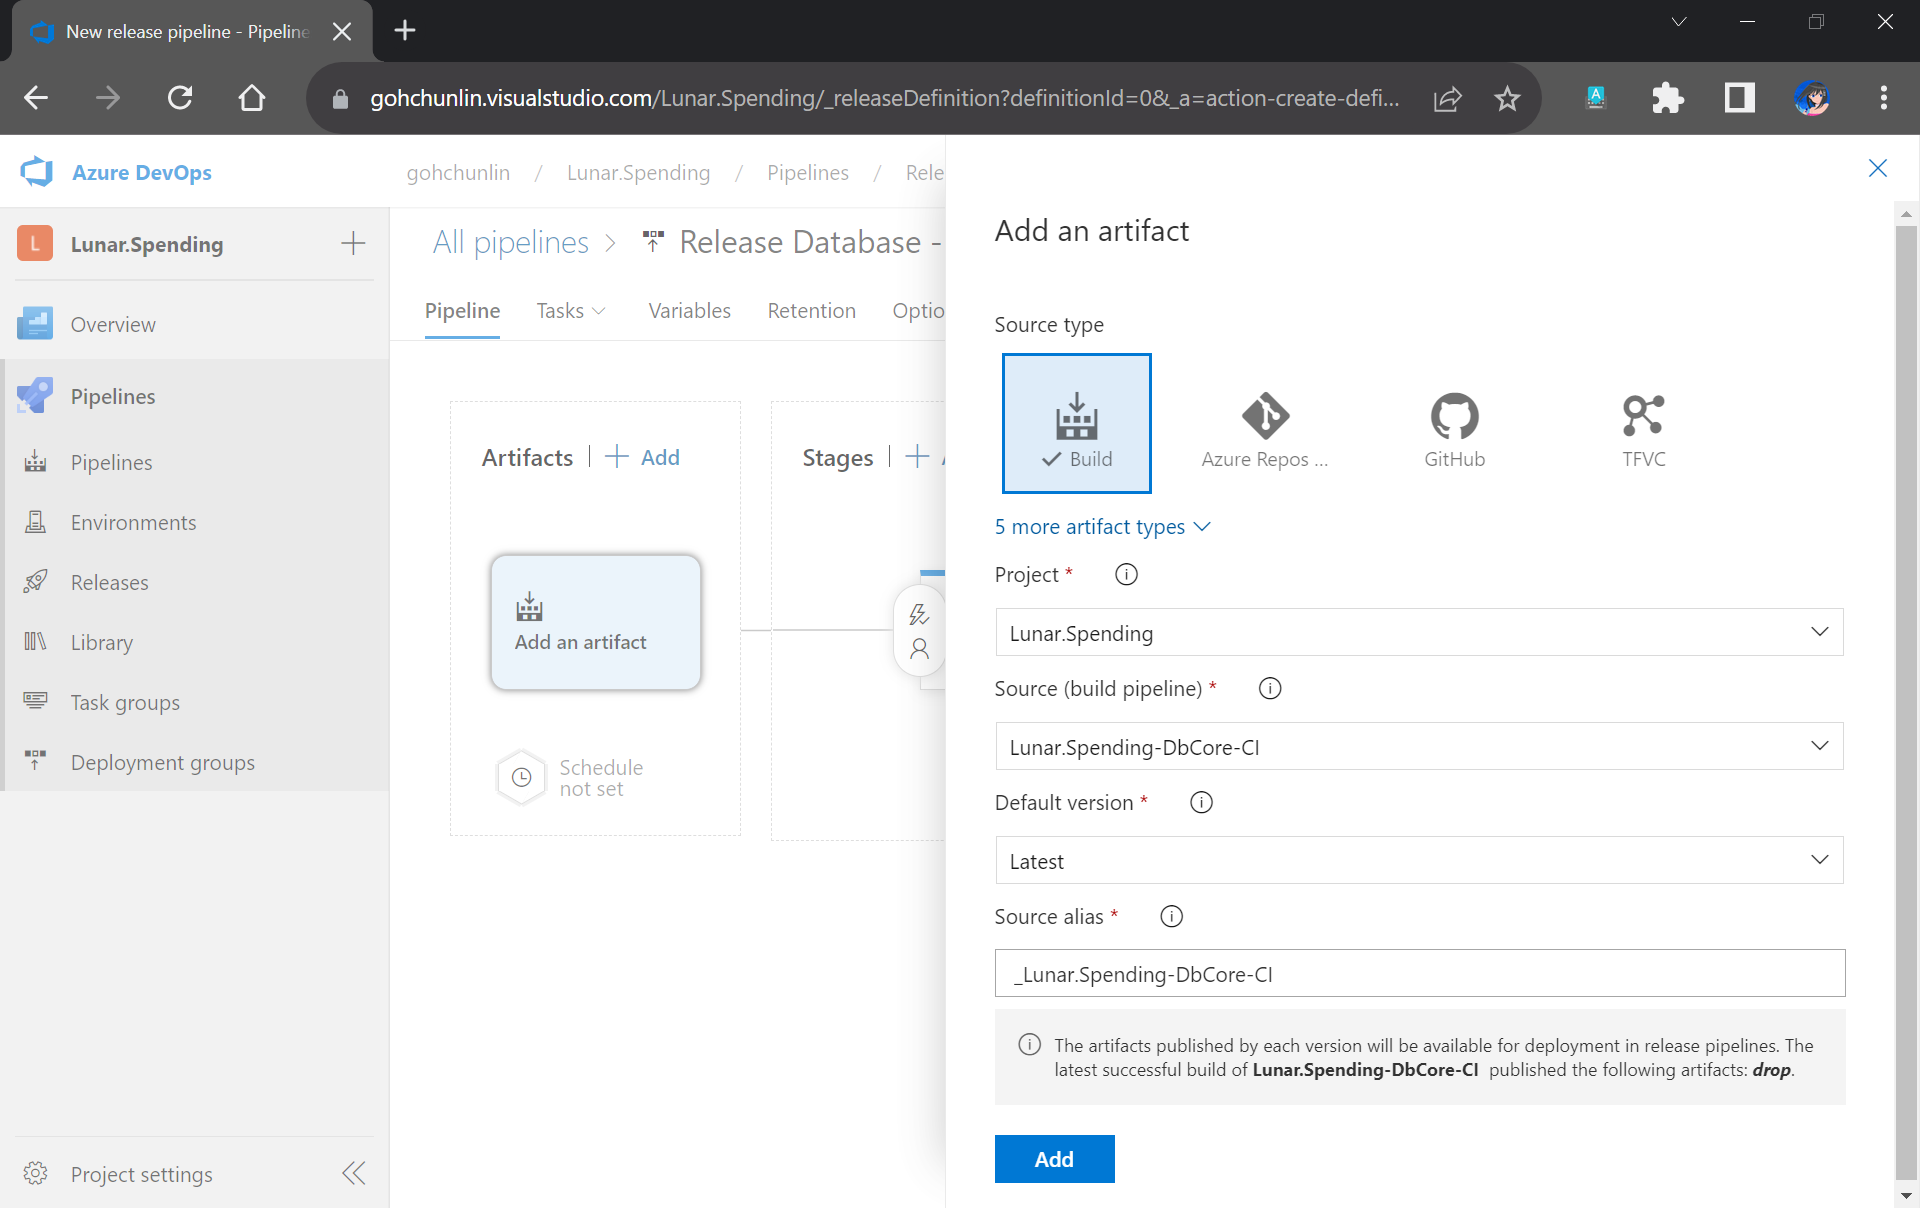
First of all, we need to integrate our Build Pipeline with this new Release Pipeline, as demonstrated in the following screenshot.
Adding the Build Artifact generated earlier in the Build Pipeline.
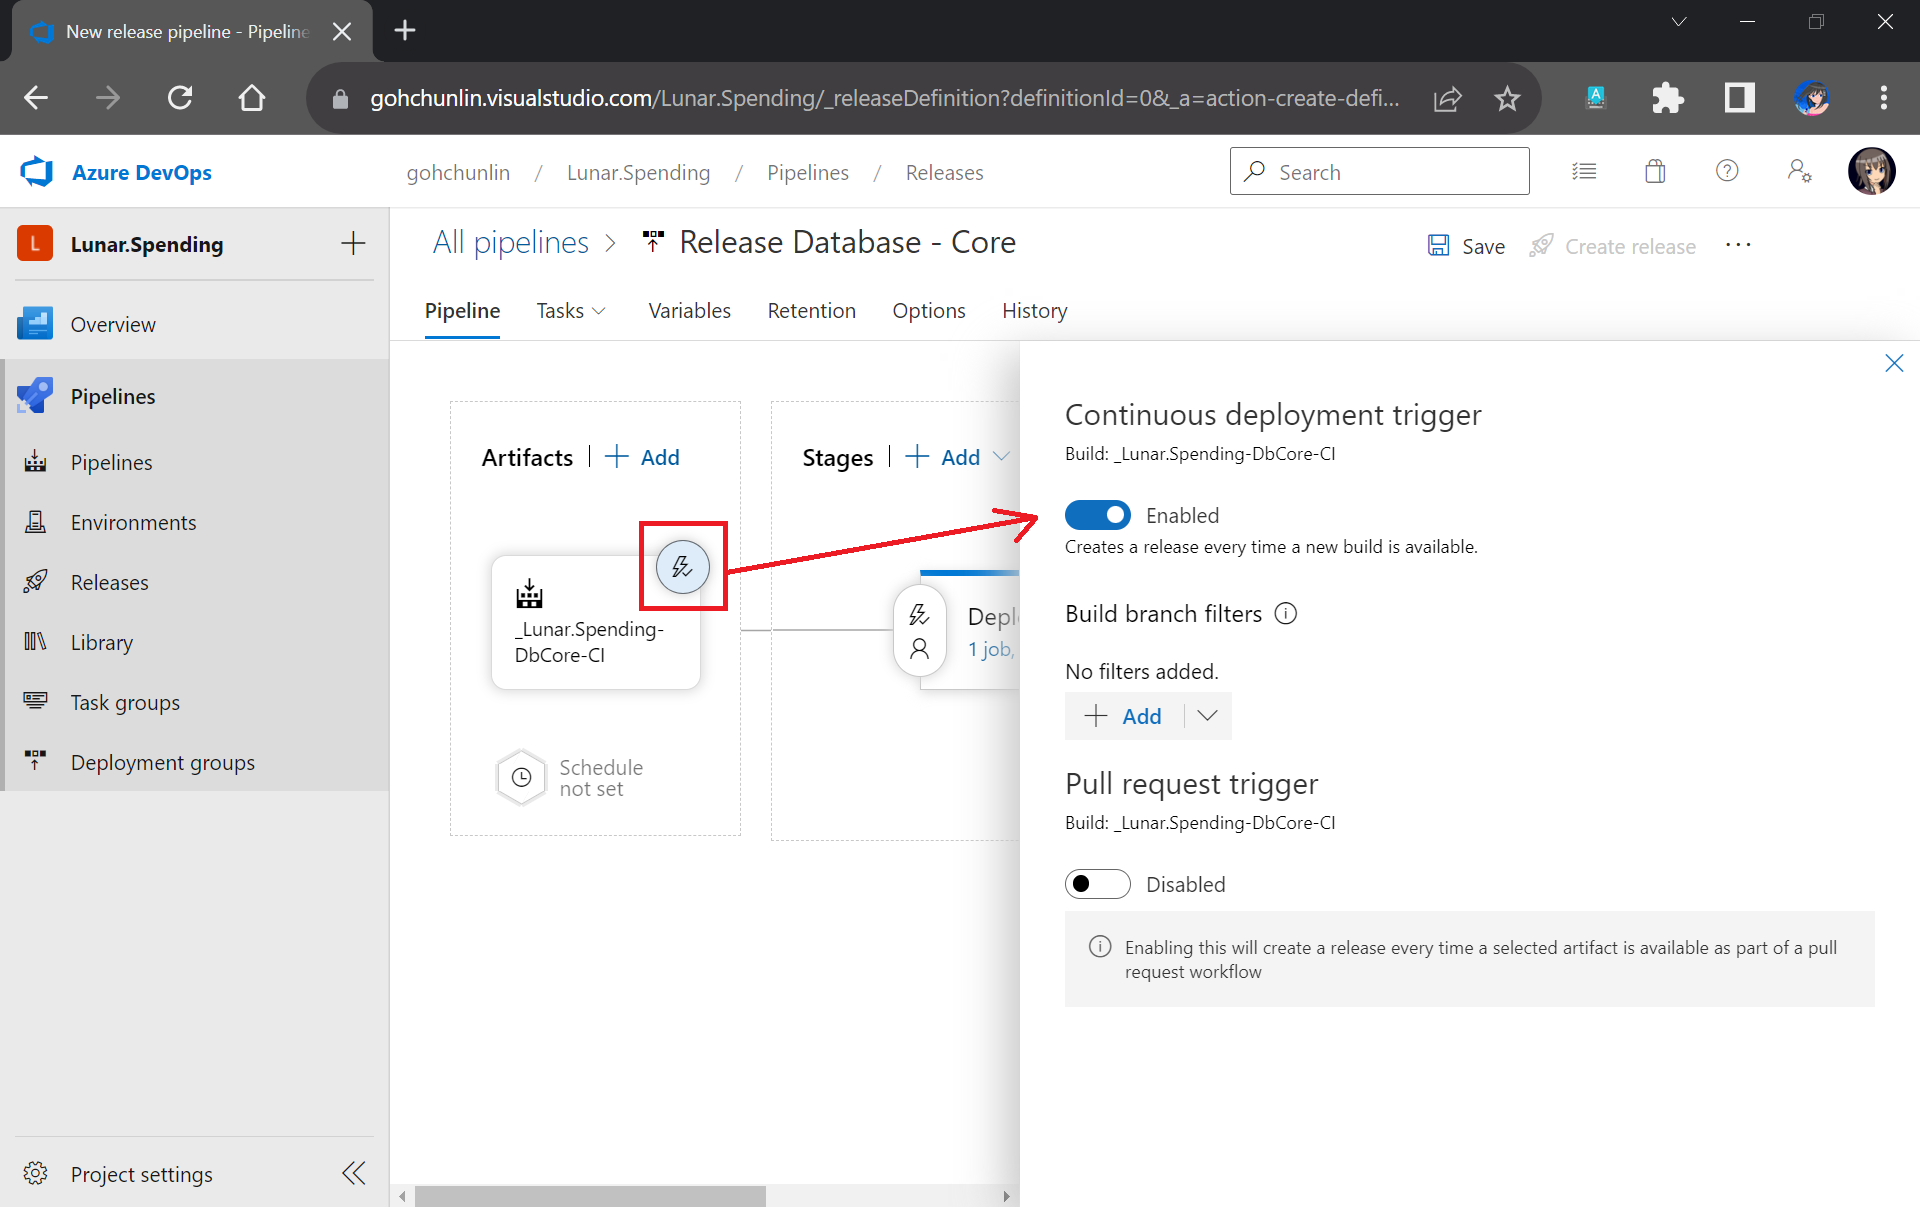
Next, we can enable the Continuous Deployment, as shown in the screenshot below. This is to make sure that we can deploy the database changes and test them automatically right after the build is completed successfully.
Enabling CD in our Release Pipeline.
Now, we can move on to configure the tasks in the stage. Here, I have renamed the stage as “Deploy DbCore”. To be consistent with the Build Pipeline, here we will be using “windows-2022” as the agent in our Release Pipeline too.
Please update to use windows-2022 as our agent or else there would be issues later.
The first task will be deploying database changes to Azure SQL with the task “Azure SQL Database deployment”. In the task, we need to select our Azure subscription and provide our Azure SQL database admin login credential so that the database changes can be deployed to Azure SQL on our behalf.
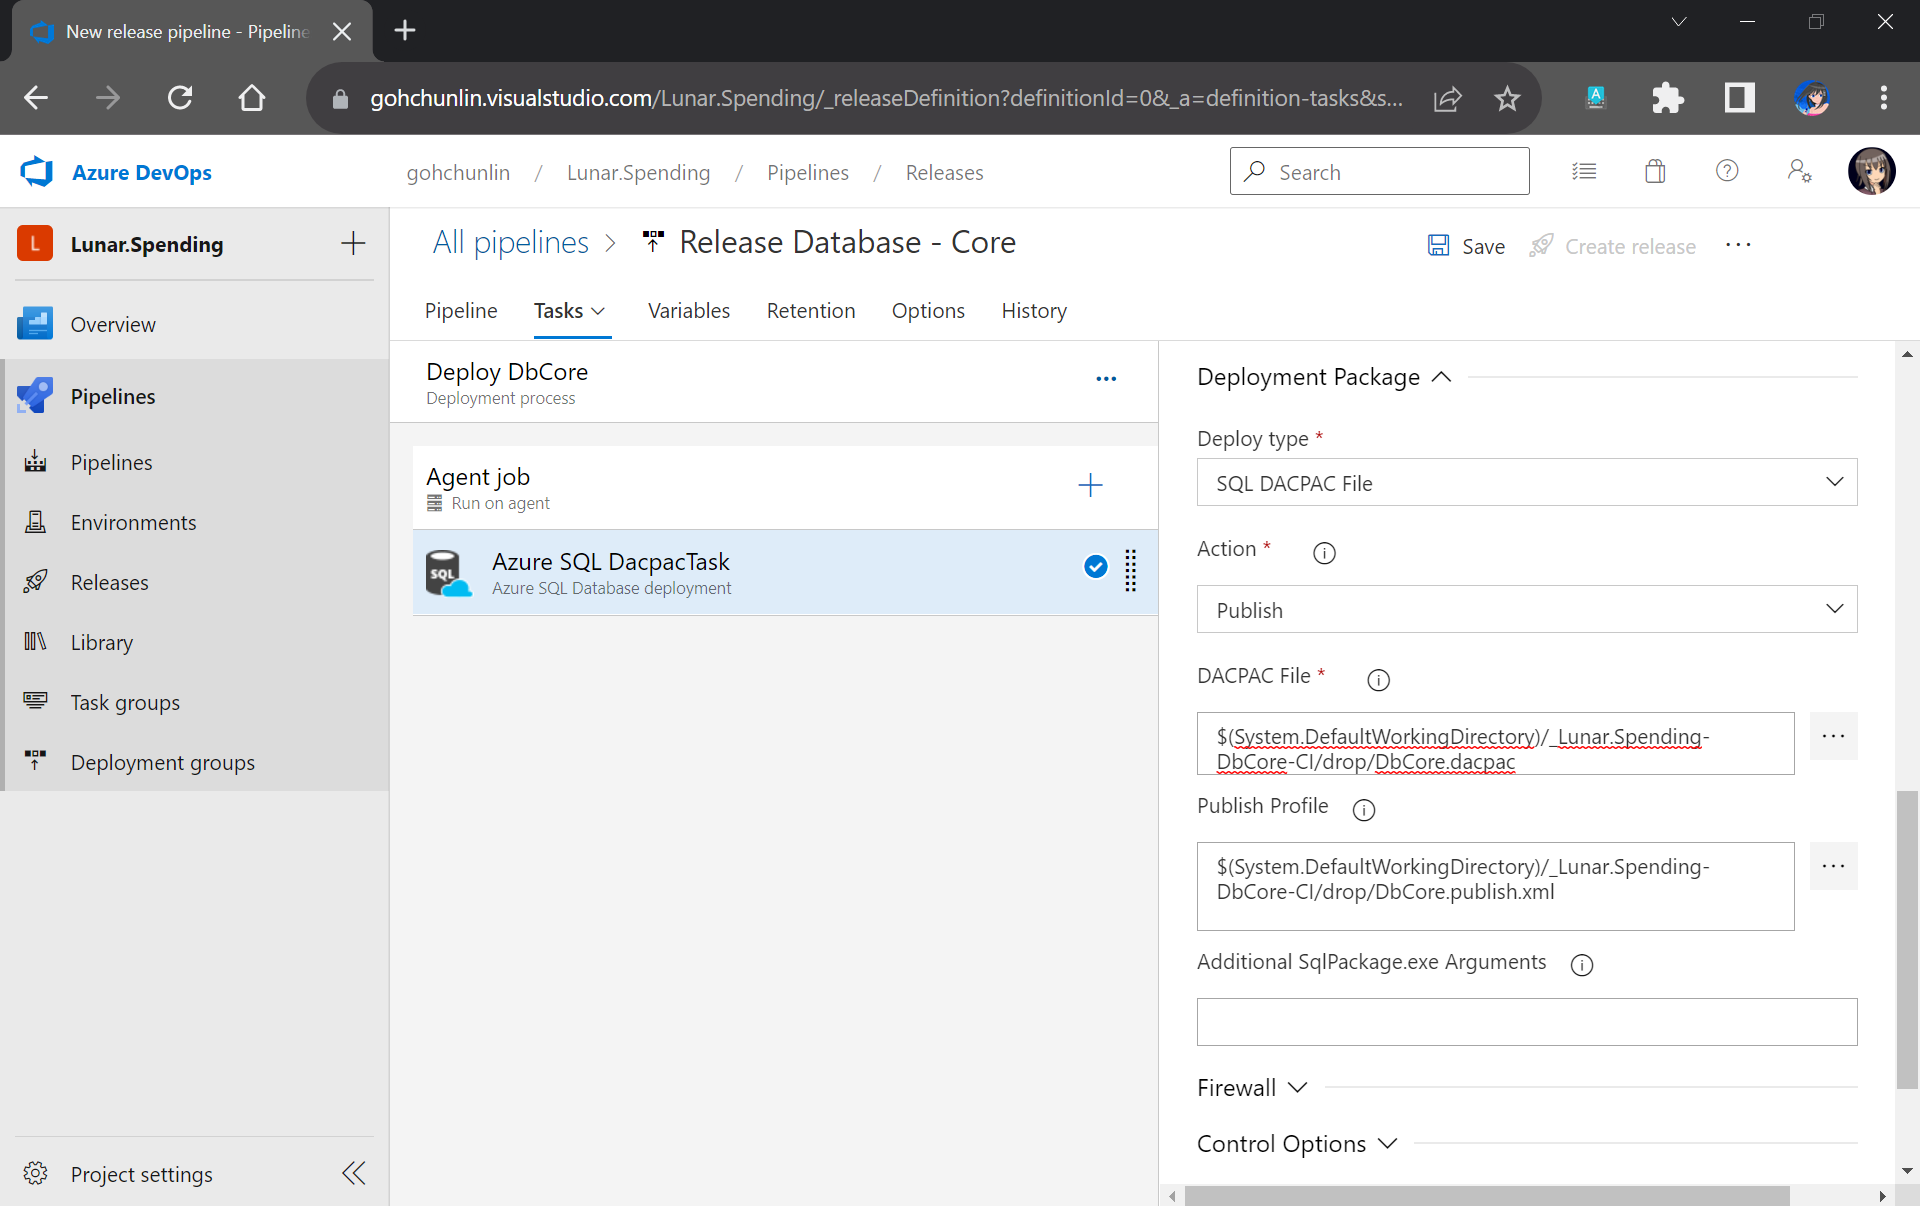
In the same task, under the Deployment Package section, we need to state that we will be deploy with a DACPAC file. This is also where we will use the DACPAC file and publish profile file in the Build Artifact.
Setting up the deployment package.
Next, we will run into a problem. We are supposed to add the testing task next. However, connection strings to the database are needed. So how could we securely store the connection strings in our pipeline?
After committing this change to our GitHub repo, we will specify the actual connection string in the Pipeline Variables section under the same name as the token. Since we use TestDbCoreConnection as our token label, the variable is thus called TestDbCoreConnection as well, as shown in the screenshot below.
Storing the actual database connection string in the Pipeline Variables of our Release Pipeline.
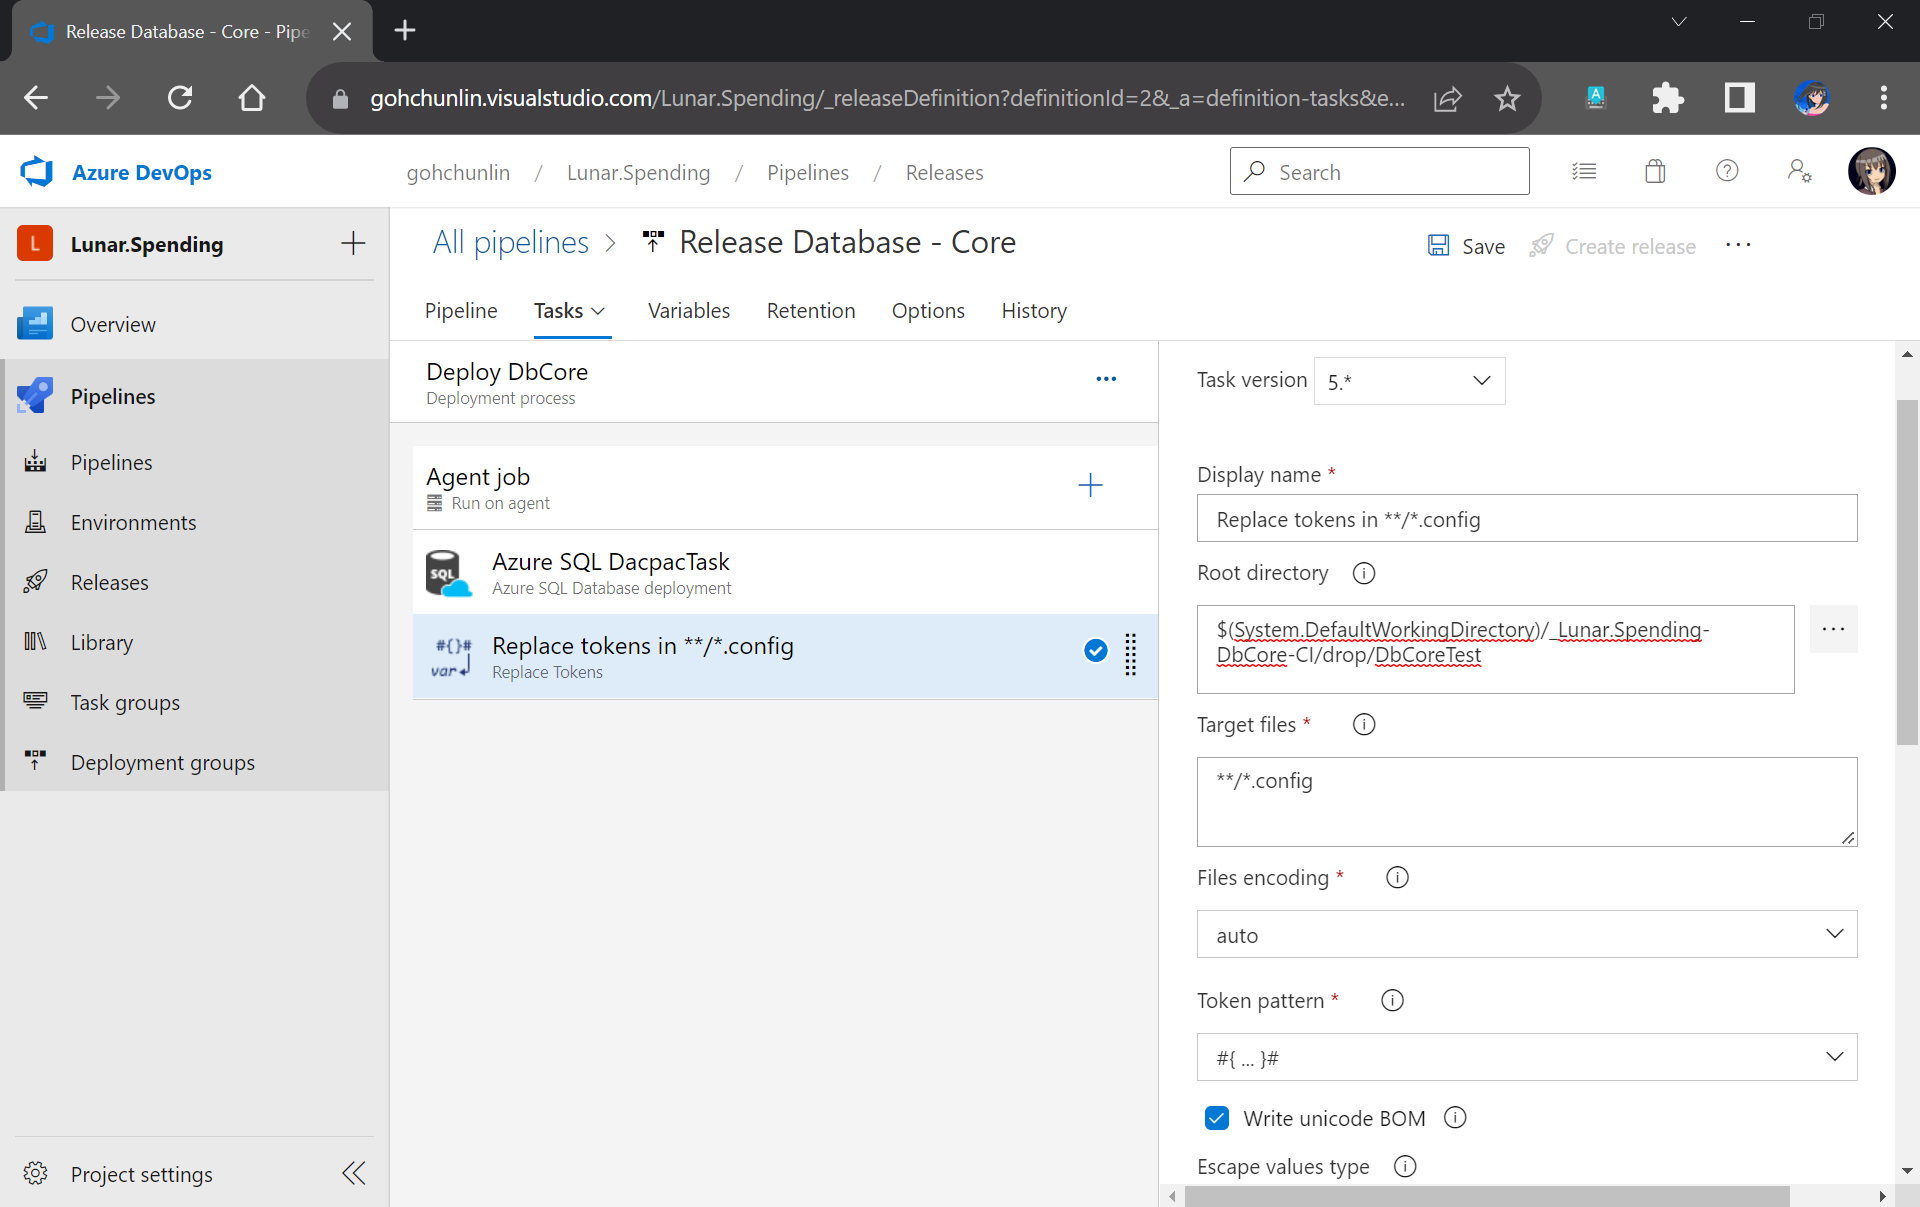
Previously we have moved the TestDbCore bin/Release folder to the Build Artifact. In fact, app.config, which is renamed to TestDbCore.dll.config, is in the folder as well. Hence, we can locate the config file easily by pointing the task to the Build Artifact accordingly, as demonstrated in the screenshot below.
We will only need to specify the Root Directory of where our TestDbCore.dll.config is located.
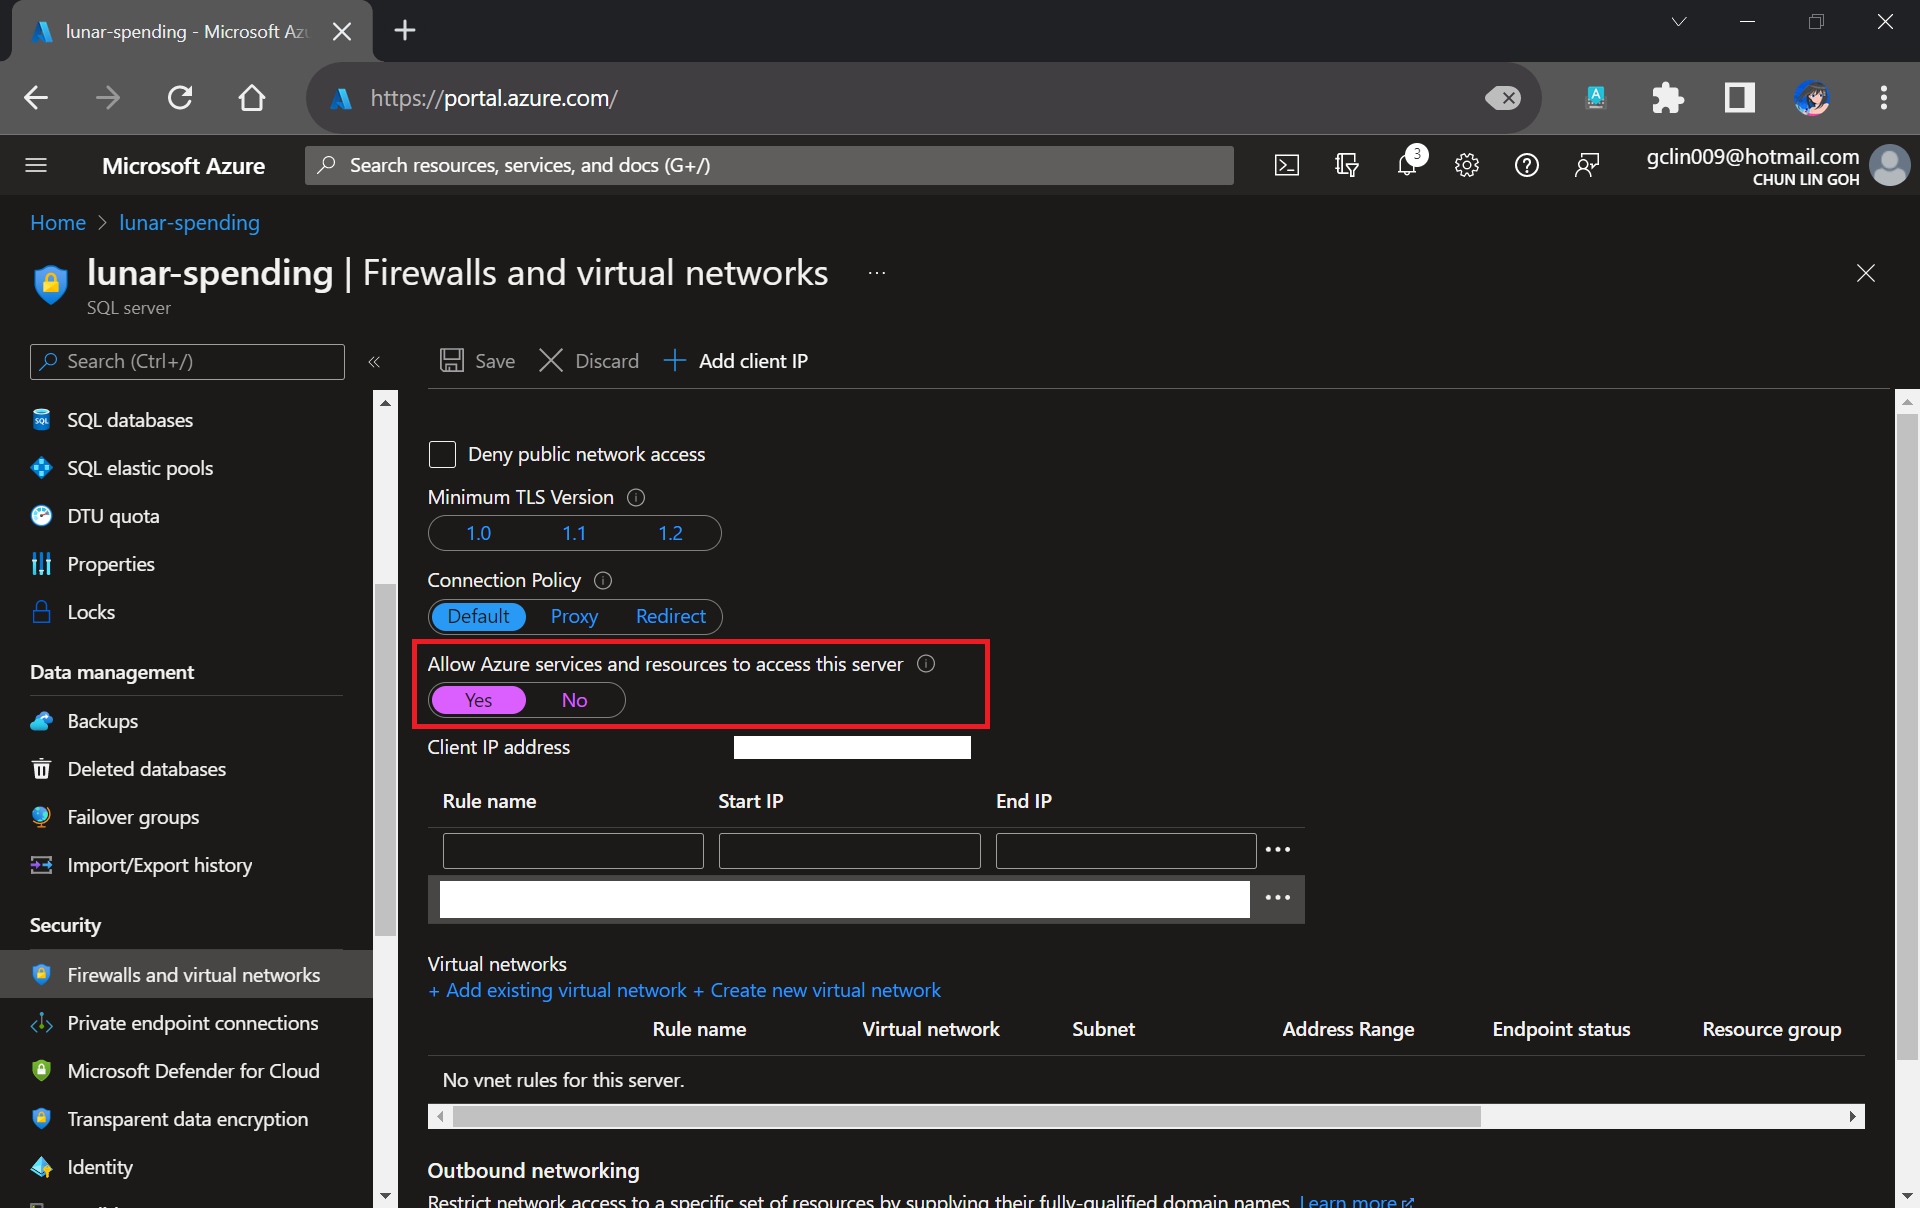
Please take note that since our unit tests need to test the Azure SQL database specified in the connection string, we need to allow Azure services and resources to access our Azure SQL server by configuring its firewall, as shown in the following screenshot. Otherwise, all our unit tests will fail because the Azure SQL server cannot be reached.
Interestingly, the Azure AQL Database deployment task will still be executed successfully even though we do not allow the access mentioned above.
We need to allow Azure services and resources to access the relevant Azure SQL server.
With the actual connection string in place, we can now add our Visual Studio Test (2.*) task back to execute our unit test.
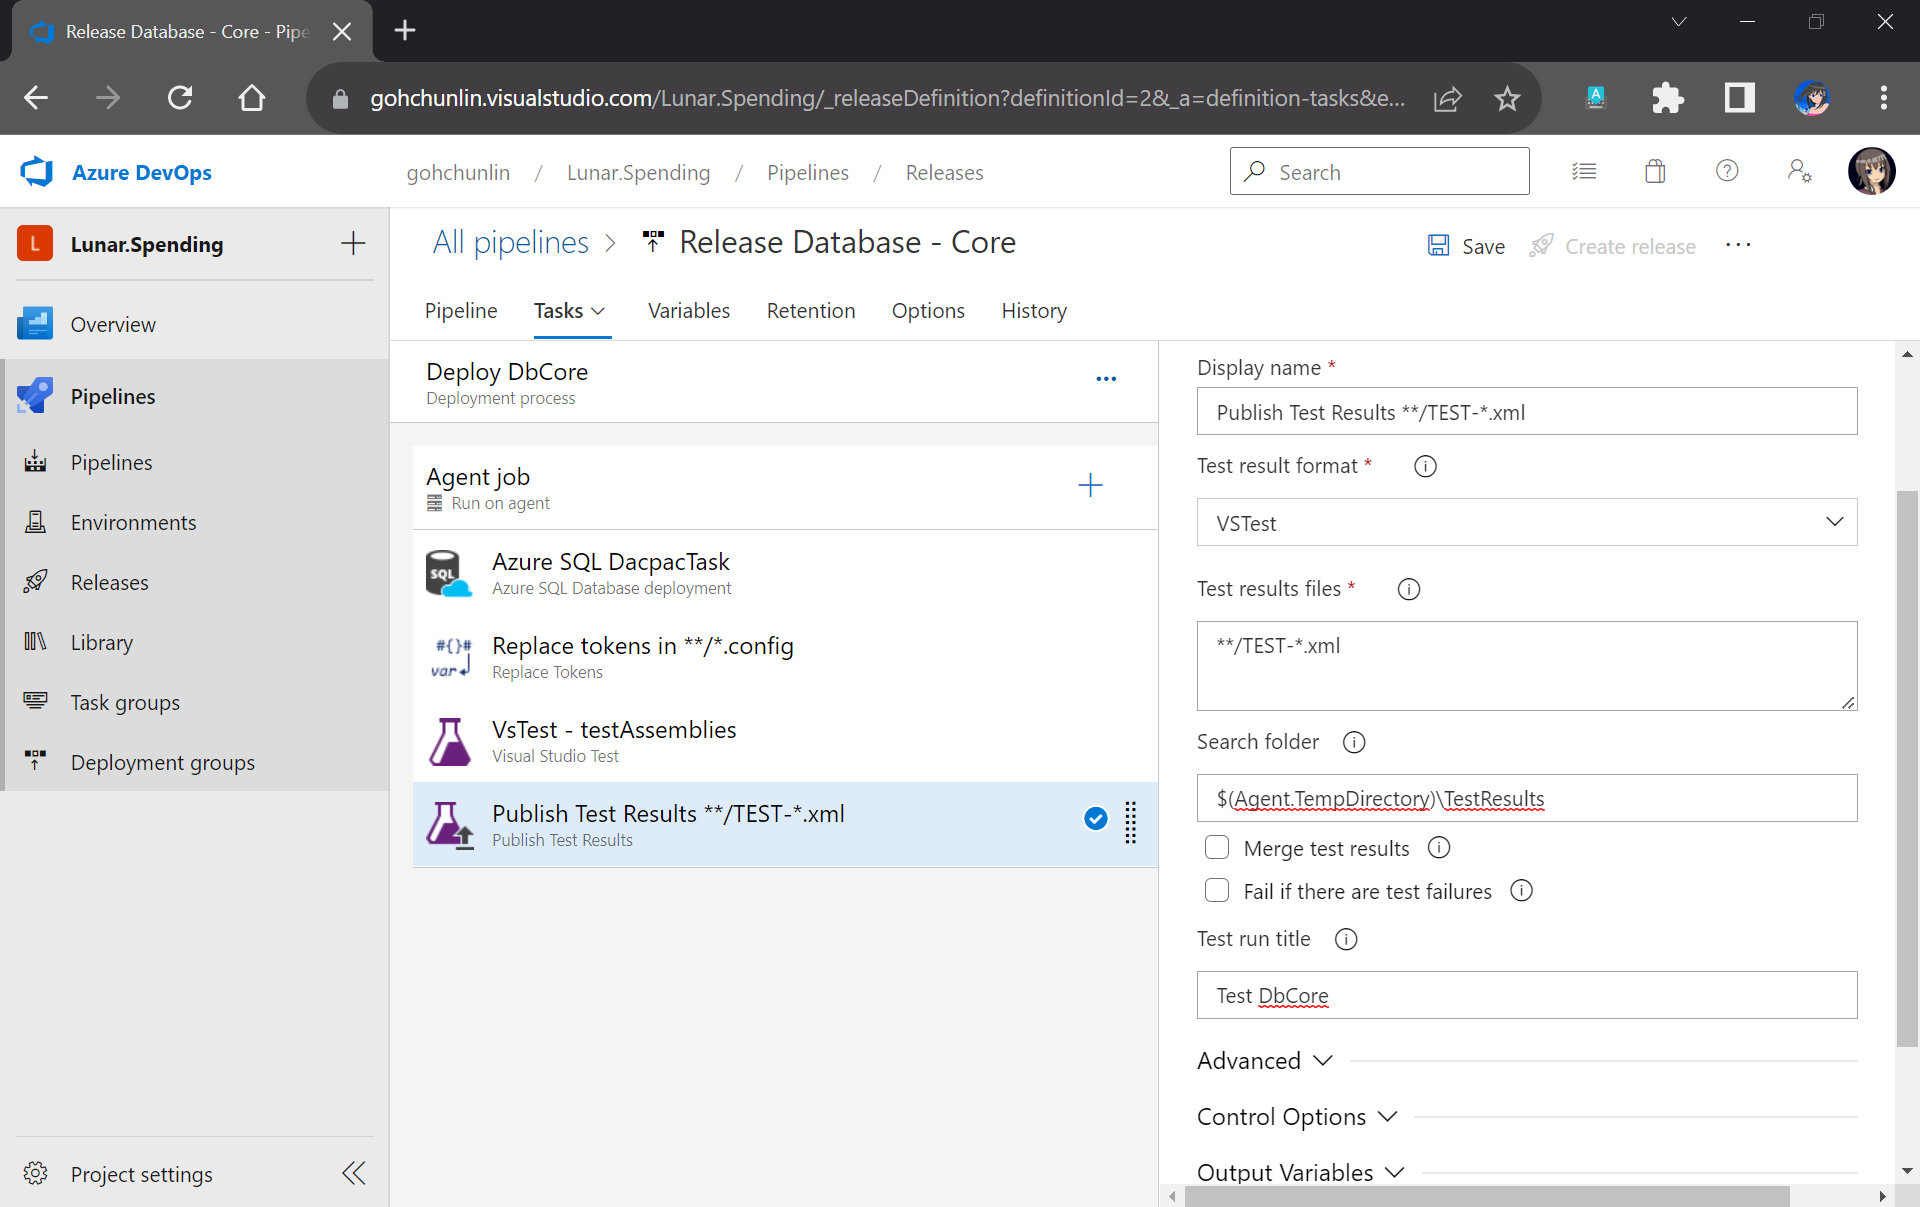
We have our test files in the folder DbCoreTest in the Build Artifact as we designed earlier in the Build Pipeline. Hence, we simply need to point the Search Folder of the Visual Studio Test task to the folder accordingly.
Setting up Visual Studio Test to run our unit test for our stored procedures.
You may have noticed that the test results will be stored in a folder called $(Agent.TempDirectory)\TestResults. So, let’s add our last task of the stage which is to publish the test results.
We will need to specify that our test results are generated by VSTest. Aftervthat, we point the task to look for test results in the $(Agent.TempDirectory)\TestResults folder. Finally, we name our test run.
We can publish our test results to the Release Pipeline.
That’s all! Please remember to save the Release Pipeline changes.
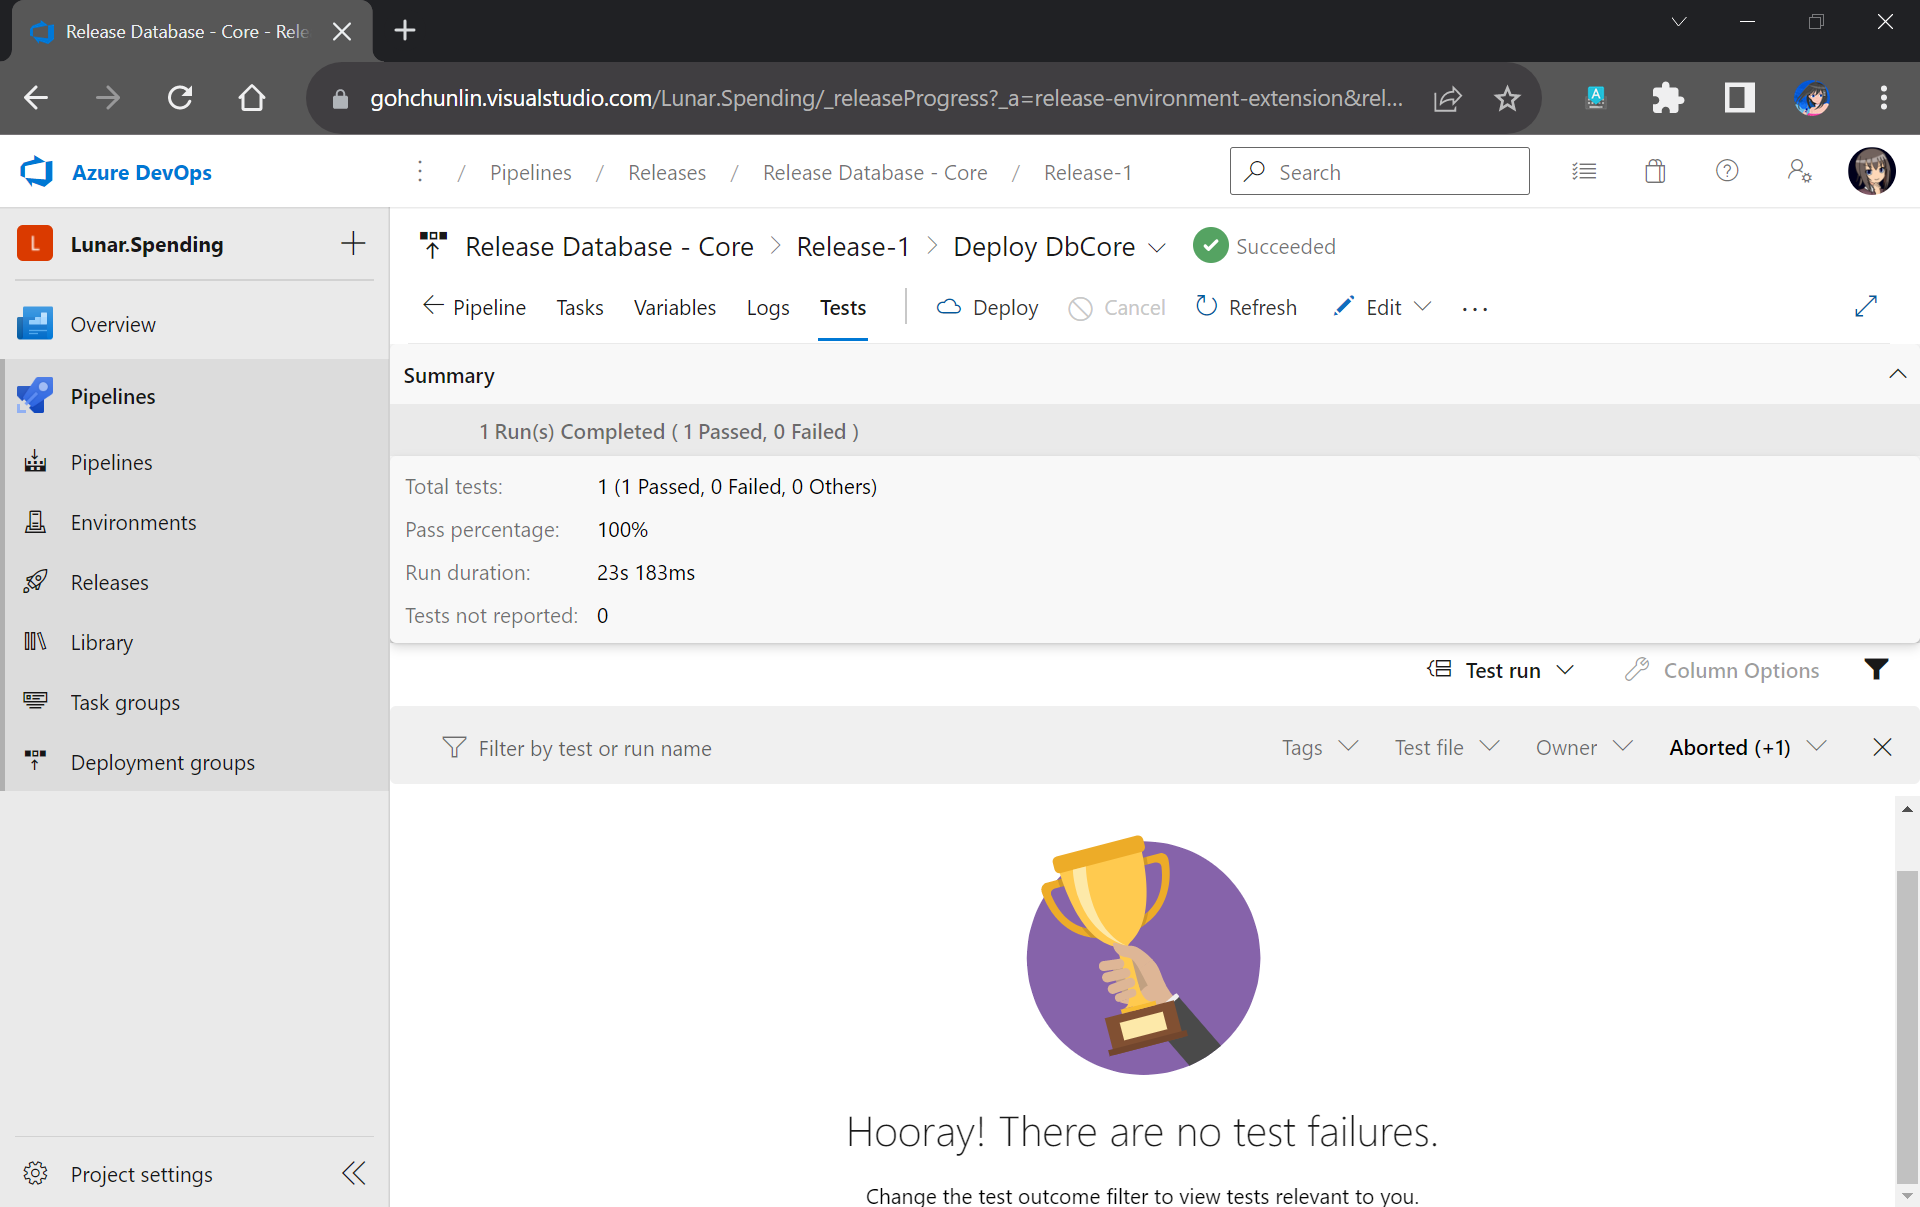
Now when there is a new build completed, the Release Pipeline will be automatically triggered. Once it is completed, not only our database on Azure SQL will be updated accordingly, but also we will have a detailed test result. For example, when all of our unit tests have passed, we will get a test result as shown below.
If all tests have passed, we will receive a trophy. 🙂
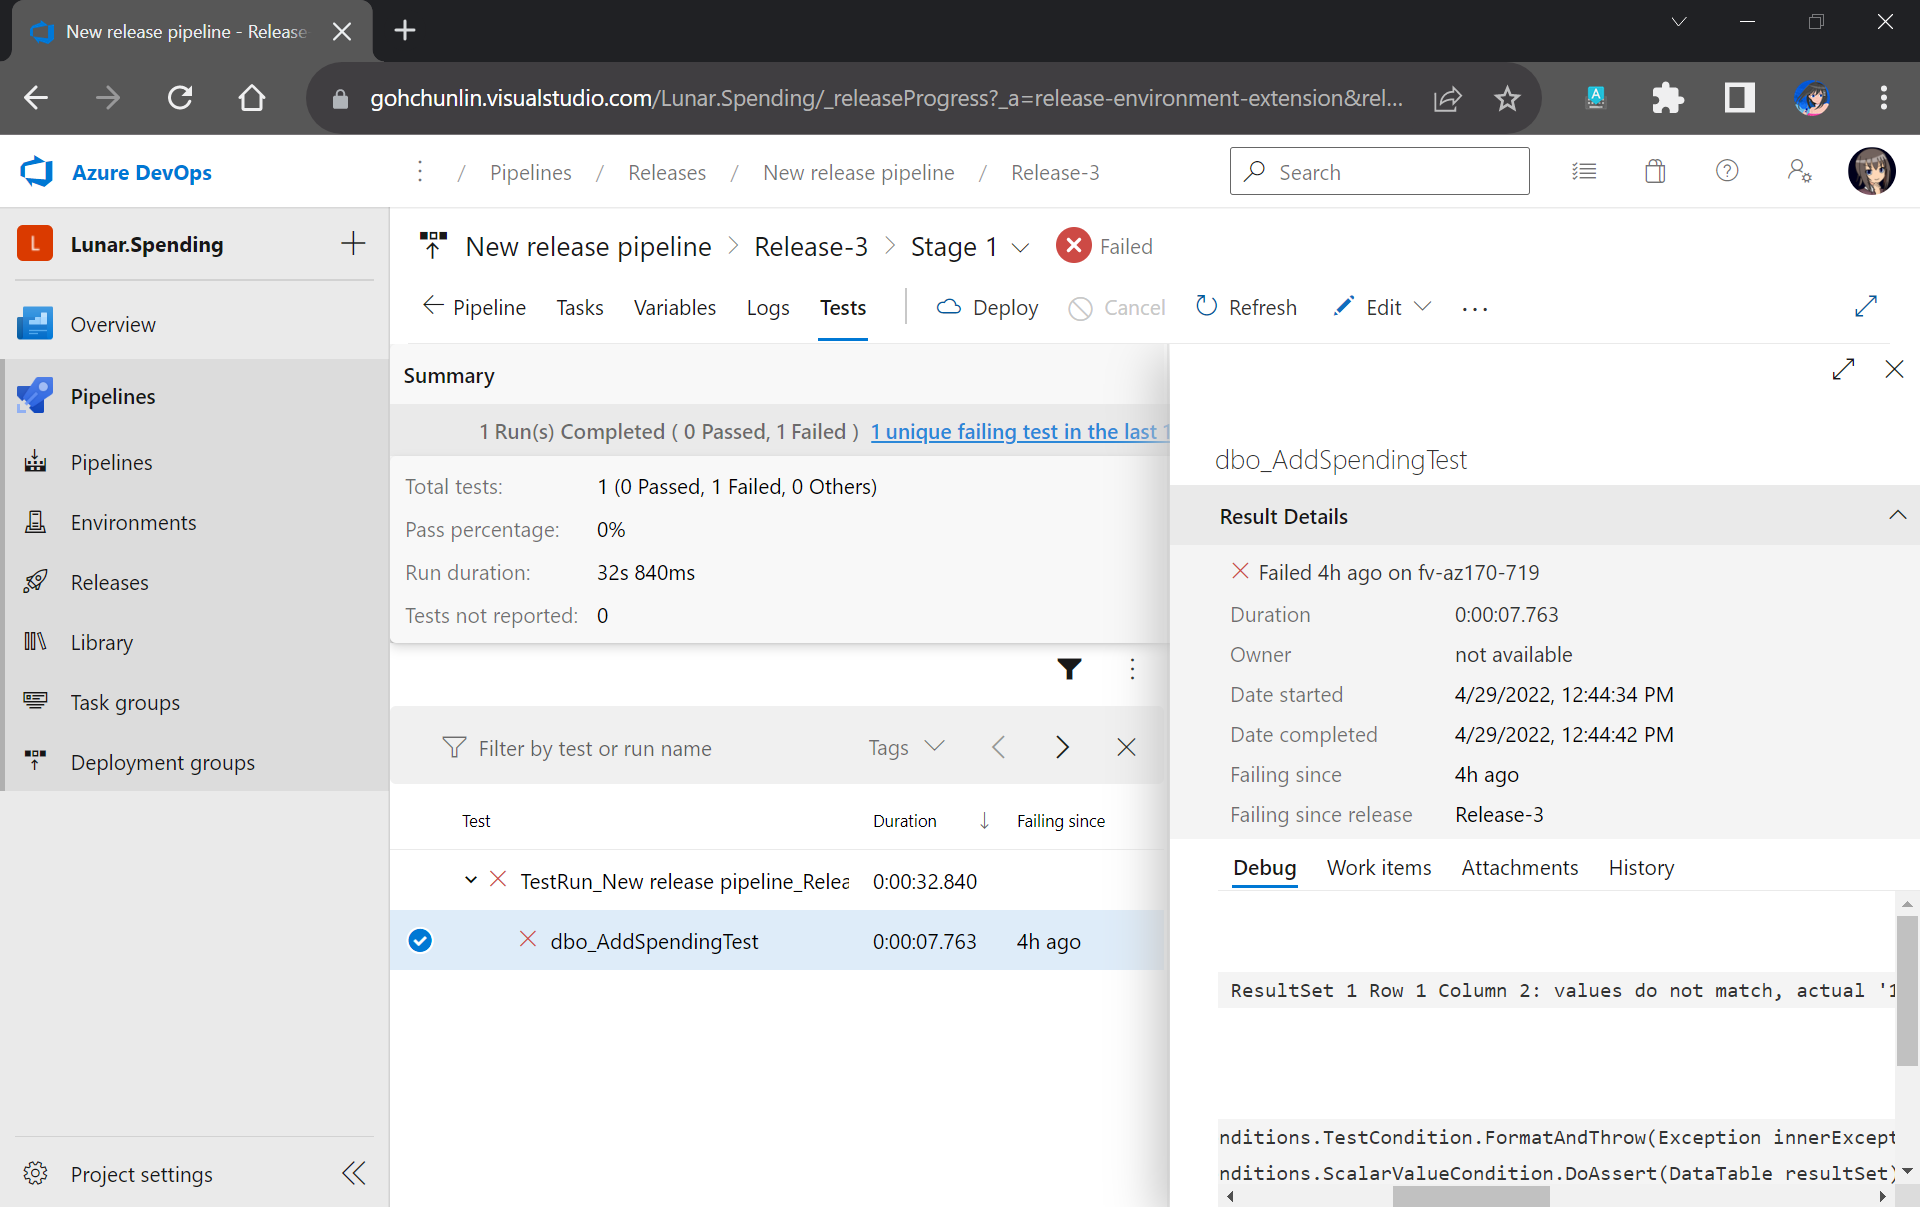
However, if there is one or many tests fail, we can easily locate the failed tests easily in the report.
This shows that our stored procedure dbo_AddSpendingTest has issues which need our attention.
That’s all for a simple walkthrough from writing unit tests for stored procedures to automatically deploying and testing them with Azure DevOps CI/CD pipelines.
Few days ago, my teammate would like to learn how to use MS SQL Server. However, he only has a Macbook and MS SQL Server doesn’t run on macOS. Hence, I decided to write him a quick setup guide on how to do that with the help of container.
🎨 Microsoft introduced SQL Server on Linux in 2016. 🎨
Docker
We need to run Docker on our Mac machine. Since my teammate is new to Docker, he can simply choose a rather straight-forward path for this, which is to use Docker Desktop on Mac. Kindly take note of the system requirement before proceed to install it.
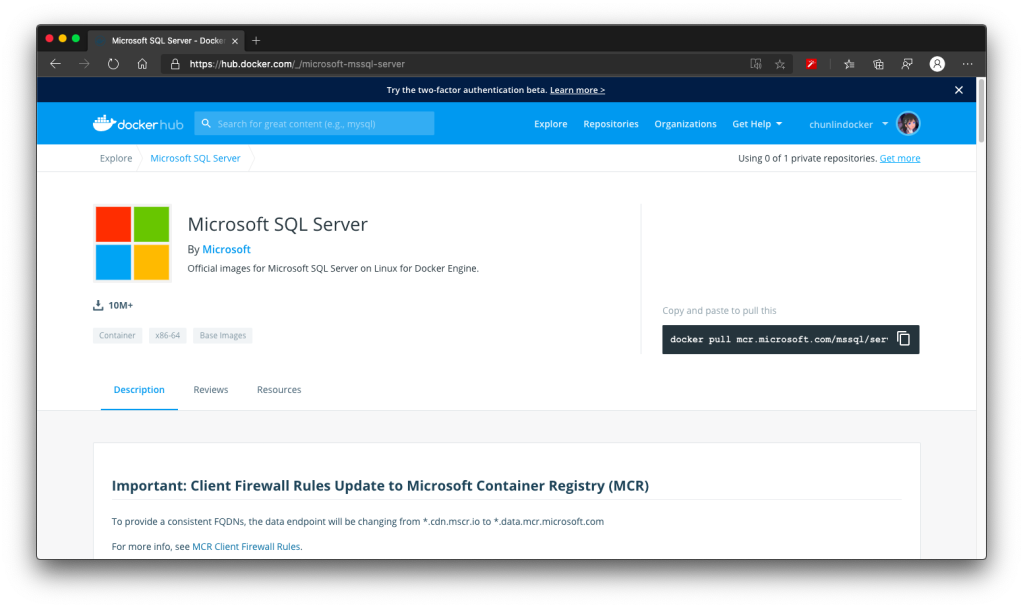
Once the Docker is up and running, we can proceed to pull the image of SQL Server 2019 from the Docker Hub.
We can run the following command in Terminal window to start the database server. Here we are using 1501 as the port. Take note that, we need to replace the password with our password which meets the following guideline:
at least 8 characters;
including uppercase, lowercase letters, base-10 digits and/or non-alphanumeric symbols.
In the command above, there are two environment variables.
Firstly, it is the environment variable “ACCEPT_EULA”. Setting it to Y means that we accept the End-User Licensing Agreement of the product. So far I still couldn’t find the EULA of the Microsoft SQL Server 2019. If you know, please drop me a message in the comment section. Thanks!
Secondly, it is the “SA_PASSWORD” which is used to set the password that we will later use to connect to the SQL server later as the database admin (userid = “sa”).
Actually, there is another environment variable which is not set here. It is the MSSQL_PID, i.e. the product ID of the SQL Server. By default, it is the Developer edition. If we would like to use Express or Enterprise edition, we can specify it here.
To visualise and manage our data in the databases, we need to use tools such as SQL Server Management Studio (SSMS). However, SSMS is only for Windows (AMD or Intel). So, on macOS, we have to choose another cross-platform alternative, which is Azure Data Studio. Azure Data Studio is usable on Windows and Linux too.
Now we can connect to the SQL Server from Azure Data Studio as shown below. Take note that the Server is “localhost,1501” and it is using comma, not dot, between the word localhost and the port number.
🎨 Connecting to the Microsoft SQL Server from Azure Data Studio. 🎨
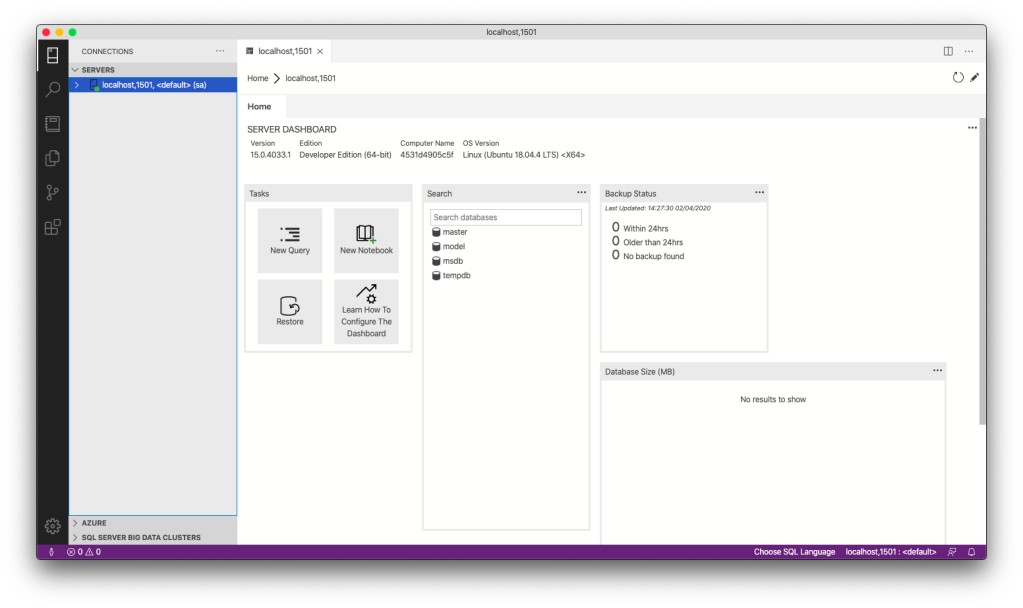
If the connection is successful, we shall be able to see the Server Dashboard as shown below.
🎨 Server Dashboard in Azure Data Studio. 🎨
That’s all. Now we can have MS SQL Server running on our Mac machine for local testing and development.
KOSD, or Kopi-O Siew Dai, is a type of Singapore coffee that I enjoy. It is basically a cup of coffee with a little bit of sugar. This series is meant to blog about technical knowledge that I gained while having a small cup of Kopi-O Siew Dai.