KOSD, or Kopi-O Siew Dai, is a type of Singapore coffee that I enjoy. It is basically a cup of coffee with a little bit of sugar. This series is meant to blog about technical knowledge that I gained while having a small cup of Kopi-O Siew Dai.
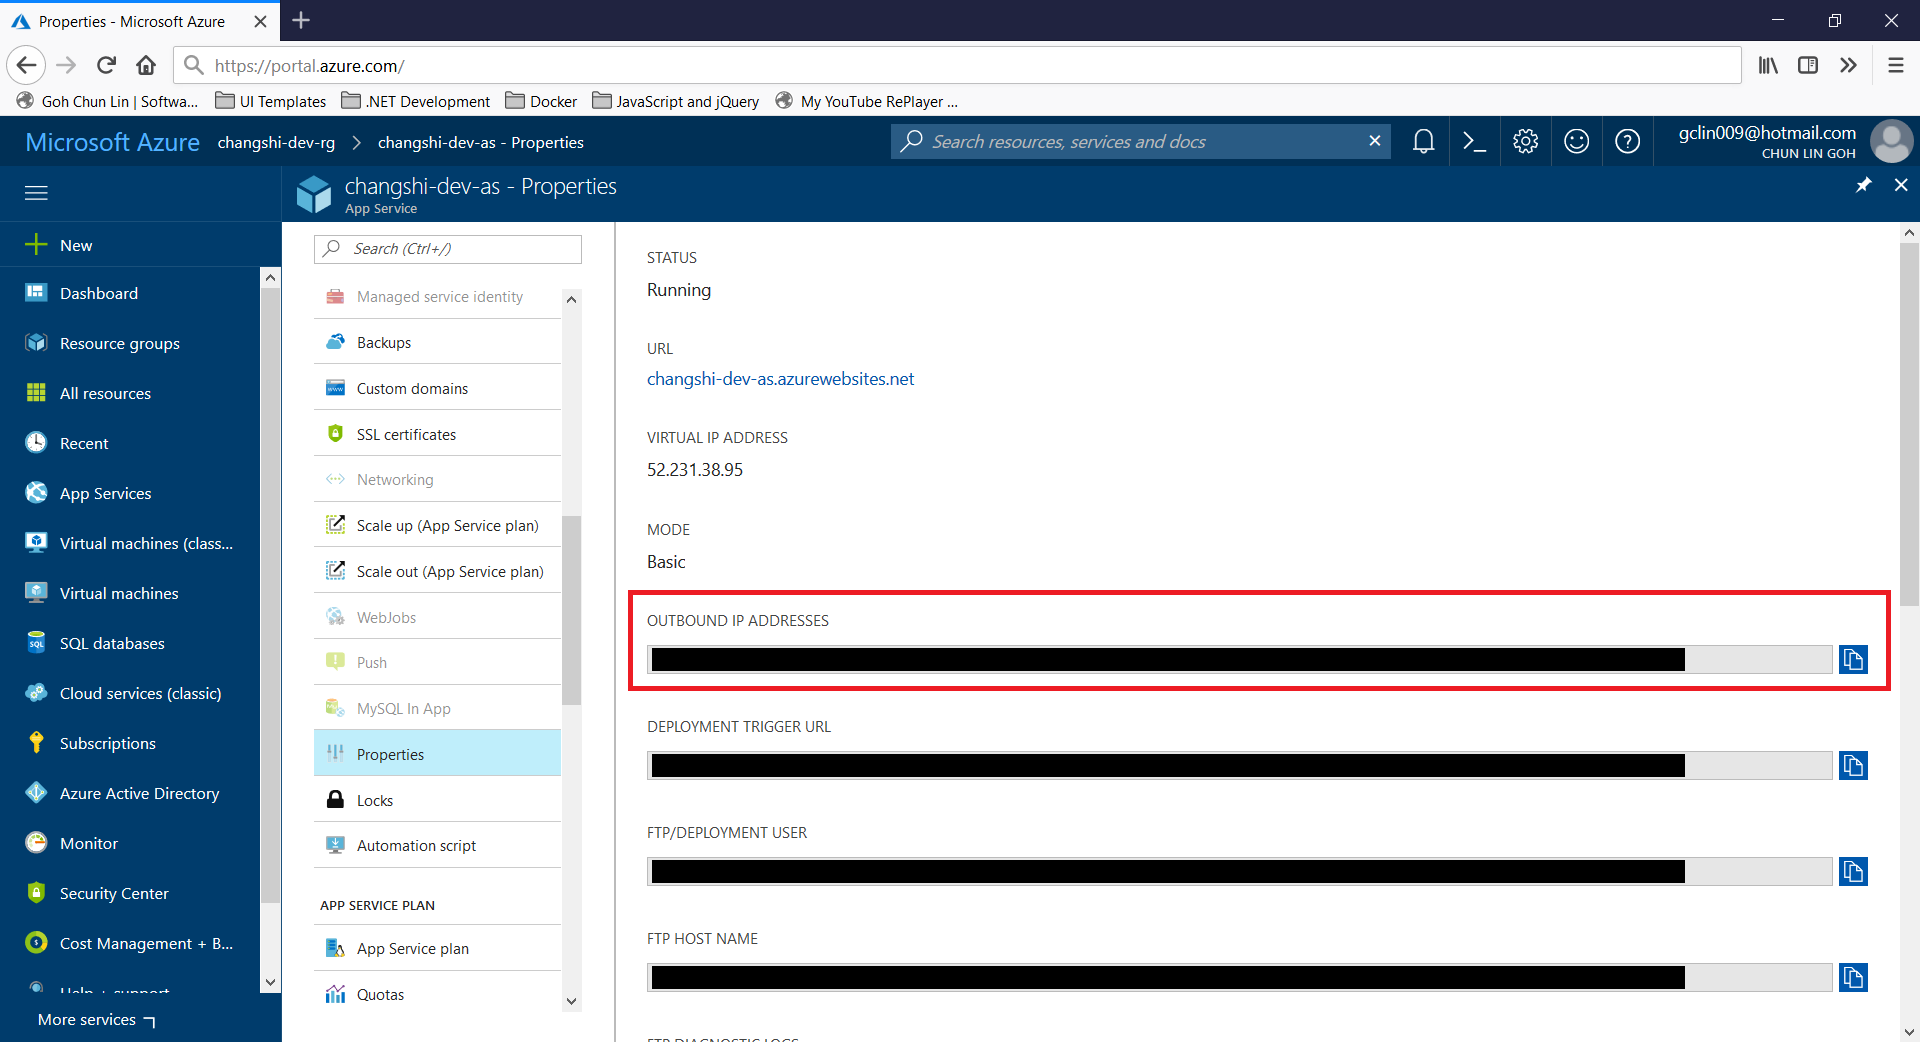
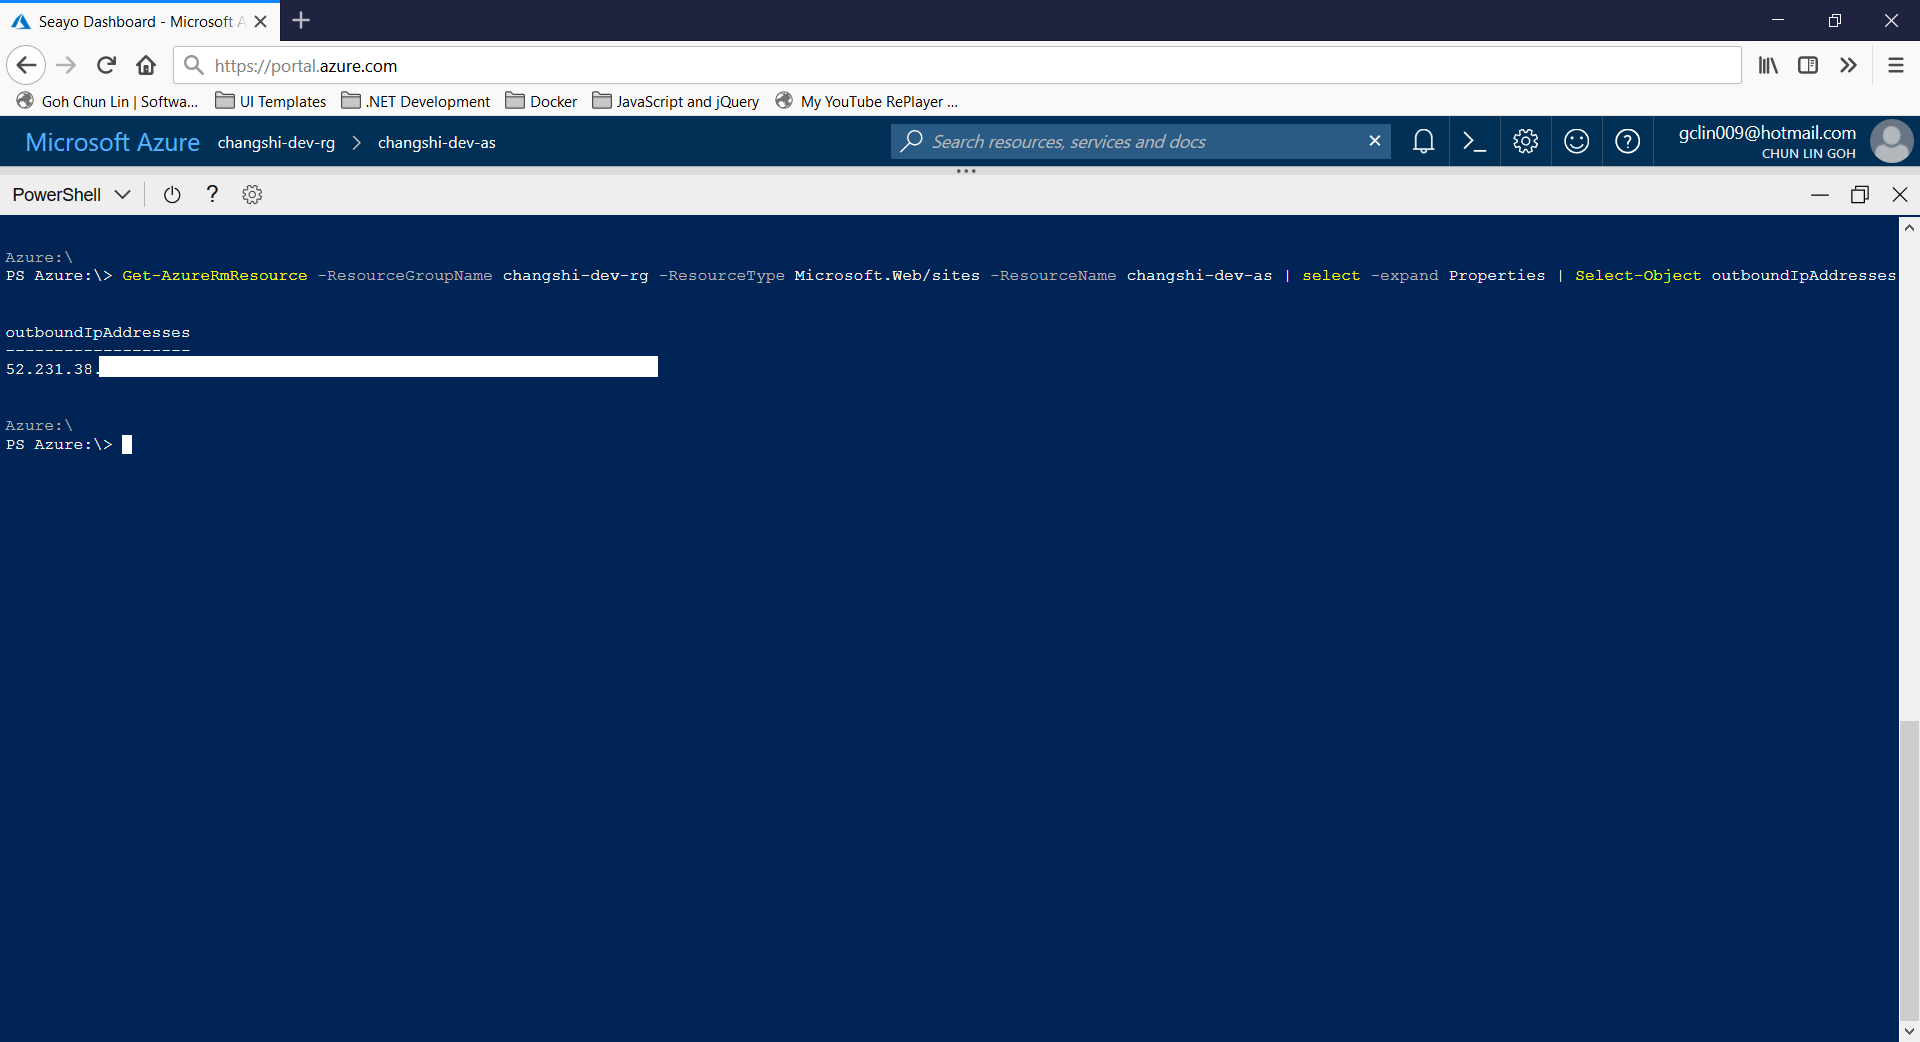
It is a common scenario for developers to integrate with different parties by using their APIs. Most of the time, the APIs are located in a locked-down network environment where only whitelisted IP addresses are allowed to access their APIs. We will then be asked to give the API providers the IP addresses of our servers.
If it’s our web back-end calling the APIs and we host our web applications on Microsoft Azure App Services, then how could we get the IP addresses?
KOSD, or Kopi-O Siew Dai, is a type of Singapore coffee that I enjoy. It is basically a cup of coffee with a little bit of sugar. This series is meant to blog about technical knowledge that I gained while having a small cup of Kopi-O Siew Dai.
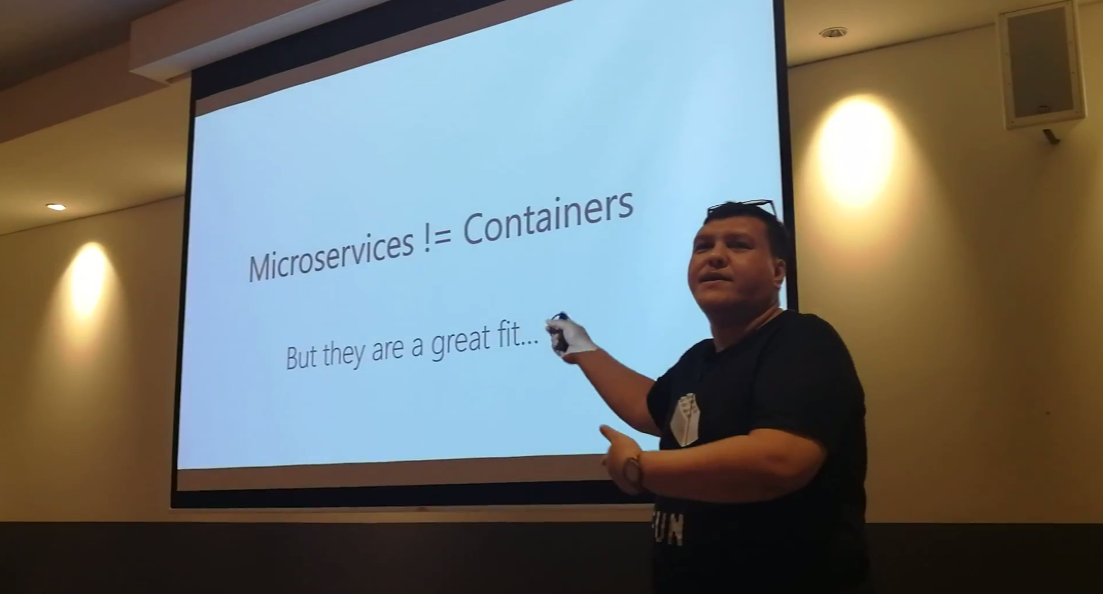
Riza’s talking about Containers. Yes, microservices are not containers!
Learning Motivation
In the beginning of Riza’s talk, he mentioned GO-JEK, an Indonesia ride-hailing phone service. Due to their rapid growth, the traditional monolithic architecture can no longer support their business. Hence, they switched to use a modern approach which includes moving apps to containers.
Hence, after the meetup, I was very excited to find out more about micro-services and Docker containers. With the ability of .NET Core to be cross-platform, as a Azure lover, I am interested to find out more how I can deploy ASP .NET Core web app to a container in Azure. So, I decided to write this short article to share with my teammates about this that they can learn while drinking a cup of coffee.
Creating New Project with Docker Support
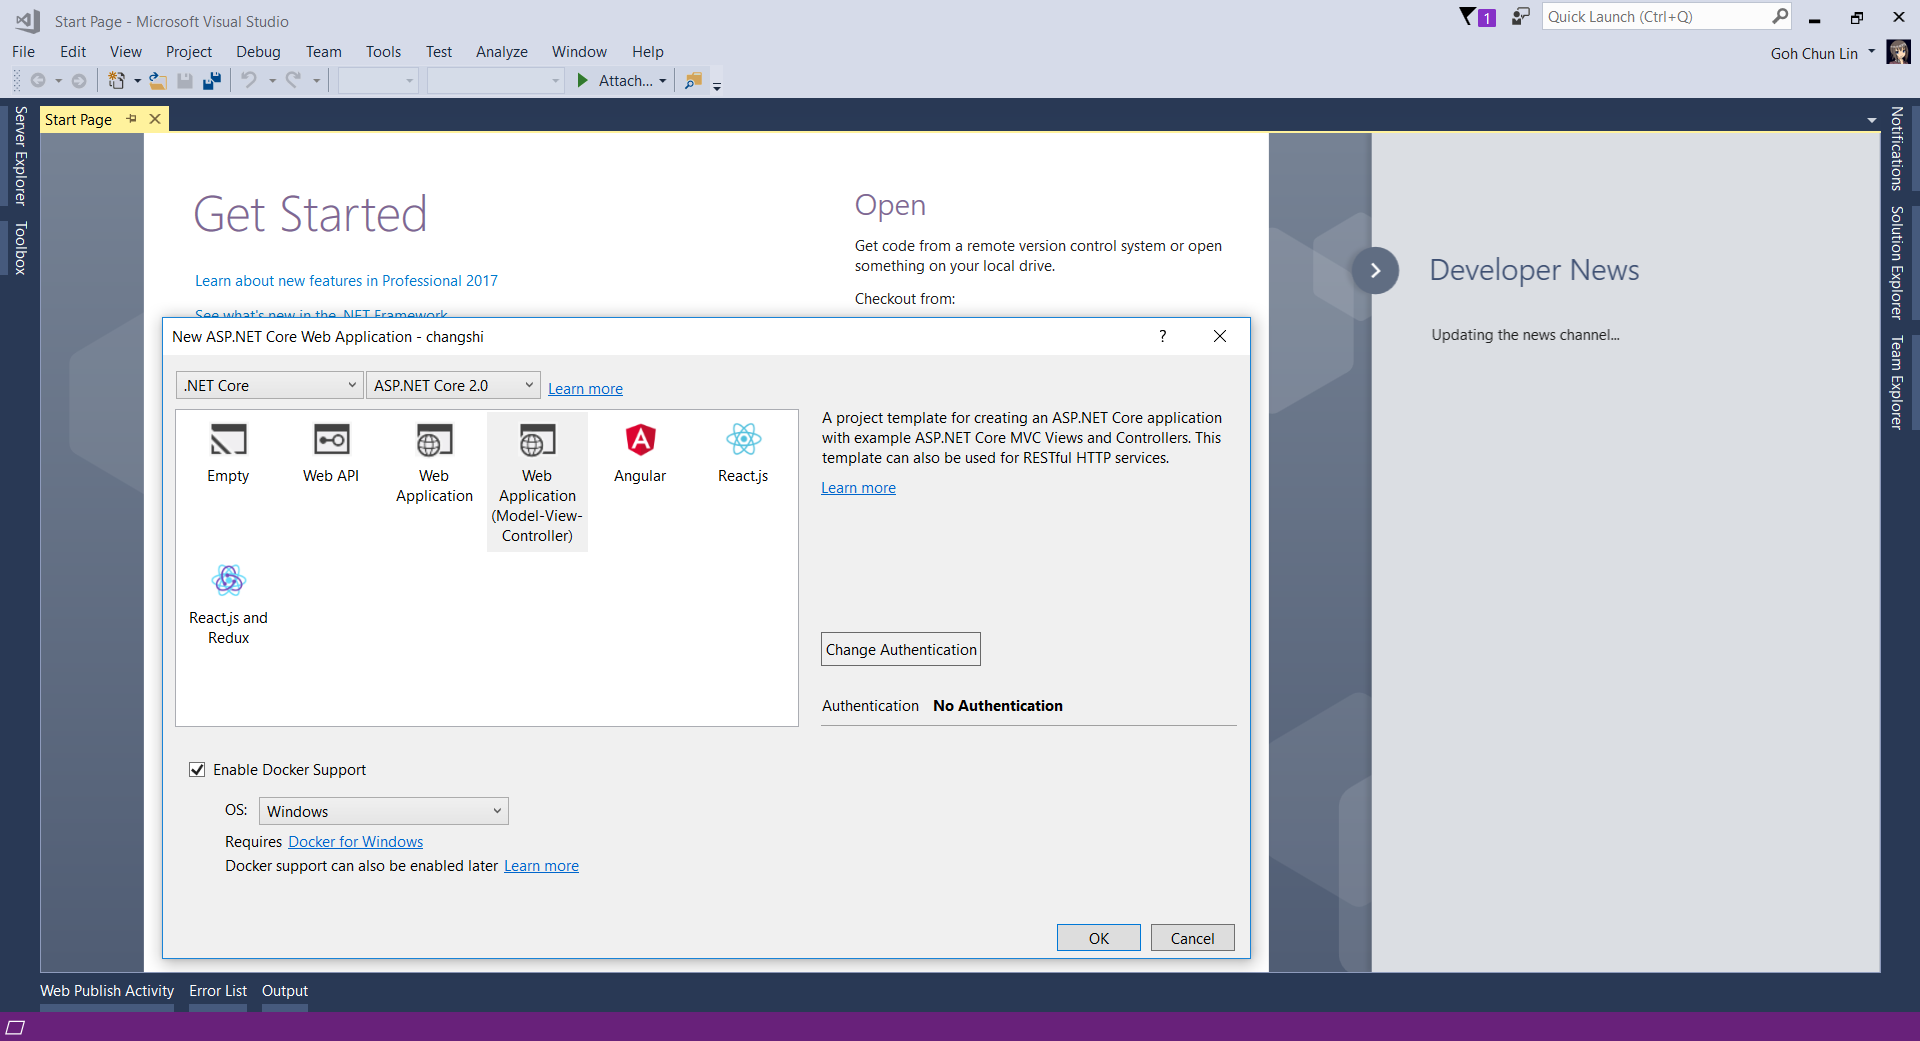
Since I am trying it out as personal project, I choose to start it with a new ASP .NET Core project. Then in the Visual Studio, I can easily turn it to be a Docker supporting app easily by checking the “Enable Docker Support” option.
Enable Docker Support
For existing web application projects, we will not have the screen above. Luckily, it is still easy to add Docker Support to an existing ASP .NET Core project on Visual Studio.
Enabling Docker Support in existing projects.
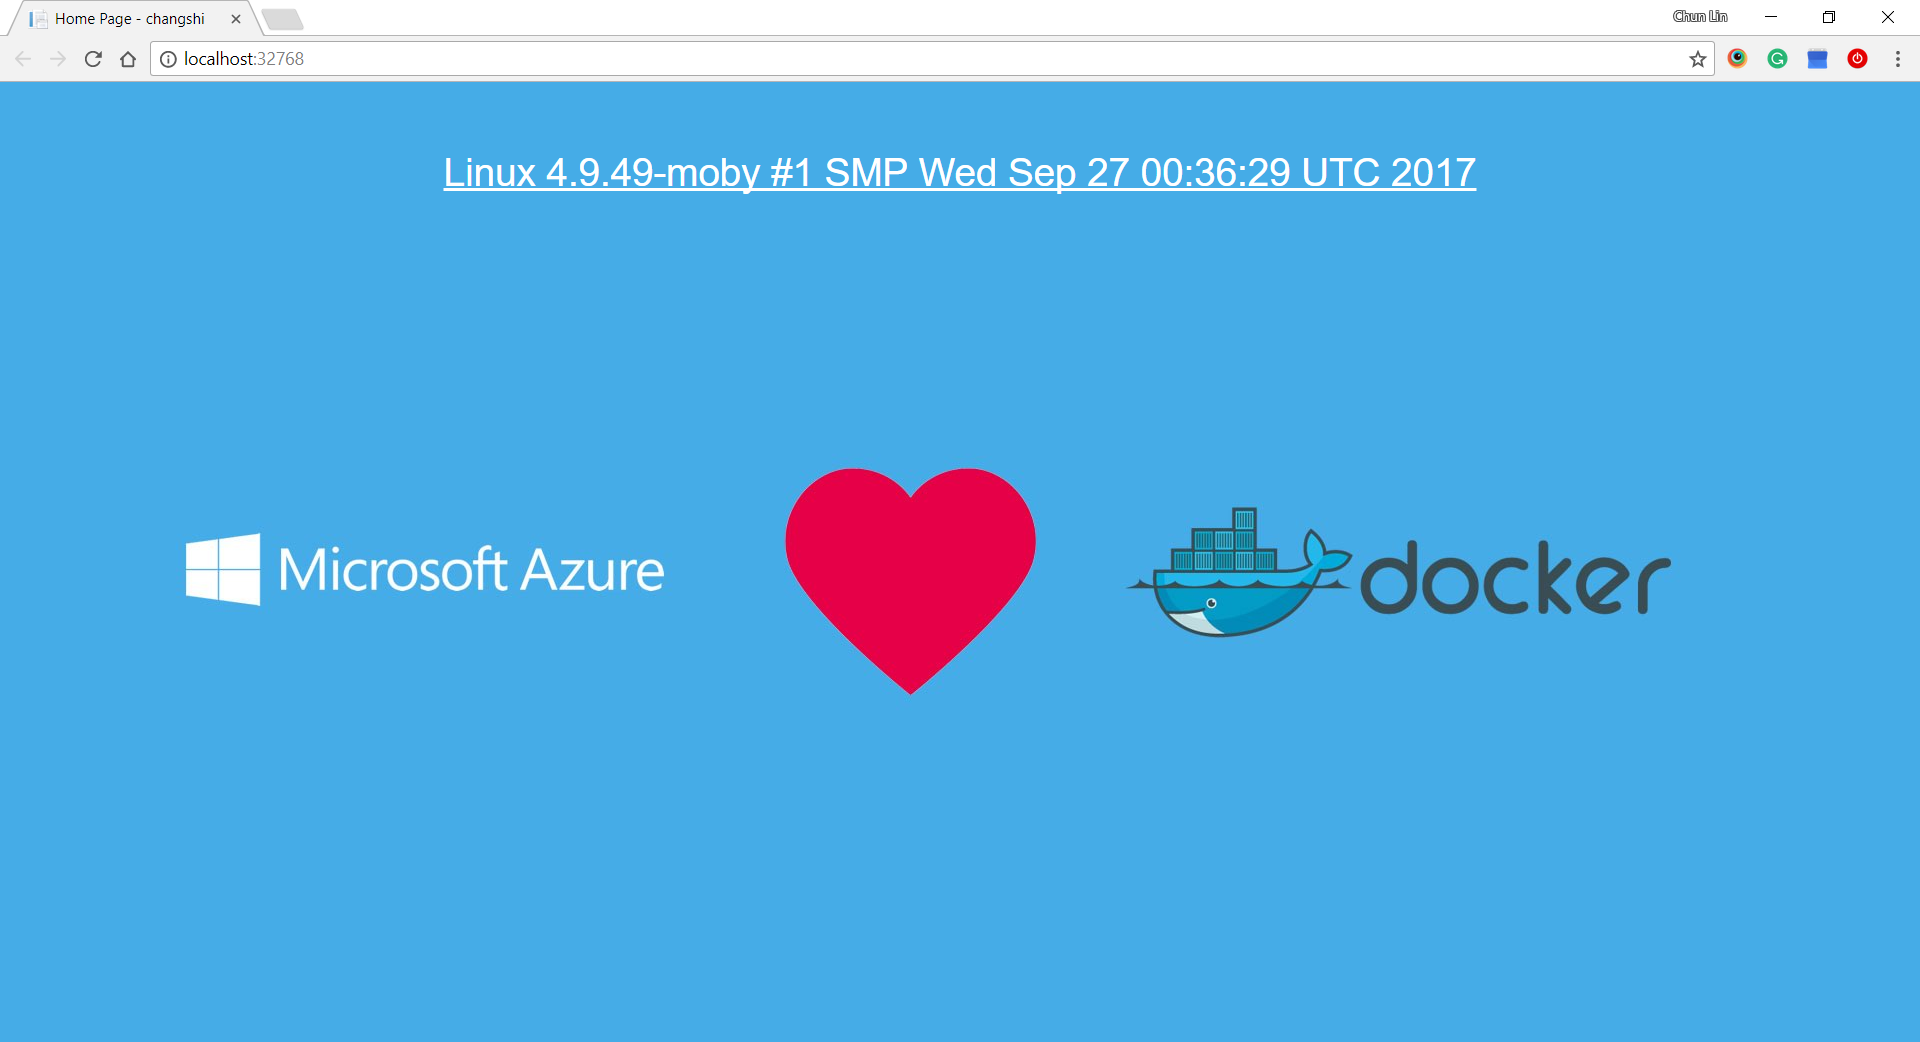
Then by clicking on the “F5” button to run the project, I manage to get the following screen (The background is customized by me). The message is displayed using the following line.
Yay, we managed to run the web app inside a Linux container locally.
Publishing to Microsoft Azure with Continuous Delivery
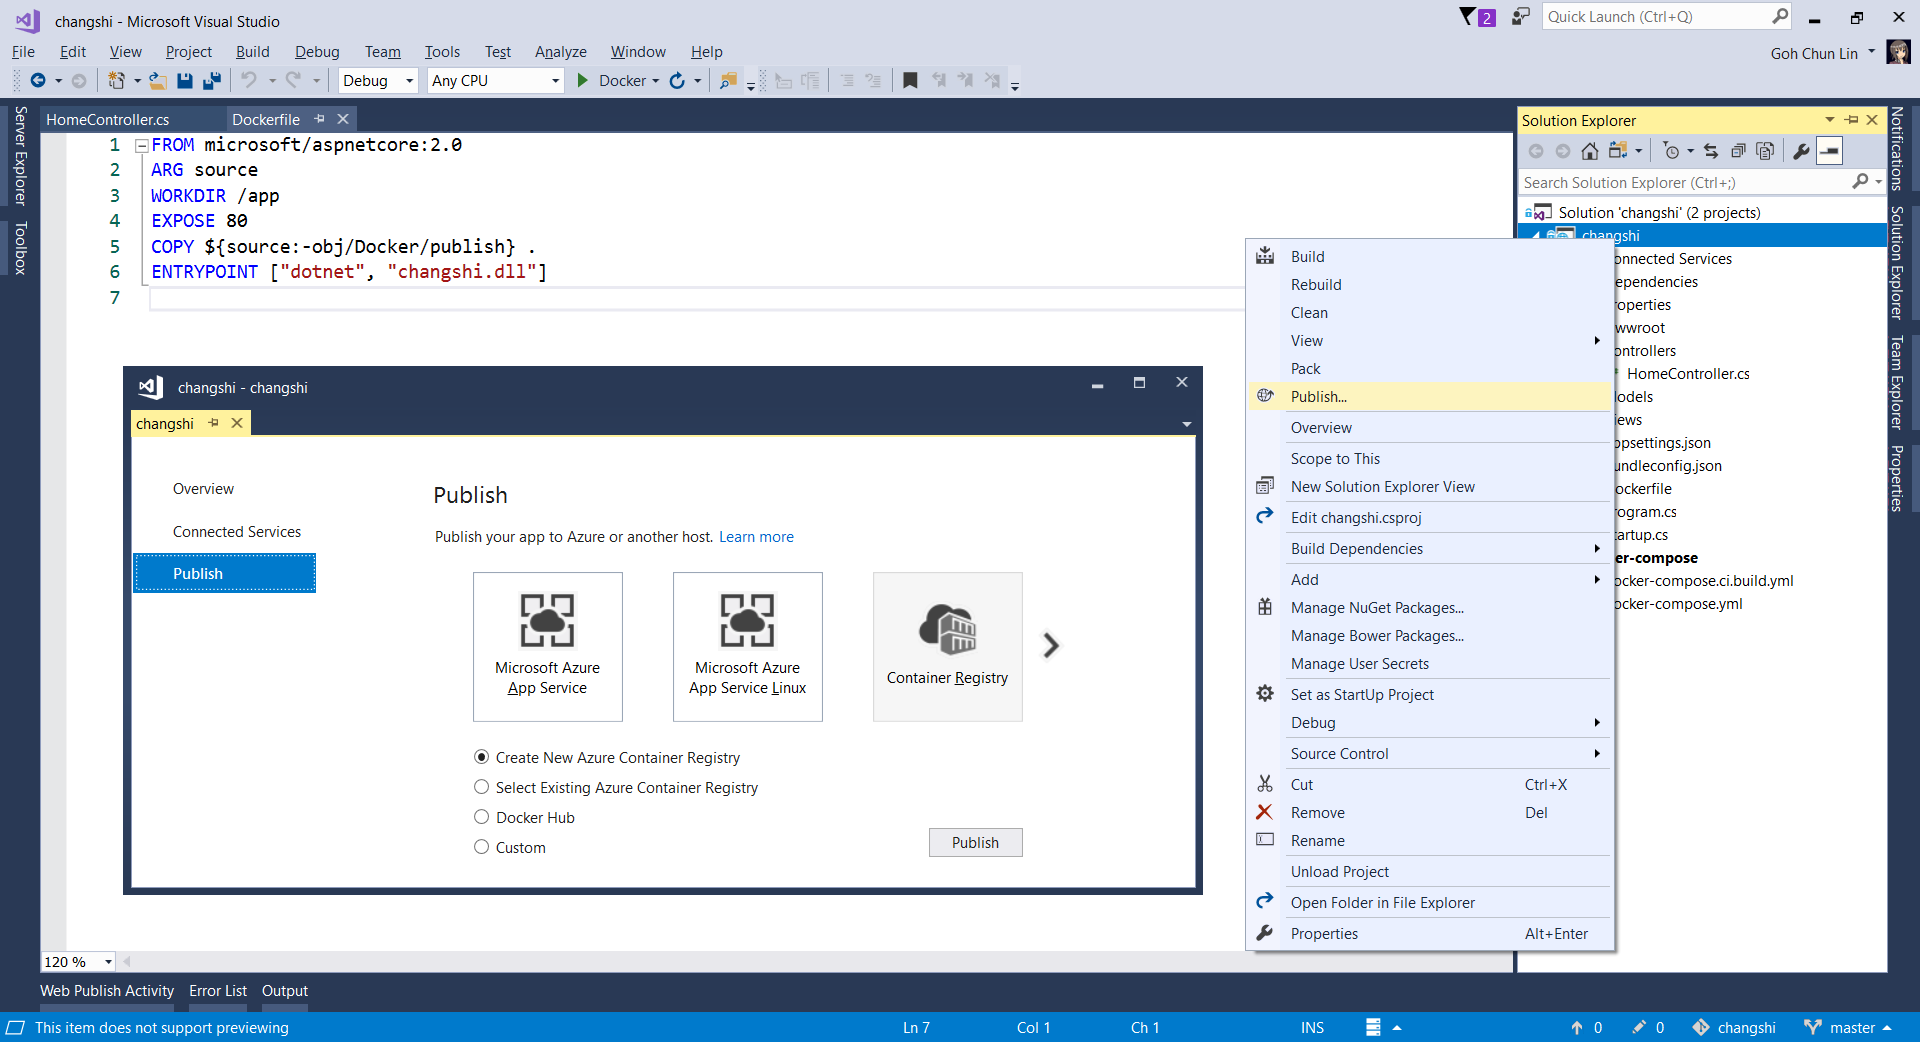
Without Continuous Delivery, we also can easily right-click the web application to publish it to the Container Registry on Azure.
Creating a new Azure Container Registry which will have the Docker image published to.
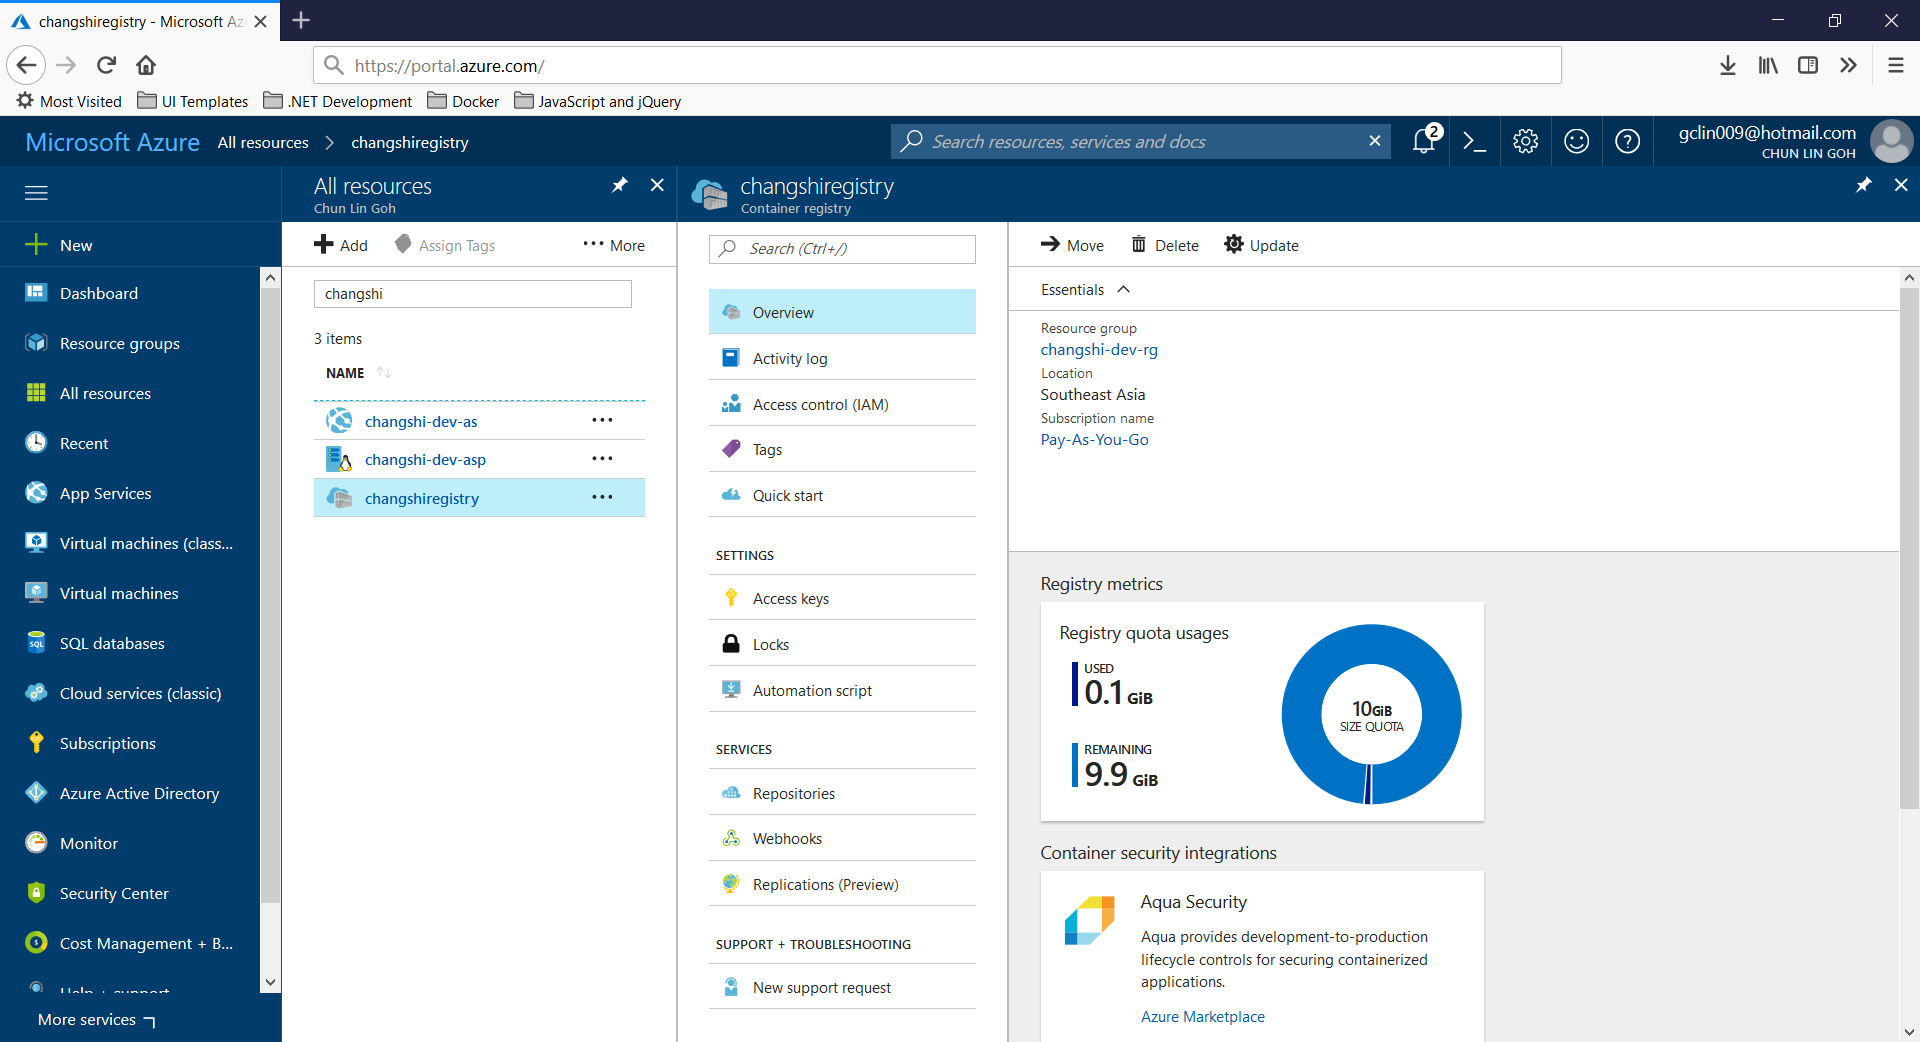
Then, on Azure Portal, we will see three new resources added. Firstly, we will have the Container Registry.
Then, we will also have an app service site which is running the image downloaded from the Container Registry. Finally, we have an App Service Plan which needs to be at least B1 because free and shared SKUs are not available for apps running on Linux (The official Microsoft documentation says we should have the VM size of the App Service Plan to be S1 or larger though).
Container Registry for my new web app, Changshi.
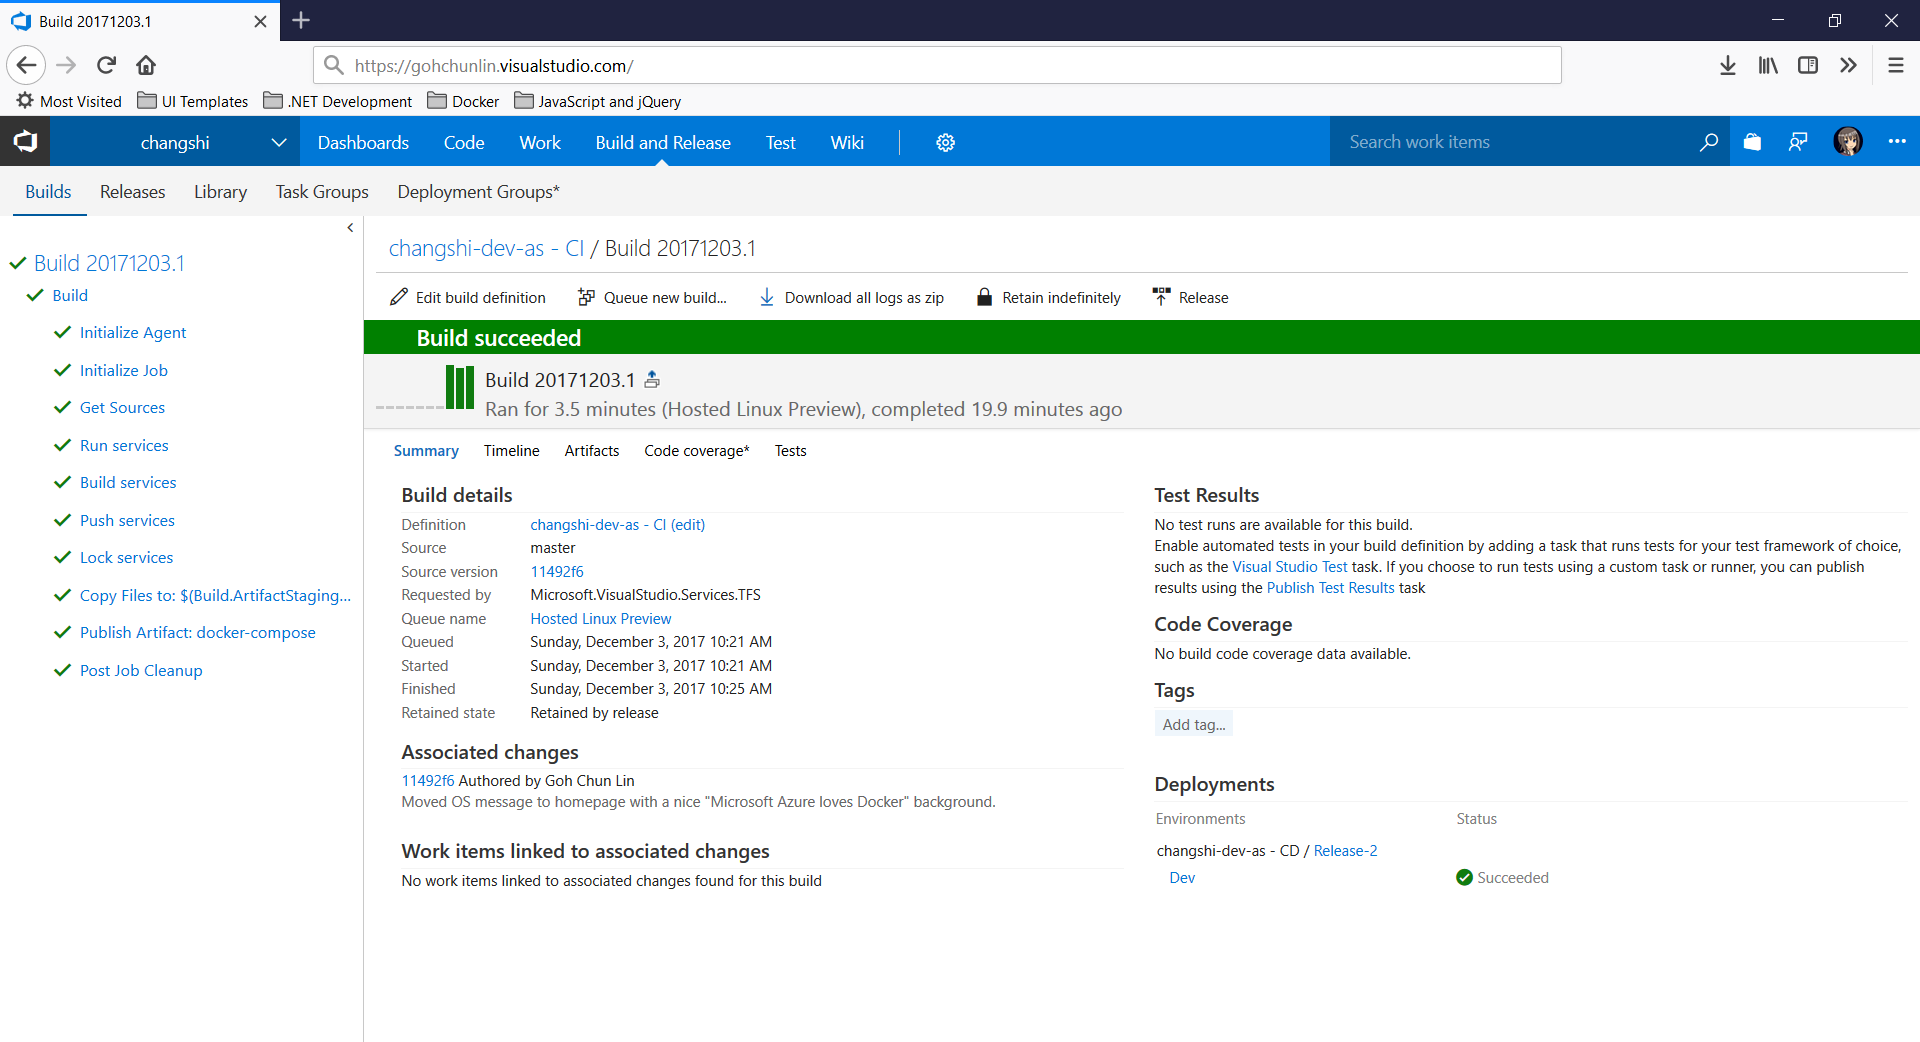
To enable Continuous Delivery, I choose to use Github + Visual Studio Team Services (VSTS). By doing so, build and release will be automatically started whenever I check in code to Github.
Build history and details on VSTS.
Yup, this is so far what I have tried out in my first step of playing with containers. If you are interested, please check out the references listed below.
During my first job after finishing my undergraduate degree in NUS, I worked in a local startup which was then the largest bus ticketing portal in Southeast Asia. In 2014, I worked with a senior to successfully migrate the whole system from on-premise to Microsoft Azure Virtual Machines, which is the IaaS option. Maintaining the virtual machines is a painful experience because we need to setup the load balancing with Traffic Manager, database mirroring, database failover, availability set, etc.
In 2015, when I first worked in Singapore Changi Airport, with the support of the team, we made use of PaaS technologies such as Azure Cloud Services, Azure Web Apps, and Azure SQL, we successfully expanded our online businesses to 7 countries in a short time. With the help of PaaS option in Microsoft Azure, we can finally have a more enjoyable working life.
Azure Functions
Now, in 2017, I decided to explore Azure Functions.
Azure Functions allows developers to focus on the code for only the problem they want to solve without worrying about the infrastructure like we do in Azure Virtual Machines or even the entire applications as we do in Azure Cloud Services.
There are two important benefits that I like in this new option. Firstly, our development can be more productive. Secondly, Azure Functions has two pricing models: Consumption Plan and App Service Plan, as shown in the screenshot below. The Consumption Plan lets us pay per execution and the first 1,000,000 executions are free!
Two hosting plans in Azure Functions: Consumption Plan vs. App Service Plan
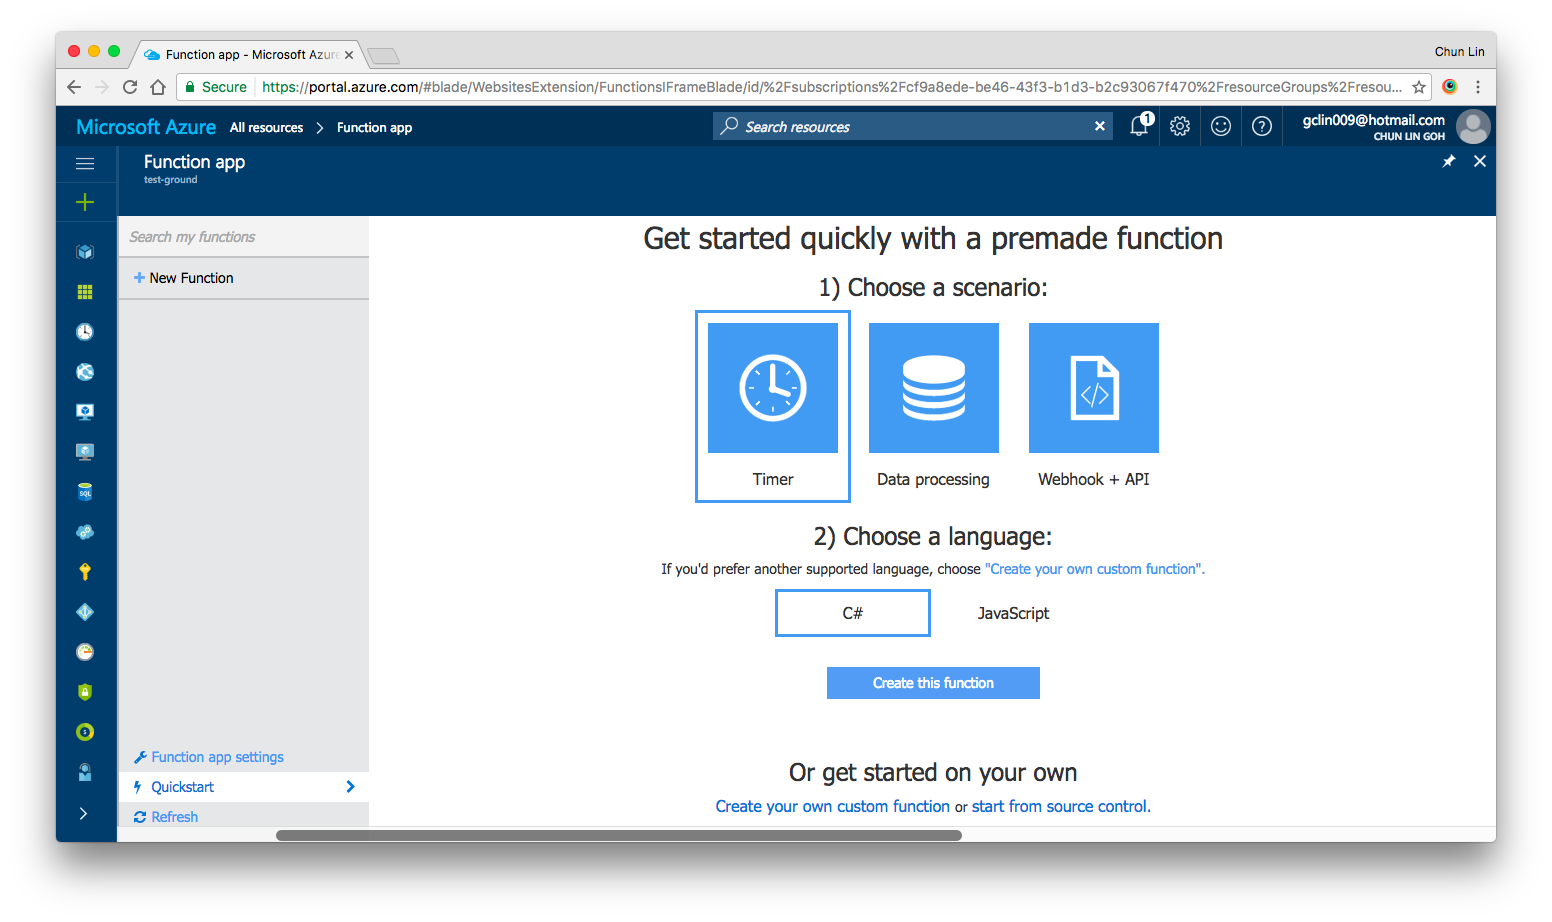
After setting up the Function App, we can choose “Quick Start” to have a simpler user interface to get started with Azure Function.
Under “Quick Start” section, there are three triggers available for us to choose, i.e. Timer, Data Processing, and Webhook + API. Today, I’ll only talk about Timer. We will see how we can achieve the scheduler functionality on Microsoft Azure.
Quick Start page in Azure Function.
Timer Trigger
Timer Trigger will execute the function according to a schedule. The schedule is defined using CRON expression. Let’s say if we want our function to be executed every four hours, we can write the schedule as follows.
Similar to the usual Azure Web App, the default time zone used in Azure Functions is also UTC. Hence, if we would like to change it to use another timezone, what we need to do is just add the WEBSITE_TIME_ZONE application setting in the Function App.
Companion File: function.json
So, where do we set the schedule? The answer is in a special file called function.json.
The name attribute is to specify the name of the parameter used in the C# function later. It is used for the bound data in the function.
The type attribute specifies the binding time. Our case here will be timerTrigger.
The direction attribute indicates whether the binding is for receiving data into the function (in) or sending data from the function (out). For scheduler, the direction will be “in” because later in our C# function, we can actually retrieve info from the myTimer parameter.
Finally, the schedule attribute will be where we put our schedule CRON expression at.
#r "Newtonsoft.Json"

using System;
using Newtonsoft.Json;
...

public static async Task Run(TimerInfo myTimer, TraceWriter log)
{
    ...
}
Assemblies in .csx File
Same as how we always did in C# project, when we need to import the namespaces, we just need to use the using clause. For example, in our case, we need to process the Json file, so we need to make use of the library Newtonsoft.Json.
using Newtonsoft.Json;
To reference external assemblies, for example in our case, Newtonsoft.Json, we just need to use the #r directive as follows.
For other assemblies, we need to upload the assembly file, for example MyAssembly.dll, into a bin folder relative to the function first. Only then we can reference is as follows.
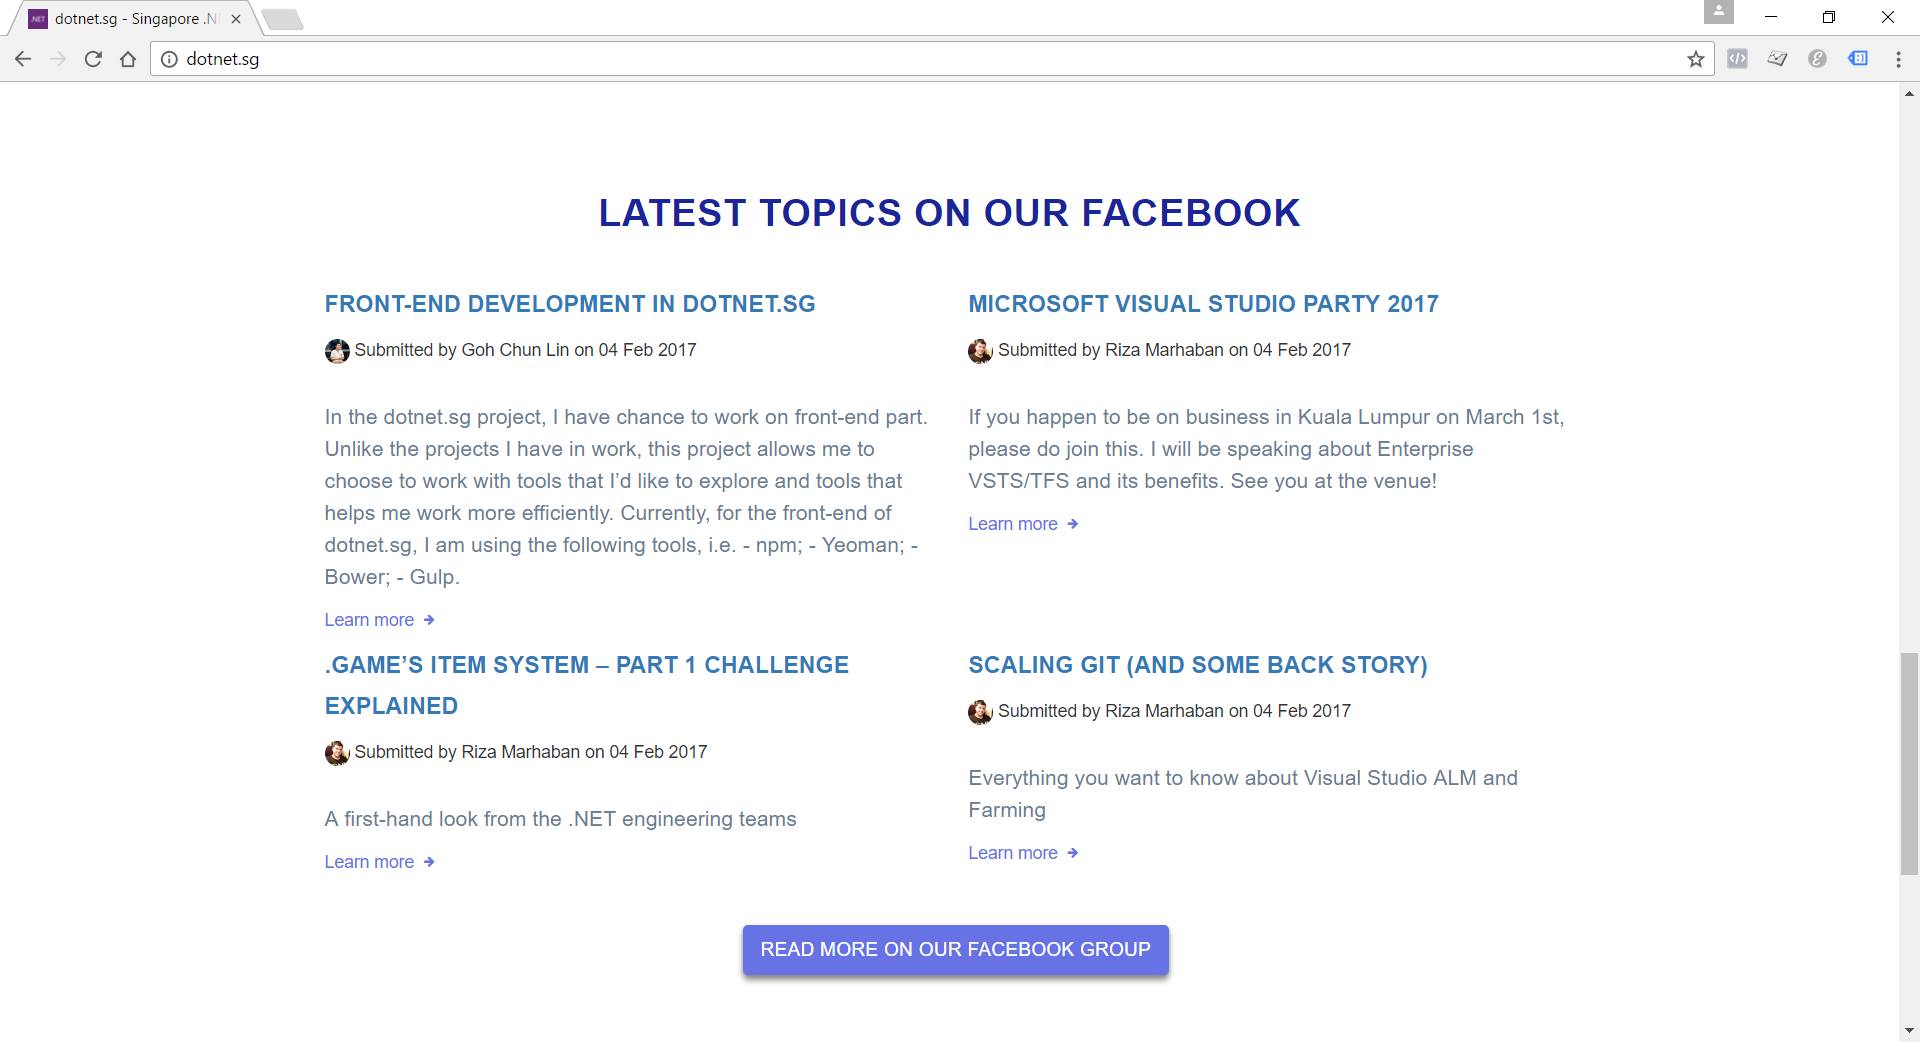
This section will display the top four latest Facebook posts pulled by Azure Function.
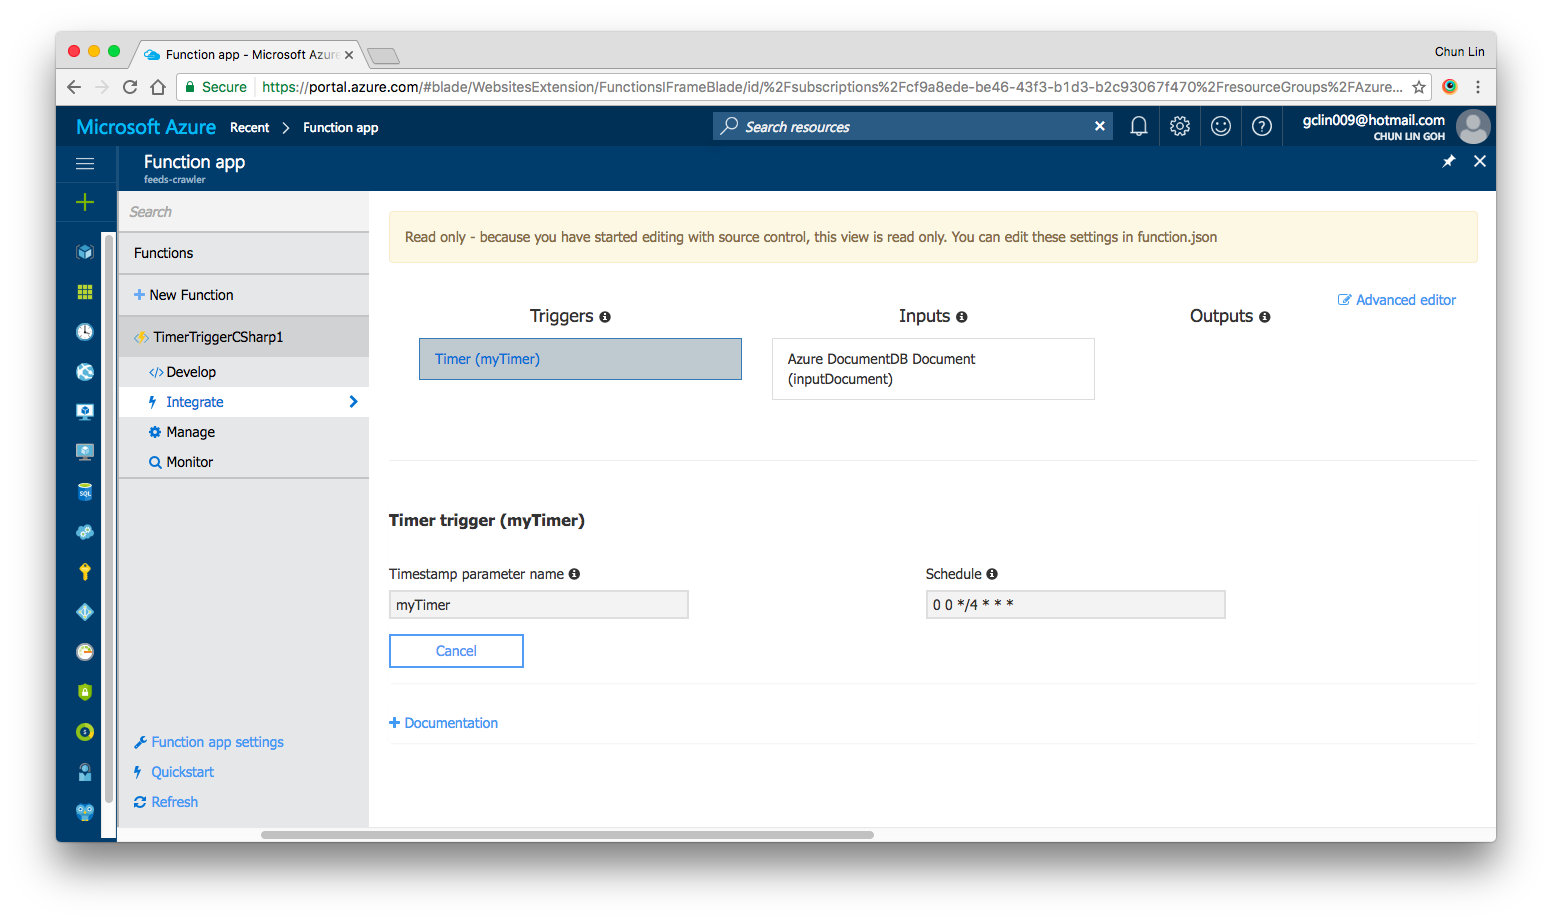
For our case, the purpose of Azure Function is to process the Facebook Group feeds and then store the feeds somewhere for later use. The “somewhere” here is DocumentDB.
To gets the inputs from DocumentDB, we first need to have 2nd binding specified in the functions.json as follows.
In the DocumentDB input binding above, the name attribute is, same as previous example, used to specify the name of the parameter in the C# function.
The databaseName and collectionName attributes correspond to the names of the database and collection in our DocumentDB, respectively. The id attribute is the Document Id of the document that we want to retrieve. In our case, we store all the Facebook feeds in one document, so we specify the Document Id in the binding directly.
The connection attribute is the name of the Azure Function Application Setting storing the connection string of the DocumentDB account endpoint. Yes, Azure Function also has Application Settings available. =)
Finally, the direction attribute must be “in”.
We can then now enhance our Run method to include inputs from DocumentDB as follows. What it does is basically just reading existing feeds from the document and then update it with new feeds found in the Singapore .NET Facebook Group
#r "Newtonsoft.Json"

using System;
using Newtonsoft.Json;
...

private const string SG_DOT_NET_COMMUNITY_FB_GROUP_ID = "1504549153159226";

public static async Task Run(TimerInfo myTimer, dynamic inputDocument, TraceWriter log)
{
    string sgDotNetCommunityFacebookGroupFeedsJson =
        await GetFacebookGroupFeedsAsJsonAsync(SG_DOT_NET_COMMUNITY_FB_GROUP_ID);

    ...

    var existingFeeds = JsonConvert.DeserializeObject(inputDocument.ToString());

    // Processing the Facebook Group feeds here...
    // Updating existingFeeds here...

    inputDocument.data = existingFeeds.Feeds;
}
Besides getting input from DocumentDB, we can also have DocumentDB output binding as follows to, for example, write a new document to DocumentDB database.
We don’t really use this in our dotnet.sg case. However, as we can see, there are only two major differences between DocumentDB input and output bindings.
Firstly, we have a new createIfNotExists attribute which specify whether to create the DocumentDB database and collection if they don’t exist or not.
Secondly, we will have to set the direction attribute to be “out”.
Then in our function code, we just need to have a new parameter with “out object outputDocument” instead of “in dynamic inputDocument”.
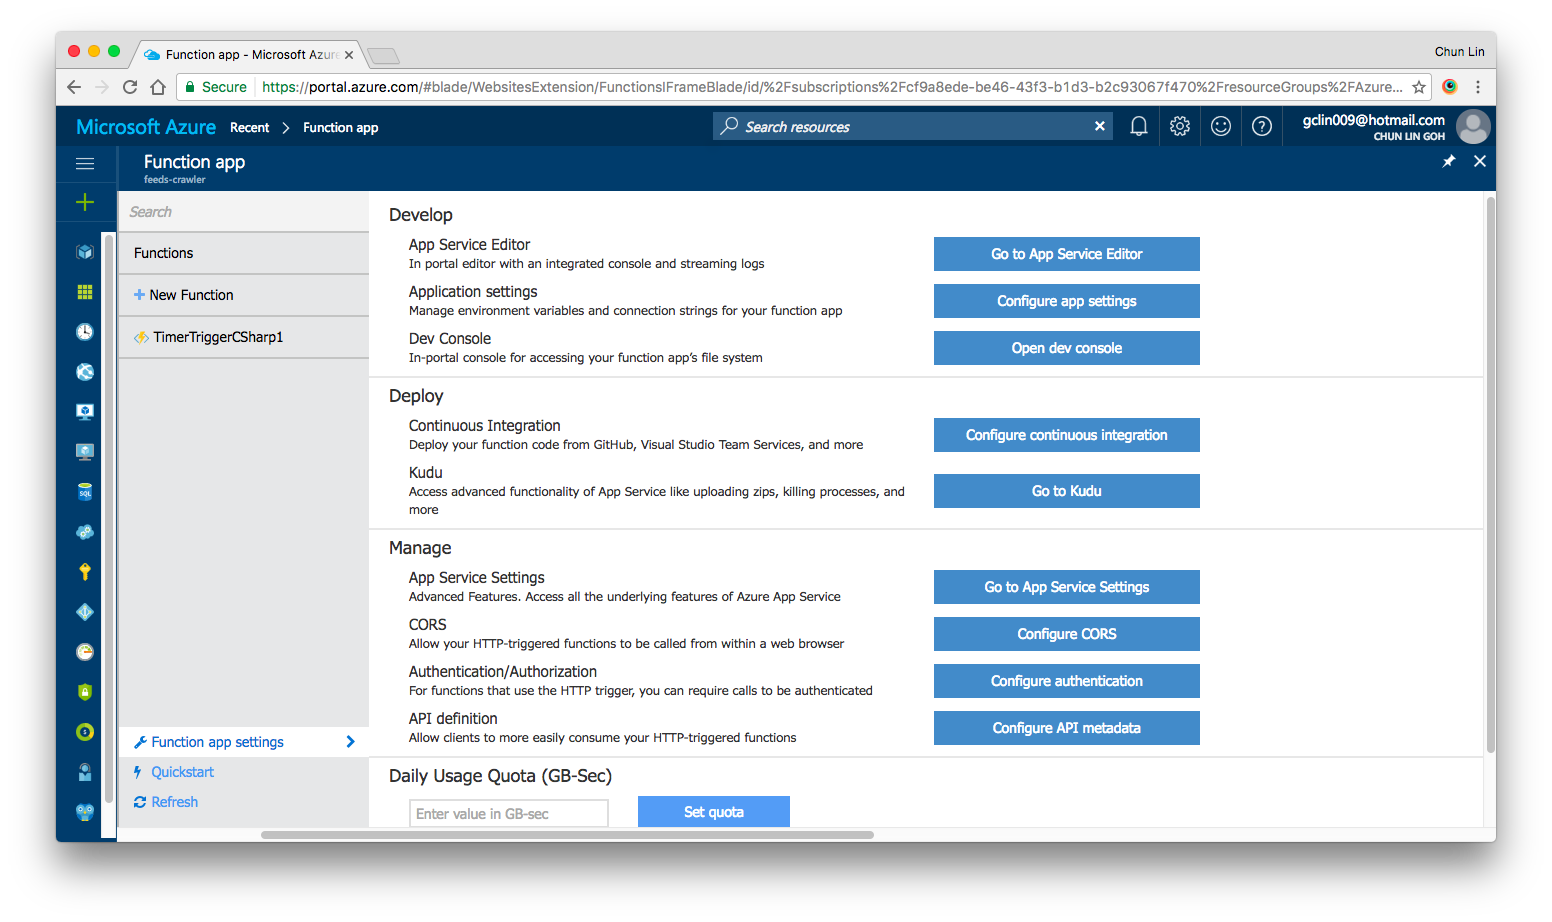
Yes, there are our familiar features such as Application Settings, Continuous Integration, Kudu, etc. in Azure Functions as well. All of them can be found under “Function App Settings” section.
Azure Function App Settings
As what we have been doing in Azure Web Apps, we can also set the timezone, store the App Secrets in the Function App Settings.
Deployment of Azure Functions with Github
We are allowed to link the Azure Function with variety of Deployment Options, such as Github, to enable the continuous deployment option too.
There is one thing that I’d like to highlight here is that if you are also starting from setting up your new Azure Function via Azure Portal, then when in the future you setup the continuous deployment for the function, please make sure that you first create a folder having the same name as the name of your Azure Function. Then all the files related to the function needs to be put in the folder.
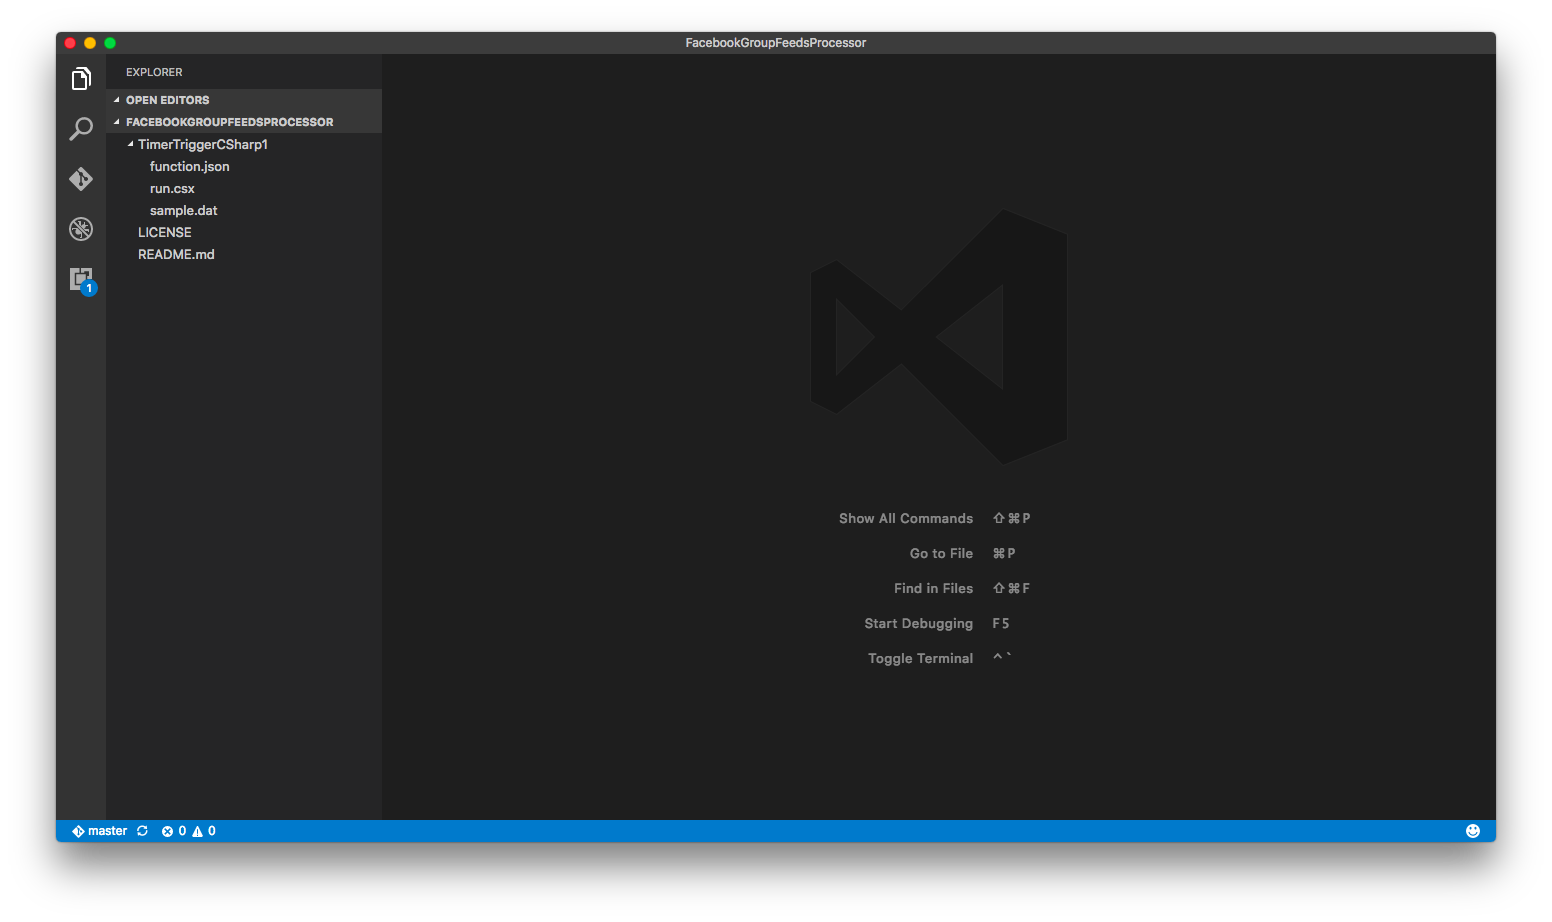
For example, in dotnet.sg case, we have the Azure Function called “TimerTriggerCSharp1”. we will have the following folder structure.
Folder structure of the TimerTriggerCsharp1.
When I first started, I made a mistake when I linked Github with Azure Function. I didn’t create the folder with the name “TimerTriggerCSharp1”, which is the name of my Azure Function. So, when I deploy the code via Github, the code in the Azure Function on the Azure Portal is not updated at all.
In fact, once the Continuous Deployment is setup, we are no longer able to edit the code directly on the Azure Portal. Hence, setting up the correct folder structure is important.
Read only once we setup the Continuous Deployment in Azure Function.
If you would like to add in more functions, simply create new folders at the same level.
Conclusion
Azure Function and the whole concept of Serverless Architecture are still very new to me. However, what I like about it is the fact that Azure Function allows us to care about the codes to solve a problem without worrying about the whole application and infrastructure.
In addition, we are also allowed to solve the different problems using the programming language that best suits the problem.
Finally, Azure Function is cost-saving because we can choose to pay only for the time our code is being executed.
If you would like to learn more about Azure Functions, here is the list of references I use in this learning journey.
As a web developer, I don’t have many chances to play with mobile app projects. So rather than limit myself to just one field, I love to explore other technologies, especially mobile app development.
Burger Project: My First Xamarin App
Last month, I attended a Xamarin talk at Microsoft Singapore office with my colleague. The talk was about authentication and authorization with social networks such as Facebook and Twitter via Azure App Service: Mobile App.
Ben Ishiyama-Levy is talking about how Xamarin and Microsoft Azure works together.
The speaker is Ben Ishiyama-Levy, a Xamarin evangelist. His talk inspired me to further explore how I could retrieve user info from social network after authenticating the users.
Because I am geek-first and I really want to find out more, so I continue to read more about this topic. With the help from my colleague, I developed a simple Xamarin.Android app to demonstrate the Authentication and logged-in user’s info retrieval.
In this project, it’s also the first time I apply Reflection in my personal project. It helps me easily get the according social network login class with a neat and organized code.
The day is the first time Microsoft CEO Satya Nadella comes to Singapore. It’s also my first time learn about the powerful Cognitive Services and LUIS (Language Understanding Intelligence Service) in Microsoft Azure in Riza’s talk.
Riza’s presentation about Microsoft Cognitive APIs during Microsoft Developer Day.
Challenges in Cheese Project
Everyday, it takes about one hour for me to reach home from office. Hence, I will only have two to three hours every night to work on personal projects and learning. During weekends, when people are having fun out there, I will spend time on researching about some exciting new technologies.
There are many advance topics in LUIS. I still remember that when I was learning how LUIS works, my friend was actually playing the Rise of the Tomb Raider beside me. So while he was there phew-phew-phew, I was doing data training on LUIS web interface.
Microsoft LUIS (Language Understanding Intelligence Service) and Intents
Currently, I only worked on some simple intents, such as returning me current date and time as well as understanding which language I want to translate to.
My first idea in Cheese project is to build an Android app such that if I say “Please translate blah-blah to xxx language”, the app will understand and do the translation accordingly. This can be quite easily done with the help of both LUIS and Google Translate.
After showing this app to my colleagues, we realized one problem in the app. It’s too troublesome for users to keep saying “Please translate blah-blah to xxx language” every time they need to translate something. Hence, recently I have changed it to use GUI to provide language selection. This, however, reduces the role played by LUIS in this project.
VoiceText provides a range of speakers and voices with emotions!
To make the project even more fun, I implemented the VoiceText Web API from Japanese in the Android app. The cool thing about this TTS (Text-To-Speech) API is that it allows developers to specify the mood and characteristic of the voice. The challenge, of course, is to read the API written in Japanese. =P
Oh ya, this is the link to my Cheese repository on Github: https://github.com/goh-chunlin/Cheese. I will continue to work on this project while exploring more about LUIS. Stay tuned.
After-Work Personal Projects
There are still more things in mobile app development for me to learn. Even though most of the time I feel exhausted after long work day, working on new and exciting technologies helps me getting energized again in the evening.
I’m not as hardworking as my friends who are willing to sacrifice their sleep for their hobby projects and learning, hence the progress of my personal project development is kind of slow. Oh well, at least now I have my little app to help me talking to people when I travel to Hong Kong and Japan next year!