When your database is big, sometimes just its backup will be around 20GB in size already. Hence, keeping them on disk is always not a solution even though Microsoft Azure provides a data disk with 1TB.
Hence, Chun Siong from Microsoft Singapore suggested my company to try out this service to store our database backups. It turns out that it can be easily done in just 3 steps.
Step 1: Create Azure Storage Account and Retrieve Access Keys
To create a new Azure Storage Account, I simply login to the Azure Management Portal and then choose the Quick Create option of the Storage under Data Services section. I am able to specify the affinity group and replication rule for the Storage Account.
Creating a Storage Account.
After the Storage is created, I can retrieve access keys which will be used later in SQL Server to access the Storage Account.
Retrieve the access keys to the Storage Account.
Finally, I just need to create a Container in the Storage Account. All the database backup files will be put inside the Container later.
Created a container in the Storage Account.
Step 2: Create SQL Server Credentials
I then execute the following T-SQL statement to create credentials so that SQL Server later can connect to the Storage Account.
The Storage Account access key here can be either Primary or Secondary access key retrieved in Step 1 above.
Step 3: Backup Database
I create a scheduled job in SQL Server Agent to do backup of my database daily. The URL is the URL of the container created in Step 1.
BACKUP DATABASE mydatabase
TO URL = 'https://chunlindbbackup.blob.core.windows.net/dbbackup/mydatabase_' + REPLACE(CONVERT(VARCHAR ,GETDATE(),126) ,':','_')+ '.bak'
WITH CREDENTIAL = 'mycredential', INIT, NAME = 'Backup of Database mydatabase'
So yup, now the database backups will be stored on the Storage Account directly.
Restore Database Backup from Azure Storage
To restore a database backup from Storage Account, if the backup file is small, I can just simply execute the following T-SQL statements. The URL of the database backup can be found in the Container in Azure Management Portal.
RESTORE DATABASE mydatabase_test
FROM URL = 'https://chunlindbbackup.blob.core.windows.net/dbbackup/mydatabase_2014-10-14T13_16_01.243.bak'
WITH RECOVERY,
MOVE 'mydatabase_db_Data' TO 'F:\db\mydatabase_test_Data.mdf',
MOVE 'mydatabase_db_Log' TO 'F:\db\mydatabase_test_Log.ldf',
CREDENTIAL = 'mycredential'
GO
Unfortunately, the backup that I have is too big. So, I can only download it from Azure Management Portal to the database server first before restoring the database. The download is quite fast.
Download backup file from Storage Account
In case, you wonder why I do not use tool like Azure Storage Explorer, no, it did not work. It would crash also if the backup file was too big.
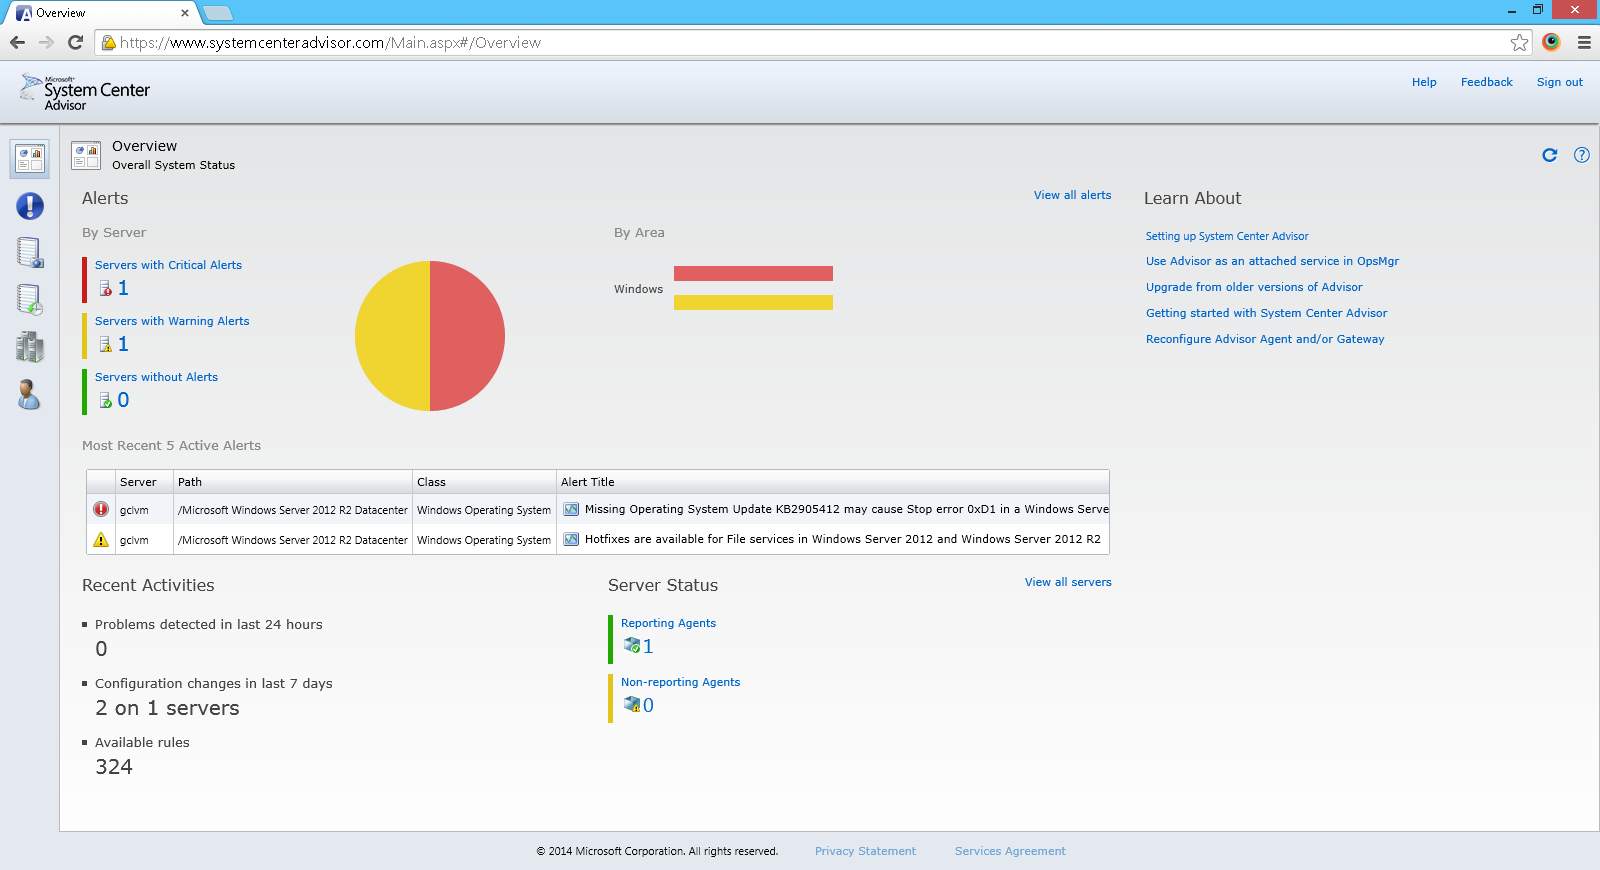
In order to proactively avoid problems in our Microsoft Azure Virtual Machines, it’s necessary to have the system admin to receive alerts for unpatched, misconfigured, or unsupported configurations. System Center Advisor from Microsoft can do this. System Center Advisor is a free web service which monitors and analyses installation of Microsoft Server 2008 (and later versions).
Alerts and regular assessment of server configurations
Activate and Deploy System Center Advisor
Before we can configure System Center Advisor, we need to enable the service on the Advisor website. To do that, we just login to the website with the same Microsoft account to activate it. After that, we need to deploy a software, which is part of Advisor, on our server on Azure. The software needs to be installed locally in the virtual machine.
Activated account before the deployment of Advisor software on the server
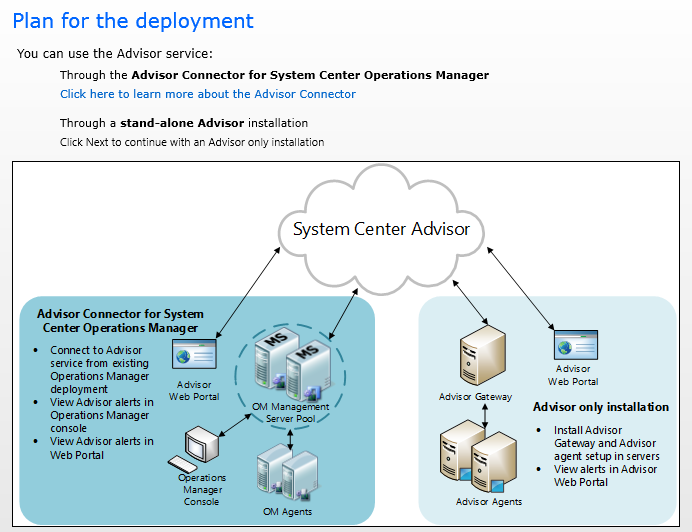
To deploy Advisor on the server, we need to install gateways and agents on our selected servers. Due to the fact that we are going to only install a stand-alone Advisor to give the system admin a way to access the alerts in Advisor web portal, we just need to install gateways and agents on selected servers.
The agent is responsible for collecting data about the server and storing it locally on the server. For every 24 hours, the agent will then pass the information to the gateway which is in charge of sending the information to the Advisor account.
Plan for Advisor Deployment
After the Advisor configuration is completed, within the next 24 hours, we should already be able to see the data being shown in the Advisor web portal.
Conclusion
The entire installation process is very simple. There are also a few related online articles that I found, as listed below.
Last year April, I received a newsletter from Windows Azure Team saying that Windows Azure Virtual Machines were generally available. Finally, full control and management of virtual machines on Azure is now possible! The release undoubtedly successfully brought Microsoft Azure closer to Amazon who is also focusing on IaaS.
The reason that I’m so happy with the announcement is because I have already an ASP .NET Web Application running on my server running on Windows Server 2008 in a data centre. I would like to find out how to host it on cloud. Since I have already tried out Amazon last time with friends, so now I am interested to see how fun it will be to host my application on Azure and what benefits it will provide.
Beginning of Journey: When Affinity Group Brings Your Services Together
Before creating a new virtual machine in Azure, I create a new Affinity Group. Affinity Groups will be able to group Microsoft Azure services by locating them in the same data centre to optimize performance.
Create a new affinity group.
Create Virtual Machine
Same as Amazon, I am allowed to create my virtual machine in Microsoft Azure with an image that is already offered in the Microsoft Azure Management Portal. So, there is no need for me to upload any Windows Server image created on-premise. Thus, the first step is to choose an image. Surprisingly, they provide also things like Ubuntu Servers, Oracle servers, openSUSE, and so on.
I need to choose operating system running on the VM from the Gallery.
There are sometimes multiple versions available for one image. So after choosing an image, for example the Windows Server 2012 R2 Datacenter, I get to choose the version of the OS that I want. As a best practice, it’s recommended to always choose the one with latest release date.
After choosing the tier, I will be able to pick one of the available sizes for the virtual machine from the Size dropdown list. There are many size codes, from A0 to A7. As David Aiken, Azure Group Technical Manager, said in Windows Azure for IT Pros Jump Start, the letter “A” and the number behind the “A” don’t mean anything. Seriously, it’s just a code. Also, the code has nothing to do with the paper size that we are familiar with. By the way, I think David did predict it correctly. There is really a A5 size introduced recently. Wow.
“It was fun naming them”. David Aiken explaining the naming of sizes for virtual machine.
Of course, the smaller the instance, the lower the price we need to pay. The following is a screenshot of the virtual machine pricing details for Asia Pacific Southeast (i.e. Singapore) which I am interested at. You can read more about the details on pricing and available VM disk sizes on Microsoft websites as well.
Asia Pacific Southeast (Singapore) VM Pricing (screenshot taken on 18 April 2014)
After the size for the new virtual machine is decided, the next thing that I need to do is create a user account to access the VM later. There is a nice feature in the management console is that it does not allow us to use “admin” or “administrator” as the user name for security purpose.
Configure Virtual Machine: Cloud Service, Affinity Group, and Availability Set
Up to this point, the virtual machine earlier is not yet created. There is other configuration needed. First of all, we need to decide which Cloud Service to use. Cloud Service is basically a boundary of management, configuration, networking, security, etc that hosts the virtual machines in it. So, virtual machine must be stored in a cloud service. By doing so, we do not need to worry about hardware failure and network issues because Cloud Service will be there to help making our applications on the virtual machines are continuously available when those issues happen. Thus. it’s a way to make your application highly-available.
Secondly, in the “Region/Affinity Group/Virtual Network” dropdown, since I have created an Affinity Group in advance, so I get to choose not just the usual region but also Affinity Groups that I have created.
Thirdly, since I don’t have a Storage Account yet, so by default, it will choose the only option “Use an automatically generated storage account”.
Finally, I will create an Availability Set for this virtual machine. Availability Set tells the Fabric Controller (which functions as the kernel of Azure OS) to place virtual machines across fault domains (groups of resources anticipated to fail together, i.e. same rack / same server) and update domains (groups of resources that will be updated together). An availability set makes sure that your application is not affected by single points of failure, like the network switch or the power unit of a rack of servers. It is okay not to create Availability Set before the virtual machine is created but specifying Availability Set after the virtual machine has been provisioned will cause reboot.
Virtual Machine Configuration Page
The Endpoints
To allow communication with the virtual machine from external resources, endpoints need to be added in order to have them to handle the inbound network traffic to the virtual machine. In addition, when an endpoint is created, there is a need to create an inbound rule in the Windows Firewall with Advanced Security in the virtual machine to allow the traffic route through the endpoint.
So, in order to enable public to view the ASP .NET web applications that I host on the virtual machine, I will first need to create an endpoint for HTTP on the Azure management portal for the virtual machine. After that, I just need to install the IIS windows feature on the virtual machine together with Application Development feature added to allow HTTP traffic.
Finally, I also add endpoints for the FTP (such as port 21) because I need FTP access to this server. There was an interesting error when I try to upload file to the FTP Server using Filezilla. The error said, “The supplied message is incomplete. The signature was not verified.” Luckily, there are already people discussing online going on with some solutions to the problem. One of them is applying a hotfix from Microsoft which I have the link to it in the list below. It turns out that this error will only occur on Windows Server 2012 (R2) and Windows 8(.1).
There are some online articles which help me to better configure the endpoints and have both the web server and FTP setup on the virtual machine.
Basically, this covers the basic stuff of setting up Azure virtual machine as both a web server and FTP server. It is quite straightforward and about the same as what I did on Amazon EC2. If you would like to learn more, I’d suggest you to attend the online courses about Microsoft Azure on Microsoft Virtual Academy.