[KOSD] Fixed 0x800B0100 WACK Issue in VS2019 16.10.2 Onwards

I have been using Visual Studio 2019 to develop desktop and mobile applications using Xamarin. I could successfully deploy my Xamarin UWP app to Microsoft Store until I upgraded my Visual Studio 2019 to 16.10.2.

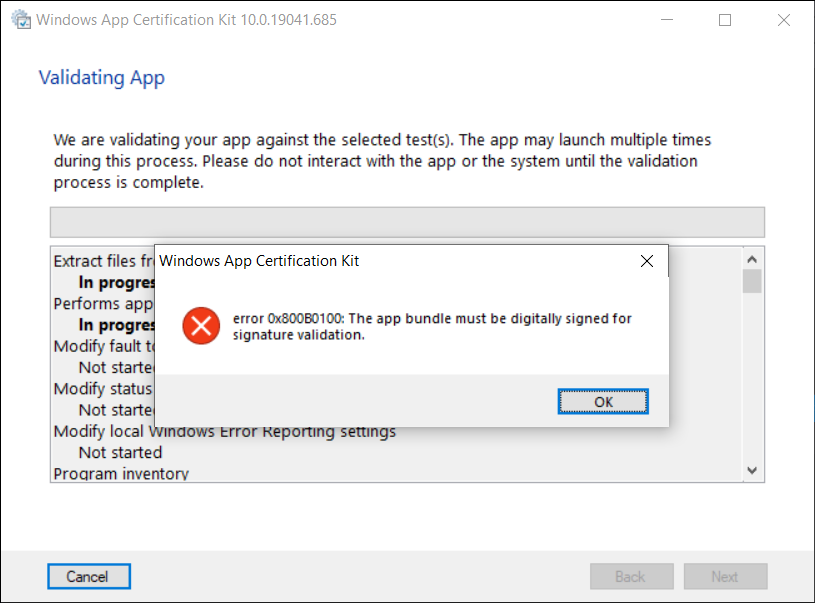
Normally, before we can publish our UWP app to Microsoft Store, we need to launch WACK (Windows App Certification Kit) to validate our app package. However, in VS2019 16.10.2 (and onwards), there will be an error occurs, as shown in the screenshot below, and the validation cannot be completed.

Error 0x800B0100 in Windows App Certification Kit (WACK).

MSBuild Project Build Output

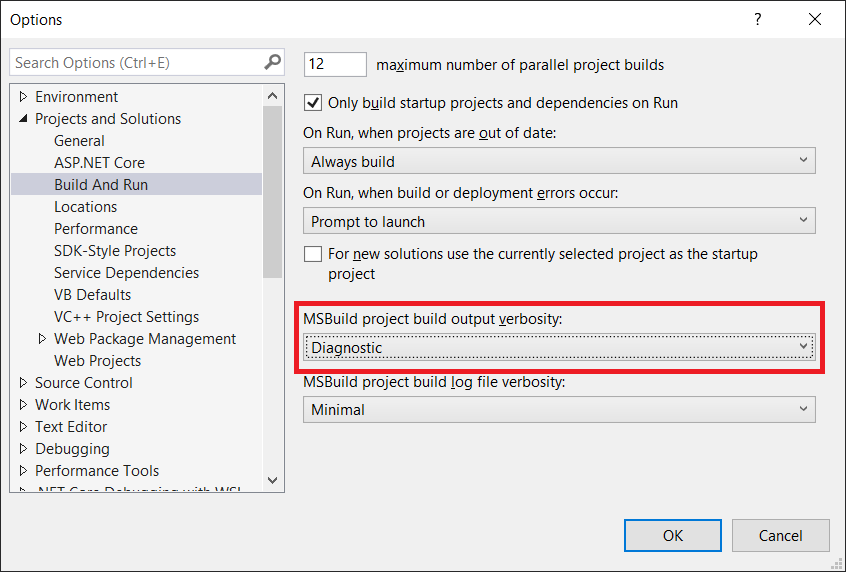
Since my code is the same, so the first thing that I suspect is that the new updates in Visual Studio 2019 are causing this issue. Hence, I changed the verbosity of the project build output to Diagnostic, as shown below. This will help us understand better about what’s happening during the build.

Setting MSBuild project build output verbosity.

By comparing the current build output with the one using the previous version of Visual Studio 2019, I realised that there is something new in the current build ouput. The parameter GenerateTemporaryStoreCertificate is set to false while BuildAppxUploadPackageForUap is true, as shown below.

1>Target "_RemoveDisposableSigningCertificate: (TargetId:293)" in file "C:\Program Files (x86)\Microsoft Visual Studio\2019\Preview\MSBuild\Microsoft\VisualStudio\v16.0\AppxPackage\Microsoft.AppXPackage.Targets" from project "...UWP.csproj" (target "_GenerateAppxPackage" depends on it):
1>Task "RemoveDisposableSigningCertificate" skipped, due to false condition; ('$(GenerateTemporaryStoreCertificate)' == 'true' and '$(BuildAppxUploadPackageForUap)' == 'true') was evaluated as ('false' == 'true' and 'true' == 'true').
1>Done building target "_RemoveDisposableSigningCertificate" in project "...UWP.csproj".: (TargetId:293)

Online Discussions

Meanwhile, there are only two discussion threads online about this issue.

On 22nd of June 2021, Nick Stevens first reported a problem that he encountered in publishing app to Microsoft Store after upgrading his Visual Studio 2019 to 16.10.2. However, his problem is about package family name and publisher name being marked as invalid.

Few days later, on 1st of July 2021, another developer Tautvydas Zilys also reported a similar issue as Nick Stevens’. Interestingly, the same Microsoft engineer, James Parsons, replied to them with the similar answer, i.e. adding the following property in their project file to set GenerateTemporaryStoreCertificate to true.

<GenerateTemporaryStoreCertificate>true</GenerateTemporaryStoreCertificate>

As explained by James, the GenerateTemporaryStoreCertificate will mimic the old behavior of Visual Studio where it will generate a certificate for us that has the publisher name that Microsoft Partner Center expects.

Fixed

Thankfully, after adding this line in the UWP csproject of my Xamarin project as shown below, the WACK works again without the error showing.

<?xml version="1.0" encoding="utf-8"?>
<Project ToolsVersion="14.0" ...>
    ...
    <PropertyGroup>
        ...
        <GenerateTemporaryStoreCertificate>True</GenerateTemporaryStoreCertificate>
        ...
    </PropertyGroup>
</Project>

That’s all to fix the issue. I hope this article, which is also the 3rd in the world discussing about this Visual Studio 2019 problem, is helpful to other Xamarin UWP developers who are running into the same problem.

References

KOSD, or Kopi-O Siew Dai, is a type of Singapore coffee that I enjoy. It is basically a cup of coffee with a little bit of sugar. This series is meant to blog about technical knowledge that I gained while having a small cup of Kopi-O Siew Dai.

[KOSD Series] Running MS SQL Server 2019 on macOS

Few days ago, my teammate would like to learn how to use MS SQL Server. However, he only has a Macbook and MS SQL Server doesn’t run on macOS. Hence, I decided to write him a quick setup guide on how to do that with the help of container.

Starting from March 2016, besides Windows, SQL Sever 2019 also runs on Linux. So, we can easily spin up a Linux container and host SQL Server on it.

🎨 Microsoft introduced SQL Server on Linux in 2016. 🎨

Docker

We need to run Docker on our Mac machine. Since my teammate is new to Docker, he can simply choose a rather straight-forward path for this, which is to use Docker Desktop on Mac. Kindly take note of the system requirement before proceed to install it.

Once the Docker is up and running, we can proceed to pull the image of SQL Server 2019 from the Docker Hub.

SQL Server 2019 Developer Edition

In 2019, continuing with the approach to delivering a consistent and trustworthy acquisition experience for Microsoft container images, Microsoft Container Registry (MCR) is announced.

We can run the following command in Terminal window to start the database server. Here we are using 1501 as the port. Take note that, we need to replace the password with our password which meets the following guideline:

  • at least 8 characters;
  • including uppercase, lowercase letters, base-10 digits and/or non-alphanumeric symbols.
$ docker run -e 'ACCEPT_EULA=Y' -e 'SA_PASSWORD=yourStrong(!)Password' -p 1501:1433 -d mcr.microsoft.com/mssql/server:2019-latest

In the command above, there are two environment variables.

Firstly, it is the environment variable “ACCEPT_EULA”. Setting it to Y means that we accept the End-User Licensing Agreement of the product. So far I still couldn’t find the EULA of the Microsoft SQL Server 2019. If you know, please drop me a message in the comment section. Thanks!

Secondly, it is the “SA_PASSWORD” which is used to set the password that we will later use to connect to the SQL server later as the database admin (userid = “sa”).

Actually, there is another environment variable which is not set here. It is the MSSQL_PID, i.e. the product ID of the SQL Server. By default, it is the Developer edition. If we would like to use Express or Enterprise edition, we can specify it here.

The reason we chose the Developer edition is because it is the edition that it is licensed for use as a development and test system, not as a production server. In addition, despite being Developer edition, it includes all the functionality of Enterprise edition. Hence, SQL Server Developer is an ideal choice for developers like us to build and test applications.

🎨 Docker Hub page of Microsoft SQL Server. 🎨

There are more information about the MS SQL Server image on the Docker Hub page. Hence I will not repeat them here.

Azure Data Studio

To visualise and manage our data in the databases, we need to use tools such as SQL Server Management Studio (SSMS). However, SSMS is only for Windows (AMD or Intel). So, on macOS, we have to choose another cross-platform alternative, which is Azure Data Studio. Azure Data Studio is usable on Windows and Linux too.

Interestingly, Azure Data Studio was previously called SQL Operations Studio. Hence, please only use the latest one, which is the Azure Data Studio.

Now we can connect to the SQL Server from Azure Data Studio as shown below. Take note that the Server is “localhost,1501” and it is using comma, not dot, between the word localhost and the port number.

🎨 Connecting to the Microsoft SQL Server from Azure Data Studio. 🎨

If the connection is successful, we shall be able to see the Server Dashboard as shown below.

🎨 Server Dashboard in Azure Data Studio. 🎨

That’s all. Now we can have MS SQL Server running on our Mac machine for local testing and development.

References

KOSD, or Kopi-O Siew Dai, is a type of Singapore coffee that I enjoy. It is basically a cup of coffee with a little bit of sugar. This series is meant to blog about technical knowledge that I gained while having a small cup of Kopi-O Siew Dai.

Protecting Web API with User Password

identity-server

In my previous post, I shared about the way to connect Android app with IdentityServer4 using AppAuth for Android. However, that way will popup a login page on a web browser on phone when users are trying to login to our app. This may not be what the business people want. Sometimes, they are looking for a customized native login page on the app itself.

To do so, we can continue to make use of IdentityServer4.

IdentityServer4 has a grant which is called Resource Owner Password Grant. It allows a client to send username and password to the token service and get an access token back that represents that user. Generally speaking, it is not really recommended to use the AppAuth way. However, since the mobile app is built by our own team, so using the resource owner password grant is okay.

Identity Server Setup: Adding New API Resource

In this setup, I will be using in-memory configuration.

As a start, I need to introduce a new ApiResource with the following codes in the Startup.cs of our IdentityServer project.

var availableResources = new List<ApiResource>();
...
availableResources.Add(new ApiResource("mobile-app-api", "Mobile App API Main Scope"));
...
services.AddIdentityServer()
    ...
    .AddInMemoryApiResources(availableResources)
    .AddInMemoryClients(new ClientStore(Configuration).GetClients())
    .AddAspNetIdentity<ApplicationUser>();

Identity Server Setup: Defining New Client

As the code above shows, there is a ClientStore that we need to add a new client to with the following codes.

public class ClientStore : IClientStore
{
    ...

    public IEnumerable<Client> GetClients()
    {
        var availableClients = new List<Client>();
        
        ...
        
        availableClients.Add(new Client
        {
            ClientId = "mobile-app-api",
            ClientName = "Mobile App APIs",
            AllowedGrantTypes = GrantTypes.ResourceOwnerPassword,
            ClientSecrets = { new Secret(Configuration["MobileAppApi:ClientSecret"].Sha256()) },
            AllowedScopes = { "mobile-app-api" }
        });

        return availableClients;
    }
}

Configuring Services in Web API

In the Startup.cs of our Web API project, we need to update it as follows.

public void ConfigureServices(IServiceCollection services)
{
    services.AddMvc();

    services.AddAuthorization();

    services.AddAuthentication("Bearer")
    .AddIdentityServerAuthentication(options =>
    {
        options.Authority = "<URL of the identity server>";
        options.RequireHttpsMetadata = true;
        options.ApiName = "mobile-app-api";
    });

    services.Configure<MvcOptions>(options =>
    {
        options.Filters.Add(new RequireHttpsAttribute());
    });
}

Configuring HTTP Request Pipeline in Web API

Besides the step above, we also need to make sure the following one line “app.UseAuthentication()” in the Startup.cs. Without this, we cannot make the authentication and authorization to work in our Web API project.

public void Configure(IApplicationBuilder app, IHostingEnvironment env)
{
    ...
    app.UseAuthentication();
    app.UseMvc();
}

Receiving Username and Password to Return Access Token

We also need to add a new controller to receive username and password which will in return tell the mobile app whether the login of the user is successful or not. If the user is logged in successfully, then an access token will be returned.

[Route("api/[controller]")]
public class AuthenticateController : Controller
{
    ...
    [HttpPost]
    [Route("login")]
    public async Task<ActionResult> Login([FromBody] string userName, string password)
    {
        var disco = await DiscoveryClient.GetAsync("<URL of the identity server>");
        var tokenClient = new TokenClient(disco.TokenEndpoint, "mobile-app-api", Configuration["MobileAppApi:ClientSecret"]);
        var tokenResponse = await tokenClient.RequestResourceOwnerPasswordAsync(userName, password, "mobile-app-api");

        if (tokenResponse.IsError)
        {
            return Unauthorized();
        }

        return new JsonResult(tokenResponse.Json);
    }
    ...
}

Securing our APIs

We can now proceed to protect our Web APIs with [Authorize] attribute. In the code below, I also try to return the available claims via the API. The claims will tell the Web API who is logging in and calling the API now via the mobile app.

[HttpGet]
[Authorize]
public IEnumerable<string> Get()
{
    var claimTypesAndValues = new List<string>();

    foreach (var claim in User.Claims)
    {
        claimTypesAndValues.Add($"{ claim.Type }: { claim.Value }");
    }

    return claimTypesAndValues.ToArray();
}

Conclusion

This project took me two days to find out how to make the authentication works because I misunderstand how IdentityServer4 works in this case. Hence, it is always important to fully understand the things on your hands before working on them.

do-not-give-up.png
Do not give up! (Source: A Good Librarian Like a Good Shepherd)

Reference