Golang Client Library for OneDrive

As I shared in my talk in Boston Golang Community early this month, I had been using OneDrive since its early days when it was still known as SkyDrive. At that time, there was no official API for accessing SkyDrive. After that, Microsoft rebranded the product to be part of Microsoft Live family and OneDrive finally could be accessible through the Live SDK.

PROJECT GITHUB REPOSITORY

The complete source code of this project can be found at https://github.com/goh-chunlin/go-onedrive.

Motivation

In November 2018, Live SDK officially went offline and gave way to the new standard, the Microsoft Graph. Similar to the capabilities of Live SDK, Microsoft Graph allows us to access multiple Microsoft services such as People, Outlook, OneDrive, Calendar, Teams, etc. Microsoft Graph also offers client libraries for many platforms that can integrate with our application similar to Live SDK, as shown in the screenshot below.

Code languages and platforms officially mentioned for Microsoft Graph.

Golang is not in the list. Since I need to access OneDrive in my other Golang applications, I decided to build a OneDrive Golang client library myself.

Project Structure

There is one project go-github from Google about building a Golang client library for accessing the GitHub API. It is similar to what I’d like to achieve so I use the project as a reference.

In the early stage of the project, the project structure is exactly the same as go-github, as shown in the screenshot below.

Project structure of the go-onedrive initially.

The onedrive folder consists of the main codes and unit tests for the library and test folder contains additional test suite which will talk to the actual OneDrive account over network and is beyond the unit tests.

Communication with Microsoft Graph

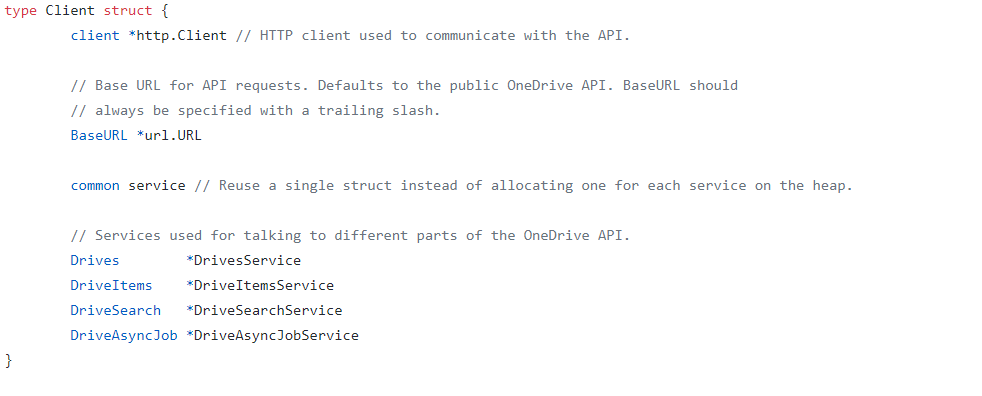
All the communication in the library is done via a client with Base URL pointing to graph.microsoft.com. I like how go-github designs its client so that while it has many services, it still can reuse one single struct for each service on the heap.

onedrive.Client manages communication with the Microsoft Graph.

The go-onedrive library does not directly handle authentication. Instead, when creating a new onedrive.Client, we need to pass an http.Client that can handle authentication. The easiest and recommended way to do so is using the oauth2 library.

For every request to the Microsoft Graph, we need to have a relative URL in which case it is resolved relative to the Base URL of the onedrive.Client.

This works for most of the cases in the OneDrive scenario. However, there is a moment when the client should not be reused, for example, monitoring the asynchronous job status on OneDrive. This is because of the following two reasons

  • Base URL for job monitoring API needs to use api.onedrive.com as domain instead of pointing to Microsoft Graph;
  • We should not pass the user authentication information to the job monitoring API because the request will be rejected.

To solve this problem, I introduce a flag, isUsingPlainHttpClient, to specify whether the is a need to use another new http.Client to send the API request, as shown in the screenshot below.

Checking whether to use the http.Client with authentication.

HTTP 202 and HTTP 204

There are some operations on OneDrive, such as copying drive items, will take a while to complete. That’s where the asynchronous job, as discussed above, comes into picture. So, when we send an API request to copy-and-paste the drive items, the Microsoft Graph will return us HTTP 202 Accepted instead of HTTP 200 OK. The HTTP 202 status code means that our request has been accepted for processing, but the processing has not been completed.

In the example of copy-and-pasting drive items, the response body is empty. It only provides a job monitoring URL (which is pointing to the OneDrive endpoint instead of Microsoft Graph) in the Location response header. Hence, to get this information, I have added in the following piece of codes.

Return the Location header in JSON format.

By doing so, now I can easily retrieve the job monitoring URL from the JSON and pass it to the OneDrive API.

In the codes above, I also check for HTTP 204 No Content because this status code is intended to describe a response with no body. Hence, the onedrive.Client only needs to read the body content if the response code is not 204.

Error Handling

When there is an error, Microsoft Graph will return error information in JSON format. Hence, the onedrive.Client will first check whether the returned JSON object is an error. If yes, it will return the error accordingly. Otherwise, it will continue to decode the response body to a struct, as shown in the following screenshot.

Reading error and response body.

Unit Testing and Integration Testing

I also learned from go-github on how the unit test cases are written.

Firstly, we have a test HTTP server setup along with a onedrive.Client that is configured to talk to that test server.

Secondly, in the HTTP request multiplexer used in the test server, since we are providing relative URL for every request, we will also need to ensure tests catch mistakes where the endpoint URL is specified as absolute rather than relative.

Thirdly, we also need to have a HTTP handler in the test server to take care of OneDrive API test which is not based on the Microsoft Graph endpoint.

With all these requirement, we will have the following setup.

Setting up a test HTTP server.

Same as the go-github project, I have also prepared a set of integration tests.

The integration tests will exercise the entire go-onedrive library against the live Microsoft Graph and OneDrive API. These tests will verify that the library is properly coded against the actual behavior of the API, and will fail upon any incompatible change in the API.

Unlike unit tests which will be run automatically on GitHub Actions, the integration tests are meant to be run manually because it will interact and change the actual OneDrive account.

Unit tests are run in GitHub Actions for every push or PR to the main branch.

Module AND Publishing

Starting from Go 1.11, a new concept called modules is introduced. Using modules, developers are not only no longer confined to working inside GOPATH, but also get to experience the new Go dependency management system that makes dependency version information explicit and easier to manage.

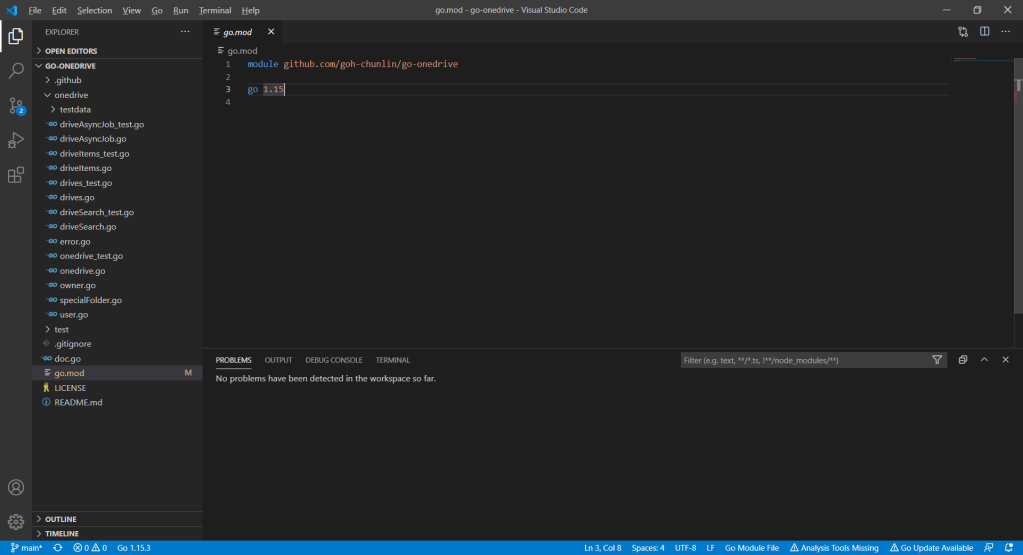
A module is basically a collection of Go packages stored in a file tree with a go.mod file at its root. Hence, if we want to transform our project to a module, we will need to make a small change to our project structure, as shown in the following screenshot.

Introducing go.mod, go.sum, and doc.go.

The approach I took is similar to how Google does for their Google API Go Client project. We need to have a new file called doc.go. This file contains only introductory documentation as comments and a package clause.

After that we make the root of project as the root of the new module with the following command.

go mod init github.com/goh-chunlin/go-onedrive

A go.mod file will be generated with the following content.

A new go.mod file being generated.

Next, we use the following command to tidy up the dependencies. A go.sum file will be also generated at the same time.

go mod tidy

Now we can proceed to publish our module by first creating a Release of it on the GitHub.

Create a release with tag in Visual Studio Code (Read more on Stack Overflow discussion).

However, there is an important question that must be addressed first: subsequently after we upgrade our go-onedrive module, how do our users upgrade dependency of the go-onedrive module to the latest version?

Dependency UPGrade

Before we upgrade the dependencies, we first need to check available dependency upgrades using the following command.

go list -u -m all

The -u flag adds information about available upgrades. The -m flag is to list modules instead of packages. Hence, with the command above, if there is a new version for go-onedrive available, it will show as follows.

github.com/goh-chunlin/go-onedrive v1.0.8 [v1.0.9]

The line above means that the v1.0.8 is being used in the application but there is now a v1.0.9 available. Now we can proceed to download the latest version of dependencies with the following command.

go get -u github.com/goh-chunlin/go-onedrive

Then it will show that the latest version is downloaded.

go: github.com/goh-chunlin/go-onedrive upgrade => v1.0.9
go: downloading github.com/goh-chunlin/go-onedrive v1.0.9

Interestingly, I also found out that the pkg.go.dev website doesn’t reflect the availability of new package immediately after the release of the new version. I waited for the v1.0.9 to be available on the pkg.go.dev website for around 15 minutes.

Another interesting finding is that the “go list” command above actually reflects the latest version about 5-minute faster than the pkg.go.dev website.

About doc.go

The way we structure our project also forces us to have a Go file like doc.go. This is because without doc.go, the only two places we have our codes are onedrive and test folders. Both of them are subdirectories. This will give us two troubles.

Firstly, somehow it could not work. The package onedrive which is in the subdirectory cannot be located, as shown in the screenshot below.

Error in CodeQL scan on GitHub.

Secondly, when we tag the release with version number, only the version of go-onedrive as a module and test/integration as package is updated, but not the version of onedrive.

These two troubles went away only after I added in the doc.go in the root. The module of go-onedrive is now also nicely shown on the pkg.go.dev website with 4 checks, as shown in the screenshot below.

go-onedrive module page.

Conclusion

This is just the very first step of me writing a library in Golang and publish it as a module on the pkg.go.dev website. I started this project as one of my after-work projects in October 2020. I only successfully publish its first release in December 2020. This project has been a great learning journey for me. So, I hope my sharing in this article can be somewhat useful to you as well.

The learning is tough but fun at the same time! (Image Credit: Bilibili)

Feel free to let me know if there is a better alternative or improvement needed. I’m always happy to hear from you all.

References

The code of the OneDrive client library described in this article can be found in my GitHub repository: https://github.com/goh-chunlin/go-onedrive.
Pack UWP Class Library with NuGet

Recently, my team is working on packing our UWP class library as a NuGet package. It turns out that it’s not that straight-forward, because even though there is a documentation from Microsoft, it is for Windows Runtime Component. So, the question on StackOverflow remains unsolved.

I thus decided to document down the steps on how I approach this problem to help the developers out there who are facing the same issue.

Step 1: Setup the UWP Class Library Project

🎨 We will be using “Class Library (Universal Windows) in this post. 🎨

In this post, the new project we create is called “RedButton” which is meant to provide red button in different style. Yup, it’s important to make our demo as simple as possible so that we can focus on the key thing, i.e. generating the NuGet package.

Before we proceed with the new project, we need to configure the project Build properties, as shown in the following screenshot, to enable the XML Documentation file. This will make a XML file generated in the output folder which we need to use later.

🎨 Enable the XML documentation file by checking the checkbox. 🎨

Now, we can proceed to add a new user control, called SimpleButton.xaml.

🎨 Yay, we have simple red button here. 🎨

So this marks the end of the steps where we create an UWP user control where we need to package it with NuGet.

Step 2: Install NuGet.exe

Before we proceed, please make sure we have nuget installed. To verify that, just run the following command in the PowerShell.

> nuget

If it is installed, it will show something as follows.

🎨 Yay, nuget is installed. 🎨

If it is not installed, please download the latest recommended nuget.exe from the NuGet website. After that, add the path the the folder containing the nuget.exe file in the PATH environment variable.

Step 3: Setup NuSpec

In order to package our class library with NuGet, we need a manifest file called NuSpec. It is a manifest containing the package metadata which provides information to be shown on NuGet and helps in package building.

Now we need to navigate in PowerShell to the project root folder, i.e. the folder containing RedButton.csproj. Then, we need to key in the following command to run it.

nuget spec

If the command is successfully executed, there will be a message saying “Created ‘RedButton.nuspec’ successfully.”

Now, we can open the RedButton.nuspec in Visual Studio. Take note that the file itself is not yet included in the solution. So we need to make sure we have enabled the “Show All Files” in the Solution Explorer to see the NuSpec file.

After that, we need to update the NuSpec file so that all of the $propertyName$ values are replaced properly. One of the values, id, must be unique across nuget.org and following the naming conventions here. Microsoft provides a very detailed explanation on each of the element in the NuSpec file. Please refer to it and follow its guidelines when you are updating the file.

🎨 Finished updating the NuSpec. 🎨

Step 4: Connect with GitHub and Azure DevOps

In order to automate the publish of our package to the NuGet, we will need to implement Continuous Integration. Here, the tools that we will be using are GitHub and Azure DevOps.

After committing our codes to GitHub, we will proceed to setup the Azure DevOps pipeline.

Firstly, we can make use of the UWP build template available on the Azure DevOps.

🎨 Yes, we can build UWP app on Azure DevOps. 🎨

At the time I am writing this port, there are 5 tasks in the agent job:

  1. Use NuGet 4.4.1;
  2. NuGet restore **\*.sln;
  3. Build solution **\*.sln;
  4. Publish artifact: drop;
  5. Deploy to Visual Studio App Center.

Take note that the NuGet version by default is 4.4.1, which is rather old and new things like <license> element in our NuSpec file will not be accepted. Hence, to solve this problem, we can refer to the list of available NuGet version at https://dist.nuget.org/tools.json.

At the time this post is written in April 2020, the latest released and blessed NuGet version is 5.5.1. So we will change it to 5.5.1. Please update it to any other latest number according to your needs and the time you read this post.

After that, for the second task, we need to update its “Path to solution, packages.config, or project.json” to be pointing at “RedButton\RedButton.csproj”.

Similarly, for the “Solution” field in the third task, we also need to point it to the “RedButton\RedButton.csproj”. Previously I pointed it to the RedButton folder which contains the .sln file, it will not work even though it is asking for “Solution”.

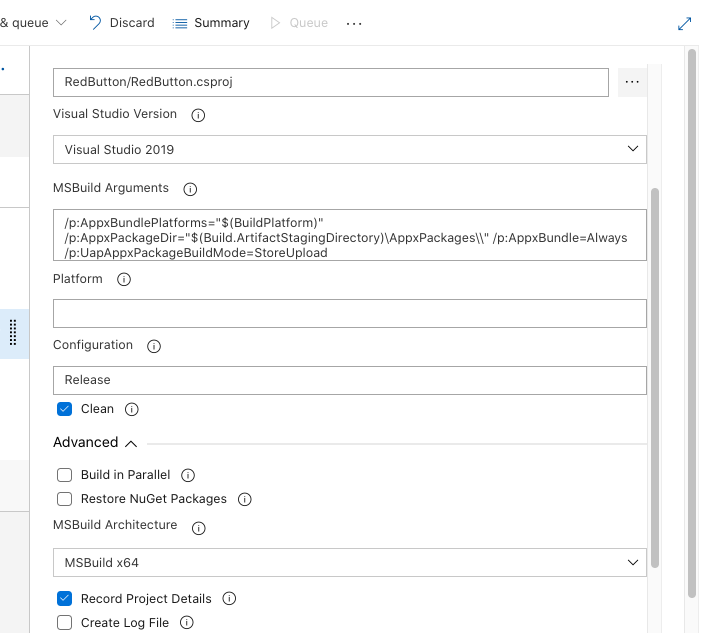
On the third task, we also need to update the “Visual Studio Version” to be “Visual Studio 2019” (or any other suitable VS for our UWP app). It seems to be not working when I was using VS2017. After that, I also updated the field “Configuration” to Release because by default it’s set to Debug and publishing Debug mode to public is not a good idea. I have also enabled “Clean” build to avoid incremental build which is not useful in my case. Finally, I changed the MSBuild Architecture to use MSBuild x64. The update of the third task is reflected on the screenshot below.

🎨 Third task configuration. 🎨

For the forth task, similarly, we also set its “Path to publish” to “RedButton”. Ah-ha, this time we are using the solution folder itself. By right, this fourth task is not relevant if we just publish our UWP class library to a NuGet server. I still keep it and set its path to publish to be the solution so that later I can view the build results of previous tasks by downloading it from the Artifact of the build.

I’d recommend to have this step because sometimes your built output folder structure may not be the same as what I have here depends on how you structure your project. Hence, based on the output folder, you many need to make some adjustments to the paths used in the Azure DevOps.

🎨 The fourth task helps to show build results from previous tasks. 🎨

By default, the fifth task is disabled. Since we are also not going to upload our UWP app to VS App Center, so we will not work on that fifth task. Instead, we are going to add three new tasks.

Firstly, we will introduce the NuGet pack task as the sixth task. The task in the template is by default called “NuGet restore” but we can change the command from “restore” to “pack” after adding the task, as shown in the following screenshot.

🎨 Remember to point the “Path to csproj” to the directory having the RedButton.csproj. 🎨

There is one more important information that we need to provide for NuGet packaging. It’s the version of our package. We can either do it manually or automatically. It’s better to automate the versioning else we may screw it up anytime down the road.

There are several ways to do auto versioning. Here, we will go with the “Date and Time” method, as shown in the screenshot below.

🎨 Choose “Use the date and time”. 🎨

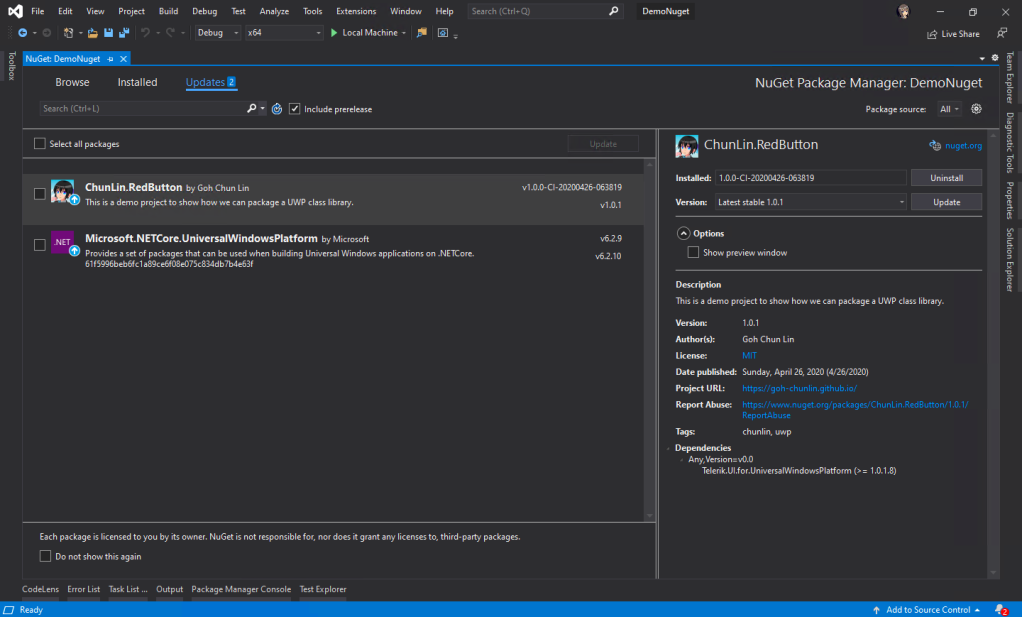
This way of versioning will append datetime at the end of our version automatically. Doing so allows us to quickly test the release on the NuGet server instead of spending additional time on updating the version number. Of course, doing so means that the releases will be categorized as pre-released which users cannot see on Visual Studio unless they check the “Include prerelease” checkbox.

🎨 The prerelease checkbox on Visual Studio 2019. 🎨

Secondly, if you are also curious about the package generated by the sixth task above, you can add a task similar to the fourth task, i.e. publish the package as artifact for download later. Here, the “Path to publish” will be “$(Build.ArtifactStagingDirectory)”.

🎨 Publishing NuGet package for verifying manually later. 🎨

Since a NuGet package is just a zipped file, we can change its extension from .nupkg to .zip to view its content on Windows. I did the similar on MacOS but it didn’t work, so I guess it is possible on Windows only.

Thirdly, we need to introduce the NuGet push task after the task above to be the eighth task. Here, we need to set its “Path to NuGet package(s) to publish” to “$(Build.ArtifactStagingDirectory)/*.nupkg”.

Then, we need to specify that we will publish our package to the nuget.org server which is an external NuGet server. By clicking on the “+ New” button, we can then see the following popup.

🎨 Adding a new connection to nuget.org. 🎨

Azure DevOps is so friendly that it tells us that “For nuget.org, use https://api.nuget.org/v3/index.json&#8221;, we will thus enter that URL as the Feed URL.

🎨 We will be using the API key that we generate in nuget.org for the NuGet push task. 🎨

With this NuGet push task setup successfully, we can proceed to save and run this pipeline.

After the tasks are all executed smoothly and successfully, we shall see our pre-released NuGet package available on the nuget.org website. Note that it requires an amount of time to do package validating before public can use the new package.

🎨 Yay, this is our first NuGet package. 🎨

This is not a happy ending yet. In fact, if we try this NuGet package, we will see the following error which states that it “cannot locate resource from ‘ms-appx:///RedButton/SimpleButton.xaml’.”

🎨 Windows.UI.Xaml.Markup.XamlParseException: ‘The text associated with this error code could not be found. 🎨

So what is happening here?

In fact, according to an answer on StackOverflow which later leads me to another post about Windows Phone 8.1, we need to make sure the file XAML Binary File (XBF) of our XAML component is put in the NuGet package as well.

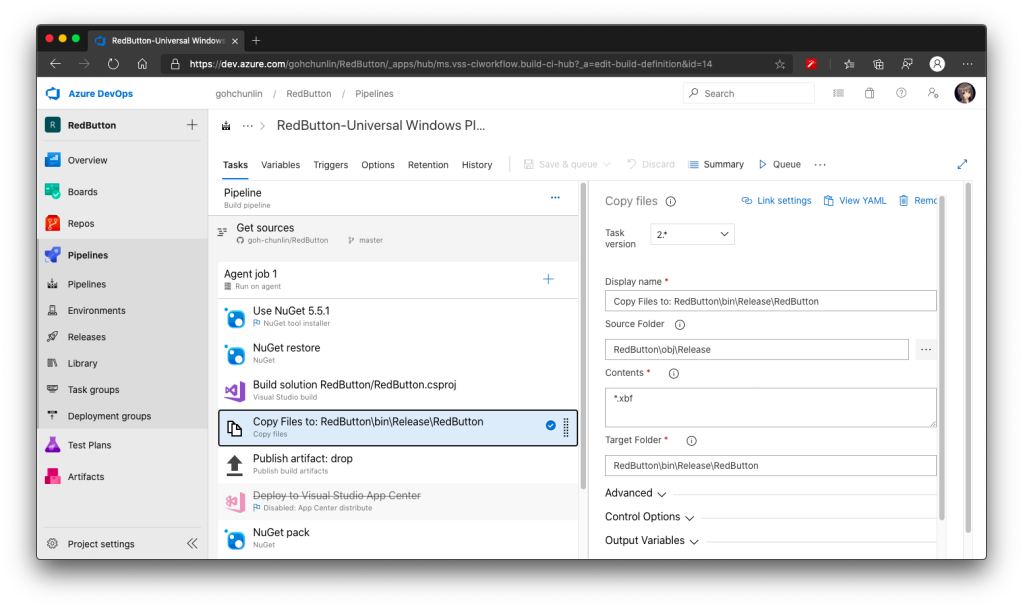
To do so, we have to introduce a new task right after the third task, which is to copy the XBF file from obj folder to the Release folder in the bin folder, as shown in the following screenshot.

🎨 We need to add “Copy Files” task here. 🎨

Step 5: Targeting Framework

Before we make our NuGet package to work, we need to specify the framework it is targeting at. To do so, we need to introduce the <files> to our NuSpec.

So, the NuSpec should look something as follows now.

🎨 Finalised NuSpec. 🎨

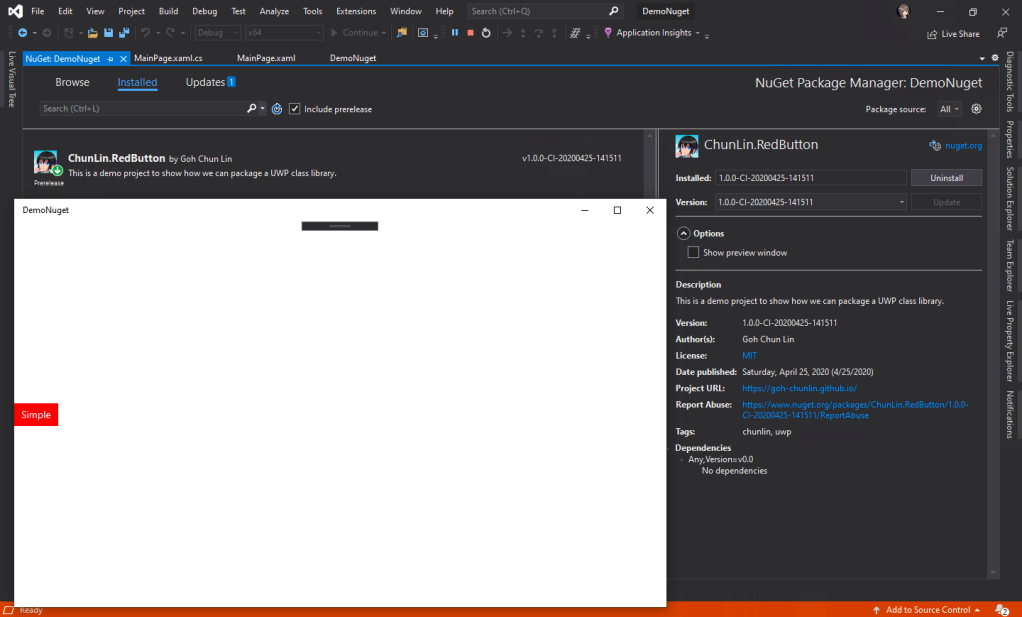
Now with this, we can use our prerelease version of our UWP control in another UWP project through NuGet.

🎨 Yay, it works finally! 🎨

Step 6: Platform Release Issues

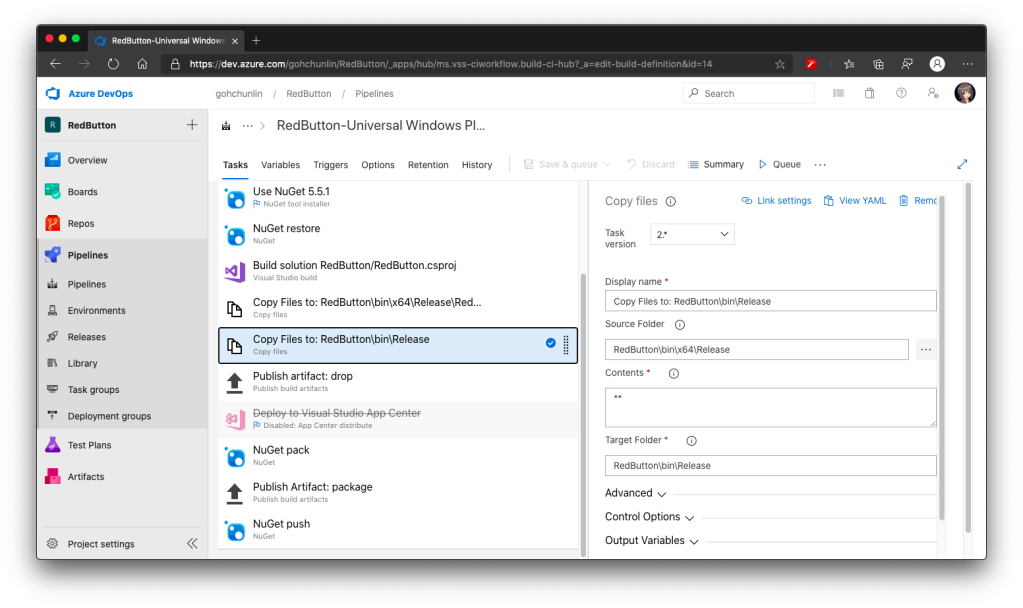
There will be time which requires us to specify the Platform to be, for example, x64 in the third task of the Azure DevOps pipeline above. That will result in putting the Release folder in both obj and bin to be moved to obj\x64 and bin\x64, respectively. This will undoubtedly make the entire build pipeline fails.

Hence we need to update the paths in the Copy File task (the fourth task) and add another Copy File task to move the Release folder back to be directly under the bin directory. Without doing this, the nuget pack task will fail as well.

🎨 The new task to correct the position of the Release folder in bin. 🎨

Step 7: Dependencies

If our control relies on the other NuGet packages, for example Telerik.UI.for.UniversalWindowsPlatform, then we have to include them too inside the <metadata> in the NuSpec, as shown below.

<dependencies>
    <dependency id="Telerik.UI.for.UniversalWindowsPlatform" version="1.0.1.8" />
<dependencies>

Step 8: True Release

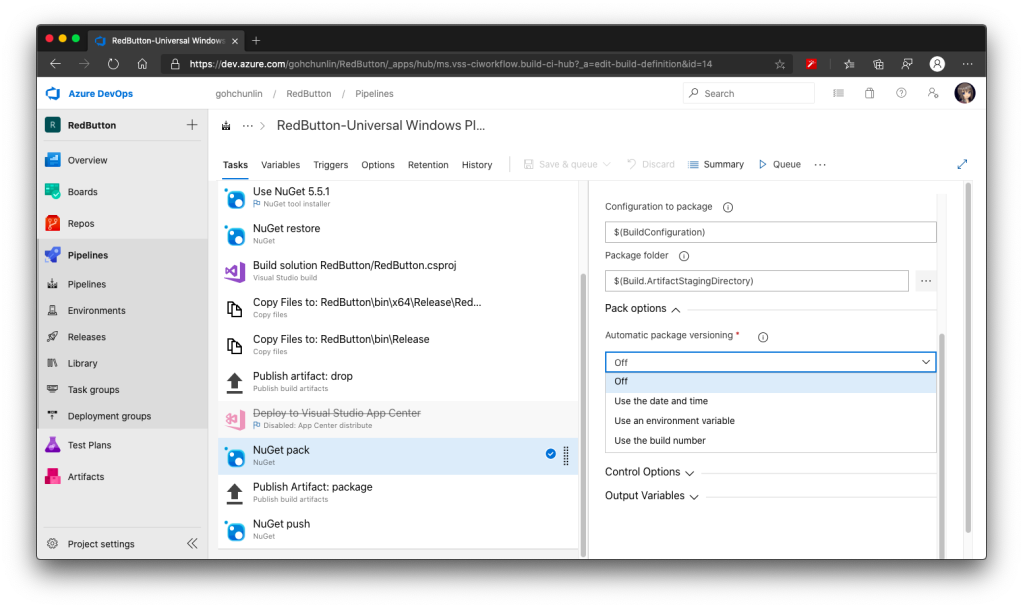
Okay, after we are happy with the prerelease of our NuGet package, we can officially release our package on the NuGet server. To do so, simply turn off the automatic package versioning on Azure DevOps, as shown in the screenshot below.

🎨 Turning off the automatic package versioning. 🎨

With this step, now when we run the pipeline again, it will generate a new release of the package without the prerelease label. The version number will follow the version we provide in the NuSpec file.

🎨 Now Visual Studio will say our package is “Latest stable” instead of prerelease. 🎨

Journey: 3 Days 3 Nights

The motivation of this project comes from a problem I encounter at workplace because our UWP class library could not be used whenever we consumed it as a NuGet package. This was also the time when Google and StackOverflow didn’t have proper answers on this.

Hence, it took me 1 working day and 2 days during weekend to research and come up with the steps above. Hopefully with my post, people around the world can easily pickup this skill without wasting too much effort and time.

Finally, I’d like to thank my senior Riza Marhaban for encouraging me in this tough period. Step 7 above is actually his idea as well. In addition, I have friend encouraging me online too in this tough Covid-19 lockdown. Thanks to all of them, I manage to learn something new in this weekend.

🎨 Yay. (Image Source: ARTE, Muse Asia) 🎨

References

Deploy Golang App to Azure Web Apps with CI/CD on DevOps

Continue from the previous topic

After we have our code on Github repository, now it’s time to automate our builds and deployments so that our Golang application will always be updated whenever there is a new change to our code on Github.

Sample Golang Web App DevOps Pipelines

To do that, we will use Azure DevOps and its Pipelines module. We can easily create a DevOps project in Azure Portal for our Golang application because there is a template available.

Golang is one of the supported languages in Azure DevOps.

As a start, we will focus on “Windows Web App” instead of containers. After that, we just need to configure basic information of the web app, such as its name, location, resource group, pricing tier, and application insights.

We can configure Application Insights while creating the DevOps project.

After that, we shall be able to see a new DevOps project created with the following two folders, Application and ArmTemplates, in Repos. Application folder contains a sample Golang application.

However, why is there an ArmTemplates folder? This is because by default when we create a new Azure DevOps project for Golang application using the steps above, it will also automatically create a web app for us. Hence, this is the ARM (Azure Resource Manager) template Azure uses to do that.

Content of ArtTemplate which is used to create/update the Azure web app.

With this pipeline setup, we can simply update the default Golang code in the Repos to launch our Golang application on Azure. However, what if we want to link Azure DevOps with the codes we already have on our Github repo?

Connecting DevOps with Github

To do that, let’s start again by creating a new project on Azure DevOps, instead of Azure portal. Here, I will make the DevOps project to be Public so that you can access it while reading this article.

Creating a new public DevOps project.

Once the project is created, we can proceed to the Project Settings page of the project to disable some modules that we don’t need, i.e. Boards and Repos.

We need to hide both Boards and Repos because Github provides us similar features.

Setting up Build Pipeline

After this, we then can proceed to create our Build pipeline by first a connecting to our Github repo.

If our code is neither on DevOps or Github, we can click “Use the visual designer” to proceed.

Before continuing to choose the corresponding Github repo, we need to have a azure-pipelines.yml. To understand the guidelines to write proper Azure DevOps Pipelines YAML, we can refer to the official guide. For Golang, there is another specific documentation on how to build and test Golang projects with Azure DevOps Pipelines.

For our case, we will have the following pipeline YAML file.

# Go 
# Build your Go project.

resources:
- repo: self

pool:
vmImage: 'vs2017-win2016'

steps:
- task: GoTool@0
inputs:
version: 1.11.5
displayName: 'Use Go 1.11.5'
- task: Go@0
displayName: 'go get'
inputs:
arguments: '-d'
workingDirectory: '$(System.DefaultWorkingDirectory)'
- task: Go@0
displayName: 'go build'
inputs:
command: build
arguments: '-o "$(System.TeamProject).exe"'
workingDirectory: '$(System.DefaultWorkingDirectory)'
- task: ArchiveFiles@2
displayName: 'Archive Files'
inputs:
rootFolderOrFile: '$(Build.Repository.LocalPath)'
includeRootFolder: False
- task: PublishBuildArtifacts@1
displayName: 'Publish Artifact'
inputs:
artifactName: drop

There are a few virtual machine images from Microsoft-hosted agent pool. We choose the “Visual Studio 2017 on Windows Server 2016 (vs2017-win2016)” image because I normally use Visual Studio 2017 for development.

The first task is the Go Tool Installer task. It will find and download a specific version of the Go tool into the tool cache and add it to the PATH. Here we will use the latest version of Golang which is 1.11.5 at the point of writing this article.

The subsequent step will be running go get. This command will download the packages along with their dependencies. Since the -d argument is present, it will only download them but not install them.

After that, it will run go build. This step compiles the packages along with their dependencies, but it does not install the results. By default, the build command will write the resulting executable to an output file named after the first source file (or the source code directory). However, with the -o flag here, it forces build to write the resulting executable to the output file named $(System.TeamProject).exe, i.e. GoLab.exe.

Next we use the Archive Files task to create an archive file from a source folder. Finally, we use the Publish Build Artifacts task to publish build artifact to DevOps pipelines. With Archive Files task, it will generate a zip file called as such D:\a\1\a\54.zip where 54 is the build id. Publish Build Artifacts task will then upload the zip file to file container called drop.

Details of the Archive Files task.

To find out what is inside the file container drop, we can download it from the Summary page of the build. It is actually a folder containing all the files of our Golang application.

We can download the drop from the Summary page of the build.

Setting up Release Pipeline

Now we can proceed to create our Release pipeline. Luckily, there is already a template available to help us kick starting the Release pipeline.

The “Deploy a Go app to Azure App Service” pipeline is what we need here.

After selecting the template, we will need to specify the artifact, as shown below. There is version that we can choose, for example, the latest version from a specific branch with tags. Here we choose Latest so that our latest code change will always get deployed to Azure Web Apps.

Adding artifact.

Next, we need to enable the CD trigger as shown in the following screenshot so that a new release will be created every time a new build is available.

Enabling CD trigger.

Now we are at Pipeline tab. What we need to next is to move on to the Tasks tab, which is now having a red exclamation mark. We just need to authorize the Release pipeline to our Azure subscription and then connect it to the Azure Web App in the subscription.

Completing tasks.

Now, as you can see, the agent basically does three steps:

  • Stop the Azure Web App;
  • Deploy our code to Web App;
  • Start the Web App.

What interests us here is the second step. The reason why we need to generate a zip file in Build pipeline is also because in the second step, we need to specify the file path to the zip files to deploy.

Default configuration of second step.

Finally, we can just Save the pipeline and rename the “New release pipeline” to another friendlier name.

Now we can manually create a Release to test it out.

Create a new release manually.

Since we trigger this release manually, we also need to click in to deploy it manually.

Deploying to Azure App Service in progress.

After the deployment is done, we can view its summary as shown below.

The deployment process of the agent.

Conclusion

That’s all for setting up simple build and release pipelines on Azure DevOps to deploy our Golang web app to Azure Web Apps.

Deploy ASP .NET Core Directly via Git

secret-manager-tool-azure-app-service-2

You can deploy ASP .NET Core web apps to Azure App Service directly using Git.

This is actually part of the Continuous Deployment workflow for apps in Azure App Service. Currently, Azure App Service integrate with not only Github, but also Visual Studio Team Services, BitBucket, Dropbox, OneDrive, and so on.

screen-shot-2017-01-30-at-1-14-16-pm
Available deployment source options in Azure App Service.

Although dotnet.sg source code is on Github, choosing the “GitHub” option cannot detect its repository. This is because the Github option only lists the repositories on my personal Github account. The dotnet.sg repo whereas is under the sg-dotnet Github Organization account. Hence, I have to choose “External Repository” as the deployment source instead.

Screen Shot 2017-01-30 at 1.21.03 PM.png
Setting up External Repository (Git) as deployment source in Azure App Service.

After that, whenever there is a new commit, if we do “Sync”, it will create a new deployment record, as shown in the screenshot below. We can anytime revert back to the previous deployment by right-clicking on the desired deployment record and select “Redeploy”.

Screen Shot 2017-01-30 at 1.13.35 PM.png
Deployment history in Azure App Service.

Kudu

So what if we want to customize the deployment process?

Before going into that, the first thing we need to say hi to is Kudu. What is Kudu? Kudu is the engine behind Git deployment in Azure App Service. It is also a set of troubleshooting and analysis tools for use with Azure App Service. It can capture hang dump for worker process for performance analyzing purposes.

On Kudu, we can also download the deployment script, deploy.cmd. We can then edit the file with any custom step we have and put the file under the root of repository.

There is another simpler way which is using a file with the filename “.deployment” at the root of repository. Then in the content of the file, we can specify our command to run during deployment as follows.

[config]
command = THE COMMAND TO RUN FOR DEPLOYMENT

To learn more about Kudu, please watch the following video clip from Channel 9.

References

If you would like to read more about the topics above, please refer to following websites.