Pushing Pkl Content from GitHub to AWS S3

In the previous article, we talked about using the S3 Object Lambda to transform the medical records, which are stored in a JSON file, into a presentable web page. However, maintaining medical records in JSON files could be challenging. In this article, we will further investigate how we can generate those JSON files.

We’re going to explore Pkl—pronounced “Pickle”—a configuration-as-code language renowned for its robust validation features and tooling. It was first introduced by Apple as an open-source project in February 2024. Pkl allows us to write configurations as code, validate them, and convert them to existing static formats.

The part highlighted in red will be the focus of this article.

About Pkl

Pkl streamlines the creation of JSON scripts, enhancing maintainability and reducing verbosity through reuse, templating, and abstraction, all supported seamlessly right out of the box.

As we can expect from our medical records in JSON, the JSON files will grow larger over time. Hence it will be increasingly difficult to maintain. Pkl can help reduce the size and complexity of our JSON files by introducing abstractions for common elements and describing similar elements in terms of their differences.

A .pkl file describes a module. Modules are objects that can be referred to from other modules.

Pkl comes with basic types, such as Numbers, Strings, Durations, etc. Having a notation for basic types, we can thus write typed objects. For example, the following module shows how we will define our medical records structure in Pkl.

module medicalVisitTemplate

class MedicalVisit {

medicalCentreName: String

centreType: "clinic"|"specialist"|"hospital"

visitStartDate: Date

visitEndDate: Date

remark: String

treatments: Listing<Treatment>

}

class Treatment {

name: String

type: "medicine"|"operation"|"scanning"

amount: String

startDate: Date

endDate: Date

}

class Date {

year: Int(isBetween(2000, 2100))

month: Int(isBetween(1, 12))

day: Int(isBetween(1, 31))
}

visits: Listing<MedicalVisit>

Listing is a collection in Pkl. It contains exclusively Elements, i.e., object members. In the code above, we define visits to be a collection of MedicalVisits. The MedicalVisit class contains information about the visit, for example type and name of the medical centres the patient visited, visiting period, remark, etc. The visiting period is then defined by Date class which stores year, month, and day.

In the Date class, since the month can only be an integer from 1 to 12, so we can restrict it to an integer range by using Int and isBetween constraint. Later, as Pkl evaluates our configuration, if there is an invalid value, for example 13, provided to the month, there will be an error shown to us, as demonstrated below.

Pkl CLI will evaluate our configuration and show detected invalid values.

Generate JSON with Pkl

So now how do we generate JSON with the module above?

Before we can generate a JSON file, we need to understand the Amending concept in Pkl. As a first intuition, think of “amending a module” as “filling out a form.”

So, to generate the chunlin.json file that was shown in the previous blog post, we can amend the medicalVisitTemplate module above with another Pkl file called chunlin.pkl as shown below.

amends "medicalVisitTemplate.pkl"

visits = new Listing<MedicalVisit> {

...
// Omitted for brevity

new {

medicalCentreName = "Tan Tock Seng Hospital"

centreType = "hospital"

visitStartDate {

year = 2024

month = 3

day = 24

}

visitEndDate {

year = 2024

month = 4

day = 19

}

remark = ""

treatments = new Listing<Treatment> {

...
// Omitted for brevity

new {

name = "Betamethasone (Valerate) 0.025% Cream 15g - Dermasone"

type = "medicine"

amount = "Applied after shower"

startDate {

year = 2024

month = 3

day = 26

}

endDate {

year = 2024

month = 4

day = 19

}

}

new {

name = "Betamethasone (Valerate) 0.1% Cream 15g - Uniflex(TM)"

type = "medicine"

amount = "Applied after shower"

startDate {

year = 2024

month = 3

day = 26

}

endDate {

year = 2024

month = 4

day = 19

}

}

}

}

}

Now if we execute the command below on Pkl CLI to evaluate the given modules and render the

$ ./pkl eval -f json -o ./output/chunlin.json ./input/chunlin.pkl

With the command above, we can get the same output as we see in chunlin.json.

Maintain Pkl in GitHub

Static files like Pkl or JSON can be easily maintained in code repositories such as GitHub. Using GitHub for version control allows us to track changes to our PKL files over time. This makes it easy to revert to previous versions if something goes wrong, compare changes, and understand the evolution of our configuration files. Additionally, we can use GitHub Actions to automate various tasks related to our PKL files, enhancing efficiency and reliability in our workflow.

GitHub Actions is an automation tool that allows us to create workflows triggered by events within our repository. These workflows can automate tasks like testing, building, and deploying code, or even running scripts. By using GitHub Actions, we can streamline the development and transformation process of our Pkl files, ensure consistency, and improve efficiency.

Thus, our mission is now to configure GitHub Actions so that a JSON file can be produced from the Pkl file and sent to the Amazon S3 bucket that we setup in another article earlier.

Configure GitHub Actions Workflow

Firstly, we need to give permission to GitHub Actions to access our S3 bucket. To do so, we will create a new user in AWS Console with appropriate rights.

We only need two permissions, s3:ListBucket and s3:PutObject, to copy files from local to the S3 bucket.

After attaching the policy, we proceed to generate an access key for this newly created user.

Secondly, we need to navigate to our repository and then click on the Actions tab to create a new simple workflow, as shown below.

Let’s start with the simple workflow.

To begin, let’s download a new Linter available for Pkl files in the workflow. The linter is known as pkl-linter done by Eduardo Aguilar Yépez, a senior software engineer at Draftea.

name: Evaluate Pkl and store it in S3 as JSON

on:
push:
branches: [ "main" ]

# Allows us to run this workflow manually from the Actions tab
workflow_dispatch:

jobs:
build:
runs-on: ubuntu-latest

steps:
- uses: actions/checkout@v4

- uses: actions/setup-go@v5
with:
go-version: '>=1.17.0'

- name: Get Go Version
run: go version

- name: Install Linter
run: go install github.com/Drafteame/pkl-linter@latest

- name: Run pkl-linter
run: pkl-linter medical-records
The linter analyses our code and shows detected stylistic errors.

Next, we need to install the Pkl CLI to evaluate Pkl modules and write their output to a file. There are native executables available for us to use. As shown in the workflow above, the GitHub Actions runner is ubuntu-latest, which uses the Ubuntu 22.04 LTS image as of Jun 2024. It uses the amd64 architecture. Hence, we can download the Pkl Linux executable for amd64 architecture.

name: Evaluate Pkl and store it in S3 as JSON

...
# Omitted for brevity

jobs:
build:
runs-on: ubuntu-latest

steps:
...
# Omitted for brevity

- name: Install Pkl CLI
run: curl -L -o pkl https://github.com/apple/pkl/releases/download/0.25.3/pkl-linux-amd64

- name: Grant execute permission to Pkl CLI
run: chmod +x pkl

- name: Get Pkl CLI version
run: ./pkl --version

- name: Eval the Pkl files
run: |
cd medical-records
files=$(find . -name "*.pkl")
count=0
for file in $files; do
output_filename="${file%.pkl}.json"
../pkl eval -f json -o ../output/$output_filename $file
done
cd ..

When my workflow is executed in June 2024, the version of the Pkl CLI is “Pkl 0.25.3 (Linux 5.15.0-1053-aws, native)”.

As shown in the last step above, it will loop through the JSON file in the medical-records folder and evaluate them one-by-one using the Pkl CLI. The JSON files generated will be stored in the output folder.

Eventually, what we need to do is to upload the file over to our AWS S3 bucket. However, before that, let’s make sure the AWS access key and secret access key we generated earlier are stored securely on GitHub Actions, a shown in the screenshot below.

The AWS access key and secret access key should be stored as GitHub Actions secrets.

Now, we can easily setup AWS CLI with the secrets above and use the s3 cp command to move the generated JSON files over to our S3 bucket. To do so, we only need to complete our workflow with the following.

name: Evaluate Pkl and store it in S3 as JSON

...
# Omitted for brevity

jobs:
build:
runs-on: ubuntu-latest

steps:
...
# Omitted for brevity

- name: Setup AWS CLI
uses: aws-actions/configure-aws-credentials@v1
with:
aws-access-key-id: ${{ secrets.AWS_ACCESS_KEY_ID }}
aws-secret-access-key: ${{ secrets.AWS_SECRET_ACCESS_KEY }}
aws-region: ap-southeast-1

- name: Copy files to S3 bucket
run: |
aws s3 cp output s3://lunar.medicalrecords --exclude "*" --include "*.json" --recursive

Please take note that the s3 cp command performs operation only on single file, hence we need to apply the --recursive flag to indicate that the command should run on all files under the specified directory, i.e. output.

Wrap-Up

In conclusion, utilising Pkl for generating and maintaining JSON files offers significant advantages in terms of reducing complexity and enhancing maintainability. By abstracting common elements and leveraging typed objects, Pkl simplifies the management of large and evolving datasets. The structured approach provided by Pkl not only minimises redundancy but also ensures that configurations remain consistent and error-free through its robust validation features.

Additionally, by using GitHub Actions, we can automate the process of evaluating Pkl files, generating the corresponding JSON files as output, and uploading these JSON files to our S3 bucket. This automation not only enhances efficiency but also ensures that changes are tracked and managed effectively.

In summary, we can conclude the infrastructure that we have gone through above and our previous article in the following diagram.

References

[KOSD] Solving SQL File Encoding Issues on Git with PowerShell

Few days ago, some of our teammates discovered that the SQL files they tried to pull from our GitHub repo had encoding issue. When they did git pull, there would be an error saying “fatal: failed to encode ‘…/xxxxx.sql’ from UTF-16-LE-BOM to UTF-8”.

In addition, on GitHub, the SQL files we committed to the GitHub are all marked as binary files. Thus we couldn’t view the changes we made to those files in the commit.

Cause of the Issue

It turns out that those SQL files are generated from SQL Server Management Studio (SSMS).

Default file encoding of SSMS is Western European (Windows) – Codepage 1252.

By default, the encoding used to save SQL files in SSMS is UTF-16. For my case, my default encoding is the “Western European (Windows) – Codepage 1252”. Codepage 1252 is a single-byte character encoding of the Latin alphabet that was used in Windows for English and many Romance and Germanic languages. This encoding will cause Git to treat the files as binary files.

Solution

The way to resolve this issue is to force the file to use UTF-8 encoding. We can run the following PowerShell script to change the encoding of all SQL files in a given directory and its subdirectories.

$Utf8NoBomEncoding = New-Object System.Text.UTF8Encoding $False

Get-ChildItem "<absolute directory path>" -Recurse *.sql | foreach {
    $FilePath = $_.FullName
    $FileContent = Get-Content $FilePath
    [System.IO.File]::WriteAllLines($FilePath, $FileContent, $Utf8NoBomEncoding)
}

The BOM (Byte Order Mark), a sequence of bytes at the start of a text stream (0xEF, 0xBB, 0xBF), is used to signal the endianness of an encoding, but since endianness is irrelevant to UTF-8, the BOM is unnecessary. This explains why we pass $False to the constructor of UTF8Encoding to indicate that BOM is not needed.

Wrap-Up

That’s all for a short little PowerShell script we used to solve the encoding issue of our SQL files.

There is an interesting discussion on StackOverflow about this issue, please give it a read too.

KOSD, or Kopi-O Siew Dai, is a type of Singapore coffee that I enjoy. It is basically a cup of coffee with a little bit of sugar. This series is meant to blog about technical knowledge that I gained while having a small cup of Kopi-O Siew Dai.

Unit Test Stored Procedures and Automate Build, Deploy, Test Azure SQL Database Changes with CI/CD Pipelines

I was recently asked about how to unit test stored procedures before deploying to servers. Unfortunately, there are not much discussions about unit testing stored procedures, especially with tools like SSDT and Azure DevOps. Hence, I decide to write this walkthrough to share my approach to this issue.

PROJECT GITHUB REPOSITORY

The complete source code of this project can be found at https://github.com/goh-chunlin/Lunar.Spending.

Unit Testing

According to The Art of Unit Testing, a unit test is an automated piece of code that invokes the unit of work being tested, and then checks some assumptions about a single end result of that unit.

Without unit testing, one has no choice but to rely on system and integration tests which are normally performed in the later stage of the SDLC. Some teams may even resort to the troublesome way, i.e. manually testing the end product they’re developing to invoke their codes.

Unit testing of stored procedures is also very crucial. If the bugs in stored procedures are not caught in the early stage of development, it is very challenging to rollback the data changes that have been made to the database.

Setup SSDT (SQL Server Data Tools)

SSDT is a development tool for building SQL Server relational databases, including databases in Azure SQL. The core SSDT functionality to create database projects has remained integral to Visual Studio 2022. Thus, we can easily include SSDT by selecting the “Data storage and processing” workload in the Visual Studio Installer, as shown below.

Setting up SSDT in Visual Studio 2022.

With SSDT, we can work directly with a connected database instance on/off-premise. We can use SSDT Transact-SQL design capabilities to build, debug, maintain, and refactor databases. In this article, we will be using SSDT to create unit tests that verify the behavior of several stored procedures.

Create a New Database Project

In this article, we will assume that we have an existing database hosted on Azure SQL server.

Firstly, as shown in the screenshot below, we need to create a new database project in order to import database schema and stored procedures from the database on Azure.

Creating a new SQL Server Database project on VS 2022.

Let’s name our project DbCore. We will then see a simple DbCore project shown in our Solution Explorer, as demonstrated in the screenshot below.

The database project is successfully created.

Next, we will import our Azure database into the database project by right-clicking on it in the Solution Explorer.

Select the “Database…” option to import from existing Azure database.

The widget will then import the data from the Azure database based on the given connection string, as shown below.

Importing database to our database project.

Once the import is done, we shall see our tables and stored procedures listed under the dbo directory in Solution Explorer, as shown below.

Table and stored procedures are successfully imported!

Before we continue, we need to edit the Target Platform of our database project accordingly, as shown in the following screenshot, otherwise we will not be able to publish the database later.

Changing the target platform to avoid the publish error.

Create Unit Test for Stored Procedure

Let’s say we would like to unit test the AddSpending stored procedure. What we need to do is simply right-clicking the AddSpending stored procedure and then click on the “Create Unit Tests…” option, as demonstrated below.

Adding unit test for a selected stored procedure.

We will then be asked for the connection string of the database that the unit test project will be connecting to. Once the project has been successfully created, we will be given a template unit test as follows.

A boilerplate code of stored procedure unit test.

We can include pre and post test SQL statements which will be run before and after the test script is executed, respectively.

For example, we would like to have a clean Spendings table before the unit test runs, we can have the following SQL script to delete all rows in the table.

Pre-test script will be run before the test script.

In our test script, we will test to see if the description and amount can be stored correctly in the database. Hence, we need to specify two Test Conditions to verify the two columns, as shown in the following screenshot.

RC means Return Code. It can later be used in a test case assertion.

Now, we can run our very first unit test with the Test Explorer to see if our stored procedure has any issue or not.

The test case fails. We shall check why the number is rounded up.

It turns out that this bug is caused by wrong data type used for the Amount column. Now we can proceed to fix it.

The test passed after we fixed the issue in our table schema and stored procedure.

Getting Ready for Publishing Database

As we discussed earlier, unit testing is not only about writing a piece of code to test our unit of work, but also making it to be automatically testable.

Hence, our next move is to automate the build, test, and release of our database.

Firstly, we shall make sure the source code of our projects is on GitHub (or any source control supported in Azure DevOps).

Secondly, we need to create the Publish Profile of our database. To do so, we simply right click on database project and choose the “Publish…” option. There will be a window popped out, as shown below.

Configuring the Publish Profile of our database.

As shown in the screenshot above, there are many settings that can be configured, including Azure SQL related settings. After configuring them accordingly, please click on the “Create Profile” button. Once it is grayed out, it means that the profile has been generated successfully. We can then proceed to close the popped-out window.

Please make sure the generated Database Profile file is included in the source control. Kindly add it to Git if it is not, as shown in the screenshot below. This is because this file is needed in our Azure DevOps build pipeline later.

Please make sure our Database Profile is included in source control.

Finally, let’s create a project on Azure DevOps which will host the build and release pipelines for our automatic database deployment.

We will configure our project to have only the Pipelines service on Azure DevOps.

Setup Build Pipeline

Once we have created our project on Azure DevOps, we can proceed to create our Build Pipeline.

Firstly, we need to specify the code repository we are using. Since our code sists on GitHub, we will connect Azure DevOps with our project on GitHub as shown in the screenshot below.

Please remember to select the correct branch too.

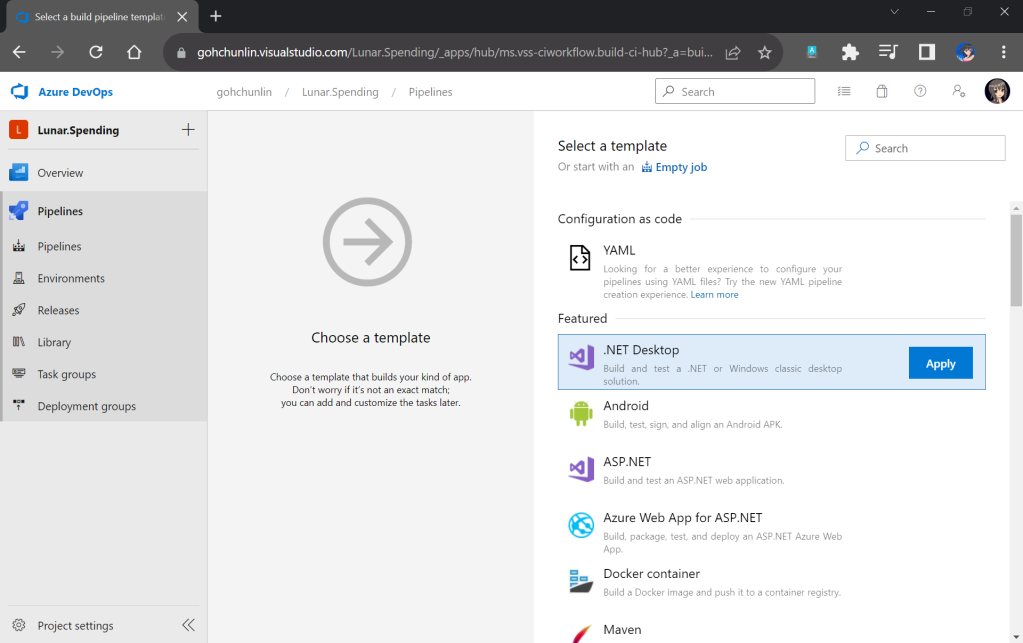
Next, we will start off from the .NET Desktop template. The reason why we choose this template is because it contains many tasks that we can use in our database build pipeline.

We will make use of the .NET Desktop template for our database build pipeline.

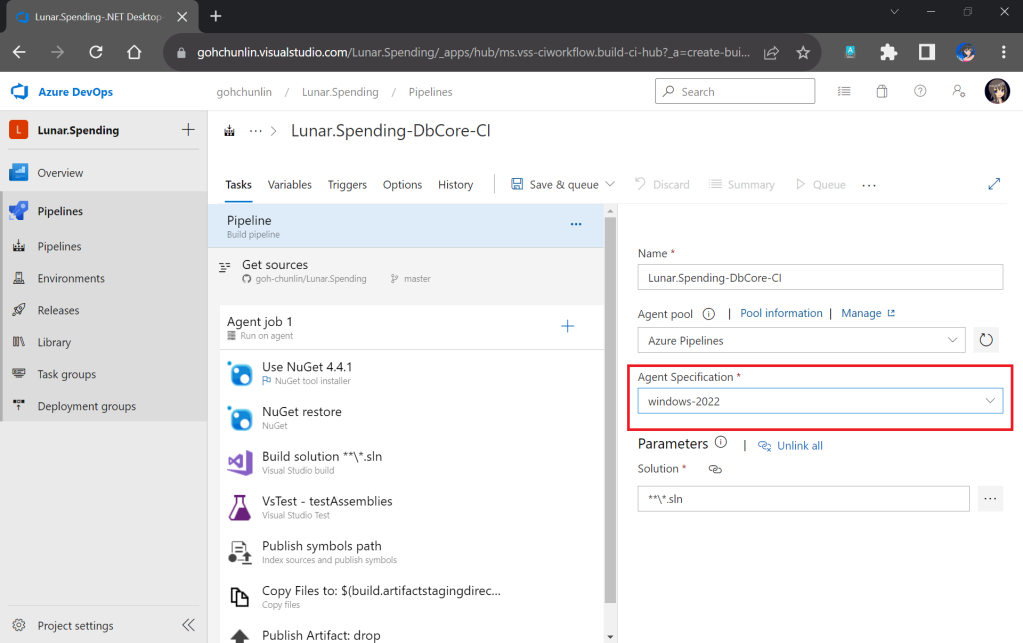
Here we will be using the Microsoft-hosted agent in our build pipeline. With Microsoft-hosted agents, maintenance and upgrades are taken care of for us. Each time we run a pipeline, we will get a fresh virtual machine for each job in the pipeline.

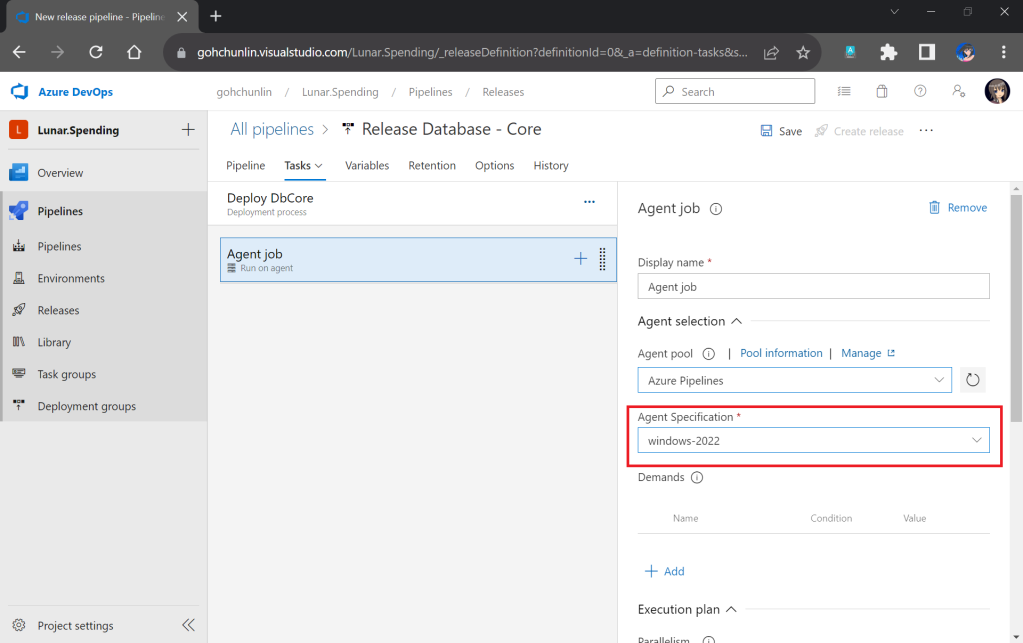
We need to make sure that “windows-2022” (Windows Sever 2022 with VS2022 installed), which is the latest version as of now, is chosen in the Agent Specification field. I have tried with the default “windows-2019” option before and there would be an error message “Error CS0234: The type or namespace name ‘Schema’ does not exist in the namespace ‘Microsoft.Data.Tools’ (are you missing an assembly reference?)”.

Please update to use windows-2022 as our build agent or else there would be issues later.

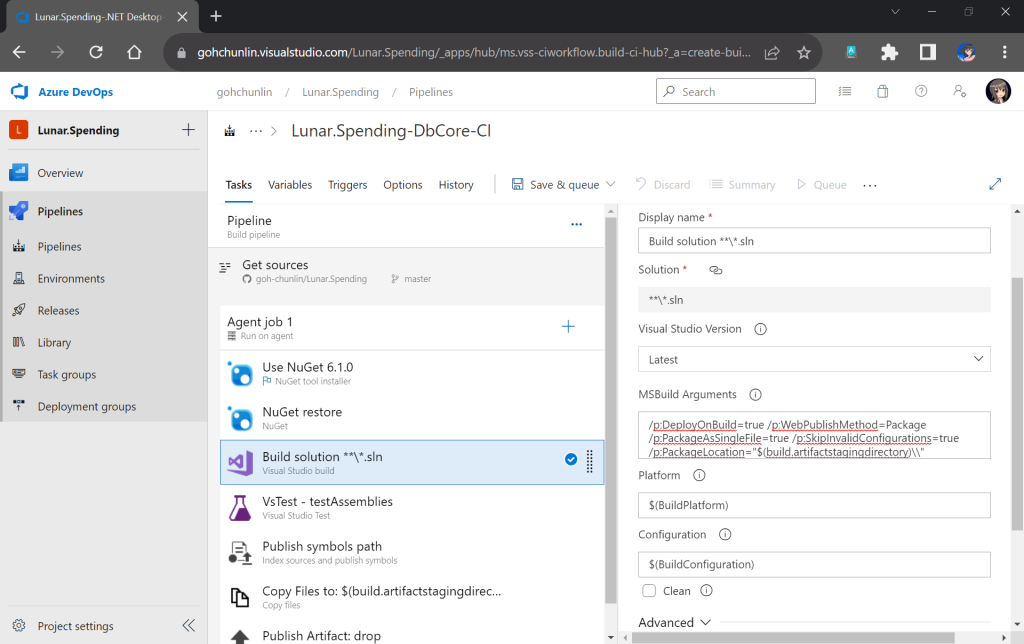
Next, we need to update the version of NuGet to be the latest, which is now 6.1.0.

After that, we move on to the third task in the pipeline which is building our Solution in Release mode with the following MSBuild Arguments on Any CPU.

/p:DeployOnBuild=true /p:WebPublishMethod=Package /p:PackageAsSingleFile=true /p:SkipInvalidConfigurations=true /p:PackageLocation="$(build.artifactstagingdirectory)\\"
Configuring the Build task.

We will remove the VsTest from the Build Pipeline because it will be proper to run the unit tests after changes have been deployed to the database. Otherwise, we will still be testing against the old schema and old stored procedures. Hence, we will add the testing task in the Release pipeline instead.

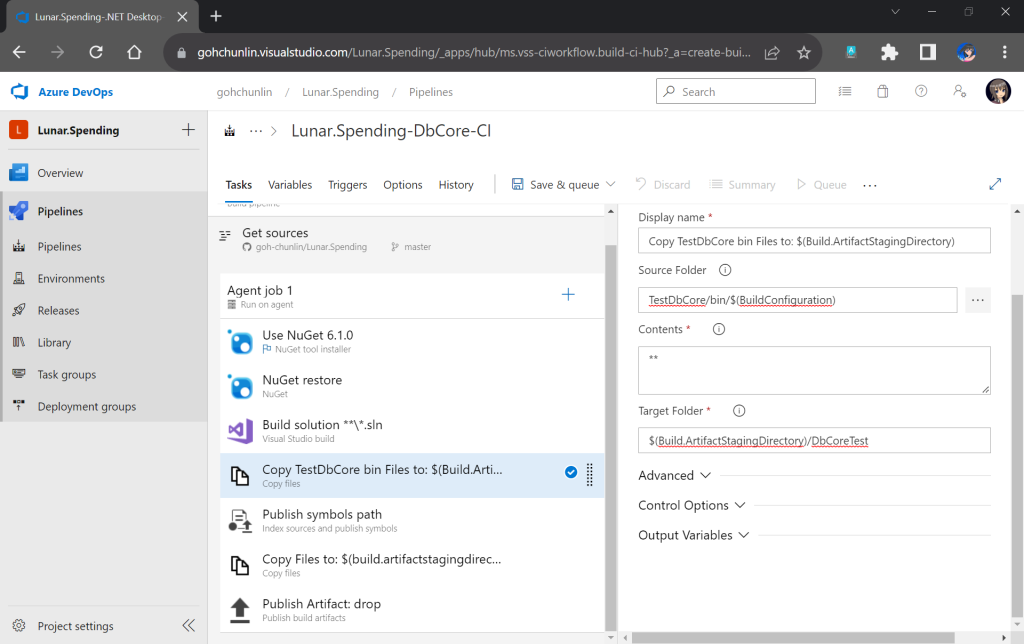
Now, since the testing will be done in the Release Pipeline instead, we shall create a task to copy the assemblies of TestDbCore project to the Build Artifact so that the assemblies can be used in the Release Pipeline later. Thus, we will add a new task “Copy Files” as shown in the screenshot below.

TestDbCore assemblies and other relevant files will be copied to DbCoreTest folder in the Build Artifact.

We will also remove the next task, which is publishing symbols because it is not necessary.

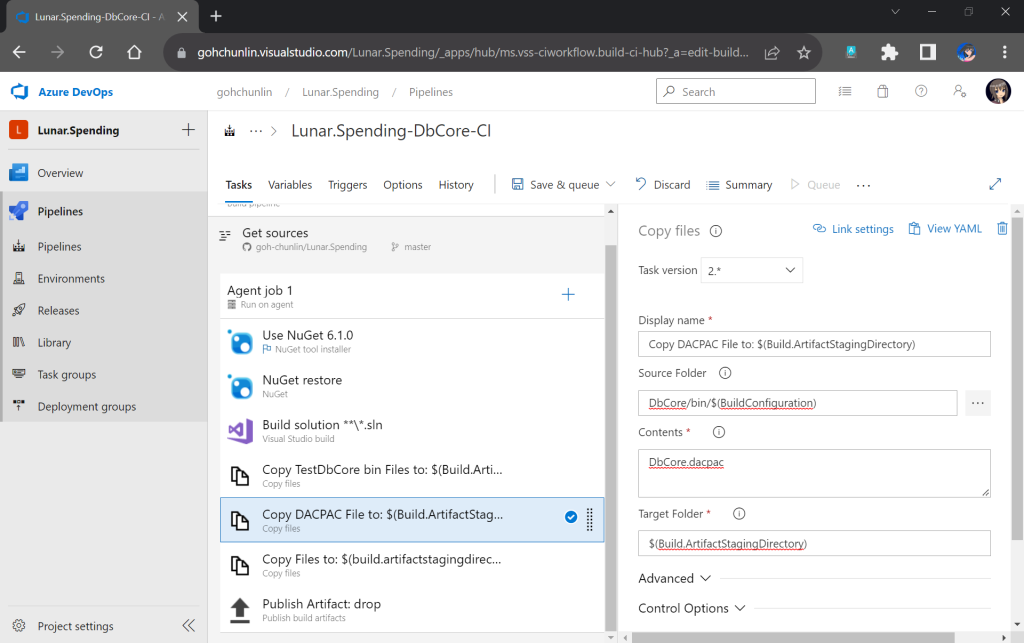
After that, we will add a new task to copy DACPAC file, which is generated during Build, to the Build Artifact, as shown in the following screenshot.

DACPAC file is needed to deploy our database to an existing instance of Azure SQL database.

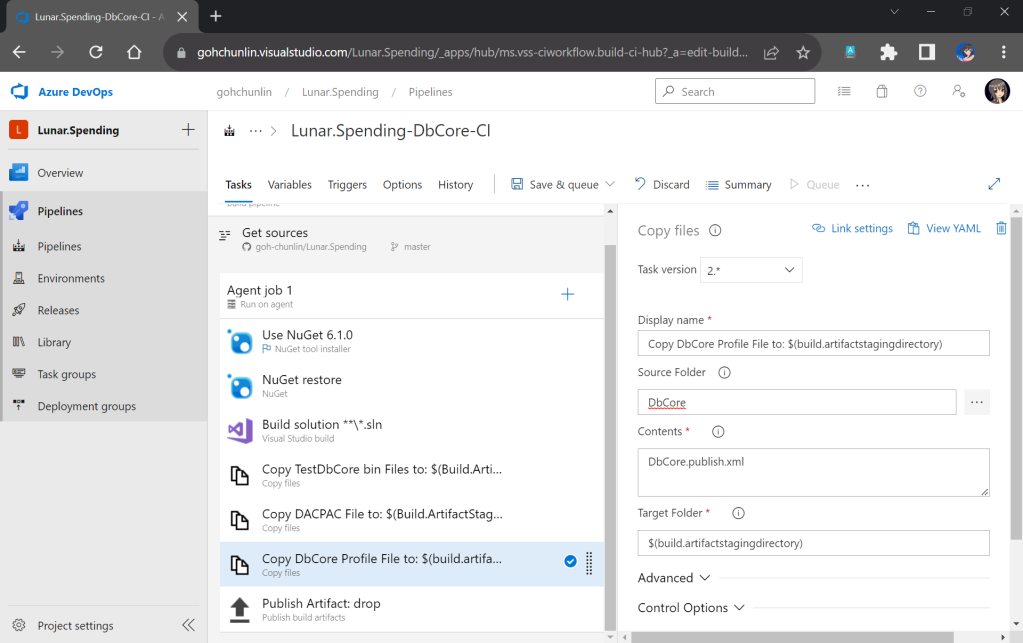
Another file we need to copy is our Database Profile. This is the reason why earlier we have to make sure the profile file needs to be in the source control.

The database publish profile needs to be copied to the Build Artifact directory as well.

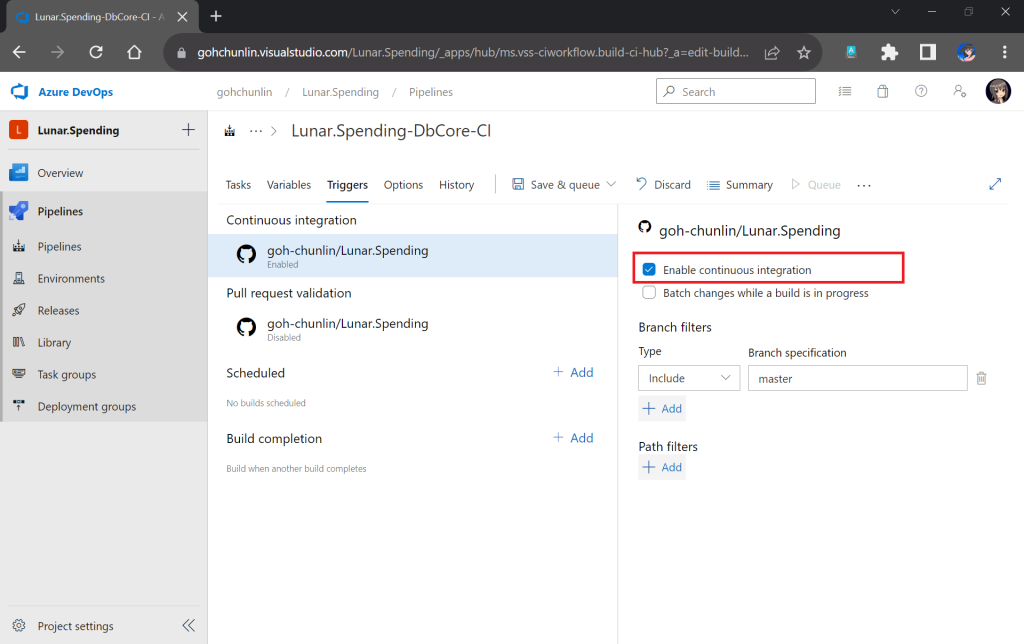
There is nothing to change for the Publish Artifact task. So, we can now move on to enable the Continuous Integration for the Build Pipeline, as shown in the screenshot below.

We can enable the continuous CI under the Triggers section of our Build Pipeline.

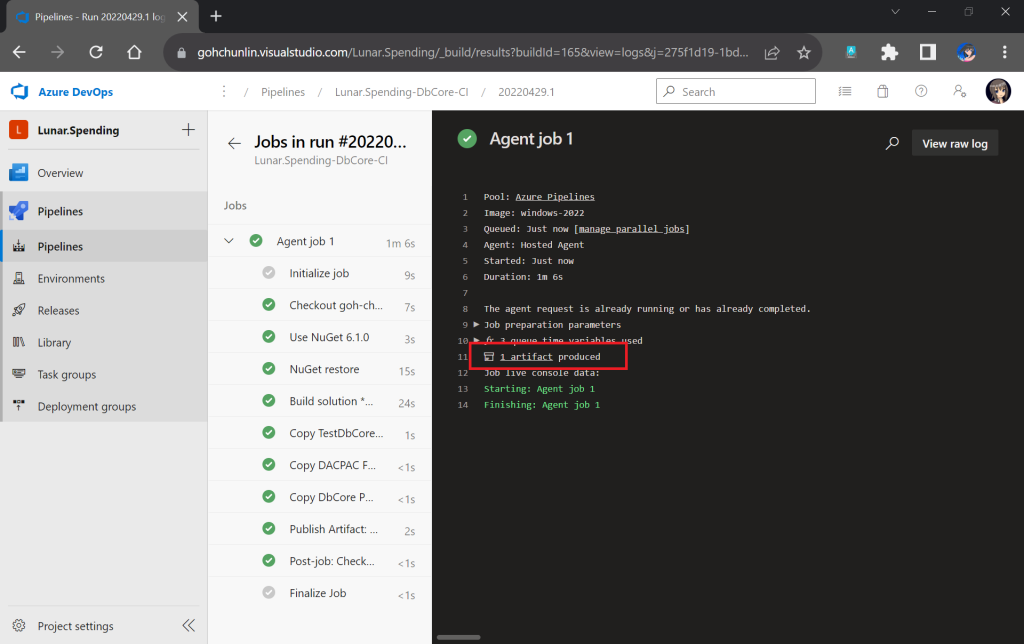
Finally, we can save and queue our Build Pipeline. If the build is successful, we will be able to see a Build Artifact produced, as shown in the screenshot below.

Build is successfully executed!

Setup Release Pipeline

In order to automatically deploy our database changes after the database project and unit test project are built successfully, we need to configure the Release Pipeline.

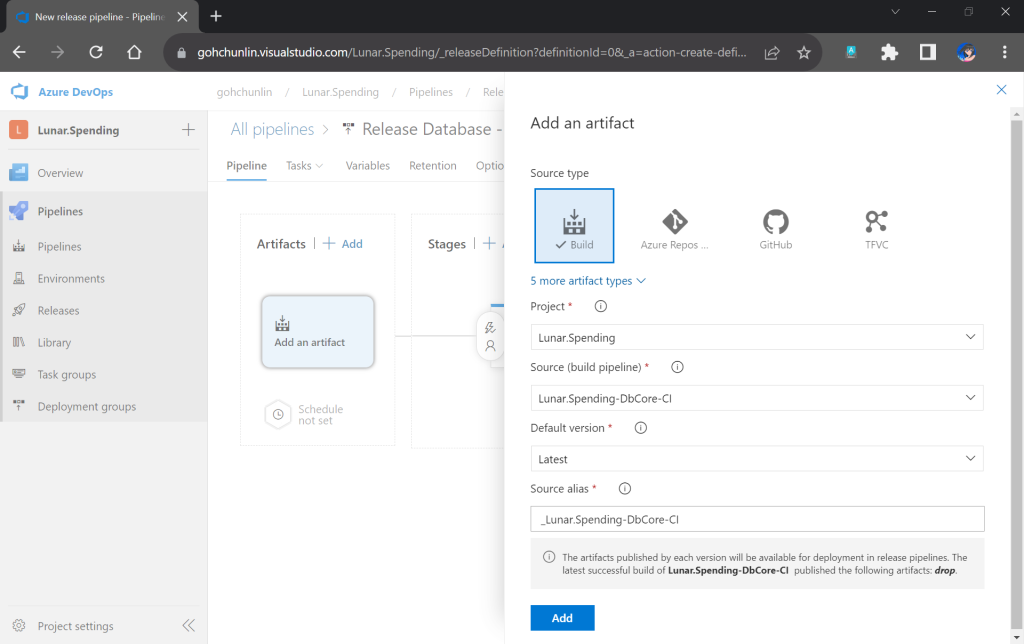
First of all, we need to integrate our Build Pipeline with this new Release Pipeline, as demonstrated in the following screenshot.

Adding the Build Artifact generated earlier in the Build Pipeline.

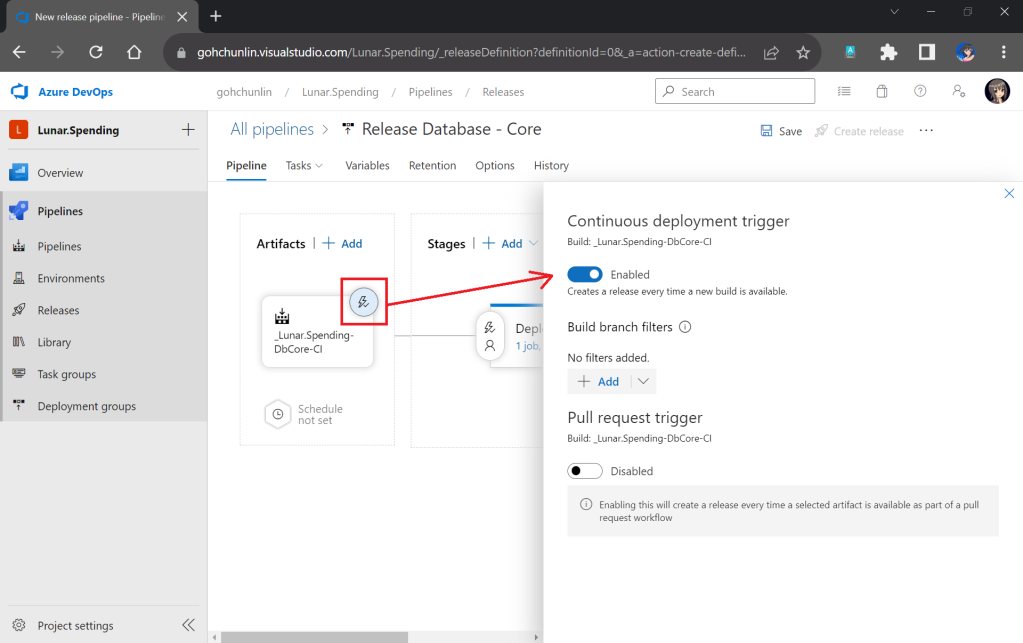
Next, we can enable the Continuous Deployment, as shown in the screenshot below. This is to make sure that we can deploy the database changes and test them automatically right after the build is completed successfully.

Enabling CD in our Release Pipeline.

Now, we can move on to configure the tasks in the stage. Here, I have renamed the stage as “Deploy DbCore”. To be consistent with the Build Pipeline, here we will be using “windows-2022” as the agent in our Release Pipeline too.

Please update to use windows-2022 as our agent or else there would be issues later.

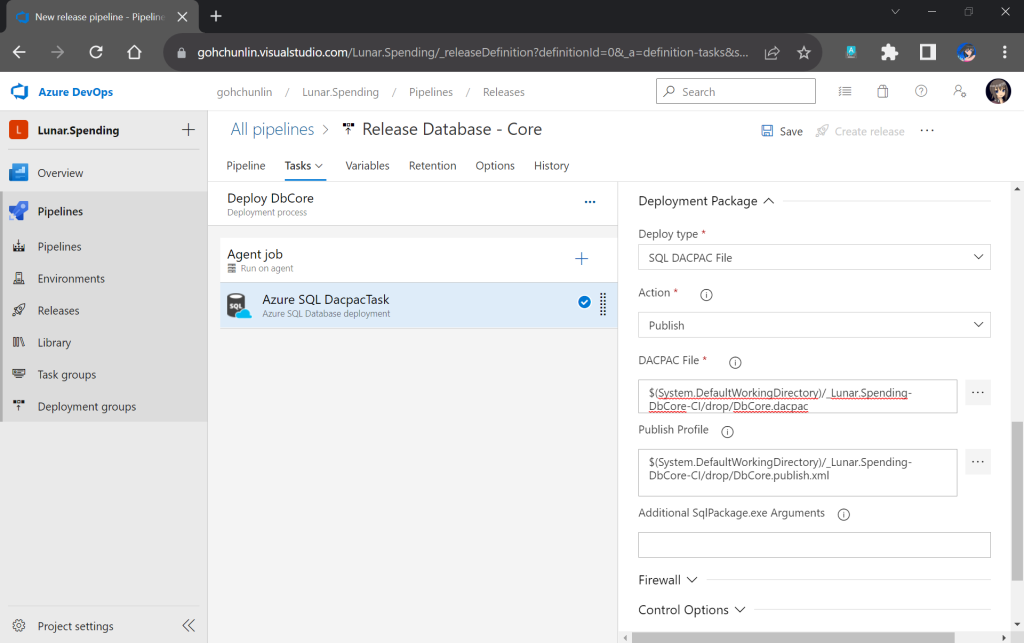
The first task will be deploying database changes to Azure SQL with the task “Azure SQL Database deployment”. In the task, we need to select our Azure subscription and provide our Azure SQL database admin login credential so that the database changes can be deployed to Azure SQL on our behalf.

In the same task, under the Deployment Package section, we need to state that we will be deploy with a DACPAC file. This is also where we will use the DACPAC file and publish profile file in the Build Artifact.

Setting up the deployment package.

Next, we will run into a problem. We are supposed to add the testing task next. However, connection strings to the database are needed. So how could we securely store the connection strings in our pipeline?
Shanmugam Chinnappa proposed three ways to solve this problem. I will demostrate how I use his method of using user-defined secret variables. This is the most straightforward way among the three.

Firstly, we need to edit the app.config file in the TestDbCore project. In this file, two connection strings can be found. The connection string in ExecutionContext is used to execute the test script in our unit test. The PrivilegedContext connection is used to test interactions with the database outside the test script in our unit test.

To keep things simple, we will use the same connection string for both contexts. We thus can replace the connection string in those two contexts with a token #{TestDbCoreConnection}#.

<ExecutionContext Provider="System.Data.SqlClient" 
    ConnectionString="#{TestDbCoreConnection}#" CommandTimeout="30" />

<PrivilegedContext Provider="System.Data.SqlClient" 
    ConnectionString="#{TestDbCoreConnection}#" CommandTimeout="30" />

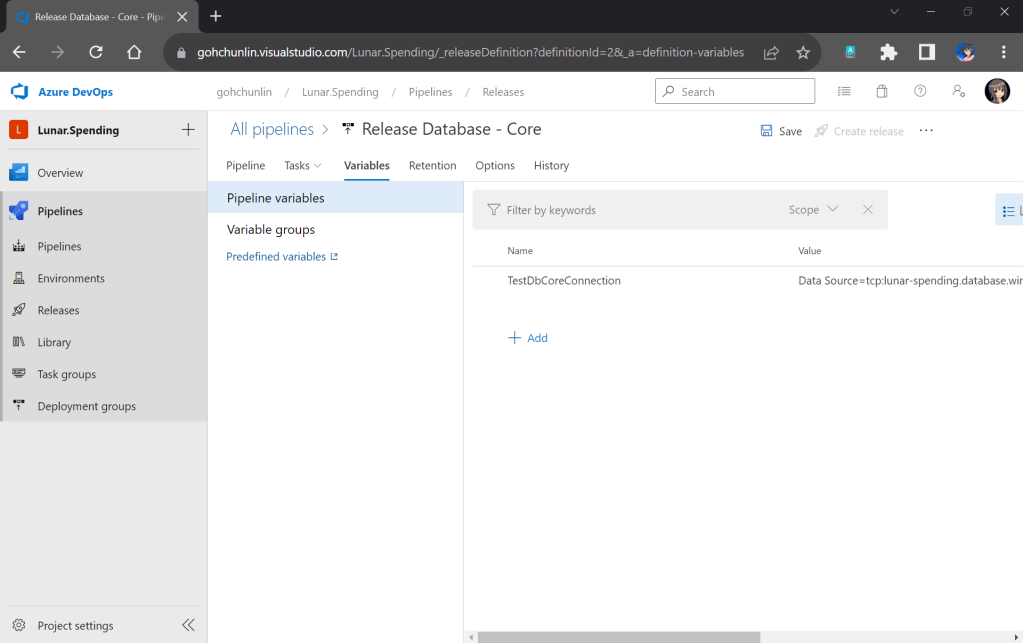
After committing this change to our GitHub repo, we will specify the actual connection string in the Pipeline Variables section under the same name as the token. Since we use TestDbCoreConnection as our token label, the variable is thus called TestDbCoreConnection as well, as shown in the screenshot below.

Storing the actual database connection string in the Pipeline Variables of our Release Pipeline.

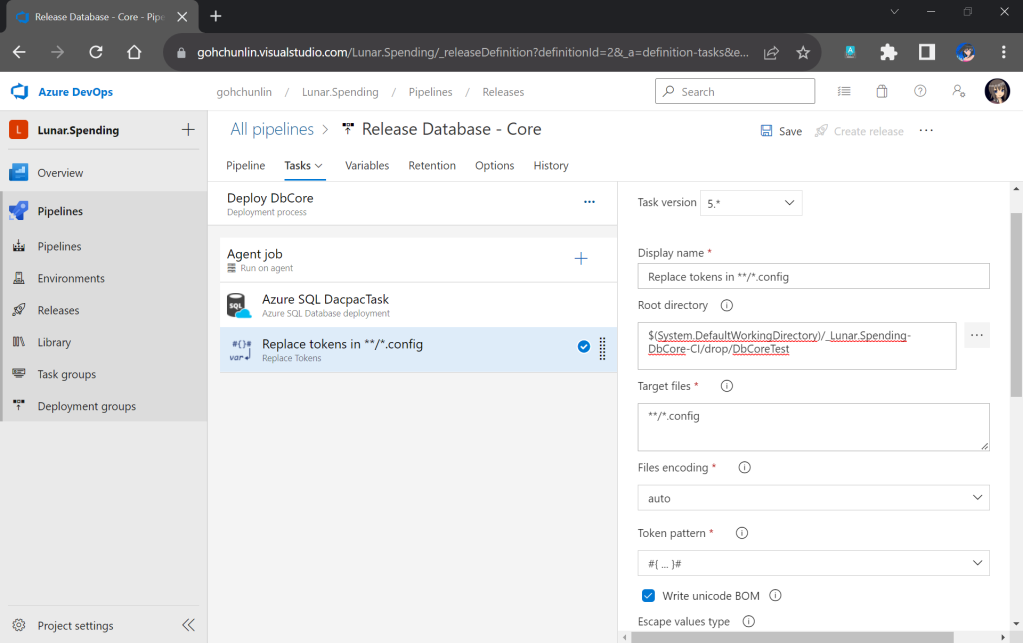
Now we will need a task which would replace the tokens in the app.config file with the actual value. The task we will be using here is the “Replace Tokens” done by Guillaume Rouchon.

Previously we have moved the TestDbCore bin/Release folder to the Build Artifact. In fact, app.config, which is renamed to TestDbCore.dll.config, is in the folder as well. Hence, we can locate the config file easily by pointing the task to the Build Artifact accordingly, as demonstrated in the screenshot below.

We will only need to specify the Root Directory of where our TestDbCore.dll.config is located.

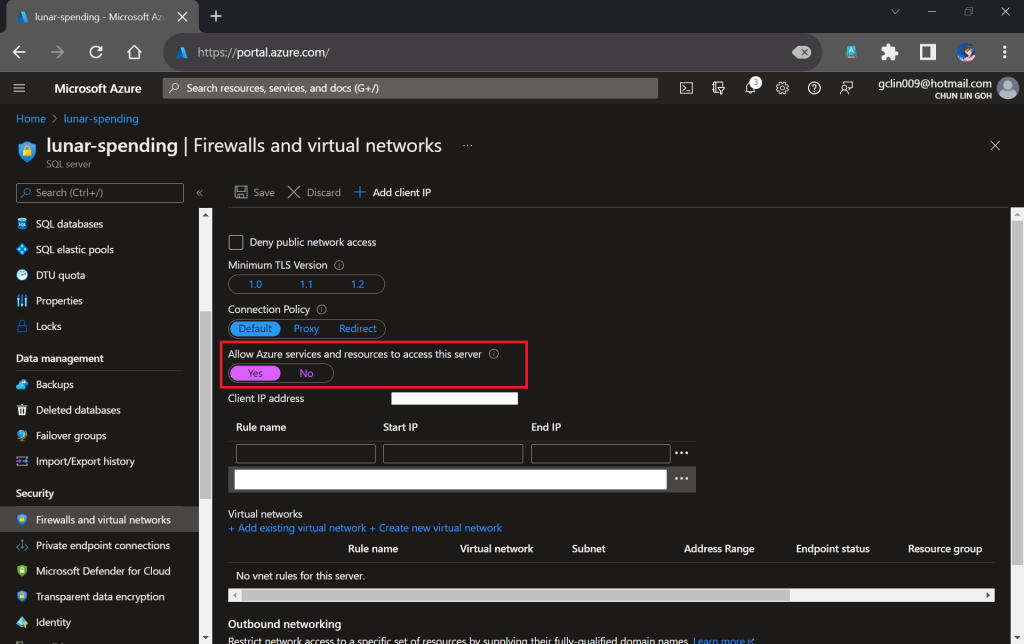
Please take note that since our unit tests need to test the Azure SQL database specified in the connection string, we need to allow Azure services and resources to access our Azure SQL server by configuring its firewall, as shown in the following screenshot. Otherwise, all our unit tests will fail because the Azure SQL server cannot be reached.

Interestingly, the Azure AQL Database deployment task will still be executed successfully even though we do not allow the access mentioned above.

We need to allow Azure services and resources to access the relevant Azure SQL server.

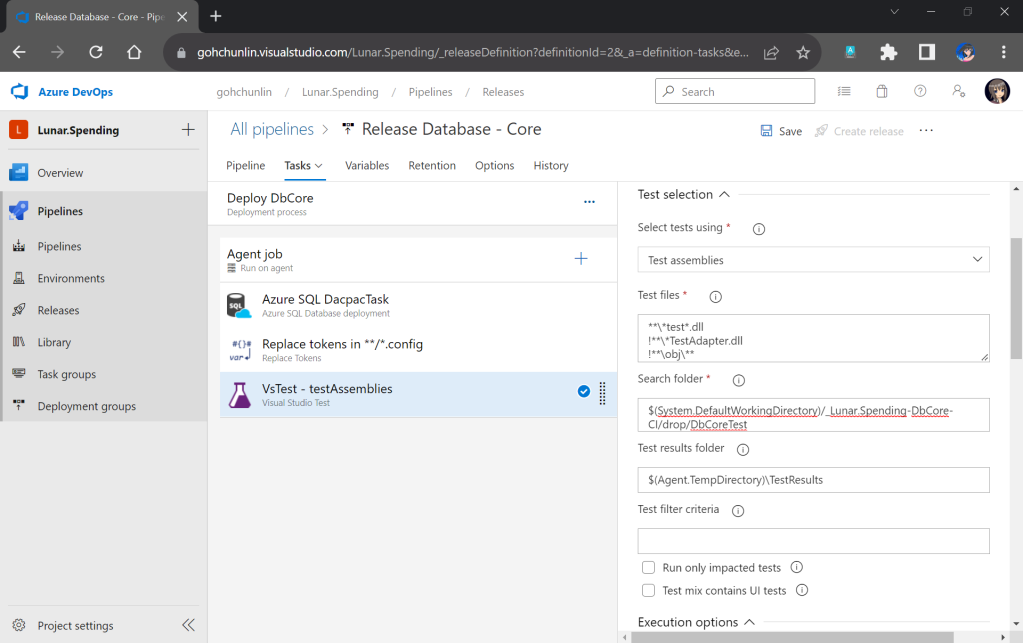
With the actual connection string in place, we can now add our Visual Studio Test (2.*) task back to execute our unit test.

We have our test files in the folder DbCoreTest in the Build Artifact as we designed earlier in the Build Pipeline. Hence, we simply need to point the Search Folder of the Visual Studio Test task to the folder accordingly.

Setting up Visual Studio Test to run our unit test for our stored procedures.

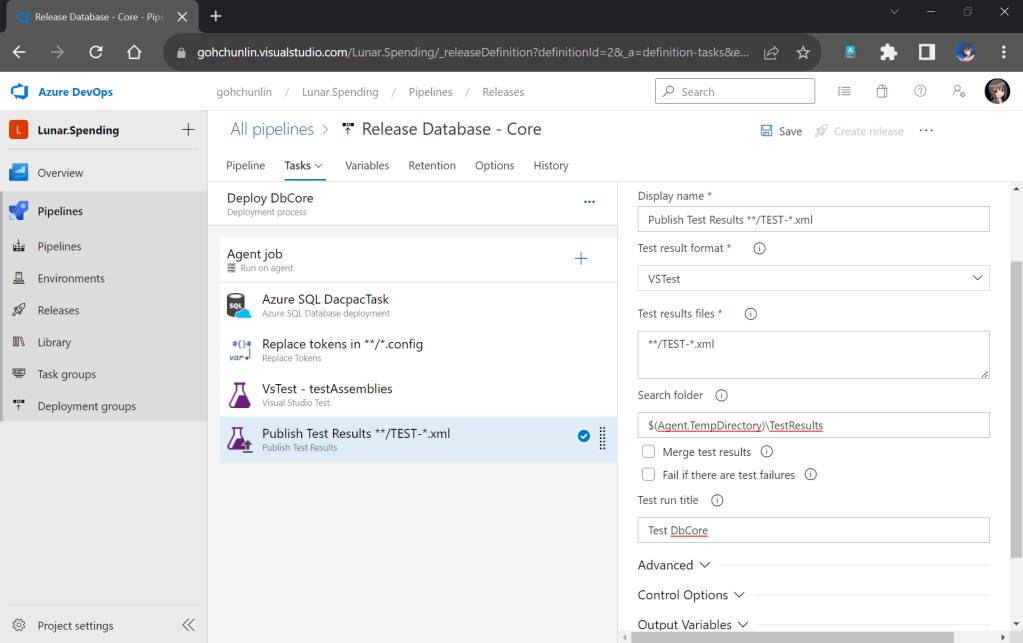
You may have noticed that the test results will be stored in a folder called $(Agent.TempDirectory)\TestResults. So, let’s add our last task of the stage which is to publish the test results.

We will need to specify that our test results are generated by VSTest. Aftervthat, we point the task to look for test results in the $(Agent.TempDirectory)\TestResults folder. Finally, we name our test run.

We can publish our test results to the Release Pipeline.

That’s all! Please remember to save the Release Pipeline changes.

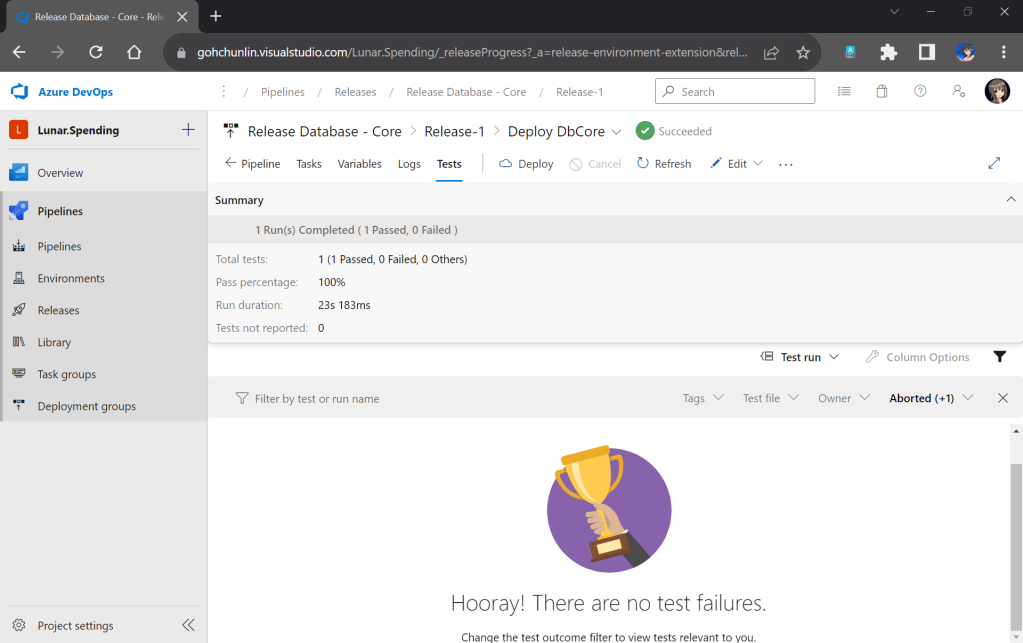
Now when there is a new build completed, the Release Pipeline will be automatically triggered. Once it is completed, not only our database on Azure SQL will be updated accordingly, but also we will have a detailed test result. For example, when all of our unit tests have passed, we will get a test result as shown below.

If all tests have passed, we will receive a trophy. 🙂

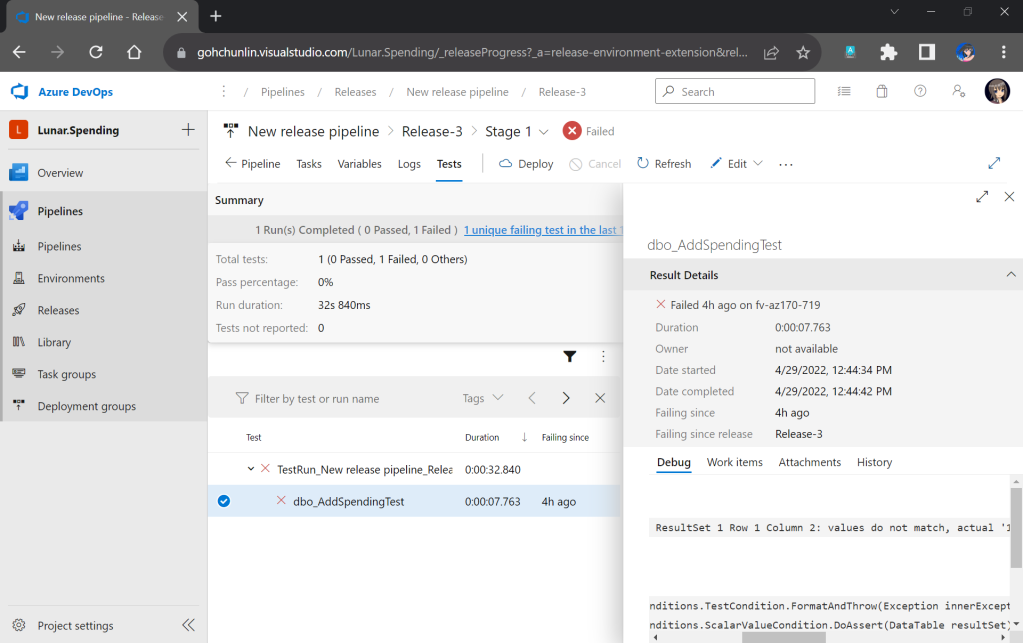
However, if there is one or many tests fail, we can easily locate the failed tests easily in the report.

This shows that our stored procedure dbo_AddSpendingTest has issues which need our attention.

That’s all for a simple walkthrough from writing unit tests for stored procedures to automatically deploying and testing them with Azure DevOps CI/CD pipelines.

I actually started learning all these after watching Hamish Watson’s sharing on DevOps Lab show which was released four years ago in 2018. In the video, he also shared about how DBA could do unit testing of their database changes tSQLt. Please watch the full YouTube video if you would like to find out more about unit testing our stored procedures.

Damian meets with Hamish Watson at the MVP Summit to talk about testing our database changes.

References

Maintaining my Open Source Golang Project

I was once asked how to build and maintain an open source project. A successful open source project not only solves a particular problem well, but also follows best practices in order to have a high code quality.

Last year December, I published my open source project, go-onedrive, a Golang client library for accessing the Microsoft OneDrive REST API.

Last month, go-onedrive successfully received 28 stars, which is the highest number of stars I received on GitHub. Also, there are new contributors joining the project. Meanwhile, I am also honoured to have received code review feedback about the go-onedrive project from Brian Ketelsen, Principal Cloud Advocate in Microsoft. Even though it’s not a great achievement, but I’m still satisfied because it’s the first time my projects on GitHub received so many eyeballs.

Hence, in this article, I will talk about maintaining this open source project, go-onedrive.

Changes Based on Feedback Received

Not all contributors will submit a pull request for their feedback. They may just submit an issue on GitHub and we have to work on that. Sometimes, they may simply message us to let us know their thoughts. Hence, we need to make the changes according to the valid feedback and comments.

Brian Ketelsen commented about the Golang file naming in the project. According to Brian, Golang source file names should be all lower case (same with package names and directory names) because some file systems are case-preserving. Hence, there will be cases where both myFile.go and myfile.go can be two different files in the same directory.

Brian Ketelsen talked about microservices and Golang in Singapore during a Microsoft event. (Photo Credit: Riza Marhaban)

We need to use git mv to rename the files.

git mv myFile.go myfile.go

Git can then tell that those files should be renamed, as shown below on Visual Studio Code.

Now all Golang file names are having lowercase.

There is one thing to take note here also is that, Git has a configuration setting that indicates whether to be case sensitive or insensitive: core.ignorecase. So if Git is case insensitive, then the direct change of file name from myFile.go to myfile.go without using the git mv command will not be picked up by Git. It is not recommended to modify this settings directly because then the files will be marked as “U” (updated) instead of “R” (renamed), as shown in the Visual Studio Code below. This will cause error in Go Build pipeline later on GitHub.

File rename should not be marked as “U”.

Changes From Pull Requests

I am glad to have two contributors, @nullaus and @ti55987, joining from another part of the world. They not only provided great improvement to the library by introducing new functionalities, but also followed the existing coding style in the project. So, I’d like to take this opportunity to thank them.

As the owner of the library, I’m aware that how contributors communicate can have a significant impact on the success of the Pull Request. I respect the time taken by the contributors to improve the codes. Hence, if sometimes they’re not able to correct the Pull Request based on the agreement, then I will try to make the changes on their behalf.

Three of us are helping each other to improve the codes in the same Pull Request whenever we can.

In the most recent change, one of the contributors submitted a new service for Shared Link in OneDrive. I noticed that hardcoded strings are used in the new code. This makes the client to be able to send any valid string and there will be no errors. Hence, I changed the code to use proper enums.

Publish Package with VS Code

Once all the necessary changes are done, it’s time to publish a new package for the users on Pkg.go.dev.

Firstly, we use the following command to tidy up the dependencies in go-onedrive library. This removes any dependencies the module might have accumulated that are no longer necessary.

go mod tidy

Now we can proceed to publish our module by first creating a Release of it on the GitHub. To do so, we open the Command Palette (Ctrl + Shift + P) and choose Git: Create Tag.

Creating tag.

For the tag, we must use the semantic version tag, which has the form has the form vMAJOR.MINOR.PATCH.

  • MAJOR: Increased when there is a backwards incompatible change to the public API of our module.
  • MINOR: Increased when a backwards compatible change to the API, like changing dependencies or adding a new function, method, struct field, or type.
  • PATCH: Increased after making minor changes that don’t affect your module’s public API or dependencies, such as fixing a bug.

Since this time we introduce the new Permission relevant functions, we should increase the MINOR and thus reset PATCH to 0.

In addition, go-onedrive is now in its first stable version, so its MAJOR is 1. If your module is not yet mature, you can tag it as v0.1.0 which is the initial, unstable version.

We will tag this release as v1.1.0 and provide a message to describe this release in the next step.

Finally, we need to push the tag to the remote server. To do so, we simply open the Command Palette again and choose Git: Push (Follow Tags). Then we shall see our new package now available on GitHub Releases page, as shown below.

Yay, this is our new package for go-onedrive.

Now, how to we update the Pkg.go.dev? Now if we navigate to the v.1.1.0 web page on Pkg.go.dev, we will be told that it cannot yet be found, as shown below.

This is because new packages are added to Pkg.go.dev through the scheduled monitoring of the Go Module Index. Hence, if we don’t see our packages on the website, we can manually make a request to fetch our packages by following the instructions here. The following screenshot shows how I make a request to proxy.golang.org, where the data of the Pkg.go.dev is downloaded from. In my case, after doing that, in less than 10 minutes, the package will be made available on the Pkg.go.dev website.

Manually request proxy.golang.org for the module version to endpoint specified by the Module proxy protocol.

With this new release, the users can simply update to use the latest version of go-onedrive in the go.mod file of their projects. After running the go mod tidy command, then they are good to go to use the new go-onedrive library.

Updated to the latest version of the library.

References