
For those ASP .NET web developers, Identity Server should be quite familiar to them especially they are looking for SSO solution.
After successfully integrating Identity Server in our ASP .NET Core MVC web applications, it is now time for us to research about how our mobile app can be integrating with IdentityServer4 too.
Background
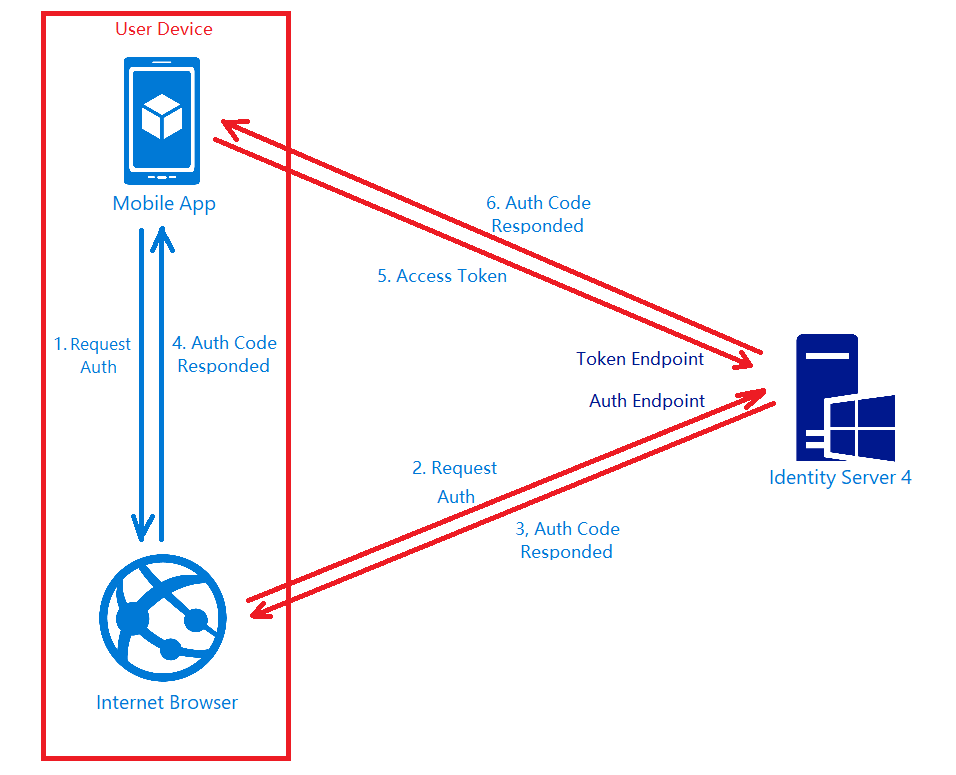
We have two types of users. The admin will be logging in to the system via our web application. The normal staff will log in to the system via mobile app. Different sets of features are provided for both web and mobile apps.
Setting up Client on Identity Server
To begin, we need to add new client to the MemoryClients of Identity Server.
According to the sample code done by Hadi Dbouk, we setup the new client as shown in the following code.
using IdentityServer4.Models;
...
public class ClientStore : IClientStore {
    ...
    var availableClients = new List();
    ...
    availableClients.Add(new Client
    {
        ClientId = "my-awesome-app",
        ClientName = "My Awesome App",
        AllowedGrantTypes = GrantTypes.Code,
        RequirePkce = true,
        RequireConsent = false,
        ClientSecrets =
        {
            new Secret("my-secret".Sha256())
        },
        RefreshTokenUsage = TokenUsage.ReUse,
        RedirectUris = { "gclprojects.chunlin.myapp:/oauth2callback" },
        AllowedScopes =
        {
            StandardScopes.OpenId,
            StandardScopes.Profile,
            StandardScopes.Email,
            StandardScopes.OfflineAccess
        },
        AllowOfflineAccess = true
    }
    );
}
For mobile apps, there are two grant types recommended, i.e. Authorization Code and Hybrid. However, as when this post is written, the support of Hybrid is still not mature in AppAuth for Android, so we decided to use GrantTypes.Code instead.
We don’t have consent screen for our apps, so we set RequireConsent to false.
For the RefreshTokenUsage, there are two possible values, i.e. ReUse and OneTime. The only difference is that ReUse will make the refresh token handle to stay the same when refreshing tokens. OneTime will update the refresh token handle once the tokens are refreshed.
Once the authorization flow is completed, users will be redirected to a URI. As documented in AppAuth for Android Readme, custom scheme based redirect URI (i.e. those of form “my.scheme:/path”) should be used for the authorization redirect because it is the most widely supported across many Android versions.
By setting AllowOfflineAccess to be true and give the client access to the offline_access scope, we allow requesting refresh tokens for long lived API access.
Android Setup: Installation of AppAuth
The version of AppAuth for Android is v0.7.0 at the point of time this post is written. To install it for our app, we first need to set it in build.gradle (Module: app).
apply plugin: 'com.android.application'

android {
    ...    defaultConfig {
        ...
        minSdkVersion 21
        targetSdkVersion 26
        ...
        manifestPlaceholders = [
            'appAuthRedirectScheme': 'gclprojects.chunlin.myapp'
        ]
    }
    ...
}

dependencies {
    ...
    compile 'com.android.support:appcompat-v7:26.+'
    compile 'com.android.support:design:26.+'
    compile "com.android.support:customtabs:26.0.0-alpha1"
    compile 'net.openid:appauth:0.7.0'
    ...
}
Android Setup: Updating Manifest
In the AndroidManifest.xml, we need to add the redirect URI to the RedirectUriReceiverActivity, as shown in the following code.
<?xml version="1.0" encoding="utf-8"?>
<manifest xmlns:android="http://schemas.android.com/apk/res/android"
    package="gclprojects.chunlin.myapp">
    ...
    <application...>
        <activity
            android:name="net.openid.appauth.RedirectUriReceiverActivity"
            android:theme="@style/Theme.AppCompact.NoActionBar">
        <intent-filter>
            <action android:name="android.intent.action.VIEW"/>

            <category android:name="android.intent.category.DEFAULT"/>
            <category android:name="android.intent.category.BROWSABLE"/>

            <data android:scheme="gclprojects.chunlin.myapp"/>
        </intent-filter>
    </application>
    ...
</manifest>
Android Setup: Authorizing Users
On the Android app, we will have one “Login” button.
<Button
    android:onClick="Login"
    android:layout_width="wrap_content"
    android:layout_height="wrap_content"
    android:text="Login"
    android:layout_centerInParent="true"/>
By clicking on it, the authorization steps will begin.
public void Login(View view) {
    AuthManager authManager = AuthManager.getInstance(this);
    AuthorizationService authService = authManager.getAuthService();

    AuthorizationRequest.Builder authRequestBuilder = new AuthorizationRequest
            .Builder(
            authManager.getAuthConfig(),
            "my-awesome-app",
            "code",
            Uri.parse("gclprojects.chunlin.myapp:/oauth2callback"))
            .setScope("openid profile email offline_access");

    String codeVerifier = CodeVerifierUtil.generateRandomCodeVerifier();
    SharedPreferencesRepository sharedPreferencesRepository = new SharedPreferencesRepository(this);
    sharedPreferencesRepository.saveCodeVerifier(codeVerifier);

    authRequestBuilder.setCodeVerifier(codeVerifier);

    AuthorizationRequest authRequest = authRequestBuilder.build();

    Intent authIntent = new Intent(this, LoginAuthActivity.class);
    PendingIntent pendingIntent = PendingIntent.getActivity(this, authRequest.hashCode(), authIntent, 0);

    authService.performAuthorizationRequest(
            authRequest,
            pendingIntent);
}
The code above uses some other classes and interact with other activity. I won’t talk about them here because the codes can be found on my Github repository which is forked from Hadi Dbouk’s.
Android Setup: Post Authorization and Refresh Token
According to the code in the LoginAuthActivity.java, if the login fails, the user will be brought back to the Login Activity. However, if it succeeds, the user can then reach to another activities in the app which require user to login first. We can also then get Access Token, Refresh Token, and ID Token from authManager. With the Access Token, we then can access our backend APIs.
Since access tokens have finite lifetimes, refresh tokens allow requesting new access tokens without user interaction. In order to have the client to request Refresh Token, we need to authorize it by setting AllowOfflineAccess to true. When we make a request to our APIs, we need to check if the Access Token is expired, if it is so, we need to make a new request with the Refresh Token to the IdentityServer to have a new Access Token.
The way how we can retrieve new Access Token with a Refresh Token in AppAuth is shown in the TokenTimer class in TokenService.java using createTokenRefreshRequest.
private class TokenTimer extends TimerTask {
    ...

    @Override
    public void run() {

        if(MyApp.Token == null)
            return;

        final AuthManager authManager = AuthManager.getInstance(TokenService.this);

        final AuthState authState = authManager.getAuthState();


        if(authState.getNeedsTokenRefresh()) {
            //Get New Token

            ClientSecretPost clientSecretPost = new ClientSecretPost("driver008!");
            final TokenRequest request = authState.createTokenRefreshRequest();
            final AuthorizationService authService = authManager.getAuthService();

            authService.performTokenRequest(request, clientSecretPost, new AuthorizationService.TokenResponseCallback() {
                @Override
                public void onTokenRequestCompleted(@Nullable TokenResponse response, @Nullable AuthorizationException ex) {
                    if(ex != null){
                        ex.printStackTrace();
                        return;
                    }
                    authManager.updateAuthState(response,ex);
                    MyApp.Token = authState.getIdToken();
                }
            });

        }

    }
}
Conclusion
Yup, that’s all for integrating the Identity Server in an Android App to provide a seamless login experience to our users. If you find any mistake in this article, kindly let me know in the comment section. Thanks in advance!
References
- [GitHub] AppAuth with IdentityServer4 for Android
- [GitHub] AppAuth for Android
- Client in IdentityServer4
- Support Hybrid Flow
- appauth
- [GitHub] Demo for App OAuth Authentication for Android
- Authorize Your Android App with AppAuth & IdentityServer 3
- Achieving Single Sign-on with AppAuth
- Full-Scratch Implementor of OAuth and OpenID Connect Talks About Findings
- Using PKCE with IdentityServer from a Xamarin Client
- [GitHub] Integrate Azure AD B2C into an Android Application
- The Proper Way to Use OAuth in a Native App


