One of the ways to develop a desktop application for Windows 10/11 is UWP (Universal Windows Platform). UWP app has two fundamental sections, i.e. front-end and back-end. The front-end is developed using XAML (Extensible Markup Language) and back-end can be coded in C# (or even JavaScript back in the old time).
public static class EnumExtension
{
    public static string GetDescription(this Enum value)
    {
        FieldInfo fi = value.GetType().GetField(value.ToString());
        var attributes = (DescriptionAttribute[])fi.GetCustomAttributes(typeof(DescriptionAttribute), false);
        if (attributes.Length > 0) return attributes[0].Description;
        else return value.ToString();
    }
}
ViewModel
Next we will define the ViewModel of our MainPage.xaml which will contains the ComboBox control. We will bind the variable SelectorColor whose type is the enum to the ComboBox control, as shown below.
public class MainViewModel : ViewModelBase
{
    private MyColors _selectedColor = MyColors.Black;

    public MyColors SelectedColor
    {
        get => _selectedColor;
        set
        {
            if (_selectedColor != value)
            {
                SetProperty(ref _selectedColor, value);
            }
        }
    }
}
The data binding will be simple when the source and target properties are of the same type, or when one type can be converted to the other type through an implicit conversion, for example binding a string variable to the Text field of a TextBlock control. However, to bind enum to the dropdown value and text fields of a ComboBox, we will need the help of a value conversion.
Here, we will implement a converter, MyColorValueConverter, that takes an enum value and then return a string value to be used in ComboBox fields, as well as the other way around.
public class MyColorValueConverter : IValueConverter
{
    public object Convert(object value, Type targetType, object parameter, string language)
    {
        if (value is MyColors color) return color.GetDescription();

        return null;
    }

    public object ConvertBack(object value, Type targetType, object parameter, string language)
    {
        if (value is string s) return Enum.Parse(typeof(MyColors), s);

        return null;
    }

    ...

}
After this, in order to provide all available values in the enum as ItemsSource of the ComboBox control, we will need to have a Strings property in the MyColorValueConverter.
public string[] Strings => GetStrings();

public static string[] GetStrings()
{
    List<string> list = new List<string>();

    foreach (MyColors color in Enum.GetValues(typeof(MyColors)))
    {
        list.Add(color.GetDescription());
    }


    return list.ToArray();
}
View: The Front-end
Now in the MainPage.xaml which contains the ComboBox control, we first need to instantiate the value converter in the resource dictionary of the page.
That’s all for the quickstart steps to bind an enum to a ComboBox control in an UWP app.
I have made the source code available on GitHub. The code will have more features where the colour of text in a TextBlock will be based on the colour we pick from the ComboBox, as shown below.
In our previous article, we have successfully imported realistic but not real patient data into the database in our Azure API for FHIR. Hence, the next step we would like to go through in this article is how to write a user-friendly dashboard to show those healthcare data.
For frontend, there are currently many open-source web frontend frameworks for us to choose from. For example, in our earlier project of doing COVID-19 dashboard, we used the Material Design from Google.
In this project, in order to make our healthcare dashboard to be consistent with other Microsoft web apps, we will be following Microsoft design system.
In web app development projects, we always come to situations where we need to add a button, a dropdown, a checkbox to our web apps. If we are working in a large team, then issues like UI consistency across different web apps which might be built using different frontend frameworks are problems that we need to solve. So what FAST Framework excites me is solving the problem with Web Components that can be used with any different frontend frameworks.
🎨 Rob Eisenberg’s (left most) first appearance on Jon Galloway’s (right most) .NET Community Standup with Daniel Roth (top most) and Steve Sanderson from the Blazor team. (Source: YouTube) 🎨
Web Components can be integrated well with major frontend frameworks, such as Angular, Blazor, Vue, etc. We can drop Web Components easily to ASP .NET web projects too and we are going to do that in our healthcare dashboard project.
In the FAST Framework, the Web Component that corresponds to the design system provider is called the FASTDesignSystemProvider. Its design system properties can be easily overridden by just setting the value of the corresponding property in the provider. For example, by simply changing the background of the FASTDesignSystemProvider from light to dark, it will automatically switch from the light mode to the dark mode where corresponding colour scheme will be applied.
🎨 FAST Framework allows our web apps to easily switch between light and dark modes. 🎨
UI Fabric and Fluent UI Core
In August 2015, Microsoft released the GA of Office UI Fabric on GitHub. The goal of having Office UI Fabric is to provide the frontend developers a mobile-first responsive frontend framework, similar like Bootstrap, to create the web experiences.
The Office UI Fabric speaks the Office Design Language. As long as you use any Office-powered web app, such as Outlook or OneDrive, the Office web layout should be very familiar to you. So by using the Office UI Fabric, we can easily make our web apps to have Office-like user interface and user experience.
🎨 OneDrive web with the Office design. 🎨
In order to deliver a more coherent and productive experience, Microsoft later released Fluent Framework, another cross-platform design system. Also, to move towards the goal of simplified developer ecosystem, Office UI Fabric later evolved into Fluent UI as well in March 2020.
Fluent UI can be used in both web and mobile apps. For web platform, it comes with two options, i.e. Fabric UI React and Fabric Core.
Fabric UI React is meant for React application while Fabric Core is provided primarily for non-React web apps or static web pages. Since our healthcare dashboard will be built on top of ASP .NET Core 3.1, Fabric Core is sufficient in our project.
However, due to some components, such as ms-Navbar and ms-Table, are still only available in Office UI Fabric but not the Fabric Core, our healthcare dashboard will use both the CSS libraries.
Azure CDN
A CDN (Content Delivery Network) is a distributed network of servers that work together to provide fast delivery of the Internet content. Normally, they are distributed across the globe so that the content can be accessed by the users based on their geographic locations so that users around the world can view the same high-quality content without slow loading time. Hence, it is normally recommended to use CDN to serve all our static files.
Another reason of us not to host static files in our web servers is that we would like to avoid extra HTTP requests to our web servers just to load only the static files such as images and CSS.
To use Azure CDN, firstly, we need to store all the necessary static files in the container of our Storage account. We will be using back the same Storage account that we are using to store the realistic but not real patient data generated by Synthea(TM).
Secondly, we proceed to create Azure CDN.
Thirdly, we add an endpoint to the Azure CDN, as shown in the following screenshot, to point to the container that stores all our static files.
🎨 The origin path of the CDN endpoint is pointing to the container storing the static files. 🎨
Finally, we can access the static files with the Azure CDN endpoint. For example, to get the Office Fabric UI css, we will use the following URL.
Similar as the Azure Function we deployed in the previous article, we will send GET request to different endpoints in the Azure API for FHIR to request for different resources. However, before we are able to do that, we need to get Access Token from the Azure Active Directory first. The steps to do so have been summarised in the same previous article as well.
Since we need application settings such as Authority, Audience, Client ID, and Client Secret to retrieve the access token, we will store them in appsettings.Development.json for local debugging purpose. When we later deploy the dashboard web app to Azure Web App, we will store the settings in the Application Settings.
We will then create a class which will be used to bind to the AzureApiForFhirSettings.
public class AzureApiForFhirSetting {
    public string Authority { get; set; }
    public string Audience { get; set; }
    public string ClientId { get; set; }
    public string ClientSecret { get; set; }
}
Finally, to setup the binding, we will need to add the following line in Startup.cs.
// This method gets called by the runtime. Use this method to add services to the container.
public void ConfigureServices(IServiceCollection services)
{
    services.AddOptions();
    services.Configure<AzureApiForFhirSetting>(Configuration.GetSection("AzureApiForFhirSetting"));
    ...
    services.AddControllersWithViews();
}
After that, we will apply dependency injection of IOption to the classes that we need to use the configuration, as shown in the following example.
public class AzureApiForFhirService : IAzureApiForFhirService
{
    private readonly AzureApiForFhirSetting _azureApiForFhirSetting;

    public AzureApiForFhirService(IOptions<AzureApiForFhirSetting> azureApiForFhirSettingAccessor)
    {
        _azureApiForFhirSetting = azureApiForFhirSettingAccessor.Value;
    }

    ...
}
Once we can get the access token, we will be able to access the Azure API for FHIR. Let’s see some of the endpoints the API has.
Azure API for FHIR: The Patient Endpoint
To retrieve all the patients in the database, it’s very easy. We simply need to send a GET request to the /patient endpoint. By default, the number of records returned by the API is 10 at most. To retrieve the next 10 records, we need to send another GET request to another URL link returned by the API, as highlighted in the red box in the following example screenshot.
🎨 The “self” URL is the API link for the current 10 records. 🎨
Once we have all the patients, we then can list them out in a nice table designed with Office UI Fabric, as shown in the following screenshot.
🎨 Listing all the patients in the Azure API for FHIR database. 🎨
When we click on the link “View Profile” of a record, we then can get more details about the selected patient. To retrieve the info of a particular patient, we need to pass the ID to the /patient endpoint, as shown in the following screenshot, which is highlighted in a red box.
🎨 Getting the info of a patient with his/her ID. 🎨
Where can we get the patient’s ID? The ID is returned, for example, when we get the list of all patients.
So after we click on the “View Profile”, we will then be able to reach a Patient page which shows more details about the selected patient, as shown in the following screenshot.
🎨 We can also get the address together with its geolocation data of a patient. 🎨
Azure API for FHIR: The Other Endpoints
There are many resources available in the Azure API for FHIR. Patient is one of them. Besides, we also have Condition, Encounter, Observation, and so on.
To get entries from the endpoints corresponding to the three resources listed above is quite straightforward. However, if we directly send a GET request to, let’s say, /condition, what we will get is all the Condition records of all the patients in the database.
In order to filter based on the patient, we need to add a query string called patient to the endpoint URL, for example /condition?patient=, and then we append the patient ID to the URL.
Then we will be able to retrieve the resources of that particular patient, as shown in the following screenshot.
🎨 It’s interesting to see COVID-19 test record can already be generated in Synthea. 🎨
So far I have only tried the four endpoints. The /observation endpoint is very tricky because the values that it return can be most of the time a single number for a measurement. However, it will also returns two numbers or text for some other measurement. Hence, I have to do some if-else checks on the returned values from the /observation endpoint.
🎨 The SARS-Cov-2 testing result is returned as a text instead of number. 🎨
Source Code of the Dashboard
That’s all for the healthcare dashboard that I have built so far. There are still many exciting features we can expect to see after we have integrated with the Azure API for FHIR.
Starting from end of last year, I have been working on several UWP projects at work. Few days ago, I’m glad to have the opportunity to borrow a Surface Dial from Riza.
Surface Dial is a revolutionary input device. It was introduced by Microsoft in the 2016 together with Surface Studio. Most of the time, it works awesome on Surface devices. However, that doesn’t mean we can’t use it with our Windows desktop or laptop. As a secondary input device, it can be used together with our mouse or touch. Developers are also welcomed to customize the abilities of the Surface Dial on their UWP apps.
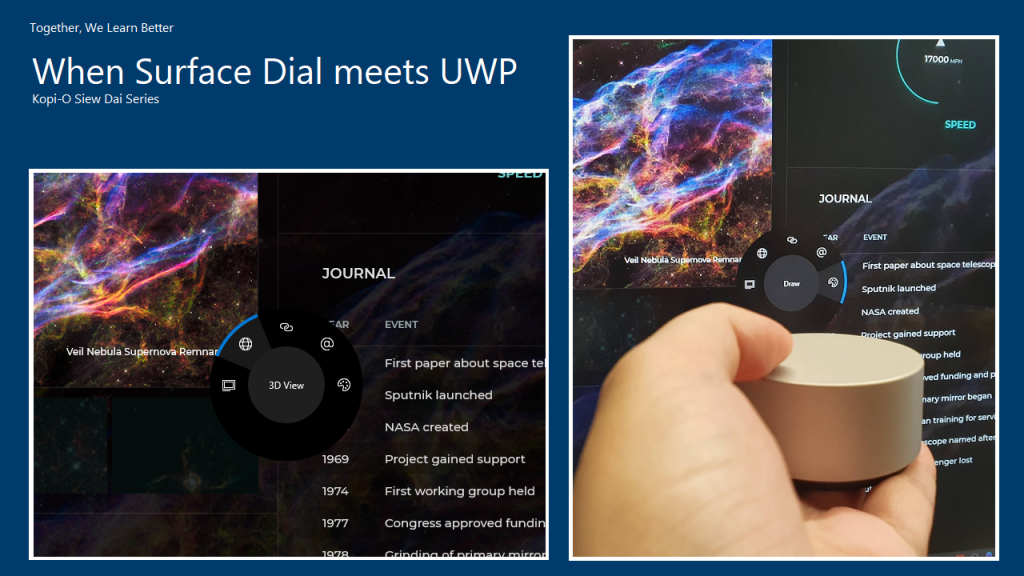
In this article, I will be sharing on how we can use Surface Dial to support a quick menu of commands in an UWP app.
Installing Surface Dial
First of all, we need to make sure our Windows device is on (Yes, UWP currently can only work on Windows machines). Then we need to turn on the Bluetooth on the machine. If our PC doesn’t come with the Bluetooth hardware installed, we can easily add it by purchasing a Bluetooth USB dongle.
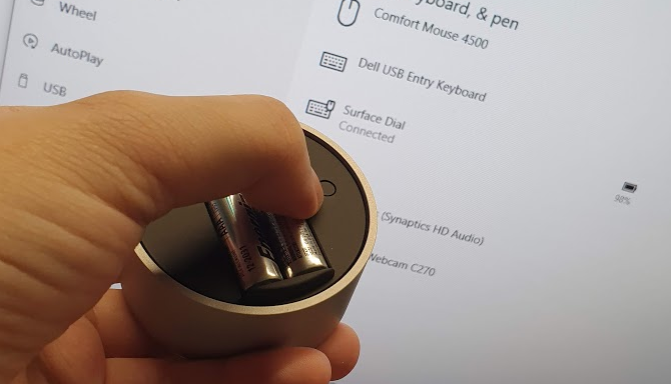
After that, we need to turn our Surface Dial on by removing the cover of its bottom and then pressing the button next to the batteries, as shown in the photo below.
🎨 Added Surface Dial to my PC. 🎨
Now we can find the Surface Dial on the “Bluetooth & other devices” window. We can proceed to add it to our PC.
Adding Menu on Surface Dial
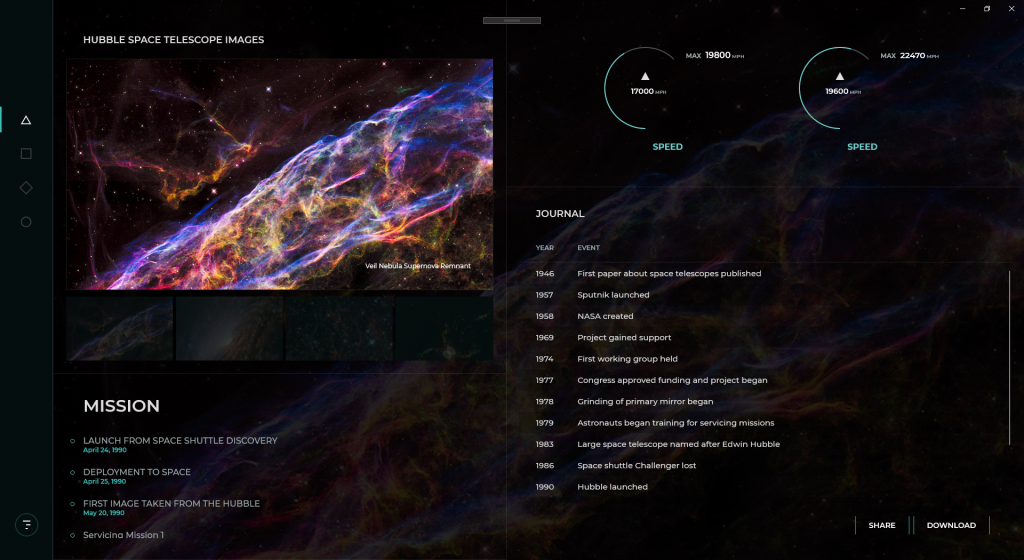
For those who attended my sharing in Microsoft Insider Dev Tour 2019 in Kuala Lumpur and Johor Bahru last year, the following UWP app should be familiar to you.
🎨 The UWP demo app done by Justin Liu for Microsoft Insider Dev Tour. 🎨
Now we will proceed to add Surface Dial menu to this page.
In the code-behind of the page, we will have the following global objects.
// Create a reference to the RadialController.
radialController = RadialController.CreateForCurrentView();
// Set rotation resolution to 1 degree of sensitivity.
radialController.RotationResolutionInDegrees = 1;
What does setting RotationResolutionInDegrees mean here? The value actually is the minimum rotation value required for the RotationChanged event to be fired. So, by setting it to 1, every one degree of rotate on the Surface Dial, the RotationChanged event will be triggered. Also, by default, when the RotationChanged happens, the Surface Dial will vibrate. So it is like massaging your hand when you’re rotating the Surface Dial that has its RotationResolutionInDegrees set to 1.
Then we can proceed to add our menu items to the Surface Dial. Here, we use a font glyph for the custom tool.
However, please take note that, by default, there are built-in menu items for the Surface Dial. So we need to remove them to prevent squeezing in too much menu items to the Surface Dial UI and thus making it harder to control.
To remove the built-in menu items, we just need to reset in the configuration of the Surface Dial. Another thing to take note is that the Surface Dial menu must have at least one menu item, else the default menu items will be restored.
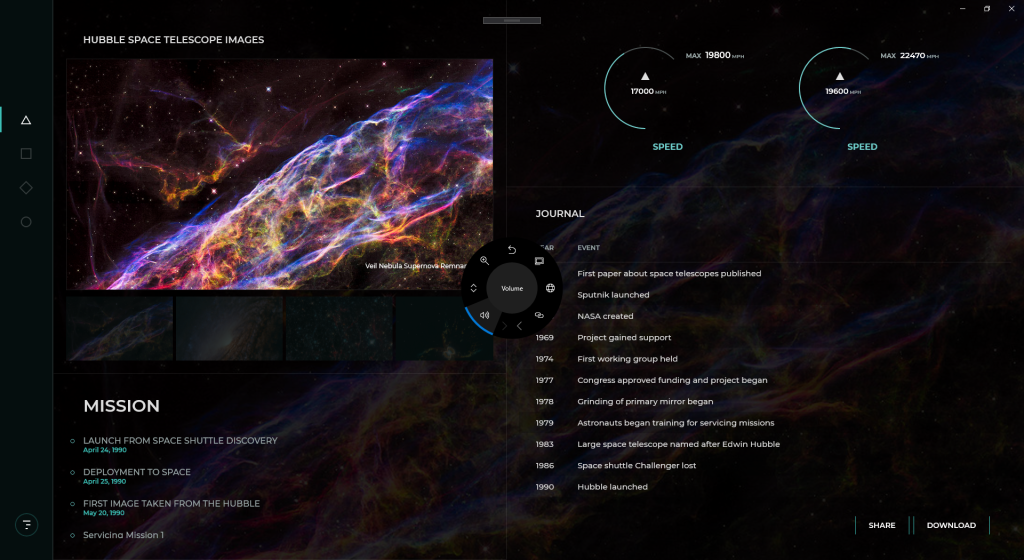
Now there is a funny thing is that if we remove all the built-in menu items before we add our customized menu items, i.e swapping the position of the two blocks of codes above, then we will realize that the default menu items will be restored and our customized menu items will be appended to the default ones, as shown in the screenshot below.
🎨 Oh my tian, the buttons on the Surface Dial menu are so crowded! 🎨
Finally, if we want to handle the events fired from the Surface Dial, for example when users click on it or rotate it, we can use the following handlers.
Please take note that the ButtonClicked event is not triggered when a menu item is selected. Instead we need to do as follows to handle the menu item chosen event.
imageGallery.Invoked += ImageGallery_Invoked;
Result
So, now, with all these few lines of codes, we can have a beautiful Surface Dial control on our UWP app, as shown in the following photo. Yay!
KOSD, or Kopi-O Siew Dai, is a type of Singapore coffee that I enjoy. It is basically a cup of coffee with a little bit of sugar. This series is meant to blog about technical knowledge that I gained while having a small cup of Kopi-O Siew Dai.
In my previous post, I shared about the way to connect Android app with IdentityServer4 using AppAuth for Android. However, that way will popup a login page on a web browser on phone when users are trying to login to our app. This may not be what the business people want. Sometimes, they are looking for a customized native login page on the app itself.
To do so, we can continue to make use of IdentityServer4.
In this setup, I will be using in-memory configuration.
As a start, I need to introduce a new ApiResource with the following codes in the Startup.cs of our IdentityServer project.
var availableResources = new List<ApiResource>();
...
availableResources.Add(new ApiResource("mobile-app-api", "Mobile App API Main Scope"));
...
services.AddIdentityServer()
    ...
    .AddInMemoryApiResources(availableResources)
    .AddInMemoryClients(new ClientStore(Configuration).GetClients())
    .AddAspNetIdentity<ApplicationUser>();
Identity Server Setup: Defining New Client
As the code above shows, there is a ClientStore that we need to add a new client to with the following codes.
public class ClientStore : IClientStore
{
    ...

    public IEnumerable<Client> GetClients()
    {
        var availableClients = new List<Client>();

        ...

        availableClients.Add(new Client
        {
            ClientId = "mobile-app-api",
            ClientName = "Mobile App APIs",
            AllowedGrantTypes = GrantTypes.ResourceOwnerPassword,
            ClientSecrets = { new Secret(Configuration["MobileAppApi:ClientSecret"].Sha256()) },
            AllowedScopes = { "mobile-app-api" }
        });

        return availableClients;
    }
}
Configuring Services in Web API
In the Startup.cs of our Web API project, we need to update it as follows.
Besides the step above, we also need to make sure the following one line “app.UseAuthentication()” in the Startup.cs. Without this, we cannot make the authentication and authorization to work in our Web API project.
Receiving Username and Password to Return Access Token
We also need to add a new controller to receive username and password which will in return tell the mobile app whether the login of the user is successful or not. If the user is logged in successfully, then an access token will be returned.
[Route("api/[controller]")]
public class AuthenticateController : Controller
{
    ...
    [HttpPost]
    [Route("login")]
    public async Task<ActionResult> Login([FromBody] string userName, string password)
    {
        var disco = await DiscoveryClient.GetAsync("<URL of the identity server>");
        var tokenClient = new TokenClient(disco.TokenEndpoint, "mobile-app-api", Configuration["MobileAppApi:ClientSecret"]);
        var tokenResponse = await tokenClient.RequestResourceOwnerPasswordAsync(userName, password, "mobile-app-api");

        if (tokenResponse.IsError)
        {
            return Unauthorized();
        }

        return new JsonResult(tokenResponse.Json);
    }
    ...
}
Securing our APIs
We can now proceed to protect our Web APIs with [Authorize] attribute. In the code below, I also try to return the available claims via the API. The claims will tell the Web API who is logging in and calling the API now via the mobile app.
[HttpGet]
[Authorize]
public IEnumerable<string> Get()
{
    var claimTypesAndValues = new List<string>();

    foreach (var claim in User.Claims)
    {
        claimTypesAndValues.Add($"{ claim.Type }: { claim.Value }");
    }

    return claimTypesAndValues.ToArray();
}
Conclusion
This project took me two days to find out how to make the authentication works because I misunderstand how IdentityServer4 works in this case. Hence, it is always important to fully understand the things on your hands before working on them.
Do not give up! (Source: A Good Librarian Like a Good Shepherd)