Migrate to TLS 1.2 for Azure Blob Storage

Objective

In November 2023, Azure conveyed through an email notification that, starting from 31st October 2024, all interactions with their services must be safeguarded using Transport Layer Security (TLS) version 1.2 or later. Post this date, their support for TLS versions 1.0 and 1.1 will be discontinued.

By default, Azure Storage already supports TLS 1.2 on public HTTPS endpoints. However, for some companies, they are still using TLS 1.0 or 1.1. Hence, to maintain their connections to Azure Storage, they have to update their OS and apps to support TLS 1.2.

About TLS

The history of TLS can be traced back to SSL.

SSL stands for “Secure Sockets Layer,” and it was developed by Netscape in the 1990s. SSL was one of the earliest cryptographic protocols developed to provide secure communication over a computer network.

SSL has been found to have several vulnerabilities over time, and these issues have led to its deprecation in favor of more secure protocols like TLS. In 2019, TLS 1.0 was introduced as an improvement over SSL. Nowadays, while the term “SSL” is still commonly used colloquially to refer to the broader category of secure protocols, it typically means TLS.

When we see “https://” in the URL and the padlock icon, it means that the website is using either TLS or SSL to encrypt the connection.

While TLS addressed some SSL vulnerabilities, it still had weaknesses, and over time, security researchers identified new threats and attacks. Subsequent versions of TLS, i.e. TLS 1.1, TLS 1.2, and TLS 1.3, were developed to further enhance security and address vulnerabilities.

Why TLS 1.2?

By the mid-2010s, it became increasingly clear that TLS 1.2 was a more secure choice, and we were encouraged to upgrade our systems to support it instead. TLS 1.2 introduced new and stronger cipher suites, including Advanced Encryption Standard (AES) cipher suites, providing better security compared to older algorithms.

Older TLS versions (1.0 and 1.1) are deprecated and removed to meet regulatory standards from NIST (National Institute of Standards and Technologies). (Photo Credit: R. Jacobson/NIST)

Ten years after TLS 1.2 was officially released as a standardised protocol, TLS 1.3 was introduced by the Internet Engineering Task Force (IETF).

The coexistence of TLS 1.2 and TLS 1.3 is currently part of a transitional approach, allowing organisations to support older clients that may not yet have adopted TLS 1.3.

For Microsoft Azure, if the service we are using still have a dependency on TLS 1.0 or 1.1, we are advised to migrate them to TLS 1.2 or 1.3 by 31 October 2024.

Monitoring TLS Version of Requests

Before we enabling that, we should setup logging to make sure that our Azure policy is working as intended. Here, we will be using Azure Monitor.

For demonstration purpose, we will create a new Log Analytics workspace called “LunarTlsAzureStorage”.

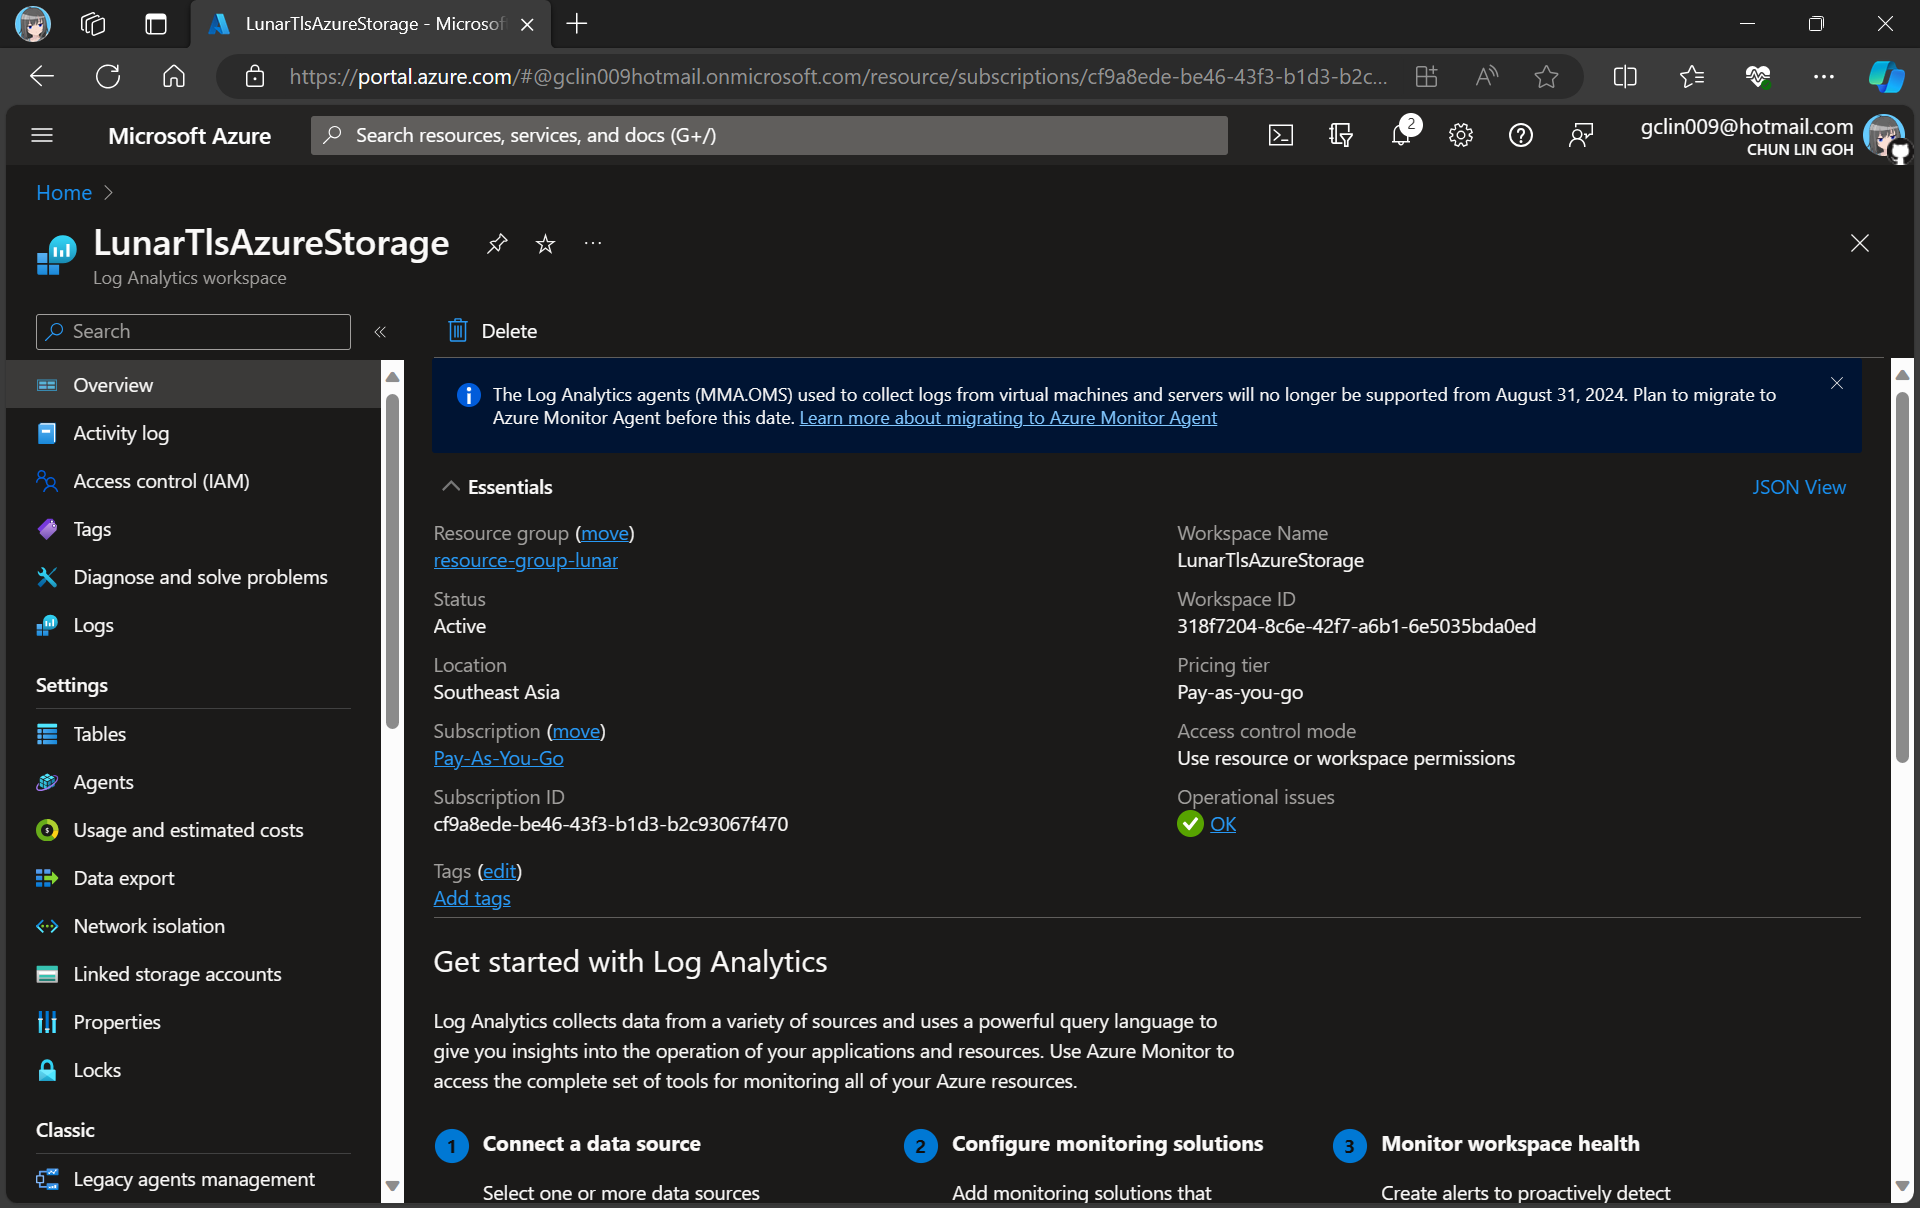
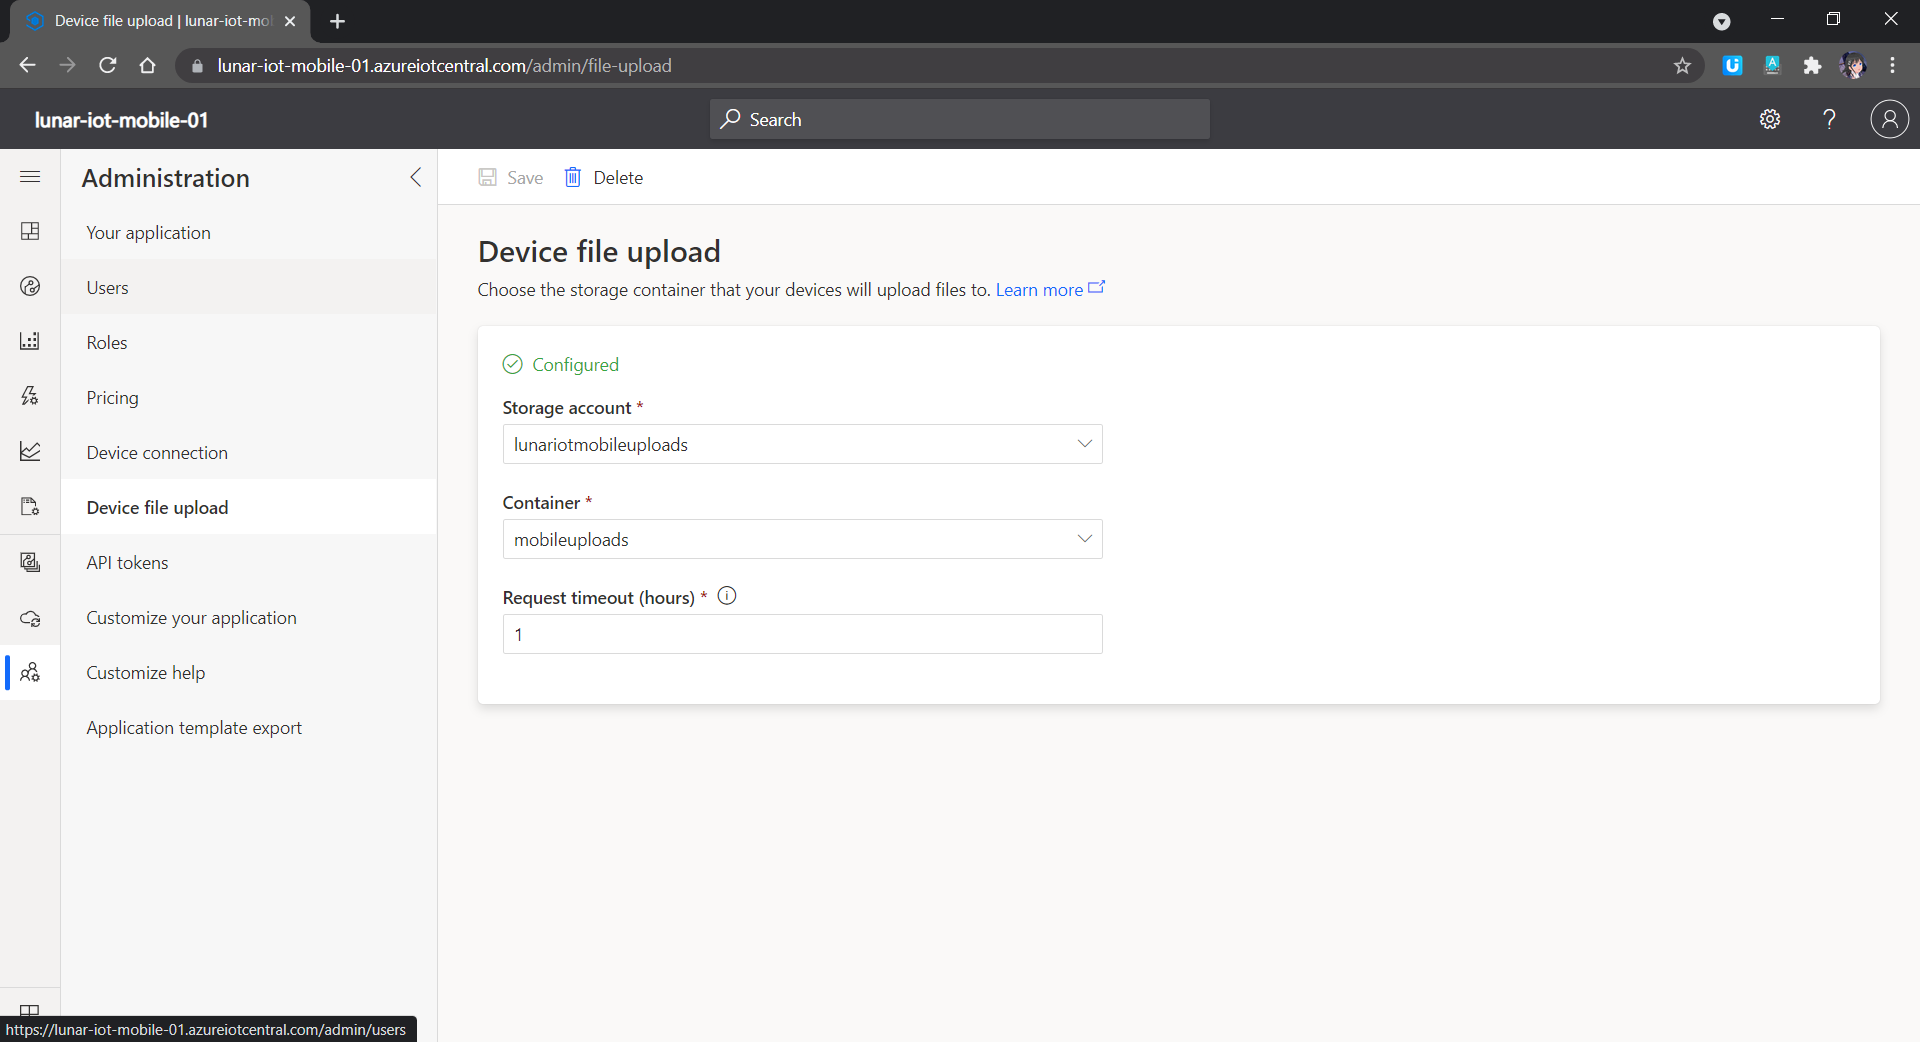
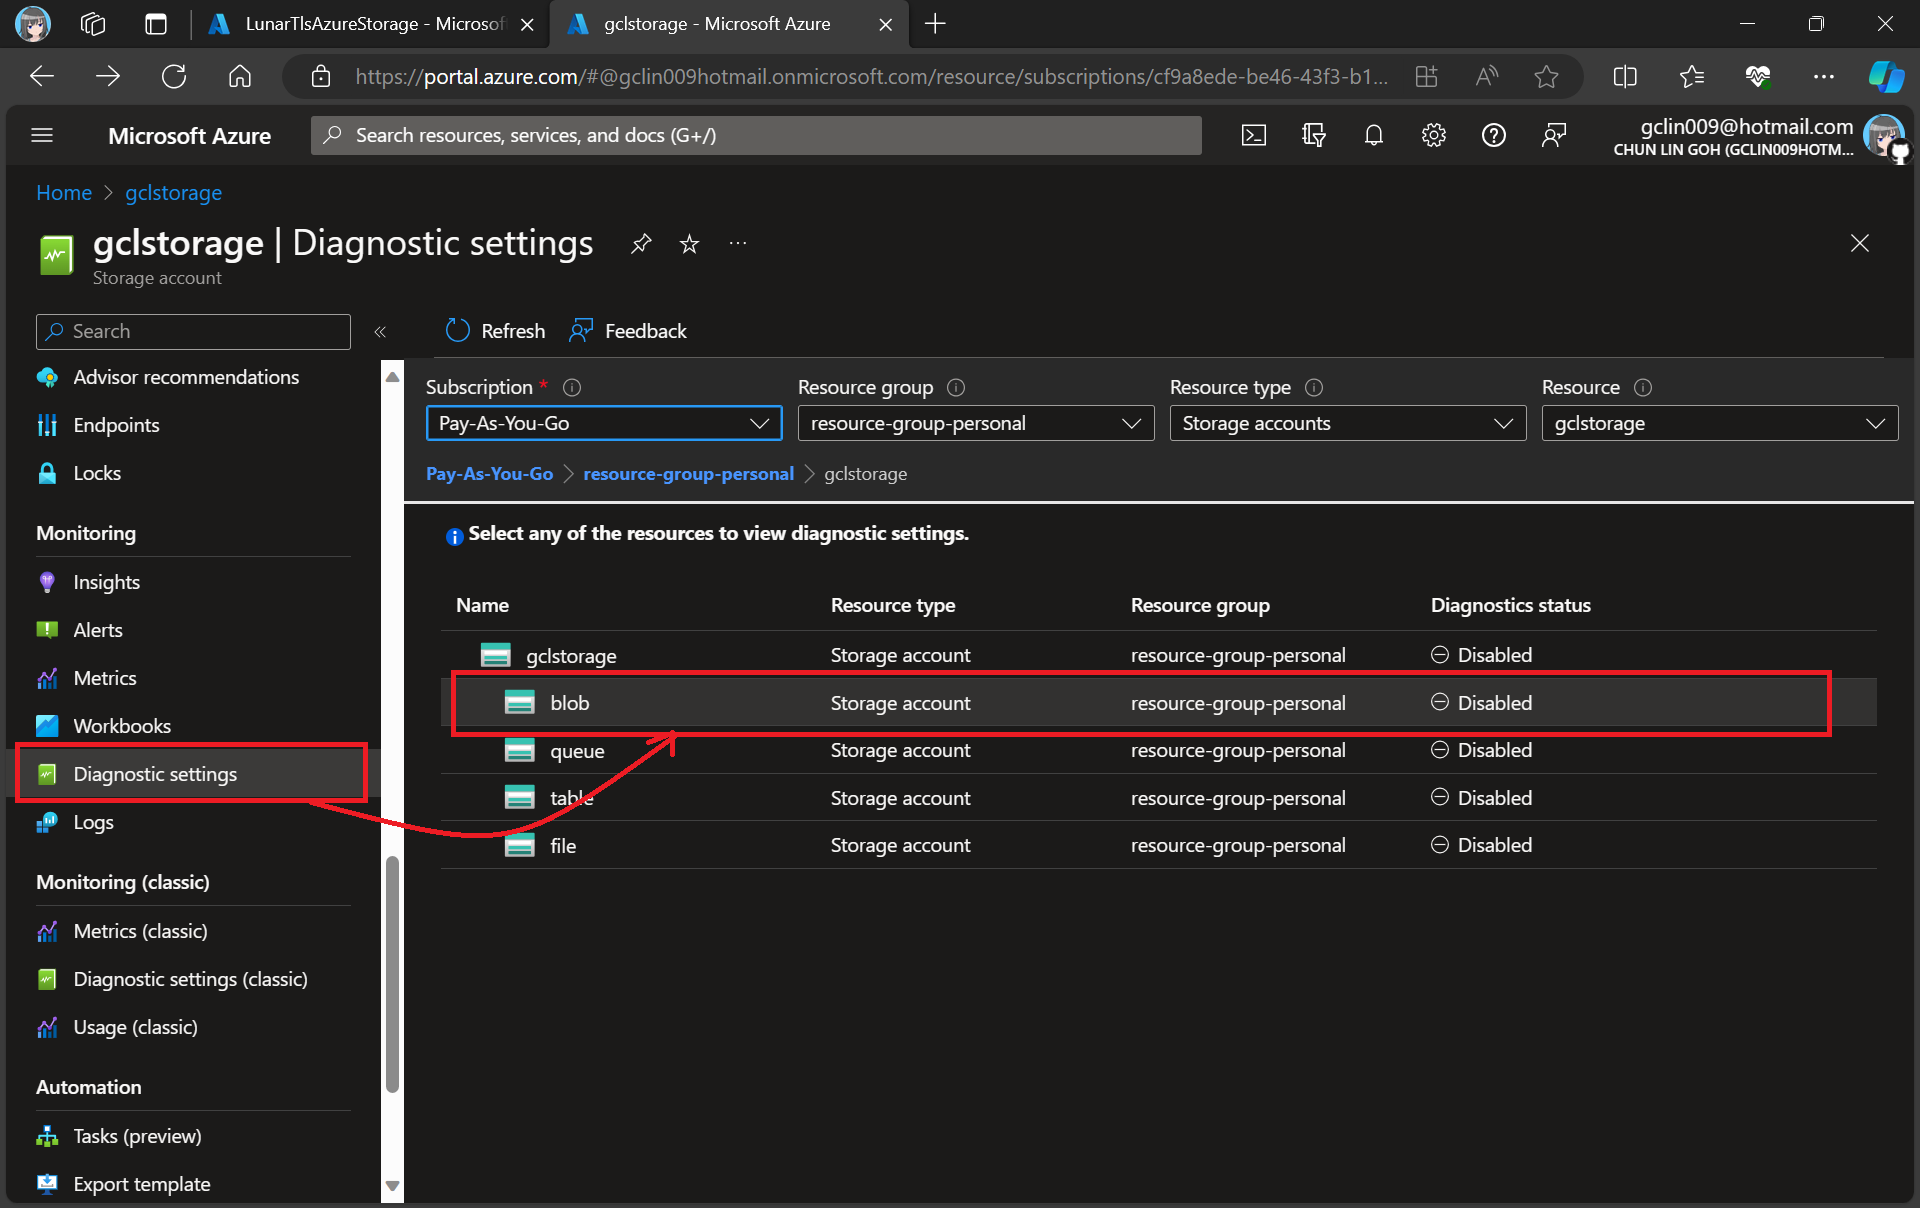
In this article, we will only be logging requests for the Blob Storage, hence, we will be setting up the Diagnostic of the Storage Account as shown in the screenshot below.

Adding new diagnostic settings for blob.

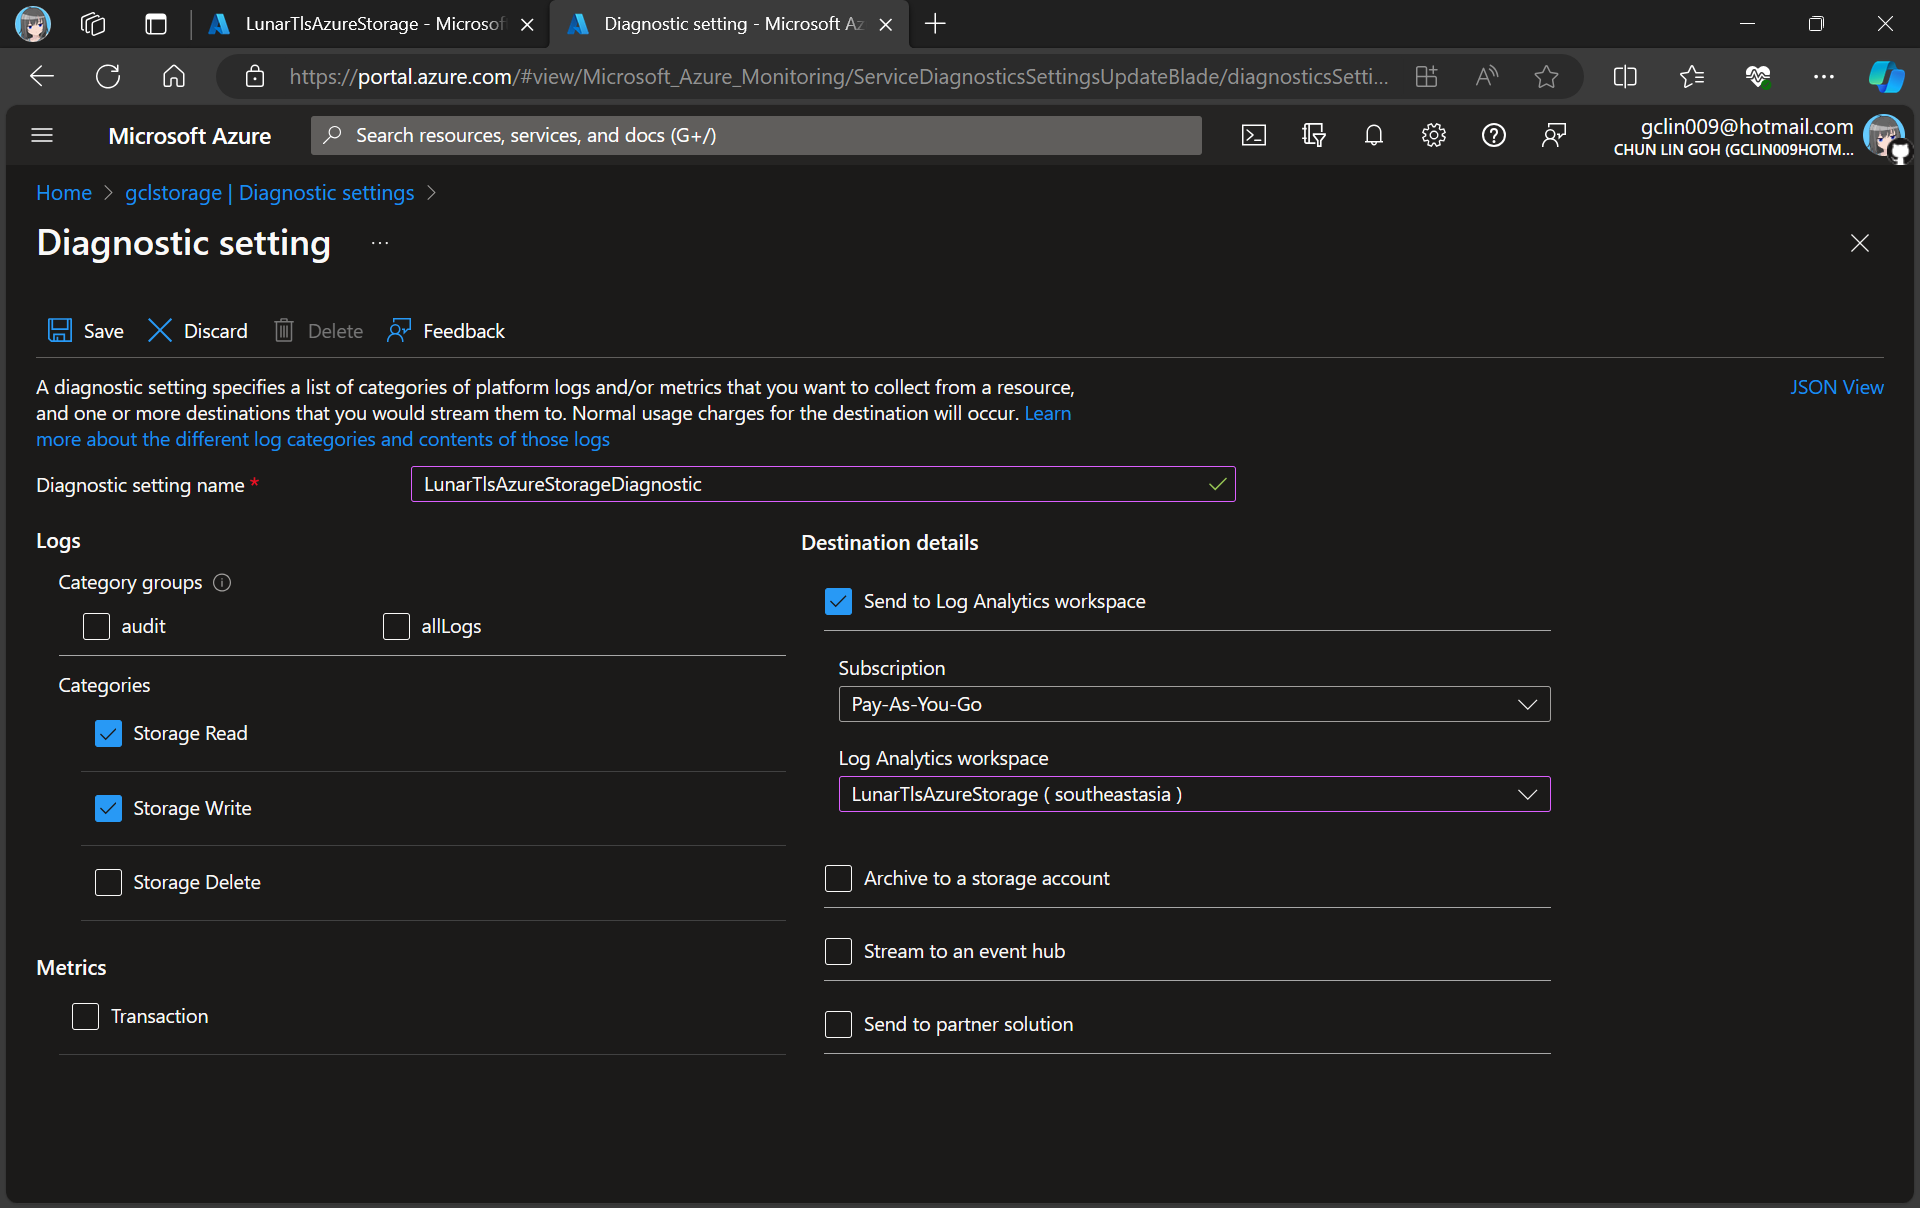
In the next step, we need to specify that we would like to collect the logs of only read and write requests of the Azure Blob Storage. After that, we will send the logs to Log Analytics we have just created above.

Creating a new diagnostic setting for our blob storage.

After we have created the diagnostic setting, requests to the storage account are subsequently logged according to that setting.

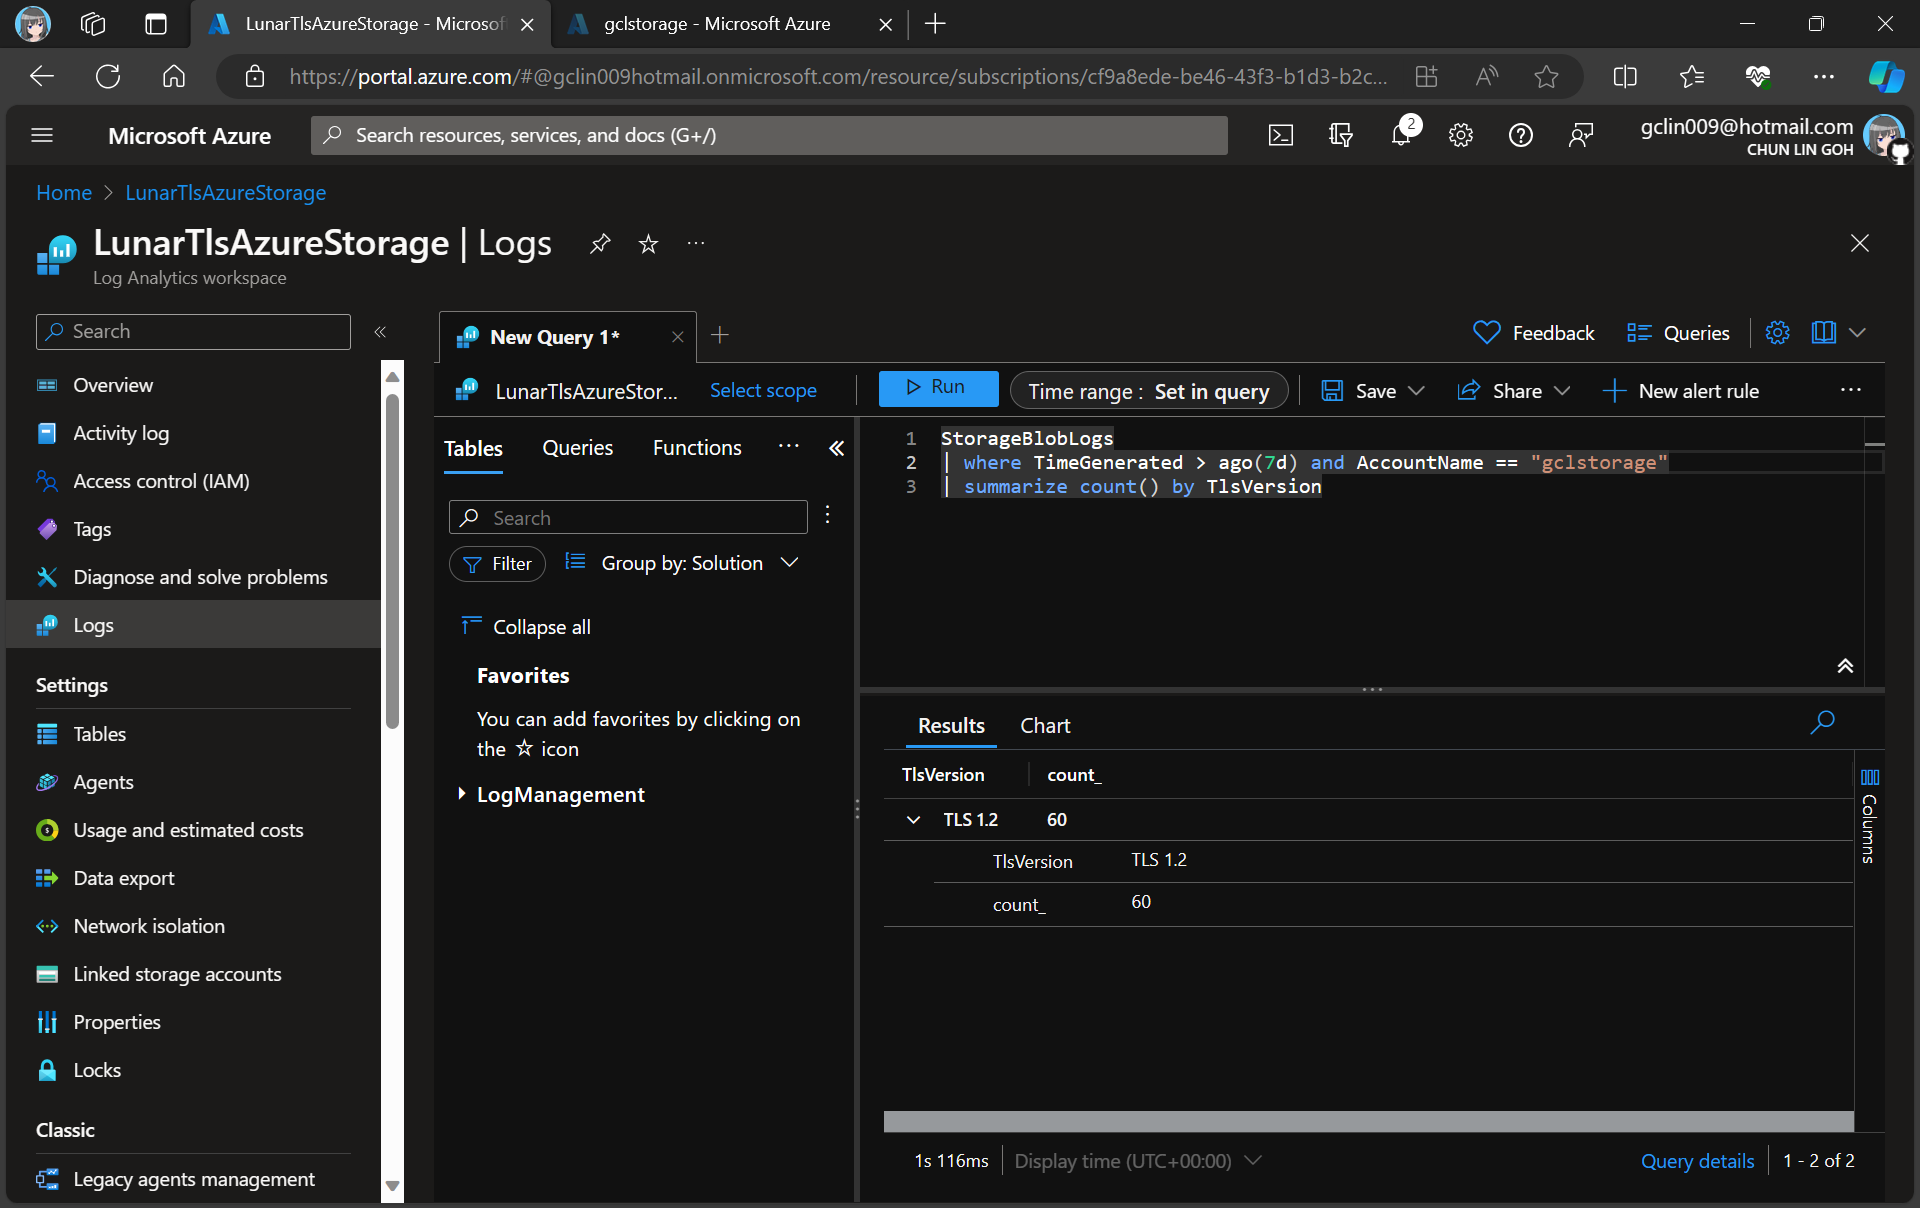
As demonstrated in the following screenshot, we use the query below to find out how many requests were made against our blob storage with different versions of TLS over the past seven day.

There are only TLS 1.2 requests for the “gclstorage” blob storage.

Verify with Telerik Fiddler

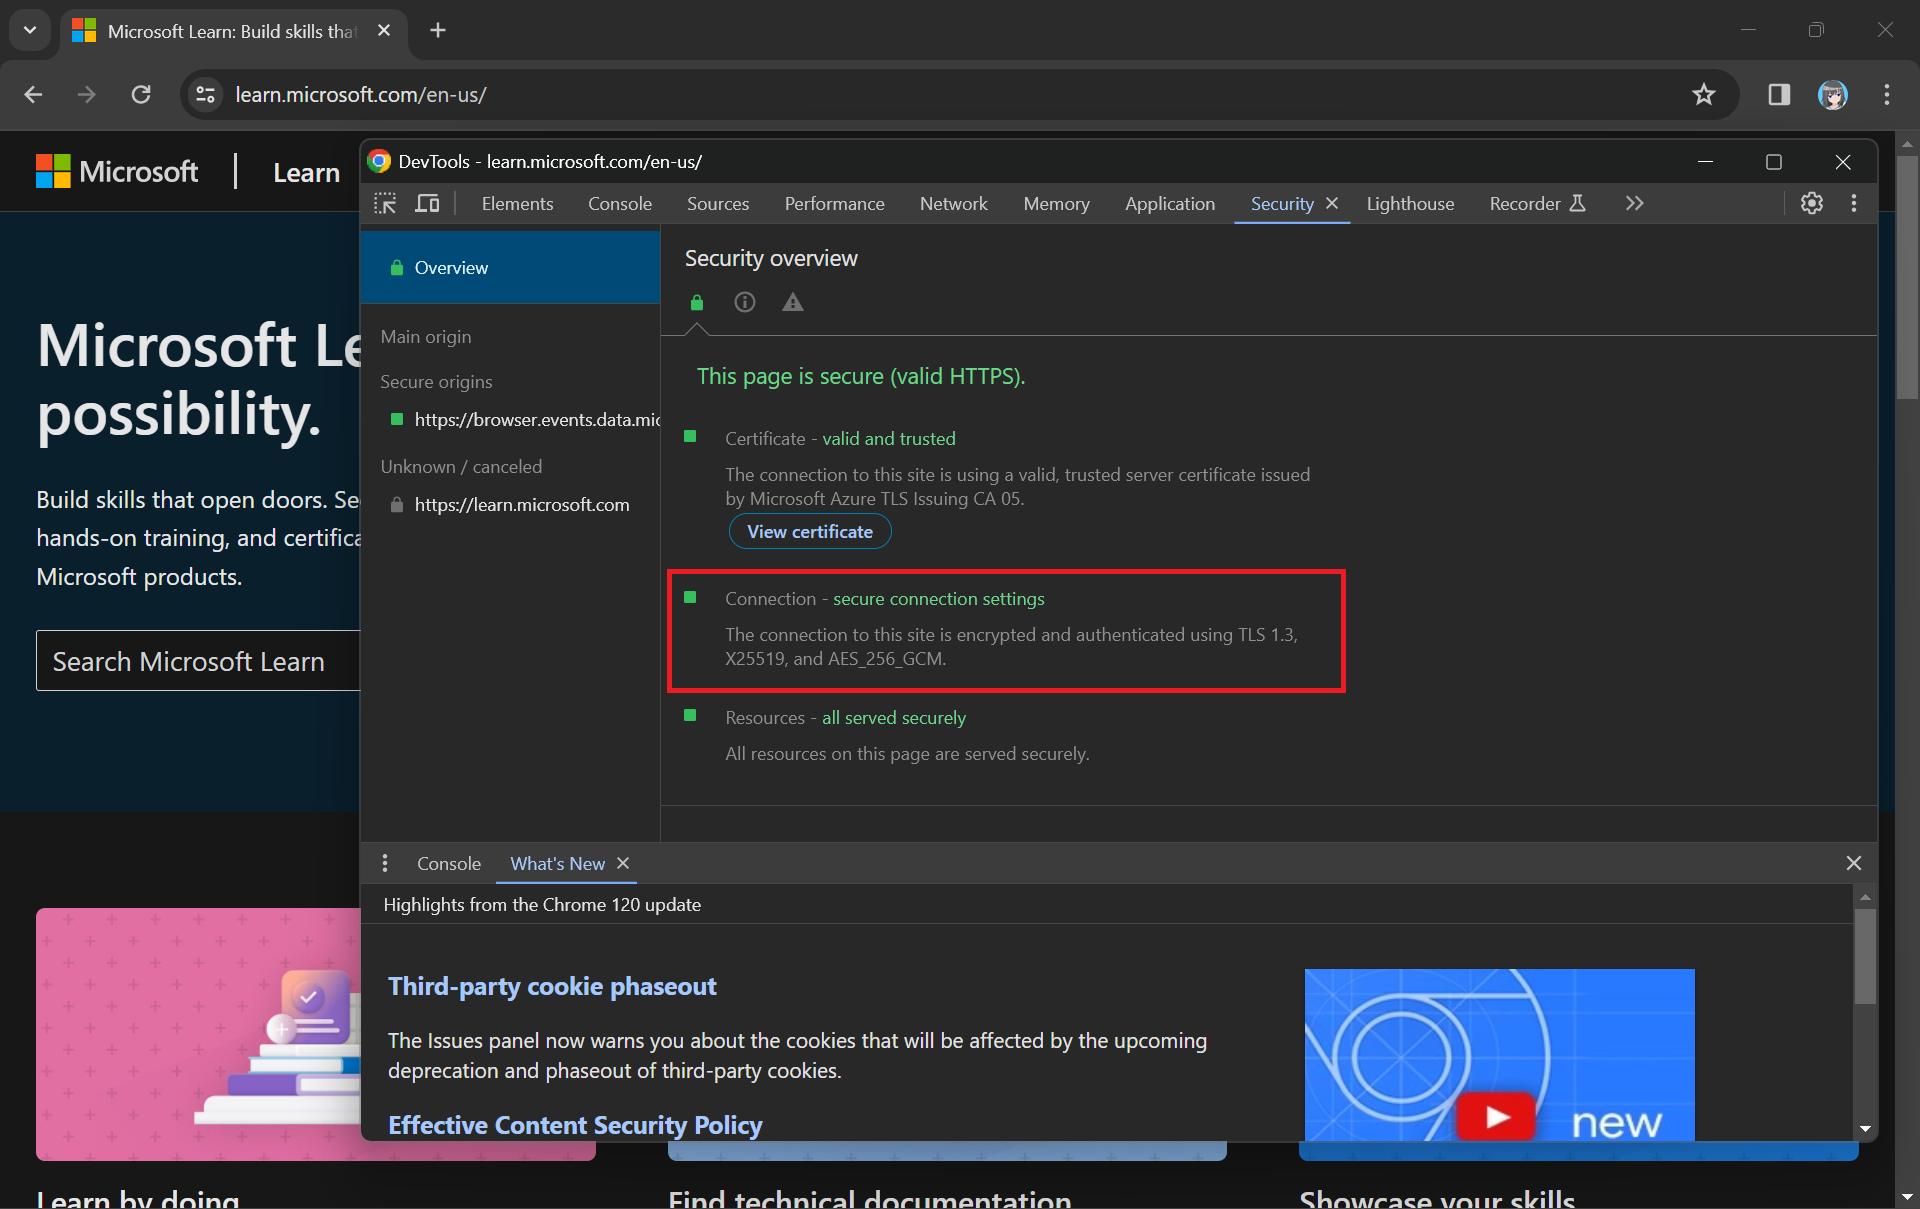
Fiddler is a popular web debugging proxy tool that allows us to monitor, inspect, and debug HTTP traffic between our machine and the Internet. Fiddler can thus be used to inspect and analyze both TLS and SSL requests.

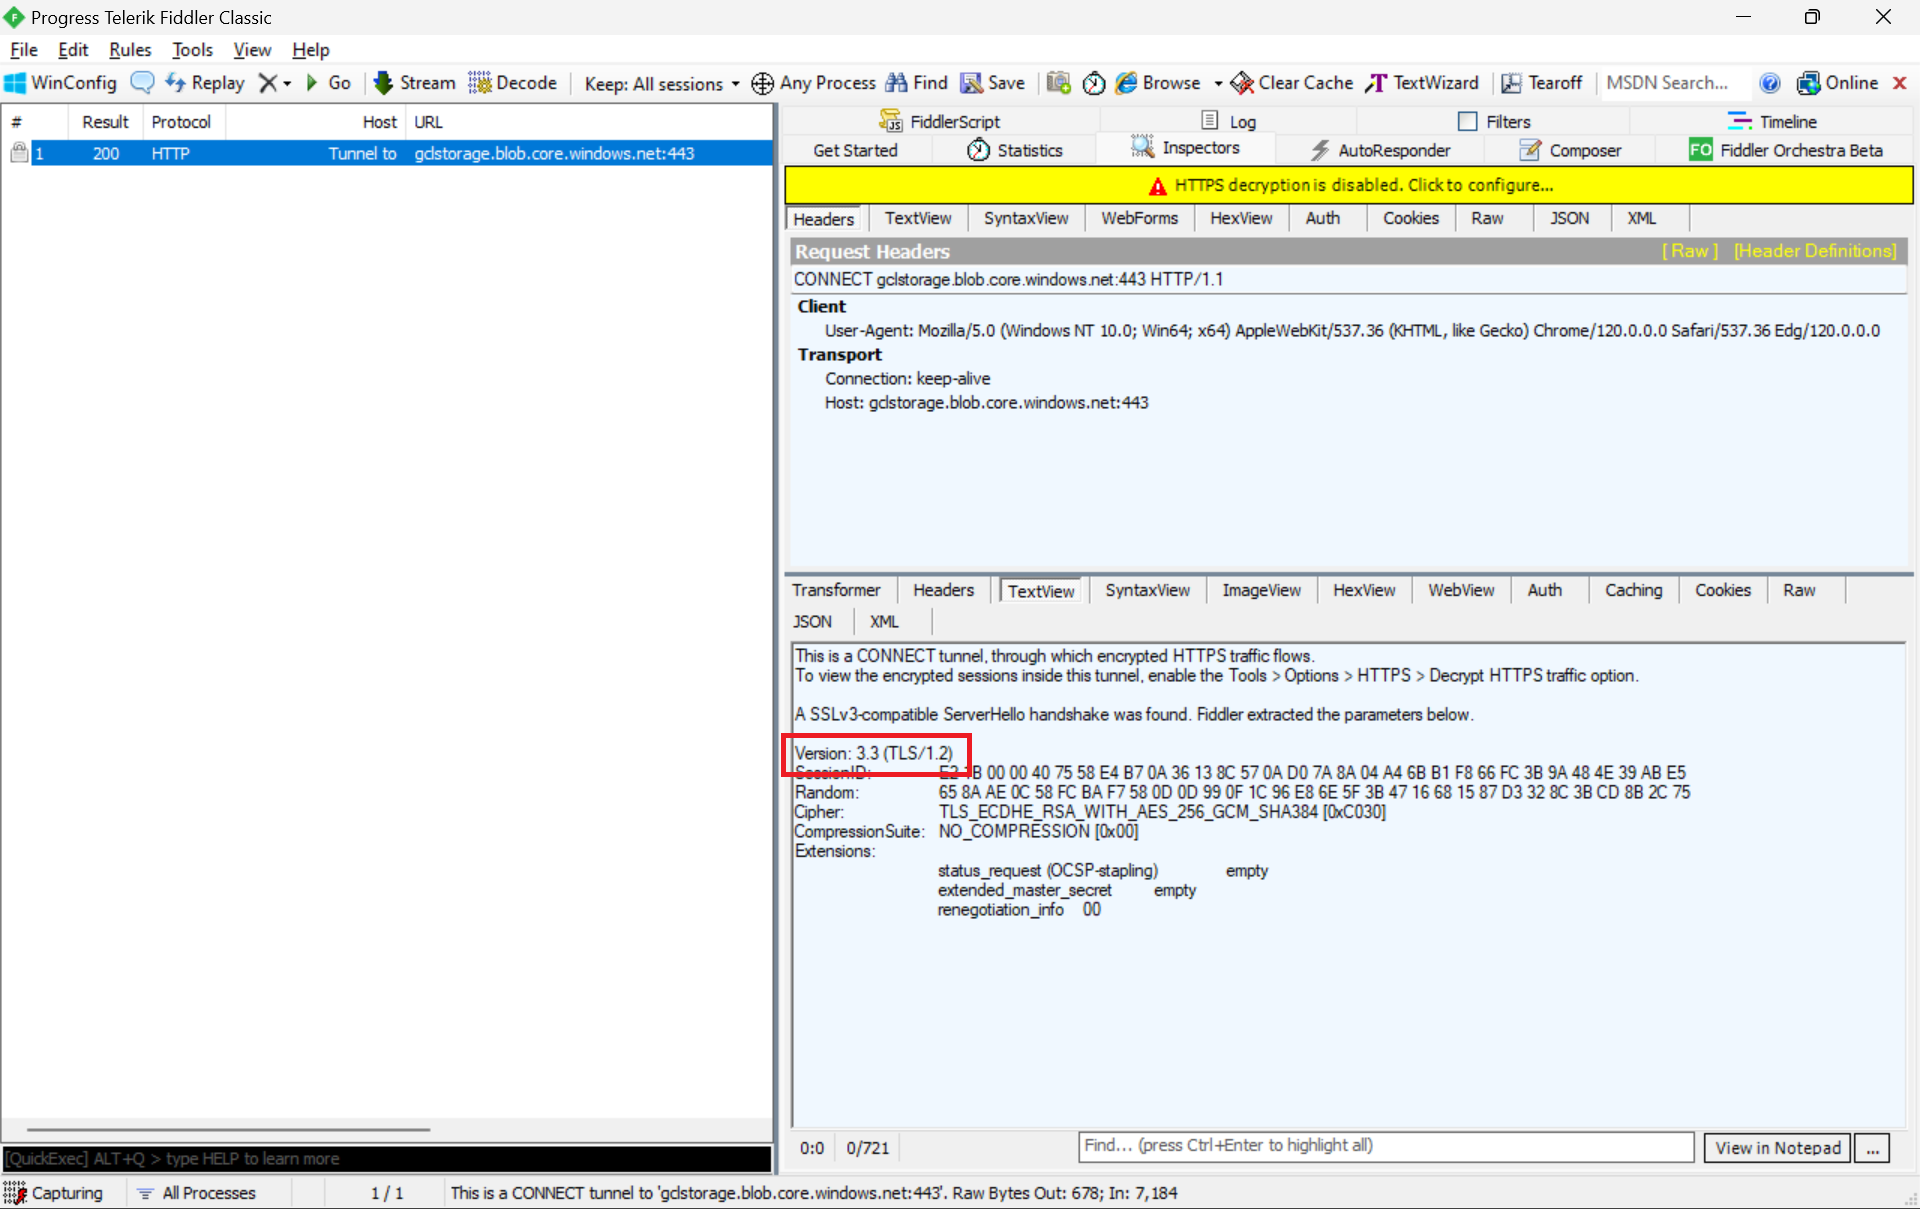
We can refer to the Fiddler trace to confirm that the correct version of TLS 1.2 was used to send the request to the blob storage “gclstorage”, as shown in the following screenshot.

TLS 1.2 is SSL 3.3, thus the version there states that it is version 3.3.

Enforce the Minimum Accepted TLS Version

Currently, the minimum TLS version accepted by storage account is set to TLS 1.0 by default before November 2014.

We at most can only set Version 1.2 for the minumum TLS version.

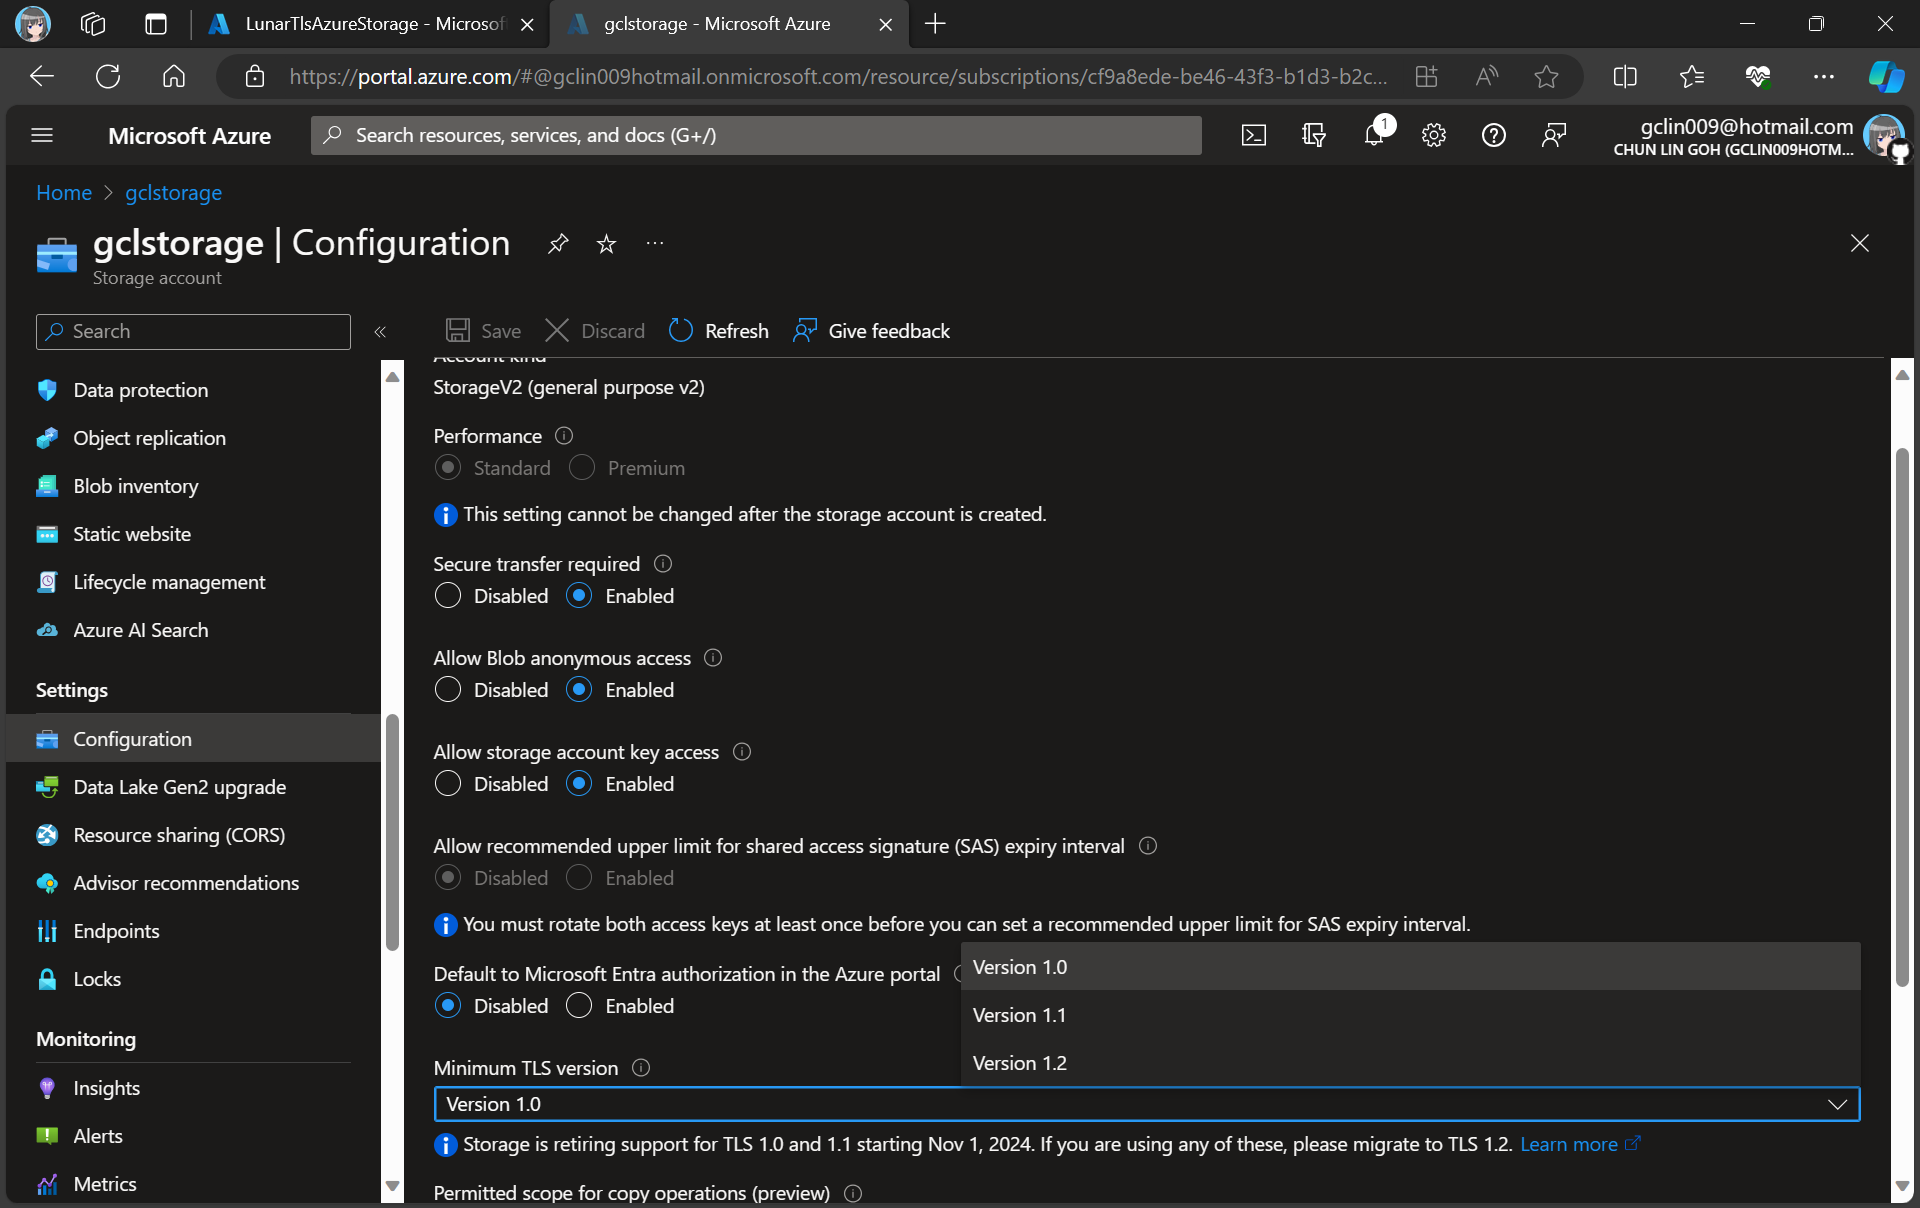
In advance of the deprecation date, we can enable Azure policy to enforce minimum TLS version to be TLS 1.2. Hence, we can now update the value to 1.2 so that we can reject all requests from clients that are sending data to our Azure Storage with an TLS 1.0 and 1.1.

Change in Kestrel for ASP .NET Core

Meanwhile, Kestrel, the cross-platform web server for ASP.NET Core, now also uses the system default TLS protocol versions rather than restricting connections to the TLS 1.1 and TLS 1.2 protocols like it did previously.

Thus, if we are running our apps on the latest Windows servers, then the latest TLS should be automatically used by our apps without any configuration from our side.

In fact, according to the TLS best practices guide from Microsoft, we should not specify the TLS version. Instead, we shall configure our code to let the OS decide on the TLS version for us.

Wrap-Up

Enhancing the security stance for Windows users, as of September 2023, the default configuration of the operating system will deactivate TLS versions 1.0 and 1.1.

As developers, we should ensure that all apps and services running on Windows are using up-to-date versions that support TLS 1.2 or higher. Hence, prior to the enforcement of TLS updates, we must test our apps in a controlled environment to verify compatibility with TLS 1.2 or later.

While TLS 1.0 and 1.1 will be disabled by default, it is also good to confirm these settings and ensure they align with your security requirements.

By taking these proactive measures, we should be able to have a seamless transition to updated TLS versions, maintaining a secure computing environment while minimising any potential disruptions to applications or services.

References

No-Code Container Chassis Tracking Dashboard Implemented with Azure IoT Plug and Play

Normally on the roads, we will see trailer trucks, which are the combination of a prime mover and a container chassis to carry freight. Container chassis is an important asset of a trucking company. It is usually an unpowered vehicle towed by another. If you still have no idea what it is, please watch the video below.

Ocean Trailer presents CIMC Combo Container Chassis.

Tracking container chassis is not a simple problem to solve. We do not only need to build trackers, which are IoT devices to send back telemetry and sensor data collected from the container chassis, but also need to have another system to store, process, and display the data. This does not sound like a system that can be easily built within, let’s say, 5 minutes.

Now what if we can turn our smart phones into trackers and then install one of them on the container chassis? Also, what if we can make use of Microsoft Azure to provide a IoT data dashboard for us in just a few clicks?

Azure IoT Plug and Play

With the newly introduced IoT Plug and Play from Microsoft, we can do a very simple container chassis tracking dashboard without any coding.

Few days ago, Microsoft release a mobile app called IoT Plug and Play on both Android and iOS.

So, you may ask, why is this IoT Plug and Play interesting? This is because it can turn our iOS or Android device into an IoT device without any coding or device modeling. Our phones can then seamlessly connect to Azure IoT Central or IoT Hub with telemetry and sensor data from the devices will be automatically uploaded to the Azure in a defined delivery interval.

In this post, I am just going to share what I have tried out so far. Hopefully it helps my friends who are looking for similar solutions.

Setup Azure IoT Central

Before we proceed further, we need to understand that even though the example I use here may sound simple to you, but the services, such as Azure IoT Central is actually meant for production use so that the industries can use it to build enterprise-grade IoT applications on a secure, reliable, and scalable infrastructure.

When we are setting up Azure IoT Central, we can have a quick start by directly applying templates which are all industry focused examples available for these industries today. For example, using the templates on Azure, logistics company can create an Azure IoT Central application to track shipments in real time across air, water, and land with location and condition monitoring. This will play an important role in the logistics industry because the technology can then provide total end-to-end supply chain enablement.

Dr Robert Yap, the Executive Chairman of YCH Group, shared about their vision of integrating the data flows in the supply chain with analytics capabilities.

In my example, I will start with a customised template which has nothing inside. We then can proceed to the “Devices” page to add a devices for our phones.

First look of the Azure IoT Central dashboard.

Connect with Azure IoT Plug and Play

Now, how do we turn our phones into IoT devices?

First of all, we just need to download the IoT Plug and Play app (from Google Play Store or Apple App Store) to our phones. After that, we simply just pair the new devices on the Azure IoT Central to our phones by scanning the corresponding QR code. That’s all, we now should be able to see the telemetry and sensor data collected from the phones on our dashboard, as shown in the following screenshot.

Data collected from accelerometer, gyroscope, magnetometer, and barometer on my phone.

Rules and Triggers

We are also able to specify rules in the Azure IoT Central so that there will be an action triggered when the defined conditions are met. We can also integrate the rule with Power Automate and Azure Logic Apps to perform relevant automated workflows.

We can also have Azure IoT Central to send us an email when the device is running on low battery, for example.

Scheduled Jobs

Another cool feature in Azure IoT Central is that we can send the commands back to the devices. In addition, we can send the commands in a scheduled manner. For example, in the following screenshot, the “lightOn” will be sent to all the devices in the Device Group and thus the connected phones in the Device Group will switch on their flashlight at 11.30pm in the midnight.

Don’t be scared if there is flashlight suddenly coming from chassis in midnight.

Image Upload

In the IoT Plug and Play app, we can also try out the image upload feature which allows us to submit images to the cloud from the IoT devices. As shown in the screenshot below, each IoT Central app can only link with one Azure Storage container. Hence, in the container, there will be folder for each of the registered IoT devices so that files uploaded will be categorised into their own folder accordingly.

We need to link Azure IoT Central to a container in the Azure Storage.

So with the phones setup as IoT devices, we can now install them on the container chassis to continuously send back the location data to the Azure IoT Central. The business owner can thus easily figure out where their container chassis is located at by looking at the dashboard.

References

Bring New Life to Old Laptop with Linux – Zorin OS Lite

According to a study conducted by the National Environment Agency (NEA) of Singapore, there are more than 60,000 tonnes of electronic waste generated in the city state a year. So, do you have an old but functioning computer and not sure what to do with it? Well, instead of throwing it away or sending it for recycling, why not re-purpose it and make it great again with lightweight OS?

Personally, for devices such as computer, even though it might not work anymore for a specific purpose, but as long as it can still function, I try to find a use for it.

NEA encourages residents to recycle the electronic waste.

I bought my first laptop in 2007 when I enrolled in the National University of Singapore. It is an Acer TravelMate 6292 with Intel Core 2 Duo T7300 CPU and 2GB RAM. The operating system installed in the machine was Windows Vista and it ran very slow. Nevertheless, I still managed to live with it and successfully completed all the assignments and projects using the slow computer.

Acer TravelMate 6292 with Windows Vista installed is the only machine I had in my 4-year campus life.

Hence, it’s now not a good idea to install Windows 10 on this 14-year-old laptop. Instead, I simply remove Windows and install a lightweight version of Linux, Zorin OS.

Why Zorin OS?

Zorin OS is fully graphical. It is a sexy looking Linux distro that manages to provide a good user experience – even with its lite edition. Speaking of user experience, although Zorin OS is an Ubuntu-based Linux distribution, it has a Windows-like graphical user interface. Hence, it is suitable to Windows users who are very accustomed to the way Windows works and are not interested in learning a new OS.

Zorin OS user interface looks just like Windows.

Zorin OS comes in two variants, i.e. Core and Lite. Here we will focus on Lite edition because it uses lightweight Xfce desktop and is intended to be the Linux for low-spec laptops and computers.

Zorin OS Lite system requirement. (Image Source: zorinos.com)

Once we are sure that our low-spec computers are capable of running Zorin OS Lite, we simply need to prepare a USB drive with at least 4GB of capacity for our Zorin OS Lite copy. Then we can start to download Zorin OS and then create an USB installation drive.

We can try Zorin OS before install it when we boot from the USB installation drive. (Image Source: zorinos.com)

Battery Replacement

The last time I changed the battery of my laptop is 10 years ago. In addition, recently the battery would become extremely hot until I couldn’t even grab my laptop when it was charging. Hence, it’s now time to replace the battery with a new one.

The battery is still available on Shopee!

The battery of the laptop is a GARDA31 6-Cell battery. I ordered one from Shopee with SGD 43.24. I received the battery one week later.

According to the spec of the battery, it has a battery life of 4 hours maximum and it would take 3 hours and 30 minutes to charge. In my case, I can only use the laptop to listen to an online radio on Chromium for at most 2 hours and 15 minutes after I have fully charged it. In addition, the CPU usage was only around 20% and RAM usage was around 1GB when the online radio is playing. However, for charging, currently it takes only around 2 hours to fully charge the battery.

System Booting Time

Currently, Zorin OS Lite took about 1 minute to boot. To find the exact time it takes to boot, we can use a tool known as systemd-analyze.

The systemd-analyze is a tool that we can use to find out the system last boot up statistics. With the systemd-analyze tool, we can find the information about how much time the system took to boot and also how much time each unit took to start, as shown in the following screenshot.

Startup finished within a minute.

We can further list all the running services that started at the boot time along with the time they took with the systemd-analyze blame command, as shown below.

Each loop device is a snap install.

Web Browsers

One of the major uses of this laptop is surfing the Internet.

By default, Firefox is pre-installed in Zorin OS. We can also install Chromium, an open-source web browser maintained by Google, from its Software store, as shown in the screenshot below.

Chromium web browser can be found in the Zorin OS Software store.

In October 2020, Microsoft announced the Edge preview builds for Linux. The release supports Ubuntu, Debian, Fedora, and openSUSE distributions. Hence, we simply need to download and install the .deb package directly from the Microsoft Edge Insider site.

Using Gdebi Package Manager to install the downloaded .deb package of Microsoft Edge. (Guide on using gdebi)

Besides listening to online radio, I also like to watch videos on Bilibili and YouTube. Unlike YouTube, Bilibili is more engaging because it has a real-time captioning system known as Danmu (弹幕) that displays user comments as streams of scrolling subtitles overlaid on the video playback screen. Due to the Danmu system, Bilibili videos don’t play well on Firefox but performs better on Chromium and Edge.

Bilibili video performance on Firefox vs Chromium on Zorin OS Lite.

Out of curiosity, I run the Basemark benchmark on Chromium, Firefox, and Edge. Here, Basemark Web 3.0 is used because it tests how well our system can use web apps. The benchmark includes various system and graphic tests that use the web recommendations and features. Firefox is a clear winner in this benchmark, with Edge and Chromium had problems on running some of the tests and Firefox couldn’t run the WebGL 2.0 Test.

Score of three web browsers on Zorin OS Lite.

Screen Recording

The video shown above is recorded using a Linux program known as SimpleScreenRecorder, which is user-friendly with a straightforward GUI.

SimpleScreenRecorder gives user a simple way to do a screen record on Linux.

To install the application, we simply need to execute the following commands.

sudo apt-get update 
sudo apt-get install simplescreenrecorder

After the videos were recorded, I edited them on my Windows machine which has a video editing software installed.

File Upload

To share the files from Zorin OS to my Windows machine, I decided to use Microsoft Azure Storage as a medium. On Zorin OS Software Store, we can easily find the Azure Storage Explorer and download it. After the Azure Storage Explorer is successfully installed, we can simply drag-and-drop files to Azure Storage and download them from other machines.

Downloading and installing Microsoft Azure Storage Explorer from Zorin OS Software store.

Chinese Input

Sometimes, I need to use Chinese in websites such as Bilibili. To add Chinese input method on Zorin OS, we will first need to install fcitx with the following command.

sudo apt install -y fcitx

Fcitx itself comes with many IMEs (Input Method Editors). Personally, I prefer fcitx-googlepinyin which is a Chinese IME using Google Pinyin. It can be installed with the following command.

sudo apt-get install fcitx-googlepinyin

After we have both of them installed, we then can proceed to follow the steps below to setup the Chinese input method.

  1. Settings > Language Support > Install / Remove Languages;
  2. Check “Chinese (simplified)”;
  3. Set “fcitx” as the Keyboard Input Method System in the Language Support window;
  4. Apply system-wide;
  5. Restart the machine;
  6. Choose “Fctix Configuration” from the “Zorin Start Menu”;
  7. Click the + button and uncheck “Only show current language”;
  8. Search “google pinyin” and add it;
  9. Done, now we can type Chinese in Zorin OS.
Setting languages and keyboard input method system in Zorin OS.

Drawing

I’ve also installed Pinta, a free and open-source program for drawing and image editing. The reason I choose to use Pinta is because it is designed in lieu of the Paint.NET on Windows.

Drawing diagram using Pinta.

Programming

I also use the laptop to learn programming at my own time. Hence, I choose to install one of my user-friendly IDEs, i.e. Visual Studio Code.

Currently, I have installed Jupyter Notebooks extension on the VS Code. The first project that I am working on now is to learn how to install and use packages, such as pandas, numpy, seaborn, and matplotlib to do statistical data visualisation, as shown below.

Working with Jupyter notebook in VS Code.

References