Unit Test Stored Procedures and Automate Build, Deploy, Test Azure SQL Database Changes with CI/CD Pipelines

I was recently asked about how to unit test stored procedures before deploying to servers. Unfortunately, there are not much discussions about unit testing stored procedures, especially with tools like SSDT and Azure DevOps. Hence, I decide to write this walkthrough to share my approach to this issue.

PROJECT GITHUB REPOSITORY

The complete source code of this project can be found at https://github.com/goh-chunlin/Lunar.Spending.

Unit Testing

According to The Art of Unit Testing, a unit test is an automated piece of code that invokes the unit of work being tested, and then checks some assumptions about a single end result of that unit.

Without unit testing, one has no choice but to rely on system and integration tests which are normally performed in the later stage of the SDLC. Some teams may even resort to the troublesome way, i.e. manually testing the end product they’re developing to invoke their codes.

Unit testing of stored procedures is also very crucial. If the bugs in stored procedures are not caught in the early stage of development, it is very challenging to rollback the data changes that have been made to the database.

Setup SSDT (SQL Server Data Tools)

SSDT is a development tool for building SQL Server relational databases, including databases in Azure SQL. The core SSDT functionality to create database projects has remained integral to Visual Studio 2022. Thus, we can easily include SSDT by selecting the “Data storage and processing” workload in the Visual Studio Installer, as shown below.

Setting up SSDT in Visual Studio 2022.

With SSDT, we can work directly with a connected database instance on/off-premise. We can use SSDT Transact-SQL design capabilities to build, debug, maintain, and refactor databases. In this article, we will be using SSDT to create unit tests that verify the behavior of several stored procedures.

Create a New Database Project

In this article, we will assume that we have an existing database hosted on Azure SQL server.

Firstly, as shown in the screenshot below, we need to create a new database project in order to import database schema and stored procedures from the database on Azure.

Creating a new SQL Server Database project on VS 2022.

Let’s name our project DbCore. We will then see a simple DbCore project shown in our Solution Explorer, as demonstrated in the screenshot below.

The database project is successfully created.

Next, we will import our Azure database into the database project by right-clicking on it in the Solution Explorer.

Select the “Database…” option to import from existing Azure database.

The widget will then import the data from the Azure database based on the given connection string, as shown below.

Importing database to our database project.

Once the import is done, we shall see our tables and stored procedures listed under the dbo directory in Solution Explorer, as shown below.

Table and stored procedures are successfully imported!

Before we continue, we need to edit the Target Platform of our database project accordingly, as shown in the following screenshot, otherwise we will not be able to publish the database later.

Changing the target platform to avoid the publish error.

Create Unit Test for Stored Procedure

Let’s say we would like to unit test the AddSpending stored procedure. What we need to do is simply right-clicking the AddSpending stored procedure and then click on the “Create Unit Tests…” option, as demonstrated below.

Adding unit test for a selected stored procedure.

We will then be asked for the connection string of the database that the unit test project will be connecting to. Once the project has been successfully created, we will be given a template unit test as follows.

A boilerplate code of stored procedure unit test.

We can include pre and post test SQL statements which will be run before and after the test script is executed, respectively.

For example, we would like to have a clean Spendings table before the unit test runs, we can have the following SQL script to delete all rows in the table.

Pre-test script will be run before the test script.

In our test script, we will test to see if the description and amount can be stored correctly in the database. Hence, we need to specify two Test Conditions to verify the two columns, as shown in the following screenshot.

RC means Return Code. It can later be used in a test case assertion.

Now, we can run our very first unit test with the Test Explorer to see if our stored procedure has any issue or not.

The test case fails. We shall check why the number is rounded up.

It turns out that this bug is caused by wrong data type used for the Amount column. Now we can proceed to fix it.

The test passed after we fixed the issue in our table schema and stored procedure.

Getting Ready for Publishing Database

As we discussed earlier, unit testing is not only about writing a piece of code to test our unit of work, but also making it to be automatically testable.

Hence, our next move is to automate the build, test, and release of our database.

Firstly, we shall make sure the source code of our projects is on GitHub (or any source control supported in Azure DevOps).

Secondly, we need to create the Publish Profile of our database. To do so, we simply right click on database project and choose the “Publish…” option. There will be a window popped out, as shown below.

Configuring the Publish Profile of our database.

As shown in the screenshot above, there are many settings that can be configured, including Azure SQL related settings. After configuring them accordingly, please click on the “Create Profile” button. Once it is grayed out, it means that the profile has been generated successfully. We can then proceed to close the popped-out window.

Please make sure the generated Database Profile file is included in the source control. Kindly add it to Git if it is not, as shown in the screenshot below. This is because this file is needed in our Azure DevOps build pipeline later.

Please make sure our Database Profile is included in source control.

Finally, let’s create a project on Azure DevOps which will host the build and release pipelines for our automatic database deployment.

We will configure our project to have only the Pipelines service on Azure DevOps.

Setup Build Pipeline

Once we have created our project on Azure DevOps, we can proceed to create our Build Pipeline.

Firstly, we need to specify the code repository we are using. Since our code sists on GitHub, we will connect Azure DevOps with our project on GitHub as shown in the screenshot below.

Please remember to select the correct branch too.

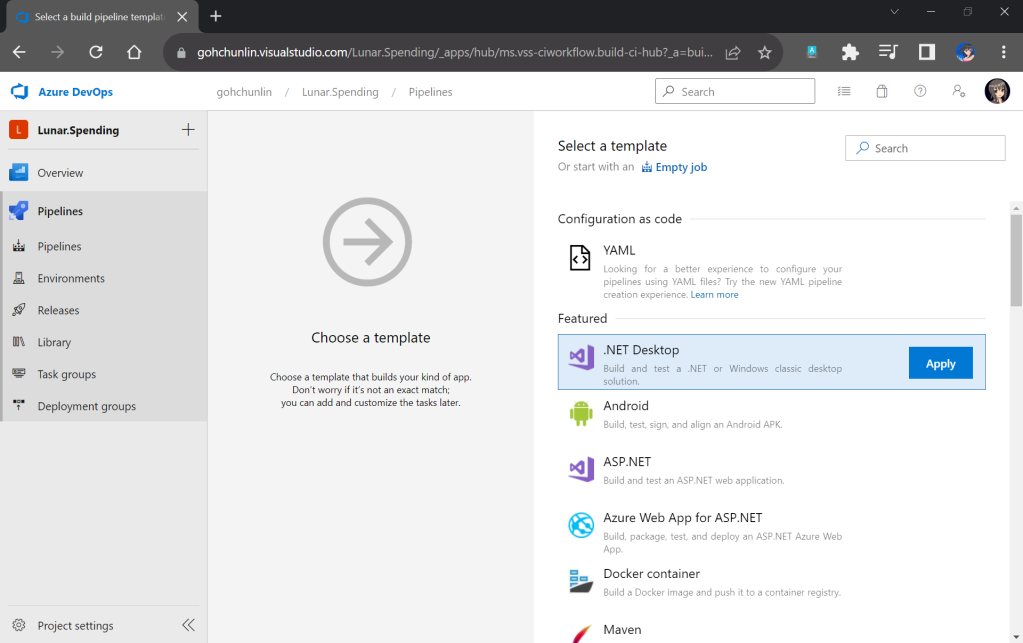
Next, we will start off from the .NET Desktop template. The reason why we choose this template is because it contains many tasks that we can use in our database build pipeline.

We will make use of the .NET Desktop template for our database build pipeline.

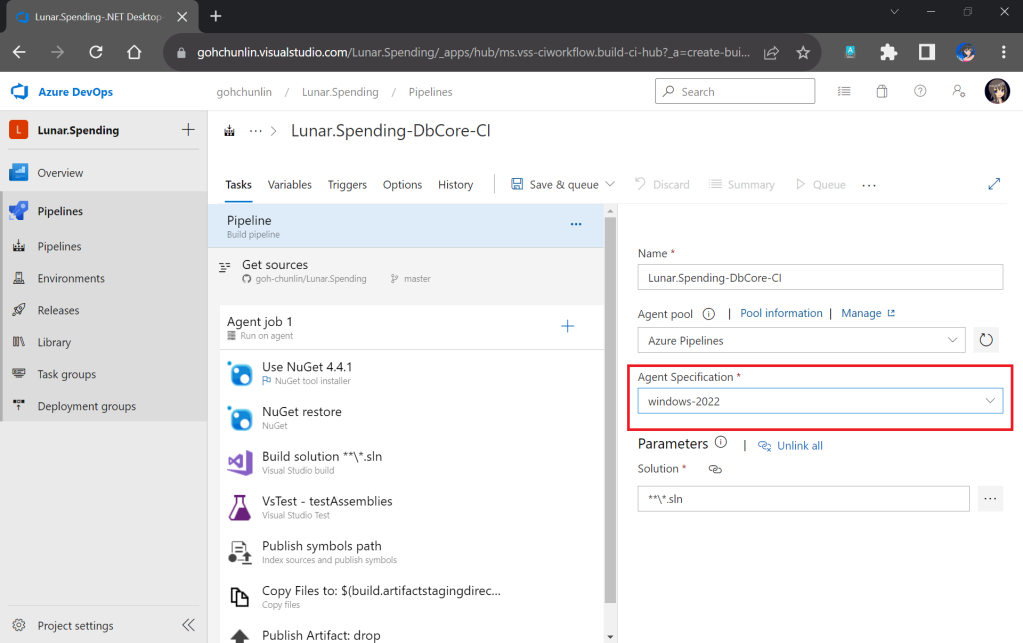
Here we will be using the Microsoft-hosted agent in our build pipeline. With Microsoft-hosted agents, maintenance and upgrades are taken care of for us. Each time we run a pipeline, we will get a fresh virtual machine for each job in the pipeline.

We need to make sure that “windows-2022” (Windows Sever 2022 with VS2022 installed), which is the latest version as of now, is chosen in the Agent Specification field. I have tried with the default “windows-2019” option before and there would be an error message “Error CS0234: The type or namespace name ‘Schema’ does not exist in the namespace ‘Microsoft.Data.Tools’ (are you missing an assembly reference?)”.

Please update to use windows-2022 as our build agent or else there would be issues later.

Next, we need to update the version of NuGet to be the latest, which is now 6.1.0.

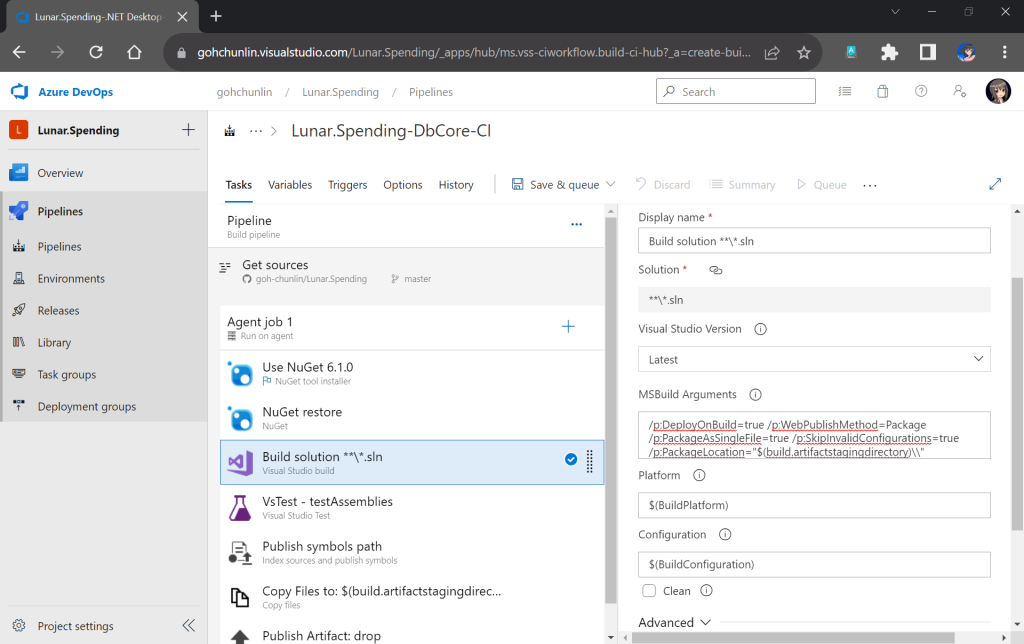
After that, we move on to the third task in the pipeline which is building our Solution in Release mode with the following MSBuild Arguments on Any CPU.

/p:DeployOnBuild=true /p:WebPublishMethod=Package /p:PackageAsSingleFile=true /p:SkipInvalidConfigurations=true /p:PackageLocation="$(build.artifactstagingdirectory)\\"
Configuring the Build task.

We will remove the VsTest from the Build Pipeline because it will be proper to run the unit tests after changes have been deployed to the database. Otherwise, we will still be testing against the old schema and old stored procedures. Hence, we will add the testing task in the Release pipeline instead.

Now, since the testing will be done in the Release Pipeline instead, we shall create a task to copy the assemblies of TestDbCore project to the Build Artifact so that the assemblies can be used in the Release Pipeline later. Thus, we will add a new task “Copy Files” as shown in the screenshot below.
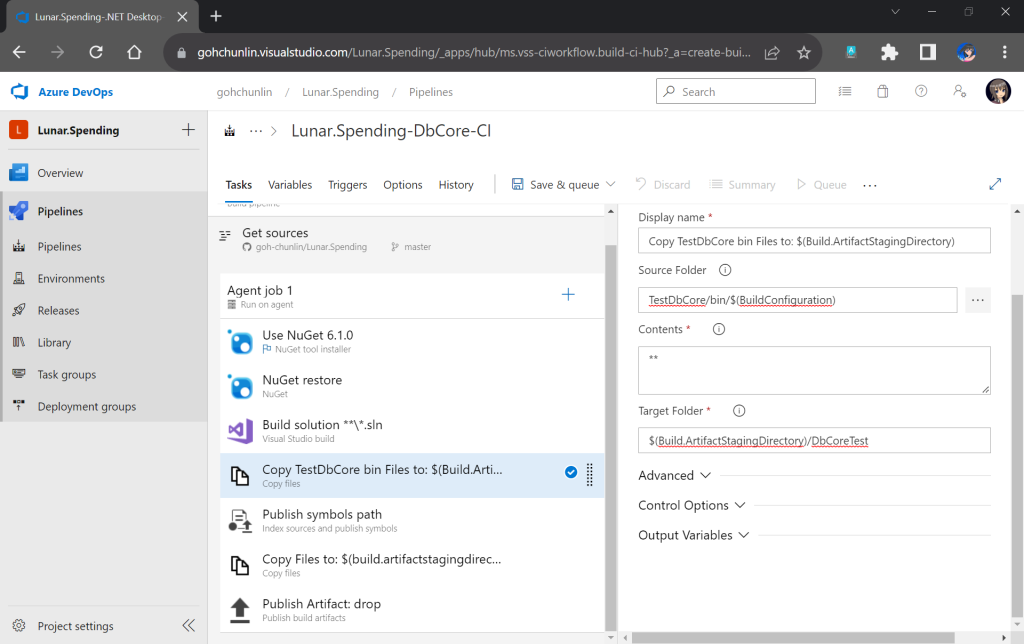
TestDbCore assemblies and other relevant files will be copied to DbCoreTest folder in the Build Artifact.

We will also remove the next task, which is publishing symbols because it is not necessary.

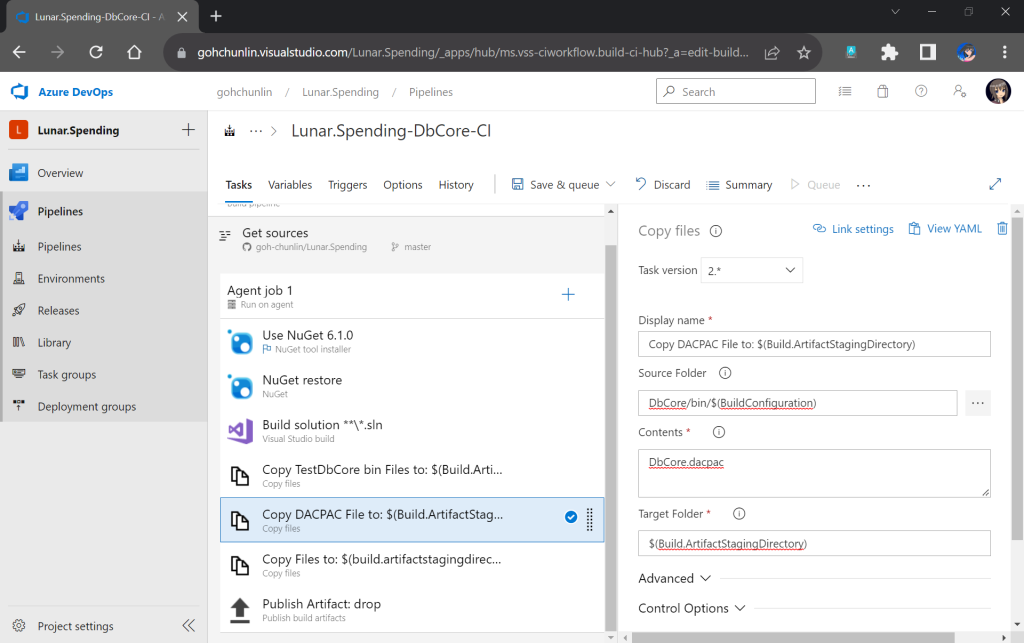
After that, we will add a new task to copy DACPAC file, which is generated during Build, to the Build Artifact, as shown in the following screenshot.

DACPAC file is needed to deploy our database to an existing instance of Azure SQL database.

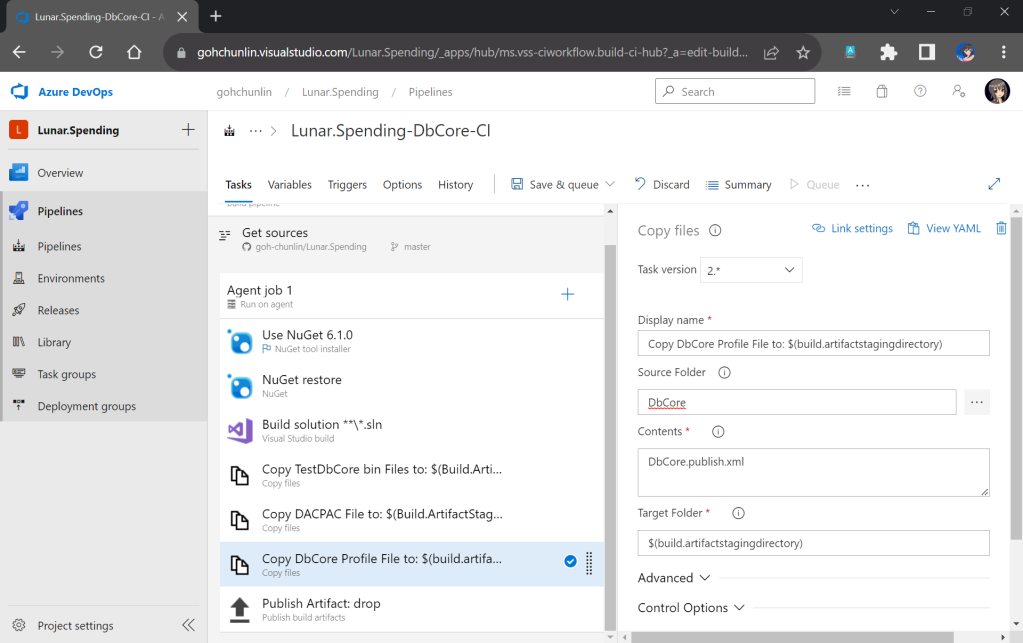
Another file we need to copy is our Database Profile. This is the reason why earlier we have to make sure the profile file needs to be in the source control.

The database publish profile needs to be copied to the Build Artifact directory as well.

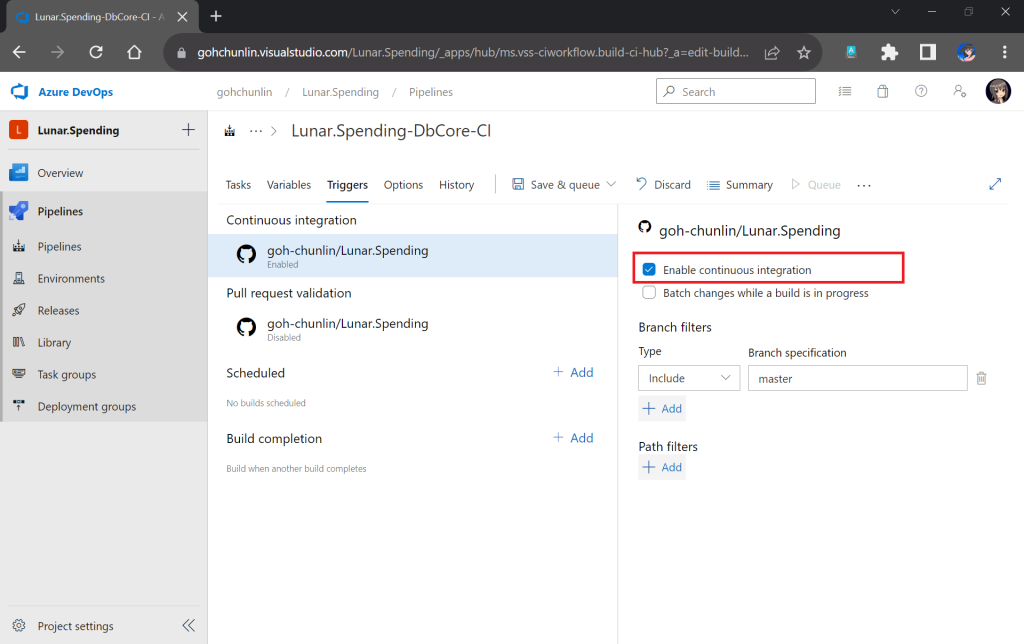
There is nothing to change for the Publish Artifact task. So, we can now move on to enable the Continuous Integration for the Build Pipeline, as shown in the screenshot below.

We can enable the continuous CI under the Triggers section of our Build Pipeline.

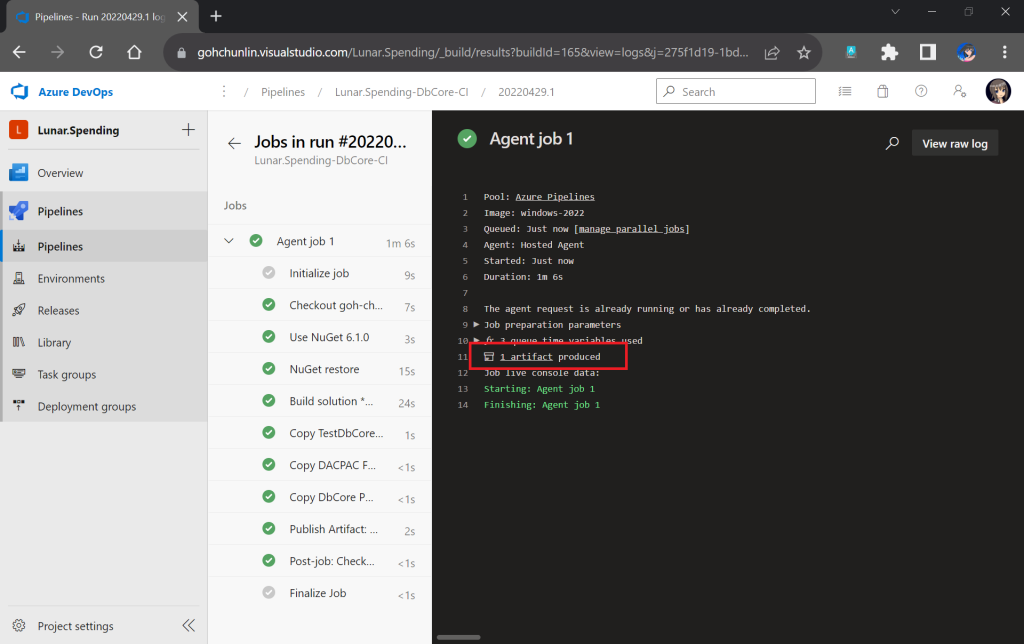
Finally, we can save and queue our Build Pipeline. If the build is successful, we will be able to see a Build Artifact produced, as shown in the screenshot below.

Build is successfully executed!

Setup Release Pipeline

In order to automatically deploy our database changes after the database project and unit test project are built successfully, we need to configure the Release Pipeline.

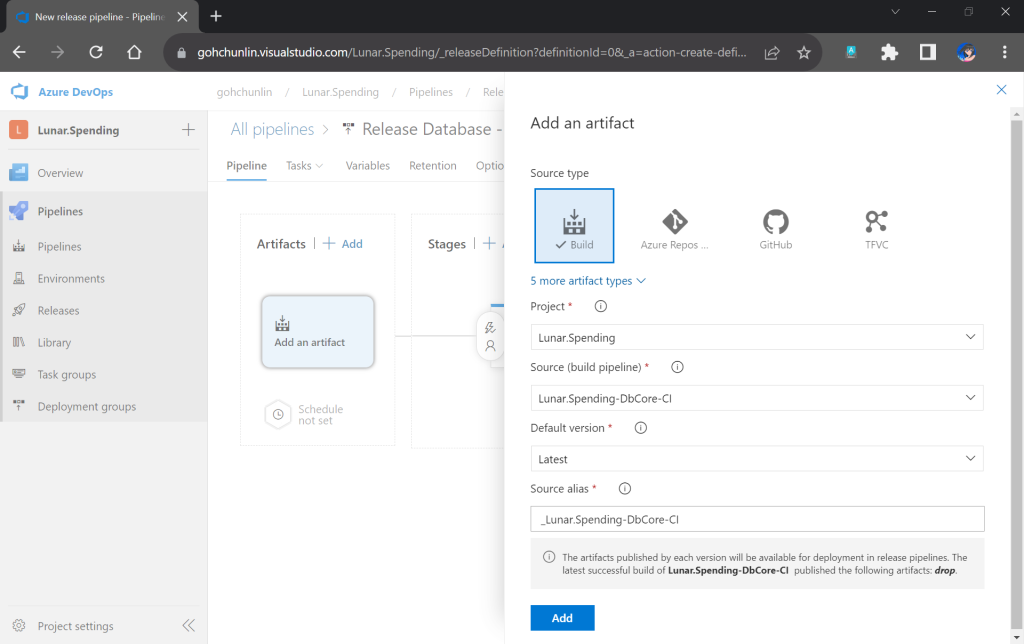
First of all, we need to integrate our Build Pipeline with this new Release Pipeline, as demonstrated in the following screenshot.

Adding the Build Artifact generated earlier in the Build Pipeline.

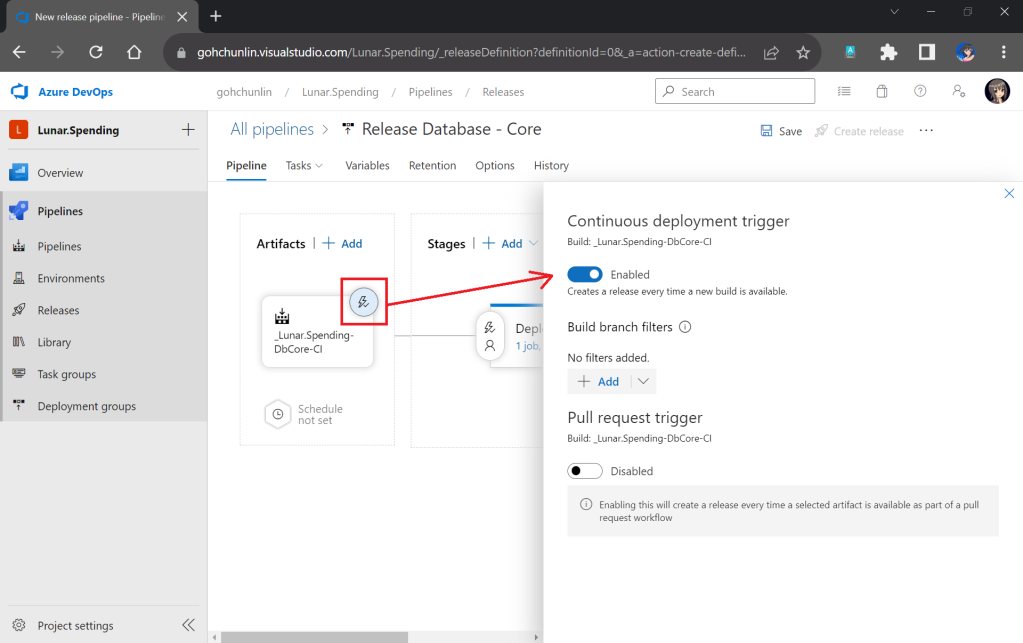
Next, we can enable the Continuous Deployment, as shown in the screenshot below. This is to make sure that we can deploy the database changes and test them automatically right after the build is completed successfully.

Enabling CD in our Release Pipeline.

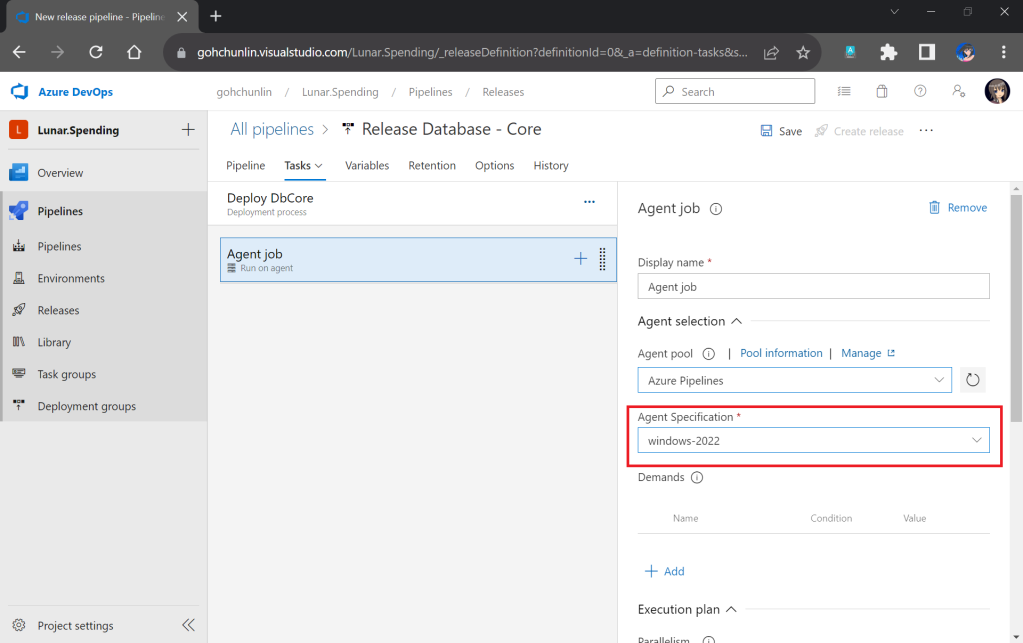
Now, we can move on to configure the tasks in the stage. Here, I have renamed the stage as “Deploy DbCore”. To be consistent with the Build Pipeline, here we will be using “windows-2022” as the agent in our Release Pipeline too.

Please update to use windows-2022 as our agent or else there would be issues later.

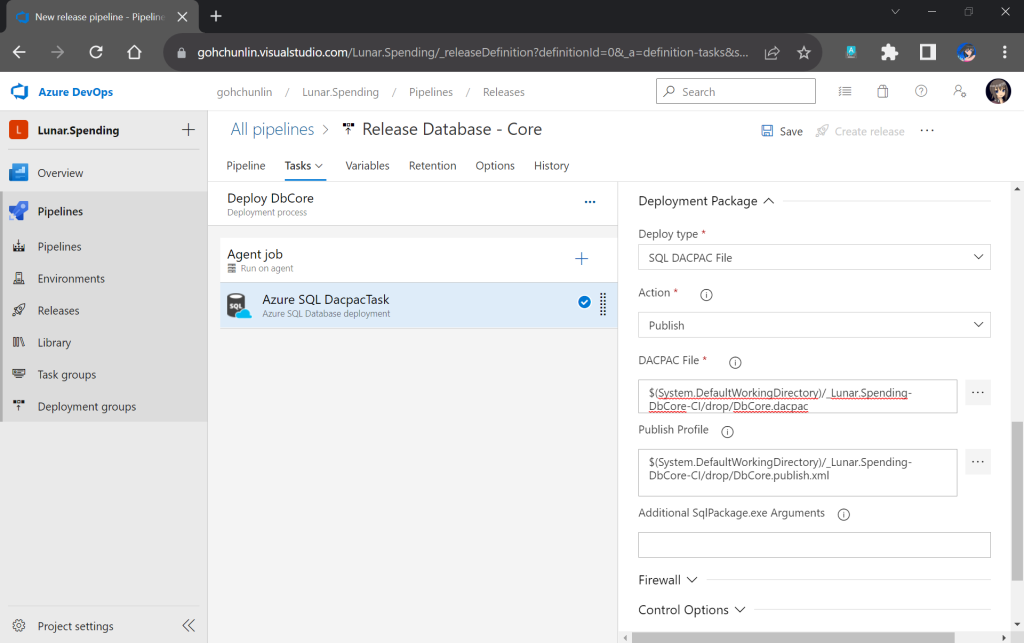
The first task will be deploying database changes to Azure SQL with the task “Azure SQL Database deployment”. In the task, we need to select our Azure subscription and provide our Azure SQL database admin login credential so that the database changes can be deployed to Azure SQL on our behalf.

In the same task, under the Deployment Package section, we need to state that we will be deploy with a DACPAC file. This is also where we will use the DACPAC file and publish profile file in the Build Artifact.

Setting up the deployment package.

Next, we will run into a problem. We are supposed to add the testing task next. However, connection strings to the database are needed. So how could we securely store the connection strings in our pipeline?

Shanmugam Chinnappa proposed three ways to solve this problem. I will demostrate how I use his method of using user-defined secret variables. This is the most straightforward way among the three.

Firstly, we need to edit the app.config file in the TestDbCore project. In this file, two connection strings can be found. The connection string in ExecutionContext is used to execute the test script in our unit test. The PrivilegedContext connection is used to test interactions with the database outside the test script in our unit test.

To keep things simple, we will use the same connection string for both contexts. We thus can replace the connection string in those two contexts with a token #{TestDbCoreConnection}#.

<ExecutionContext Provider="System.Data.SqlClient" 
    ConnectionString="#{TestDbCoreConnection}#" CommandTimeout="30" />

<PrivilegedContext Provider="System.Data.SqlClient" 
    ConnectionString="#{TestDbCoreConnection}#" CommandTimeout="30" />

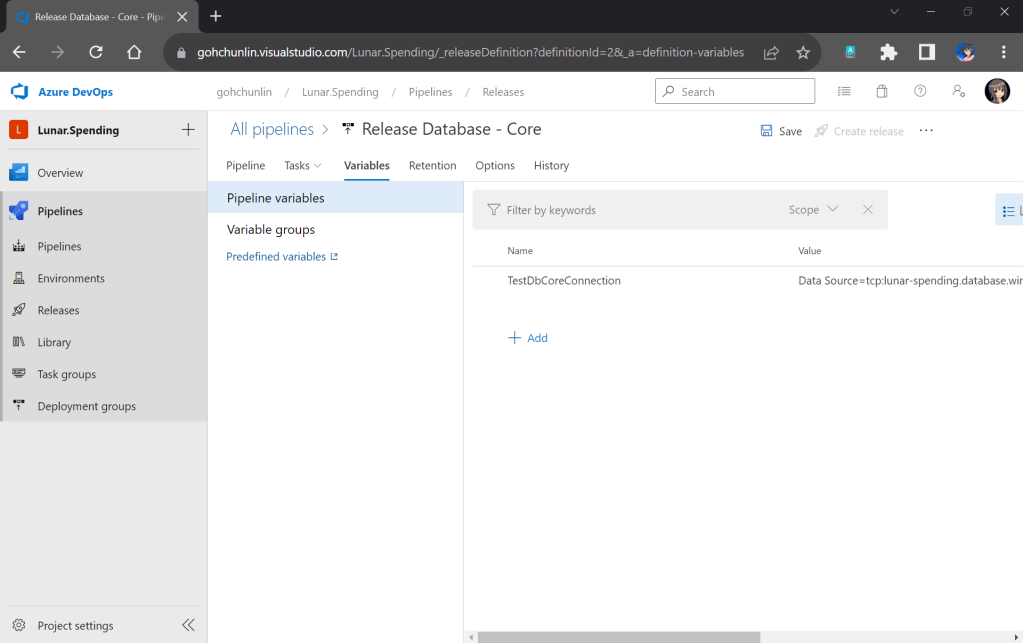
After committing this change to our GitHub repo, we will specify the actual connection string in the Pipeline Variables section under the same name as the token. Since we use TestDbCoreConnection as our token label, the variable is thus called TestDbCoreConnection as well, as shown in the screenshot below.

Storing the actual database connection string in the Pipeline Variables of our Release Pipeline.

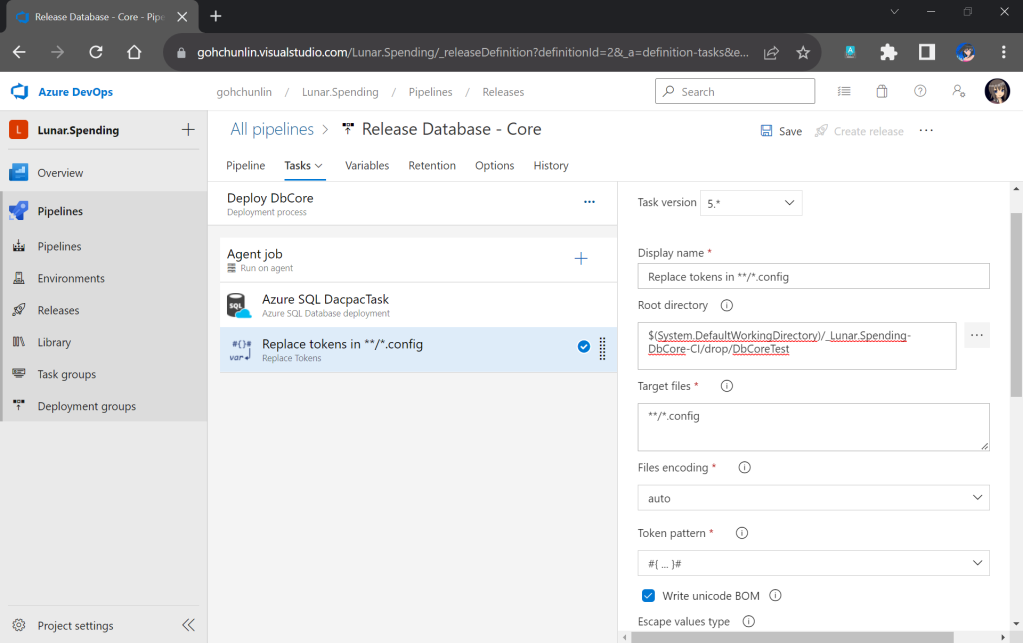
Now we will need a task which would replace the tokens in the app.config file with the actual value. The task we will be using here is the “Replace Tokens” done by Guillaume Rouchon.

Previously we have moved the TestDbCore bin/Release folder to the Build Artifact. In fact, app.config, which is renamed to TestDbCore.dll.config, is in the folder as well. Hence, we can locate the config file easily by pointing the task to the Build Artifact accordingly, as demonstrated in the screenshot below.

We will only need to specify the Root Directory of where our TestDbCore.dll.config is located.

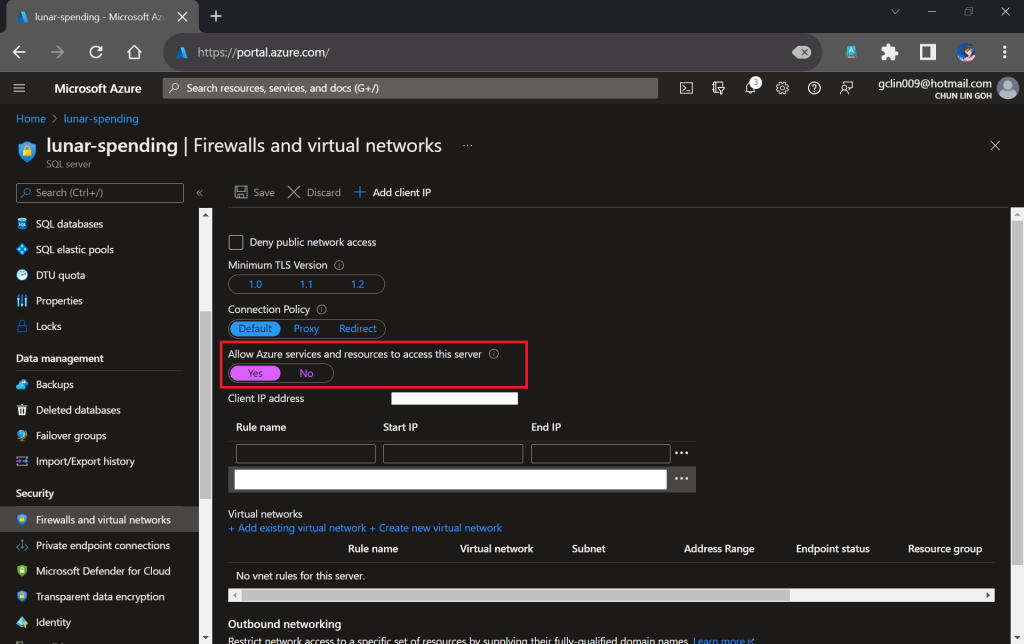
Please take note that since our unit tests need to test the Azure SQL database specified in the connection string, we need to allow Azure services and resources to access our Azure SQL server by configuring its firewall, as shown in the following screenshot. Otherwise, all our unit tests will fail because the Azure SQL server cannot be reached.

Interestingly, the Azure AQL Database deployment task will still be executed successfully even though we do not allow the access mentioned above.

We need to allow Azure services and resources to access the relevant Azure SQL server.

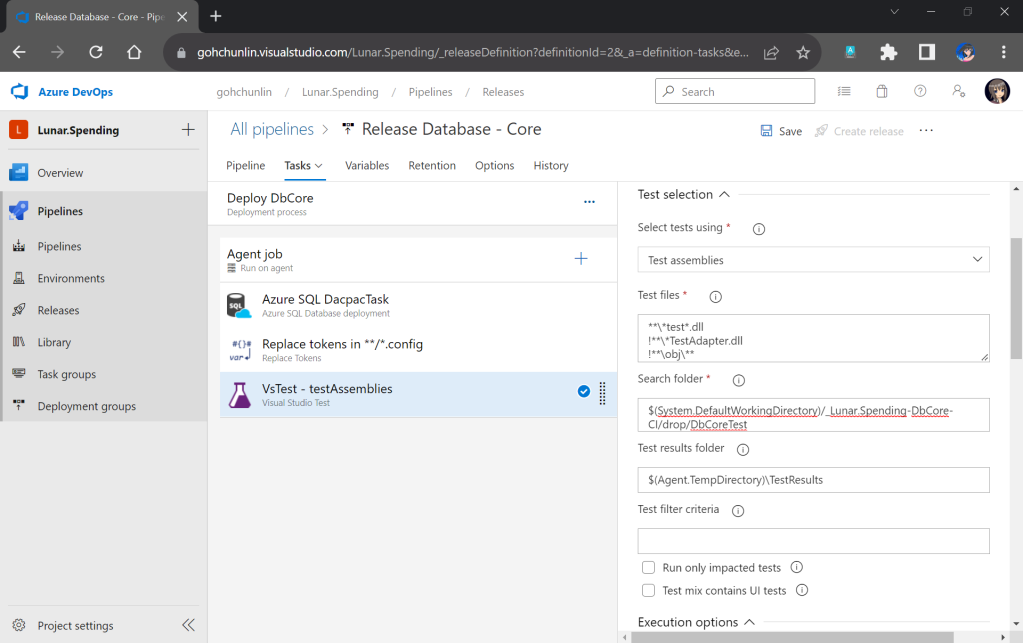
With the actual connection string in place, we can now add our Visual Studio Test (2.*) task back to execute our unit test.

We have our test files in the folder DbCoreTest in the Build Artifact as we designed earlier in the Build Pipeline. Hence, we simply need to point the Search Folder of the Visual Studio Test task to the folder accordingly.

Setting up Visual Studio Test to run our unit test for our stored procedures.

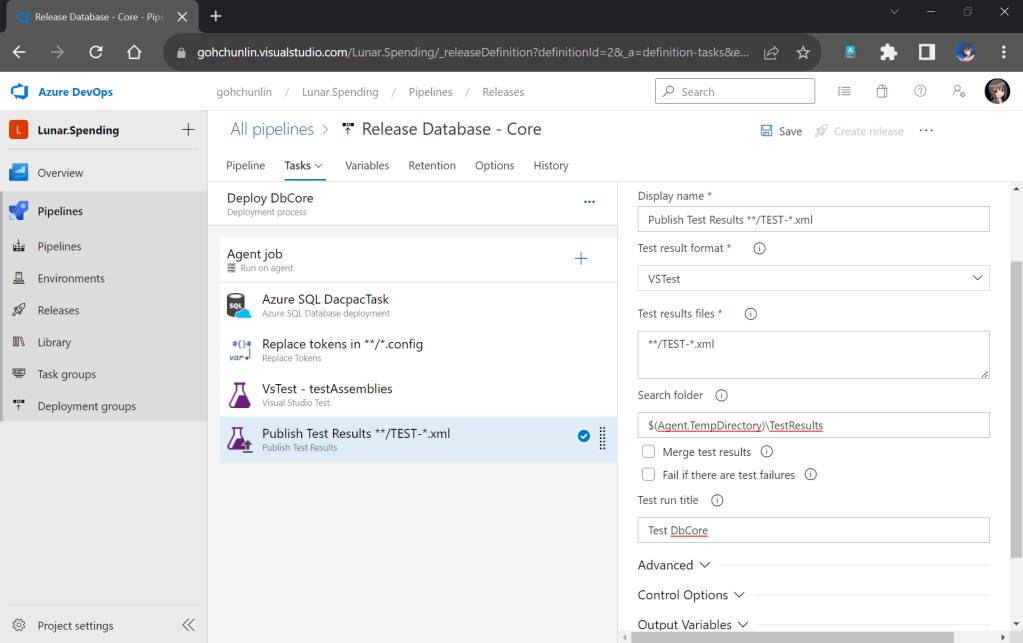
You may have noticed that the test results will be stored in a folder called $(Agent.TempDirectory)\TestResults. So, let’s add our last task of the stage which is to publish the test results.

We will need to specify that our test results are generated by VSTest. Aftervthat, we point the task to look for test results in the $(Agent.TempDirectory)\TestResults folder. Finally, we name our test run.

We can publish our test results to the Release Pipeline.

That’s all! Please remember to save the Release Pipeline changes.

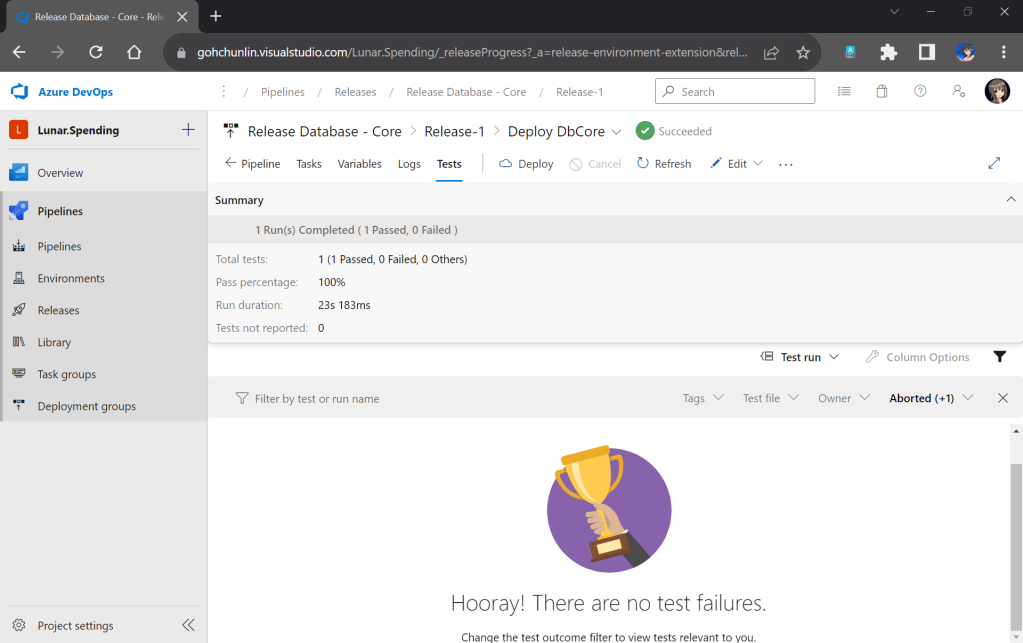
Now when there is a new build completed, the Release Pipeline will be automatically triggered. Once it is completed, not only our database on Azure SQL will be updated accordingly, but also we will have a detailed test result. For example, when all of our unit tests have passed, we will get a test result as shown below.

If all tests have passed, we will receive a trophy. 🙂

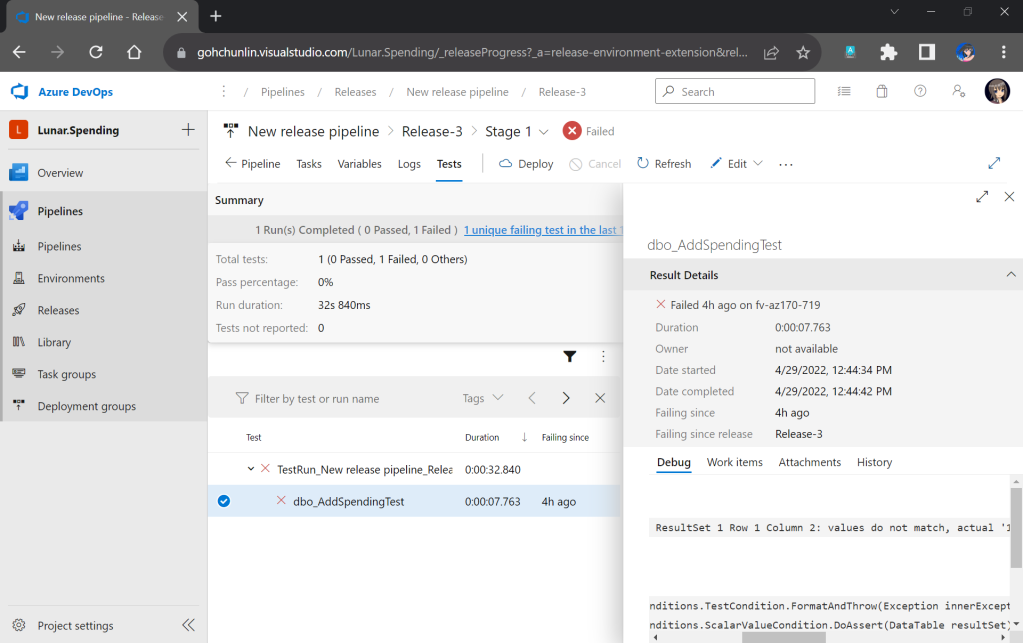
However, if there is one or many tests fail, we can easily locate the failed tests easily in the report.

This shows that our stored procedure dbo_AddSpendingTest has issues which need our attention.

That’s all for a simple walkthrough from writing unit tests for stored procedures to automatically deploying and testing them with Azure DevOps CI/CD pipelines.

I actually started learning all these after watching Hamish Watson’s sharing on DevOps Lab show which was released four years ago in 2018. In the video, he also shared about how DBA could do unit testing of their database changes tSQLt. Please watch the full YouTube video if you would like to find out more about unit testing our stored procedures.

Damian meets with Hamish Watson at the MVP Summit to talk about testing our database changes.

References

Publish C# Library to NuGet Gallery with Azure DevOps

It’s always a good idea to not only make our libraries open-source, but also publish them as a package for public to use if our libraries can make the life of other developers better.

In this article, I’d like to share how we can use the pipeline in Azure DevOps to auto build and publish a C# library that has its source code on GitHub to the NuGet Gallery, the .NET package repository.

PROJECT GITHUB REPOSITORY

The complete source code of this project can be found at https://github.com/goh-chunlin/WordpressRssFeed.

As you can see in the csproj file of the library project, we have the following properties are required to create a package.

<Project Sdk="Microsoft.NET.Sdk">

    <PropertyGroup>
	<TargetFramework>netstandard2.0</TargetFramework>
        ...
	<PackageId>WordpressRssFeed</PackageId>
	<GeneratePackageOnBuild>true</GeneratePackageOnBuild>
	<Description>A reusable codes library for reading WordPress RSS feeds.</Description>
	<Authors>Goh Chun Lin</Authors>
	<Copyright>Copyright 2022, Goh Chun Lin</Copyright>
	<PackageTags>Wordpress</PackageTags>
	<Company>Goh Chun Lin</Company>
	<RepositoryType>git</RepositoryType>
        <RepositoryUrl>https://github.com/goh-chunlin/WordpressRssFeed</RepositoryUrl>
	<PackageReleaseNotes>Please refer to README.</PackageReleaseNotes>
    </PropertyGroup>

    ...

</Project>

Azure DevOps Project

On Azure DevOps, we can create a pipeline which has source code sitting in a GitHub repository. We simply select “GitHub” as the source and then choose the correct repository and branch which contains the code that the pipeline should build.

Selecting a repository and branch on the GitHub as the pipeline source.

The DevOps project is made open to public. So, you can view its build history at https://dev.azure.com/gohchunlin/WordpressRssFeed/_build.

Build Number

Before we begin to look at the pipeline tasks, we need to setup the build number properly because we will later use it to version our package.

Firstly, we will setup BuildConfiguration, MajorVersion, MinorVersion, and BuildRevision as shown in the following screenshot.

We will start our first stable build from 1.0.0.

Next, we need to format the build number with MajorVersion, MinorVersion, and BuildRevision as shown below.

We will use the standard format $(MajorVersion).$(MinorVersion).$(BuildRevision) for build number.

NuGet 6 and .NET 6

Currently (Jan 2022), the latest version of NuGet.exe is 6.0.0 and the latest .NET SDK is 6.0.1. The main reason why we choose to use the latest versions is because we’d like to use the latest feature where we can pack a README.md file in our NuGet package and have it fully rendered on NuGet.org! This feature was newly introduced in May 2021 and was still in preview back then with NuGet 5.10 Preview 2 and .NET SDK 5.0.300 Preview.

Using .NET SDK 6.0.101.

Restore, Build, Test, Pack

We then need to point the restore and build tasks to our library csproj, as shown below.

The library project is built in release mode, which is specified in BuildConfiguration variable.

After the build succeeds, we can proceed to run our test cases in the test project, as shown in the following screenshot.

It’s important to test the library first before publishing it to the public.

We can pack our library once the test cases are all green. The package will be created in the $(Build.ArtifactStagingDirectory) directory, as shown below. Here, we need to make sure that we setup the package versioning properly. In order to make things easier, we will simply use the build number as our package version.

Using the build number as the package version.

If you are interested about the output of the pack task, you can also publish it to the drop as shown in the “Publish Artifact” as shown in the screenshot below. Otherwise, you can skip this task.

This task is optional. It is only for you to download the output of the “dotnet pack” task.

Publish Package to NuGet.org

Since our package is created in $(Build.ArtifactStagingDirectory), so we can specify the path to publish as shown in the screenshot below.

This pipeline has been linked with NuGet.org through an API key. So package will be uploaded directly to NuGet.org.

Add Readme File

Firstly, we will have a README.md file in the root of our library project, as demonstrated below.

Then we need to reference the README.md in the project file as follows.

<Project Sdk="Microsoft.NET.Sdk">
    <PropertyGroup>
        ...
	<PackageReadmeFile>README.md</PackageReadmeFile>
    </PropertyGroup>

    ...

    <ItemGroup>
	<None Include="README.md" Pack="true" PackagePath="" />
    </ItemGroup>
</Project>

Specify Icon

We can specify the icon for our NuGet package with an image resolution of 128×128 (size is limited to 1MB).

Previously, we could simply host the image online and then specify its URL in the <PackageIconUrl> property. However, starting with NuGet 5.3 and Visual Studio 2019 version 16.3, pack task raises the NU5048 warning if the package metadata only specifies PackageIconUrl property.

Now, we shall use the <PackageIcon> property to specify the icon file path, relative to the root of the library project. In addition, we also need to make sure that the file is included in the package.

<Project Sdk="Microsoft.NET.Sdk">
    <PropertyGroup>
        ...
	<PackageIcon>logo.png</PackageIcon>
    </PropertyGroup>

    ...

    <ItemGroup>
	<None Include="logo.png" Pack="true" Visible="false" PackagePath="" />
    </ItemGroup>
</Project>

License

If you pay attention to the log of the “NuGet Push” task, you will notice that there is a warning about the license information, as shown below.

There is a warning saying that all published packages should have license information specified.

To solve this issue, we can use the <PackageLicenseExpression> property to specify the license of our package. If we’re licensing the package under a common license, like MIT or GPL 3.0, we can use the associated SPDX license identifier.

<Project Sdk="Microsoft.NET.Sdk">
    <PropertyGroup>
        ...
	<PackageLicenseExpression>GPL-3.0-only</PackageLicenseExpression>
    </PropertyGroup>

    ...

</Project>

After specifying the license, the warning above will go away.

Alternatively, you can also choose to package a license file by using the <PackageLicenseFile> property to specify the package path, relative to the root of the package. This is similar to how we add an icon to the package, so I won’t repeat the steps of doing that here.

Please take note that only one of PackageLicenseExpression and PackageLicenseFile can be specified at a time. Also, PackageLicenseUrl is deprecated.

Conclusion

It takes a while for our package to be published on NuGet.org. We have to wait a bit longer if it’s the first release of our package.

Once the package is searchable on the NuGet Gallery, we shall be able to see our beautiful package page as shown below.

Oh noes, the build status badge cannot be loaded.

There is one thing to take note here is that due to security and privacy concerns, NuGet.org restricts the domains from which images and badges can be rendered to trusted hosts.

Hence, you may notice that the badge of “Build status” in the screenshot above cannot be loaded. This is because my Azure DevOps is on the old domain, i.e. *.visualstudio.com. The visualstudio.com unfortunately is not one of the trusted domains.

To solve that issue, we should get the badge from the new domain of Azure DevOps, i.e. dev.azure.com, instead.

We can get our status badge from Azure DevOps.

After the update is done, we should be able to see a complete homepage of our NuGet package as shown in the following screenshot.

The homepage of our WordPressRssFeed library (https://www.nuget.org/packages/WordpressRssFeed/).

References

Pack UWP Class Library with NuGet

Recently, my team is working on packing our UWP class library as a NuGet package. It turns out that it’s not that straight-forward, because even though there is a documentation from Microsoft, it is for Windows Runtime Component. So, the question on StackOverflow remains unsolved.

I thus decided to document down the steps on how I approach this problem to help the developers out there who are facing the same issue.

Step 1: Setup the UWP Class Library Project

🎨 We will be using “Class Library (Universal Windows) in this post. 🎨

In this post, the new project we create is called “RedButton” which is meant to provide red button in different style. Yup, it’s important to make our demo as simple as possible so that we can focus on the key thing, i.e. generating the NuGet package.

Before we proceed with the new project, we need to configure the project Build properties, as shown in the following screenshot, to enable the XML Documentation file. This will make a XML file generated in the output folder which we need to use later.

🎨 Enable the XML documentation file by checking the checkbox. 🎨

Now, we can proceed to add a new user control, called SimpleButton.xaml.

🎨 Yay, we have simple red button here. 🎨

So this marks the end of the steps where we create an UWP user control where we need to package it with NuGet.

Step 2: Install NuGet.exe

Before we proceed, please make sure we have nuget installed. To verify that, just run the following command in the PowerShell.

> nuget

If it is installed, it will show something as follows.

🎨 Yay, nuget is installed. 🎨

If it is not installed, please download the latest recommended nuget.exe from the NuGet website. After that, add the path the the folder containing the nuget.exe file in the PATH environment variable.

Step 3: Setup NuSpec

In order to package our class library with NuGet, we need a manifest file called NuSpec. It is a manifest containing the package metadata which provides information to be shown on NuGet and helps in package building.

Now we need to navigate in PowerShell to the project root folder, i.e. the folder containing RedButton.csproj. Then, we need to key in the following command to run it.

nuget spec

If the command is successfully executed, there will be a message saying “Created ‘RedButton.nuspec’ successfully.”

Now, we can open the RedButton.nuspec in Visual Studio. Take note that the file itself is not yet included in the solution. So we need to make sure we have enabled the “Show All Files” in the Solution Explorer to see the NuSpec file.

After that, we need to update the NuSpec file so that all of the $propertyName$ values are replaced properly. One of the values, id, must be unique across nuget.org and following the naming conventions here. Microsoft provides a very detailed explanation on each of the element in the NuSpec file. Please refer to it and follow its guidelines when you are updating the file.

🎨 Finished updating the NuSpec. 🎨

Step 4: Connect with GitHub and Azure DevOps

In order to automate the publish of our package to the NuGet, we will need to implement Continuous Integration. Here, the tools that we will be using are GitHub and Azure DevOps.

After committing our codes to GitHub, we will proceed to setup the Azure DevOps pipeline.

Firstly, we can make use of the UWP build template available on the Azure DevOps.

🎨 Yes, we can build UWP app on Azure DevOps. 🎨

At the time I am writing this port, there are 5 tasks in the agent job:

  1. Use NuGet 4.4.1;
  2. NuGet restore **\*.sln;
  3. Build solution **\*.sln;
  4. Publish artifact: drop;
  5. Deploy to Visual Studio App Center.

Take note that the NuGet version by default is 4.4.1, which is rather old and new things like <license> element in our NuSpec file will not be accepted. Hence, to solve this problem, we can refer to the list of available NuGet version at https://dist.nuget.org/tools.json.

At the time this post is written in April 2020, the latest released and blessed NuGet version is 5.5.1. So we will change it to 5.5.1. Please update it to any other latest number according to your needs and the time you read this post.

After that, for the second task, we need to update its “Path to solution, packages.config, or project.json” to be pointing at “RedButton\RedButton.csproj”.

Similarly, for the “Solution” field in the third task, we also need to point it to the “RedButton\RedButton.csproj”. Previously I pointed it to the RedButton folder which contains the .sln file, it will not work even though it is asking for “Solution”.

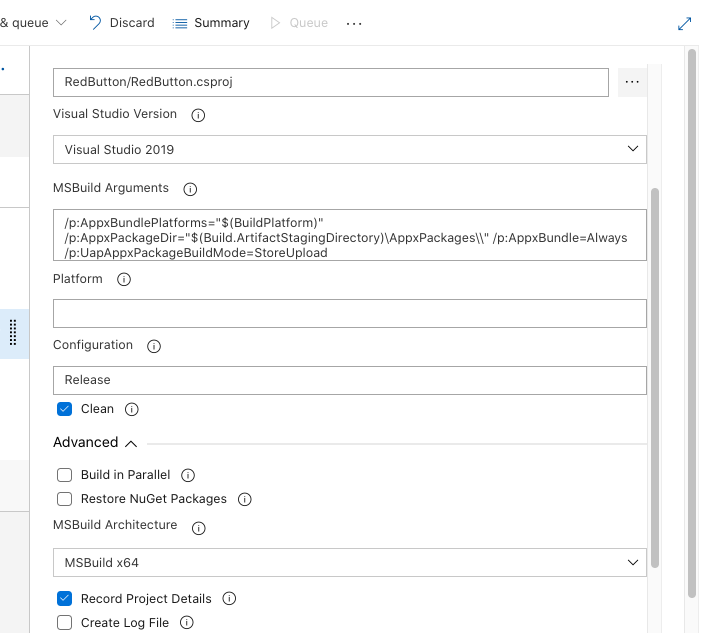
On the third task, we also need to update the “Visual Studio Version” to be “Visual Studio 2019” (or any other suitable VS for our UWP app). It seems to be not working when I was using VS2017. After that, I also updated the field “Configuration” to Release because by default it’s set to Debug and publishing Debug mode to public is not a good idea. I have also enabled “Clean” build to avoid incremental build which is not useful in my case. Finally, I changed the MSBuild Architecture to use MSBuild x64. The update of the third task is reflected on the screenshot below.

🎨 Third task configuration. 🎨

For the forth task, similarly, we also set its “Path to publish” to “RedButton”. Ah-ha, this time we are using the solution folder itself. By right, this fourth task is not relevant if we just publish our UWP class library to a NuGet server. I still keep it and set its path to publish to be the solution so that later I can view the build results of previous tasks by downloading it from the Artifact of the build.

I’d recommend to have this step because sometimes your built output folder structure may not be the same as what I have here depends on how you structure your project. Hence, based on the output folder, you many need to make some adjustments to the paths used in the Azure DevOps.

🎨 The fourth task helps to show build results from previous tasks. 🎨

By default, the fifth task is disabled. Since we are also not going to upload our UWP app to VS App Center, so we will not work on that fifth task. Instead, we are going to add three new tasks.

Firstly, we will introduce the NuGet pack task as the sixth task. The task in the template is by default called “NuGet restore” but we can change the command from “restore” to “pack” after adding the task, as shown in the following screenshot.

🎨 Remember to point the “Path to csproj” to the directory having the RedButton.csproj. 🎨

There is one more important information that we need to provide for NuGet packaging. It’s the version of our package. We can either do it manually or automatically. It’s better to automate the versioning else we may screw it up anytime down the road.

There are several ways to do auto versioning. Here, we will go with the “Date and Time” method, as shown in the screenshot below.

🎨 Choose “Use the date and time”. 🎨

This way of versioning will append datetime at the end of our version automatically. Doing so allows us to quickly test the release on the NuGet server instead of spending additional time on updating the version number. Of course, doing so means that the releases will be categorized as pre-released which users cannot see on Visual Studio unless they check the “Include prerelease” checkbox.

🎨 The prerelease checkbox on Visual Studio 2019. 🎨

Secondly, if you are also curious about the package generated by the sixth task above, you can add a task similar to the fourth task, i.e. publish the package as artifact for download later. Here, the “Path to publish” will be “$(Build.ArtifactStagingDirectory)”.

🎨 Publishing NuGet package for verifying manually later. 🎨

Since a NuGet package is just a zipped file, we can change its extension from .nupkg to .zip to view its content on Windows. I did the similar on MacOS but it didn’t work, so I guess it is possible on Windows only.

Thirdly, we need to introduce the NuGet push task after the task above to be the eighth task. Here, we need to set its “Path to NuGet package(s) to publish” to “$(Build.ArtifactStagingDirectory)/*.nupkg”.

Then, we need to specify that we will publish our package to the nuget.org server which is an external NuGet server. By clicking on the “+ New” button, we can then see the following popup.

🎨 Adding a new connection to nuget.org. 🎨

Azure DevOps is so friendly that it tells us that “For nuget.org, use https://api.nuget.org/v3/index.json&#8221;, we will thus enter that URL as the Feed URL.

🎨 We will be using the API key that we generate in nuget.org for the NuGet push task. 🎨

With this NuGet push task setup successfully, we can proceed to save and run this pipeline.

After the tasks are all executed smoothly and successfully, we shall see our pre-released NuGet package available on the nuget.org website. Note that it requires an amount of time to do package validating before public can use the new package.

🎨 Yay, this is our first NuGet package. 🎨

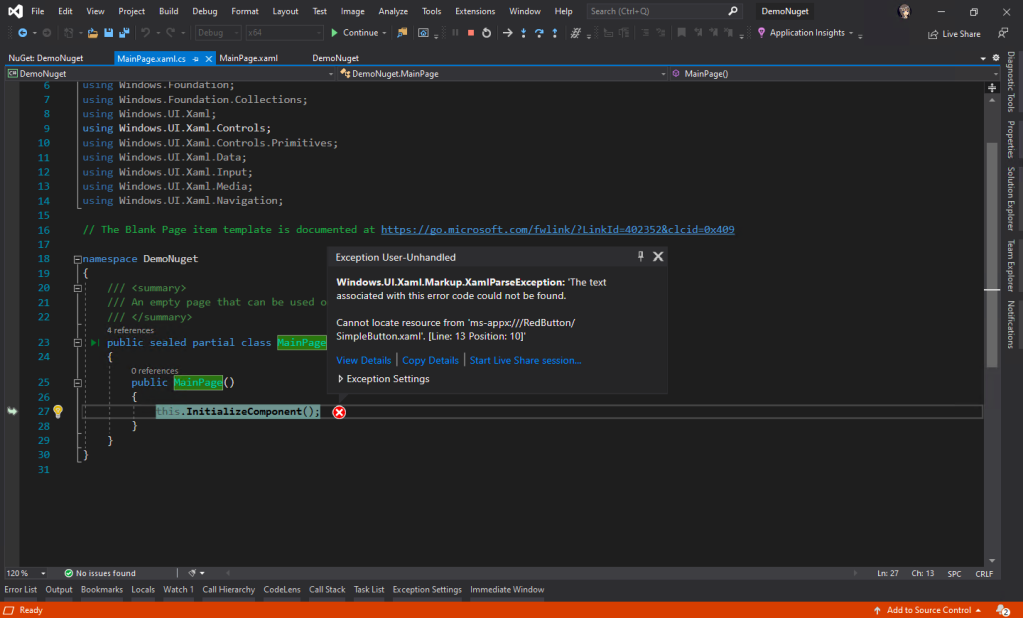
This is not a happy ending yet. In fact, if we try this NuGet package, we will see the following error which states that it “cannot locate resource from ‘ms-appx:///RedButton/SimpleButton.xaml’.”

🎨 Windows.UI.Xaml.Markup.XamlParseException: ‘The text associated with this error code could not be found. 🎨

So what is happening here?

In fact, according to an answer on StackOverflow which later leads me to another post about Windows Phone 8.1, we need to make sure the file XAML Binary File (XBF) of our XAML component is put in the NuGet package as well.

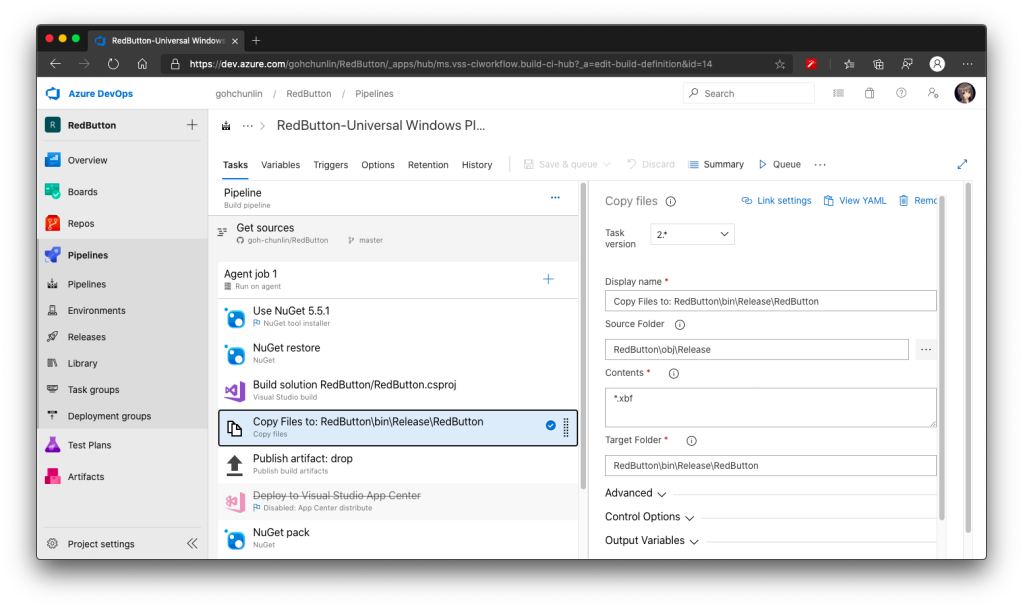
To do so, we have to introduce a new task right after the third task, which is to copy the XBF file from obj folder to the Release folder in the bin folder, as shown in the following screenshot.

🎨 We need to add “Copy Files” task here. 🎨

Step 5: Targeting Framework

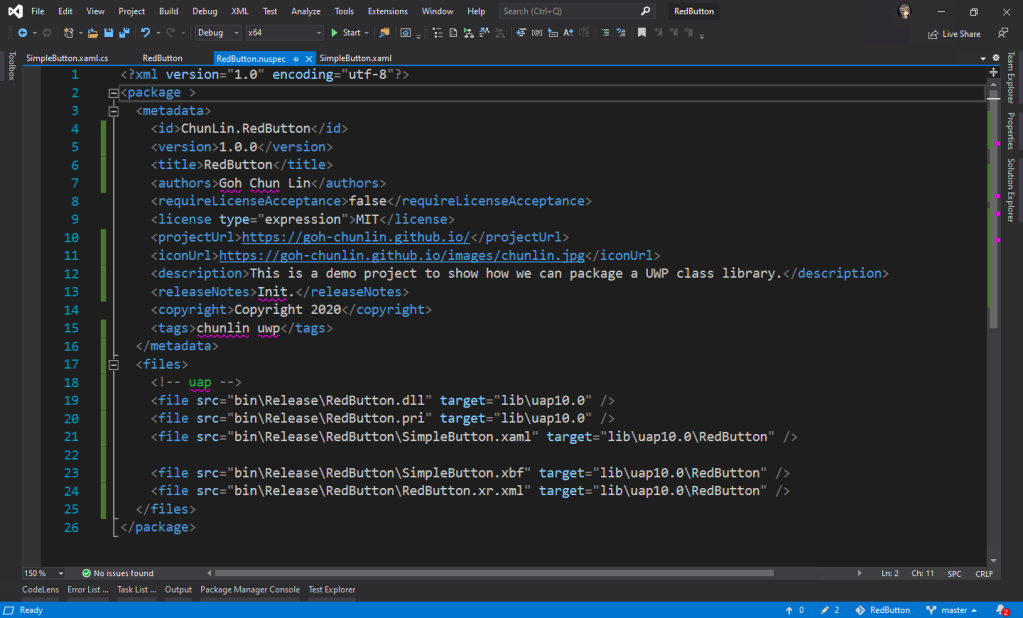
Before we make our NuGet package to work, we need to specify the framework it is targeting at. To do so, we need to introduce the <files> to our NuSpec.

So, the NuSpec should look something as follows now.

🎨 Finalised NuSpec. 🎨

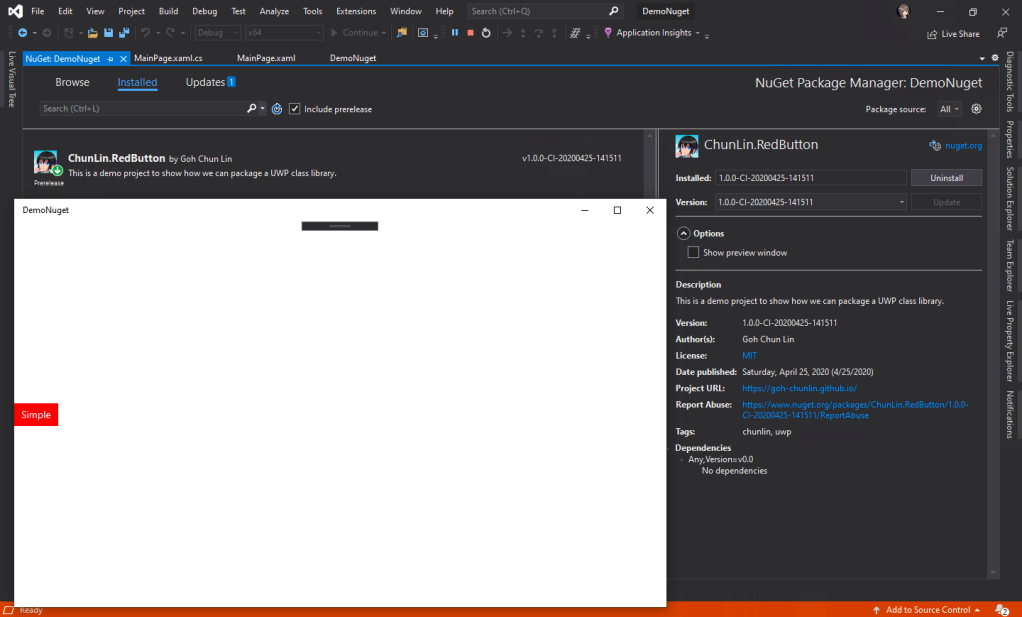
Now with this, we can use our prerelease version of our UWP control in another UWP project through NuGet.

🎨 Yay, it works finally! 🎨

Step 6: Platform Release Issues

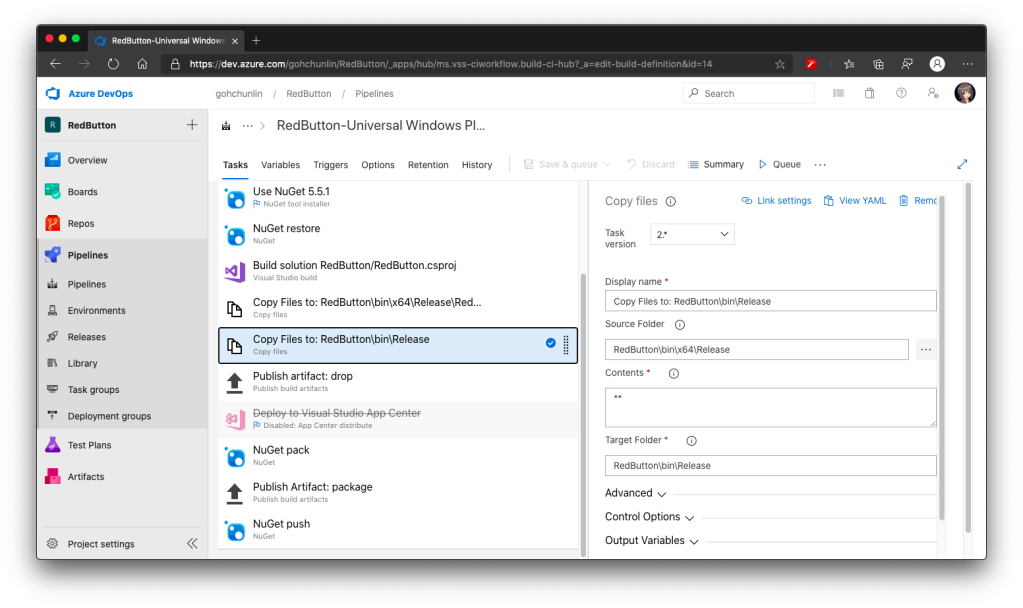
There will be time which requires us to specify the Platform to be, for example, x64 in the third task of the Azure DevOps pipeline above. That will result in putting the Release folder in both obj and bin to be moved to obj\x64 and bin\x64, respectively. This will undoubtedly make the entire build pipeline fails.

Hence we need to update the paths in the Copy File task (the fourth task) and add another Copy File task to move the Release folder back to be directly under the bin directory. Without doing this, the nuget pack task will fail as well.

🎨 The new task to correct the position of the Release folder in bin. 🎨

Step 7: Dependencies

If our control relies on the other NuGet packages, for example Telerik.UI.for.UniversalWindowsPlatform, then we have to include them too inside the <metadata> in the NuSpec, as shown below.

<dependencies>
    <dependency id="Telerik.UI.for.UniversalWindowsPlatform" version="1.0.1.8" />
<dependencies>

Step 8: True Release

Okay, after we are happy with the prerelease of our NuGet package, we can officially release our package on the NuGet server. To do so, simply turn off the automatic package versioning on Azure DevOps, as shown in the screenshot below.

🎨 Turning off the automatic package versioning. 🎨

With this step, now when we run the pipeline again, it will generate a new release of the package without the prerelease label. The version number will follow the version we provide in the NuSpec file.

🎨 Now Visual Studio will say our package is “Latest stable” instead of prerelease. 🎨

Journey: 3 Days 3 Nights

The motivation of this project comes from a problem I encounter at workplace because our UWP class library could not be used whenever we consumed it as a NuGet package. This was also the time when Google and StackOverflow didn’t have proper answers on this.

Hence, it took me 1 working day and 2 days during weekend to research and come up with the steps above. Hopefully with my post, people around the world can easily pickup this skill without wasting too much effort and time.

Finally, I’d like to thank my senior Riza Marhaban for encouraging me in this tough period. Step 7 above is actually his idea as well. In addition, I have friend encouraging me online too in this tough Covid-19 lockdown. Thanks to all of them, I manage to learn something new in this weekend.

🎨 Yay. (Image Source: ARTE, Muse Asia) 🎨

References

Development and DevOps of Desktop Apps with .NET Core 3.0

In September, .NET Core 3.0 was announced in the official .NET Conf 2019. Happily, I’m invited to be speaker in .NET Conf Singapore happening in BLOCK71. I am one the organisers of the event, so theoretically speaking, I invited myself.

The topic that I delivered in the event is “Development and DevOps of Desktop Apps with .NET Core 3.0”. It is a 45-minute talk combining the content from the following three talks.

From coding, converting, to deploying. (Image Credit: .NET Conf 2019)

If you watch the videos above, the total length is about 70 minutes. So covering three of them in a 45-minute talk is a challenge to me. Luckily, I have Sabrina to help me out by co-speaking with me.

If you have missed our session, don’t worry, I have uploaded the recordings of the .NET Conf Singapore 2019 to the YouTube: https://www.youtube.com/watch?v=5VX-bAcBOWw&list=PLJEtXrSgWKZqkaYgY3PxBjRbA8O2vKEL7

If you have watched our session, you will realise it’s quite different from the official .NET Conf. In this post, I am going to brief you through about my thoughts and development process of our talk content.

Let’s Hashtag Together!

In order to make the conference to be more engaging, after discussing with Sabrina, I came out with a desktop app which will shows the recent tweets having #dotnetconfsg hashtag, which looks like the following.

Participants tweeting about our sessions.

To make this “game” more interesting, I announced that the top four participants who earn the highest scores would receive prizes from me. The formula to calculate the score is basically

  • +1 point for one tweet;
  • +5 point for one retweet of the tweet;
  • +5 point for one like of the tweet.

Throughout the conference, we thus had seen a huge number of tweets about our event and speakers. Some of them even tweeted with great photos (I should have given 5 points for great photos too).

In our talk, we used this desktop app as our sample. The app is built in .NET Framework 4.7. Sabrina started the demo with showing how we can modernise it to a .NET Core desktop app. I then covered a bit about Hot Reload, the runtime tools (the small little black bar on top of locally launched WPF app), and DevOps part of desktop app.

Starting from .NET Framework 4.7

After the talk, I redo the project to make it nicer. I have also published the code on GitHub: https://github.com/goh-chunlin/DotNetConfSgTweetsDashboard

I am using the Tweetinvi library to retrieve the tweets easily. I originally tried calling the Tweeter APIs directly from C# and it’s a painful experience. Instead of wasting resources on researching the Tweeter APIs, I change to use Tweetinvi because it allows me to easily get the tweets in just two lines of codes.

To improve the GUI, I use the Material Design in XAML Toolkit. So, I can easily change the WPF application to have dark mode. This is very important to me because I realise light mode isn’t displayed well on the projected screen during the event. So, it now looks as shown in the following screenshot.

New look with Material Design.

By clicking on the “Show Ranking” button at the top-right corner, we can easily tell the scores received by the participants.

The participants are sorted according to the score they receive.

Migrating to .NET Core 3.0

Now with many third-party libraries used in our WPF application, is the desktop app still compatible with .NET Core? Well, to answer this question, there is a tool from Microsoft called Portability Analyzer can give us a detail report on the set of APIs referenced in our apps that are not yet available in NET Core 3.0.

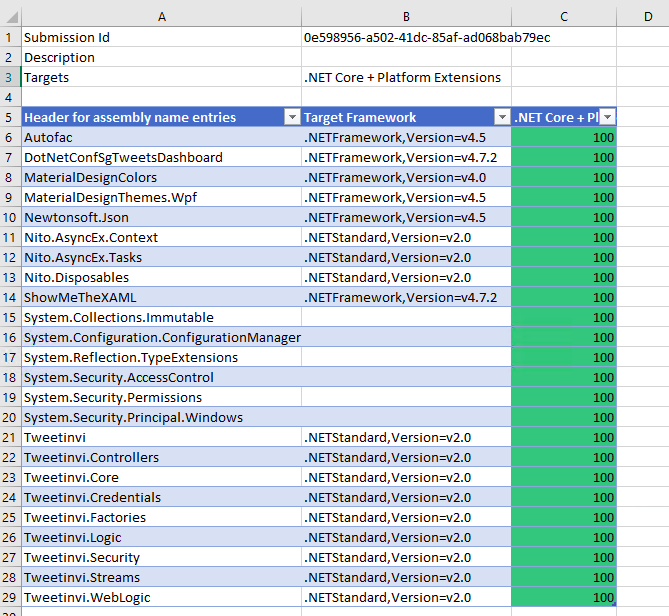
After downloading it and using it to check our application above, we received the following report.

This says that our WPF application is 100% portable to the .NET Core.

The Excel report comes with three tabs, i.e. Portability Summary (the one shown above), Details (empty), and Missing assemblies. There is one item in the report Missing assemblies though, as shown below.

There is one unresolved assembly.

Interestingly, if we refer to the .NET API Portability GitHub repo, we will see an issue filed by Alicia Li. There are many doubts over this tab.

However, if we proceed to use try-convert to migrate our WPF application from .NET Framework to .NET Core, it will be a successful conversion, as shown in the screenshot below.

Converted a .NET Framework project to .NET Core 3.0.

The try-convert tool is an open-source tool that helps us to migrate .NET Framework projects to .NET Core. After installing it, we need to restart the Command Prompt to use it.

The following screenshot shows how the app looks like after being migrated to .NET Core 3.0. Nothing significant is changed. If you would like to find out what have been changed, please visit the commit of this project on GitHub.

This is a WPF app in .NET Core 3.0.

XAML Islands

There is another thing that I shared in my talk is about XAML Islands. In fact, I talked about XAML Islands in Microsoft Insider Dev Tour too when I was sharing about WinUI.

Image may contain: 10 people, people sitting
Microsoft Insider Dev Tour (Image Credit: Microsoft Malaysia – Insider Dev Tour Kuala Lumpur)

XAML Islands is a feature that allows us to host UWP controls in non-UWP desktop applications. The reason of having it is to improve the UX of existing Win32 apps by leveraging UWP controls.

Although the documentation says it is enabled only starting from Windows 10, version 1903. However, if you are using version 1809, XAML Islands feature is also available already, just that not yet stable. So, the best choice is still using version 1903 and above.

In my presentation, since I was using the Windows 10 image hosted on Microsoft Azure VM, the best version I could get is 1809.

Windows 10 Pro, version 1809 on Microsoft Azure.

The quick-start way to use an XAML Island inside a WPF app is to use the NuGet packages from Microsoft. The one I am using is Microsoft.Toolkit.Wpf.UI.Controls, which has wrapper classes for 1st party controls, such as the InkCanvas, InkToolbar, MapControl, and MediaPlayerElement, all for WPF.

Installed with Microsoft.Toolkit.Wpf.UI.Controls.

You may ask why I am using version 5.1.1 of the Microsoft.Toolkit.Wpf.UI.Controls. On the day of .NET Conf Singapore, the version 6.0 (Preview 9.1) of it is already out. However, when I try to use the library, it threw the exception, as shown in the screenshot below.

Oops, app crashes with Microsoft.Toolkit.Wpf.UI.Controls 6.0 (Preview 9.1).

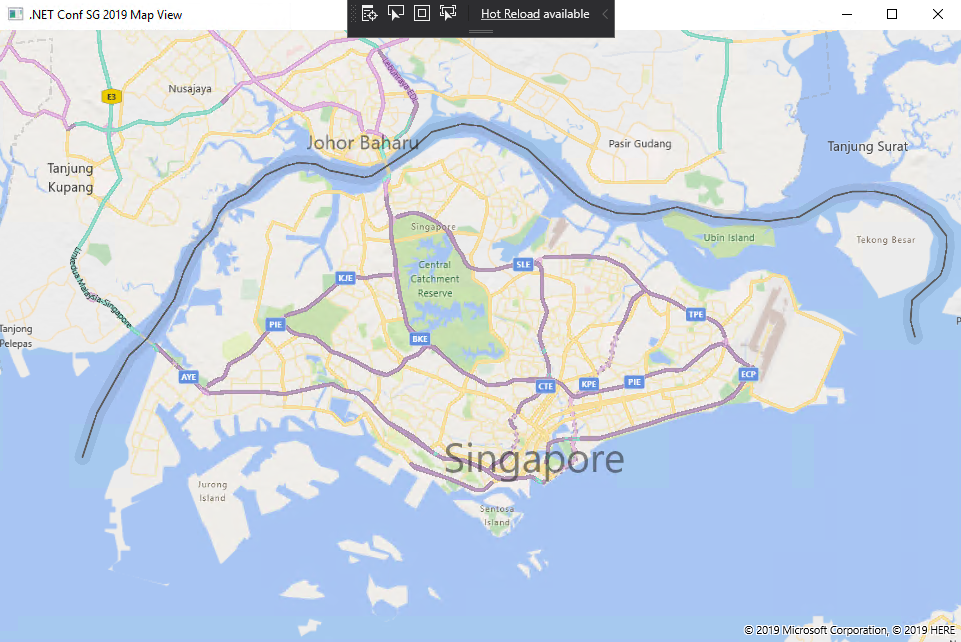
I could only demonstrated how I used the MapControl in a WPF app with XAML Islands.

Such a beautiful map displayed on WPF app!

Creating Build Pipeline in Azure DevOps

Now, with the codes of our WPF application on GitHub, we can create a Build pipeline for the app on Azure DevOps. This is not a new feature but it is nice to see how we can now build a .NET Core WPF app on Azure DevOps.

Benefits of DevOps (Image Credit: .NET Conf 2019)

There is a template available on Azure DevOps to build .NET Desktop app.

We can apply this template to build .NET Desktop app on Azure DevOps.

However, before we proceed to start the build, we need to make a few changes to it.

Since we will be using dotnet publish later, so the BuildPlatform variable is not necessary and can be removed.

Removing BuildPlatform variable from the pipeline.

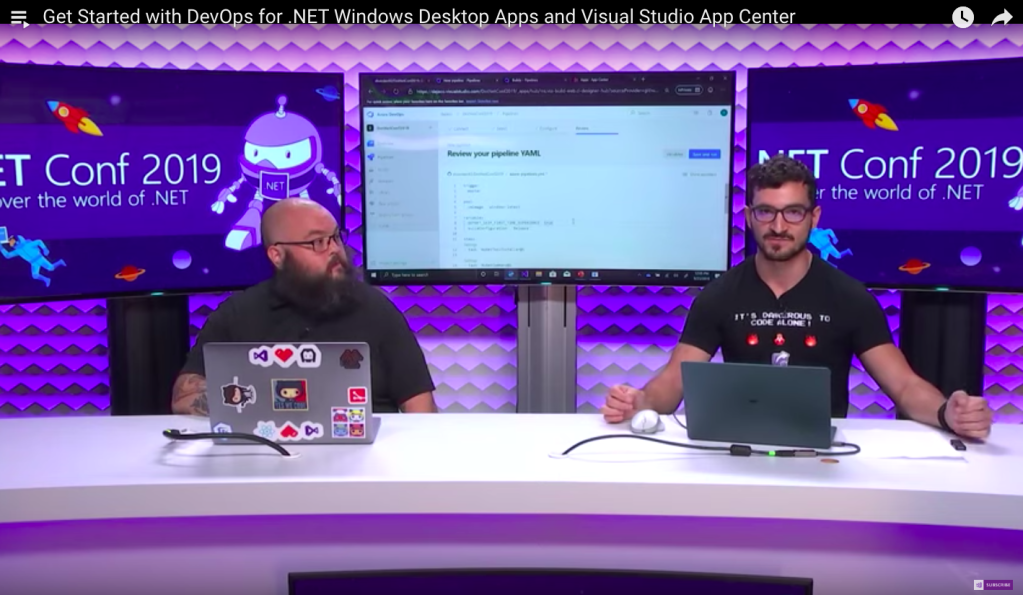
Instead, we need to add a new variable called DOTNET_SKIP_FIRST_TIME_EXPERIENCE and set it to true. This is to speed up the build process because by default when we run any .NET Core SDK command on Azure DevOps, it does some caching. However, now we are running this on a hosted build agent, so this caching will never be useful because the agent will be discarded right after the build is completed. Thanks Daniel Jacobson for highlighting this in his video.

Daniel Jacobson (right) explains about Azure DevOps and .NET Core SDK commands. (Image source: YouTube video)

After that, we need to remove all the default steps because we need to start from scratch for .NET Core.

The first step is to install .NET Core SDK 3.0. Remember to state “3.0.x” as the version otherwise if there is a minor update to .NET Core 3.0, we will still be using the outdated one to build.

Step 1: Use .NET Core SDK 3.0

After that, we are going to do dotnet publish.

Starting with .NET Core 2.0, we don’t have to run dotnet restore because it’s run implicitly by all commands that require a restore to occur. Also dotnet publish will build the project, so we do not need to run dotnet build.

Since this is a WPF project, so we have to uncheck the “Publish Web Projects” checkbox, together with the other two checkboxes “Zip Published Projects” and “Add project name to publish path”, as shown in the screenshot below.

Step 2: dotnet publish

We also need to specify the output of the artifacts. We will put it in a directory known as $(Build.ArtifactStagingDirectory). This is actually a pre-defined variable that we can find in the Azure DevOps documentation. There is a link to this document in the Variables tab.

Now we proceed to add the next step, which is to publish the artifact. Here we specify $(Build.ArtifactStagingDirectory) as the path of the directory to publish. Then we also specify a user friendly name for the artifact.

Step 3: Publish Pipeline Artifact

Now we can click the “Save & queue” to run this pipeline.

In the published artifact, we will see the following.

Published artifact in our first attempt.

Wow, there are a lot of DLLs! The .exe file alone is only 157KB.

Fortunately, starting from .NET Core 3.0, as long as we specify the following in our csproj file, it will produce a single .exe file.

<PublishSingleFile>true</PublishSingleFile>

However, there is one more thing to take note is that if we miss out the <RuntimeIdentifier>, there will be an error NETSDK1097 which says, “It is not supported to publish an application to a single-file without specifying a RuntimeIdentifier. Please either specify a RuntimeIdentifier or set PublishSingleFile to false.”

<RuntimeIdentifier>win-x86</RuntimeIdentifier>

With this change, when we run the Build pipeline again, we get the following.

Published artifact with <PublishSingleFile>.

We now only have one .exe file but its size has grown from 157KB to 145MB!

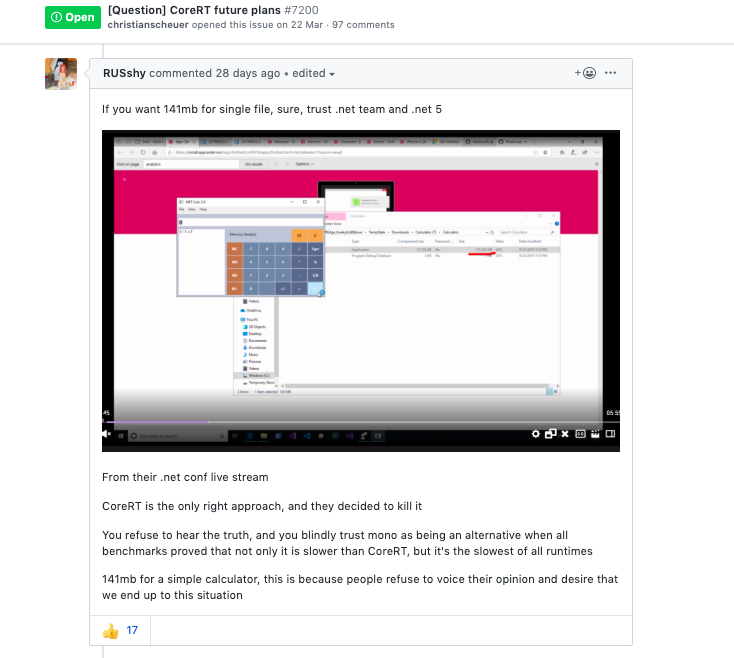
There is mixed feeling for developers in .NET CoreRT project. In their discussion about CoreRT future, they’re disappointed about CoreRT not being mentioned, instead PublishSingleFile was mentioned in the .NET Conf 2019.

“CoreRT is the only right approach” (Image Soure: .NET CoreRT Issue #7200)

In fact, according to Scott Hanselmen’s blog post “Making a tiny .NET Core 3.0 entirely self-contained single executable”, he suggested to set <PublishTrimmed> to be true to trim out unused codes so that now the .exe will be smaller.

Published artifact with additional <PublishTrimmed>.

Cool, now we have a .exe file with 89MB, instead of the one over 100MB.

With this .exe file, we can proceed to the release of our application.

Releasing WPF Application in VS App Center

VS App Center was launched in 2017, which was previously known as VS Mobile Center. When it was first launched, it was mainly for Android, iOS, macOS, and Windows apps. The “Windows apps” here refer to UWP apps. Only in August 2019, WinForm and WPF applications are supported.

WinForms and WPF are now available on VS App Center but still in preview.

So, the artifact generated in Azure DevOps Build pipeline cannot be automatically delivered to VS App Center even after .NET Conf 2019. We now have to do it manually.

Firstly, we need to download the actifact as a zipped file in Azure DevOps.

Secondly, we need to upload the zipped file to the VS App Center in its Releases tab, as shown in the following screenshot.

Setting Build version to 1 because this is our first release of the app.

After keying the release notes, we will be landed on a page to choose who we should distribute the app to. Normally they are our developers, business analysts, and testers. Here, in my example, I only have one group called Collaborator and I am the only one in the group.

We are not allowed to add those who are not in our App Center as testers.

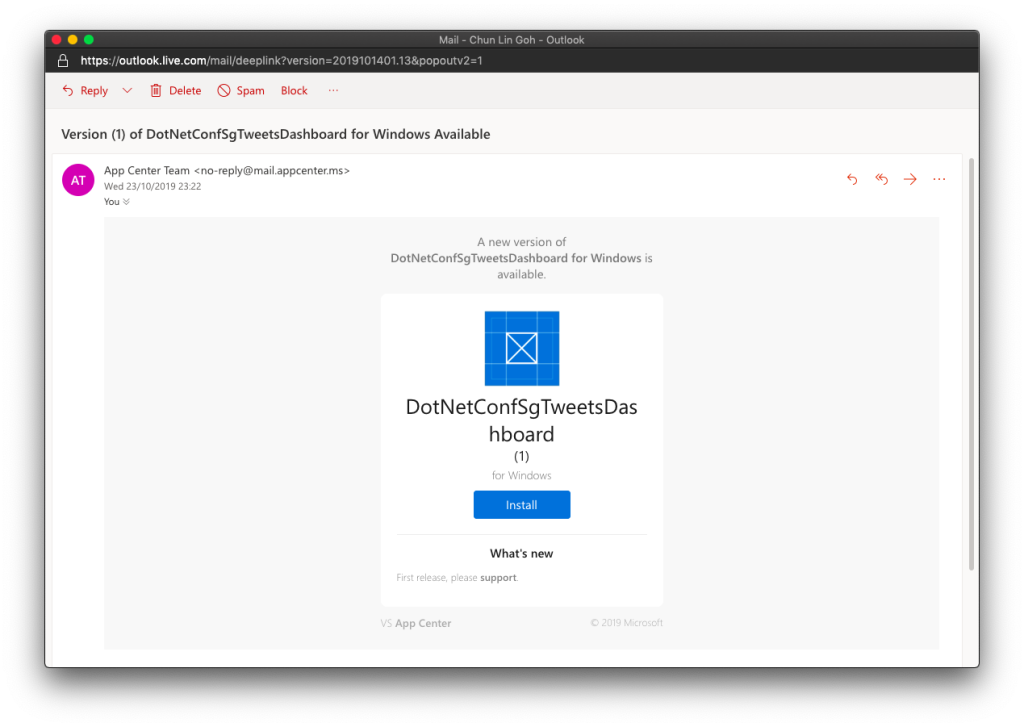
Finally, we will hit the “Distribute” button to release our app to testers. As tester, I will receive the email notifying about the new release.

Yay, new release available for in-house testing.
Analytics with App Center SDK

We can also integrate our WPF desktop app with App Center SDK to further collect data to find out how people use our app as well as the crashes in our app.

To do so, firstly, we need to install the following two Nuget packages. As the support for WPF SDK is still in preview, please remember to check the “Include prerelease” checkbox.

  • Microsoft.AppCenter.Analytics;
  • Microsoft.AppCenter.Crashes.
SQLitePLCRaw is being installed when we install the App Center SDK.

Now we can proceed to put the following code in the first window that will be launched in our app. In my case, it is the MainWindow. So, right after the InitializeComponent() is called, the following codes will be executed.

AppCenter.Start("<app-secret>", 
    typeof(Analytics), typeof(Crashes)); 

The App Secret can be found in the code sample of the Overview page in VS App Center.

However, if we run the WPF app now, the Analytics Overview page in VS App Center will still say there is no data. Why is it so?

No analytics, how come?

It turns out that, as highlighted in .NET Conf 2019, there is a bug in the preview SDK.

Daniel Jacobson mentions about the bug. (Image source: YouTube video)

So what we need to do is simply to add the following line in <ItemGroup> in the .csproj file.

<PackageReference Include="SQLitePCLRaw.lib.e_sqlite3.v110_xp" Version="1.1.14" />

Yup, if you have noticed earlier when we’re installing the App Center SDK, SQLitePCLRaw was being installed also. Just because of the bug in the SDK, this line was not added to the project file and thus we have to manually reference it. Hopefully this bug gets fixed soon.

Now when we launch our WPF app again, the nice dashboard will show there is 1 user. Yay!

+1 active user in our app!

Conclusion

That’s all so far for what I’d like to share in addition to what I have shared in .NET Conf Singapore 2019.

Happy .NET Conf 2019 from Singapore! (Image Credit: .NET Developers Community Singapore)

If you spot any mistake or you have any suggestion to make, please let me know in the Comments section below. Thank you!

References