Using Amazon SES SMTP to Send Email

In December 2011, Amazon Web Services added a new feature to help sending email in a easy and cost saving way through the Amazon SES (Simple Email Service). They provided the SMTP interface to allow users to directly use their existing SMTP to do mass emailing without the need to change the users’ existing programs. So, I decided to try it out.

SES: Email sending service from Amazon

Amazon SES can be found in the AWS Management Console. If this is the first use, there will be message saying the SES account currently only had “sandbox” access. Although full access to the Amazon SES API is available in the sandbox mode, only 200 emails, at most, to be sent out each day. Also, the email addresses of sender and recipients can only be those from the verified email addresses and domains. Thus, there is a need to request a production access to the Amazon SES.

To apply for the production access, we need to submit a registration form to Amazon. After that, their team will review the application before approving it. For my previous application, they approved it the day after I submitted the form. Thus, the reviewing process is actually very fast. The registration form is simple. We only need to provide some user information as well as the types of emails that will be sent using Amazon SES, such as marketing, subscription, transactional, and system notifications.

After the application is approved, we have to create SMTP credentials to start sending emails. The credentials will be used when we connect to the Amazon SES SMTP interface later. To do so, just click on the “SMTP Settings” tab located at the left hand side of the web page. The SMTP credentials created can all be found in the AWS Identity and Access Management (IAM) page.

After all these have been done, we just need to use the SMTP credential in our existing programs to send emails.

Create SMTP Credentials

The good thing about Amazon SES is that the sending quota is 10,000 for each day. In addition, Amazon SES will automatically increase the sending limits as we continue to send greater quantities of email. The maximum of message size is 10MB per message, including the attachments in the email. Unfortunately, the maximum number of recipients per email is only 50, unlike Google Apps for Business allowing up to 99 addresses in To, Cc, and Bcc fields of a single email. For more details about the sending limits in Amazon SES, please visit its official documentation page.

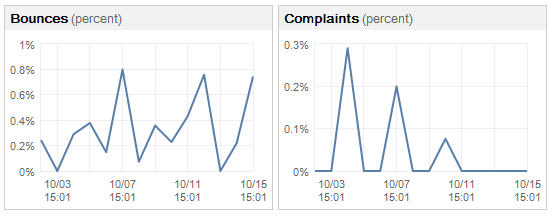
Finally, there are graphs available to understand the statistics regarding the number of emails that are sent successfully, rejected, bounced back or marked as complaints. There is a thing that needs to be taken note is that if there are too many bounces and complaints, our Amazon SES account would be terminated. Thus, it is necessary to keep monitoring the bounce and complaint rates and keep them as low as possible. Currently, the average bounce rate of one of my SES accounts is around 0.5% and the average complaint rate is less than 0.5%. It should still be fine, I guess?

Bounces and Complaints Graphs

So, why are there bounces and complaints? As stated on Amazon SES FAQs, bounces are usually caused by attempting to send a nonexistent recipient. For complaints, they arise when our emails go into recipients’ spam box. That means the recipients indicate that they do not want to receive our message. Normally, a notification email will be sent from Amazon (complaints@email-abuse.amazonses.com) to tell us to look into the problem and recommend us to stop emailing to those email accounts.

Yup, this concludes what I have learnt so far about the Amazon SES. Besides smtp.gmail.com, now there is another option to choose to use as SMTP.

IE Is Being Mean to Me: Episode 1 – Trailing Comma

This post is about a mistake that I made in my JavaScript code.

I always thought trailing commas were standard in all browsers. I tested my code on IE 10, Firefox and Chrome and it just worked fine. However, my code is just not working at all when tested it on IE 7 and IE 8. It turns out that IE 7 & 8 have not implemented ECMAScript 5 correctly because, in fact, if an element is elided at the end of an array, that element does not contribute to the length of the Array.

So if I run the following code in different browsers, I will get different results.

var test = [,,,,];
alert("Length of the array: " + test.length);

In IE 10, Firefox and Chrome, the length of the array will be 4. However, in IE 7 and 8, the length of the array is 5, which in this case does not chop off the “undefined” item at the end of the array.

Here is a list of online discussions that I found when I was trying to fix the bug.

  1. Trailing commas in JavaScript
  2. The Curious Case of Trailing Commas in IE
  3. My IE9 is fine with trailing comma, user’s IE9 is not; why?
  4. Jquery autoselect not working on IE8

Yup, so this post is just to remind me to be careful and not to repeat the same mistake again.

Finally, a song “IE Is Being Mean to Me” by Scott Ward that I found on YouTube.

Jigsaw Puzzle and Image Processing (ジグソーパズルと画像処理)

Recently, I got a Little Busters! (リトルバスターズ!) jigsaw puzzle of 500 pieces. According to the description printed on the box, the size of the puzzle is 38 x 53 cm. The estimated time to complete the whole puzzle will be 15 hours. So, I decided to build a tool to help me complete the task by identifying the location of each piece of the jigsaw puzzle.

Little Busters! 500 Pieces Jigsaw Puzzle
Little Busters! (Rin and Komari) 500 Pieces Jigsaw Puzzle

The first thing I need is a webcam. Most of the modern laptops have a webcam, even Chromebook has one. So, the next problem will be capturing image using the webcam. Therefore, I built a simple project to do that using Silverlight because it is very easy to achieve simple webcam image capturing in Silverlight.

After that, since the Silverlight project is web based, I can embed it in another my Windows Form C# application with the WebBrowser control easily. So now what I have is a image capturing app without the saving function yet.

Successfully capture the image from webcam.

The main task of the C# application is to save the captured image and then compare it with a target image to identify the matching pieces in the jigsaw puzzle. The square with white border is the area where the image will be saved as an image for the use of image comparison later. The templates that the captured image will be compared with are the 500 squares from the original complete image. To save only the captured image inside the square (100×100 pixels), I do the following.

Rectangle bounds = this.Bounds;
int widthOfCaptureArea = 100;
int heightOfCaptureArea = 100;
int captureAreaX = 120;
int captureAreaY = 85;
Size captureArea = new Size(widthOfCaptureArea, heightOfCaptureArea);
Point webBrowserLocation = webBrowser1.PointToClient(new Point(bounds.Left, bounds.Top));
using (Bitmap bitmap = new Bitmap(widthOfCaptureArea, heightOfCaptureArea))
{
    using (Graphics g = Graphics.FromImage(bitmap))
    {
        g.CopyFromScreen(
        new Point(bounds.Left + captureAreaX + webBrowserLocation.X * -1, bounds.Top + captureAreaY + webBrowserLocation.Y * -1), Point.Empty, captureArea);
    }
    bitmap.Save("D://.../source.jpg", ImageFormat.Jpeg);
    bitmap.Dispose();
 }

With the help of AForge.NET framework, I can easily get the similarity of source and template images using its ExhaustiveTemplateMatching class to compare pixel-by-pixel between the source image and the template image.

private float CheckSimilarity(Bitmap sourceImage, Bitmap targetImage) 
{
   // create template matching algorithm's instance
   ExhaustiveTemplateMatching tm = new ExhaustiveTemplateMatching(0.8f);
   // find all matchings with specified above similarity
   TemplateMatch[] matchings = tm.ProcessImage(sourceImage, targetImage);
   float similarity = 0;
   foreach (TemplateMatch m in matchings)
   {
       similarity = m.Similarity;
   }
   return similarity;
}

When comparing the images, I perform rotation three times because the direction of the piece is uncertain. So, I will just need to rotate the source image three times and compare the source and the template for each of the time to get the highest similarity value.

float similarity = CheckSimilarity(sourceImage, targetImage);
// Rotate the source image 90 degrees
for (int i = 1; i <= 3; i++)
{
    sourceImage.RotateFlip(RotateFlipType.Rotate90FlipNone);
    if (CheckSimilarity(sourceImage, targetImage) > similarity)
    {
        similarity = CheckSimilarity(sourceImage, targetImage);
    }
}
Similarity of 83%
Similarity of 83% between this particular piece with one of the template images from the original complete image

Yup, now it is done and I can thus use it to complete my 500-piece jigsaw puzzle. However, in the whole project, I actually assume each piece to be a perfect square. So the similarity value is not that accurate as well. This can be improved in the next version to take the pattern of each piece into consideration.

Long Weekend Activity #4: Reading Clean Code by Robert C. Martin

I was reading the book Clean Code: A Handbook of Agile Software Craftsmanship written by Robert C. Martin in the last long weekend. Today, I finally got the time to sit down and compile the notes that I took when I was reading the book.

Book cover of Clean Code
Book cover of Clean Code. Image Credits: Amazon.com: Books

Working for a local startup is fast-paced and hectic. Working for a startup means moving fast, and learning even faster. Thus sometimes my manager allows us to “hack”  a fast solution first without caring too much about the quality of the code as long as the code works. However, this is not good for both the company and the developers in the long run. Hence, clean code, a code which is designed-well, reader-friendly, is important.

Took-So-Long-To-Realize-Something-So-Obvious
It’s also a shame it took me so long to realize writing clean code is extremely important in my career. Image Credits: Shakugan no Shana Final

I read the first 11 chapters and the last chapter of the book which mainly focus on writing, spotting and maintaining clean code. Most of the suggestions in the book are awesome and easy to follow. Hence, after reading the book, I highlighted some of what I thought were its important points. What resulted is a 30-page summary of direct quotes and other important points from the book. Also, I included some relevant info that I got from online resources, such as StackExchange, MSDN and Wikipedia.

This book is an excellent read. However, it is very challenging to write clean code that is easy read and test. So, I hope with the help of this book, I will keep improving my code quality and eventually everyone will enjoy reading the code written by me. Take pride in my code!

Clean Code NotesView my notes here: http://goo.gl/oViFRK