January Self-Learning: Node.JS + Express + Jade + MongoDB

I am web developer. I do .NET stuff at work. However, it is always good to try something new and different. Thus, in December 2013, I planned a rough schedule for programming self-learning in the first two months of 2014. In January, I decided to spend one hour per day to learn about Node.js and MongoDB.

I only started to learn JavaScript when I was in the first year of my university life. It turns out that it’s a very useful skill that I have because JavaScript is used very widely in my current job. However, I never tried to use JavaScript in server environment before. Here I choose Node.js because it is a very well-known server-side JavaScript example.

For MongoDB, I decided to learn it because I was invited by my friend to join a local MongoDB user group last year. It’s a group formed by developers who are very keen on learning MongoDB and other related new web technologies. After reading through their posts online, I decided to spend sometime on learning MongoDB too. Plus, the first meet up of the group that I’m always looking forward to is going to be held in this coming month, so learning MongoDB will at least help me to communicate with other members better.

Getting Started: Installing Stuff

The web development tool that I use is WebMatrix 3. The reasons that I choose WebMatrix are free, easy-to-use, and Azure-connected. In addition, WebMatrix also comes with Node.js supports and templates. Thus, with the help of WebMatrix, a simple Node.js web application can be done without too much pain.

Node.JS Website Templates
Node.js Website Templates

There are three templates available for Node.js project. The Empty Site template gives a blank website setup with Node.js. This option threw me error saying “This product did not download successfully: The remote server returned an error: (404) Not Found”. According to the installer log, the error happened when downloading file ‘http://download.microsoft.com/download/6/F/4/6F439734-9589-4859-AADE-B88B0B84401E/NodeJsSite.zip‘ because the URL basically just returns error 404. Well done, Microsoft.

Hence, I’m left with two options. The Starter Site template provides a pre-built website setup with not only Node.js, but also the Express web framework. Besides Express, there are many other alternatives actually. In fact, there are reviews of different Node.js web framework available online also.

The good thing about Starter Site template is that without writing a single line of code, a beautiful web app is ready to use. Just click on the Run button in WebMatrix, the sample site will be launched in web browser. From there, you get to learn many new howtos. For example, how mobile-friendly web pages are made, how to design a web page layout with a template engine called Jade, how to enable Facebook and Twitter logins on a website, and also how to use client-side socket.io libraries to implement a chat feature in the website.

The Sample Website from NodeJS Starter Template

As a start, I don’t think it is a good idea to learn so many new knowledge in one month. Thus, I chose the third available template, which is the Express Site. It basically just provides a website setup with Node.js and Express without too many random stuff as what Starter Site offers.

For the modules that I use in my web app, such as Express, Jade, Mongoose, and Monk, they all can be easily installed in the NPM Gallery in WebMatrix. npm stands for Node Packaged Modules, an official package manager for Node.js and online repository for publishing packages. There is one thing that I would like to highlight is that when I didn’t run WebMatrix as administrator, the NPM Gallery seemed to have some problems. I only got to install the modules when I run WebMatrix as administrator.

Designing Web Pages

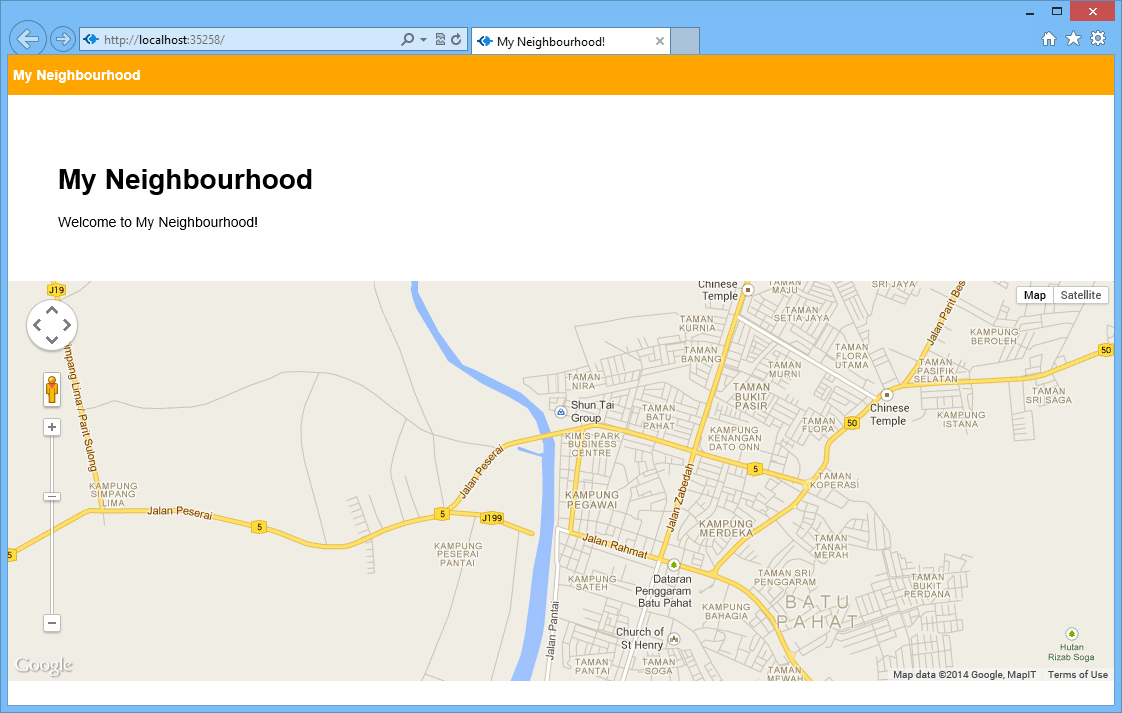
In the homepage, I would like to show a map of the place that I am currently at.

Firstly, I add the following lines in the layout.jade which is in charge of defining the general look-and-feel of each web page in my web app.

doctype html
html
  head
    title= title + "!"
    link(rel='stylesheet', href='/stylesheets/style.css')
  body
    div(style="background-color: orange; color: white; height: 40px;") 
        div(style="padding-top: 12px; padding-left: 5px; font-weight: bold;") #{title}
    block content

Secondly, I proceed to the content block for index.jade, the page displaying the map. The code below basically just loads the Google Maps API library and shows the map on the web page.

extends layout

block content
    div(style="padding: 50px;")
        h1= title
        span Welcome to #{title}! 
    div(id="map-canvas")
    script(type='text/javascript', src='https://maps.googleapis.com/maps/api/js?key=...&sensor=true')
    script(type='text/javascript', src='/javascripts/initGoogleMap.js')

With such simple codes, a page with Google Maps showing the neighbourhood of user’s current location is done.

Guess where I'm now? =)
Can you guess where I’m now? =)

Bringing Data Into The App

A map showing user’s current location is not interesting enough. The next step will be adding an ability for the user to add marker to the map by specifying latitude and longitude.

The database system that I choose here is MongoDB. Normally people will use Mongoose, the officially supported Object Document Mapper (ODM) for Node.js. However, as a beginner, I choose to use a simpler tool, Monk. Monk offers an easier and faster way for me to learn and start working with MongoDB in Node.js.

Firstly, I need to connect to the databases and to setup routes in the server.js.

var express = require('express')
  , routes = require('./routes')
  , newlocation = require('./routes/newlocation')
  , addlocation = require('./routes/addlocation')
  , http = require('http')
  , path = require('path');

...

var monk = require('monk');
var dbc = monk('localhost:27017/test');

app.get('/', routes.index(dbc));
app.get('/newlocation', newlocation.location);
app.post('/addlocation', addlocation.add(dbc));
...

After that, in the newlocation.jade, I create the form to submit the data to addlocation.js.

Interface to add new location.

In the addlocation.js, there will be code to add those user-entered data to the database. With Monk, it can be done easily as shown as follows.

exports.add = function (dbc) {
    return function (req, res) {
        ... 
        // Set our collection
        var collection = dbc.get('LocationInfo');

        // Submit to the DB
        collection.insert({
            "locationLatitude": locationLatitude,
            "locationLongitude": locationLongitude,
            "locationInfo": locationInfo
        }, function (err, doc) {
            if (err) {
                // If it failed, return error
                res.send("There was a problem adding the information to the database. Reason: " + err);
            }
            else {
                // If it worked, set the header so the address bar doesn't still say /addlocation
                res.location("");
                // And forward to the homepage
                res.redirect("");
            }
        });

    }
}

Finally, I just need to retrieve the value from the database and show it in the homepage.

var collection = dbc.get('LocationInfo');

collection.find({}, {}, function (e, locations) {
    res.render('index', {
         "title": "My Neighbourhood",
         "listOfLocations": locations
    });
});
Places that I frequently visit in the neighborhood.
Places that I frequently visit in Kluang.

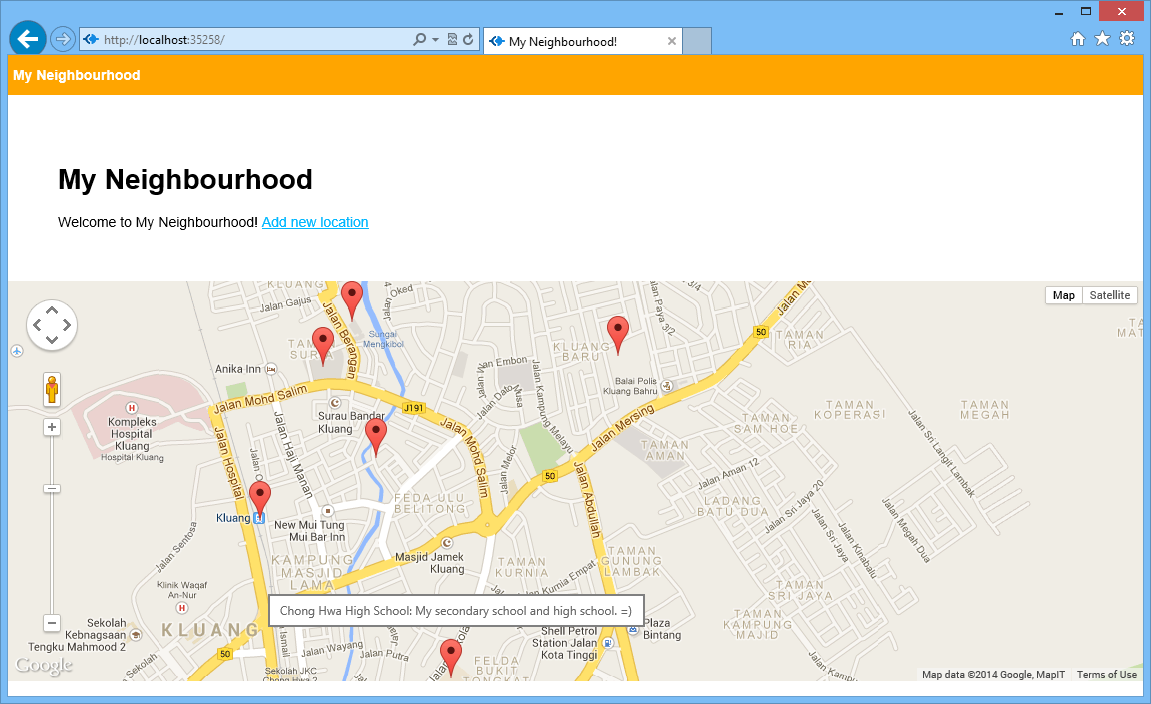
So with the help of Monk, there is even no need to define a schema at all. Even the collection LocationInfo does not need to be defined.

There is a detailed step-by-step tutorial on setting up Node.js, Express, Jade, and MongoDB available online. I personally find it to be useful because there is where I start my self-learning. In addition, here is a list of online resources that I used in the self-learning.

Conclusion of January Self-Learning

Since I have only one hour per day to do this self-learning, so it’s quite challenging to learn all these new things in one month. In addition, there were days that I needed to work OT. So, I’m quite happy that I manage to complete this first monthly self-learning successfully. =)

Click here to read the following part of the learning: Deploying the website and MongoDB on Azure easily.

Entertainment Hub Version 1

I received my first Raspberry Pi back in October, ten days after I ordered it online. After that I brought it back to my home in Kluang, Malaysia. The reason is that I would like to setup a home theatre with the help of Raspberry Pi. Hopefully in near future, I can have a complete entertainment hub setup for my family. Thus, I name this project, the Entertainment Hub.

Gunung Lambak, the highest point in Kluang.

Getting Raspberry Pi

Raspberry Pi is a credit-card-sized computer. According to the official website, it is designed to help the students to learn programming with lower cost. To understand more about Raspberry Pi, you can read its detailed FAQ. By saving S$1 per day, I easily got myself a new Raspberry Pi Model B (with 8GB SD card) after 2 months.

Entertainment Hub Project

Before the use of Raspberry Pi, I was using a Wireless 1080p Computer to HD Display Kit from IOGEAR to stream video from my laptop to the home TV. It requires a one-time installation of both the software and drivers on the laptop before I can use its wireless USB transmitter to connect between the PC and the wireless receiver which is connected to the TV with HDMI. Afer the installation, whenever I want to show the videos stored in external hard disk on the big screen, I always first need to switch on the receiver at TV side and then plug in the wireless USB transmitter on laptop. Now with the use of Raspberry Pi, I can easily browse the videos directly on the TV.

I only worked on the Entertainment Hub when I was at home. Also due to the fact that I only went back to home on Saturday and I would need to go back to Singapore on the following day, I didn’t really got much time to work on the project. Hence, I finally got video to show on the TV only after four times of travelling back to home.

Connecting External Hard Disk to Raspberry Pi

Before I started this project, I thought connecting an external hard disk directly to the Raspberry Pi would be enough. However, it turned out that it’s not the case. When I connected the external hard disk to the Raspberry Pi directly, the USB optical mouse, which was connected to another USB port of the Raspebrry Pi, lost its power. After doing some searches online, I found that it was most probably due to the fact that the Raspberry Pi didn’t have enough power to power up both the hard disk and the optical mouse at the same time.

The USB hard disk I have is 2.5” Portable HDD (Model: IM100-0500K) from Imation. After finding out that Raspebrry Pi had insufficient power for the portal hard disk, I chose to get a powered USB hub. Fortunately, there are nice people done a lot of tests on many, many USB hubs to find out which powered USB hubs are best to use together with Raspberry Pi. They posted a useful list of working powered USB hubs online for us to use as a guideline when choosing USB hub for Raspberry Pi. I bought the Hi-Speed USB 2.0 7-Port Hub by Belkin at Funan. Even though the model isn’t same as the one in the list, the USB hub works fine in my case.

To find out if Raspberry Pi can detect the portable hard disk or not, simply use the following command.

sudo blkid

If the external hard disk can be detected, then a similar results as follows should be printed.

/dev/sda1: LABEL=”HDD Name” UUID=”xxxxxxxxxxxxxxxxxx” TYPE=”ntfs”

Luckily my Raspberry Pi can auto detect the external hard disk and then can mount it automatically.

Entertainment Hub Version 1 Structure

Enjoy Movies on Raspberry Pi

After successfully mounting the external hard disk on Raspberry Pi, I just need to browse to the folders on the hard disk to pick the video files and then play them using OMXPlayer, a video player pre-installed on Raspberry Pi. As I used HDMI cable to connect Raspberry Pi and TV, so by using the following command, both audio and video can be successfully transferred to the TV.

omxplayer -o hdmi -r video.flv

The reason of having -r here is to adjust video framerate and resolution. Without it, not only the video won’t be displayed in full screen on TV, but there also won’t be any audio from TV.

When I first used omxplayer, it showed a black screen after I closed the program. There are online documentation and solution about this issue as well. For me, after I rebooted the Raspberry Pi, the issue disappeared.

Watching Movie with Help of Raspberry Pi
Watching movie with the help of Raspberry Pi.

Dad’s Help in the Project

The case of my Raspberry Pi is designed and made by my Dad. I am very happy and thankful that my Dad helped making a case for my Raspberry Pi. Usually the case of Raspberry Pi is box-shaped. However, the case I have here is a cylinder. So my Raspberry Pi looks special. =)

A closer look of my Raspberry Pi.

Future Work

With this little success of having movies played on Raspberry Pi, the first part of the Entertainment Hub is done. Now, there are more things needed to be done in order to make it more user friendly and robust. First of all, there needs a playlist support. Secondly, the ability of replaying the videos. Thirdly, a better GUI to select videos, instead of just a command-line UI. All of these depend on how fast I learn to program an app in Raspberry Pi.

Let’s look forward to completion of this project.

Rubber Band Launcher. Phew, Phew, Phew!

Last month, I went to School of Computing, NUS to attend the third School of Computing Term Project Showcase (STePS). During the event, I got the opportunity to meet Jonathan Sim from Team Annikken. He was also there to take a look at the cool student projects.

Team Annikken is part of the Singapore based company, Piasim Corporation. Piasim Corporation is currently a distributor and integrator of laser and optice devices. In order to explore into other fields, they formed the Team Annikken in 2010.

I came to know about Annikken in the Google DevFest Singapore 2013. Their key product, Annikken Andee, was introduced by Harish Pillay from Red Hat. He said he was very excited about this product because it was made by a group of talented engineers in Singapore. So, what exactly is Annikken Andee?


Annikken Andee provides a solution for the developers to easily build a smartphone app to interact with the Arduino. Without Annikken Andee, developers normally need to work on both the smartphone app programming and the Arduino programming. Now, with the help of Annikken Andee as the Bluetooth shield between the smartphone and Arduino, the developers can skip the time-consuming smartphone app programming part and directly work on the Arduino programming. This is all because Annikken Andee also comes with their own libary for the Arduino IDE.

Annikken Andee can work well with different types of Arduino, such as Uno, Leonardo, and Mega. At the smartphone side, Annikken Andee offers a free Android app to download. After downloading the app from the Play Store, we can just choose the Annikken Andee that we want to connect to via Bluetooth. Then a corresponding GUI will appear on the app itself.

Rubber Band Launcher

Before the closing of the STePS, Jonathan happily demonstrated a toy that he built with Annikken Andee. It is basically a rubber band launcher. By putting the rubber band on the machine, he easily controlled the position and behavior of the launcher via an Android phone. So, the launcher will face different direction and then fire the rubber band based on the commands it receives.

Jonathan Sim from Team Annikken was giving explanation to the students on how Annikken Andee worked.

There were students watching Jonathan’s Annikken Andee demo also. The students were really actively showing their interest by asking questions. I’m guessing with the help of both Arduino and Annikken Andee, the schools will be able to get more students to show more interest in Computer Engineering. What I heard from Jonathan is that there are already many polytechnics in Singapore are interested in Annikken Andee and Arduino. That is a good news. =)

Upgrading Fedora from 17 to 18 and then to 19, yum, yum, meow!

I installed Fedora 17 in the beginning of this year. Since the 17th version of Fedora already expired in July, so now I decided to upgrade it. I would also like to see if it is as easy as updating Windows 8 to Windows 8.1.

Upgrading from Fedora 17 to 18

There is a tutorial available at the wiki page of FedoraProject to guide users to update Fedora 17 to Fedora 18. I decided to use yum command to update the system because FedUp didn’t seem to work in my Fedora 17. For some reasons I didn’t know, the following error messages were printed out at the end of sudo fedup-cli –network 18 execution.

YumDownloadError: [u’perl-HTTP-Message-6.06-7.fc20.noarch: failure: Packages/p/perl-HTTP-Message-6.06-7.fc20.noarch.rpm from default-installrepo: [Errno 14] curl#22 – “The requested URL returned error: 404 Not Found”‘, u’adwaita-gtk3-theme-3.10.0-1.fc20.i686: failure: Packages/a/adwaita-gtk3-theme-3.10.0-1.fc20.i686.rpm from default-installrepo: [Errno 14] curl#22 – “The requested URL returned error: 404 Not Found”‘, u’sox-14.4.1-4.fc20.i686: failure: Packages/s/sox-14.4.1-4.fc20.i686.rpm from default-installrepo: [Errno 14] curl#22 – “The requested URL returned error: 404 Not Found”‘, u’gnome-icon-theme-symbolic-3.10.1-1.fc20.noarch: failure: Packages/g/gnome-icon-theme-symbolic-3.10.1-1.fc20.noarch.rpm from default-installrepo: [Errno 14] curl#22 – “The requested URL returned error: 404 Not Found”‘, u’celt-0.11.1-6.fc20.i686: failure: Packages/c/celt-0.11.1-6.fc20.i686.rpm from default-installrepo: [Errno 14] curl#22 – “The requested URL returned error: 404 Not Found”‘, u’perl-File-Path-2.09-292.fc20.noarch: failure: Packages/p/perl-File-Path-2.09-292.fc20.noarch.rpm from default-installrepo: [Errno 14] curl#22 – “The requested URL returned error: 404 Not Found”‘, u’usermode-gtk-1.111-4.fc20.i686: failure: Packages/u/usermode-gtk-1.111-4.fc20.i686.rpm from default-installrepo: [Errno 14] curl#22 – “The requested URL returned error: 404 Not Found”‘]

Thus, although FedUp is a recommended way to upgrade Fedora 17, I have no choice but to upgrade it using yum instead.

After following the four steps listed on the tutorial, I rebooted PC. I pressed the Esc key at the loading screen. Then I realized that the system stuck at the following step at the loading screen.

[  OK  ] Started GNOME Display Manager

After doing some online searches, I found that I need to reinstall the polkit service. More details can be found online, for example the blog post that I found which shows the steps required to upgrade system to Fedora 18 successfully. Hence, what I did is while I was at the GRUB screen, I highlighted Fedora 18 and then I pressed ‘e‘ to edit the command before booting. After that I was brought to another screen where I could change the number of runlevel to 3, so that system could enter the text mode directly for me to enter the following command.

yum reinstall polkit

Then I chose to shutdown once the process was completed.

su – c “/sbin/shutdown -h now”

After that, I can successfully login to the graphical mode.

Successfully Upgraded to Fedora 18
Successfully upgraded to Fedora 18.

Upgrading from Fedora 18 to 19

When I tried to upgrade Fedora 18 to 19 with FedUp, the system displayed similar error messages as the time I upgraded Fedora 17 to 18. Thus, I have no choice but to use yum to upgrade Fedora 18 to 19 again.

To upgrade Fedora 18 to 19, it’s very straightforward. Just follow the steps listed at the tutorial then Fedora 19 will be available after rebooting.

/etc/os-release file shows that my Acer laptop is now running Fedora 19 !
/etc/os-release file shows that my Acer laptop is now running Fedora 19!

Within an hour, Fedora 19 can be used on my laptop. The upgrade is fast!

Meanwhile, threre is an article that I found online about Fedora 19, Fedora 19 Schrodinger’s Cat (Meow!) Reviews.