Deploy MongoDB to Azure: It’s Never Been Easier

WebMatrix + MongoLab + Windows Azure

This post is to continue the story of my MongoDB self-learning back in January. Also, the theme for March self-learning is about Windows Azure, thus I guess it’s a good opportunity to combine these two knowledge together. So, let’s continue the story now.

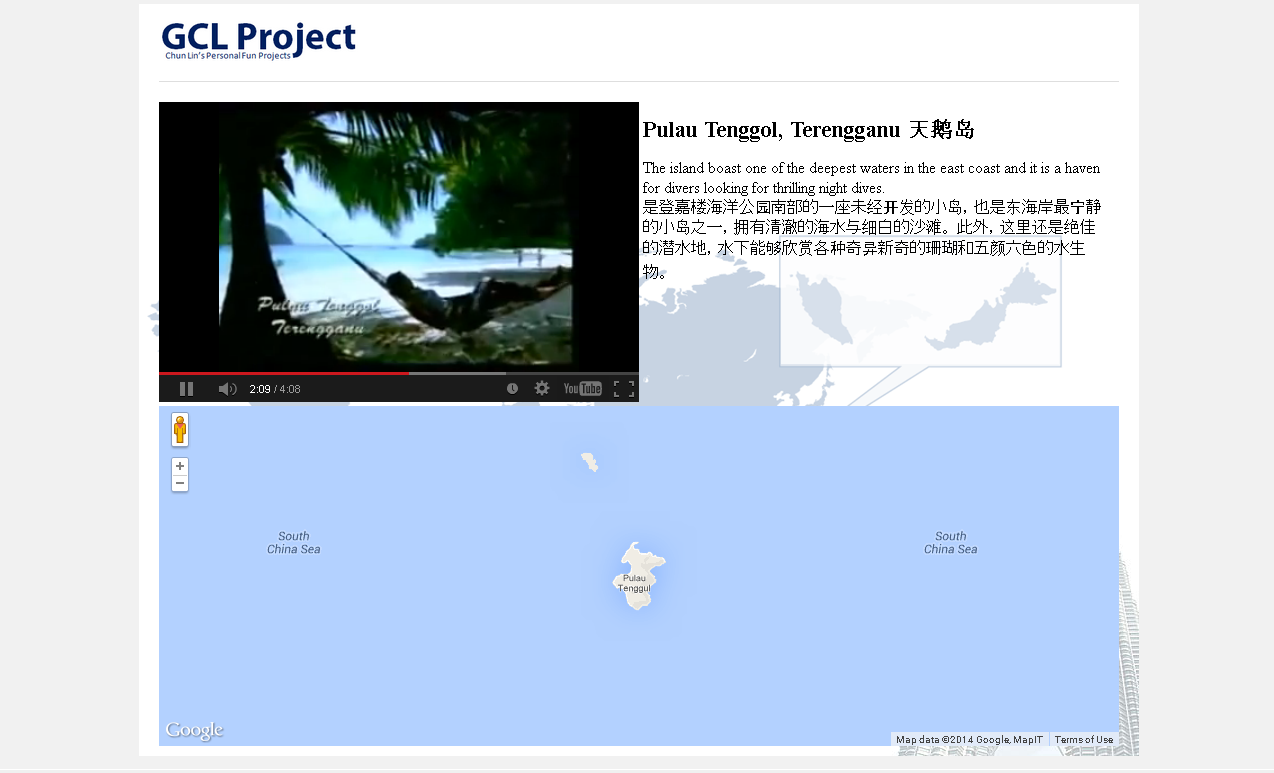
Basically, after the one-month MongoDB learning in January, I have successfully built a simple web application allowing users to add pinpoints on Google Map and store those info on MongoDB. However, all those are happening in local machine. So, how to do that if we would like to deploy it on, for example, Azure for the public to access?

Fortunately, with the help of Microsoft WebMatrix, the whole process is rather simple and straight-forward.

Deploy The Website in 3 Simple Steps

Firstly, there is a Publish feature available on WebMatrix. After adding your Windows account on WebMatrix, there is a simple Publish interface which allows you to publish our current website to either a new site or existing site on Azure.

Create a new website on Windows Azure with WebMatrix.

Secondly, we need to create new MongoDB database on cloud. Windows Azure Store offers a web-based cloud MongoDB management tool, called MongoLab. Currently, MongoLab provides a free sandbox plan for the developers to try out MongoDB on Windows Azure. It also provides some other plans with Replica Set cluster on shared or dedicated Azure VMs. Normally those are for large and heavy traffic sites. For learning purpose, a free plan with 0.5 GB of storage is enough.

MongoLab: One of the MongoDB hosting platforms available on Windows Azure.

Thirdly, once the MongoLab service is added, we can now happily get the Connection Info of the database and then paste it to our code in WebMatrix.

var dbc = monk('mongodb://GCLMongoDB:.../GCLMongoDB');
Connection Info can be found on Windows Azure Portal.

Finally, we can just hit the Publish button on WebMatrix to launch the website on Windows Azure with MongoDB. Ta-da!

MongoLab Helpful Features

In MongoLab, we get to see the documents either in list view or even the table view. List view allows us to read all the documents stored in the collection in JSON format. We can scroll through a consecutive set of documents each in its entirely. By clicking on a document, we then can edit and delete the selected document.

Documents can be presented as JSON List View in MongoLab.

In table view, we get to choose the format of the displayed table by defining how to translate JSON documents in the collection into a 2D table. This is especially useful for those who are familiar with relational database but are still new to document database.

Documents can be shown as table in MongoLab as well.

In addition, there is an editor provided to do query. A friendly quick reference of query displayed at the side of the page to guide new developers along on how to do query also.

We can write queries in MongoLab too!

For the database backup, there is a charge of $0.50 per run + $0.02 per run per GB if we store our backups in MongoLab-owned cloud container. Hence, even for a small-sized database that I have above (2.49 KB), I will already be charged for around $15 monthly for 30 backups.

Conclusion

My friend once said that I used too much Microsoft developer tools and products without knowing what have really been handled by them in the background secretly. I think it’s kind of true. As we can see, to deploy both the website and MongoDB on Windows Azure, it took only a few simple steps as shown above. Thus, I’d encourage to learn in this way only if you are totally new to MongoDB and you would just like to have an overview of how a Node.JS website can work together with MongoDB on the cloud.

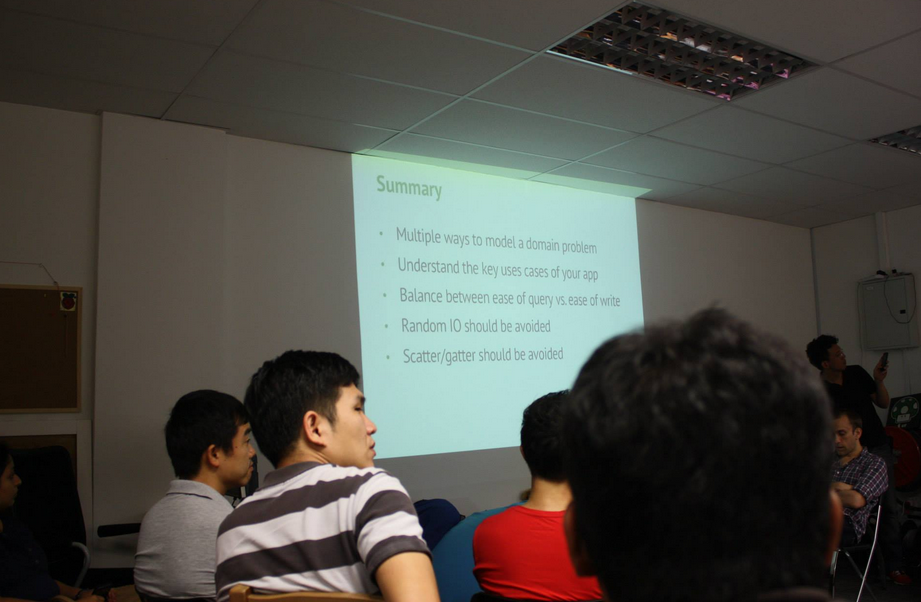
If you want to learn more about MongoDB, you can also checkout the following slides from the presentation in Singapore MongoDB User Group Meetup #2. The first half of the slides basically cover some fundamental knowledge about MongoDB which is quite useful for those who are new to this document database.

February Self-Learning: Let’s Take a Tour to Malaysia with HTML5

February is a short month so I have to plan my self-learning accordingly so that I can get myself more focused. Due to the fact that I can only spend on average one hour per day to work on my personal project and self-learning, I choose to learn not only something which is easier, faster to learn, but also a technology that is more interesting. So, the topic of February self-learning is HTML5! (Notice/Joke: ! is exclamation mark here. It doesn’t mean 5! which equals to 120).

Canvas

Canvas element is indeed an exciting addition to HTML5. Thanks to <canvas>, we can now draw graphics on the web page easily via, for example, JavaScript. I have seen many people trying to use CSS to do drawing. There are even people successfully using CSS to render Homer Simpson. Oh my tian. It’s a fun thing to draw stuff in CSS but it’s just a hack after all.

Draw in CSS? Come, I clap for you.

I do a firefly animation by using this new <canvas> element in a simple way. Firstly, I draw some fireflies on the canvas.

cxt.globalAlpha = 0.4;
cxt.beginPath();
cxt.arc(x, y, ((fireflyLightMaxDiameter - fireflyDiameter) * brightnessRatio) + fireflyDiameter, 0, Math.PI * 2, true);
cxt.closePath();
var grd = cxt.createRadialGradient(x, y, 1, x, y, 4);
grd.addColorStop(0, "#FFFFFF"); // white
grd.addColorStop(1, "#FFFF00"); // yellow
cxt.fillStyle = grd;
cxt.fill();
cxt.globalAlpha = brightnessRatio;
cxt.fillStyle = "#99FF00";
cxt.beginPath();
cxt.arc(x, y, fireflyDiameter, 0, Math.PI * 2, true);
cxt.closePath();
cxt.fill();

Secondly, I will redraw the whole canvas for every 60 milliseconds. Then in each redraw function, I randomly assign flying speed and direction to every single firefly. Also, there is a counter set so that the firefly won’t change its direction too often.

dx = Math.floor(Math.random() * fireflyMaxSpeed);
dy = Math.floor(Math.random() * fireflyMaxSpeed);
firefliesDx[i] = dx;
firefliesDy[i] = dy;
x += dx * directionX[i];
y += dy * directionY[i];
if (callCounter % 40 == 0) { // Don't change the flying direction too often
    directionX[i] = ((Math.floor(Math.random() * 10) < 5) ? 1 : -1);
    directionY[i] = ((Math.floor(Math.random() * 10) < 5) ? 1 : -1);
}

Thirdly, I set a counter to do the brightness changing of each firefly.

brightness[i] += fireflyBrightnessSpeed * brightnessDirection[i];
if (brightness[i] > fireflyMaxBrightness) {
    brightnessDirection[i] = -1;
} else if (brightness[i] < 0) {
    brightnessDirection[i] = 1;
}

So, yup, that’s the basic idea on how I  do firefly animation in <canvas>. Since this year is the tourism year in my country, I apply the firefly animation in a page about watching fireflies in Kuala Selangor, Malaysia. To get the source code, you can visit my page of this animation in the Mozilla Demo Studio. Don’t forget to click “Like It” button if you really like it. =P

Firefly HTML5 Animation
Firefly HTML5 Animation: The page is to promote Kuala Selangor, the world’s biggest firefly colony

Popcorn.js: Integrating Video and the Web Content

However, promoting just one attraction in my country is not enough. So, I am thinking of building a page which will guide the viewer through different places in Malaysia.

I get a promotional video about Malaysia tourism from YouTube. In the video, it shows several famous tourist attractions in Malaysia. I want to build a web page showing a short introduction as well as a map (or even street view) about those places. I thus chose Popcorn.js.

Popcorn.js is an open-source HTML5 video framework which allows us to create time-based interactive media on the web. So, we can now bring content in a web page into a video easily. People watching a video on the website now can also read a web page content which is relevant to the video content. So, this JavaScript library basically allows to add value to a video.

The following screenshot shows how the page looks when the video is displaying a picture of Pulau Tenggol.

Popcorn.js in action.

YouTube Plug-in Issue in Popcorn.js

There is a problem if we are using the YouTube plug-in offered in the Popcorn.js. After the video ends, the YouTube player will show a group of relevant videos. So it basically allows the viewer to change the content of the video player. Hence, to solve this problem, I added one value to the playerVars in popcorn.js.

playerVars = { wmode: "transparent", rel: 0 };

By default, rel is 1. The rel parameter in YouTube Player API indicated whether related videos should be shown in the player after the video finishes. So setting it to 0 fixes the problem.

CSS Animation

Although it’s not encouraged to use CSS to do complicated drawing on the web pages, thanks to the CSS3, we can now create animations with CSS by using @keyframes. For example, the following is part of my CSS which does the animation of the name of each attraction in the web page.

#footNote h1 {
    -webkit-animation:blurFadeIn 5s; 
    animation:blurFadeIn 5s; 
    font-family:KaiTi 隶书 Arial;
}
@-webkit-keyframes blurFadeIn{
    0%{
        opacity:0;
        text-shadow:0px 0px 40px #fff;
        -webkit-transform:scale(1.5);
    }
    100%{
        opacity:1;
        text-shadow:0px 0px 1px #fff;
        -webkit-transform:scale(1);
    }
}
@keyframes blurFadeIn{
    0%{
       opacity:0;
       text-shadow:0px 0px 40px #fff;
       transform:scale(1.5);
    }
    100%{
       opacity:1;
       text-shadow:0px 0px 1px #fff;
       transform:scale(1);
    }
}

What it does is basically just a simple fade-in animation of the text.

To view the finalized version of the web page, please visit to my page on Mozilla Demo Studio.

Visit Malaysia 2014

Both of the web pages mentioned above are all about Malaysia tourism. Why? This is because this year, Malaysians are having the nation’s largest tourism celebration. We had one back in 2007 when we were celebrating the 50th years anniversary of independent in Malaysia. Then Prime Minister, Abdullah Ahmad Badawi, even showed up in the Visit Malaysia 2007 promotional video.

So, if you haven’t visited Malaysia before, please bring your family and friends to this lovely country and join us in this grand tourism celebration. However, before that, kindly vote for my following two demos by clicking the “Like It” button. Thanks. =D

Enjoy the HTML5 firefly animation here.
Take a tour to Malaysia with HTML5 here.

Use Technology to Give You a Hug: T.Jacket

Two months ago, I met my senior, Lai Sep Riang, who is now a CTO in a newly founded local startup, T.Ware. T.Ware is a team of young and talented people who focusing on modern wearable technology. Wearable technology, or wearable devices, are clothes or accessories that has computer and electronic devices built-in. I came to know more about this term after the recent announcement of some exciting wearable technology products, such as Google Glass and Smart Contact Lens Project from Google. T.Jacket from the T.Ware team is also an interesting wearable electronic item and, more importantly, it is a local product (Yay!).

T.Jacket has similar design as fitness weighted vest. The fitness weighted vest is simply a vest loaded with a certain amount of weight. People wear it for fitness workout because the carrying of extra weight helps burning calories. So, what a T.Jacket can do is not just providing deep pressure, but also giving the user a way to control both the pressure amount and the pressure pattern. By linking the electronic device in the jacket with the T.Jacket Android app via Bluetooth, the user can easily manage the air pressure in the jacket. Hence, T.Jacket can be considered as a smart version of traditional weighted vest.

T-Jacket Android App

Who will be using T.Jacket? Based on what I understand from discussion with James Teh, the founder and CEO of T.Ware, T.Jacket is made for children with sensory disorder and autistic disorder. T.Jacket is designed to provide pressure therapy to the children which helps calming them down.

James and Sep Riang also happily lent me a T.Jacket for me to try. The one that I got is the T.Jacket without long sleeves. Personally, I like this version because it will not be comfortable to wear long sleeve in Singapore. I wear it sometimes in the air-conditioned office when the weather is cold. I only switched on the deep pressure device once because using Bluetooth will increase my smartphone power consumption a lot.

I sometimes wore T.Jacket to work. I also walked around at City Hall area with the T.Jacket on. I realized that no one actually found out that I was wearing something special. This is because you just can’t tell from the outside that it is a wearable device. In fact, the T.Ware team already thought about this when they were designing the product. T.Jacket should still look like a usual jacket. It also shouldn’t cause the person who wears it to feel insecure or strange. That’s one thing that I like about T.Jacket.

Another nice thing about T.Jacket is that it comes with an online portal that provides a channel for the child and his/her parents to monitor the acitvities. Their web portal, aka T.Cloud, is actually very user friendly and straightforward. There is a section where you can get to see the date, time, pressure amount of the activities done. You can also get to tag the activity so that in the future the system gets to know more accurately about the action you are doing.

T-Cloud: Monitoring your activities with T.Jacket.

In fact, according to James and Sep Riang, T.Ware is currently doing well in getting funds and supports from many parties. They even got the chance to demonstrate the use of T.Jacket to the Singapore President. I am impressed by their work to produce such an impressive technology to the kids with special needs. So hopefully I will get to see one more successful local startup story and it’s about T.Ware. =)

The team presented T.Jacket to the President of Singapore, Dr Tony Tan.

MongoDB User Group First Meetup: Learning MongoDB with Seniors

The first meetup organized by local MongoDB user group was held at Hackerspace Singapore on last Tuesday. During the meetup, Matias Cascallares, consulting engineer from MongoDB, shared with us the importance of schema design in a “schemaless” MongoDB, the use cases of different schema design approach, and ended his talk with the new features that will be released in MongoDB 2.6.

Documents and Collections

MongoDB is an open-source document oriented database, an example of the NoSQL database, which is non-relational and horizontally scalable. Many of the databases currently in use are based on relational database model where we have tables and each table has columns and keys defined in database schema.

In my job, I deal with relational database. Sometimes there is a need to store two types of records in the same table. Even though they share some fields with one another, each of them also has its own unique elements. So, I simply combine all the fields and defined them as the columns in the table, leaving unused fields empty or null.

Not all records have discount info
Not all records have discount info in the table

MongoDB stores the data in documents. Documents are stored on disk in BSON, a binary representation of JSON objects. A grouping of documents is called a collection, which is equivalent of a table in relational database model. So documents in MongoDB are equivalent of rows in a table. Because of “schemaless”, collections do not enforce document structure. Documents within a collection can have different fields. Thus, it’s allowed to write the two records shown in the image above into two documents as follows.

{
    ID: 1,
    ItemCode: "T934",
    CreateUser: "User01",
    CreateDate: "2014-01-01"
}
{
    ID: 2,
    ItemCode: "T987",
    DiscountID: 4,
    DiscountAmount: 0.32,
    CreateUser: "User02",
    CreateDate: "2014-02-01"
}
Schema in "schemaless" MongoDB?
Schema design in “schemaless” MongoDB?

Different Approach of Schema Design in MongoDB

I use relational database in my work. I realize that when the tables are growing bigger and bigger, it’s getting harder and harder to adjust the schema. I always hope to have the columns to be dynamic. Hence, the concept of schemaless database in MongoDB interests me a lot.

In relational database, we can use stuff like joins to provide results to a query. However, in MongoDB, joins are not supported. The data is either denormalized or stored together with related data in the same document. In addition, we can also use the _id field of one document in another document as a reference. The application just needs to run a second query to return the referenced data. Hence, it’s like doing a reverse engineering when we are designing schema in MongoDB because now we have to ask “What question will I have”.

Also, due to fact that documents can have different fields, we cannot describe the collection. Instead, we have to look into the codes to find out the schema information of the collections. Even though when we query with a key not existing in any of the document in the collection, it will still not raise an error. It just won’t return anything. So, it is impossible to describe the collection as how we do in relational database.

Shards and Shard Keys

Normally, we use the strongest servers we have to host our databases. We do vertical scaling by adding more CPU, RAM and storage resources to increase capacity. This gets expensive quickly. There is where horizontal scaling can come into play. Horizontal scaling, aka sharding, does a horizontal partition in a database. Instead of just increase the capacity of the one server, we add more servers. The data is then distributed to multiple database servers, aka shards.

MongoDB is built with horizontal scaling in mind. Sharding is implemented in MongoDB with the help of sharded cluster which consits of three components: shards, config server, and router. Router is in charge of routing the reads and writes from applications to the shards by refering to the metadata stored in the config server.

To shard a collection, shard key is needed to divide a collection’s data across the cluster’s shards. During the talk, Matias analyzed three different approaches of schema design for a social network application which has to support a great amount of read and write operations. By just changing the shard key used in the shard and the schema, we manage to get 3 different solutions. One of them is good at writing performance. One is good at reading performance with lots of random IO. Final one is good at reading performance with no random IO but with more work in write. For more details about these three schema design approaches, please read the blog post “Schema Design for Social Inboxes in MongoDB”.

Data Expiration

Data expiration is mentioned in the second half of the talk about schema design.

Data expiration is useful and important because some data stored in database will not be used anymore. However, data won’t expire itself.

In MS SQL Server, we create scheduled jobs with stored procedures to erase the data which has been there for more than 2 months, for example.

In Matias’ talk, I came to know about the feature that was introduced back in MongoDB 2.2, the Time To Live (TTL) Collection. By just specifying a value in the expireAfterSeconds index option, the documents in the TTL Collection will automatically removed after specific period of time.

That’s All

Important slide, the summary.
Important slide, the summary. Photo Credit: Singapore MongoDB User Group

The talk is very interesting. I agree that schema design in MongoDB is not trivial. As mentioned during the talk, it does require a lot of practices to get really, really good at schema design in MongoDB and know how to balance between the read performance and write performance. Thus, the talk is actually just a starting point for a beginner like me. It’s now up to me to find out more about MongoDB and other database technologies myself. Hopefully one day I’ll be so imba that I have the opportunity to give a talk about MongoDB as well.

For those who were there will now realize that I do not cover everything of the talk in this post. Firstly, I don’t want my post to be too lengthy. Most of the readers will just tl;dr. Secondly, I just started to learn MongoDB last month, so I try not to “act smart” here. Thirdly, it’s to encourage people to join our Singapore MongoDB User Group to find out more (such as the upcoming talks and other activities) instead of just reading my post. =P

I’d also like to take this opportunity to thank my friend, Laurence, for inviting me to attend this amazing talk. I’m now already looking forward to the next meetup in April.