I just downloaded Fiddler. I would like to see how I can make use of it, so I noted down some of the things that I have tried out.
Experiment 01: Process Filter
The first thing that I realized when I used Fiddler is that there are too many information being displayed especially when there are too many programs accessing the Internet. This is because, as advertised, Fiddler is a web debugging proxy for any browser (Microsoft Edge is included as well!) that works independently.
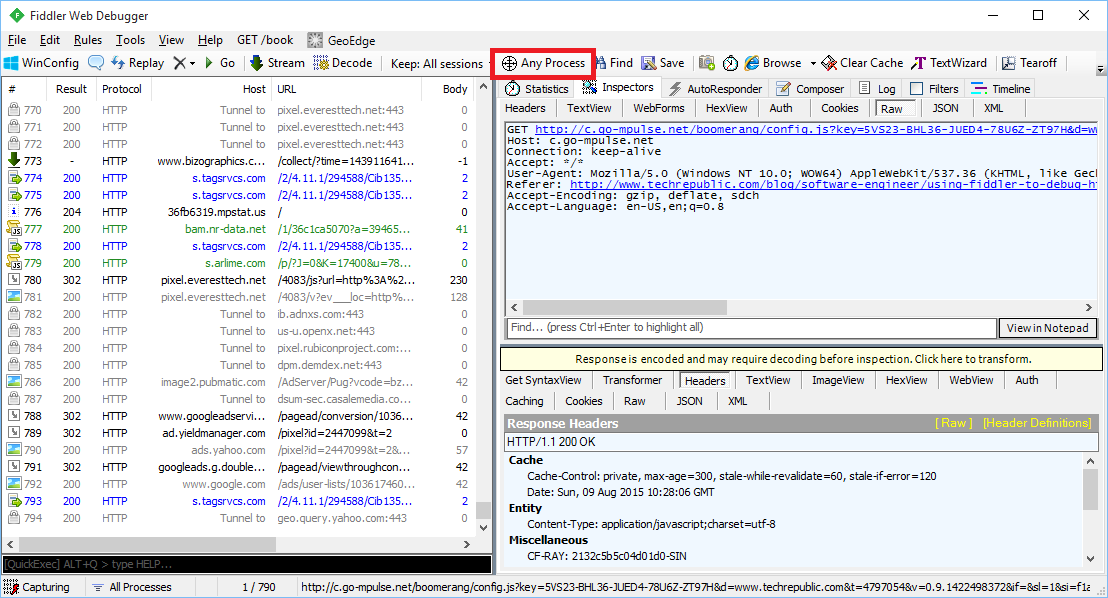
Fortunately, Fiddler providing a filtering function “Process Filter” to enable us to capture traffic coming from a particular browser, instead of all browsers.
Just drag and drop the icon on the browser you want to track.
Experiment 02: Performance Profiling
By just filtering and selecting the relevant sessions, we would be able to generate a web page performance report about total number of requests, total bytes sent and received, response time, DNS lookup time, response bytes by content type in a pie chart, etc.
Performance profiling of id.easybook.com, an Indonesia bus ticket booking website.
By clicking on the “Timeline” tab, we will be able to get an overview of activities recorded. It is one of the useful features to start investigating performance issues in our web application.
Transfer Timeline diagram of id.easybook.com.
Experiment 03: Decrypt HTTPS Traffic
By default, Fiddler disables HTTPS decryption. However, nowadays most of the websites that we would like to debug are using HTTPS encryption. So, it’s sometimes necessary to set it up to work with HTTPS traffic.
HTTPS decryption is disabled by default.
First of all, we just click Tools -> Fiddler Options.
In the “HTTPS” tab of the popup window, we need to enable both “Capture HTTP CONNECTs” and “Decrypt HTTPS Traffic”. To intercept HTTPS traffic, Fiddler generates a unique root certificate. In order to suppress Windows security warnings, Fiddler recommends to have our PC to trust the cert. Hence, there will be a warning message shown after we click on the “OK” button.
Yes, scary text! Are you sure you want to trust the certificate?
However, Windows cannot validate the certificate properly, so we will be asked if we really want to install the cert.
Are you sure you want to install certificate from DO_NOT_TRUST_FiddlerRoot?
Finally, we will also be asked if we wish to add the cert to our PC’s Trusted Root List.
Adding cert to PC Trusted Root List.
If we want to remove the cert from the PC’s Trusted Root List, we can always do so by clicking on the “Remove Interception Certificate” button in the Fiddler Options window.
By using Entity Framework, we can save a lot of time on writing SQL ourselves because Entity Framework, a Microsoft-supported ORM for .NET, is able to generate the SQL for us.
I started to use ADO .NET when I was building .NET web applications in my first job. I learnt about how to call stored procedures with ADO .NET. I witnessed how my colleague wrote a 400-line SQL to complete a task which we normally will choose to do it in C#. I also realized the pain of forgetting to update the stored procedure when the C# code is already different.
After that, my friend introduced me Entity Framework when I was working on my first ASP .NET MVC project. Since then, I have been using Entity Framework because it enables me to deliver my web applications faster without writing (and debugging) any SQL myself. I read a very interesting article comparing between Entity Framework and ADO .NET. The author also acknowledged that the performance of Entity Framework was slower than hand-coded ADO .NET. He emphasized that, however, Entity Framework did maximize his productivity.
How I react when I read a 400-line stored procedure submitted by my colleague.
What Is Happening in Database with Entity Framework?
The SQL generated by Entity Framework is believed to be pretty good. However, it’s still nice to be aware of what SQL is being generated. For example, I have the following code to retrieve Singapore weather info.
using (var db = new ApplicationDbContext())
{
    var forecastRecords = db.SingaporeWeathers.ToList();
}
In Visual Studio, I can just mouse-over “SingaporeWeather” to get the following query.
SELECT
    [Extent1].[RecordID] AS [RecordID],
    [Extent1].[LocationID] AS [LocationID],
    [Extent1].[WeatherDescription] AS [WeatherDescription],
    [Extent1].[Temperature] AS [Temperature],
    [Extent1].[UpdateDate] AS [UpdateDate]
FROM [dbo].[SingaporeWeathers] AS [Extent1]
If I have the following code which retrieves only records having temperature greater than 37, then I can use ToString().
using (var db = new ApplicationDbContext())
{
    var query = from sw in db.SingaporeWeathers where sw.Temperature > 37 select sw;
    Console.WriteLine(query.ToString());
}
SELECT
     [Extent1].[RecordID] AS [RecordID],
     [Extent1].[LocationID] AS [LocationID],
     [Extent1].[WeatherDescription] AS [WeatherDescription]
     [Extent1].[Temperature] AS [Temperature],
     [Extent1].[UpdateDate] AS [UpdateDate]
FROM [dbo].[SingaporeWeathers] AS [Extent1]
WHERE [Extent1].[Temperature] > cast(37 as decimal(18))
using (var db = new ApplicationDbContext())
{
    var logFile = new StreamWriter("C:\\temp\\log.txt");
    db.Database.Log = logFile.Write;
    var forecastRecords = db.SingaporeWeathers.Where(x => x.Temperature > 37).ToList();
    logFile.Close();
}
Then in the log file, I can see logs as follows.
...
Closed connection at 6/6/2015 10:59:32 PM +08:00
Opened connection at 6/6/2015 10:59:32 PM +08:00
SELECT TOP (1)
    [Project1].[C1] AS [C1],
    [Project1].[MigrationId] AS [MigrationId],
    [Project1].[Model] AS [Model],
    [Project1].[ProductVersion] AS [ProductVersion]
FROM ( SELECT
    [Extent1].[MigrationId] AS [MigrationId],
    [Extent1].[Model] AS [Model],
    [Extent1].[ProductVersion] AS [ProductVersion],
    1 AS [C1]
    FROM [dbo].[__MigrationHistory] AS [Extent1]
    WHERE [Extent1].[ContextKey] = @p__linq__0
) AS [Project1]
ORDER BY [Project1].[MigrationId] DESC
-- p__linq__0: 'MyWeb.Migrations.Configuration' (Type = String, Size = 4000)
-- Executing at 6/6/2015 10:59:32 PM +08:00
-- Completed in 70 ms with result: SqlDataReader

Closed connection at 6/6/2015 10:59:32 PM +08:00
Opened connection at 6/6/2015 10:59:32 PM +08:00
SELECT
    [Extent1].[RecordID] AS [RecordID],
    [Extent1].[WeatherDate] AS [WeatherDate],
    [Extent1].[WeatherDescription] AS [WeatherDescription],
    [Extent1].[WeatherSecondaryDescription] AS [WeatherSecondaryDescription],
    [Extent1].[IconFileName] AS [IconFileName],
    [Extent1].[Temperature] AS [Temperature],
    [Extent1].[UpdateDate] AS [UpdateDate]
FROM [dbo].[Weathers] AS [Extent1]
WHERE [Extent1].[Temperature] > cast(37 as decimal(18))
-- Executing at 6/6/2015 10:59:33 PM +08:00
-- Completed in 28 ms with result: SqlDataReader
...
Speaking of Code First migration, if you would like to find out the SQL being generated when Update-Database is executed, you can add a Verbose flag to the command.
Update-Database -Verbose
Navigation Property
“I have no idea why tables in our database don’t have any relationship especially when we are using relational database.”
I heard from my friend that my ex-colleague shouted this in the office. He left his job few days after. I think bad codes and bad design do anger some of the developers. So, how do we do “relationship” in Entity Framework Code First? How do we specify the foreign key?
I quit!
In Entity Framework, we use the Navigation Property to represent the foreign key relationship inside the database. With Navigation Property, we can define relationship between entities.
If we have a 1-to-1 Relationship between two entities, then we can have the following code.
public class Entity1
{
    [Key]
    public int Entity1ID { get; set; }
    public virtual Entity2 Entity2 { get; set; }
}

public class Entity2
{
    [Key, ForeignKey("Entity1")]
    public int Entity1ID { get; set; }
    public virtual Entity1 Entity1 { get; set; }
}
By specifying the ForeignKey attribute for Entity1ID in Entity2 class, Code First will then create a 1-to-1 Relationship between Entity1 and Entity2 using the DataAnnotations attributes.
For 1-to-n Relationship, we then need to change the navigation property, for example, in Entity1 class to use collection as demonstrated in the code below.
public class Entity1
{
    [Key]
    public int Entity1ID { get; set; }
    public virtual ICollection<Entity2> Entity2s { get; set; }
}
Finally, how about n-to-m Relationship? We will just need to change the navigation property in both Entity1 and Entity2 classes to use collection.
public class Entity2
{
    [Key]
    public int Entity2ID { get; set; }
    public virtual ICollection<Entity1> Entity1s { get; set; }
}
Together with the following model builder statement.
The code above is using Fluent API which won’t be discussed in this post.
Database Context Disposal
When I first used Scaffolding in MVC 5, I noticed the template of controller class it generates look something as follows.
public class MyController : Controller
{
    private MyContext db = new MyContext();

    protected override void Dispose(bool disposing)
    {
        if (disposing)
        {
            db.Dispose();
        }
        base.Dispose(disposing);
    }
}
Before using Scaffolding, I have always been using the Using block, so I only create database context where I have to, as recommended in a discussion on StackOverflow. Also, the Using block will have the Dispose() be called automatically at the end of the block, so I don’t need to worry about forgetting to include the Dispose() method to dispose the database context in my controller.
Azure SQL: Database Backup and Restore
Before ending this post, I would like to share about how DB backup and restore is done in Azure SQL Database.
For each activate databases, Azure SQL will create a backup and geo-replicate it every hour to achieve 1-hour Recovery Point Objective (RPO).
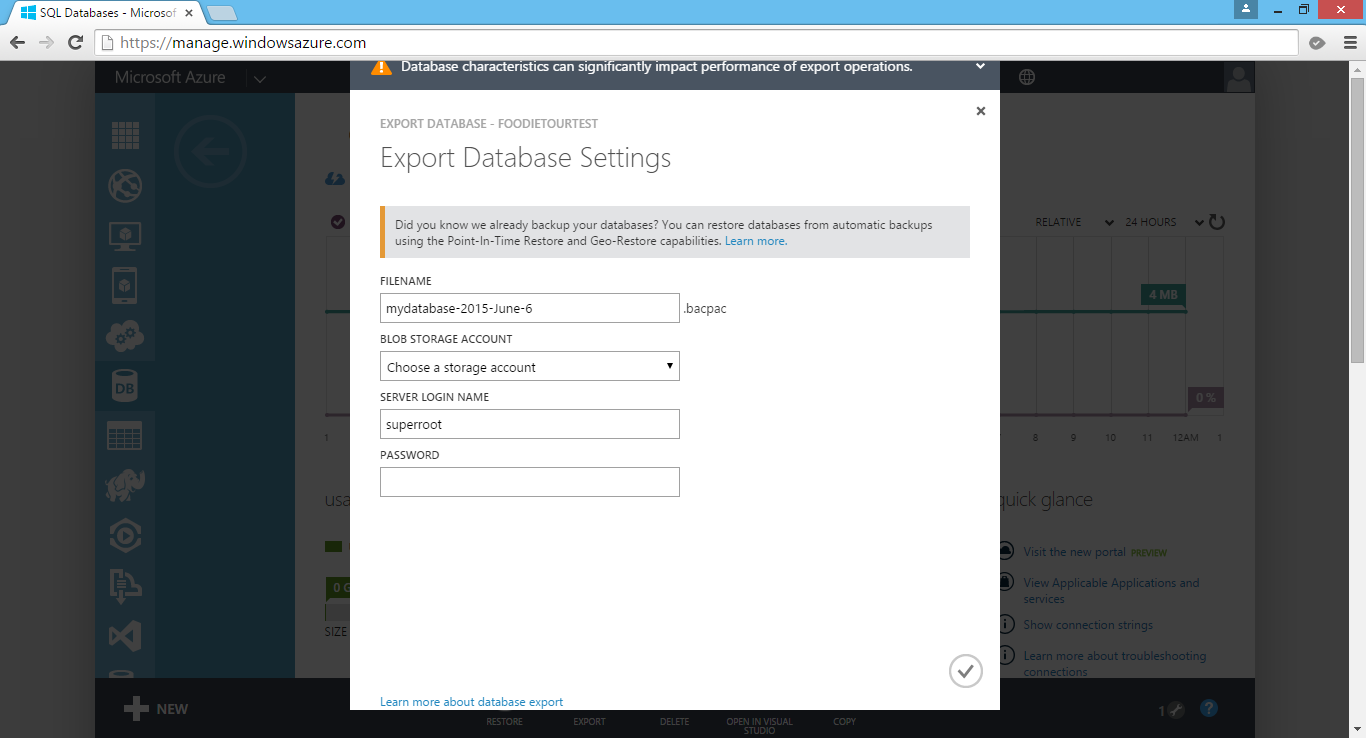
If there is a need to migrate the database or archive it, we can also export the database from Azure SQL Database. Simply click on the Export button in the SQL Databases section of Azure Management Portal and then choose an Azure blob storage account to export the database to.
Finally, just provide the server login name and password to the database and you are good to go.
Export DB from Azure SQL Database.
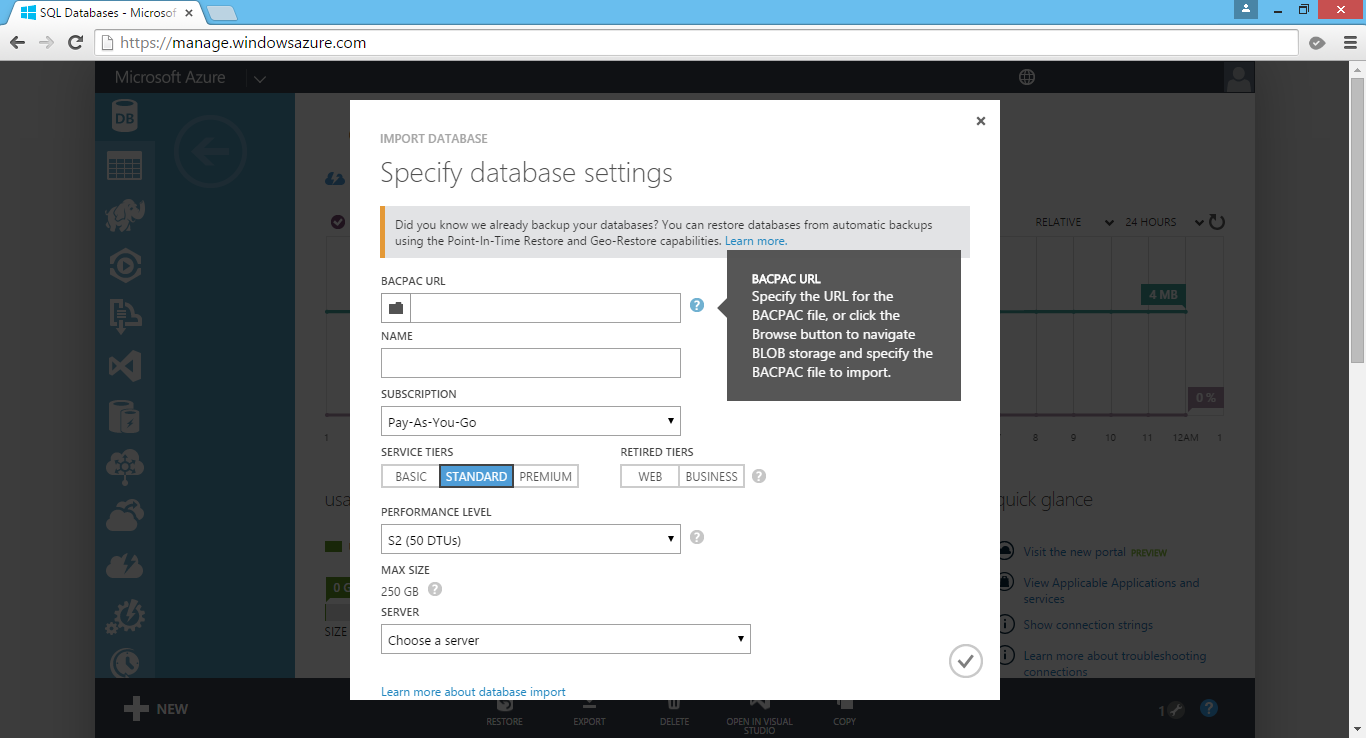
Later, we can also create a new database using the BACPAC file which is being generated by the Export function. In the Azure Management Portal, click New > Data Services > SQL Database > Import. This will open the Import Database dialog, as shown in the screenshot below.
Create a new database in Azure SQL Database by import BACPAC file.
Okai, that’s all for this post on Entity Framework, database, and Azure SQL Database. Thank you for your time and have a nice day!
It is quite common that we need our users to input date and time on the web pages. For example, when you search for flight schedules, you normally need to tell the search engine your journey period.
The Datepicker offered by jQuery UI is normally what people will use in their website. It offers a user-friendly way for the user to input a date from a popup calendar. However, it has a disadvantage. Datepicker doesn’t come with an interface for users to input the time. Workaround is normally to provide two more drop-down boxes for user to choose the hour and minute. However, this means that users have to click more times to input both date and time.
In the sample code above, the step defines the gap (in terms of minutes) between two time selections in the plugin. The value of minDate is set to 0 so that the earliest date the user can choose is today.
That’s all. Now you can use the plugin in a text field for user to input both date and time.
@Html.EditorFor(model => model.IncidentTime,
    new {
        htmlAttributes = new {
            @class = "form-control date_field",
            @placeholder = "Incident Date & Time",
            @style = "max-width: 100%"
        }
    }
)
DateTimePicker enables us to specify both date and time in a user-friendly way.
The time picker will then only show the 13 options specified in the code above. If user doesn’t pick any of the time option, then by default the chosen time will be 9am.
In case you would like to hide the time picker, you can do so by setting timepicker to false.
Some users sent their feedback to me about the visibility of time picker on the plugin. To them, the time picker is not so obvious. Hence, I change to use a brighter background colour in one of the class definition in jquery.datetimepicker.css.
I tried it out in my MVC project. Basically, what I do is just use one of the examples as reference, and then include one JS library (Suggestion from the author: Use ‘jssor.slider.mini.js’ (40KB for jQuery Plugin) or ‘jssor.slider.min.js’ (60KB for No-jQuery Version) for release) and some other JavaScript codes together with some inline CSS. I don’t want to talk much about it here because, hey, they have hosted the code and samples on GitHub for public to download!
Jssor Slider with thumbnail navigator is one of the available templates that I like.
“Given an address, how do I get its latitude and longitude?”
I had been finding the solution for this problem for a long time until I discovered the API from Google Maps, the Geocoding Service.
Recently, I found out that my kampung was actually searchable on Google Maps Street View.
Geocoding
According to the definition given in the Geocoding Service, geocoding is the process of converting human-readable address into geographic coordinates, such as latitude and longitude. Sometimes, the results returned can also include other information like postal code and bounds.
To do a latitude-longitude lookup of a given address, I just need to pass the a GeocodeRequest object Geocoder.geocode method. For example, if I want to find out the latitude and longitude of Changi Airport, I just do the following in JavaScript.
https://maps.googleapis.com/maps/api/js?libraries=places


var geocoder = new google.maps.Geocoder();
if (geocoder) {
    geocoder.geocode(
        { address: "Changi Airport" },
        function (result, status) {
            if (status != google.maps.GeocoderStatus.OK) {
                alert(address + " not found!");
            } else {
                var topPick = result[0]; // The first result returned

                var selectedLatitude = topPick.geometry.location.lat();
                var selectedLongitude = topPick.geometry.location.lng();

                alert("Latitude: " + selectedLatitude.toFixed(2));
                alert("Longitude: " + selectedLongitude.toFixed(2));
            }
        }
    );
} else {
    alert("Geocoder is not available.");
}
The above method is recommended for dynamic geocoding which will response to user input in real time. However, if what is available is a list of valid addresses, the Google Geocoding API will be another tool that you can use, especially in server applications. The Geocoding API is what I tried out in the beginning too, as shown in the C# code below.
var googleURL = "http://maps.googleapis.com/maps/api/geocode/json?address=" +
    Server.UrlEncode(address) + "&sensor=false";

using (var webClient = new System.Net.WebClient())
{
    var json = webClient.DownloadString(googleURL);
    dynamic dynObj = JsonConvert.DeserializeObject(json);
    foreach (var data in dynObj.results)
    {
        var latitude = data.geometry.location.lat;
        var longitude = data.geometry.location.lng;
        ...
    }
}
The reason of using dynamic JSON object here is because the Geocoding API returns many information, as mentioned earlier, and what I need is basically just the latitude and longitude. So dynamic JSON parsing allows me to get the data without mapping the entire API to a C# data structure. You can read more about this on Rick Strahl’s post about Dynamic JSON Parsing with JSON.NET. He also uses it for Google Maps related API.
The reason that I don’t use the Geocoding API is because there are usage limits. For each day, we can only call the API 2,500 times and only 5 calls per second are allowed. This means that in order to use the API, we have to get the API Key from Google Developer Console first. Also, it is recommended for use in server applications. Thus I change to use the Geocoding Service.
Where to Get the Address?
This seems to be a weird question. The reason why I worry about this is because it’s very easy to have typos in user input. Sometimes, having a typo is an address can mean two different places, for example the two famous cities in Malaysia, Klang and Kluang. The one without “u” is located at Kuala Lumpur area while the one with “u” is near to Singapore.
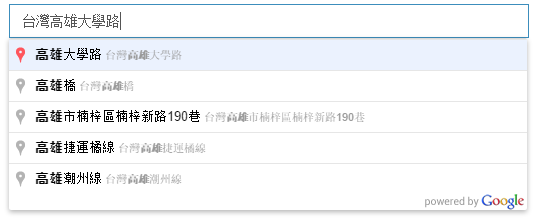
In the code above, I restricted the places which will be suggested by the Place Autocomplete to be only places in Taiwan (tw). Also, what I choose in my code above is “address”, which means the Place Autocomplete will only return me addresses. There are a few Place Types available.
The interesting thing is that even when I input simplified Chinese characters in the LocationName textbox, the Place Autocomplete is able to suggest me the correct addresses in Taiwan, which are displayed in traditional Chinese.
If I search Malaysia places (which are mostly named in Malay or English) with Chinese words, even though the Place Autocomplete will not show anything, the Geocoder is still able to return me accurate results for some popular cities.
Google Place Autocomplete can understand Chinese!
I also notice that if I view the source of the web page, there will be an attribute called “autocomplete” in the LocationName textbox and its value is set to false. However, this should not be a problem for Place Autocomplete API to work. So don’t be frightened if you see that.
Isn’t it good if it can show the location of the address on Google Map after keying in the address in the textbox? Well, it’s simple to do so.
Remember the script to look for Changi Airport latitude and longitude above? I just put the code in a function called showLatLngOfAddress which accepts a parameter as address. Then call it when the LocationName loses focus.
In addition, I add a few more lines of code to showLatLng to draw a marker on the Google Map to point out the location of the given address on a map.
var marker = null;

function showLatLngOfAddress(address) {
    ...

    var topPick = result[0];

    ...

    //center the map over the result
    map.setCenter(topPick.geometry.location);

    //remove existing marker (if any)
    if (marker != null)
    {
        marker.setMap(null);
    }

    //place a marker at the location
    marker = new google.maps.Marker(
    {
        map: map,
        position: topPick.geometry.location,
        animation: google.maps.Animation.DROP,
        draggable: true
    });
}
Finally, I not only make the marker to be draggable, but also enable it to update the latitude and longitude of the address when it is dragged to another location on the map.
I tried to search “Kluang” using Bing Maps API, it returned me two locations. One was in Malaysia and another one was near to Palembang in Indonesia! Wow, cool! On the other hand, Google Places returned me only the Kluang in Malaysia.