KOSD, or Kopi-O Siew Dai, is a type of Singapore coffee that I enjoy. It is basically a cup of coffee with a little bit of sugar. This series is meant to blog about technical knowledge that I gained while having a small cup of Kopi-O Siew Dai.
Code reviews are a best practice for software development projects but it’s normally ignored in startups and SMEs because
the top management doesn’t understand the value of doing so;
the developers have no time to do code reviews and even unit testing.
So, in order to improve our code quality and management standards, we decided to introduce the idea of code reviewing by enforcing pull requests creating in our deployment procedure, even though our team is very small and we are working in a startup environment.
Firstly, we set up two websites on Azure App Service, one for UAT and another for the Production. We enabled Continuous Deployment feature for two of them by configuring Azure App Service integration with our Git repository on Visual Studio Team Services (VSTS).
Secondly, we have two branches in the Git repository of the project, i.e. master and development-deployment. Changes pushed to the branches will automatically be deployed to the Production and the UAT websites, respectively.
In order to prevent that our codes are being deployed to even the UAT site without code reviews, we created a new branch known as the development branch. The development branch allows all the relevant developers (in the example below, we call them Alvin and Bryan) to pull/push their local changes freely from/to it.
Once any of the developers is confident with his/her changes, he/she can create a new pull request on VSTS.
Creating a new pull request on VSTS.
We then proceed to make use of the new capability on VSTS, which is to set policies for the branches. In the policy setting, we checked the option “Require a minimum number of reviewers” to prevent direct pushes to both master and development-deployment branches.
Enabled the code review requirement in each pull request to protect the branch.
So for every deployment to our UAT and Production websites, the checking step is in place to make sure that the deployments are all properly reviewed and approved. This is not just to protect the system but also to protect the developers by having a standardized quality checking across the development team.
This is the end of this episode of KOSD series. If you have any comment or suggestion about this article, please shout out. Hope you enjoy this cup of electronic Kopi-O Siew Dai. =)
There are some startups and SMEs hosting their databases on AWS. However, most of them choose to use Amazon EC2 because doing so is similar to running a SQL Server on-premise at data centres. So, to them, it’s something that they are familiar with back in the old days. However, doing so actually increases their cost of hosting services on AWS. The companies also need to hire experts to do database administration such as database backup and recovery and OS patching.
Starting from May 2014, Amazon RDS also provides a highly available database solution with the synchronous Multi-AZ replication for MS SQL. Multi-AZ deployments for MS SQL database instances use SQL Server Mirroring.
Asia Pacific (Sdyney): Supported for DB instances in VPCs only;
Asia Pacific (Tokyo): Supported for DB instances in VPCs only;
South America (São Paulo): Supported for all DB instance classes except m1/m2.
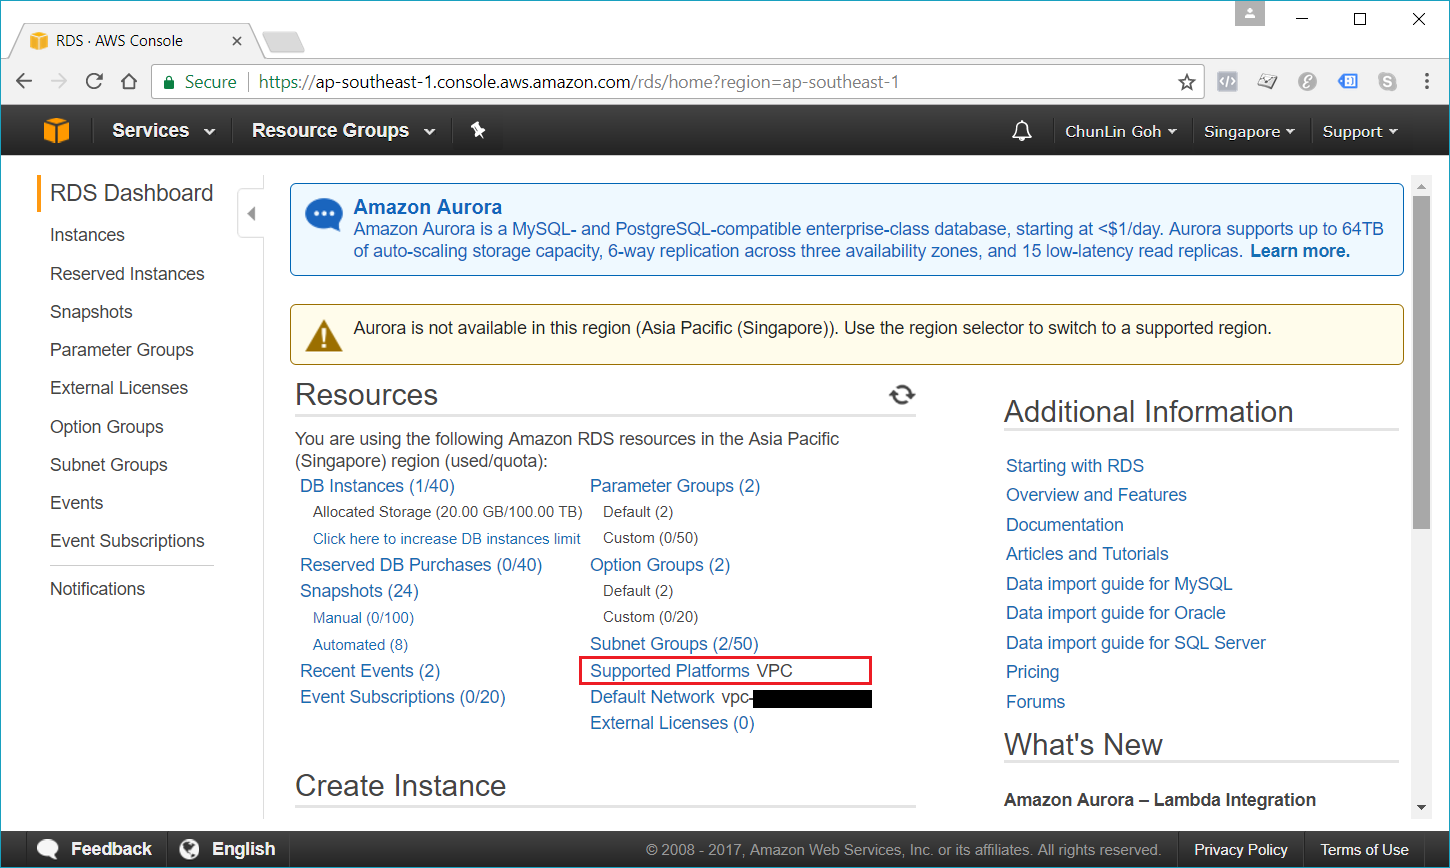
It’s quite unfortunate that Singapore Region is one of them.
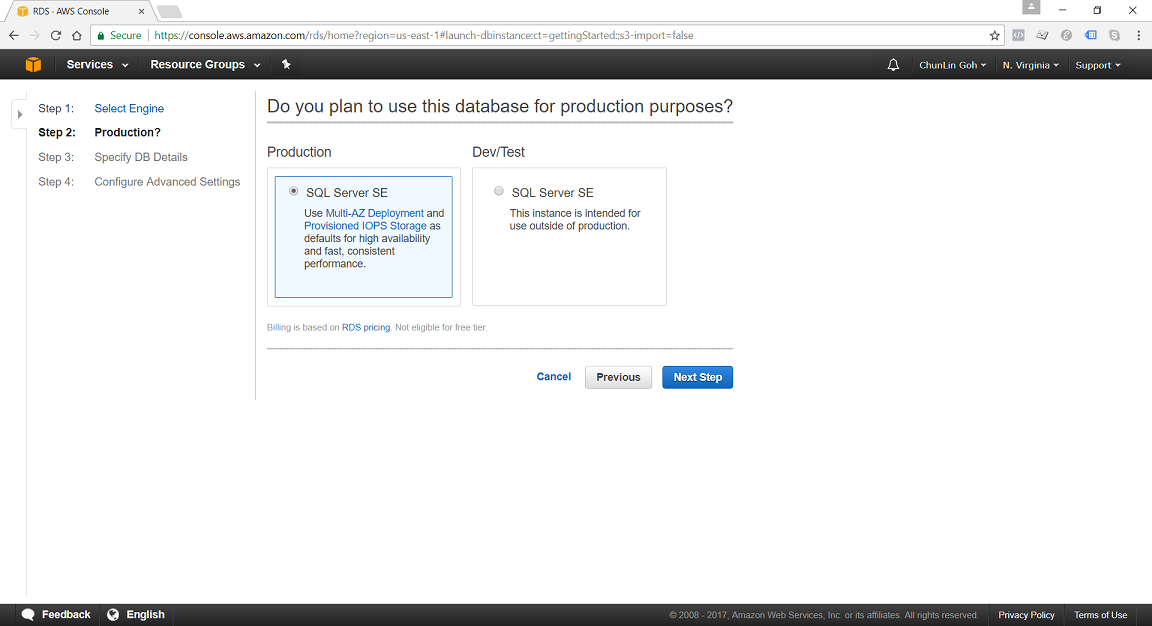
In N. Virginia Region, we’re able to specify to use Multi-AZ Deployment in Production SQL Server SE.
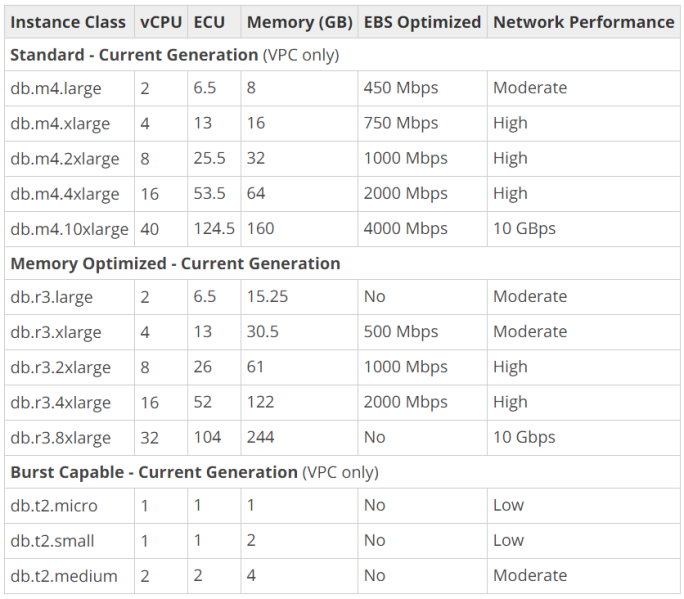
DB Instance Class
We can specify the DB Instance Class that allocates the computational, network, and memory capacity required by planned workload of the database instance.
Standard (db.m4) instances offer a balance of compute, memory, and network resources, and are a good choice for many applications.
Memory Optimized (db.r3) instances are designed to deliver fast performance for workloads that process large data sets in memory. The instances are well suited for the applications, such as high performance relational databases, in-memory analytics, and enterprise applications (for example, Microsoft SharePoint).
Burst Capable (db.t2) instances are instances that provide baseline performance level with the ability to burst to full CPU usage.
General Purpose (SSD) storage, aka gp2, offers cost-effective storage which is suitable for a broad range of database workloads. Hence, it’s ideal for small to medium-sized databases. It provides baseline of 3 IOPS/GB and ability to burst to 3,000 IOPS for extended periods of time. Its volume can range from 20GB to 4TB for MS SQL database instances. However, provisioning less than 100 GB of General Purpose (SSD) storage for high throughput workloads could result in higher latencies upon exhaustion of the initial General Purpose (SSD) I/O Credit balance.
Provisioned IOPS (SSD) storage, aka io1, is suitable for I/O intensive database workloads which pay attention to storage performance and consistency in random access I/O throughput. It provides flexibility to provision I/O ranging from 1,000 to 30,000 IOPS. MS SQL can have provisioned IOPS volumes between 100GB (Express/Web edition) or 200GB (Standard/Enterprise edition) and 4TB.
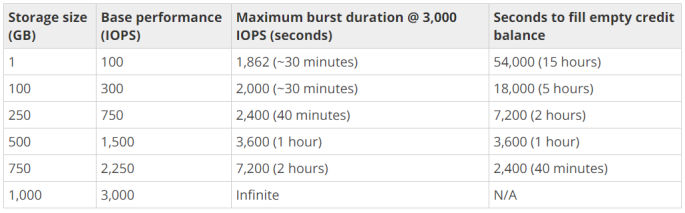
For General Purpose (SSD) storage, the DB instance has an initial I/O Credits balance of 5.4 million. When the storage requires more than the base performance I/O level, it uses I/O credits in the credit balance to burst to the required performance level, up to a maximum of 3,000 IOPS. If the storage uses all of its I/O credit balance, its maximum performance will remain at the base performance level until I/O demand drops below the base level and unused credits are added to the I/O credit balance at the baseline performance rate of 3 IOPS/GB of volume size. Hence, we can use the formula below to calculate the Burst Duration.
Thus, for production application that requires fast and consistent I/O performance, it’s recommended to use Provisioned IOPS (SSD) storage that is optimized for I/O intensive, online transaction processing workloads that have consistent performance requirements. Note that we cannot decrease storage allocated for a DB instance.
For MS SQL Server, Amazon RDS does not currently support increasing storage. Hence, we need to provision storage based on anticipated future storage growth. If we predict it wrongly, then we need to increase the storage of an existing SQL Server DB instance by first exporting the data, creating a new database instance with increased storage, and then importing the data into the new database instance.
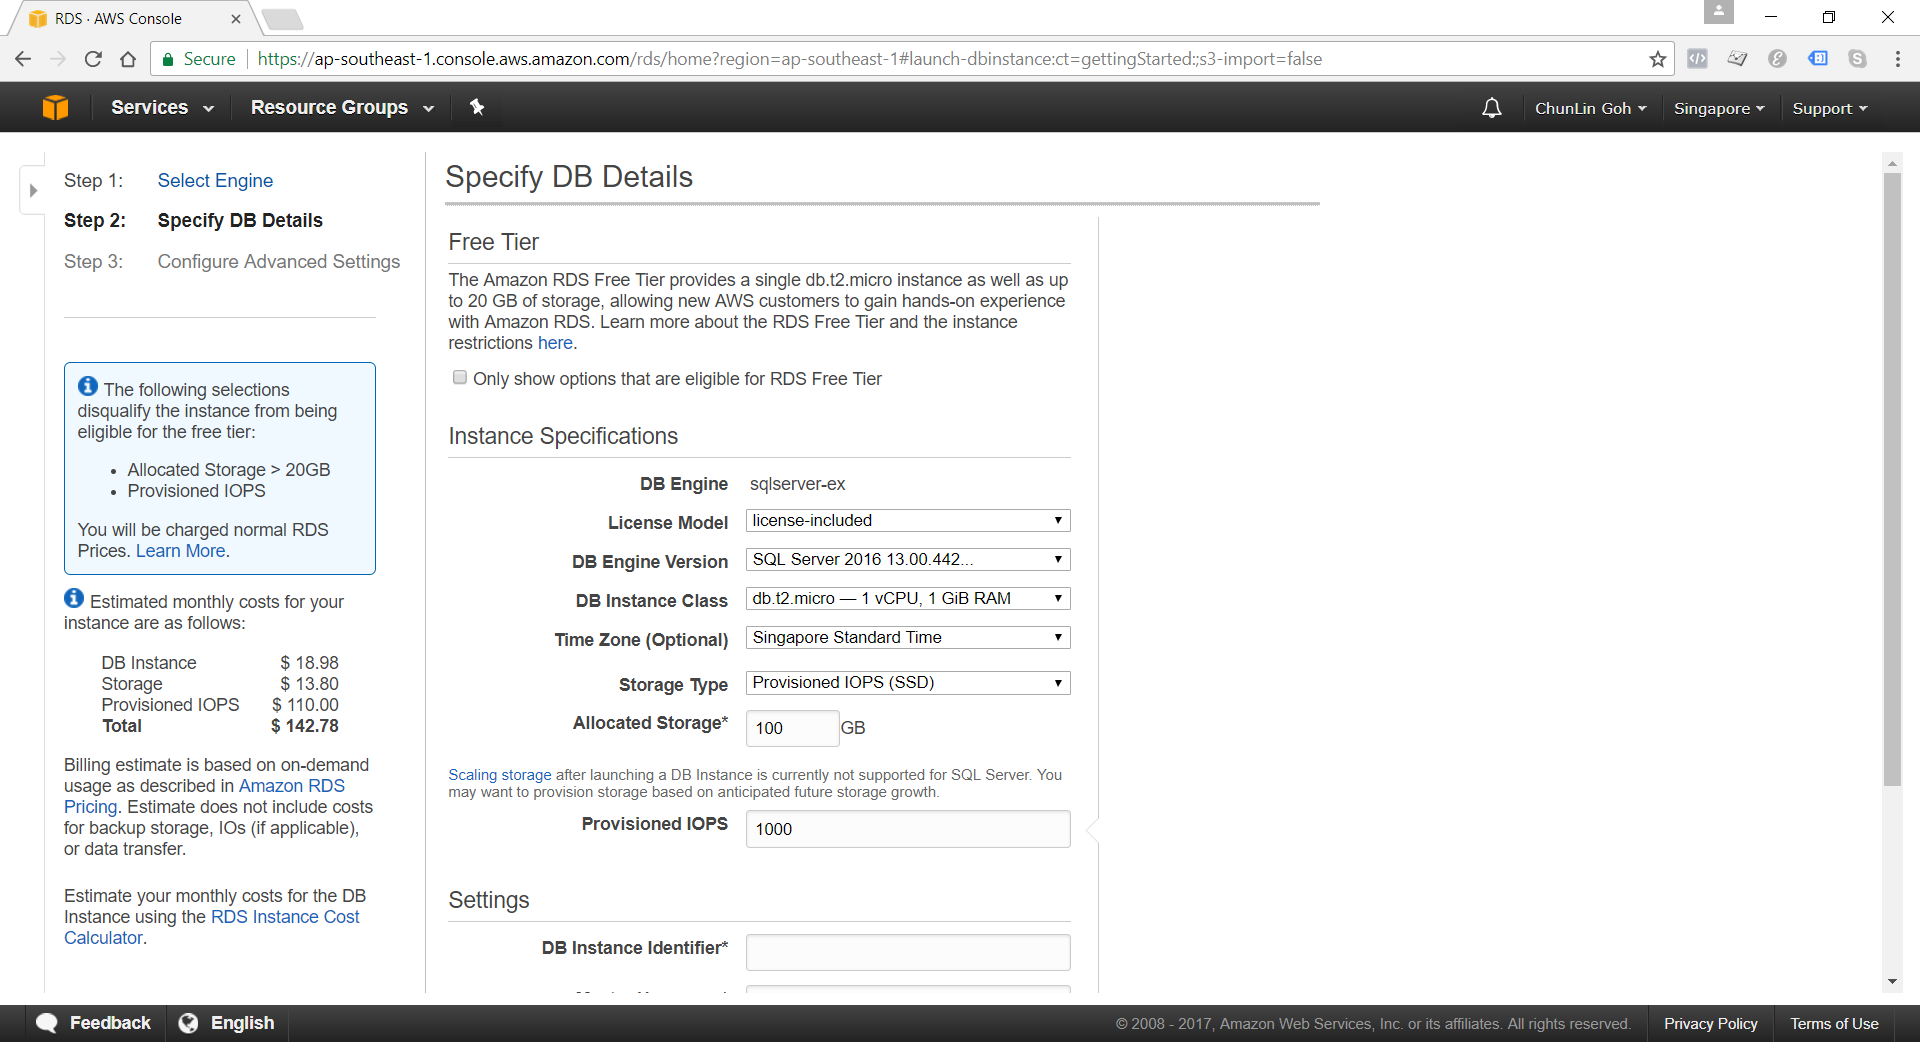
Specifying Database Instance Specification
After understanding key concepts above, we can then proceed to setup our database instance.
Although there is Free Tier available but allocating storage > 20GB or adding provisioned IOPS will disqualify the databse instance from being eligible for the Free Tier.
Nowadays, if we are creating a database instance in a region that we have not used before, we normally are already on the EC2-VPC platform.
We are already on EC2-VPC platform.
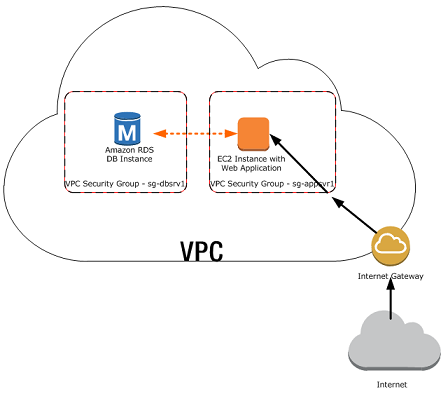
There are many scenarios for accessing a database instance in a VPC. Today, I will only focus on having an EC2 web server to access the database instance in the same VPC.
A database instance in a VPC accessed by an EC2 instance in the same VPC (Source: AWS Documentation)
In such scenario, Amazon RDS database instance normally needs to be available to the web server, and not to the public Internet. Hence, we can create a VPC with both public and private subnets. The web server will be hosted in the public subnet so that it is accessible by the public. The database instance is hosted in the private subnet so that it won’t be available to the public Internet, providing greater security.
The Security Group used to restrict access to the database instances can have a custom rule that allows TCP access using the port 1433 and an IP address we will use to access the database instance for development or other purposes. In addition, we also need to set the Public Accessible option to Yes first (It is recommended to set the option to No for production database instance to limit the potential thread with no public routes).
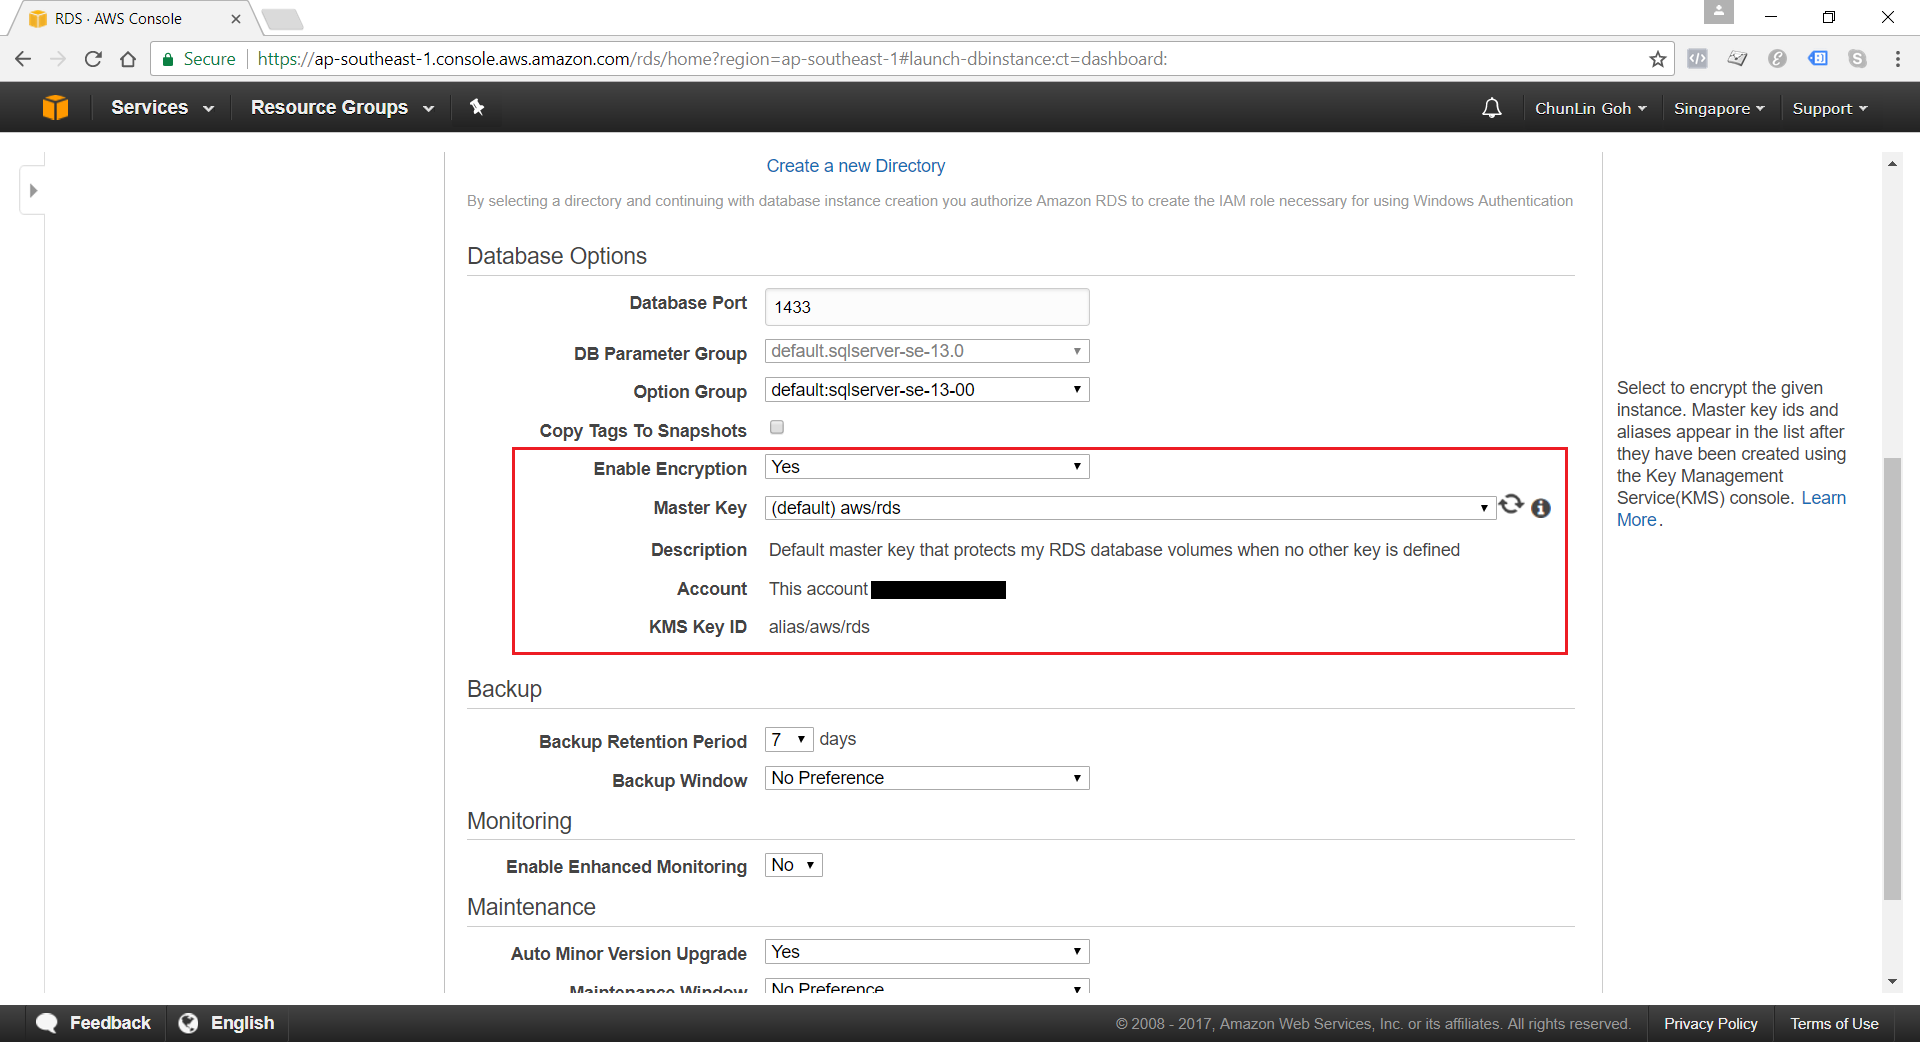
Encryption of Database Instances using Key Management Service (KMS)
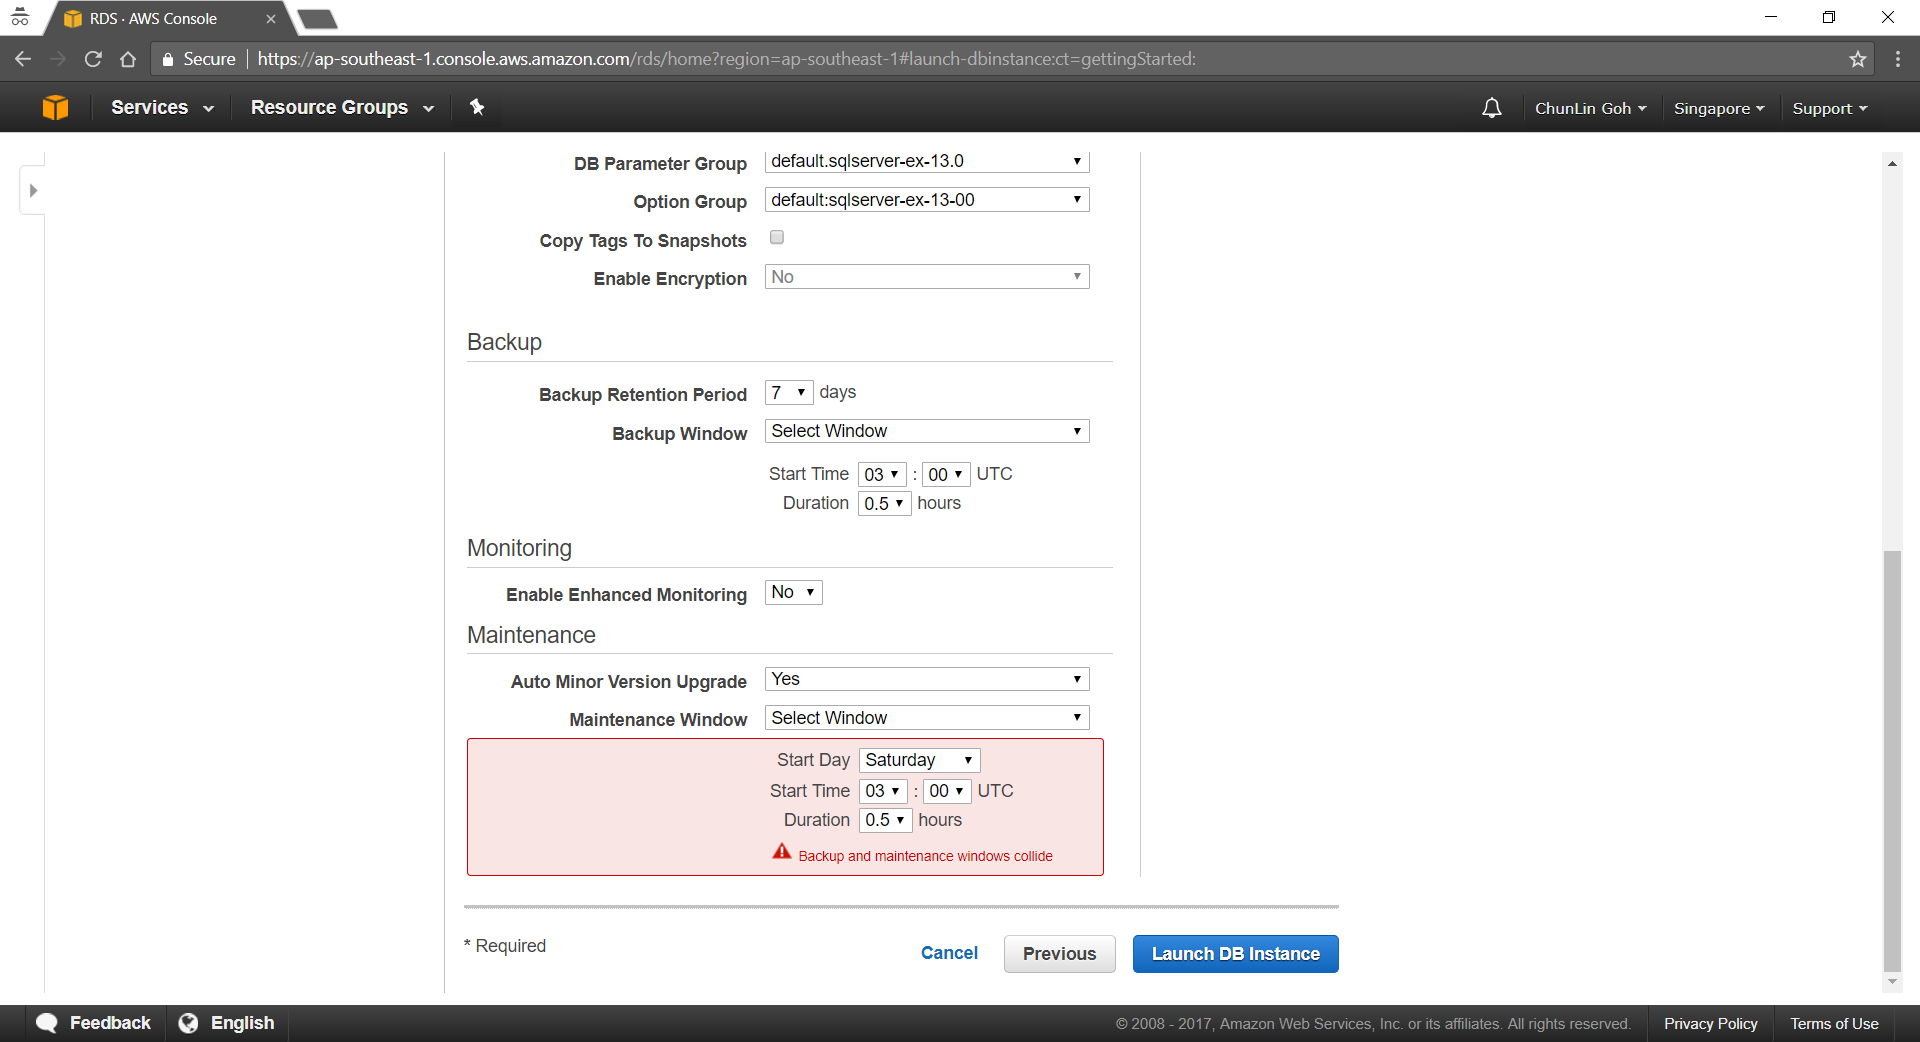
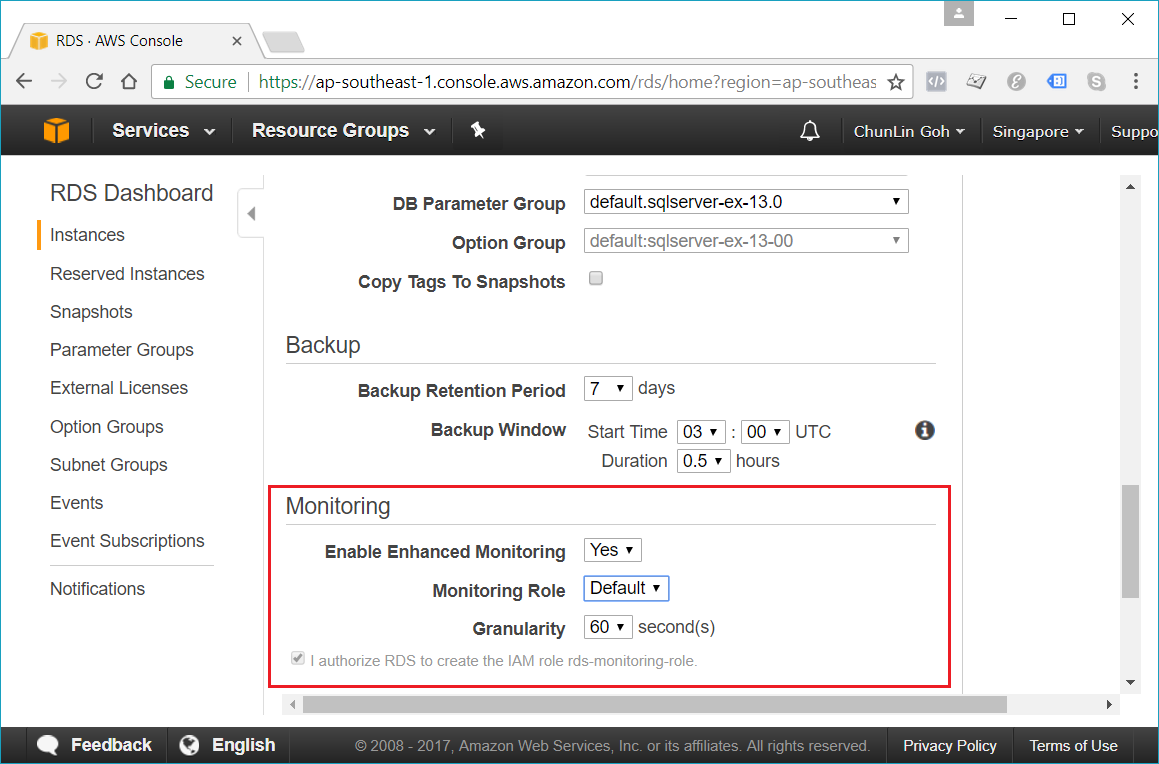
Enhanced monitoring requires permission to act on our behalf to send OS metric information to CloudWatch Logs.
Conclusion
It’s true that AWS allows us to deploy our MS SQL Server database on either Amazon RDS and Amazon EC2. However, it’s very crucial to analyze our needs and our application before deciding which one to use. In general, it is still recommended to consider Amazon RDS first so that developers can focus on high-level tasks and business logic implementation.
That’s all for my first trip to Amazon RDS. As a frequent user of Microsoft Azure, I never host MS SQL Server on AWS platform. So, if there is any mistake made in this article, kindly feedback to me. Thanks in advance!
One month ago on 27th of March, my friend passed me a box of Estimote Proximity Beacons. That day marks the beginning of my journey towards a greater understanding of beacons and IoT.
Since the day I joined travel industry, I have always been thinking of providing a fun travel experience with beacon technology. When I joined Changi Airport team in 2015, I proposed to my manager the possibility of applying beacons in the airport. The idea was rejected. Now, I finally get the chance to build something with the small little Estimote Proximity Beacons.
We forcefully opened up the beacons and replaced the batteries.
The three values are hierarchical. The purpose of UUID is to distinguish our beacons from all other beacons in the network. Major and Minor values allow us to label the beacons with higher accuracy.
An example of how a chain of retail shops will deploy and label their beacons. (Source: Estimote Developer Docs)
The iBeacon ID can be changed. One way is to use the Estimote app to do it. Since I wasn’t the owner of the beacons, my first step is to claim the beacon using the app. After I successfully claim the beacons, I can then proceed to retrieve detailed info of the beacons and modify their info.
Claiming beacon and modifying its info, such as its range (by default it’s ~3.5m).
package gclprojects.icymarshmallow;

...
import com.google.android.gms.common.ConnectionResult;
import com.google.android.gms.common.api.GoogleApiClient;
import com.google.android.gms.Nearby;
import com.google.android.gms.nearby.messages.Message;
import com.google.android.gms.nearby.messages.MessageListener;
import com.google.android.gms.nearby.messages.Strategy;
import com.google.android.gms.nearby.messages.SubscribeOptions;

public class MainActivity extends AppCompatActivity
        implements GoogleApiClient.ConnectionCallbacks,
        GoogleApiClient.OnConnectionFailedListener {

    private GoogleApiClient mGoogleApiClient;
    private MessageListener mMessageListener;
    ...

    @Override
    protected void onCreate(Bundle savedInstanceState) {
        super.onCreate(savedInstanceState);

        ...

        mGoogleApiClient = new GoogleApiClient.Builder(this)
                .addApi(Nearby.MESSAGES_API)
                .addConnectionCallbacks(this)
                .enableAutoManage(this, this)
                .build();

        mMessageListener = new MessageListener() {
            @Override
            public void onFound(final Message message) {
                // Called when a new message is found.
                // Use message.getType().toString() to read the attachment Type
                // Use new String(message.getContent()) to read the attachment Value
            }
        }
    }

    @Override
    protected void onStart() {
        super.onStart();
        mGoogleApiClient.connect();
    }

    @Override
    protected void onStop() {
        super.onStop();
        mGoogleApiClient.disconnect();
    }

    @Override
    public void onConnected(@Nullable Bundle bundle) {
        if (mGoogleApiClient != null && mGoogleApiClient.isConnected()) {
            subscribe();
        }
    }

    ...

    private void subscribe() {
        SubscribeOptions options = new SubscribeOptions.Builder()
                .setStrategy(Strategy.BLE_ONLY)
                .build();

        Nearby.Messages.subscribe(mGoogleApiClient, mMessageListener);
    }
}
With the codes above, when beacon gets detected by the mobile app, the onFound method gets called for each of the attachment associated with the beacons. If we print the variable message into Log, we shall see something as follows.
As shown above, the Value of the attachment is base64 encoded. So to read it, we just need to use new String(message.getContent()).
In the subscribe method, since we are only interested in messages attached to BLE (Bluetooth Low Energy) beacons, we use Strategy.BLE_ONLY.
Problem #1: Unsubscribe Method
When the app is running and another app comes into the foreground, we also need to stop subscribing to messages from the beacons. Otherwise, when we navigate back to the app, the messages can no longer be received even though we re-trigger the subscribe method.
Problem #2: Stop Receiving Messages After Few Minutes
Another problem I notice is that the messages will stop be “found” after one to two minutes. However, if I re-trigger the mobile app, then I can start seeing the messages being detected for another one or two minutes.
To solve this issue, I use a simple timer which helps to check whether it has been quite some time the app doesn’t detect the beacons. If it’s more than 1 minute, then the timer will do a unsubscribe-then-subscribe-again action. This will help the mobile app to keep receiving the messages from the beacons. It also solve the problem of the mobile app re-visiting the beacons.
Problem #3: Geo-Location
This is not a real problem if we don’t need the geo-location information of the beacons. However, if we need to know the geo-location of the beacon, one simple way is to just use the LocationManager which provides periodic updates of the mobile geographical location.
package gclprojects.icymarshmallow;

...
import android.location.Location;
import android.location.LocationListener;
import android.location.LocationManager;

public class MainActivity extends AppCompatActivity
        implements GoogleApiClient.ConnectionCallbacks,
        GoogleApiClient.OnConnectionFailedListener {
    LocationManager locationManager;
    ...

    @Override
    protected void onCreate(Bundle savedInstanceState) {
        super.onCreate(savedInstanceState);

        ...

        LocationListener locationListener = new LocationListener() {
            public void onLocationChanged(Location location) {
                // Record down the latitude and longitude of the mobile
            }

            ...
        }

        locationManager = (LocationManager) this.getSystemService(Context.LOCATION_SERVICE);

        int permissionCheck = ContextCompat.checkSelfPermission(this, Manifest.permission.ACCESS_FINE_LOCATION);
        if (permissionCheck == PackageManager.PERMISSION_GRANTED) {
            locationManager.requestLocationUpdates(LocationManager.NETWORK.PROVIDER, 0, 0, locationListener);

            ...
        }
    }
}
Writing Data to Firebase
This step is optional unless the data collected needs to be stored for future use.
I use the following codes to write the beacon data to Firebase database.
package gclprojects.icymarshmallow;

...
import com.google.firebase.database.DatabaseReference;
import com.google.firebase.database.FirebaseDatabase;

public class MainActivity extends AppCompatActivity
        implements GoogleApiClient.ConnectionCallbacks,
        GoogleApiClient.OnConnectionFailedListener {
    private DatabaseReference mDatabase;
    ...

    @Override
    protected void onCreate(Bundle savedInstanceState) {
        super.onCreate(savedInstanceState);

        ...

        mDatabase = FirebaseDatabase.getInstance().getReference();

        mMessageListener = new MessageListener() {
            @Override
            public void onFound(final Message message) {
                ...

                Beacon beaconInfo = new Beacon(...);

                Format formatter = new SimpleDateFormat("yyyy-MM-dd-HH:mm:ss");
                mDatabase.child("Person A")
                        .child(formatter.format(new Date())
                        .setValue(beaconInfo);
            }
        }
    }
}

...

public class Beacon { ... }
Successfully recorded the data from beacons in my Firebase database!
To integrate our Android app with Firebase, our friendly Android Studio comes with a tool called the Firebase Assistance which will help us connect to the Firebase. The assistance also comes with short getting-started tutorial to show us how to cinfigure and add realtime database to our mobile app.
Spot the beacon. =)
Installing Beacons in Changi Airport
Installing beacons in our Changi Airport is always one of my dreams to enhance the experience of millions of travelers flying in and out of the airport. In fact, currently the Armsterdam city is already making use of beacon technology to build a powerful beacon networks to give the people a better experience when they are walking around in the city. So why can’t we do the same in our friendly Changi Airport? =)
The Internet of Things (IoT) is here today, and it begins with the data, devices, and services already at work in your organization. When your “things” are connected to each other and to the cloud, you create new ways to improve efficiency, enable innovation, and transform your business.
Gerald is sharing Azure IoT Hub during the lunchtime workshop.
IoT hasn’t gone totally mainstream, however, and we have yet to feel its impact. In many ways it is roughly where the big data movement was few years ago — consisting mainly of a buzzword that’s not yet widely understood.
Nevertheless, Gerald’s workshop does give me, a web developer who doesn’t know much about this field, a helpful quick start about IoT. After reading and experimenting, I learn more about the capability of Microsoft Azure in IoT and thus I’d like to share with you about what I’ve learnt so far about Azure IoT Hub.
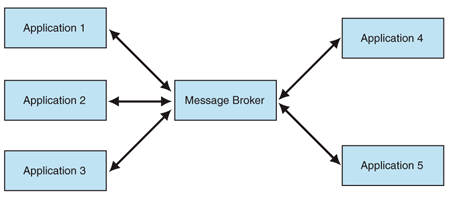
Message Broker
I’m working in Changi Airport. In the airport, we have several shops serving the travelers and visitors. Most of the shops have a back-end system that integrates several systems such as the retail system, e-commerce website, payment system, Changi Rewards system, inventory management system, the finance system.
So there will be cases where, when a customer buys something at the shop, the retail system needs to send as request to the payment system. Then when the purchase is successful, another purchase request will be sent to the inventory management system and the finance system.
I’m not too sure how the shops link different systems, especially this kind of point-to-point integration will cause a large number of connections among the systems. Hence, the developers of their system may find Message Broker useful.
Besides AMQP, MQTT (Message Queue Telemetry Transport) is another open protocol based on TCP/IP for asynchronous message queuing which has been developed and matured over past few years.
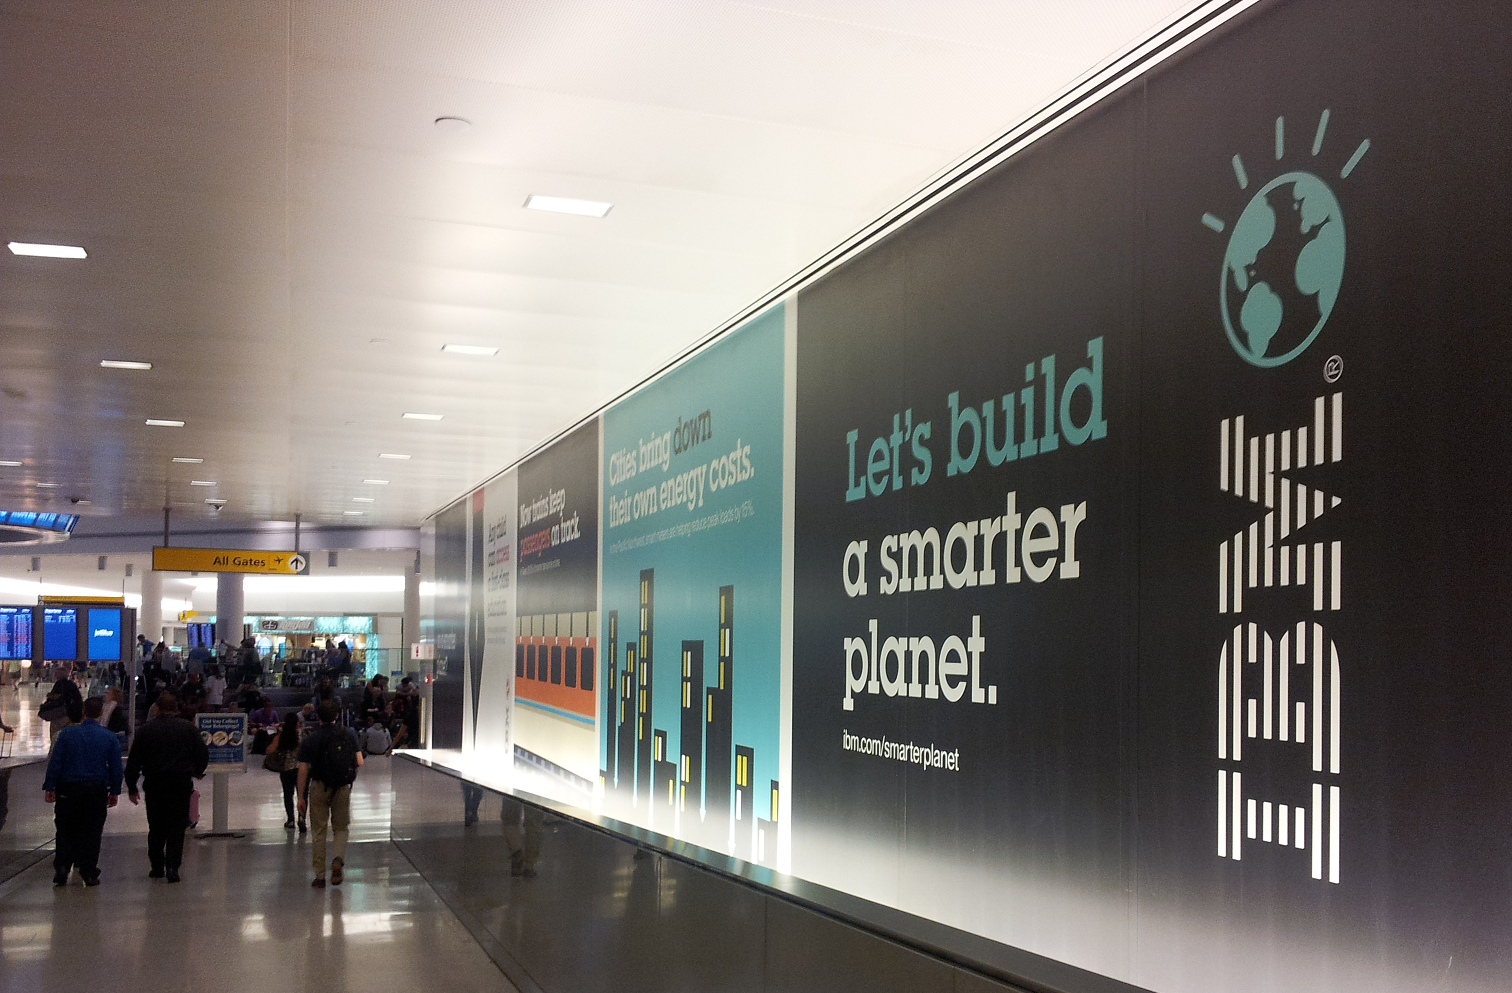
Dr Andy Stanform-Clark from IBM invented the MQTT protocol. (Image Source: IBM – Wikipedia)
While AMQP is designed to provide the full vibrancy of messaging scenarios, MQTT is designed as an extremely lightweight publish/subscribe message transport for small and simple devices sending small messages on low-bandwidth networks. Hence, MQTT is said to be ideal for mobile applications because of its low power usage and minimized data packets.
When two or more systems want to exchange information, they need a communication facilitator. This is where Microsoft Azure Service Bus comes into picture.
One of the messaging patterns offered in Azure Service Bus is called Service Bus Messaging, or Brokered Messaging. By using it, both senders and receivers do not have to be available at the exact same time.
In AMQP transport mode, the client library of sender will serialize the brokered message into an AMQP message so that the message can be received and interpreted by a receiver running on a different platform.
Since Event Hubs only enable event ingress, i.e. C2D, Azure offers another service, IoT Hub, for both C2D and D2C (Device-to-Cloud) communications which are reliable and secure. Not only allowing bi-directional communication, IoT Hub also supports AMQP, HTTP, and MQTT.
In a Hello World tutorial of connecting stimulated device to IoT Hub using C#, there is a way to add device and retrieve device identity programmatically as shown below.
The Registry Manager, which is connecting to the IoT Hub using a Connection String with proper Policy, will add an device identity with the Device ID “gclRasPi2” to the Device Explorer in Azure.
The device “gclRasPi2” is now in the Device Explorer.
After doing so, a message then can be sent from (stimulated) device to the IoT Hub. For example, the device wants to send data about the temperature and humidity at that moment using MQTT, we can use the following code.
var deviceClient = DeviceClient.Create(
    iotHubUri,
    new DeviceAuthenticationWithRegistrySymmetricKey("gclRasPi2", deviceKey),
    TransportType.Mqtt);

var telemetryDataPoint = new
{
    deviceId = "gclRasPi2",
    temperature = currentTemperature,
    humidity = currentHumidity
};

var messageString = JsonConvert.SerializeObject(telemetryDataPoint);

var message = new Message(Encoding.ASCII.GetBytes(messageString));
message.Properties.Add("temperatureAlert", (currentTemperature > 30) ? "true" : "false");

await deviceClient.SendEventAsync(message);
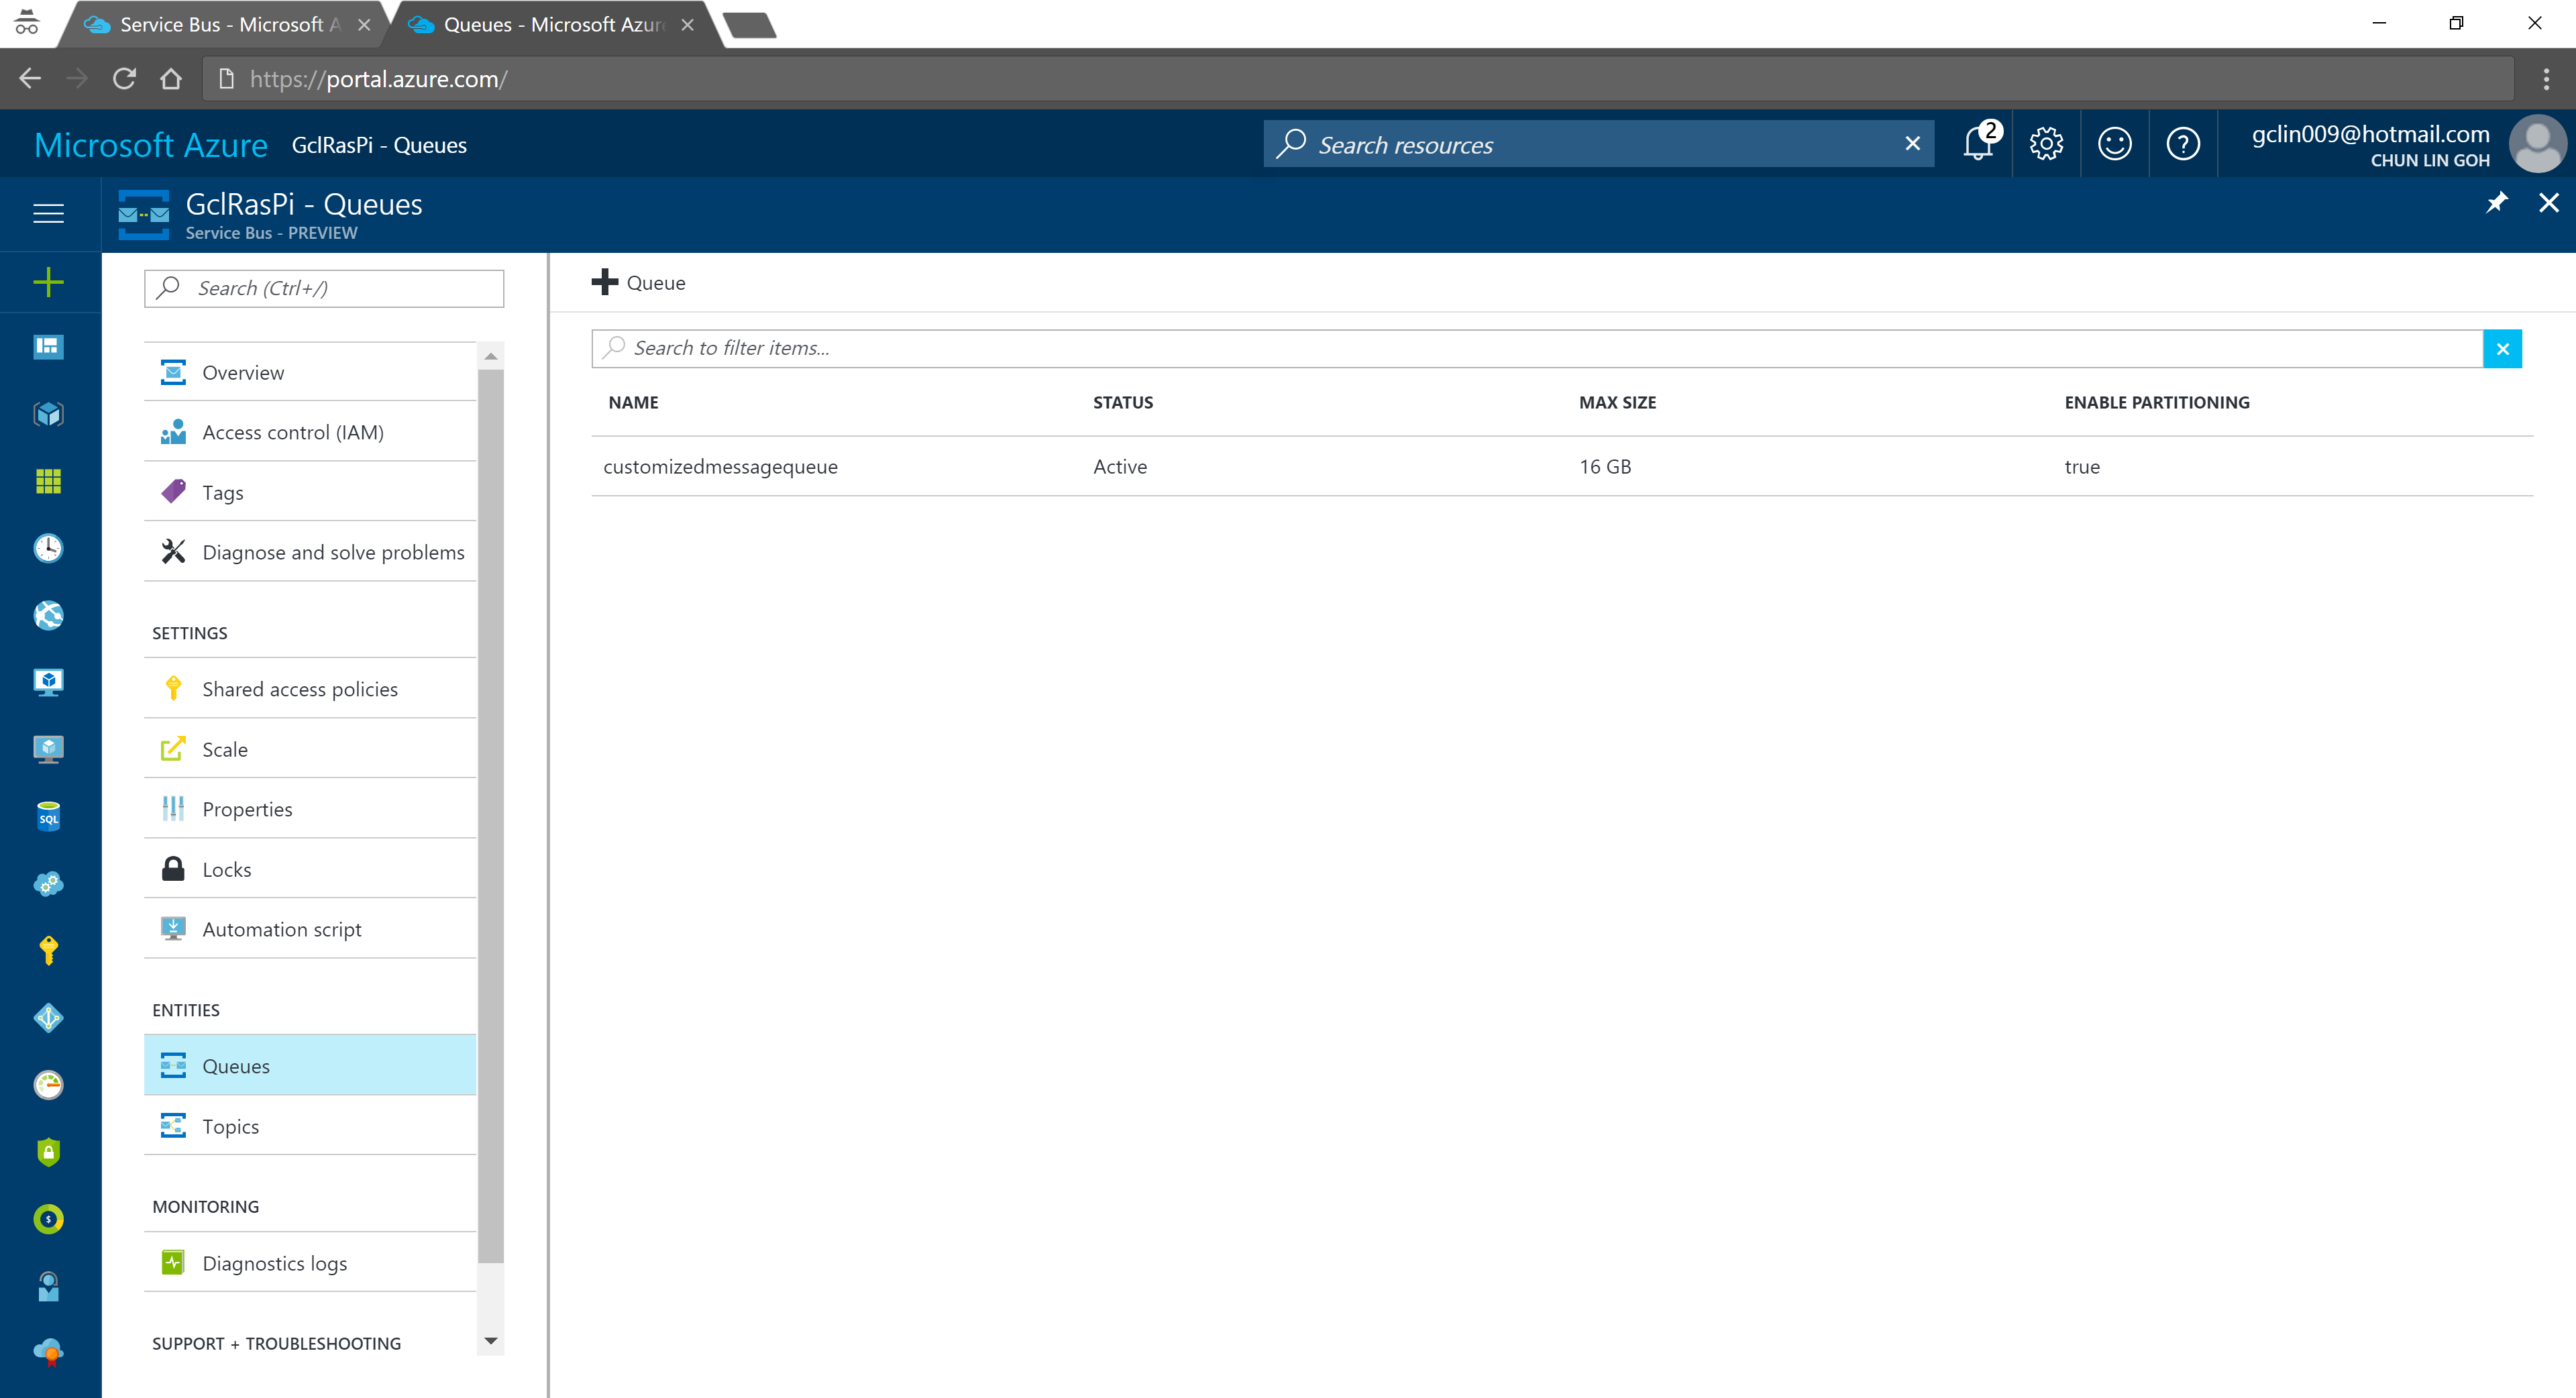
According to the tutorial, we first need to setup a Service Bus queue in the same Azure subscription and region as our IoT Hub.
Created a Queue in the Service Bus.
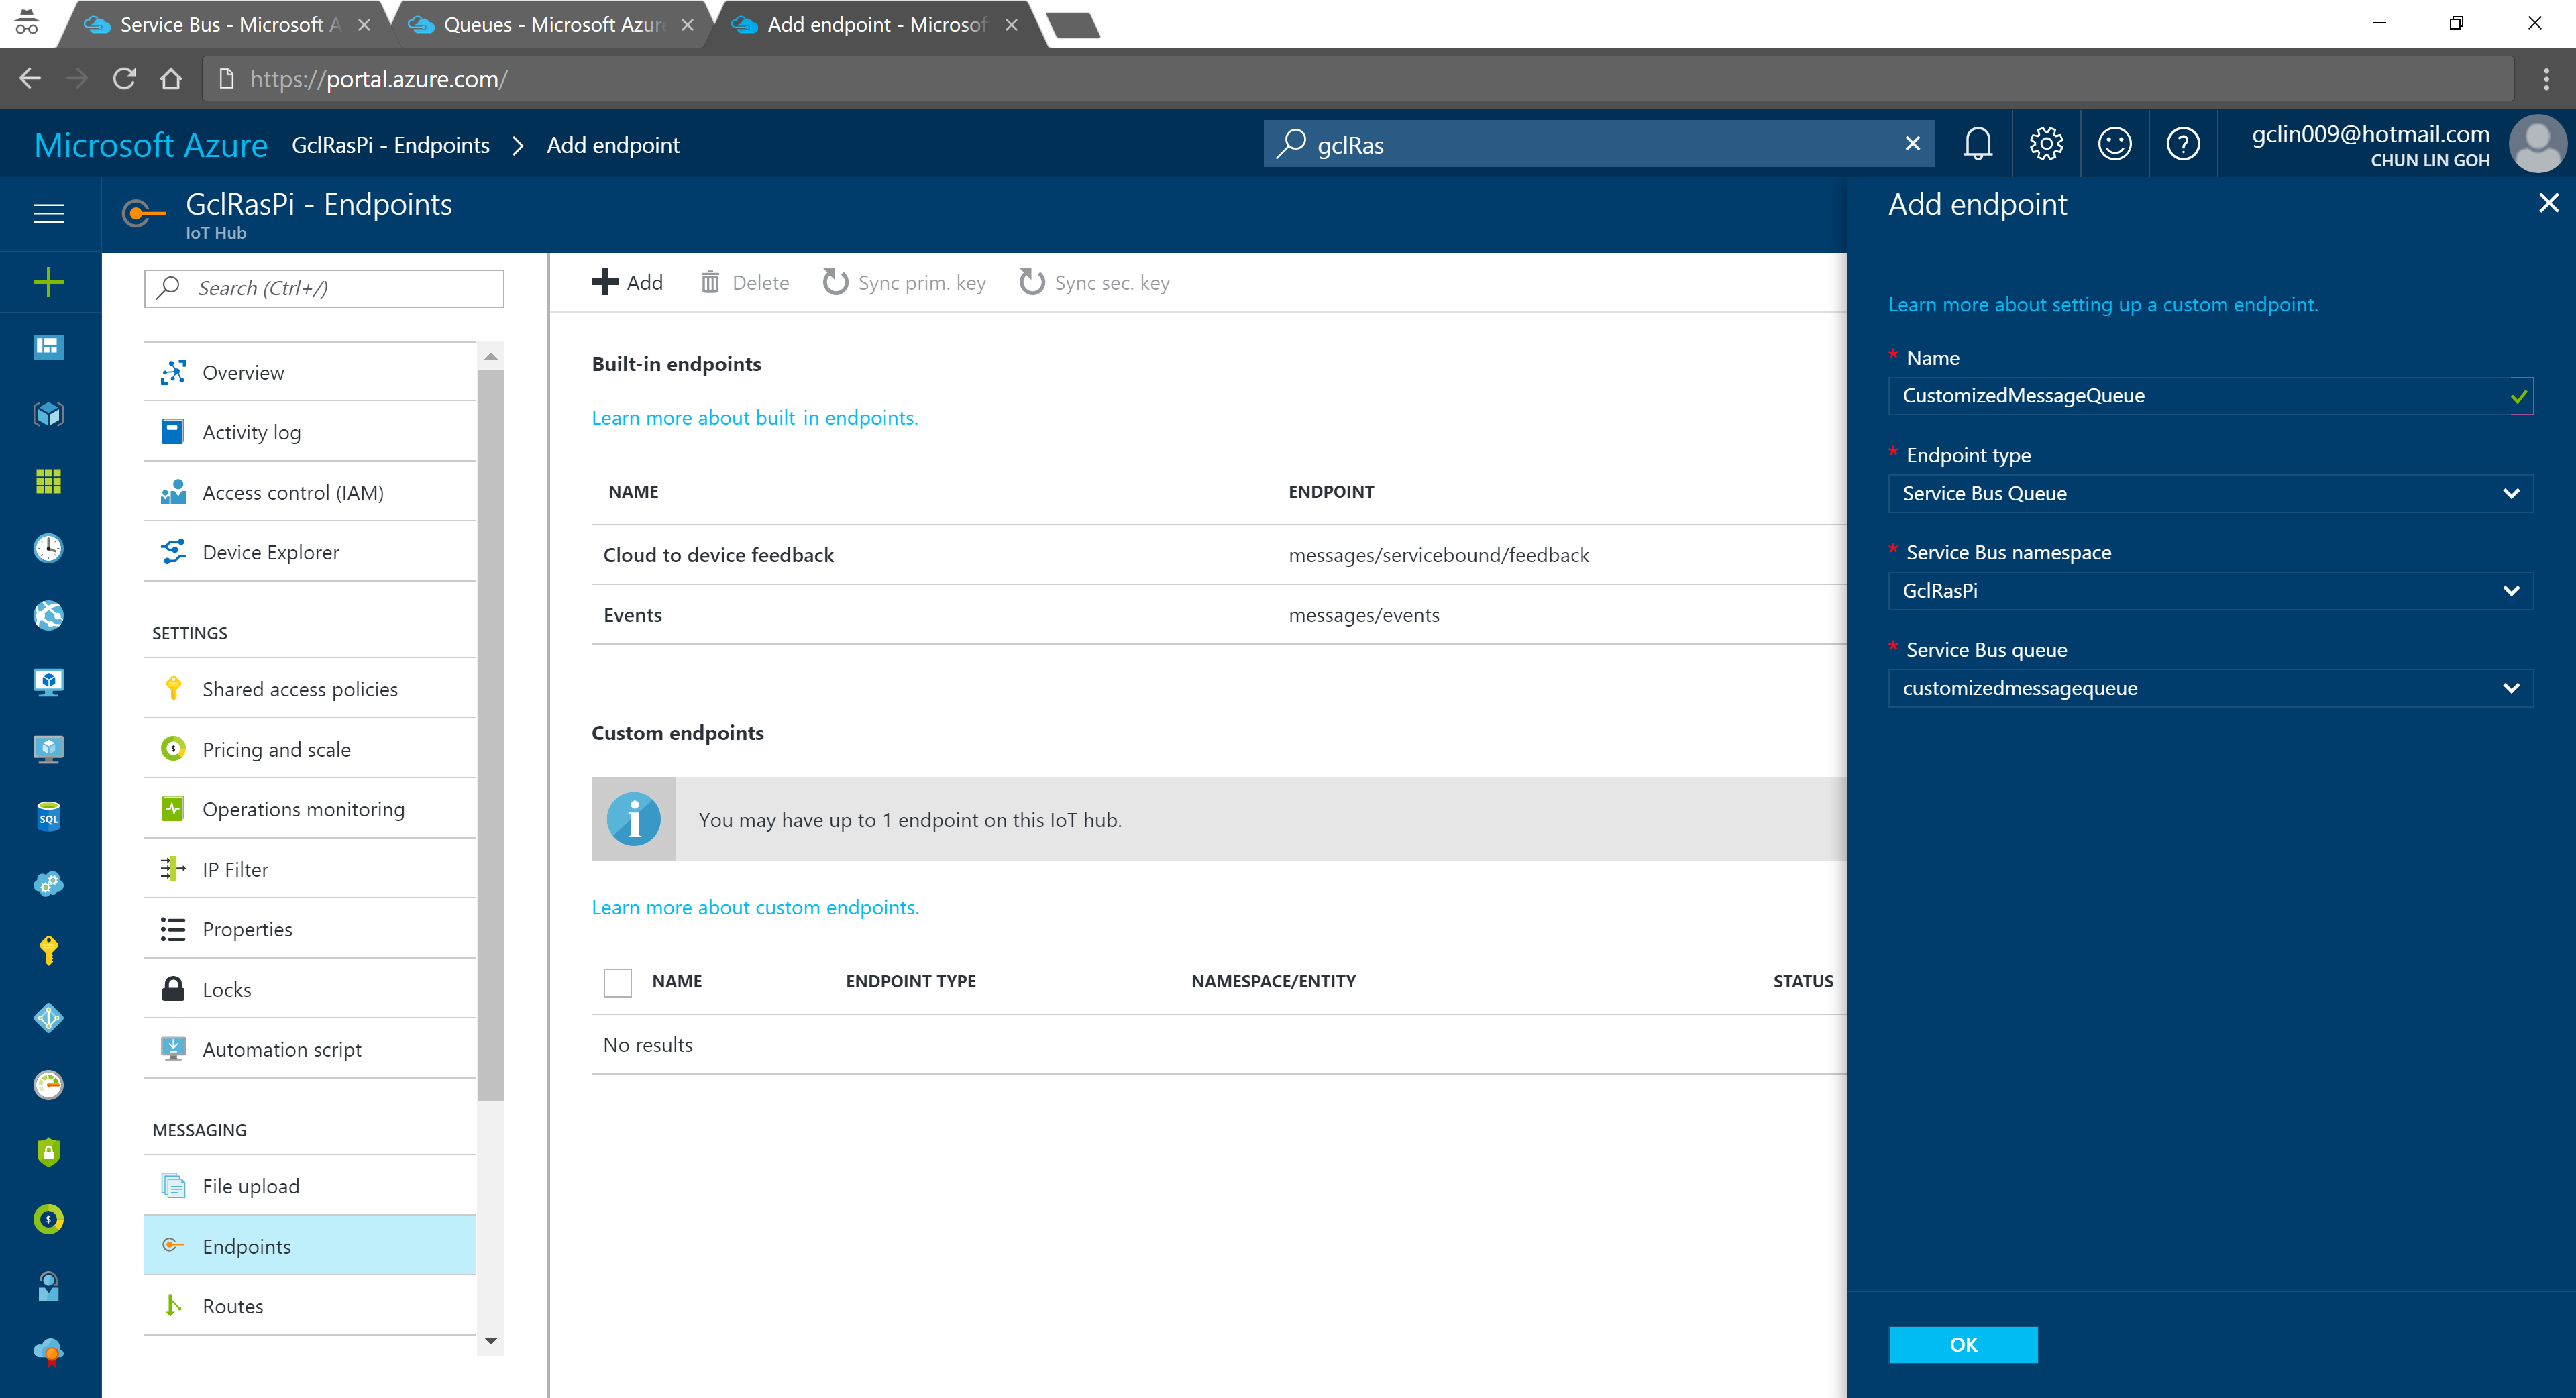
We can then add an Endpoint in the IoT Hub for the queue we just created. As shown in the following screenshot, there is a message saying that “You may have up to 1 endpoint on the IoT hub.” This is because I am using the free IoT Hub. For its paid versions, only at most 10 custom endpoints are allowed.
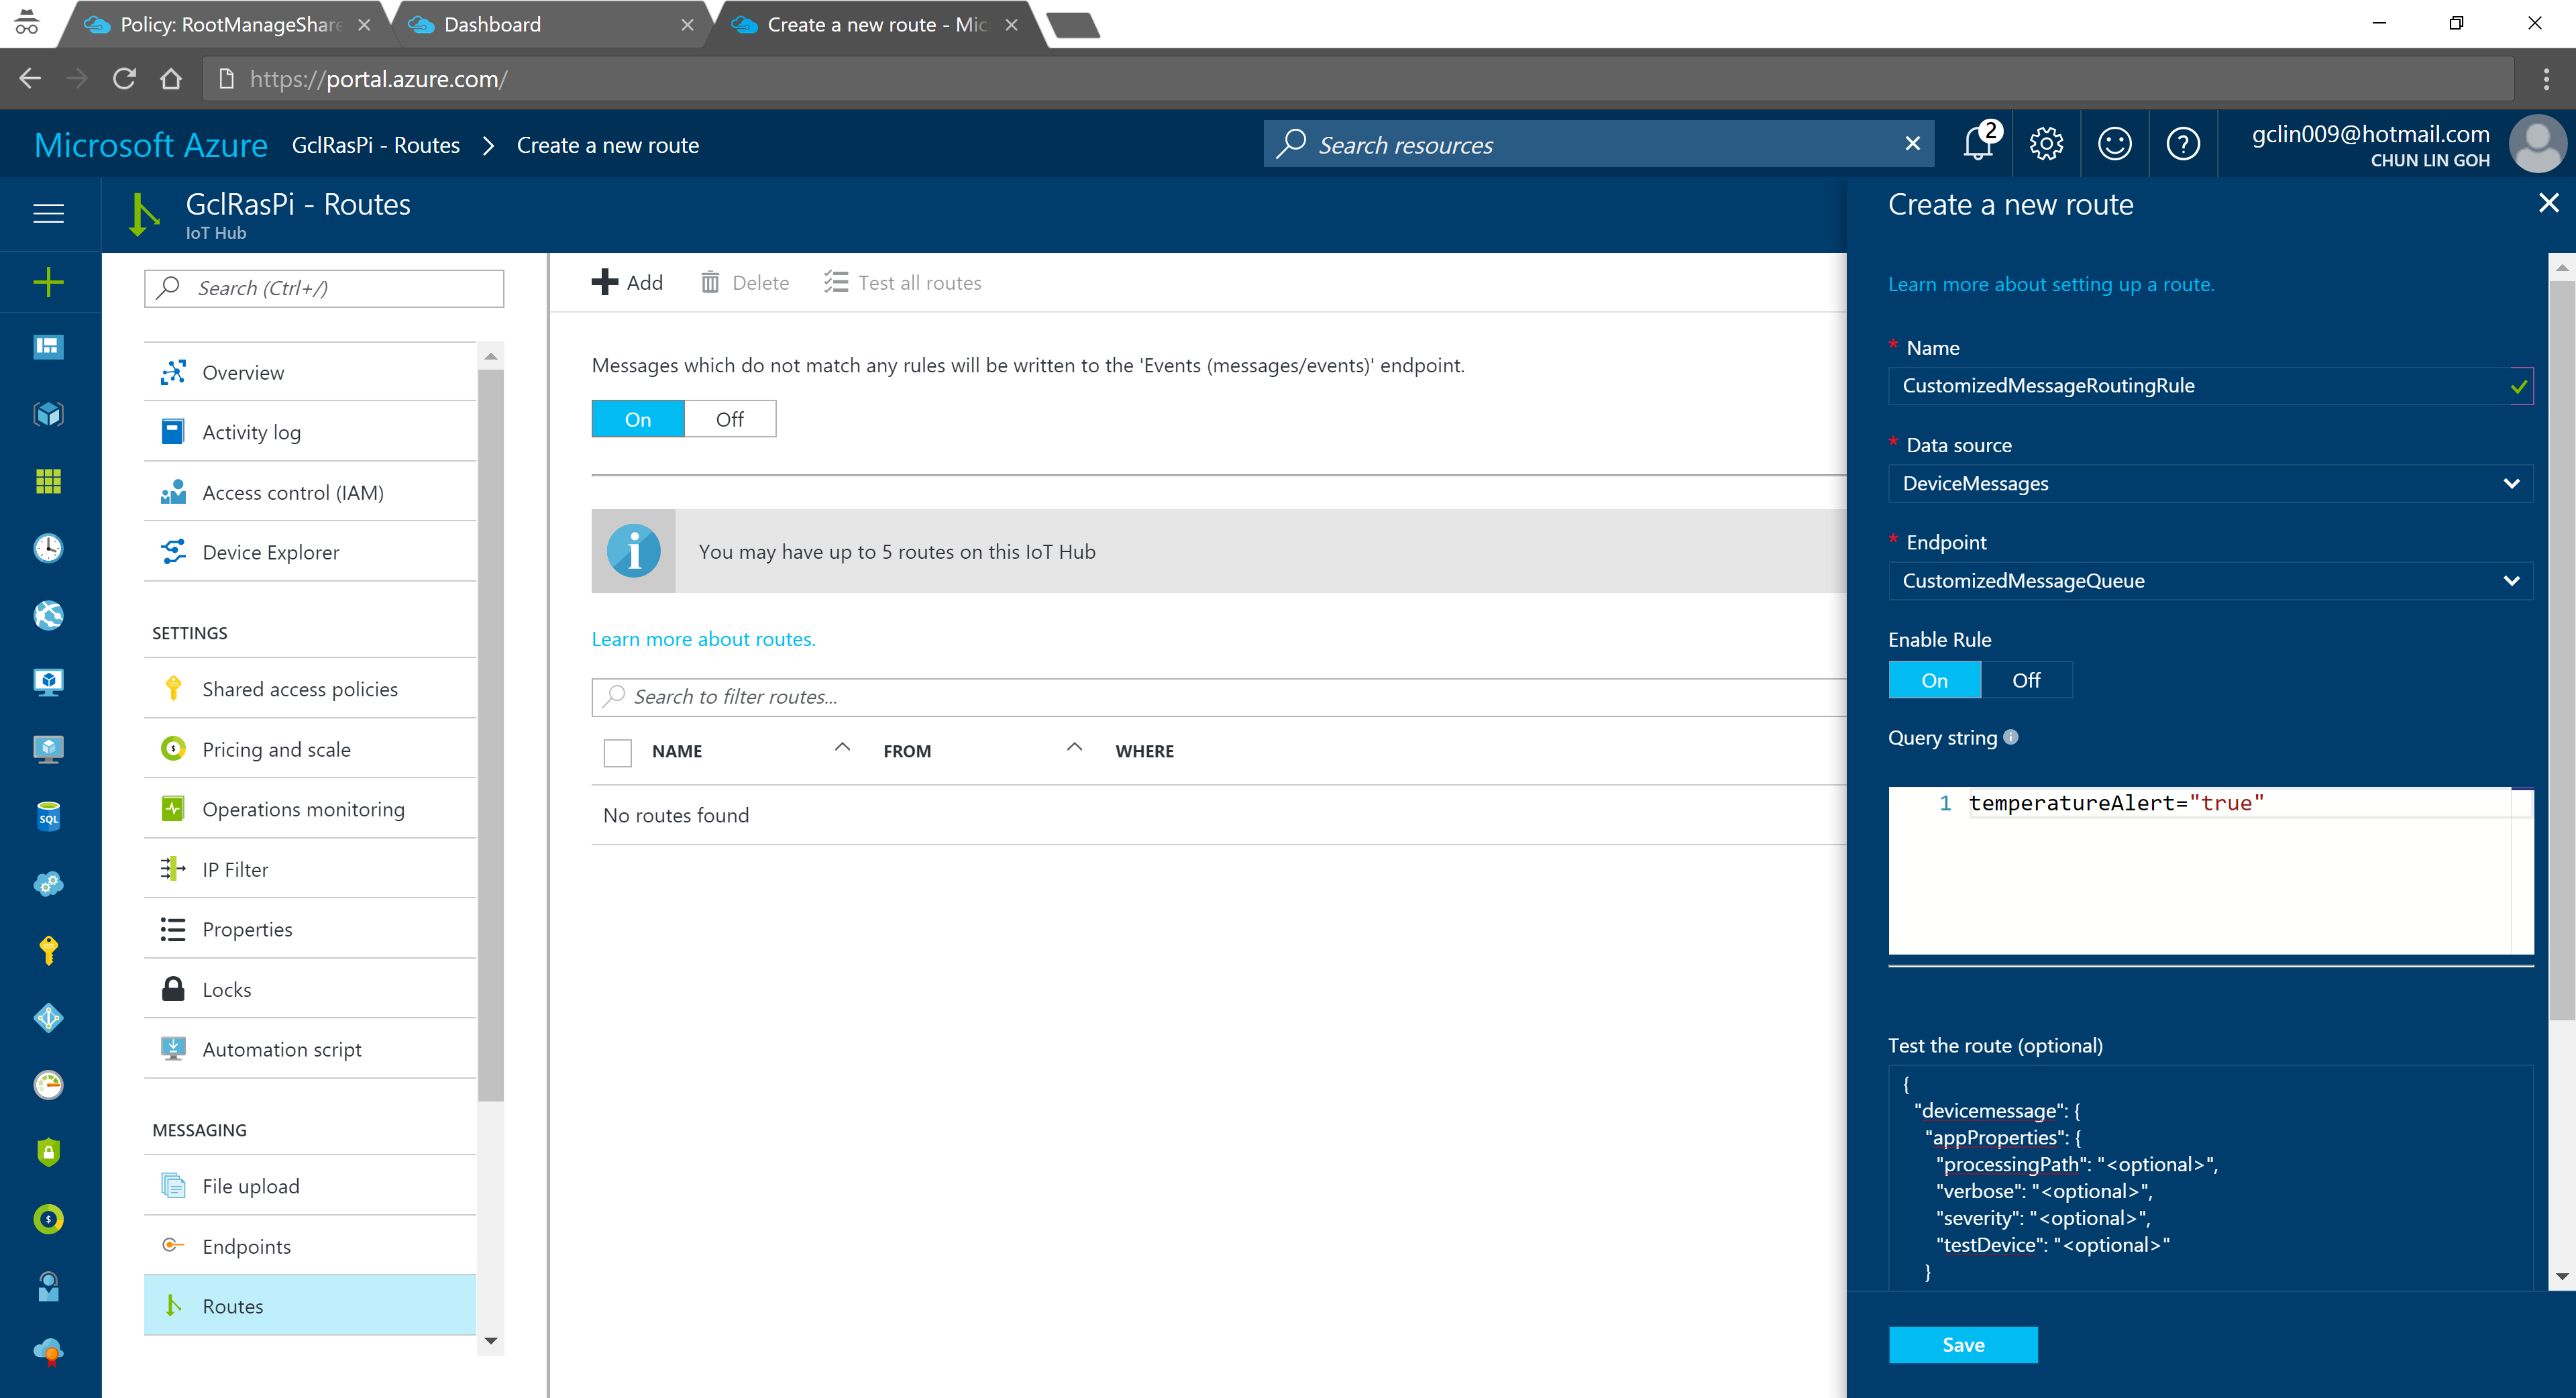
In the query string, I used temperatureAlert = “true” as the condition. Also, as shown on the screenshot above, there is a line saying “Messages which do not match any rules will be written to the ‘Events (messages/events)’ endpoint.” Hence, the following two console applications will show different results: The left one is connecting to the messages/events endpoint while the right one is showing messages that match the CustomizedMessageRoutingRule created above.
Only data with temperatureAlert = “true” will be sent to the “CustomizedMessageRoute”.
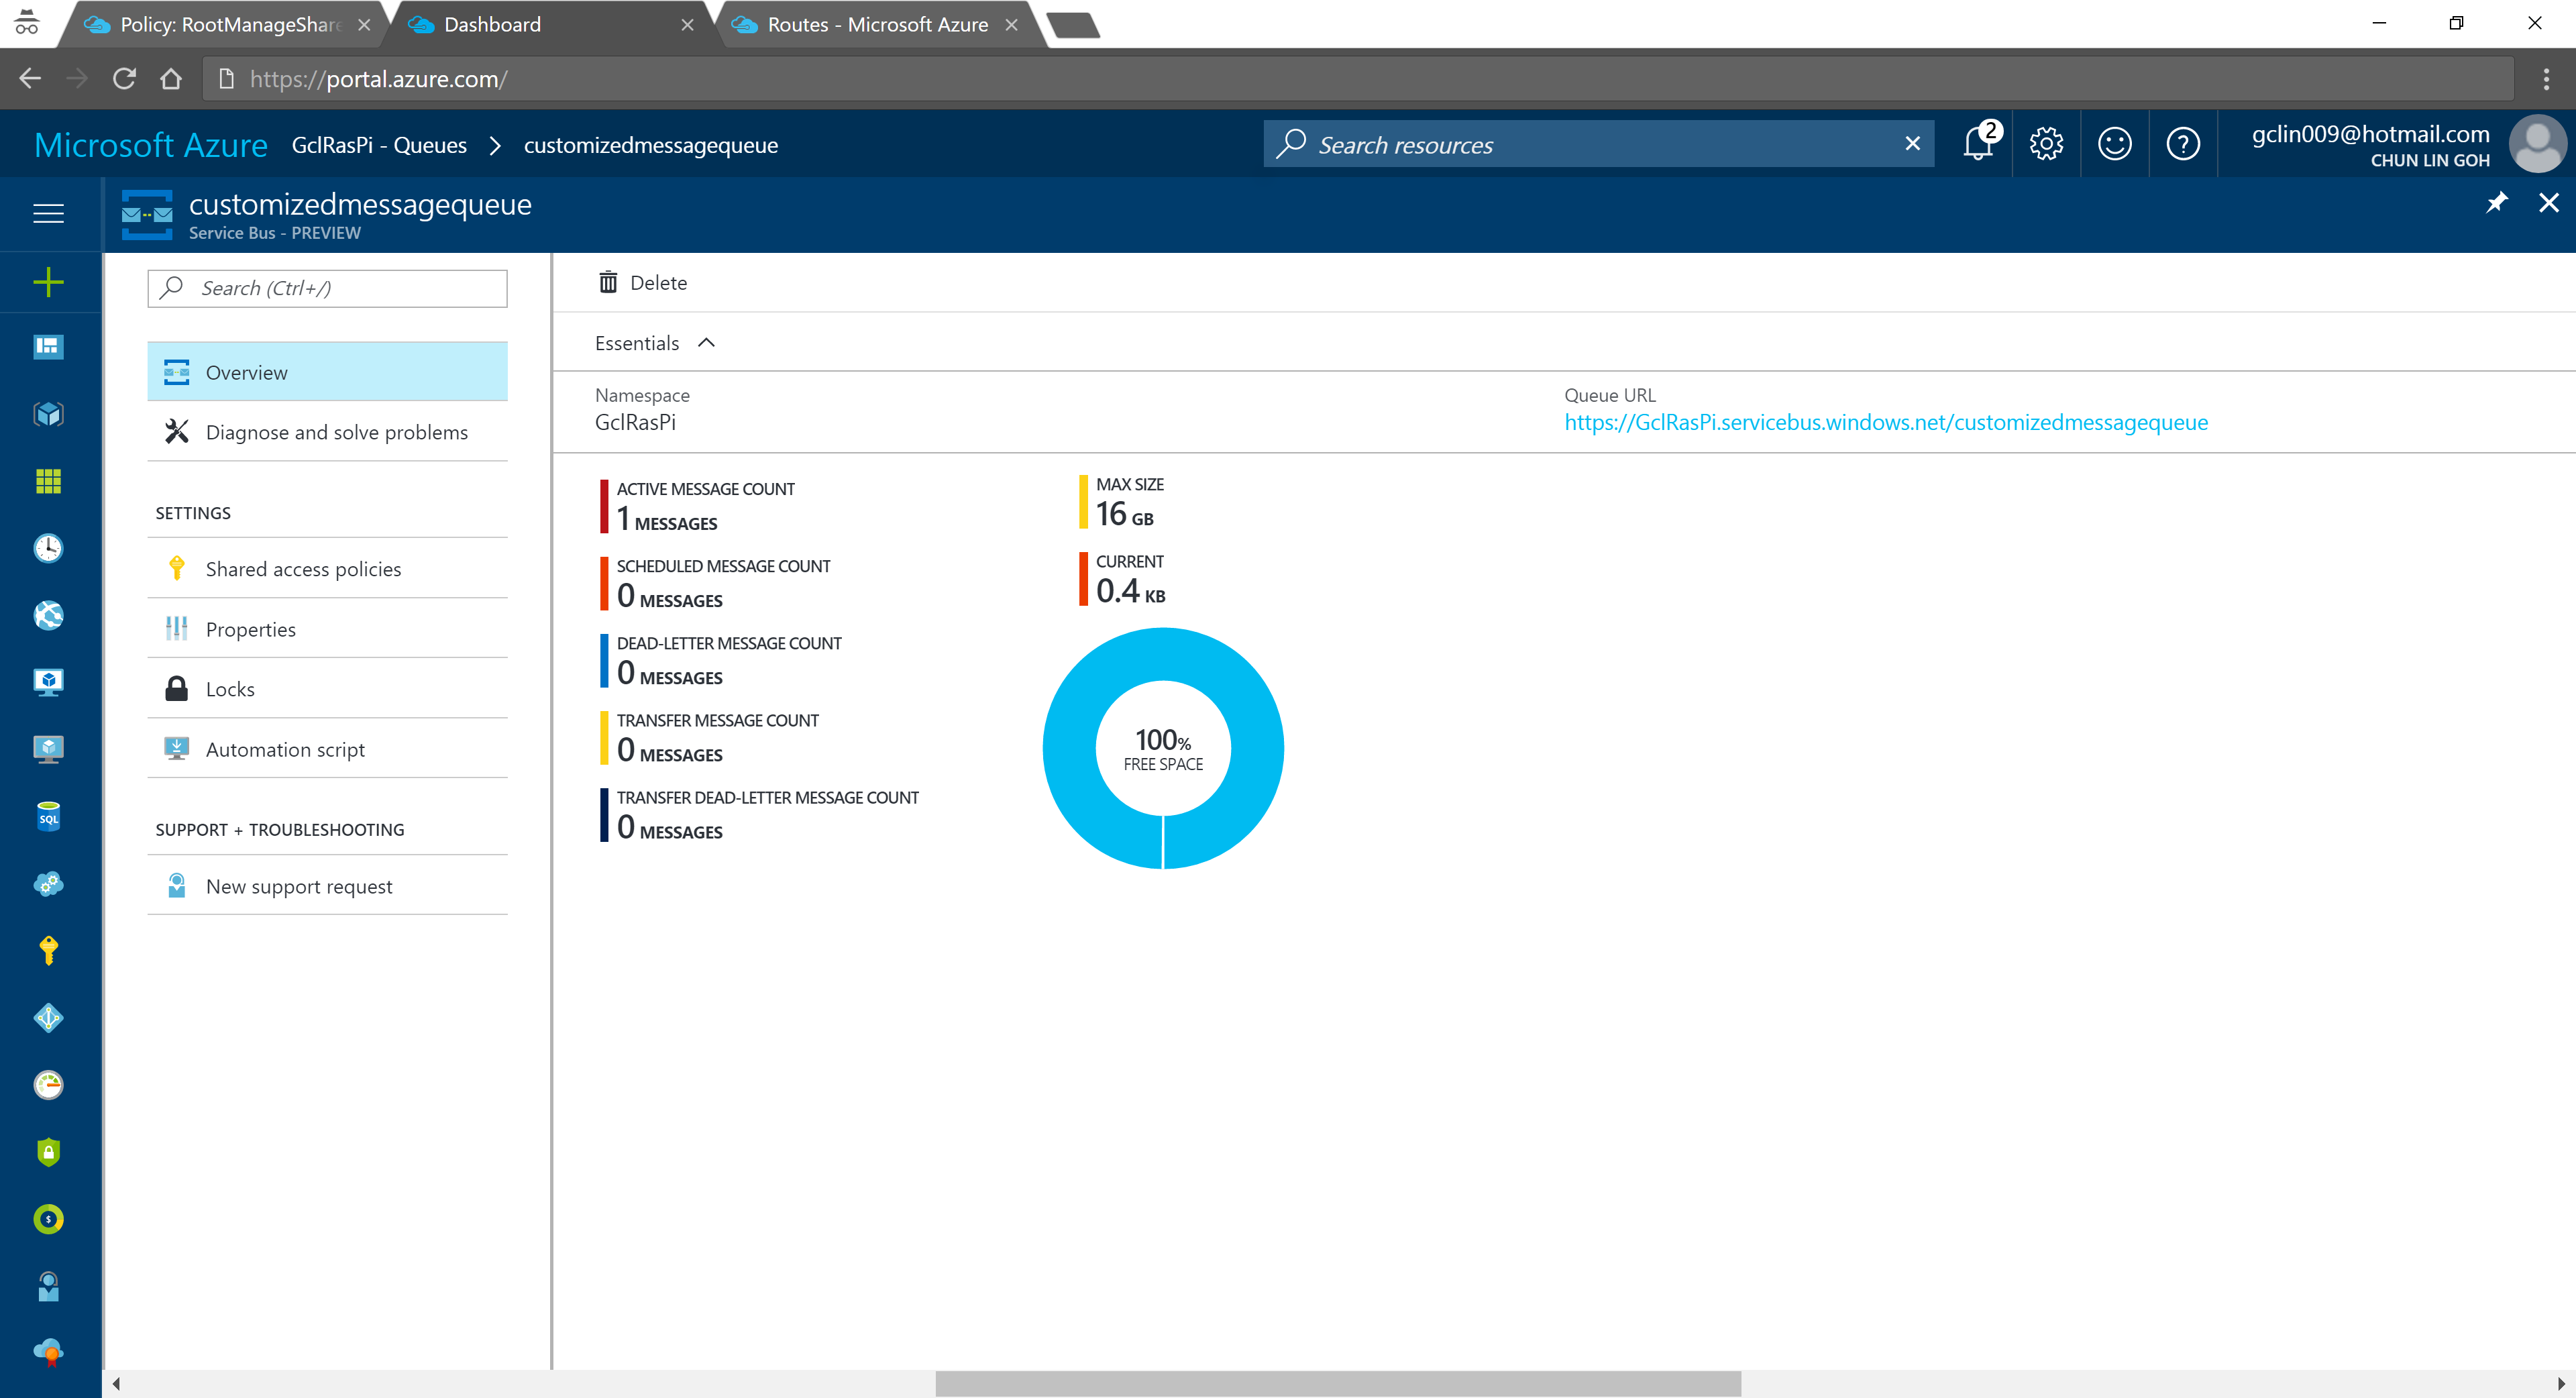
Now if we visit the Service Bus Queue page and IoT Hub page again, we will see some updates on the numbers.
Usage statistics in Service Bus Queue.2% of 8k messages sent from the stimulated device console application.
Conclusion
That’s all about my first try of Azure IoT Hub after attending the workshop delivered by Gerald. It’s a great lunchtime workshop.
This is just the beginning of my IoT learning journey. There are still more things for me to learn, such as Azure Stream Analysis and Microsoft Azure IoT Suite which is briefly brought up in the booklet mentioned above.
If you spot any mistake in this article or you have more to talk about IoT and in particular IoT in Azure ecosystem, please share with me. =)