Edge Detection with Sobel-Feldman Operator in C#

One of the main reasons why we can easily identify objects in our daily life is because we can tell the boundary of objects easily with our eyes. For example, whenever we see objects, we can tell the edge between the boundary of the object and the background behind it. Hence, there are some images can play tricks on our eyes and confuse our brain with edge optical illusion.

Sobel-Felman Operator in Computer Vision

Similarly, if a machine would like to understand what it sees, edge detection needs to be implemented in its computer vision. Edge detection, one of the image processing techniques, refers to an algorithm for detecting edges in an image when the image has sharp changes.

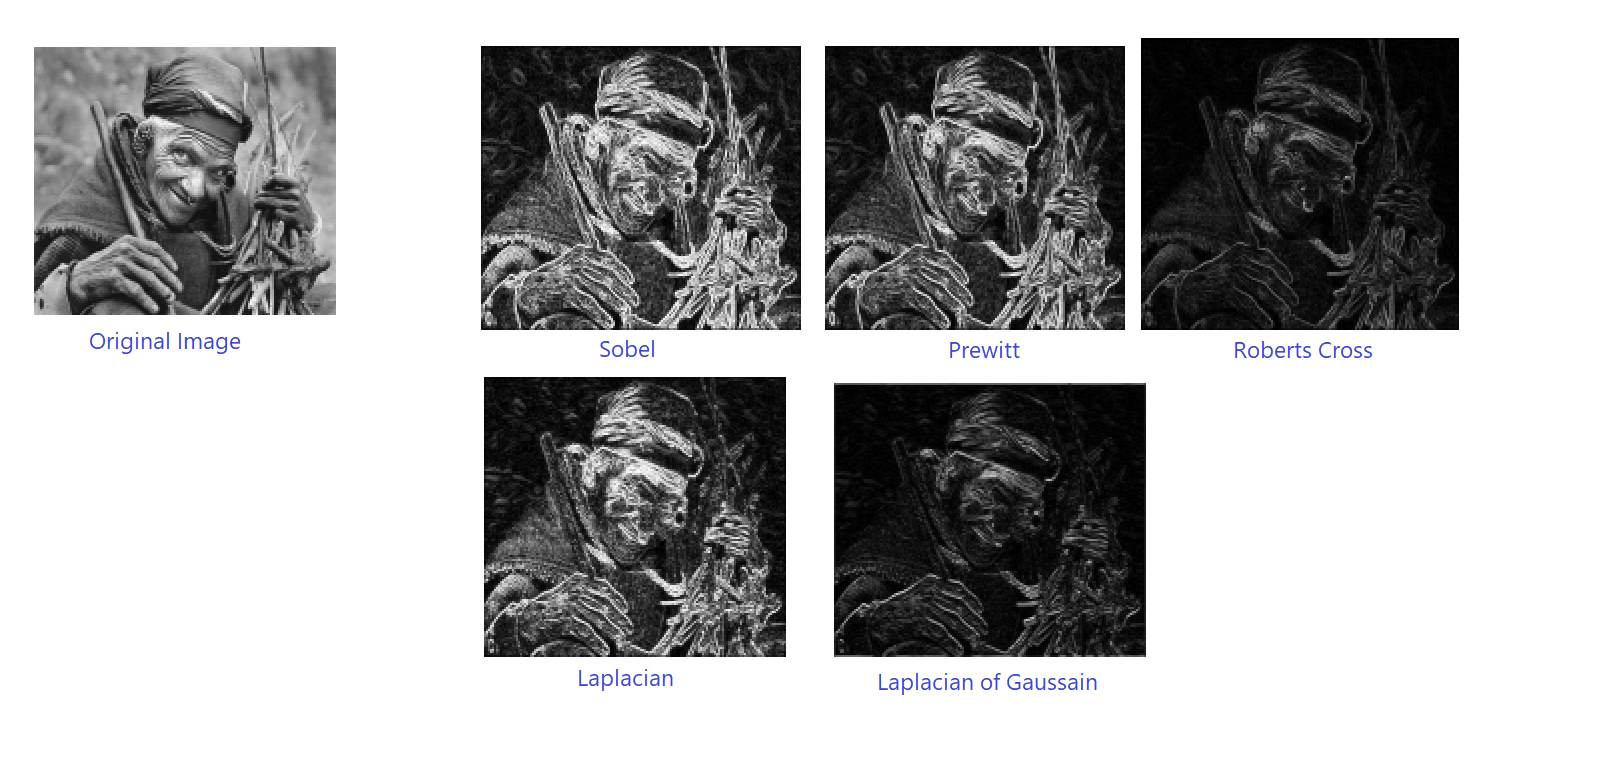
There are many methods for edge detection. One of the methods is using a derivative kernel known as the Sobel-Feldman Operator which can emphasise edges in a given digital image. The operator is based on convolving the image with filters in both horizontal and vertical directions to calculate approximations of the Image Derivatives which will tell us the strength of edges.

An example of how edge strength can be computed with Image Derivative with respect to x and y. (Image Credit: Chris McCormick)

The Kernels

The operator uses two 3×3 kernels which are convolved with the original image to calculate approximations of the derivatives for both horizontal and vertical changes.

We define the two 3×3 kernels as follows. Firstly, the one for calculating the horizontal changes.

double[,] xSobel = new double[,]
{
    { -1, 0, 1 },
    { -2, 0, 2 },
    { -1, 0, 1 }
};

Secondly, we have another 3×3 kernel for the vertical changes.

double[,] ySobel = new double[,]
{
    { 1, 2, 1 },
    { 0, 0, 0 },
    { -1, -2, -1 }
};

Loading the Image

Before we continue, we also need to read the image bits into system memory. Here, we will use the LockBits method to lock an existing bitmap in system memory so that it can be changed programmatically. Unlike SetPixel method that we used in our another image processing project, the Image Based CAPTCHA using Jigsaw Puzzle on Blazor, the LockBits method offers better performance for large-scale changes.

Let’s say we have our image in a Bitmap variable sourceImage, then we can perform the following.

int width = sourceImage.Width;
int height = sourceImage.Height;
int bytes = srcData.Stride * srcData.Height;

//Lock source image bits into system memory
BitmapData srcData = sourceImage.LockBits(new Rectangle(0, 0, width, height), ImageLockMode.ReadOnly, PixelFormat.Format32bppArgb);

byte[] pixelBuffer = new byte[bytes];

//Get the address of the first pixel data
IntPtr srcScan0 = srcData.Scan0;

//Copy image data to one of the byte arrays
Marshal.Copy(srcScan0, pixelBuffer, 0, bytes);

//Unlock bits from system memory
sourceImage.UnlockBits(srcData);

Converting to Grayscale Image

Since our purpose is to identify edges found on objects within the image, it is standard practice to take the original image and convert it to grayscale first so that we can simplifying our problem by ignoring the colours and other noise. Only then we perform the edge detection on this grayscale image.

However, how do we convert colour to grayscale?

GIMP is a cross-platform image editor available for GNU/Linux, macOS, Windows and more operating systems. (Credit: GIMP)

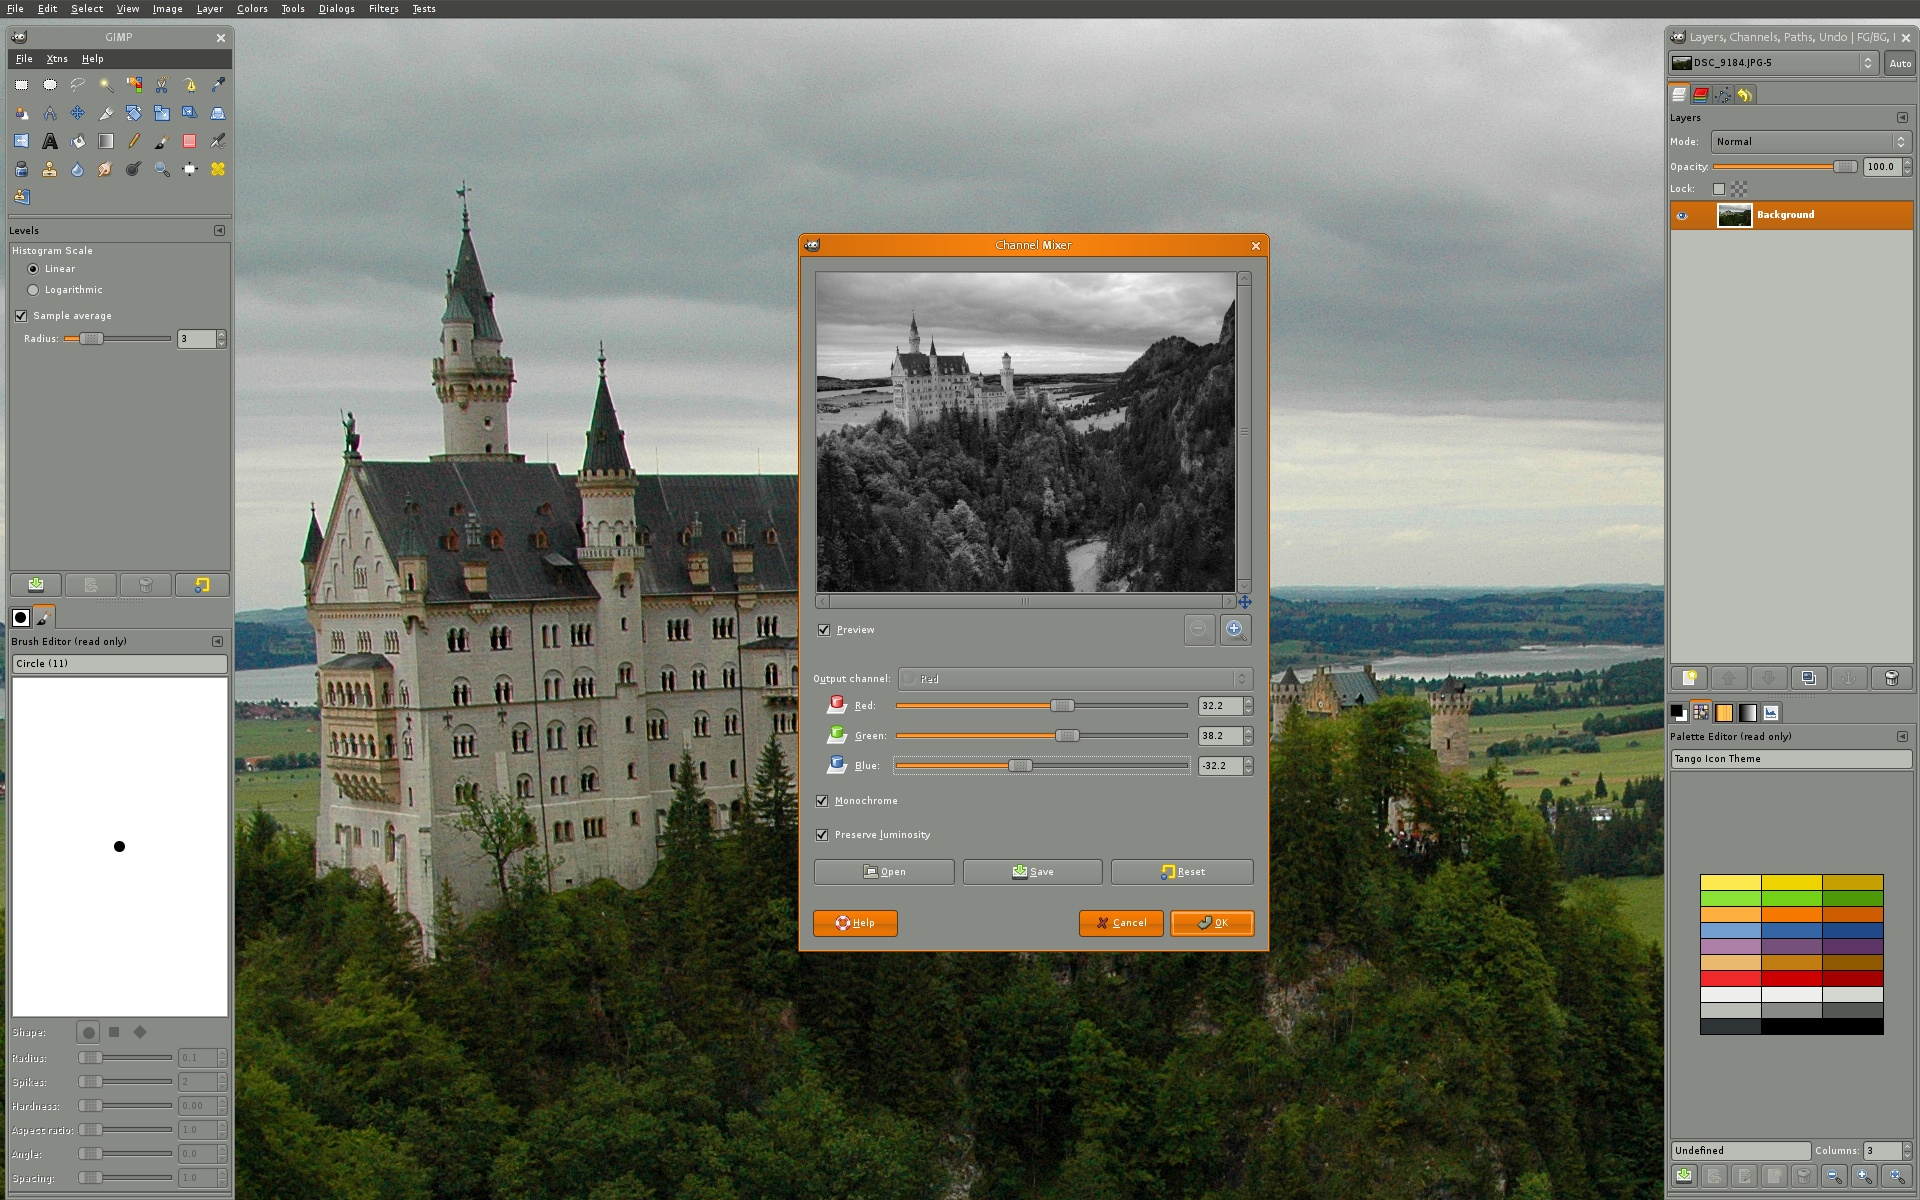
According to GIMP, or GNU Image Manipulation Program, the grayscale can be calculated based on luminosity which is a weighted average to account for human perception, as shown below.

We thus will use the following code to generate a grayscale image from the sourceImage.

float rgb = 0;
for (int i = 0; i < pixelBuffer.Length; i += 4)
{
    rgb = pixelBuffer[i] * .21f;
    rgb += pixelBuffer[i + 1] * .72f;
    rgb += pixelBuffer[i + 2] * .071f;

    pixelBuffer[i] = (byte)rgb;
    pixelBuffer[i + 1] = pixelBuffer[i];
    pixelBuffer[i + 2] = pixelBuffer[i];
    pixelBuffer[i + 3] = 255;
}

Image Derivatives and Gradient Magnitude

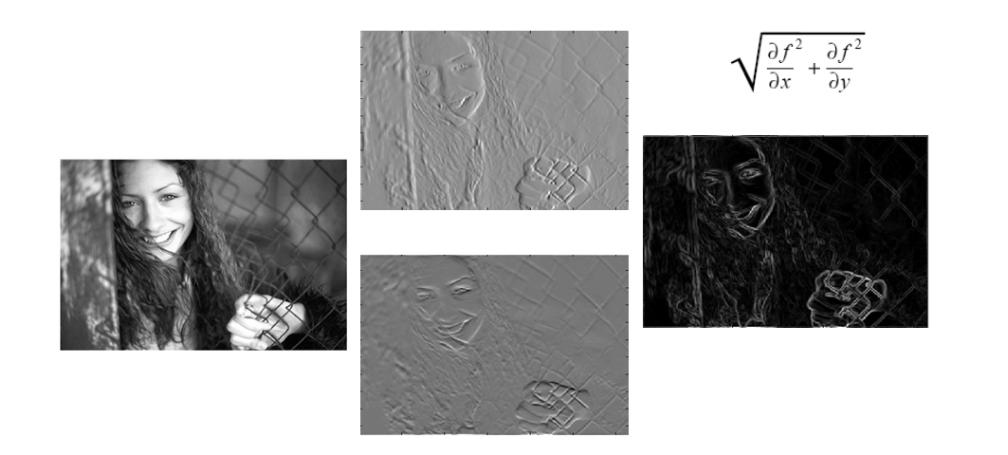
Now we can finally calculate the approximations of the derivatives. Given S as the grayscale of sourceImage, and Gx and Gy are two images which at each point containing the horizontal and vertical derivative approximations respectively, we have the following.

Given such estimates of the Image Derivatives, the gradient magnitude is then computed as follows.

Translating to C#, the formulae above will look like the following code. As we all know, S here is grayscale, so we will only focus on one colour channel instead of all RGB.

//Create variable for pixel data for each kernel
double xg = 0.0;
double yg = 0.0;
double gt = 0.0;

//This is how much our center pixel is offset from the border of our kernel
//Sobel is 3x3, so center is 1 pixel from the kernel border
int filterOffset = 1;
int calcOffset = 0;
int byteOffset = 0;

byte[] resultBuffer = new byte[bytes];

//Start with the pixel that is offset 1 from top and 1 from the left side
//this is so entire kernel is on our image
for (int offsetY = filterOffset; offsetY < height - filterOffset; offsetY++)
{
    for (int offsetX = filterOffset; offsetX < width - filterOffset; offsetX++)
    {
        //reset rgb values to 0
        xg = yg = 0;
        gt = 0.0;

        //position of the kernel center pixel
        byteOffset = offsetY * srcData.Stride + offsetX * 4;   
     
        //kernel calculations
        for (int filterY = -filterOffset; filterY <= filterOffset; filterY++)
        {
            for (int filterX = -filterOffset; filterX <= filterOffset; filterX++)
            {
                calcOffset = byteOffset + filterX * 4 + filterY * srcData.Stride;
                xg += (double)(pixelBuffer[calcOffset + 1]) * xkernel[filterY + filterOffset, filterX + filterOffset];
                yg += (double)(pixelBuffer[calcOffset + 1]) * ykernel[filterY + filterOffset, filterX + filterOffset];
            }
        }

        //total rgb values for this pixel
        gt = Math.Sqrt((xg * xg) + (yg * yg));
        if (gt > 255) gt = 255;
        else if (gt < 0) gt = 0;

        //set new data in the other byte array for output image data
        resultBuffer[byteOffset] = (byte)(gt);
        resultBuffer[byteOffset + 1] = (byte)(gt);
        resultBuffer[byteOffset + 2] = (byte)(gt);
        resultBuffer[byteOffset + 3] = 255;
    }
}

Output Image

With the resultBuffer, we can now generate the output as an image using the following codes.

//Create new bitmap which will hold the processed data
Bitmap resultImage = new Bitmap(width, height);

//Lock bits into system memory
BitmapData resultData = resultImage.LockBits(new Rectangle(0, 0, width, height), ImageLockMode.WriteOnly, PixelFormat.Format32bppArgb);

//Copy from byte array that holds processed data to bitmap
Marshal.Copy(resultBuffer, 0, resultData.Scan0, resultBuffer.Length);

//Unlock bits from system memory
resultImage.UnlockBits(resultData);

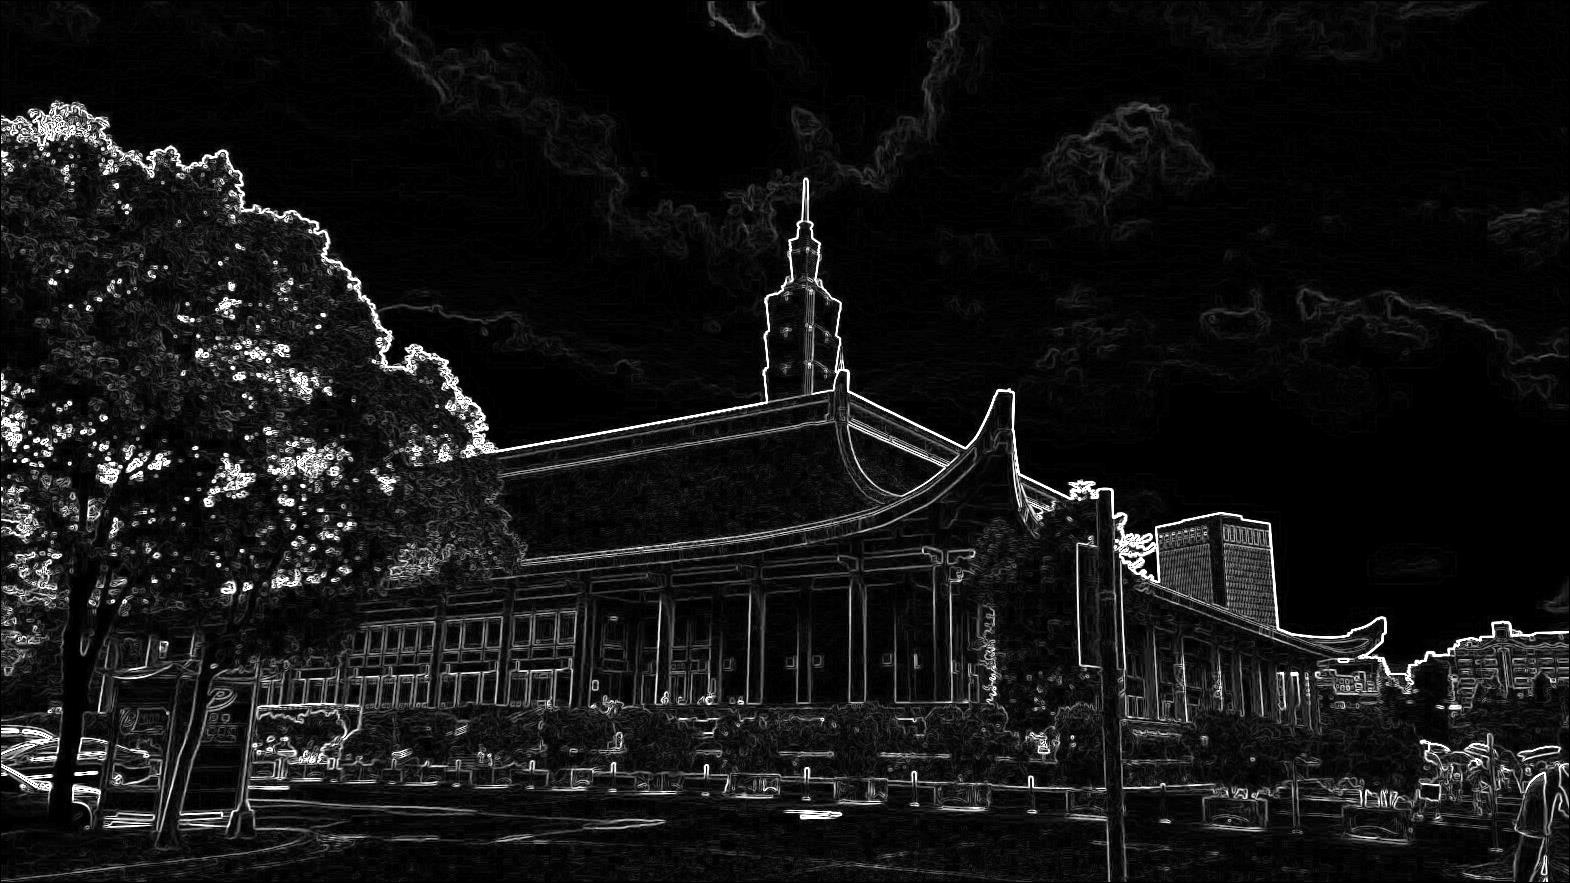
So, let’s say the image below is our sourceImage,

A photo of Taipei that I took when I was in Taiwan.

then the algorithm above should return us an image which contains only the detected edges as shown below.

Successful edge detection on the Taipei photo above.

Special Thanks

I am still very new to image processing. Thus, I’d like to thank Andraz Krzisnik who has written a great C# tutorial on applying Sobel-Feldman Operator to an image. The code above is mostly what I learned from his tutorial.

The source code above is also available on my GitHub Gist.

If you are interested in alternative edge detection techniques, you can refer to the paper Study and Comparison of Various Image Edge Detection Techniques.

Comparison of edge detection techniques. (Source: Study and Comparison of Various Image Edge Detection Techniques)

Renewed Microsoft Certified Azure Developer Associate

This image has an empty alt attribute; its file name is image-10.png

It’s always rewarding to renew Microsoft certifications. We do not only get the opportunities to keep up with the new Azure services, but also to unlearn and relearn some key concepts because cloud technologies are rapidly changing and it’s important to keep our skills current.

Microsoft role-based and specialty certifications expire every year and thus we need to go through the corresponding renewal process every year too. Passing the free renewal assessment on Microsoft Learn is the only way to renew our certification.

The renewal test of Microsoft Certified Azure Developer Associate is straightforward. The assessment uses a scaled score model with a range of 0-100. The passing score is 60 and I received 80 in the test.

If you are worried that you might not be able to pass the renewal test, don’t worry! We are allowed to take the assessment multiple times before our certification expires.

Prepare for the Exam

I am notified to take my free renewal test in May, which is 6 months before my certificate expires. I am thus able to plan accordingly and complete the assessment online at a time that works best for me.

Unlike the first time of me taking the exam last year, the assessment only covers a few core topics. There are eight topics that I have to study before the test. The breakdown of my score is as follows.

This image has an empty alt attribute; its file name is image.png
I received full score for most of them, except three topics, i.e. Microsoft Identity Platform, Azure App Configuration, and Azure Monitor.

Depends on one’s role, certifications are important. However if we only go through the materials without practicing what we have learnt, then certifications may not worth our time and money. Hence, instead of just reading the documents on Microsoft Learn, I also practiced the way recommended by Viktoria Semaan, as shown below. According to her, the best way to learn cloud skills is by getting our hands dirty. We shall practice as much as we can.

This image has an empty alt attribute; its file name is image-1.png
The best way to learn cloud skills by building. (Source: Viktoria Semaan)

When I was preparing for the test, I also took the opportunity to practice what I had learnt. For example, in order to understand more about Microsoft Identity Platform, MSAL (Microsoft Authentication Library), and Microsoft Graph, I had created a simple web application with Mithril.JS and Bulma.

This image has an empty alt attribute; its file name is image-4.png
My little web app can have a simple user login feature with the help of MSAL.

Bulma is a free, open-source, and easy-to-use CSS library introduced by my friend Rodelio Dahay. Since it is CSS only, it integrates in any JavaScript environment. Hence, with its frontend components, I can easily build a decent-looking SPA built with Mithril.JS. Developing this web app which integrates with MSAL and Graph Library, I am able to understand the given materials better.

This image has an empty alt attribute; its file name is image-5.png
Azure services that I was playing with when I was preparing for the renewal test.

Taking notes plays an important role in either the exam or the assessment. Effective notes enable us to capture the important points of the training materials. We then can focus our attention on what to study, make it easier to review material, and save our time. Currently, I am using Notion as the tool to take notes.

This image has an empty alt attribute; its file name is image-3.png
Notion is a convenient tool for exam preparation.

Conclusion

Certification or no certification, in the end what matters most is our actual ability to do the job.

Even though certification can be important and one should always aim for continuous learning, we need to be smart about it. Every certification exam is unique. Each certification requires a sincere commitment of time and resources. We should not simply get a certification without first figuring out why we should get it.

In Genshin Impact story, Kuki Shinobu and Noelle are two characters who study hard in order to pass examinations and getting certified. Their stories encourage players like me to continue improving ourselves.

A Comic Artwork from a Software Developer

I’m proud to have my comic artwork being accepted by the 7th Singapore Original Comics Festival (SGOCF), a month long event which puts the spotlight on comic artworks created in Singapore. SGOCF is co-organised by Singapore National Library Board (NLB). Thus, all the submissions had to be reviewed and approved by NLB before the artworks could be presented to the public in the library. I’m glad that my work is one of the approved artworks this year.

About My Artwork

Min, a young girl who loves coding.

The title of my artwork is called “Min”. Min is the name of the girl in the portrait. Her name Min, or 敏 in Chinese, means smart (聪敏) and agile (敏捷, yes, it is the same “agile” in our beloved Agile methodology).

Min is a programmer who is studying Computer Science. Even though she is young, she has been playing an important role in the national Artificial Intelligence programme, i.e. the PERPUSTAKAAN.

Unlike other common commics which focus on making female superheroes who are also sometimes hypersexualised, my artwork highlights more on the people we meet in our daily life. In this particular artwork, it focuses on Min, a female programmer in our neighbourhood. Hence, even though Min does not have any special abilities like other traditional superheroes, I hope her image as a female programmer makes girls feel confident, inspired, and motivated to learn more about software development.

During one of my sharings in Haulio, I told the team about women who have been forgotten in tech history, for example Ada Lovelace, who is considered by many to be the first computer programmer. The reason why I shared the story of her is because after I have been working in the software industry for more than 10 years, I realised that there was no question women were in the minority in the local tech industry. When I was studying in the university, the number of female students was fewer in the Computer Science field. After the graduation, their number decreased again in the software industry.

Fortunately, I am proud to work with smart and inspiring female software developers, both colleagues and clients. For example, in 2019, as the co-organiser of Singapore .NET Developers Coummunity, I had setup a tech sharing session with the help of Women Who Code (Singapore) for female developers to join and share their software development story.

Priyanka Shah, Microsoft MVP, talked about chat bot in a Women Who Code (Singapore) tech meetup. (Photo Credit: Marvin Heng)

Whenever I have a chance, I’ll always encourage aspiring female talents who are also interested in programming to join the software industry. This is the main reason why I present my artwork Min in this year of SGOCF.

Drawing as a Hobby

Having a hobby is a great way to chill.

Drawing is one of my favourite hobbies because it encourages creativity and innovation in other aspects of my live.

As a programmer who deals with codes daily, I definitely encourage drawing and painting as a past time as compared to watching movies or playing mobile games. We tend to lose a lot of those when we are only using a side of our brain all day everyday. Drawing helps in not only changing our mood, but also encouraging us to experience things from a different perspective.

It’s awesome to see my drawing presented together with other great artworks in a local art exhibition. (Photo Credit: Singapore Original Comics Festival)

Even though I was one of the few students who passed the art test in the national Unified Examination Certificate exam, it took me a long time to master the basic techniques of drawing since I am self taught. I am finally beginning to enjoy this hobby after years of learning from the experts.

What I learned during the learning process are,

  • It’s alright to start from something small in our learning journey as long as we have a growth mindset. I will put in some time every month to draw.
  • It’s important to learn from the mistakes. I’m happy to have my brother, who is also a graphic designer, to give feedback on my drawings. His professional experience helps me to learn fast.
  • Agile. We can use the very similar strategies we apply in our agile software development to our hobby.
  • It’s necessary to develop skills and hobbies that can help us when things in our life get tough so that we can have something to fall back on.

See You in the Exhibition!

SGOCF artwork exhibition at Jurong East.

SGOCF is a month long artwork exhibition happening at Jurong Regional Library, Level 2, Sky Bridge from 1st July to 31st July, 2022. It’s open to public for free. Please drop by to give support to our local commic artists.

Running Our Own NuGet Server on Azure Container Instance (ACI)

In software development, it is a common practice that developers from different teams create, share, and consume useful code which is bundled into packages. For .NET the way we share code is using NuGet package, a single ZIP file with the .nupkg extension that contains compiled code (DLLs).

Besides the public nuget.org host, which acts as the central repository of over 100,000 unique packages, NuGet also supports private hosts. Private host is useful for example it allows developers working in a team to produce NuGet packages and share them with other teams in the same organisation.

There are many open-source NuGet server available. BaGet is one of them. BaGet is built using .NET Core, thus it is able to run behind IIS or via Docker.

In this article, we will find out how to host our own NuGet server on Azure using BaGet.

Hosting Locally

Before we talk about hosting NuGet server on the cloud, let’s see how we could do it in our own machine with Docker.

Fortunately, there is an official image for BaGet on Docker Hub. Hence, we can pull it easily with the following command.

docker pull loicsharma/baget

Before we run a new container from the image, we need to create a file named baget.env to store BaGet’s configurations, as shown below.

# The following config is the API Key used to publish packages.
# We should change this to a secret value to secure our own server.
ApiKey=NUGET-SERVER-API-KEY

Storage__Type=FileSystem
Storage__Path=/var/baget/packages
Database__Type=Sqlite
Database__ConnectionString=Data Source=/var/baget/baget.db
Search__Type=Database

Then we also need to have a new folder named baget-data in the same directory as the baget.env file. This folder will be used by BaGet to persist its state.

The folder structure.

As shown in the screenshot above, we have the configuration file and baget-data at the C:\Users\gclin\source\repos\Lunar.NuGetServer directory. So, let’s execute the docker run command from there.

docker run --rm --name nuget-server -p 5000:80 --env-file baget.env -v "C:\Users\gclin\source\repos\Lunar.NuGetServer\baget-data:/var/baget" loicsharma/baget:latest

In the command, we also mount the baget-data folder on our host machine into the container. This is necessary so that data generated by and used by the container, such as package information, can be persisted.

We can browse our own local NuGet server by visiting the URL http://localhost:5000.

Now, let’s assume that we have our packages to publish in the folder named packages. We can publish it easily with dotnet nuget push command, as shown in the screenshot below.

Oops, we are not authorised to publish the package to own own NuGet server.

We will be rejected to do the publish, as shown in the screenshot above, if we do not provide the NUGET-SERVER-API-KEY that we defined earlier. Hence, the complete command is as follows.

dotnet nuget push -s http://localhost:5000/v3/index.json -k <NUGET-SERVER-API-KEY here> WordPressRssFeed.1.0.0.nupkg

Once we have done that, we should be able to see the first package on our own NuGet server, as shown below.

Yay, we have our first package in our own local NuGet server!

Moving on to the Cloud

Instead of hosting the NuGet server locally, we can also host it on the cloud so that other developers can access too. Here, we will be using Azure Cloud Instance (ACI).

ACI allows us to run Docker containers on-demand in a managed, serverless Azure environment. ACI is currently the fastest and simplest way to run a container in Azure, without having to manage any virtual machines and without having to adopt a higher-level service.

The first thing we need to have is to create a resource group (in this demo, we will be using a new resource group named resource-group-lunar-nuget) which will contain ACI, File Share, etc. for this project.

Secondly, we need to have a way to retrieve and persist state with ACI because by default, ACI is stateless. Hence, when the container is restarted all of its state will be lost and the packages we’ve uploaded to our NuGet server on the container will also be lost. Fortunately, we can make use of the Azure services, such as Azure SQL and Azure Blob Storage to store the metadata and packages.

For example, we can create a new Azure SQL database called lunar-nuget-db. Then we create an empty Container named nuget under the Storage Account lunar-nuget.

Created a new Container nuget under lunarnuget Storage Account.

Thirdly, we need to deploy our Docker container above on ACI using docker run. To do so, we first need to log into Azure with the following command.

docker login azure

Once we have logged in, we proceed to create a Docker context associated with ACI to deploy containers in ACI of our resource group, resource-group-lunar-nuget.

Creating a new ACI context called lunarnugetacicontext.

After the context is created, we can use the following command to see the current available contexts.

docker context ls
We should be able to see the context we just created in the list.

Next, we need to swich to use the new context with the following command because currently, as shown in the screenshot above, the context being used is default (the one with an asterisk).

docker context use lunarnugetacicontext

Fourthly, we can now proceed to create our ACI which connect to the Azure SQL and Azure Blob Storage above.

az container create \
    --resource-group resource-group-lunar-nuget \
    --name lunarnuget \
    --image loicsharma/baget \
    --environment-variables <Environment Variables here>
    --dns-name-label lunar-nuget-01 \
    --ports 80

The environment variables include the following

  • ApiKey=<NUGET-SERVER-API-KEY here>
  • Database__Type=SqlServer
  • Database__ConnectionString=”<Azure SQL connection string here>”
  • Storage__Type=AzureBlobStorage
  • Storage__AccountName=lunarnuget
  • Storage__AccessKey=<Azure Storage key here>
  • Storage__Container=nuget

If there is no issue, after 1 to 2 minutes, the ACI named lunarnuget will be created. Otherwise, we can always use docker ps to get the container ID first and then use the following command to find out the issues if any.

docker logs <Container ID here>
Printing the logs from one of our containers with docker logs.

Now, if we visit the given FQDN of the ACI, we shall be able to browse the packages on our NuGet server.

That’s all for a quick setup of our own NuGet server on Microsoft Azure. =)

References