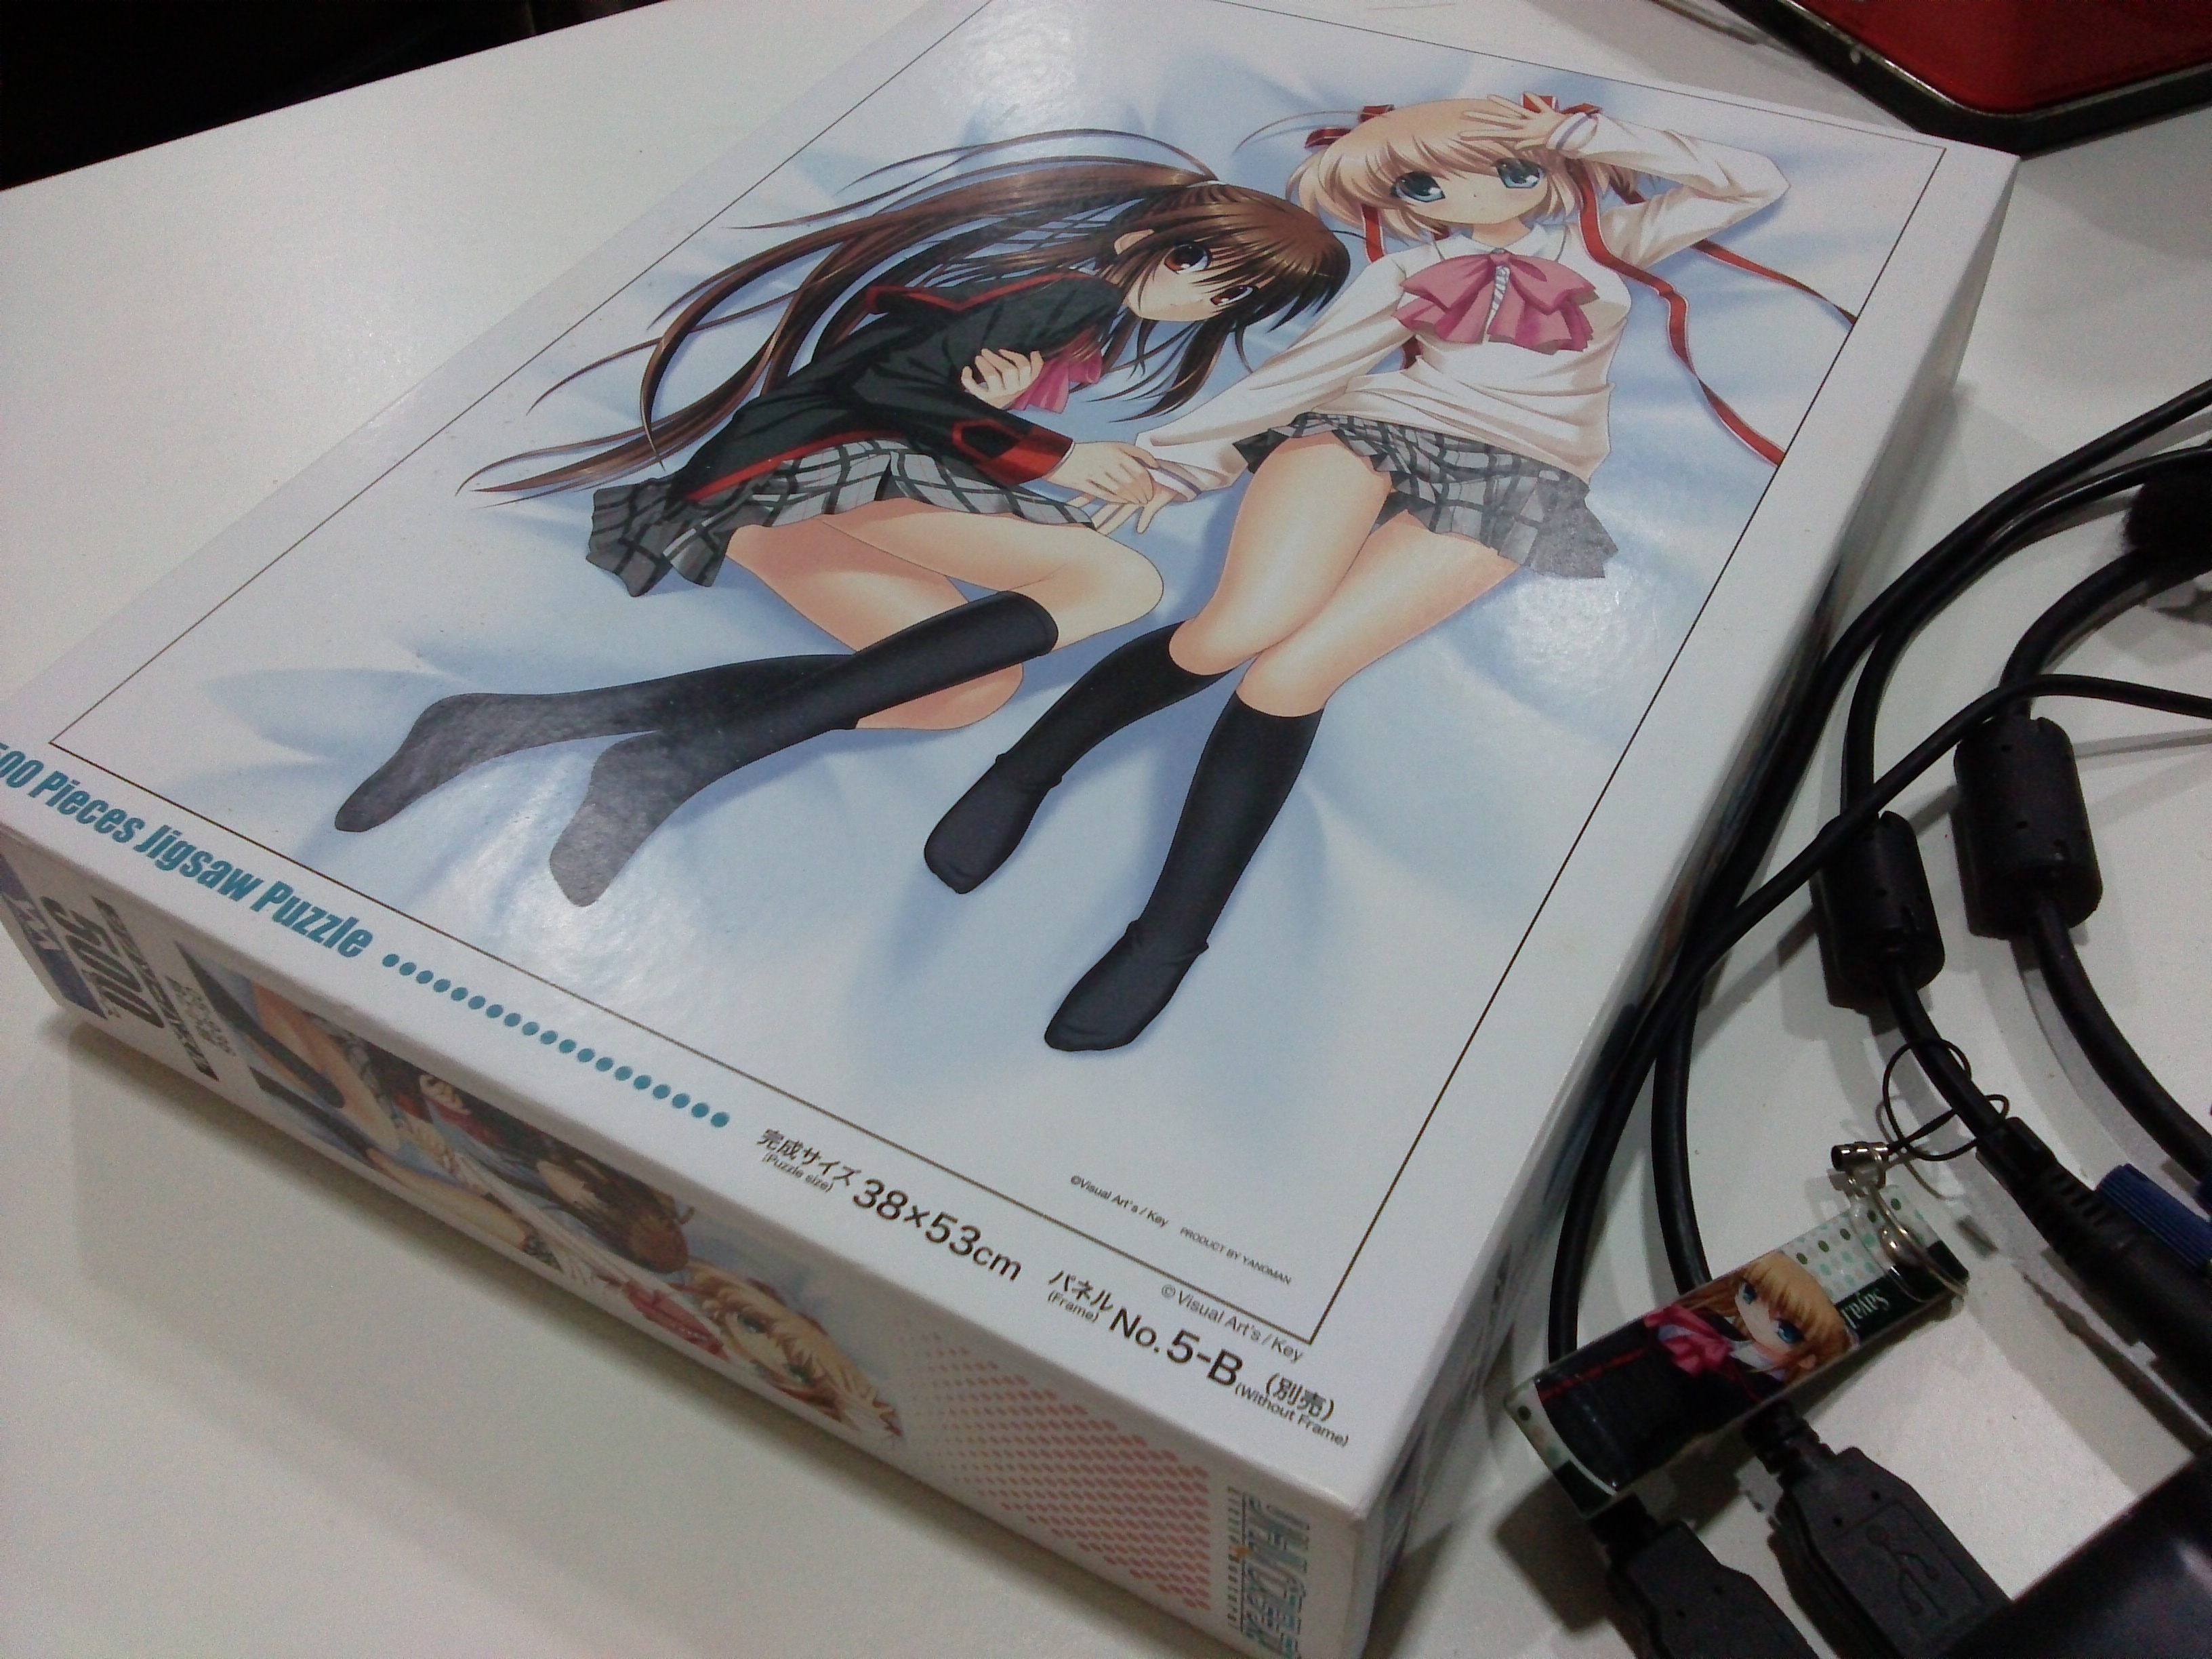
Recently, I got a Little Busters! (リトルバスターズ!) jigsaw puzzle of 500 pieces. According to the description printed on the box, the size of the puzzle is 38 x 53 cm. The estimated time to complete the whole puzzle will be 15 hours. So, I decided to build a tool to help me complete the task by identifying the location of each piece of the jigsaw puzzle.
Little Busters! (Rin and Komari) 500 Pieces Jigsaw Puzzle
The first thing I need is a webcam. Most of the modern laptops have a webcam, even Chromebook has one. So, the next problem will be capturing image using the webcam. Therefore, I built a simple project to do that using Silverlight because it is very easy to achieve simple webcam image capturing in Silverlight.
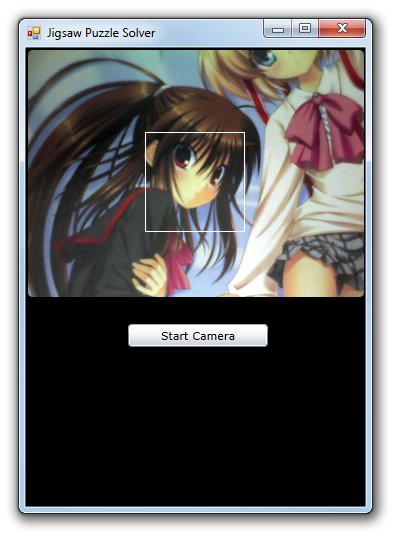
After that, since the Silverlight project is web based, I can embed it in another my Windows Form C# application with the WebBrowser control easily. So now what I have is a image capturing app without the saving function yet.
Successfully capture the image from webcam.
The main task of the C# application is to save the captured image and then compare it with a target image to identify the matching pieces in the jigsaw puzzle. The square with white border is the area where the image will be saved as an image for the use of image comparison later. The templates that the captured image will be compared with are the 500 squares from the original complete image. To save only the captured image inside the square (100×100 pixels), I do the following.
Rectangle bounds = this.Bounds;
int widthOfCaptureArea = 100;
int heightOfCaptureArea = 100;
int captureAreaX = 120;
int captureAreaY = 85;
Size captureArea = new Size(widthOfCaptureArea, heightOfCaptureArea);
Point webBrowserLocation = webBrowser1.PointToClient(new Point(bounds.Left, bounds.Top));
using (Bitmap bitmap = new Bitmap(widthOfCaptureArea, heightOfCaptureArea))
{
    using (Graphics g = Graphics.FromImage(bitmap))
    {
        g.CopyFromScreen(
        new Point(bounds.Left + captureAreaX + webBrowserLocation.X * -1, bounds.Top + captureAreaY + webBrowserLocation.Y * -1), Point.Empty, captureArea);
    }
    bitmap.Save("D://.../source.jpg", ImageFormat.Jpeg);
    bitmap.Dispose();
 }
private float CheckSimilarity(Bitmap sourceImage, Bitmap targetImage)
{
   // create template matching algorithm's instance
   ExhaustiveTemplateMatching tm = new ExhaustiveTemplateMatching(0.8f);
   // find all matchings with specified above similarity
   TemplateMatch[] matchings = tm.ProcessImage(sourceImage, targetImage);
   float similarity = 0;
   foreach (TemplateMatch m in matchings)
   {
       similarity = m.Similarity;
   }
   return similarity;
}
When comparing the images, I perform rotation three times because the direction of the piece is uncertain. So, I will just need to rotate the source image three times and compare the source and the template for each of the time to get the highest similarity value.
float similarity = CheckSimilarity(sourceImage, targetImage);
// Rotate the source image 90 degrees
for (int i = 1; i <= 3; i++)
{
    sourceImage.RotateFlip(RotateFlipType.Rotate90FlipNone);
    if (CheckSimilarity(sourceImage, targetImage) > similarity)
    {
        similarity = CheckSimilarity(sourceImage, targetImage);
    }
}
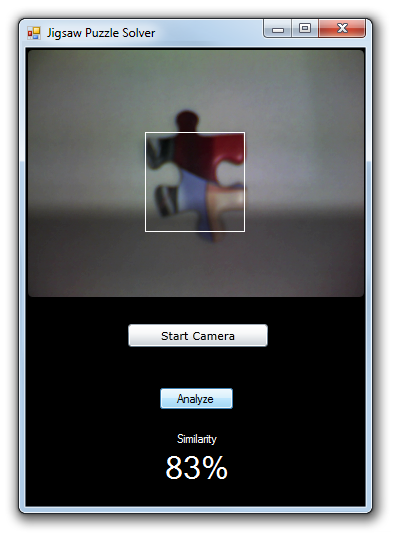
Similarity of 83% between this particular piece with one of the template images from the original complete image
Yup, now it is done and I can thus use it to complete my 500-piece jigsaw puzzle. However, in the whole project, I actually assume each piece to be a perfect square. So the similarity value is not that accurate as well. This can be improved in the next version to take the pattern of each piece into consideration.
Since Hari Raya fell on Thursday and Singapore National Day fell on Friday, we got a long weekend. From what I read on Facebook, many of my friends had interesting plan for the long weekend, such as travelling to overseas. I also travelled back to my home in Johor, Malaysia.
Malaysia checkpoint is always crowded on weekends, I decided to wake up early on the first day of the long weekend to catch the early bus to Malaysia so that I could avoid the crowd. Even though I had alarm clock and phone, as a snooze button king, I sometimes still overslept. Thus, I decided to turn my laptop into a alarm as well.
My laptop is running on Fedora. So, I decided to write a cron job that would play a music or song in the early morning to wake me up.
Firstly, I created a bash script to play an FLV, MP3 or MP4 file stored on the disk. I had VLC Media Player installed on the laptop. So, what I needed was just a command to open the audio/video file using the media player. The following is the simple script.
That was my first time writing a cron job in Fedora, so I only successfully wrote it after reading quite a number of online forums and tutorials to understand how to do that.
For the line export DISPLAY=:0, I did not include it in the script before and no music video was played. It worked only after I found an online discussion about the command and added it back to the script. As mentioned in the online discussion, DISPLAY=:0 means the GPUs in the system. So, without that command, the VLC Media Player was not launched previously.
I used xdg-open(1) because it is able to open a file or URL in the user’s preferred application (as stated in xdg-open Manual). Due to the fact that VLC Media Player is set as the default application of media files on my laptop, that command will automatically launch the program with the specified music video.
Little Explorer music video
I then saved the script as /home/chunlin/Music/alarm.sh. Next, I made the file executable.
[chunlin@chunlin Music]$ chmod +x alarm.sh
Finally, I just needed to schedule it in crontab. Crontab is the program used to install, remove or list the tables used to serve the cron(8) daemon (Reference: man crontab).
After that, the gedit window would popup (Oh yeah, I like gedit). In the editor, I just needed to key in the following line in the file.
0 7 * * * /home/chunlin/Music/alarm.sh
The first five fields are time and date fields. The first one is minute (0 – 59), followed by hour (0 – 23), followed by day of month (1 – 31), followed by month (1 – 12) and day of week (sun, mon, …, sat). Any of the five fields can contain an asterisk which means “first-last”. So, “0 7 * * *” means the task will be scheduled at 7am everyday.
After saving the file and closing the gedit window, a line saying “crontab: installing new crontab” would be printed on the Terminal window. That meant the cron job had been added successfully and the alarm clock was created.
During the time I was doing this alarm, I also found some interesting and useful online discussion about the crontab and shell script as stated below.
I saw a Facebook post announcing the first JBoss workshop in Singapore. However, since I had meeting overseas at that time, I couldn’t attend the event. Fortunately, my good friend, Wai Hong, who is also interested in Java programming decided to attend the workshop as well. After the workshop, he shared with me the notes so that I could learn it myself also. Thus, here I’d like to thank Wai Hong for his kindness. =D
The first JBoss Workshop in Singapore!
In this post, I want to share my JBoss learning journey after going through the notes, online tutorials, and online forums. Meanwhile, I also developed a new app, My YouTube RePlayer, and then deployed it on OpenShift, the Red Hat cloud hosting service, during the long weekend.
Set Up JBoss Developer Studio
In order to build web applications and then to publish them easily to the OpenShift, I choose to use the recommended IDE in the workshop, the JBoss Developer Studio 6.0.0.GA (JBDS).
In the beginning of the installation, there are short introduction and the End User License Agreement. Please spend some time to read it.
Let’s get started with JBDS installation.
The next step will be selecting the installation path. I guess there is no need to put a screenshot for this?
After choosing the installation path, there will be an option to choose Java VM. So, the directory chosen will be the jre directory in the place Java is installed on the PC.
Select the Java Virtual Machine.
The next step will be “Select Platforms and Servers” which can be skipped because this part will be done in later stage.
At the end of the installation, if everything goes well, there will be a message saying “Installation has been completed successfully” in Step 9, which is also the last step. That means JBDS can be used now.
Launch JBoss Developer Studio
JBDS is almost like Eclipse. Well, this is because it includes not only the web development tools, but also Eclipse.
Hello, JBDS!
In the workshop, a quickstart project sample called kitchensink-html5-mobile is used. Due to the fact that I was following the workshop tutorial, I ended up using it to build my app, My YouTube RePlayer, eventually.
Choose the kitchensink-html5-mobile sample project as starting point.
Under the “Requirements” section, there are four items. On my PC, three of the plugins were found. Only the JBoss Enterprise Application Platoform 6 or JBoss Application Server 7.1 was missing. I thus installed the JBoss Application Server 7.1 which was given by Wai Hong together with his notes. I think it can also be downloaded in the “Download and Install…” section.
Download and install the JBoss Application Server 7.1.
After the runtime is added, just click on the “Finish” button and the project will be imported.
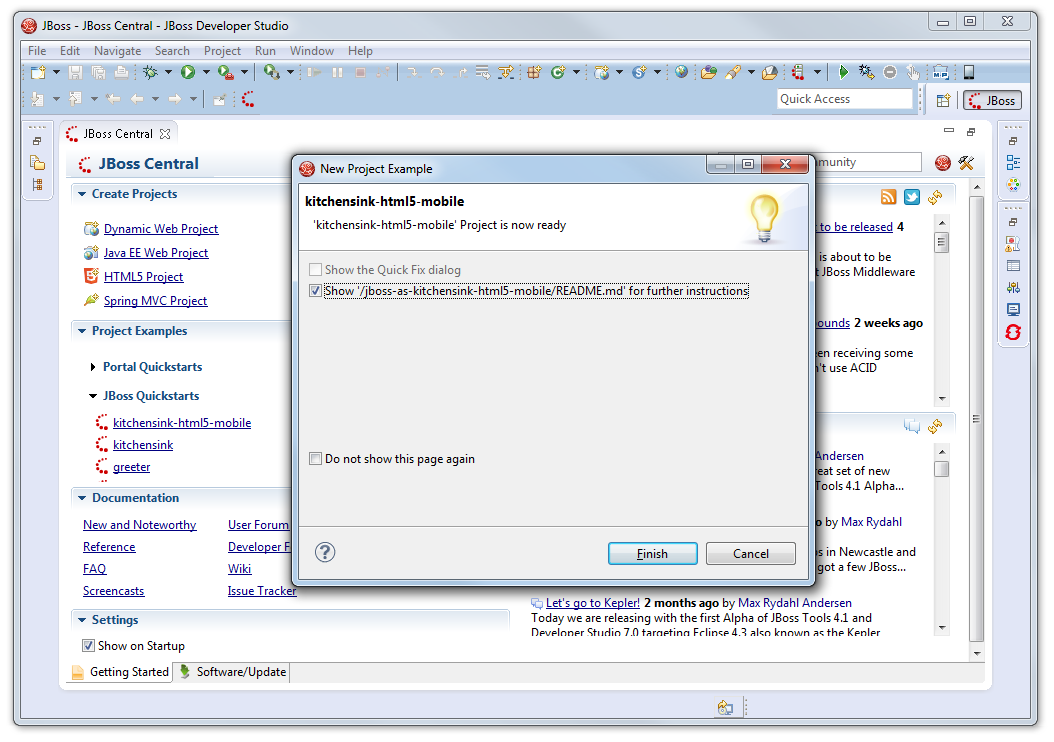
Once a message saying “‘kitchensink-html5-mobile’ Project is now ready” appears, that means everything has been done correctly so far. Yesh!
The project is now ready!
Deploy to OpenShift
I decided to use the sample project as a template to build my app, My YouTube RePlayer.
Before deploying to the cloud, I needed to test my app on local. To do that, firstly, right-click on the project folder in the “Project Explorer” window and then choose “Run As -> Maven Install” to build the project. Secondly, right-click on the project folder again and then choose “Run As -> Run on Server” to deploy on a local JBoss application server. Finally, the app will appears in the browser nicely.
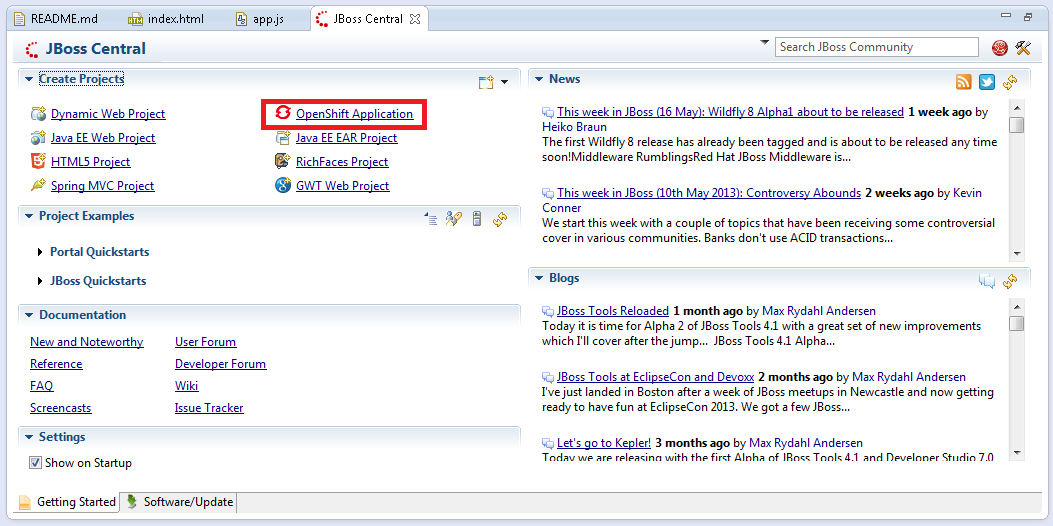
After testing on localhost, it is time to deploy the app to the cloud. First thing to do is to go back to the JBoss Central tab and click on the “OpenShift Application” button.
Click on the “OpenShift Application” button to start setting up the app on the cloud server.
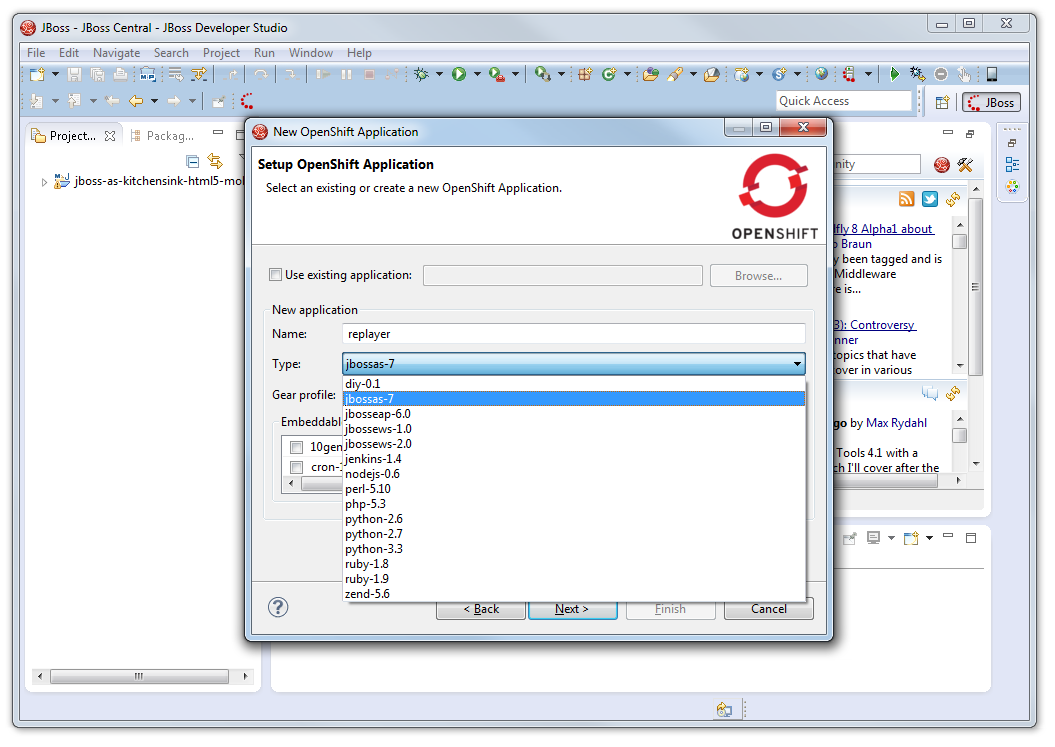
The next step will be naming the application. The naming is very important because both the application name and OpenShift username will appear in the URL of the app on OpenShift in the following format: <application name>-<username>.rhcloud.com.
Choose jbossas-7 under the application type option.
For the “Type” drop-down list, I chose jbossas-7.
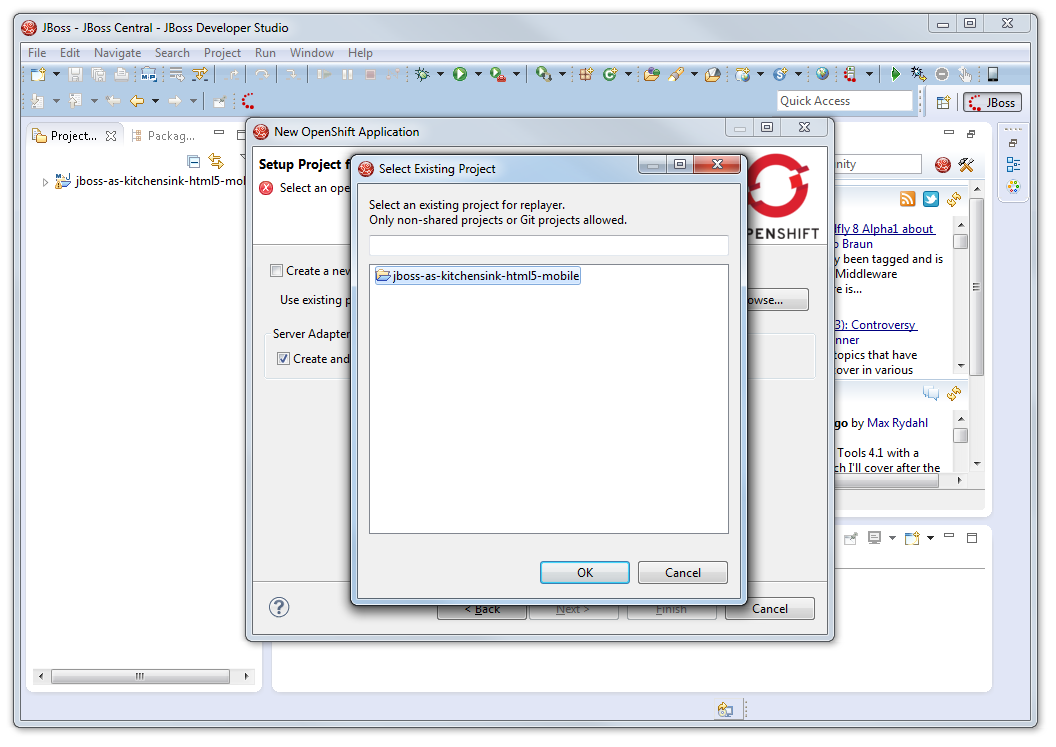
In the next window, I setup the project for the new OpenShift application. Due to the fact that I just would like to deploy my existing project, I unchecked the “Create a new project” checkbox and browsed to my modified sample project folder.
Choose to use existing project instead of create a new project on OpenShift.
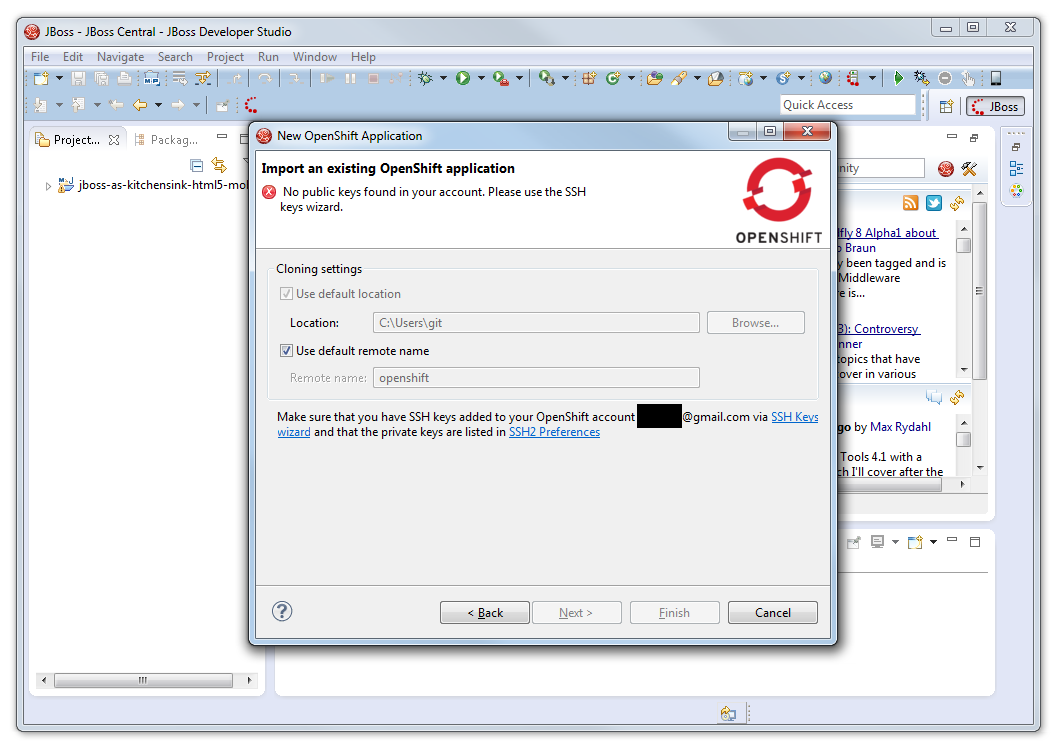
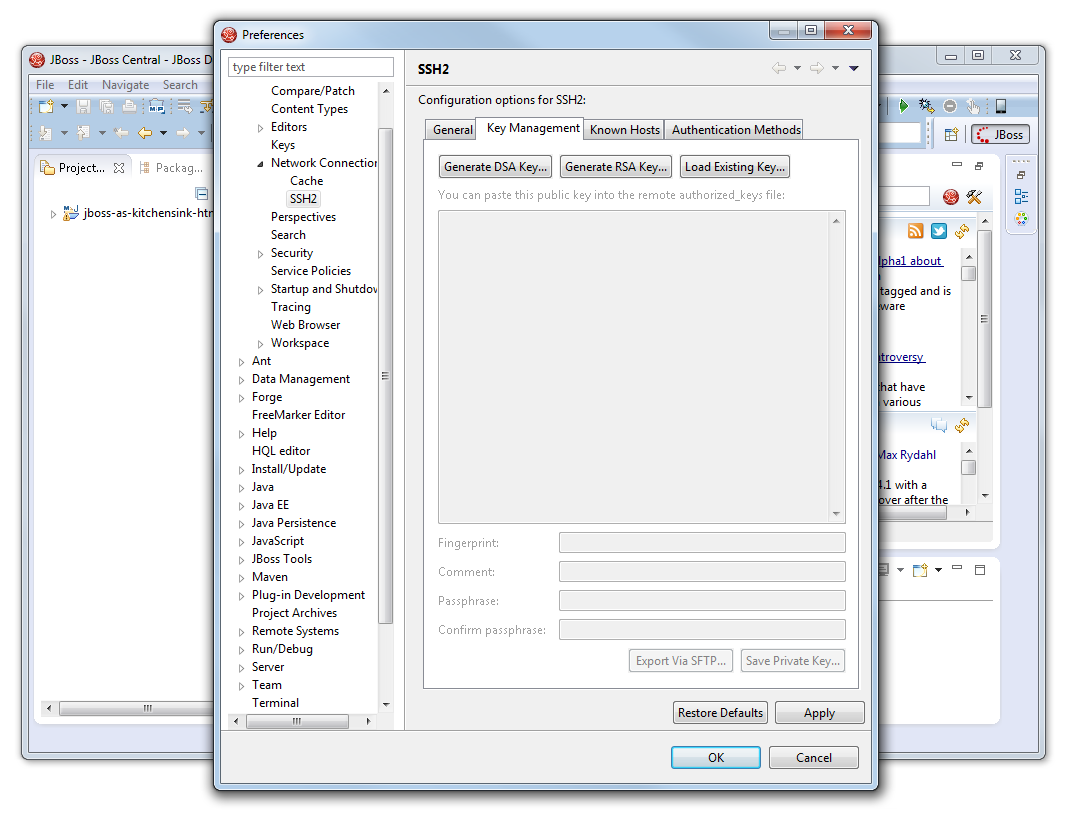
After having all these done, I reached the step where I needed to add SSH key to OpenShift account for authentication purpose. I first clicked on the “SSH2 Preferences” link.
Click on the SSH2 Preferences link.
As I did not yet have an SSH key, I had to click on the “Generate RSA Key…” button to generate the key under the “Key Management” tab of the popped out window. After the key was generated, I clicked on the “Save Private Key…” button to save the private key for later use when publishing the app to OpenShift. It is recommended to have passphrase set, unless you also like to live dangerously.
The place to generate RSA key.Not enter any passphrase?
After the private key is saved, the public key also needs to be taken care of. The generated public key should be copied to clipboard (or paste it somewhere for later use). This is because after the keys are generated, the public key has to be added through the “SSH Keys wizard”. This is to setup the authentication between the local PC and the remote OpenShift server.
Click on the SSH Keys Wizard link.
Once everything is done, click on the “Finish” button.
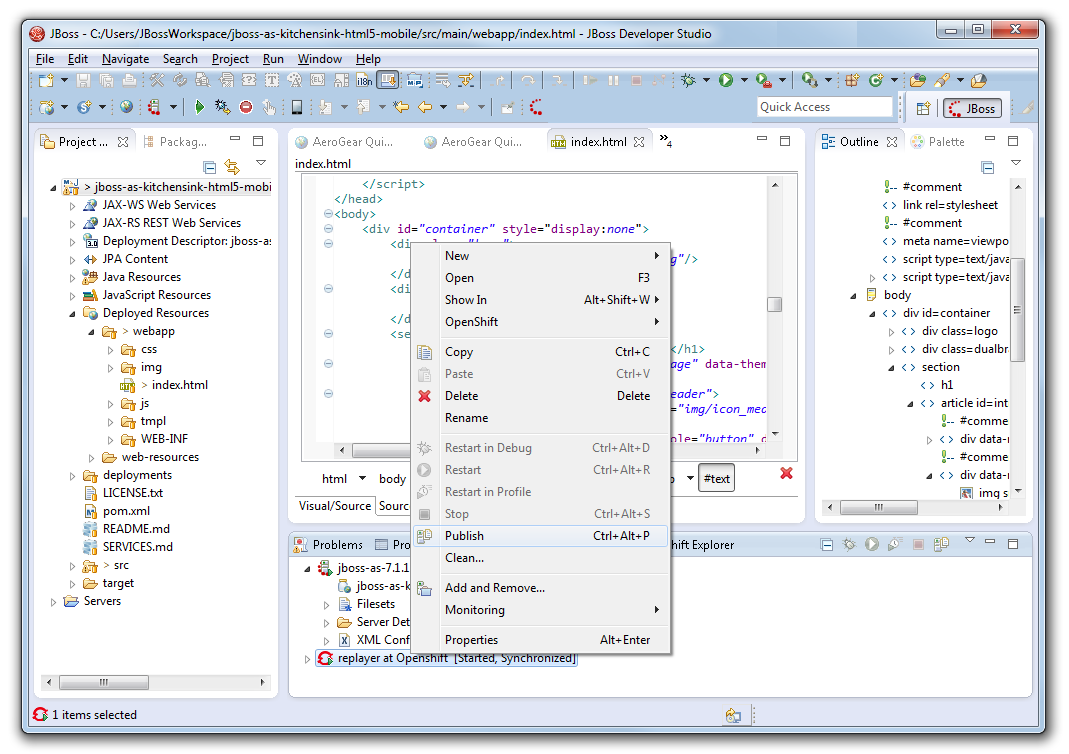
Now, it is time to publish the app. To do so, right-click on the OpenShift server item in the “Servers” tab and then choose “Publish”. That’s all.
This is how I published my new app My YouTube RePlayer.
Publish the project and deploy it on OpenShift.
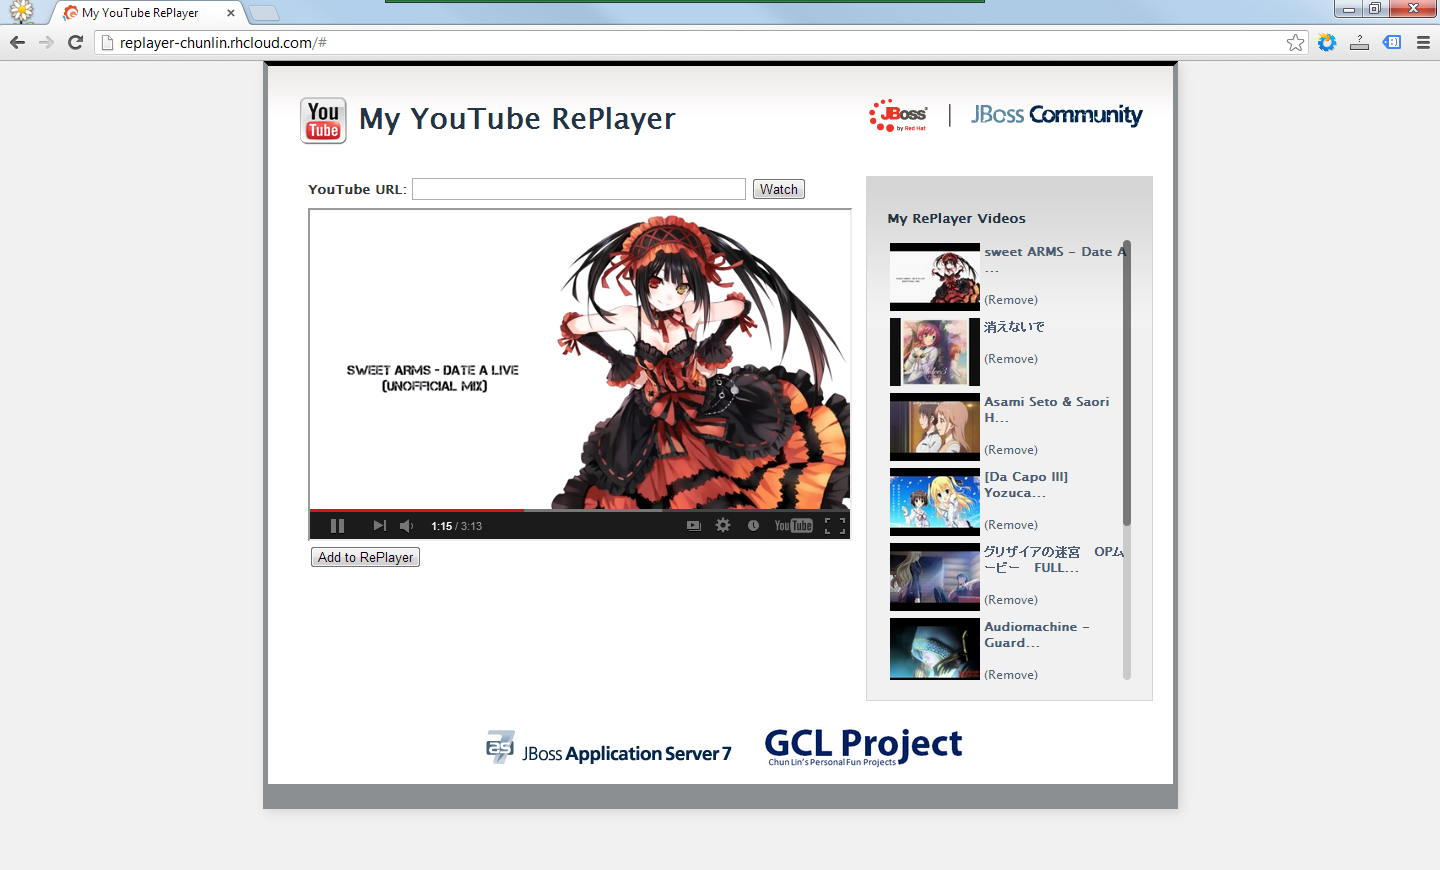
My YouTube RePlayer
So, what is My YouTube RePlayer that I built in the project above?
I love listening to music and thus I like YouTube as well. However, there is a feature that is still not yet found on YouTube website. The auto replay. To solve this problem, I have been working on several versions of YouTube Re-Player since 2009. Some are web applications and some are desktop applications.
Playing a well done unofficial mix of “Date a Live” done by DaRk5nAk3 on My YouTube RePlayer.
This time, I am using the HTML5 technology in my new YouTube Re-Player app. Instead of using database, I directly use the available web storage to store the video ids (YouTube has unique id assigned to each online YouTube video). However, I think it is still good to have a database so that the data won’t be just stored locally on user’s browser and thus can be synced over different PCs with the same login.
Thus, although the workshop is more on building a Java web application, I end up doing my own HTML 5 application. Haha. Oh well, see if I got time to continue this project next time.
10 February is the Chinese New Year. I went back to my home in Malaysia As a multiracial country, Malaysia celebrates this festival with great fanfare as well. So, in the past few days, I got to play and eat a lot without worrying about my work too much. Also, I had more time to work on some personal projects. =D
Chinese New Year dinner!
Since it’s a new year, I decided to work on a totally new project with PHP, a language that I have not been using for about one year. With a few years of experience on using PHP and Drupal, I would like to try a new PHP web application framework which is known as CodeIgniter. I first heard it from my friend last year but I only got the time to play with it now.
Install LAMP
After Windows 8 on my laptop was expired, I changed to use Fedora a few weeks ago. Hence, I am a beginner in the world of Linux. Before working on the PHP project, I have to install the LAMP programs, like Apache, MySQL and PHP on my laptop again.
There are some helpful tutorials online to install three of them. Here is just a list of websites that I referred to during the installation process.