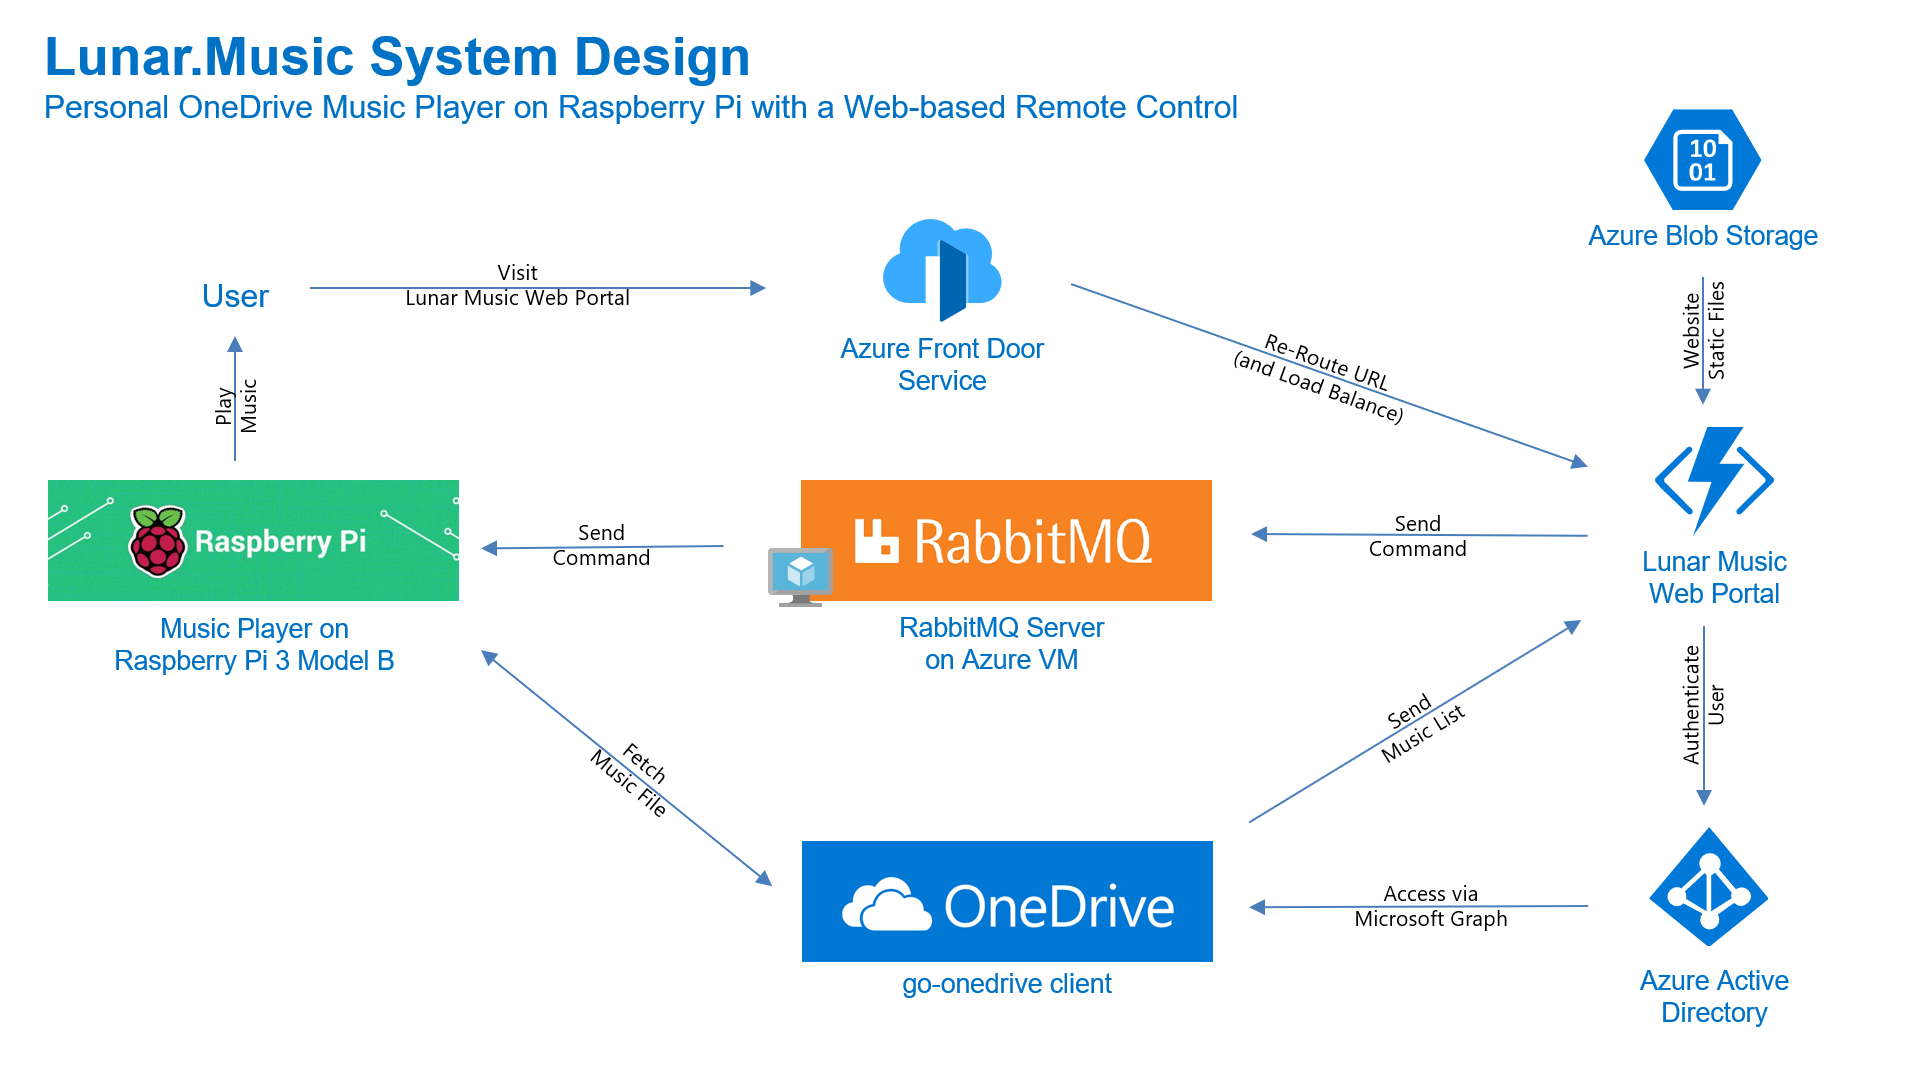
There are so much things that we can build with a Raspberry Pi. It’s always my small little dream to have a personal music player that sits on my desk. In the Part 1, we already setup the music player programme which is written in Golang on Raspberry Pi successfully.
Now we need to have a web app as a remote control which will send command to the music player to play the selected song. In this article, we will talk about the web portal and how we access the OneDrive with Microsoft Graph and go-onedrive client.

Project GitHub Repository
The complete source code of this web-based music player remote control can be found at https://github.com/goh-chunlin/Lunar.Music.Web.
Gin Web Framework
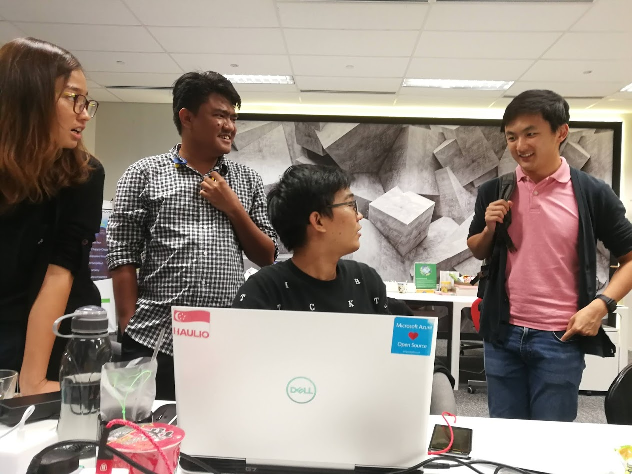
I had a discussion with Shaun Chong, the Ninja Van CTO, and I was told that they’re using Gin web framework. Hence, now I decide to try the framework out in this project as well.
Gin offers a fast router that’s easy to configure and use. For example, to serve static files, we simply need to have a folder static_files, for example, in the root of the programme together with the following one line.
router.StaticFS("/static", http.Dir("static_files"))
However, due to the fact that later I need to host this web app on Azure Function, I will not go this route. Hence, currently the following are the main handlers in the main function.
router.LoadHTMLGlob("templates/*.tmpl.html")

router.GET("/api/HttpTrigger/login-url", getLoginURL)
router.GET("/api/HttpTrigger/auth/logout", showLogoutPage)
router.GET("/api/HttpTrigger/auth/callback", showLoginCallbackPage)

router.GET("/api/HttpTrigger/", showMusicListPage)

router.POST("/api/HttpTrigger/send-command-to-raspberrypi", sendCommandToRaspberryPi)
The first line is to load all the HTML template files (*.tmpl.html) located in the templates folder. The templates we have include some reusable templates such as the following footer template in the file footer.tmpl.html.
<!-- Footer -->
<footer id="footer">
    <div class="container">
        ...
    </div>
</footer>
We can then import such reusable templates into other HTML files as shown below.
<!DOCTYPE html>
<html>
    ...
    <body>
        ...
        {{ template "footer.tmpl.html" . }}
        ...
    </body>
</html>
After importing the templates, we have five routes defined. All of the routes start with /api/HttpTrigger is because this web app is designed to be hosted on Azure Function with a HTTP-triggered function called HttpTrigger.
The first three routes are for authentication. Then after that is one route for loading the web pages, and one handler for sending RabbitMQ message to the Raspberry Pi.
The showMusicListPage handler function will check whether the user is logged in to Microsoft account with access to OneDrive or not. It will display the homepage if the user is not logged in yet. Otherwise, if the user has logged in, it will list the music items in the user’s OneDrive Music folder.
func showMusicListPage(context *gin.Context) {
    ...
    defaultDrive, err := client.Drives.Default(context)
    if err == nil && defaultDrive.Id != "" {
        ...
        context.HTML(http.StatusOK, "music-list.tmpl.html", gin.H{ ... })

        return
    }

    context.HTML(http.StatusOK, "index.tmpl.html", gin.H{ ... })
}
Hosting Golang Application on Azure Function
There are many ways to host Golang web application on Microsoft Azure. The place we will be using in this project is Azure Function, the serverless service from Microsoft Azure.
Currently, Azure Function offers first-class support for only a limited number of programming languages, such as JavaScript, C#, Python, Java, etc. Golang is not one of them. Fortunately, in March 2020, Azure Function custom handler is announced officially even though it’s still in preview now.
The custom handler provides a lightweight HTTP server written in any language which then enables developers to bring applications, such as those written in Golang, into Azure Function.

What is even more impressive is that for HTTP-triggered functions with no additional bindings or outputs, we can enable HTTP Request Forwarding. With this configuration, the handler in our Golang application can work directly with the HTTP requests and responses. This is all configured in the host.json of the Azure Function as shown below.
{
    "version": "2.0",
    "extensionBundle": {
        "id": "Microsoft.Azure.Functions.ExtensionBundle",
"version": "[1.*, 2.0.0)"
    },
    "customHandler": {
        "description": {
            "defaultExecutablePath": "lunar-music-webapp.exe"
        },
        "enableForwardingHttpRequest": true
    }
}
The defaultExecutablePath is pointing to the our Golang web app binary executable which is output by go build command.
So, in the wwwroot folder of the Azure Function, we should have the following items, as shown in the screenshot below.

Since we have already enabled the HTTP Request Forwarding, we don’t have to worry about the HttpTrigger directory. Also, we don’t have to upload our web app source codes because the executable is there already. What we need to upload is just the static resources, such as our HTML template files in the templates folder.
The reason why I don’t upload other static files, such as CSS JavaScript, and image files, is that those static files can be structured to have multiple directory levels. We will encounter a challenge when we are trying to define the Route Template of the Function, as shown in the screenshot below. There is currently no way to define route template without knowing the maximum number of directory level we can have in our web app.
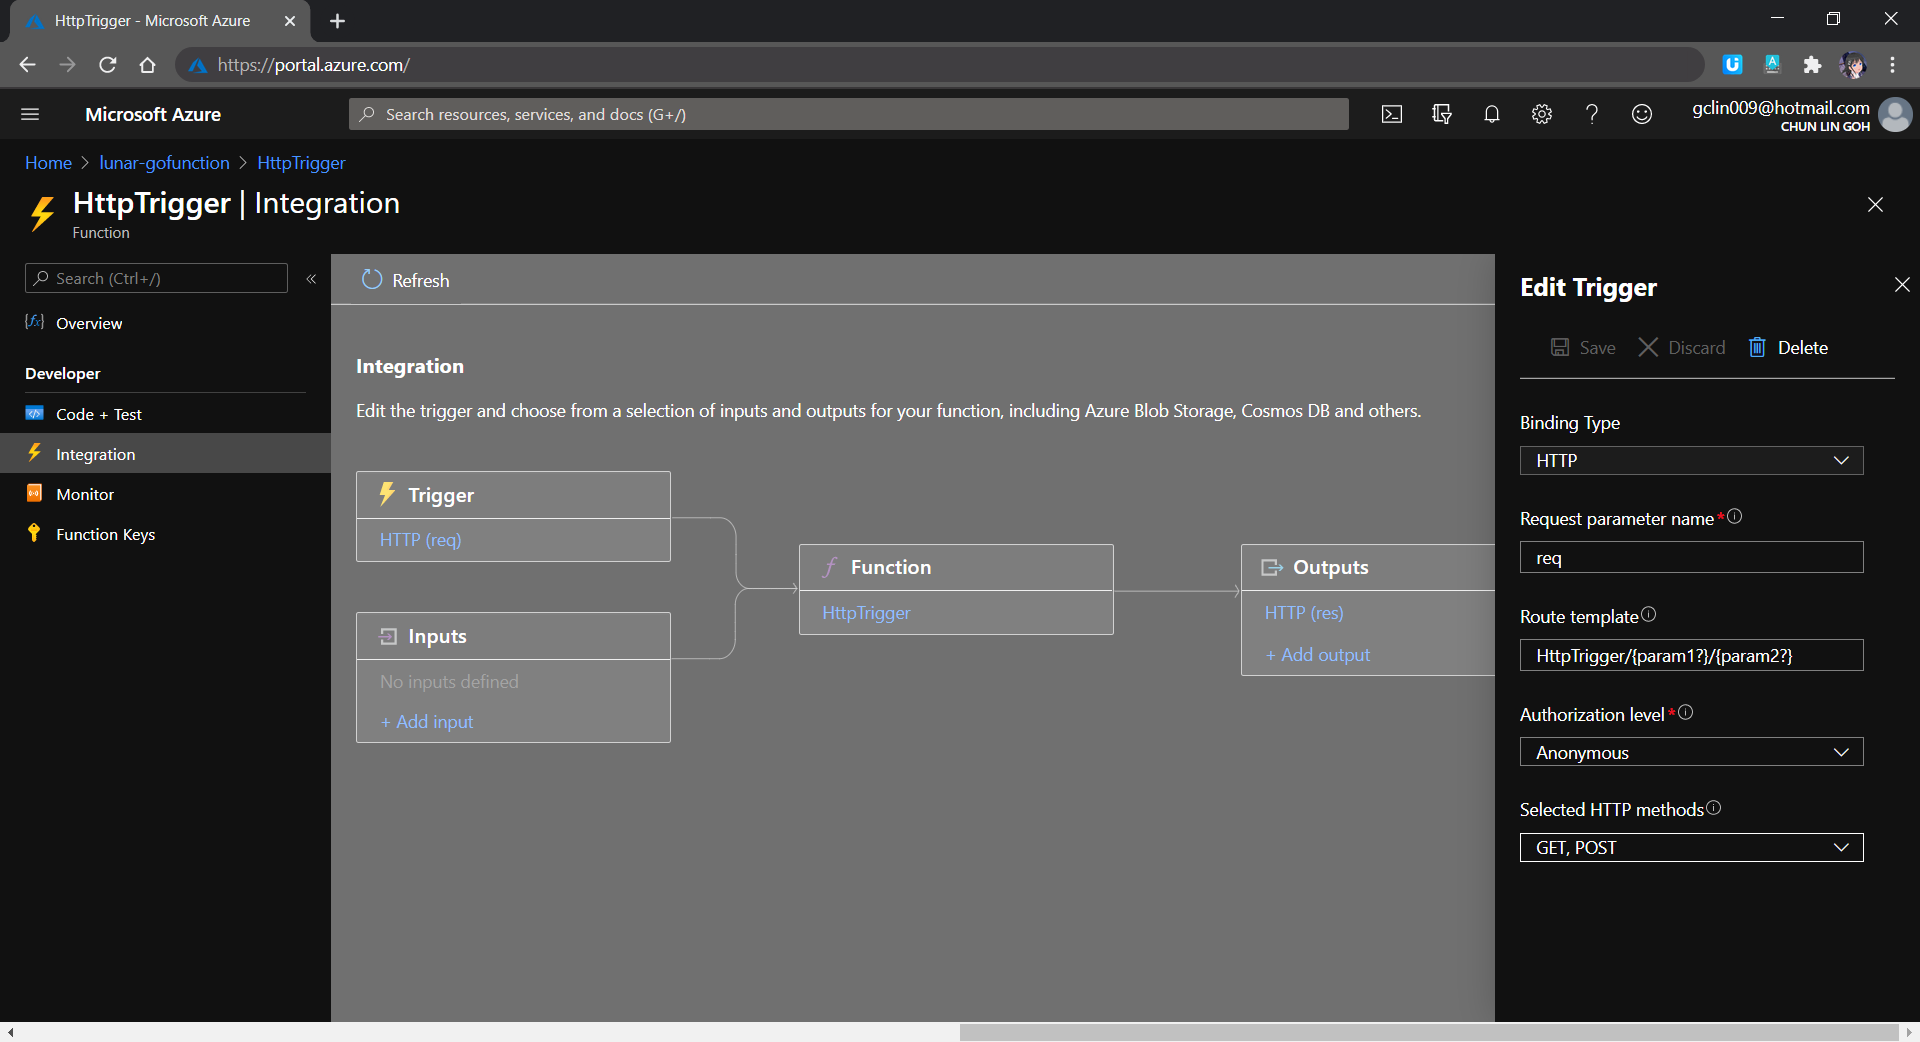
Hence, I move all the CSS, JS, and image files to Azure Storage instead.
From the Route Template in the screenshot above, we can also understand why the routes in our Golang web app needs to start with /api/HttpTrigger.
Golang Client Library for OneDrive API
In this project, users will first store the music files online at their personal OneDrive Music folder. I restrict it to only the Music folder is to make the management of the music to be more organised. So it is not because there is technical challenge in getting files from other folders in OneDrive.
Referring to the Google project where they build a Golang client library for accessing the GitHub API, I have also come up with go-onedrive, a Golang client library, which is still in progress, to access the Microsoft OneDrive.
Currently, the go-onedrive only support simple API methods such as getting Drives and DriveItems. These two are the most important API methods for our web app in this project. I will continue to enhance the go-onedrive library in the future.

The go-onedrive library does not directly handle authentication. Instead, when creating a new client, we need to pass an http.Client that can handle authentication. The easiest and recommended way to do this is using the oauth2 library.
So the next thing we need to do is adding user authentication feature to our web app.
Microsoft Graph and Microsoft Identity platform
Before our web app can make requests to OneDrive, it needs users to authenticate and authorise the application to have access to their data. Currently, the official recommended way of doing so is to use Microsoft Graph, a set of REST APIs which enable us to access data on Microsoft cloud services, such as OneDrive, User, Calendar, People, etc. For more information, please refer to the YouTube video below.
So we can send HTTP GET requests to endpoints to retrieve information from OneDrive, for example /me/drives will return the default drive of the currently authenticated user.
Generally, to access OneDrive API, developers are recommend to use the standard OAuth 2.0 authorisation framework with the Azure AD v2.0 endpoint. This is where we will talk about the new Microsoft Identity Platform, which is the recommended way for accessing Microsoft Graph APIs. Microsoft Identity Platform allows developers to build applications that sign in users, get tokens to call the APIs, as shown in the diagram below.

By the way, according to Microsoft, the support for ADAL will come to an end in June 2022. So it’s better to do the necessary migration if you are still using the v1.0. Currently, the Golang oauth2 package is already using the Microsoft Identity Platform endpoints.

Now the first step we need to do is to register an Application with Microsoft on the Azure Portal. From there, we can get both the Client ID and the Client Secret (secret is now available under the “Certificates & secrets” section of the Application).
After that, we need to find out the authentication scopes to use so that the correct access type is granted when the user is signed in from our web app.
With those information available, we can define the OAuth2 configuration as follows in our web app.
var oauthConfig = &oauth2.Config{
    RedirectURL:  AzureADCallbackURL,
    ClientID:     AzureADClientID,
    ClientSecret: AzureADClientSecret,
    Scopes:       []string{"files.read offline_access"},
    Endpoint:     microsoft.AzureADEndpoint("common"),
}
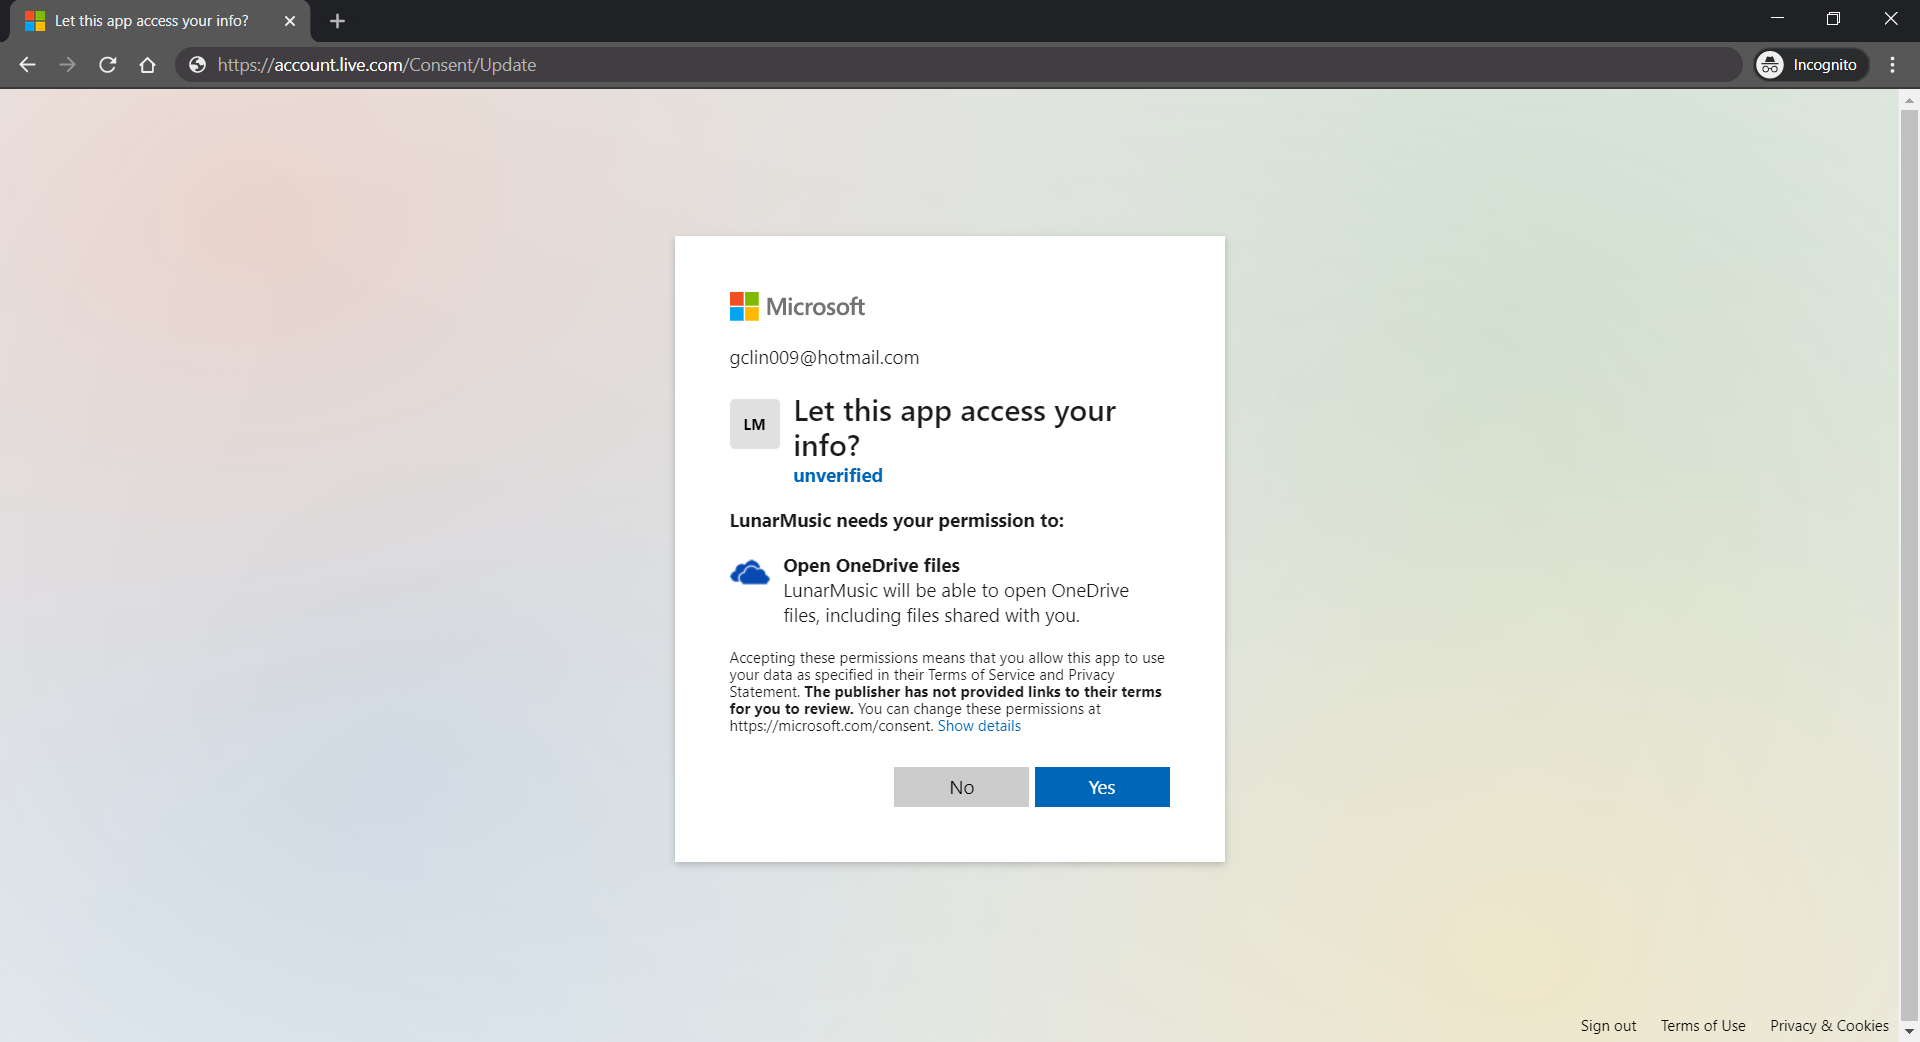
The “file.read” scope is to grant read-only permission to all OneDrive files of the logged in user. By the way, to check the Applications that you are given access to so far in Microsoft Account, you can refer to the consent management page of Microsoft Account.
Access Token, Refresh Token, and Cookie
The “offline_access” scope is used here because we need a refresh token that can be used to generate additional access tokens as necessary. However, please take note that this “offline_access” scope is not available for the Token Flow. Hence, what we can only use is the Code Flow, which is described in the following diagram.

Hence, this explains why we have the following codes in the /auth/callback, which is the Redirect URL of our registered Application. What the codes do is to get the access token and refresh token from the /token endpoint using the auth code returned from the /authorize endpoint.
r := context.Request
code := r.FormValue("code")

response, err := http.PostForm(
    microsoft.AzureADEndpoint("common").TokenURL,
    url.Values{
        "client_id":     {AzureADClientID},
        "redirect_uri":  {AzureADCallbackURL},
        "client_secret": {AzureADClientSecret},
        "code":          {code},
        "grant_type":    {"authorization_code"}
    }
)
Here, we cannot simply decode the response body into the oauth2.Token yet. This is because the JSON in the response body from the Azure AD token endpoint only has expires_in but not expiry. So it does not have any field that can map to the Expiry field in oauth2.Token. Without Expiry, the refresh_token will never be used, as highlighted in the following screenshot.

Hence, we must have our own struct tokenJSON defined so that we can first decode the response body to tokenJSON and then convert it to oauth2.Token with value in the Expiry field before passing the token to the go-onedrive client. By doing so, the access token will be automatically refreshed as necessary.
Finally, we just need to store the token in cookies using gorilla/securecookie which will encode authenticated and encrypted cookie as shown below.
encoded, err := s.Encode(ACCESS_AND_REFRESH_TOKENS_COOKIE_NAME, token)
if err == nil {
    cookie := &http.Cookie{
        Name: ACCESS_AND_REFRESH_TOKENS_COOKIE_NAME,
        Value: encoded,
        Path: "/",
        Secure: true,
        HttpOnly: true,
        SameSite: http.SameSiteStrictMode,
    }
    http.SetCookie(context.Writer, cookie)
}
Besides encryption, we also enable both Secure and HttpOnly attributes so that the cookie is sent securely and is not accessed by unintended parties or JavaScript Document.cookie API. The SameSite attribute also makes sure the cookie above not to be sent with cross-origin requests and thus provides some protection against Cross-Site Request Forgery (CSRF) attacks.
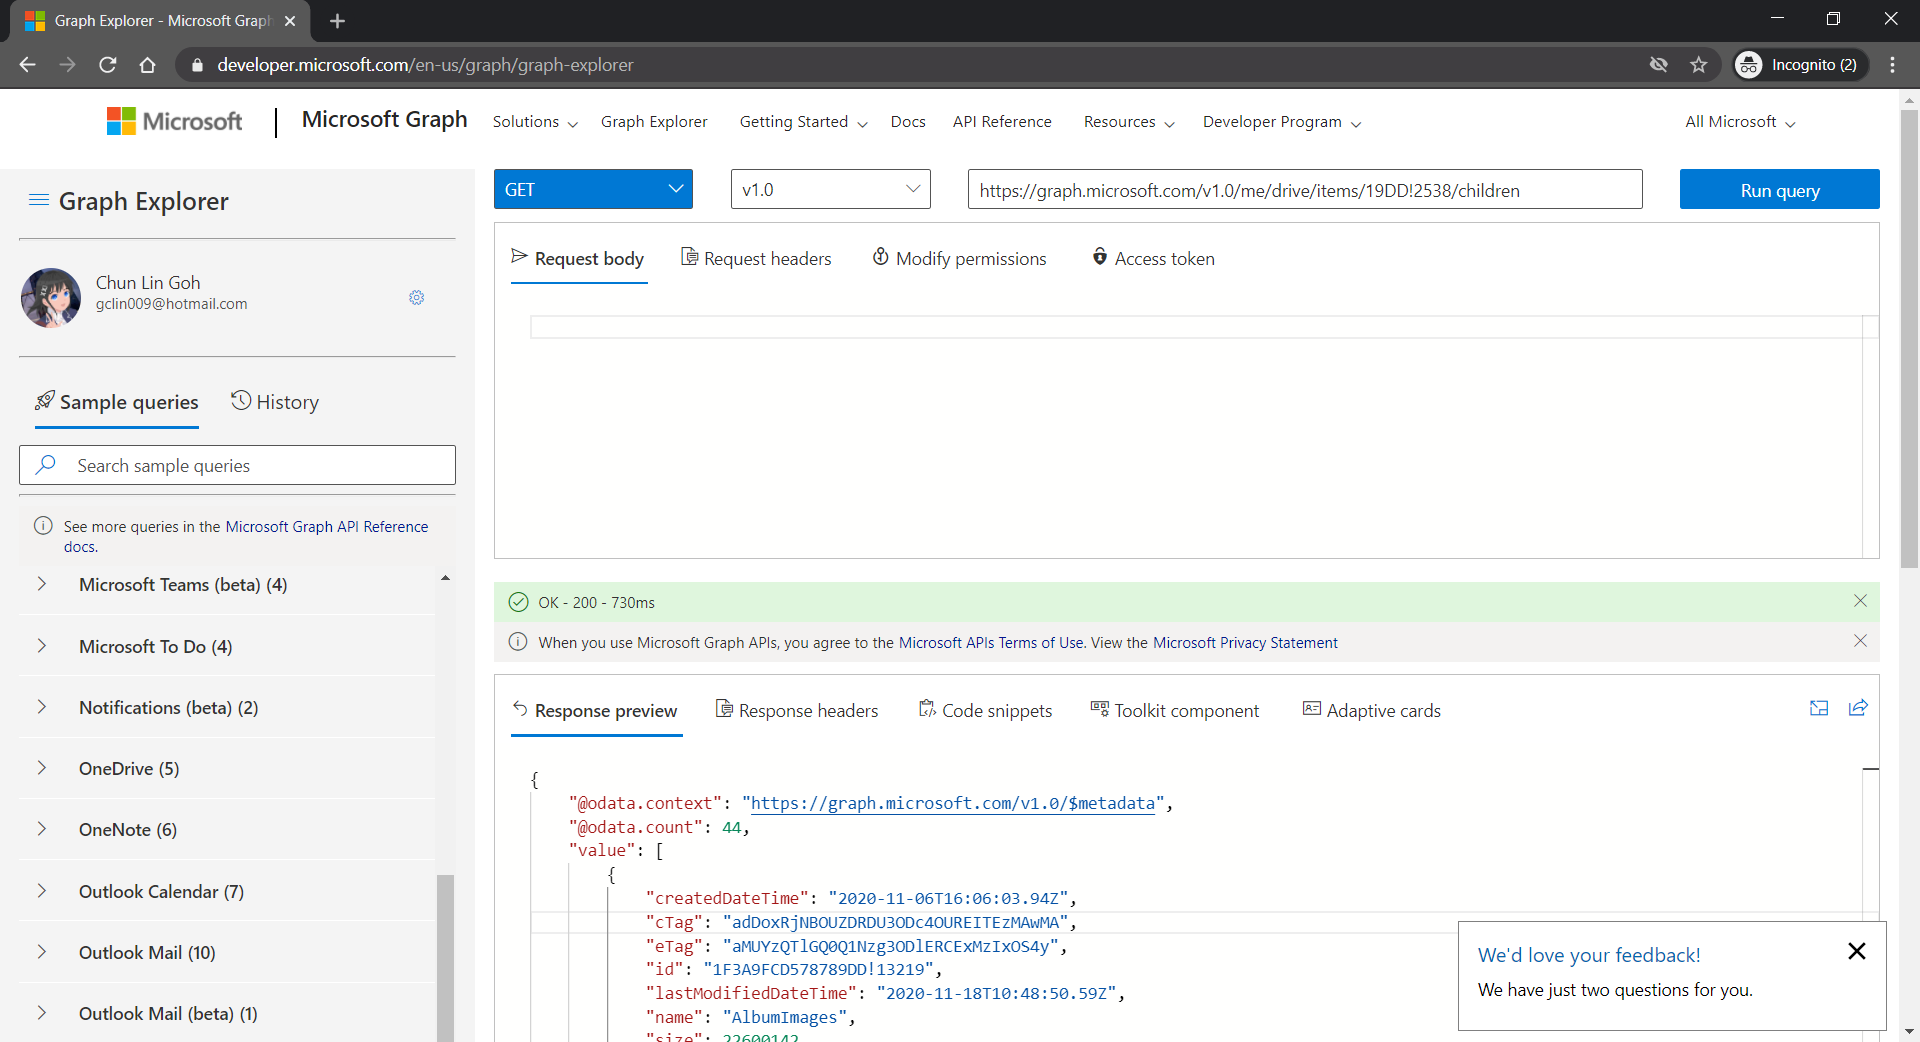
Microsoft Graph Explorer
For testing purposes, there is an official tool known as the Graph Explorer. It’s a tool that lets us make requests and see responses against the Microsoft Graph. From the Graph Explorer, we can also retrieve the Access Token and use it on other tools such as Postman to do further testing.
Azure Front door
In additional, Azure Front Door is added between the web app and the user in order to give us convenience in managing the global routing for the traffic to our web app.
The very first reason why I use Azure Front Door is also because I want to hide the /api/HttpTrigger part from the URL. This can be done by setting the custom forwarding path which points to the /api/HttpTrigger/ with URL rewrite enabled, as shown in the screenshot below.
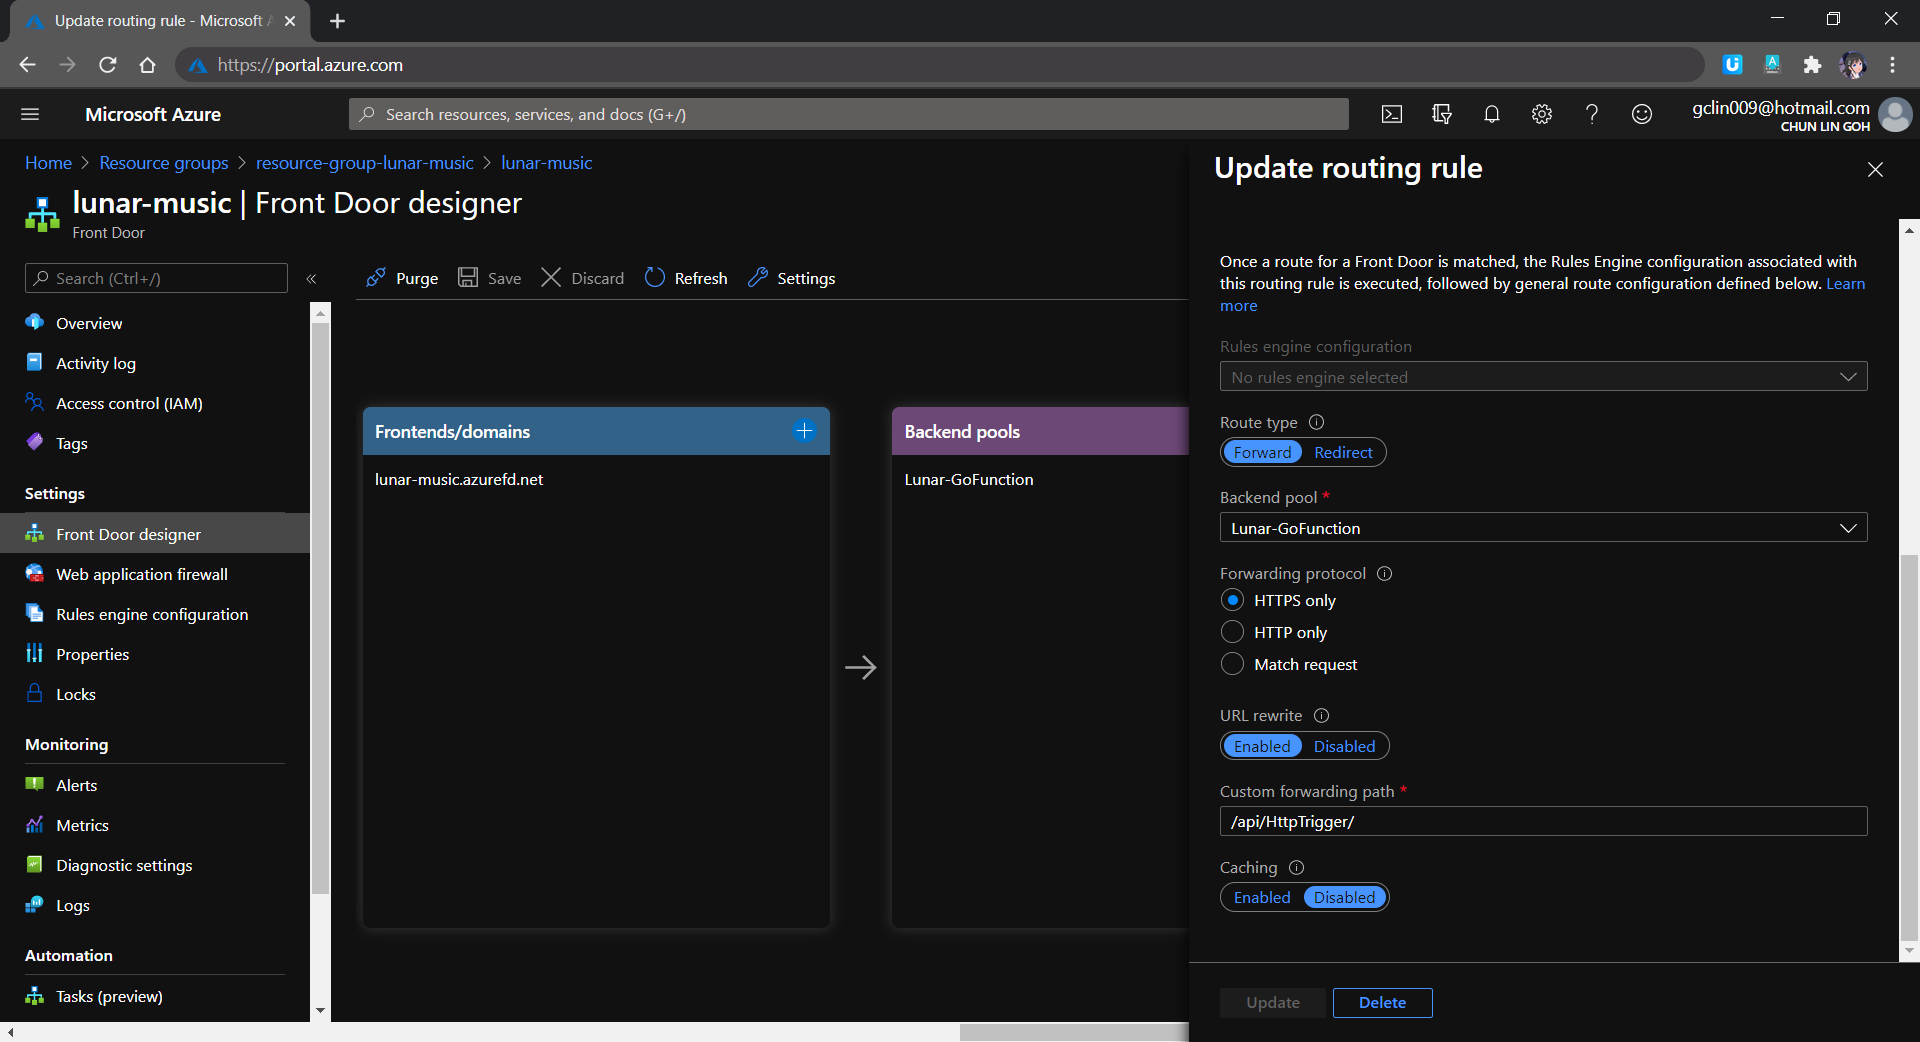
In the screenshot above, we also notice a field called Backend Pool. A backend pool is a set of equivalent backends to which Front Door load balances your client requests. In our project, this will be the Azure Function that we’ve created above. Hence, in the future, when we have deployed the same web app to multiple Azure Functions so that Azure Front Door can help us to do load balancing.
Finally, Azure Front Door also provides a feature called Session Affinity which enables direct subsequent traffic from a user session to the same application backend for processing using Front Door generated cookies. This feature can be useful if we are building a stateful applications.
Final Product
Let’s take a look what it looks like after we’ve deployed the web app above and uploaded some music to the OneDrive. The web app is accessible through the Azure Front Door URL now at https://lunar-music.azurefd.net/.

Yup, that’s all. I finally have a personal music entertainment system on Raspberry Pi. =)
References
- Building Go Web Applications and Microservices Using Gin;
- Azure Functions custom handlers (preview);
- Overview of Microsoft Graph;
- Microsoft identity platform documentation;
- End of support timelines for ADAL and Azure AD Graph API;
- Azure AD Endpoint V1 vs V2;
- OAuth 2.0 and OpenID Connect protocols on Microsoft identity platform;
- Authorization and sign-in for OneDrive in Microsoft Graph;
- oauth2 · pkg.go.dev;
- How to: Configure an application’s publisher domain;
- Using HTTP Cookies – MDN Web Docs.
The code of the music player described in this article can be found in my GitHub repository: https://github.com/goh-chunlin/Lunar.Music.Web.
If you would like to find out more about Microsoft Identity Platform, you can also refer to the talk below given by Christos Matskas, Microsoft Senior Program Manager. Enjoy!