Processing S3 Data before Returning It with Object Lambda (version 2024)

We use Amazon S3 to store data for easy sharing among various applications. However, each application has its unique requirements and might require a different perspective on the data. To solve this problem, at times, we store additional customised datasets of the same data, ensuring that each application has its own unique dataset. This sometimes creates another set of problems because we now need to maintain additional datasets.

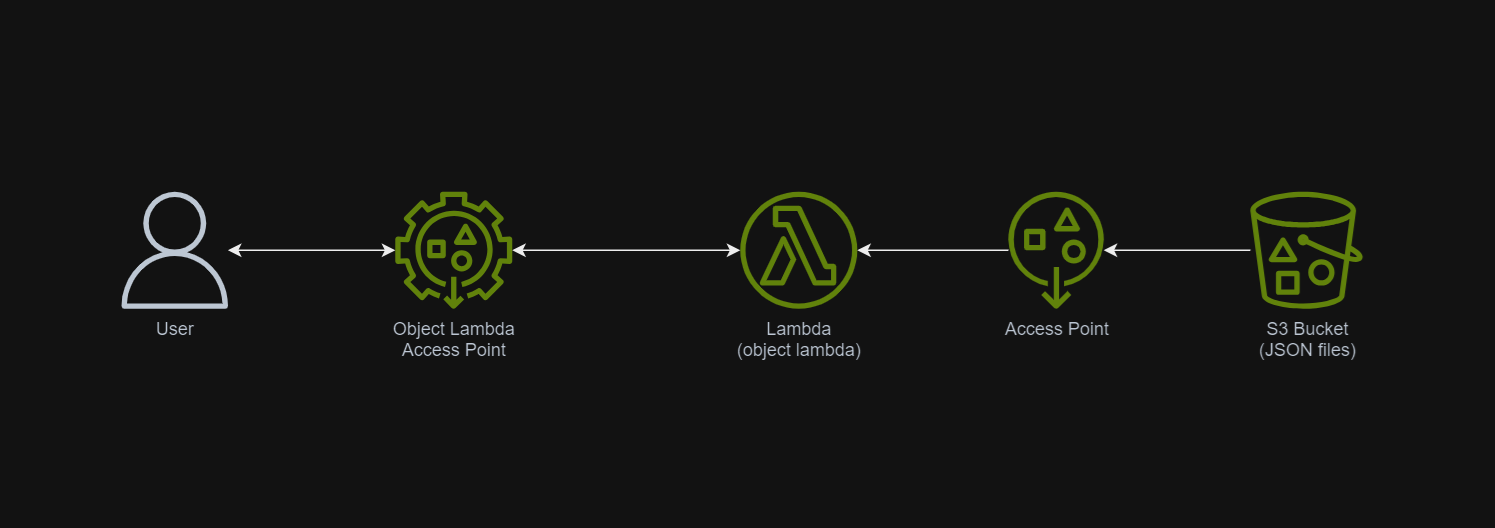
In March 2021, a new feature known as S3 Object Lambda was introduced. Similar to the idea of setting up a proxy layer in front of S3 to intercept and process data as it is requested, Object Lambda uses AWS Lambda functions to automatically process and transform your data as it is being retrieved from S3. With Object Lambda, we only need to change our apps to use the new S3 Object Lambda Access Point instead of the actual bucket name to retrieve data from S3.

Simplified architecture diagram showing how S3 Object Lambda works.

Example: Turning JSON to Web Page with S3 Object Lambda

I have been keeping details of my visits to medical centres as well as the treatments and medicines I received in a JSON file. So, I would like to take this opportunity to show how S3 Object Lambda can help in doing data processing.

The JSON file looks something as follows.

{
"visits": [
{
"medicalCentreName": "Tan Tock Seng Hospital",
"centreType": "hospital",
"visitStartDate": {
"year": 2024,
"month": 3,
"day": 24
},
"visitEndDate": {
"year": 2024,
"month": 4,
"day": 19
},
"purpose": "",
"treatments": [
{
"name": "Antibiotic Meixam(R) 500 Cloxacillin Sodium",
"type": "medicine",
"amount": "100ml per doese every 4 hours",
"startDate": {
"year": 2024,
"month": 3,
"day": 26
},
"endDate": {
"year": 2024,
"month": 4,
"day": 19
}
},
...
]
},
...
]
}

In this article, I will show the steps I took to setup the S3 Object Lambda architecture for this use case.

Step 1: Building the Lambda Function

Before we begin, we need to take note that the maximum duration for a Lambda function used by S3 Object Lambda is 60 seconds.

We need a Lambda Function to do the data format transformation from JSON to HTML. To keep things simple, we will be developing the Function using Python 3.12.

Object Lambda does not need any API Gateway since it should be accessed via the S3 Object Lambda Access Point.

In the beginning, we can have the code as follows. The code basically does two things. Firstly, it performs some logging. Secondly, it reads the JSON file from S3 Bucket.

import json
import os
import logging
import boto3
from urllib import request
from urllib.error import HTTPError
from types import SimpleNamespace

logger = logging.getLogger()
logger.addHandler(logging.StreamHandler())
logger.setLevel(getattr(logging, os.getenv('LOG_LEVEL', 'INFO')))

s3_client = boto3.client('s3')

def lambda_handler(event, context):
object_context = event["getObjectContext"]
# Get the presigned URL to fetch the requested original object from S3
s3_url = object_context["inputS3Url"]
# Extract the route and request token from the input context
request_route = object_context["outputRoute"]
request_token = object_context["outputToken"]

# Get the original S3 object using the presigned URL
req = request.Request(s3_url)
try:
response = request.urlopen(req)
responded_json = response.read().decode()
except Exception as err:
logger.error(f'Exception reading S3 content: {err}')
return {'status_code': 500}

json_object = json.loads(responded_json, object_hook=lambda d: SimpleNamespace(**d))

visits = json_object.visits

html = ''

s3_client.write_get_object_response(
Body = html,
ContentType = 'text/html',
RequestRoute = request_route,
RequestToken = request_token)

return {'status_code': 200}
Step 1.1: Getting the JSON File with Presigned URL

In the event that an Object Lambda receives, there is a property known as the getObjectContext, which contains useful information for us to figure out the inputS3Url, which is the presigned URL of the object in S3.

By default, all S3 objects are private and thus for a Lambda Function to access the S3 objects, we need to configure the Function to have S3 read permissions to retrieve the objects. However, with the presigned URL, the Function can get the object without the S3 read permissions.

In the code above, we can retrieve the JSON file from the S3 using its presigned URL. After that we parse the JSON file content with json.loads() method and convert it into a JSON object with SimpleNamespace. Thus the variable visits now should have all the visits data from the original JSON file.

Step 1.2: Call WriteGetObjectResponse

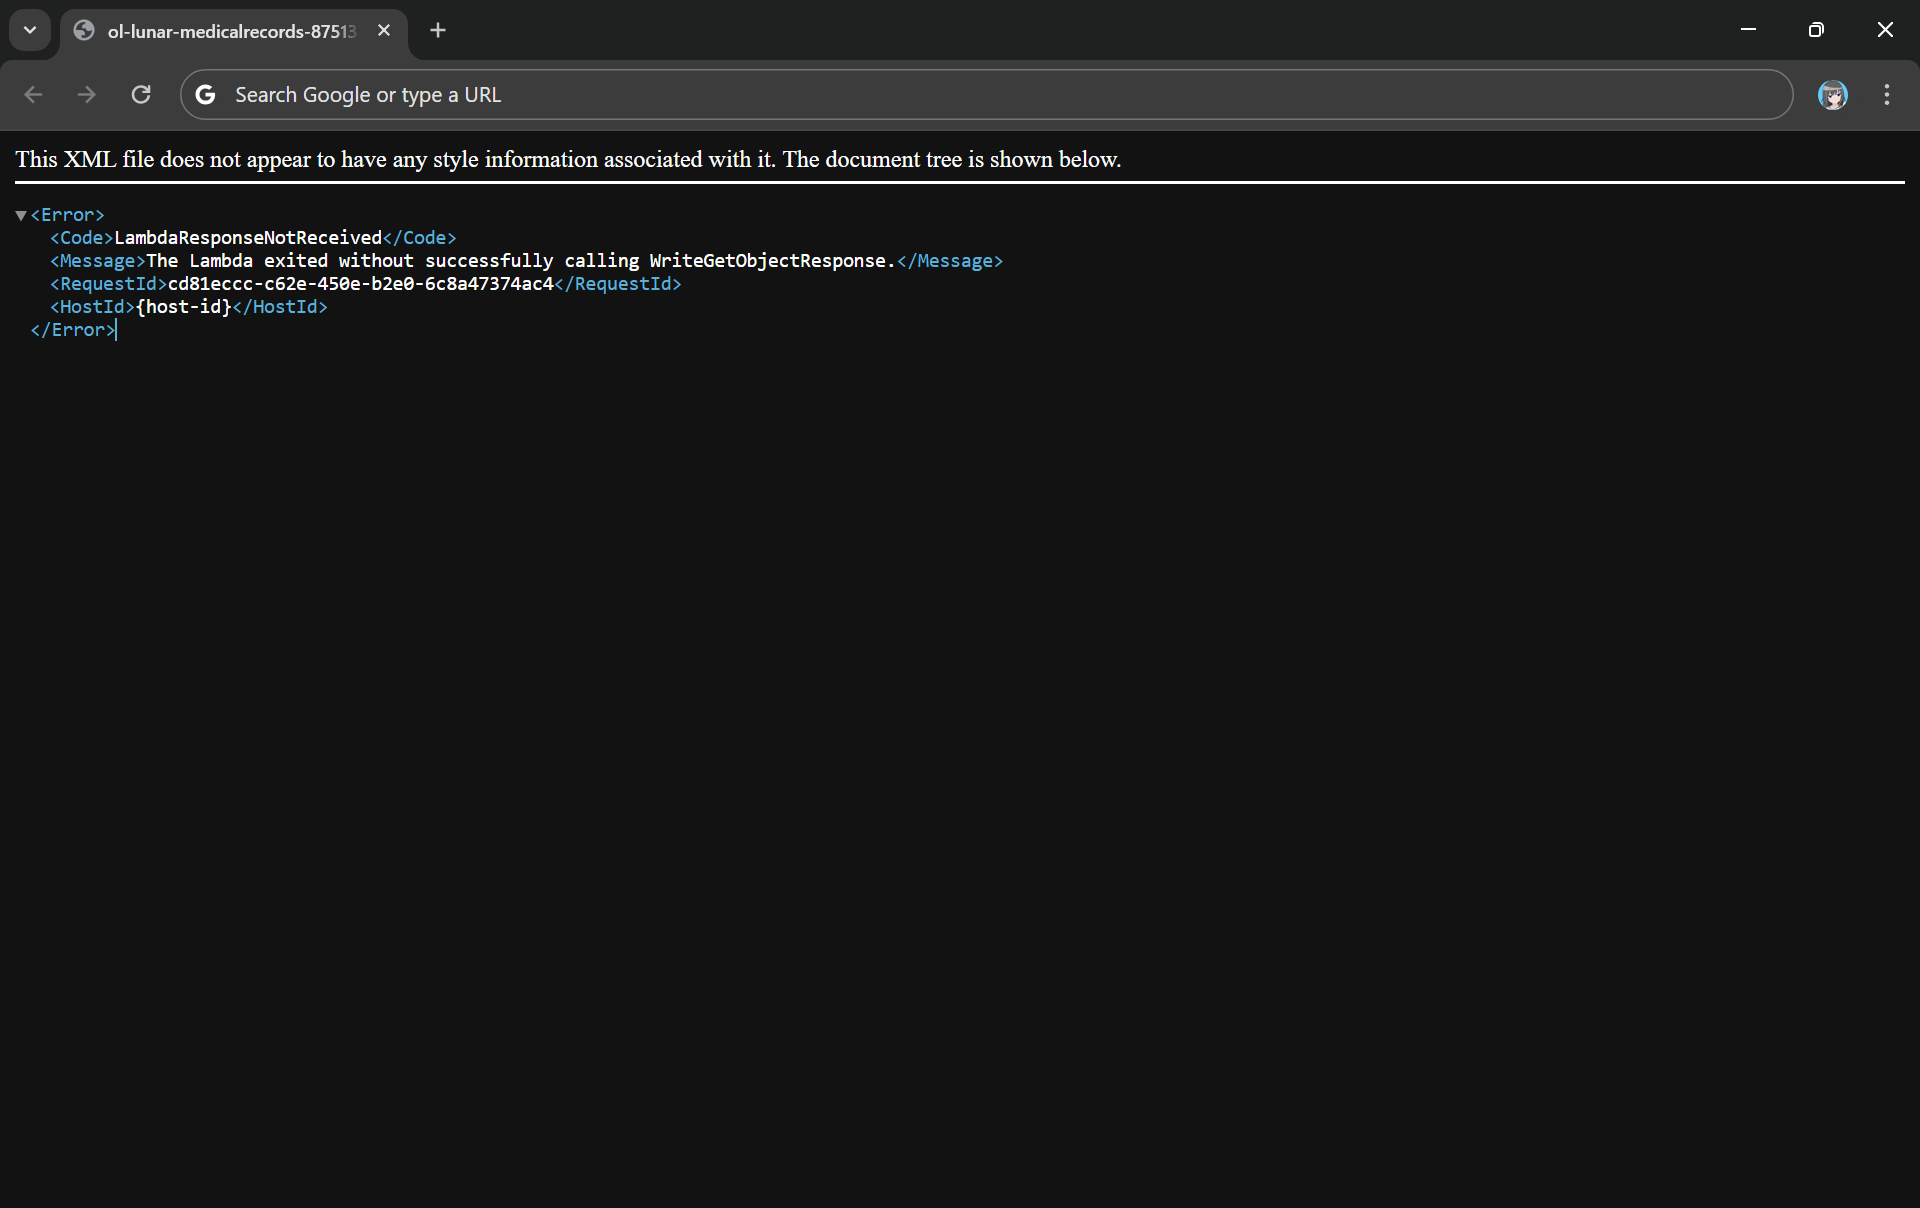
Since the purpose of Object Lambda is to process and transform our data as it is being retrieved from S3, we need to pass transformed object to a GetObject operation in the Function via the method write_get_object_response. Without this method, there will be an error from the Lambda complaining that it is missing.

Error: The Lambda exited without successfully calling WriteGetObjectResponse.

The method write_get_object_response requires two compulsory parameters, i.e. RequestRoute and RequestToken. Both of them are available from the property getObjectContext under the name outputRoute and outputToken.

Step 1.3: Get the HTML Template from S3

To make our Lambda code cleaner, we will not write the entire HTML there. Instead, we keep a template of the web page in another S3 bucket.

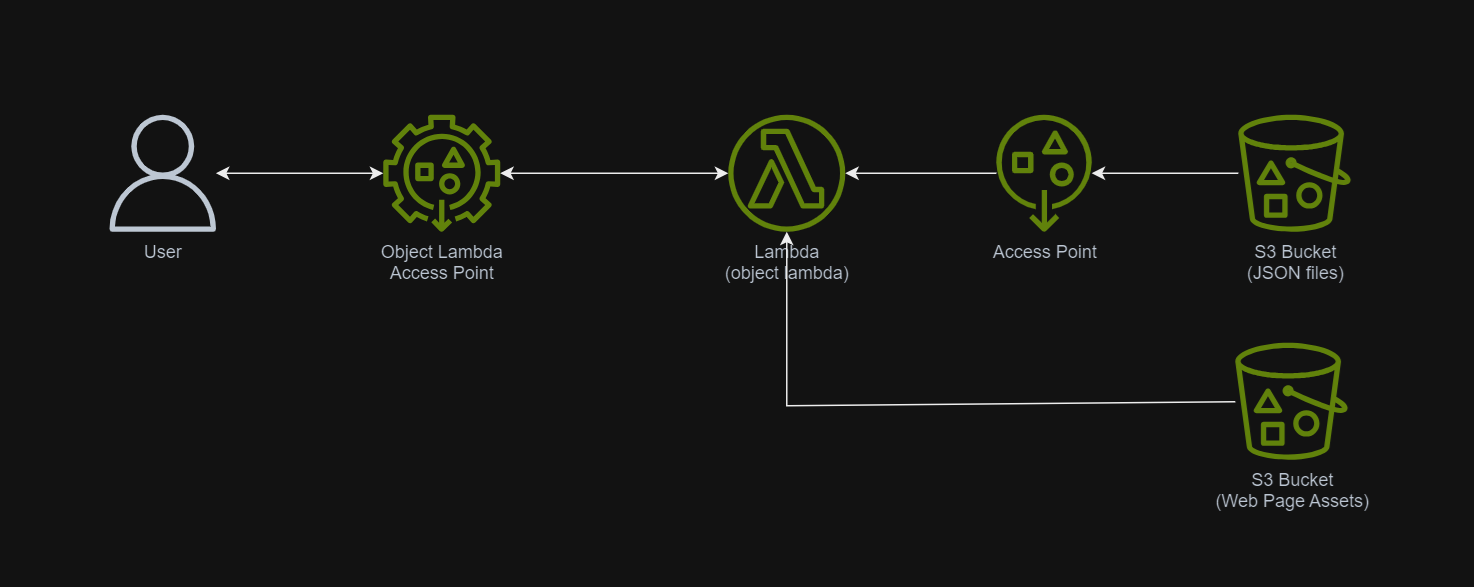
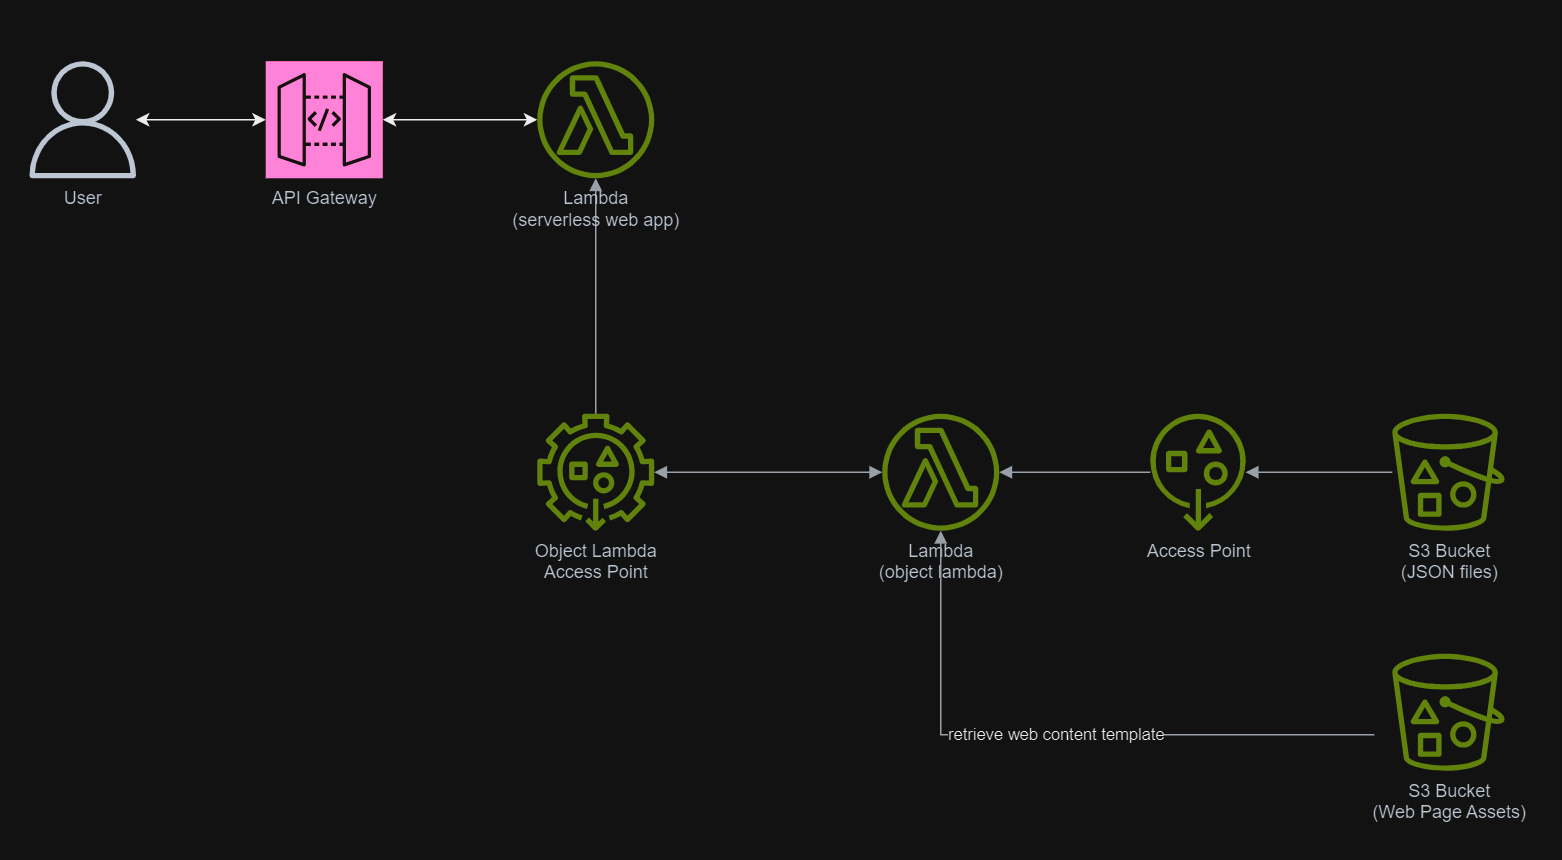
Now, the architecture above will be improved to include second S3 bucket which will provide web page template and other necessary static assets.

Introducing second S3 bucket for storing HTML template and other assets.

Now, we will replace the line html = '' earlier with the Python code below.

    template_response = s3_client.get_object(
Bucket = 'lunar.medicalrecords.static',
Key = 'medical-records.html'
)

template_object_data = template_response['Body'].read()
template_content = template_object_data.decode('utf-8')

dynamic_table = f"""
<table class="table accordion">
<thead>
<tr>
<th scope="col">#</th>
<th scope="col">Medical Centre</th>
<th scope="col">From</th>
<th scope="col">To</th>
<th scope="col">Purpose</th>
</tr>
</thead>

<tbody>
...
</tbody>
</table>"""

html = template_content.replace('{{DYNAMIC_TABLE}}', dynamic_table)

Step 2: Give Lambda Function Necessary Permissions

With the setup we have gone through above, we understand that our Lambda Function needs to have the following permissions.

  • s3-object-lambda:WriteGetObjectResponse
  • s3:GetObject

Step 3: Create S3 Access Point

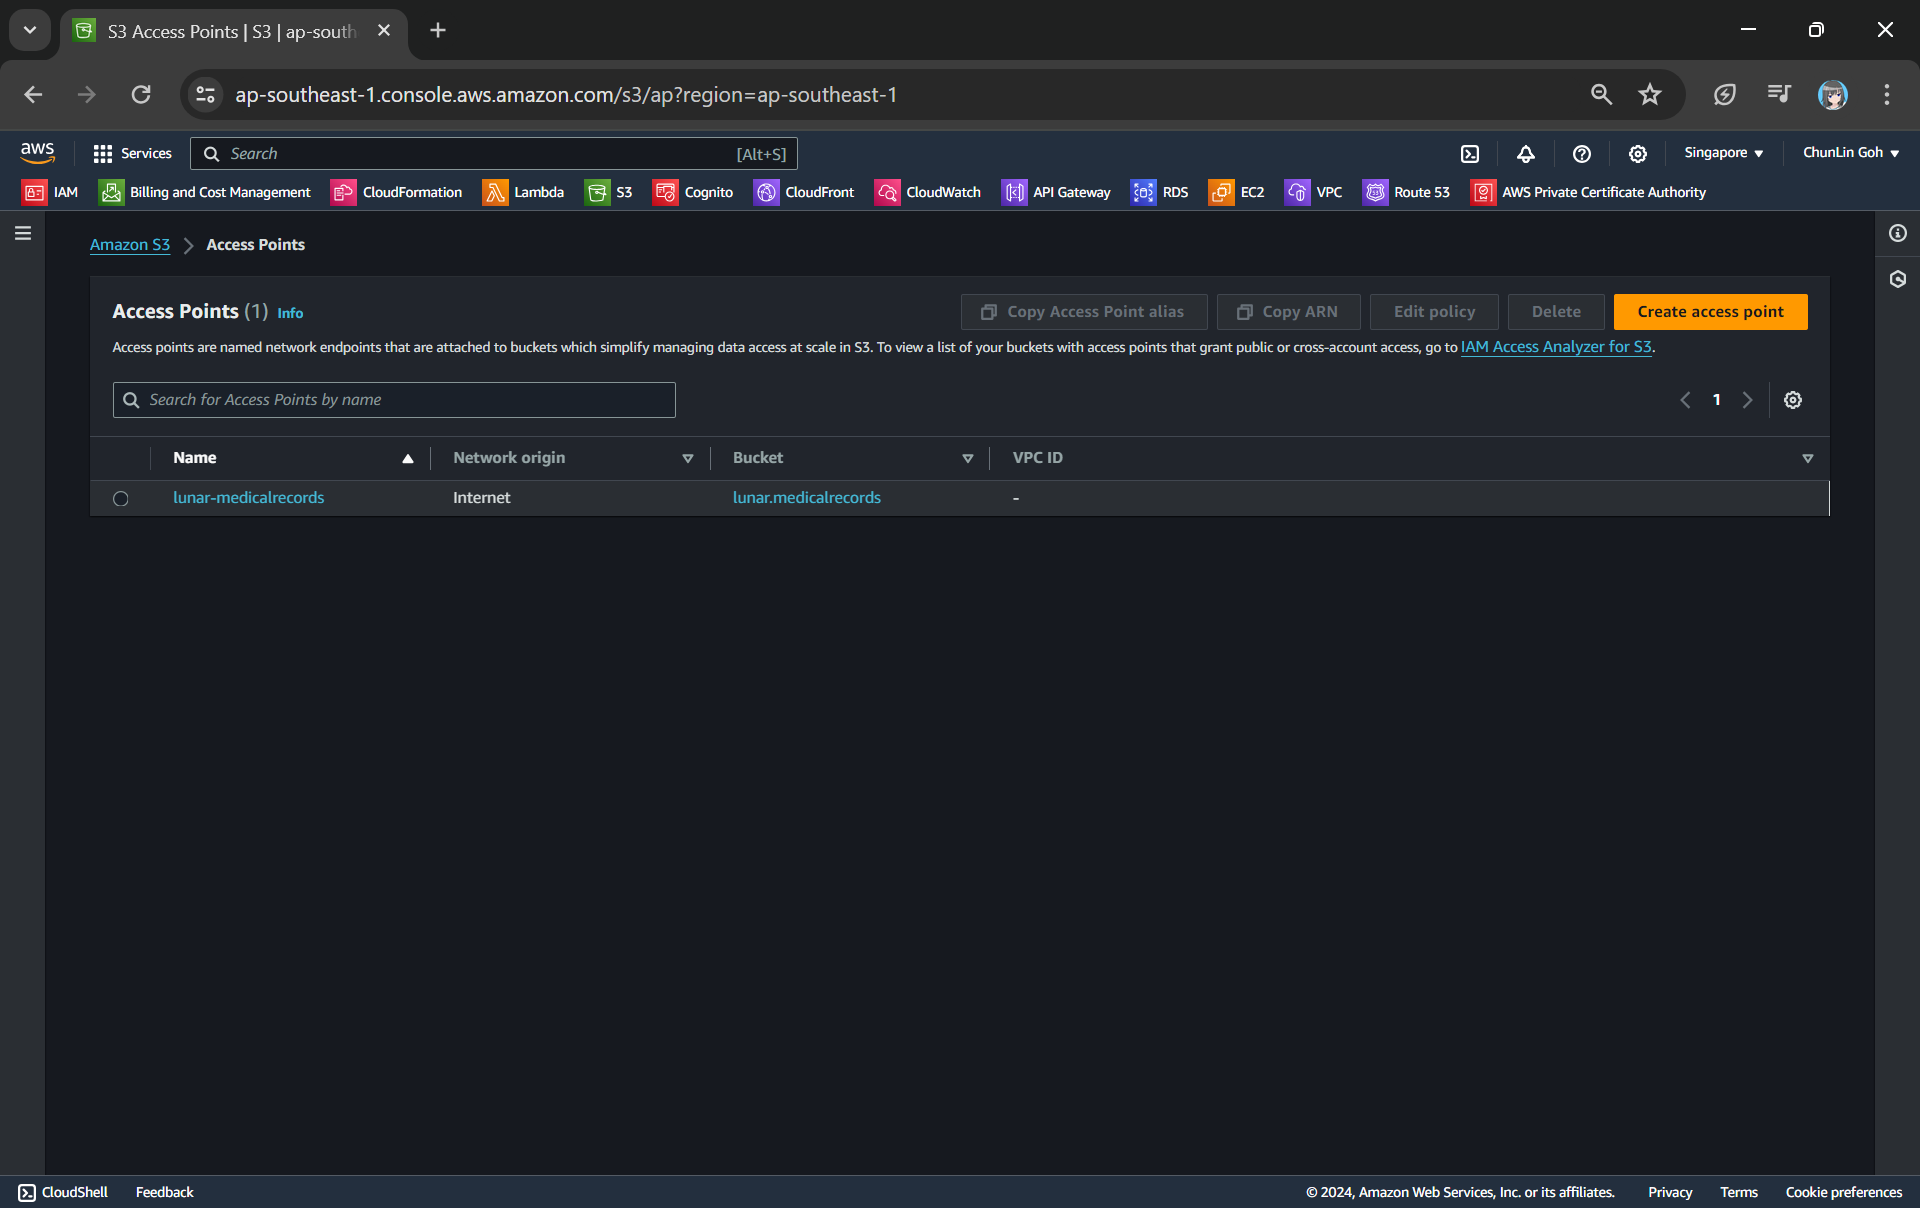
Next, we will need to create a S3 Access Point. It will be used to support the creation of the S3 Object Lambda Access Point later.

One of the features that S3 Access Point offers is that we can specify any name that is unique within the account and region. For example, as shown in the screenshot below, we can actually have a “lunar-medicalrecords” access point in every account and region.

Creating an access point from the navigation pane of S3.

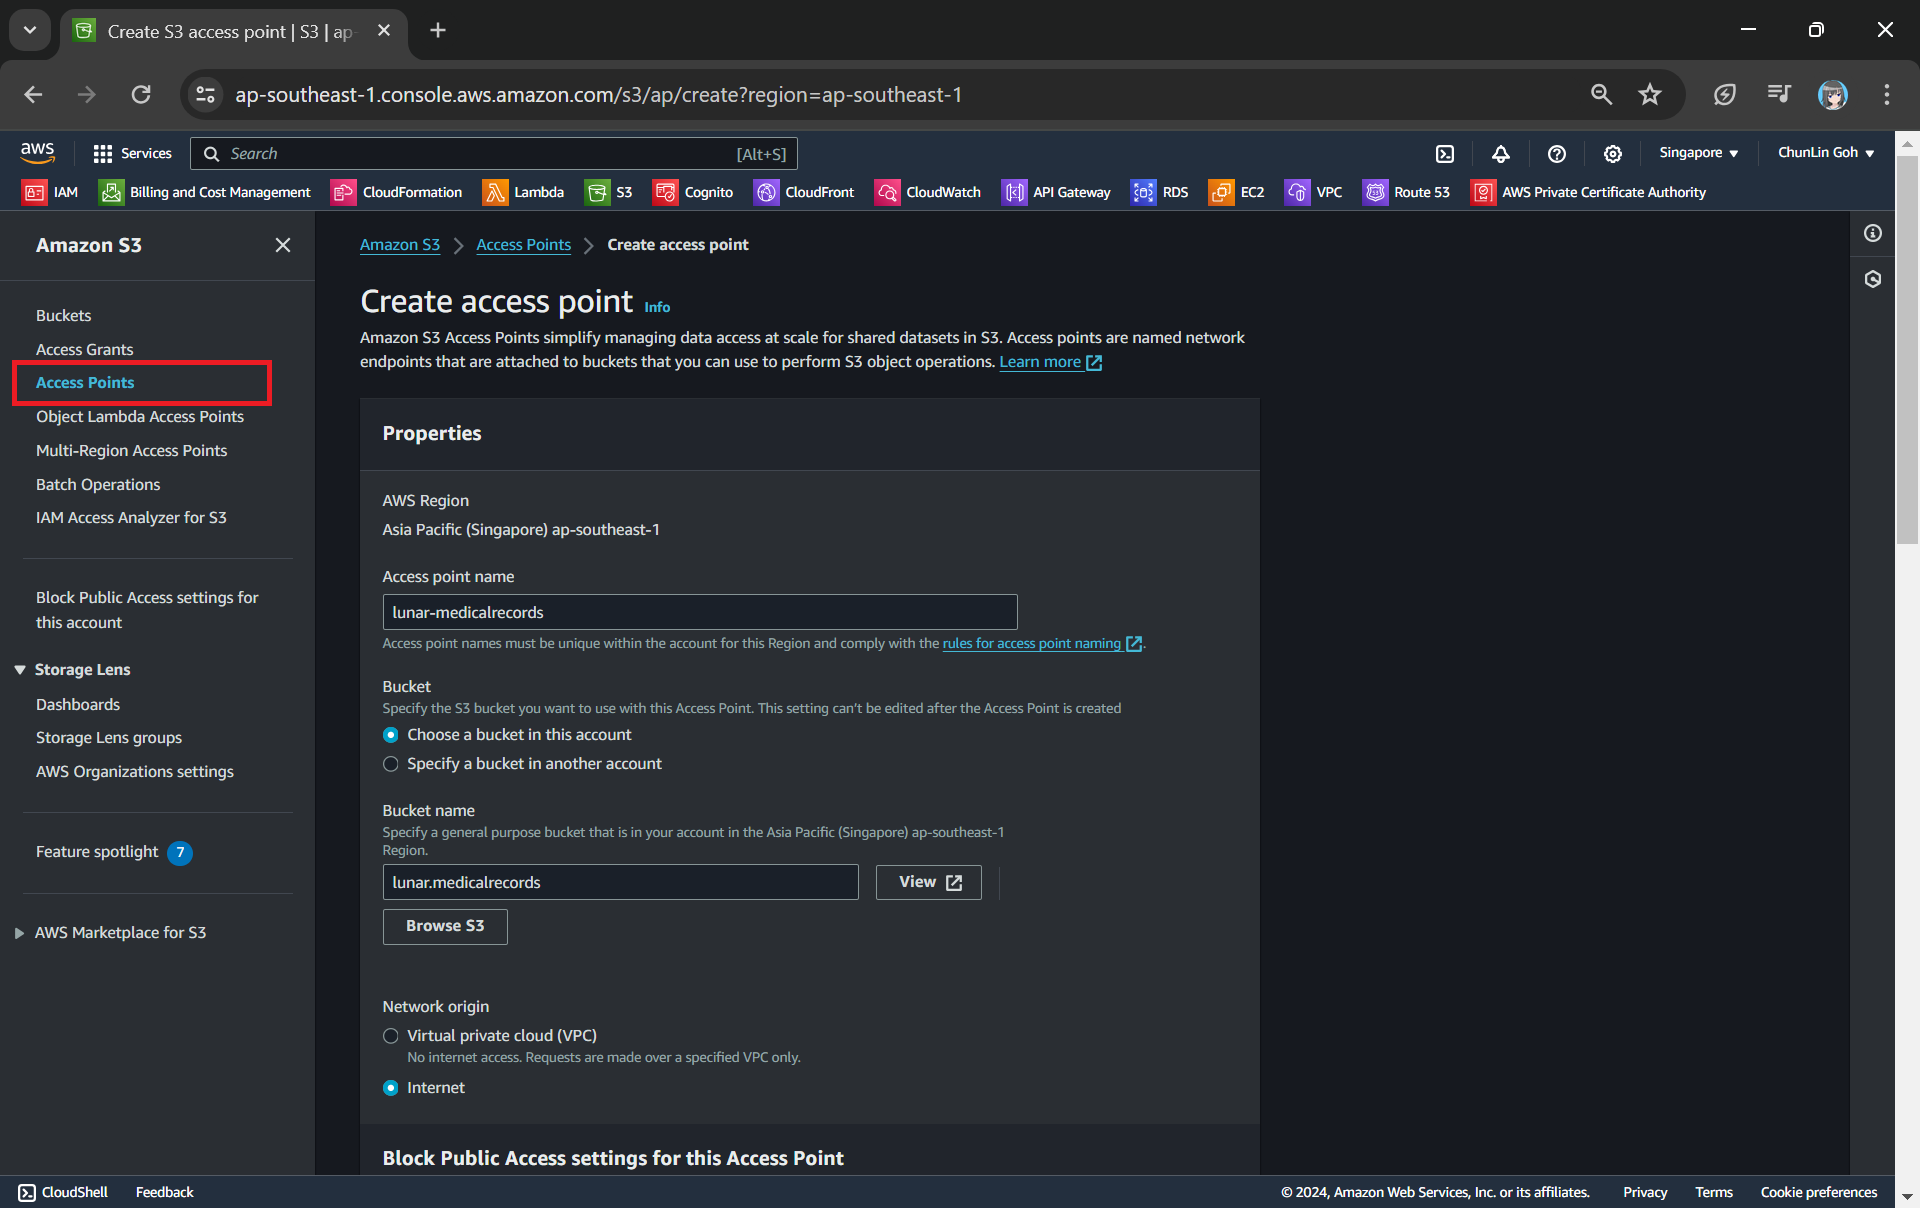
When we are creating the access point, we need to specify the bucket which resides in the same region that we want to use with this Access Point. In addition, since we are not restricting the access of it to only a specific VPC in our case, we will be choosing “Internet” for the “Network origin” field.

After that, we keep all other defaults as is. We can directly proceed to choose the “Create access point” button.

Our S3 Access Point is successfully created.

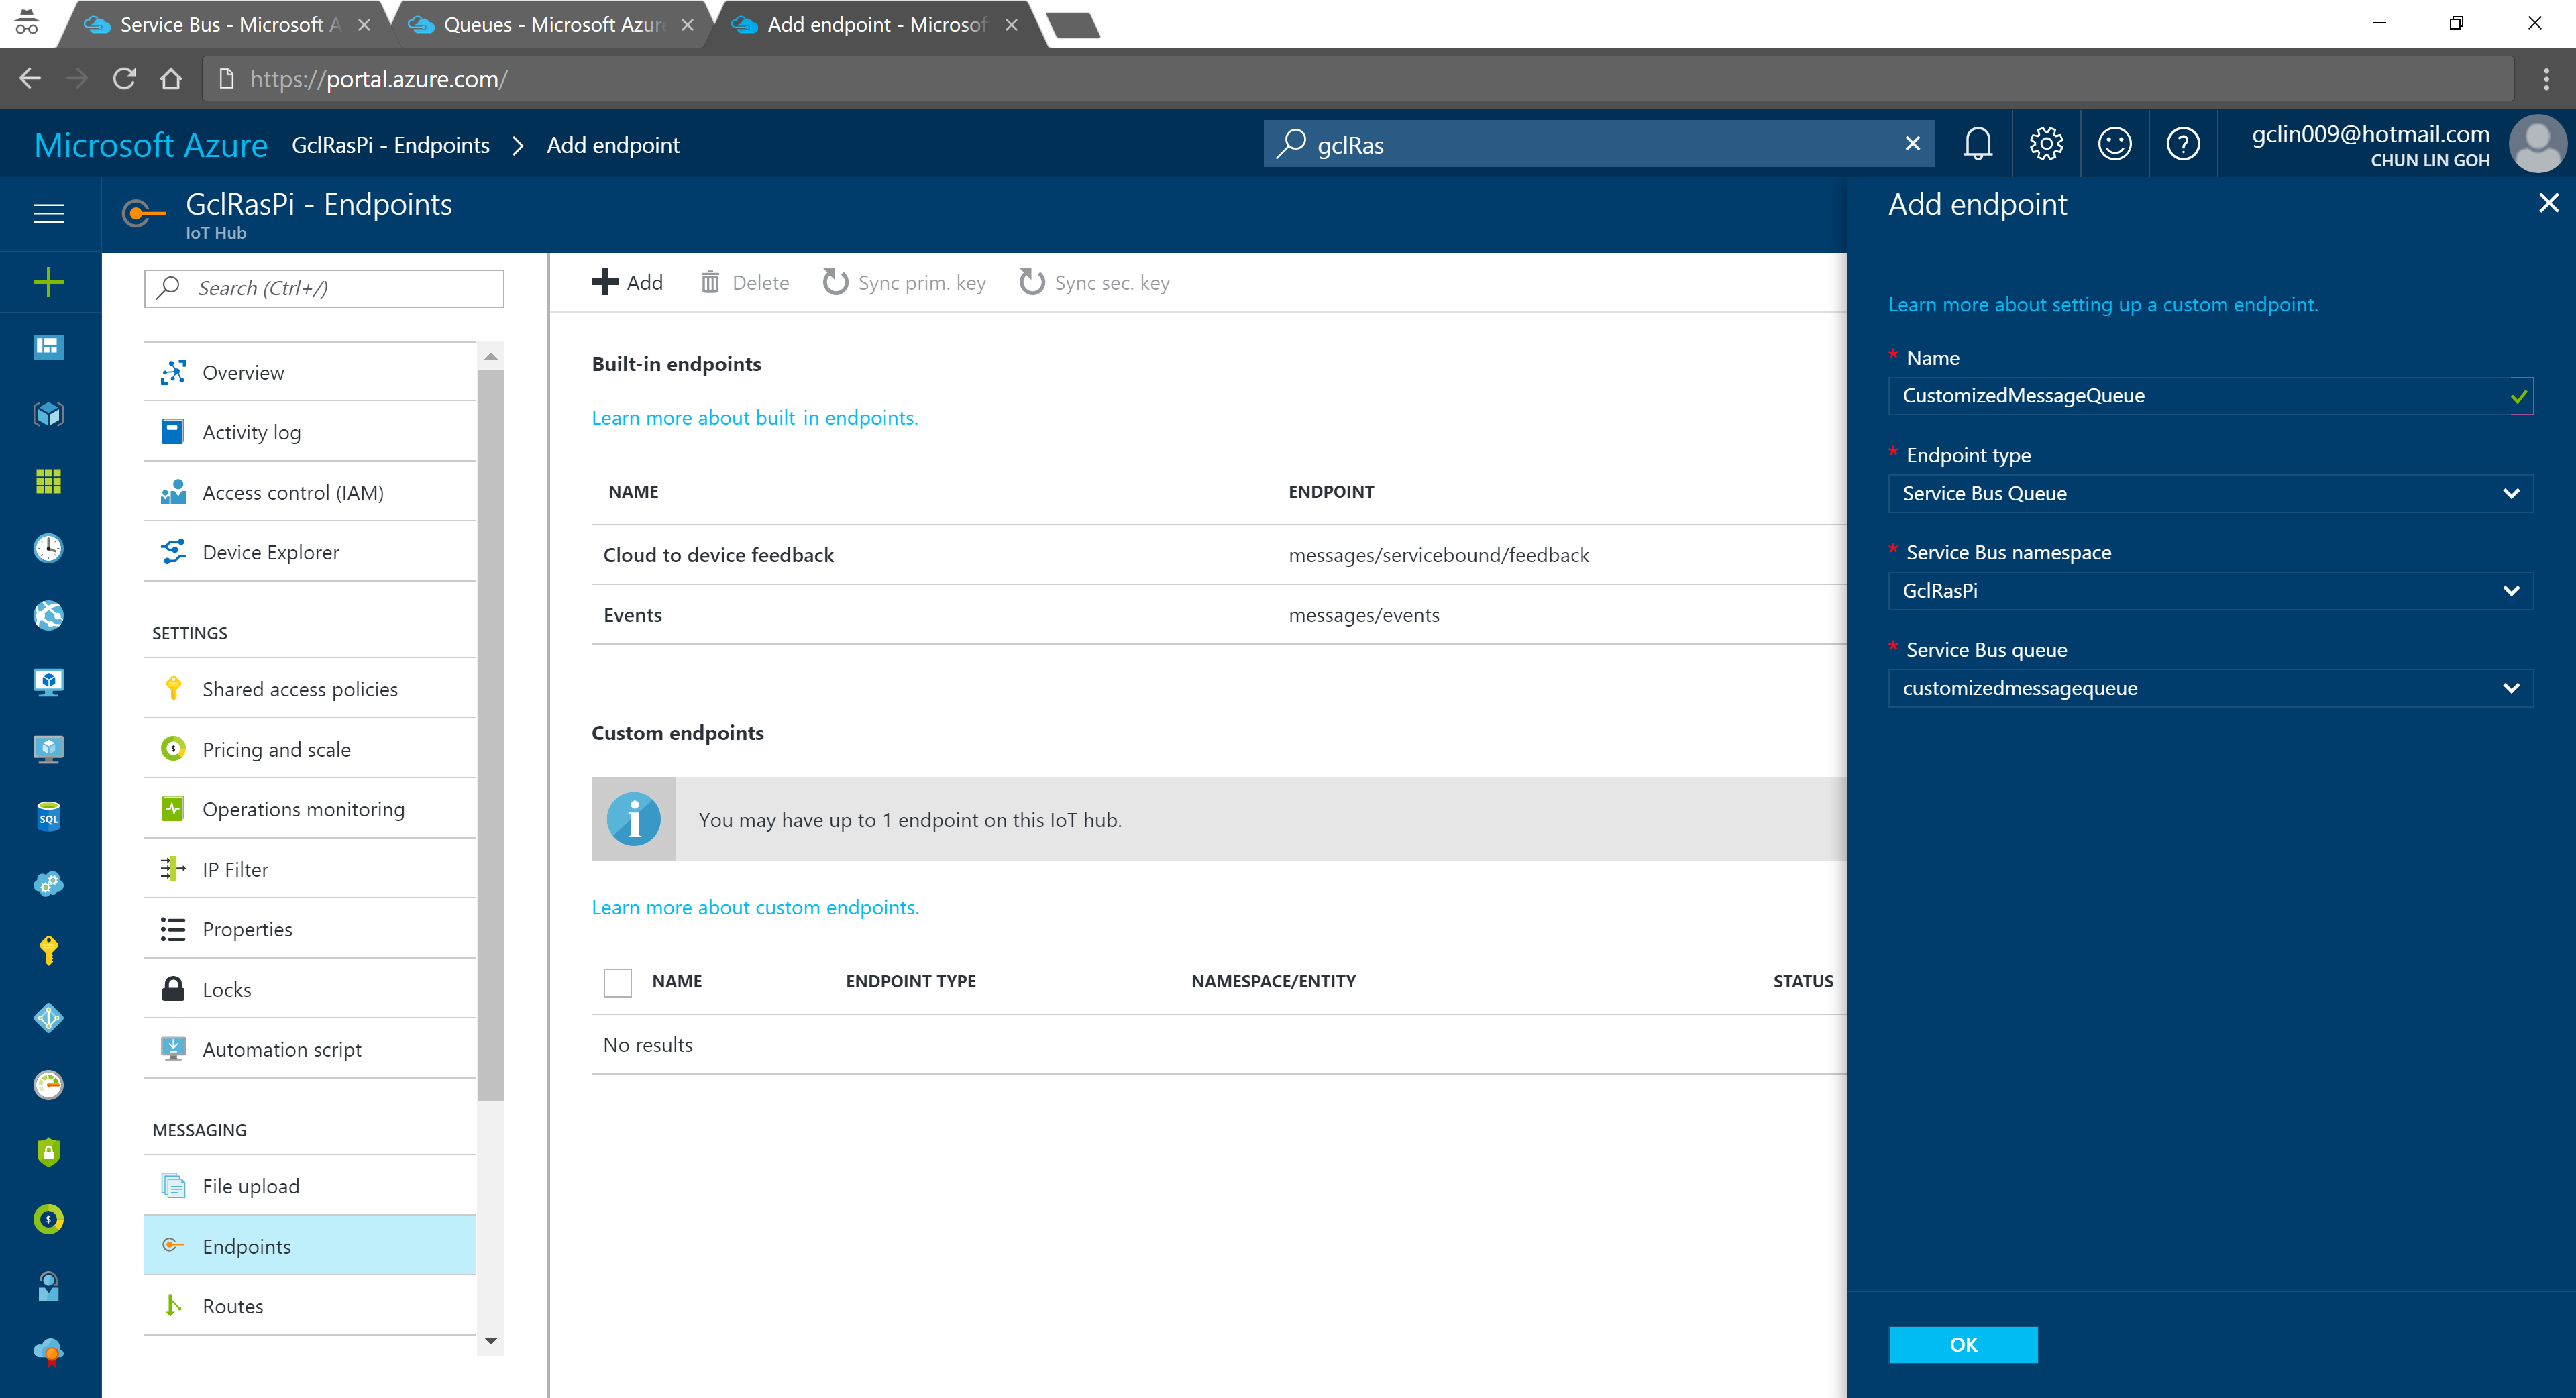
Step 4: Create S3 Object Lambda Access Point

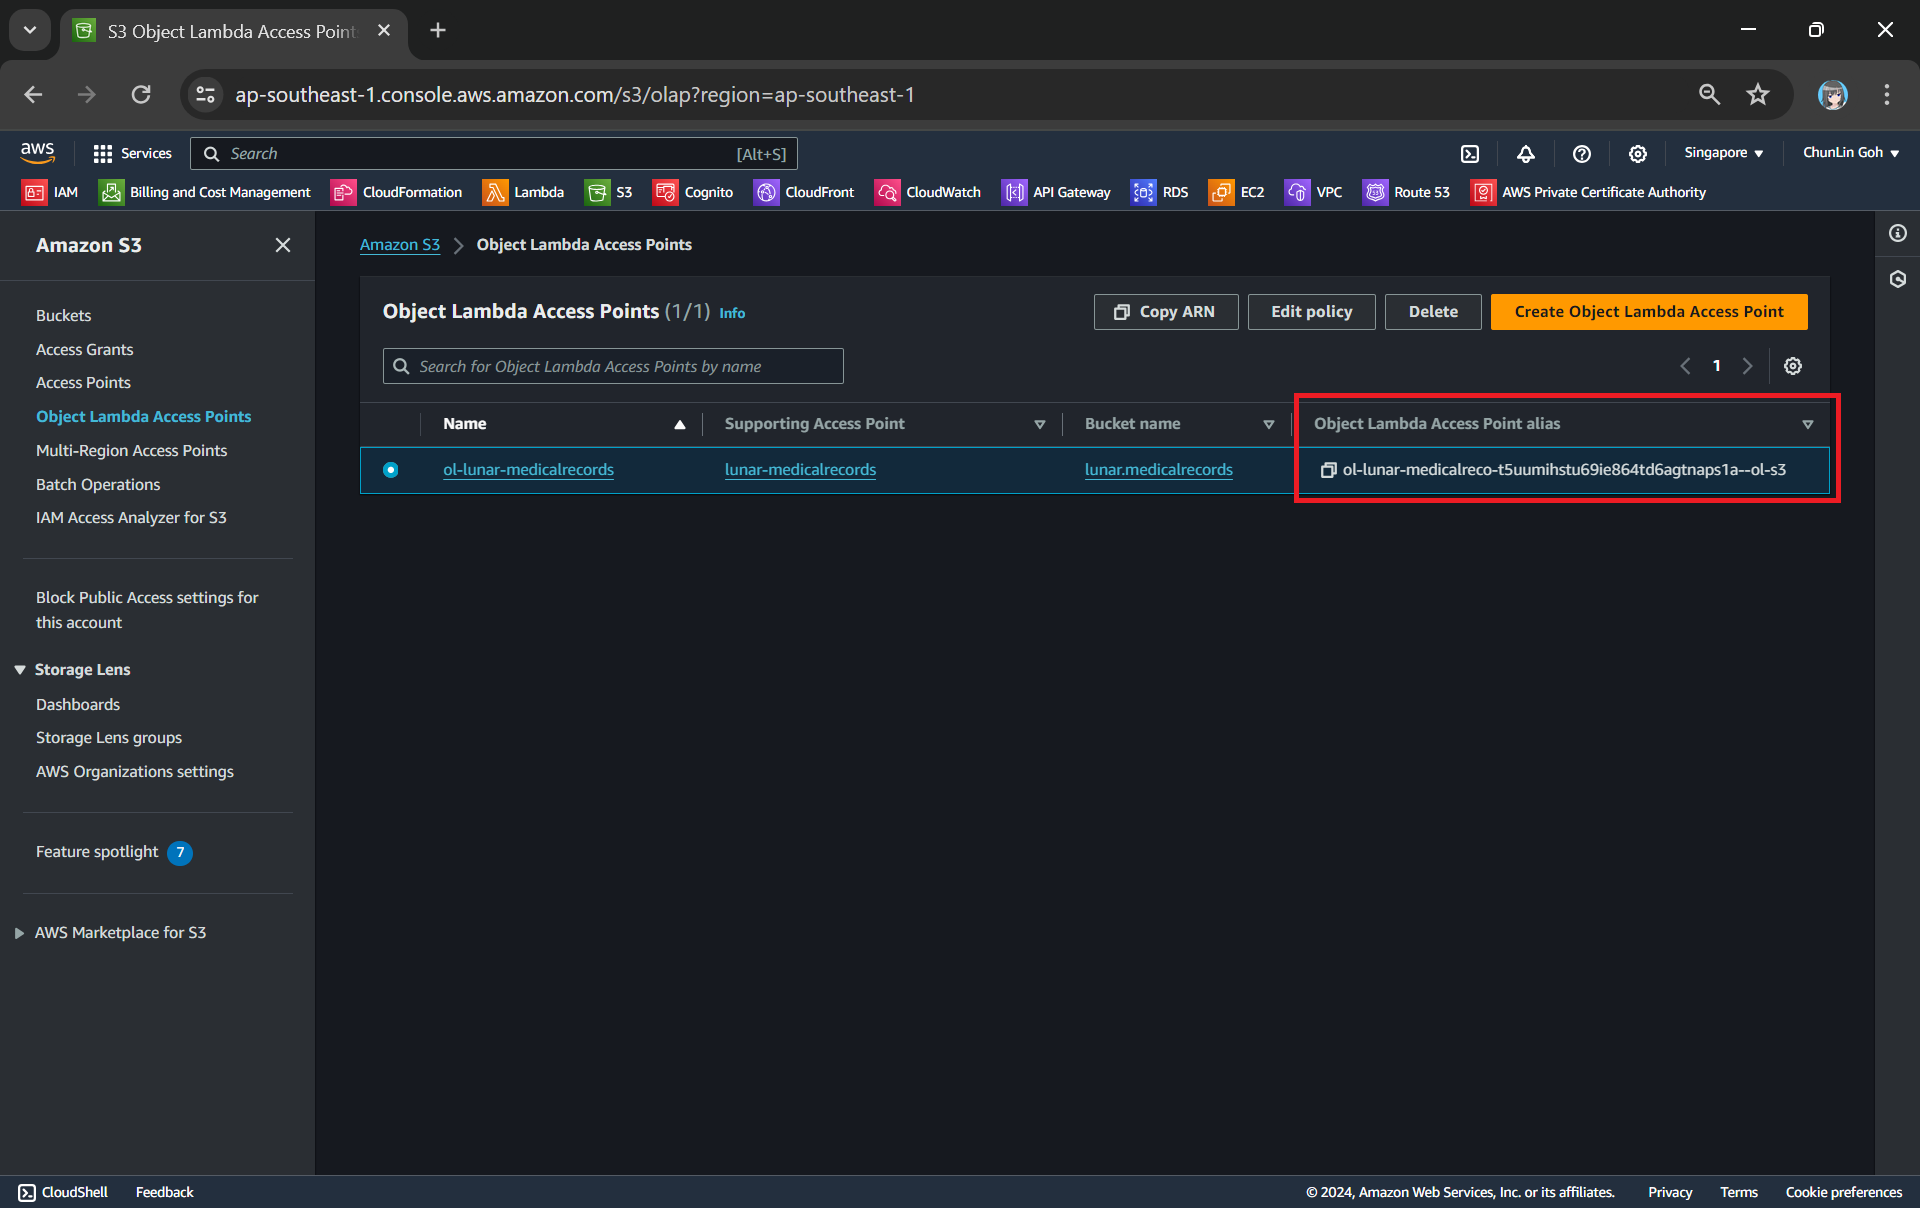
After getting our S3 Access Point set up, we can then move on to create our S3 Object Lambda Access Point. This is the actual access point that our app will be using to access the JSON file in our S3 bucket. It then should return a HTML document generated by the Object Lambda that we built in Step 1.

Creating an object lambda access point from the navigation pane of S3.

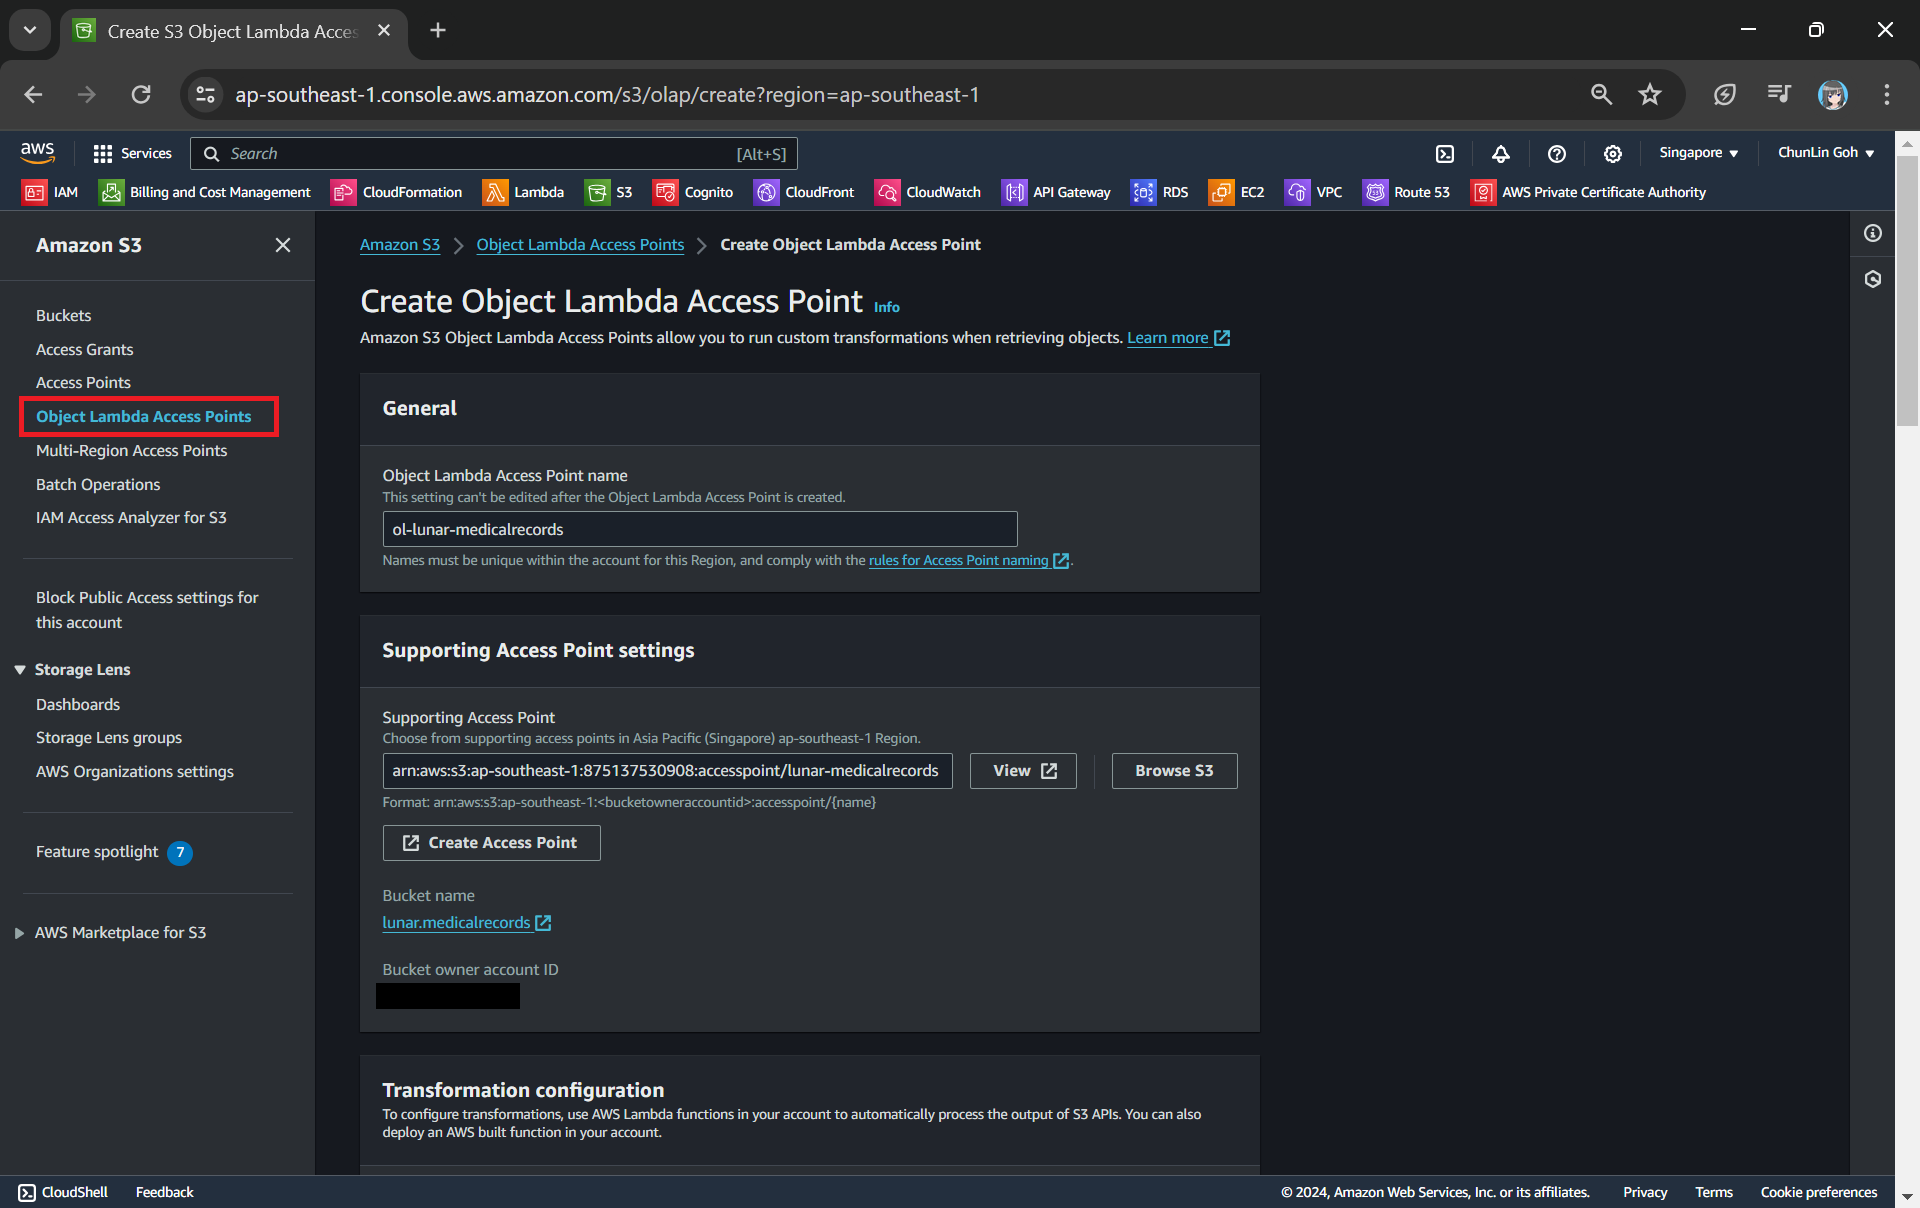
In the Object Lambda Access Point creation page, after we give it a name, we need to provide the Supporting Access Point. This access point is the Amazon Resource Name (ARN) of the S3 Access Point that we created in Step 3. Please take note that both the Object Lambda Access Point and Supporting Access Point must be in the same region.

Next we need to setup the transformation configuration. In our case, we will be retrieving the JSON file from the S3 bucket to perform the data transformation via our Lambda Function, so we will be choosing GetObject as the S3 API we will be using, as shown in the screenshot below.

Configuring the S3 API that will be used in the data transformation and the Lambda Function to invoke.

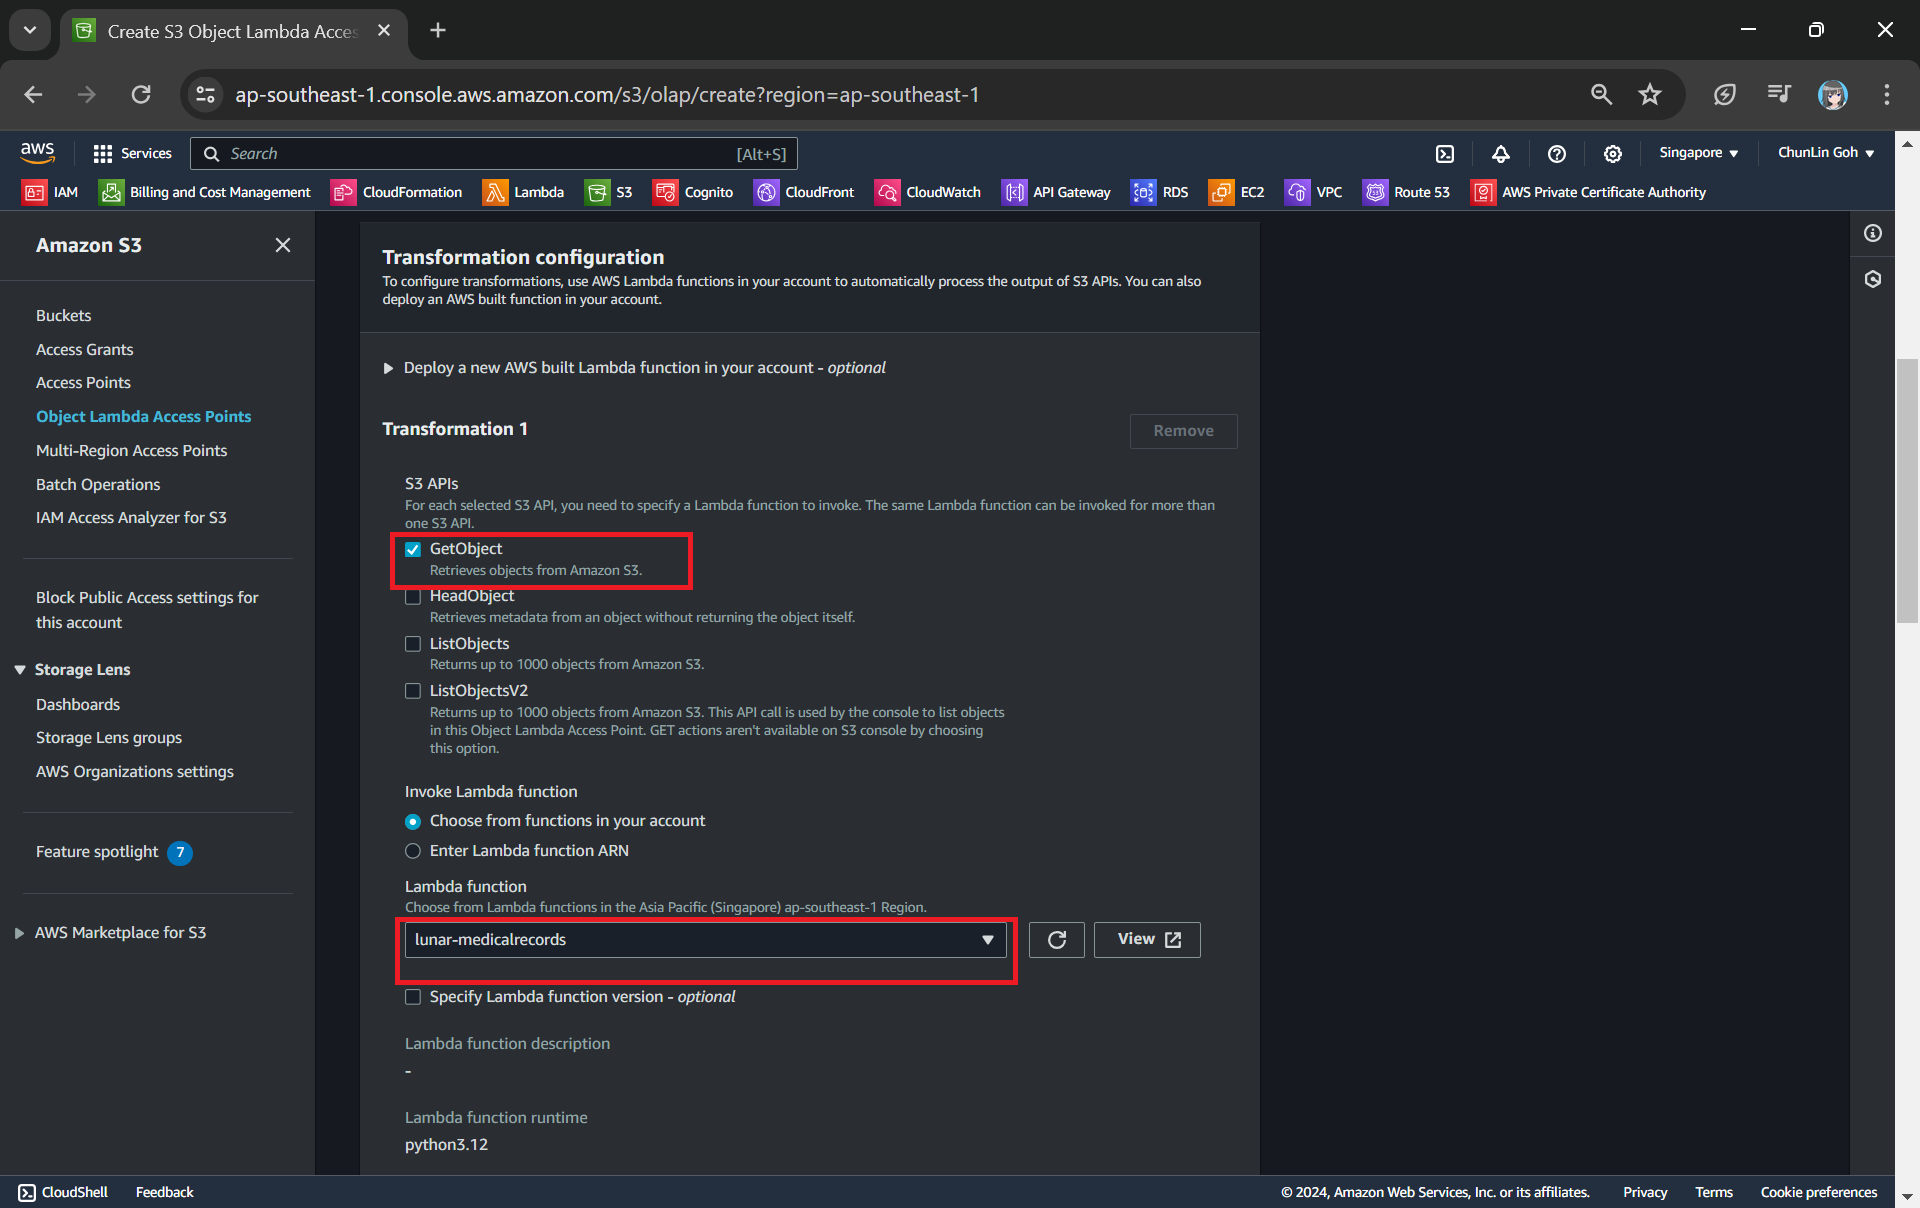
Once all these fields are keyed in, we can proceed to create the Object Lambda Access Point.

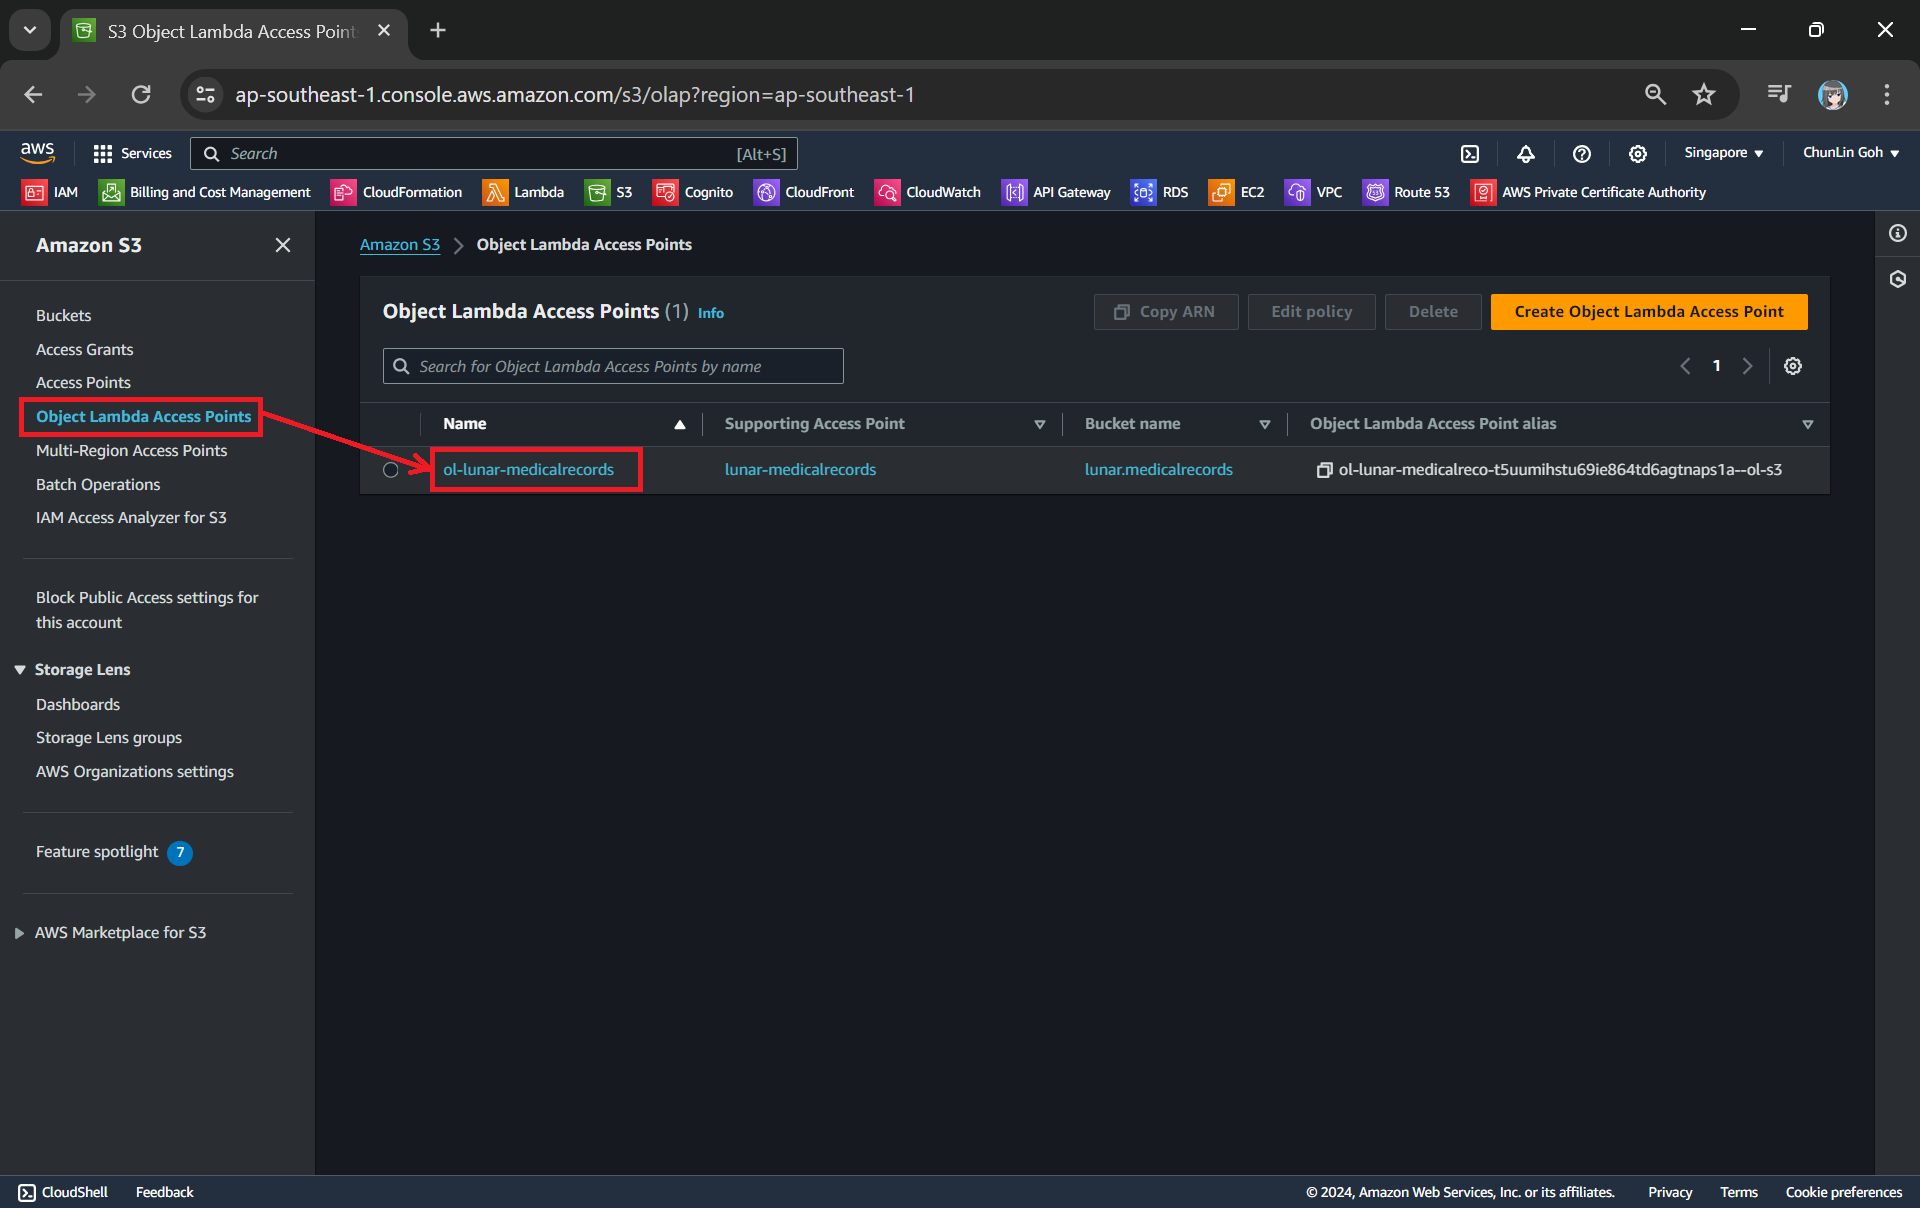
Now, we will access the JSON file via the Object Lambda Access Point to verify that the file is really transformed into a web page during the request. To do so, firstly, we need to select the newly create Object Lambda Access Point as shown in the following screenshot.

Locate the Object Lambda Access Point we just created in the S3 console.

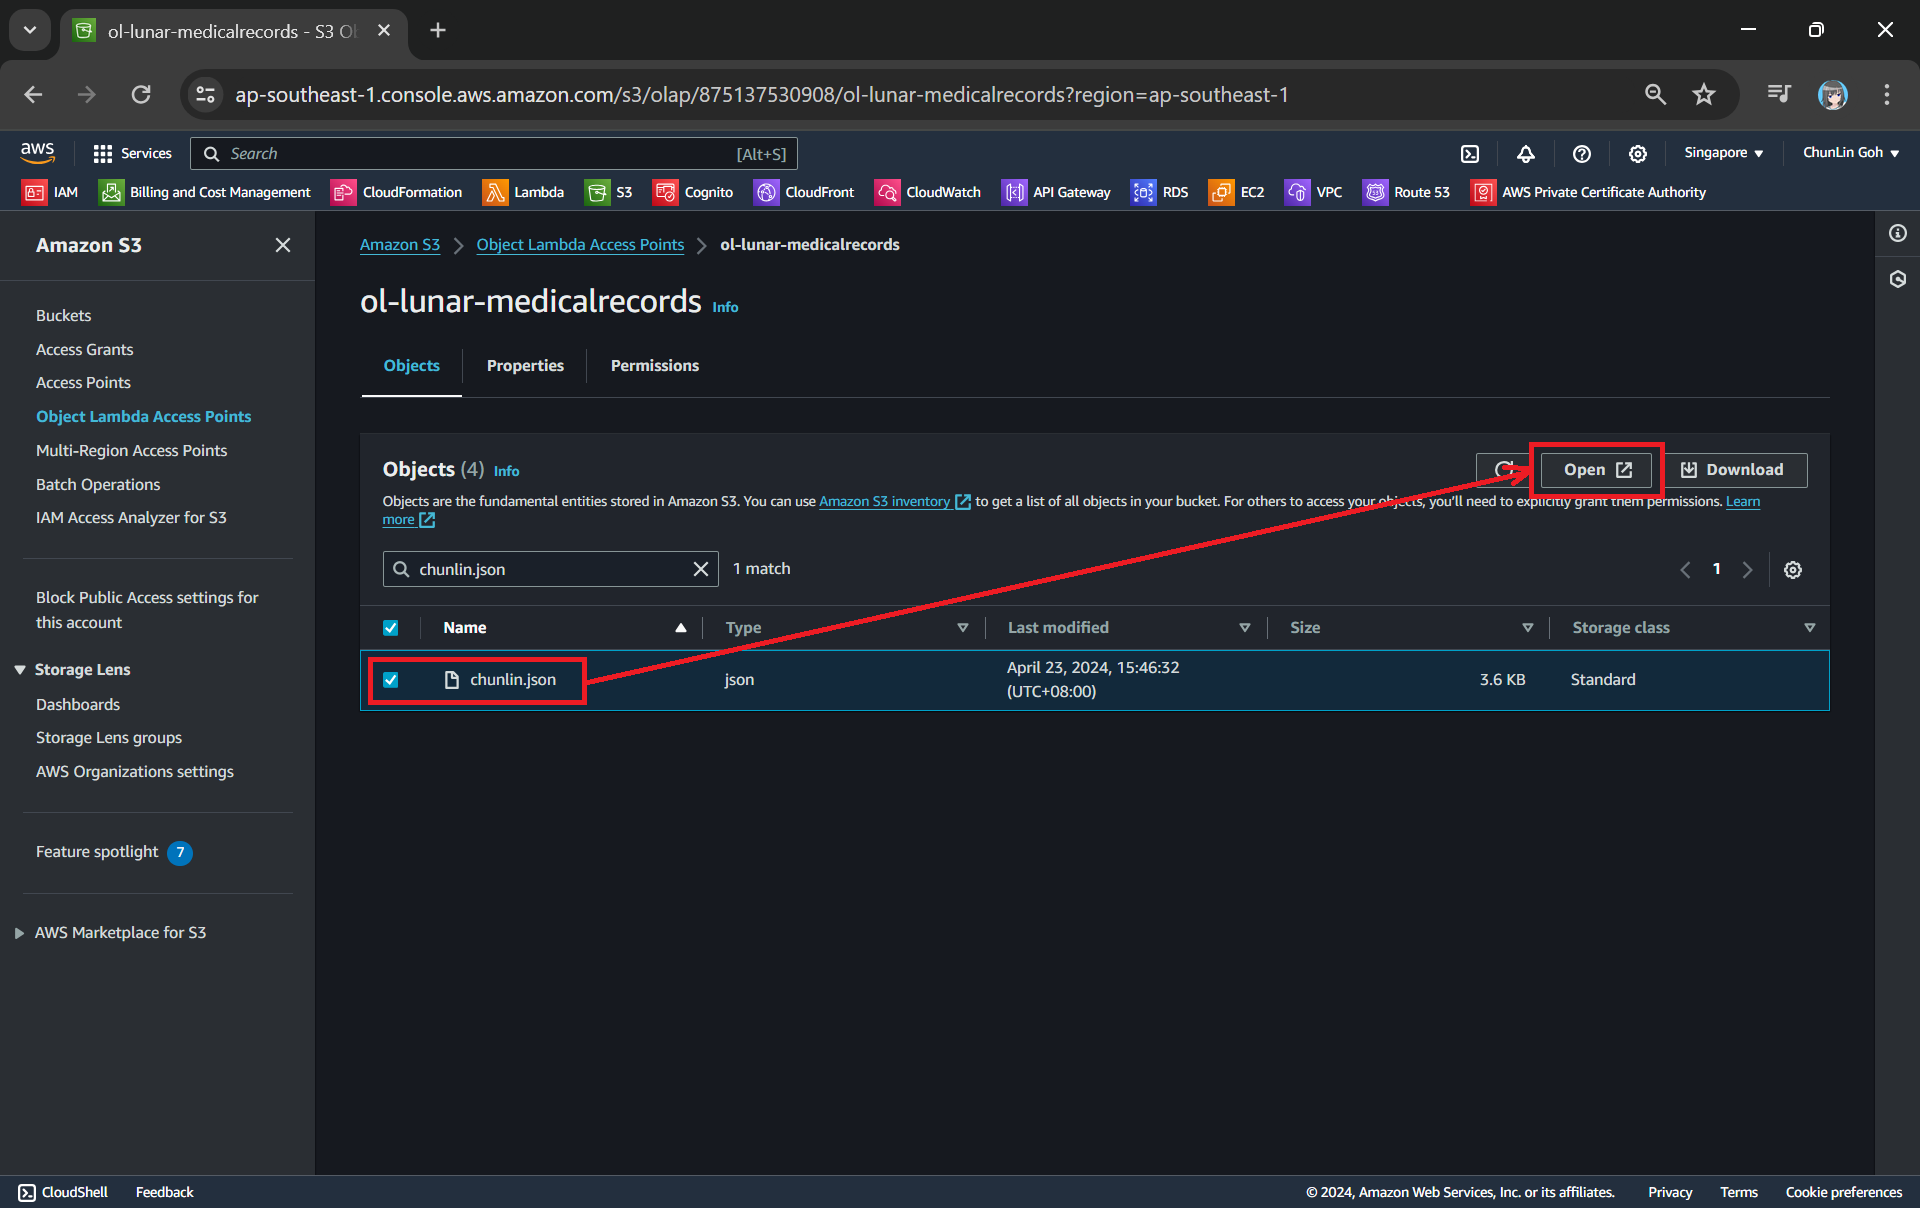
Secondly, we will be searching for our JSON file, for example chunlin.json in my case. Then, we will click on the “Open” button to view it. The reason why I name the JSON file containing my medical records is because later I will be adding authentication and authorisation to only allow users retrieving their own JSON file based on their login user name.

This page looks very similar to the usual S3 objects listing page. So please make sure you are doing this under the “Object Lambda Access Point”.

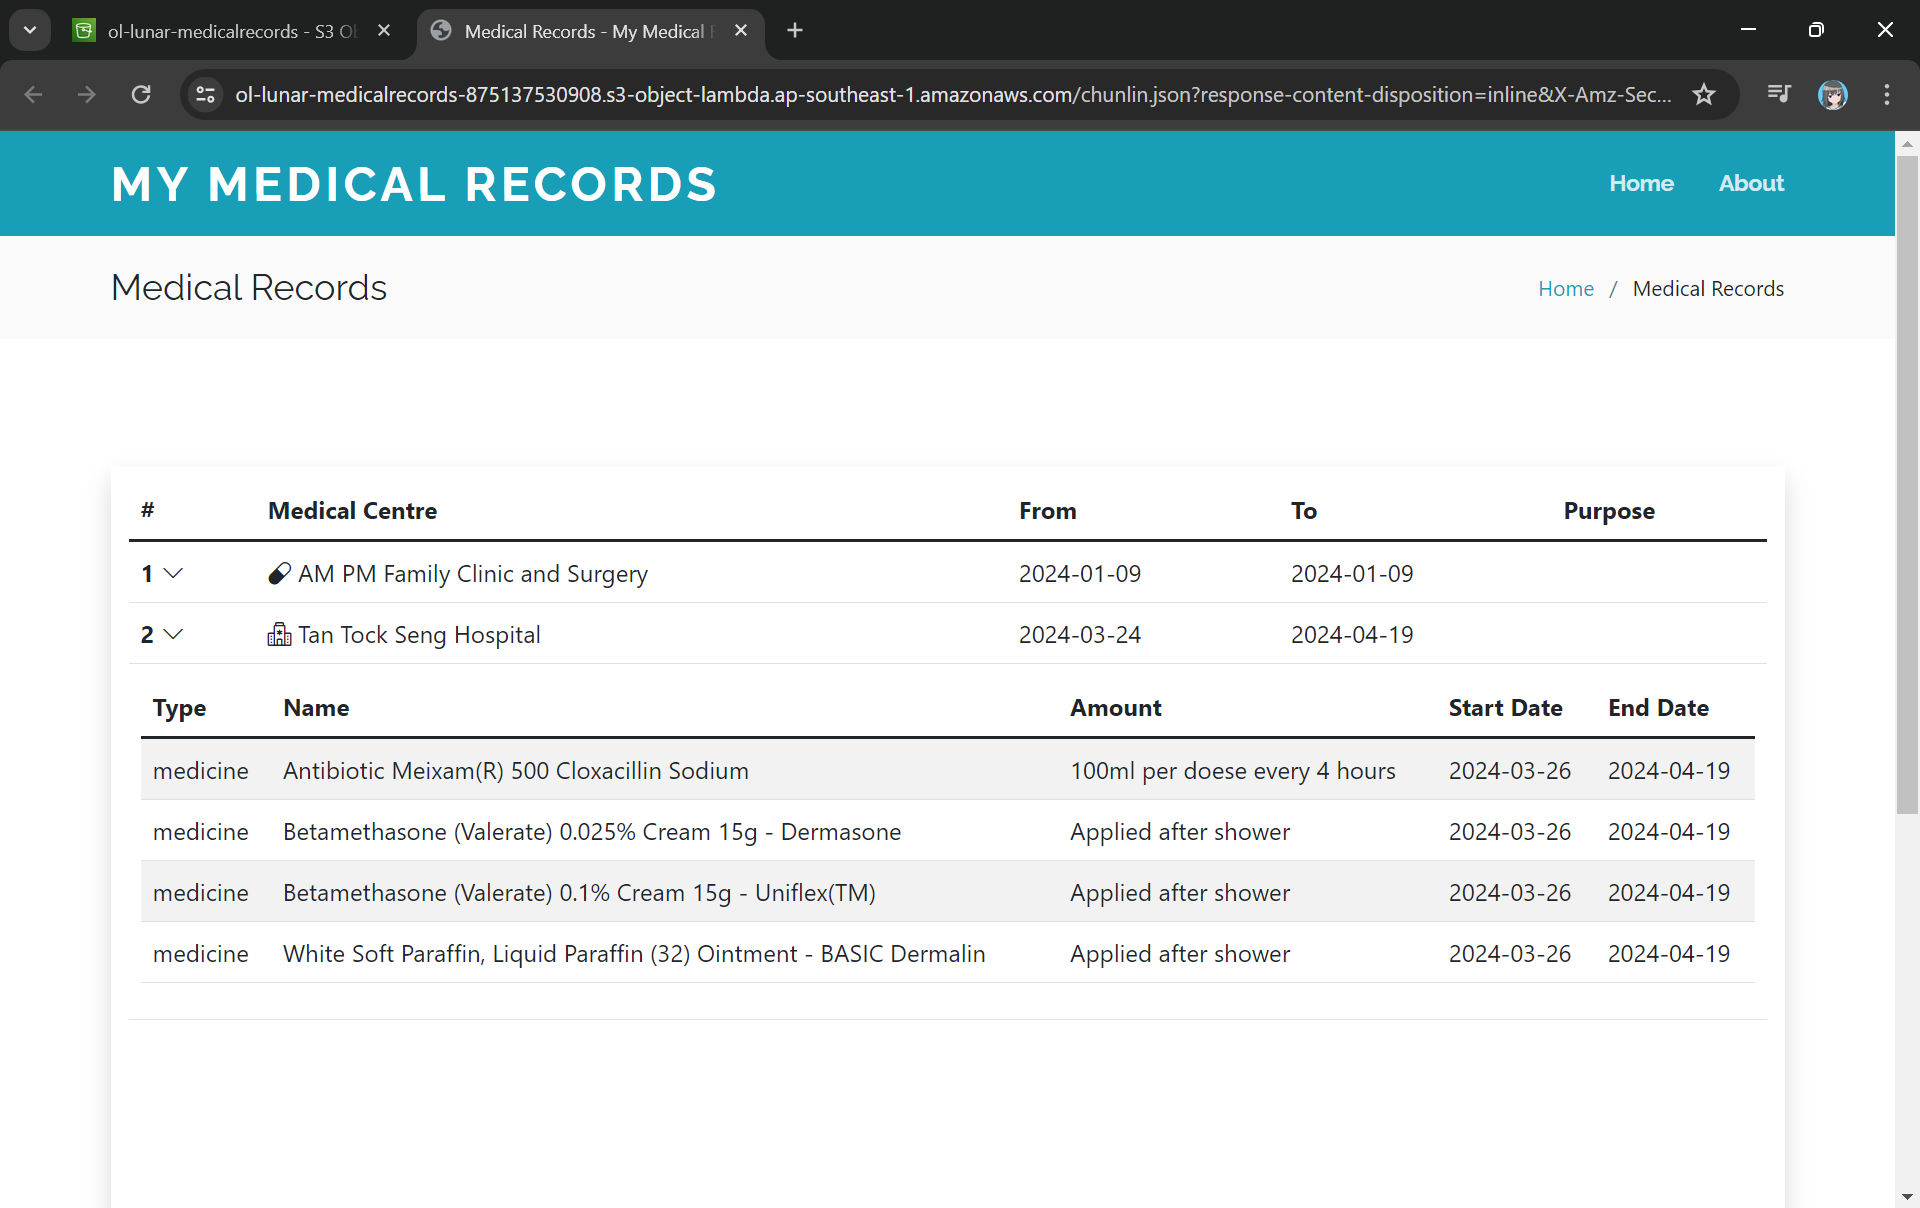
There will be new tab opened showing the web page as demonstrated in the screenshot below. As you have noticed in the URL, it is still pointing to the JSON file but the returned content is a HTML web page.

The domain name is actually no longer the usual S3 domain name but it is our Object Lambda Access Point.

Using the Object Lambda Access Point from Our App

With the Object Lambda Access Point successfully setup, we will show how we can use it. To not overcomplicate things, for the purposes of this article, I will host a serverless web app on Lambda which will be serving the medical record website above.

In addition, since Lambda Functions are by default not accessible from the Internet, we will be using API Gateway so that we can have a custom REST endpoint in the AWS and thus we can map this endpoint to the invokation of our Lambda Function. Technically speaking, the architecture diagram now looks as follows.

This architecture allows public to view the medical record website which is hosted as a serverless web app.

In the newly created Lambda, we will still be developing it with Python 3.12. We name this Lambda lunar-medicalrecords-frontend. We will be using the following code which will retrieve the HTML content from the Object Lambda Access Point.

import json
import os
import logging
import boto3

logger = logging.getLogger()
logger.addHandler(logging.StreamHandler())
logger.setLevel(getattr(logging, os.getenv('LOG_LEVEL', 'INFO')))

s3_client = boto3.client('s3')

def lambda_handler(event, context):
try:
bucket_name = 'ol-lunar-medicalreco-t5uumihstu69ie864td6agtnaps1a--ol-s3'
object_key = 'chunlin.json'

response = s3_client.get_object(
Bucket=bucket_name,
Key=object_key
)

object_data = response['Body'].read()
object_string = object_data.decode('utf-8')

return {
'statusCode': 200,
'body': object_string,
'headers': {
'Content-Type': 'text/html'
}
}

except Exception as err:
return {
'statusCode': 500,
'body': json.dumps(str(err))
}

As shown in the code above, we are still using the same function get_object from the S3 client to retrieve the JSON file, chunlin.json. However, instead of providing the bucket name, we will be using the Object Lambda Access Point Alias, which is located at the S3 Object Lambda Access Points listing page.

This is where we can find the Object Lambda Access Point Alias.

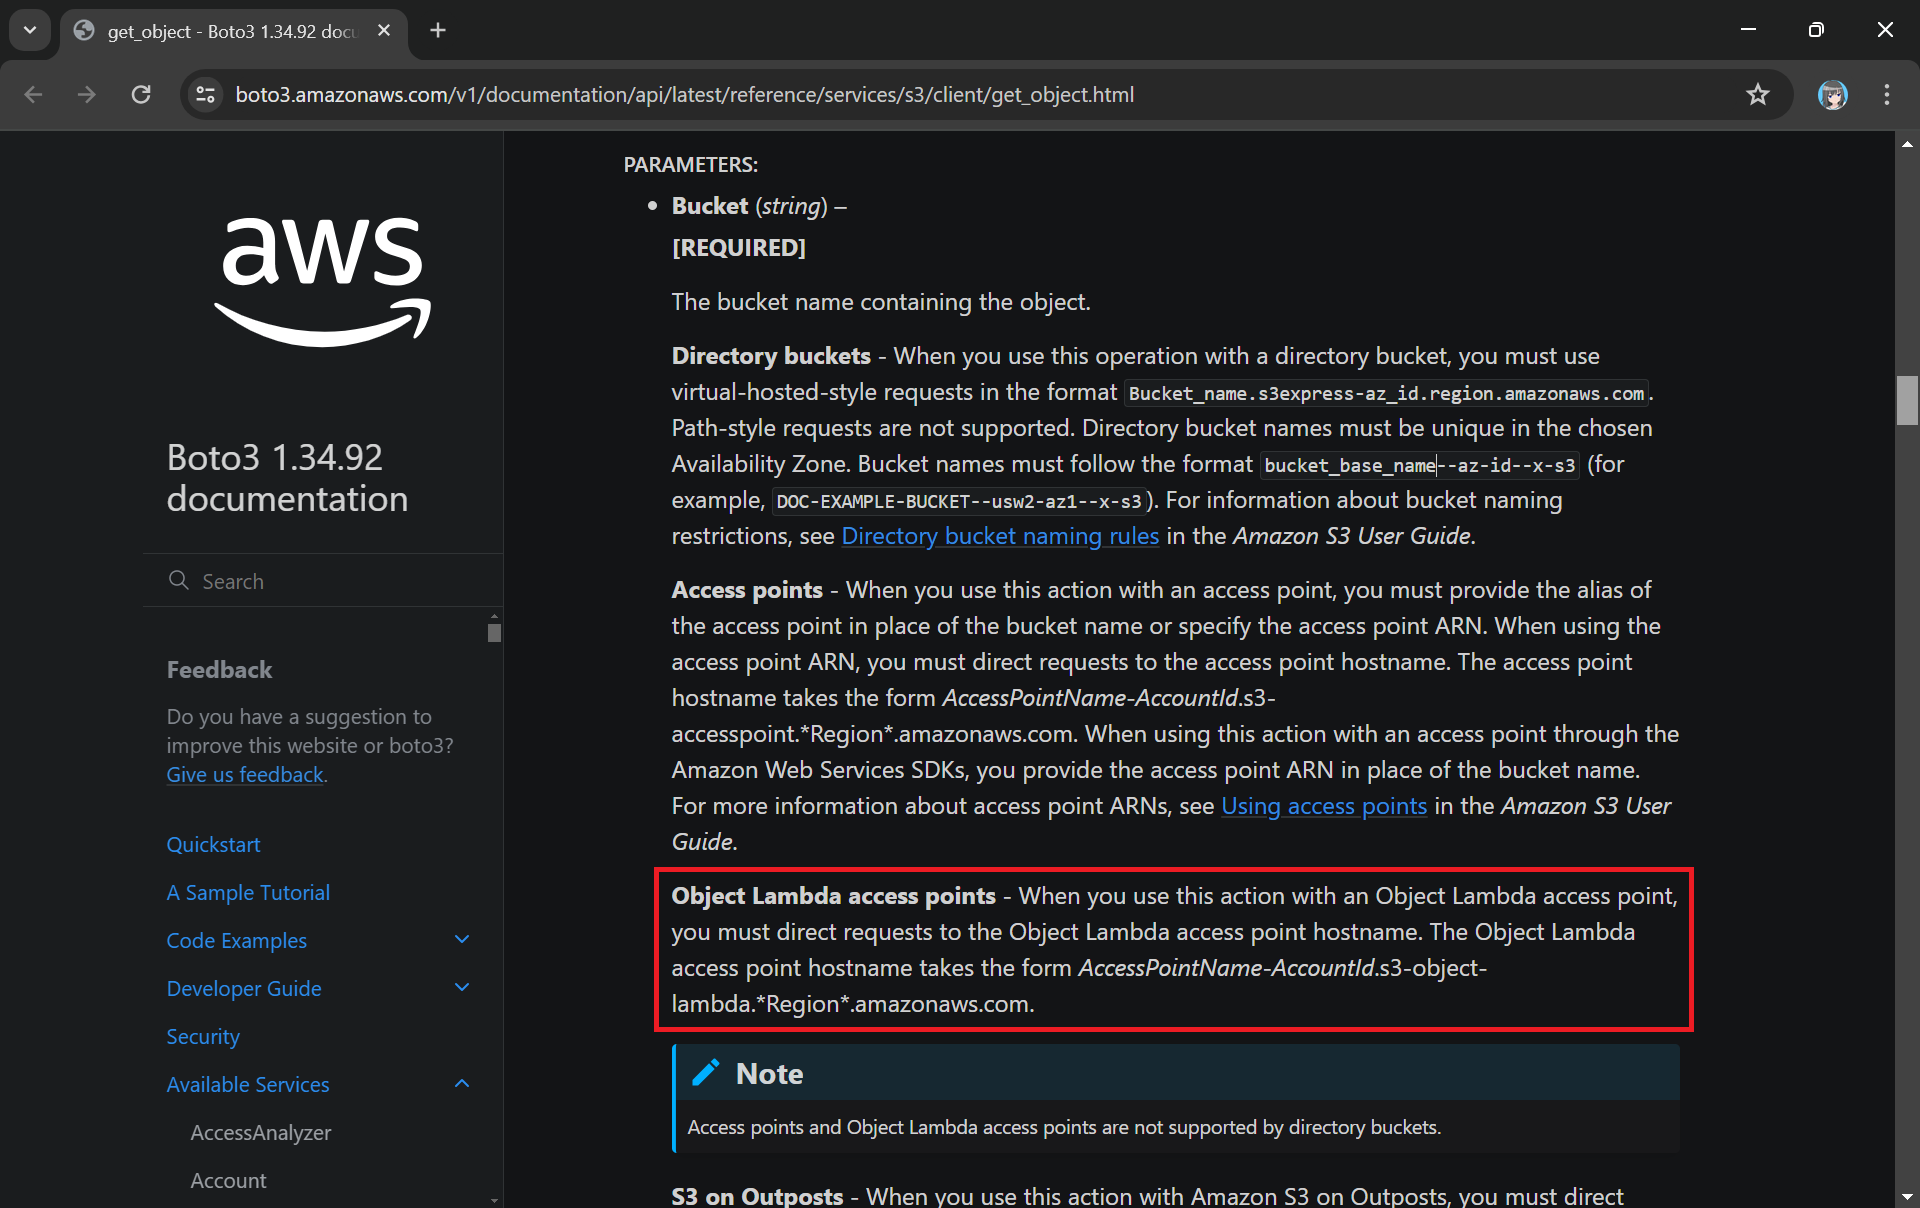
You can read more about the Boto3 get_object documentation to understand more about its Bucket parameter.

The Boto3 documentation highlights the use of Object Lambda Access Point in get_object.

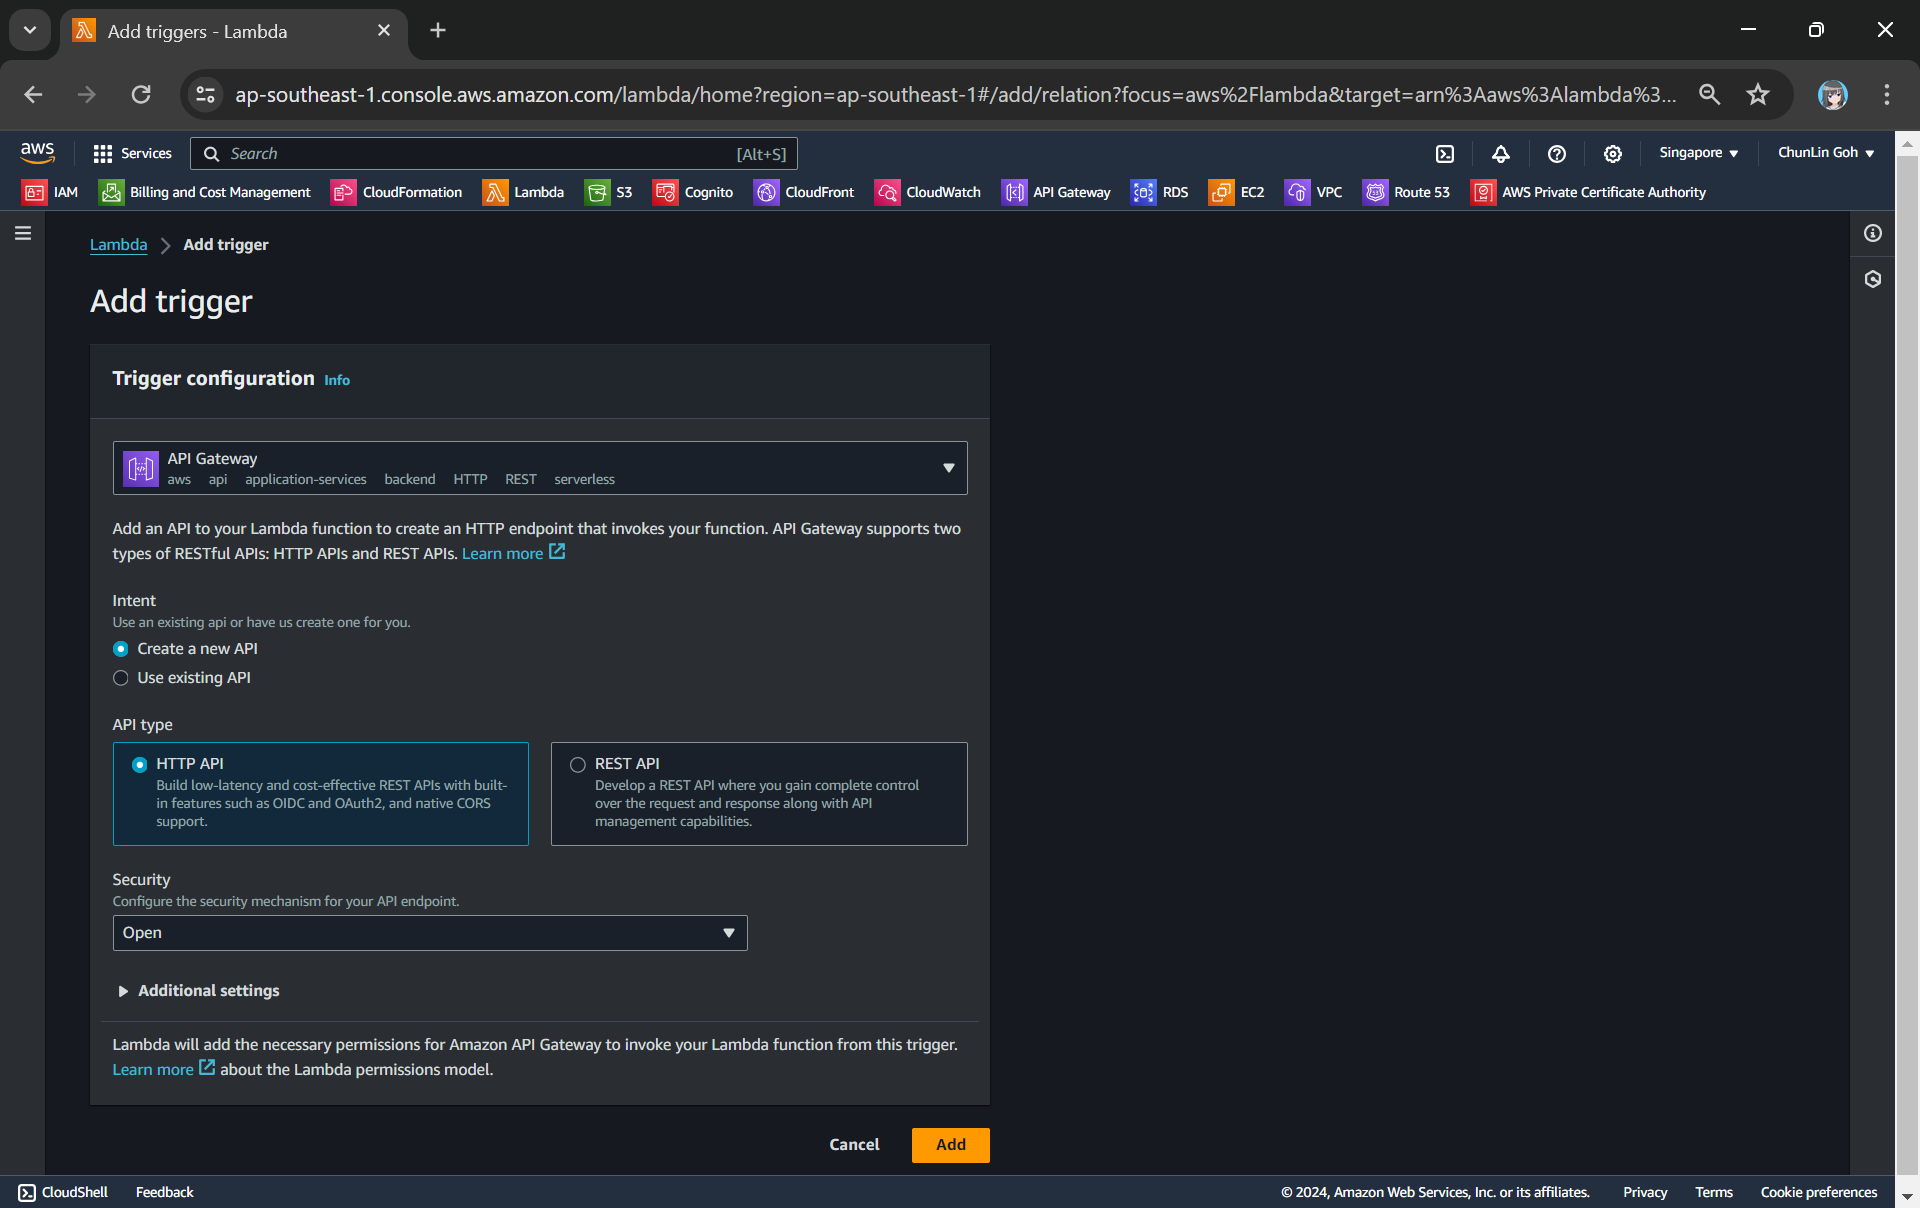
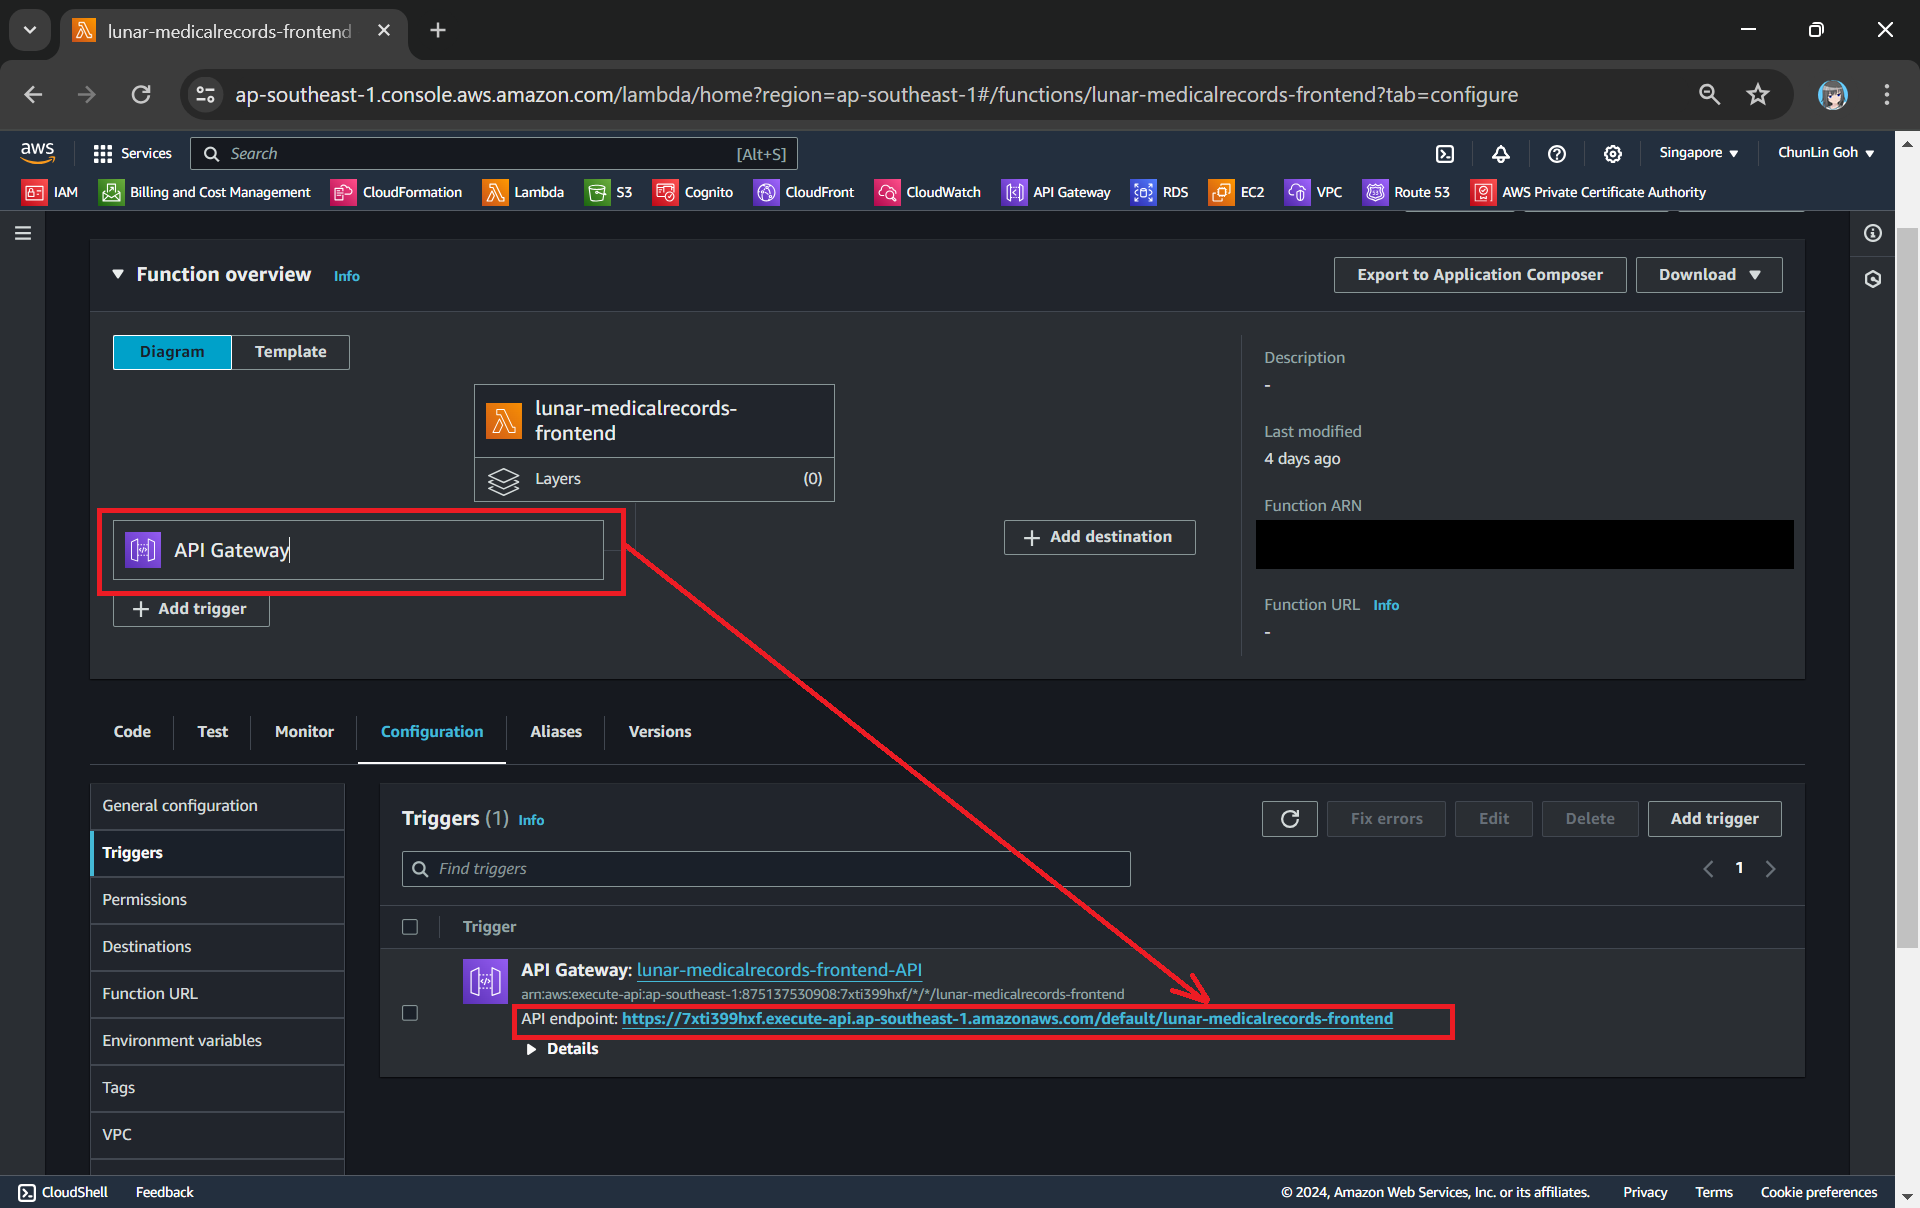
The API Gateway for the Lambda Function is created with HTTP API through the “Add Trigger” function (which is located at the Function overview page). For the Security field, we will be choosing “Open” for now. We will add the login functionality later.

Adding API Gateway as a trigger to our Lambda.

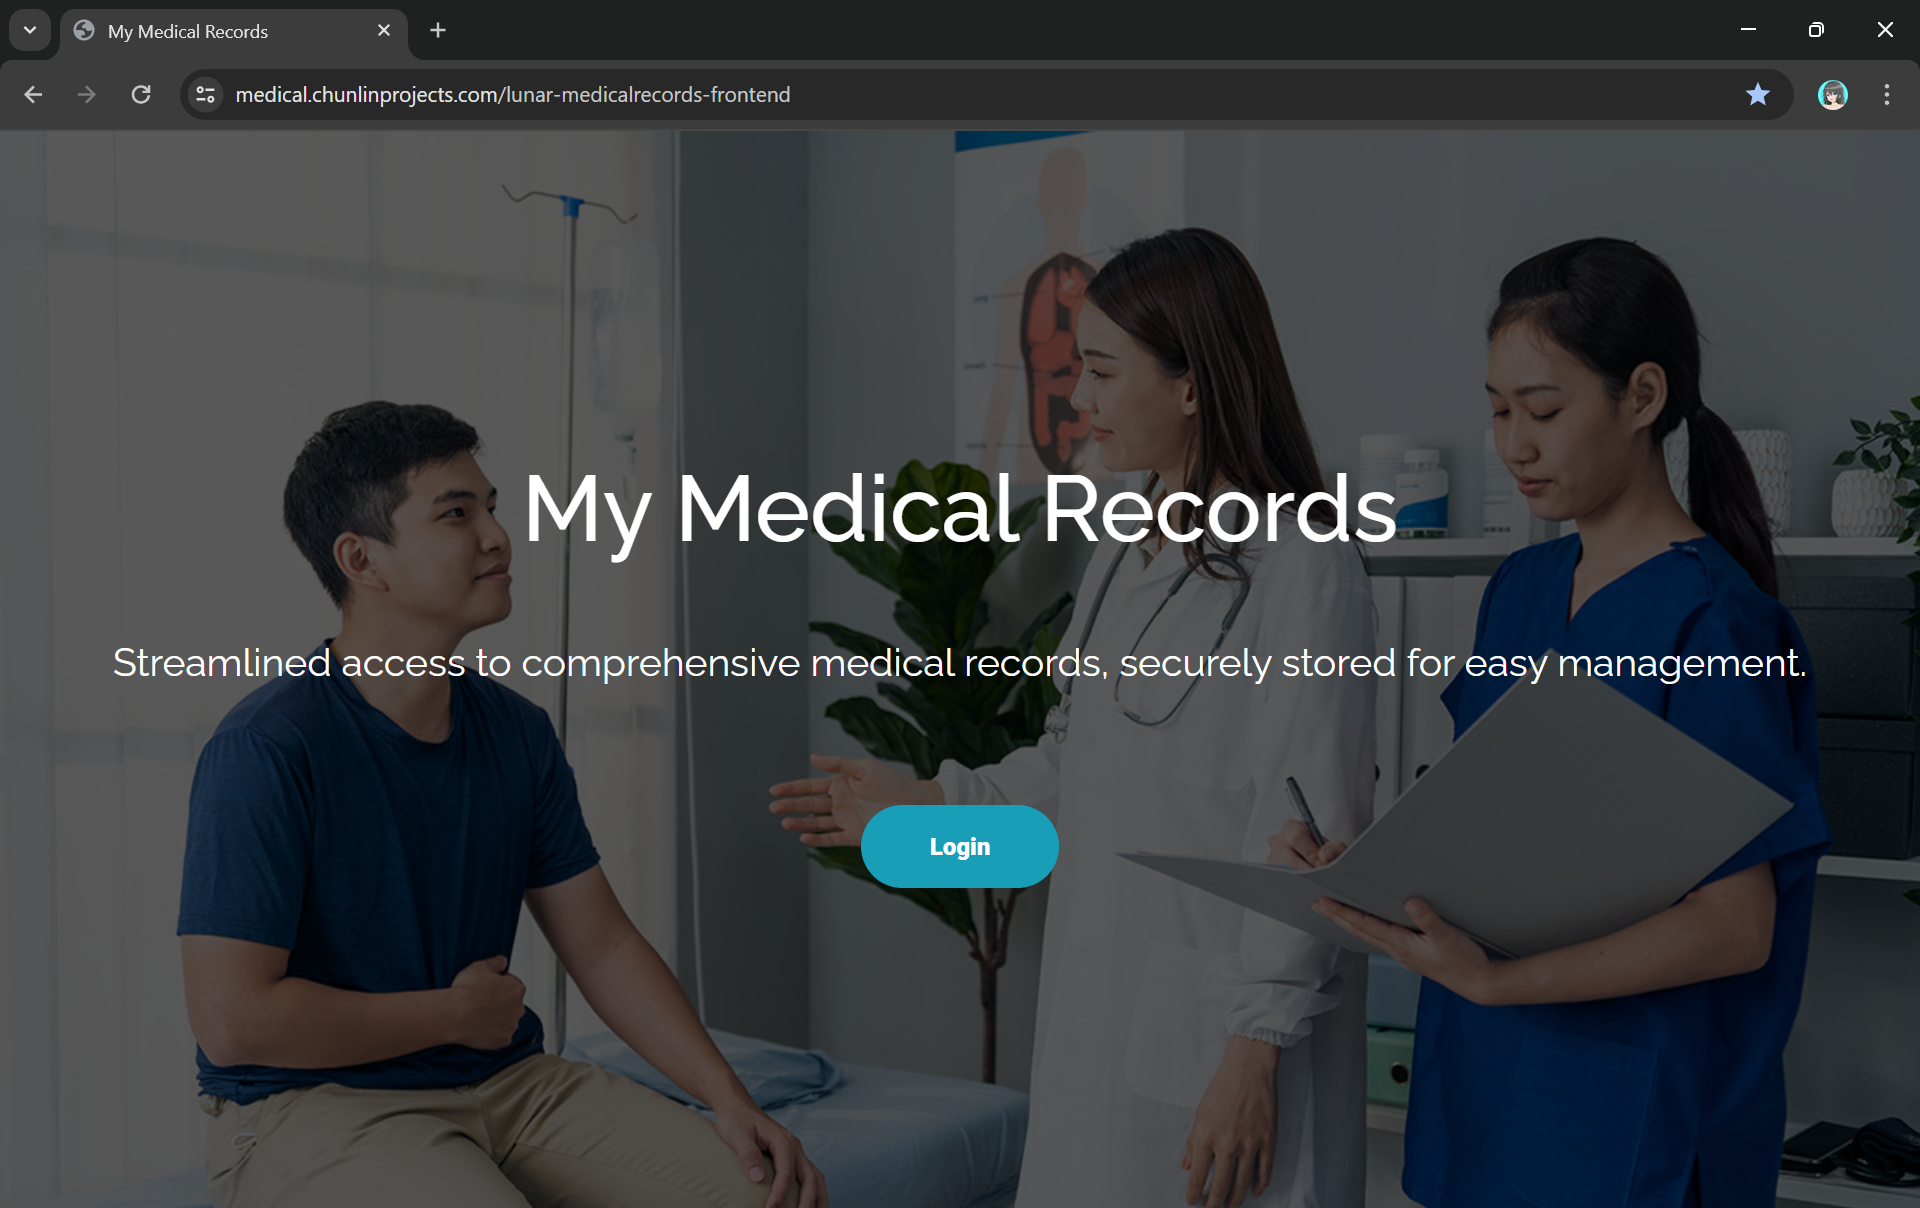
Once this is done, we will be provided an API Gateway endpoint, as shown in the screenshot below. Visiting the endpoint should be rendering the same web page listing the medical records as we have seen above.

Getting the API endpoint of the API Gateway.

Finally, for the Lambda Function permission, we only need to grand it the following.

  • s3:GetObject.

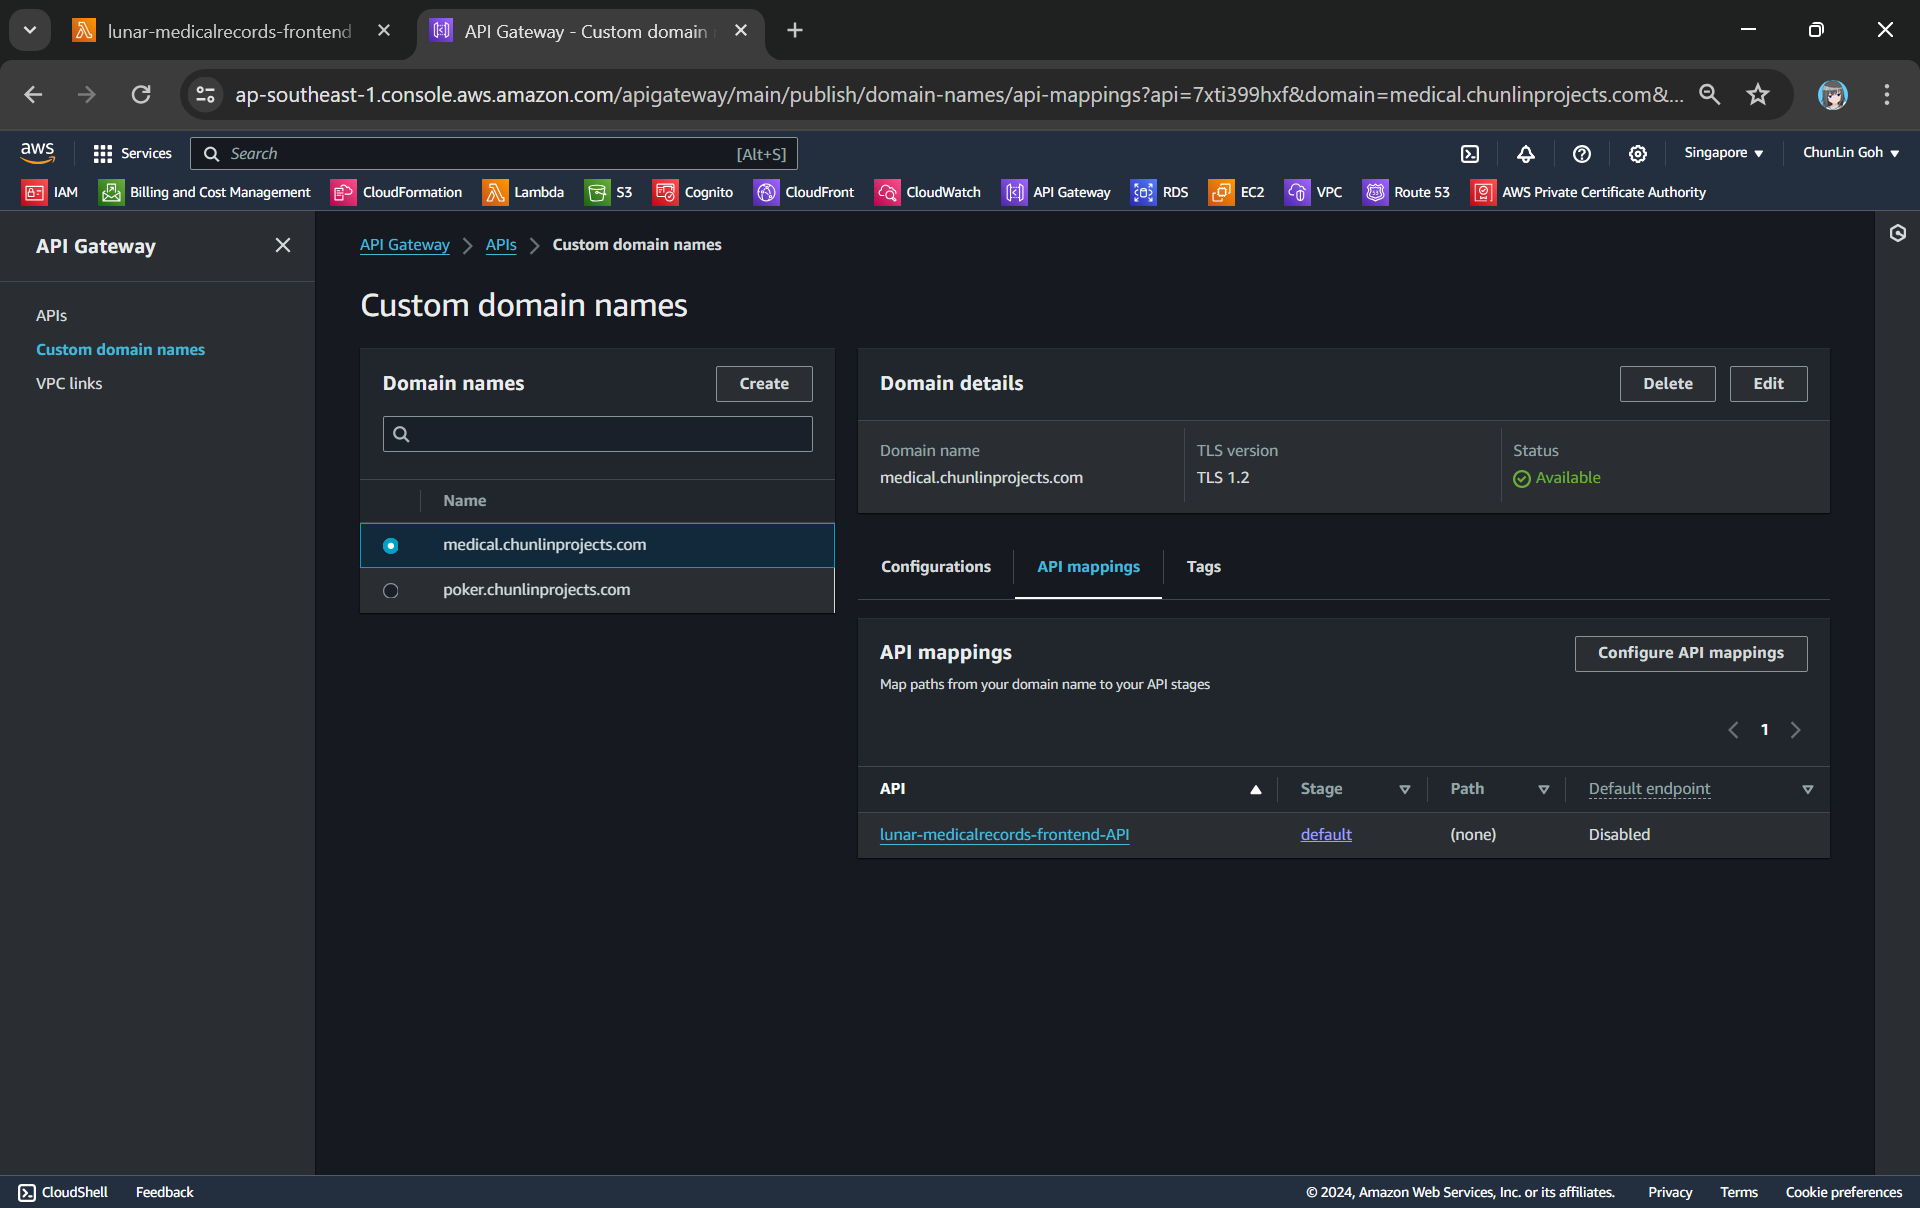
To make the API Gateway endpoint looks more user friendly, we can also introduce Custom Domain to the API Gateway, following the guide in one of our earlier posts.

Assigned medical.chunlinprojects.com to our API Gateway.

Protecting Data with Cognito

In order to ensure that only authenticated and authorised users can access their own medical records, we need to securely control access to our the app with the help from Amazon Cognito. Cognito is a service that enables us to add user sign-in and access control to our apps quickly and easily. Hence it helps authenticate and authorise users before they can access the medical records.

Step 1: Setup Amazon Cognito

To setup Cognito, firstly, we need to configure the User Pool by specifying sign-in options. User pool is a managed user directory service that provides authentication and user management capabilities for our apps. It enables us to offload the complexity of user authentication and management to AWS.

Configuring sign-in options and user name requirements.

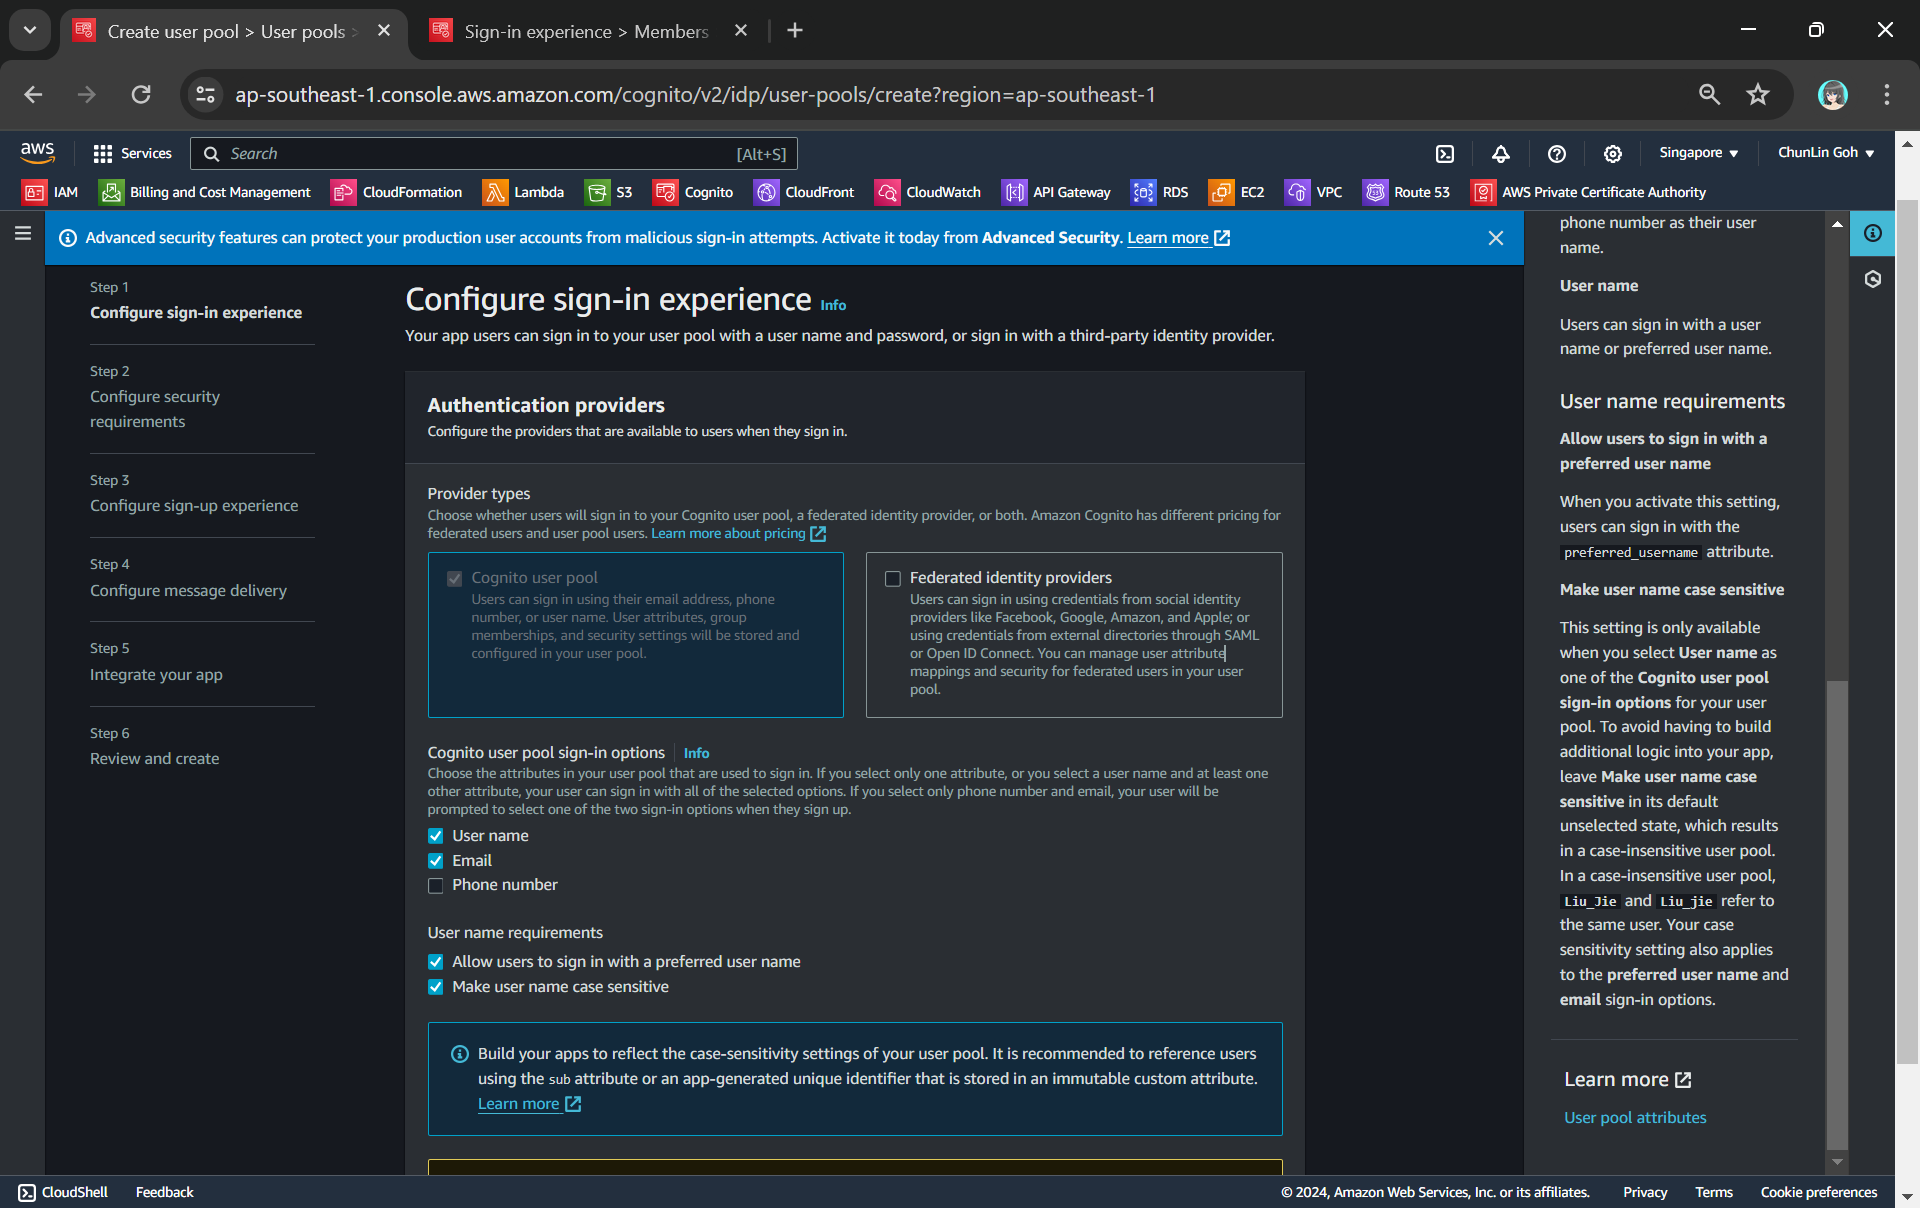
Please take note that Cognito user pool sign-in options cannot be changed after the user pool has been created. Hence, kindly think carefully during the configuration.

Configuring password policy.

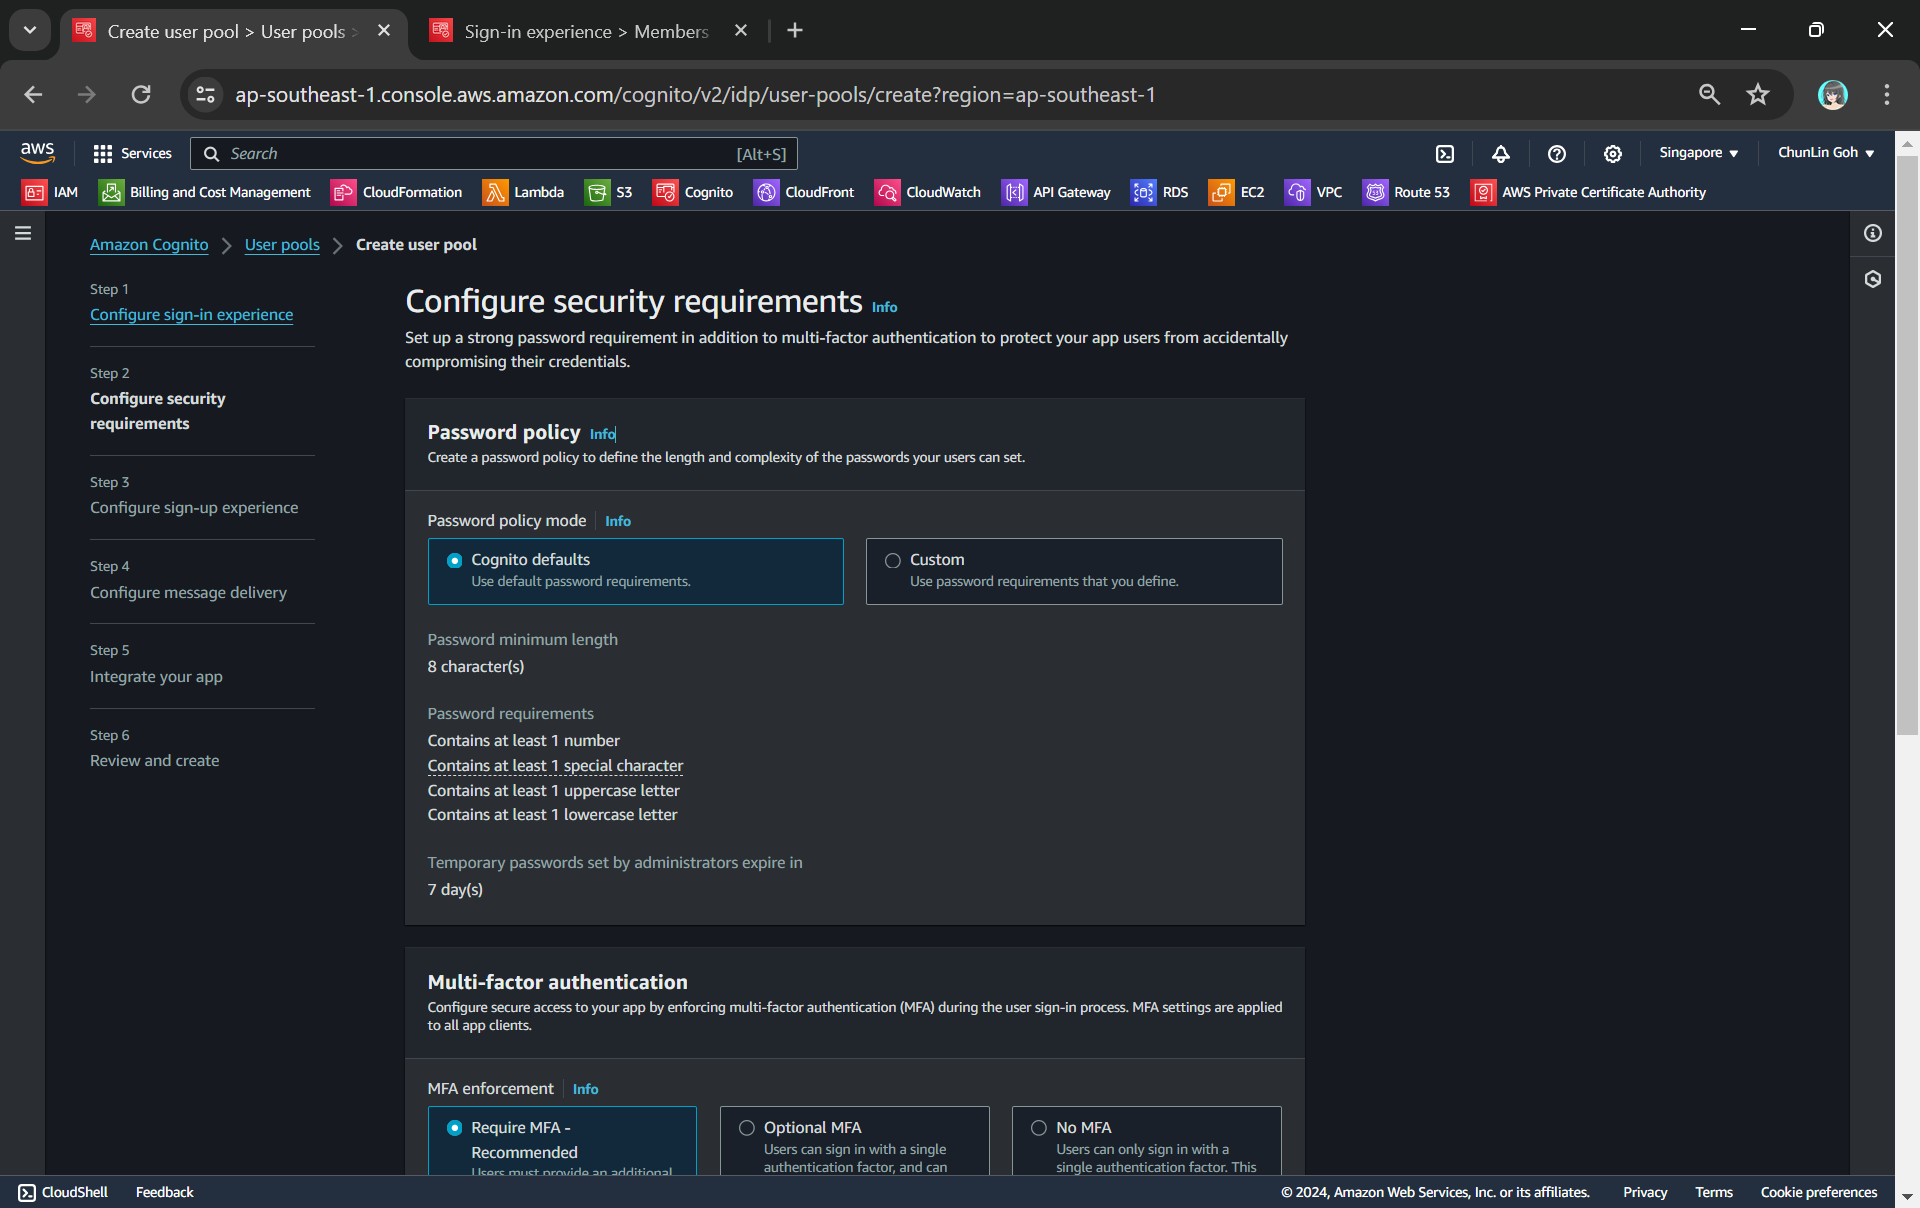
Secondly, we need to configure password policy and choose whether to enable Multi-Factor Authentication (MFA).

By default, Cognito comes with a password policy that ensures our users maintain a password with a minimum length and complexity. For password reset, it will also generate a temporary password to the user which will expire in 7 days, by default.

MFA adds an extra layer of security to the authentication process by requiring users to provide additional verification factors to gain access to their accounts. This reduces the risk of unauthorised access due to compromised passwords.

Enabling MFA in our Cognito user pool.

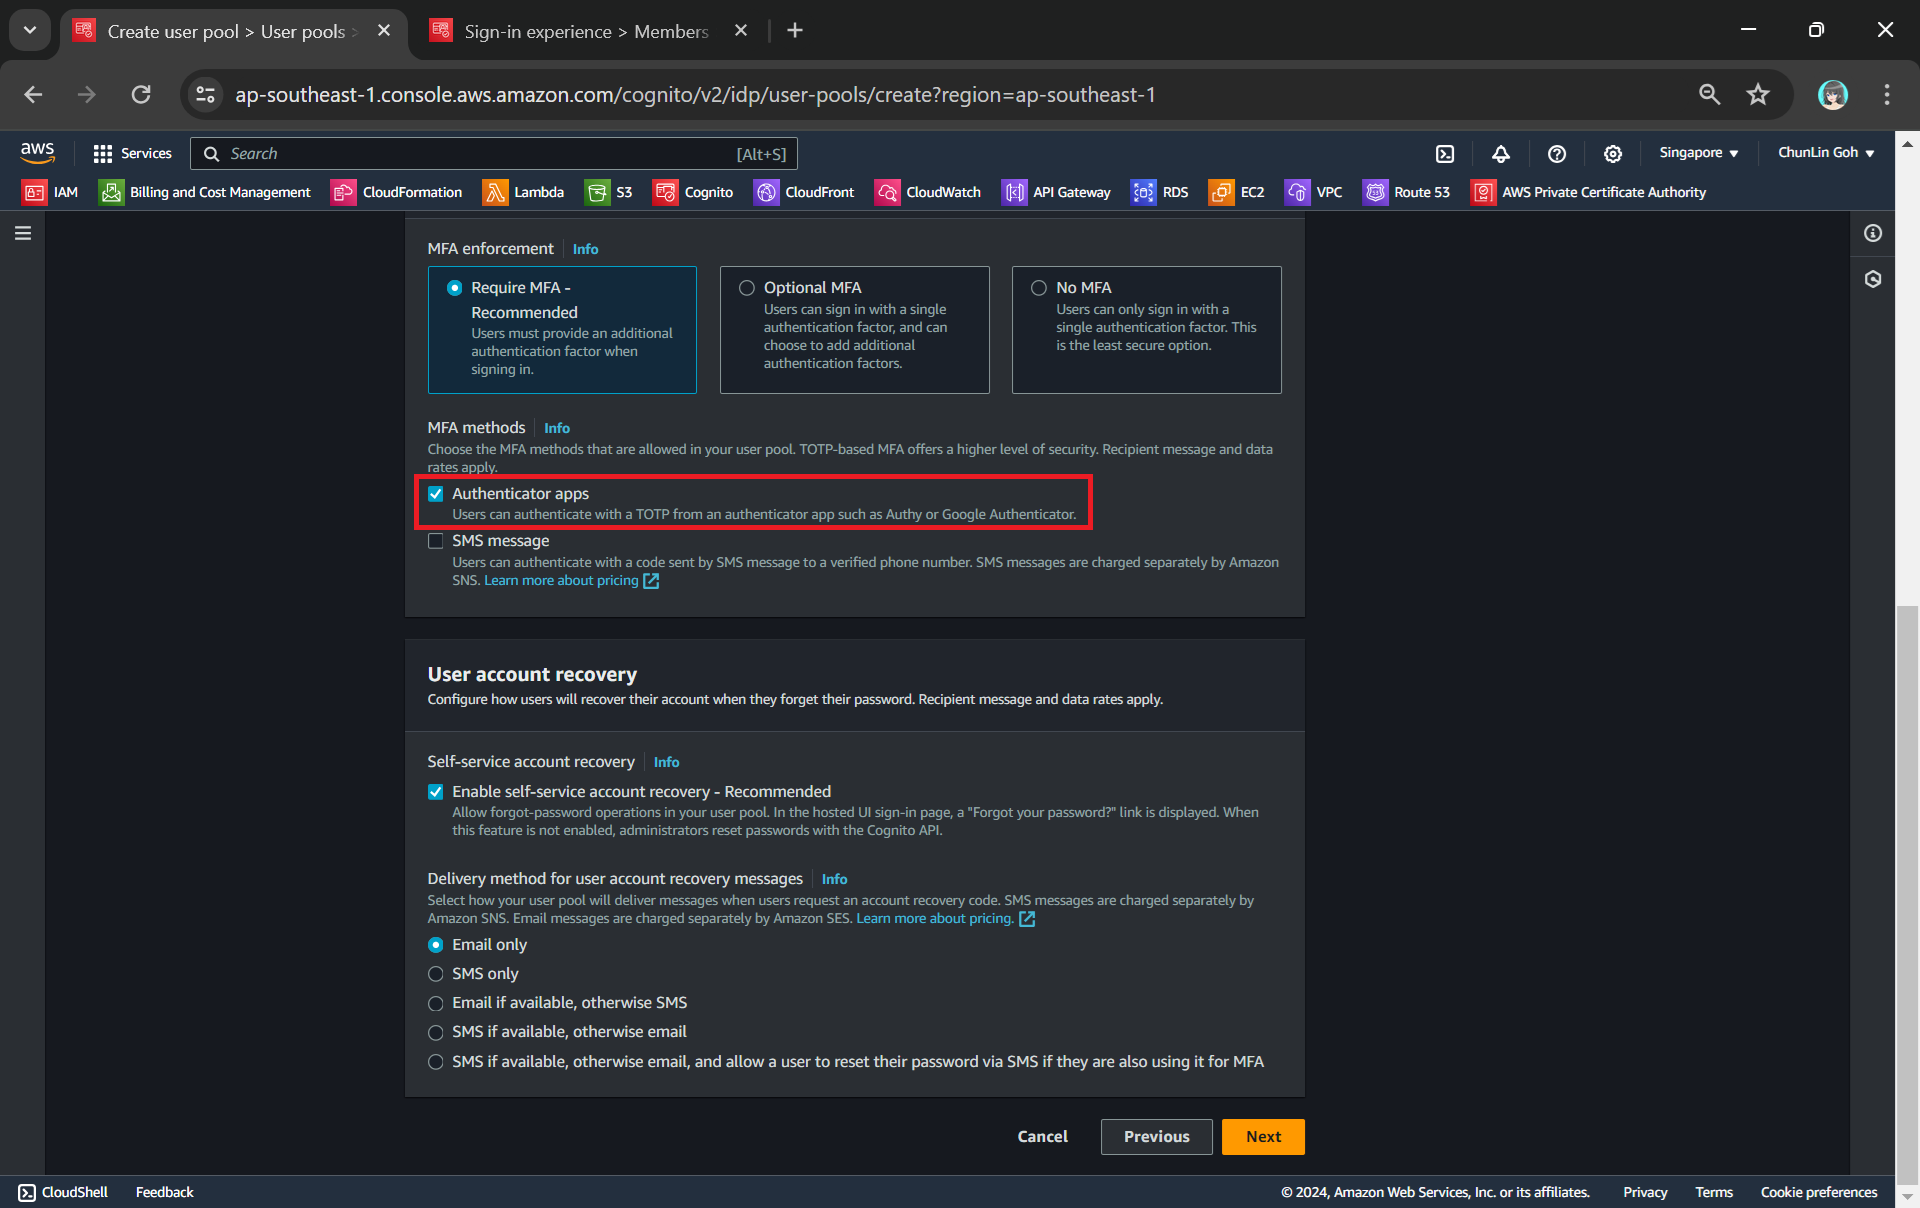
As shown in the screenshot above, one of the methods is called TOTP. TOTP stands for Time-Based One-Time Password. It is a form of multi-factor authentication (MFA) where a temporary passcode is generated by the authenticator app, adding a layer of security beyond the typical username and password.

Thirdly, we will be configuring Cognito to allow user account recovery as well as new user registration. Both of these by default require email delivery. For example, when users request an account recovery code, an email with the code should be sent to the user. Also, when there is a new user signing up, there should be emails sent to verify and confirm the new account of the user. So, how do we handle the email delivery?

We can choose to send email with Cognito in our development environment.

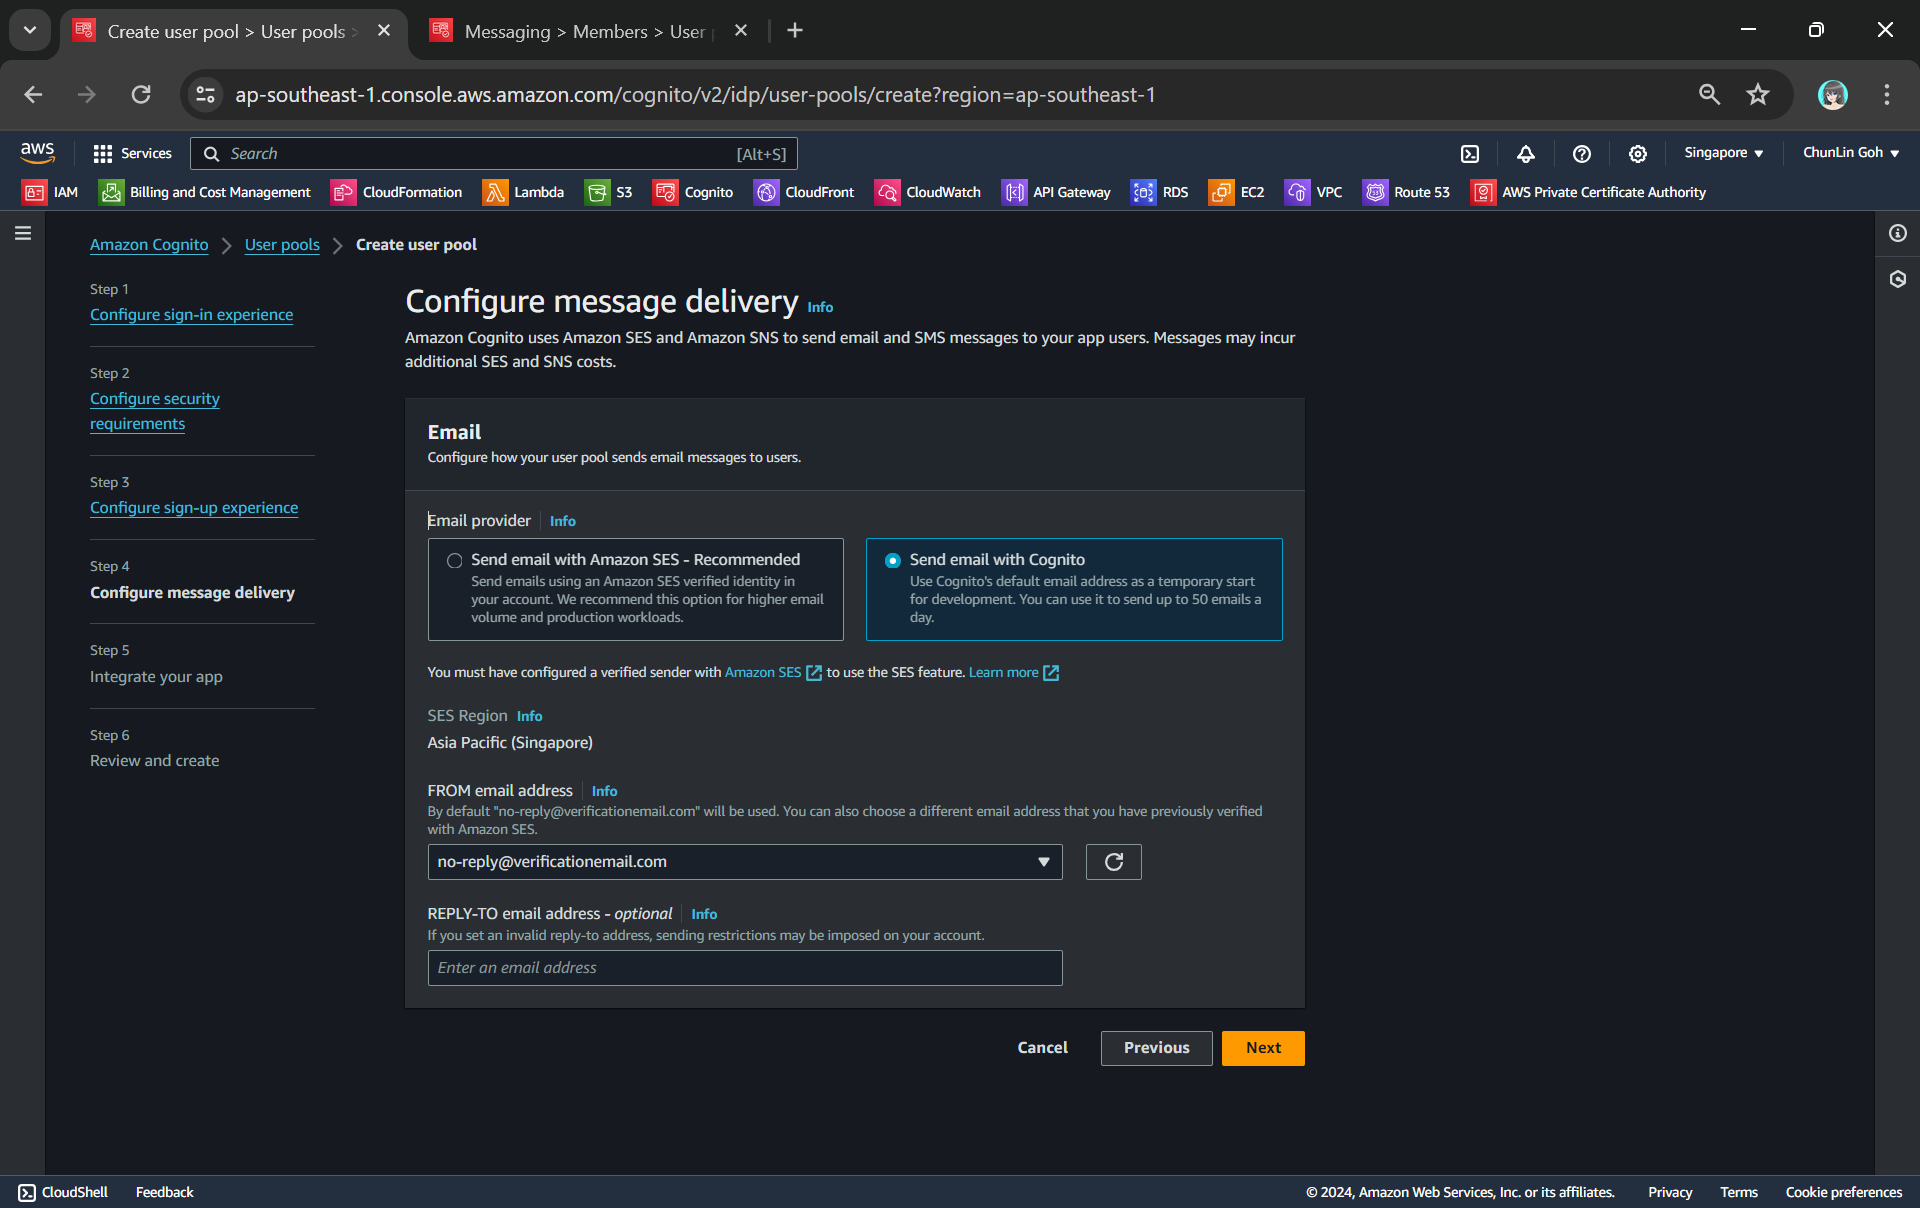
Ideally, we should be setting up another service known as Amazon SES (Simple Email Service), an email sending service provided by AWS, to deliver the emails. However, for testing purpose, we can choose to use Cognito default email address as well. This approach is normally only suitable for development purpose because we can only use it to send up to 50 emails a day.

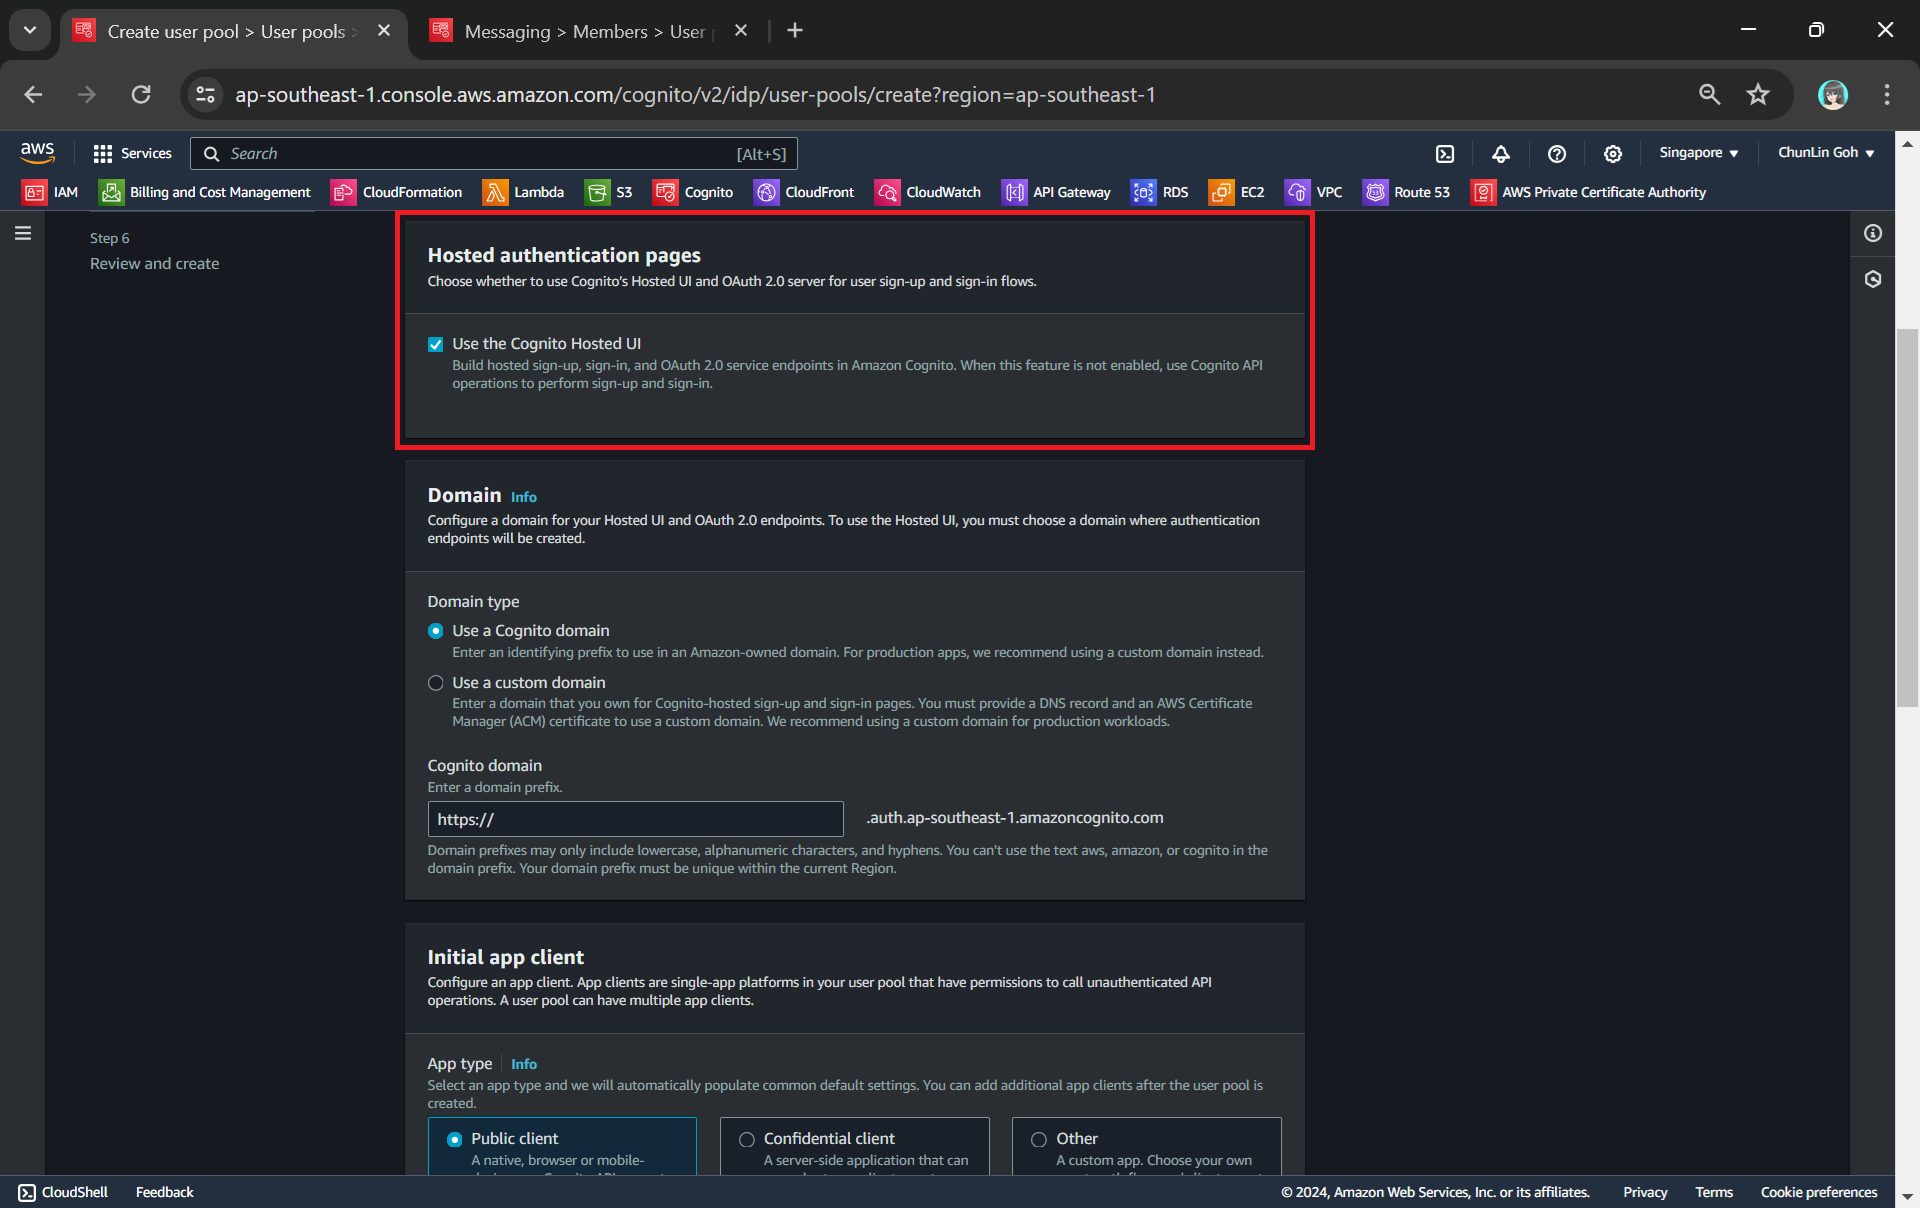
Finally, we will be using the hosted authentication pages for user sign-in and sign-up, as demonstrated below.

Using hosted UI so that we can have a simple frontend ready for sign-in and sign-up.

Step 2: Register Our Web App in Cognito

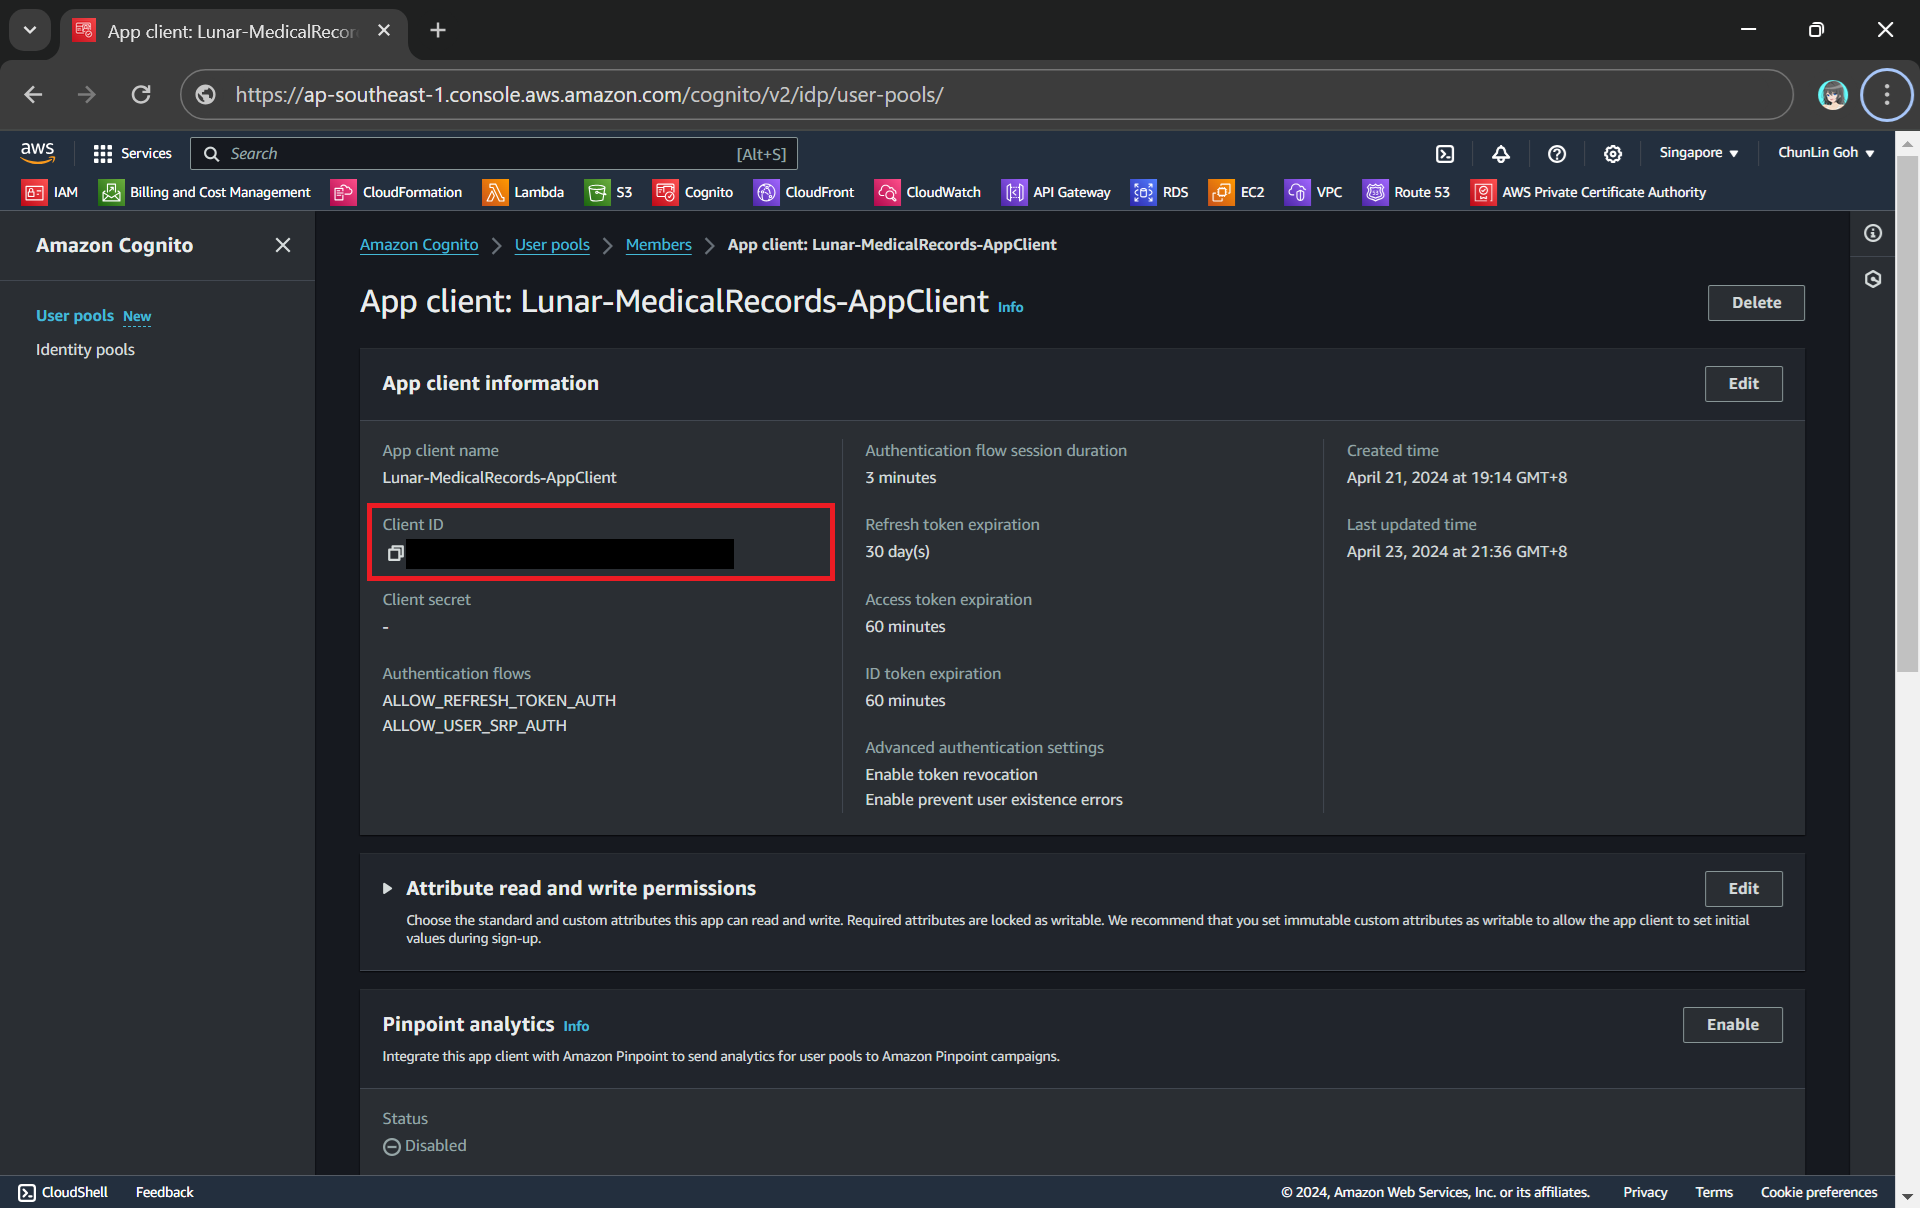
To integrate our app with Cognito, we still need to setup the app client. An App Client is a configuration entity that allows our app to interact with the user pool. It is essentially an application-specific configuration that defines how users will authenticate and interact with our user pool. For example, we have setup a new app client for our medical records app as shown in the following screenshot.

We customise the hosetd UI with our logo and CSS.

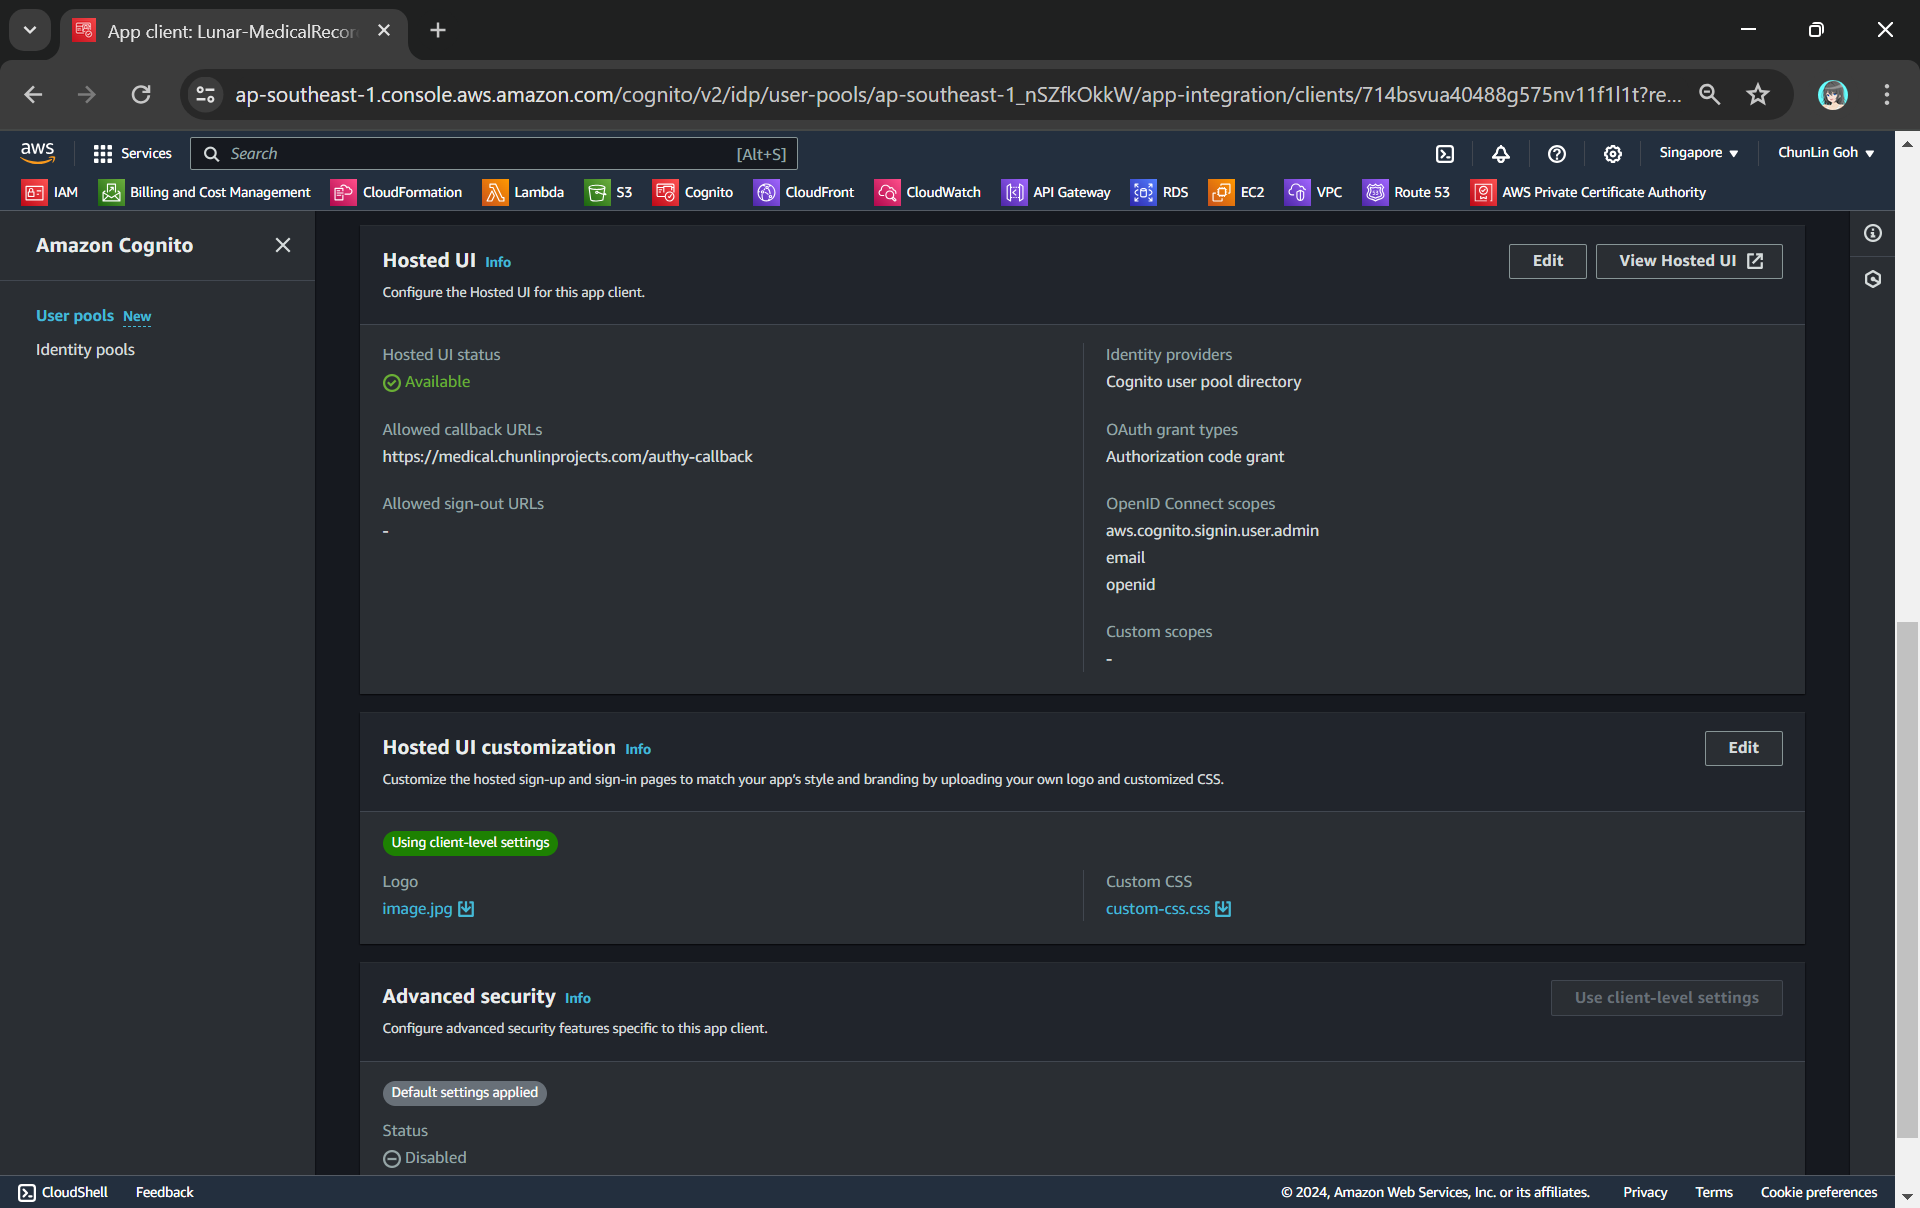
As shown in the screenshot above, we are able to to specify customisation settings for the built-in hosted UI experience. Please take note that we are only able to customise the look-and-feel of the default “login box”, so we cannot modify the layout of the entire hosted UI web page, as demonstrated below.

The part with gray background cannot be customised with the CSS.

In the setup of the app client above, we have configured the callback URL to /authy-callback. So where does this lead to? It actually points to a new Lambda function which is in charge of the authentication.

Step 3: Retrieve Access Token from Cognito Token Endpoint

Here, Cognito uses the OAuth 2.0 authorization code grant flow. Hence, after successful authentication, Cognito redirects the user back to the specified callback URL with an authorisation code included in the query string with the name code. Our authentication Lambda function thus needs to makes a back-end request to the Cognito token endpoint, including the authorisation code, client ID, and redirect URI to exchange the authorisation code for an access token, refresh token, and ID token.

Client ID can be found under the “App client information” section.
auth_code = event['queryStringParameters']['code']

token_url = "https://lunar-corewebsite.auth.ap-southeast-1.amazoncognito.com/oauth2/token"
client_id = "<client ID to be found in AWS Console>"
callback_url = "https://medical.chunlinprojects.com/authy-callback"

params = {
"grant_type": "authorization_code",
"client_id": client_id,
"code": auth_code,
"redirect_uri": callback_url
}

http = urllib3.PoolManager()
tokens_response = http.request_encode_body(
"POST",
token_url,
encode_multipart = False,
fields = params,
headers = {'Content-Type': 'application/x-www-form-urlencoded'})

token_data = tokens_response.data
tokens = json.loads(token_data)

As shown in the code above, the token endpoint URL for a Cognito user pool generally follows the following structure.

https://<your-domain>.auth.<region>.amazoncognito.com/oauth2/token

A successful response from the token endpoint typically is a JSON object which includes:

  • access_token: Used to access protected resources;
  • id_token: Contains identity information about the user;
  • refresh_token: Used to obtain new access tokens;
  • expires_in: Lifetime of the access token in seconds.

Hence we can retrieve the medical records if there is an access_token but return an “HTTP 401 Unauthorized” response if there is no access_token returned.

if 'access_token' not in tokens:
return {
'statusCode': 401,
'body': get_401_web_content(),
'headers': {
'Content-Type': 'text/html'
}
}

else:
access_token = tokens['access_token']

return {
'statusCode': 200,
'body': get_web_content(access_token),
'headers': {
'Content-Type': 'text/html'
}
}

The function get_401_web_content is responsible to retrieve a static web page showing 401 error message from the S3 bucket and return it to the frontend, as shown in the code below.

def get_401_web_content():
bucket_name = 'lunar.medicalrecords.static'
object_key = '401.html'

response = s3_client.get_object(
Bucket=bucket_name,
Key=object_key
)

object_data = response['Body'].read()
content = object_data.decode('utf-8')

return content

Step 4: Retrieve Content Based on Username

For the get_web_content function, we will be passing the access token to the Lambda that we developed earlier to retrieve the HTML content from the Object Lambda Access Point. As shown in the following code, we invoke the Lambda function synchronously and wait for the response.

def get_web_content(access_token):
useful_tokens = {
'access_token': access_token
}

lambda_response = lambda_client.invoke(
FunctionName='lunar-medicalrecords-frontend',
InvocationType='RequestResponse',
Payload=json.dumps(useful_tokens)
)

lambda_response_payload = lambda_response['Payload'].read().decode('utf-8')

web_content = (json.loads(lambda_response_payload))['body']

return web_content

In the Lambda function lunar-medicalrecords-frontend, we will no longer need to hardcode the object key as chunlin.json. Instead, we can just retrieve the user name from the Cognito using the access token, as highlighted in bold in the code below.

...
import boto3

cognito_idp_client = boto3.client('cognito-idp')

def lambda_handler(event, context):
if 'access_token' not in event:
return {
'statusCode': 200,
'body': get_homepage_web_content(),
'headers': {
'Content-Type': 'text/html'
}
}

else:
cognitio_response = cognito_idp_client.get_user(AccessToken = event['access_token'])

username = cognitio_response['Username']

try:
bucket_name = 'ol-lunar-medicalreco-t5uumihstu69ie864td6agtnaps1a--ol-s3'
object_key = f'{username}.json'

...

except Exception as err:
return {
'statusCode': 500,
'body': json.dumps(str(err))
}

The get_homepage_web_content function above basically is to retrieve a static homepage from the S3 bucket. It is similar to how the get_401_web_content function above works.

The homepage comes with a Login button redirecting users to Hosted UI of our Cognito app client.

Step 5: Store Access Token in Cookies

We need to take note that the auth_code above in the OAuth 2.0 authorisation code grant flow can only be used once. This is because single-use auth_code prevents replay attacks where an attacker could intercept the authorisation code and try to use it multiple times to obtain tokens. Hence, our implementation above will break if we refresh our web page after logging in.

To solve this issue, we will be saving the access token in a cookie when the user first signs in. After that, as long as we detect that there is a valid access token in the cookie, we will not use the auth_code.

In order to save an access token in a cookie, there are several important considerations to ensure security and proper functionality:

  • Set the Secure attribute to ensure the cookie is only sent over HTTPS connections. This helps protect the token from being intercepted during transmission;
  • Use the HttpOnly attribute to prevent client-side scripts from accessing the cookie. This helps mitigate the risk of cross-site scripting (XSS) attacks;
  • Set an appropriate expiration time for the cookie. Since access tokens typically have a short lifespan, ensure the cookie does not outlive the token’s validity.

Thus the code at Step 3 above can be improved as follows.

def lambda_handler(event, context):
now = datetime.now(timezone.utc)

if 'cookies' in event:
for cookie in event['cookies']:
if cookie.startswith('access_token='):
access_token = cookie.replace("access_token=", "")
break

if 'access_token' in locals():

returned_html = get_web_content(access_token)

return {
'statusCode': 200,
'headers': {
'Content-Type': 'text/html'
},
'body': returned_html
}

return {
'statusCode': 401,
'body': get_401_web_content(),
'headers': {
'Content-Type': 'text/html'
}
}

else:
...
if 'access_token' not in tokens:
...

else:
access_token = tokens['access_token']

cookies_expiry = now + timedelta(seconds=tokens['expires_in'])

return {
'statusCode': 200,
'headers': {
'Content-Type': 'text/html',
'Set-Cookie': f'access_token={access_token}; path=/; secure; httponly; expires={cookies_expiry.strftime("%a, %d %b %Y %H:%M:%S")} GMT'
},
'body': get_web_content(access_token)
}

With this, now we can safely refresh our web page and there should be no case of reusing the same auth_code repeatedly.

Wrap-Up

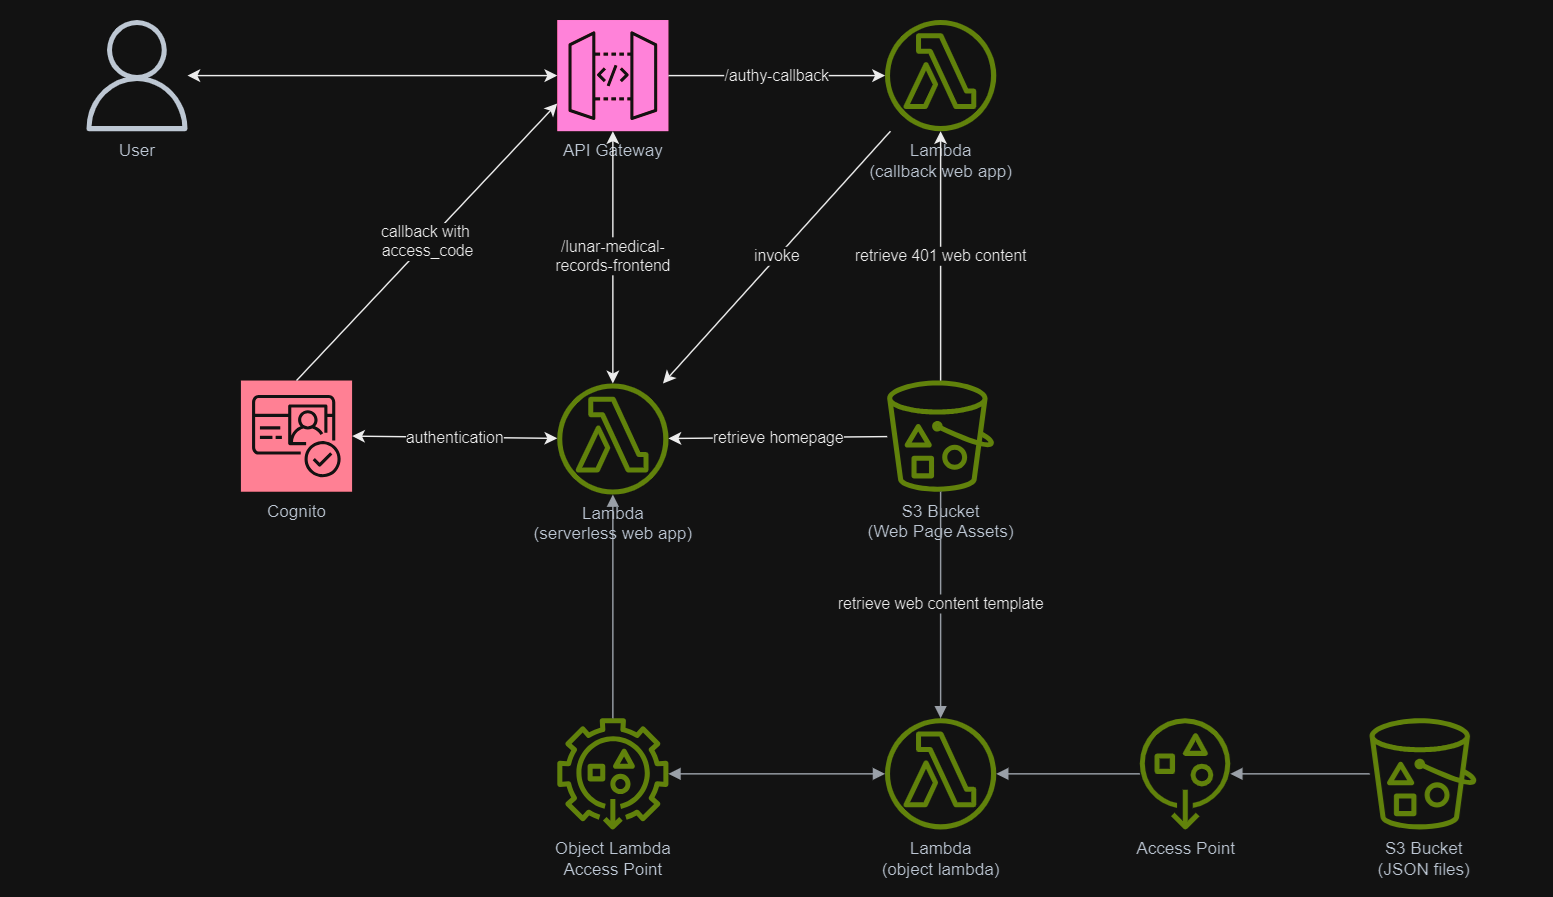
In summary, we can conclude the infrastructure that we have gone through above in the following diagram.

References

Magical Experience with Beacons

One month ago on 27th of March, my friend passed me a box of Estimote Proximity Beacons. That day marks the beginning of my journey towards a greater understanding of beacons and IoT.

Since the day I joined travel industry, I have always been thinking of providing a fun travel experience with beacon technology. When I joined Changi Airport team in 2015, I proposed to my manager the possibility of applying beacons in the airport. The idea was rejected. Now, I finally get the chance to build something with the small little Estimote Proximity Beacons.

estimote-beacons.png
We forcefully opened up the beacons and replaced the batteries.

Claiming Beacons

Every Estimote beacons are shipped with an unique ID which we can modify. By default, the beacon ID is in iBeacon format and consists of 3 values:

The three values are hierarchical. The purpose of UUID is to distinguish our beacons from all other beacons in the network. Major and Minor values allow us to label the beacons with higher accuracy.

ibeacon-format
An example of how a chain of retail shops will deploy and label their beacons. (Source: Estimote Developer Docs)

The iBeacon ID can be changed. One way is to use the Estimote app to do it. Since I wasn’t the owner of the beacons, my first step is to claim the beacon using the app. After I successfully claim the beacons, I can then proceed to retrieve detailed info of the beacons and modify their info.

claiming-beacons-and-changing-broadcasting-power.png
Claiming beacon and modifying its info, such as its range (by default it’s ~3.5m).

Google Beacon Platform

After configuring our beacons, we can then proceed to claim the ownership of our beacons on the Google Beacon Registry. There is a mobile app called Beacon Tools available from Google to help us registering our beacons on Google Beacon Registry. There is a very interesting video interviewing Peter Lewis in the Coffee with a Googler season talking about the steps of beacon registration.

google-beacon-registry.png
Peter shares about Google Beacon Registry and Google Beacon Platform. (Source: YouTube)

After that, we can associate a lot of information with our beacons. To do so, we first are recommended to use Google Beacon Dashboard. There is a very simple tutorial guiding us to use the Google Beacon Dashboard to associate the attachments with the beacons.

attachments
My beacon project, Icy Marshmallow, and the attachments of a beacon in the project.

Read Attachments

I’m using the Nearby Messages API to retrieve the attachments from the beacons. I did a small little Android app (which is properly configured following the recommended steps) with the codes as shown below to achieve this.

package gclprojects.icymarshmallow;

...
import com.google.android.gms.common.ConnectionResult;
import com.google.android.gms.common.api.GoogleApiClient;
import com.google.android.gms.Nearby;
import com.google.android.gms.nearby.messages.Message;
import com.google.android.gms.nearby.messages.MessageListener;
import com.google.android.gms.nearby.messages.Strategy;
import com.google.android.gms.nearby.messages.SubscribeOptions;

public class MainActivity extends AppCompatActivity 
        implements GoogleApiClient.ConnectionCallbacks,
        GoogleApiClient.OnConnectionFailedListener {
    
    private GoogleApiClient mGoogleApiClient;
    private MessageListener mMessageListener;
    ...

    @Override
    protected void onCreate(Bundle savedInstanceState) {
        super.onCreate(savedInstanceState);

        ...

        mGoogleApiClient = new GoogleApiClient.Builder(this)
                .addApi(Nearby.MESSAGES_API)
                .addConnectionCallbacks(this)
                .enableAutoManage(this, this)
                .build();

        mMessageListener = new MessageListener() {
            @Override
            public void onFound(final Message message) {
                // Called when a new message is found.
                // Use message.getType().toString() to read the attachment Type
                // Use new String(message.getContent()) to read the attachment Value
            }
        }
    }

    @Override
    protected void onStart() {
        super.onStart();
        mGoogleApiClient.connect();
    }

    @Override
    protected void onStop() {
        super.onStop();
        mGoogleApiClient.disconnect();
    }

    @Override
    public void onConnected(@Nullable Bundle bundle) {
        if (mGoogleApiClient != null && mGoogleApiClient.isConnected()) {
            subscribe();
        }
    }

    ...

    private void subscribe() {
        SubscribeOptions options = new SubscribeOptions.Builder()
                .setStrategy(Strategy.BLE_ONLY)
                .build();

        Nearby.Messages.subscribe(mGoogleApiClient, mMessageListener);
    }
}

With the codes above, when beacon gets detected by the mobile app, the onFound method gets called for each of the attachment associated with the beacons. If we print the variable message into Log, we shall see something as follows.

Message{namespace='icy-marshmallow', type='string', content=[29 bytes]}

As shown above, the Value of the attachment is base64 encoded. So to read it, we just need to use new String(message.getContent()).

In the subscribe method, since we are only interested in messages attached to BLE (Bluetooth Low Energy) beacons, we use Strategy.BLE_ONLY.

Problem #1: Unsubscribe Method

When the app is running and another app comes into the foreground, we also need to stop subscribing to messages from the beacons. Otherwise, when we navigate back to the app, the messages can no longer be received even though we re-trigger the subscribe method.

So, I added the following codes.

@Override
protected void onPause() {
    if (mGoogleApiClient != null && mGoogleApiCLient.isConnected) {
        unsubsribe();
    }

    super.onPause();
}

@Override
protected void onResume() {
    if (mGoogleApiClient != null && mGoogleApiClient.isConnected) {
        subscribe();
    }

    super.onResume();
}

private void unsubscribe() {
    Nearby.Messages.unsubscribe(mGoogleApiClient, mMessageListener);
}

Problem #2: Stop Receiving Messages After Few Minutes

Another problem I notice is that the messages will stop be “found” after one to two minutes. However, if I re-trigger the mobile app, then I can start seeing the messages being detected for another one or two minutes.

To solve this issue, I use a simple timer which helps to check whether it has been quite some time the app doesn’t detect the beacons. If it’s more than 1 minute, then the timer will do a unsubscribe-then-subscribe-again action. This will help the mobile app to keep receiving the messages from the beacons. It also solve the problem of the mobile app re-visiting the beacons.

Problem #3: Geo-Location

This is not a real problem if we don’t need the geo-location information of the beacons. However, if we need to know the geo-location of the beacon, one simple way is to just use the LocationManager which provides periodic updates of the mobile geographical location.

package gclprojects.icymarshmallow;

...
import android.location.Location;
import android.location.LocationListener;
import android.location.LocationManager;

public class MainActivity extends AppCompatActivity 
        implements GoogleApiClient.ConnectionCallbacks,
        GoogleApiClient.OnConnectionFailedListener {
    LocationManager locationManager;
    ...

    @Override
    protected void onCreate(Bundle savedInstanceState) {
        super.onCreate(savedInstanceState);

        ...

        LocationListener locationListener = new LocationListener() {
            public void onLocationChanged(Location location) {
                // Record down the latitude and longitude of the mobile
            }

            ...
        }

        locationManager = (LocationManager) this.getSystemService(Context.LOCATION_SERVICE);
    
        int permissionCheck = ContextCompat.checkSelfPermission(this, Manifest.permission.ACCESS_FINE_LOCATION);
        if (permissionCheck == PackageManager.PERMISSION_GRANTED) {
            locationManager.requestLocationUpdates(LocationManager.NETWORK.PROVIDER, 0, 0, locationListener);

            ...
        }
    }
}

Writing Data to Firebase

This step is optional unless the data collected needs to be stored for future use.

I use the following codes to write the beacon data to Firebase database.

package gclprojects.icymarshmallow;

...
import com.google.firebase.database.DatabaseReference;
import com.google.firebase.database.FirebaseDatabase;

public class MainActivity extends AppCompatActivity 
        implements GoogleApiClient.ConnectionCallbacks,
        GoogleApiClient.OnConnectionFailedListener {
    private DatabaseReference mDatabase;
    ...

    @Override
    protected void onCreate(Bundle savedInstanceState) {
        super.onCreate(savedInstanceState);

        ...
        
        mDatabase = FirebaseDatabase.getInstance().getReference();

        mMessageListener = new MessageListener() {
            @Override
            public void onFound(final Message message) {
                ...

                Beacon beaconInfo = new Beacon(...);

                Format formatter = new SimpleDateFormat("yyyy-MM-dd-HH:mm:ss");
                mDatabase.child("Person A")
                        .child(formatter.format(new Date())
                        .setValue(beaconInfo);
            }
        }
    }
}

...

public class Beacon { ... }

firebase.png
Successfully recorded the data from beacons in my Firebase database!

To integrate our Android app with Firebase, our friendly Android Studio comes with a tool called the Firebase Assistance which will help us connect to the Firebase. The assistance also comes with short getting-started tutorial to show us how to cinfigure and add realtime database to our mobile app.

beacon-in-changi-airport.png
Spot the beacon. =)

Installing Beacons in Changi Airport

Installing beacons in our Changi Airport is always one of my dreams to enhance the experience of millions of travelers flying in and out of the airport. In fact, currently the Armsterdam city is already making use of beacon technology to build a powerful beacon networks to give the people a better experience when they are walking around in the city. So why can’t we do the same in our friendly Changi Airport? =)

IoT Hub First Peek

The Internet of Things (IoT) is here today, and it begins with the data, devices, and services already at work in your organization. When your “things” are connected to each other and to the cloud, you create new ways to improve efficiency, enable innovation, and transform your business.

This line is printed on the front page of a Microsoft booklet distributed during the lunchtime workshop “Connecting and Building the Internet of Things (IoT)” conducted by Gerald Goh, Microsoft Technical Evangelist. Gerald shared with us technologies such as AMQP, MQTT, Message Broker in Azure, Device Explorer, and so on.

gerald-goh.png
Gerald is sharing Azure IoT Hub during the lunchtime workshop.

IoT hasn’t gone totally mainstream, however, and we have yet to feel its impact. In many ways it is roughly where the big data movement was few years ago — consisting mainly of a buzzword that’s not yet widely understood.

Nevertheless, Gerald’s workshop does give me, a web developer who doesn’t know much about this field, a helpful quick start about IoT. After reading and experimenting, I learn more about the capability of Microsoft Azure in IoT and thus I’d like to share with you about what I’ve learnt so far about Azure IoT Hub.

Message Broker

I’m working in Changi Airport. In the airport, we have several shops serving the travelers and visitors. Most of the shops have a back-end system that integrates several systems such as the retail system, e-commerce website, payment system, Changi Rewards system, inventory management system, the finance system.

So there will be cases where, when a customer buys something at the shop, the retail system needs to send as request to the payment system. Then when the purchase is successful, another purchase request will be sent to the inventory management system and the finance system.

I’m not too sure how the shops link different systems, especially this kind of point-to-point integration will cause a large number of connections among the systems. Hence, the developers of their system may find Message Broker useful.

Message Broker is a physical component that handles the communication between systems. A system sends a message to the message broker, providing the logical name of the receiving systems. The message broker will then search for the receiving systems and then passes the message to them.

message-broker
A message broker mediating the communication between systems. (Image Credit: Message Broker – MSDN)

Messaging Protocols: AMQP and MQTT

Sending a message between systems seems to be an easy task, however, doing it in a reliable and secure manner can be a challenging work.

As shown in the article “Scalable Eventing over Mesos!”, Autodesk is using AMQP (Advanced Message Queuing Protocol) as messaging protocols between two parties with the following main characteristics as goals.

  • Security
  • Reliability
  • Interoperability
  • Standard
  • Open

autodesk-messaging-protocol
AMQP communication between two parties (Image Credit: Autodesk)

AMQP 1.0 is the current specification version. It is also the primary protocol of Azure Event Hubs and Azure Service Bus Messaging after the SBMP (Service Bus Messaging Protocol), the TCP-based protocol which is used inside of .NET client library, is phased out.

Besides AMQP, MQTT (Message Queue Telemetry Transport) is another open protocol based on TCP/IP for asynchronous message queuing which has been developed and matured over past few years.

ibm.png
Dr Andy Stanform-Clark from IBM invented the MQTT protocol. (Image Source: IBM – Wikipedia)

While AMQP is designed to provide the full vibrancy of messaging scenarios, MQTT is designed as an extremely lightweight publish/subscribe message transport for small and simple devices sending small messages on low-bandwidth networks. Hence, MQTT is said to be ideal for mobile applications because of its low power usage and minimized data packets.

MQTT is also simple because it just has five API methods:

  • Connect to an MQTT broker;
  • Disconnect from an MQTT broker;
  • Subscribe to an MQTT topic filter;
  • Unsubscribe from an MQTT topic filter;
  • Publish MQTT messages.

facebook-messenger.png
“By maintaining an MQTT connection and routing messages through our chat pipeline, we were able to often achieve phone-to-phone delivery in the hundreds of milliseconds, rather than multiple seconds.” — Lucy Zhang, Facebook software engineer

If you are interested to know more about the comparison of AMQP and MQTT, there is a detailed white paper from StormMQ discussing the difference between AMQP and MQTT.

Brokered Messaging – Service Bus Messaging

When two or more systems want to exchange information, they need a communication facilitator. This is where Microsoft Azure Service Bus comes into picture.

Azure Service Bus is a reliable information delivery service, which is similar to a postal service in the physical world.

One of the messaging patterns offered in Azure Service Bus is called Service Bus Messaging, or Brokered Messaging. By using it, both senders and receivers do not have to be available at the exact same time.

AMQP 1.0 support is available in the Service Bus SDK since its version 2.1. Since the Service Bus .NET client library by default using a dedicated SOAP-based protocol, to use AMQP 1.0, we need to specify in the Service Bus Connection String as highlighted below in bold.

<?xml version="1.0" encoding="utf-8" ?>
<configuration>
    <appSettings>
        <add 
            key="Microsoft.ServiceBus.ConnectionString" 
            value="Endpoint=sb://[namespace].servicebus.windows.net/;SharedAccessKeyName=RootManageSharedAccessKey;SharedAccessKey=[SAS key];TransportType=Amqp" /> 
    appSettings> 
configuration>

In AMQP transport mode, the client library of sender will serialize the brokered message into an AMQP message so that the message can be received and interpreted by a receiver running on a different platform.

Azure Event Hub

When our event-based messaging needs to be handled at a very huge scale, we can either continue to pay even more to use Azure Service Bus or we can switch to use Event Hub. Event Hub is a cheaper way for us to be able to deal with huge bursts of messages and retain messages for a longer period of time.

event-hub-is-cheaper.png
Event Hub is cheaper, reliable and also fully managed. (Full video: Azure Service Bus Event Hubs 101 with Dan Rosanova)

Although Event Hub does not support MQTT, it does support AMQP (and HTTP) where there could be at most 5,000 concurrent AMQP connections.

Event Hubs event and telemetry handling capabilities, such as ingesting millions of events per second, make it especially usefu for IoT scenarios. However, since it is ingestion only thus Event Hub has no facility for sending traffic, for example, from the cloud back to the devices (C2D).

Azure IoT Hub

Since Event Hubs only enable event ingress, i.e. C2D, Azure offers another service, IoT Hub, for both C2D and D2C (Device-to-Cloud) communications which are reliable and secure. Not only allowing bi-directional communication, IoT Hub also supports AMQP, HTTP, and MQTT.

IoT Hub has an identity registry storing information about devices which are given the permission to connect to the IoT Hub. Before a device can connect to an IoT Hub, there must be an entry for that device in the identity registry of the IoT Hub.

In a Hello World tutorial of connecting stimulated device to IoT Hub using C#, there is a way to add device and retrieve device identity programmatically as shown below.

private static async Task AddDeviceAsync()
{
    string deviceId = "gclRasPi2";
    Device device;

    try
    {
        device = await registryManager.AddDeviceAsync(new Device(deviceId));
    }
    catch (DeviceAlreadyExistsException)
    {
        device = await registryManager.GetDeviceAsync(deviceId);
    }

    Console.WriteLine("Generated device key: {0}", device.Authentication.SymmetricKey.PrimaryKey);
}

The Registry Manager, which is connecting to the IoT Hub using a Connection String with proper Policy, will add an device identity with the Device ID “gclRasPi2” to the Device Explorer in Azure.

azure-iot-hub-device-explorer.png
The device “gclRasPi2” is now in the Device Explorer.

After doing so, a message then can be sent from (stimulated) device to the IoT Hub. For example, the device wants to send data about the temperature and humidity at that moment using MQTT, we can use the following code.

var deviceClient = DeviceClient.Create(
    iotHubUri, 
    new DeviceAuthenticationWithRegistrySymmetricKey("gclRasPi2", deviceKey), 
    TransportType.Mqtt);

var telemetryDataPoint = new
{
    deviceId = "gclRasPi2",
    temperature = currentTemperature,
    humidity = currentHumidity
};

var messageString = JsonConvert.SerializeObject(telemetryDataPoint);

var message = new Message(Encoding.ASCII.GetBytes(messageString));
message.Properties.Add("temperatureAlert", (currentTemperature > 30) ? "true" : "false");

await deviceClient.SendEventAsync(message);

To read the message, please follow the steps shared by the tutorial on setting up to read data-point messages.

Message Routing

Besides reading normal data-point messages, what really interests me is another tutorial about message processing with Message Routing.

iot-hub-routing
Message Routing (Image Source: Microsoft Azure Blog)

According to the tutorial, we first need to setup a Service Bus queue in the same Azure subscription and region as our IoT Hub.

service-bus-queue.png
Created a Queue in the Service Bus.

We can then add an Endpoint in the IoT Hub for the queue we just created. As shown in the following screenshot, there is a message saying that “You may have up to 1 endpoint on the IoT hub.” This is because I am using the free IoT Hub. For its paid versions, only at most 10 custom endpoints are allowed.

Interestingly, each Azure subscription can only have at most 10 IoT Hubs, and only 1 free IoT Hub.

iot-hub-endpoint.png
Adding a new endpoint to the IoT Hub.

After adding endpoint, we need to setup the Message Routing. For free version, we can only have 5 routing rules.

iot-hub-route.png
Creating new route with query string following special syntax.

In the query string, I used temperatureAlert = “true” as the condition. Also, as shown on the screenshot above, there is a line saying “Messages which do not match any rules will be written to the ‘Events (messages/events)’ endpoint.” Hence, the following two console applications will show different results: The left one is connecting to the messages/events endpoint while the right one is showing messages that match the CustomizedMessageRoutingRule created above.

consoles-results.png
Only data with temperatureAlert = “true” will be sent to the “CustomizedMessageRoute”.

Now if we visit the Service Bus Queue page and IoT Hub page again, we will see some updates on the numbers.

queue-results.png
Usage statistics in Service Bus Queue.

iot-hub-usage.png
2% of 8k messages sent from the stimulated device console application.

Conclusion

That’s all about my first try of Azure IoT Hub after attending the workshop delivered by Gerald. It’s a great lunchtime workshop.

For those who are interested, there is an article on Microsoft sharing the benefits of using Azure IoT Hub service, you can read it to understand more.

This is just the beginning of my IoT learning journey. There are still more things for me to learn, such as Azure Stream Analysis and Microsoft Azure IoT Suite which is briefly brought up in the booklet mentioned above.

If you spot any mistake in this article or you have more to talk about IoT and in particular IoT in Azure ecosystem, please share with me. =)

Travelling with Easybook.com: Four Young Developers in 2D2N Malaysia Trip

I’m working in Easybook.com, a rapidly growing MNC with headquarter in Singapore. Easybook is currently a tour agency with the largest online coach ticketing website in Malaysia and Singapore.

This year, we successfully recruited many young software engineers from different countries. Most of them had never been to many interesting places in Malaysia. Hence, in order to help the newcomers in my team to understand more about local express bus industry and places in Malaysia, I suggested to have a short trip to Kuala Lumpur, the capital of Malaysia.

Planning the trip to Kuala Lumpur.

Purchase the Coach Tickets

After we had decided to visit Kuala Lumpur, we went to our website to book 2-way coach tickets to and from Singapore and Kuala Lumpur.

Easybook.com is a very convenient one-stop booking for travelers to plan an entire trip from beginning to end in Malaysia. By simply keying the origin and destination as well as the travel dates, we could find out the coach services suitable to us.

Search coach trips in Easybook is very simple.

After that, we proceed to book hotel rooms. Easybook.com is an affiliate agent of Agoda. Hence, we can search for the hotel rooms in Easybook.com too!

Easy Payment

Easybook.com provides many ways for customers to make payment. AXS Station is one of them. By scanning the barcode of the coach receipts that we got from coach booking steps, we could easily make payment in any of the AXS Station located in Singapore.

Easybook customers can now make payment in AXS Station in Singapore.
Easybook customers can now make payment in Singapore AXS Station.

The Midnight Journey from Singapore to Kuala Lumpur

We checked-in at the coach counter located at Boon Lay after work. We presented our order summary printed from Easybook.com website to the counter staff. The counter is installed with Easybook system as well. Hence, the staff is able to easily validate our tickets and inform us the correct coach plate number with the help of Easybook waybill. Soon, the staff brought us to board the coach waiting outside the counter.

Coach counter staff is using Easybook system to validate our tickets.

The express coach is here!

After the journey of 5.5 hours from Boon Lay, we reached the first drop-off point in Kuala Lumpur, Terminal Bersepadu Selatan (TBS). It was around 4am. So, the entire terminal was very quiet. After that, the coach continued its journey to its last stop in Kuala Lumpur, Berjaya Times Square.

The quiet TBS at 4am.

We reached Berjaya Times Square 30 minutes later. Most of the shops, except 7-Eleven, were not yet open. The street was very quiet with only few of us walking and chatting.

Visit to Kuala Lumpur City Centre

It’s very easy to travel in Kuala Lumpur city area. You can choose to travel by bus, taxi, LRT, train. Or, if you are as young as us, then you can walk from one attraction to another!

Waiting for RapidKL LRT.

We decided to have the famous Bak Kut Teh as our lunch. We took LRT because the restaurant selling Bak Kut Teh was quite far from our hotel. The Bak Kut Teh in Kuala Lumpur has totally different taste from the one we always find in Singapore. The soup is herbal soup, instead of peppery soup.

Waiting Bak Kut Teh to be served.

After lunch, we visited many attractions in the city, such as Petronas Twin Tower, KLCC, Dataran Merdeka, Kuala Lumpur City Gallery, and Petaling Street.

Masjid Jamek, one of the oldest mosques in Kuala Lumpur.

Christmas decoration in KLCC.

Lok Lok, one of Malaysia local delights is available near our hotel.
Lok Lok, one of Malaysia local delights, is available near our hotel.

Our Product Is Everywhere

Even the tissue paper we use is from Easybook!
Even the tissue paper we use is from Easybook.com!

Our returning trip was on Sunday afternoon from TBS to Singapore.

When we just walked in the the TBS lobby, what we could see was a big advertisement of Easybook.com.

In 2014, we successfully integrated with TBS system. Hence, now our customers can actually easily check-in and collect ticket at TBS.

When I was walking outside the terminal, I saw the KTM Berhad train station, Badar Tasik Selatan, located just beside TBS. That reminded me the KTM Berhad train booking which was just implemented on our platform last month. Hence, our customers can easily book the train tickets on Easybook.com and then earn some loyalty points.

After we check-in at the coach counter in TBS at 12:30pm, we boarded the coach at 1:30pm to go back to Singapore.

Easybook.com advertisement is very obvious in TBS.

Check-in at coach counter in TBS with Easybook.com order summary.

Train services, such as KTM Berhad, is available in TBS as well.
Train services, such as KTM Berhad (train ticket provider on Easybook.com platform), are available in TBS as well.

Easybook.com

I think technology has the capability to make our life better. That’s why I like building software applications. Thus, it’s very important for developers to experience the changes their software brings to the society themselves.

In this trip, we have witnessed how our system improves the workflow of bus operators, how our application helps travelers to plan their journey easily, and also how our website introduces attractions in both countries to the world. I am amazed by what we have achieved so far.

With just IT system and tour, it is already almost endless what we can do. So, what is our next goal? =)