I first learned about goroutine and channel when I was attending the Golang meetup in GoJek Singapore. In the talk “Orchestrating Concurrency in Go” delivered by the two GoJek engineers Abhinav Suryavanshi and Douglas Vaz, they highlighted the point “concurrency is not same as parallelism” in the very beginning of their talk.
Using goroutines is very simple because we only need to add the keyword go in front of any function. This remind me of the async/await in C# which is also concurrent. Async/await in C# implies that if we make a chain of function calls, and the last function is an async function, then all the functions before it have to be async too. On contrary, there is no such constraint in Golang. So when we do concurrency in Golang, we don’t really have to plan on what’s going to be asynchronous ahead of time.
Applying Goroutines
In the web application we built earlier, we introduce a new feature where users can pick the music categories that they are interested at, then it will insert relevant videos into the playlist.
We have six different music categories to choose.
The codes to do the suggestion is as follows.
for i := 0; i < len(request.PostForm["MusicType"]); i++ {
    if request.PostForm["MusicType"][i] != "" {
        go retrieveSuggestedVideos(request.PostForm["MusicType"][i], video, user)
    }
}
Now, if we select all categories and press the Submit button, we will see the videos to be added not following the selection order. For example, as shown in the following screenshot, the Anime related videos actually come after the Piano videos.
A lot suggested videos added to the list.
YouTube Data API
If you are interested at how the relevant videos are retrieved, it is actually done with the YouTube Data API as follows.
February is a short month so I have to plan my self-learning accordingly so that I can get myself more focused. Due to the fact that I can only spend on average one hour per day to work on my personal project and self-learning, I choose to learn not only something which is easier, faster to learn, but also a technology that is more interesting. So, the topic of February self-learning is HTML5! (Notice/Joke: ! is exclamation mark here. It doesn’t mean 5! which equals to 120).
I do a firefly animation by using this new <canvas> element in a simple way. Firstly, I draw some fireflies on the canvas.
cxt.globalAlpha = 0.4;
cxt.beginPath();
cxt.arc(x, y, ((fireflyLightMaxDiameter - fireflyDiameter) * brightnessRatio) + fireflyDiameter, 0, Math.PI * 2, true);
cxt.closePath();
var grd = cxt.createRadialGradient(x, y, 1, x, y, 4);
grd.addColorStop(0, "#FFFFFF"); // white
grd.addColorStop(1, "#FFFF00"); // yellow
cxt.fillStyle = grd;
cxt.fill();
cxt.globalAlpha = brightnessRatio;
cxt.fillStyle = "#99FF00";
cxt.beginPath();
cxt.arc(x, y, fireflyDiameter, 0, Math.PI * 2, true);
cxt.closePath();
cxt.fill();
Secondly, I will redraw the whole canvas for every 60 milliseconds. Then in each redraw function, I randomly assign flying speed and direction to every single firefly. Also, there is a counter set so that the firefly won’t change its direction too often.
dx = Math.floor(Math.random() * fireflyMaxSpeed);
dy = Math.floor(Math.random() * fireflyMaxSpeed);
firefliesDx[i] = dx;
firefliesDy[i] = dy;
x += dx * directionX[i];
y += dy * directionY[i];
if (callCounter % 40 == 0) { // Don't change the flying direction too often
    directionX[i] = ((Math.floor(Math.random() * 10) < 5) ? 1 : -1);
    directionY[i] = ((Math.floor(Math.random() * 10) < 5) ? 1 : -1);
}
Thirdly, I set a counter to do the brightness changing of each firefly.
So, yup, that’s the basic idea on how I do firefly animation in <canvas>. Since this year is the tourism year in my country, I apply the firefly animation in a page about watching fireflies in Kuala Selangor, Malaysia. To get the source code, you can visit my page of this animation in the Mozilla Demo Studio. Don’t forget to click “Like It” button if you really like it. =P
Firefly HTML5 Animation: The page is to promote Kuala Selangor, the world’s biggest firefly colony
Popcorn.js: Integrating Video and the Web Content
However, promoting just one attraction in my country is not enough. So, I am thinking of building a page which will guide the viewer through different places in Malaysia.
I get a promotional video about Malaysia tourism from YouTube. In the video, it shows several famous tourist attractions in Malaysia. I want to build a web page showing a short introduction as well as a map (or even street view) about those places. I thus chose Popcorn.js.
Popcorn.js is an open-source HTML5 video framework which allows us to create time-based interactive media on the web. So, we can now bring content in a web page into a video easily. People watching a video on the website now can also read a web page content which is relevant to the video content. So, this JavaScript library basically allows to add value to a video.
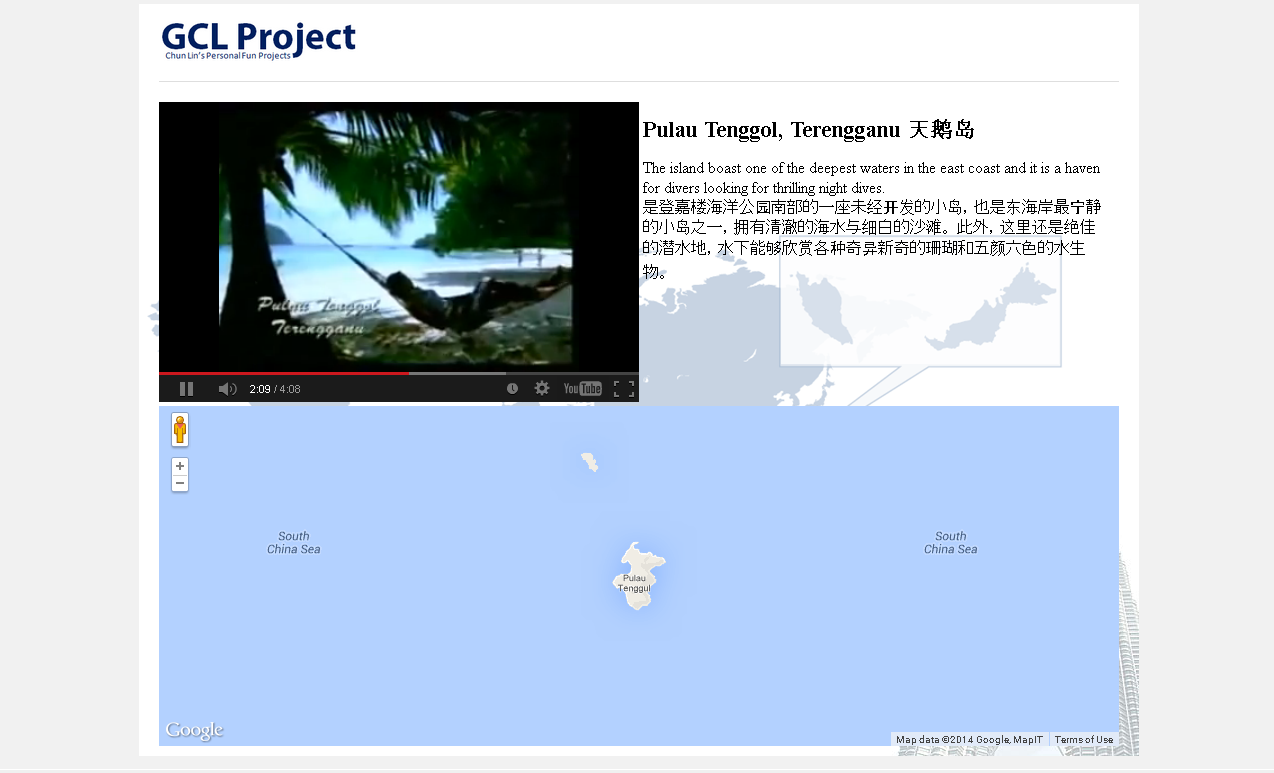
The following screenshot shows how the page looks when the video is displaying a picture of Pulau Tenggol.
Popcorn.js in action.
YouTube Plug-in Issue in Popcorn.js
There is a problem if we are using the YouTube plug-in offered in the Popcorn.js. After the video ends, the YouTube player will show a group of relevant videos. So it basically allows the viewer to change the content of the video player. Hence, to solve this problem, I added one value to the playerVars in popcorn.js.
Although it’s not encouraged to use CSS to do complicated drawing on the web pages, thanks to the CSS3, we can now create animations with CSS by using @keyframes. For example, the following is part of my CSS which does the animation of the name of each attraction in the web page.
So, if you haven’t visited Malaysia before, please bring your family and friends to this lovely country and join us in this grand tourism celebration. However, before that, kindly vote for my following two demos by clicking the “Like It” button. Thanks. =D
I saw a Facebook post announcing the first JBoss workshop in Singapore. However, since I had meeting overseas at that time, I couldn’t attend the event. Fortunately, my good friend, Wai Hong, who is also interested in Java programming decided to attend the workshop as well. After the workshop, he shared with me the notes so that I could learn it myself also. Thus, here I’d like to thank Wai Hong for his kindness. =D
The first JBoss Workshop in Singapore!
In this post, I want to share my JBoss learning journey after going through the notes, online tutorials, and online forums. Meanwhile, I also developed a new app, My YouTube RePlayer, and then deployed it on OpenShift, the Red Hat cloud hosting service, during the long weekend.
Set Up JBoss Developer Studio
In order to build web applications and then to publish them easily to the OpenShift, I choose to use the recommended IDE in the workshop, the JBoss Developer Studio 6.0.0.GA (JBDS).
In the beginning of the installation, there are short introduction and the End User License Agreement. Please spend some time to read it.
Let’s get started with JBDS installation.
The next step will be selecting the installation path. I guess there is no need to put a screenshot for this?
After choosing the installation path, there will be an option to choose Java VM. So, the directory chosen will be the jre directory in the place Java is installed on the PC.
Select the Java Virtual Machine.
The next step will be “Select Platforms and Servers” which can be skipped because this part will be done in later stage.
At the end of the installation, if everything goes well, there will be a message saying “Installation has been completed successfully” in Step 9, which is also the last step. That means JBDS can be used now.
Launch JBoss Developer Studio
JBDS is almost like Eclipse. Well, this is because it includes not only the web development tools, but also Eclipse.
Hello, JBDS!
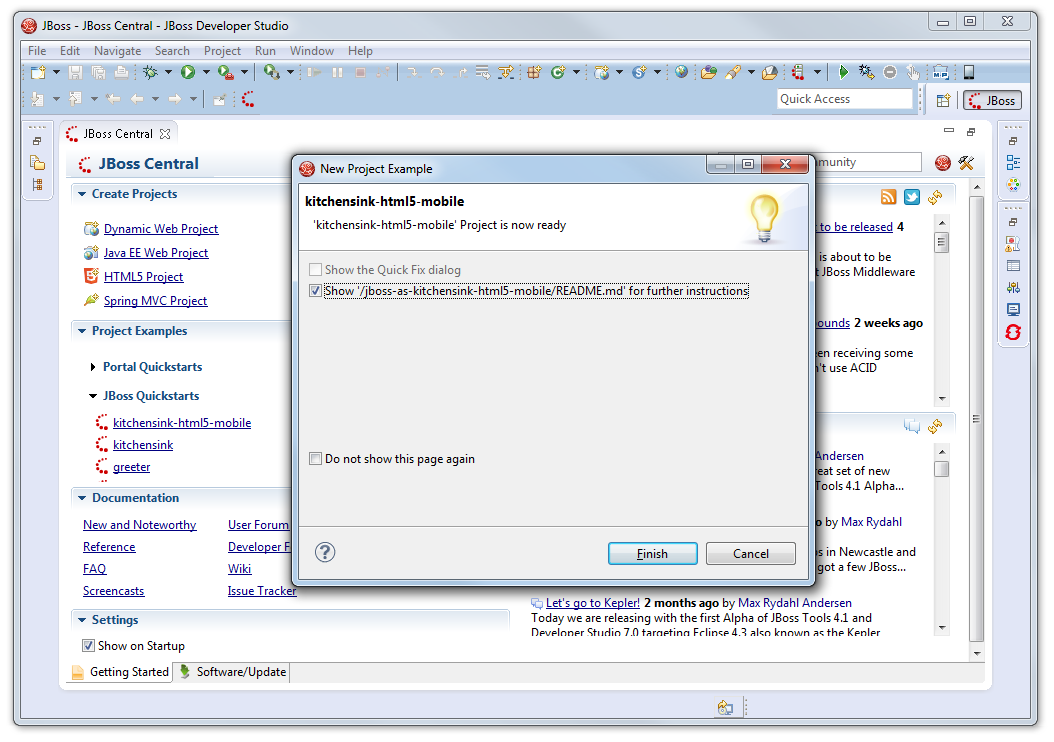
In the workshop, a quickstart project sample called kitchensink-html5-mobile is used. Due to the fact that I was following the workshop tutorial, I ended up using it to build my app, My YouTube RePlayer, eventually.
Choose the kitchensink-html5-mobile sample project as starting point.
Under the “Requirements” section, there are four items. On my PC, three of the plugins were found. Only the JBoss Enterprise Application Platoform 6 or JBoss Application Server 7.1 was missing. I thus installed the JBoss Application Server 7.1 which was given by Wai Hong together with his notes. I think it can also be downloaded in the “Download and Install…” section.
Download and install the JBoss Application Server 7.1.
After the runtime is added, just click on the “Finish” button and the project will be imported.
Once a message saying “‘kitchensink-html5-mobile’ Project is now ready” appears, that means everything has been done correctly so far. Yesh!
The project is now ready!
Deploy to OpenShift
I decided to use the sample project as a template to build my app, My YouTube RePlayer.
Before deploying to the cloud, I needed to test my app on local. To do that, firstly, right-click on the project folder in the “Project Explorer” window and then choose “Run As -> Maven Install” to build the project. Secondly, right-click on the project folder again and then choose “Run As -> Run on Server” to deploy on a local JBoss application server. Finally, the app will appears in the browser nicely.
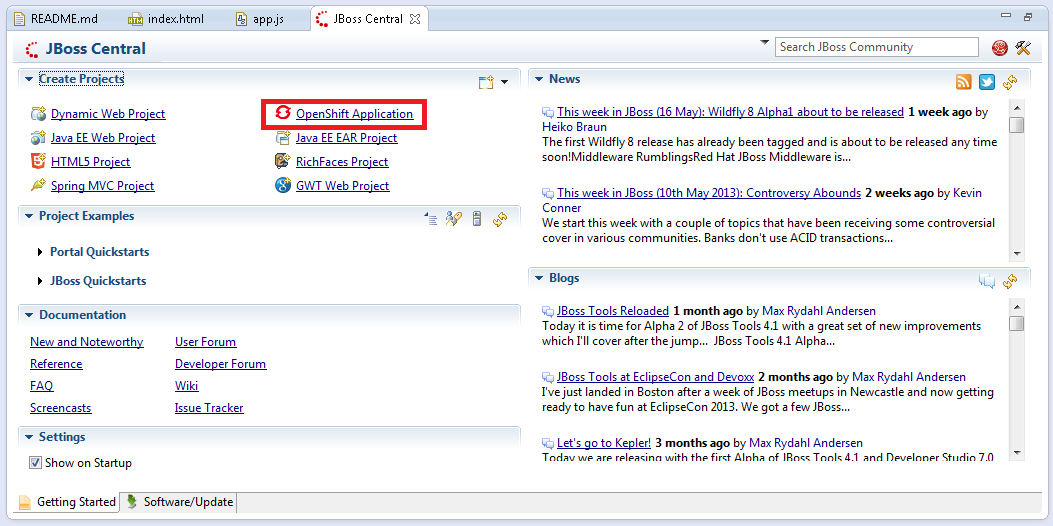
After testing on localhost, it is time to deploy the app to the cloud. First thing to do is to go back to the JBoss Central tab and click on the “OpenShift Application” button.
Click on the “OpenShift Application” button to start setting up the app on the cloud server.
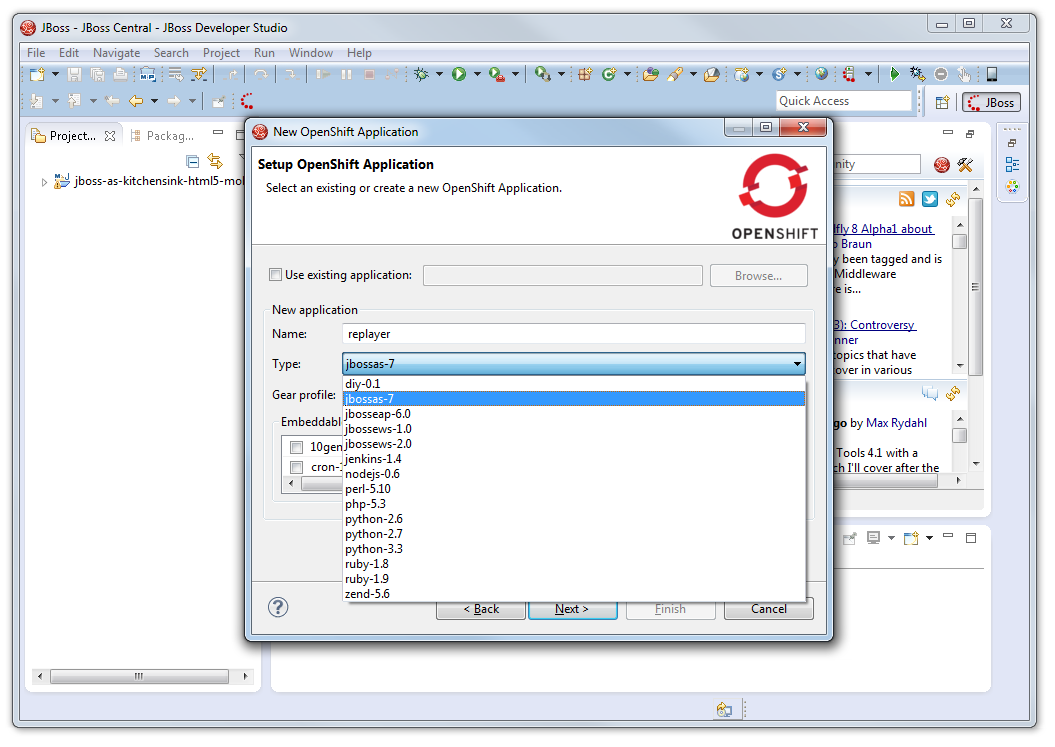
The next step will be naming the application. The naming is very important because both the application name and OpenShift username will appear in the URL of the app on OpenShift in the following format: <application name>-<username>.rhcloud.com.
Choose jbossas-7 under the application type option.
For the “Type” drop-down list, I chose jbossas-7.
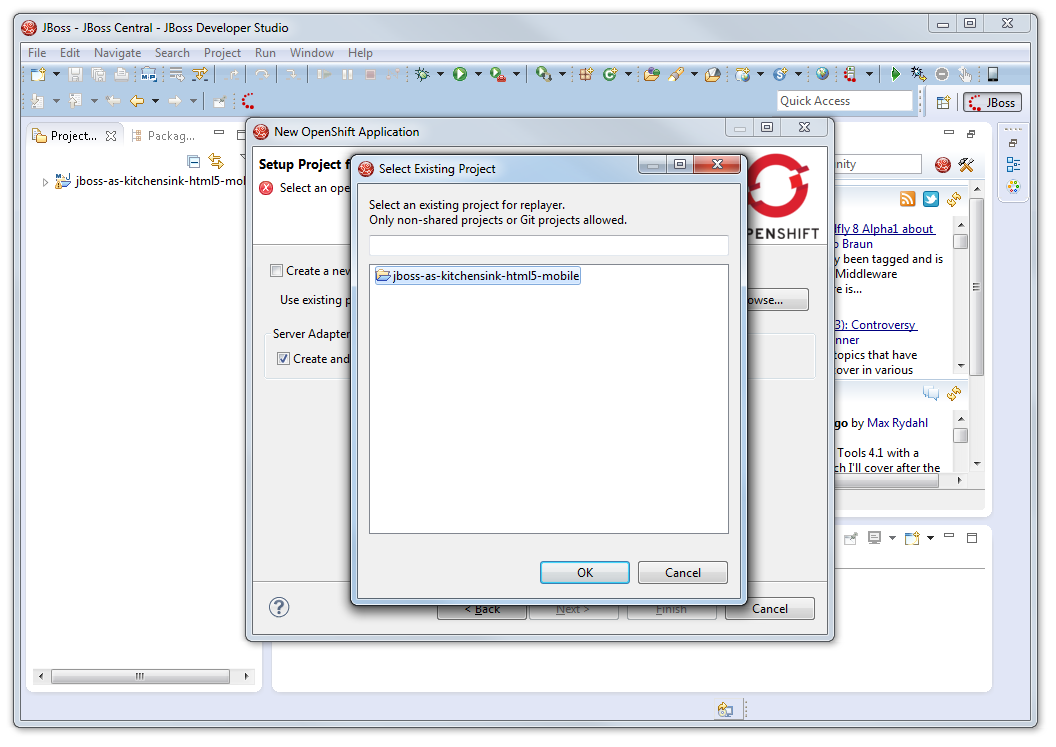
In the next window, I setup the project for the new OpenShift application. Due to the fact that I just would like to deploy my existing project, I unchecked the “Create a new project” checkbox and browsed to my modified sample project folder.
Choose to use existing project instead of create a new project on OpenShift.
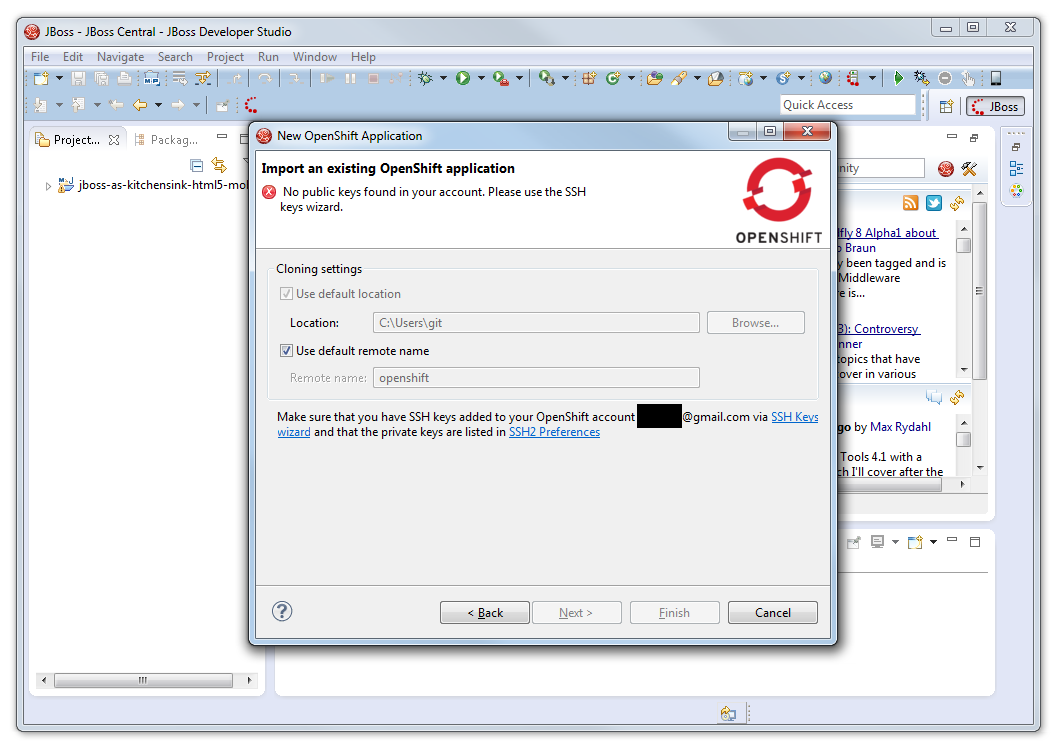
After having all these done, I reached the step where I needed to add SSH key to OpenShift account for authentication purpose. I first clicked on the “SSH2 Preferences” link.
Click on the SSH2 Preferences link.
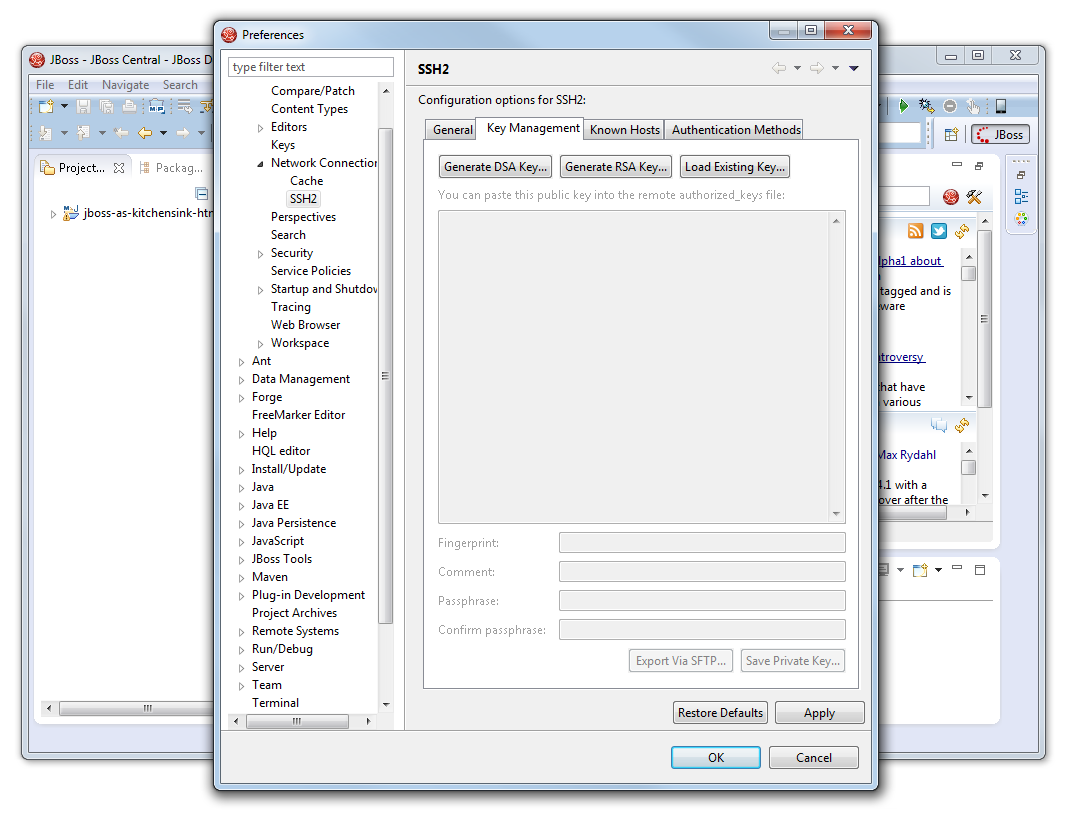
As I did not yet have an SSH key, I had to click on the “Generate RSA Key…” button to generate the key under the “Key Management” tab of the popped out window. After the key was generated, I clicked on the “Save Private Key…” button to save the private key for later use when publishing the app to OpenShift. It is recommended to have passphrase set, unless you also like to live dangerously.
The place to generate RSA key.
Not enter any passphrase?
After the private key is saved, the public key also needs to be taken care of. The generated public key should be copied to clipboard (or paste it somewhere for later use). This is because after the keys are generated, the public key has to be added through the “SSH Keys wizard”. This is to setup the authentication between the local PC and the remote OpenShift server.
Click on the SSH Keys Wizard link.
Once everything is done, click on the “Finish” button.
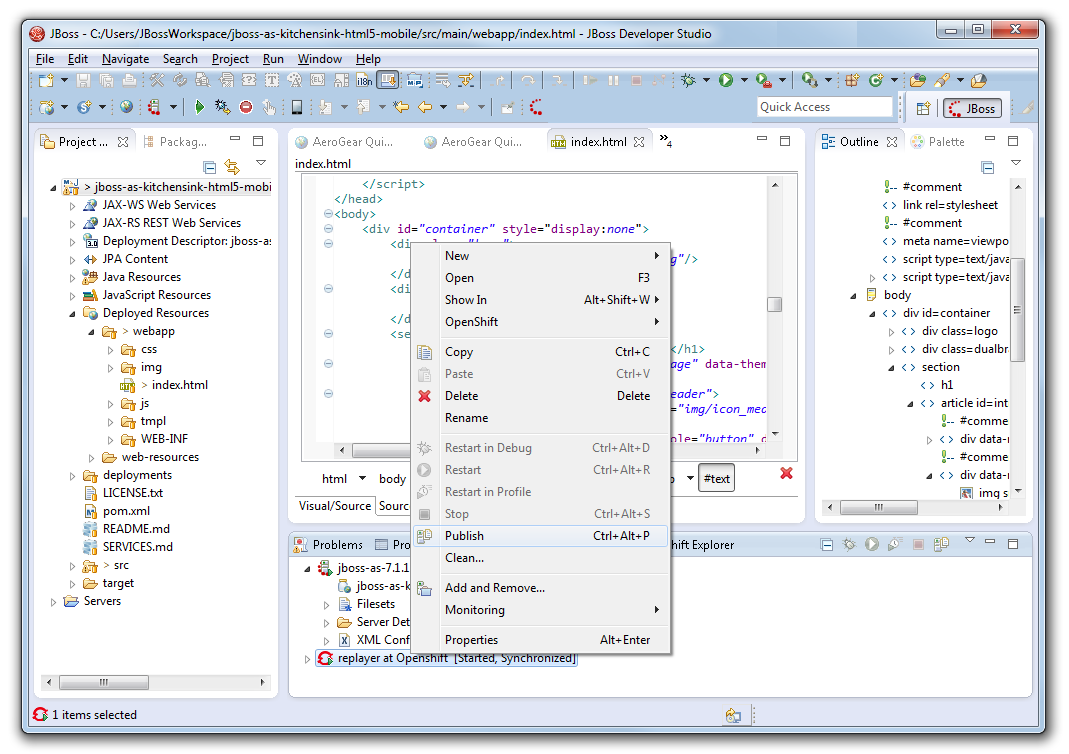
Now, it is time to publish the app. To do so, right-click on the OpenShift server item in the “Servers” tab and then choose “Publish”. That’s all.
This is how I published my new app My YouTube RePlayer.
Publish the project and deploy it on OpenShift.
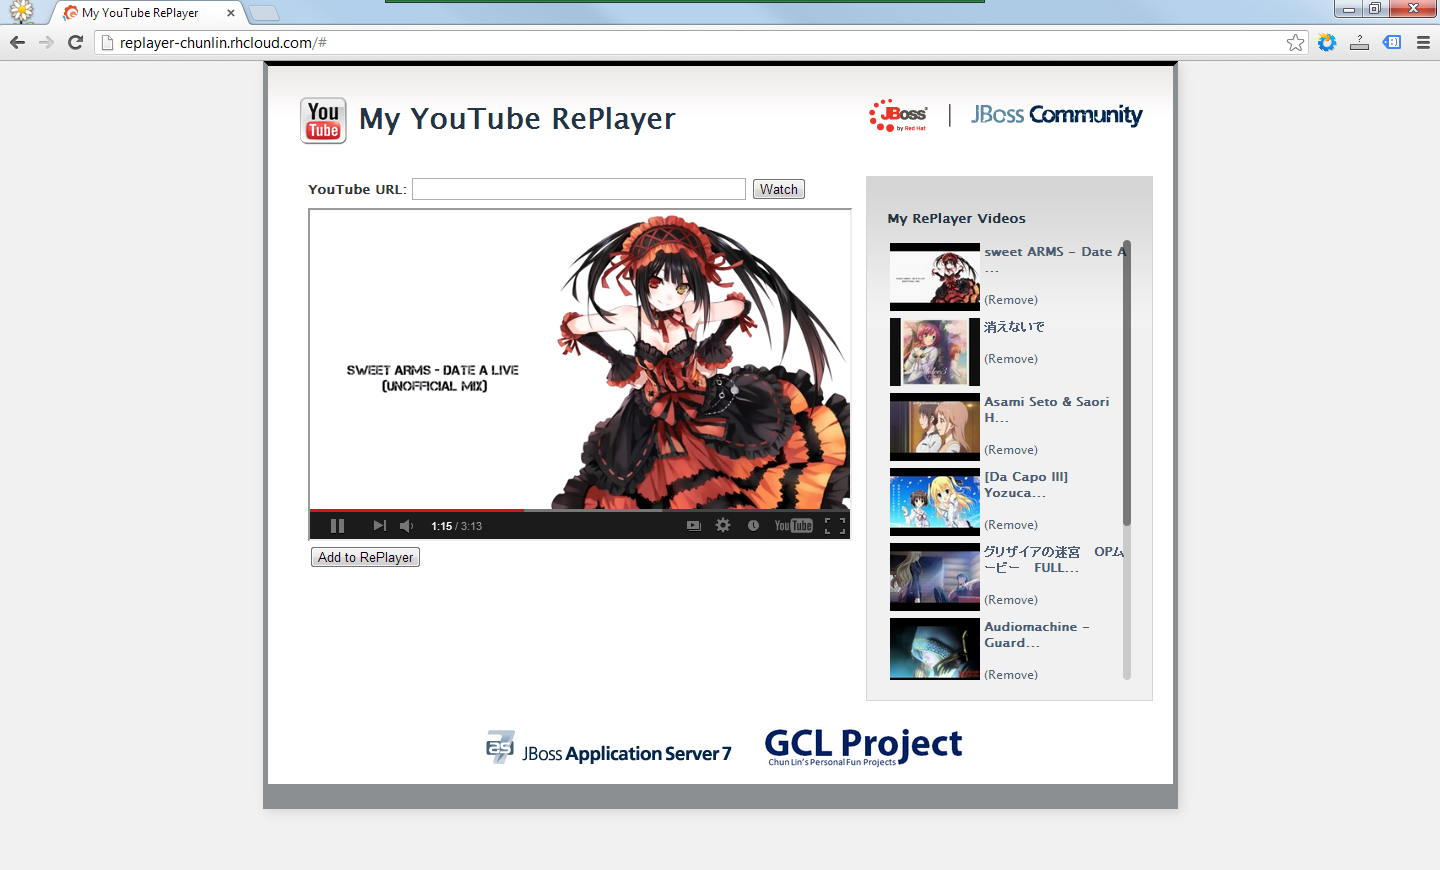
My YouTube RePlayer
So, what is My YouTube RePlayer that I built in the project above?
I love listening to music and thus I like YouTube as well. However, there is a feature that is still not yet found on YouTube website. The auto replay. To solve this problem, I have been working on several versions of YouTube Re-Player since 2009. Some are web applications and some are desktop applications.
Playing a well done unofficial mix of “Date a Live” done by DaRk5nAk3 on My YouTube RePlayer.
This time, I am using the HTML5 technology in my new YouTube Re-Player app. Instead of using database, I directly use the available web storage to store the video ids (YouTube has unique id assigned to each online YouTube video). However, I think it is still good to have a database so that the data won’t be just stored locally on user’s browser and thus can be synced over different PCs with the same login.
Thus, although the workshop is more on building a Java web application, I end up doing my own HTML 5 application. Haha. Oh well, see if I got time to continue this project next time.
Motivation
I have been doing the YouTube related projects since late 2008. As a YouTube user (and fan), I find that watching videos together with friends or family is a very unique experience also because normally we only watch YouTube on our own laptop or computer.
In the early 2010, when I was doing the first assignment for CS4341 Multimedia Technologies in NUS, I found an interesting feature provided by YouTube. It was called YouTube RealTime. In YouTube itself, it allowed user-to-user interaction, an element which is getting more and more important due to the rise of social networking sites.
In YouTube RealTime, people are able to see what their friends are doing on YouTube, for example the videos they are watching, their comments for the videos and so on. They can also receive real-time notifications when their friends add a new comment to the video. So, it is something like Facebook where the users can see their friends’ status as well as receive real-time notification when their friends like or comment on their posts.
However, just about one month after the school assignment was done, YouTube RealTime was discontinued by Google in March (Reference: http://www.google.com/support/forum/p/youtube/thread?tid=114593f2f666e137&hl=en). About the same time, I attended a Google Wave workshop for CS3216 students. So, I was thinking whether I could do something similar to YouTube RealTime which would allow me to share and watch videos together with friends staying in different places. On 6 February, a new project Re-Player Wave began.
Google Wave
Google Wave is a software application originally developed by Google and later continued by Apache as its Incubator program on 6 December. Google Wave is mainly for real-time communication and collaboration. It was a cool toy for the web developers as well because they could write a gadget for Google Wave. Building a Wave gadget is not that difficult because it requires simple JavaScript, HTML and XML knowledge only.
Luckily, Google Wave does not meet the same fate as YouTube RealTime which is discontinued by Google. Hence, I was still working on the project of building Re-Player Wave, which is also a Wave gadget, in the past few days.
Real-time Videos Sharing and Communication
Google Wave provides a very interesting feature which is online real-time collaborative editing. The main reason why I choose Google Wave as the platform is also because of this feature. Re-Player Wave allows user to share videos with a selected group of his friends on Wave. For each time he adds a new video to Re-Player Wave, the group of friends will be updated at the same time as well.
In order to prove that Re-Player Wave is able to do that, I borrow my sister’s Wave account to do the experiment. If I add a video on my computer, then my sister’s Wave thread will be updated with the new video which is added by me. Similarly, if I add a video on her computer, then I can see the update in my computer as well. The new video will only be added to the list but will not replace the current viewing video.
Re-Player Wave: Sharing Playlist with Friends
YouTube RealTime also provided the feature for real-time communication. Thanks to the same feature offered by Google Wave, real-time communication will thus be possible in Re-Player Wave as well. Besides, there is no need to find a place to host my YouTube Re-Player because all the key information can be stored easily in the state of each Wave thread. After trying to find a place to host my YouTube Re-Player, I finally find a solution to this problem by just transforming YouTube Re-Player to be a Wave gadget.
JSON-C
I learnt about the JSON in my previous GCL Project. In this project, I came to know about the JSON-C. According to the YouTube API Developer Guide, the developers are encouraged to use the JSON-C, instead of JSON, for their applications because the JSON feed will be eventually be replaced by the new functionality provided by JSON-C.
According to the guide (http://code.google.com/apis/youtube/2.0/developers_guide_jsonc.html#Comparing_JSON_and_JSONC), JSON-C feeds are something like the simplified version of JSON because all those XML namespaces and schema related information will not be kept in JSON-C. So, JSON-C is easier to be parsed and used. I am currently finding ways to improve Google Docs Notifier from my another GCL Project. Google Docs Notifier retrieves all the information stored in the JSON format, not in the JSON-C format. So, it is sometimes very hard for me to find out where I should get a certain information out from the JSON.
YouTube Social
Another Alternative: YouTube Social
Actually besides YouTube RealTime, there is another application called YouTube Social which does almost the same thing as YouTube RealTime and Re-Player Wave. One interesting feature of YouTube Social is the remote control. Unlike Re-Player Wave which the user cannot control what his or her friends are watching, YouTube Social gives the owner a remote control so that he can control the YouTube player of his or her friends as well. If you find this feature useful, you can try it out at http://www.youtubesocial.com.
Re-Player Wave
What’s In It For The Users?
To summarize, Re-Player Wave is a new way for YouTube users to interact with their friends in real time. With Re-Player Wave, you can:
Share videos with friends;
Invite your friends to watch the video you are watching;
Chat with friends about the videos in real time.
Now the Wave has come back from the dead, so please join the Wave community again. If you want to try out the gadget, you can download it at: http://www.comp.nus.edu.sg/~gohchunl/Re-PlayerWave.xml (available until 31 December 2011).


")


