Serverless Web App on AWS Lambda with .NET 6

We have a static website for marketing purpose hosting on Amazon S3 buckets. S3 offers a pay-as-you-go model, which means we only pay for the storage and bandwidth used. This can be significantly cheaper than traditional web hosting providers, especially for websites with low traffic.

However, S3 is designed as a storage service, not a web server. Hence, it lacks many features found in common web hosting providers. We thus decide to use AWS Lambda to power our website.

AWS Lambda and .NET 6

AWS Lambda is a serverless service that runs code for backend service without the need to provision or manage servers. Building serverless apps means that we can focus on our web app business logic instead of worrying about managing and operating servers. Similar to S3, Lambda helps to reduce overhead and lets us reclaim time and energy that we can spent on developing our products and services.

Lambda natively supports several programming languages such as Node.js, Go, and Python. In February 2022, the AWS team announced that .NET 6 runtime can be officially used to build Lambda functions. That means now Lambda also supports C#10 natively.

So as the beginning, we will setup the following simple architecture to retrieve website content from S3 via Lambda.

Simple architecture to host our website using Lambda and S3.

API Gateway

When we are creating a new Lambda service, we have the option to enable the function URL so that a HTTP(S) endpoint will be assigned to our Lambda function. With the URL, we can then use it to invoke our function through, for example, an Internet browser directly.

The Function URL feature is an excellent choice when we seek rapid exposure of our Lambda function to the wider public on the Internet. However, if we are in search of a more comprehensive solution, then opting for API Gateway in conjunction with Lambda may prove to be the better choice.

We can configure API Gateway as a trigger for our Lambda function.

Using API Gateway also enables us to invoke our Lambda function with a secure HTTP endpoint. In addition, it can do a bit more, such as managing large volumes of calls to our function by throttling traffic and automatically validating and authorising API calls.

Keeping Web Content in S3

Now, we will create a new S3 bucket called “corewebsitehtml” to store our web content files.

We then can upload our HTML file for our website homepage to the S3 bucket.

We will store our homepage HTML in the S3 for Lambda function to retrieve it later.

Retrieving Web Content from S3 with C# in Lambda

With our web content in S3, the next issue will be retrieving the content from S3 and returning it as response via the API Gateway.

According to performance evaluation, even though C# is the slowest on a cold start, it is one of the fastest languages if few invocations go one by one.

The code editor on AWS console does not support the .NET 6 runtime. Thus, we have to install the AWS Toolkit for Visual Studio, so that we can easily develop, debug, and deploy .NET applications using AWS, including the AWS Lambda.

Here, we will use the AWS SDK for reading the file from S3 as shown below.

public async Task<APIGatewayProxyResponse> FunctionHandler(APIGatewayProxyRequest request, ILambdaContext context)
{
    try 
    {
        RegionEndpoint bucketRegion = RegionEndpoint.APSoutheast1;

        AmazonS3Client client = new(bucketRegion);

        GetObjectRequest s3Request = new()
        {
            BucketName = "corewebsitehtml",
            Key = "index.html"
        };

        GetObjectResponse s3Response = await client.GetObjectAsync(s3Request);

        StreamReader reader = new(s3Response.ResponseStream);

        string content = reader.ReadToEnd();

        APIGatewayProxyResponse response = new()
        {
            StatusCode = (int)HttpStatusCode.OK,
            Body = content,
            Headers = new Dictionary<string, string> { { "Content-Type", "text/html" } }
        };

        return response;
    } 
    catch (Exception ex) 
    {
        context.Logger.LogWarning($"{ex.Message} - {ex.InnerException?.Message} - {ex.StackTrace}");

        throw;
    }
}

As shown in the code above, we first need to specify the region of our S3 Bucket, which is Asia Pacific (Singapore). After that, we also need to specify our bucket name “corewebsitehtml” and the key of the file which we are going to retrieve the web content from, i.e. “index.html”, as shown in the screenshot below.

Getting file key in S3 bucket.

Deploy from Visual Studio

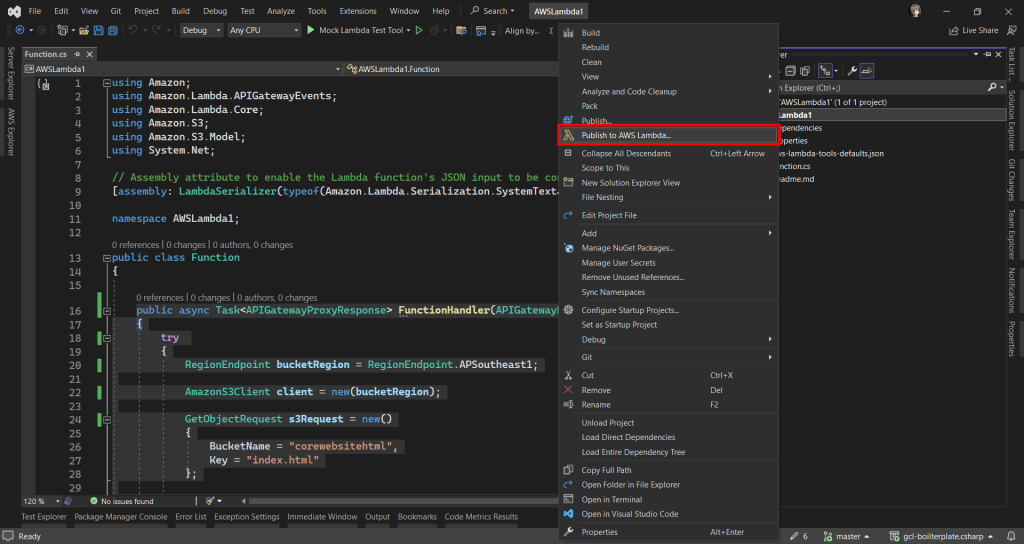
After ew have done the coding of the function, we can right click on our project in the Visual Studio and then choose “Publish to AWS Lambda…” to deploy our C# code to Lambda function, as shown in the screenshot below.

Publishing our function code to AWS Lambda from Visual Studio.

After that, we will be prompted to key in the name of the Lambda function as well as the handler in the format of <assembly>::<type>::<method>.

Then we are good to proceed to deploy our Lambda function.

Logging with .NET in Lambda Function

Now when we hit the URL of the API Gateway, we will receive a HTTP 500 internal server error. To investigate, we need to check the error logs.

Lambda logs all requests handled by our function and automatically stores logs generated by our code through CloudWatch Logs. By default, info level messages or higher are written to CloudWatch Logs.

Thus, in our code above, we can use the Logger to write a warning message if the file is not found or there is an error retrieving the file.

context.Logger.LogWarning($"{ex.Message} - {ex.InnerException?.Message} - {ex.StackTrace}");

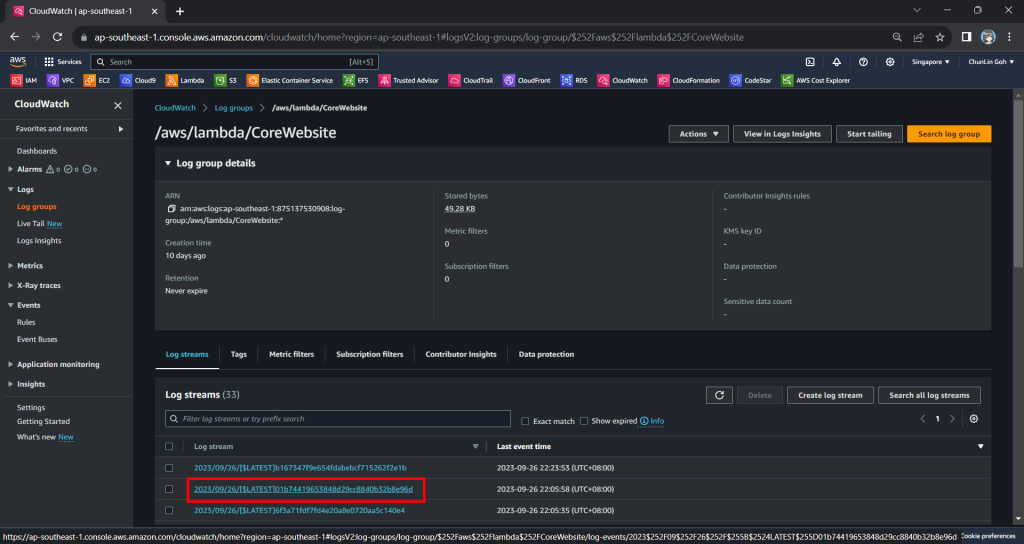
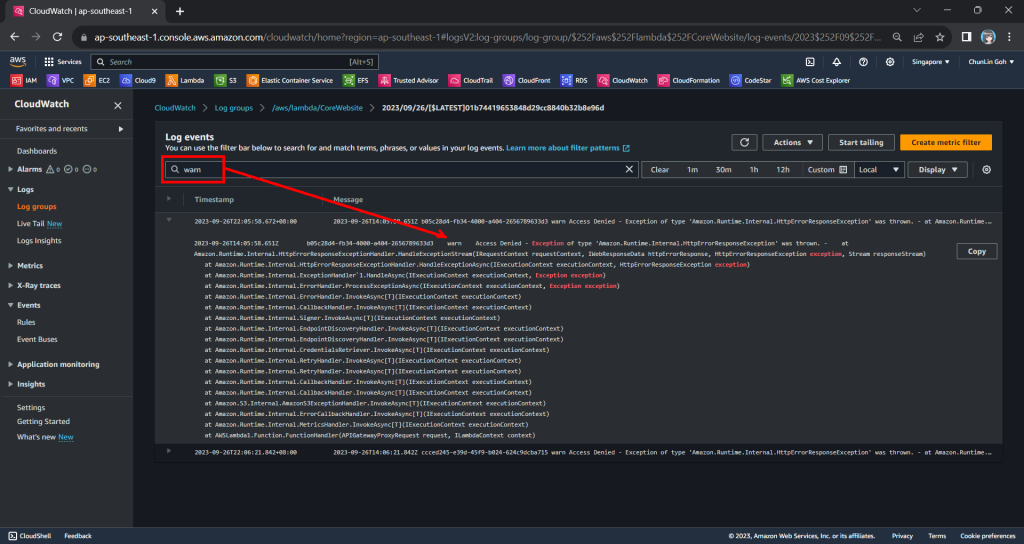
Hence, now if we access our API Gateway URL now, we should find a warning log message in our CloudWatch, as shown in the screenshot below. The page can be accessed from the “View CloudWatch logs” button under the “Monitor” tab of the Lambda function.

Viewing the log streams of our Lambda function on CloudWatch.

From one of the log streams, we can filter the results to list only those with the keyword “warn”. From the log message, we then know that our Lambda function has access denied from accessing our S3 bucket. So, next we will setup the access accordingly.

Connecting Lambda and S3

Since both our Lambda function and S3 bucket are in the same AWS account, we can easily grant the access from the function to the bucket.

Step 1: Create IAM Role

By default, Lambda creates an execution role with minimal permissions when we create a function in the Lambda console. So, now we first need to create an AWS Identity and Access Management (IAM) role for the Lambda function that also grants access to the S3 bucket.

In the IAM homepage, we head to the Access Management > Roles section to create a new role, as shown in the screenshot below.

Click on the “Create role” button to create a new role.

In the next screen, we will choose “AWS service” as the Trusted Entity Type and “Lambda” as the Use Case so that Lambda function can call AWS services like S3 on our behalf.

Select Lambda as our Use Case.

Next, we need to select the AWS managed policies AWSLambdaBasicExecutionRole and AWSXRayDaemonWriteAccess.

Attaching two policies to our new role.

Finally, in the Step 3, we simply need to key in a name for our new role and proceed, as shown in the screenshot below.

We will call our new role “CoreWebsiteFunctionToS3”.

Step 2: Configure the New IAM Role

After we have created this new role, we can head back to the IAM homepage. From the list of IAM roles, we should be able to see the role we have just created, as shown in the screenshot below.

Search for the new role that we have just created.

Since the Lambda needs to assume the execution role, we need to add lambda.amazonaws.com as a trusted service. To do so, we simply edit the trust policy under the Trust Relationships tab.

Updating the Trust Policy of the new role.

The trust policy should be updated to be as follows.

{
    "Version": "2012-10-17",
    "Statement": [
        {
            "Effect": "Allow",
            "Principal": {
                "Service": "lambda.amazonaws.com"
            },
            "Action": "sts:AssumeRole"
        }
    ]
}

After that, we also need to add one new inline policy under the Permissions tab.

Creating new inline policy.

We need to grant this new role to the list and read access (s3:ListBucket and s3:GetObject) access our S3 bucket (arn:aws:s3:::corewebsitehtml) and its content (arn:aws:s3:::corewebsitehtml/*) with the following policy in JSON. The reason why we grant the list access is so that our .NET code later can tell whether the list is empty or not. If we only grant this new role the read access, the AWS S3 SDK will always return 404.

{
    "Version": "2012-10-17",
    "Statement": [
        {
            "Sid": "VisualEditor0",
	    "Effect": "Allow",
	    "Action": [
                "s3:GetObject",
	        "s3:ListBucket"
	    ],
	    "Resource": [
	        "arn:aws:s3:::corewebsitehtml/*",
	        "arn:aws:s3:::corewebsitehtml"
	    ]
        }
    ]
}

You can switch to the JSON editor, as shown in the following screenshot, to easily paste the JSON above into the AWS console.

Creating inline policy for our new role to access our S3 bucket.

After giving this inline policy a name, for example “CoreWebsiteS3Access”, we can then proceed to create it in the next step. We should now be able to see the policy being created under the Permission Policies section.

We will now have three permission policies for our new role.

Step 3: Set New Role as Lambda Execution Role

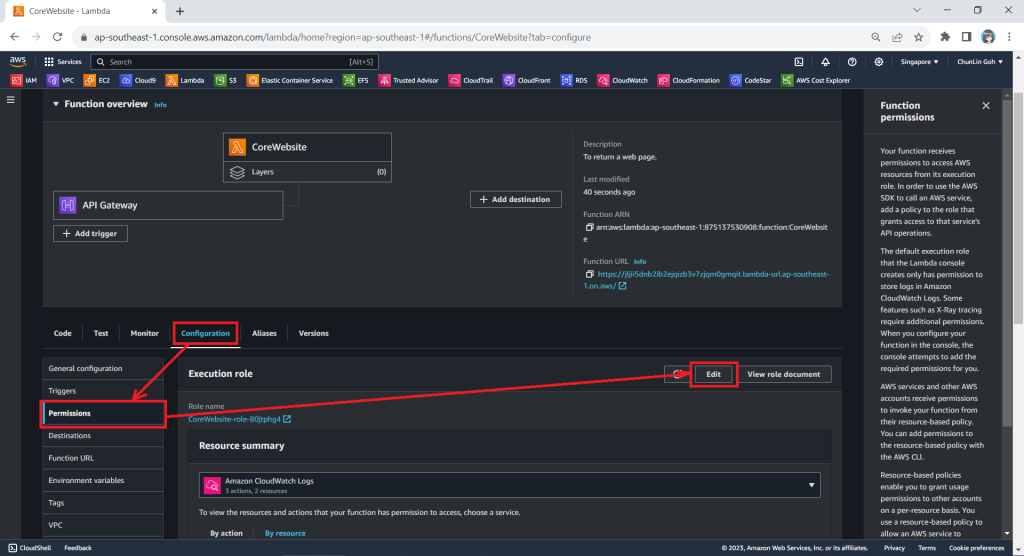
So far we have only setup the new IAM role. Now, we need to configure this new role as the Lambda functions execution role. To do so, we have to edit the current Execution Role of the function, as shown in the screenshot below.

Edit the current execution role of a Lambda function.

Next, we need to change the execution role to the new IAM role that we have just created, i.e. CoreWebsiteFunctionToS3.

After save the change above, when we visit the Execution Role section of this function again, we should see that it can already access Amazon S3, as shown in the following screenshot.

Yay, our Lambda function can access S3 bucket now.

Step 4: Allow Lambda Access in S3 Bucket

Finally, we also need to make sure that the S3 bucket policy doesn’t explicitly deny access to our Lambda function or its execution role with the following policy.

{
    "Version": "2012-10-17",
    "Id": "CoreWebsitePolicy",
    "Statement": [
        {
            "Sid": "CoreWebsite",
            "Effect": "Allow",
            "Principal": {
                "AWS": "arn:aws:iam::875137530908:role/CoreWebsiteFunctionToS3"
            },
            "Action": "s3:GetObject",
            "Resource": [
                "arn:aws:s3:::corewebsitehtml/*",
                "arn:aws:s3:::corewebsitehtml"
            ]
        }
    ]
}

The JSON policy above can be entered in the Bucket Policy section, as demonstrated in the screenshot below.

Simply click on the Edit button to input our new bucket policy.

Setup Execution Role During Deployment

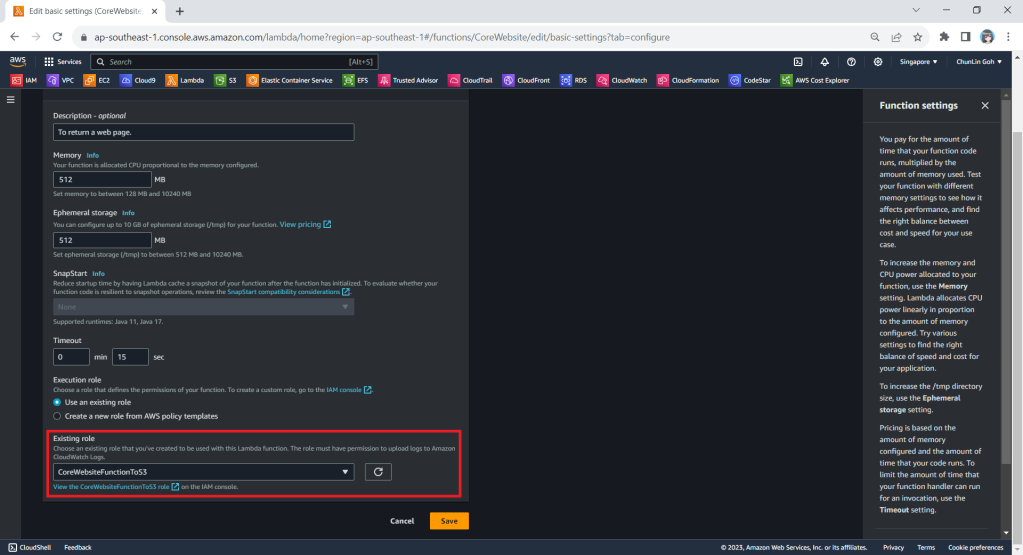
Since we have updated to use the new execution role for our Lambda function, in our subsequent deployment of the function, we should remember to set the role to be the correct role, i.e. CoreWebsiteFunctionToS3, as highlighted in the screenshot below.

Please remember to use the correct execution role during the deployment.

After we have done all these, we shall be able to see our web content which is stored in S3 bucket to be displayed when we visit the API Gateway URL on our browser.

References

Celebrate My 3rd Year of Working in NUS

This month marks the beginning of my 3rd year of working as a software engineer in National University of Singapore (NUS). Hence, at this juncture, I would like to give myself an opportunity to broaden my horizon so that I can live up to the expectations of the team and continue to grow professionally.

Coincidentally, it’s NUS Well-Being Day in the beginning of the month. All the staff and students can have a long holiday to rest and re-energise.

7 PitStop Principles for Mental Wellbeing

In the beginning of Well-Being Day, NUS introduced the 7 PitStop Principles to aid everyone in the campus in stress management and self care. The seven principles are as listed below.

  1. Personal Skills;
  2. Interactions;
  3. Time Out;
  4. Sleep;
  5. Thoughtful Eating;
  6. On the Move;
  7. Purpose.

In order to make my life better by enhancing my mental wellbeing, I have tried to adopt the principles as a part of my lifestyle during the long holiday.

Personal Skills

As Eduardo Briceño shared in his Ted talk, in our life, there are two key zones, i.e. the Performance Zone and the Learning Zone.

The Performance Zone is where we apply our knowledge and skills to carry out our tasks. The Learning Zone on the other hand is all about improving our current skills and learning new skills.

The problem why many people don’t improve much is that they spend all of their time in their performance zone. They simply do, do, do but seldom reflect on it. Hence, in his talk, Eduardo Briceño suggested that we should frequently switch between the two zones.
During the NUS Well-Being Day long holiday, it’s also coincidentally the launch of Visual Studio 2022 and .NET 6. Both of them are the key tools in my career. Hence, I took the opportunity to learn what’s new during the launch event.
Joining the Microsoft team for the launch of Visual Studio 2022 to learn about what’s new. (Image Source: Microsoft Visual Studio)

I have been focusing more on desktop and mobile app development in my past two years of working in NUS. Before that, I had always been working on web development projects which required skills in cloud computing.

Hence, in order to keep my skill relevant, I also took 6 to 7 hours per day to take some modules on Microsoft Learn to enhance my knowledge in designing, building, testing, and maintaining cloud applications and services on Microsoft Azure.

Interactions

Social isolation and loneliness can affect one’s physical and mental health. Hence, family and friends play an important role in our healthy life.

Having a cup of coffee with friend in a quiet evening is enjoyable. (Image Source: PxHere)

I’m glad to have the opportunity to have a talk with Riza Marhaban, my friend and my mentor, in one of the evenings. This is a type of happiness especially in the current situation of pandemic because meeting friends is not as easy as the good old days.

In addition, during the holiday, I attended Dato Yeo Kok Hwa’s session about Disrupting Negative Thoughts organised by NUSHeart. Dato Yeo shared with us the symptoms and causes of negative thoughts as well as how we can apply strategies to disrupt those negative thoughts.

Dato Yeo talked about how some of us have Automatic Negative Thoughts (ANTs). For example, it could be because some people over-generalise things in their life in such a way that they view a negative event as a never-ending pattern of defeat. It also could be because some people dwell on the negatives and ignore the positives. Hence, it’s important to have alternative thinking which helps us to change the way we think.

Dato Yeo Kok Hwa’s session about Disrupting Negative Thoughts.

Time Out

I’m not sure about the rest of NUS staff, but I find that the working life in NUS research centre is challenging. Hence, it’s important for me to take time out for myself.

Before the holiday, Riza was telling me that Queen’s Gambit is a must-watch miniseries on Netflix. So I took the chance to watch it during the holiday. I haven’t stopped thinking about the series since finishing it because it was just that good.

Besides watching movie, I also played Command and Conquer 3 which is one of my favourite RTS games during the holiday. This video game was released in 2007. After 14 years have passed, I finally got the time to play it.

Pew pew.

Coincidentally, HoYo FEST was happening in Singapore during the holiday as well. So, I took the opportunity to visit their café.

Mei senpai!

Sleep

When I was working in startups, I lost a night or two of sleep especially when there is a deadline to meet. This is normal because sleep is undervalued in a startup culture where being busy and working beyond capacity is celebrated. Now in my current work life, I decide to sleep more.

During the holiday, I had 10 hours of sleep/rest per day on average.

Thoughtful Eating

Even though I’m not allowed to cook in the place I rent, I still try my best to avoid unhealthy food. It has been more than one year I stop consuming fast food.

In addition, eating slower also helps. The benefits of slow eating include better digestion, better hydration, easier weight loss or maintenance, and greater satisfaction with our meals.

There is a lot of good food available in the campus.

On the Move

In 2018, a WHO report estimates that more than a quarter of people worldwide – 1.4 billion – are not doing enough physical exercise, a figure that has barely improved since 2001.

Currently, I am still trying to exercise for at least 20-minutes, 3 times a week.

My friend Jon introduced me a home workout video for beginner like me. You can refer to the video below if you are also finding ways to stay healthy during the lockdown period.

Purpose

Research suggests that people who volunteer actually experience a boost in their mental health.

I have been volunteering in National Library Board until the volunteering opportunity was cancelled in May 2021 due to the Covid-19 situation. So, there is nothing much to share about this until the volunteering programme is back.

The new library at Harbour Front that I was always volunteering at.

That’s all for how I celebrate both my 3rd year of working in NUS and the NUS Well-Being Day. I hope reading this brought you some inspiration.

References

Publishing New Xamarin.Forms App with AAB to Play Store

In the past, we published our Android app with APK, or Android Package file format, to the Google Play Store. However, starting from August 2021, if we have new apps to be published to the Google Play Store, we must use the AAB format, or Android App Bundle, instead.

AAB was first introduced in May 2018. AAB is a publishing format that includes all the compiled code and resources of our app, and defers APK generation and signing to Google Play. AAB also makes our app smaller (on average, 15% smaller than a universal APK) and faster to download.

Hence, today in this article, we will see how we can publish our Android app which is newly built using Xamarin.Forms in AAB format to the Google Play Store.

Step 0: Configure MainActivity And Android Manifest

In the Android project, we will see a class called MainActivity which is used to powered our Android app. It has an attribute called Activity which lets Android know that the class is part of the app managed by the Android Manifest.

There are many properties in the Activity attribute. One of them is called MainLauncher. By default, MainLauncher will be set to true for MainActivity class to state that the MainActivity is where our app starts up.

Step 0.1: App Name, Icon, and MainActivity

We also can customise our app name by updating the Label property in MainActivity Activity attribute. However, please take note that the value of Label here will override the app name value in the Android Manifest. Hence, it is preferable to delete the Label property here and set the name in the Android Manifest instead with strings.xml.

Relative sizes for bitmaps at different density sizes. (Image Source: Android Developers)

The Icon property here specifies the application icon. By default, it is set to be “@mipmap/icon”. Hence, we simply need to update the icon.png files in all the mipmap folders. We don’t use drawable folder because our app icon may need to be scaled differently on different UIs. The launcher app will then pick the best resolution icon to display on the screen. An alternative to creating multiple density-specific versions of an image is to create just one vector graphic.

Finally, if you are using Xamarin plugins, such as Rg.Plugins.Popup, you will be asked to configure the ConfigurationChanges property. This is to declare that our app handles the configuration change itself which prevents the system from restarting our activity.

Step 0.2: App Manifest

Updating Android Manifest of the Android project in Visual Studio. (Screenshot A)

Android Manifest allows us to describe the functionality and requirements of our Android app. We can either directly edit the AndroidManifest.xml file or edit it through the Properties window of the Android project.

Step 0.2.1: Android API Level

In the manifest, we can specify the minimum and target Android versions.

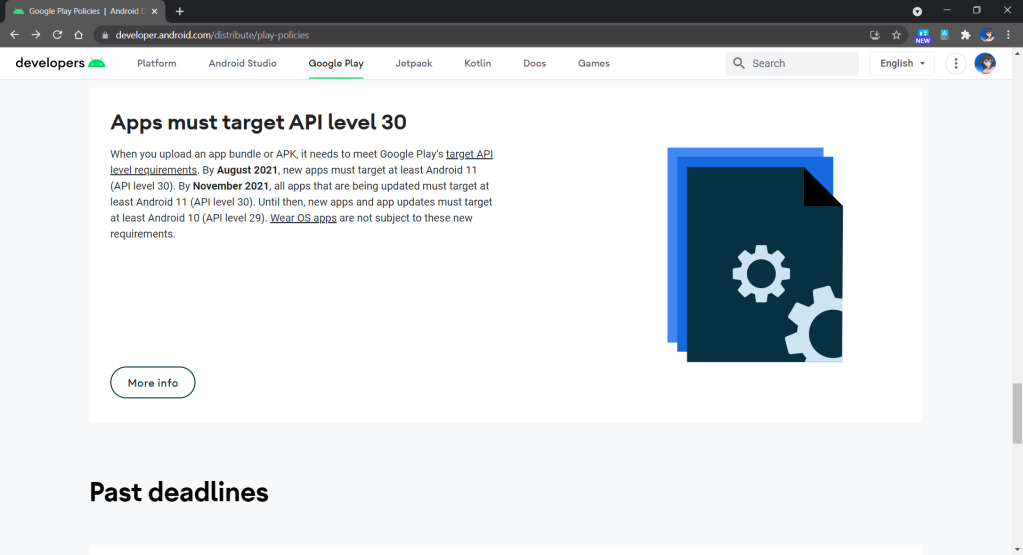
By November 2021, all apps that are being updated must target at least API Level 30, as shown in the announcement in Google Play Policies screenshot below.

Apps now must target API Level 30.

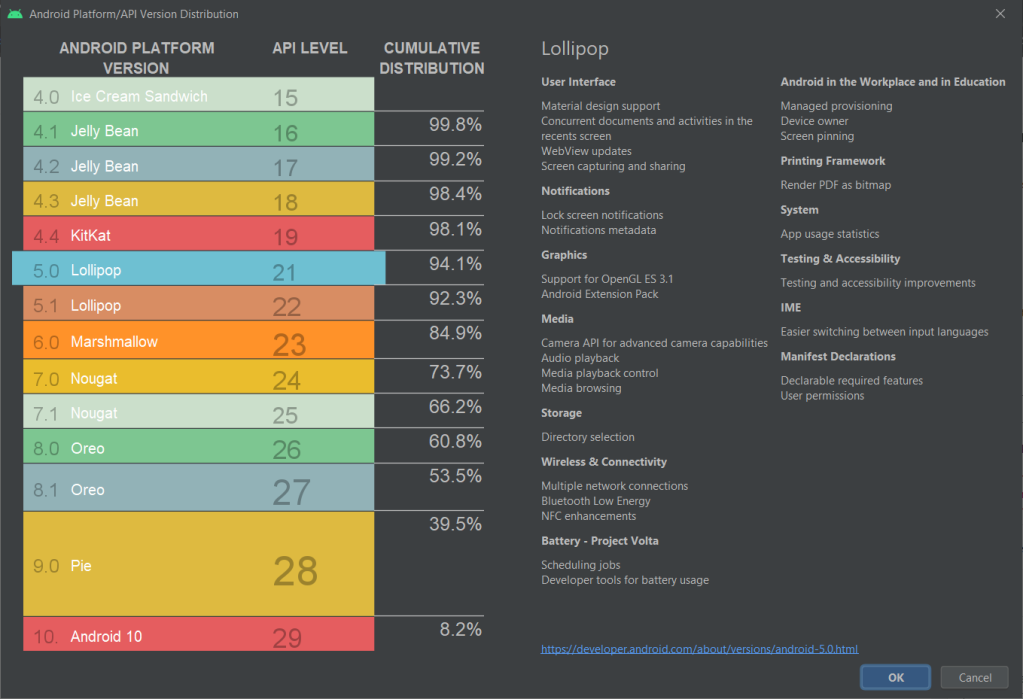
In addition, in order to not make our app to run on Android devices which are still using the discontinued Dalvik VM, we shall set minimum Android API Level to be 21 at least. According to the chart provided in Android Studio, we can see that 94.1% of the Android devices are already using API Level 21 and above as of October 2021. So it is safe to set the minimum Android API Level to be 21.

API Version distribution chart in Android Studio (as of October 2021).
Step 0.2.2: Permissions

In the manifest, we also need to specify the permissions our app requires to run. We should only request necessary permissions because users will be prompted to allow these permissions when they download our app from the Google Play Store.

By the way, if we find that switching to a Release build causes our app to lose a permission that was available in the Debug build, verify that the permission is explicitly set in the Android Manifest in Properties window, as shown in the Screenshot A above.

Step 0.2.3: App Version

Finally, in the manifest, we need to version our app release. Android recognises two different types of version information:

  • Version Number: A positive integer value (used internally by Android and the application, and thus not displayed to users) that represents the version of the application. Normally it starts with 1;
  • Version Name: A string about the app version and it’s displayed to users in Google Play Store.

Step 1: Change To AAB

As mentioned earlier, Google requires us to publish our apps with the Android App Bundle (AAB). Hence, we need to first update the Android Package Format for our app in Android Options to use bundle instead of apk, as shown in the following screenshot.

Change to use Android App Bundle.

Step 2: Configure Linker

In order to have an efficient app deployment, we need to build and release small app packages. To do so, we execute a process, known as Linking, that examines the application and removes any code that is not directly used.

The Linker in Xamarin.Android uses static analysis to determine which assemblies, types, and type members are used or referenced by a Xamarin.Android application. The linker will then discard all the unused assemblies, types, and members that are not used or referenced.

There are three linking options available:

  • None: No linking will be executed;
  • SDK Assembly Only: Linking will be performed on the assemblies required by Xamarin.Android only, NOT user’s assemblies;
  • SDK and User Assemblies: Linking will be performed on ALL assemblies, including user’s assemblies.

Normally, we will pick “SDK Assembly Only”. If we choose the “SDK and User Assemblies” option, the Linker may sometimes remove classes that are not seemed to be used by our code, especially if they are in the Xamarin shared project (or PCL library project).

Please take note that linking can produce some unintended side effects, so it is important that an application be re-tested in Release mode on a physical device.

Step 3: Dex Compilation

In order to have our app run on Android Runtime (ART), which is the successor of Dalvik VM, there is a process known as Dex (Dalvik Executable) Compilation which will transform .class bytecode into .dex bytecode. Inevitably, Xamarin.Android also has to compile Java source code into Dex format as part of the build.

In 2017, Google introduced a new Dex compiler know as D8 and one year later Google made it as the default Dex compiler in Android Studio. Soon, in Visual Studio 2019 Preview 2, D8 was allowed to be set in csproj.

ART, D8, and R8 in Google I/O 2018. (Image Source: Android Developers YouTube)

As an extension to D8, R8 is a Java code shrinker. R8 will remove unused code and resources from our app release so that the released is shrank. According to Google, in R8, we can also benefit from obfuscation, which shortens the names of classes and members in our app, and optimization, which applies more aggressive strategies to further reduce the size of our app. However, R8 doesn’t obfuscate when used with Xamarin.

Setting D8 and R8 as the Dex Compiler and Code Shrinker, respectively.

Step 4: Disable Debugging

In the Android Options shown above, we need to make sure we have disabled the “Enable developer instrumentation (debugging and profiling)” option for Release mode.

In addition, we should disable the debug state in a released application as it is possible to gain full access to the Java process and execute arbitrary code in the context of the app via JDWP (Java Debug Wire Protocol, which is turned on by default) if this debug state is not disabled. To disable it, we need to add the following lines into AssemblyInfo.cs file.

#if DEBUG
[assembly: Application(Debuggable=true)]
#else
[assembly: Application(Debuggable=false)]
#endif

Step 5: Set Supported Architecture

Currently, all our apps published on Google Play must support 64-bit architectures because starting from August 2021, Google Play stops serving non-64-bit capable devices. This means that apps with 32-bit native code will need to have an additional 64-bit version as well.

Fortunately, Xamarin.Android having supported 64-bit CPU architectures for some time and is the default in Visual Studio 2019.

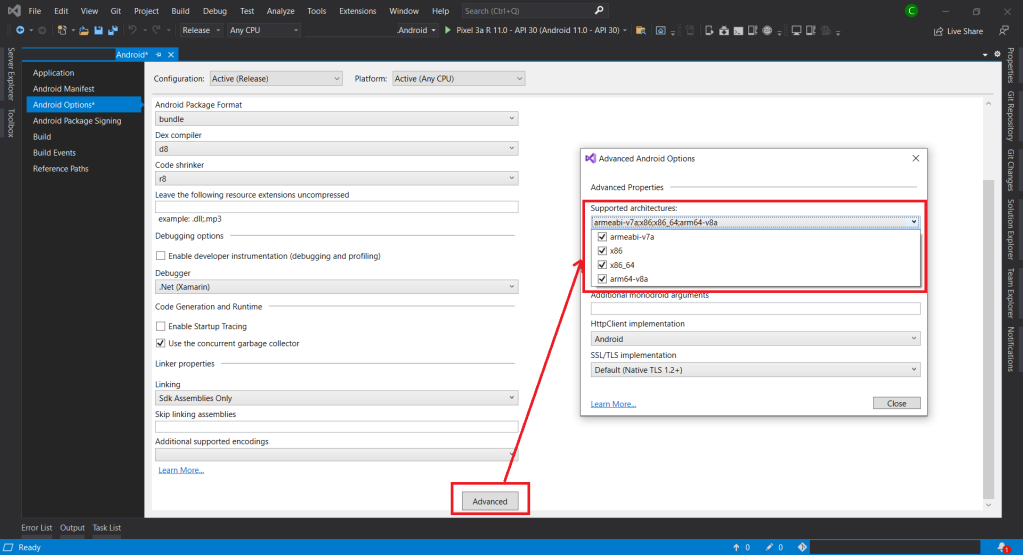
We can pick the supported architectures for our app in Android Options.

Take note that with AAB, Google Play now can use our app bundle to generate and serve optimized APKs for each device configuration. Hence, only the code and resources that are needed for a specific device are downloaded to run our app. This means that including additional architectures will no longer have any impact on the binary size when using AAB.

Step 6: Compile and Archive

After all of the above steps are completed, we can now proceed to compile our app in Release mode. We need to make sure that our app can be built successfully in Release mode.

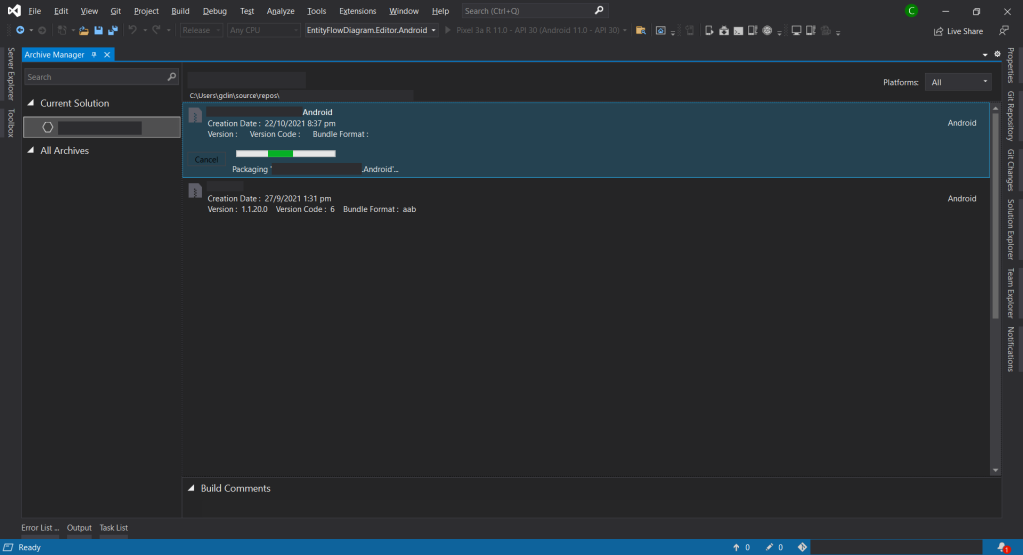
Next, we will right-click on the Android project and choose the “Archive…” option. Then the Archive Manager will be displayed, as shown below. We just need wait for the packaging process to finish.

The Archive Manager.

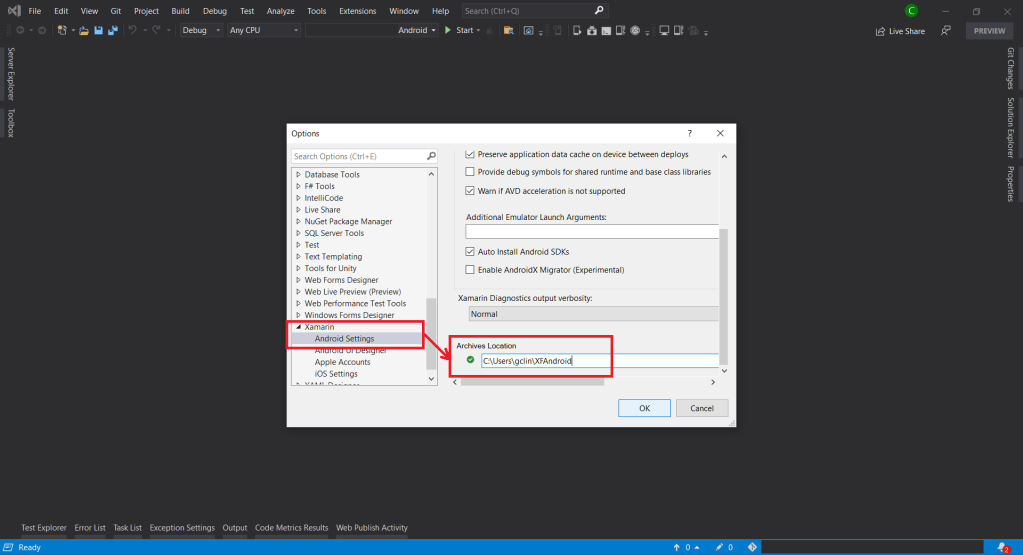
Sometimes, the archive process will fail with an error message saying “Cannot create the archive file because the copy of mdbs files failed.” or “Could not find part of the path”. According to the discussion on MSDN, this is because the Xamarin Android Archive Location path is too long. Hence, the solution is to update it to a shorter path under Tools -> Options in Visual Studio, as shown below.

Update Xamarin Android Archive Location in Visual Studio.

Step 7: Configure Distribution Channel

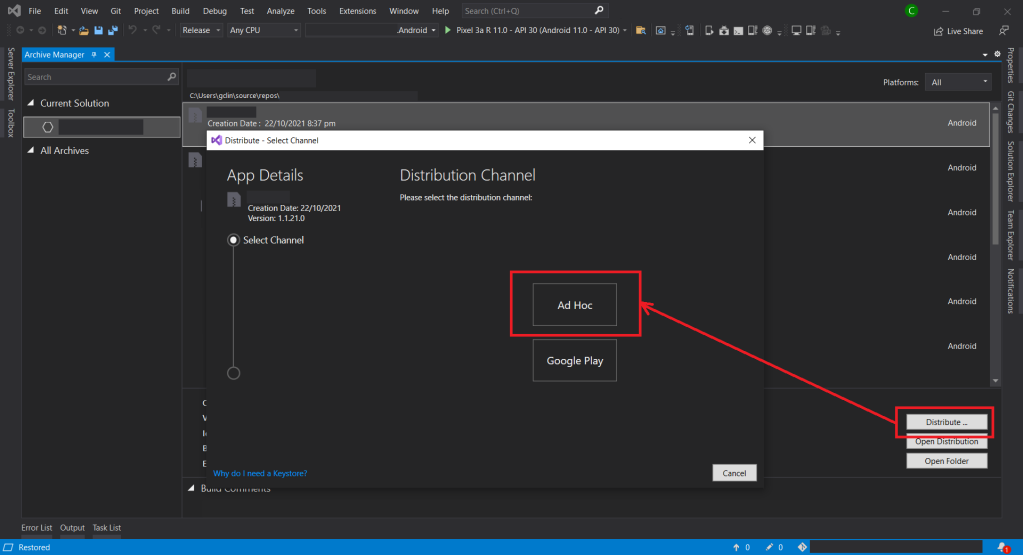
After the archive has been successfully built, we can proceed to choose the distribution channel. Here, we will choose Ad Hoc instead of Google Play as our distribution channel. This is because to Ad Hoc approach does not restrict our app to be published to Google Play only and thus gives us more freedom. In addition, to use Google Play as the channel, we will need to obtain OAuth 2.0 client credentials from the Google Cloud Console. So, to keep thing simple, we will use the Ad Hoc approach here.

Choosing Ad Hoc as the distribution channel of our aab.

Step 8: Generate Signed Bundle

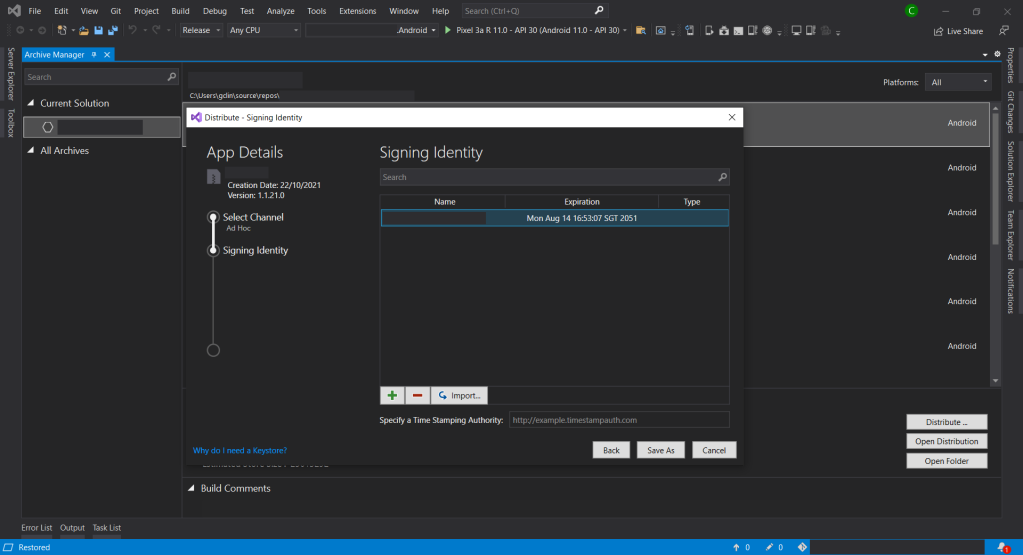
Before we can publish our app on the Google Play, we need to sign our aab with a certificate (aka upload key). We sign our aab so users know the app is really from us. Hence, after Ad Hoc is selected, Visual Studio will display the Signing Identity page.

If we already have an existing certificate, we can simply import it (password is needed). Otherwise, we can choose to create a new signing certificate.

Created certificated will be saved and listed under Signing Identity.

When we upload our signed package to Google Play, it remembers the key that was used to upload the initial package and makes sure subsequent packages are signed with the same key.

We must back up the resulting keystore file and password in a safe place. To retrieve the keystore, we can simply double click on the certificate in the list shown in the screenshot above. From there we can choose to view the keystore file in the Windows Explorer.

Signing an app with Play App Signing. (Image Source: Android Developers)

Once we have signed our aab, Play App Signing will take care of the rest. With Play App Signing, Google manages and protects our app signing key for us and uses it to sign optimized, distribution APKs that are generated from our aab, as illustrated in the chart above.

Currently, when our app is updated to a new version, Android will first makes sure the certificate of new version is same as the one in the previous version. Hence, when the app signing key expires, users will no longer be able to seamlessly upgrade to new versions of our app. Now, with Play App Signing, Google helps to keep our app signing key safe, and ensures our apps are correctly signed and able to receive updates throughout their lifespans.

In addition, when we use Play App Signing, if we lose our upload key, we can request for Upload Key Rest by contacting Play Store support. Since our app signing key is secured by Google, we can then continue to upload new versions of our app as updates to the original app, even if the upload keys have been changed.

For more information about Play App Signing, please watch the video below.

Wojtek Kaliciński talks about Play App Signing.

After we have signed and save our app bundle as aab file locally, we can move on to create and setup our new app on Google Play Store.

Step 9: Setup App on Google Play Console

In June 2020, new Google Play Console was introduced.

There are many steps involved to setup our app on Google Play Console. Fortunately, there is a very good YouTube tutorial from MJSD Coding about how to create and setup a new app on the new Google Play Console. You can simply refer to the video below.

How to Publish an Android App to Google Play in 2021.

Step 10: Release our App

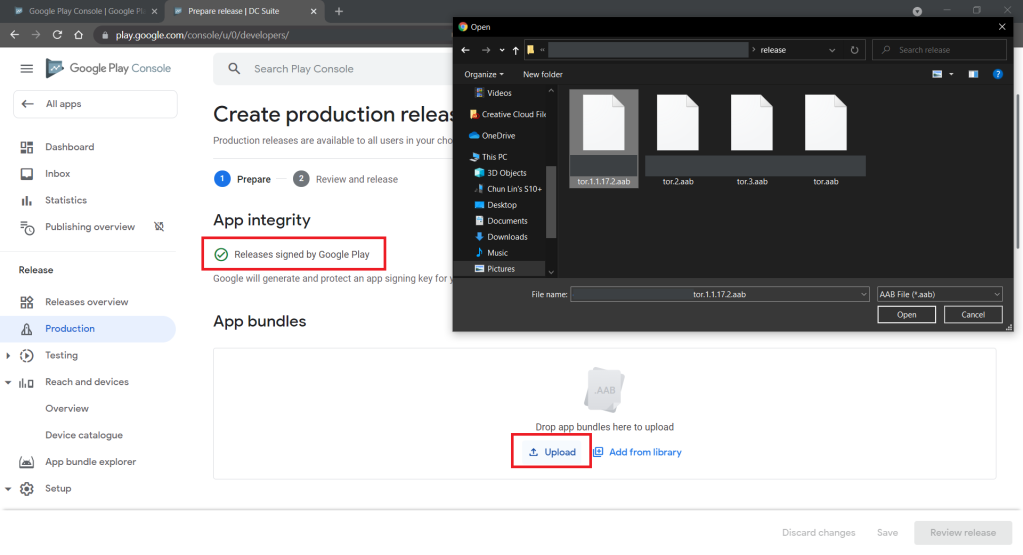
In the video above, we learnt about the step to create production release. After we have confirmed to use the Play App Signing, we can proceed to upload our aab file generated in Step 8, as shown in the screenshot below. Once it is successfully uploaded to the Google Play Console, we can proceed to rollout our app release.

Uploading our signed app bundle to Google Play Console.

References

[KOSD] Fixed 0x800B0100 WACK Issue in VS2019 16.10.2 Onwards

I have been using Visual Studio 2019 to develop desktop and mobile applications using Xamarin. I could successfully deploy my Xamarin UWP app to Microsoft Store until I upgraded my Visual Studio 2019 to 16.10.2.

Normally, before we can publish our UWP app to Microsoft Store, we need to launch WACK (Windows App Certification Kit) to validate our app package. However, in VS2019 16.10.2 (and onwards), there will be an error occurs, as shown in the screenshot below, and the validation cannot be completed.

Error 0x800B0100 in Windows App Certification Kit (WACK).

MSBuild Project Build Output

Since my code is the same, so the first thing that I suspect is that the new updates in Visual Studio 2019 are causing this issue. Hence, I changed the verbosity of the project build output to Diagnostic, as shown below. This will help us understand better about what’s happening during the build.

Setting MSBuild project build output verbosity.

By comparing the current build output with the one using the previous version of Visual Studio 2019, I realised that there is something new in the current build ouput. The parameter GenerateTemporaryStoreCertificate is set to false while BuildAppxUploadPackageForUap is true, as shown below.

1>Target "_RemoveDisposableSigningCertificate: (TargetId:293)" in file "C:\Program Files (x86)\Microsoft Visual Studio\2019\Preview\MSBuild\Microsoft\VisualStudio\v16.0\AppxPackage\Microsoft.AppXPackage.Targets" from project "...UWP.csproj" (target "_GenerateAppxPackage" depends on it):
1>Task "RemoveDisposableSigningCertificate" skipped, due to false condition; ('$(GenerateTemporaryStoreCertificate)' == 'true' and '$(BuildAppxUploadPackageForUap)' == 'true') was evaluated as ('false' == 'true' and 'true' == 'true').
1>Done building target "_RemoveDisposableSigningCertificate" in project "...UWP.csproj".: (TargetId:293)

Online Discussions

Meanwhile, there are only two discussion threads online about this issue.

On 22nd of June 2021, Nick Stevens first reported a problem that he encountered in publishing app to Microsoft Store after upgrading his Visual Studio 2019 to 16.10.2. However, his problem is about package family name and publisher name being marked as invalid.

Few days later, on 1st of July 2021, another developer Tautvydas Zilys also reported a similar issue as Nick Stevens’. Interestingly, the same Microsoft engineer, James Parsons, replied to them with the similar answer, i.e. adding the following property in their project file to set GenerateTemporaryStoreCertificate to true.

<GenerateTemporaryStoreCertificate>true</GenerateTemporaryStoreCertificate>

As explained by James, the GenerateTemporaryStoreCertificate will mimic the old behavior of Visual Studio where it will generate a certificate for us that has the publisher name that Microsoft Partner Center expects.

Fixed

Thankfully, after adding this line in the UWP csproject of my Xamarin project as shown below, the WACK works again without the error showing.

<?xml version="1.0" encoding="utf-8"?>
<Project ToolsVersion="14.0" ...>
    ...
    <PropertyGroup>
        ...
        <GenerateTemporaryStoreCertificate>True</GenerateTemporaryStoreCertificate>
        ...
    </PropertyGroup>
</Project>

That’s all to fix the issue. I hope this article, which is also the 3rd in the world discussing about this Visual Studio 2019 problem, is helpful to other Xamarin UWP developers who are running into the same problem.

References

KOSD, or Kopi-O Siew Dai, is a type of Singapore coffee that I enjoy. It is basically a cup of coffee with a little bit of sugar. This series is meant to blog about technical knowledge that I gained while having a small cup of Kopi-O Siew Dai.