Getting Started: Connecting Golang Console App with Azure PostgreSQL Database

Setting up Go in VS Code

Firstly, I need to equip Visual Studio Code with the Go language support by installing Go extension in the IDE. Installing the extension helps us to do day-to-day job, such as, code navigating, code editing, code testing and debugging in an easy and efficient manner.

Installed and enabled the Go extension from Microsoft.

There are many cool features I like in the extension.

Firstly, it’s the convenience of F12 Code Navigation. With Go extension, in Go code I can easily view the source code of the type definition with just F12 or Alt+F12 on it. This is similar to my C# coding experience on Visual Studio too. To show all references of the type, I can simply use Shift+F12.

Secondly, for every file save, the extension will build, vet, and lint. Build (go build) builds the command or the package. Vet (go vet) examines Go source code and reports suspicious constructs, such as Printf calls whose arguments do not align with the format string. A linter is a tool giving coding style feedback and suggestions. By default, this extension uses the official golint as a linter.

We can update go.lintTool to other linter, for example the more advanced Go Meta Linter. Take note of the warnings (and errors) shown under the Problems tab below.

After I have installed the Go extension, I proceed to start coding. The app that I am going to build in this learning journey is a YouTube video player app. So, let’s get started!

Storing Connection String in Environment

I will start with building a console application connecting to Azure PostgreSQL. To do that, I will connect to the database as follows.

package main;

const (
// Initialize connection constants.
HOST = "...postgres.database.azure.com"
DATABASE = "..."
USER = "..."
PASSWORD = "..."
)

...

function main() {
var connectionString = fmt.Sprintf("host=%s port=5432 user=%s password=%s dbname=%s sslmode=require", HOST, USER, PASSWORD, DATABASE)
...
}

The code above is quite straight-forward. However, it does have a problem. The configuration to connect to database is hard-coded in the code. This will thus reduce the code maintainability. Also, it is extremely bad to have password appearing in the code in plain text. To store such sensitive data, we need to store them as Environment variables, as recommended by the article Best Practice for Configuration File in Your Code.

In Powershell, there are two ways of setting Environment variable. The first one is a temporarily variable that lasts only as long as the Powershell session. The command is as follows.

> $env:CONNECTION_STRING = '...'

If what you are looking for is a permanent one, you can do as follows.

> [environment]::SetEnvironmentVariable("CONNECTION_STRING", "...", "User")

After setting the connection string in environment variable, we then can edit the earlier code to be something shorter as follows.

package main;


function main() {
var connectionString = fmt.Sprintf(os.Getenv("CONNECTION_STRING"))


}

Connecting to Database

After that, we can initialize the connection object.

package main

...

func checkError(err error) {
    if err != nil {
        log.Fatal(err)
        panic(err)
    }
}

func main() {
var connectionString = ...

// Initialize connection string.
db, err := sql.Open("postgres", connectionString)
checkError(err)

err = db.Ping()
    checkError(err)
    fmt.Println("Successfully created connection to database")

...
}

The Ping() function verifies a connection to the database is alive and it will establish a connection if necessary. After that, we can use the database handler db to do CRUD operations, as demonstrated below.

Remember to allow the PostgreSQL access to Azure service and also your local IP if you need to access the database from your local machine.

Insert Data into Table

sqlStatement := "INSERT INTO table (column1) VALUES ($1);"
_, err = db.Exec(sqlStatement, "New Value")
checkError(err)

Read Data from Table

var id int
var column1 string

sqlStatement := "SELECT * from table;"
rows, err := db.Query(sqlStatement)
checkError(err)

defer rows.Close()

for rows.Next() {
switch err := rows.Scan(&id, &column1); err {
case sql.ErrNoRows:
fmt.Println("No rows were returned")
case nil:
fmt.Printf("Data row = (%d, %s)\n", id, column1)
default:
checkError(err)
}
}

Update Data in Database

sqlStatement := "UPDATE table SET column1 = $1 WHERE id = $2;"
_, err = db.Exec(sqlStatement, "New Value 2", 1)
checkError(err)

Delete Data from Database

sqlStatement := "DELETE FROM table WHERE id = $1;"
_, err = db.Exec(sqlStatement, 1)
checkError(err)

A YouTube Playlist Console App

With the codes above, we then can create a simple table to store our YouTube video URLs as a playlist, as shown in the following screenshot.

The console app allows user to choose video from the list and plays it on default browser.

To make the program to play the video on a browser, we then can make use of the code written by hyg (黄勇刚) which is to open a web page on the default browser of the machine, as shown below.

func openbrowser(url string) {
var err error

switch runtime.GOOS {
case "linux":
err = exec.Command("xdg-open", url).Start()
case "windows":
err = exec.Command("rundll32", "url.dll,FileProtocolHandler", url).Start()
case "darwin":
err = exec.Command("open", url).Start()
default:
err = fmt.Errorf("unsupported platform")
}

if err != nil {
checkError(err)
}

}

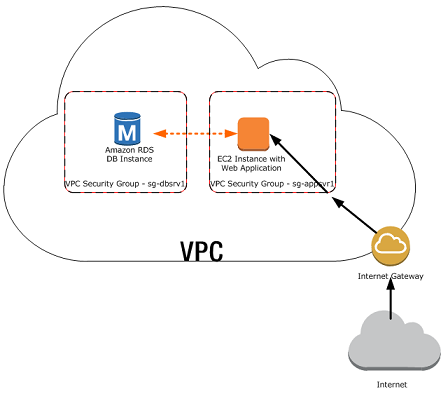
Playing YouTube video via console is cool, isn’t it? Next, we will see how we can make it to be web application so that we can have a better UI/UX.

To be continued in next article

References

1. Quickstart: Create an Azure Database for PostgreSQL server in the Azure portal;
2. Azure Database for PostgreSQL: Use Go language to connect and query data;
3. [StackOverflow] List all environment variables from command line;
4. Azure Database for PostgreSQL Server firewall rules;
5. PostgreSQL – CREATE Database;
6. [StackOverflow] How to switch databases in psql?;
7. [StackOverflow] How to read input from console line?;
8. [StackOverflow] Convert string to integer type in Go?;
9. [StackOverflow] Reading an integer from standard input;
10. [StackOverflow] How to exit from PostgreSQL command line utility: psql.

[KOSD Series] Read-only Users for Azure SQL Databases

kosd-azure-sql-ms-sql-server-management-studio.png

It’s quite common that Business Analyst will always ask for the permission to access the databases of our systems to do data analysis. However, most of the time we will only give them read-only access. With on-premise MS SQL Server and SQL Management Studio, it is quite easily done. However, how about for those databases hosted on Azure SQL?

Login as Server Admin

To make things simple, we will first login to the Azure SQL Server as Server admin on SQL Management Studio. The Server Admin name can be found easily on Azure Portal, as shown in the screenshot below. Its password will be the password we use when we create the SQL Server.

sql-server-admin.png
Identifying the Server Admin of an Azure SQL Server. (Source: Microsoft Azure Docs)

Create New Login

By default, the master database will be the default database in Azure SQL Server. So, once we have logged in, we simply create the read-only login using the following command.

CREATE LOGIN <new-login-id-here>
    WITH PASSWORD = '<password-for-the-new-login>' 
GO

Alternatively, we can also right-click on the “Logins” folder under “Security” then choose “New Login…”, as shown in the screenshot below. The same CREATE LOGIN command will be displayed.

new-login.png
Adding new login to the Azure SQL Server.

Create User

After the new login is created, we need to create a new user which is associated with it. The user needs to be created and granted read-only permission in each of the databases that the new login is allowed to access.

Firstly, we need to expand the “Databases” in the Object Explorer and then look for the databases that we would like to grant the new login the access to. After that, we right-click on the database and then choose “New Query”. This shall open up a new blank query window, as shown in the screenshot below.

new-query-to-create-user.png
Opening new query window for one of our databases.

Then we simply need to run the following query for the selected database in the query window.

CREATE USER <new-user-name-here> FROM LOGIN <new-login-id-here>;

Please remember to run this for the master database too. Otherwise we will not be able to login via SQL Management Studio at all with the new login because the master database is the default database.

Grant Read-only Permission

Now for this new user in the database, we need to give it a read-only permission. This can be done with the following command.

EXEC sp_addrolemember 'db_datareader', '<new-user-name-here>';

Conclusion

Repeat the two steps above for the remaining databases that we want the new login to have access to. Finally we will have a new login that can read from only selective databases on Azure SQL Server.

References


KOSD, or Kopi-O Siew Dai, is a type of Singapore coffee that I enjoy. It is basically a cup of coffee with a little bit of sugar. This series is meant to blog about technical knowledge that I gained while having a small cup of Kopi-O Siew Dai.

MS SQL on AWS: Amazon RDS

amazon-rds-ms-sql-server

There are some startups and SMEs hosting their databases on AWS. However, most of them choose to use Amazon EC2 because doing so is similar to running a SQL Server on-premise at data centres. So, to them, it’s something that they are familiar with back in the old days. However, doing so actually increases their cost of hosting services on AWS. The companies also need to hire experts to do database administration such as database backup and recovery and OS patching.

Hence, if I’m given the opportunity, I usually recommend the small companies with limited resources to consider Amazon RDS (or Azure SQL) first. Amazon RDS is a fully managed service which provides cost-efficient and resizable capacity while automating time-consuming database administration tasks.

Multi-AZ Deployments for MS SQL Server

Starting from May 2014, Amazon RDS also provides a highly available database solution with the synchronous Multi-AZ replication for MS SQL. Multi-AZ deployments for MS SQL database instances use SQL Server Mirroring.

Currently, Amazon RDS only supports Standard Edition and Enterprise Edition of SQL Server 2008 R2, 2012, 2014, and 2016. Amazon RDS also does not support Multi-AZ with Mirroring for the following regions yet:

  • US West (N. California);
  • Asia Pacific (Singapore);
  • European Union (Frankfurt);
  • AWS GovCloud (US);
  • Asia Pacific (Sdyney): Supported for DB instances in VPCs only;
  • Asia Pacific (Tokyo): Supported for DB instances in VPCs only;
  • South America (São Paulo): Supported for all DB instance classes except m1/m2.

It’s quite unfortunate that Singapore Region is one of them.

use-multi-az-deployment-for-production-sql-server-se.png
In N. Virginia Region, we’re able to specify to use Multi-AZ Deployment in Production SQL Server SE.

DB Instance Class

We can specify the DB Instance Class that allocates the computational, network, and memory capacity required by planned workload of the database instance.

available-instance-class-for-ms-sql.png
DB Instance Classes available in MS SQL 2016 on AWS.

Standard (db.m4) instances offer a balance of compute, memory, and network resources, and are a good choice for many applications.

Memory Optimized (db.r3) instances are designed to deliver fast performance for workloads that process large data sets in memory. The instances are well suited for the applications, such as high performance relational databases, in-memory analytics, and enterprise applications (for example, Microsoft SharePoint).

Burst Capable (db.t2) instances are instances that provide baseline performance level with the ability to burst to full CPU usage.

Storage Types

Most of the Amazon RDS are using Amazon EBS (Elastic Block Store) volumes for database and log storage. There are currently two main Storage Types available when setting up MS SQL database instances, as listed below.

General Purpose (SSD) storage, aka gp2, offers cost-effective storage which is suitable for a broad range of database workloads. Hence, it’s ideal for small to medium-sized databases. It provides baseline of 3 IOPS/GB and ability to burst to 3,000 IOPS for extended periods of time. Its volume can range from 20GB to 4TB for MS SQL database instances. However, provisioning less than 100 GB of General Purpose (SSD) storage for high throughput workloads could result in higher latencies upon exhaustion of the initial General Purpose (SSD) I/O Credit balance.

Provisioned IOPS (SSD) storage, aka io1, is suitable for I/O intensive database workloads which pay attention to storage performance and consistency in random access I/O throughput. It provides flexibility to provision I/O ranging from 1,000 to 30,000 IOPS. MS SQL can have provisioned IOPS volumes between 100GB (Express/Web edition) or 200GB (Standard/Enterprise edition) and 4TB.

amazon-ebs-pricing.png
Amazon Elastic Block Store (EBS) Pricing for Singapore region.

Allocated Storage and I/O Credits

General Purpose (SSD) storage performance is controlled by the volume size. Larger volumes have higher base performance levels and can accumulate I/O Credits faster. The more storage, the greater the base performance is and the faster it replenishes the credit balance.

For General Purpose (SSD) storage, the DB instance has an initial I/O Credits balance of 5.4 million. When the storage requires more than the base performance I/O level, it uses I/O credits in the credit balance to burst to the required performance level, up to a maximum of 3,000 IOPS. If the storage uses all of its I/O credit balance, its maximum performance will remain at the base performance level until I/O demand drops below the base level and unused credits are added to the I/O credit balance at the baseline performance rate of 3 IOPS/GB of volume size. Hence, we can use the formula below to calculate the Burst Duration.

burst-duration-formula.png

burst-duration-tabular.png

Thus, for production application that requires fast and consistent I/O performance, it’s recommended to use Provisioned IOPS (SSD) storage that is optimized for I/O intensive, online transaction processing workloads that have consistent performance requirements. Note that we cannot decrease storage allocated for a DB instance.

For MS SQL Server, Amazon RDS does not currently support increasing storage. Hence, we need to provision storage based on anticipated future storage growth. If we predict it wrongly, then we need to increase the storage of an existing SQL Server DB instance by first exporting the data, creating a new database instance with increased storage, and then importing the data into the new database instance.

Specifying Database Instance Specification

After understanding key concepts above, we can then proceed to setup our database instance.

specifying-db-instance-specifications.png
Although there is Free Tier available but allocating storage > 20GB or adding provisioned IOPS will disqualify the databse instance from being eligible for the Free Tier.

Network and Security: VPC (Virtual Private Cloud)

Amazon RDS database instances can be hosted on either EC2-VPC platform or the legacy EC2-Classic platform, the original platform used by Amazon RDS. Amazon VPC launches AWS resources, such as database instances, into a virtual private cloud.

Nowadays, if we are creating a database instance in a region that we have not used before, we normally are already on the EC2-VPC platform.

rds-supported-platforms.png
We are already on EC2-VPC platform.

There are many scenarios for accessing a database instance in a VPC. Today, I will only focus on having an EC2 web server to access the database instance in the same VPC.

web-server-and-db-instance-in-the-same-vpc.png
A database instance in a VPC accessed by an EC2 instance in the same VPC (Source: AWS Documentation)

In such scenario, Amazon RDS database instance normally needs to be available to the web server, and not to the public Internet. Hence, we can create a VPC with both public and private subnets. The web server will be hosted in the public subnet so that it is accessible by the public. The database instance is hosted in the private subnet so that it won’t be available to the public Internet, providing greater security.

The Security Group used to restrict access to the database instances can have a custom rule that allows TCP access using the port 1433 and an IP address we will use to access the database instance for development or other purposes. In addition, we also need to set the Public Accessible option to Yes first (It is recommended to set the option to No for production database instance to limit the potential thread with no public routes).

Encryption of Database Instances using Key Management Service (KMS)

Amazon RDS for MS SQL supports the encryption of database instances with encryption keys managed in AWS KMS. Once the data is encrypted, Amazon RDS handles authentication of access and decryption of the data transparently without having the need to change our database client applications.

enable-database-encryption.png
Currently, encryption of database instances (Data-in-Rest Protection) is not available for those which are running SQL Server Express Edition.

Backup and Maintenance

Amazon RDS automatically backup our database instances. It creates a storage volume snapshot of our database instance, backing up the entire database instance and not just individual databases. We can setup and modify our preferred Backup Window from time to time. During the automatic backup window, storage I/O might be suspended briefly while the backup process initializes (typically under a few seconds). For SQL Server, I/O activity is suspended briefly during backup for Multi-AZ deployments.

By default, Amazon RDS has a 30-minute backup window randomly selected from an 8-hour block (Singapore region will be 14:00–22:00 UTC).

Periodically, Amazon RDS also automatically does maintenance work such as, updating the databse instance’s or database cluster’s OS. We can choose to manually apply maintenance, or wait for the automatic maintenance process initiated during our preferred maintenance window. There is one thing to take note is that the maintenance window determines when pending operations start, but does not limit the total execution time of these operations.

By default, Amazon RDS also has a 30-minute maintenance window randomly selected from an 8-hour block (Singapore region will be 14:00–22:00 UTC).

maintenance-window-collide-with-backup-window.png
We’re not allowed to make the maintenance window and the backup window overlap.

CloudWatch

Amazon RDS sends metrics to CloudWatch for each active database instance every minute. Detailed monitoring is enabled by default.

cloudwatch.png
Amazon RDS Metrics

When setting up the database instance, there is an option for us to specify whether to enable Enhanced Monitoring or not. Enhanced Monitoring is not exactly like CloudWatch. CloudWatch gathers metrics about CPU utilization from the hypervisor for a database instance, and Enhanced Monitoring gathers its metrics from an agent on the instance.

enable-enhanced-monitoring.png
Enhanced monitoring requires permission to act on our behalf to send OS metric information to CloudWatch Logs.

Conclusion

It’s true that AWS allows us to deploy our MS SQL Server database on either Amazon RDS and Amazon EC2. However, it’s very crucial to analyze our needs and our application before deciding which one to use. In general, it is still recommended to consider Amazon RDS first so that developers can focus on high-level tasks and business logic implementation.

That’s all for my first trip to Amazon RDS. As a frequent user of Microsoft Azure, I never host MS SQL Server on AWS platform. So, if there is any mistake made in this article, kindly feedback to me. Thanks in advance!

Further Reading

Deploying Microsoft SQL Server on Amazon Web Services

Entity Framework and Database

By using Entity Framework, we can save a lot of time on writing SQL ourselves because Entity Framework, a Microsoft-supported ORM for .NET, is able to generate the SQL for us.

I started to use ADO .NET when I was building .NET web applications in my first job. I learnt about how to call stored procedures with ADO .NET. I witnessed how my colleague wrote a 400-line SQL to complete a task which we normally will choose to do it in C#. I also realized the pain of forgetting to update the stored procedure when the C# code is already different.

After that, my friend introduced me Entity Framework when I was working on my first ASP .NET MVC project. Since then, I have been using Entity Framework because it enables me to deliver my web applications faster without writing (and debugging) any SQL myself. I read a very interesting article comparing between Entity Framework and ADO .NET. The author also acknowledged that the performance of Entity Framework was slower than hand-coded ADO .NET. He emphasized that, however, Entity Framework did maximize his productivity.

How I react when I read a 400-line stored procedure submitted by my colleague.

What Is Happening in Database with Entity Framework?

The SQL generated by Entity Framework is believed to be pretty good. However, it’s still nice to be aware of what SQL is being generated. For example, I have the following code to retrieve Singapore weather info.

using (var db = new ApplicationDbContext())
{
    var forecastRecords = db.SingaporeWeathers.ToList();
}

In Visual Studio, I can just mouse-over “SingaporeWeather” to get the following query.

SELECT 
    [Extent1].[RecordID] AS [RecordID], 
    [Extent1].[LocationID] AS [LocationID], 
    [Extent1].[WeatherDescription] AS [WeatherDescription], 
    [Extent1].[Temperature] AS [Temperature], 
    [Extent1].[UpdateDate] AS [UpdateDate]
FROM [dbo].[SingaporeWeathers] AS [Extent1]

If I have the following code which retrieves only records having temperature greater than 37, then I can use ToString().

using (var db = new ApplicationDbContext())
{
    var query = from sw in db.SingaporeWeathers where sw.Temperature > 37 select sw;
    Console.WriteLine(query.ToString());
}
SELECT
     [Extent1].[RecordID] AS [RecordID],
     [Extent1].[LocationID] AS [LocationID],
     [Extent1].[WeatherDescription] AS [WeatherDescription]
     [Extent1].[Temperature] AS [Temperature],
     [Extent1].[UpdateDate] AS [UpdateDate]
FROM [dbo].[SingaporeWeathers] AS [Extent1]
WHERE [Extent1].[Temperature] > cast(37 as decimal(18))

I am using DBContect API, so I can just use ToString(). Alternatively, you can also use ToTraceString(), which is a method of ObjectQuery, to get the generated SQL.

SQL Logging in Entity Framework 6

It is a great news for developer when Entity Framework is announced to have SQL Logging feature added For example, to write database logs to a file, I just need to do as follows.

using (var db = new ApplicationDbContext())
{
    var logFile = new StreamWriter("C:\\temp\\log.txt");
    db.Database.Log = logFile.Write;
    var forecastRecords = db.SingaporeWeathers.Where(x => x.Temperature > 37).ToList();
    logFile.Close();
}

Then in the log file, I can see logs as follows.

...
Closed connection at 6/6/2015 10:59:32 PM +08:00
Opened connection at 6/6/2015 10:59:32 PM +08:00
SELECT TOP (1) 
    [Project1].[C1] AS [C1], 
    [Project1].[MigrationId] AS [MigrationId], 
    [Project1].[Model] AS [Model], 
    [Project1].[ProductVersion] AS [ProductVersion]
FROM ( SELECT 
    [Extent1].[MigrationId] AS [MigrationId], 
    [Extent1].[Model] AS [Model], 
    [Extent1].[ProductVersion] AS [ProductVersion], 
    1 AS [C1]
    FROM [dbo].[__MigrationHistory] AS [Extent1]
    WHERE [Extent1].[ContextKey] = @p__linq__0
) AS [Project1]
ORDER BY [Project1].[MigrationId] DESC
-- p__linq__0: 'MyWeb.Migrations.Configuration' (Type = String, Size = 4000)
-- Executing at 6/6/2015 10:59:32 PM +08:00
-- Completed in 70 ms with result: SqlDataReader

Closed connection at 6/6/2015 10:59:32 PM +08:00
Opened connection at 6/6/2015 10:59:32 PM +08:00
SELECT 
    [Extent1].[RecordID] AS [RecordID], 
    [Extent1].[WeatherDate] AS [WeatherDate], 
    [Extent1].[WeatherDescription] AS [WeatherDescription], 
    [Extent1].[WeatherSecondaryDescription] AS [WeatherSecondaryDescription], 
    [Extent1].[IconFileName] AS [IconFileName], 
    [Extent1].[Temperature] AS [Temperature], 
    [Extent1].[UpdateDate] AS [UpdateDate]
FROM [dbo].[Weathers] AS [Extent1]
WHERE [Extent1].[Temperature] > cast(37 as decimal(18))
-- Executing at 6/6/2015 10:59:33 PM +08:00
-- Completed in 28 ms with result: SqlDataReader
...

So, as you can see, even the Code First migration related activity is logged as well. If you would like to know what are being logged, you can read an article about SQL Logging in EF6 which was written before it’s released.

Migration and the Verbose Flag

Speaking of Code First migration, if you would like to find out the SQL being generated when Update-Database is executed, you can add a Verbose flag to the command.

Update-Database -Verbose

Navigation Property

“I have no idea why tables in our database don’t have any relationship especially when we are using relational database.”

I heard from my friend that my ex-colleague shouted this in the office. He left his job few days after. I think bad codes and bad design do anger some of the developers. So, how do we do “relationship” in Entity Framework Code First? How do we specify the foreign key?

I quit!
I quit!

In Entity Framework, we use the Navigation Property to represent the foreign key relationship inside the database. With Navigation Property, we can define relationship between entities.

If we have a 1-to-1 Relationship between two entities, then we can have the following code.

public class Entity1
{
    [Key]
    public int Entity1ID { get; set; }
    public virtual Entity2 Entity2 { get; set; }
}

public class Entity2
{
    [Key, ForeignKey("Entity1")]
    public int Entity1ID { get; set; }
    public virtual Entity1 Entity1 { get; set; }
}

By default, navigation properties are not loaded. Here, the virtual keyword is used to achieve the lazy loading, so that the entity is automatically loaded from the database the first time a property referring to the entity is accessed.

However, there are people against using virtual keyword because they claim that lazy loading will have subtle performance issue in the application using it. So, what they suggest is to use the include keyword, for example

dbContext.Entity1.Include(x => x.Entity2).ToArray();

By specifying the ForeignKey attribute for Entity1ID in Entity2 class, Code First will then create a 1-to-1 Relationship between Entity1 and Entity2 using the DataAnnotations attributes.

For 1-to-n Relationship, we then need to change the navigation property, for example, in Entity1 class to use collection as demonstrated in the code below.

public class Entity1
{
    [Key]
    public int Entity1ID { get; set; }
    public virtual ICollection<Entity2> Entity2s { get; set; }
}

Finally, how about n-to-m Relationship? We will just need to change the navigation property in both Entity1 and Entity2 classes to use collection.

public class Entity2
{
    [Key]
    public int Entity2ID { get; set; }
    public virtual ICollection<Entity1> Entity1s { get; set; }
}

Together with the following model builder statement.

protected override void OnModelCreating(DbModelBuilder modelBuilder)
{
    modelBuilder.Entity<Entity2>()
        .HasMany(e2 => e2.Entity1s)
        .WithMany(e1 => e1.Entity2s)
        .Map(e12 => 
            {
                e12.MapLeftKey("Entity1ID");
                e12.MapRightKey("Entity2ID");
                e12.ToTable("Entity12");
            });
}

The code above is using Fluent API which won’t be discussed in this post.

Database Context Disposal

When I first used Scaffolding in MVC 5, I noticed the template of controller class it generates look something as follows.

public class MyController : Controller
{
    private MyContext db = new MyContext();
    
    protected override void Dispose(bool disposing)
    {
        if (disposing) 
        {
            db.Dispose(); 
        } 
        base.Dispose(disposing);
    }
}

Before using Scaffolding, I have always been using the Using block, so I only create database context where I have to, as recommended in a discussion on StackOverflow. Also, the Using block will have the Dispose() be called automatically at the end of the block, so I don’t need to worry about forgetting to include the Dispose() method to dispose the database context in my controller.

Azure SQL: Database Backup and Restore

Before ending this post, I would like to share about how DB backup and restore is done in Azure SQL Database.

First of all, Azure SQL Database has built-in backups and even self-service point in time restores. Yay!

For each activate databases, Azure SQL will create a backup and geo-replicate it every hour to achieve 1-hour Recovery Point Objective (RPO).

If there is a need to migrate the database or archive it, we can also export the database from Azure SQL Database. Simply click on the Export button in the SQL Databases section of Azure Management Portal and then choose an Azure blob storage account to export the database to.

Finally, just provide the server login name and password to the database and you are good to go.

Export DB from Azure SQL Database.

Later, we can also create a new database using the BACPAC file which is being generated by the Export function. In the Azure Management Portal, click New > Data Services > SQL Database > Import. This will open the Import Database dialog, as shown in the screenshot below.

Create a new database in Azure SQL Database by import BACPAC file.

Okai, that’s all for this post on Entity Framework, database, and Azure SQL Database. Thank you for your time and have a nice day!

Summer 2015 Self-Learning Project

This article is part of my Self-Learning in this summer. To read the other topics in this project, please click here to visit the project overview page.

Summer Self-Learning Banner