It’s quite common that Business Analyst will always ask for the permission to access the databases of our systems to do data analysis. However, most of the time we will only give them read-only access. With on-premise MS SQL Server and SQL Management Studio, it is quite easily done. However, how about for those databases hosted on Azure SQL?
Login as Server Admin
To make things simple, we will first login to the Azure SQL Server as Server admin on SQL Management Studio. The Server Admin name can be found easily on Azure Portal, as shown in the screenshot below. Its password will be the password we use when we create the SQL Server.
Identifying the Server Admin of an Azure SQL Server. (Source: Microsoft Azure Docs)
Create New Login
By default, the master database will be the default database in Azure SQL Server. So, once we have logged in, we simply create the read-only login using the following command.
CREATE LOGIN <new-login-id-here>
    WITH PASSWORD = '<password-for-the-new-login>'
GO
Alternatively, we can also right-click on the “Logins” folder under “Security” then choose “New Login…”, as shown in the screenshot below. The same CREATE LOGIN command will be displayed.
Adding new login to the Azure SQL Server.
Create User
After the new login is created, we need to create a new user which is associated with it. The user needs to be created and granted read-only permission in each of the databases that the new login is allowed to access.
Firstly, we need to expand the “Databases” in the Object Explorer and then look for the databases that we would like to grant the new login the access to. After that, we right-click on the database and then choose “New Query”. This shall open up a new blank query window, as shown in the screenshot below.
Opening new query window for one of our databases.
Then we simply need to run the following query for the selected database in the query window.
CREATE USER <new-user-name-here> FROM LOGIN <new-login-id-here>;
Please remember to run this for the master database too. Otherwise we will not be able to login via SQL Management Studio at all with the new login because the master database is the default database.
Grant Read-only Permission
Now for this new user in the database, we need to give it a read-only permission. This can be done with the following command.
Repeat the two steps above for the remaining databases that we want the new login to have access to. Finally we will have a new login that can read from only selective databases on Azure SQL Server.
KOSD, or Kopi-O Siew Dai, is a type of Singapore coffee that I enjoy. It is basically a cup of coffee with a little bit of sugar. This series is meant to blog about technical knowledge that I gained while having a small cup of Kopi-O Siew Dai.
KOSD, or Kopi-O Siew Dai, is a type of Singapore coffee that I enjoy. It is basically a cup of coffee with a little bit of sugar. This series is meant to blog about technical knowledge that I gained while having a small cup of Kopi-O Siew Dai.
Last year, Riza shared a very interesting topic twice during Singapore .NET Developers Community in Microsoft office. For those who attended the meetups, do you still remember? Yes, it’s about IdentityServer.
IdentityServer 4 is a middleware, an OpenID Connect provider built to spec, which provides user identity and access control in ASP .NET Core applications.
In my example, I will start with the simplest setup where there will be one Authenticate Server and one Application Server. Both of them in my example will be using ASP .NET Core.
How an application uses JWT to authenticate a user.
In the Authenticate Server, I register the minimum required dependencies in ConfigureServices method of its Startup.cs as follows.
I won’t be talking about how IdentityServer works here. Instead, I will be focusing on the “AddDeveloperSigningCredential” method here.
JSON Web Token (JWT)
By default, IdentityServer issues access tokens in the JWT format. According to the abstract definition in RCF 7519 from Internet Engineering Task Force (IETF) , JWT is a compact, URL-safe means of representing claims between two parties where claims are encoded as JSON objects which can be digitally signed or encrypted.
In the diagram above, the Application Server receives the secret key used in signing the JWT from the Authentication Server when the app sets up its authentication process. Hence, the app can verify whether the JWT comes from an authentic source using the secret key.
During development, we normally don’t have cert prepared yet. Hence, AddTemporarySigningCredential can be used to auto-generate certificate to sign JWT. However, this method has a disadvantage. Every time the IdentityServer is restarted, the certificate will change. Hence, all tokens that have been signed with the previous certificate will fail to validate.
Anyway, as documented, we are only allowed to use AddDeveloperSigningCredential in development environments. In addition, AddDeveloperSigningCredential can only be used when we host IdentityServer on single machine. What should we do when we are going to deploy our code to the production environment? We need a signing key service that will provide the specified certificate to the various token creation and validation services. Thus now we need to change to use AddSigningCredential method.
Production Code
For production, we need to change the code earlier to be as follows.
X509Certificate2 cert = null;
using (X509Store certStore = new X509Store(StoreName.My, StoreLocation.CurrentUser))
{
    certStore.Open(OpenFlags.ReadOnly);
    var certCollection = certStore.Certificates.Find(
        X509FindType.FindByThumbprint,
        Configuration["AppSettings:IdentityServerCertificateThumbprint"],
        false);

    // Get the first cert with the thumbprint
    if (certCollection.Count > 0)
    {
        cert = certCollection[0];
    }
}

services.AddIdentityServer()
     .AddSigningCredential(cert)
     .AddInMemoryIdentityResources(...)
     .AddInMemoryApiResources(...)
     .AddInMemoryClients(...)
     .AddAspNetIdentity();
We use AddSigningCredential to replace the AddDeveloperSigningCredential method. Now, AddSigningCredential requires a X509Certificate2 cert as parameter.
Key-in and remember the password for the private key;
Import the certificate to the Current User Certificate Store on developer’s local machine by double-clicking on the newly generated .pfx file. We will be asked to key in the password used in Step 4 above again.
Importing certificate.
Now, we need to find out the Thumbprint of it. This is because in our production code above, we are using Thumbprint to look for the cert.
Thumbprint and Microsoft Management Console (MMC)
To retrieve the Thumbprint of a certificate, we need help from a tool called MMC.
Using MMC to view certificates in the local machine store for current user account.
We will then be able to find the new certificate that we have just created and imported. To retrieve its Thumbprint, we first need to open it, as shown in the screenshot below.
Open the new cert in MMC.
A popup window called Certificate will appear. Simply copy the value of the Thumbprint under the Details tab.
Thumbprint!
After keeping the value of the cert thumbprint in the appsettings.Development.json of the IdentityServer project, we can now build and run the project on localhost without any problem.
Deployment to Microsoft Azure Web App
Before we talk about how to deploy the IdentityServer project to Microsoft Azure Web App, do you realize how come in the code above, we are looking cert only My/Personal store of the CurrentUser registry, i.e. “StoreName.My, StoreLocation.CurrentUser”? This is because this is the place where Azure will load the certificate from.
So now, we will first proceed to upload the certificate as Private Certificate that we self-sign above to Azure Web App. After selecting the .pfx file generated above and keying-in the password, the cert will appear as one of the Private Certificates of the Web App.
To upload the cert, we can do it in “SSL certificates” settings of our Web App on Azure Portal.
Last but not least, in order to make the cert to be available to the app, we need to have the following setting added under “Application settings” of the Web App.
WEBSITE_LOAD_CERTIFICATES setting is needed to make the cert to be available to the app.
Brock also provided a link in the discussion to his blog post on how to create signing cert using makecert instead of OpenSSL as discussed earlier. In fact, during Riza’s presentation, he was using makecert to self-sign his cert too. Hence, if you are interested about how to use makecert to do that, please read his post here: https://brockallen.com/2015/06/01/makecert-and-creating-ssl-or-signing-certificates/.
Conclusion
This episode of KOSD series is a bit long such that drinking a large cup of hot KOSD while reading this post seems to be a better idea. Anyway, I think this post will help me and other beginners who are using IdentityServer in their projects to understand more about the framework bit by bit.
There are too many things that we can learn in the IdentityServer project and I hope to share what I’ve learnt about this fantastic framework in my future posts. Stay tuned.
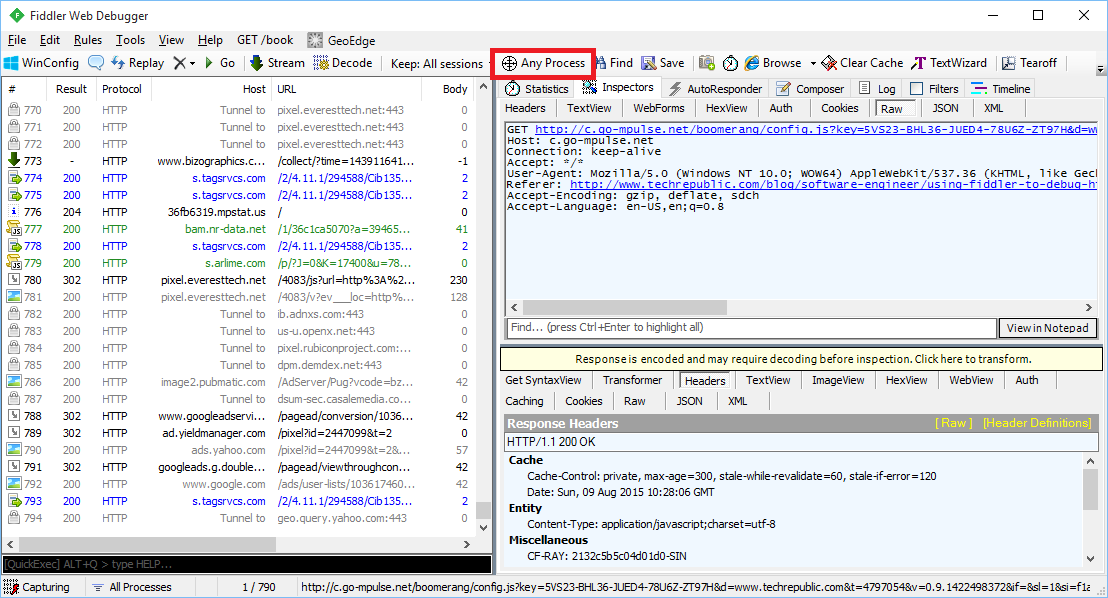
I just downloaded Fiddler. I would like to see how I can make use of it, so I noted down some of the things that I have tried out.
Experiment 01: Process Filter
The first thing that I realized when I used Fiddler is that there are too many information being displayed especially when there are too many programs accessing the Internet. This is because, as advertised, Fiddler is a web debugging proxy for any browser (Microsoft Edge is included as well!) that works independently.
Fortunately, Fiddler providing a filtering function “Process Filter” to enable us to capture traffic coming from a particular browser, instead of all browsers.
Just drag and drop the icon on the browser you want to track.
Experiment 02: Performance Profiling
By just filtering and selecting the relevant sessions, we would be able to generate a web page performance report about total number of requests, total bytes sent and received, response time, DNS lookup time, response bytes by content type in a pie chart, etc.
Performance profiling of id.easybook.com, an Indonesia bus ticket booking website.
By clicking on the “Timeline” tab, we will be able to get an overview of activities recorded. It is one of the useful features to start investigating performance issues in our web application.
Transfer Timeline diagram of id.easybook.com.
Experiment 03: Decrypt HTTPS Traffic
By default, Fiddler disables HTTPS decryption. However, nowadays most of the websites that we would like to debug are using HTTPS encryption. So, it’s sometimes necessary to set it up to work with HTTPS traffic.
HTTPS decryption is disabled by default.
First of all, we just click Tools -> Fiddler Options.
In the “HTTPS” tab of the popup window, we need to enable both “Capture HTTP CONNECTs” and “Decrypt HTTPS Traffic”. To intercept HTTPS traffic, Fiddler generates a unique root certificate. In order to suppress Windows security warnings, Fiddler recommends to have our PC to trust the cert. Hence, there will be a warning message shown after we click on the “OK” button.
Yes, scary text! Are you sure you want to trust the certificate?
However, Windows cannot validate the certificate properly, so we will be asked if we really want to install the cert.
Are you sure you want to install certificate from DO_NOT_TRUST_FiddlerRoot?
Finally, we will also be asked if we wish to add the cert to our PC’s Trusted Root List.
Adding cert to PC Trusted Root List.
If we want to remove the cert from the PC’s Trusted Root List, we can always do so by clicking on the “Remove Interception Certificate” button in the Fiddler Options window.
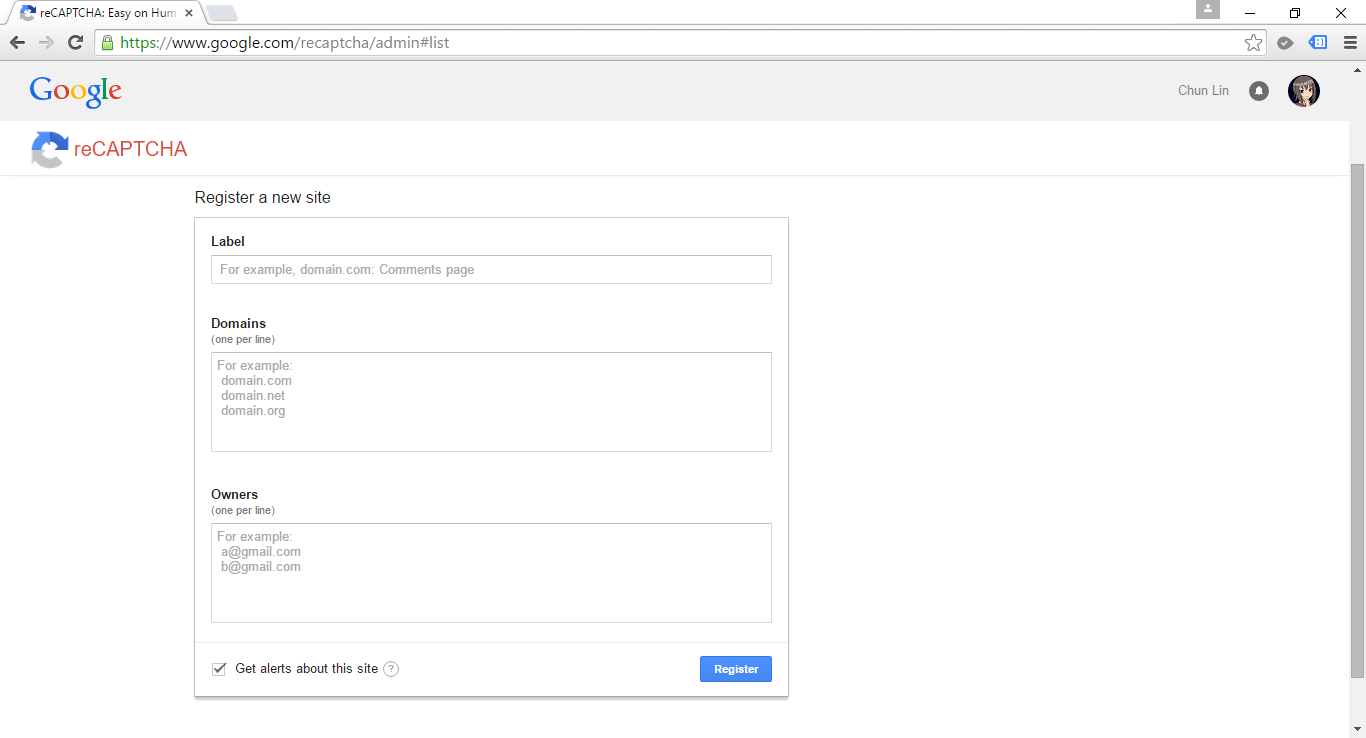
reCAPTCHA is a free Google CAPTCHA service that comes in the form of widget that can be added to websites easily. So, how do we implement reCAPTCHA in our ASP .NET MVC sites?
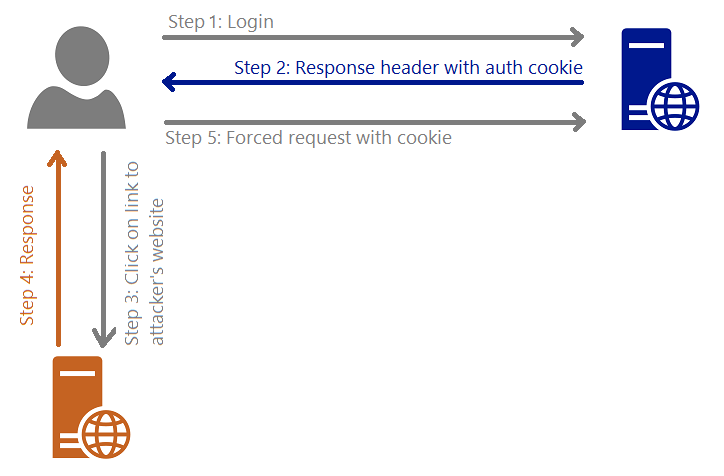
I draw a graph for me to better explain about what XSRF is.
XSRF (Cross-Site Request Forgery)
Steps are as follows.
The user logs in to, for example, a bank website.
The response header from the bank site will contain the user’s authentication cookie. Since authentication cookie is a session cookie, it will only be cleared when the process ends. Thus, until that time, the browser will always include the cookie with each request to the same bank website.
The attacker sends to the user a link and somehow encourage the user to click on it. This causes sending a request to the attacker’s server.
Because of Step 4, the user will be forced to send a request to the bank website to transfer money to attacker’s account with the user’s authentication cookie.
You want to control what is being passed into the binder.
There are two my personal favourite solutions to avoid Over-Posting Attack.
One is using Bind attribute in the controller method. For example, in order to prevent users editing the value of isAdmin when they update their profile, I can do something as follows.
[HttpPost]
public ViewResult Edit([Bind(Exclude = "IsAdmin")] User user)
{
    ...
}
Alternatively, we can also use “Include” to define those fields that should be included in the binding.
Second solution is using view model. For example, the following class will not contain properties such as IsAdmin which are not allowed to be edited in the form post of profile edit.
public class UserProfileUpdateViewModel
{
    public string FirstName { get; set; }
    public string LastName { get; set; }
    ...
}
XSS: Cross-Site Scripting
According to OWASP (Open Web Application Security Project), XSS attacks
…are a type of injection, in which malicious scripts are injected into otherwise benign and trusted web sites… Flaws that allow these attacks are quite widespread and occur anywhere a web application uses input from a user within the output it generates without validating or encoding it.
Kirill Saltanov from NUS is explaining to guests about XSS during 5th STePS event.
There are some cases where our web application should accept HTML tags. For example, we have a <textarea> element in our blogging system where user can write the content of post, then we need to skip the default checking of ASP .NET.
To post HTML back to our Model, we can simply add the [AllowHtml] attribute to the corresponding property in the Model, for example
publicclassBlogPost{
[Key]
public int ID { get; set; }
...
[AllowHtml]publicstring Content { get; set; }}
Then in the View, we will need to use @Html.Raw to tell Razor not to encode the HTML markup.
@Html.Raw(post.Content)
Wait… Won’t this make XSS attack possible in our website? Yup, of course. So, we must be very careful whenever we are trying to bypass the Razor encoding. The solution will then be using AntiXSS encoding library from Microsoft.
Previously in the discussion of XSS, we know that by default ASP .NET throws exception if potentially dangerous content is detected in the request. This is because of the existence of ASP .NET Request Validation.
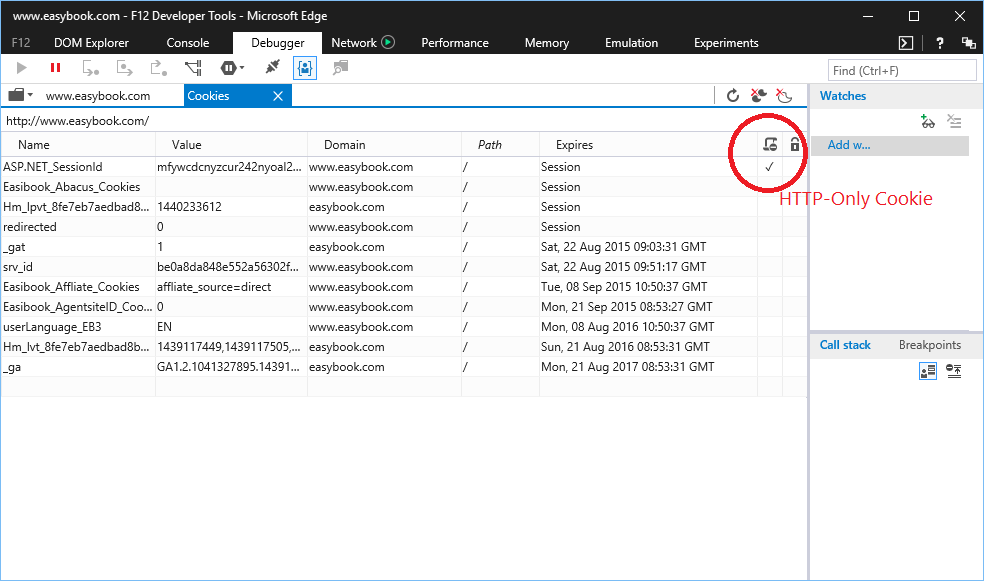
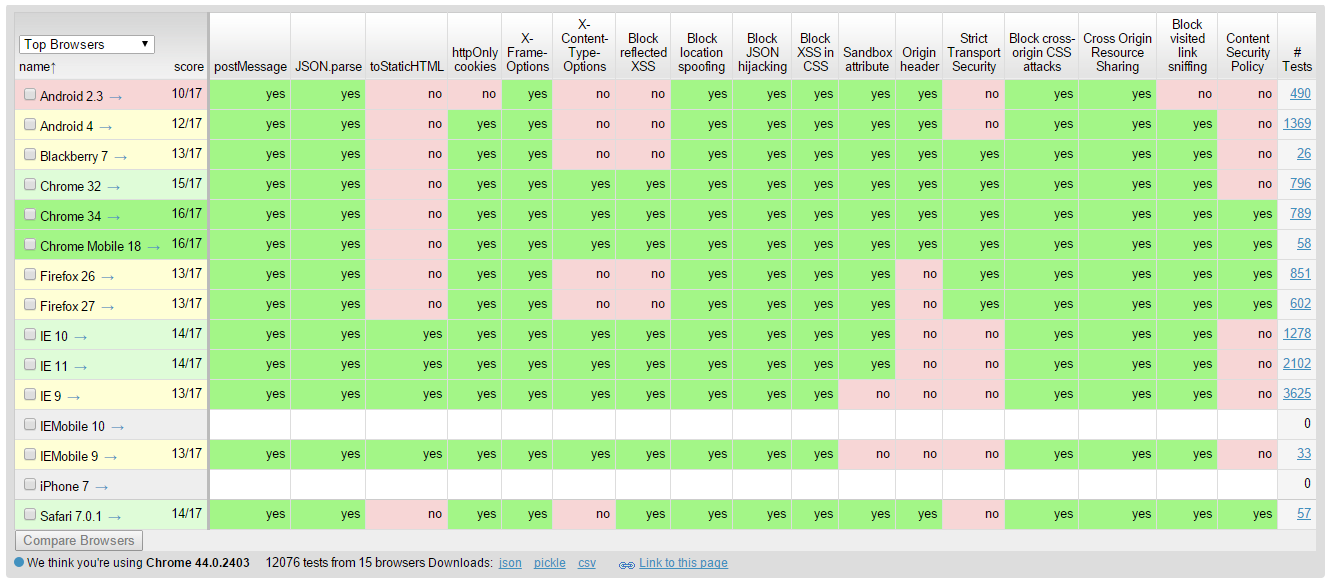
In order to reduce the risk of XSS, popular modern browsers have added a new attribute to cookie called HttpOnly Cookie. This new attribute specifies that a cookie is not accessible through script. Hence, it prevents the sensitive data contained in the cookie can be sent to attacker’s side via malicious JavaScript in XSS attack.
This request has been blocked because sensitive information could be disclosed to third party web sites when this is used in a GET request. To allow GET requests, set JsonRequestBehavior to AllowGet.
Since the method only accepts POST requests, unless Cross-Origin Resource Sharing (CORS) is implemented, the browser will be able to protect our data from returning the Json result to other domains.
The reason why “returning JSON data as array” is dangerous is that although browsers nowadays stop us from making cross domain HTTP request via JavaScript, we are still able to use a <script> tag to make the browser load a script from another domain.