In today’s interconnected world, APIs are the backbone of modern apps. Protecting these APIs and ensuring only authorised users access sensitive data is now more crucial than ever. While many authentication and authorisation methods exist, OAuth2 Introspection stands out as a robust and flexible approach. In this post, we will explore what OAuth2 Introspection is, why we should use it, and how to implement it in our .NET apps.
Before we dive into the technical details, let’s remind ourselves why API security is so important. Think about it: APIs often handle the most sensitive stuff. If those APIs are not well protected, we are basically opening the door to some nasty consequences. Data breaches? Yep. Regulatory fines (GDPR, HIPAA, you name it)? Potentially. Not to mention, losing the trust of our users. A secure API shows that we value their data and are committed to keeping it safe. And, of course, it helps prevent the bad guys from exploiting vulnerabilities to steal data or cause all sorts of trouble.
The most common method of securing APIs is using access tokens as proof of authorization. These tokens, typically in the form of JWTs (JSON Web Tokens), are passed by the client to the API with each request. The API then needs a way to validate these tokens to verify that they are legitimate and haven’t been tampered with. This is where OAuth2 Introspection comes in.
OAuth2 Introspection
OAuth2 Introspection is a mechanism for validating bearer tokens in an OAuth2 environment. We can think of it as a secure lookup service for our access tokens. It allows an API to query an auth server, which is also the “issuer” of the token, to determine the validity and attributes of a given token.
The workflow of an OAuth2 Introspection request.
To illustrate the process, the diagram above visualises the flow of an OAuth2 Introspection request. The Client sends the bearer token to the Web API, which then forwards it to the auth server via the introspection endpoint. The auth server validates the token and returns a JSON response, which is then processed by the Web API. Finally, the Web API grants (or denies) access to the requested resource based on the token validity.
Introspection vs. Direct JWT Validation
You might be thinking, “Isn’t this just how we normally validate a JWT token?” Well, yes… and no. What is the difference, and why is there a special term “Introspection” for this?
With direct JWT validation, we essentially check the token ourselves, verifying its signature, expiry, and sometimes audience. Introspection takes a different approach because it involves asking the auth server about the token status. This leads to differences in the pros and cons, which we will explore next.
With OAuth2 Introspection, we gain several key advantages. First, it works with various token formats (JWTs, opaque tokens, etc.) and auth server implementations. Furthermore, because the validation logic resides on the auth server, we get consistency and easier management of token revocation and other security policies. Most importantly, OAuth2 Introspection makes token revocation straightforward (e.g., if a user changes their password or a client is compromised). In contrast, revoking a JWT after it has been issued is significantly more complex.
.NET Implementation
Now, let’s see how to implement OAuth2 Introspection in a .NET Web API using the AddOAuth2Introspection authentication scheme.
The core configuration lives in our Program.cs file, where we set up the authentication and authorisation services.
// ... (previous code for building the app)

builder.Services.AddAuthentication("Bearer")
   .AddOAuth2Introspection("Bearer", options =>
   {
       options.IntrospectionEndpoint = "<Auth server base URL>/connect/introspect";
       options.ClientId = "<Client ID>";
       options.ClientSecret = "<Client Secret>";

       options.DiscoveryPolicy = new IdentityModel.Client.DiscoveryPolicy
       {
           RequireHttps = false,
       };
   });

builder.Services.AddAuthorization();

// ... (rest of the Program.cs)
This code above configures the authentication service to use the “Bearer” scheme, which is the standard for bearer tokens. AddOAuth2Introspection(…) is where the magic happens because it adds the OAuth2 Introspection authentication handler by pointing to IntrospectionEndpoint, the URL our API will use to send the token for validation.
Usually, RequireHttps needs to be true in production. However, in situations like when the API and the auth server are both deployed to the same Elastic Container Service (ECS) cluster and they communicate internally within the AWS network, we can set it to false. This is because the Application Load Balancer (ALB) handles the TLS/SSL termination and the internal communication between services happens over HTTP, we can safely disable RequireHttps in the DiscoveryPolicy for the introspection endpoint within the ECS cluster. This simplifies the setup without compromising security, as the communication from the outside world to our ALB is already secured by HTTPS.
Finally, to secure our API endpoints and require authentication, we can simply use the [Authorize] attribute, as demonstrated below.
[ApiController]
[Route("[controller]")]
[Authorize]
public class MyController : ControllerBase
{
   [HttpGet("GetData")]
   public IActionResult GetData()
   {
       ...
   }
}
Wrap-Up
OAuth2 Introspection is a powerful and flexible approach for securing our APIs, providing a centralised way to validate bearer tokens and manage access. By understanding the process, implementing it correctly, and following best practices, we can significantly improve the security posture of our apps and protect our valuable data.
We use Amazon S3 to store data for easy sharing among various applications. However, each application has its unique requirements and might require a different perspective on the data. To solve this problem, at times, we store additional customised datasets of the same data, ensuring that each application has its own unique dataset. This sometimes creates another set of problems because we now need to maintain additional datasets.
In March 2021, a new feature known as S3 Object Lambda was introduced. Similar to the idea of setting up a proxy layer in front of S3 to intercept and process data as it is requested, Object Lambda uses AWS Lambda functions to automatically process and transform your data as it is being retrieved from S3. With Object Lambda, we only need to change our apps to use the new S3 Object Lambda Access Point instead of the actual bucket name to retrieve data from S3.
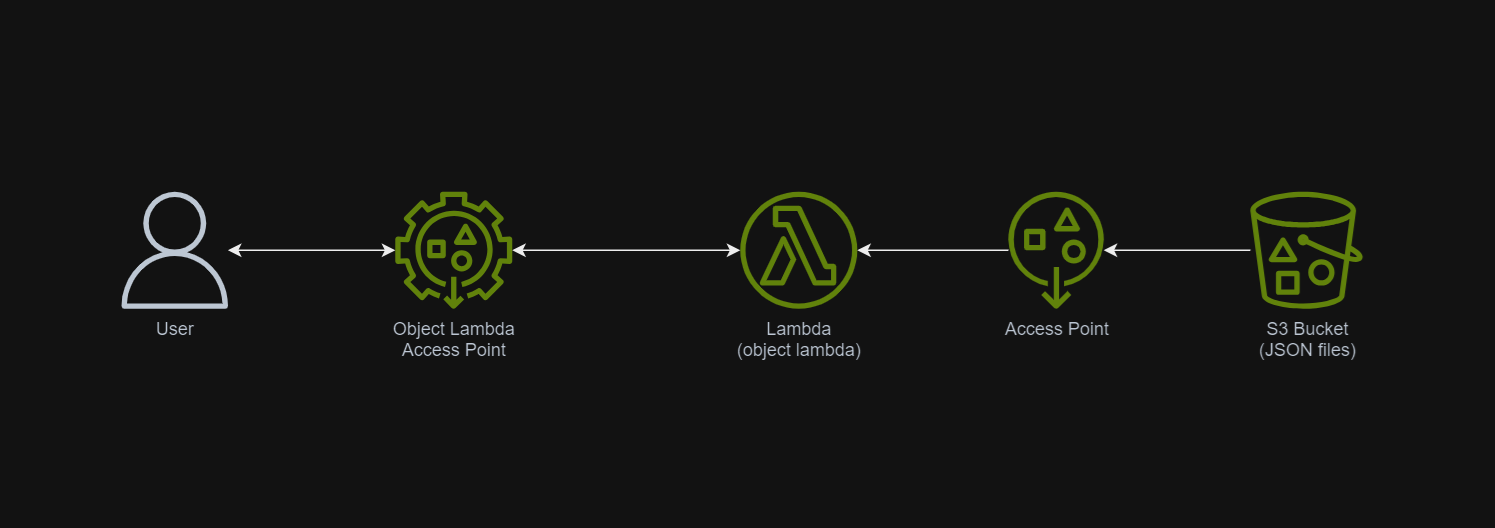
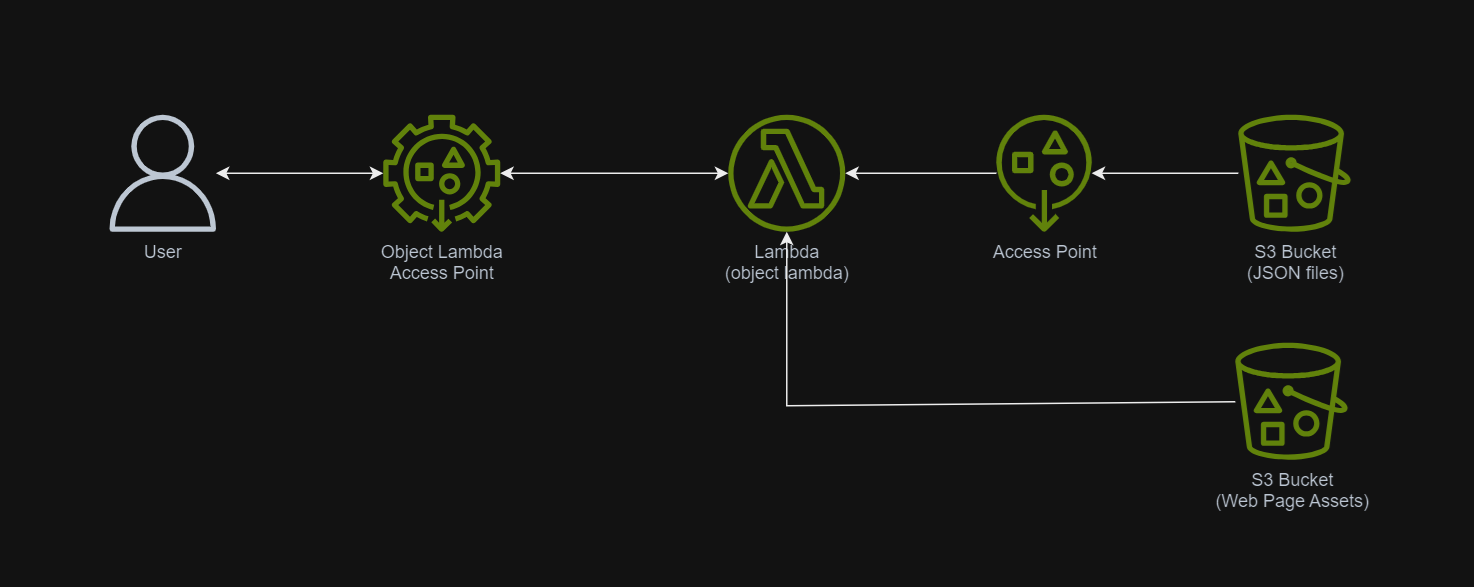
Simplified architecture diagram showing how S3 Object Lambda works.
Example: Turning JSON to Web Page with S3 Object Lambda
I have been keeping details of my visits to medical centres as well as the treatments and medicines I received in a JSON file. So, I would like to take this opportunity to show how S3 Object Lambda can help in doing data processing.
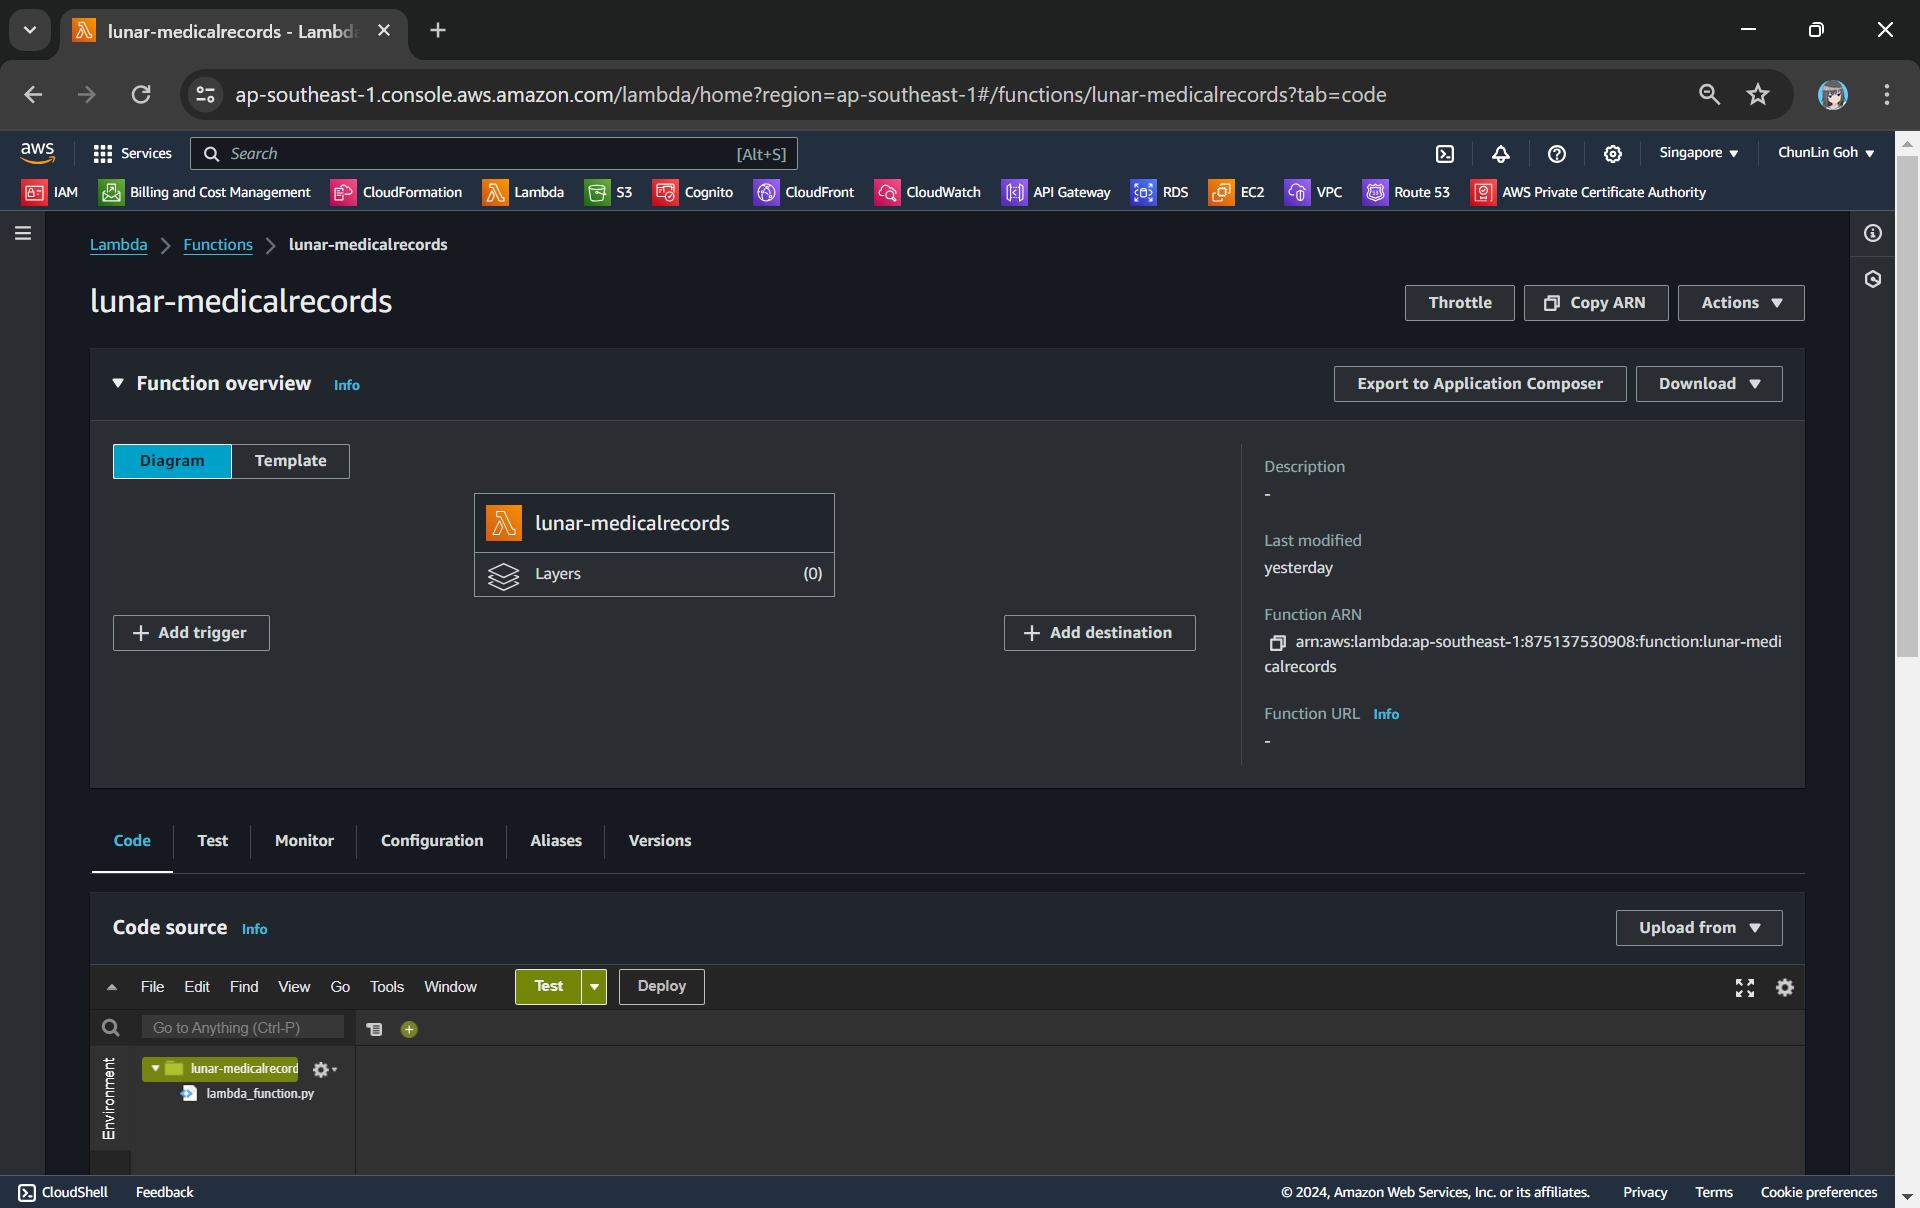
We need a Lambda Function to do the data format transformation from JSON to HTML. To keep things simple, we will be developing the Function using Python 3.12.
Object Lambda does not need any API Gateway since it should be accessed via the S3 Object Lambda Access Point.
In the beginning, we can have the code as follows. The code basically does two things. Firstly, it performs some logging. Secondly, it reads the JSON file from S3 Bucket.
import json import os import logging import boto3 from urllib import request from urllib.error import HTTPError from types import SimpleNamespace
def lambda_handler(event, context): object_context = event["getObjectContext"] # Get the presigned URL to fetch the requested original object from S3 s3_url = object_context["inputS3Url"] # Extract the route and request token from the input context request_route = object_context["outputRoute"] request_token = object_context["outputToken"]
# Get the original S3 object using the presigned URL req = request.Request(s3_url) try: response = request.urlopen(req) responded_json = response.read().decode() except Exception as err: logger.error(f'Exception reading S3 content: {err}') return {'status_code': 500}
Step 1.1: Getting the JSON File with Presigned URL
In the event that an Object Lambda receives, there is a property known as the getObjectContext, which contains useful information for us to figure out the inputS3Url, which is the presigned URL of the object in S3.
By default, all S3 objects are private and thus for a Lambda Function to access the S3 objects, we need to configure the Function to have S3 read permissions to retrieve the objects. However, with the presigned URL, the Function can get the object without the S3 read permissions.
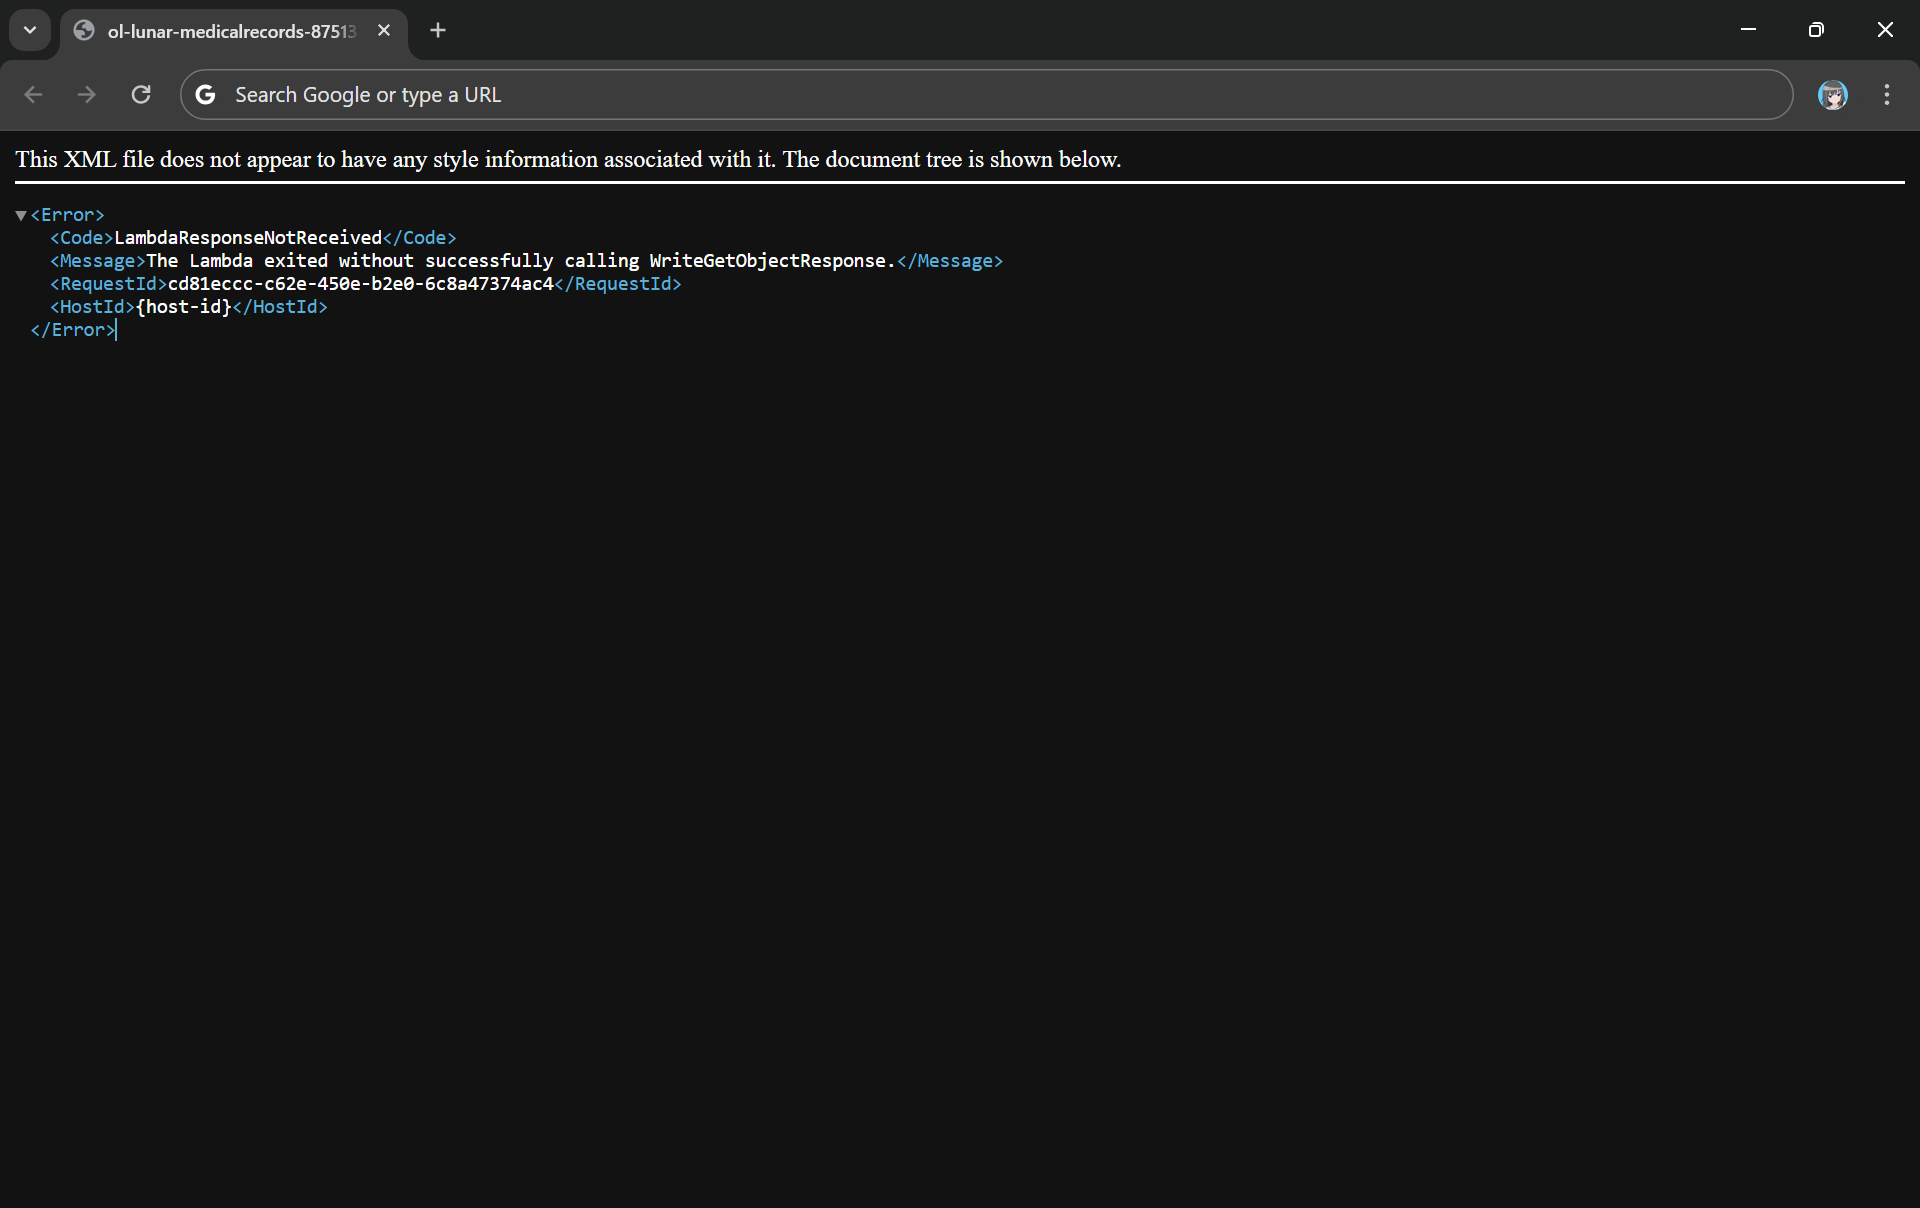
Since the purpose of Object Lambda is to process and transform our data as it is being retrieved from S3, we need to pass transformed object to a GetObject operation in the Function via the method write_get_object_response. Without this method, there will be an error from the Lambda complaining that it is missing.
Error: The Lambda exited without successfully calling WriteGetObjectResponse.
html = template_content.replace('{{DYNAMIC_TABLE}}', dynamic_table)
Step 2: Give Lambda Function Necessary Permissions
With the setup we have gone through above, we understand that our Lambda Function needs to have the following permissions.
s3-object-lambda:WriteGetObjectResponse
s3:GetObject
Step 3: Create S3 Access Point
Next, we will need to create a S3 Access Point. It will be used to support the creation of the S3 Object Lambda Access Point later.
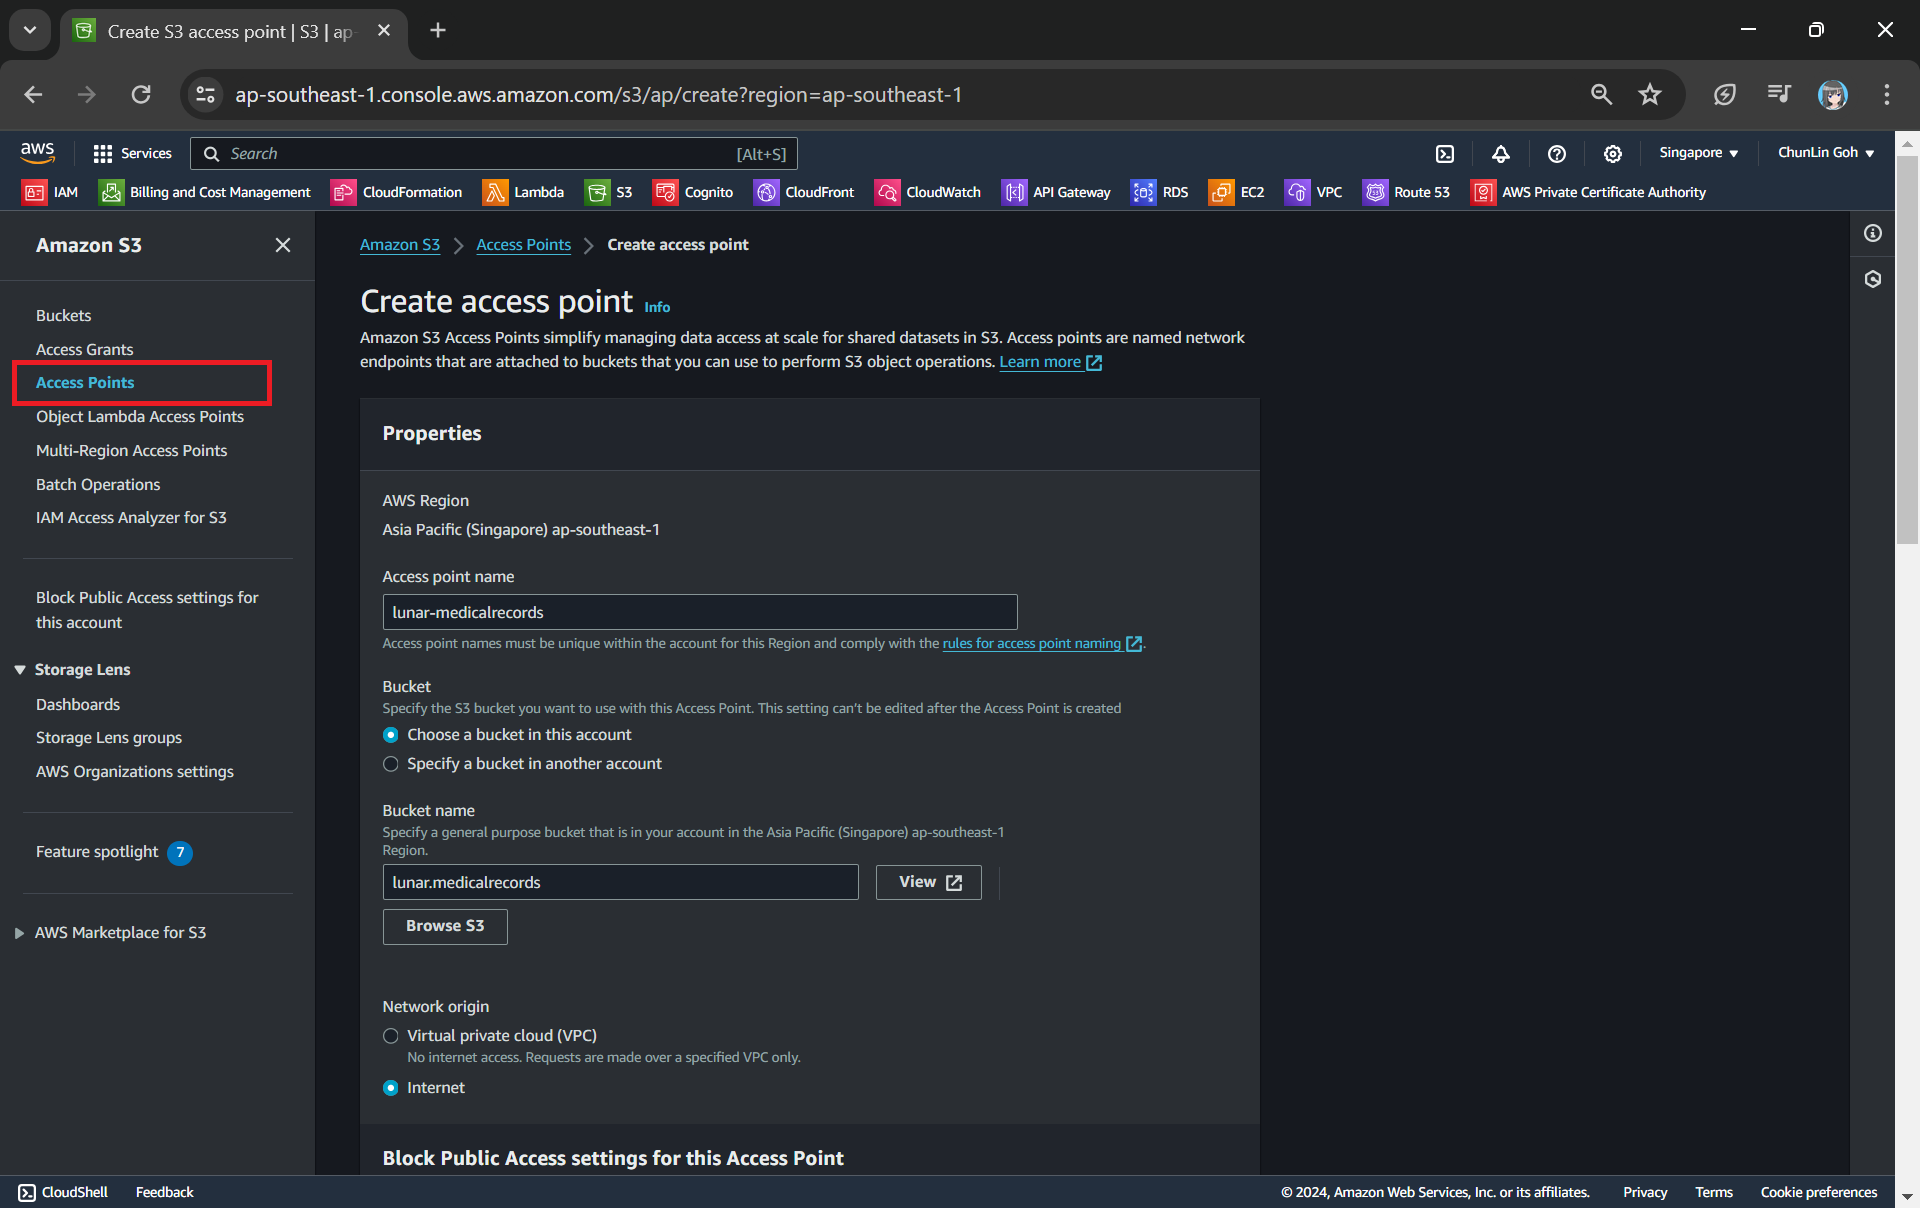
One of the features that S3 Access Point offers is that we can specify any name that is unique within the account and region. For example, as shown in the screenshot below, we can actually have a “lunar-medicalrecords” access point in every account and region.
Creating an access point from the navigation pane of S3.
When we are creating the access point, we need to specify the bucket which resides in the same region that we want to use with this Access Point. In addition, since we are not restricting the access of it to only a specific VPC in our case, we will be choosing “Internet” for the “Network origin” field.
After that, we keep all other defaults as is. We can directly proceed to choose the “Create access point” button.
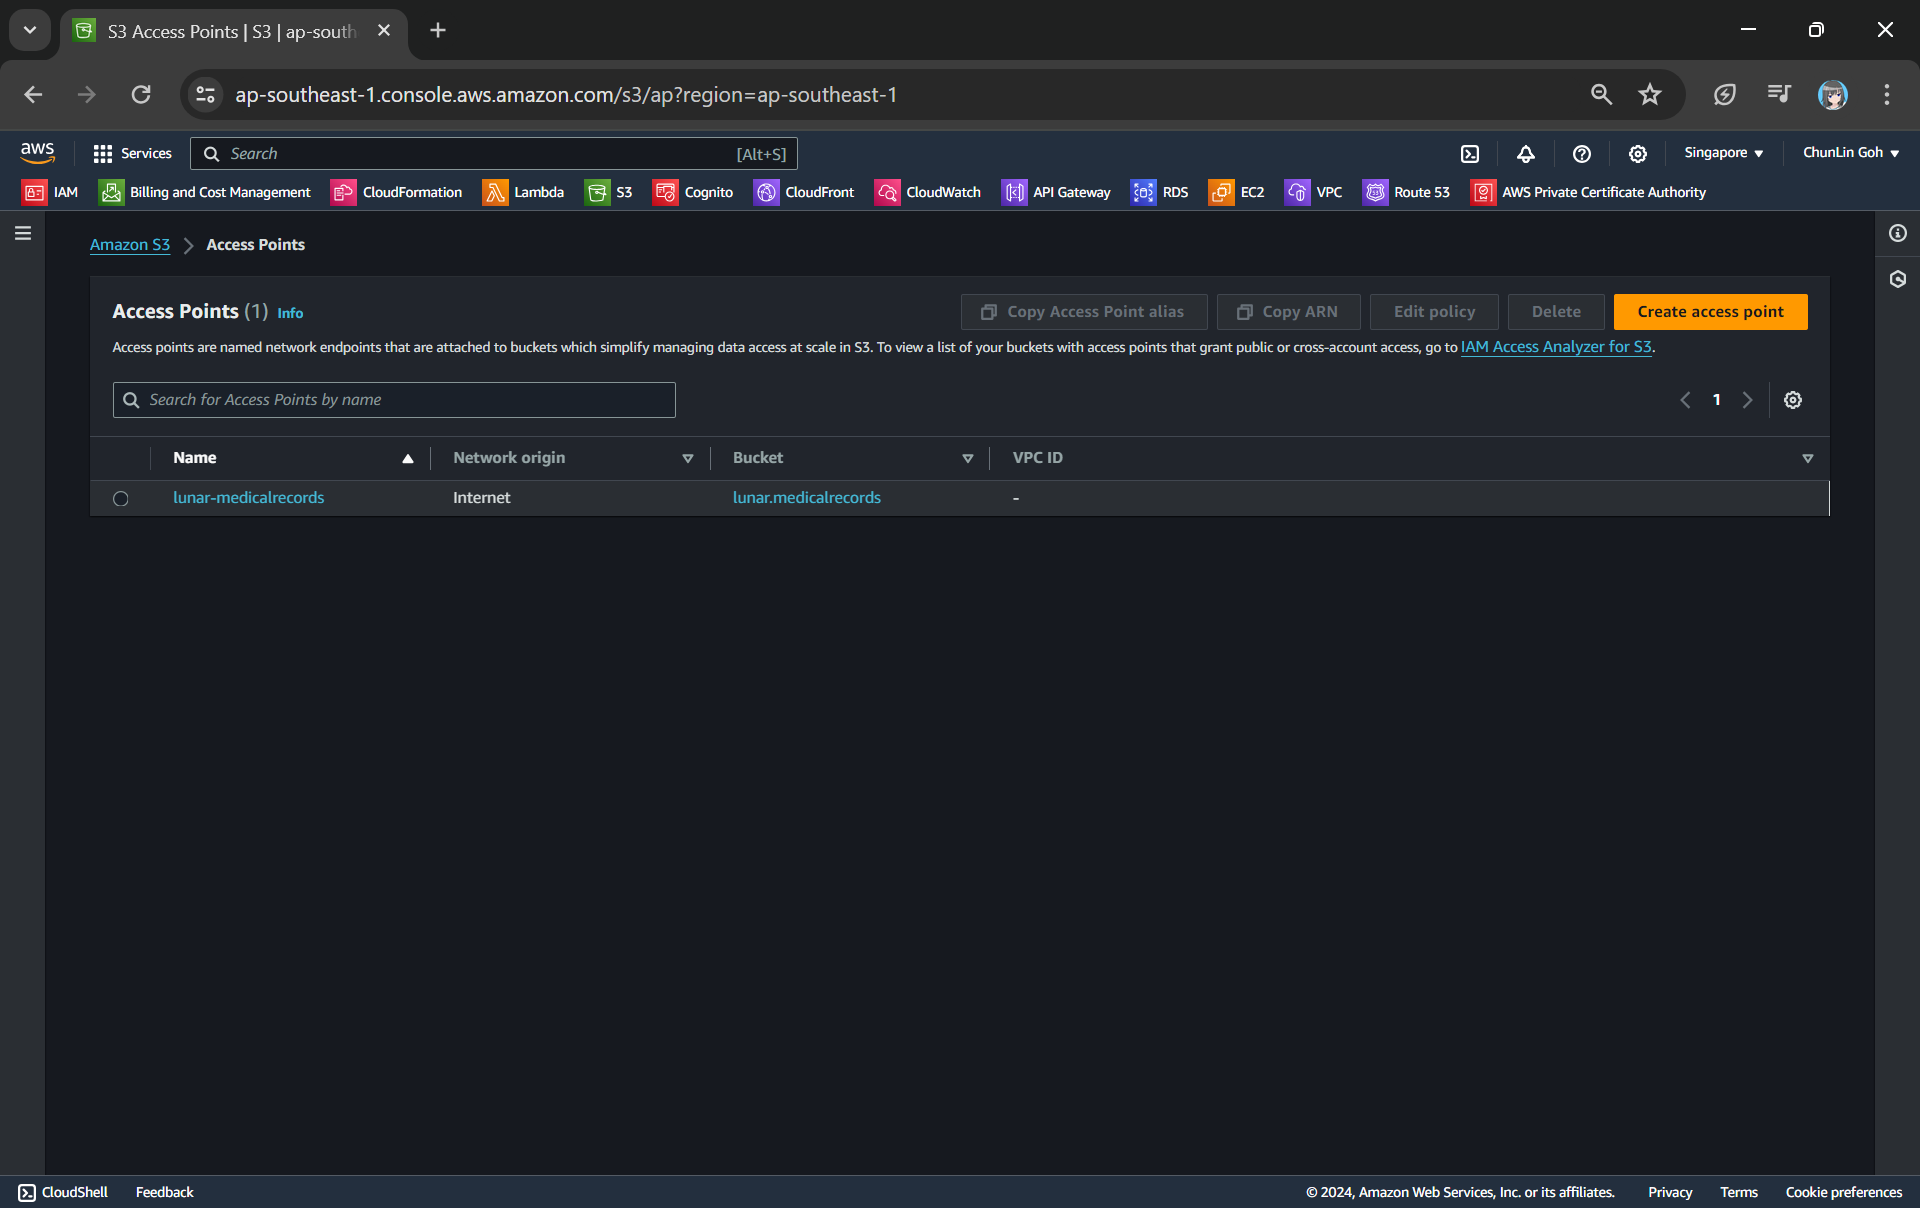
Our S3 Access Point is successfully created.
Step 4: Create S3 Object Lambda Access Point
After getting our S3 Access Point set up, we can then move on to create our S3 Object Lambda Access Point. This is the actual access point that our app will be using to access the JSON file in our S3 bucket. It then should return a HTML document generated by the Object Lambda that we built in Step 1.
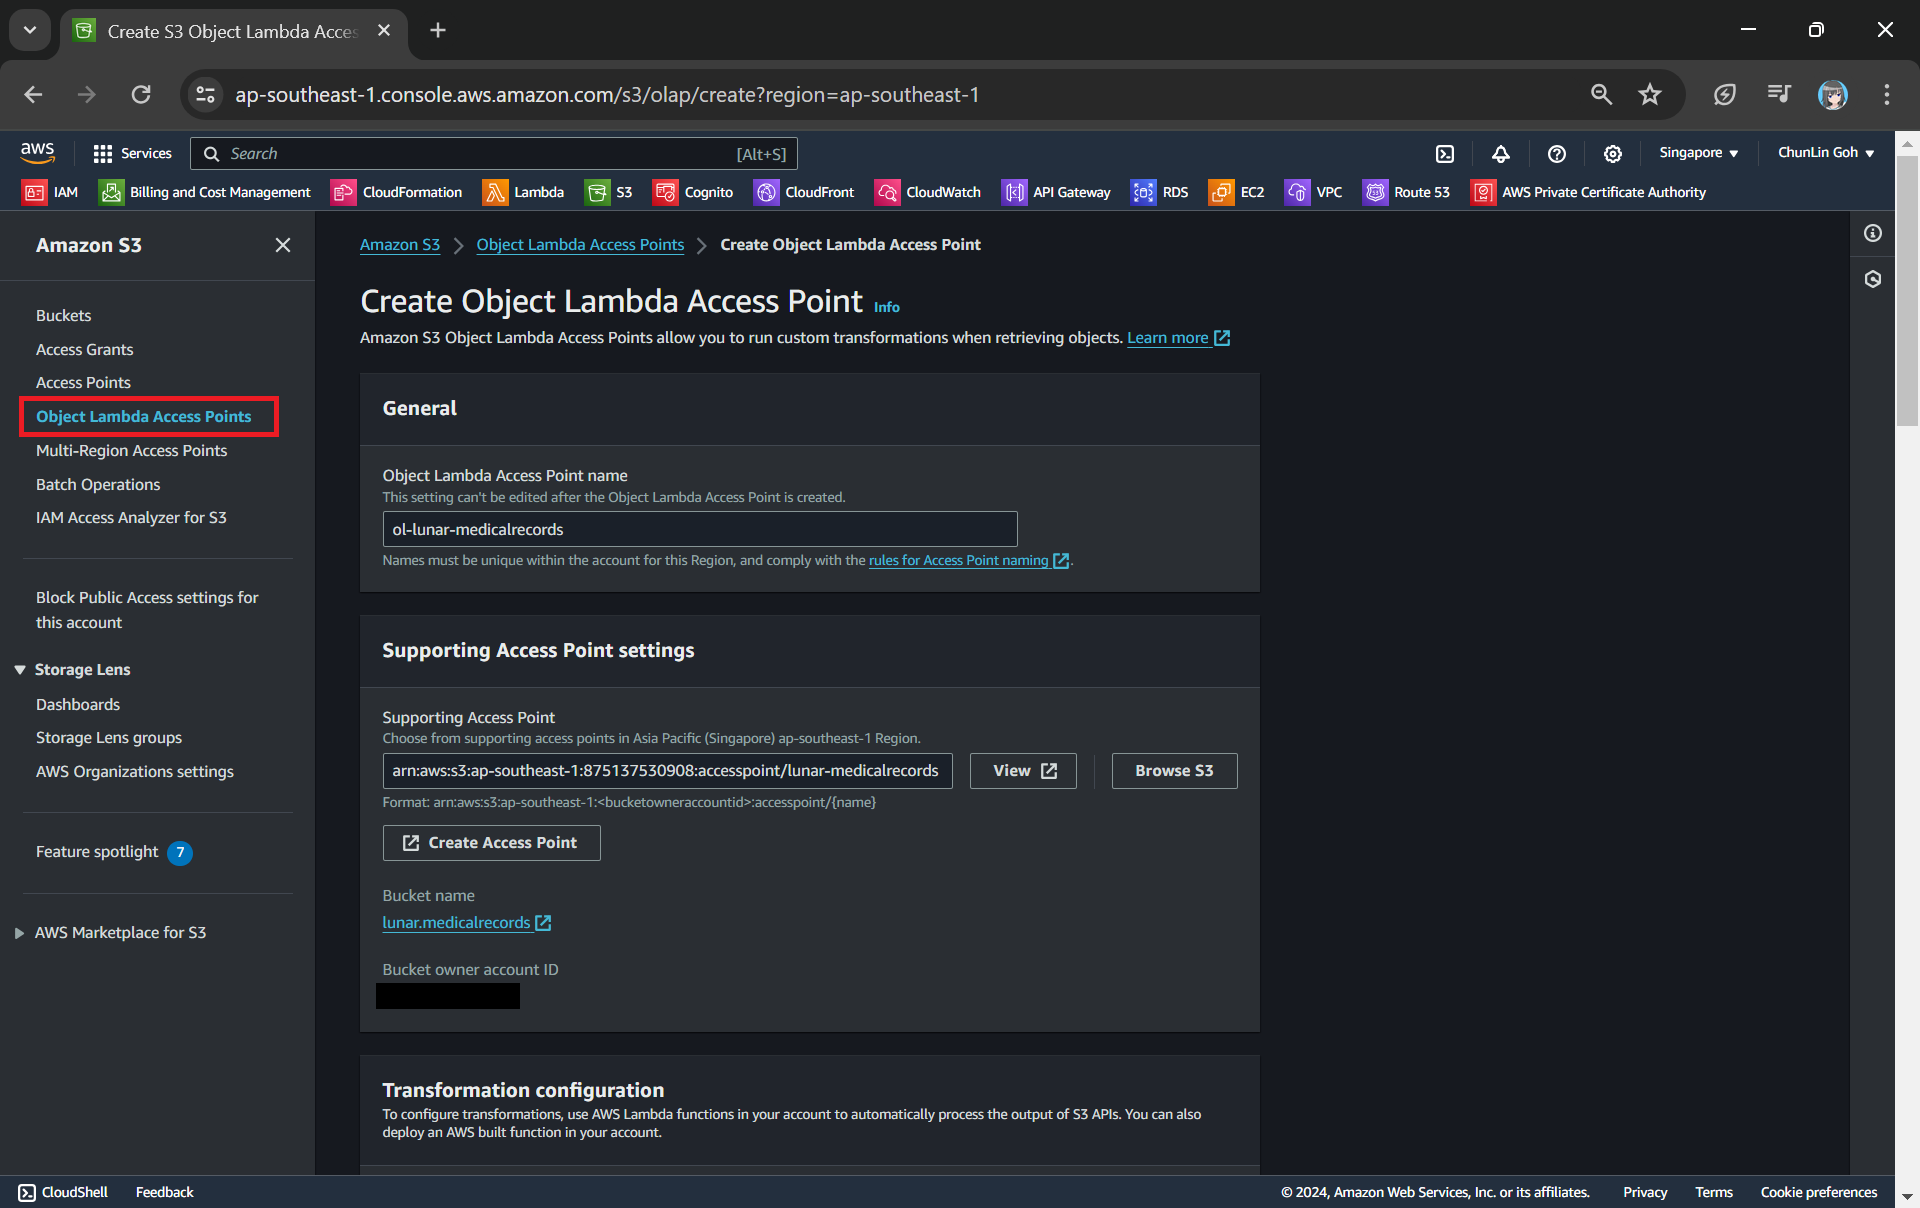
Creating an object lambda access point from the navigation pane of S3.
In the Object Lambda Access Point creation page, after we give it a name, we need to provide the Supporting Access Point. This access point is the Amazon Resource Name (ARN) of the S3 Access Point that we created in Step 3. Please take note that both the Object Lambda Access Point and Supporting Access Point must be in the same region.
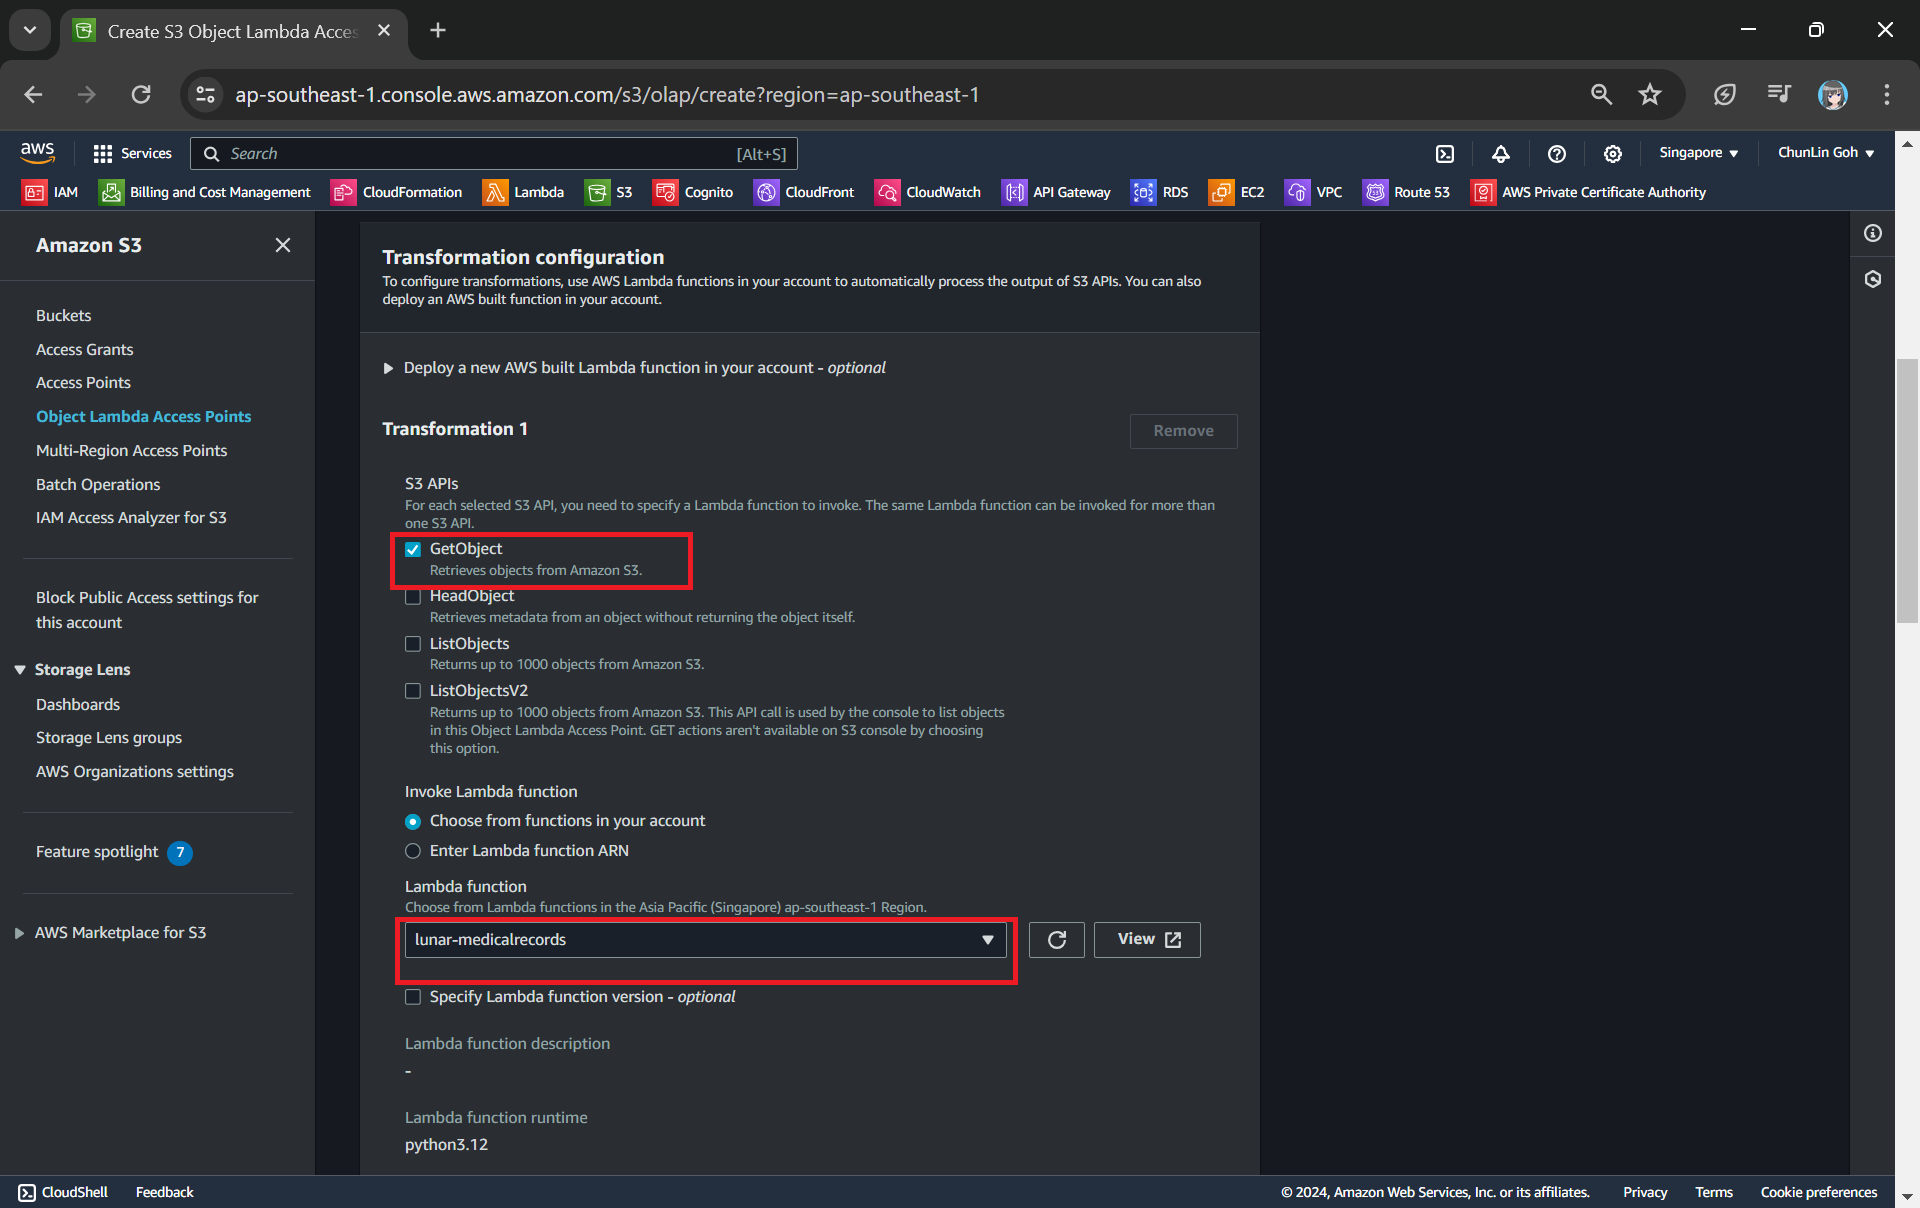
Next we need to setup the transformation configuration. In our case, we will be retrieving the JSON file from the S3 bucket to perform the data transformation via our Lambda Function, so we will be choosing GetObject as the S3 API we will be using, as shown in the screenshot below.
Configuring the S3 API that will be used in the data transformation and the Lambda Function to invoke.
Once all these fields are keyed in, we can proceed to create the Object Lambda Access Point.
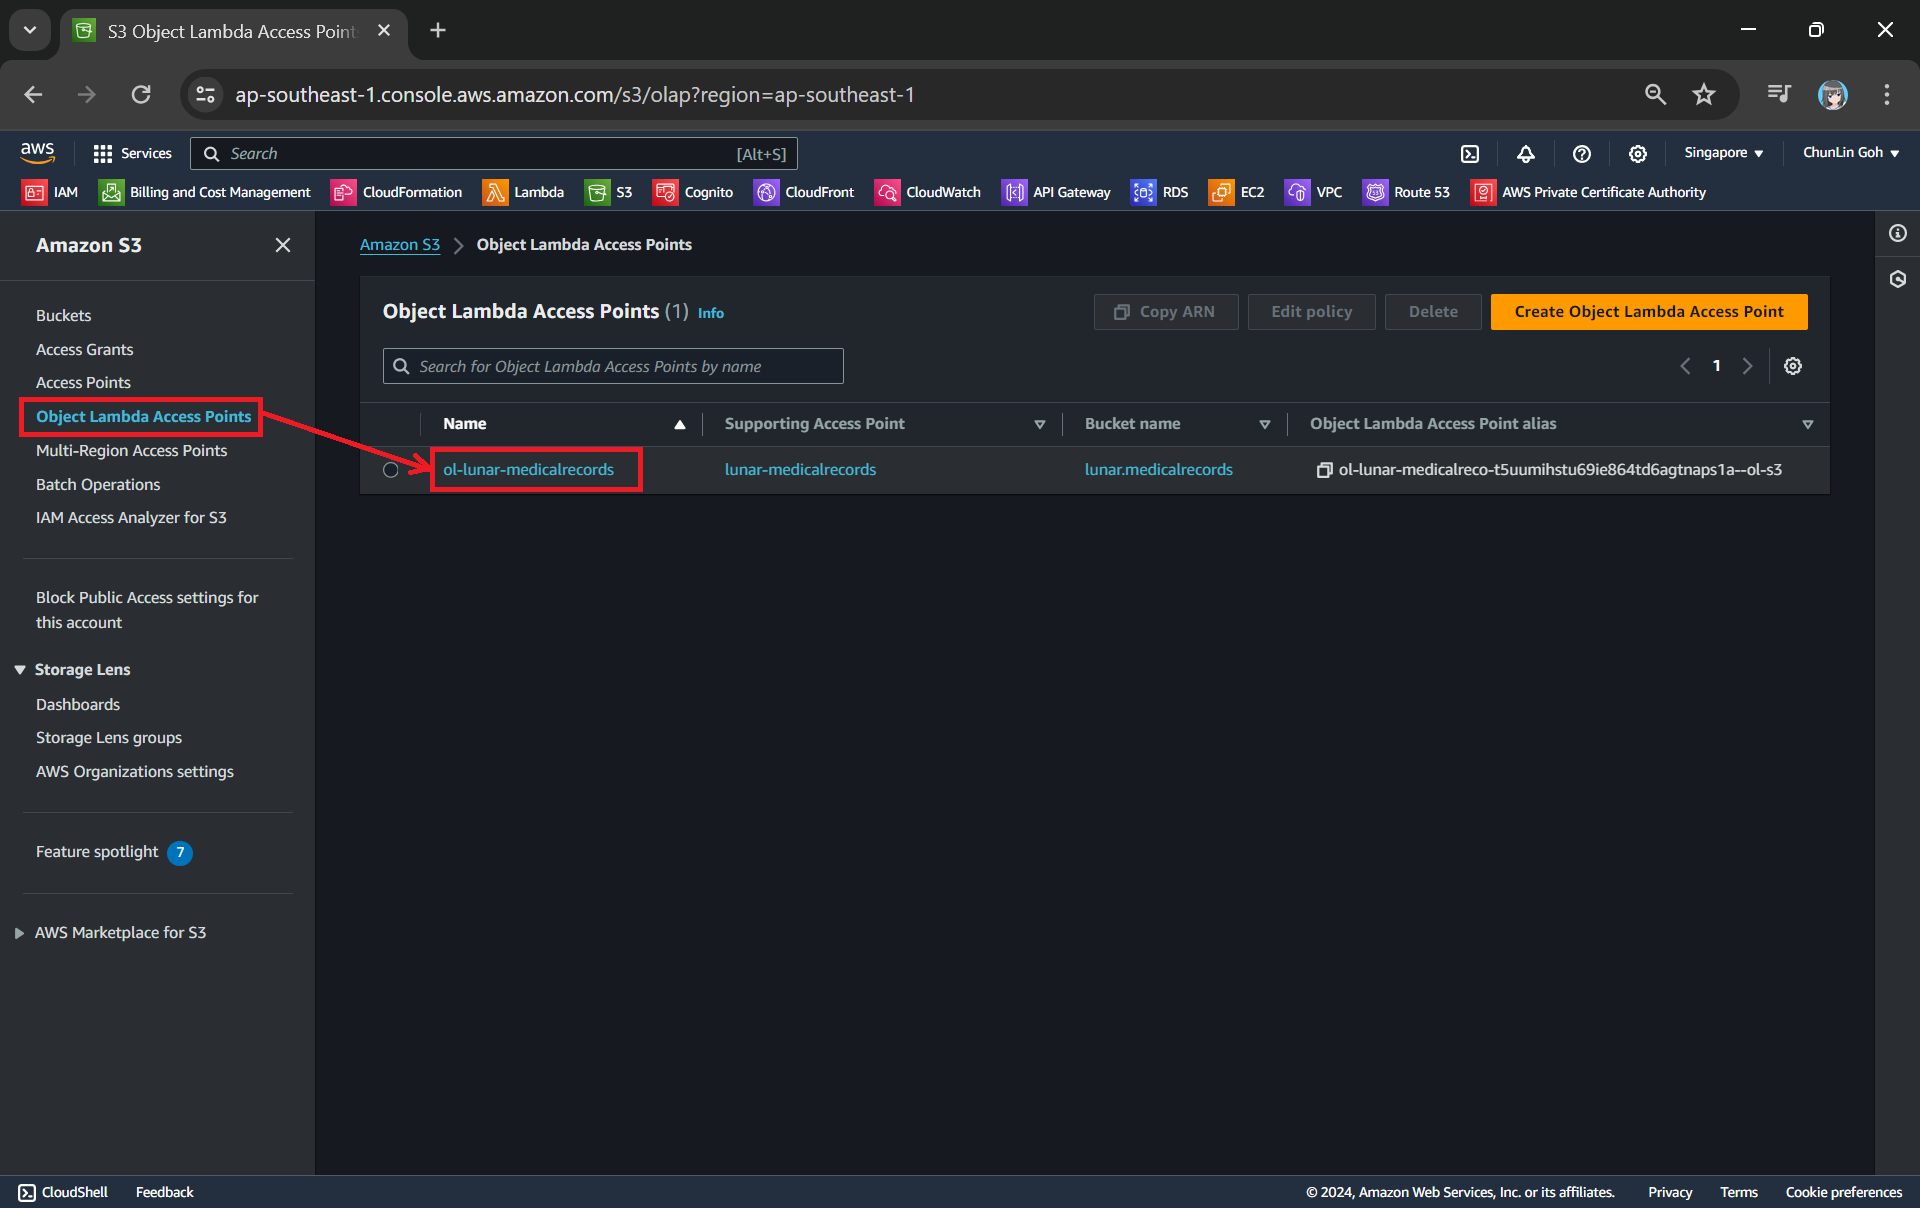
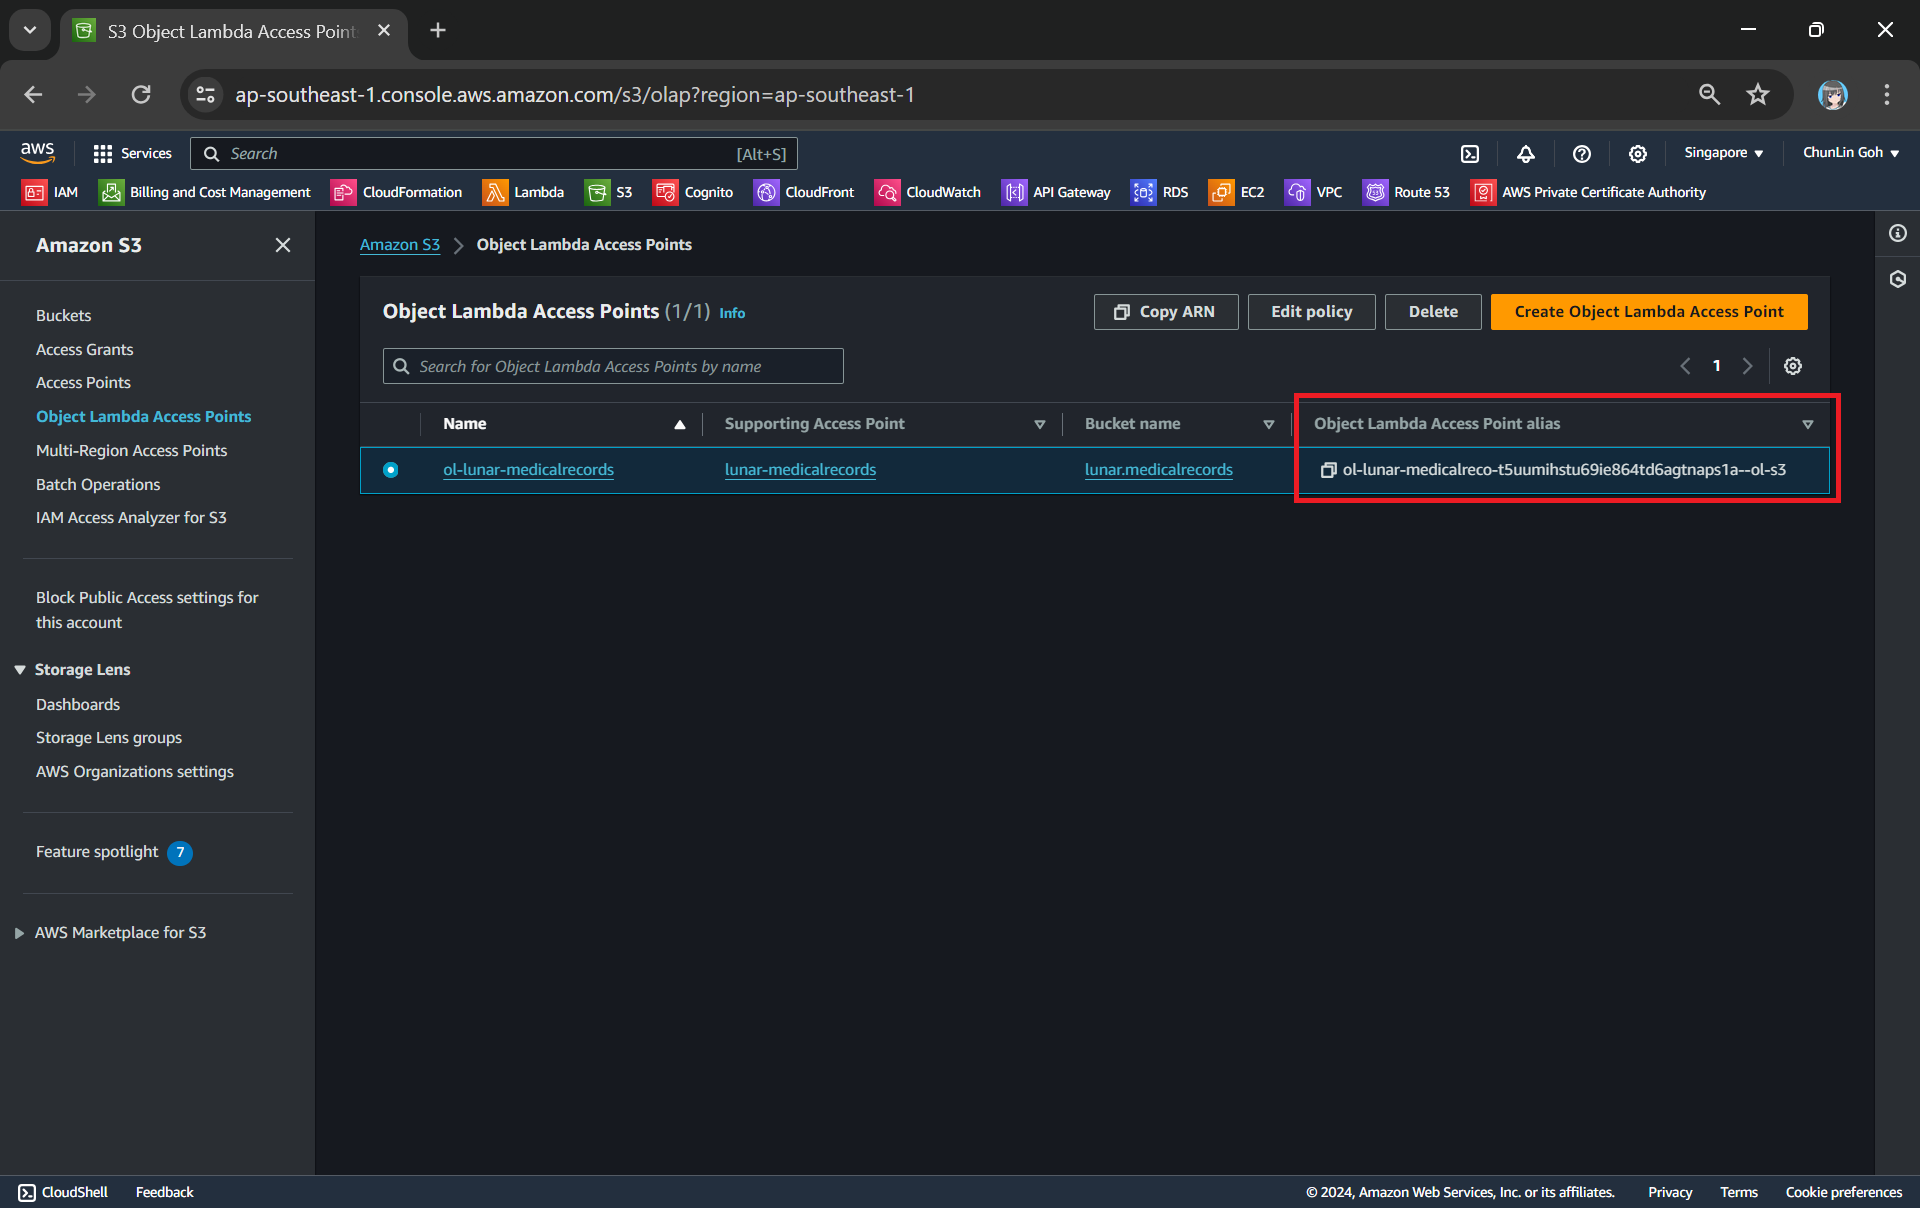
Now, we will access the JSON file via the Object Lambda Access Point to verify that the file is really transformed into a web page during the request. To do so, firstly, we need to select the newly create Object Lambda Access Point as shown in the following screenshot.
Locate the Object Lambda Access Point we just created in the S3 console.
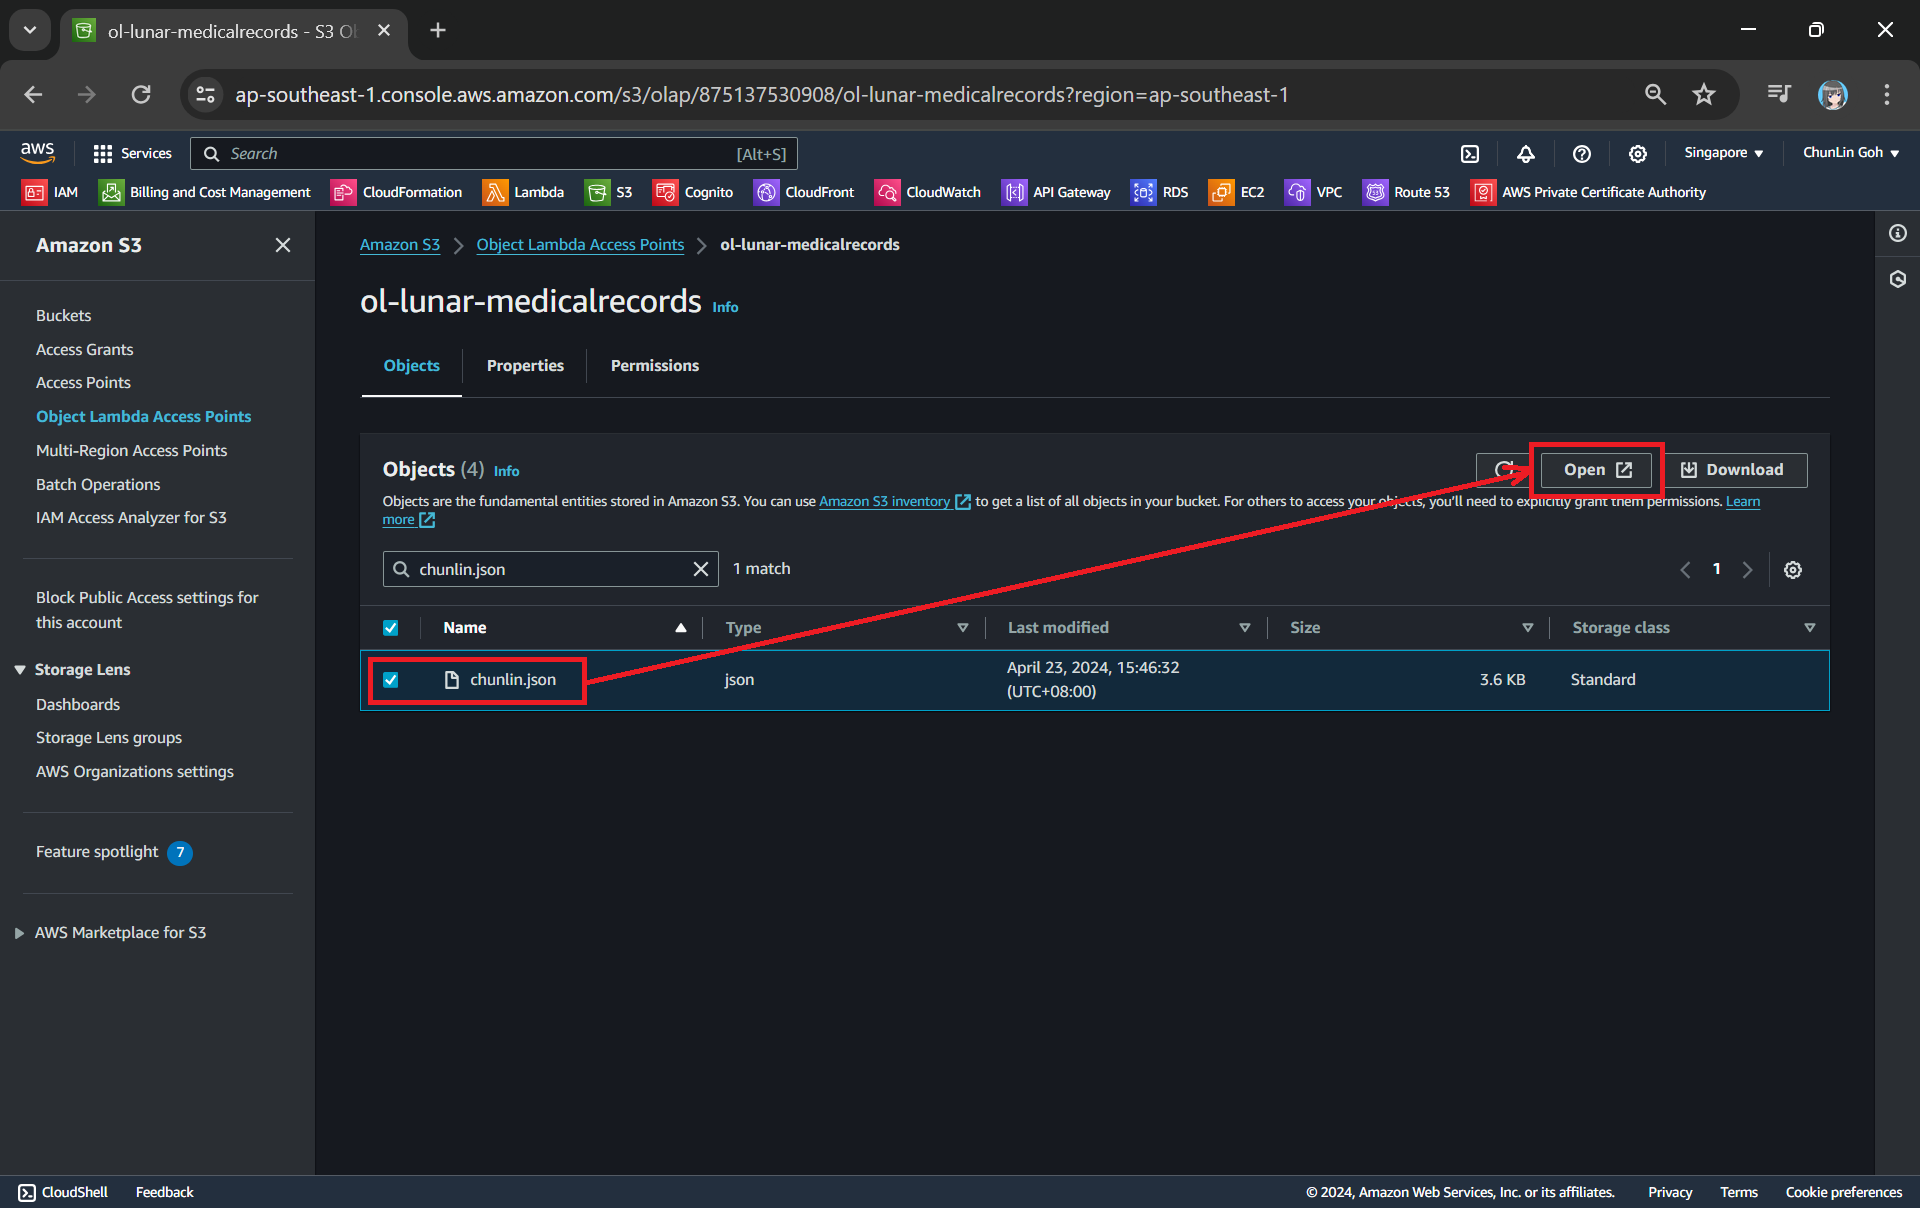
Secondly, we will be searching for our JSON file, for example chunlin.json in my case. Then, we will click on the “Open” button to view it. The reason why I name the JSON file containing my medical records is because later I will be adding authentication and authorisation to only allow users retrieving their own JSON file based on their login user name.
This page looks very similar to the usual S3 objects listing page. So please make sure you are doing this under the “Object Lambda Access Point”.
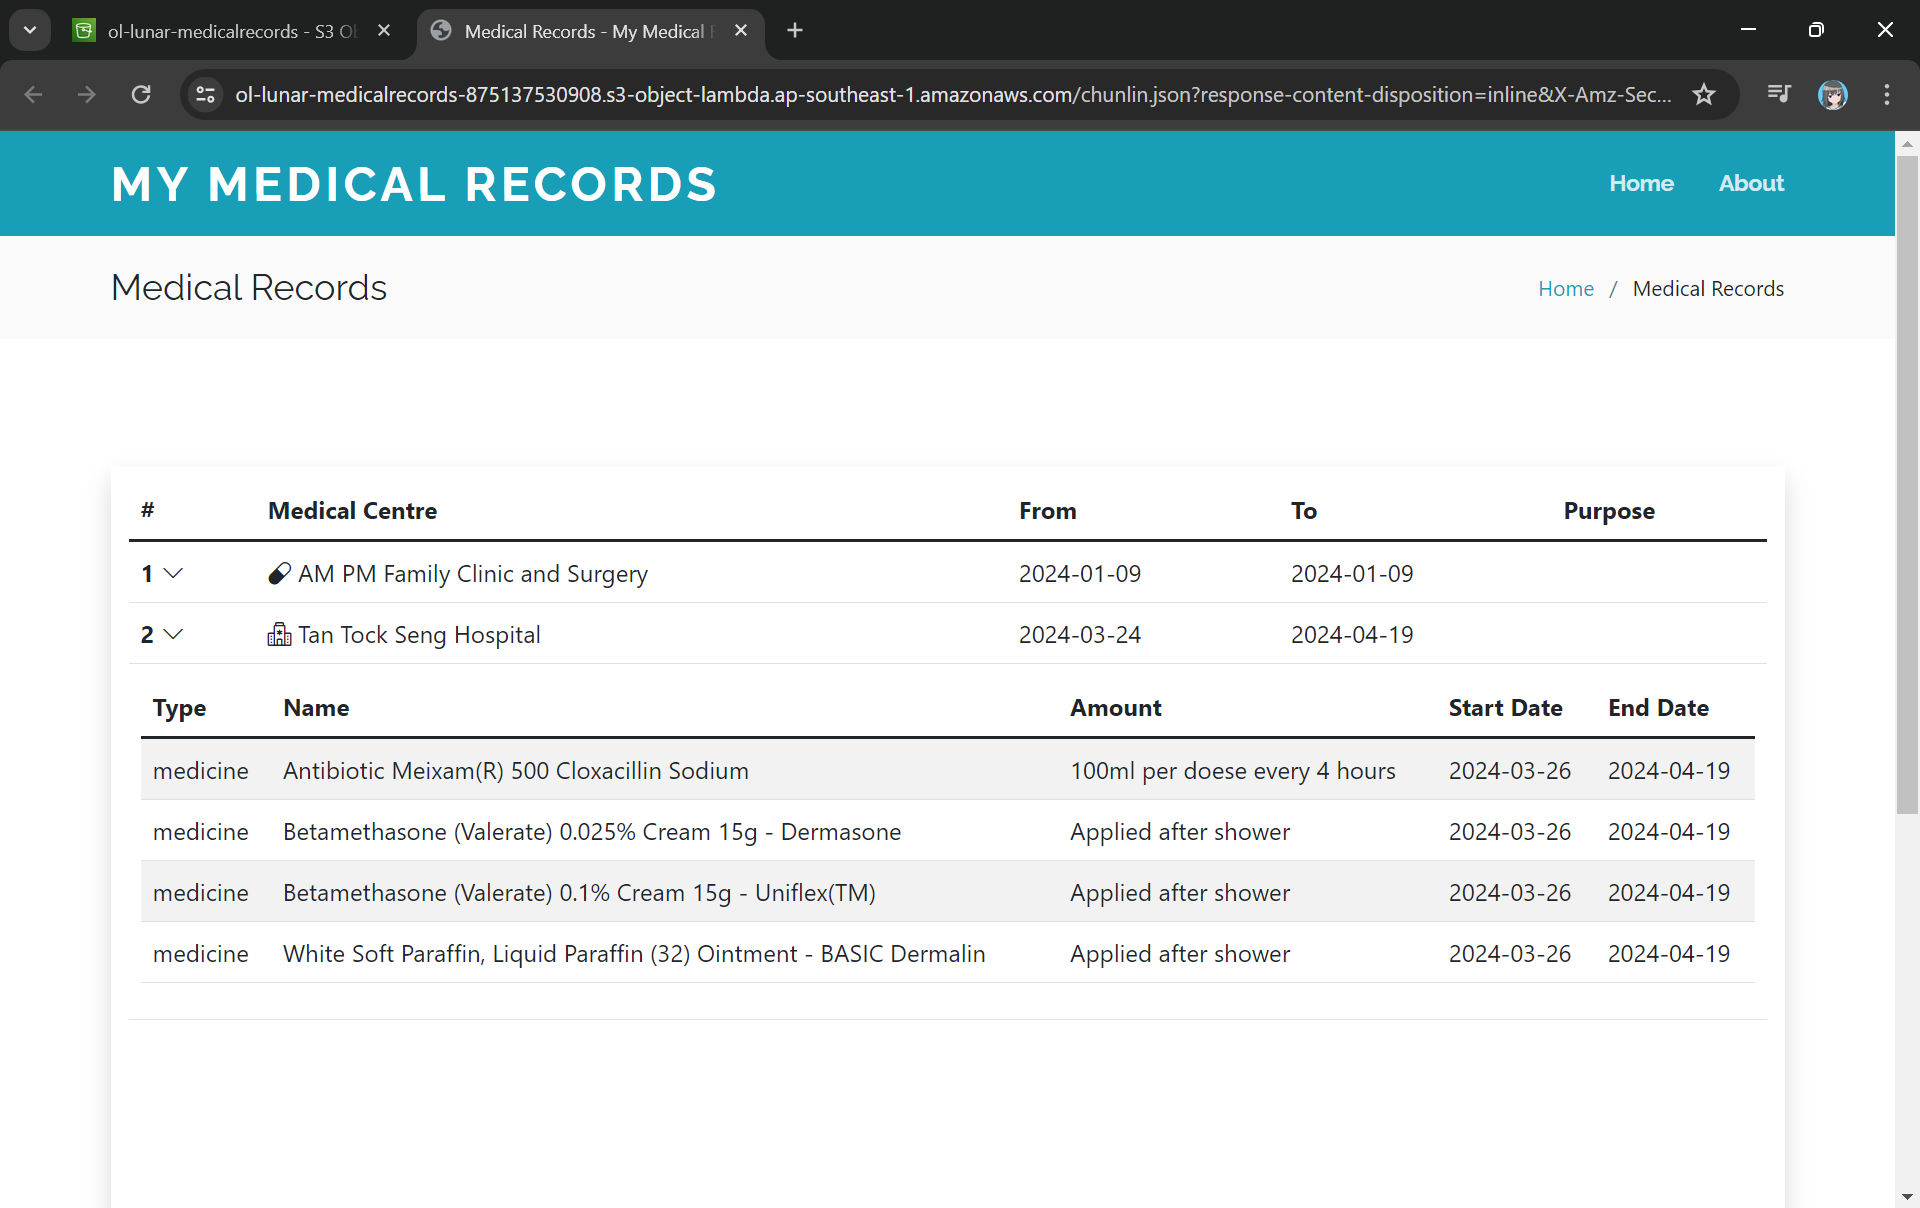
There will be new tab opened showing the web page as demonstrated in the screenshot below. As you have noticed in the URL, it is still pointing to the JSON file but the returned content is a HTML web page.
The domain name is actually no longer the usual S3 domain name but it is our Object Lambda Access Point.
Using the Object Lambda Access Point from Our App
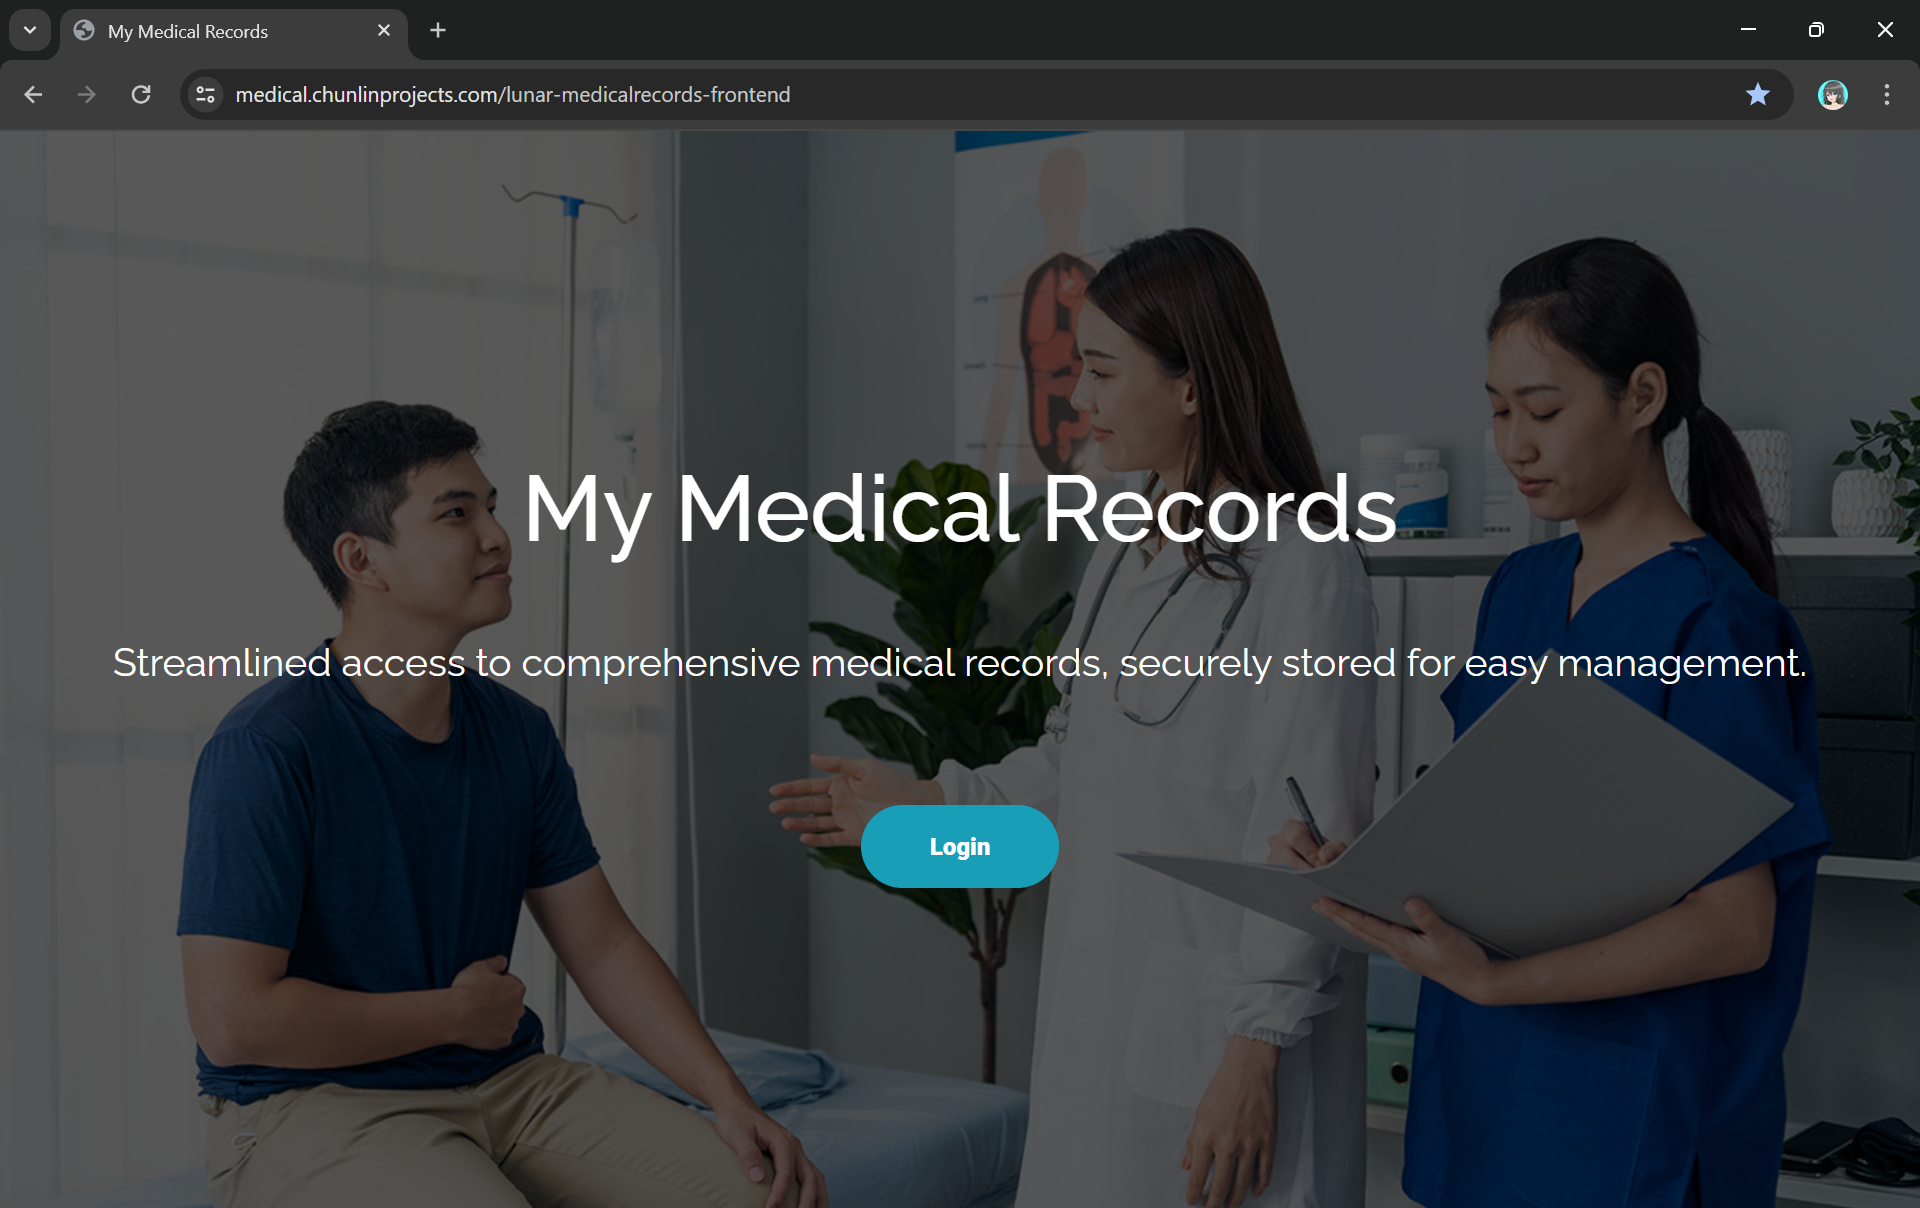
With the Object Lambda Access Point successfully setup, we will show how we can use it. To not overcomplicate things, for the purposes of this article, I will host a serverless web app on Lambda which will be serving the medical record website above.
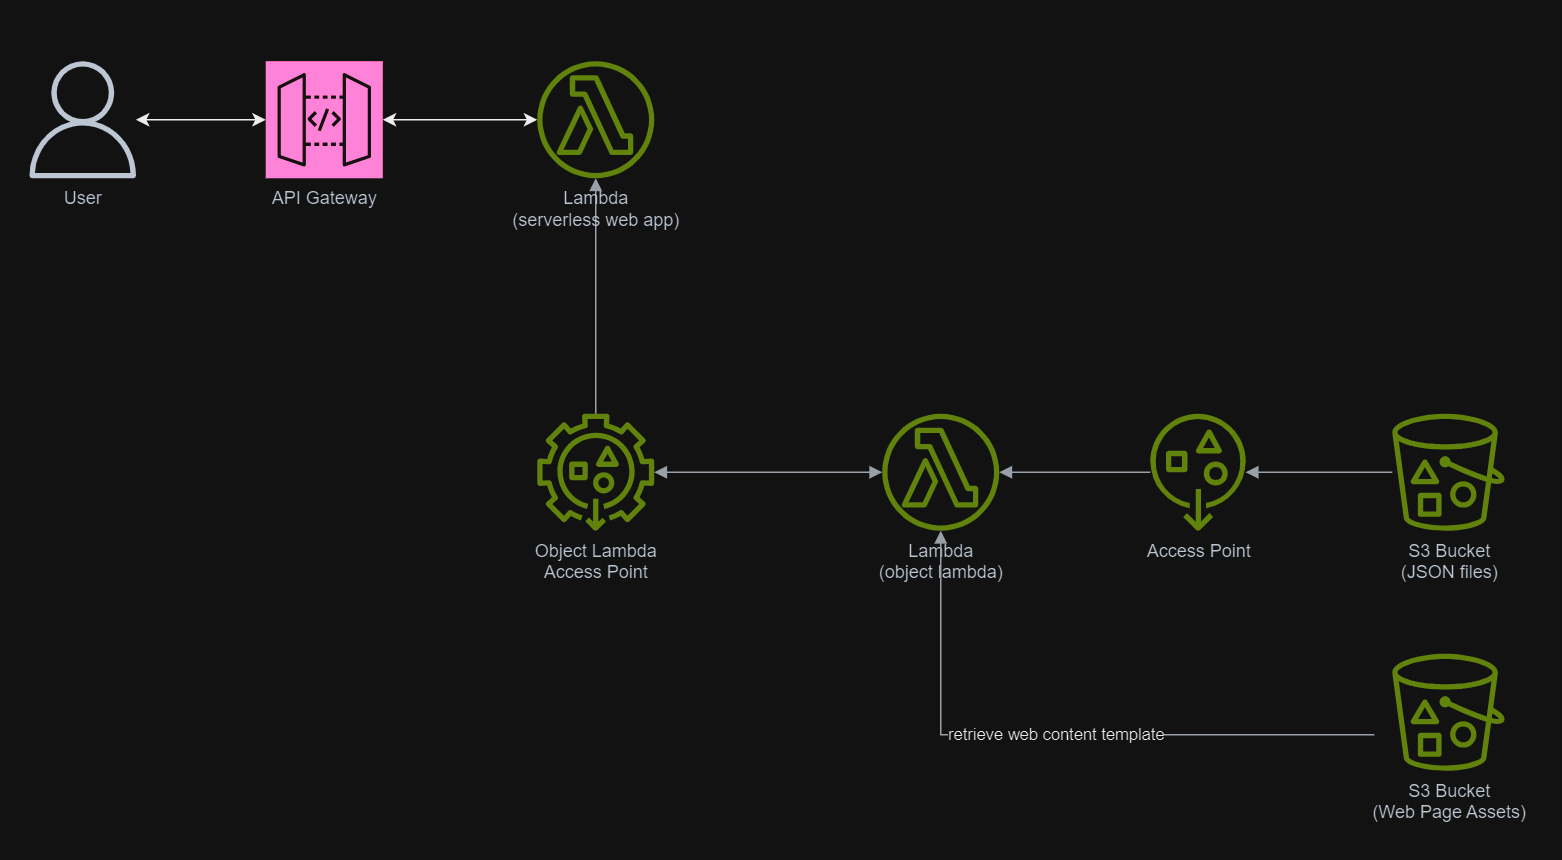
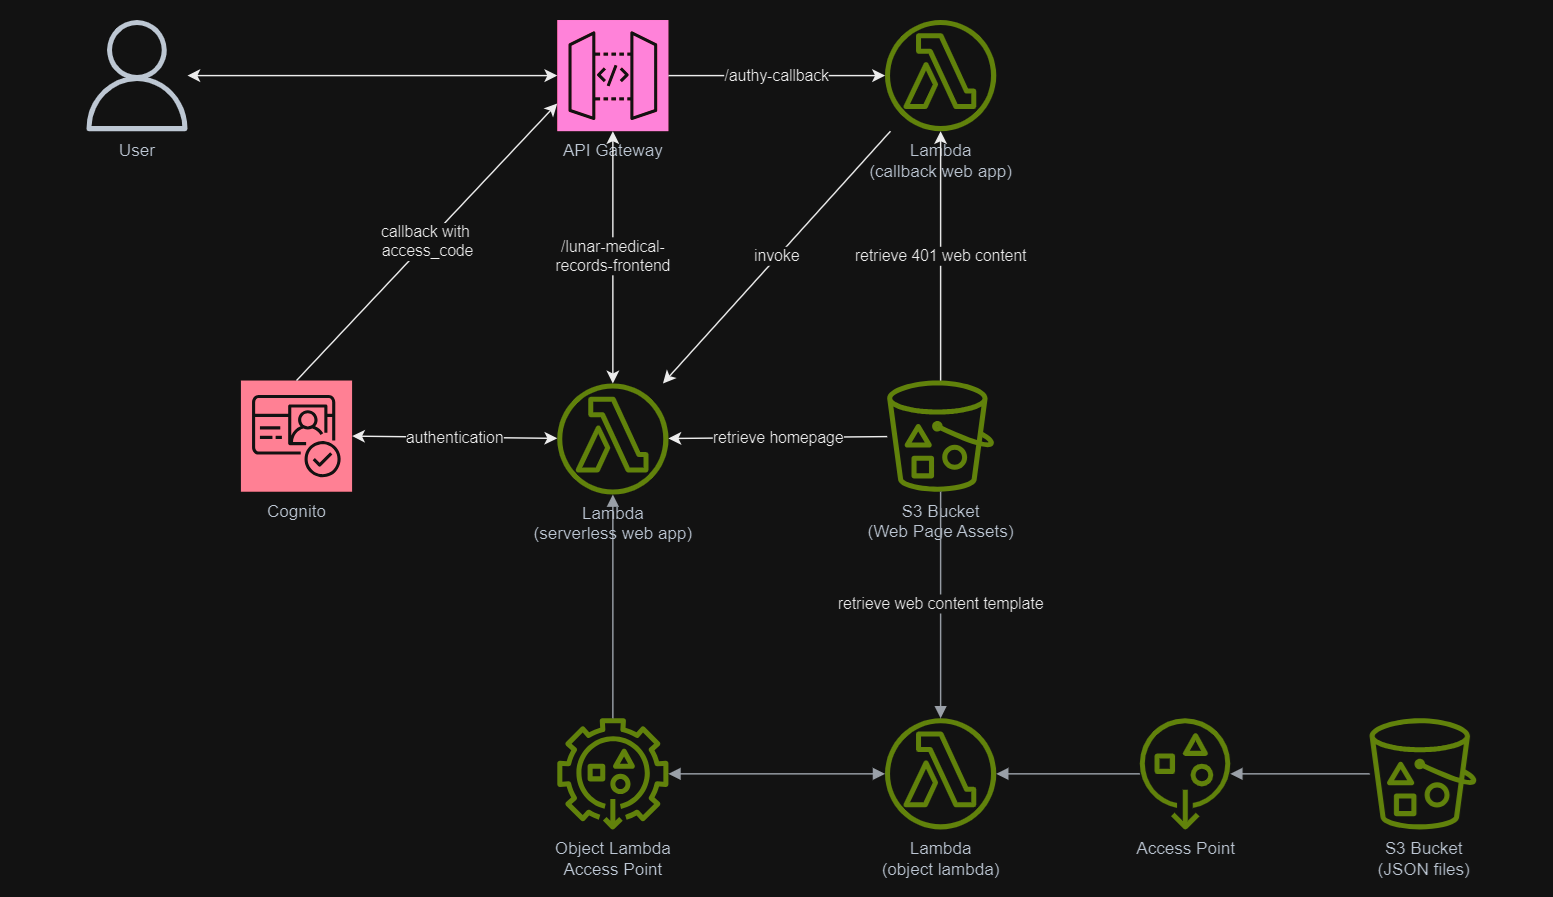
In addition, since Lambda Functions are by default not accessible from the Internet, we will be using API Gateway so that we can have a custom REST endpoint in the AWS and thus we can map this endpoint to the invokation of our Lambda Function. Technically speaking, the architecture diagram now looks as follows.
This architecture allows public to view the medical record website which is hosted as a serverless web app.
In the newly created Lambda, we will still be developing it with Python 3.12. We name this Lambda lunar-medicalrecords-frontend. We will be using the following code which will retrieve the HTML content from the Object Lambda Access Point.
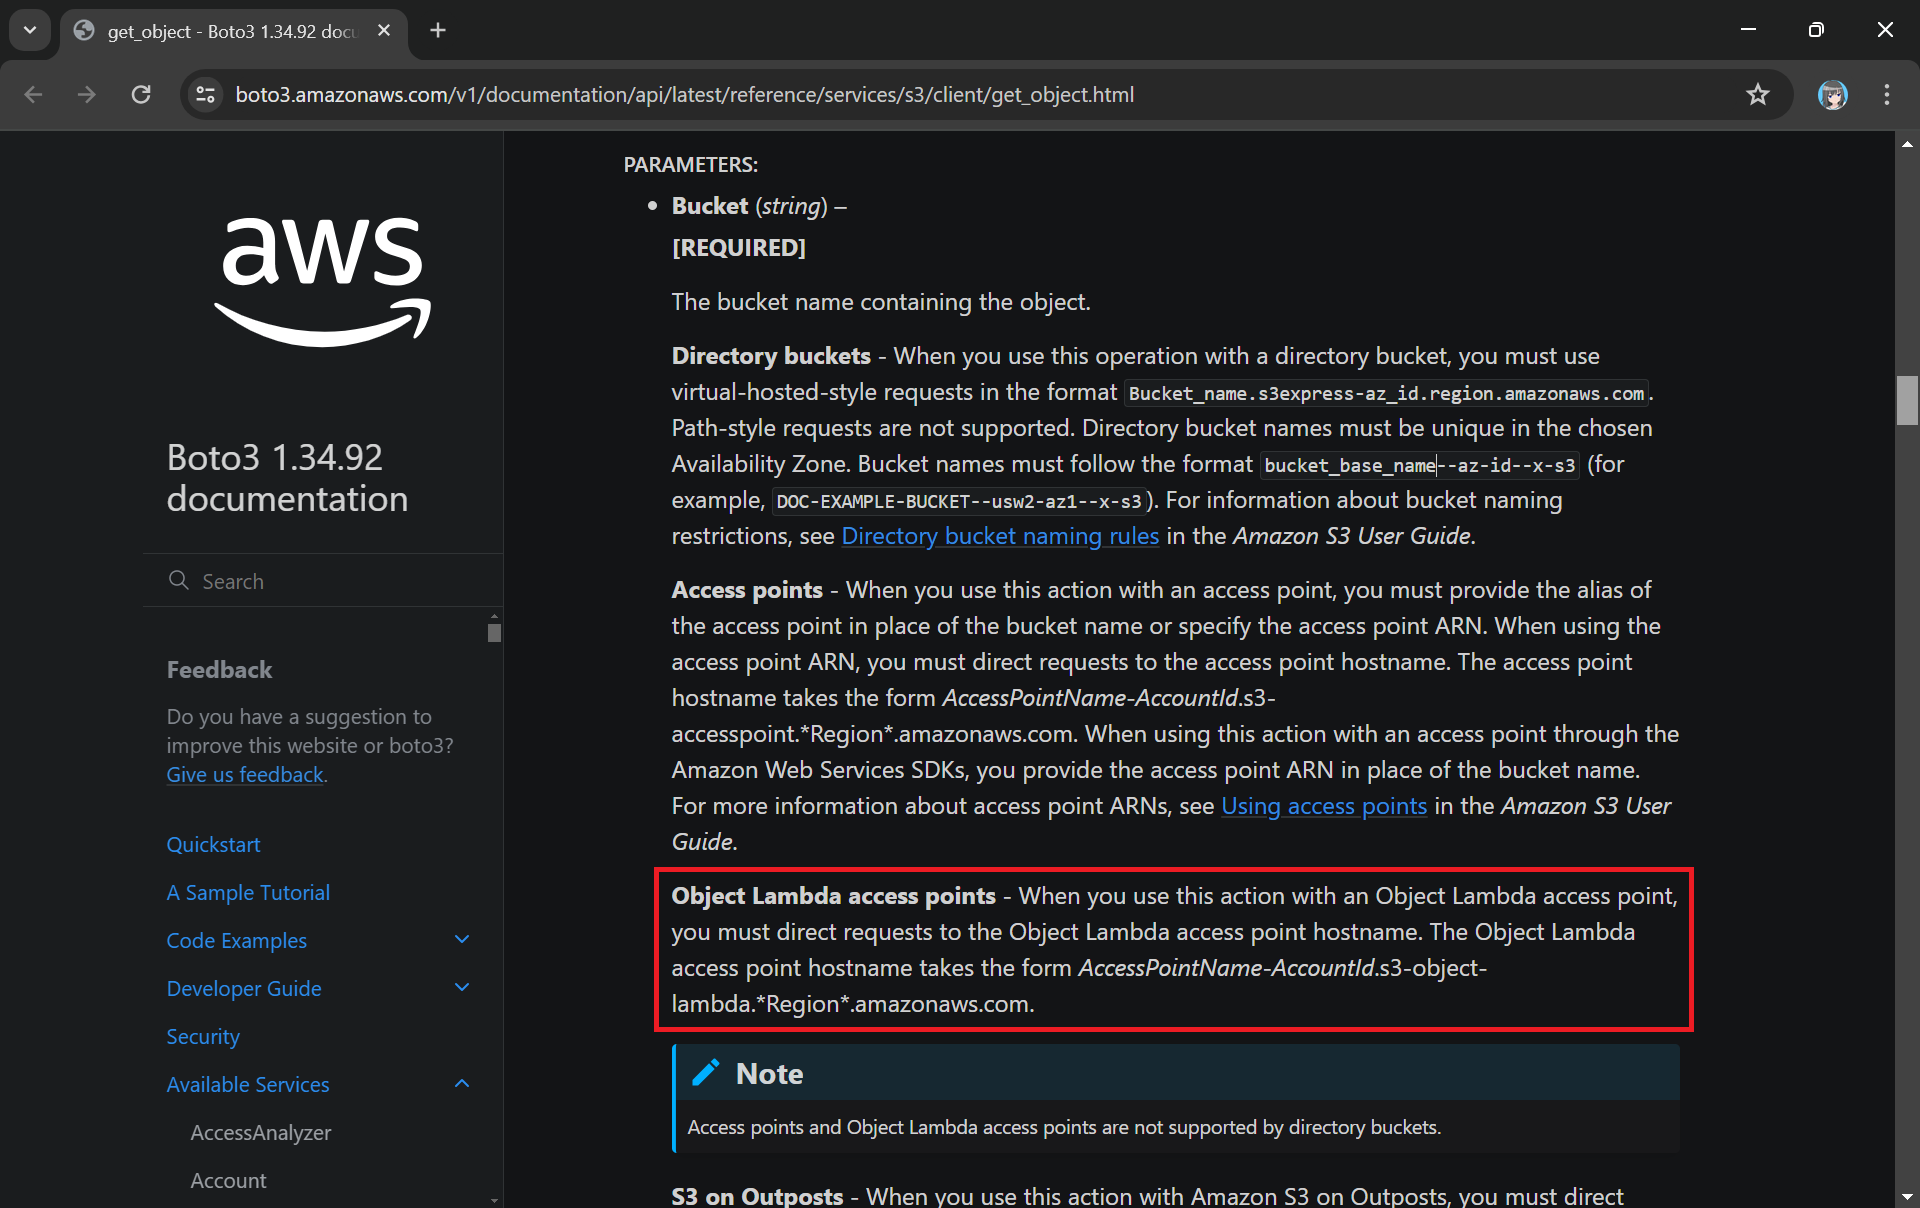
The Boto3 documentation highlights the use of Object Lambda Access Point in get_object.
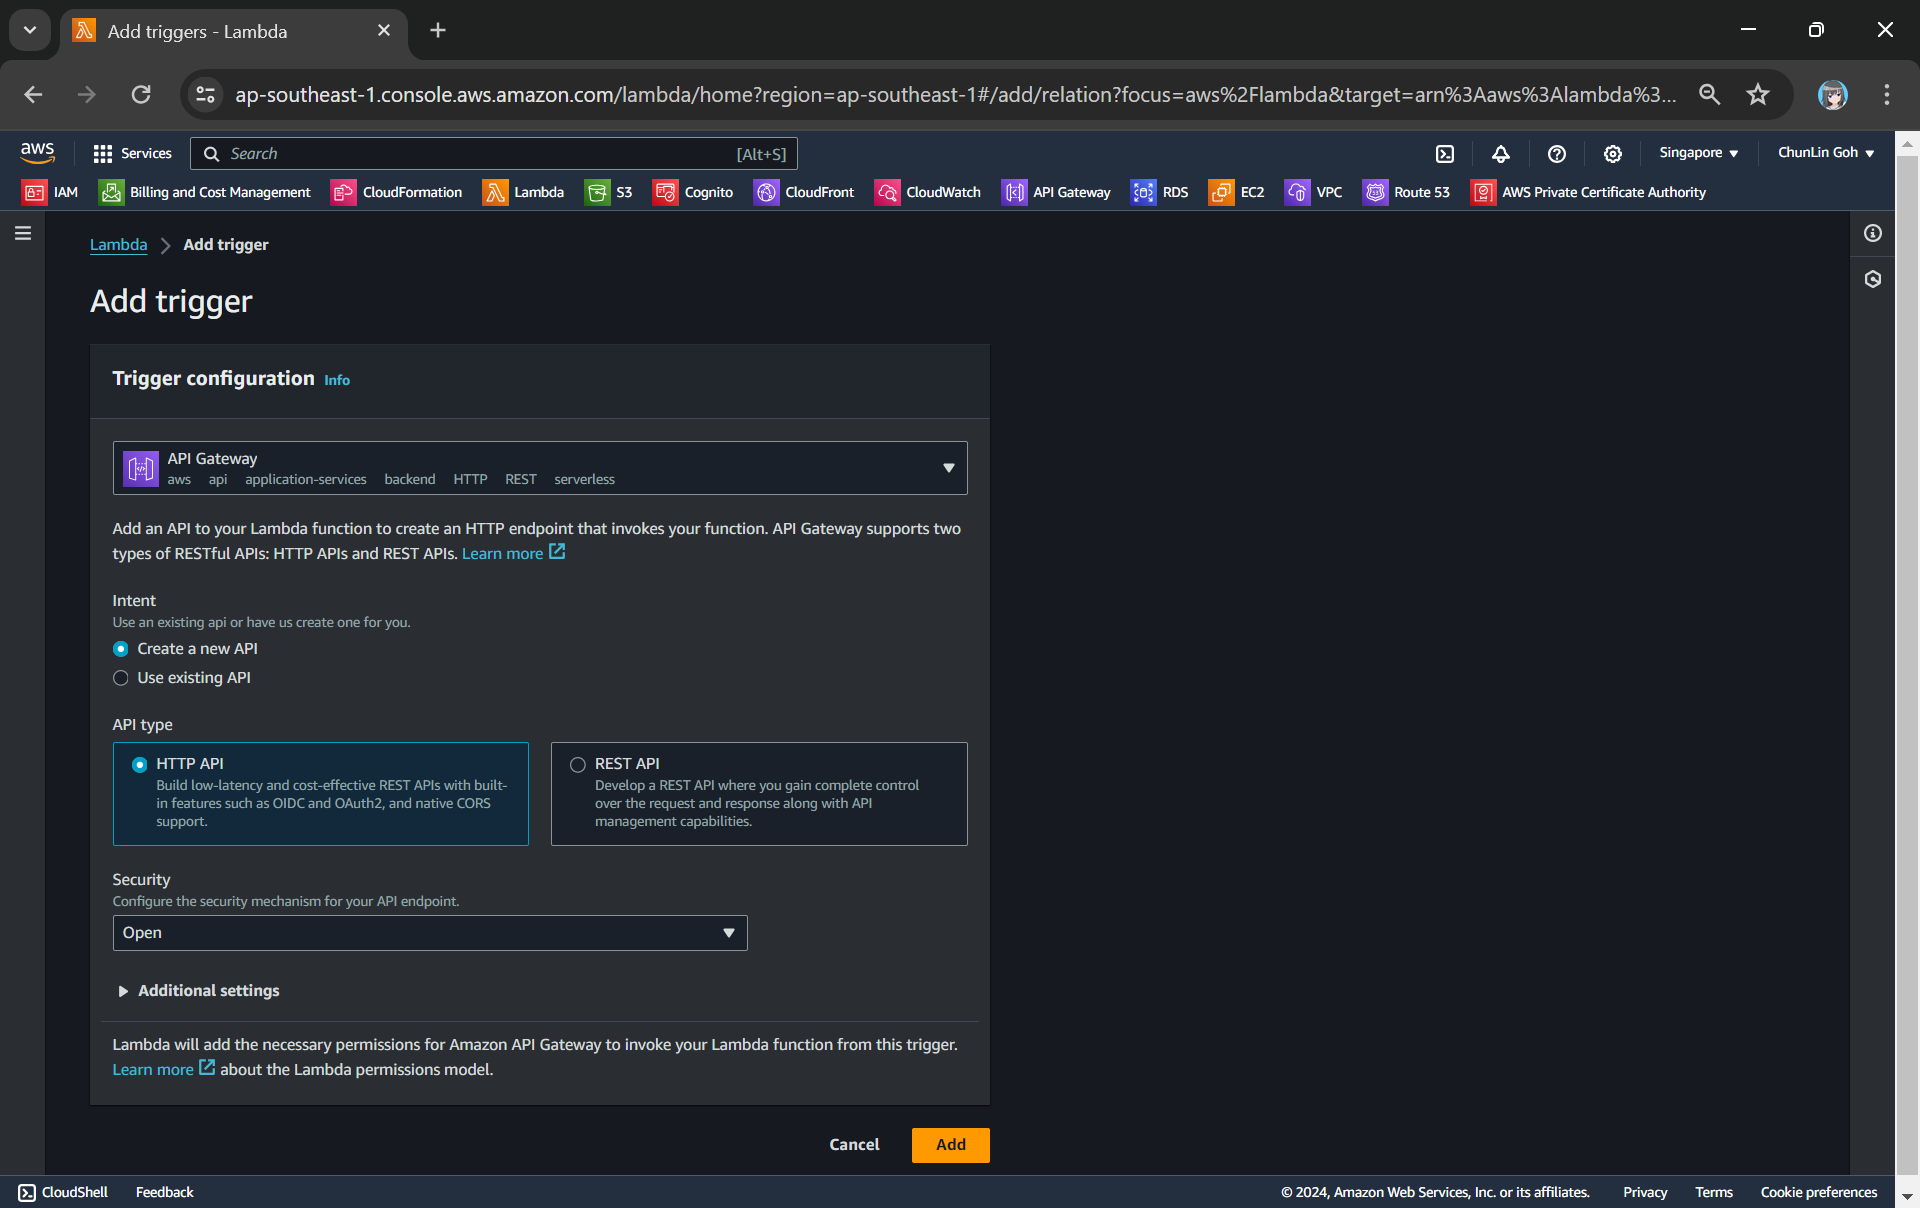
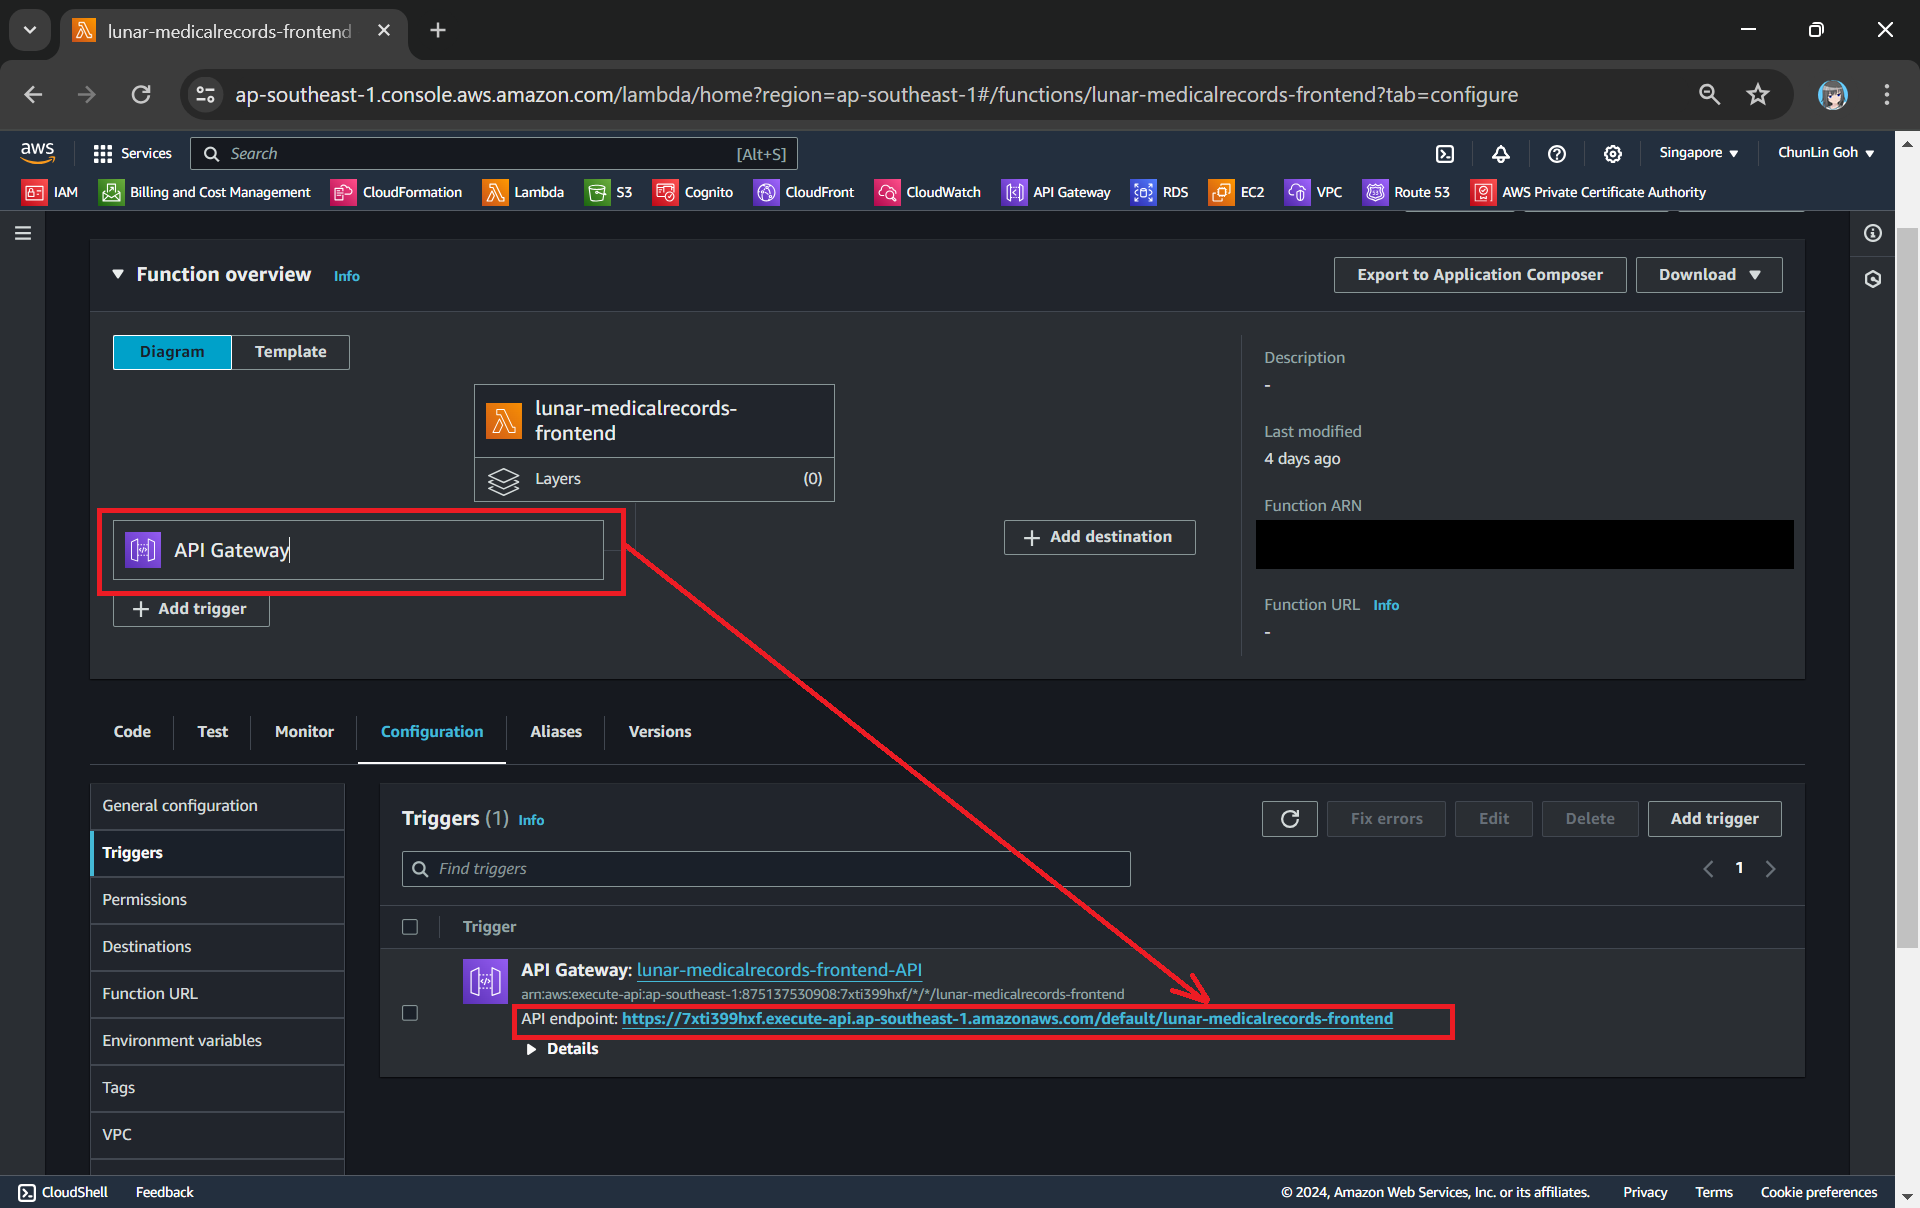
The API Gateway for the Lambda Function is created with HTTP API through the “Add Trigger” function (which is located at the Function overview page). For the Security field, we will be choosing “Open” for now. We will add the login functionality later.
Adding API Gateway as a trigger to our Lambda.
Once this is done, we will be provided an API Gateway endpoint, as shown in the screenshot below. Visiting the endpoint should be rendering the same web page listing the medical records as we have seen above.
Getting the API endpoint of the API Gateway.
Finally, for the Lambda Function permission, we only need to grand it the following.
s3:GetObject.
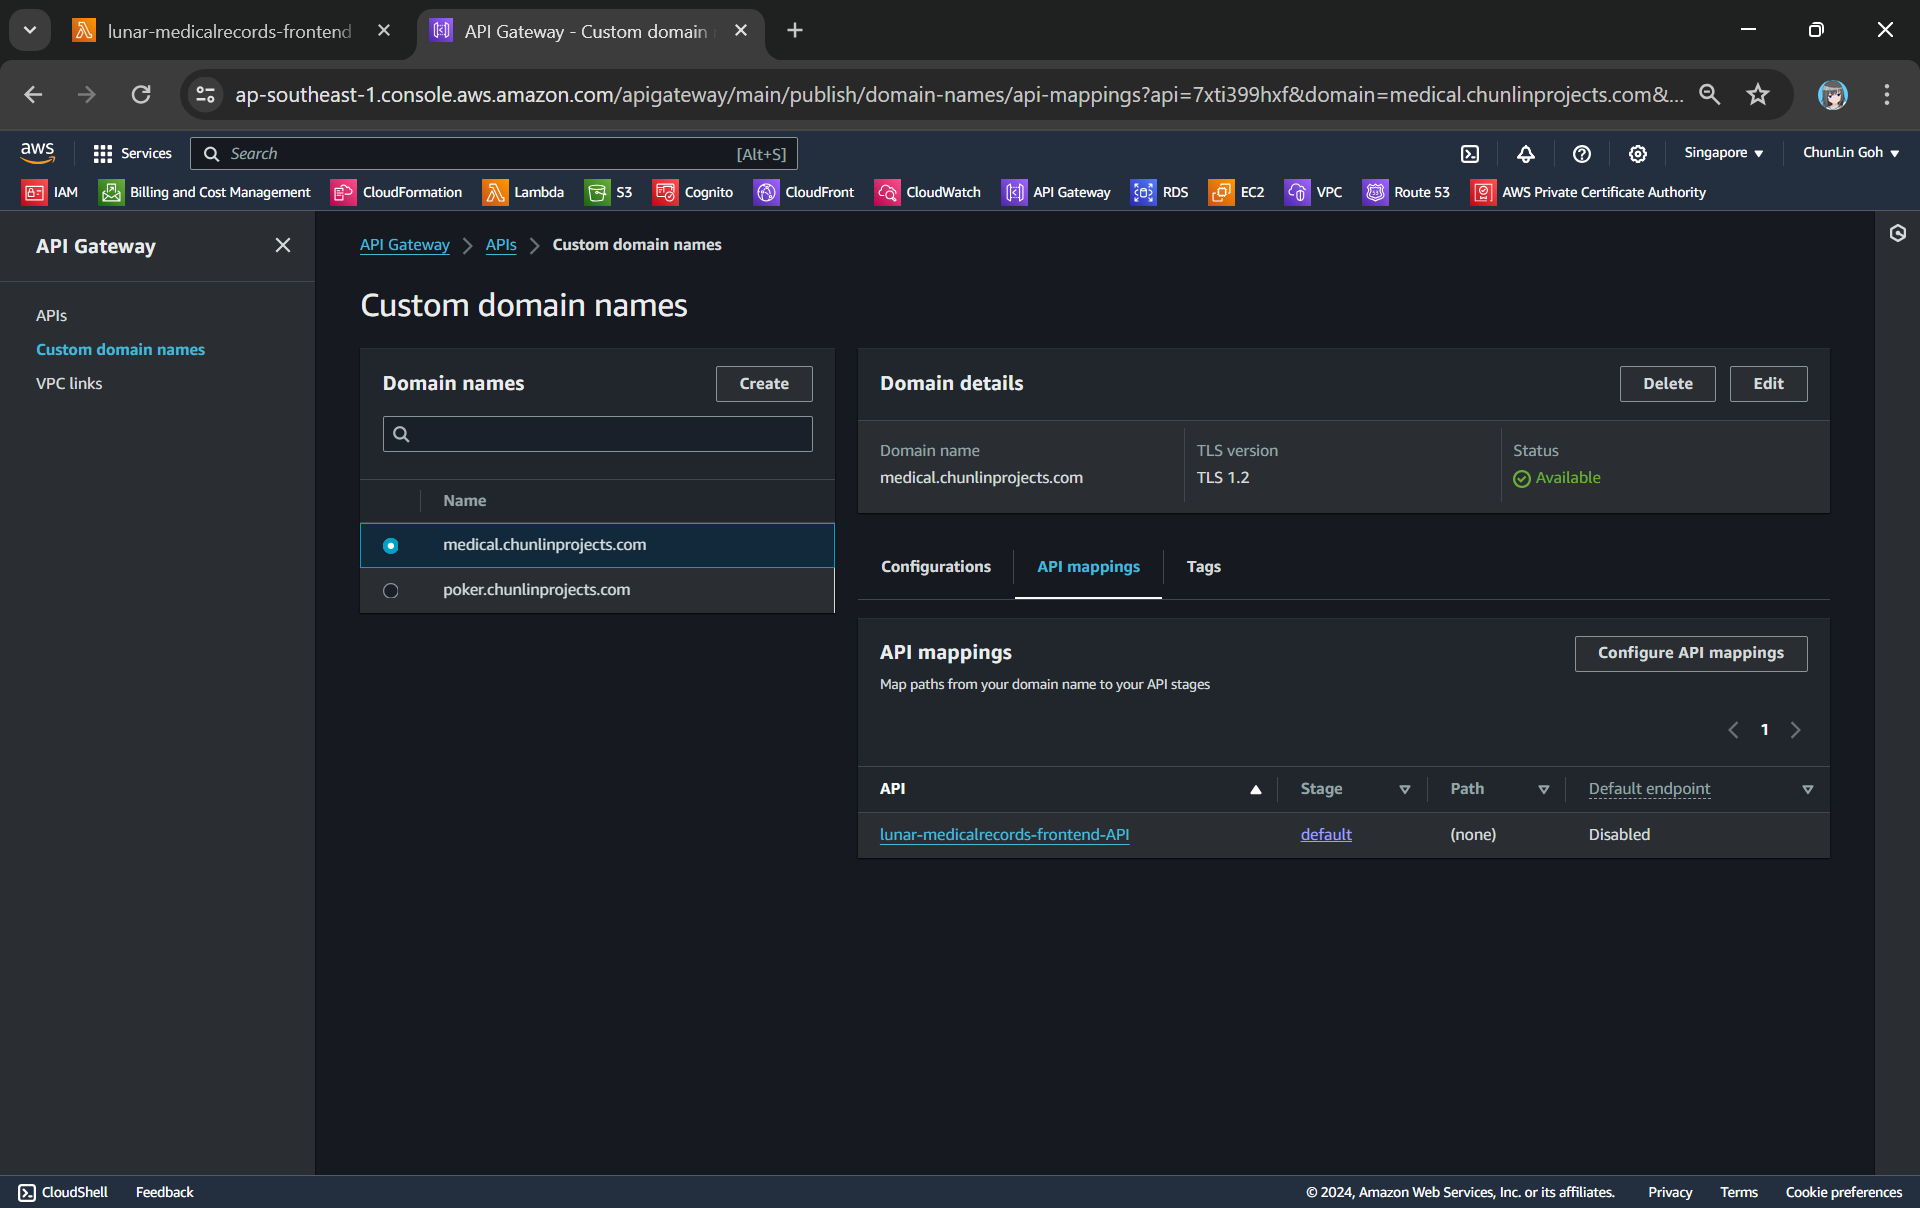
To make the API Gateway endpoint looks more user friendly, we can also introduce Custom Domain to the API Gateway, following the guide in one of our earlier posts.
Assigned medical.chunlinprojects.com to our API Gateway.
Protecting Data with Cognito
In order to ensure that only authenticated and authorised users can access their own medical records, we need to securely control access to our the app with the help from Amazon Cognito. Cognito is a service that enables us to add user sign-in and access control to our apps quickly and easily. Hence it helps authenticate and authorise users before they can access the medical records.
Step 1: Setup Amazon Cognito
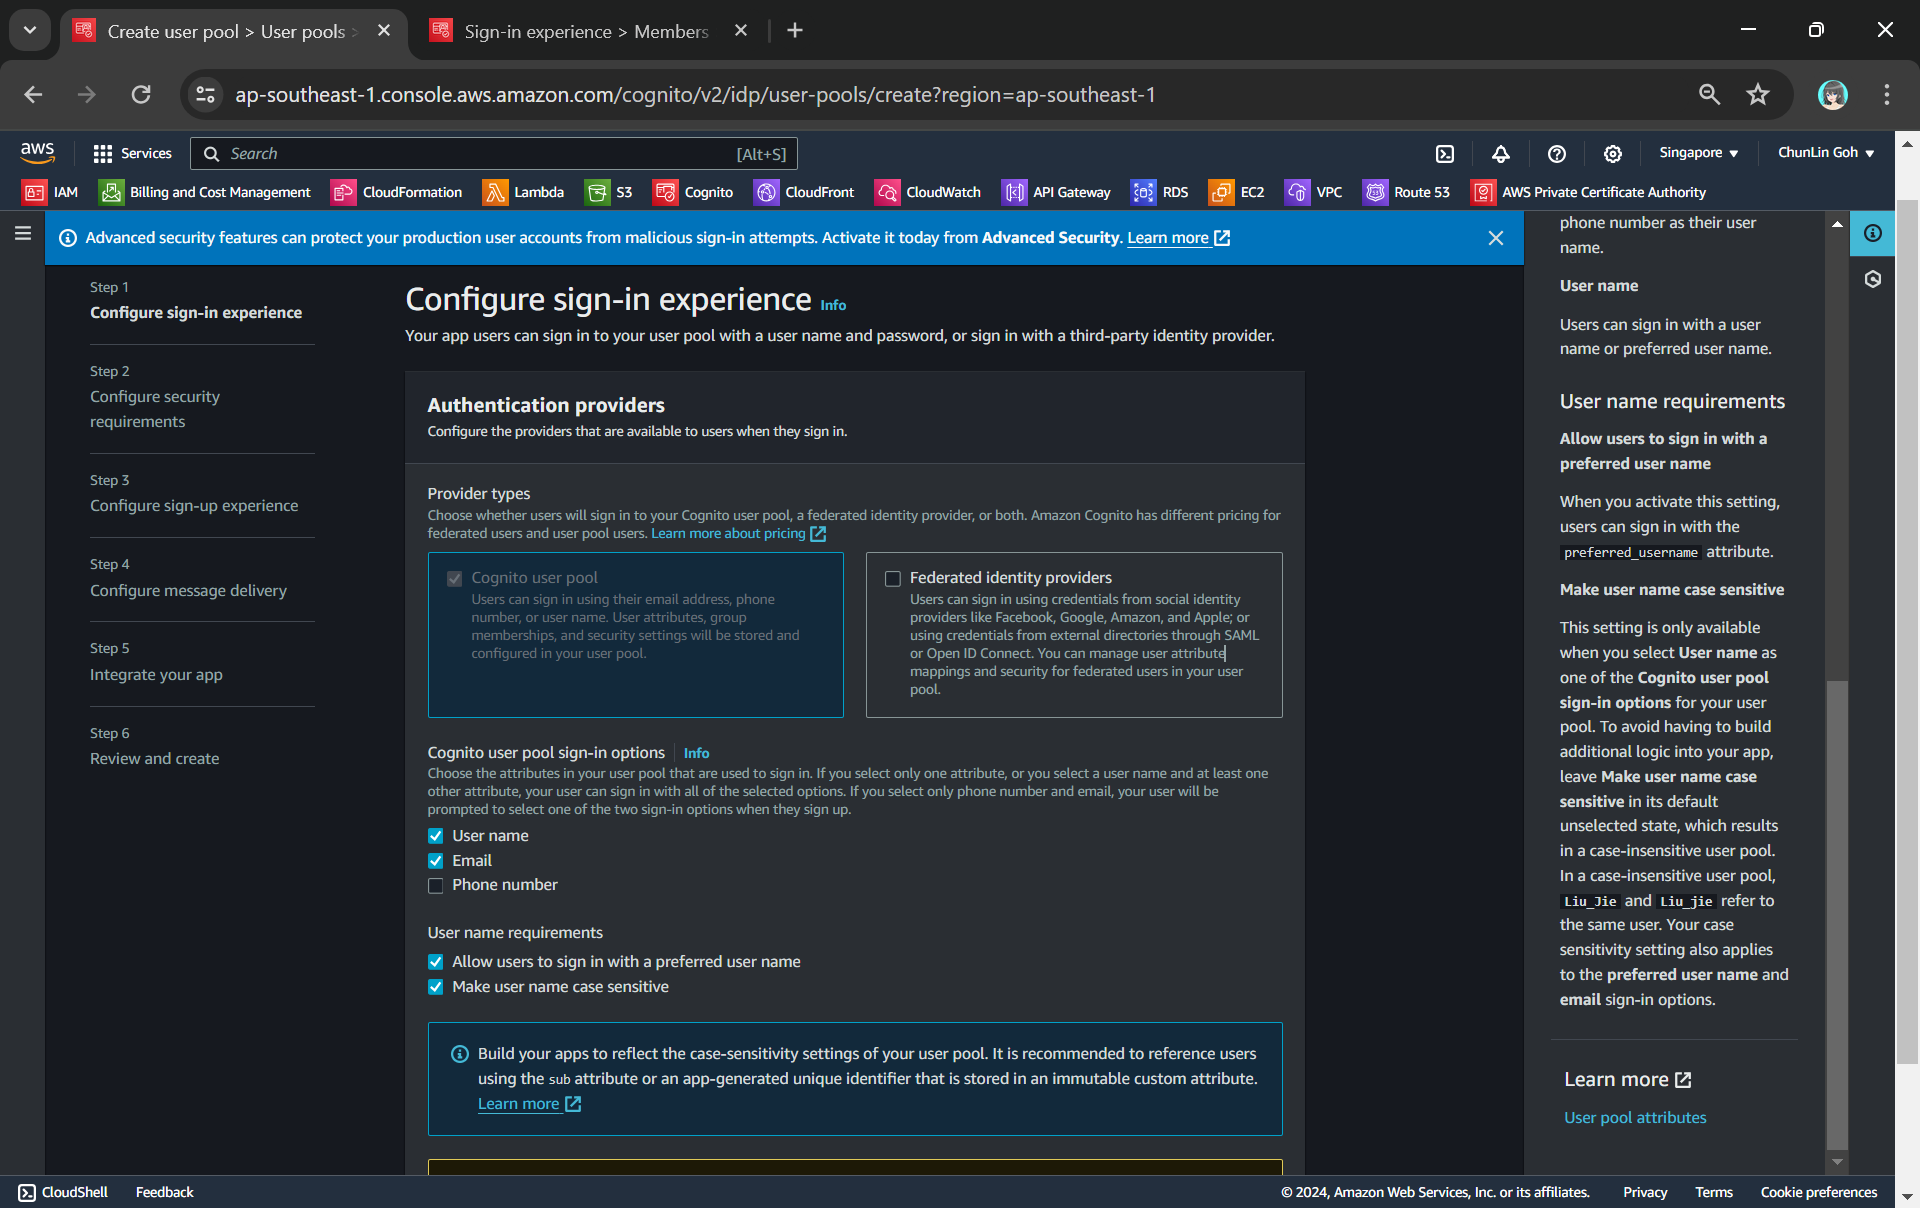
To setup Cognito, firstly, we need to configure the User Pool by specifying sign-in options. User pool is a managed user directory service that provides authentication and user management capabilities for our apps. It enables us to offload the complexity of user authentication and management to AWS.
Configuring sign-in options and user name requirements.
Please take note that Cognito user pool sign-in options cannot be changed after the user pool has been created. Hence, kindly think carefully during the configuration.
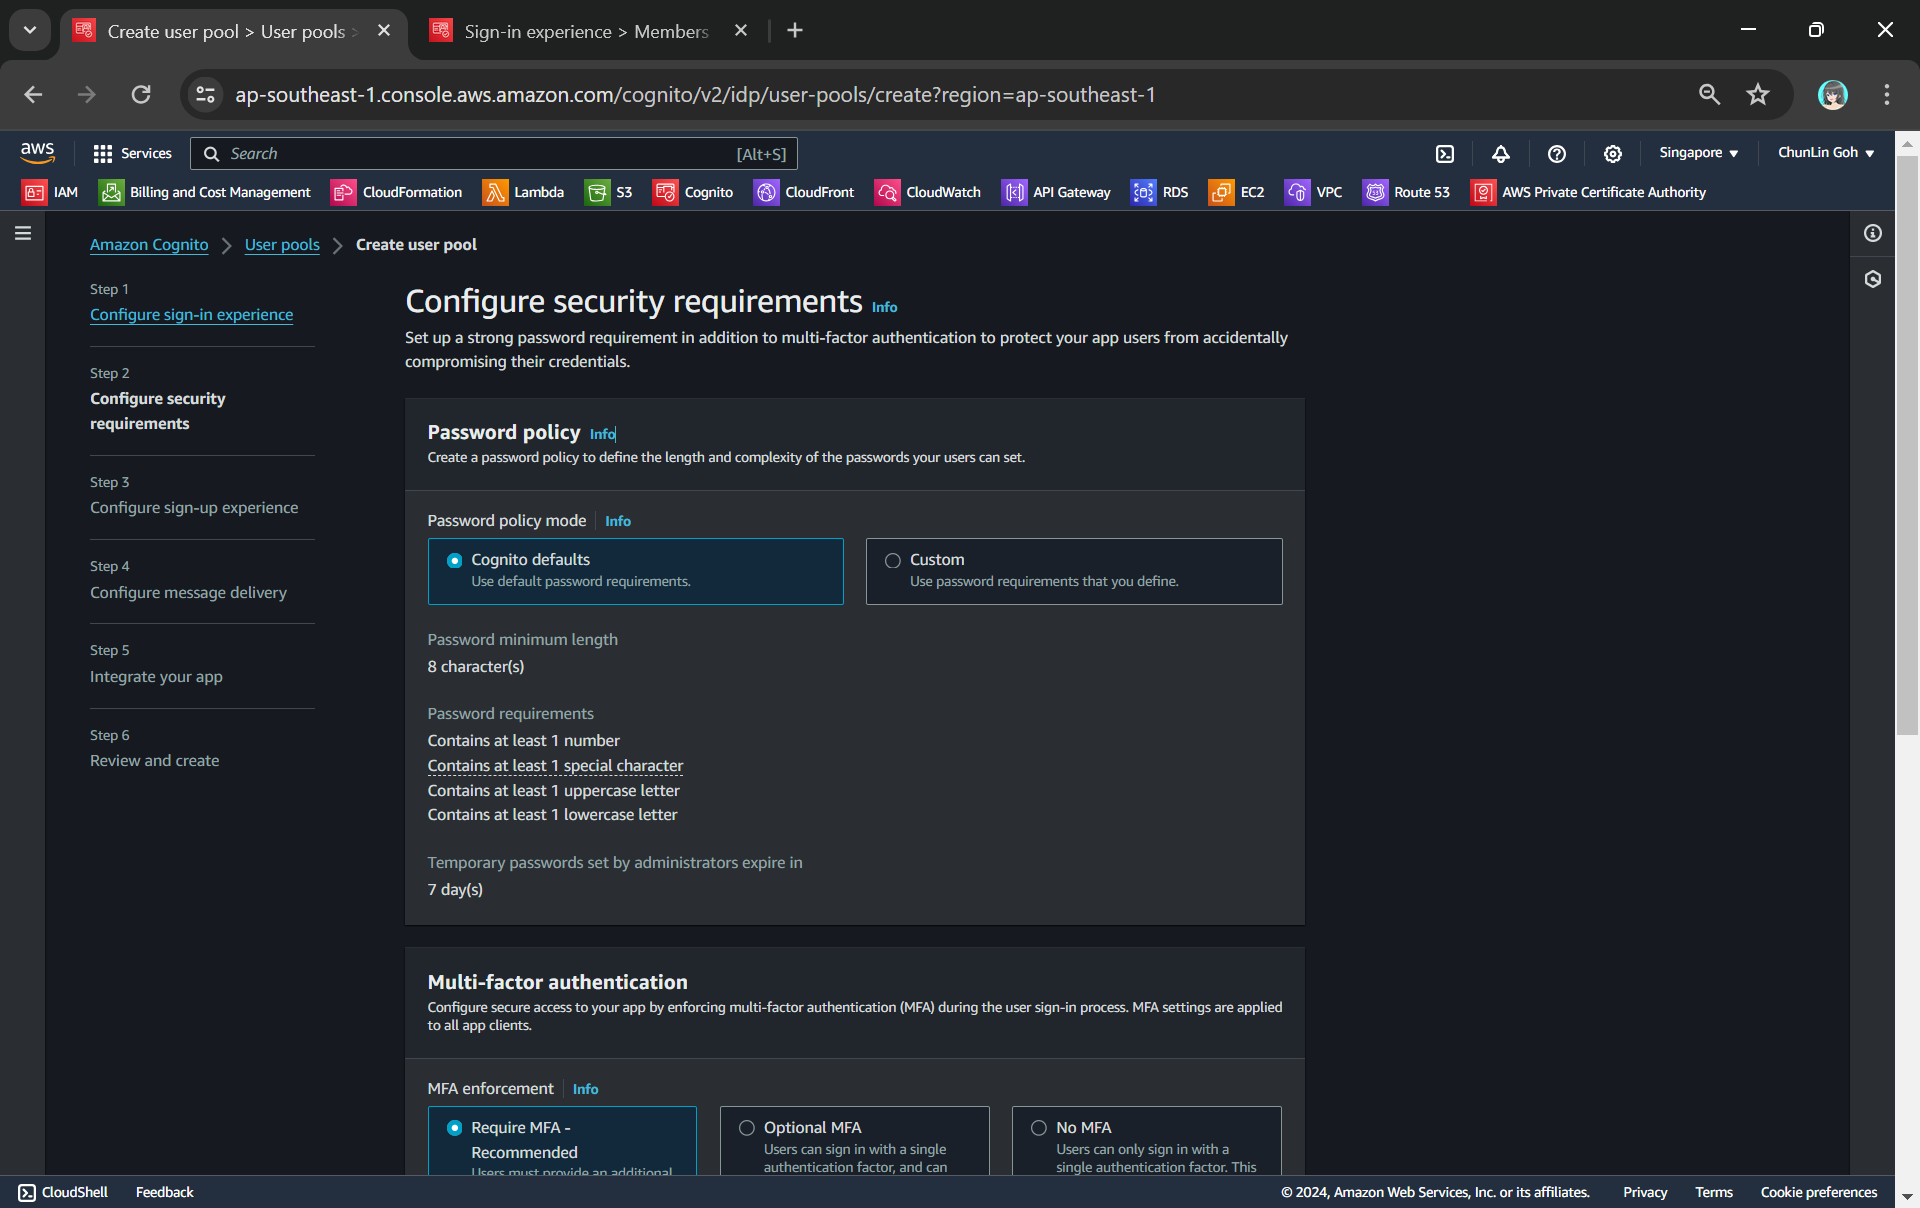
Configuring password policy.
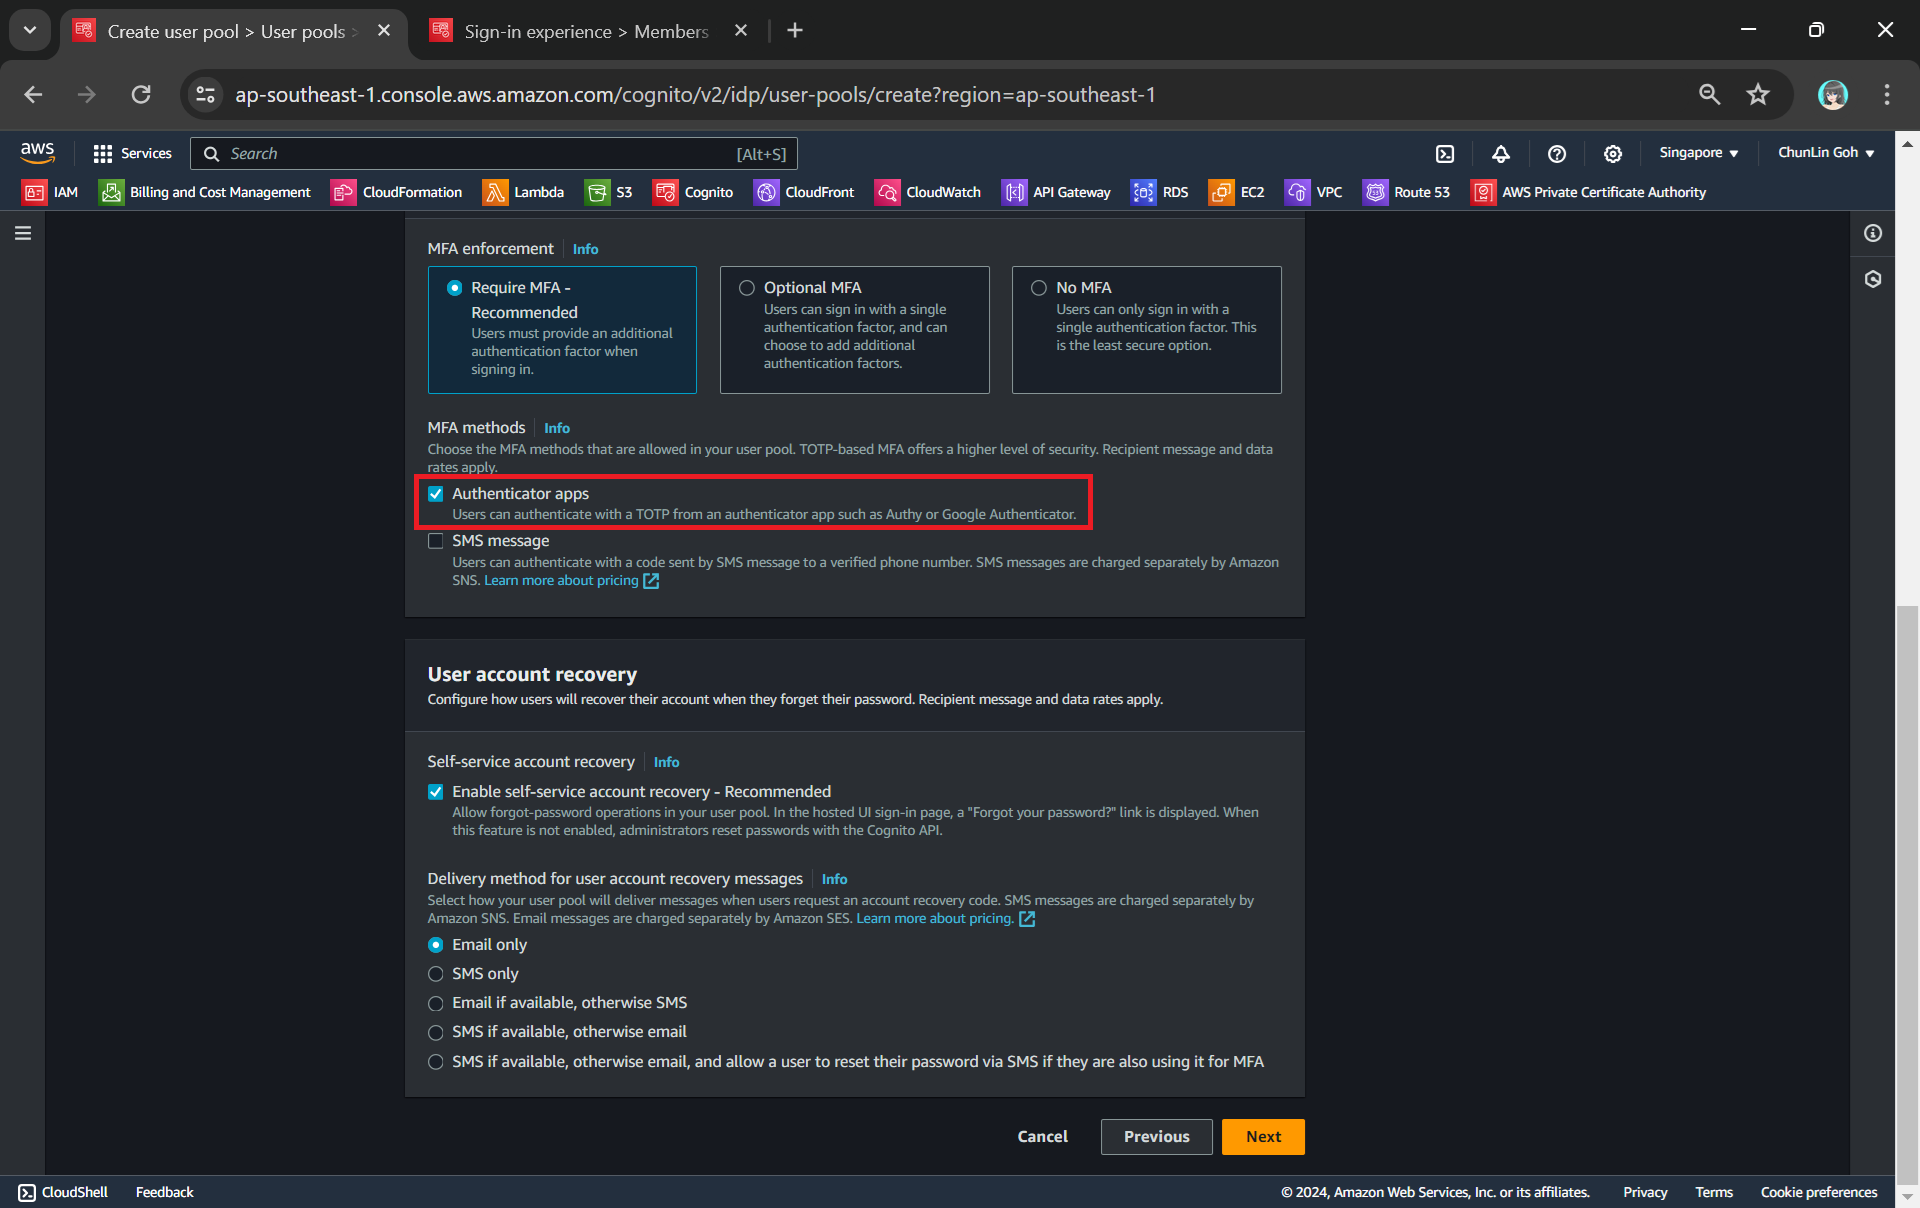
Secondly, we need to configure password policy and choose whether to enable Multi-Factor Authentication (MFA).
By default, Cognito comes with a password policy that ensures our users maintain a password with a minimum length and complexity. For password reset, it will also generate a temporary password to the user which will expire in 7 days, by default.
MFA adds an extra layer of security to the authentication process by requiring users to provide additional verification factors to gain access to their accounts. This reduces the risk of unauthorised access due to compromised passwords.
Enabling MFA in our Cognito user pool.
As shown in the screenshot above, one of the methods is called TOTP. TOTP stands for Time-Based One-Time Password. It is a form of multi-factor authentication (MFA) where a temporary passcode is generated by the authenticator app, adding a layer of security beyond the typical username and password.
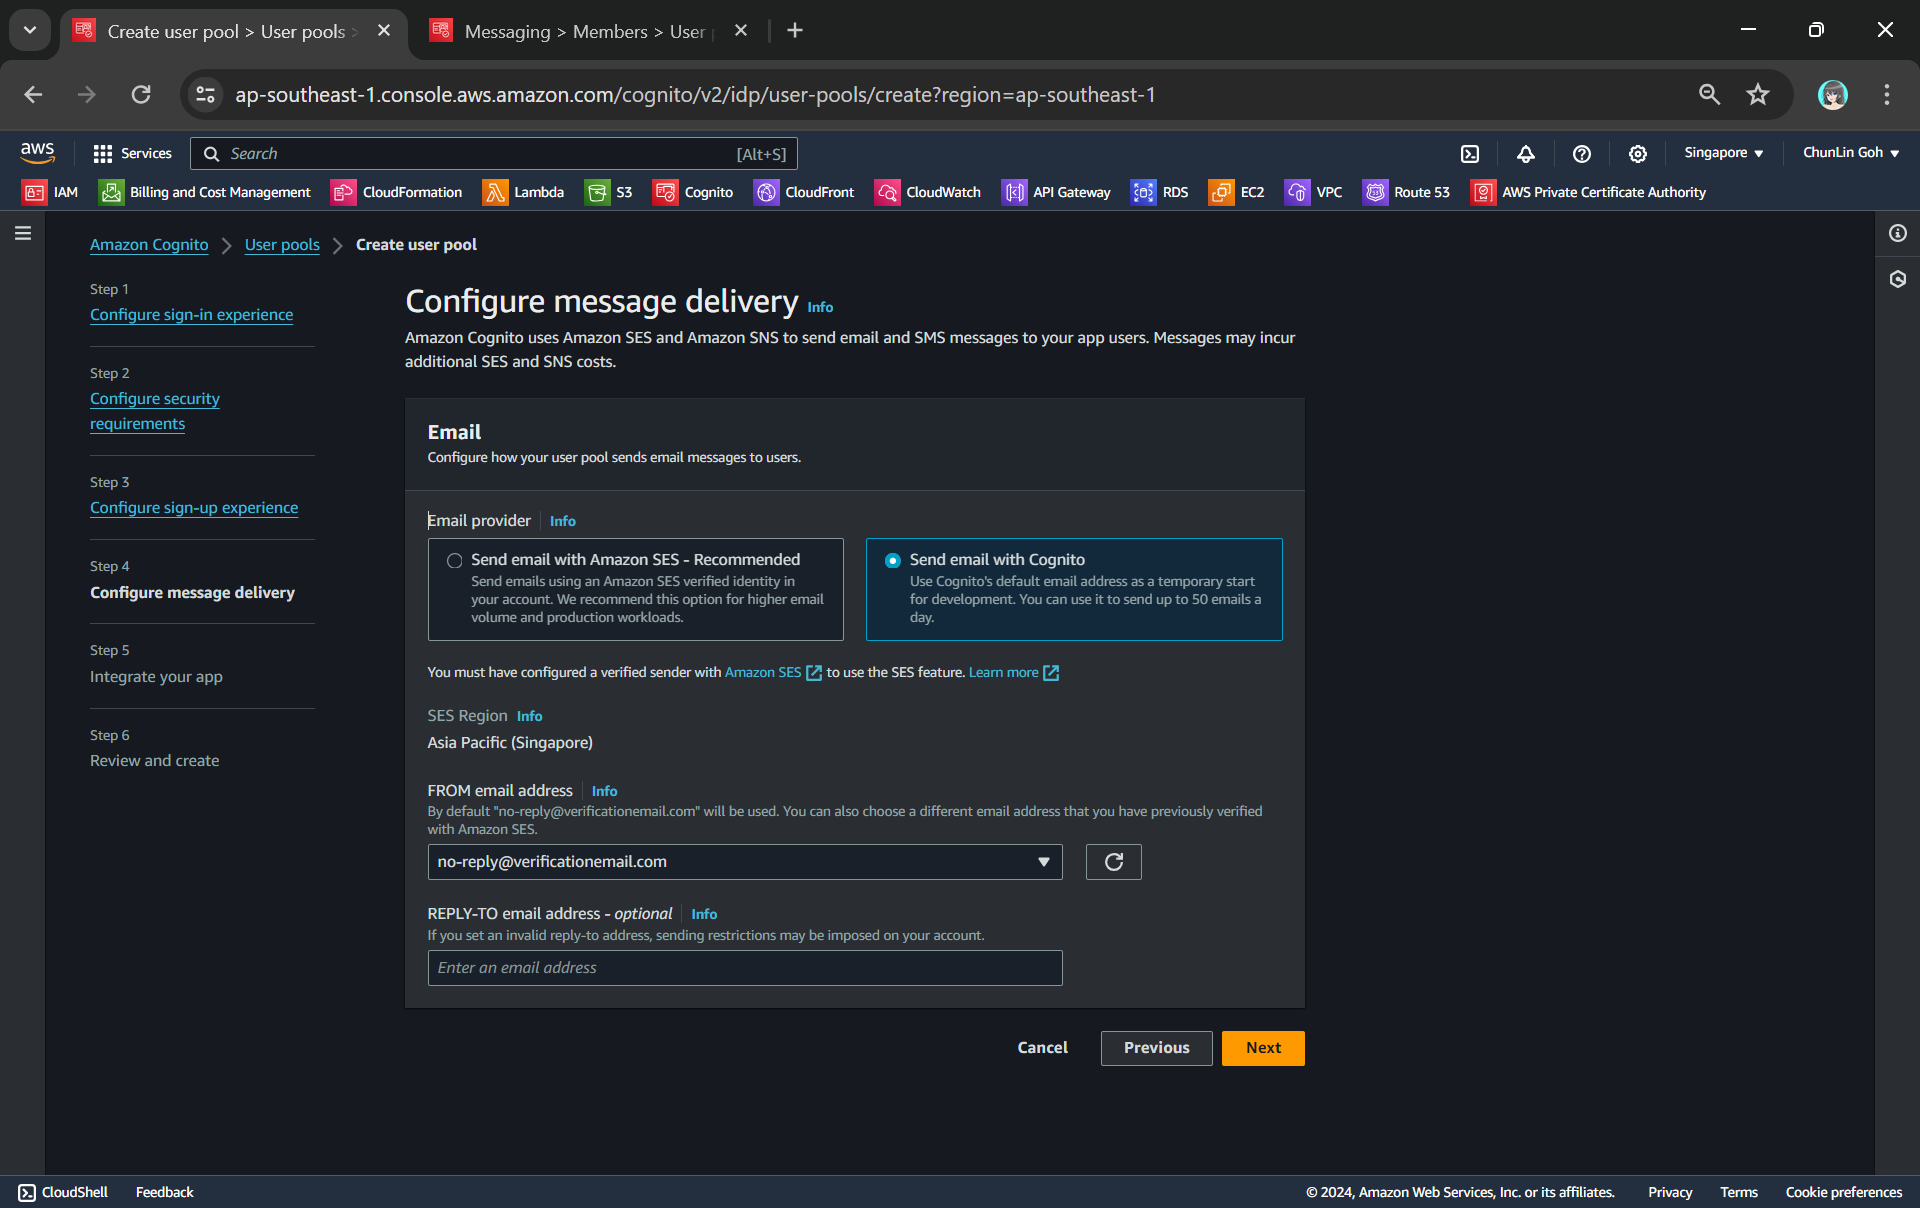
Thirdly, we will be configuring Cognito to allow user account recovery as well as new user registration. Both of these by default require email delivery. For example, when users request an account recovery code, an email with the code should be sent to the user. Also, when there is a new user signing up, there should be emails sent to verify and confirm the new account of the user. So, how do we handle the email delivery?
We can choose to send email with Cognito in our development environment.
Ideally, we should be setting up another service known as Amazon SES (Simple Email Service), an email sending service provided by AWS, to deliver the emails. However, for testing purpose, we can choose to use Cognito default email address as well. This approach is normally only suitable for development purpose because we can only use it to send up to 50 emails a day.
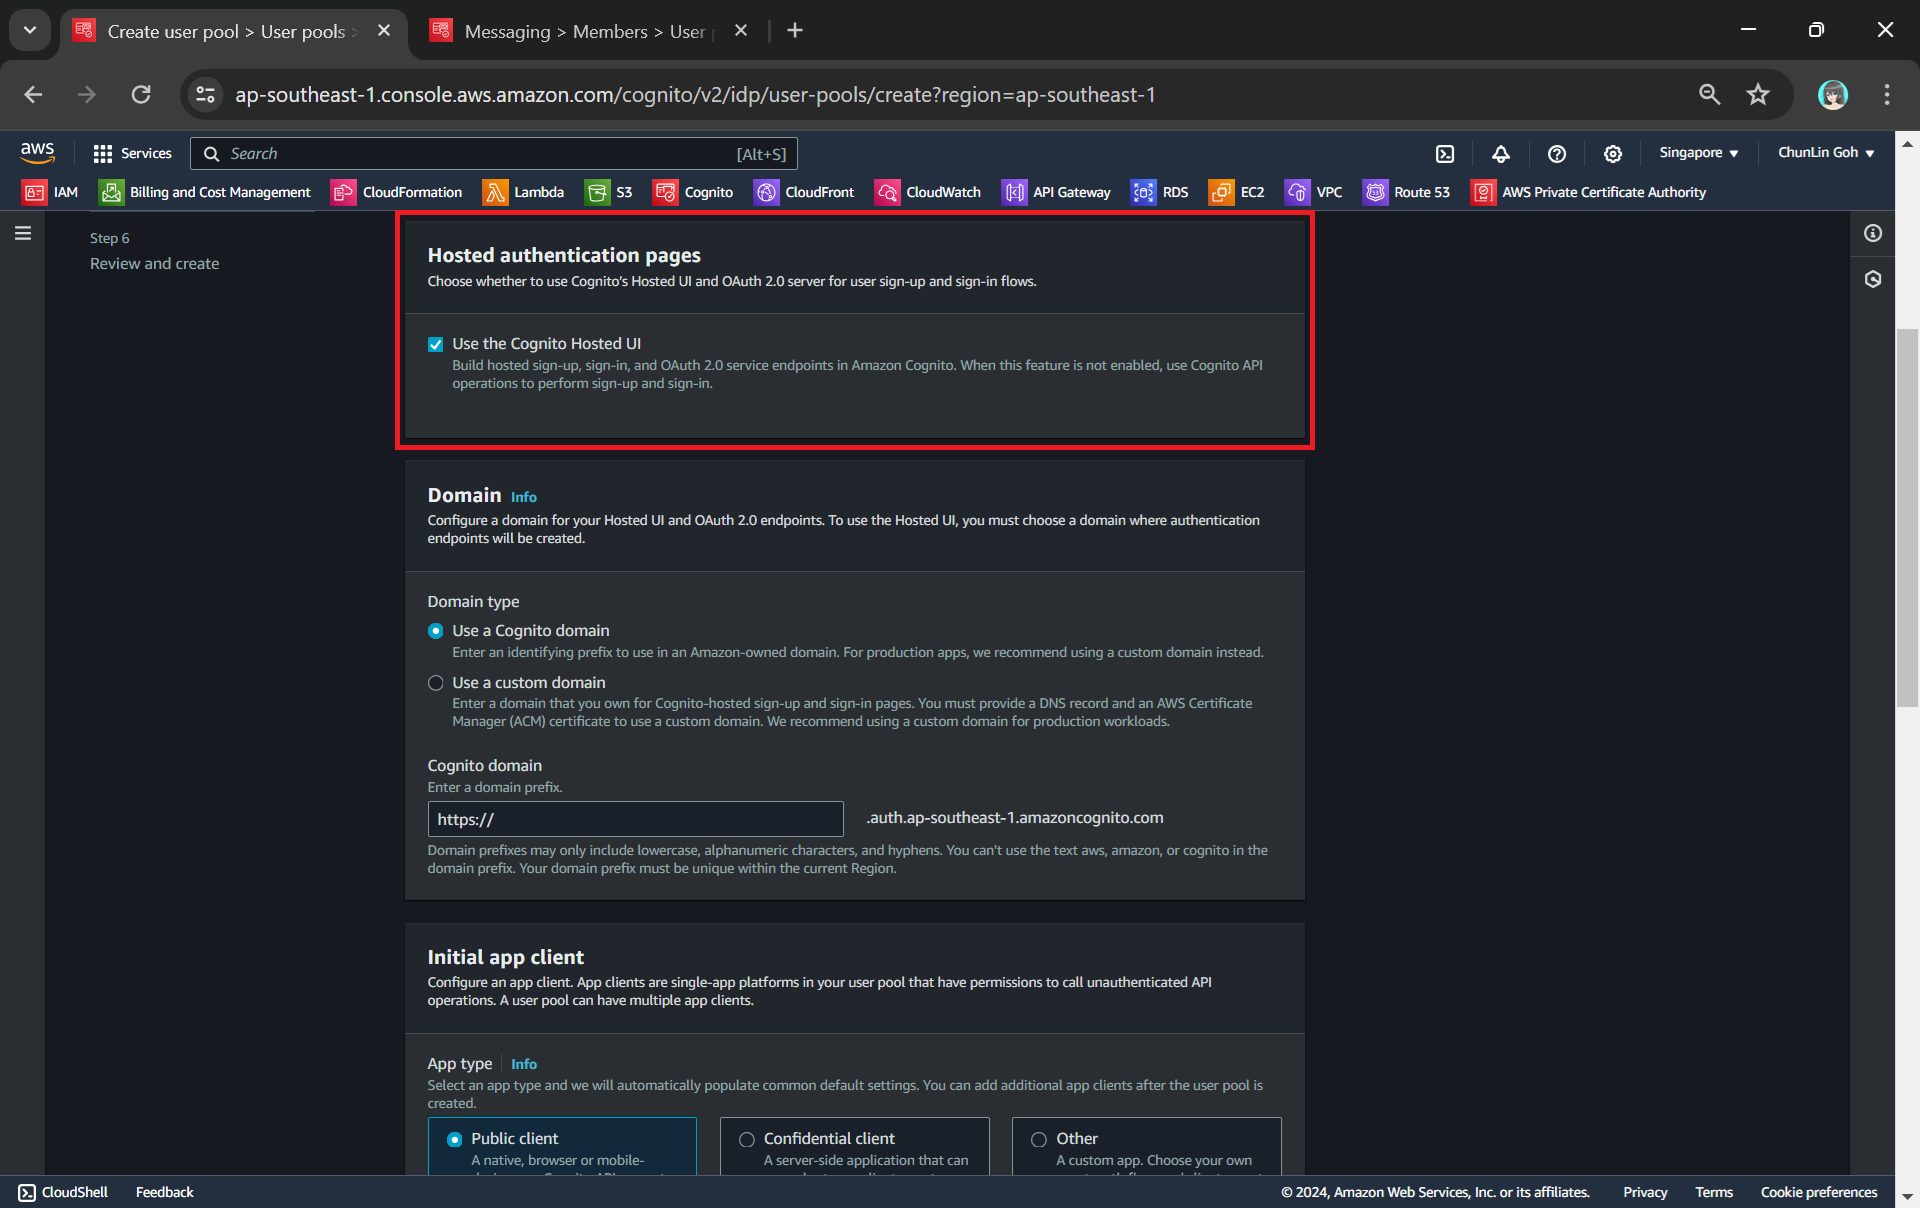
Finally, we will be using the hosted authentication pages for user sign-in and sign-up, as demonstrated below.
Using hosted UI so that we can have a simple frontend ready for sign-in and sign-up.
Step 2: Register Our Web App in Cognito
To integrate our app with Cognito, we still need to setup the app client. An App Client is a configuration entity that allows our app to interact with the user pool. It is essentially an application-specific configuration that defines how users will authenticate and interact with our user pool. For example, we have setup a new app client for our medical records app as shown in the following screenshot.
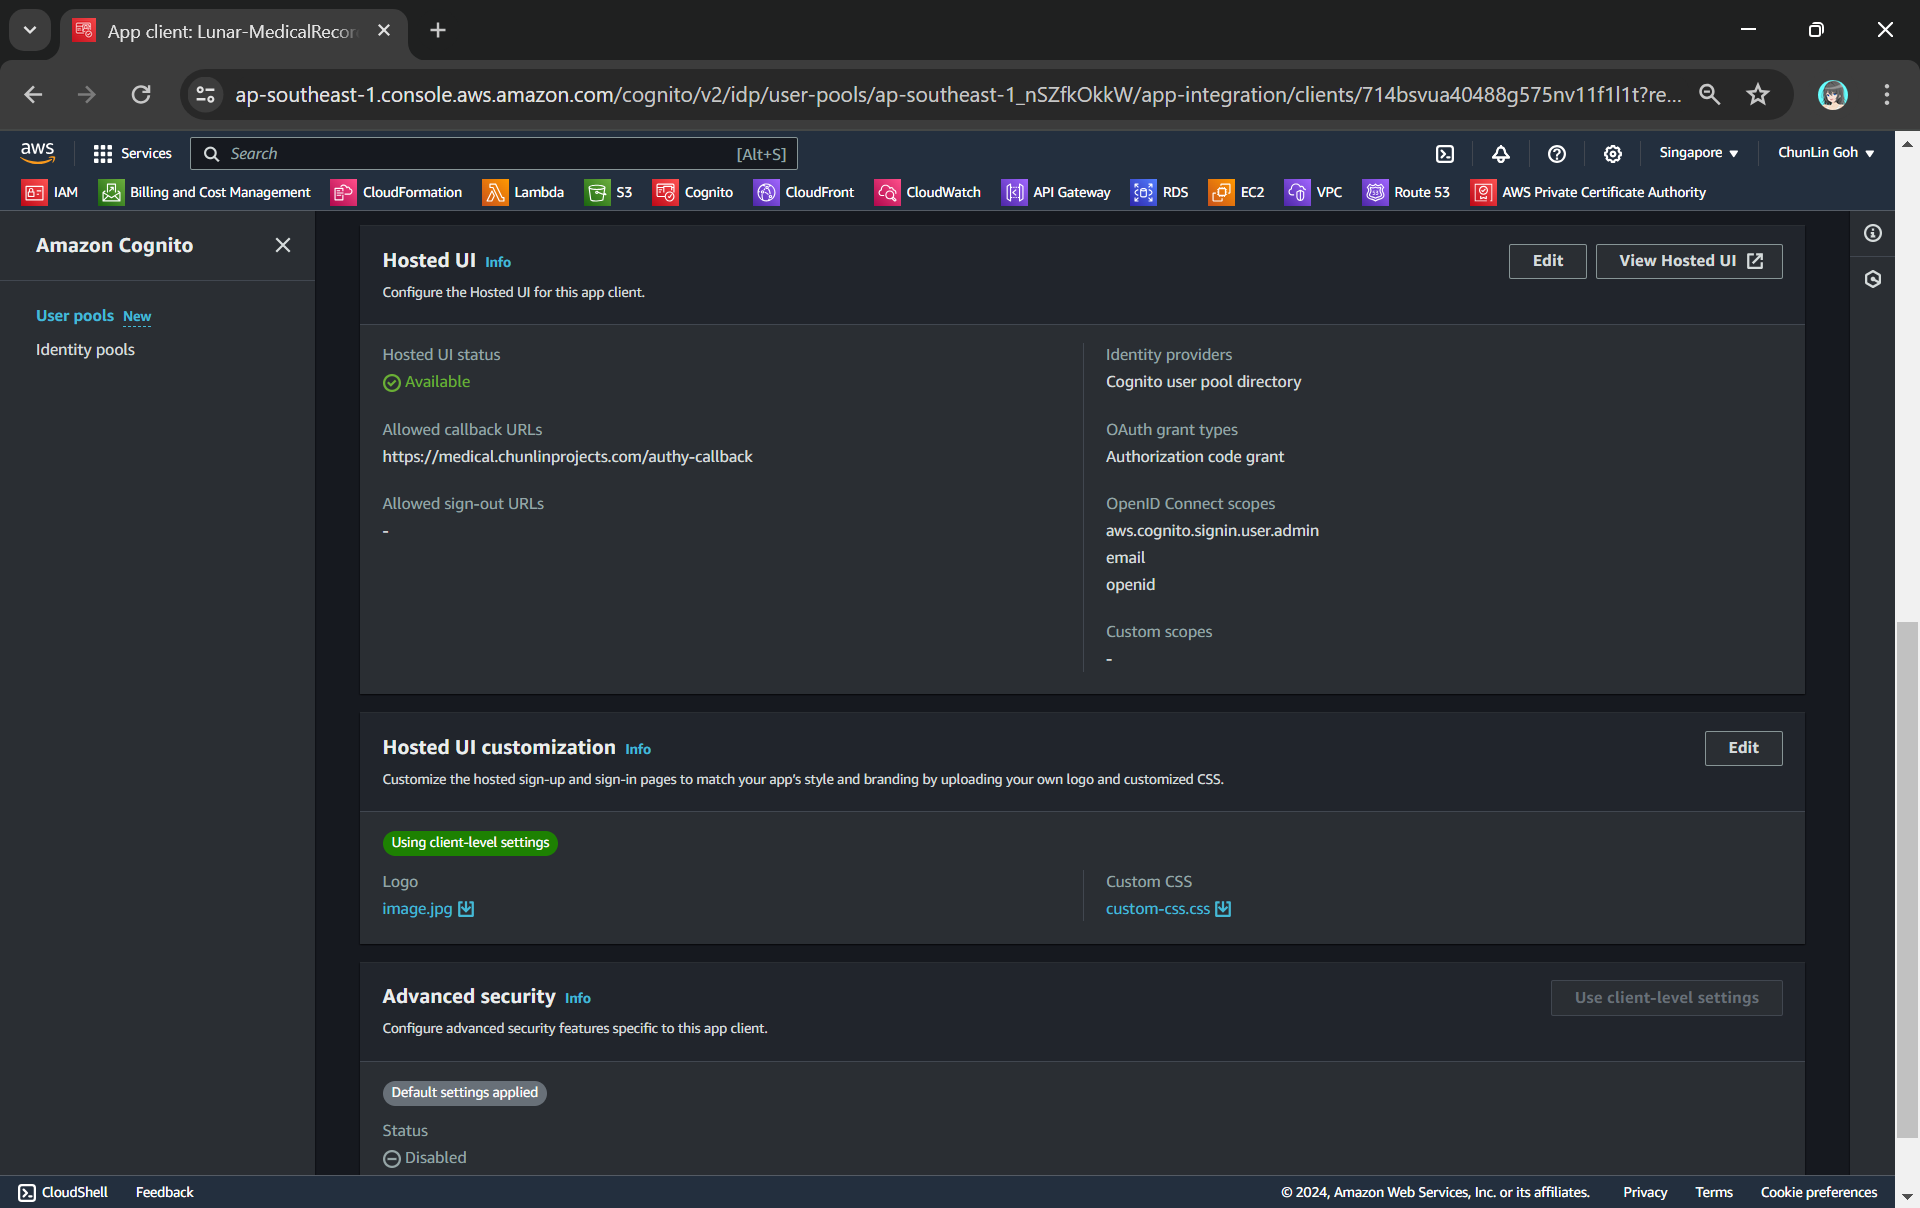
We customise the hosetd UI with our logo and CSS.
As shown in the screenshot above, we are able to to specify customisation settings for the built-in hosted UI experience. Please take note that we are only able to customise the look-and-feel of the default “login box”, so we cannot modify the layout of the entire hosted UI web page, as demonstrated below.
The part with gray background cannot be customised with the CSS.
In the setup of the app client above, we have configured the callback URL to /authy-callback. So where does this lead to? It actually points to a new Lambda function which is in charge of the authentication.
Step 3: Retrieve Access Token from Cognito Token Endpoint
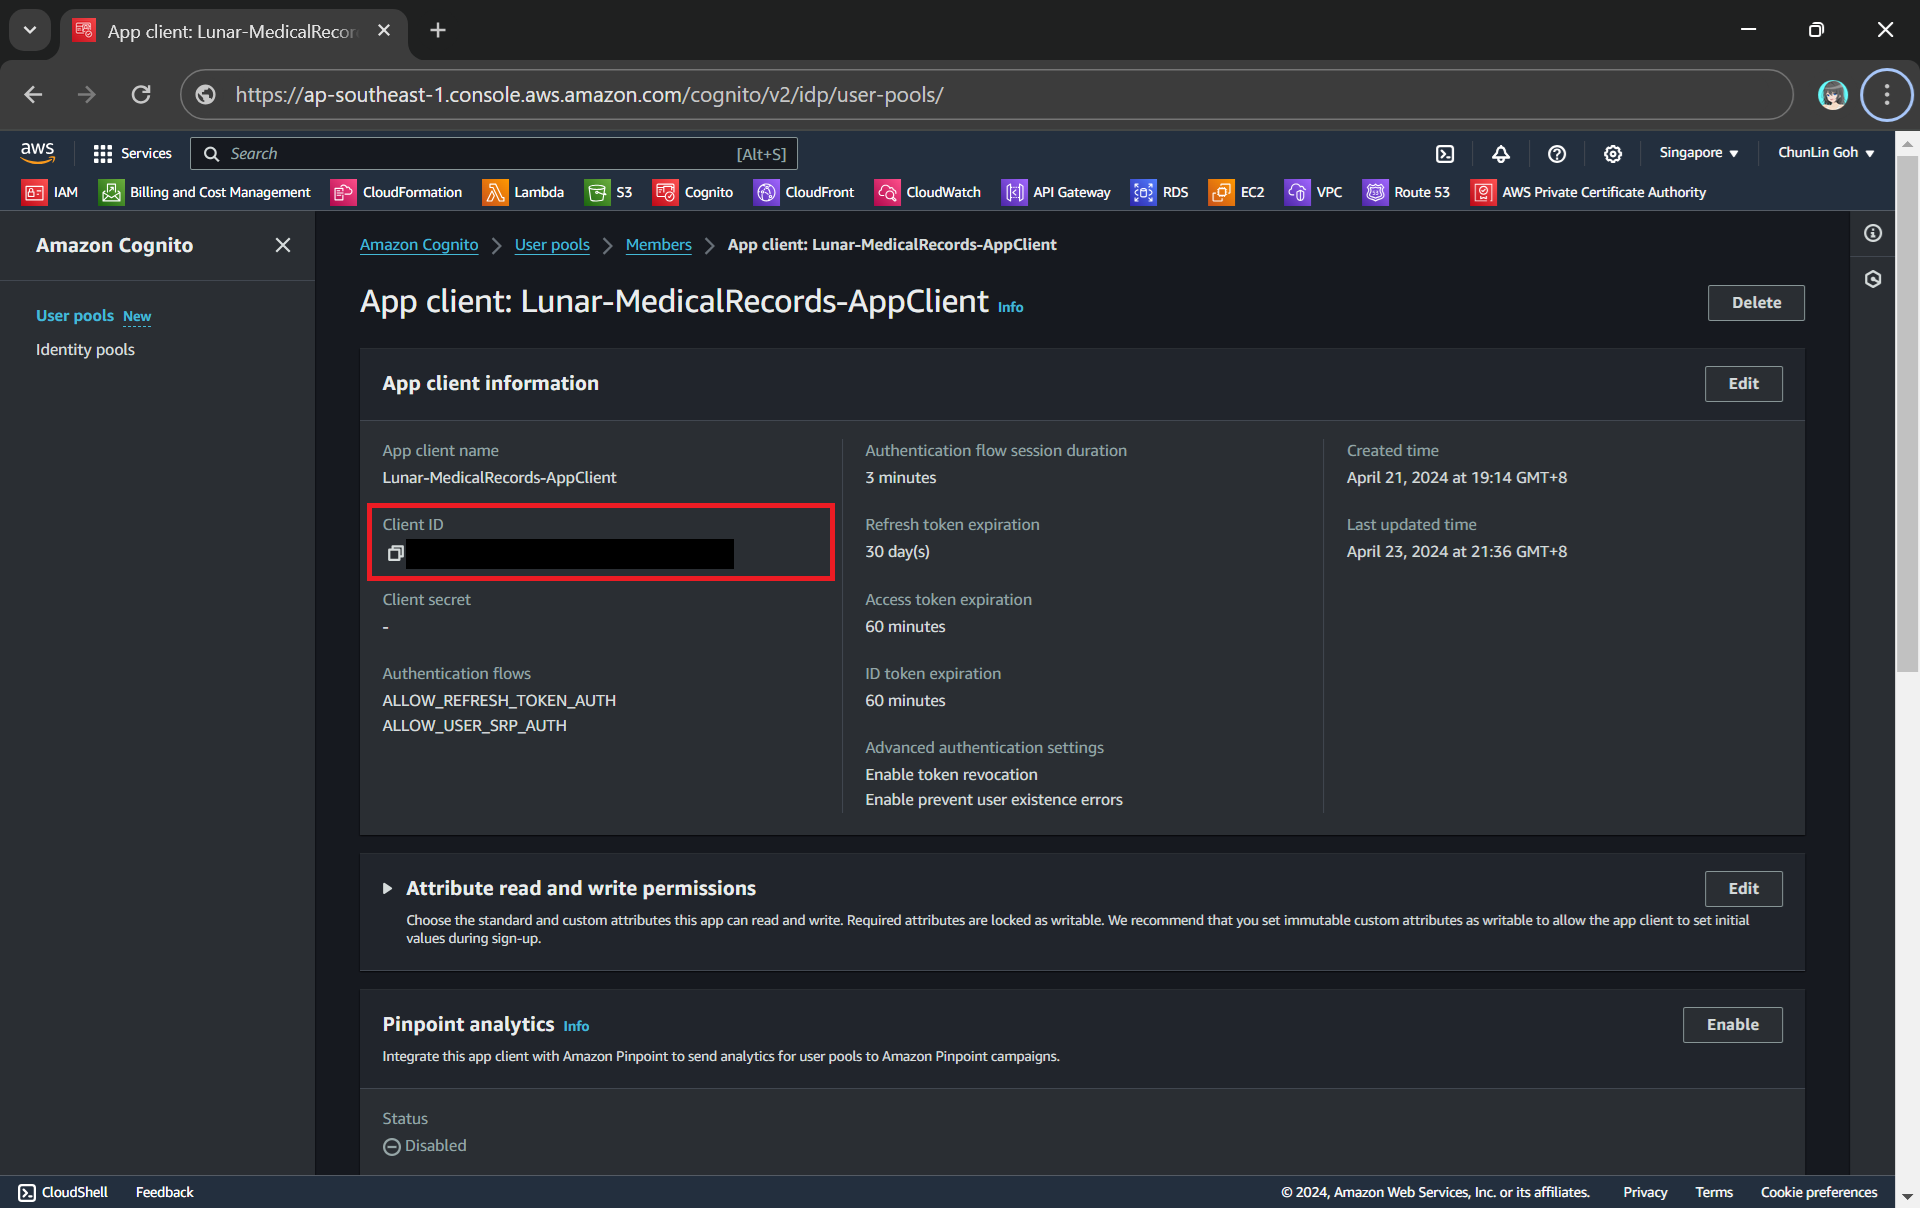
Here, Cognito uses the OAuth 2.0 authorization code grant flow. Hence, after successful authentication, Cognito redirects the user back to the specified callback URL with an authorisation code included in the query string with the name code. Our authentication Lambda function thus needs to makes a back-end request to the Cognito token endpoint, including the authorisation code, client ID, and redirect URI to exchange the authorisation code for an access token, refresh token, and ID token.
Client ID can be found under the “App client information” section.
token_url = "https://lunar-corewebsite.auth.ap-southeast-1.amazoncognito.com/oauth2/token" client_id = "<client ID to be found in AWS Console>" callback_url = "https://medical.chunlinprojects.com/authy-callback"
A successful response from the token endpoint typically is a JSON object which includes:
access_token: Used to access protected resources;
id_token: Contains identity information about the user;
refresh_token: Used to obtain new access tokens;
expires_in: Lifetime of the access token in seconds.
Hence we can retrieve the medical records if there is an access_token but return an “HTTP 401 Unauthorized” response if there is no access_token returned.
if 'access_token' not in tokens: return { 'statusCode': 401, 'body': get_401_web_content(), 'headers': { 'Content-Type': 'text/html' } }
The function get_401_web_content is responsible to retrieve a static web page showing 401 error message from the S3 bucket and return it to the frontend, as shown in the code below.
For the get_web_content function, we will be passing the access token to the Lambda that we developed earlier to retrieve the HTML content from the Object Lambda Access Point. As shown in the following code, we invoke the Lambda function synchronously and wait for the response.
In the Lambda function lunar-medicalrecords-frontend, we will no longer need to hardcode the object key as chunlin.json. Instead, we can just retrieve the user name from the Cognito using the access token, as highlighted in bold in the code below.
... import boto3
cognito_idp_client = boto3.client('cognito-idp')
def lambda_handler(event, context): if 'access_token' not in event: return { 'statusCode': 200, 'body': get_homepage_web_content(), 'headers': { 'Content-Type': 'text/html' } }
The get_homepage_web_content function above basically is to retrieve a static homepage from the S3 bucket. It is similar to how the get_401_web_content function above works.
The homepage comes with a Login button redirecting users to Hosted UI of our Cognito app client.
Step 5: Store Access Token in Cookies
We need to take note that the auth_code above in the OAuth 2.0 authorisation code grant flow can only be used once. This is because single-use auth_code prevents replay attacks where an attacker could intercept the authorisation code and try to use it multiple times to obtain tokens. Hence, our implementation above will break if we refresh our web page after logging in.
To solve this issue, we will be saving the access token in a cookie when the user first signs in. After that, as long as we detect that there is a valid access token in the cookie, we will not use the auth_code.
In order to save an access token in a cookie, there are several important considerations to ensure security and proper functionality:
Set the Secure attribute to ensure the cookie is only sent over HTTPS connections. This helps protect the token from being intercepted during transmission;
Use the HttpOnly attribute to prevent client-side scripts from accessing the cookie. This helps mitigate the risk of cross-site scripting (XSS) attacks;
Set an appropriate expiration time for the cookie. Since access tokens typically have a short lifespan, ensure the cookie does not outlive the token’s validity.
Thus the code at Step 3 above can be improved as follows.
def lambda_handler(event, context): now = datetime.now(timezone.utc)
if 'cookies' in event: for cookie in event['cookies']: if cookie.startswith('access_token='): access_token = cookie.replace("access_token=", "") break
By default, Azure Storage already supports TLS 1.2 on public HTTPS endpoints. However, for some companies, they are still using TLS 1.0 or 1.1. Hence, to maintain their connections to Azure Storage, they have to update their OS and apps to support TLS 1.2.
About TLS
The history of TLS can be traced back to SSL.
SSL stands for “Secure Sockets Layer,” and it was developed by Netscape in the 1990s. SSL was one of the earliest cryptographic protocols developed to provide secure communication over a computer network.
SSL has been found to have several vulnerabilities over time, and these issues have led to its deprecation in favor of more secure protocols like TLS. In 2019, TLS 1.0 was introduced as an improvement over SSL. Nowadays, while the term “SSL” is still commonly used colloquially to refer to the broader category of secure protocols, it typically means TLS.
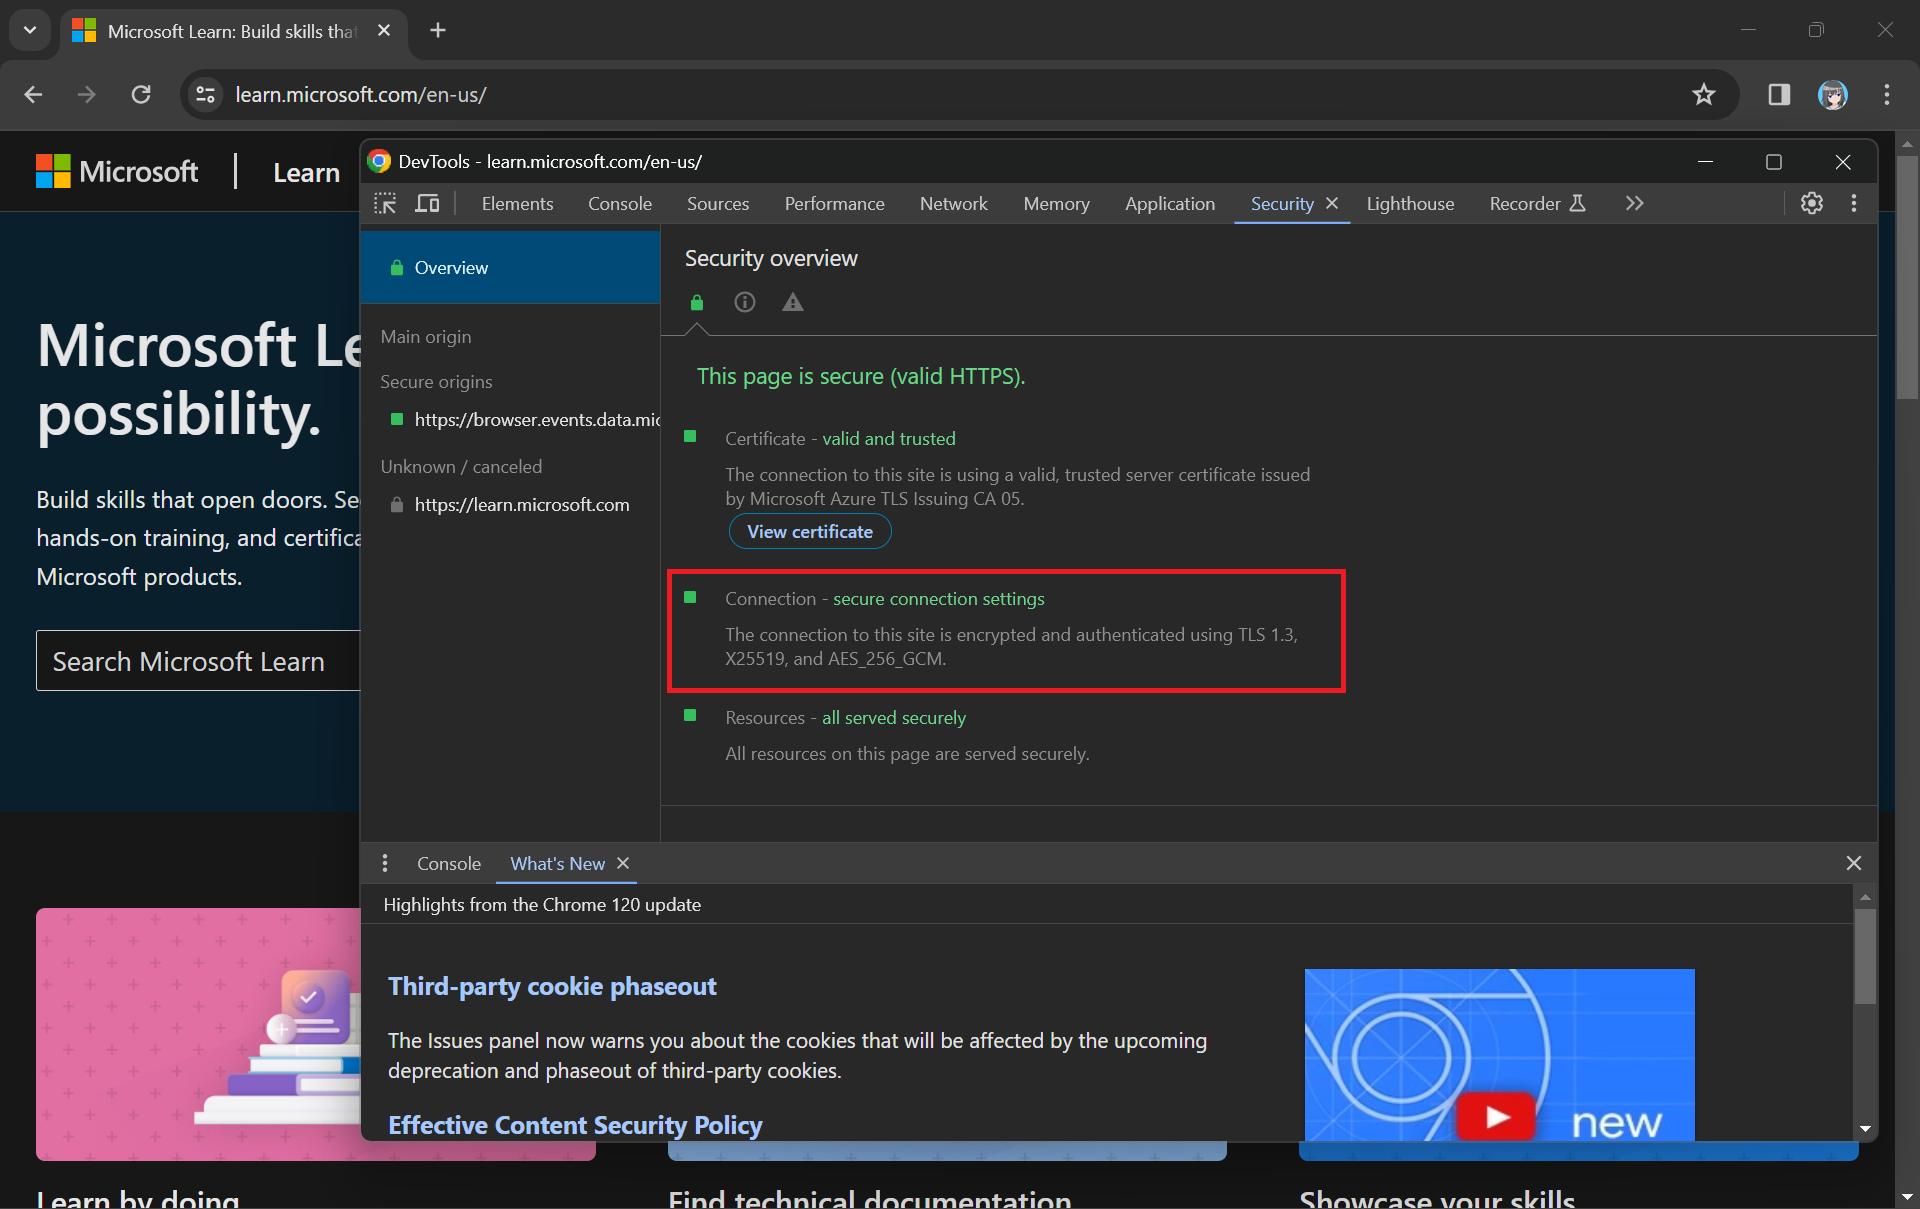
When we see “https://” in the URL and the padlock icon, it means that the website is using either TLS or SSL to encrypt the connection.
While TLS addressed some SSL vulnerabilities, it still had weaknesses, and over time, security researchers identified new threats and attacks. Subsequent versions of TLS, i.e. TLS 1.1, TLS 1.2, and TLS 1.3, were developed to further enhance security and address vulnerabilities.
Why TLS 1.2?
By the mid-2010s, it became increasingly clear that TLS 1.2 was a more secure choice, and we were encouraged to upgrade our systems to support it instead. TLS 1.2 introduced new and stronger cipher suites, including Advanced Encryption Standard (AES) cipher suites, providing better security compared to older algorithms.
Older TLS versions (1.0 and 1.1) are deprecated and removed to meet regulatory standards from NIST (National Institute of Standards and Technologies). (Photo Credit: R. Jacobson/NIST)
The coexistence of TLS 1.2 and TLS 1.3 is currently part of a transitional approach, allowing organisations to support older clients that may not yet have adopted TLS 1.3.
Before we enabling that, we should setup logging to make sure that our Azure policy is working as intended. Here, we will be using Azure Monitor.
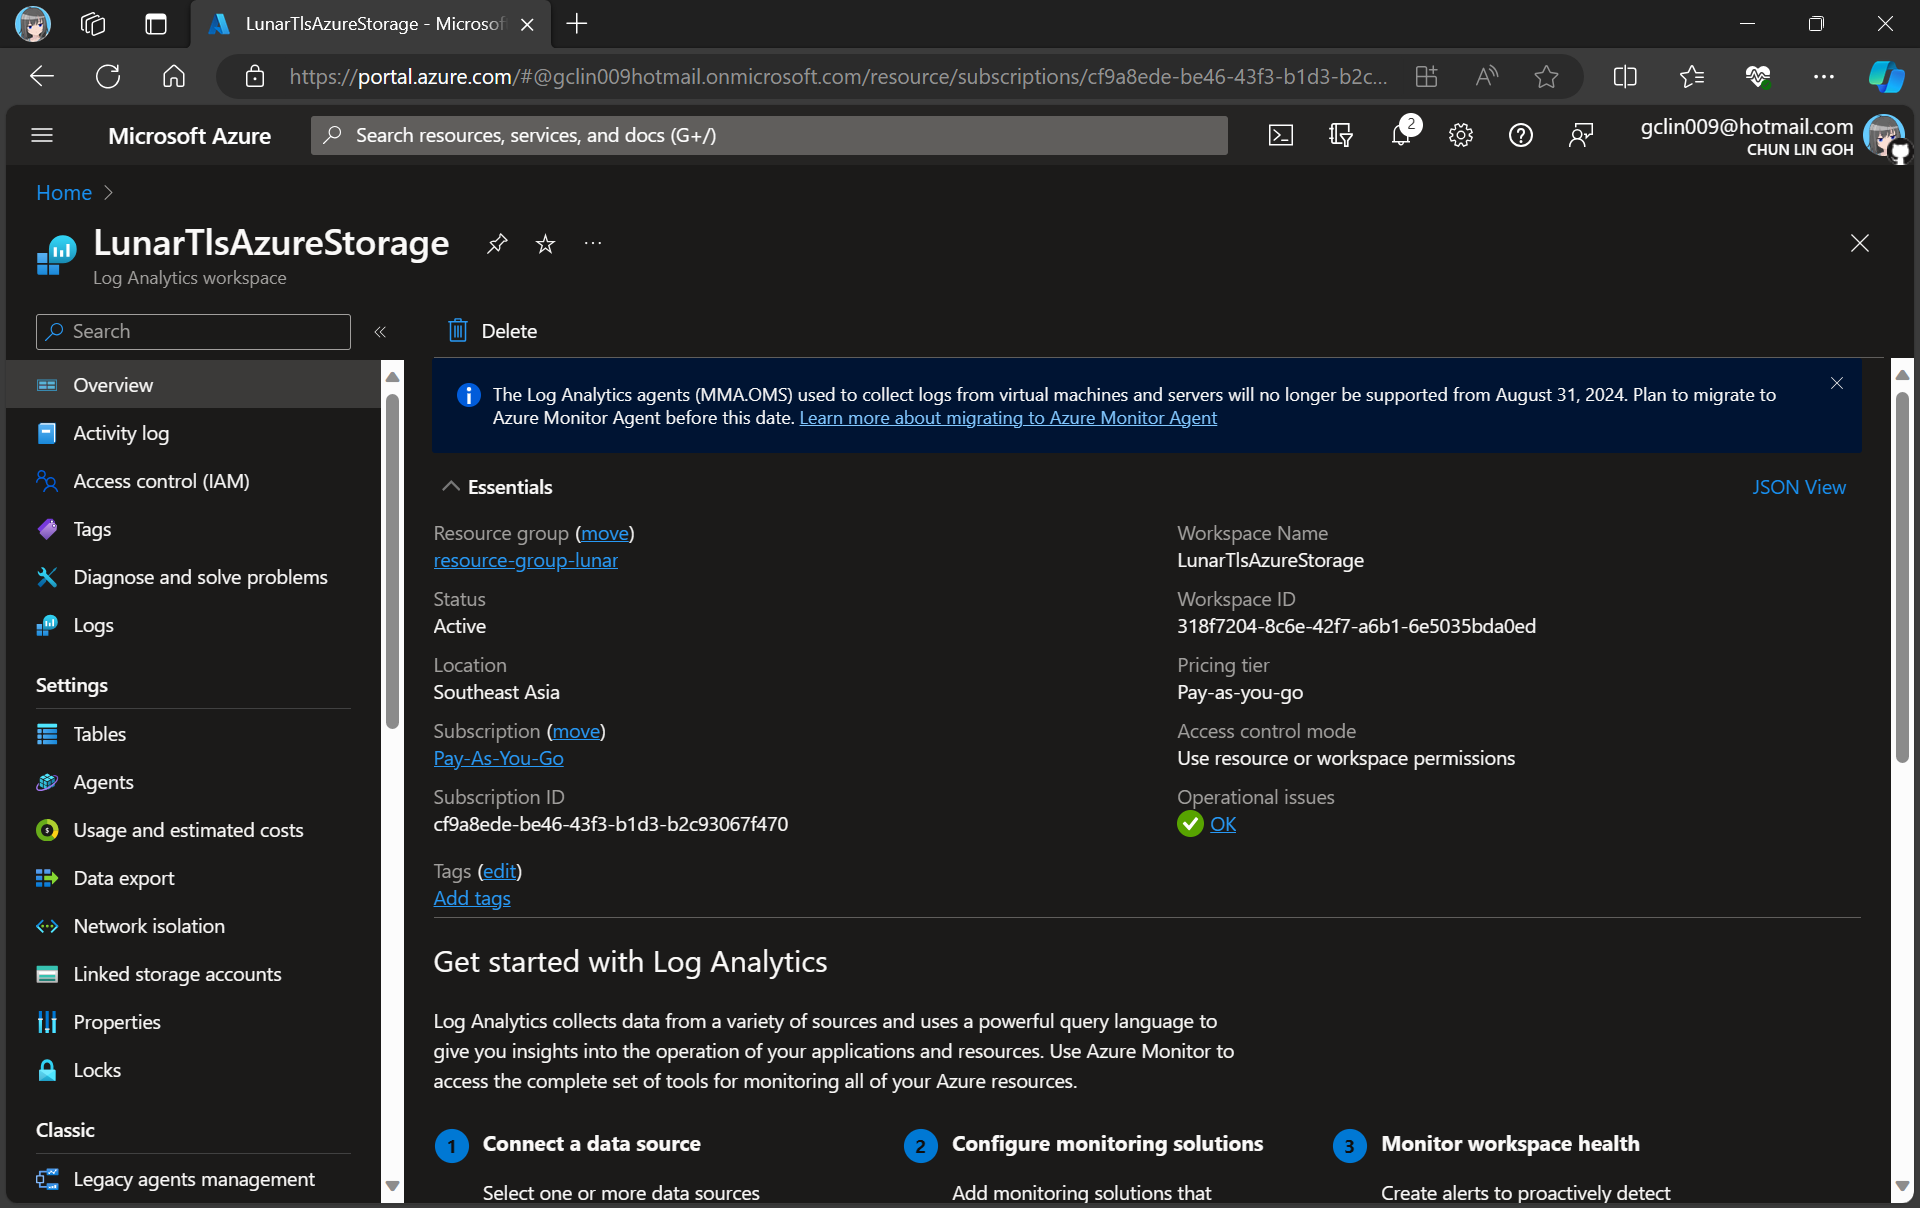
For demonstration purpose, we will create a new Log Analytics workspace called “LunarTlsAzureStorage”.
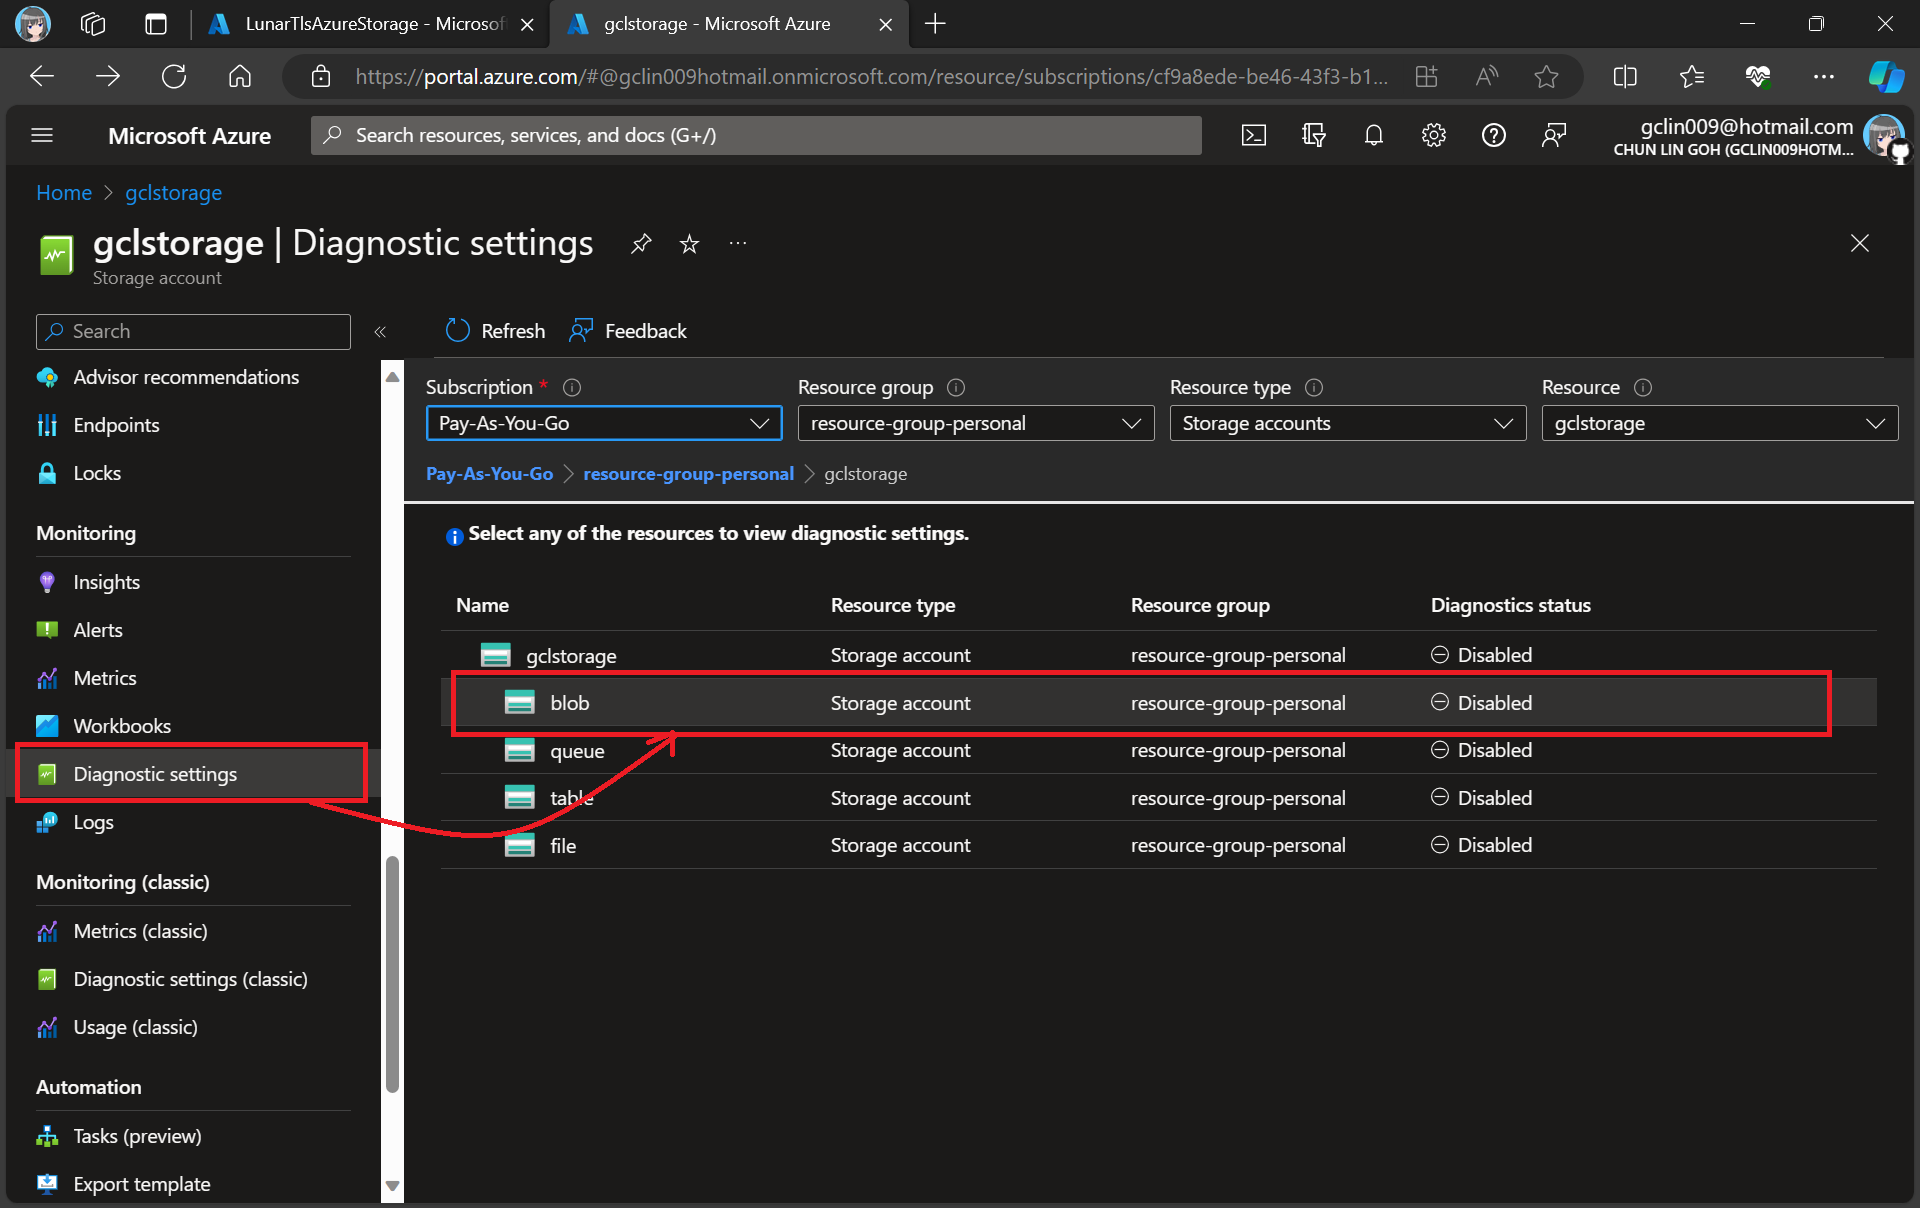
In this article, we will only be logging requests for the Blob Storage, hence, we will be setting up the Diagnostic of the Storage Account as shown in the screenshot below.
Adding new diagnostic settings for blob.
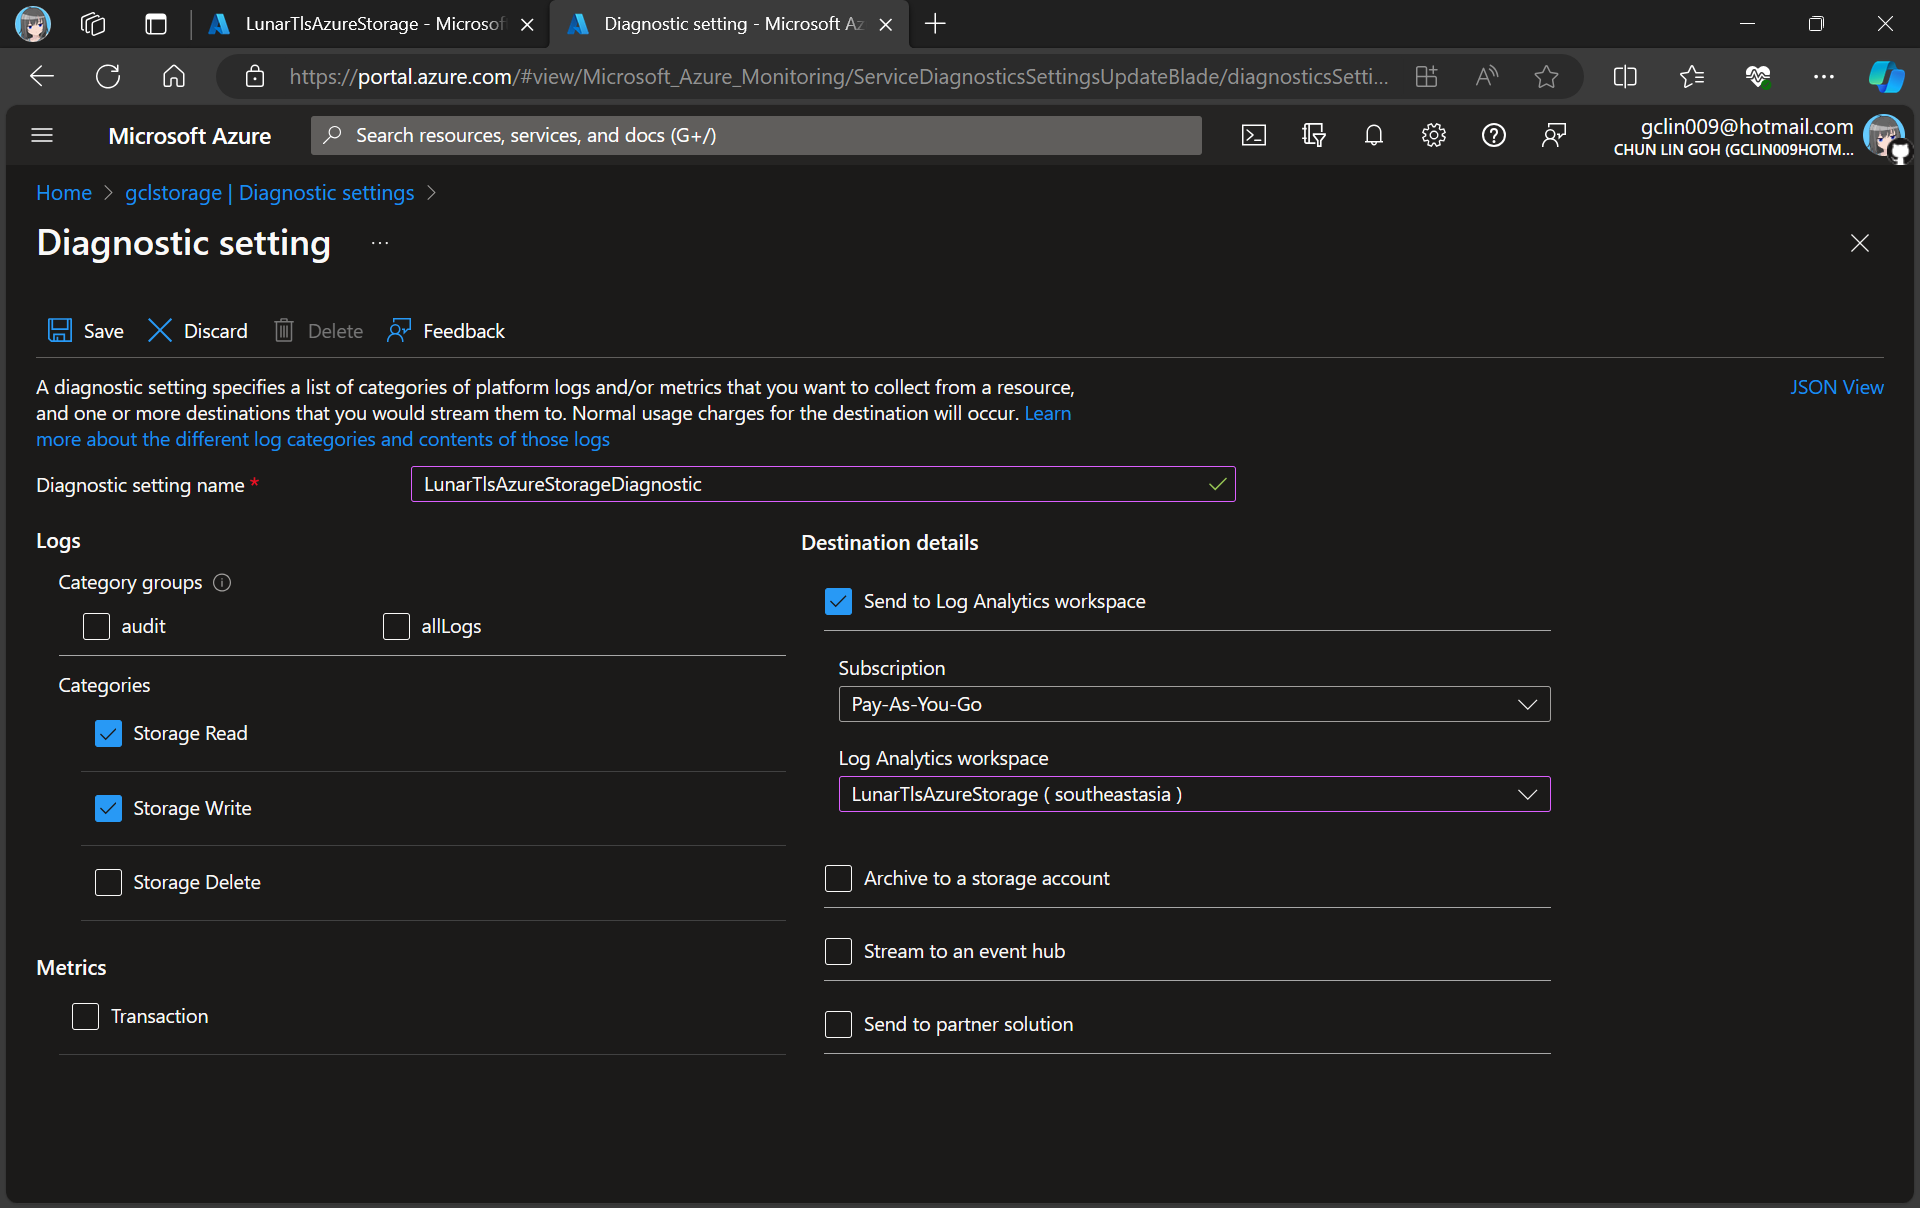
In the next step, we need to specify that we would like to collect the logs of only read and write requests of the Azure Blob Storage. After that, we will send the logs to Log Analytics we have just created above.
Creating a new diagnostic setting for our blob storage.
After we have created the diagnostic setting, requests to the storage account are subsequently logged according to that setting.
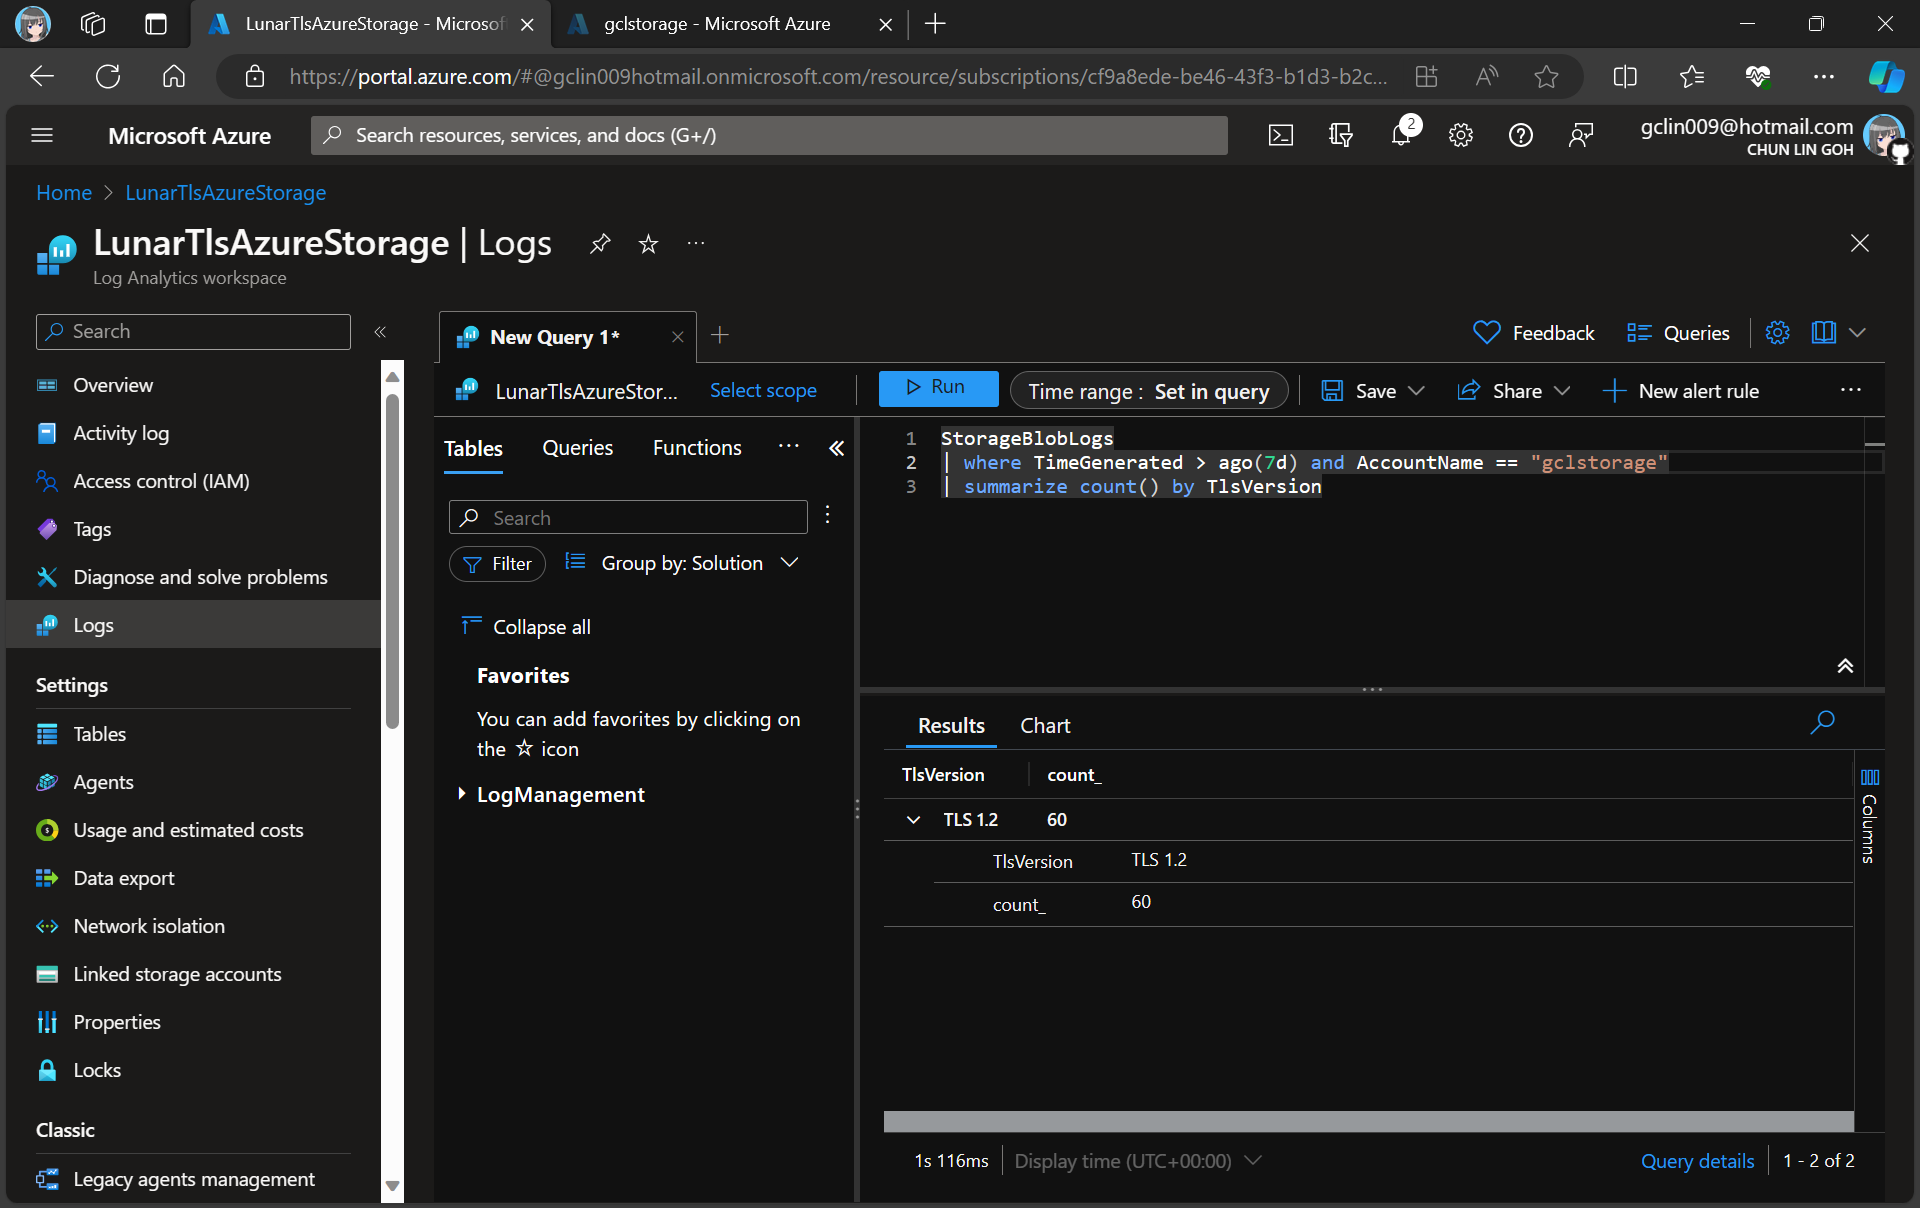
As demonstrated in the following screenshot, we use the query below to find out how many requests were made against our blob storage with different versions of TLS over the past seven day.
There are only TLS 1.2 requests for the “gclstorage” blob storage.
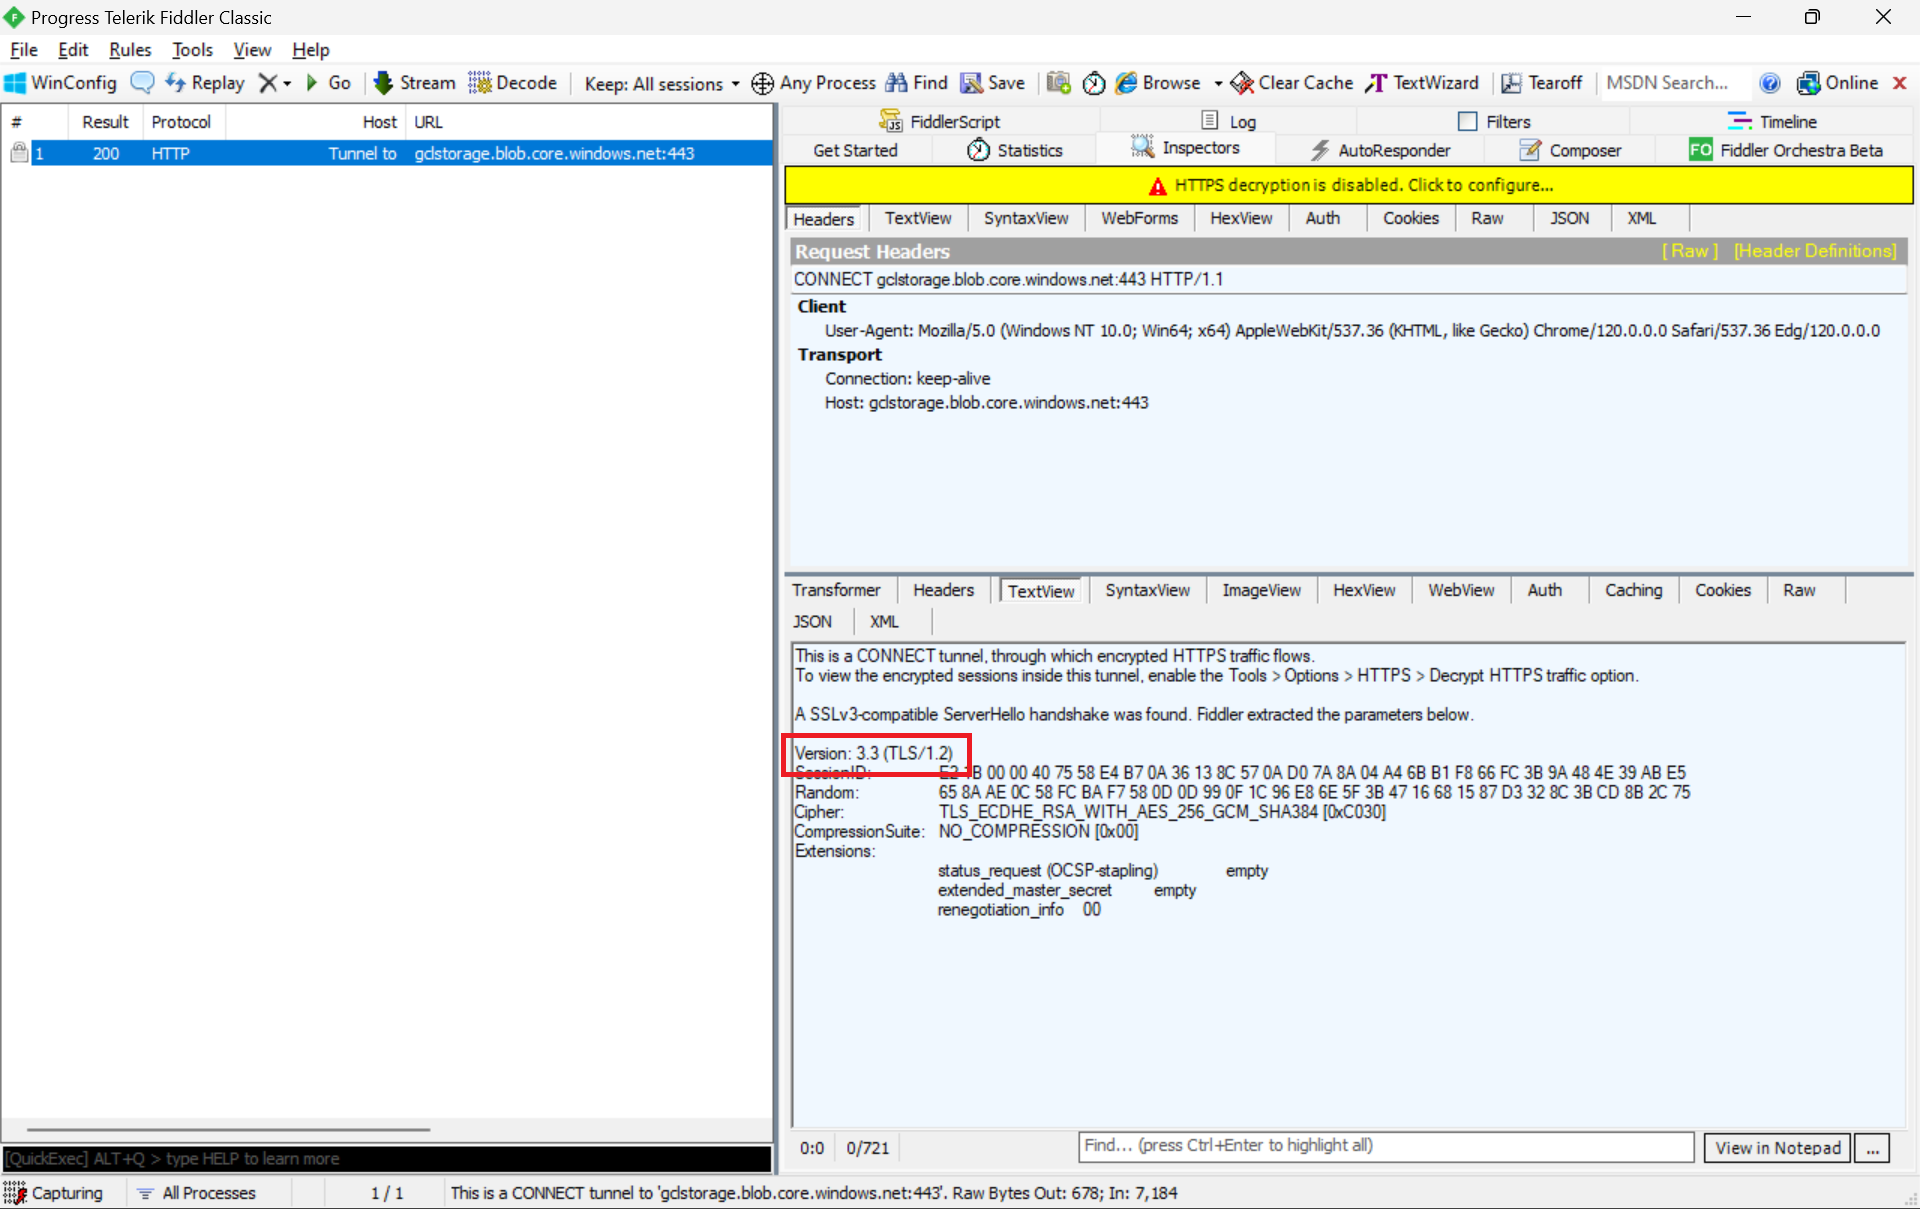
Verify with Telerik Fiddler
Fiddler is a popular web debugging proxy tool that allows us to monitor, inspect, and debug HTTP traffic between our machine and the Internet. Fiddler can thus be used to inspect and analyze both TLS and SSL requests.
We can refer to the Fiddler trace to confirm that the correct version of TLS 1.2 was used to send the request to the blob storage “gclstorage”, as shown in the following screenshot.
TLS 1.2 is SSL 3.3, thus the version there states that it is version 3.3.
Enforce the Minimum Accepted TLS Version
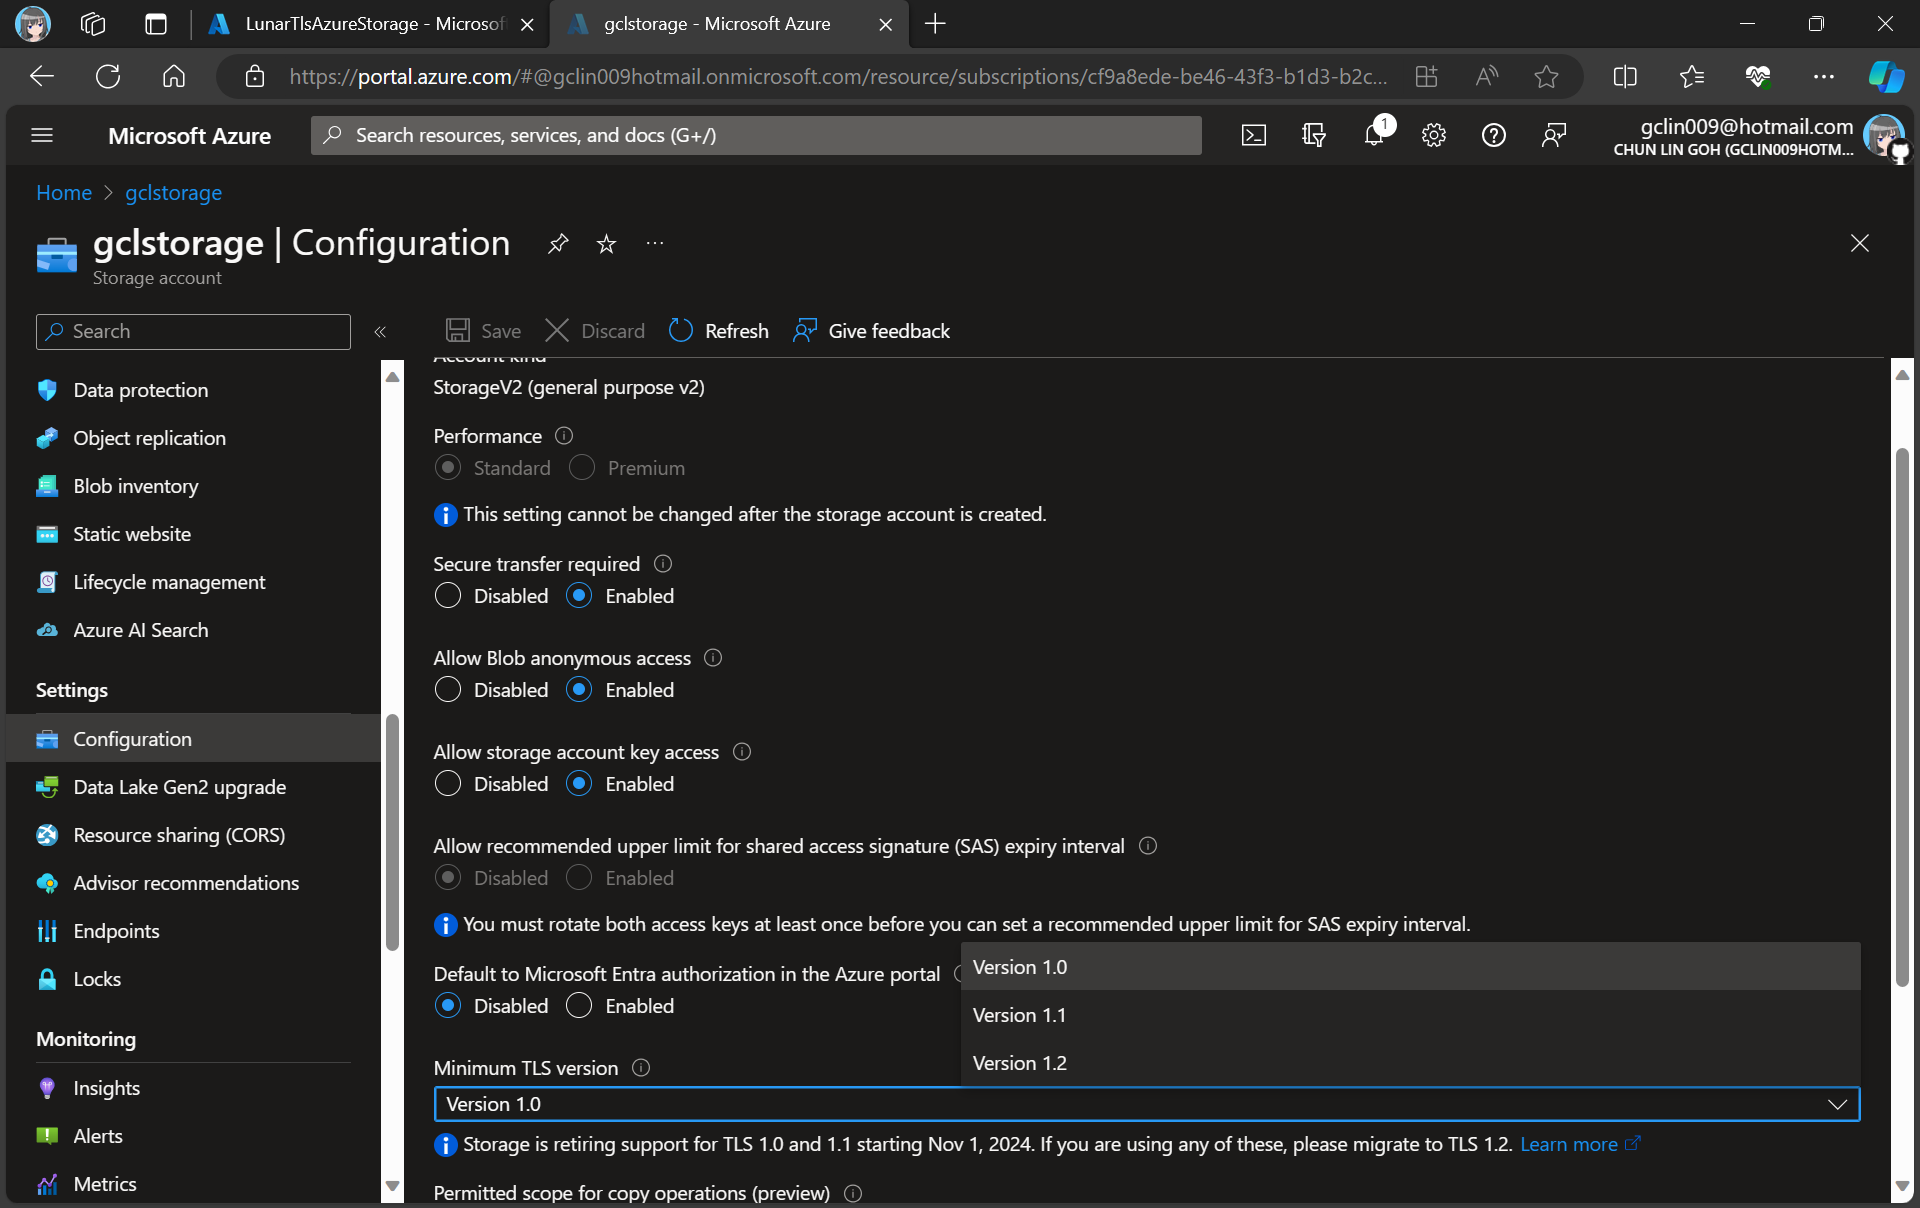
Currently, the minimum TLS version accepted by storage account is set to TLS 1.0 by default before November 2014.
We at most can only set Version 1.2 for the minumum TLS version.
In advance of the deprecation date, we can enable Azure policy to enforce minimum TLS version to be TLS 1.2. Hence, we can now update the value to 1.2 so that we can reject all requests from clients that are sending data to our Azure Storage with an TLS 1.0 and 1.1.
Thus, if we are running our apps on the latest Windows servers, then the latest TLS should be automatically used by our apps without any configuration from our side.
In fact, according to the TLS best practices guide from Microsoft, we should not specify the TLS version. Instead, we shall configure our code to let the OS decide on the TLS version for us.
Wrap-Up
Enhancing the security stance for Windows users, as of September 2023, the default configuration of the operating system will deactivate TLS versions 1.0 and 1.1.
As developers, we should ensure that all apps and services running on Windows are using up-to-date versions that support TLS 1.2 or higher. Hence, prior to the enforcement of TLS updates, we must test our apps in a controlled environment to verify compatibility with TLS 1.2 or later.
While TLS 1.0 and 1.1 will be disabled by default, it is also good to confirm these settings and ensure they align with your security requirements.
By taking these proactive measures, we should be able to have a seamless transition to updated TLS versions, maintaining a secure computing environment while minimising any potential disruptions to applications or services.
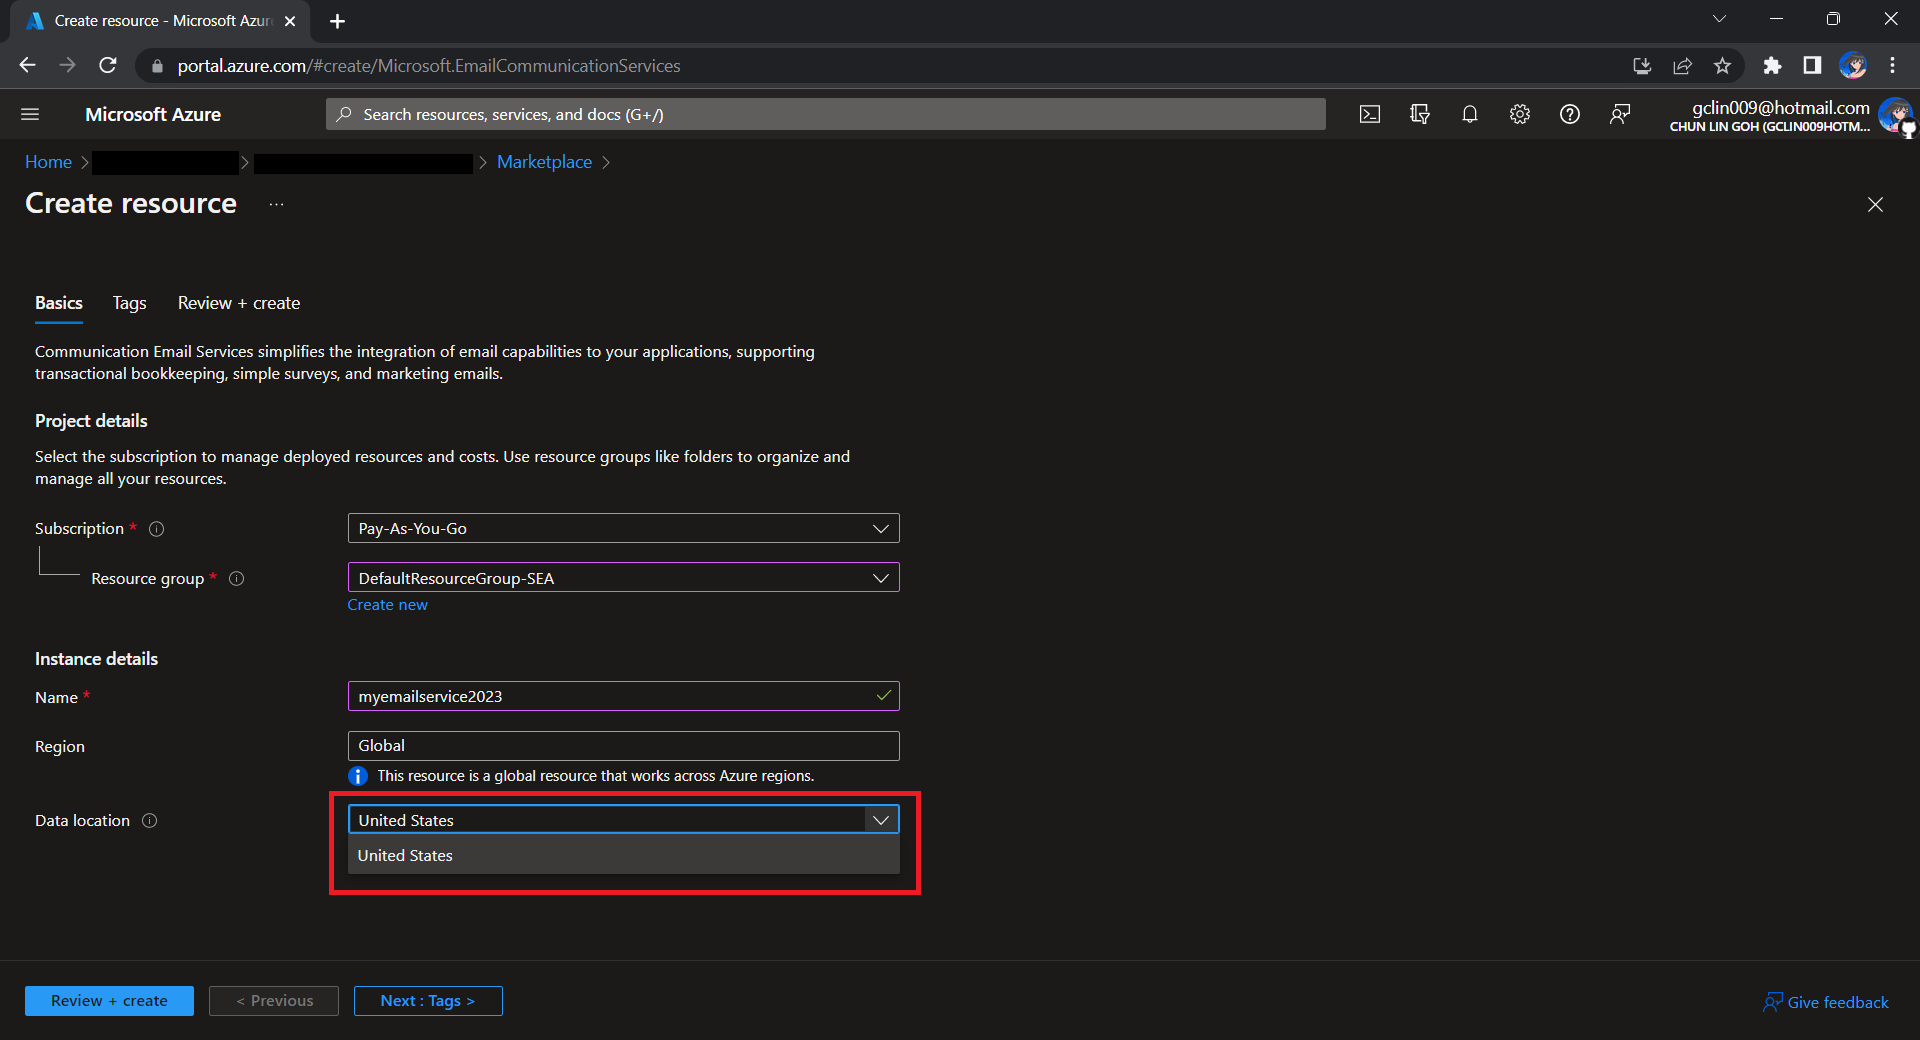
To begin, we need to createa a new Email Communication Services resource from the marketplace, as shown in the screenshot below.
US is the only option for the Data Location now in Email Communication Services.
Take note that currently we can only choose United States as the Data Location, which determines where the data will be stored at rest. This cannot be changed after the resource has been created. This thus make our Azure Communication Services which we need to configure next to store the data in United States as well. We will talk about this later.
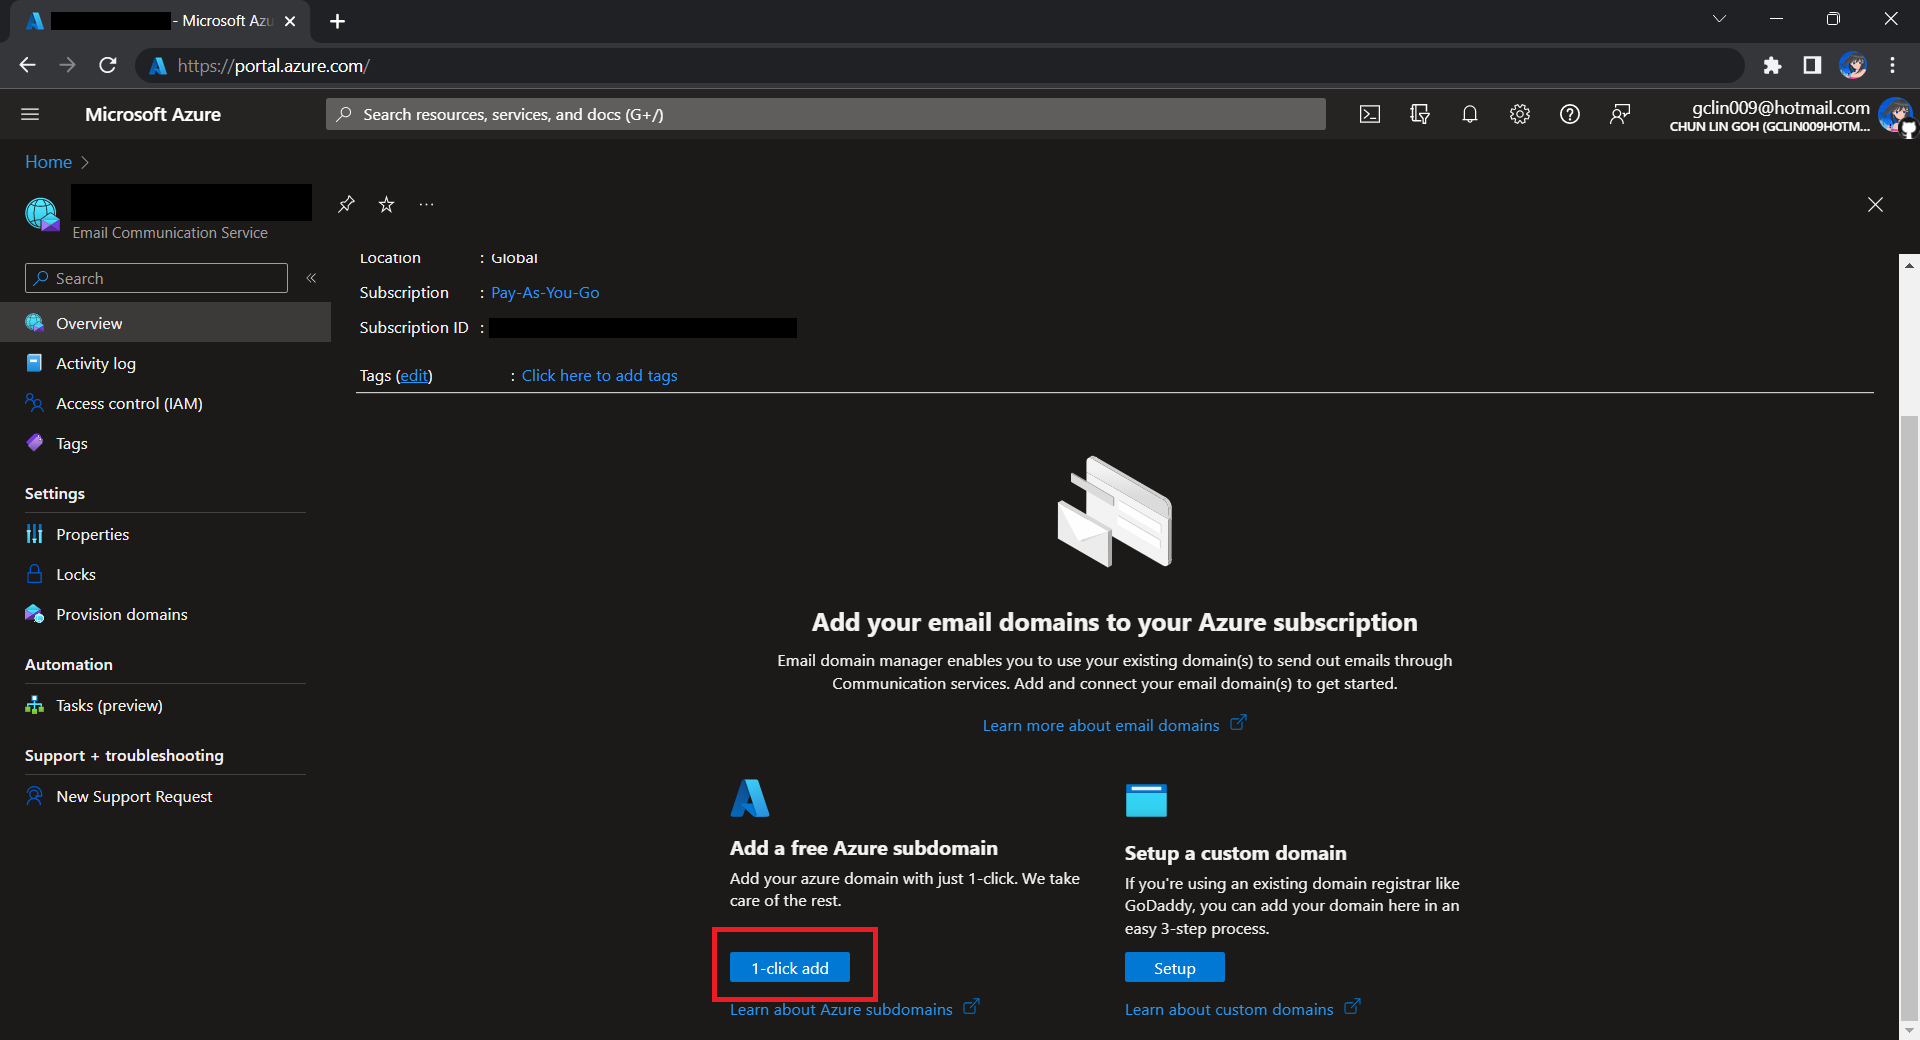
After getting the domain, we need to connect Azure Communication Services to it to send emails.
As we talked earlier, we need to make sure that the Azure Communication Services to have United States as its Data Location as well. Otherwise, we will not be able to link the email domain for email sending.
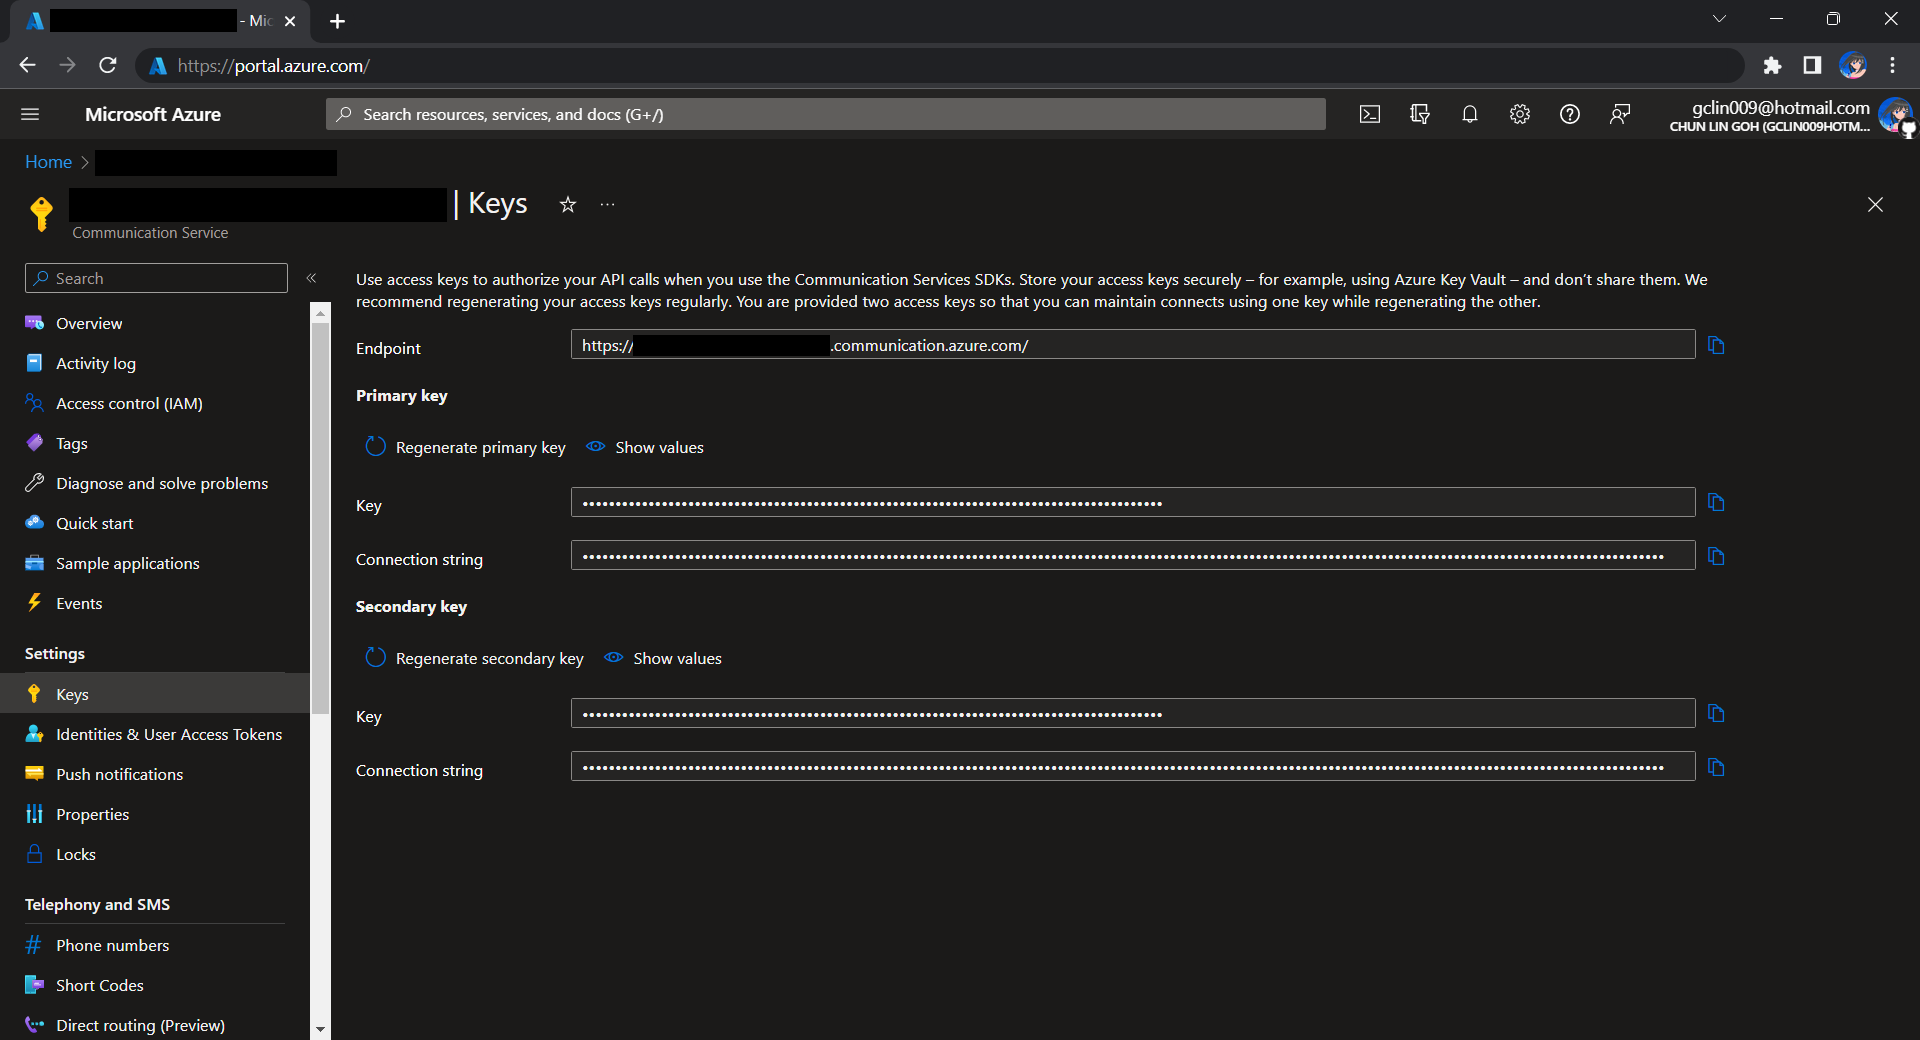
Before we begin, we have to get the connection string for the Azure Communication Service resource.
Getting connection string of the Azure Communication Service.
Here I have the following code to send a sample email to myself.
using Azure.Communication.Email.Models;
using Azure.Communication.Email;
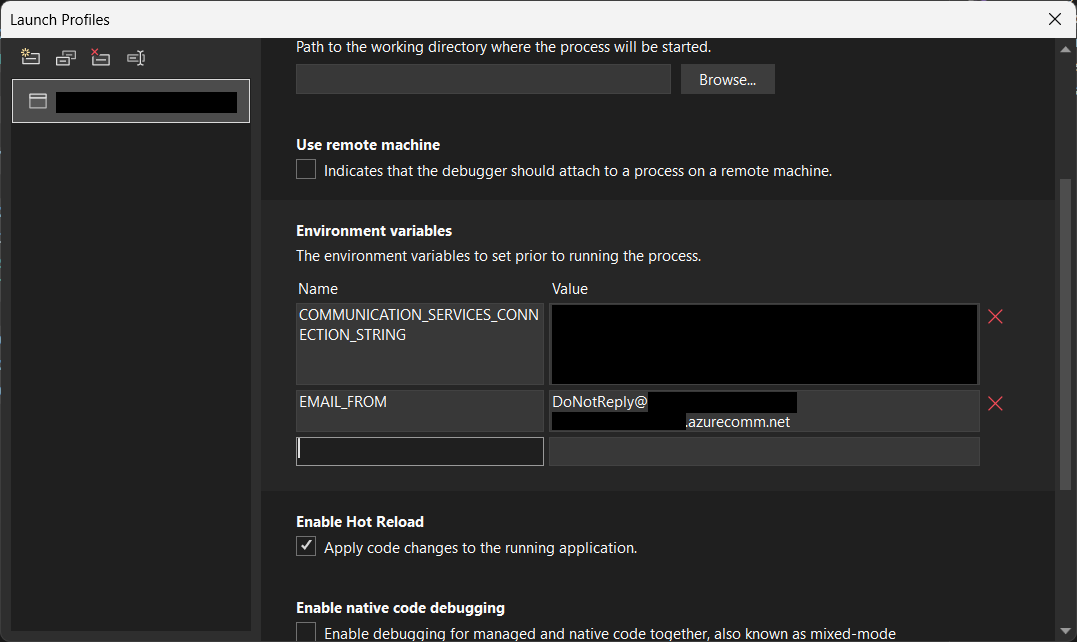
string connectionString = Environment.GetEnvironmentVariable("COMMUNICATION_SERVICES_CONNECTION_STRING") ?? string.Empty;
string emailFrom = Environment.GetEnvironmentVariable("EMAIL_FROM") ?? string.Empty;
if (connectionString != string.Empty)
{
EmailClient emailClient = new EmailClient(connectionString);
EmailContent emailContent = new EmailContent("Welcome to Azure Communication Service Email APIs.");
emailContent.PlainText = "This email message is sent from Azure Communication Service Email using .NET SDK.";
List<EmailAddress> emailAddresses = new List<EmailAddress> {
new EmailAddress("gclin009@hotmail.com") { DisplayName = "Goh Chun Lin" }
};
EmailRecipients emailRecipients = new EmailRecipients(emailAddresses);
EmailMessage emailMessage = new EmailMessage(emailFrom, emailContent, emailRecipients);
SendEmailResult emailResult = emailClient.Send(emailMessage, CancellationToken.None);
}
Setting environment variables for local debugging purpose.
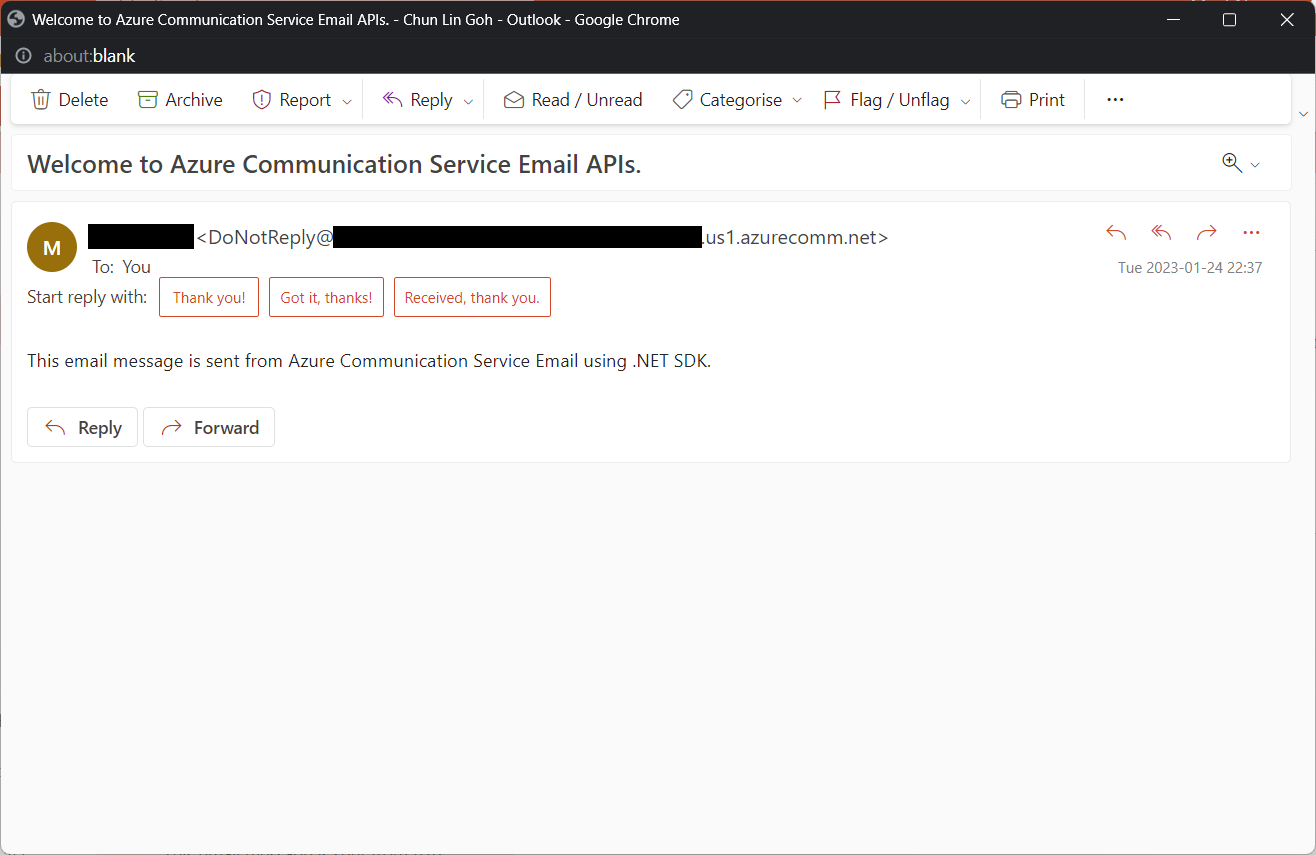
Tada, there should be an email successfully sent out as instructed.
Email is successfully sent and received. =)
Containerise the Console App
Next what we need to do is containerising our console app above.
Assume that our console app is called MyConsoleApp, then we will prepare a Dockerfile as follows.
FROM mcr.microsoft.com/dotnet/runtime:6.0 AS base
WORKDIR /app

FROM mcr.microsoft.com/dotnet/sdk:6.0 AS build
WORKDIR /src
COPY ["MyMedicalEmailSending.csproj", "."]
RUN dotnet restore "./MyConsoleApp.csproj"
COPY . .
WORKDIR "/src/."
RUN dotnet build "MyConsoleApp.csproj" -c Release -o /app/build

FROM build AS publish
RUN dotnet publish "MyConsoleApp.csproj" -c Release -o /app/publish /p:UseAppHost=false

FROM base AS final
WORKDIR /app
COPY --from=publish /app/publish .
ENTRYPOINT ["dotnet", "MyConsoleApp.dll"]
We then can publish it to Docker Hub for consumption later.
In Kubernetes, pods are the smallest deployable units of computing we can create and manage. A pod can have one or more relevant containers, with shared storage and network resources. Here, we will be scheduling a job so that it creates pods containing our container with the image we created above to operate the execution of the pods, which is in our case, to send emails.
Hence, if we would like to have the email scheduler to be triggered at 8am of every Friday, we can create a CronJob in the namespace my-namespace with the following YAML file.
After the CronJob is created, we can proceed to annotate it with the command below.
kubectl annotate cj email-scheduler jobtype=scheduler frequency=weekly
This helps us to query the cron jobs with jsonpath easily in the future. For example, we can list all cronjobs which are scheduled weekly, we can do it with the following command.
kubectl get cj -A -o=jsonpath="{range .items[?(@.metadata.annotations.jobtype)]}{.metadata.namespace},{.metadata.name},{.metadata.annotations.jobtype},{.metadata.annotations.frequency}{'\n'}{end}"
Create ConfigMap
In our email sending programme, we have two environment variables. Hence, we can create ConfigMap to store the data as key-value pair.
Then, the Pods created by the CronJob can thus consume the ConfigMap and Secret above as environment variables. So, we need to update the CronJob YAML file to be as follows.
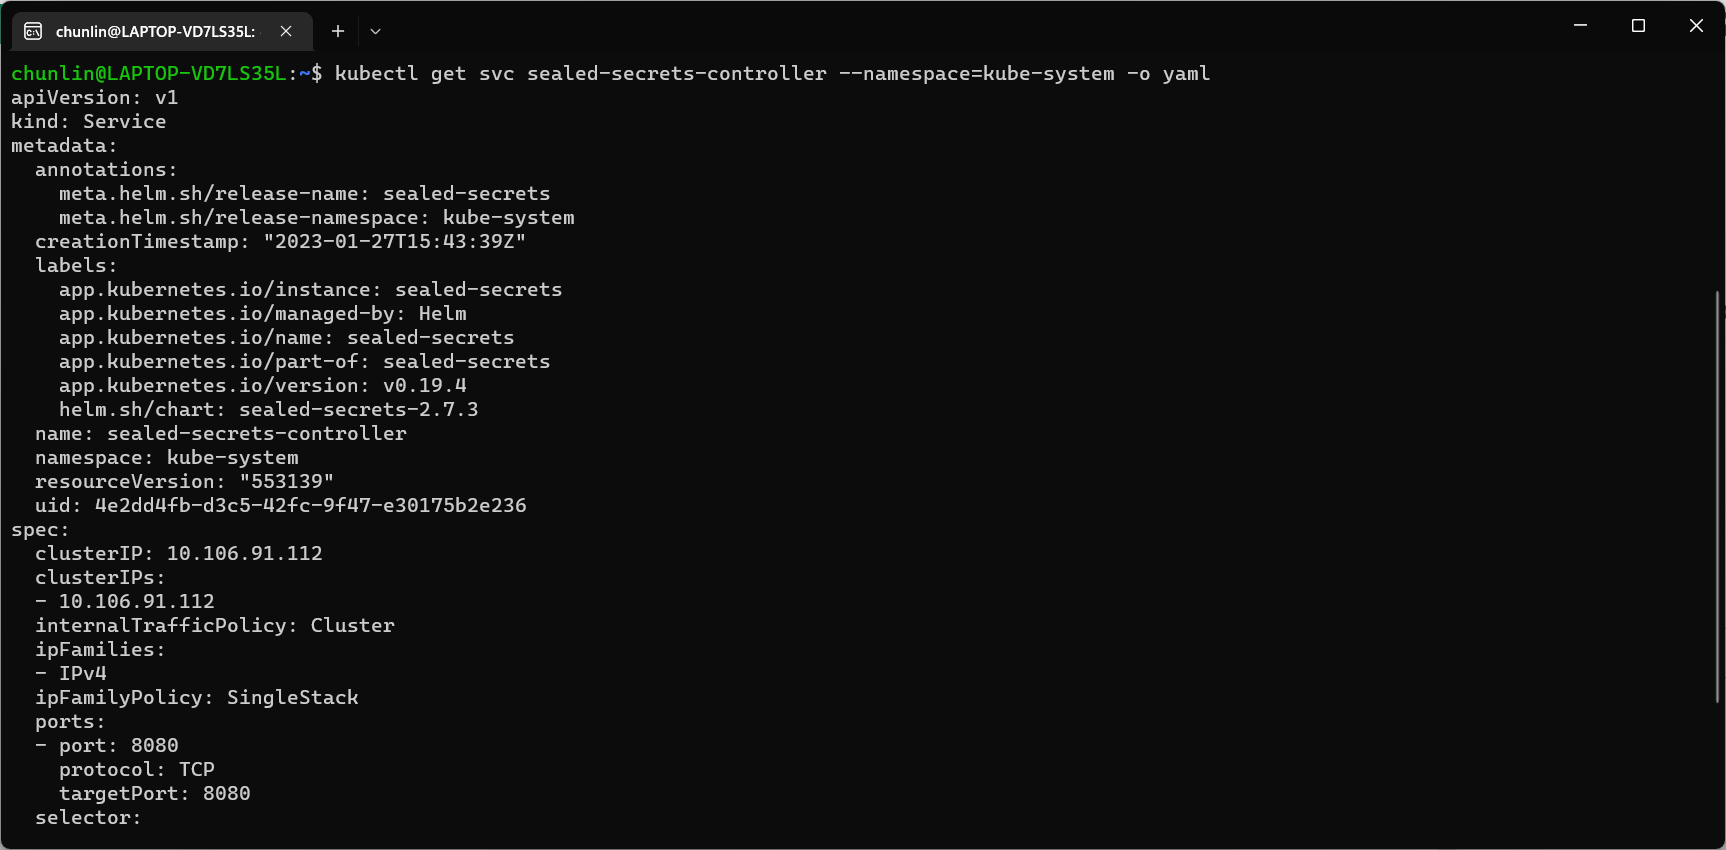
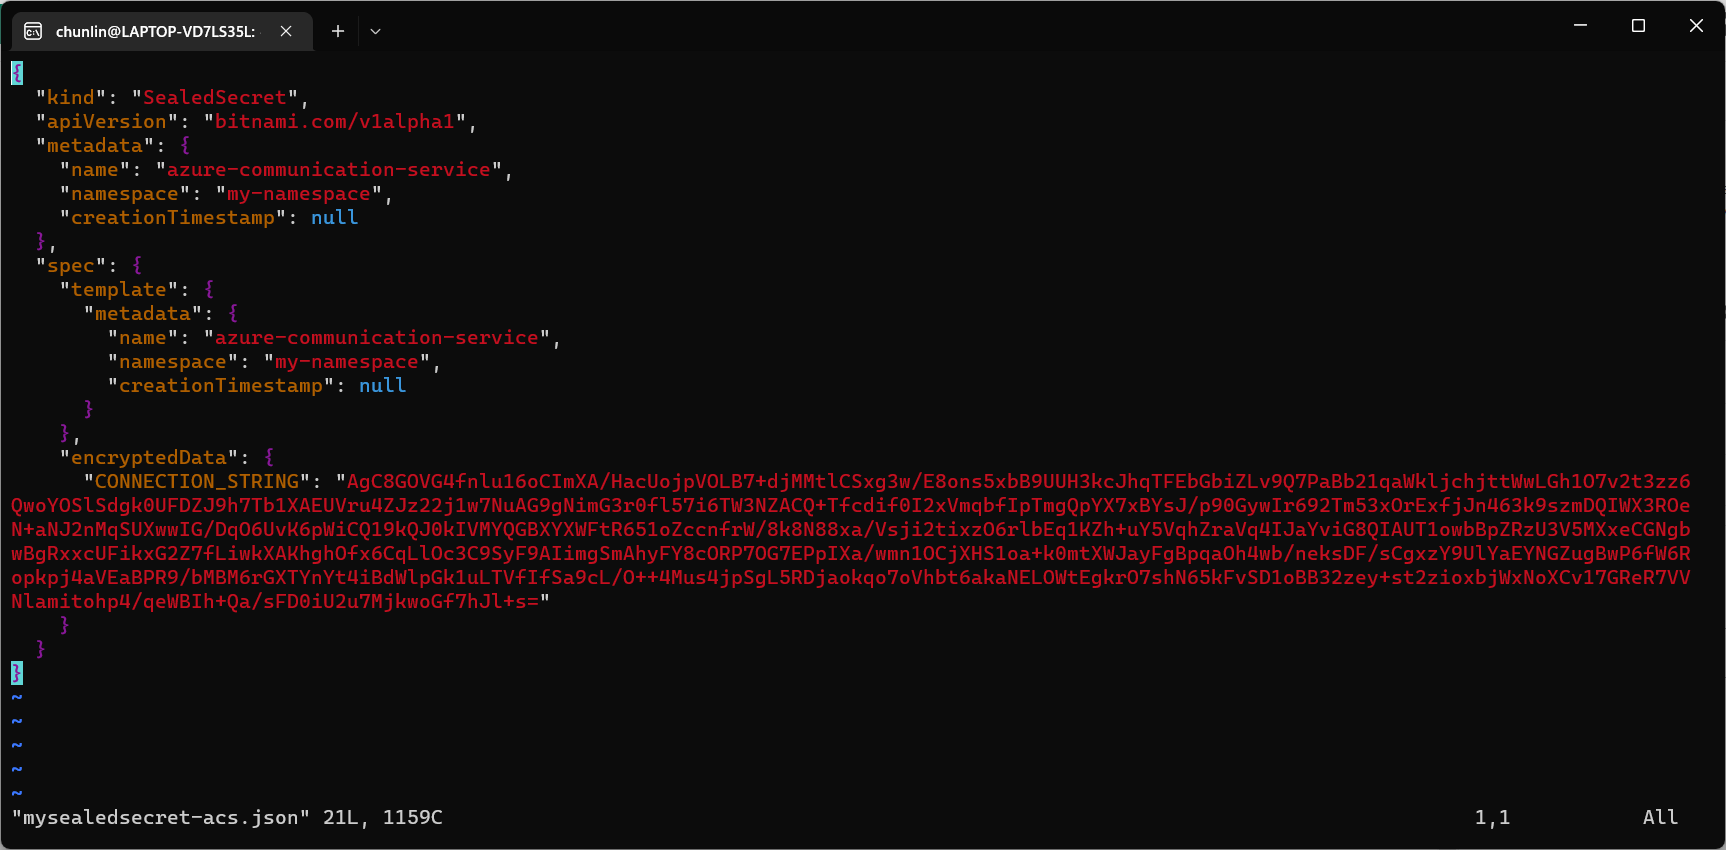
Problem with using Secrets is that we can’t really commit them to our code repository because the data are only encoded but not encrypted. Hence, in order to store our Secrets safely, we need to use SealedSecret which helps us to encrypt our Secret. The SealedSecret can only be decrypted by the controller running in the targer cluster.
Unpack it: tar -zxvf helm-v3.2.0-linux-amd64.tar.gz
Move the Helm binary to desired location: sudo mv linux-amd64/helm /usr/local/bin/helm
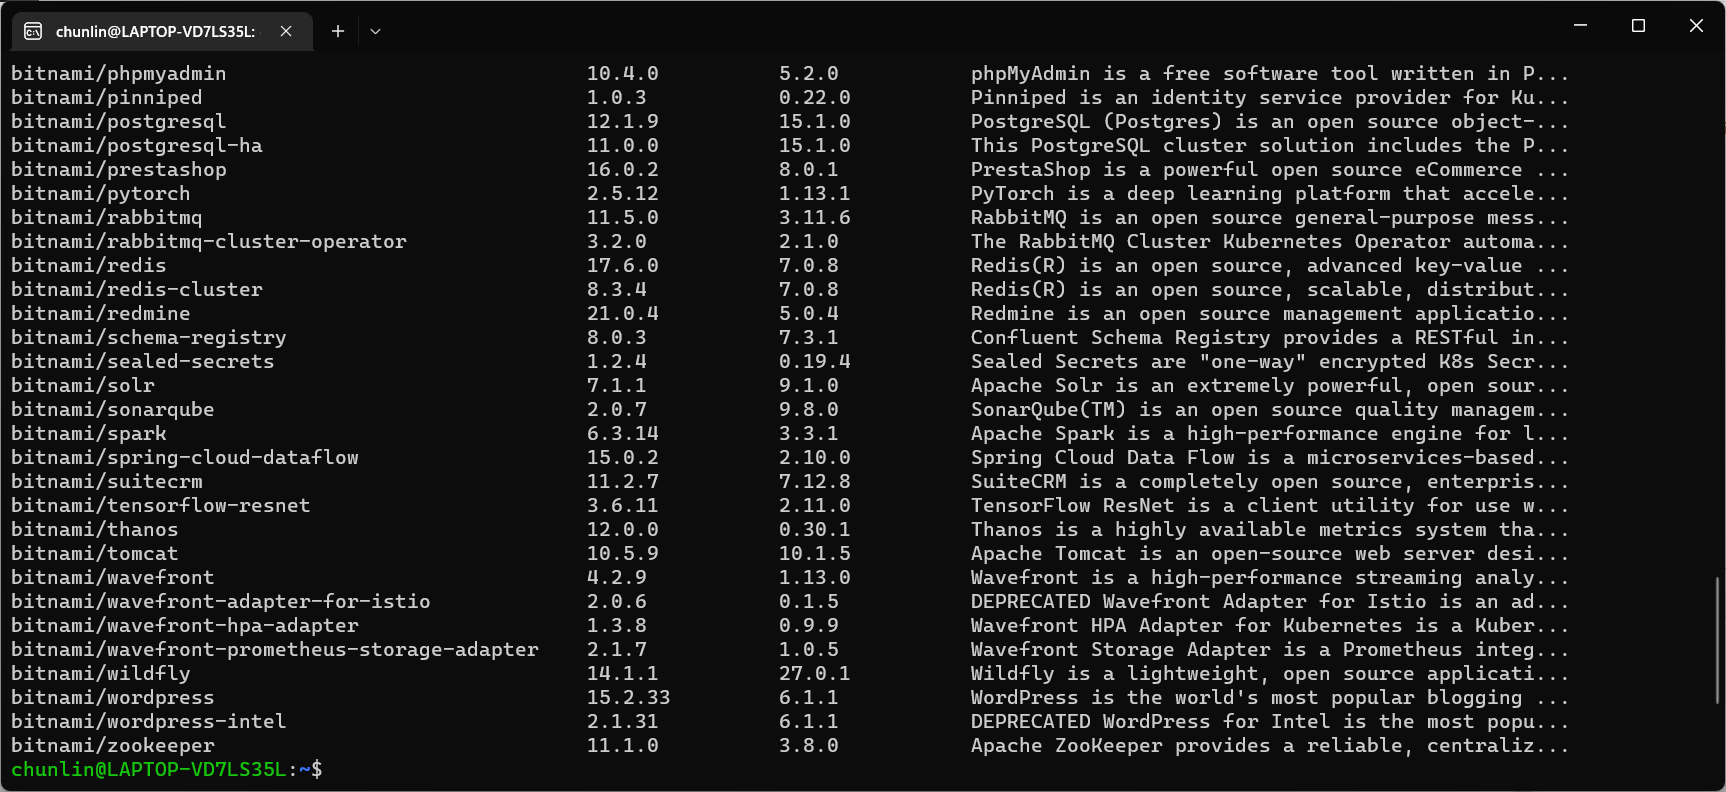
Once we have successfully downloaded Helm and have it ready, we can add a Chart repository. In our case, we need to add the repo of SealedSecret Helm Chart.
The Kamus URL could be found after we installed Kamus as shown in the screenshot below.
Kamus URL in localhost
We need to follow the instruction printed on the screen to get the Kamus URL. To do so, we need to forward local port to the pod, as shown in the following screenshot.
Successfully forward the port and thus can use the URL as the Kamus URL.
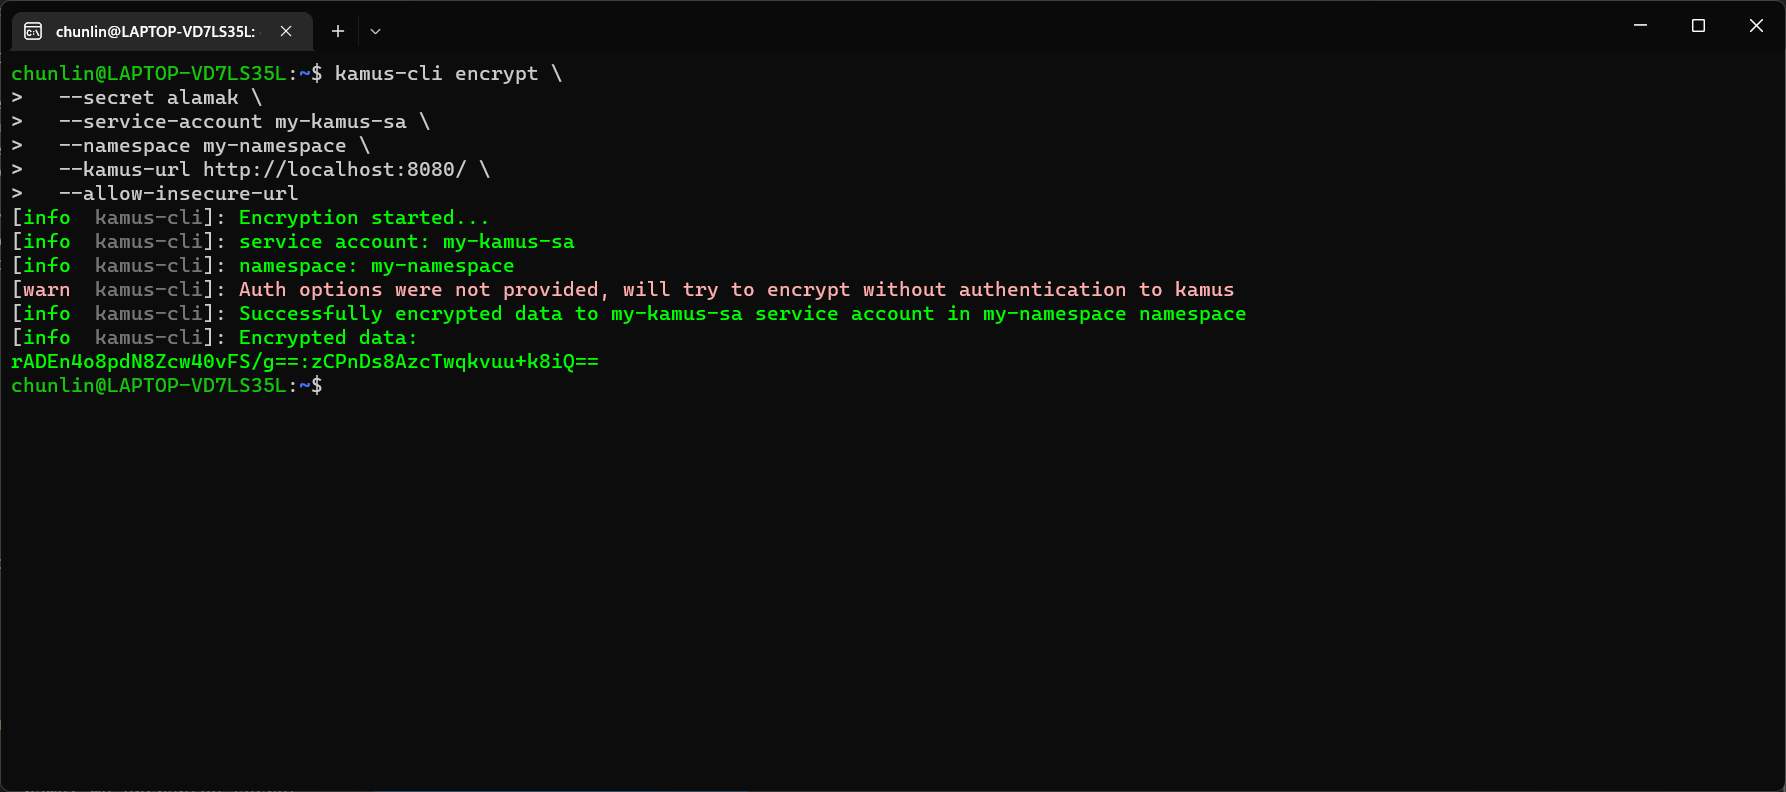
Hence, let’s say we want to encrypt a secret “alamak”, we can do so as follows.
Since our localhost Kamus URL is using HTTP, so we have to specify “–allow-insecure-url”.
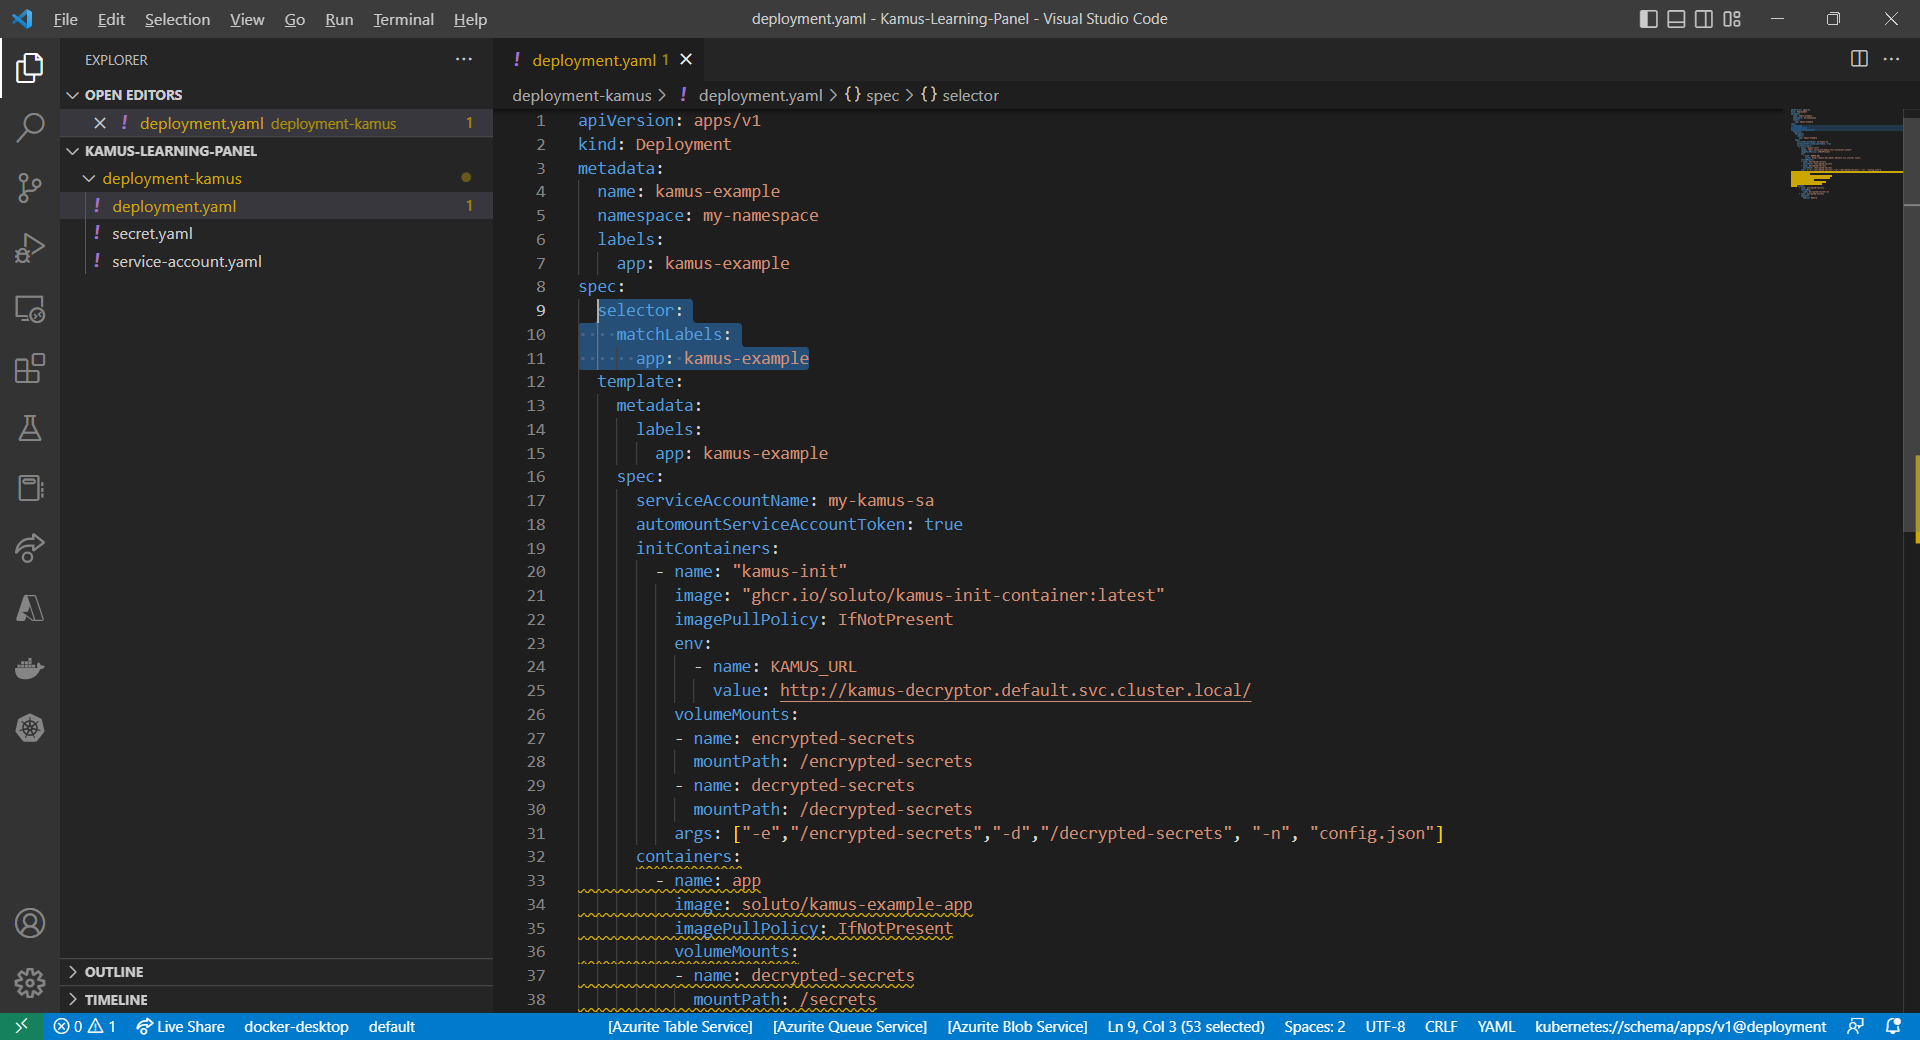
After we have encrypted our secret successfully, we need to configure our pod accordingly so that it can decrypt the value with Kamus Decrypt API. The simplest way will be storing our secret in a ConfigMap because it is already encrypted, so it’s safe to store it in ConfigMap.
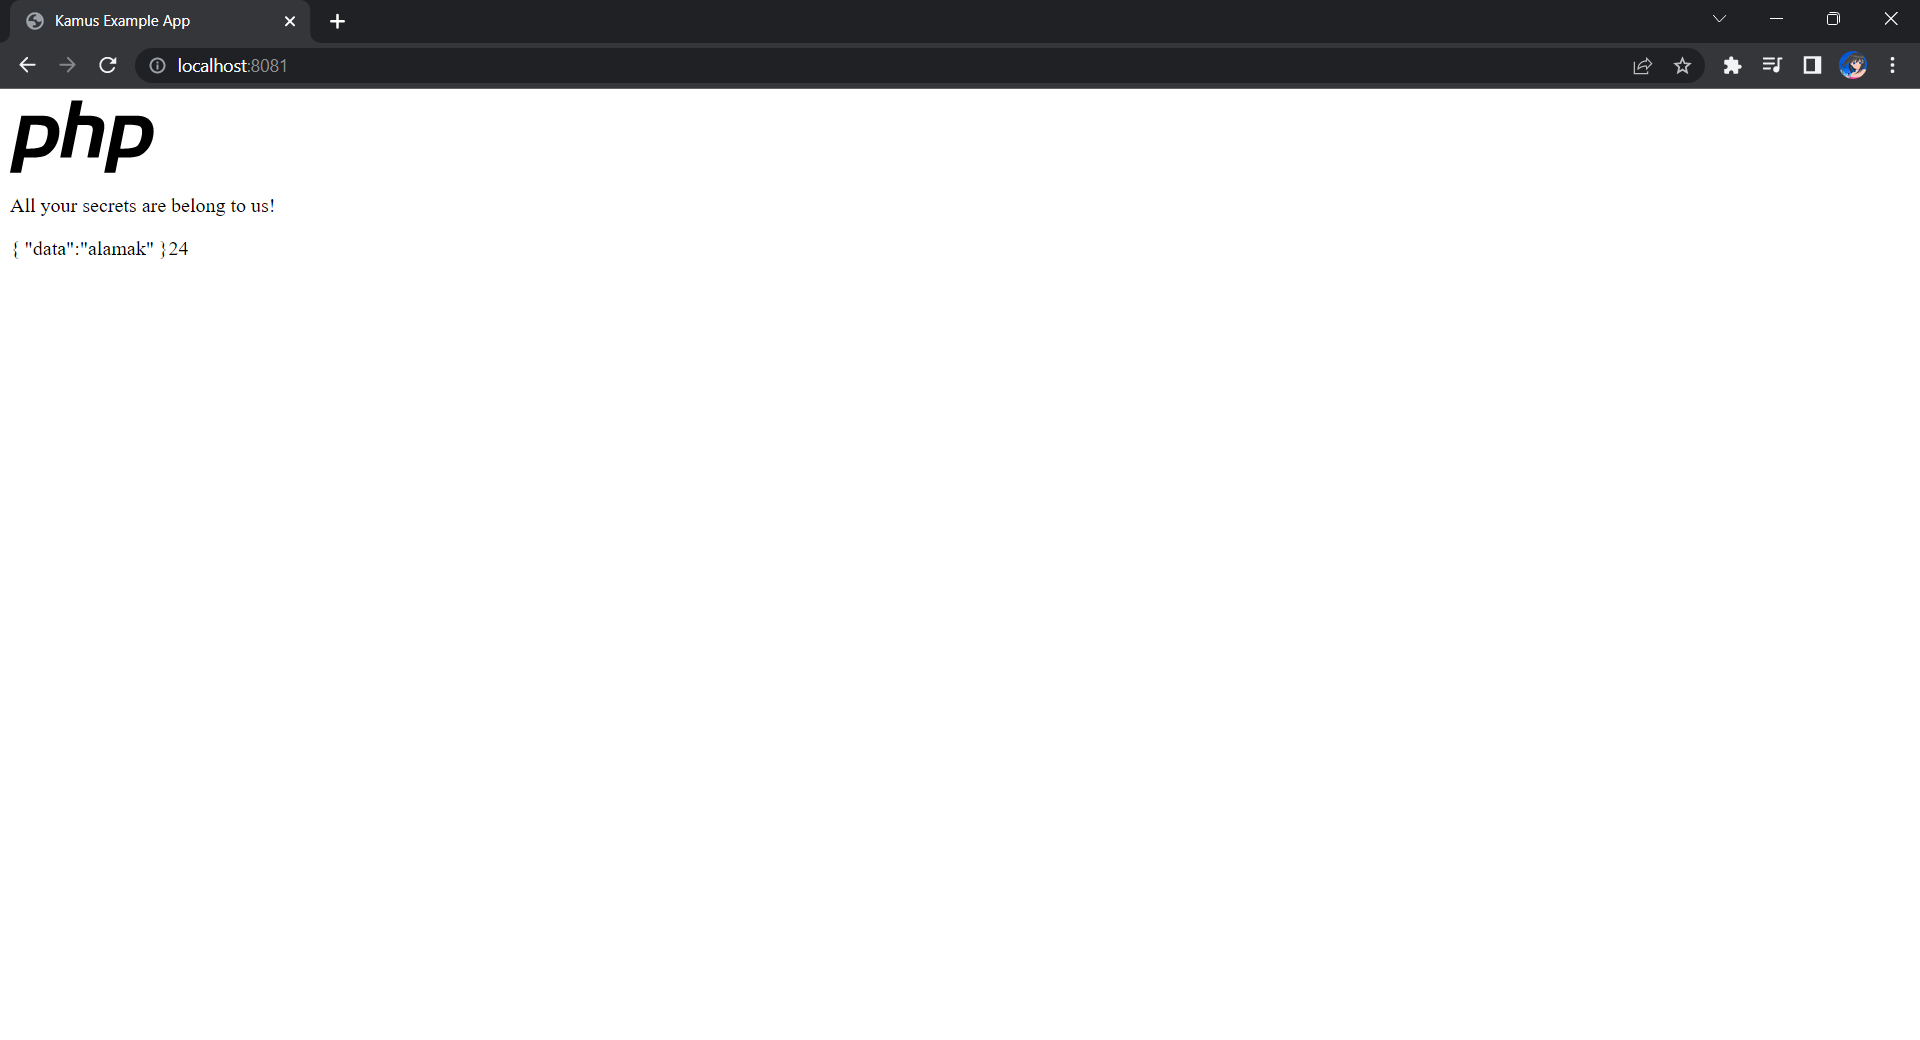
If the deployment is successful, we should be able to see the following when we visit localhost:8081 on our Internet browser, as shown in the following screenshot.
Yay, the original text “alamak” is successfully decrypted and displayed.
Deploy Our CronJob
Now, since we have everything setup, we can create our Kubernetes CronJob with the YAML file we have earlier. For local testing, I have edited the schedule to be “*/2 * * * *”. This means that an email will be sent to me every 2 minutes.
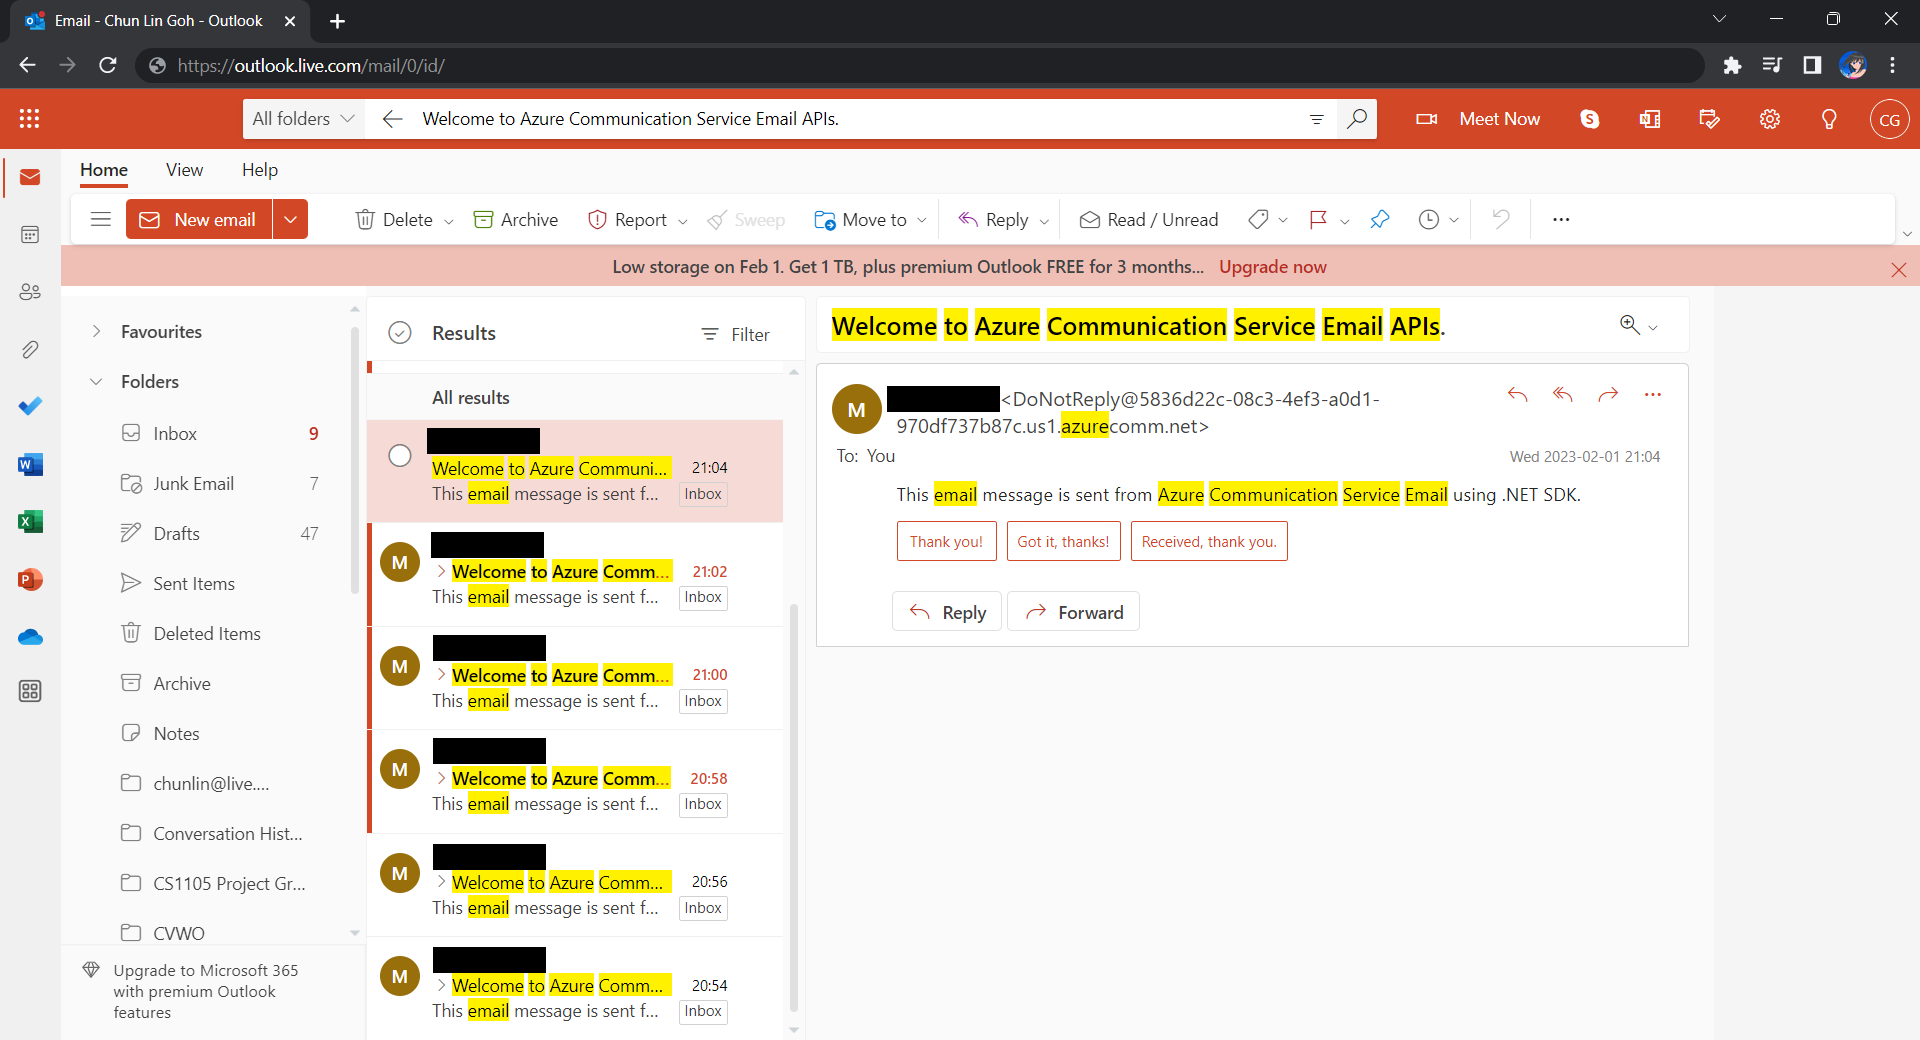
After waiting for a couple of minutes, I have received a few emails sent via the Azure Communication Services, as shown below.
Now the emails are received every 2 minutes. =)
Hoorey, this is how we build a simple Kubernetes CronJob and how we can send emails with the Azure Email Communication Services.