In our previous post, we introduced SilverVector as a “Day 0” dashboard prototyping tool. Today, we are going to show you exactly how powerful that can be by applying it to a real-world, complex open-source CMS: Orchard Core.
Orchard Core is a fantastic, modular CMS built on ASP.NET Core. It is powerful, flexible, and used by enterprises worldwide. However, because it is so flexible, monitoring it on dashboard like Grafana can be a challenge. Orchard Core stores content as JSON documents, which means “simple” questions like “How many articles did we publish today?” often require complex queries or custom admin modules.
With SilverVector, we solved this in seconds.
Grafana: Your open and composable observability stack. (Event Page)
The “Few Clicks” Promise
Usually, building a dashboard for a CMS like Orchard Core involves:
Installing a monitoring plugin (if one exists).
Configuring Prometheus exporters.
Building panels manually in Grafana.
With SilverVector, we took a different approach. We simply asked: “What does the database look like?”
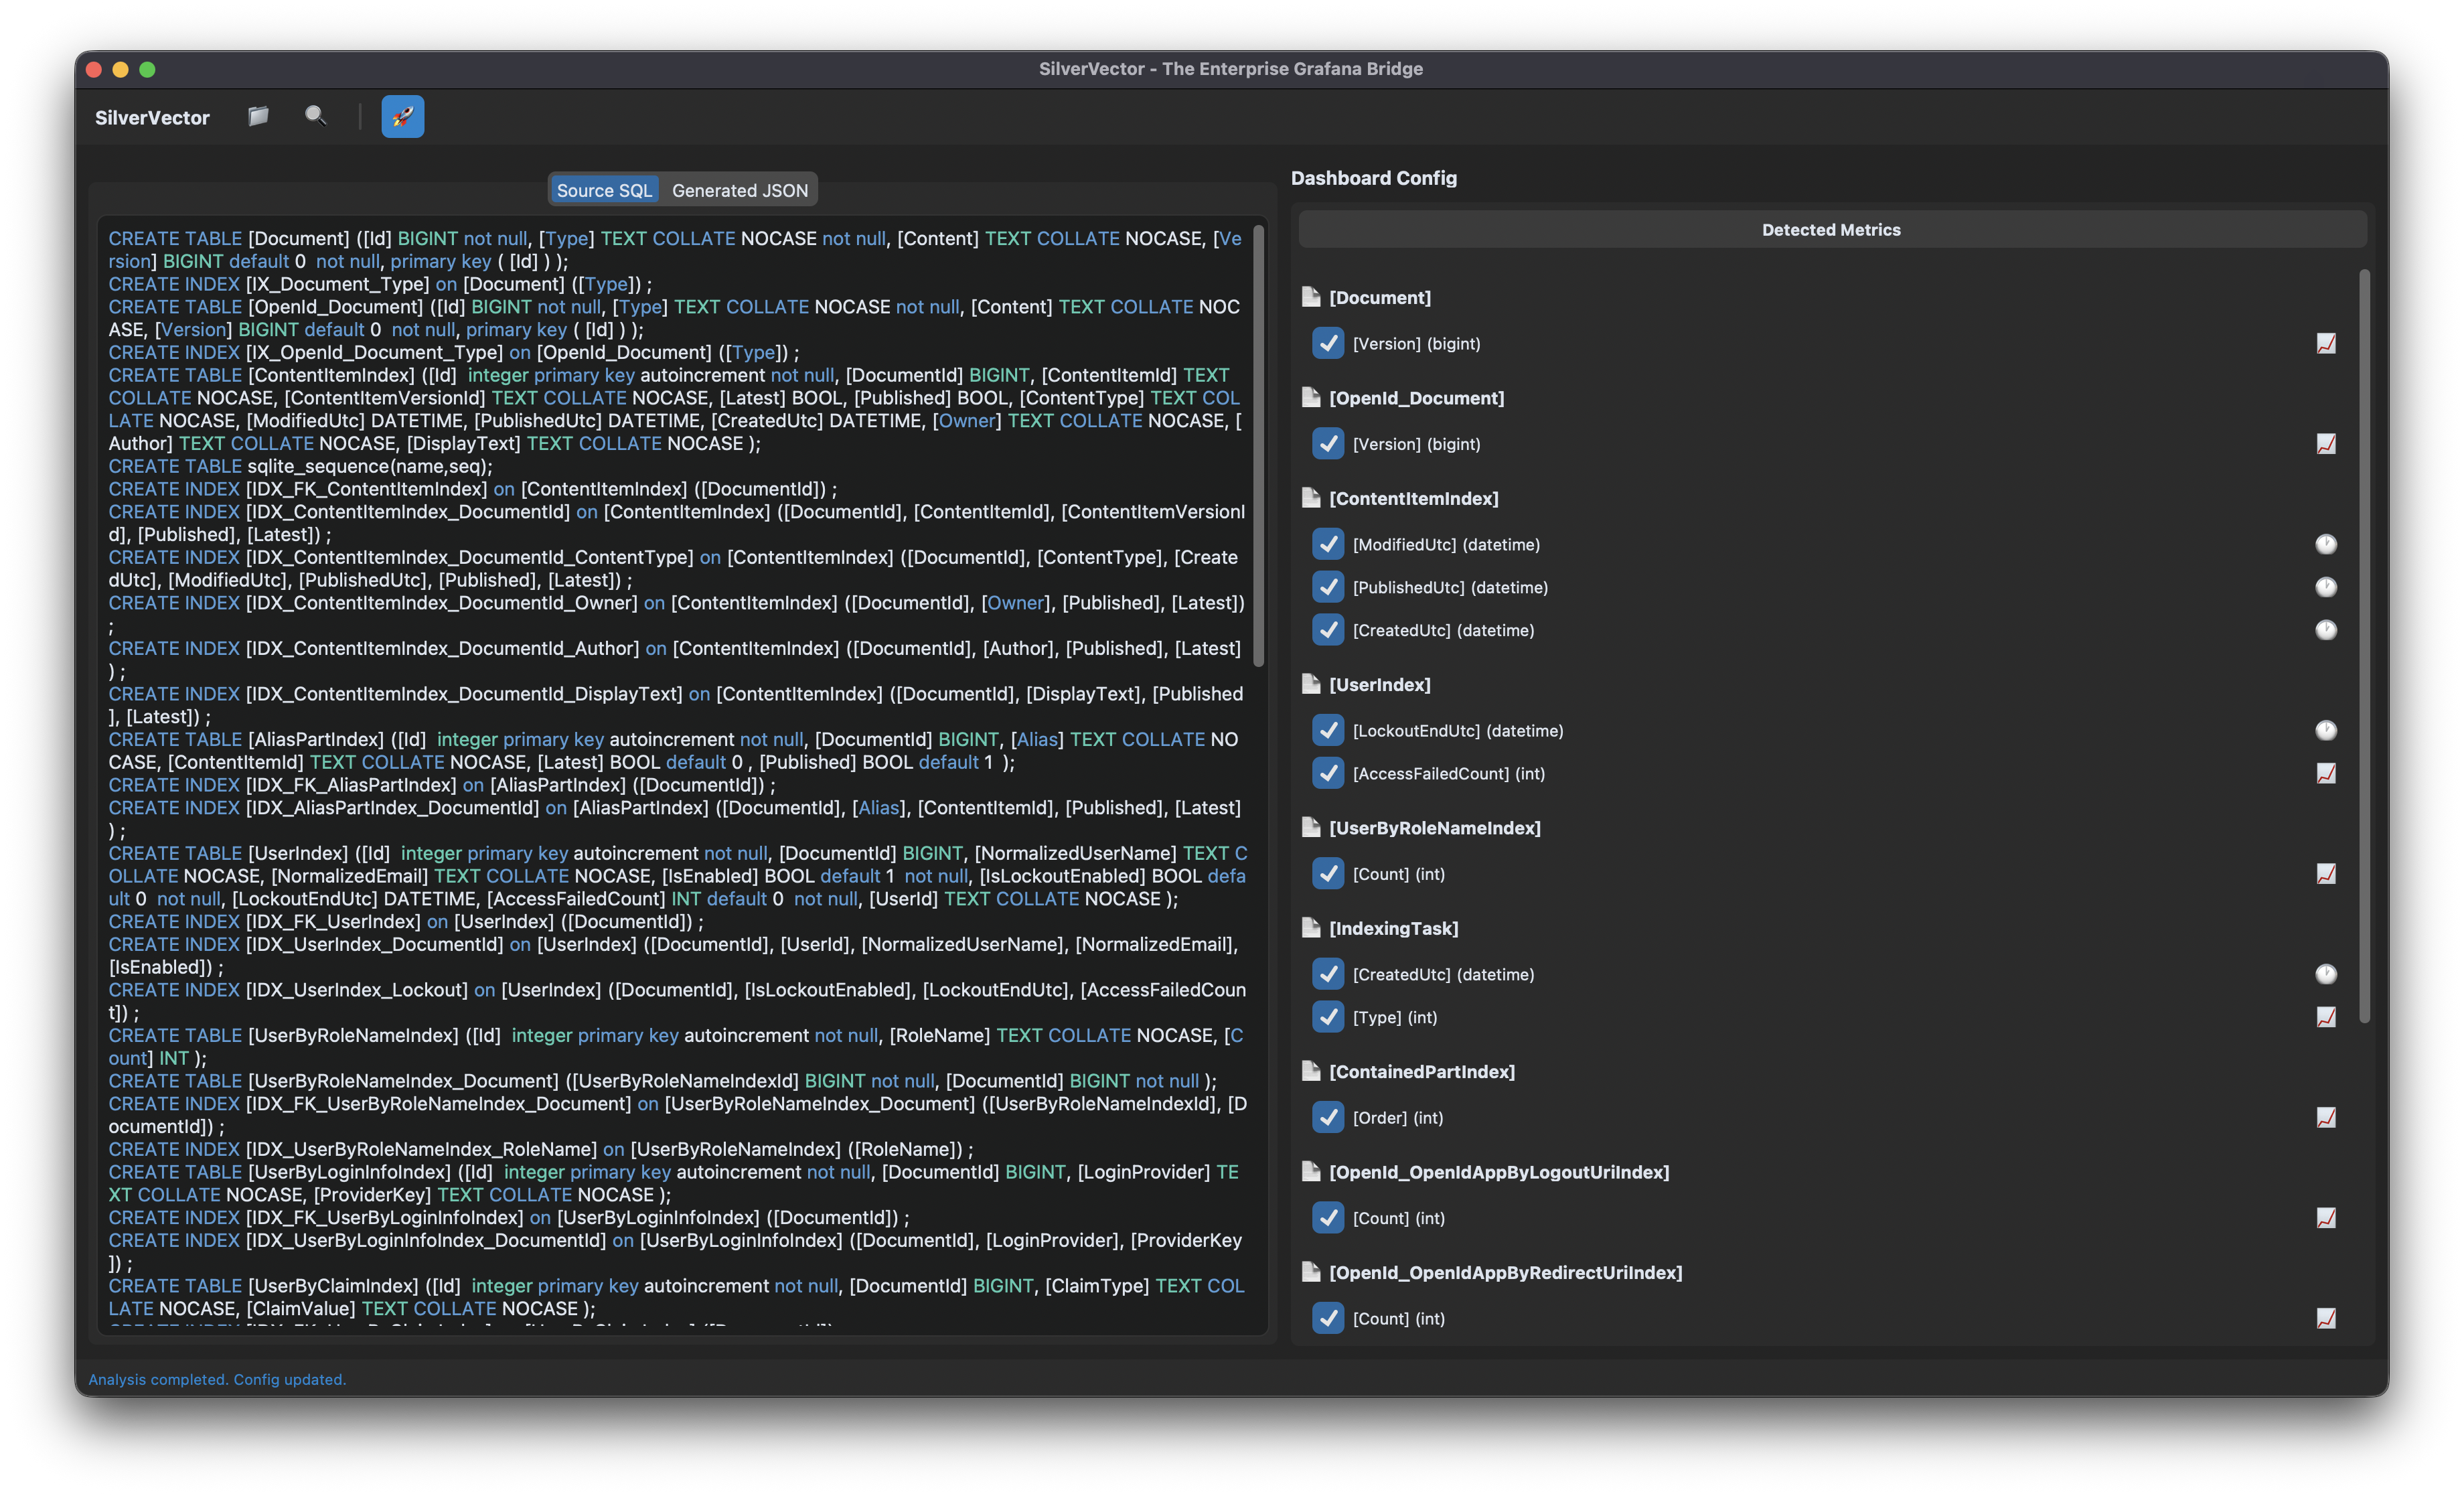
We took the standard SQL file containing Orchard Core DDL, i.e the script that creates the database tables used in the CMS. We did not need to connect to a live server. We also did not need API keys. We just needed the schema.
We taught SilverVector to recognise the signature of an Orchard Core database.
It sees ContentItemIndex? It knows this is an Orchard Core CMS;
It sees UserIndex? It knows there are users to count;
It sees PublishedUtc? It knows we can track velocity.
SilverVector detects the relevant metrics from the Orchard Core DDL that could be used in Grafana dashboard.
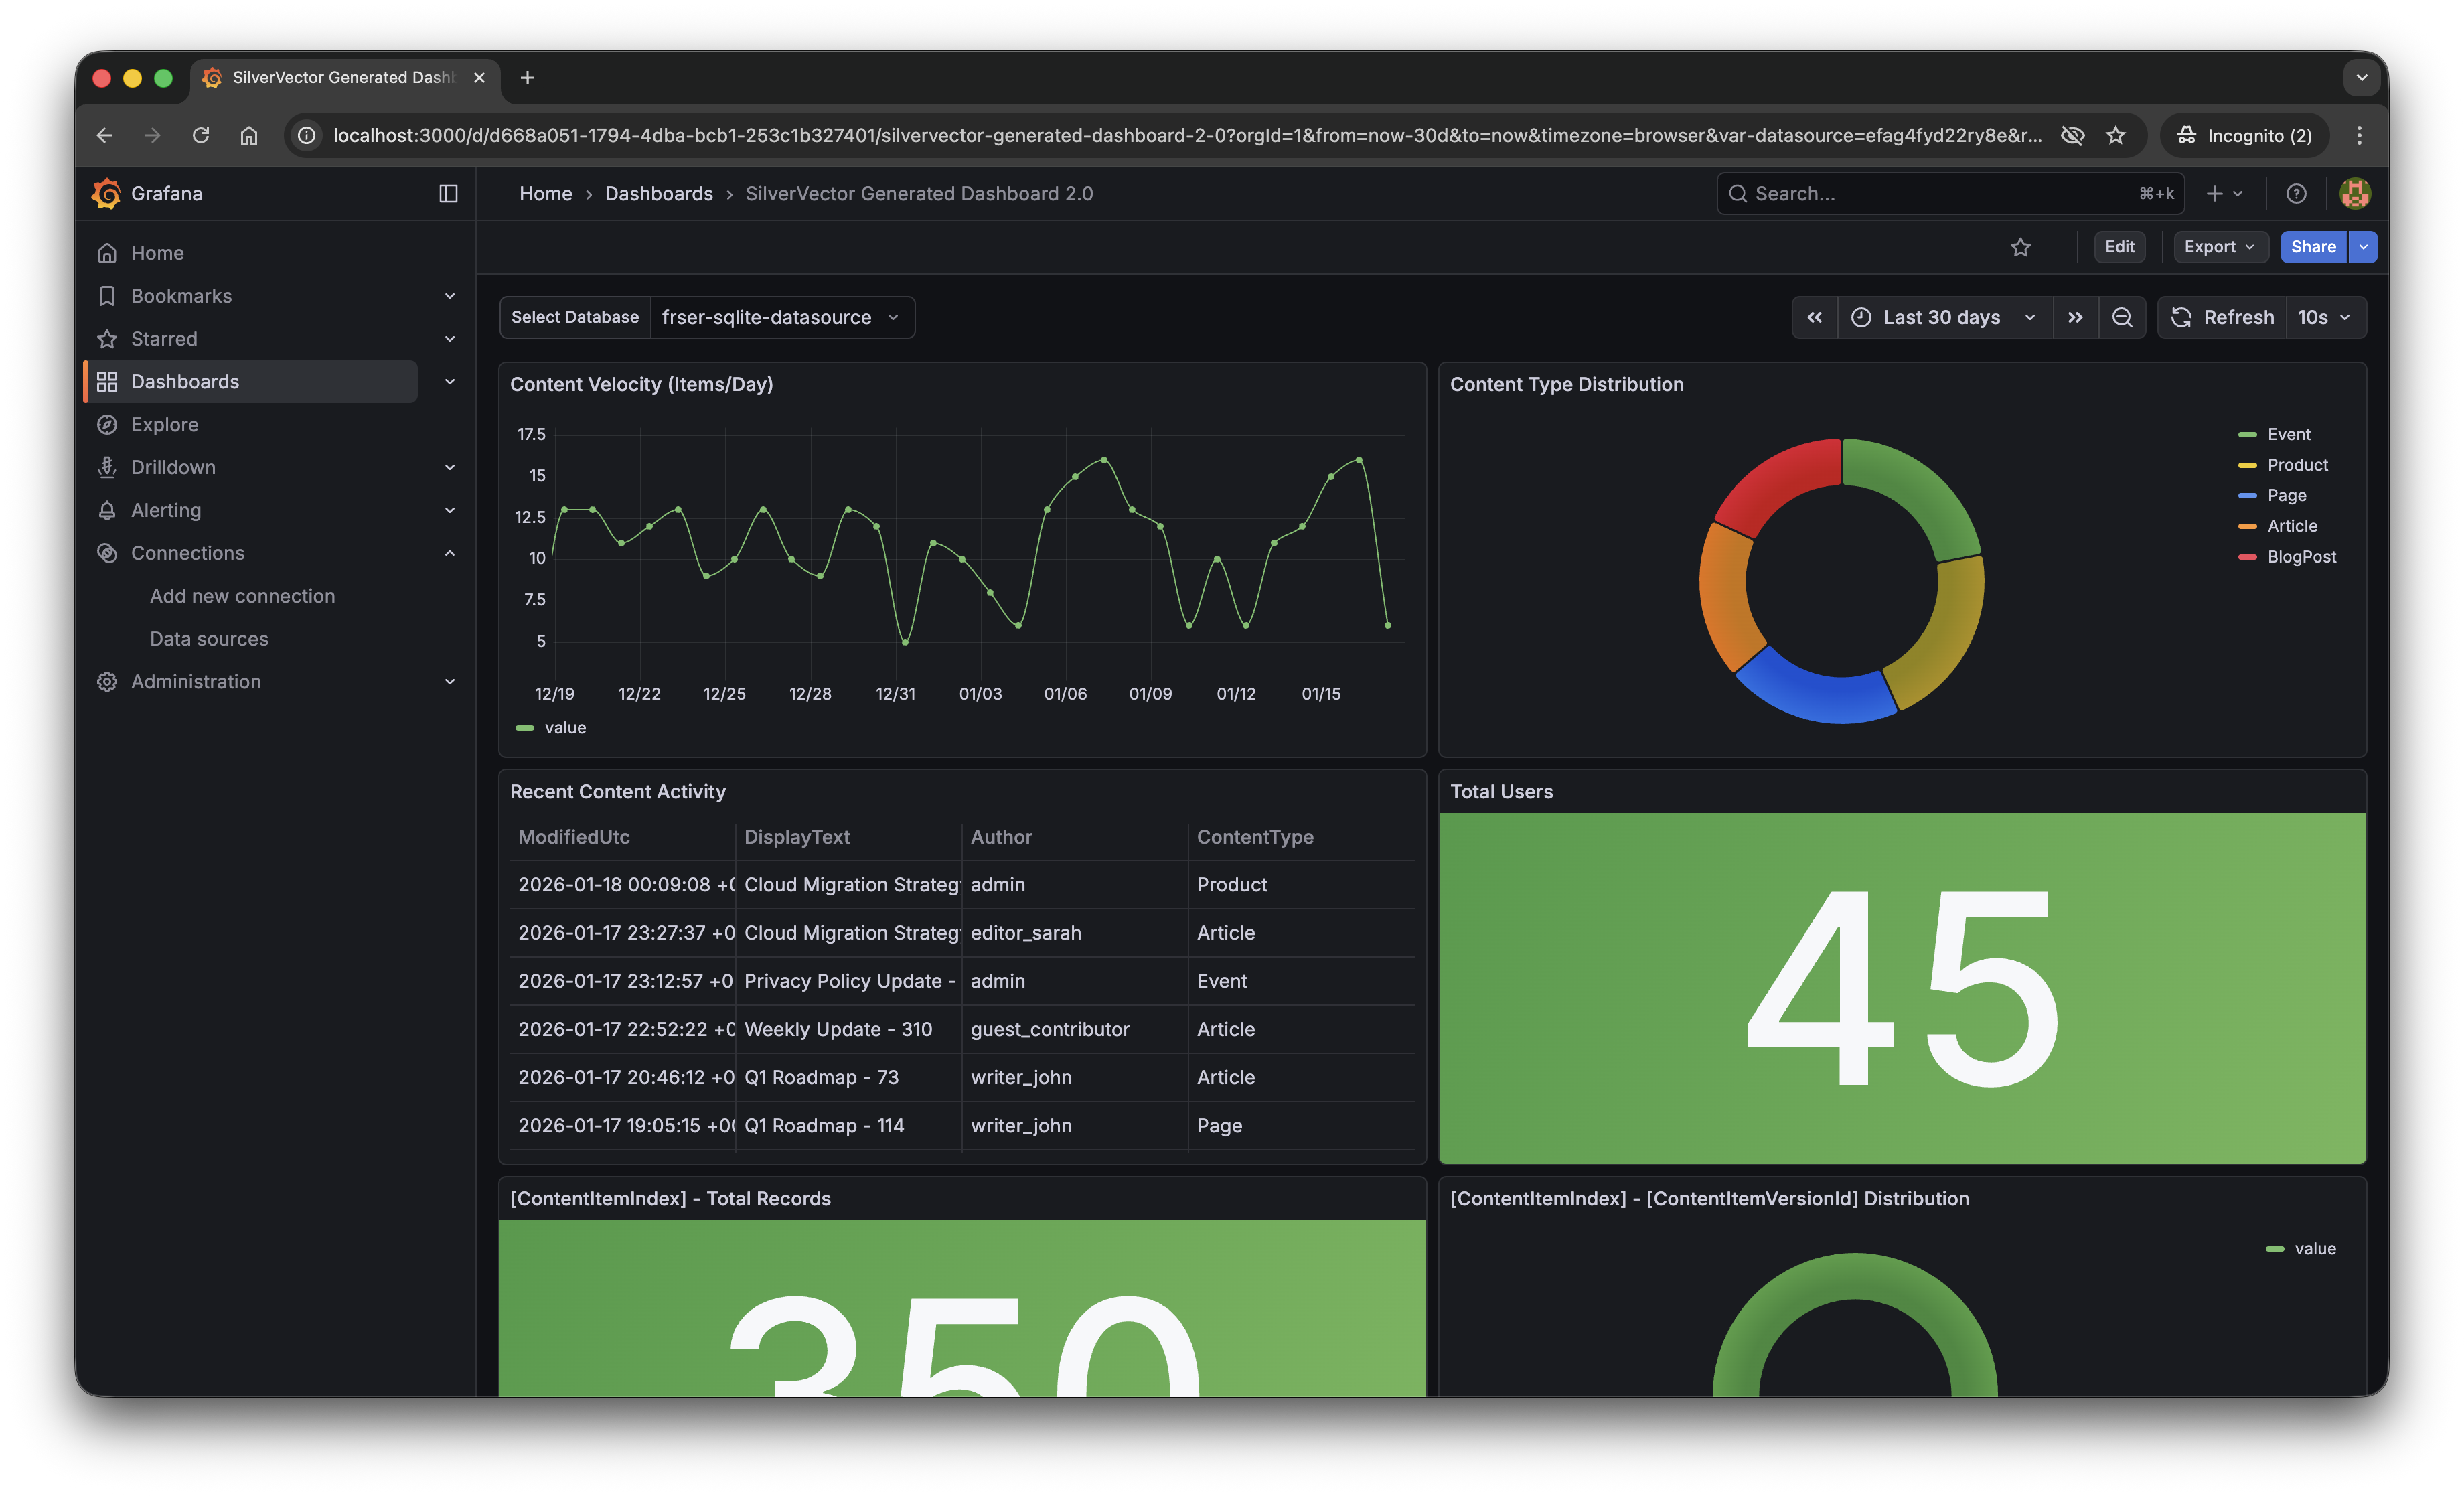
With a single click of the “blue rocket” button, SilverVector generated a JSON dashboard pre-configured with:
Content Velocity: A time-series graph showing publishing trends over the last 30 days.
Content Distribution: A pie chart breaking down content by type (Articles, Products, Pages).
Recent Activity: A detailed table of who changed what and when.
User Growth: A stat panel showing the total registered user base.
The “Content Velocity” graph generated by SilverVector.
Why This Matters for Orchard Core Developers
This is not just about saving 10 minutes of clicking to setup the initial Grafana dashboard. It is about empowerment.
As Orchard Core developers, you do not need to commit to a complex observability stack just to see if it is worth it. You can generate this dashboard locally, just as demonstrated above, point it at a backup of your production database, and instantly show your stakeholders the value of your work.
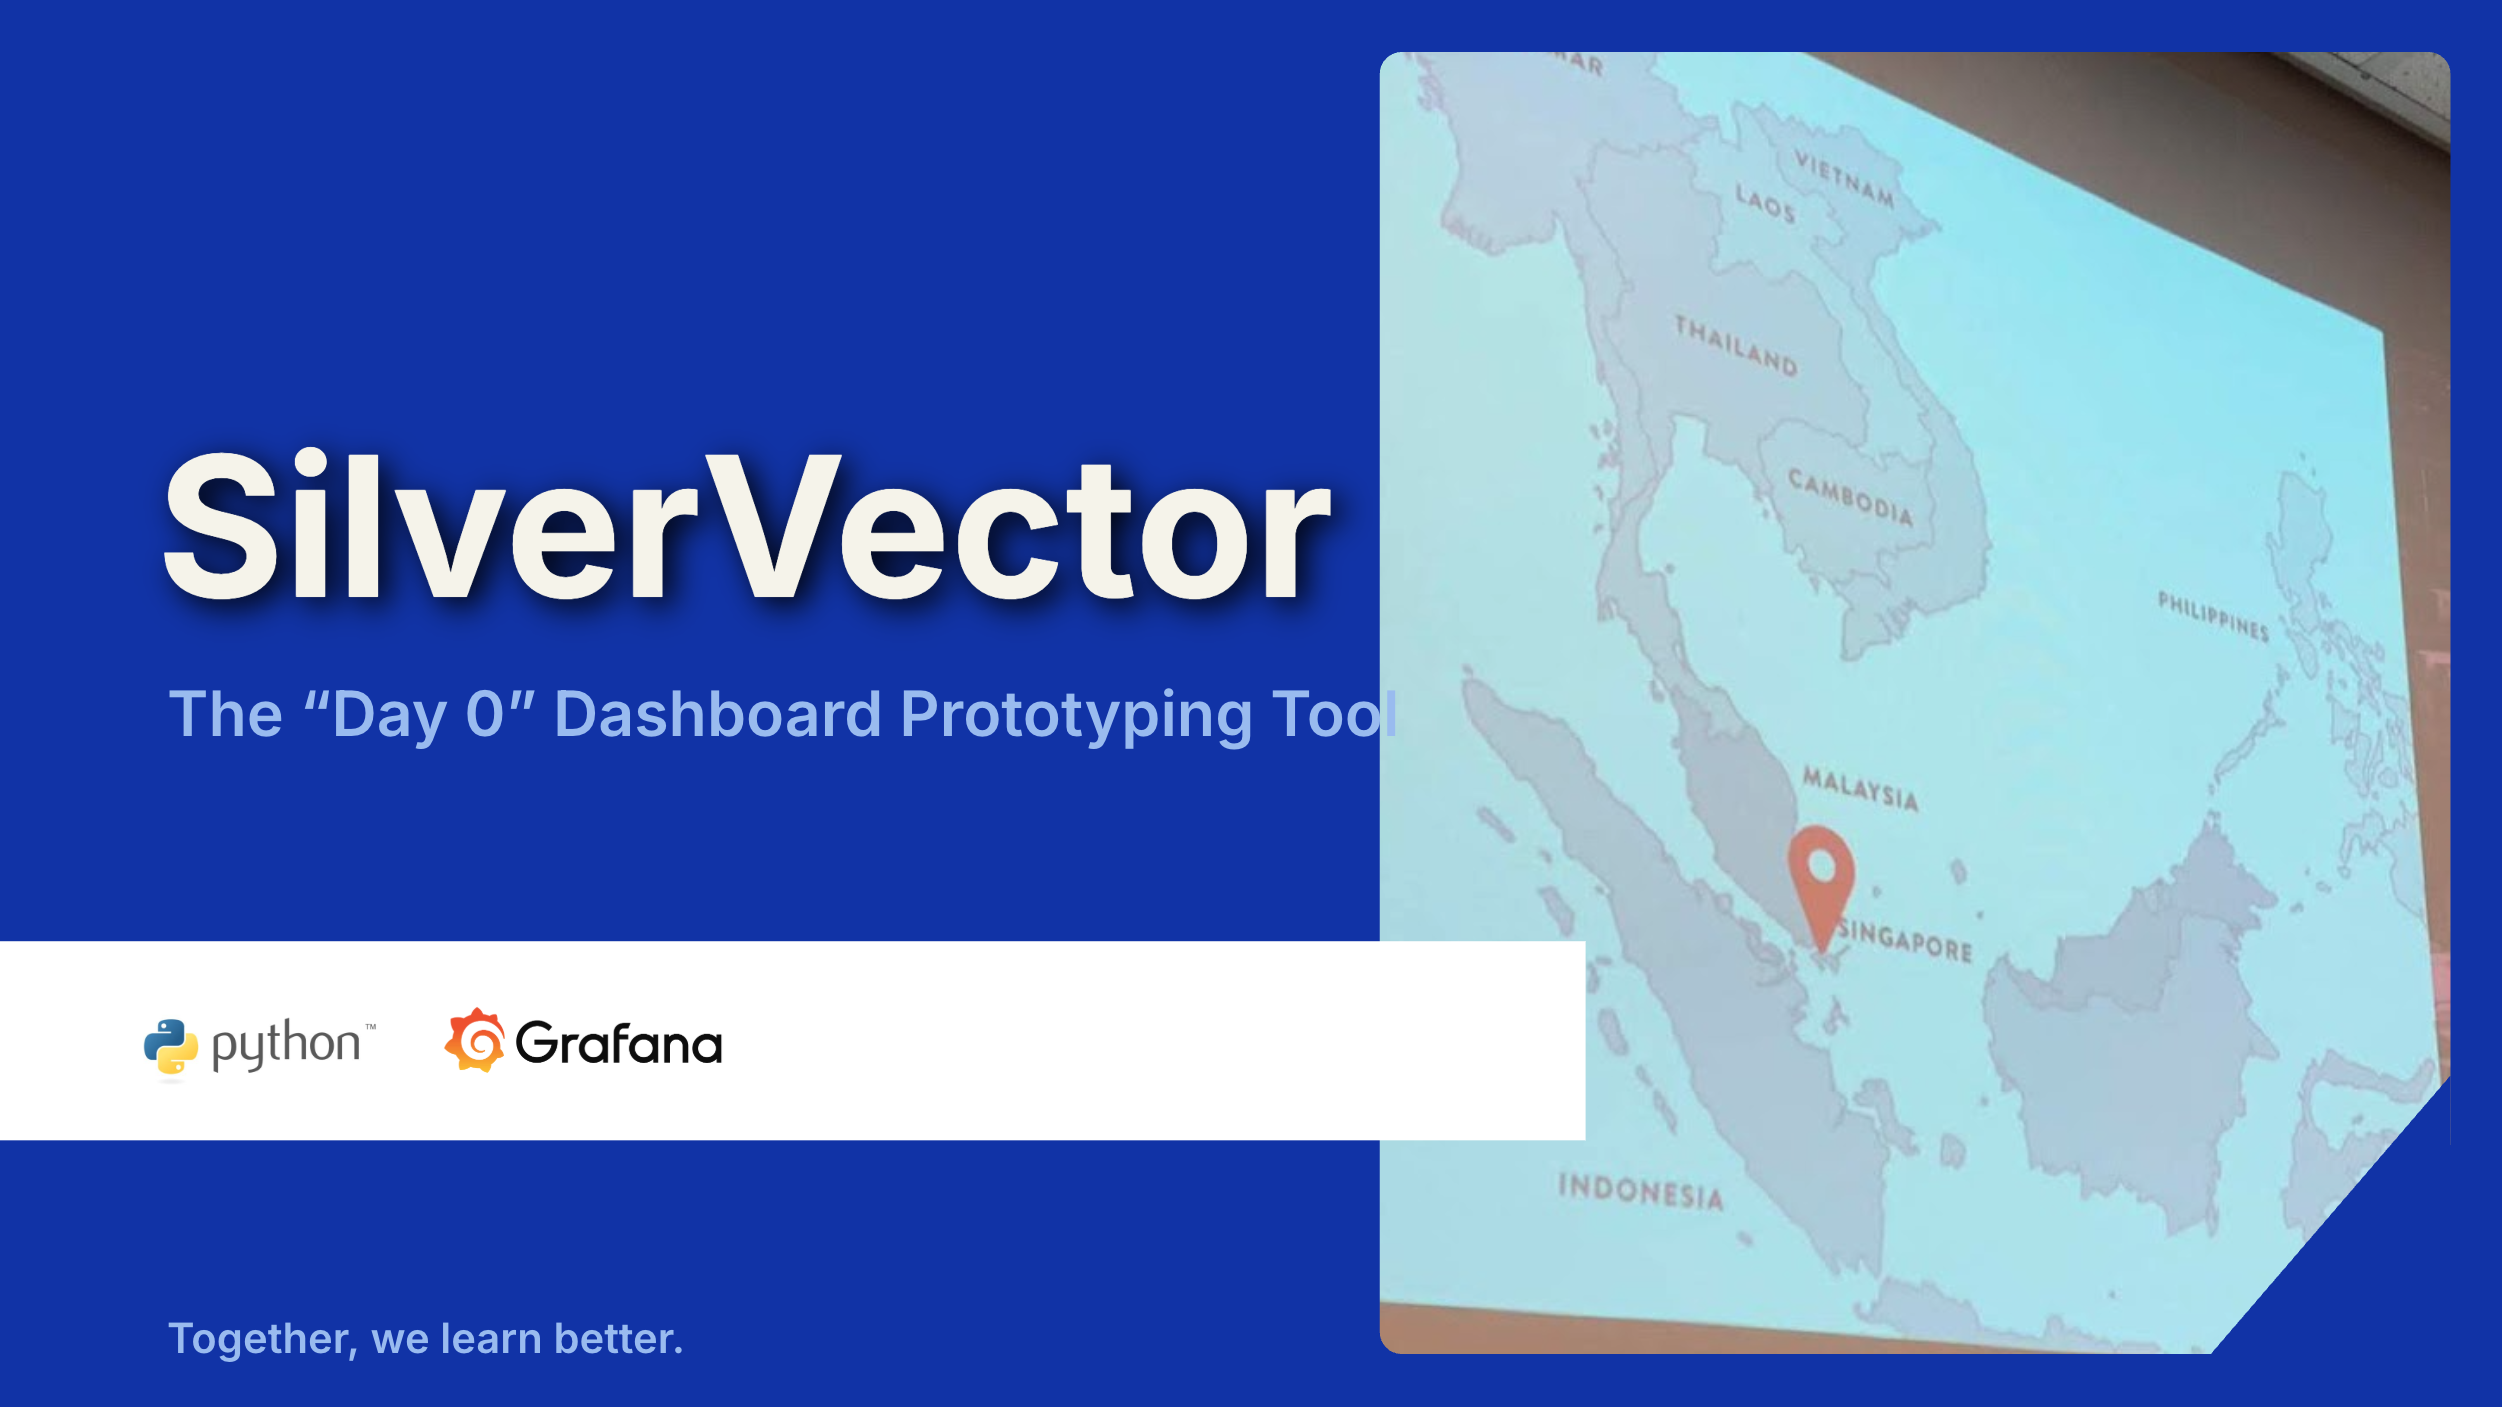
For many small SMEs in Singapore and Malaysia, as shared in our earlier post, the barrier of deploying observability stack is not just technical but it is survival. They are often too busy worrying about the rent of this month to invest time in a complex tech stack they do not fully understand. SilverVector lowers that barrier to minimal.
SilverVector gives you the foundation. We generate the boring boilerplate, i.e. the grid layout, the panel IDs, the basic SQL queries. Once you have that JSON, you are free to extend it! For example, you want to add CPU Usage? Just add a panel for your server metrics. Want to track Page Views? Join it with your IIS/Nginx logs.
In addition, since we rely on standard SQL indices such as ContentItemIndex, this dashboard works on any Orchard Core installation that uses a SQL database (SQL Server, SQLite, PostgreSQL, MySQL). You do not need to install a special module in your CMS application code.
A Call to Action
We believe the “Day 0” of observability should not be hard. It should be a default.
If you are an Orchard Core developer, try SilverVector today. Paste in your DDL, generate the dashboard, and see your Orchard Core CMS in a whole new light.
SilverVector is open source. Fork it, tweak the detection logic, and help us build the ultimate “Day 0” dashboard tool for every developer.
In the world of data visualisation, Grafana is the leader. It is the gold standard for observability, used by industry leaders to monitor everything from bank transactions to Mars rovers. However, for a local e-commerce shop in Penang or a small digital agency in Singapore, Grafana can feel like bringing a rocket scientist tool to cut fruits because it is powerful, but perhaps too difficult to use.
This is why we build SilverVector.
SilverVector generates standard Grafana JSON from DDL.
Why SilverVector?
In Malaysia and Singapore, SMEs are going digital very fast. However, they rarely have a full DevOps team. Usually, they just rely on The Solo Engineer, i.e. the freelancer, the agency developer, or the “full-stack developer” who does everything.
A common mistake in growing SMEs is asking full-stack developers to build meaningful business insights. The result is almost always a custom-coded “Admin Panel”.
While functional, these custom tools are hidden technical debt:
High Maintenance: Every new metric requires a code change and a deployment;
Poor Performance: Custom dashboards are often unoptimised;
Lack of Standards: Every internal tool looks different.
Custom panels developed in-house in SMEs are often ugly, hard to maintain, and slow because they often lack proper pagination or caching.
SilverVector allows you to skip building the internal tool entirely. By treating Grafana as your GUI layer, you get a standardised, performant, and beautiful interface for free. You supply the SQL and Grafana handles the rendering.
In addition, to some of the full-stack developers, building a proper Grafana dashboard from scratch involves hours of repetitive GUI clicking.
For an SME, “Zero Orders in the last hour” is not just a statistic. Instead, it is an emergency. SilverVector focuses on this Operational Intelligence, helping backend engineers visualise their system health easily.
Why not just use Terraform?
Terraform (and GitOps) is the gold standard for long-term maintenance. But terraform import requires an existing resource. SilverVector acts as the prototyping engine. It helps us in Day 0, i.e. getting us from “Zero” to “First Draft” in a few seconds. Once the client approves the dashboard, we can export that JSON into our GitOps workflow. We handle the chaotic “Drafting Phase” so our Terraform manages the “Stable Phase.”
Another big problem is trust. In the enterprise world, shadow IT is a nightmare. In the SME world, managers are also afraid to give API keys or database passwords to a tool they just found on GitHub.
SilverVector was built on a strict “Zero-Knowledge” principle.
We do not ask for database passwords;
We do not ask for API keys;
We do not connect to your servers.
We only ask for one safe thing: Schema (DDL). By checking the structure of your data (like CREATE TABLE orders...) and not the meaningful data itself, we can generate the dashboard configuration file. You take that file and upload it to your own Grafana yourself. We never connect to your production environment.
Key Technical Implementation
Building this tool means we act like a translator: SQL DDL -> Grafana JSON Model. Here is how we did it.
We did not use a heavy full SQL engine because we are not trying to be a database. We simply want to be a shortcut.
We built SilverVectorParser using regex and simple logic to solve the “80/20” problem. It guesses likely metrics (e.g., column names like amount, duration) and dimensions. However, regex is not perfect. That is why the Tooling matters more than the Parser. If our logic guesses wrong, you do not have to debug our python code. You just uncheck the box in the UI.
The goal is not to be a perfect compiler. Instead, it is to be a smart assistant that types the repetitive parts for you.
Screenshot of the SilverVector UI Main Window.
For the interface, we choose CustomTkinter. Why a desktop GUI instead of a web app?
It comes down to Speed and Reality.
Offline-First: Network infrastructure in parts of Malaysia, from remote industrial sites in Sarawak to secure server basements in Johor Bahru can be spotty. This is critical for engineers deploying to Self-Hosted Grafana (OSS) instances where Internet access is restricted or unavailable;
Zero Configuration: Connecting a tool to your Grafana API requires generating service accounts, copying tokens, and configuring endpoints. It is tedious. SilverVector bypasses this “configuration tax” by generating a standard JSON file when you can just generate, drag, and drop.
Human-in-the-Loop: A command-line tool runs once and fails if the regex is wrong. Our UI allows you to see the detection and correct it instantly via checkboxes before generating the JSON.
To make the tool feel like a real developer product, we integrate a proper code experience. We use pygments to read both the input SQL and the output JSON. We then map those tokens to Tkinter text tags colours. This makes it look familiar, so you can spot syntax errors in the input schema easily.
Close-up zoom of the text editor area in SilverVector.
Technical Note: To ensure the output actually works when you import it:
Datasources: We set the Data Source as a Template Variable. On import, Grafana will simply ask you: “Which database do you want to use?” You do not need to edit the JSON helper IDs manually.
Performance: Time-series queries automatically include time range clauses (using $__from and $__to). This prevents the dashboard from accidentally scanning your entire 10-year history every time you refresh;
SQL Dialects: The current version uses SQLite for the local demo so anyone can test it immediately without spinning up Docker containers.
Future-Proofing for Growth
SilverVector is currently in its MVP phase, and the vision is simple: Productivity.
If you are a consultant or an engineer who has to set up observability for many projects, you know the pain of configuring panel positions manually. SilverVector is the painkiller. Stop writing thousands of lines of JSON boilerplate. Paste your schema, click generate, and spend your time on the queries that actually matter.
The resulting Grafana dashboard generated by SilverVector.
A sensible question that often comes up is: “Is this just a short-term fix? What happens when I hire a real team?”
The answer lies in Standardisation.
SilverVector generates standard Grafana JSON, which is the industry default. Since you own the output file, you will never be locked in to our tool.
Ownership: You can continue to edit the dashboard manually in Grafana OSS or Grafana Cloud as your requirements change;
Scalability: When you eventually hire a full DevOps engineer or migrate to Grafana Cloud, the JSON generated by SilverVector is fully compatible. You can easily convert it into advanced Code (like Terraform) later. We simply do the heavy lifting of writing the first 500 lines for them;
Stability: By building on simple SQL principles, the dashboard remains stable even as your data grows.
In addition, since SilverVector generates SQL queries that read from your database directly, you must be a responsible engineer to ensure your columns (especially timestamps) are indexed properly. A dashboard is only as fast as the database underneath it!
In short, we help you build the foundation quickly so you can renovate freely later.
Pinecone worked well, but as the project grew, I wanted more control, something open-source, and a cheaper option. That is when I found pgvector, a tool that adds vector search to PostgreSQL and gives the flexibility of an open-source database.
About HSR and Relic Recommendation System
Honkai: Star Rail (HSR) is a popular RPG that has captured the attention of players worldwide. One of the key features of the game is its relic system, where players equip their characters with relics like hats, gloves, or boots to boost stats and unlock special abilities. Each relic has unique attributes, and selecting the right sets of relics for a character can make a huge difference in gameplay.
As a casual player, I often found myself overwhelmed by the number of options and the subtle synergies between different relic sets. Finding the good relic combination for each character was time-consuming.
This is where LLMs like Gemini come into play. With the ability to process and analyse complex data, Gemini can help players make smarter decisions.
In November 2024, I started a project to develop a Gemini-powered HSR relic recommendation system which can analyse a player’s current characters to suggest the best options for them. In the project, I have been storing embeddings in Pinecone.
Embeddings and Vector Database
An embedding is a way to turn data, like text or images, into a list of numbers called a vector. These vectors make it easier for a computer to compare and understand the relationships between different pieces of data.
For example, in the HSR relic recommendation system, we use embeddings to represent descriptions of relic sets. The numbers in the vector capture the meaning behind the words, so similar relics and characters have embeddings that are closer together in a mathematical sense.
This is where vector databases like Pinecone or pgvector come in. Vector databases are designed for performing fast similarity searches on large collections of embeddings. This is essential for building systems that need to recommend, match, or classify data.
pgvector is an open-source extension for PostgreSQL that allows us to store and search for vectors directly in our database. It adds specialised functionality for handling vector data, like embeddings in our HSR project, making it easier to perform similarity searches without needing a separate system.
Unlike managed services like Pinecone, pgvector is open source. This meant we could use it freely and avoid vendor lock-in. This is a huge advantage for developers.
Finally, since pgvector runs on PostgreSQL, there is no need for additional managed service fees. This makes it a budget-friendly option, especially for projects that need to scale without breaking the bank.
Choosing the Right Model
While the choice of the vector database is important, it is not the key factor in achieving great results. The quality of our embeddings actually is determined by the model we choose.
For my HSR relic recommendation system, when our embeddings were stored in Pinecone, I started by using the multilingual-e5-large model from Microsoft Research offered in Pinecone.
When I migrated to pgvector, I had the freedom to explore other options. For this migration, I chose the all-MiniLM-L6-v2 model hosted on Hugging Face, which is a lightweight sentence-transformer designed for semantic similarity tasks. Switching to this model allowed me to quickly generate embeddings for relic sets and integrate them into pgvector, giving me a solid starting point while leaving room for future experimentation.
The all-MiniLM-L6-v2 model hosted on Hugging Face.
Using all-MiniLM-L6-v2 Model
Once we have decided to use the all-MiniLM-L6-v2 model, the next step is to generate vector embeddings for the relic descriptions. This model is from the sentence-transformers library, so we first need to install the library.
pip install sentence-transformers
The library offers SentenceTransformer class to load pre-trained models.
from sentence_transformers import SentenceTransformer

model_name = 'all-MiniLM-L6-v2'
model = SentenceTransformer(model_name)
At this point, the model is ready to encode text into embeddings.
The SentenceTransformer model takes care of tokenisation and other preprocessing steps internally, so we can directly pass text to it.
# Function to generate embedding for a single text
def generate_embedding(text):
    # No need to tokenise separately, it's done internally
    # No need to average the token embeddings
    embeddings = model.encode(text)

    return embeddings
In this function, when we call model.encode(text), the model processes the text through its transformer layers, generating an embedding that captures its semantic meaning. The output is already optimised for tasks like similarity search.
Setting up the Database
After generating embeddings for each relic sets using the all-MiniLM-L6-v2 model, the next step is to store them in the PostgreSQL database with the pgvector extension.
Here, a dimension refers to one of the “features” that helps describe something. When we talk about vectors and embeddings, each dimension is just one of the many characteristics used to represent a piece of text. These features could be things like the type of words used, their relationships, and even the overall meaning of the text.
Updating the Database
After the table is created, we can proceed to create INSERT INTO SQL statements to insert the embeddings and their associated text into the database.
In this step, I load the relic information from a JSON file and process it.
import json

# Load your relic set data from a JSON file
with open('/content/hsr-relics.json', 'r') as f:
    relic_data = json.load(f)

# Prepare data
relic_info_data = [
    {"id": relic['name'], "text": relic['two_piece'] + " " + relic['four_piece']}  # Combine descriptions
    for relic in relic_data
]
The relic_info_data will then be passed to the following function to generate the INSERT INTO statements.
# Function to generate INSERT INTO statements with vectors
def generate_insert_statements(data):
    # Initialise list to store SQL statements
    insert_statements = []

    for record in data:
        # Extracting text and id from the record
        id = record.get('id')
        text = record.get('text')

        # Generate the embedding for the text
        embedding = generate_embedding(text)

        # Convert the embedding to a list
        embedding_list = embedding.tolist()

        # Create the SQL INSERT INTO statement
        sql_statement = f"""
        INSERT INTO embeddings (id, vector, text)
        VALUES (
          '{id.replace("'", "''")}',
          ARRAY{embedding_list},
          '{text.replace("'", "''")}')
        ON CONFLICT (id) DO UPDATE
        SET vector = EXCLUDED.vector, text = EXCLUDED.text;
        """

        # Append the statement to the list
        insert_statements.append(sql_statement)

    return insert_statements
The embeddings of the relic sets are successfully inserted to the database.
How It All Fits Together: Query the Database
Once we have stored the vector embeddings of all the relic sets in our PostgreSQL database, the next step is to find the relic sets that are most similar to a given character’s relic needs.
Just like what we have done for storing relic set embeddings, we need to generate an embedding for the query describing the character’s relic needs. This is done by passing the query through the model as demonstrated in the following code.
The generated embedding is an array of 384 numbers. We simply use this array in our SQL query below.
SELECT id, text, vector <=> '[<embedding here>]' AS distance
FROM embeddings
ORDER BY distance
LIMIT 3;
The key part of the query is the <=> operator. This operator calculates the “distance” between two vectors based on cosine similarity. In our case, it measures how similar the query embedding is to each stored embedding. The smaller the distance, the more similar the embeddings are.
We use LIMIT 3 to get the top 3 most similar relic sets.
Test Case: Finding Relic Sets for Gallagher
Gallagher is a Fire and Abundance character in HSR. He is a sustain unit that can heal allies by inflicting a debuff on the enemy.
According to the official announcement, Gallagher is a healer. (Image Source: Honkai: Star Rail YouTube)
The following screenshot shows the top 3 relic sets which are closely related to a HSR character called Gallagher using the query “Suggest the best relic sets for this character: Gallagher is a Fire and Abundance character in Honkai: Star Rail. He can heal allies.”
The returned top 3 relic sets are indeed recommended for Gallagher.
One of the returned relic sets is called the “Thief of Shooting Meteor”. It is the official recommended relic set in-game, as shown in the screenshot below.
Gallagher’s official recommended relic set.
Future Work
In our project, we will not be implementing indexing because currently in HSR, there are only a small number of relic sets. Without an index, PostgreSQL will still perform vector similarity searches efficiently because the dataset is small enough that searching through it directly will not take much time. For small-scale apps like ours, querying the vector data directly is both simple and fast.
However, when our dataset grows larger in the future, it is a good idea to explore indexing options, such as the ivfflat index, to speed up similarity searches.
On a chilly November morning, I attended the Google DevFest 2024 in Singapore. Together with my friends, we attended a workshop titled “Gemini Masterclass: How to Unlock Its Power with Prompting, Functions, and Agents.” The session was led by two incredible speakers, Martin Andrews and Sam Witteveen.
Martin, who holds a PhD in Machine Learning and has been an Open Source advocate since 1999. Sam is a Google Developer Expert in Machine Learning. Both of them are also organisers of the Machine Learning Singapore Meetup group. Together, they delivered an engaging and hands-on workshop about Gemini, the advanced LLM from Google.
Thanks to their engaging Gemini Masterclass, I have taken my first steps into the world of LLMs. This blog post captures what I learned and my journey into the fascinating world of Gemini.
Martin Andrews presenting in Google DevFest 2024 in Singapore.
About LLM and Gemini
LLM stands for Large Language Model. To most people, an LLM is like a smart friend who can answer almost all our questions with responses that are often accurate and helpful.
As a LLM, Gemini is trained on large amount of text data and can perform a wide range of tasks: answering questions, writing stories, summarising long documents, or even helping to debug code. What makes them special is their ability to “understand” and generate language in a way that feels natural to us.
Many of my developer friends have started using Gemini as a coding assistant in their IDEs. While it is good at that, Gemini is much more than just a coding tool.
Gemini is designed to not only respond to prompts but also act as an assistant with an extra set of tools. To make the most of Gemini, it is important to understand how it works and what it can (and cannot) do. With the knowledge gained from the DevFest workshop, I decided to explore how Gemini could assist with optimising relic choices in a game called Honkai: Star Rail.
Honkai: Star Rail and Gemini for Its Relic Recommendations
Honkai: Star Rail (HSR) is a popular RPG that has captured the attention of players worldwide. One of the key features of the game is its relic system, where players equip their characters with relics like hats, gloves, or boots to boost stats and unlock special abilities. Each relic has unique attributes, and selecting the right sets of relics for a character can make a huge difference in gameplay.
As a casual player, I often found myself overwhelmed by the number of options and the subtle synergies between different relic sets. Finding the good relic combination for each character was time-consuming.
This is where LLMs like Gemini come into play. With the ability to process and analyse complex data, Gemini can help players make smarter decisions.
In this blog post, I will briefly show how this Gemini-powered relic recommendation system can analyse a player’s current characters to suggest the best options for them. Then it will also explain the logic behind its recommendations, helping us to understand why certain relics are ideal.
Setup the Project
To make my project code available to everyone, I used Google Colab, a hosted Jupyter Notebook service that requires no setup to use and provides free access to computing resources, including GPUs and TPUs. You can access my code by clicking on the button below.
In my project, I used the google-generativeai Python library, which is pre-installed in Colab. This library serves as a user-friendly API for interacting with Google LLMs, including Gemini. It makes it easy for us to integrate Gemini capabilities directly into our code.
Next, we will need to import the necessary libraries.
Importing the libraries and setup Gemini client.
The first library to import is definitely the google.generativeai. Without it, we cannot interact with Gemini easily. Then we have google.colab.userdata which securely retrieves sensitive data, like our API key, directly from the Colab notebook environment.
We will also use IPython.display for displaying results in a readable format, such as Markdown.
HONKAI_STAR_RAIL_PLAYER_ID: Your HSR player UID. It is used later to personalise relic recommendations.
GOOGLE_API_KEY: The API key that we can get from Google AI Studio to authenticate with Gemini.
Creating and retrieving our API keys in Google AI Studio.
Once we have initialised the google.generativeai library with the GOOGLE_API_KEY, we can proceed to specify the Gemini model we will be using.
The choice of model is crucial in LLM projects. Google AI Studio offers several options, each representing a trade-off between accuracy and cost. For my project, I choose models/gemini-1.5-flash-8b-001, which provided a good balance for this experiment. Larger models might offer slightly better accuracy but at a significant cost increase.
Google AI Studio offers a range of models, from smaller, faster models suitable for quick tasks to larger, more powerful models capable of more complex processing.
Hallucination and Knowledge Limitation
We often think of LLMs like Gemini as our smart friends who can answer any question. But just like even our smartest friend can sometimes make mistakes, LLMs have their limits too.
Gemini knowledge is based on the data it was trained on, which means it doesn’t actually know everything. Sometimes, it might hallucinate, i.e. model invents information that sounds plausible but not actually true.
Kiana is not a character from Honkai: Star Rail but she is from another game called Honkai Impact 3rd.
While Gemini is trained on a massive dataset, its knowledge is not unlimited. As a responsible AI, it acknowledges its limitations. So, when it cannot find the answer, it will tell us that it lacks the necessary information rather than fabricating a response. This is how Google builds safer AI systems, as part of its Secure AI Framework (SAIF).
Knowledge cutoff in action.
To overcome these constraints, we need to employ strategies to augment the capabilities of LLMs. Techniques such as integrating Retrieval-Augmented Generation (RAG) and leveraging external APIs can help bridge the gap between what the model knows and what it needs to know to perform effectively.
System Instructions
Leveraging System Instructions is a way to improve the accuracy and reliability of Gemini responses.
System instructions are prompts given before the main query in order to guide Gemini. These instructions provide crucial context and constraints, significantly enhancing the accuracy and reliability of the generated output.
System Instruction with contextual information about HSR characters ensures Gemini has the necessary background knowledge.
The specific design and phrasing of the system instructions provided to the Gemini is crucial. Effective system instructions provide Gemini with the necessary context and constraints to generate accurate and relevant responses. Without carefully crafted system instructions, even the most well-designed prompt can yield poor results.
Context Framing
As we can see from the example above, writing clear and effective system instructions requires careful thought and a lot of testing.
This is just one part of a much bigger picture called Context Framing, which includes preparing data, creating embeddings, and deciding how the system retrieves and uses that data. Each of these steps needs expertise and planning to make sure the solution works well in real-world scenarios.
You might have heard the term “Prompt Engineering,” and it sounds kind of technical, but it is really about figuring out how to ask the LLM the right questions in the right way to get the best answers from an LLM.
While context framing and prompt engineering are closely related and often overlap, they emphasise different aspects of the interaction with the LLM.
Stochasticity
While experimenting with Gemini, I noticed that even if I use the exact same prompt, the output can vary slightly each time. This happens because LLMs like Gemini have a built-in element of randomness , known as Stochasticity.
Lingsha, an HSR character released in 2024. (Image Credit: Game8)
For example, when querying for DPS characters, Lingsha was inconsistently included in the results. While this might seem like a minor variation, it underscores the probabilistic nature of LLM outputs and suggests that running multiple queries might be needed to obtain a more reliable consensus.
Lingsha was inconsistently included in the response to the query about multi-target DPS characters.
According to the official announcement, even though Lingsha is a healer, she can cause significant damage to all enemies too. (Image Source: Honkai: Star Rail YouTube)
Hence, it is important to treat writing efficient system instruction and prompt as iterative processes. so that we can experiment with different phrasings to find what works best and yields the most consistent results.
Temperature Tuning
We can also reduce the stochasticity of Gemini response through adjusting parameters like temperature. Lower temperatures typically reduce randomness, leading to more consistent outputs, but also may reduce creativity and diversity.
Temperature is an important parameter for balancing predictability and diversity in the output. Temperature, a number in the range of 0.0 to 2.0 with default to be 1.0 in gemini-1.5-flash model, indicates the probability distribution over the vocabulary in the model when generating text. Hence, a lower temperature makes the model more likely to select words with higher probabilities, resulting in more predictable and focused text.
Having Temperature=0 means that the model will always select the most likely word at each step. The output will be highly deterministic and repetitive.
Function Calls
A major limitation of using system instructions alone is their static nature.
For example, my initial system instructions included a list of HSR characters, but this list is static. The list does not include newly released characters or characters specific to the player’s account. In order to dynamically access a player’s character database and provide personalised recommendations, I integrated Function Calls to retrieve real-time data.
For fetching the player’s HSR character data, I leveraged the open-source Python library mihomo. This library provides an interface for accessing game data, enabling dynamic retrieval of a player’s characters and their attributes. This dynamic data retrieval is crucial for generating truly personalised relic recommendations.
Using the mihomo library, I retrieve five of my Starfaring Companions.
Defining the functions in my Python code was only the first step. To use function calls, Gemini needed to know which functions were available. We can provide this information to Gemini as shown below.
model = genai.GenerativeModel('models/gemini-1.5-flash-8b-001', tools=[get_player_name, get_player_starfaring_companions])
The correct function call is picked up by Gemini based on the prompt.
Using descriptive function names is essential for successful function calling with LLMs because the accuracy of function calls depends heavily on well-designed function names in our Python code. Inaccurate naming can directly impact the reliability of the entire system.
If our Python function is named incorrectly, for example, calling a function get_age but it returns the name of the person, Gemini might select that function wrongly when the prompt is asking for age.
After Gemini telling us which function to call, our code needs to call the function to get the result.
Grounding with Google Search
Function calls are a powerful way to access external data, but they require pre-defined functions and APIs.
To go beyond these limits and gather information from many online sources, we can use Gemini grounding feature with Google Search. This feature allows Gemini to google and include what it finds in its answers. This makes it easier to get up-to-date information and handle questions that need real-time data.
If you are getting the HTTP 429 errors when using the Google Search feature, please make sure you have setup a billing account here with enough quota.
With this feature enabled, we thus can ask Gemini to get some real-time data from the Internet, as shown below.
The upcoming v2.7 patch of HSR is indeed scheduled to be released on 4th December.
Building a Semantic Knowledge Base with Pinecone
System instructions and Google search grounding provide valuable context, but a structured knowledge base is needed to handle the extensive data about HSR relics.
Having explored system instructions and Google search grounding, the next challenge is to manage the extensive data about HSR relics. We need a way to store and quickly retrieve this information, enabling the system to generate timely and accurate relic recommendations. Thus we will need to use a vector database ideally suited for managing the vast dataset of relic information.
Vector databases, unlike traditional databases that rely on keyword matching, store information as vectors enabling efficient similarity searches. This allows for retrieving relevant relic sets based on the semantic meaning of a query, rather than relying solely on keywords.
There are many options for vector database, but I choose Pinecone. Pinecone, a managed service, offered the scalability needed to handle the HSR relic dataset and the robust API essential for reliable data access. Its availability of a free tier is also a significant factor because it allows me to keep costs low during the development of my project.
API keys in Pinecone dashboard.
Pinecone’s well-documented API and straightforward SDK make integration surprisingly easy. To get started, simply follow the Pinecone documentation to install the SDK in our code and retrieve the API key.
# Import the Pinecone library
from pinecone.grpc import PineconeGRPC as Pinecone
from pinecone import ServerlessSpec
import time

# Initialize a Pinecone client with your API key
pc = Pinecone(api_key=userdata.get('PINECONE_API_KEY'))
I prepare my Honkai: Star Rail relic data, which I have previously organised into a JSON structure. This data includes information on each relic set’s two-piece and four-piece effects. Here’s a snippet to illustrate the format:
[
  {
    "name": "Sacerdos' Relived Ordeal",
    "two_piece": "Increases SPD by 6%",
    "four_piece": "When using Skill or Ultimate on one ally target, increases the ability-using target's CRIT DMG by 18%, lasting for 2 turn(s). This effect can stack up to 2 time(s)."
  },
  {
    "name": "Scholar Lost in Erudition",
    "two_piece": "Increases CRIT Rate by 8%",
    "four_piece": "Increases DMG dealt by Ultimate and Skill by 20%. After using Ultimate, additionally increases the DMG dealt by the next Skill by 25%."
  },
  ...
]
With the relic data organised in Pinecone, the next challenge is to enable similarity searches with vector embedding. Vector embedding captures the semantic meaning of the text, allowing Pinecone to identify similar relic sets based on their inherent properties and characteristics.
Now, we can generate vector embeddings for the HSR relic data using Pinecone. The following code snippet illustrates this process which is to convert textual descriptions of relic sets into numerical vector embeddings. These embeddings capture the semantic meaning of the relic set descriptions, enabling efficient similarity searches later.
# Load relic set data from the JSON file with open('/content/hsr-relics.json', 'r') as f: relic_data = json.load(f)
# Prepare data for Pinecone relic_info_data = [ {"id": relic['name'], "text": relic['two_piece'] + " " + relic['four_piece']} # Combine relic set descriptions for relic in relic_data ]
# Generate embeddings using Pinecone embeddings = pc.inference.embed( model="multilingual-e5-large", inputs=[d['text'] for d in relic_info_data], parameters={"input_type": "passage", "truncate": "END"} )
Pinecone ability to perform fast similarity searches relies on its indexing mechanism. Without an index, searching for similar relic sets would require comparing each relic set’s embedding vector to every other one, which would be extremely slow, especially with a large dataset. I choose Pinecone serverless index hosted on AWS for its automatic scaling and reduced infrastructure management.
# Create a serverless index
index_name = "hsr-relics-index"

if not pc.has_index(index_name):
    pc.create_index(
        name=index_name,
        dimension=1024,
        metric="cosine",
        spec=ServerlessSpec(
            cloud='aws',
            region='us-east-1'
        )
    )

# Wait for the index to be ready
while not pc.describe_index(index_name).status['ready']:
    time.sleep(1)
The dimension parameter specifies the dimensionality of the vector embeddings. Higher dimensionality generally allows for capturing more nuanced relationships between data points. For example, two relic sets might both increase ATK, but one might also increase SPD while the other increases Crit DMG. A higher-dimensional embedding allows the system to capture these subtle distinctions, leading to more relevant recommendations.
For the metric parameter which measures the similarity between two vectors (representing relic sets), we use the cosine metric which is suitable for measuring the similarity between vector embeddings generated from text. This is crucial for understanding how similar two relic descriptions are.
With the vector embeddings generated, the next step was to upload them into my Pinecone index. Pinecone uses the upsert function to add or update vectors in the index. The following code snippet shows how we can upsert the generated embeddings into the Pinecone index.
# Target the index where you'll store the vector embeddings
index = pc.Index("hsr-relics-index")

# Prepare the records for upsert
# Each contains an 'id', the embedding 'values', and the original text as 'metadata'
records = []
for r, e in zip(relic_info_data, embeddings):
    records.append({
        "id": r['id'],
        "values": e['values'],
        "metadata": {'text': r['text']}
    })

# Upsert the records into the index
index.upsert(
    vectors=records,
    namespace="hsr-relics-namespace"
)
The code uses the zip function to iterate through both the list of prepared relic data and the list of generated embeddings simultaneously. For each pair, it creates a record for Pinecone with the following attributes.
id: Name of the relic set to ensure uniqueness;
values: The vector representing the semantic meaning of the relic set effects;
metadata: The original description of the relic effects, which will be used later for providing context to the user’s recommendations.
Implementing Similarity Search in Pinecone
With the relic data stored in Pinecone now, we can proceed to implement the similarity search functionality.
def query_pinecone(query: str) -> dict:

  # Convert the query into a numerical vector that Pinecone can search with
  query_embedding = pc.inference.embed(
      model="multilingual-e5-large",
      inputs=[query],
      parameters={
          "input_type": "query"
      }
  )

  # Search the index for the three most similar vectors
  results = index.query(
      namespace="hsr-relics-namespace",
      vector=query_embedding[0].values,
      top_k=3,
      include_values=False,
      include_metadata=True
  )

  return results
The function above takes a user’s query as input, converts it into a vector embedding using Pinecone’s inference endpoint, and then uses that embedding to search the index, returning the top three most similar relic sets along with their metadata.
Relic Recommendations with Pinecone and Gemini
With the integration with Pinecode, we design the initial prompt to pick relevant relic sets from Pinecone. After that, we take the results from Pinecone and combine them with the initial prompt to create a richer, more informative prompt for Gemini, as shown in the following code.
from google.generativeai.generative_models import GenerativeModel
for character_name, (character_avatar_image_url, character_description) in character_relics_mapping.items(): print(f"Processing Character: {character_name}")
prompt = f"User Query: {character_query}\n\nRelevant Relic Sets:\n" for match in pinecone_response['matches']: prompt += f"* {match['id']}: {match['metadata']['text']}\n" # Extract relevant data prompt += "\nBased on the above information, recommend two best relic sets and explain your reasoning. Each character can only equip with either one 4-piece relic or one 2-piece relic with another 2-piece relic. You cannot recommend a combination of 4-piece and 2-piece together. Consider the user's query and the characteristics of each relic set."
The code shows that we are doing both prompt engineering (designing the initial query to get relevant relics) and context framing (combining the initial query with the retrieved relic information to get a better overall recommendation from Gemini).
First the code retrieves data about the player’s characters, including their descriptions, images, and relics the characters currently are wearing. The code then gathers potentially relevant data about each character from a separate data source character_profile which has more information, such as gameplay mechanic about the characters that we got from the Game8 Character List. With the character data, the query will find similar relic sets in the Pinecone database.
After Pinecone returns matches, the code constructs a detailed prompt for the Gemini model. This prompt includes the character’s description, relevant relic sets found by Pinecone, and crucial instructions for the model. The instructions emphasise the constraints of choosing relic sets: either a 4-piece set, or two 2-piece sets, not a mix. Importantly, it also tells Gemini to consider the character’s existing profile and to prioritise fitting relic sets.
Finally, the code sends this detailed prompt to Gemini, receiving back the recommended relic sets.
Knight of Purity Palace, is indeed a great option for Gepard!
Using LLMs like Gemini is sure exciting, but figuring out what is happening “under the hood” can be tricky.
If you are a web developer, you are probably familiar with Grafana dashboards. They show you how your web app is performing, highlighting areas that need improvement.
Langtrace is like Grafana, but specifically for LLMs. It gives us a similar visual overview, tracking our LLM calls, showing us where they are slow or failing, and helping us optimise the performance of our AI app.
Traces for the Gemini calls are displayed individually.
Langtrace is not only useful for tracing our LLM calls, it also offers metrics on token counts and costs, as shown in the following screenshot.
Building this Honkai: Star Rail (HSR) relic recommendation system is a rewarding journey into the world of Gemini and LLMs.
I am incredibly grateful to Martin Andrews and Sam Witteveen for their inspiring Gemini Masterclass at Google DevFest in Singapore. Their guidance helped me navigate the complexities of LLM development, and I learned firsthand the importance of careful prompt engineering, the power of system instructions, and the need for dynamic data access through function calls. These lessons underscore the complexities of developing robust LLM apps and will undoubtedly inform my future AI projects.
Building this project is an enjoyable journey of learning and discovery. I encountered many challenges along the way, but overcoming them deepened my understanding of Gemini. If you’re interested in exploring the code and learning from my experiences, you can access my Colab notebook through the button below. I welcome any feedback you might have!