I like to explore interesting new technologies. I also love to learn more from the materials available on Microsoft Virtual Academy, Google Developers channel, and several other tech/dev events.
For API developers, Postman is a popular tool that streamlines the process of testing APIs. Postman is like having a Swiss Army knife for API development as it allows developers to interact with APIs efficiently.
In March 2023, Postman Flows was officially announced. Postman Flows is a no-code visual tool within the Postman platform designed to help us create API workflows by dragging and dropping components, making it easier to build complex sequences of API calls without writing extensive code.
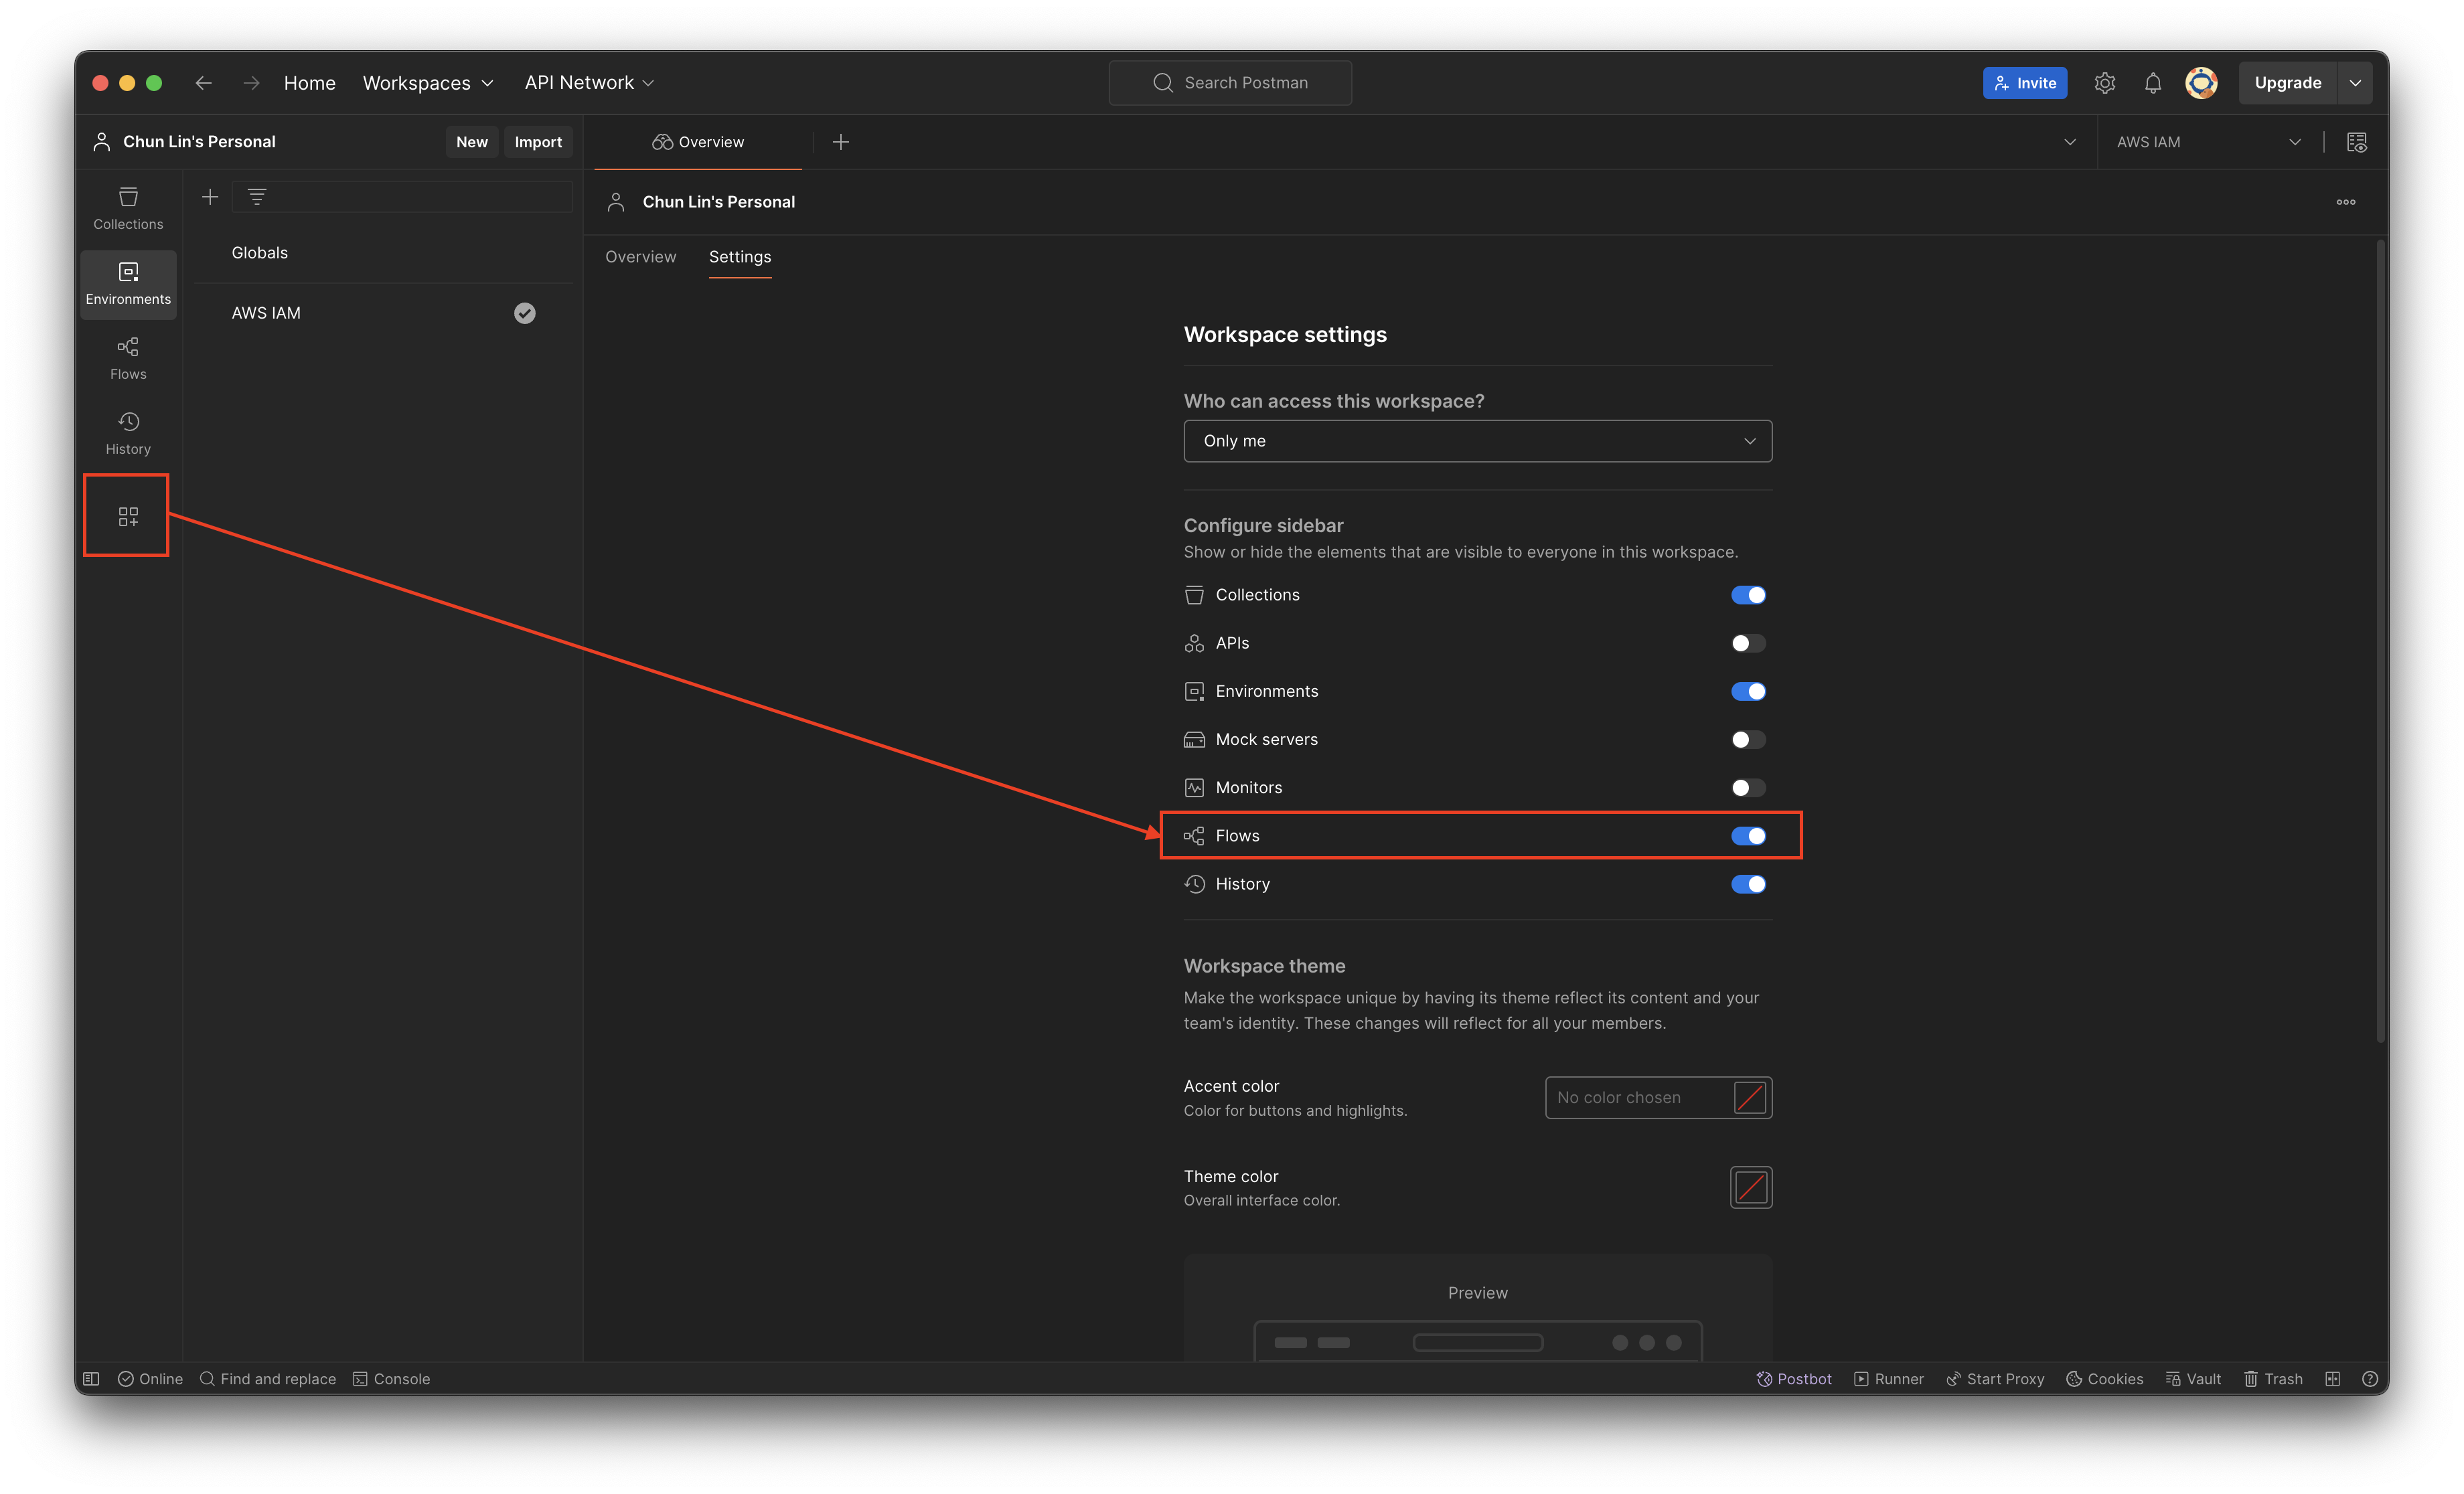
Please make sure Flows is enabled in our Postman Workspace.
Recently, my teammate demonstrated how Postman Flows works, and I’d like to share what I’ve learned from him in this article.
Use Case
Assume that there is a list of APIs that we need to call in sequence every time, then we can make use of Postman Flows. For demonstration purpose, let’s say we have to call the following three AWS APIs for a new user registration.
We will first need to define the environment variables, as shown in the following screenshot.
We keep the region variable to be empty because the region of IAM setup should be Global.
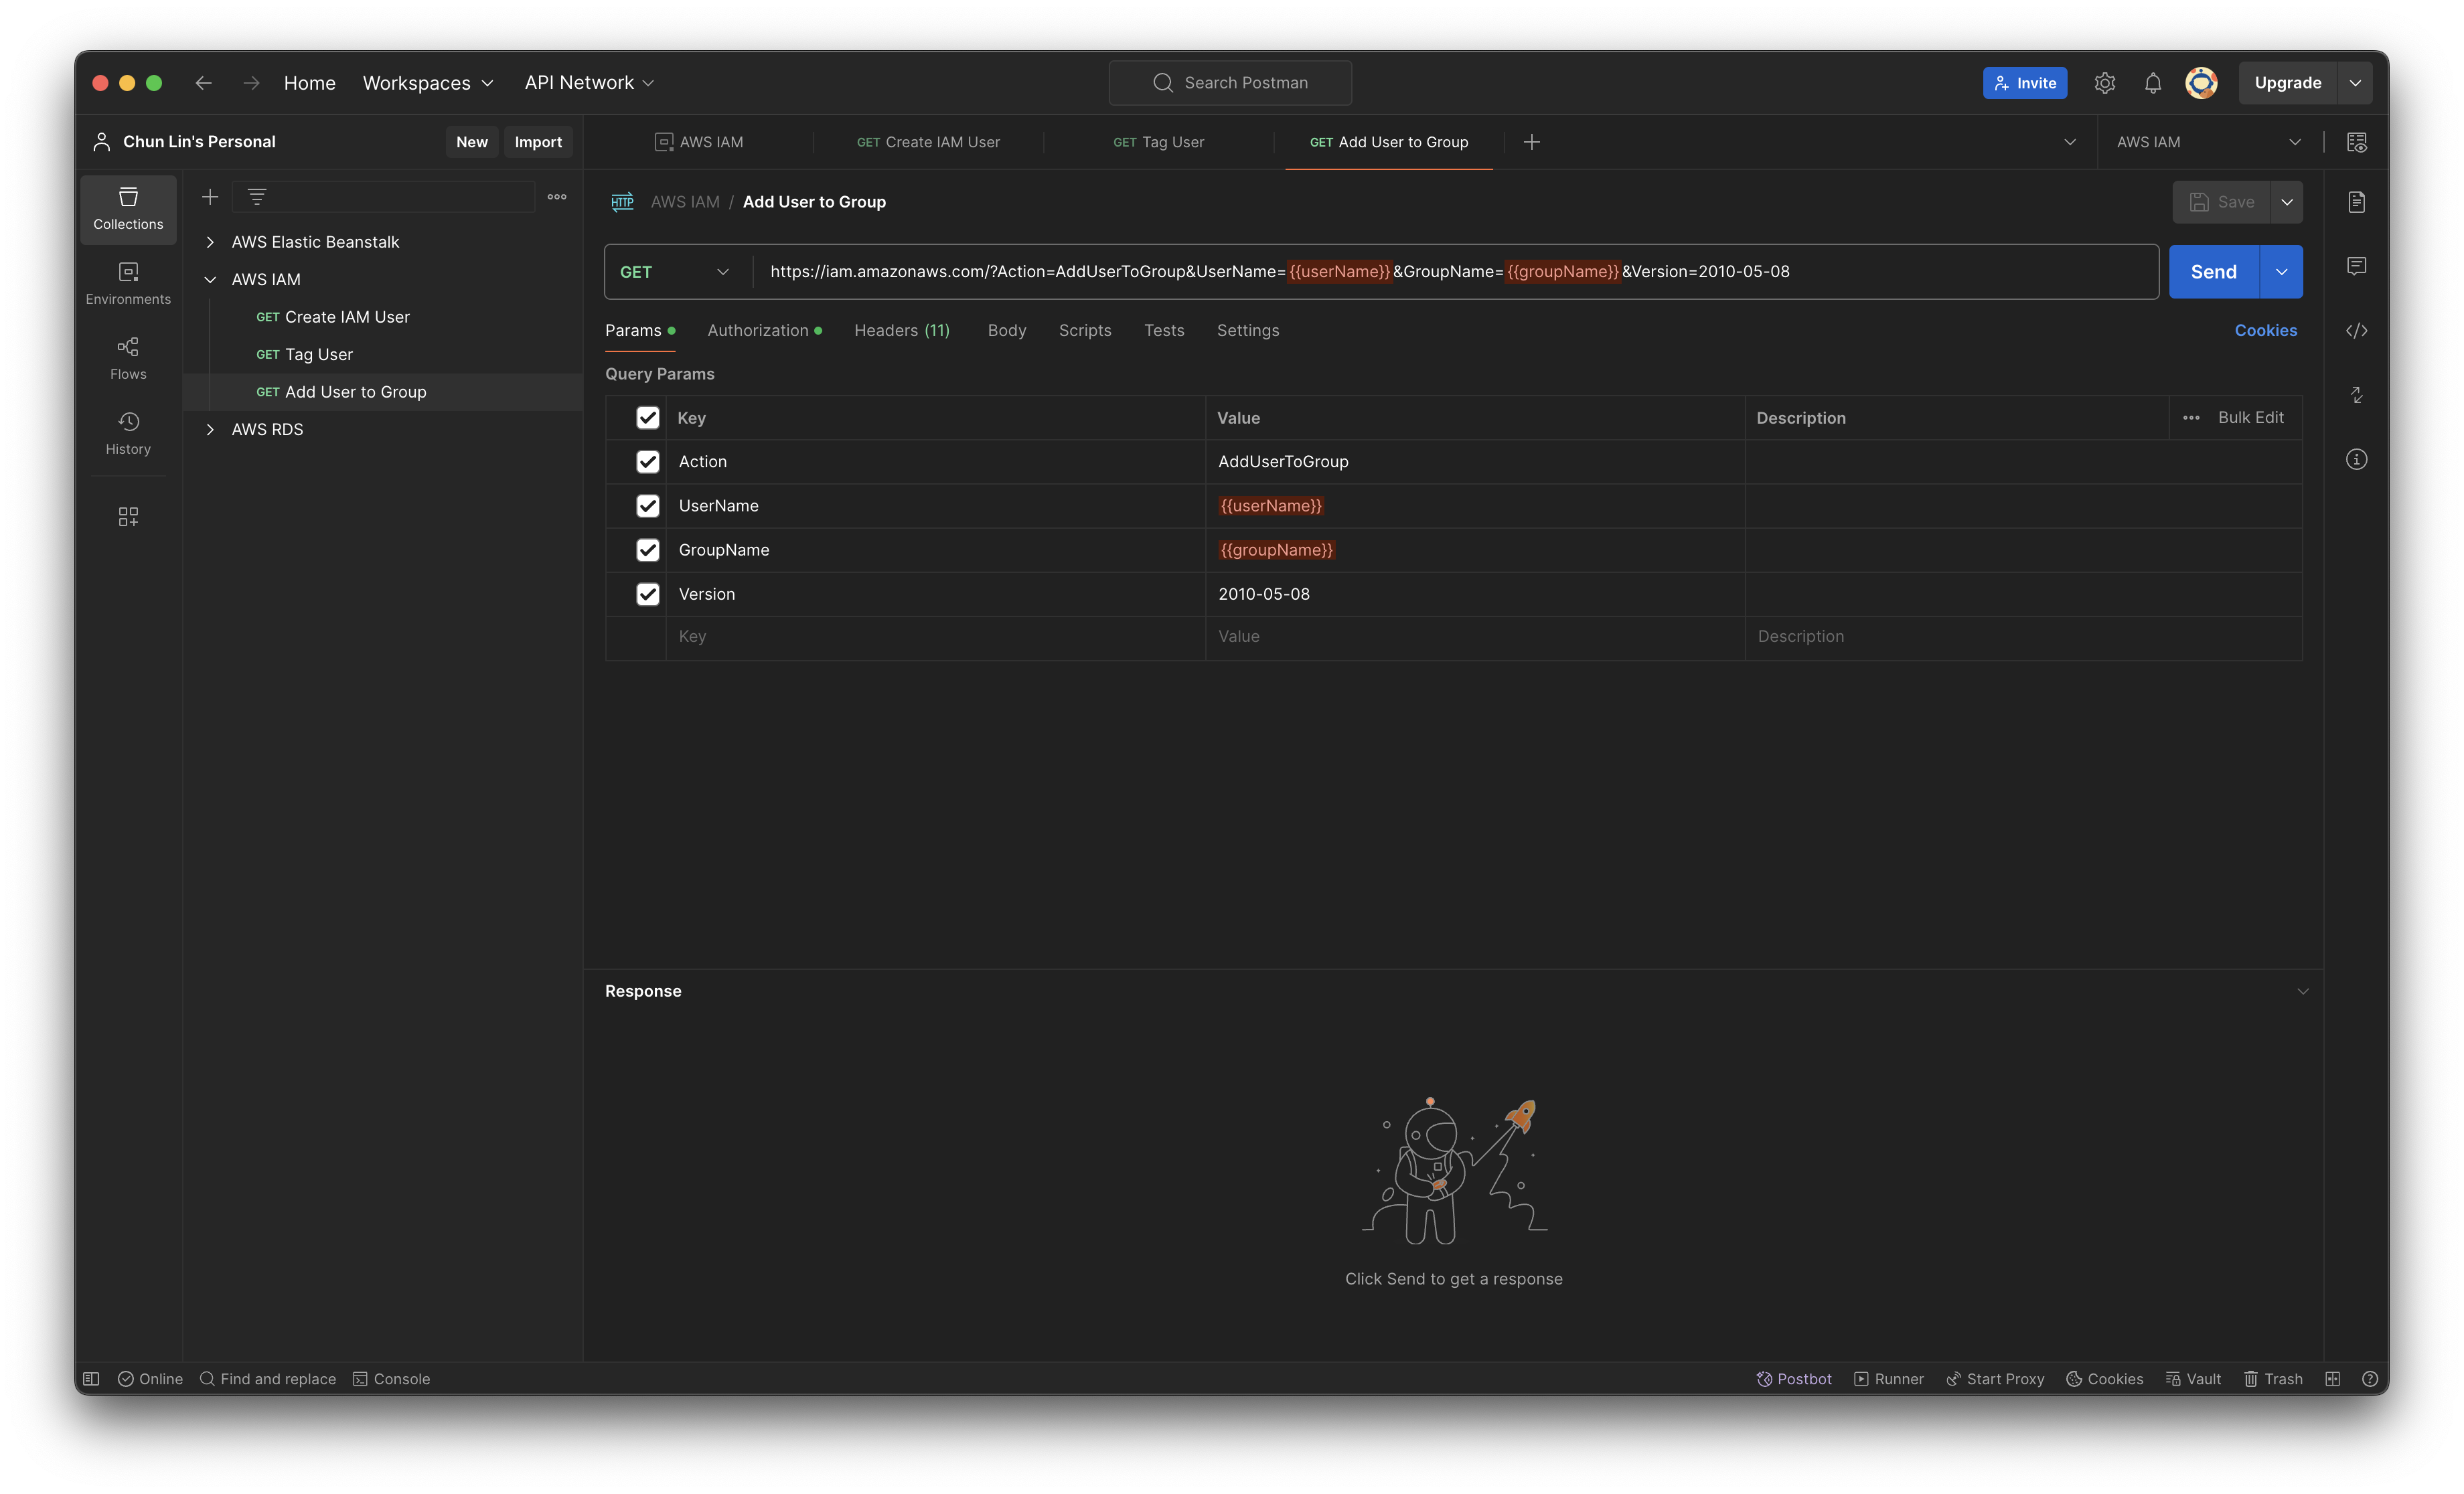
Next, we will setup the three API calls. For example, to create a new user on AWS, we need to make an HTTP GET request to the IAM base URL with CreateUser as the action, as shown in the following screenshot.
The UserName will be getting its value from the variable userName.
To tag the user, for example assigning the user above to a team in the organisation, we can do so by setting TagUser as the action, as shown in the screenshot below. The team that the user will be assigned to is based on their employee ID, which we will discuss later in this article.
The teamName is a variable with value determined by another variable.
Finally, we will assign the user to an existing user group by setting AddUserToGroup as its action.
The groupName must be having a valid existing group name in our AWS account.
Create the Flow
As demonstrated in the previous section, calling the three APIs sequentially is straightforward. However, managing variables carefully to avoid input errors can be challenging. Postman Flows allows us to automate these API calls efficiently. By setting up the Flow, we can execute all the API requests with just a few clicks, reducing the risk of mistakes and saving time.
Firstly, we will create a new Flow called “AWS IAM New User Registration”, as shown below.
Created a new Flow.
By default, it comes with three options that we can get started. We will go with the “Send a request” since we will be sending a HTTP GET request to create a user in IAM. As shown in the following screenshot, a list of variables that we defined earlier will be available. We only need to make sure that we choose a correct Environment. The values of service, region, accessKey, and secretKey will then be retrieved from the selected Environment.
Choosing the environment for the block.
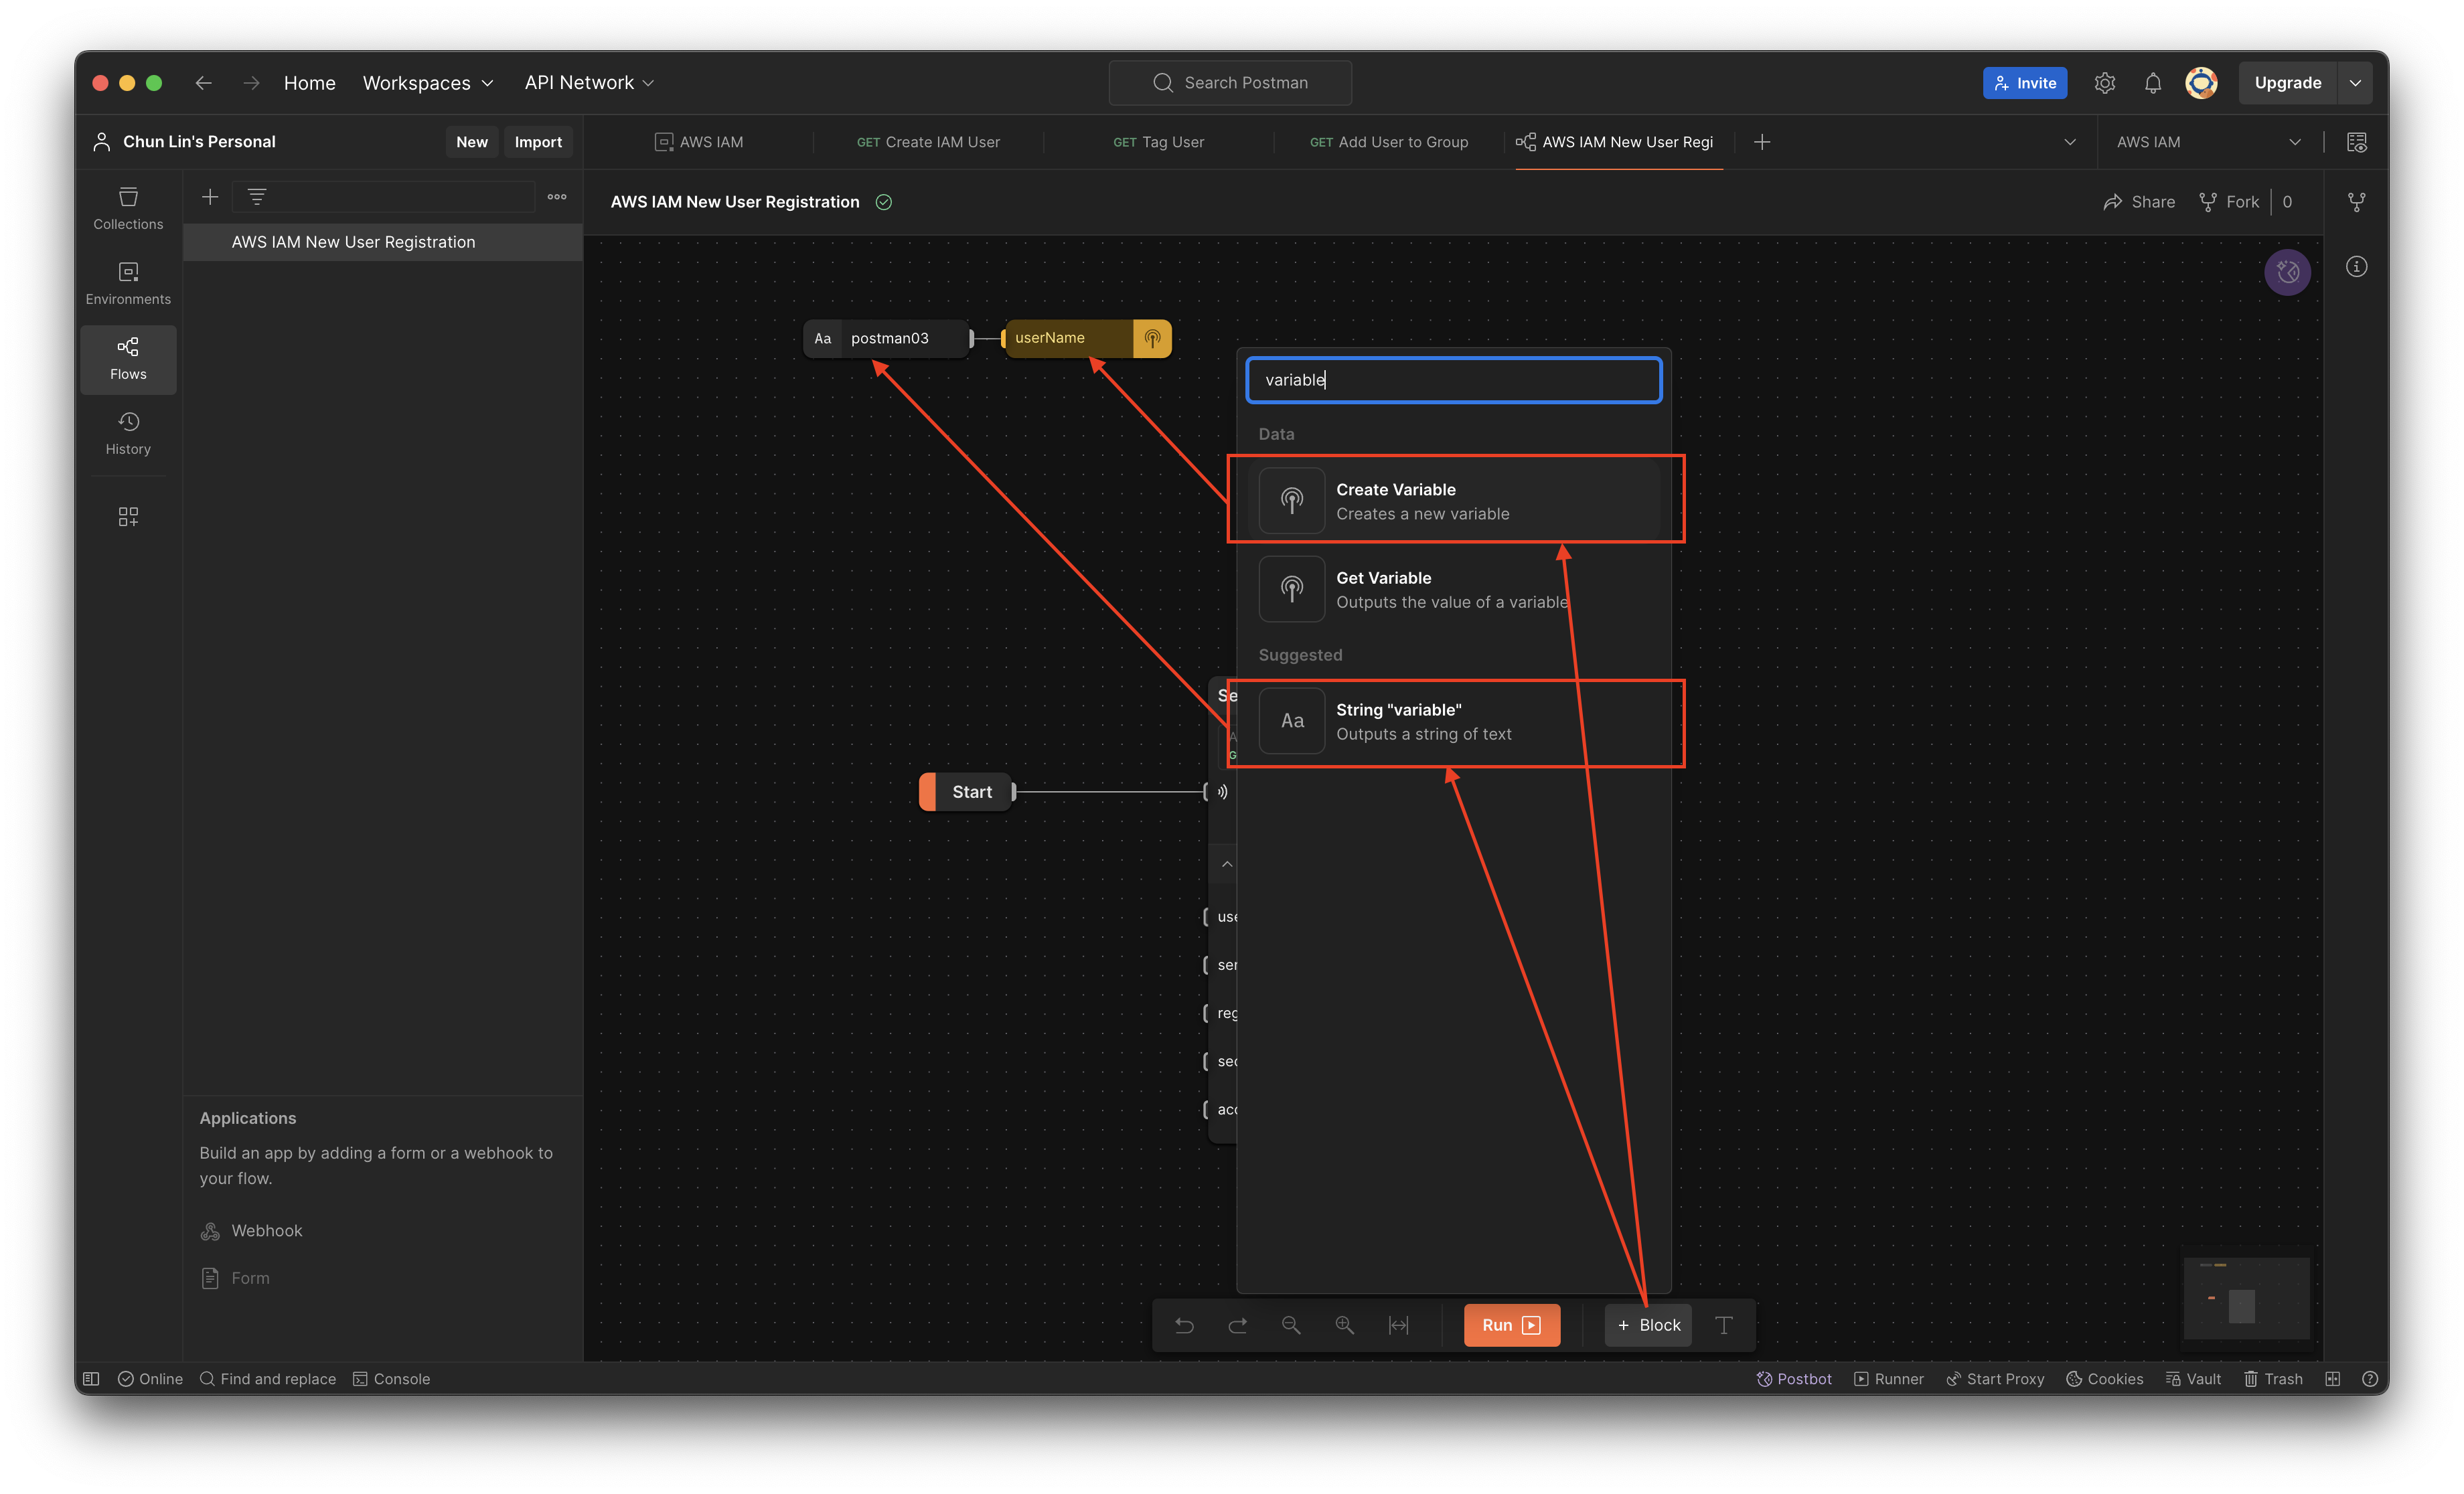
Since the variable userName will be used in all three API calls, let’s create a variable block and assign it a value called “postman03”.
Created a variable and assigned a string value to it.
Next, we simply need to tell the API calling block to assign the value of userName to the field userName.
Assigning variable to the query string in the API call.
Now if we proceed to click on the “Run” button, by right, the call should respond with HTTP 200 and relevant info returned from AWS, as demonstrated below.
Yes, the user “postman03” is created successfully on AWS IAM.
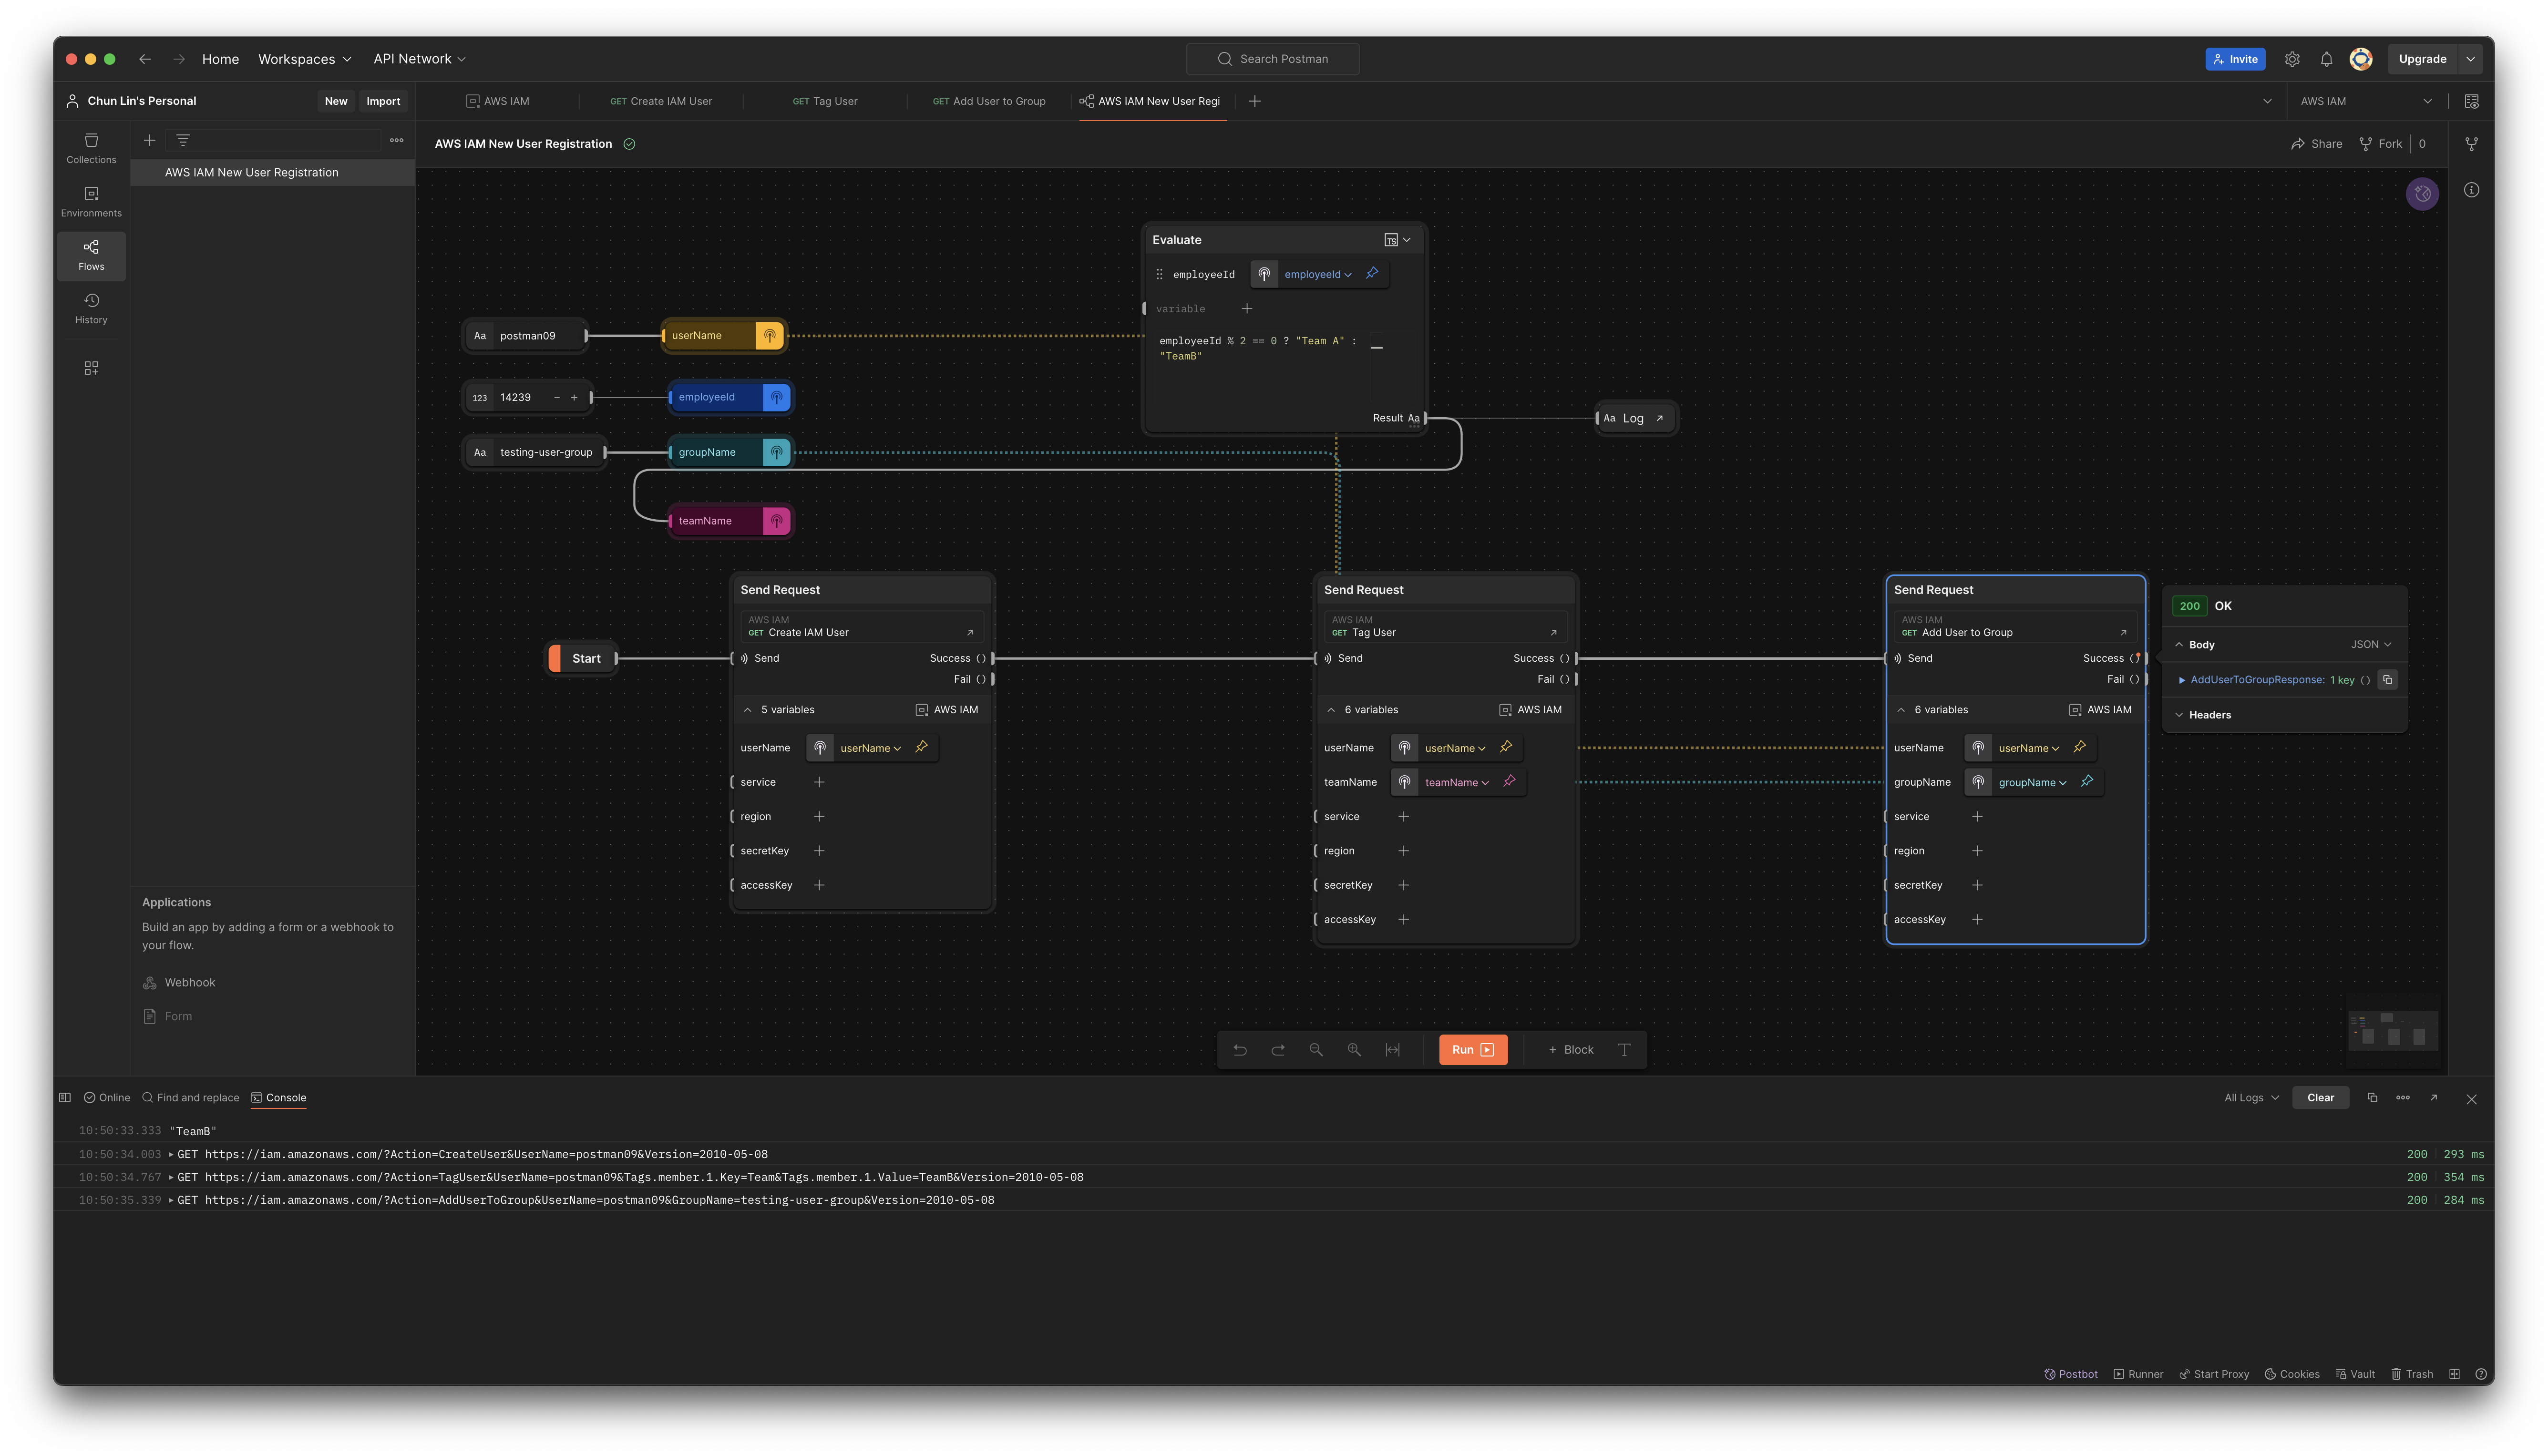
With the success of user creation, the next step is to call the user tagging API. In this API, we will have two variables, i.e. userName and teamName. Let’s assume that the teamName is assigned based on whether the user’s employeeId is an even or odd number, we can design the Flow as shown in the following screenshot.
With two different employeeId, the teamNames are different too.
As shown in the Log, when we assign an even number to the user postman06, the team name assigned to it is “Team A”. However, when we assign an odd number to another user postman07, its team name is “Team B”.
Finally, we can complete the Flow with the third API call as shown below.
The groupName variable is introduced for the third API call.
Now, we can visit AWS Console to verify that the new user postman09 is indeed assigned to the testing-user-group.
The new user is assigned to the desired user group.
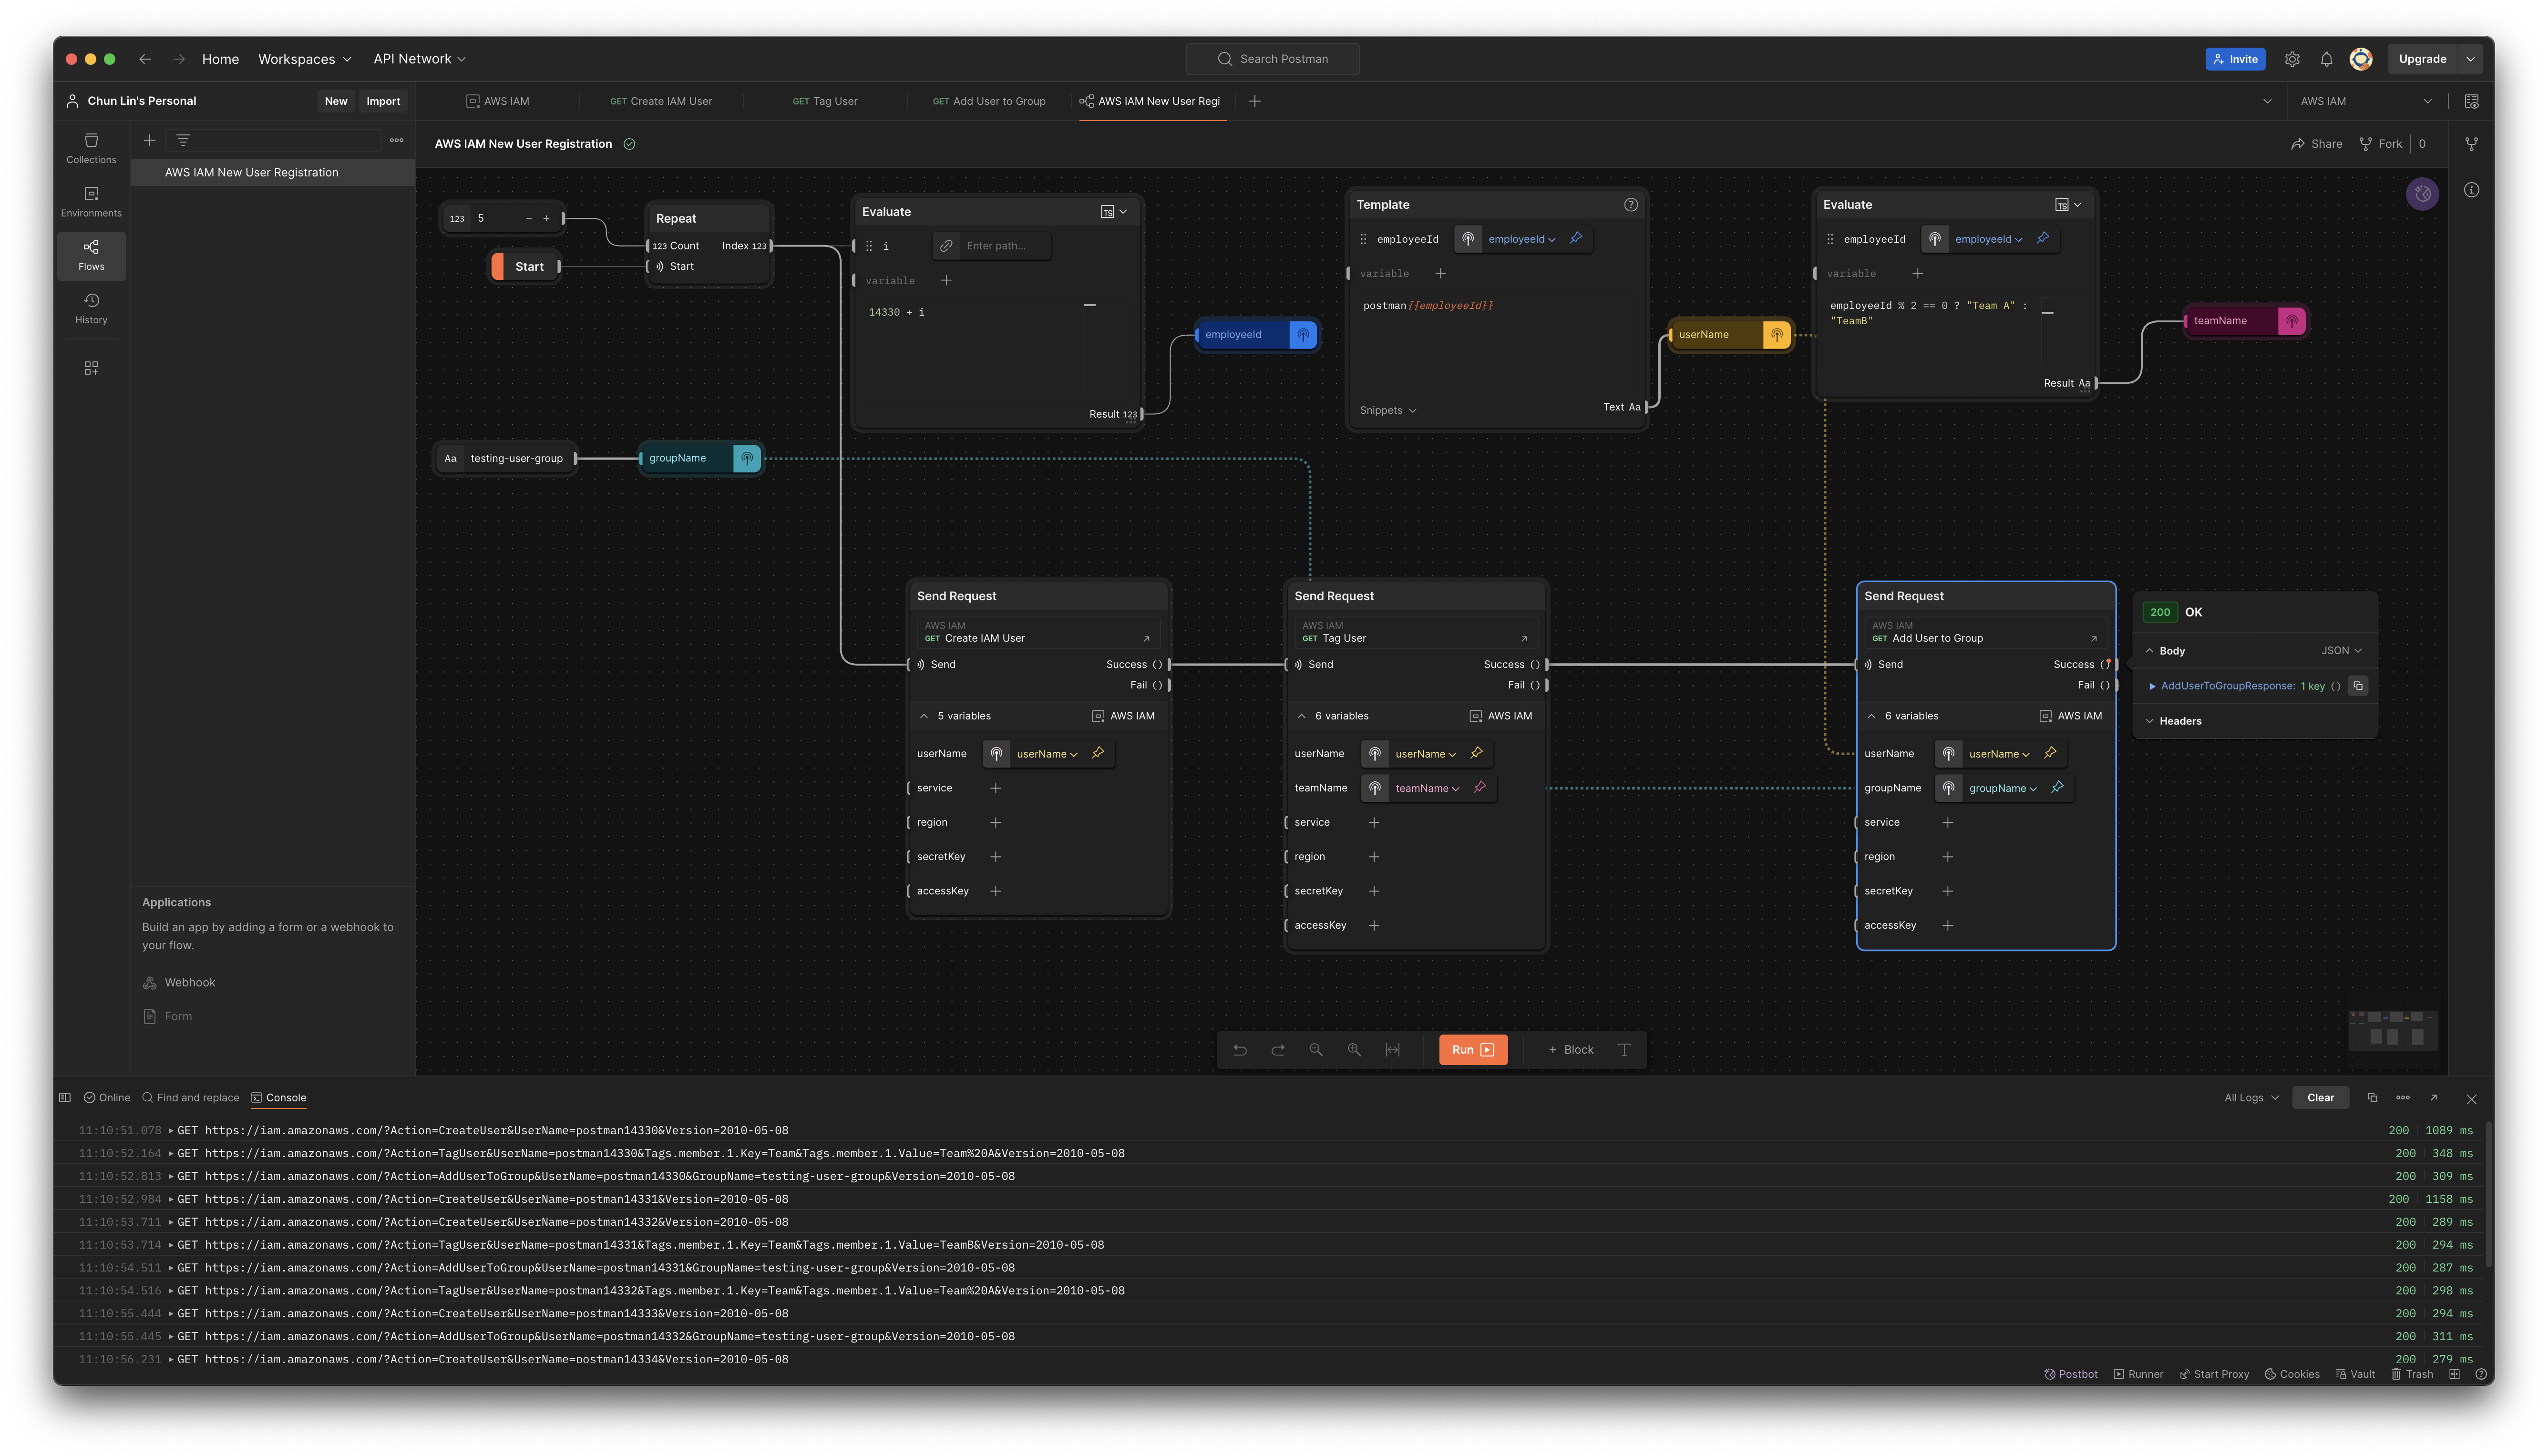
The Flow above only can create one new user in every Flow execution. By using the Repeat block which takes a numeric input N and iterates over it from 0 to N - 1, we can create multiple users in a single run, as shown in the following updated Flow.
This flow will create 5 users in one single execution.
Variable Limitation in Flows
Could we save the response in a variable that allows us to reuse its value in other Flow? We would guess this is possible with variables in Postman.
The variable with the broadest scope in Postman is the global variables which are available throughout a workspace. So what we can do is actually storing the response in the global variables.
To do so, we need to update our request in the Collection. One of the snippets provided is actually about setting a global variable, so we can use it. For example, we add it to the post-response script of “Create IAM User” request, as shown in the screenshot below.
Postman provides snippets to help us quickly generate boilerplate code for common tasks, including setting global variables.
Let’s change the boilerplate code to be as follows.
pm.globals.set("my_global", pm.response.code);
Now, if we send a “Create IAM User” request, we will notice that a new global variable called my_global has been created, as demonstrated below.
The response code received is 400 and thus my_global is 400.
However, now if we run our Flow, we will realise that my_global is not being updated even though the response code received is 200, as illustrated in the following screenshot.
According to Saswat, global variables and environment variables are now treated as read-only values in the Flows, and any updates made to them through script are not respected.
So the answer to the question whether we can share variable across different Flows earlier is simply a big no by design currently.
Do It with CLI: Newman
Is there any alternative way that we can use instead of relying on the GUI of Postman?
A command-line Collection Runner is basically a tool that allows users to execute API requests defined in Postman collections directly from the command line. So, could we use Newman to do what we have done above with Postman Flows as well?
Before we can use Newman, we first need to export our Collection as well as the corresponding Environment. To do so, firstly, we click on the three dots (…) next to the collection name and select Export. Then, we choose the format (usually Collection v2.1 is recommended) and click Export. Secondly, we proceed to click on the three dots (…) next to the environment name and select Export as well.
Once we have the two exported files in the same folder, for example a folder canned “experiment.postman.newman”, we can run the following command.
While Newman and Postman Flows can both be used to automate API requests, they are tailored for different use cases: Newman is better suited for automated testing, integration into CI/CD pipelines, and command-line execution. Postman Flows, on the other hand, is ideal for visually designing the workflows and interactions between API calls.
We use Amazon S3 to store data for easy sharing among various applications. However, each application has its unique requirements and might require a different perspective on the data. To solve this problem, at times, we store additional customised datasets of the same data, ensuring that each application has its own unique dataset. This sometimes creates another set of problems because we now need to maintain additional datasets.
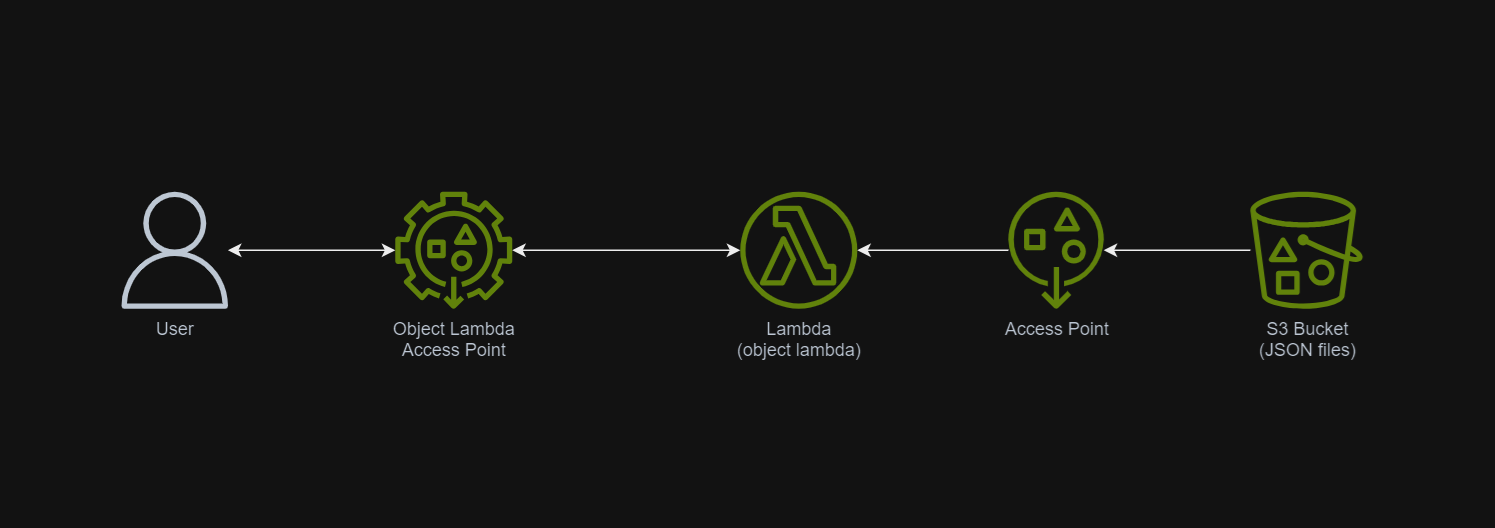
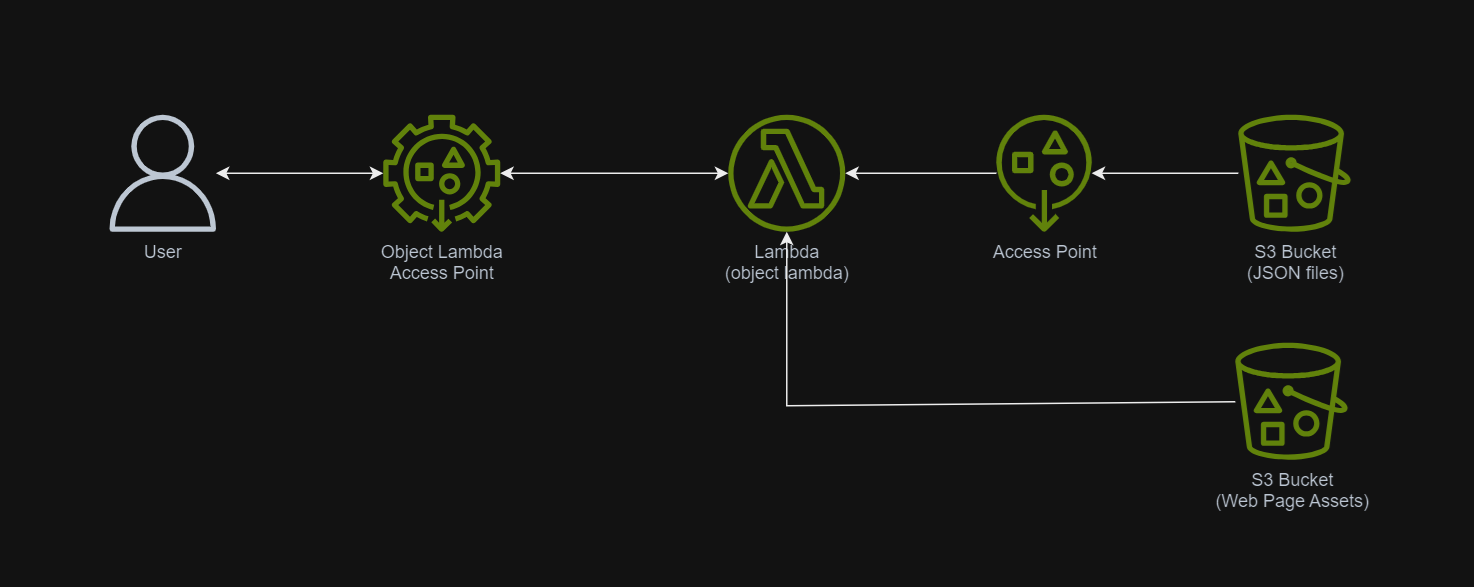
In March 2021, a new feature known as S3 Object Lambda was introduced. Similar to the idea of setting up a proxy layer in front of S3 to intercept and process data as it is requested, Object Lambda uses AWS Lambda functions to automatically process and transform your data as it is being retrieved from S3. With Object Lambda, we only need to change our apps to use the new S3 Object Lambda Access Point instead of the actual bucket name to retrieve data from S3.
Simplified architecture diagram showing how S3 Object Lambda works.
Example: Turning JSON to Web Page with S3 Object Lambda
I have been keeping details of my visits to medical centres as well as the treatments and medicines I received in a JSON file. So, I would like to take this opportunity to show how S3 Object Lambda can help in doing data processing.
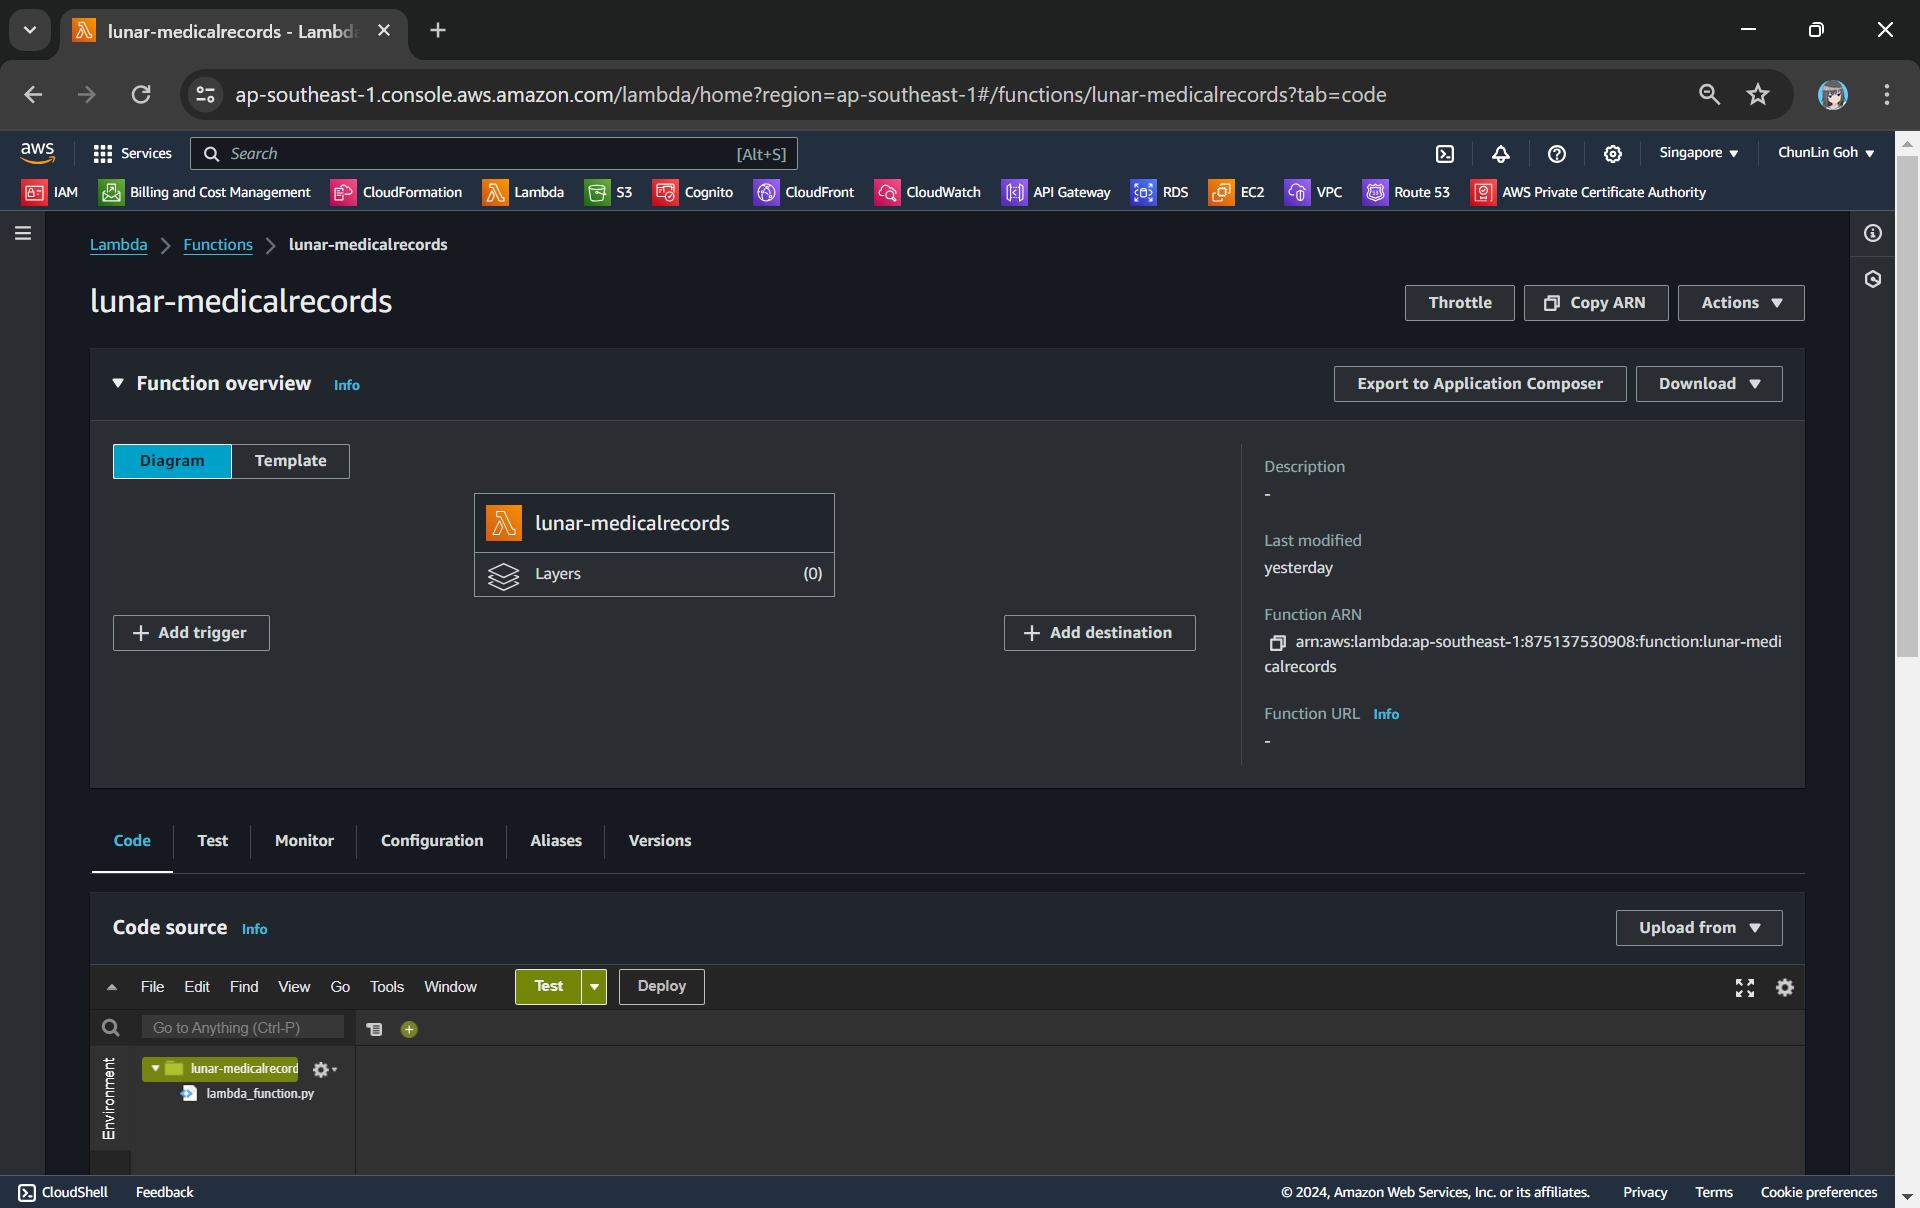
We need a Lambda Function to do the data format transformation from JSON to HTML. To keep things simple, we will be developing the Function using Python 3.12.
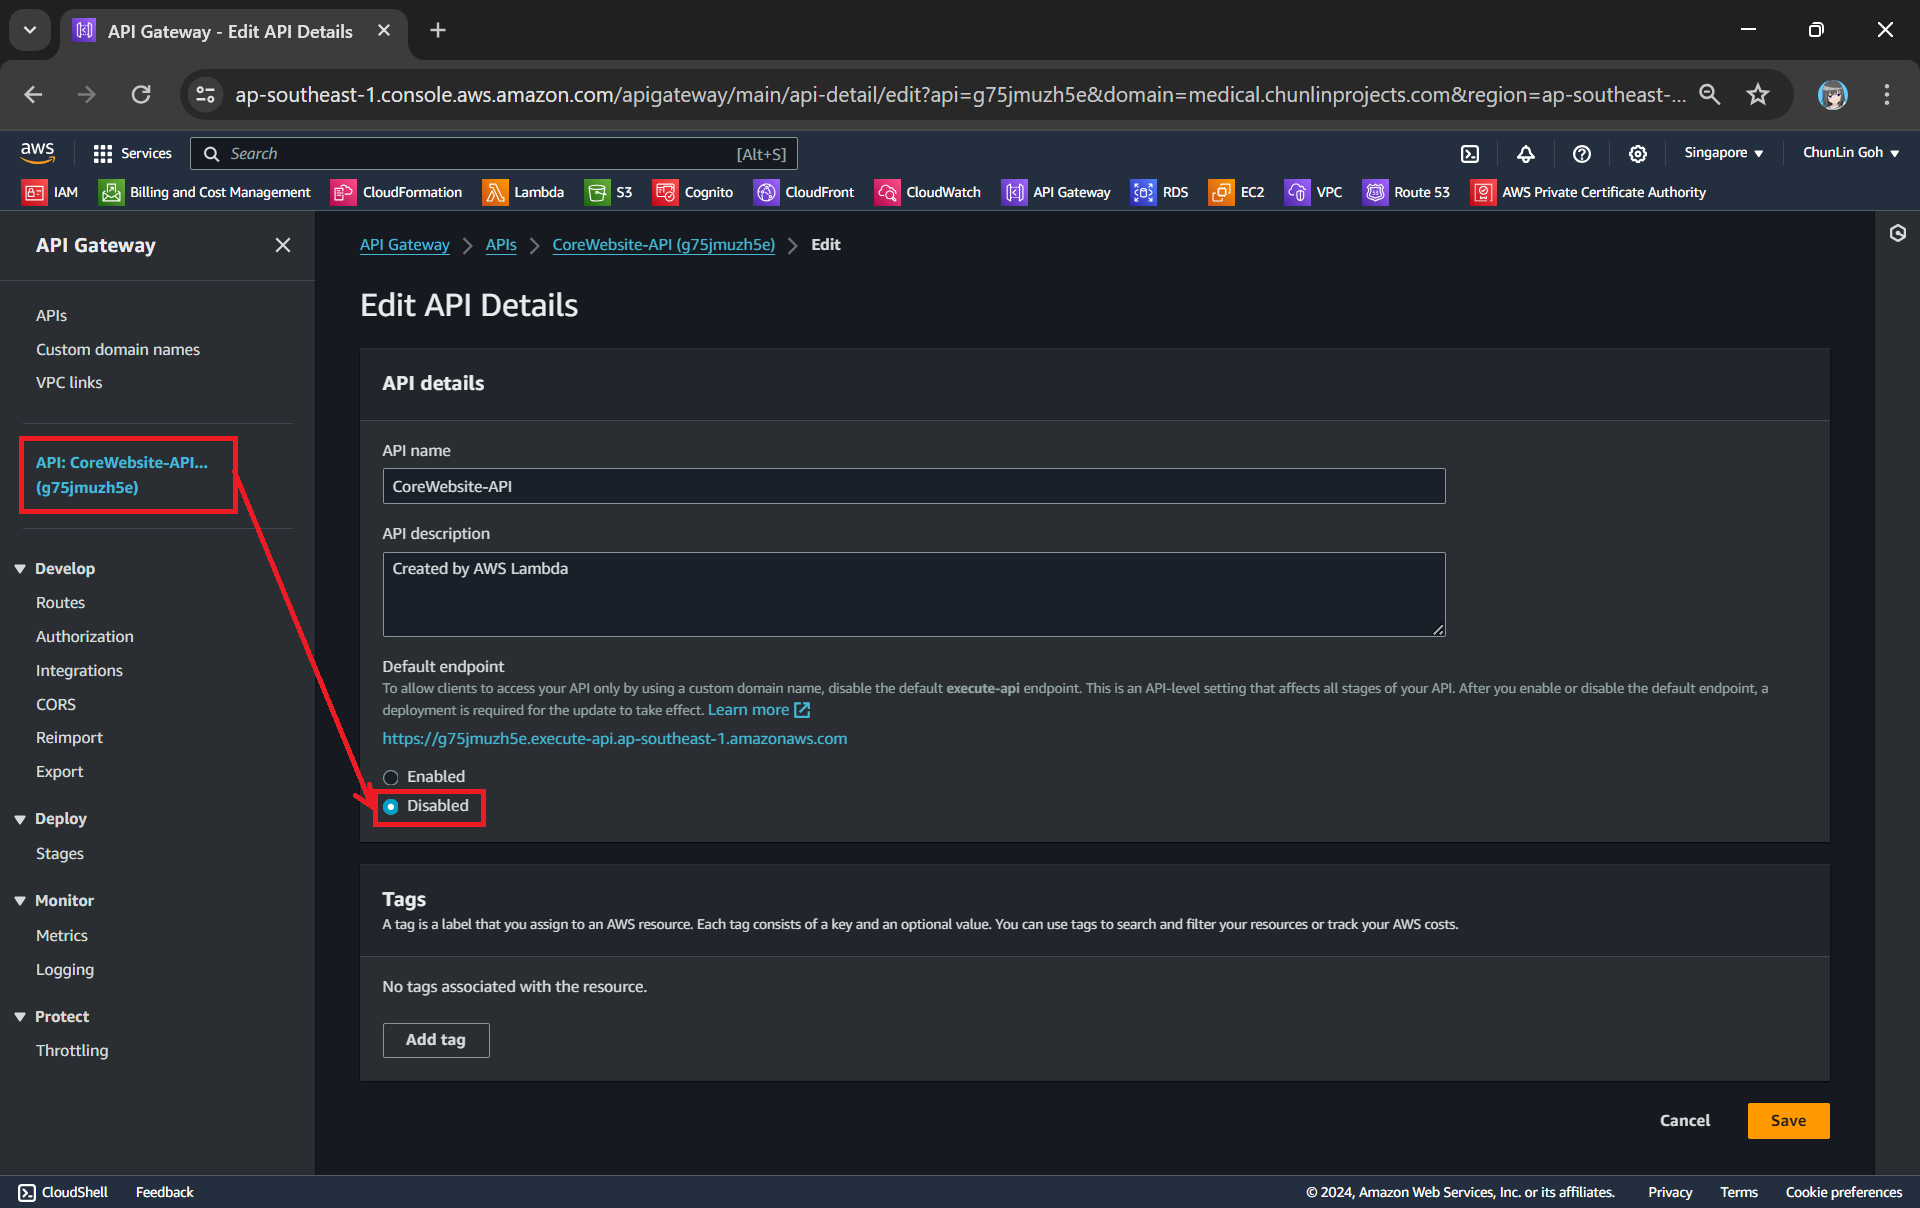
Object Lambda does not need any API Gateway since it should be accessed via the S3 Object Lambda Access Point.
In the beginning, we can have the code as follows. The code basically does two things. Firstly, it performs some logging. Secondly, it reads the JSON file from S3 Bucket.
import json import os import logging import boto3 from urllib import request from urllib.error import HTTPError from types import SimpleNamespace
def lambda_handler(event, context): object_context = event["getObjectContext"] # Get the presigned URL to fetch the requested original object from S3 s3_url = object_context["inputS3Url"] # Extract the route and request token from the input context request_route = object_context["outputRoute"] request_token = object_context["outputToken"]
# Get the original S3 object using the presigned URL req = request.Request(s3_url) try: response = request.urlopen(req) responded_json = response.read().decode() except Exception as err: logger.error(f'Exception reading S3 content: {err}') return {'status_code': 500}
Step 1.1: Getting the JSON File with Presigned URL
In the event that an Object Lambda receives, there is a property known as the getObjectContext, which contains useful information for us to figure out the inputS3Url, which is the presigned URL of the object in S3.
By default, all S3 objects are private and thus for a Lambda Function to access the S3 objects, we need to configure the Function to have S3 read permissions to retrieve the objects. However, with the presigned URL, the Function can get the object without the S3 read permissions.
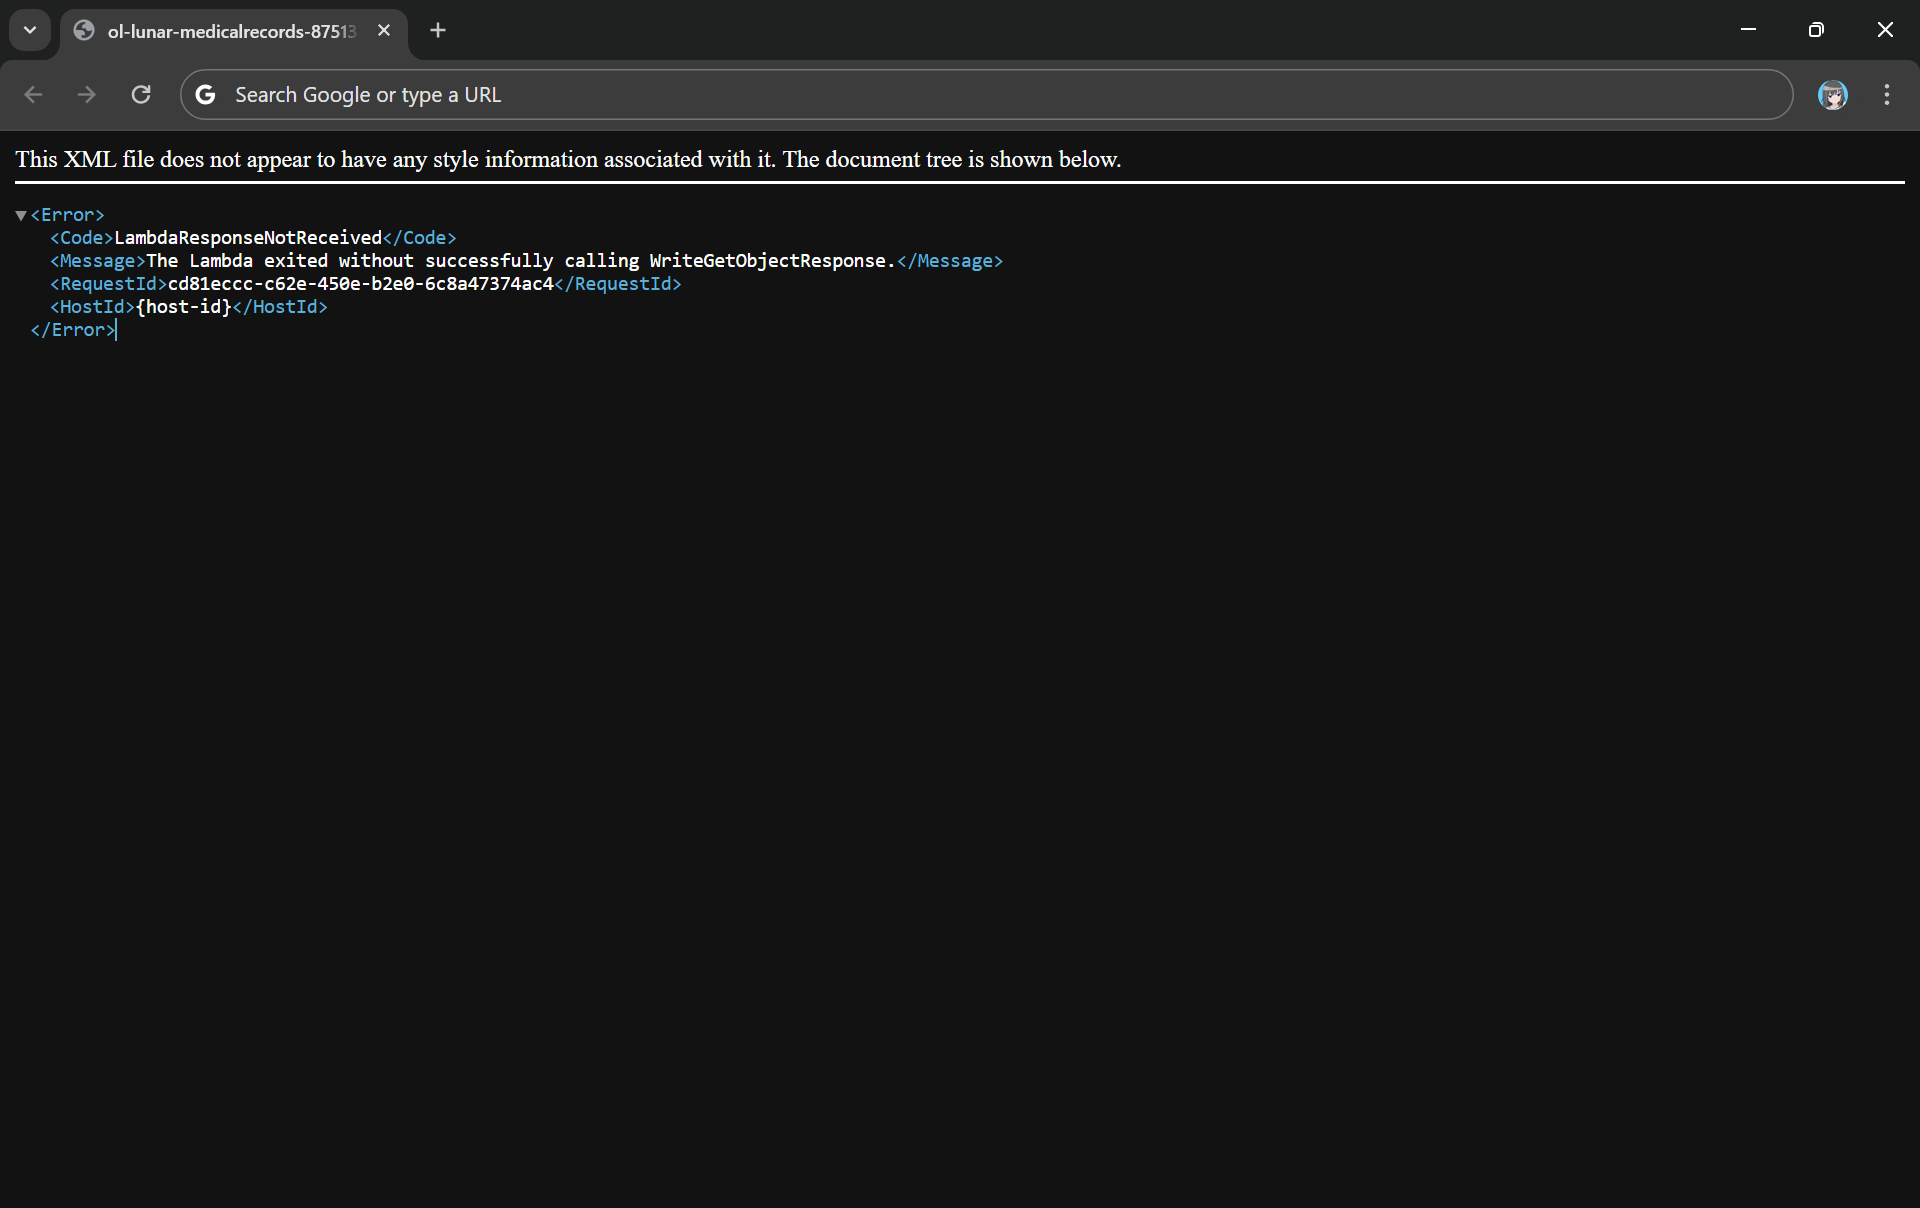
Since the purpose of Object Lambda is to process and transform our data as it is being retrieved from S3, we need to pass transformed object to a GetObject operation in the Function via the method write_get_object_response. Without this method, there will be an error from the Lambda complaining that it is missing.
Error: The Lambda exited without successfully calling WriteGetObjectResponse.
html = template_content.replace('{{DYNAMIC_TABLE}}', dynamic_table)
Step 2: Give Lambda Function Necessary Permissions
With the setup we have gone through above, we understand that our Lambda Function needs to have the following permissions.
s3-object-lambda:WriteGetObjectResponse
s3:GetObject
Step 3: Create S3 Access Point
Next, we will need to create a S3 Access Point. It will be used to support the creation of the S3 Object Lambda Access Point later.
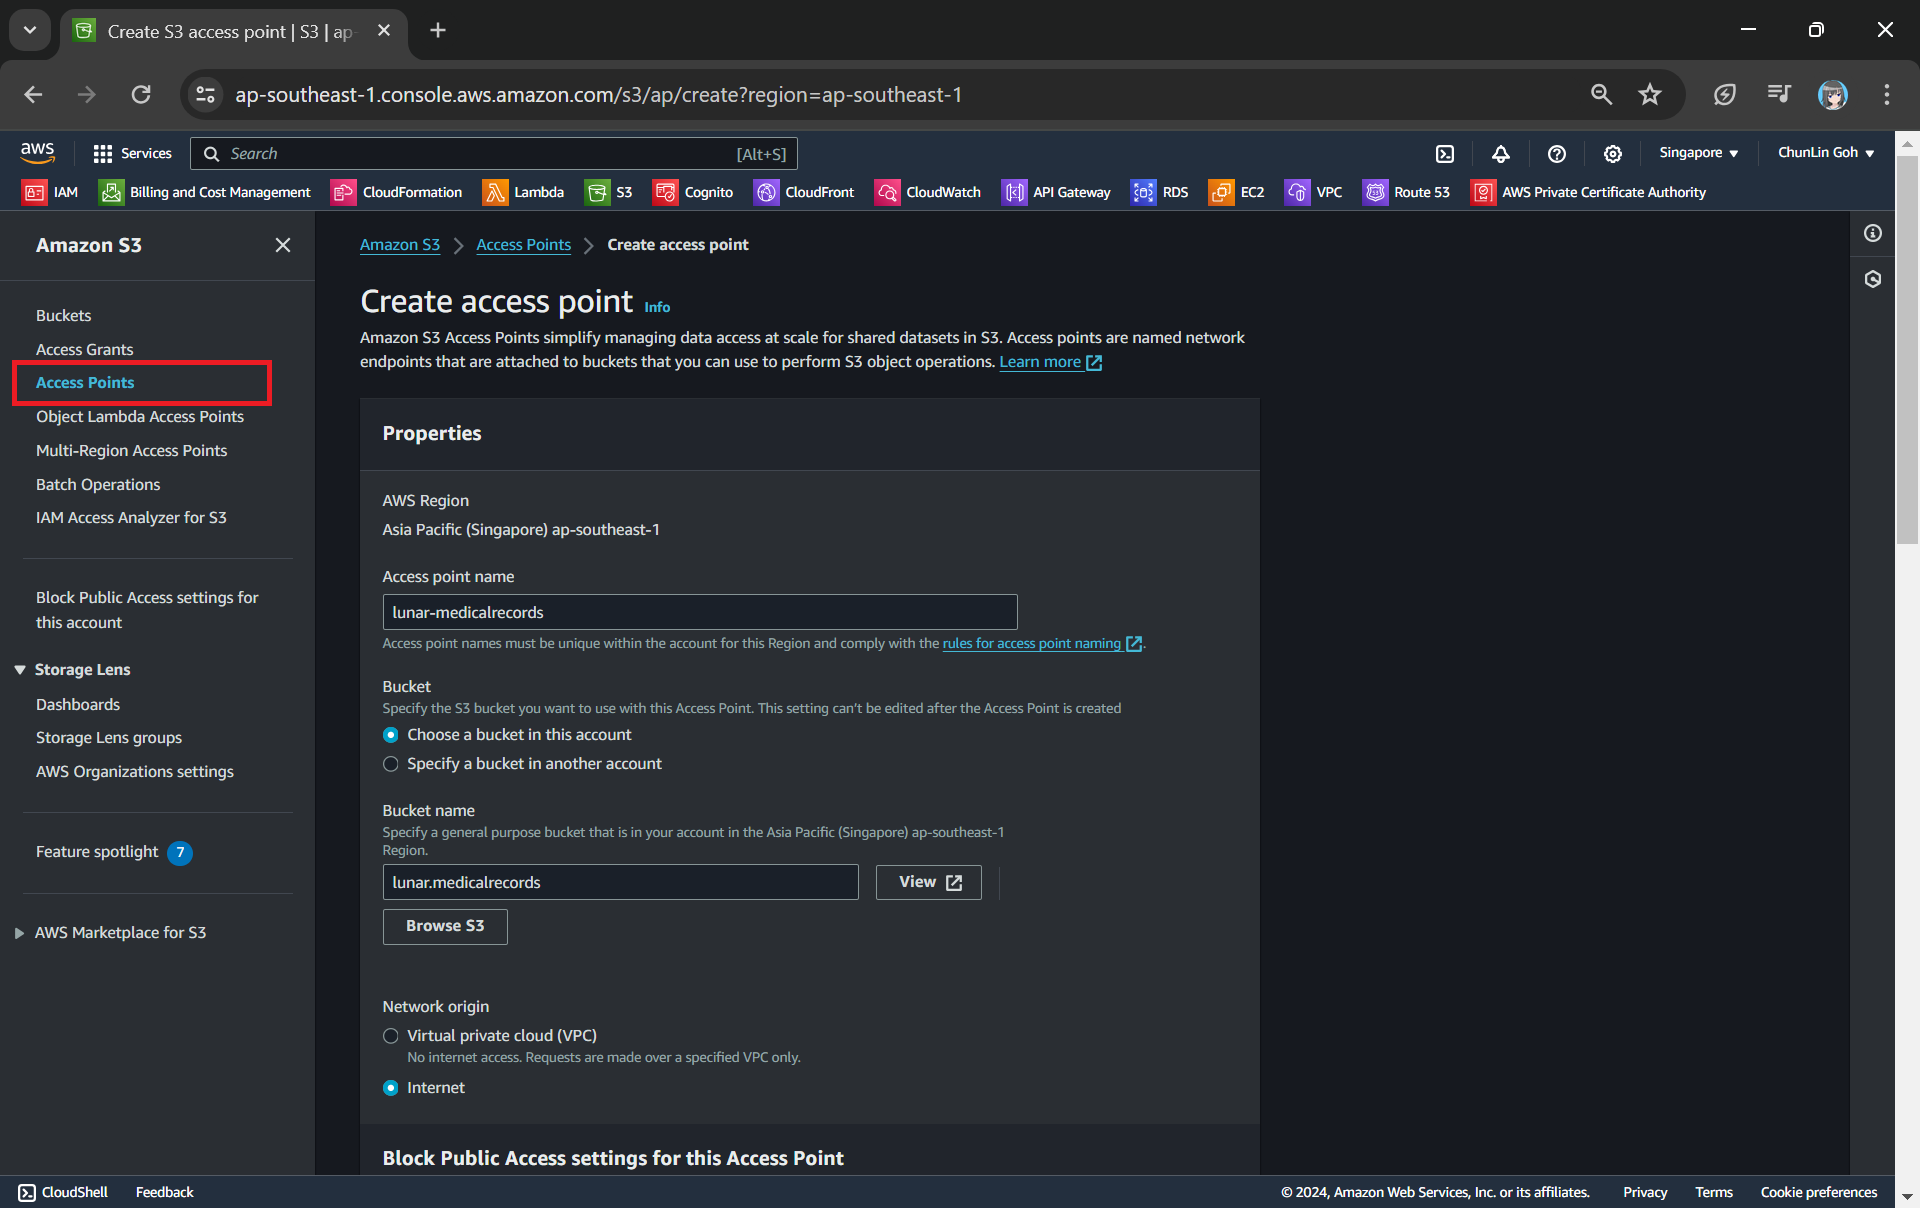
One of the features that S3 Access Point offers is that we can specify any name that is unique within the account and region. For example, as shown in the screenshot below, we can actually have a “lunar-medicalrecords” access point in every account and region.
Creating an access point from the navigation pane of S3.
When we are creating the access point, we need to specify the bucket which resides in the same region that we want to use with this Access Point. In addition, since we are not restricting the access of it to only a specific VPC in our case, we will be choosing “Internet” for the “Network origin” field.
After that, we keep all other defaults as is. We can directly proceed to choose the “Create access point” button.
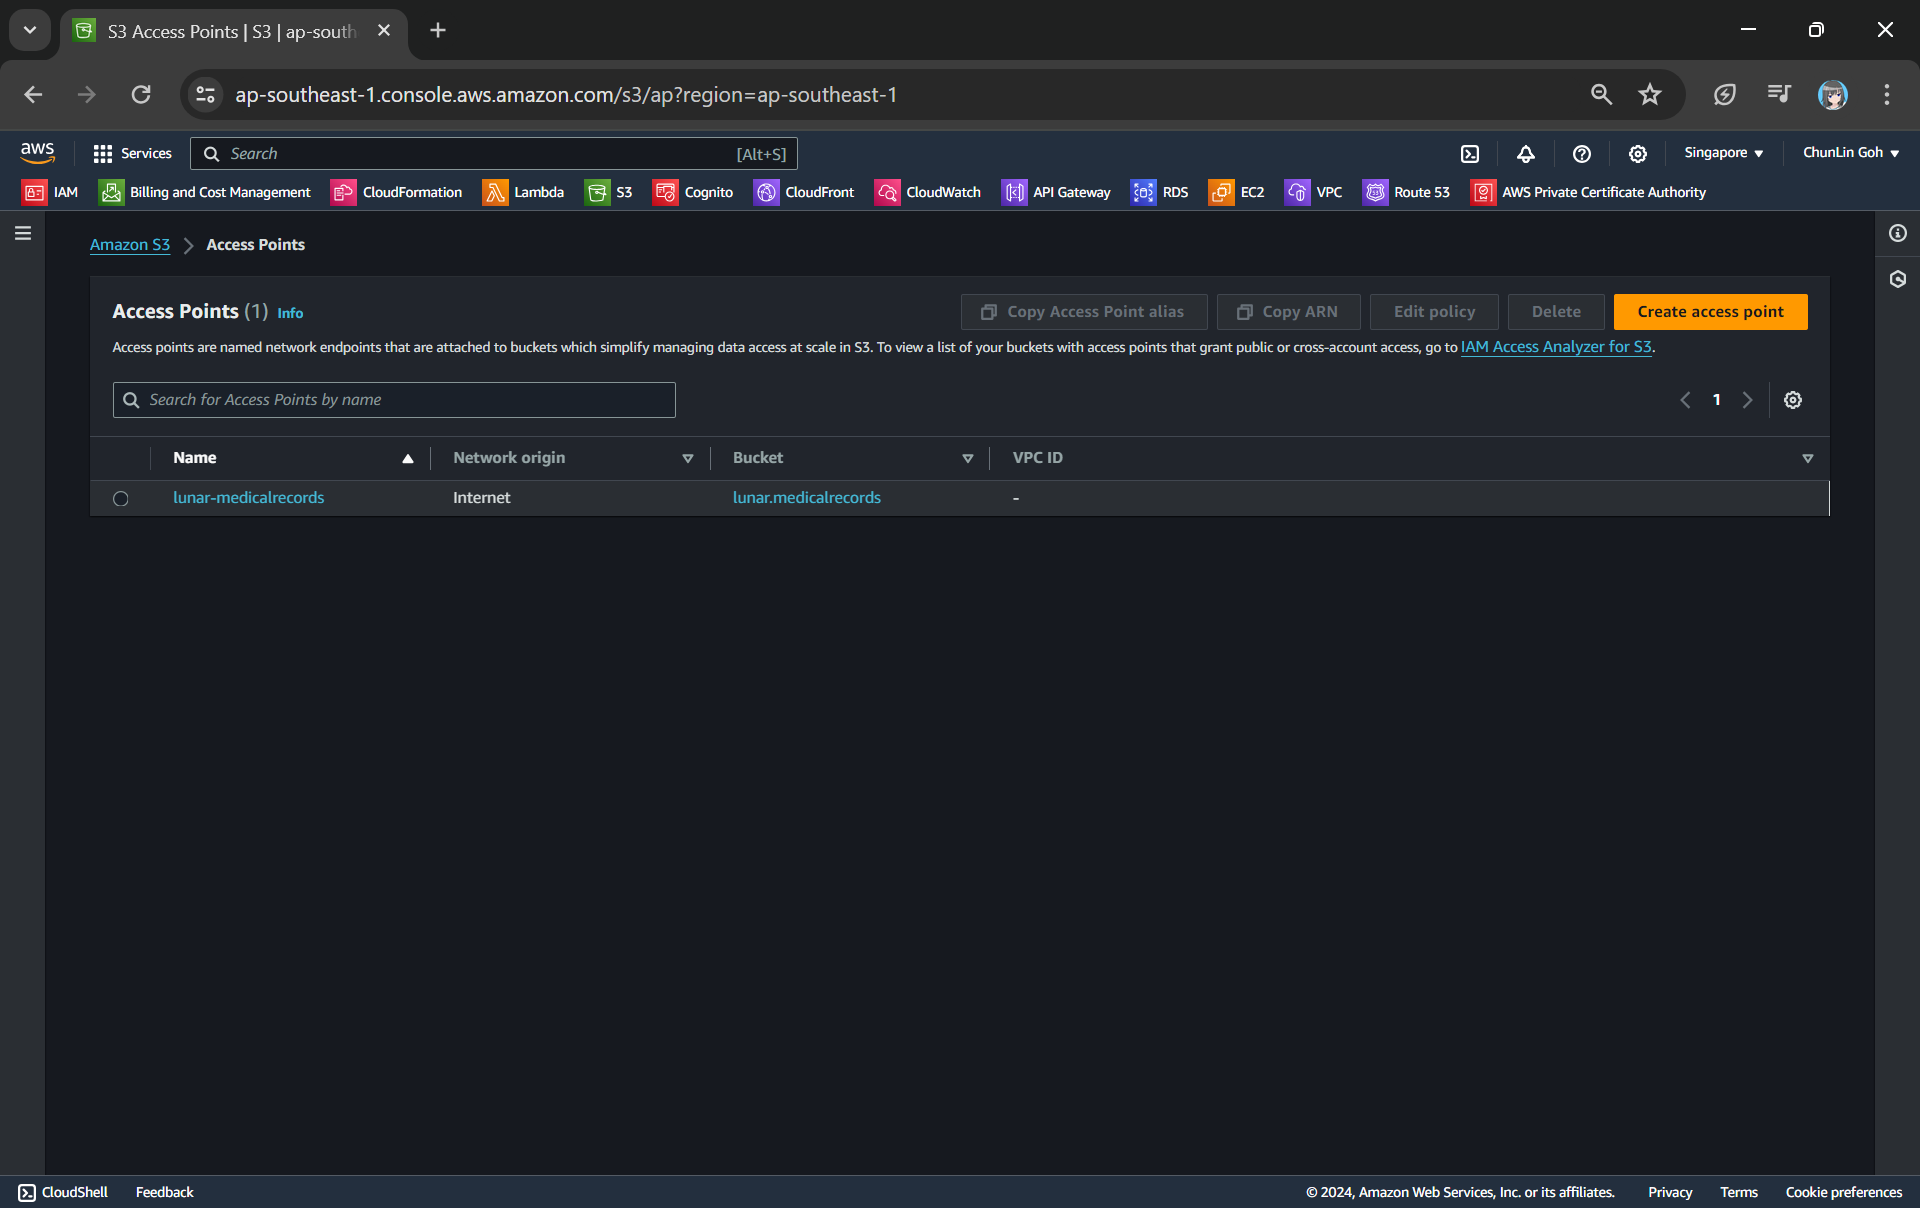
Our S3 Access Point is successfully created.
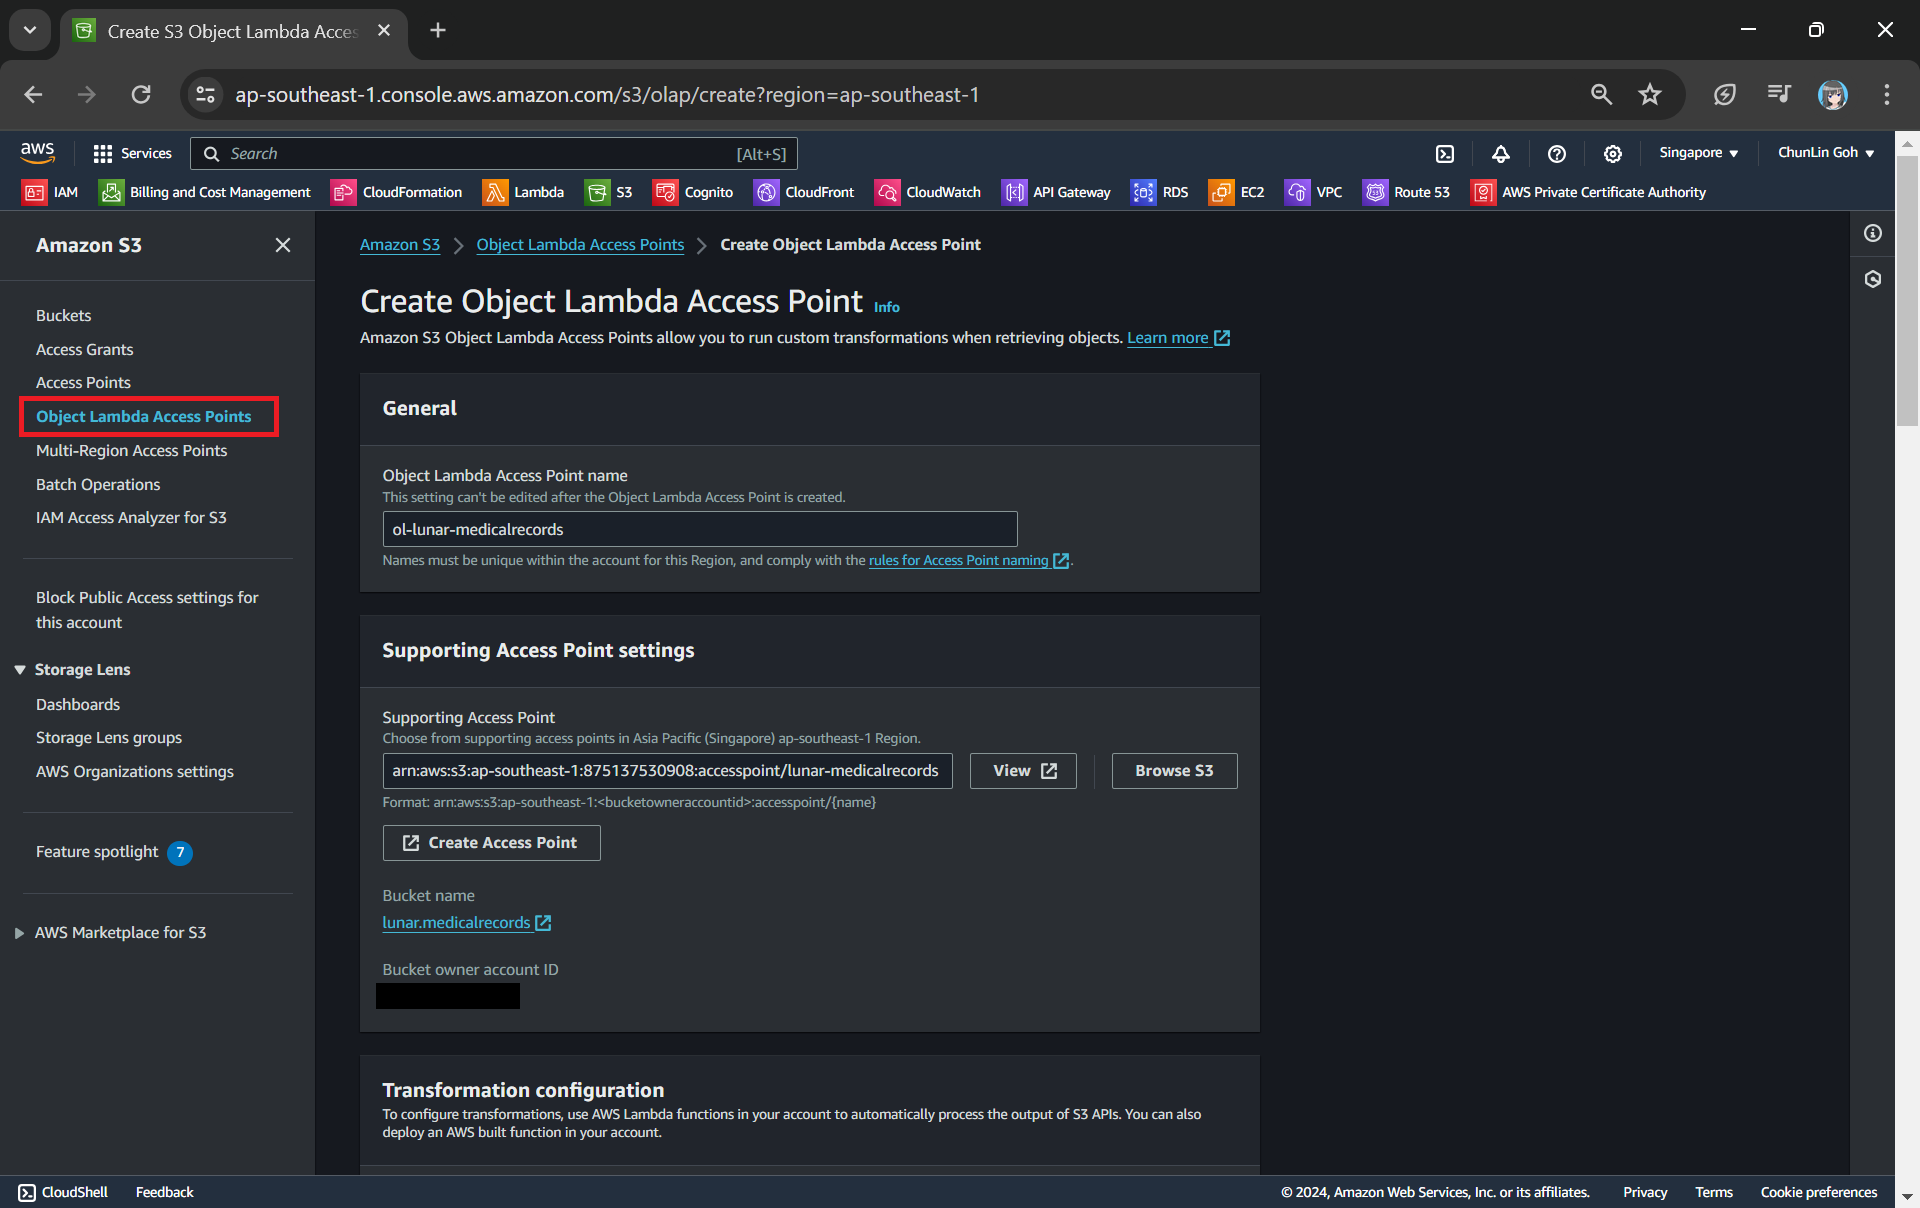
Step 4: Create S3 Object Lambda Access Point
After getting our S3 Access Point set up, we can then move on to create our S3 Object Lambda Access Point. This is the actual access point that our app will be using to access the JSON file in our S3 bucket. It then should return a HTML document generated by the Object Lambda that we built in Step 1.
Creating an object lambda access point from the navigation pane of S3.
In the Object Lambda Access Point creation page, after we give it a name, we need to provide the Supporting Access Point. This access point is the Amazon Resource Name (ARN) of the S3 Access Point that we created in Step 3. Please take note that both the Object Lambda Access Point and Supporting Access Point must be in the same region.
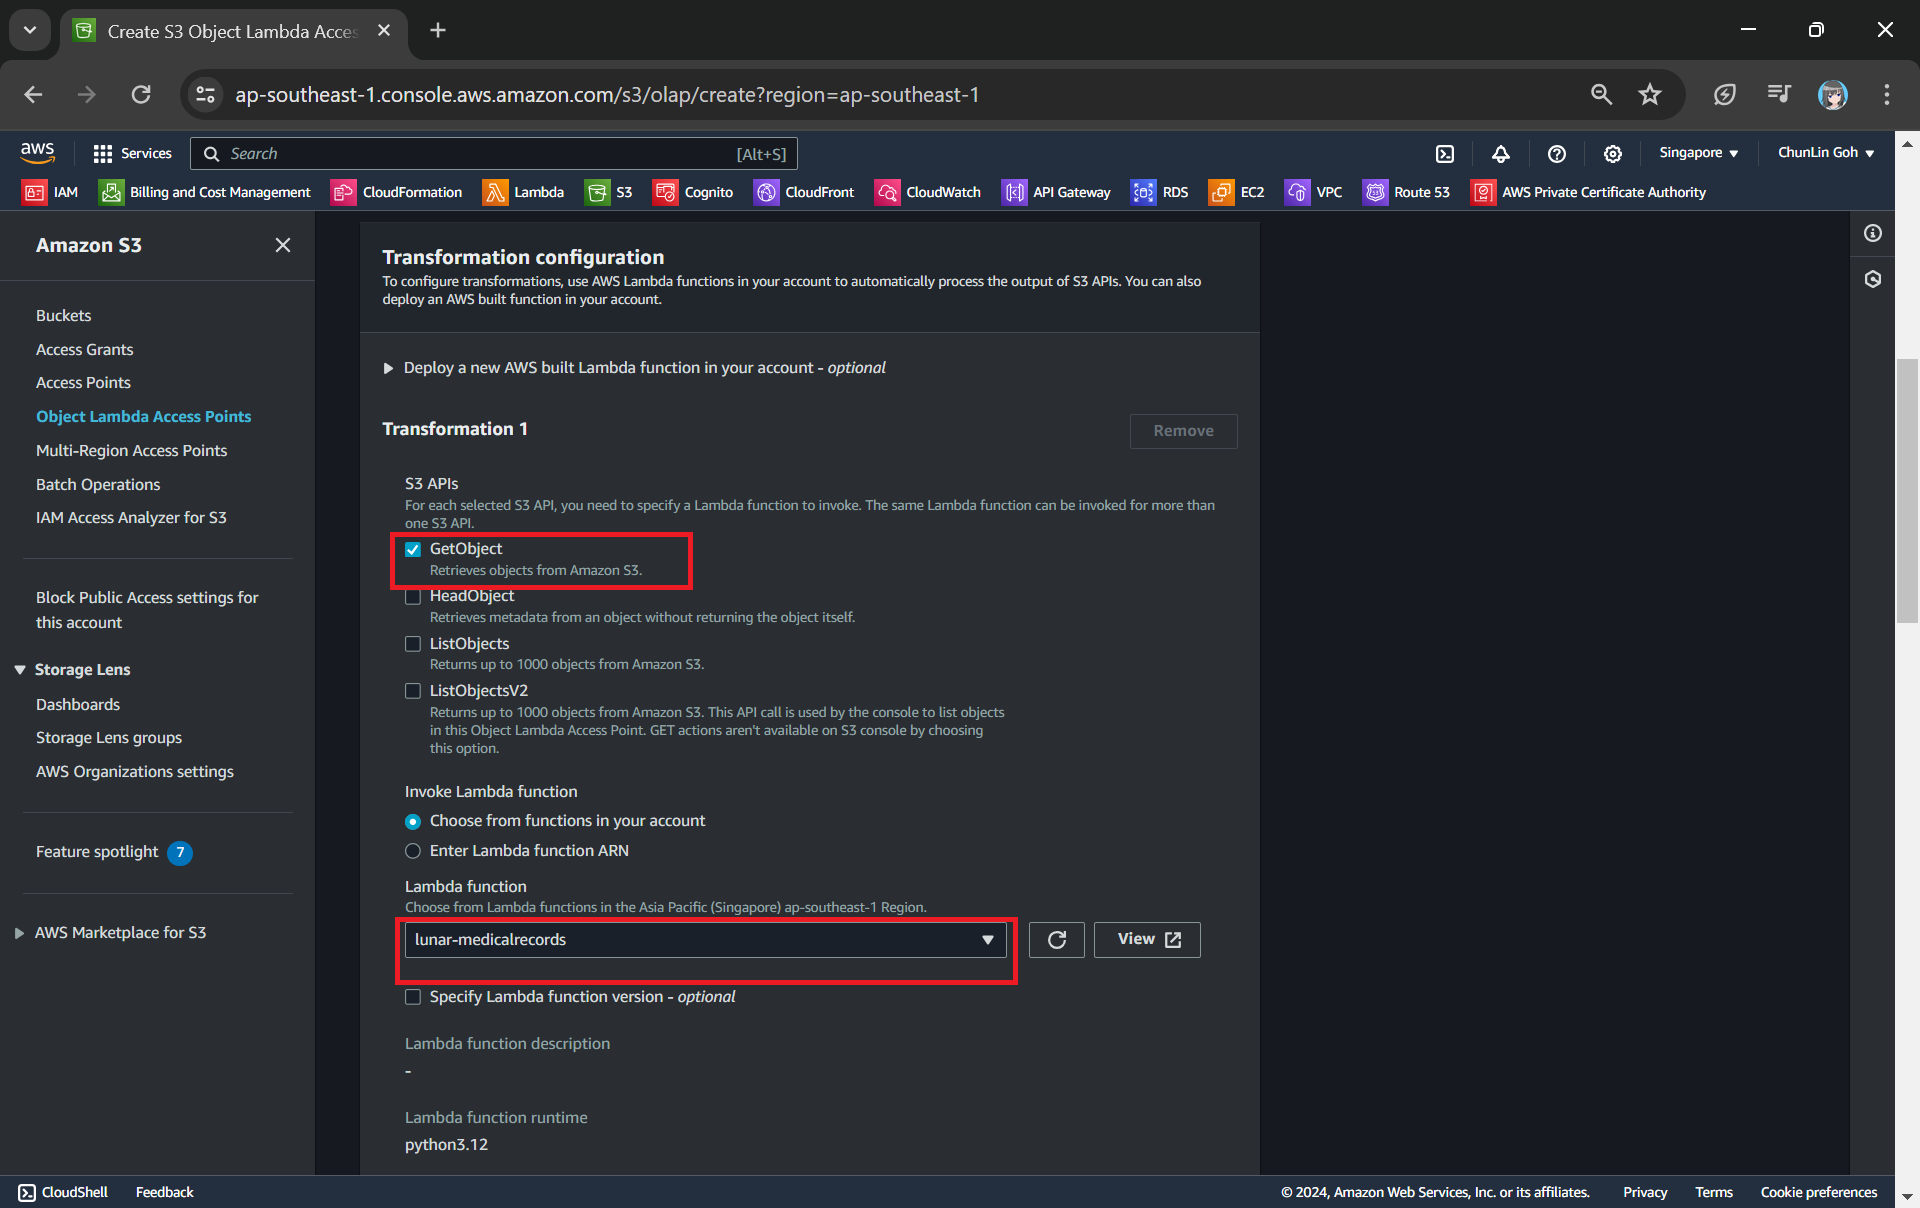
Next we need to setup the transformation configuration. In our case, we will be retrieving the JSON file from the S3 bucket to perform the data transformation via our Lambda Function, so we will be choosing GetObject as the S3 API we will be using, as shown in the screenshot below.
Configuring the S3 API that will be used in the data transformation and the Lambda Function to invoke.
Once all these fields are keyed in, we can proceed to create the Object Lambda Access Point.
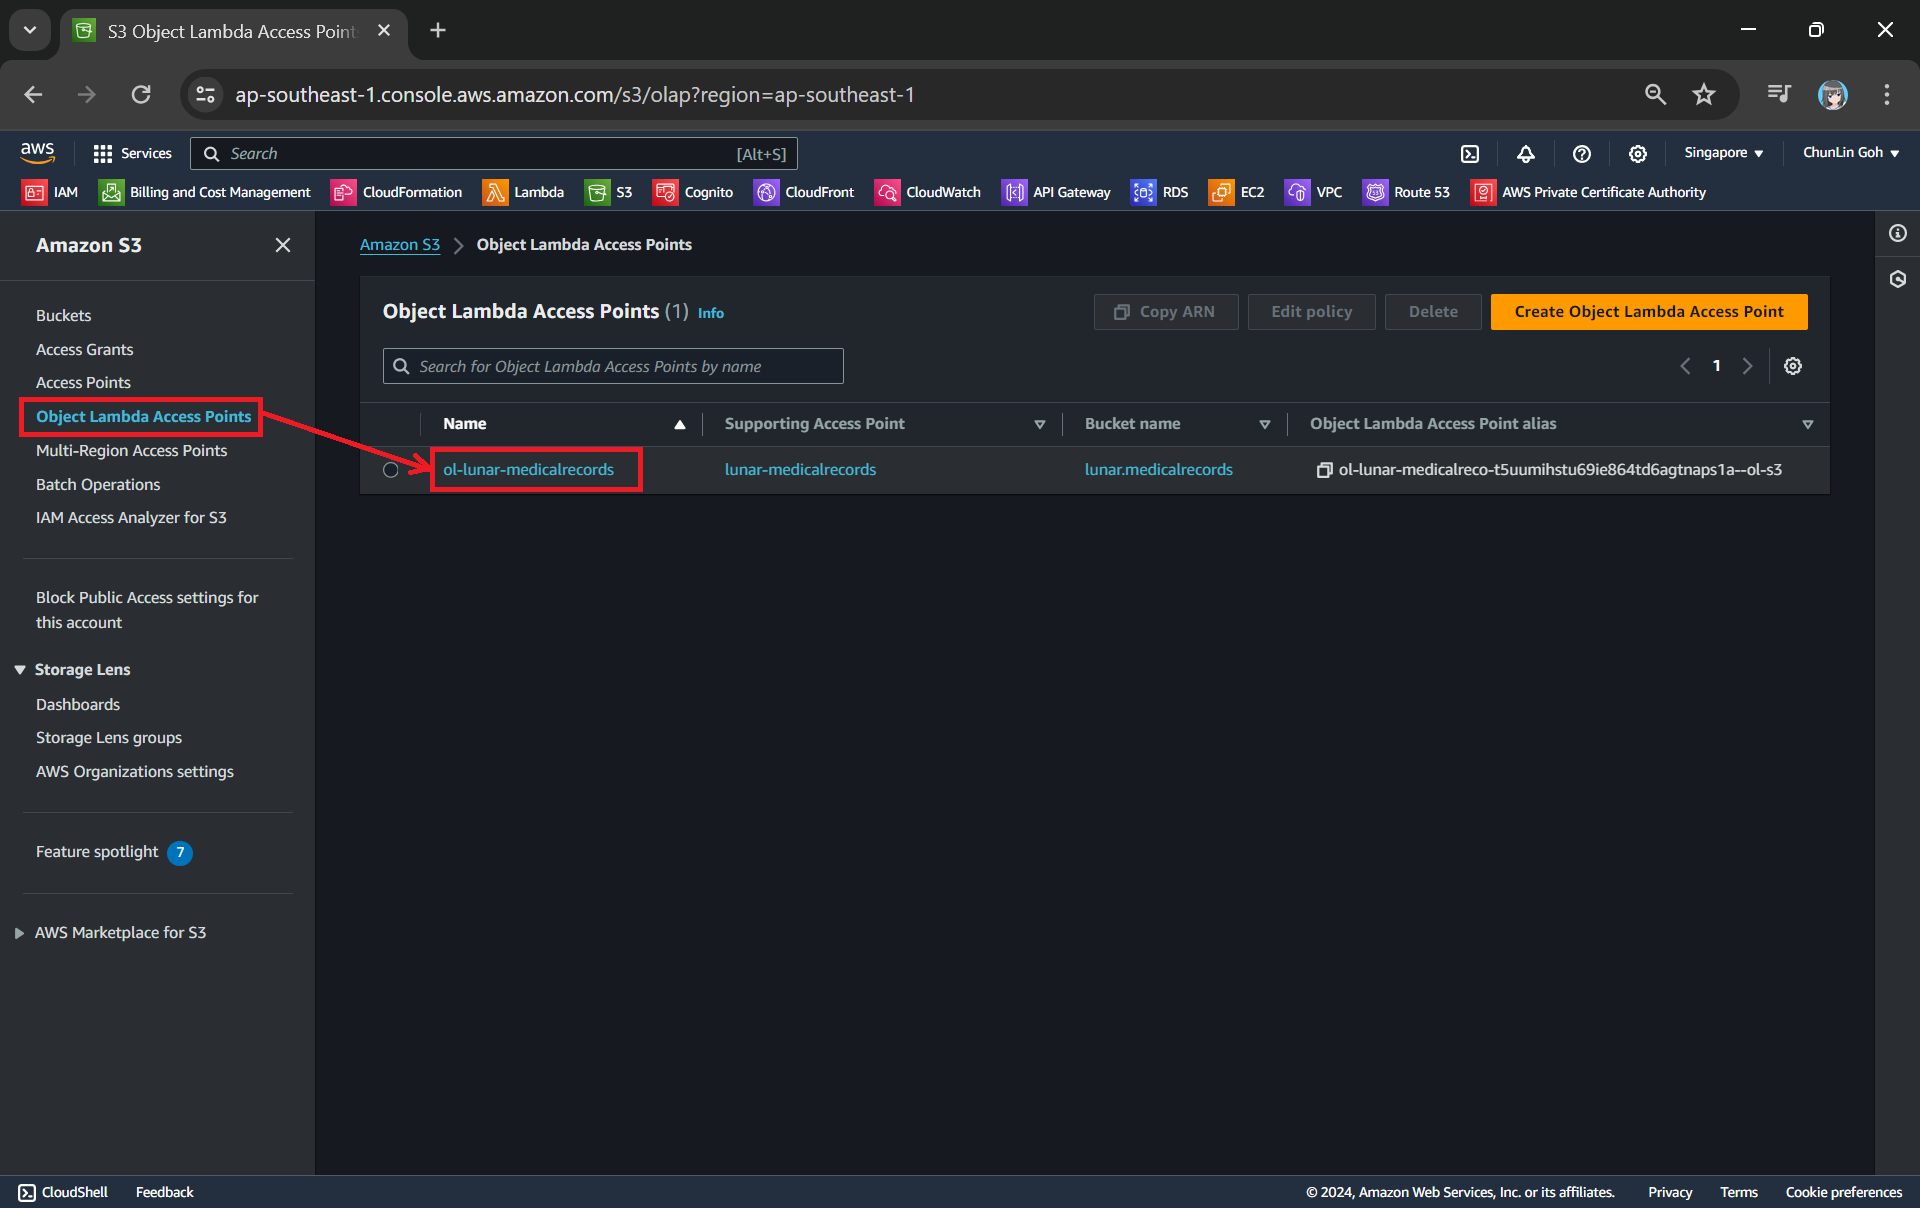
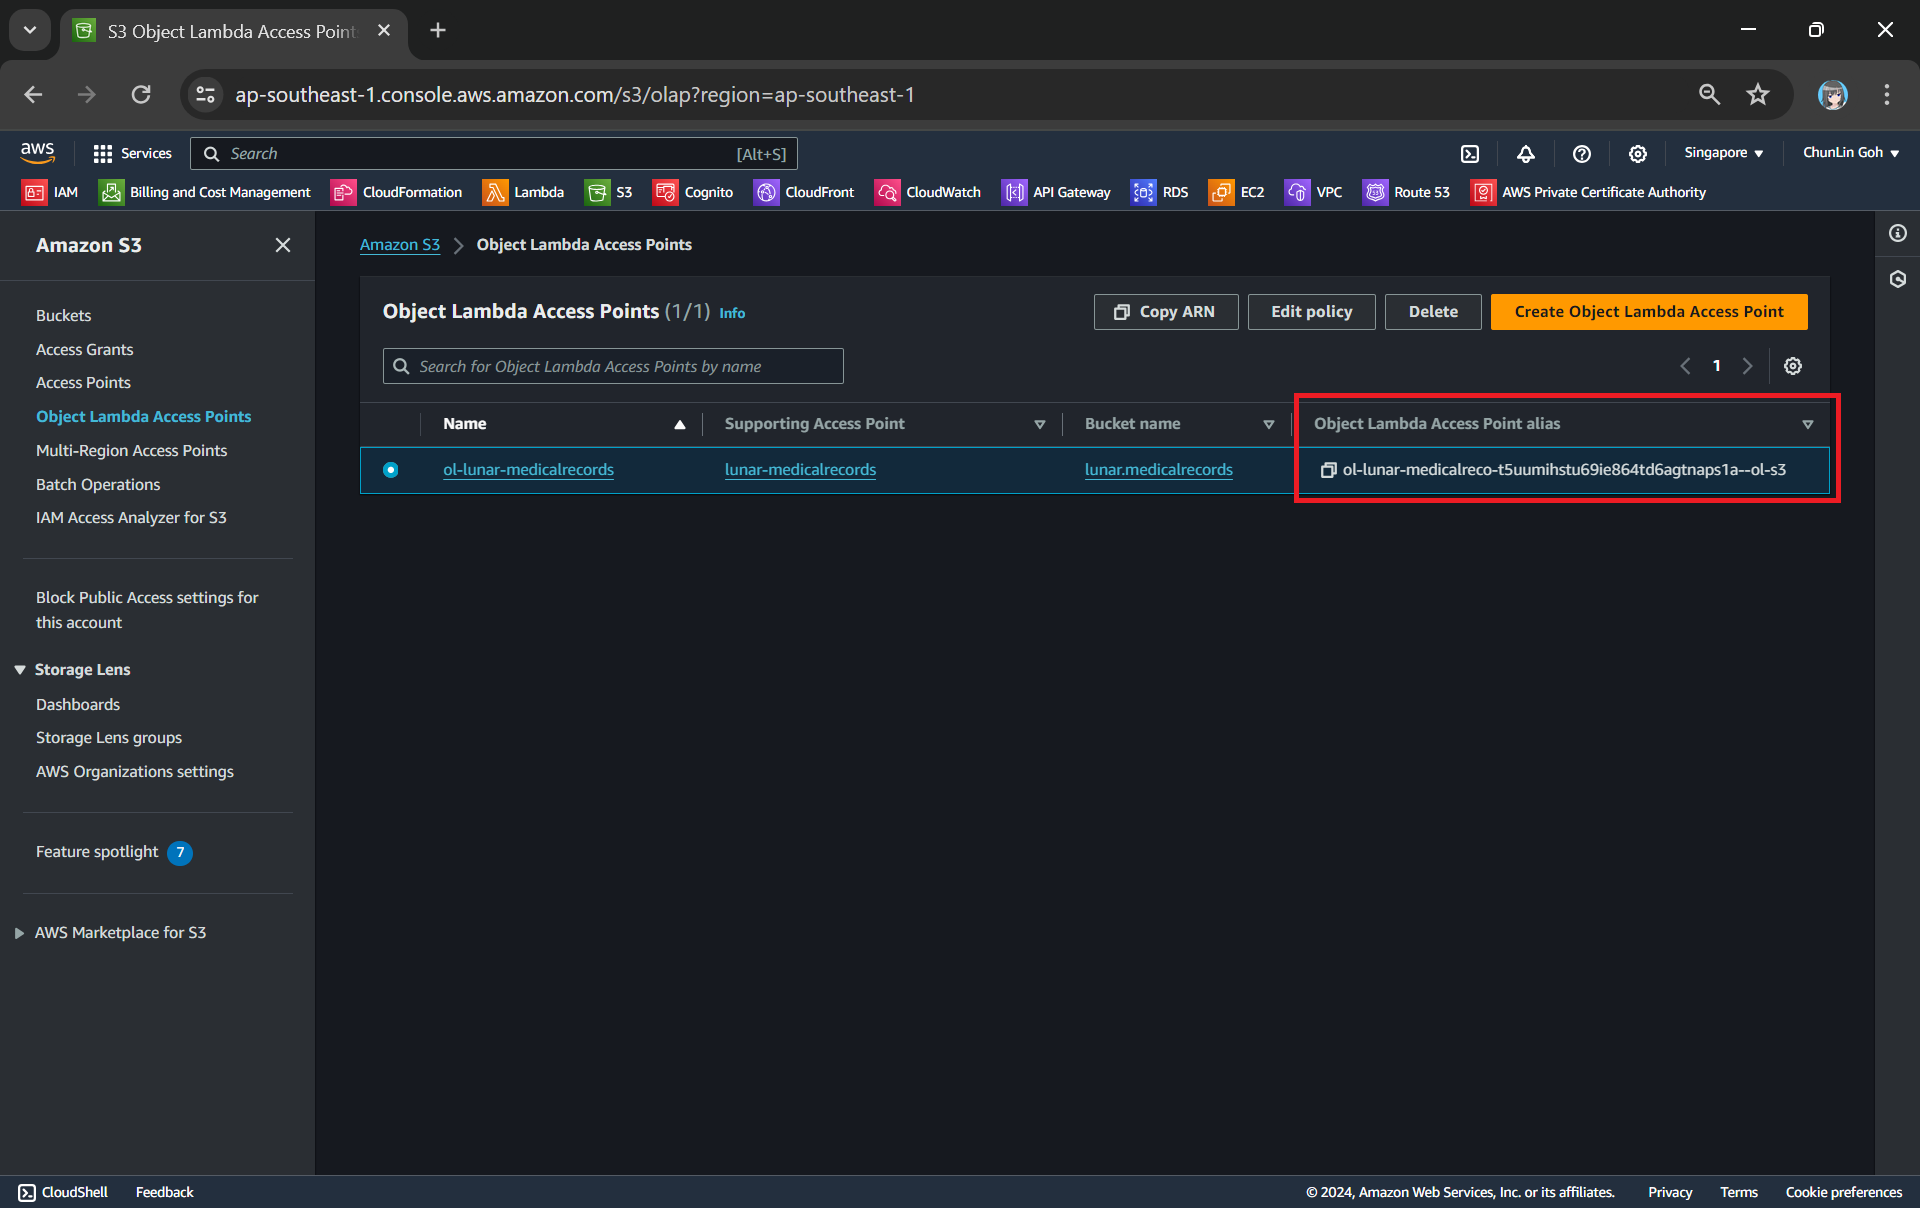
Now, we will access the JSON file via the Object Lambda Access Point to verify that the file is really transformed into a web page during the request. To do so, firstly, we need to select the newly create Object Lambda Access Point as shown in the following screenshot.
Locate the Object Lambda Access Point we just created in the S3 console.
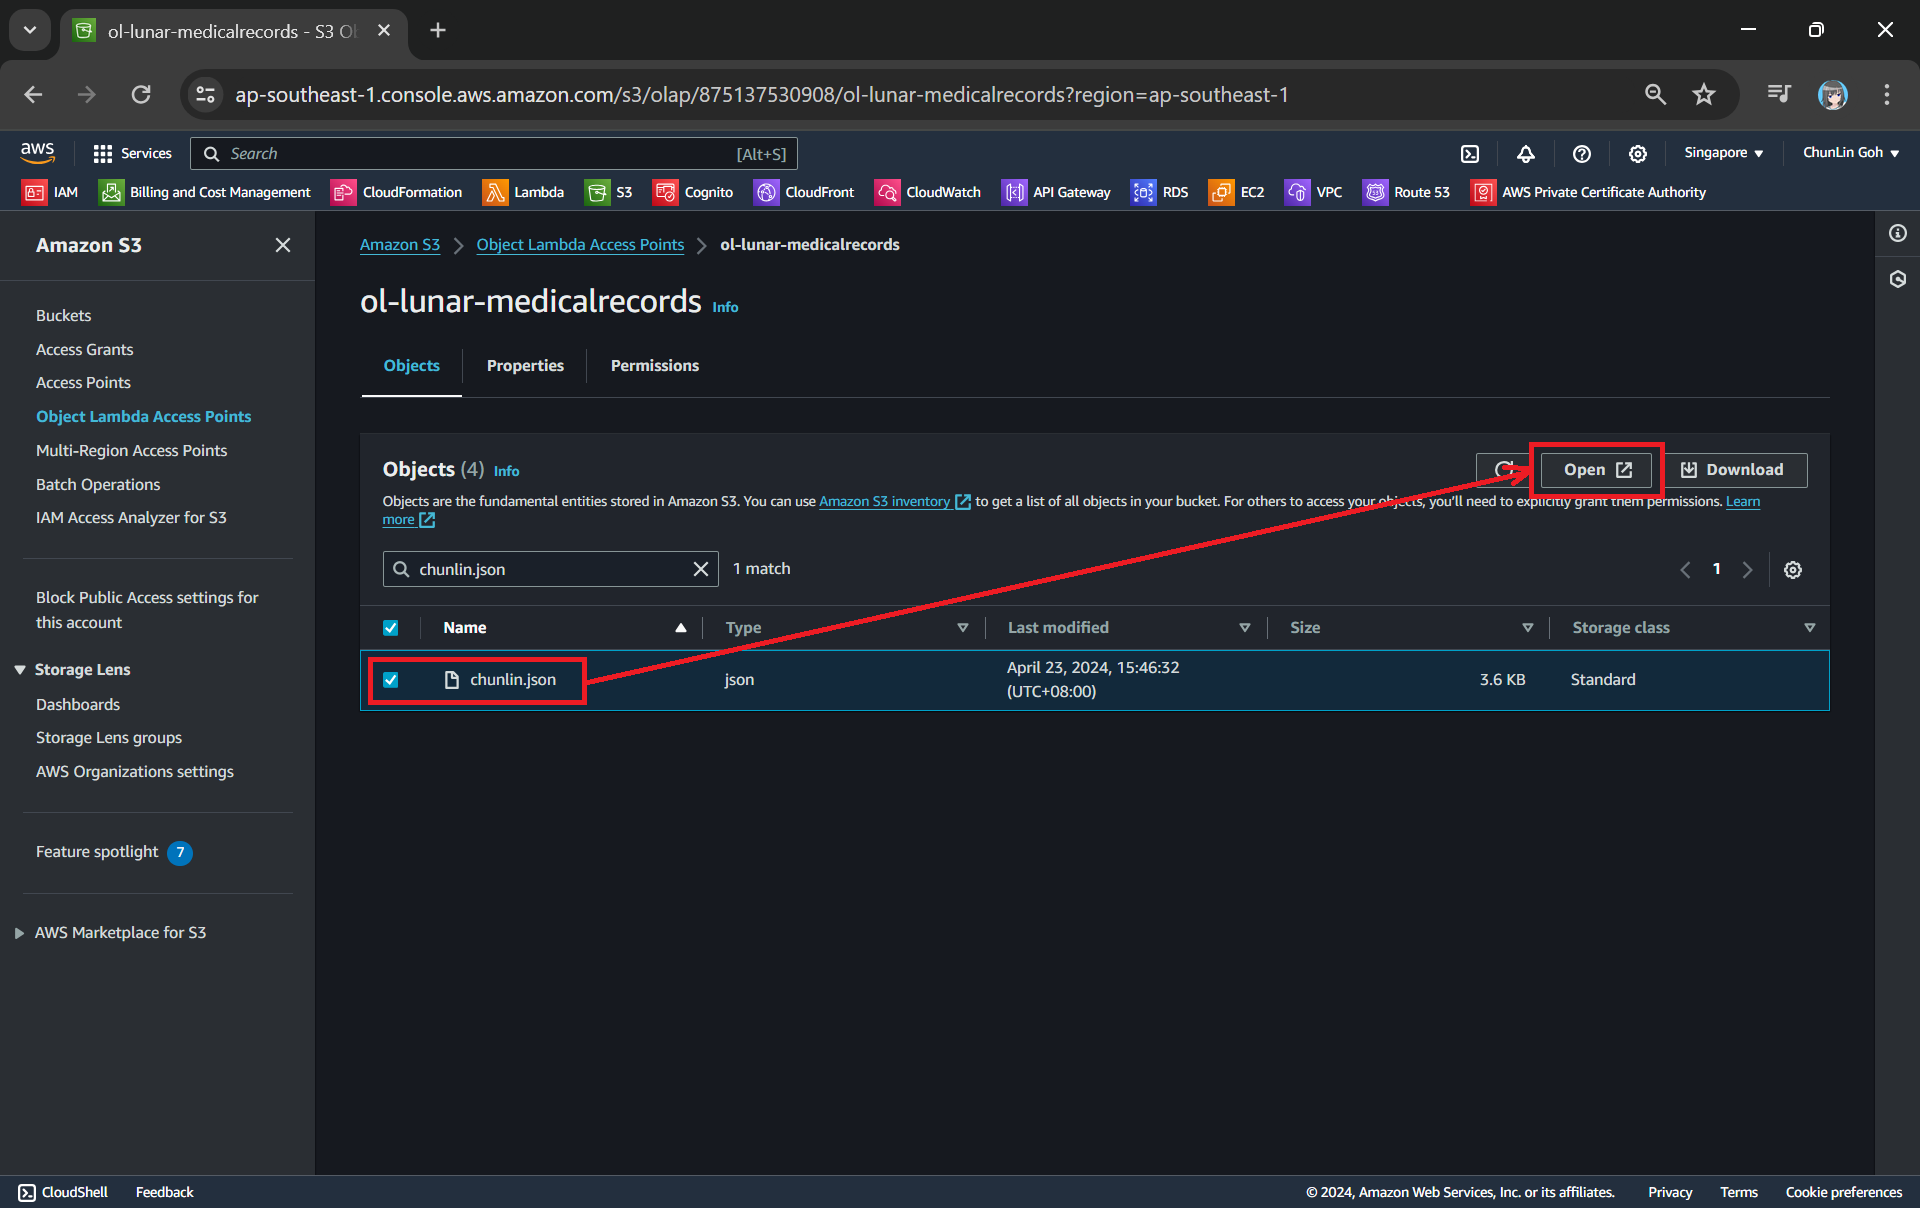
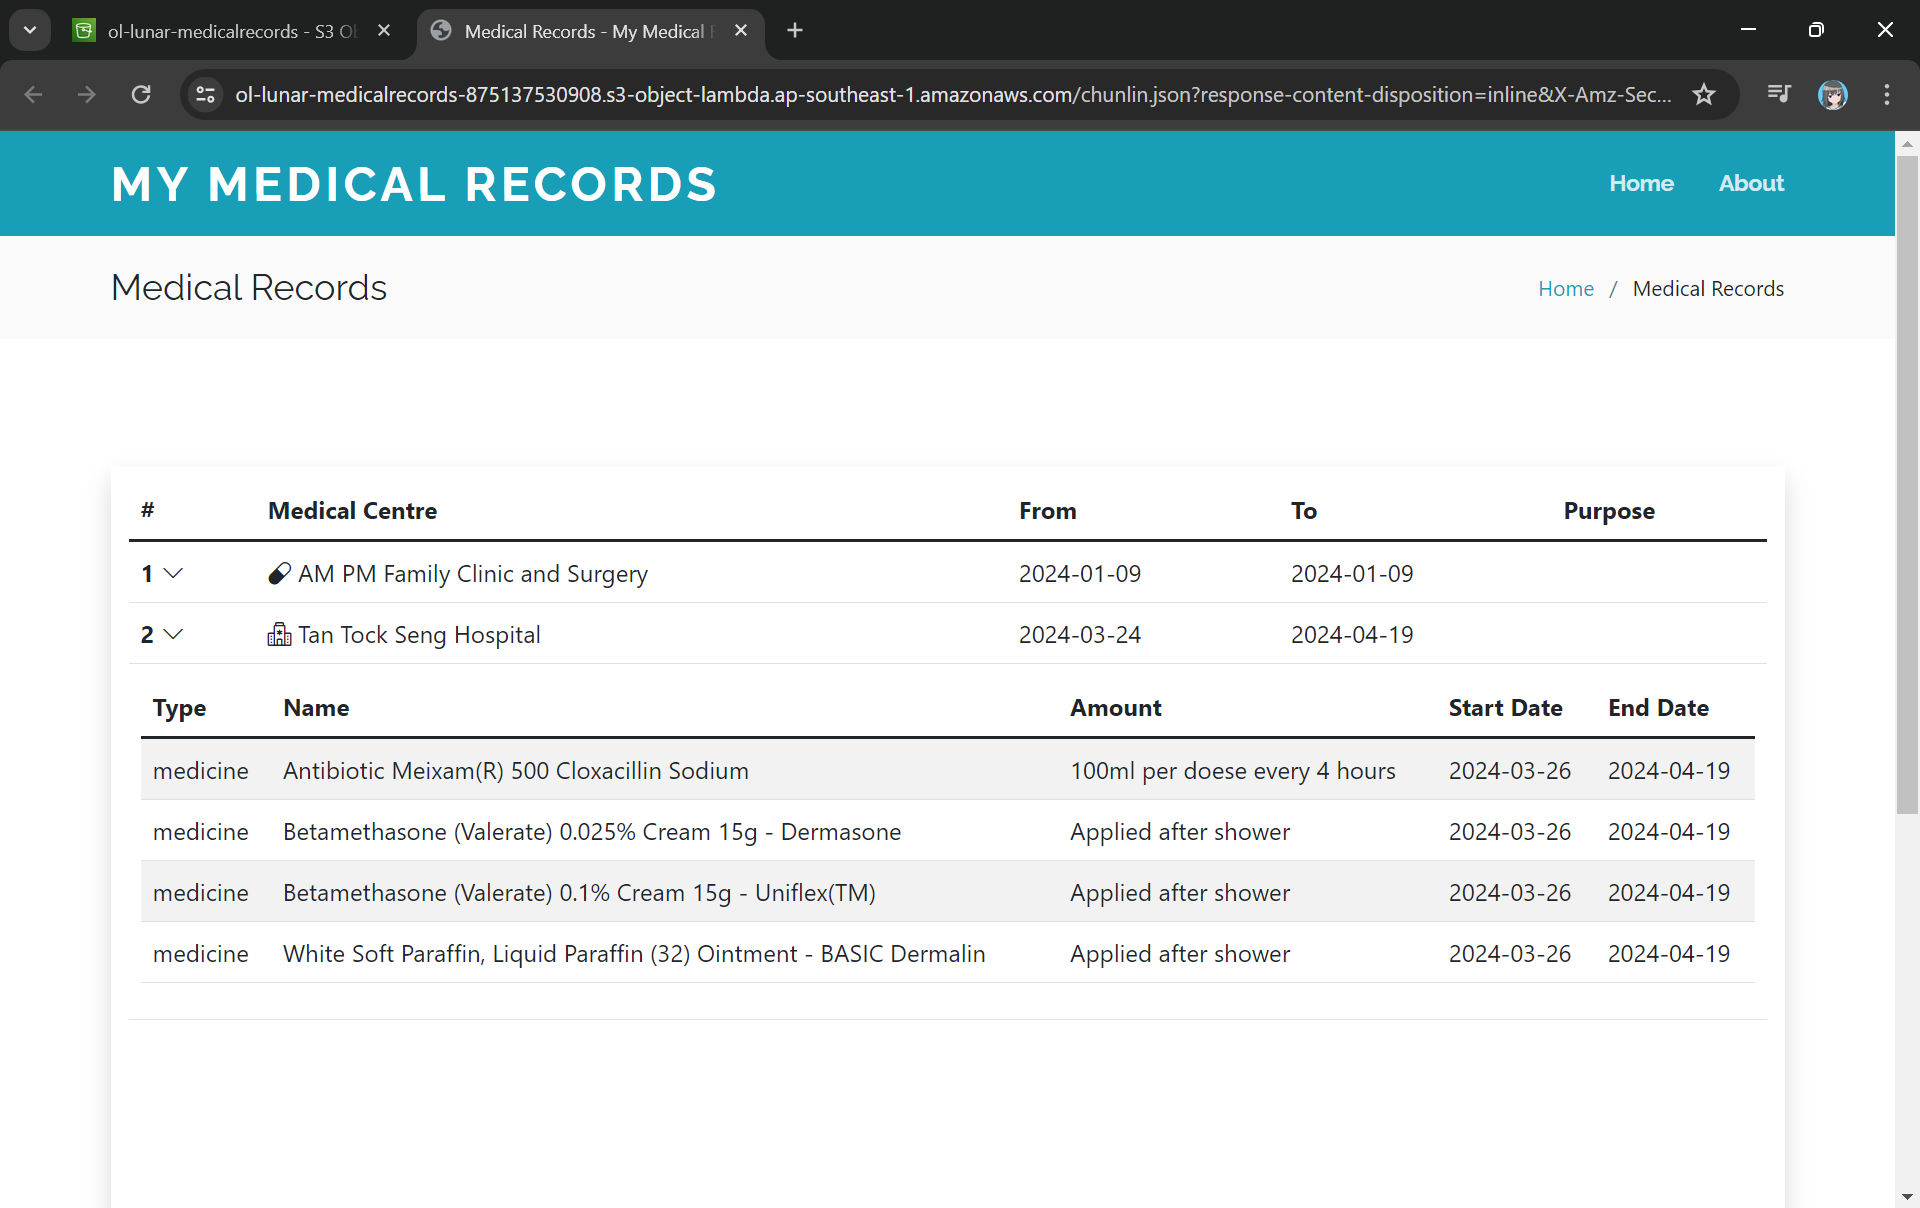
Secondly, we will be searching for our JSON file, for example chunlin.json in my case. Then, we will click on the “Open” button to view it. The reason why I name the JSON file containing my medical records is because later I will be adding authentication and authorisation to only allow users retrieving their own JSON file based on their login user name.
This page looks very similar to the usual S3 objects listing page. So please make sure you are doing this under the “Object Lambda Access Point”.
There will be new tab opened showing the web page as demonstrated in the screenshot below. As you have noticed in the URL, it is still pointing to the JSON file but the returned content is a HTML web page.
The domain name is actually no longer the usual S3 domain name but it is our Object Lambda Access Point.
Using the Object Lambda Access Point from Our App
With the Object Lambda Access Point successfully setup, we will show how we can use it. To not overcomplicate things, for the purposes of this article, I will host a serverless web app on Lambda which will be serving the medical record website above.
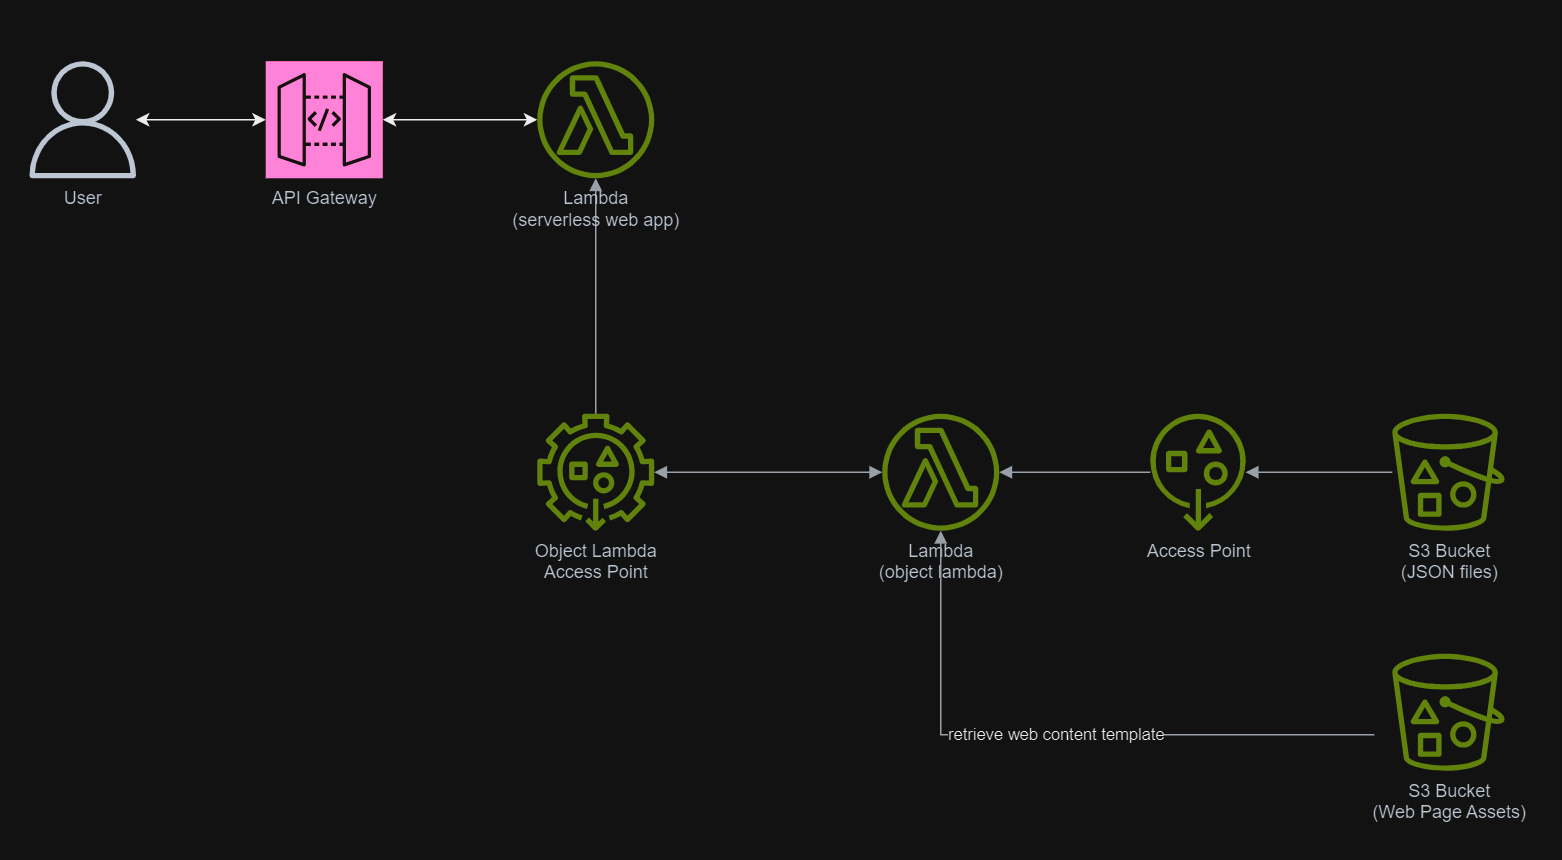
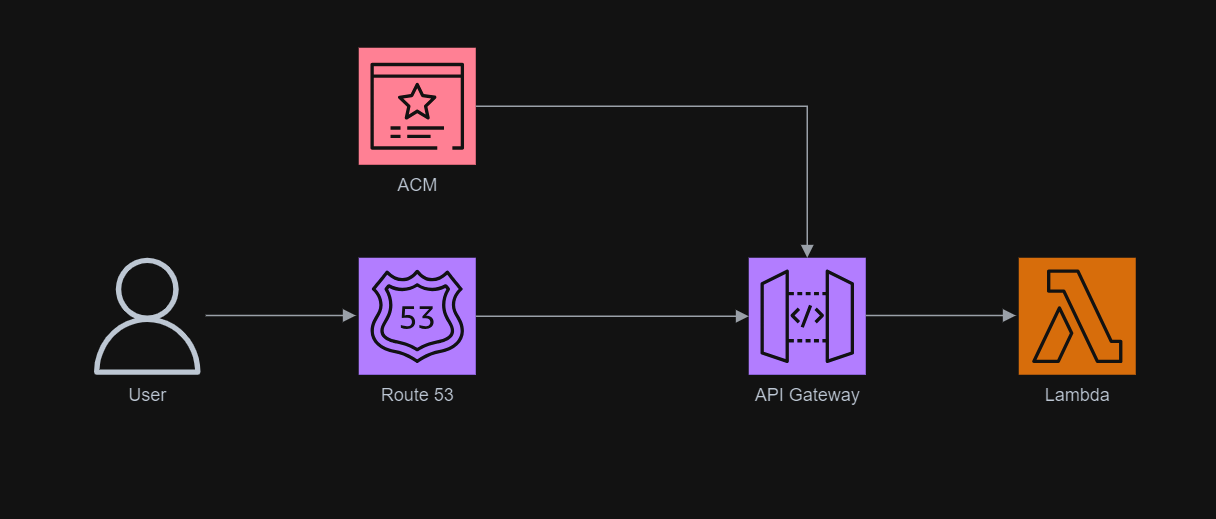
In addition, since Lambda Functions are by default not accessible from the Internet, we will be using API Gateway so that we can have a custom REST endpoint in the AWS and thus we can map this endpoint to the invokation of our Lambda Function. Technically speaking, the architecture diagram now looks as follows.
This architecture allows public to view the medical record website which is hosted as a serverless web app.
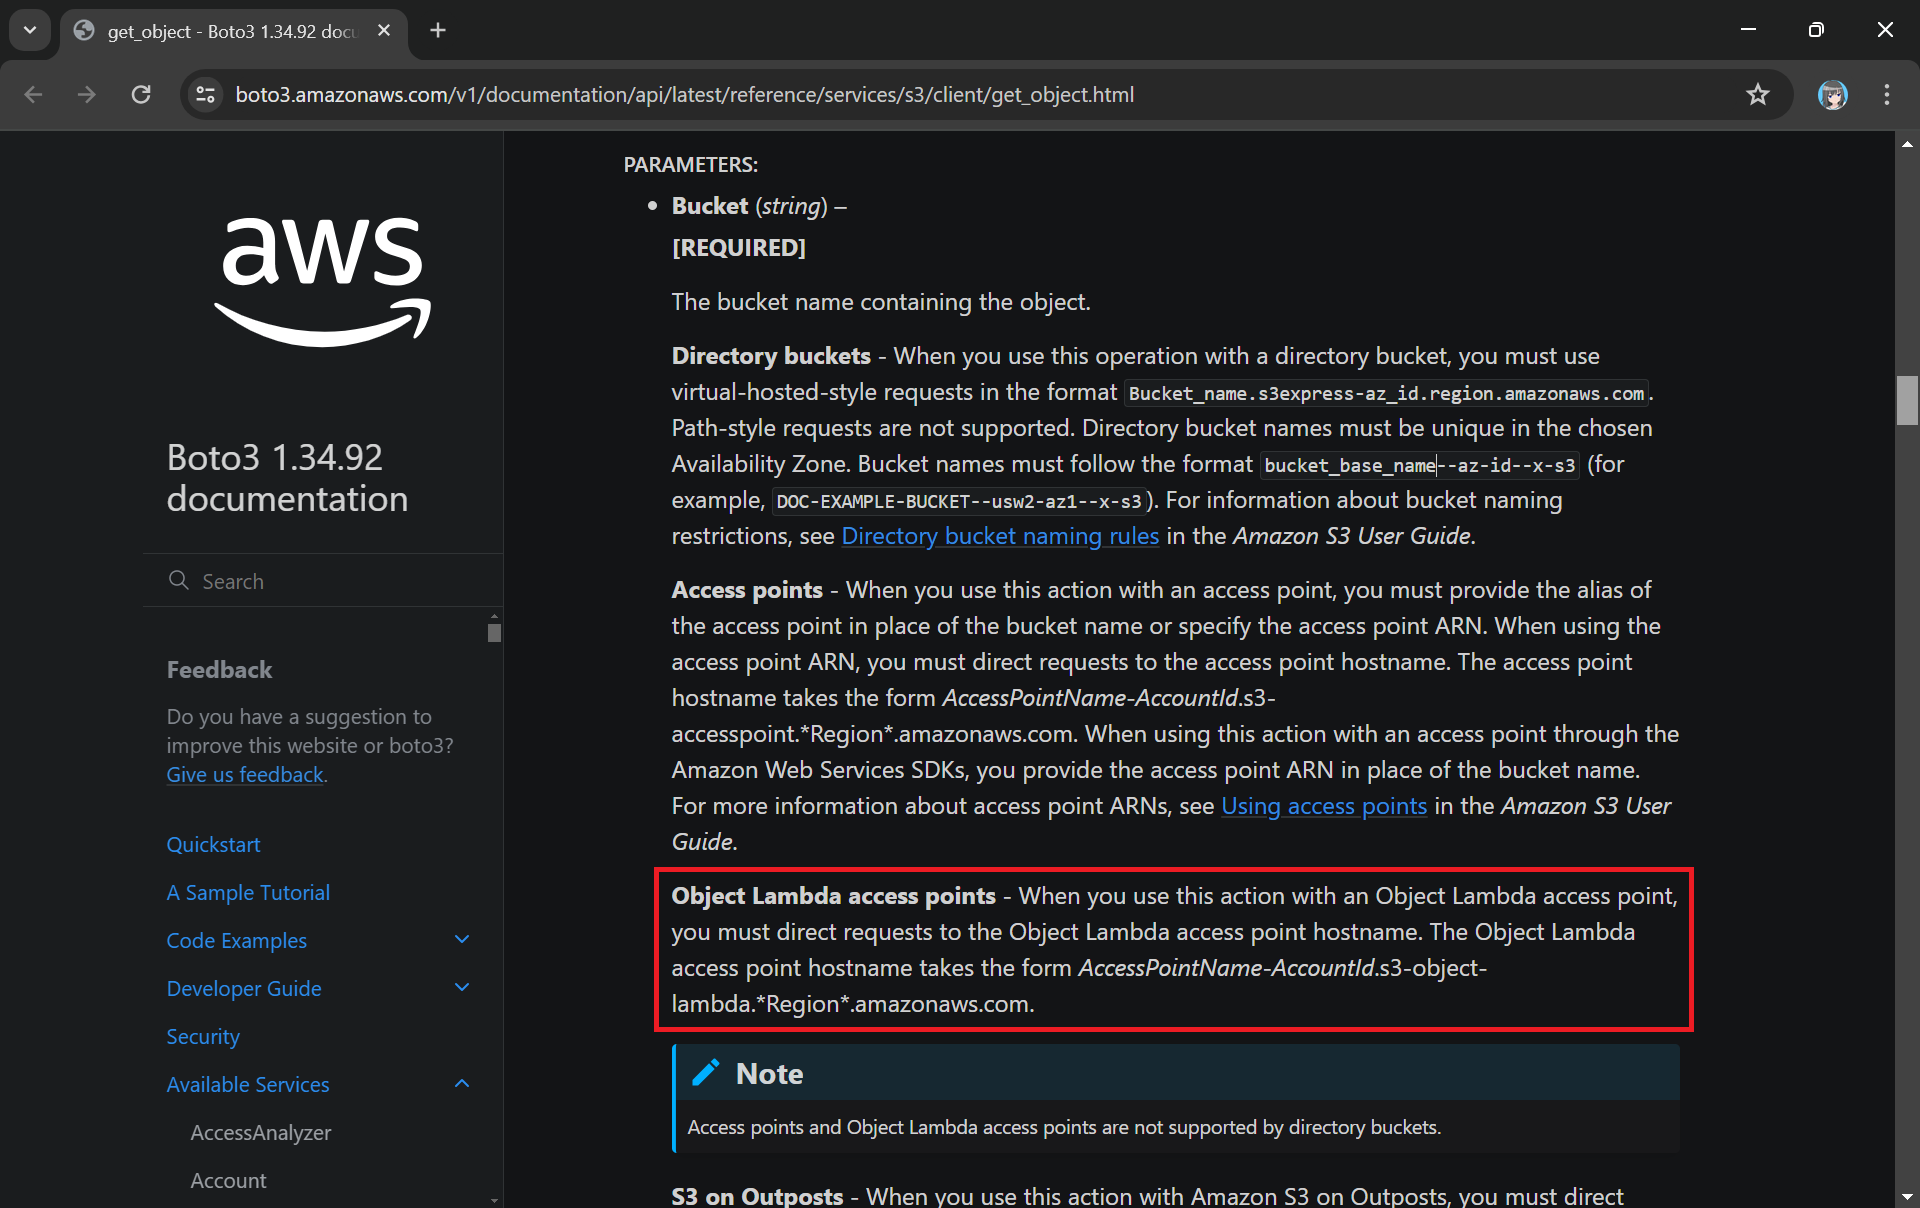
In the newly created Lambda, we will still be developing it with Python 3.12. We name this Lambda lunar-medicalrecords-frontend. We will be using the following code which will retrieve the HTML content from the Object Lambda Access Point.
The Boto3 documentation highlights the use of Object Lambda Access Point in get_object.
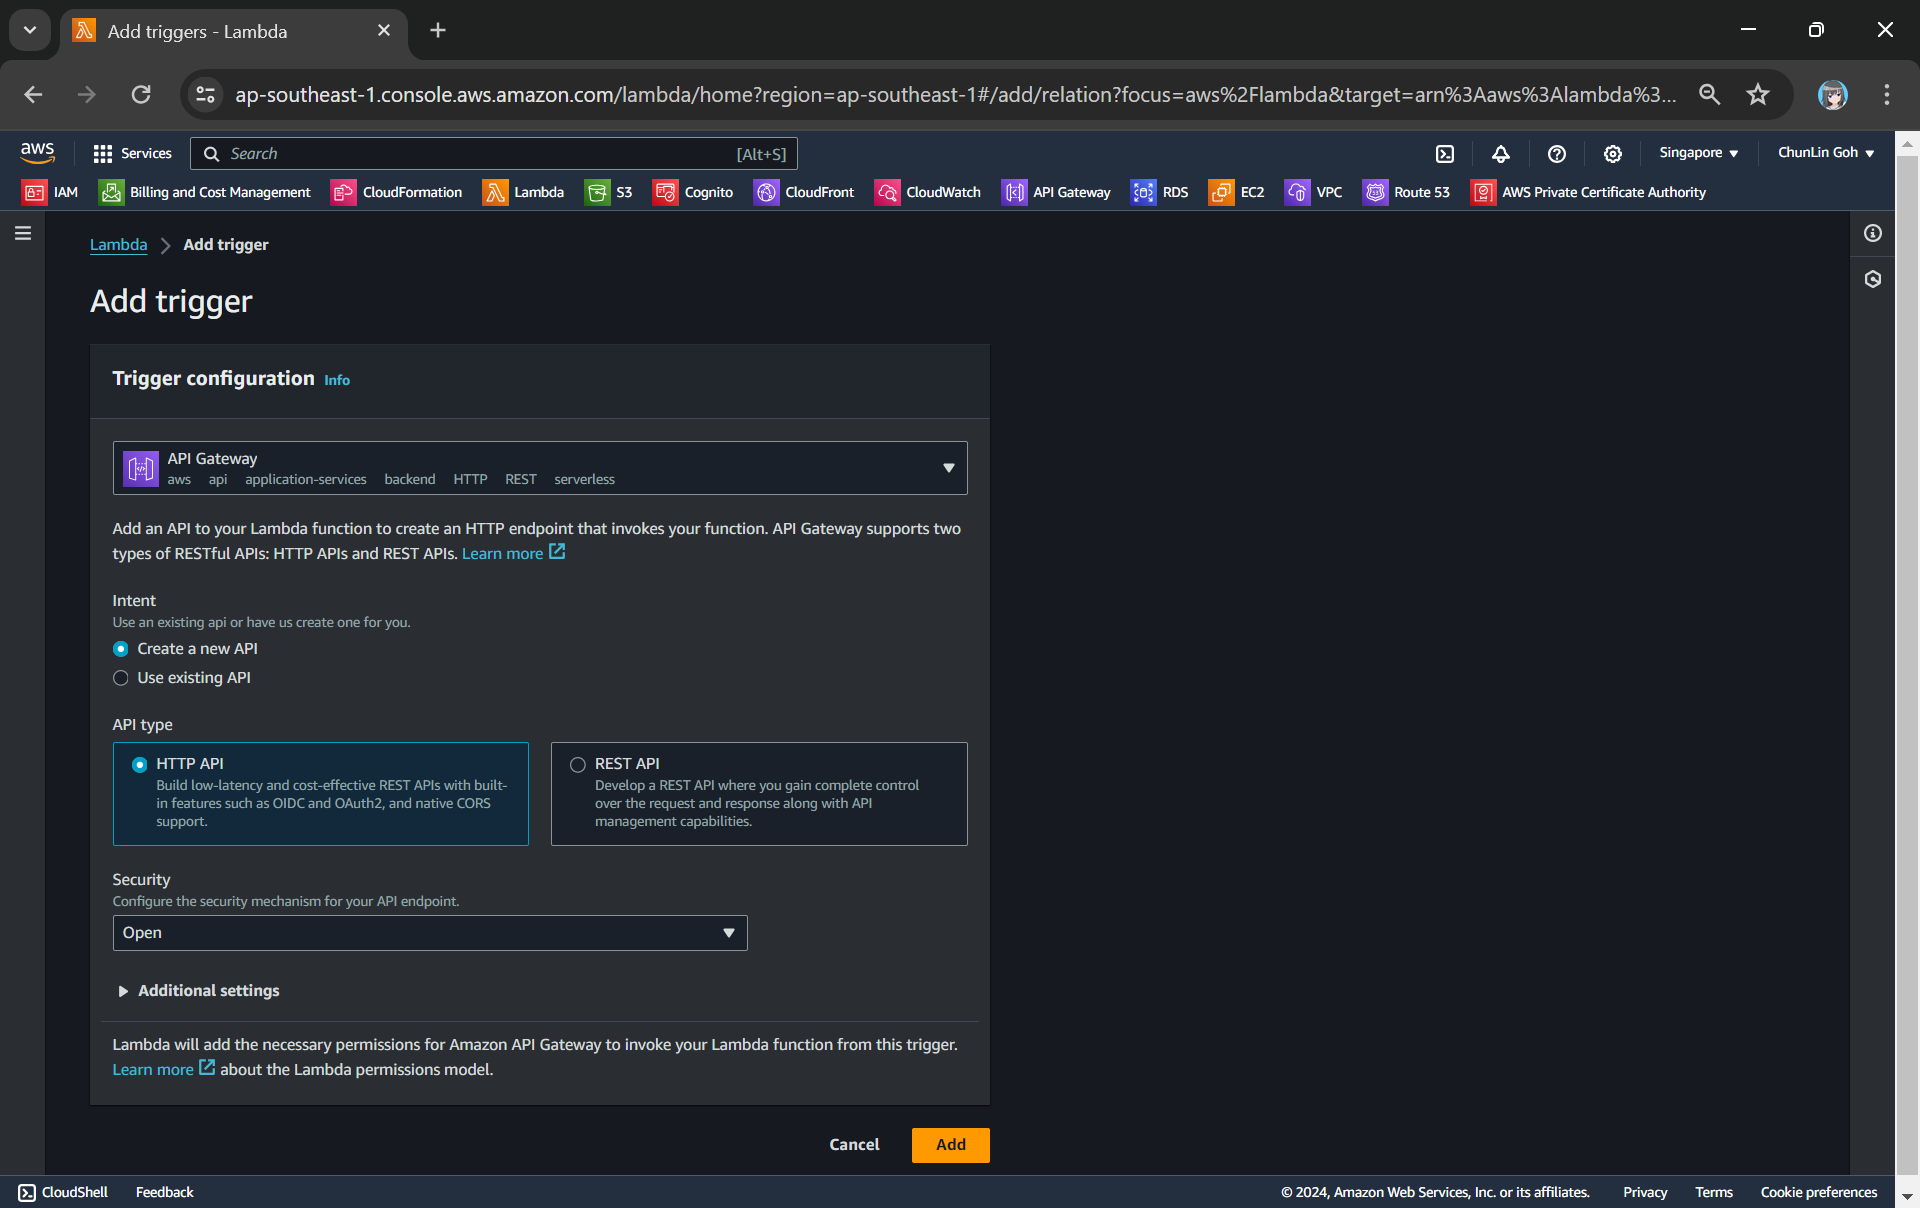
The API Gateway for the Lambda Function is created with HTTP API through the “Add Trigger” function (which is located at the Function overview page). For the Security field, we will be choosing “Open” for now. We will add the login functionality later.
Adding API Gateway as a trigger to our Lambda.
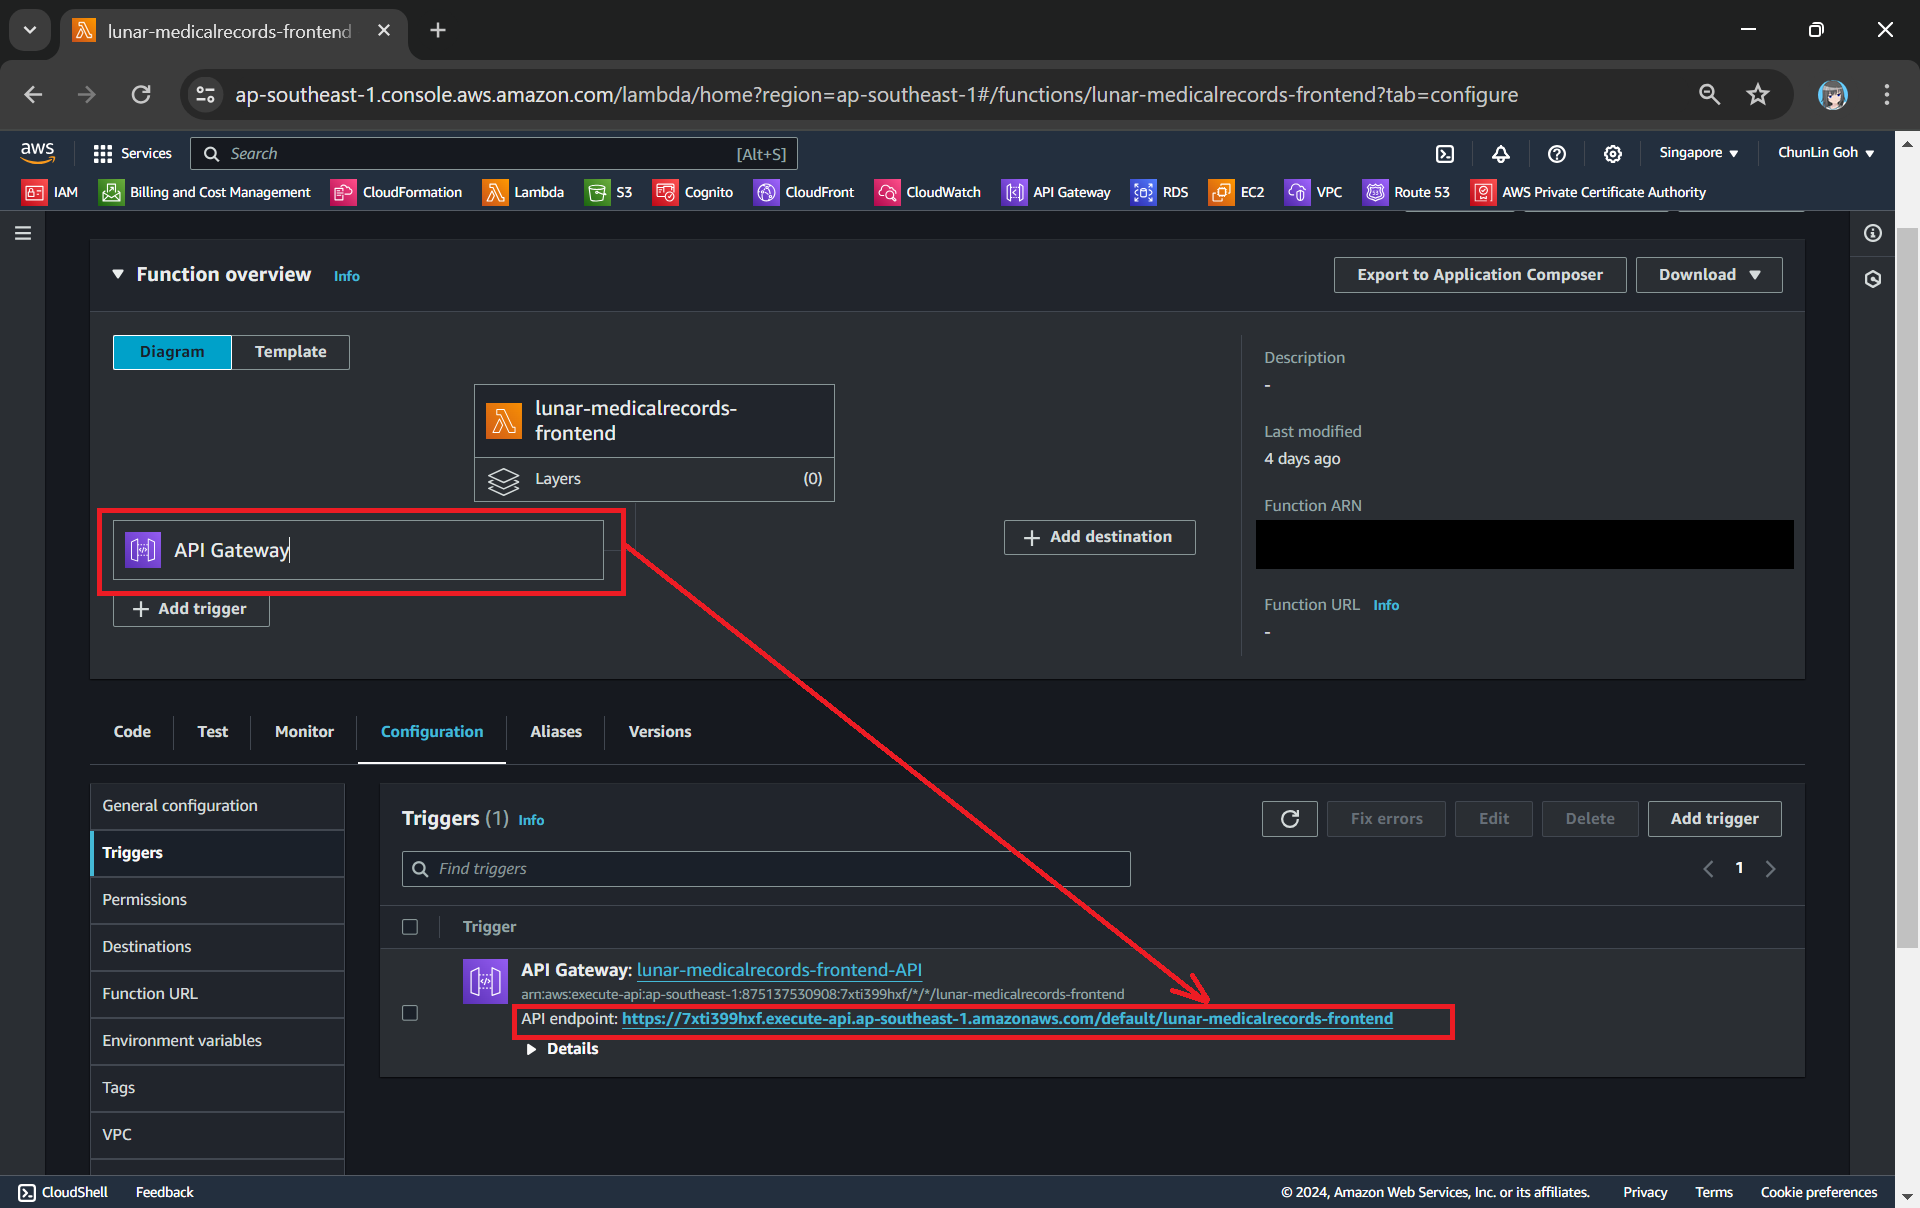
Once this is done, we will be provided an API Gateway endpoint, as shown in the screenshot below. Visiting the endpoint should be rendering the same web page listing the medical records as we have seen above.
Getting the API endpoint of the API Gateway.
Finally, for the Lambda Function permission, we only need to grand it the following.
s3:GetObject.
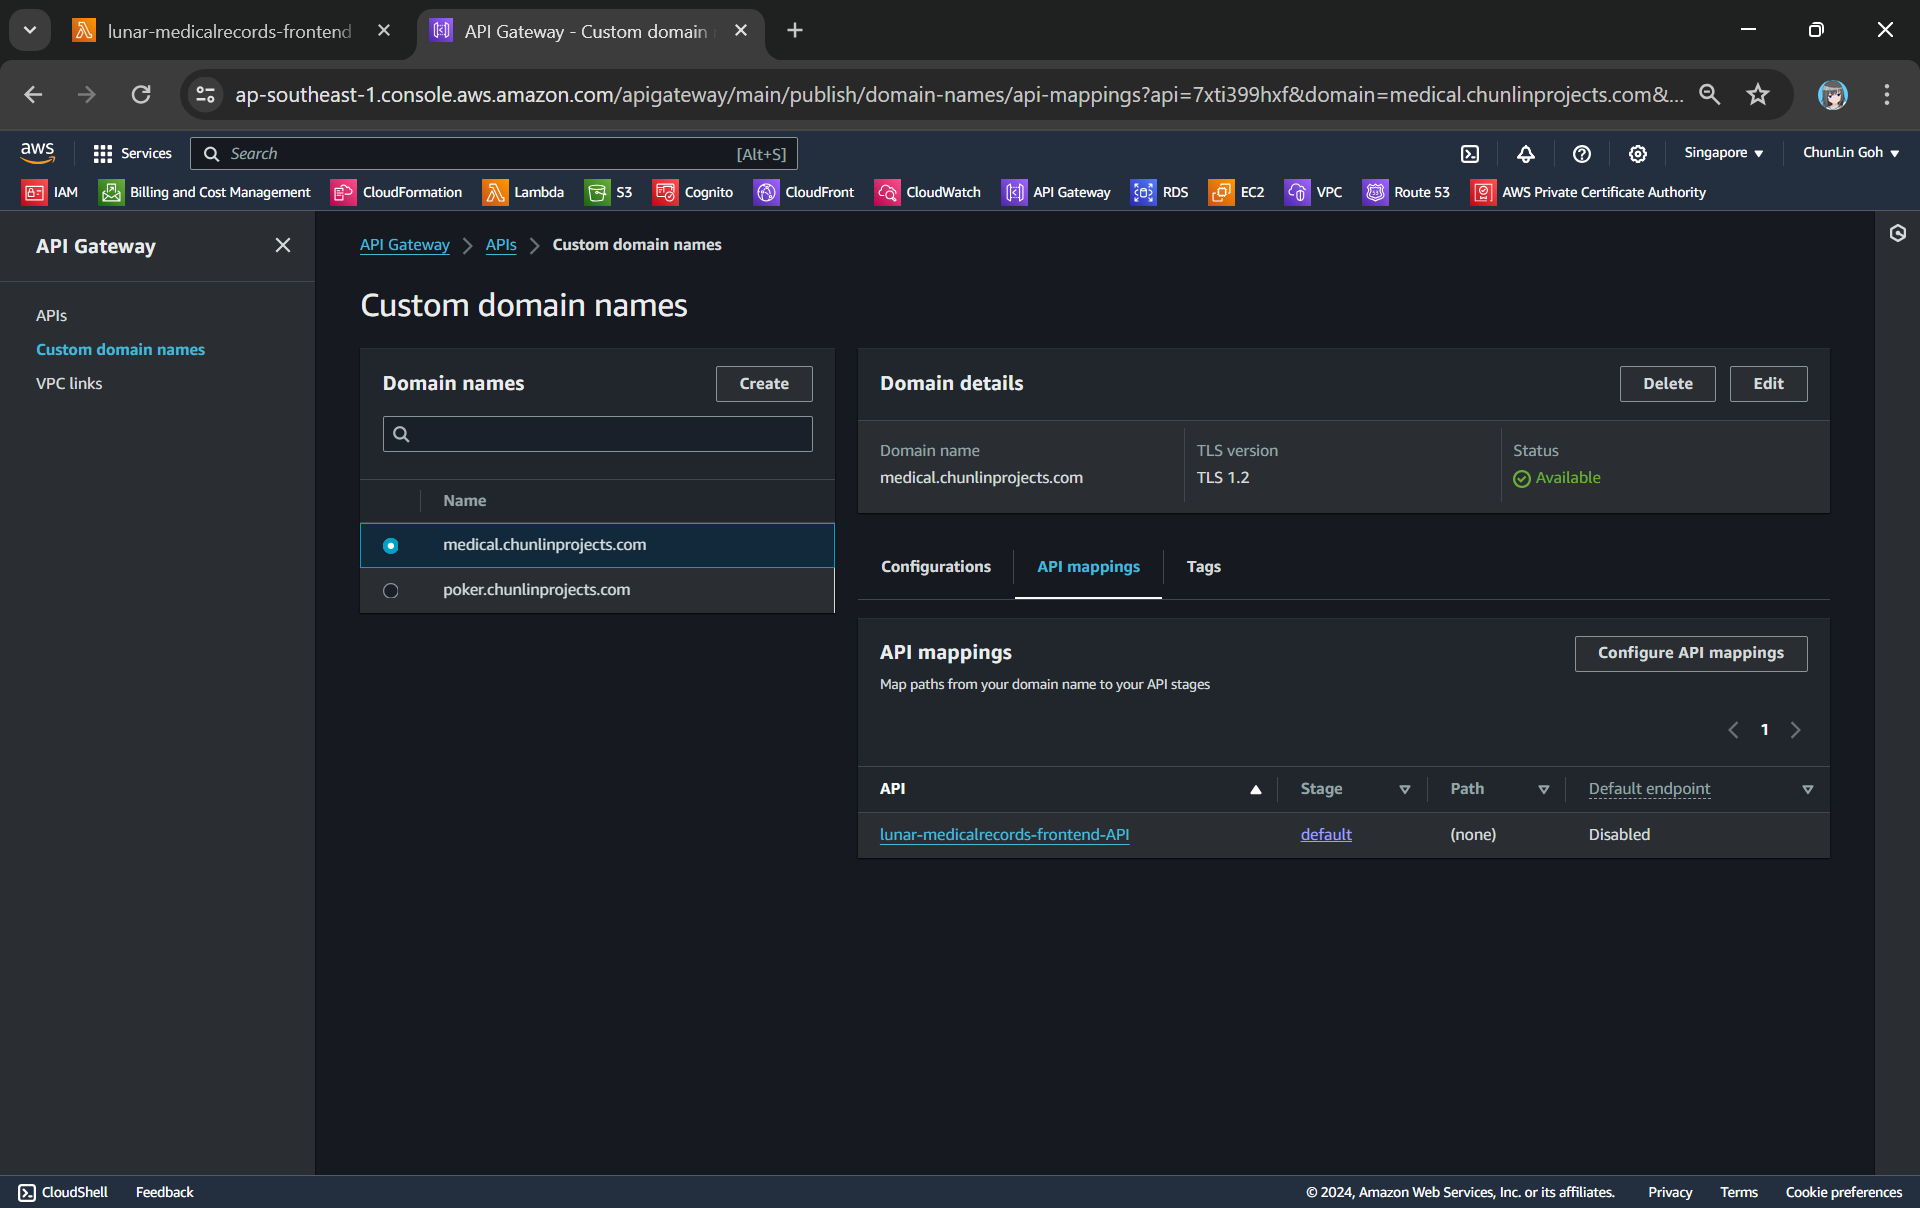
To make the API Gateway endpoint looks more user friendly, we can also introduce Custom Domain to the API Gateway, following the guide in one of our earlier posts.
Assigned medical.chunlinprojects.com to our API Gateway.
Protecting Data with Cognito
In order to ensure that only authenticated and authorised users can access their own medical records, we need to securely control access to our the app with the help from Amazon Cognito. Cognito is a service that enables us to add user sign-in and access control to our apps quickly and easily. Hence it helps authenticate and authorise users before they can access the medical records.
Step 1: Setup Amazon Cognito
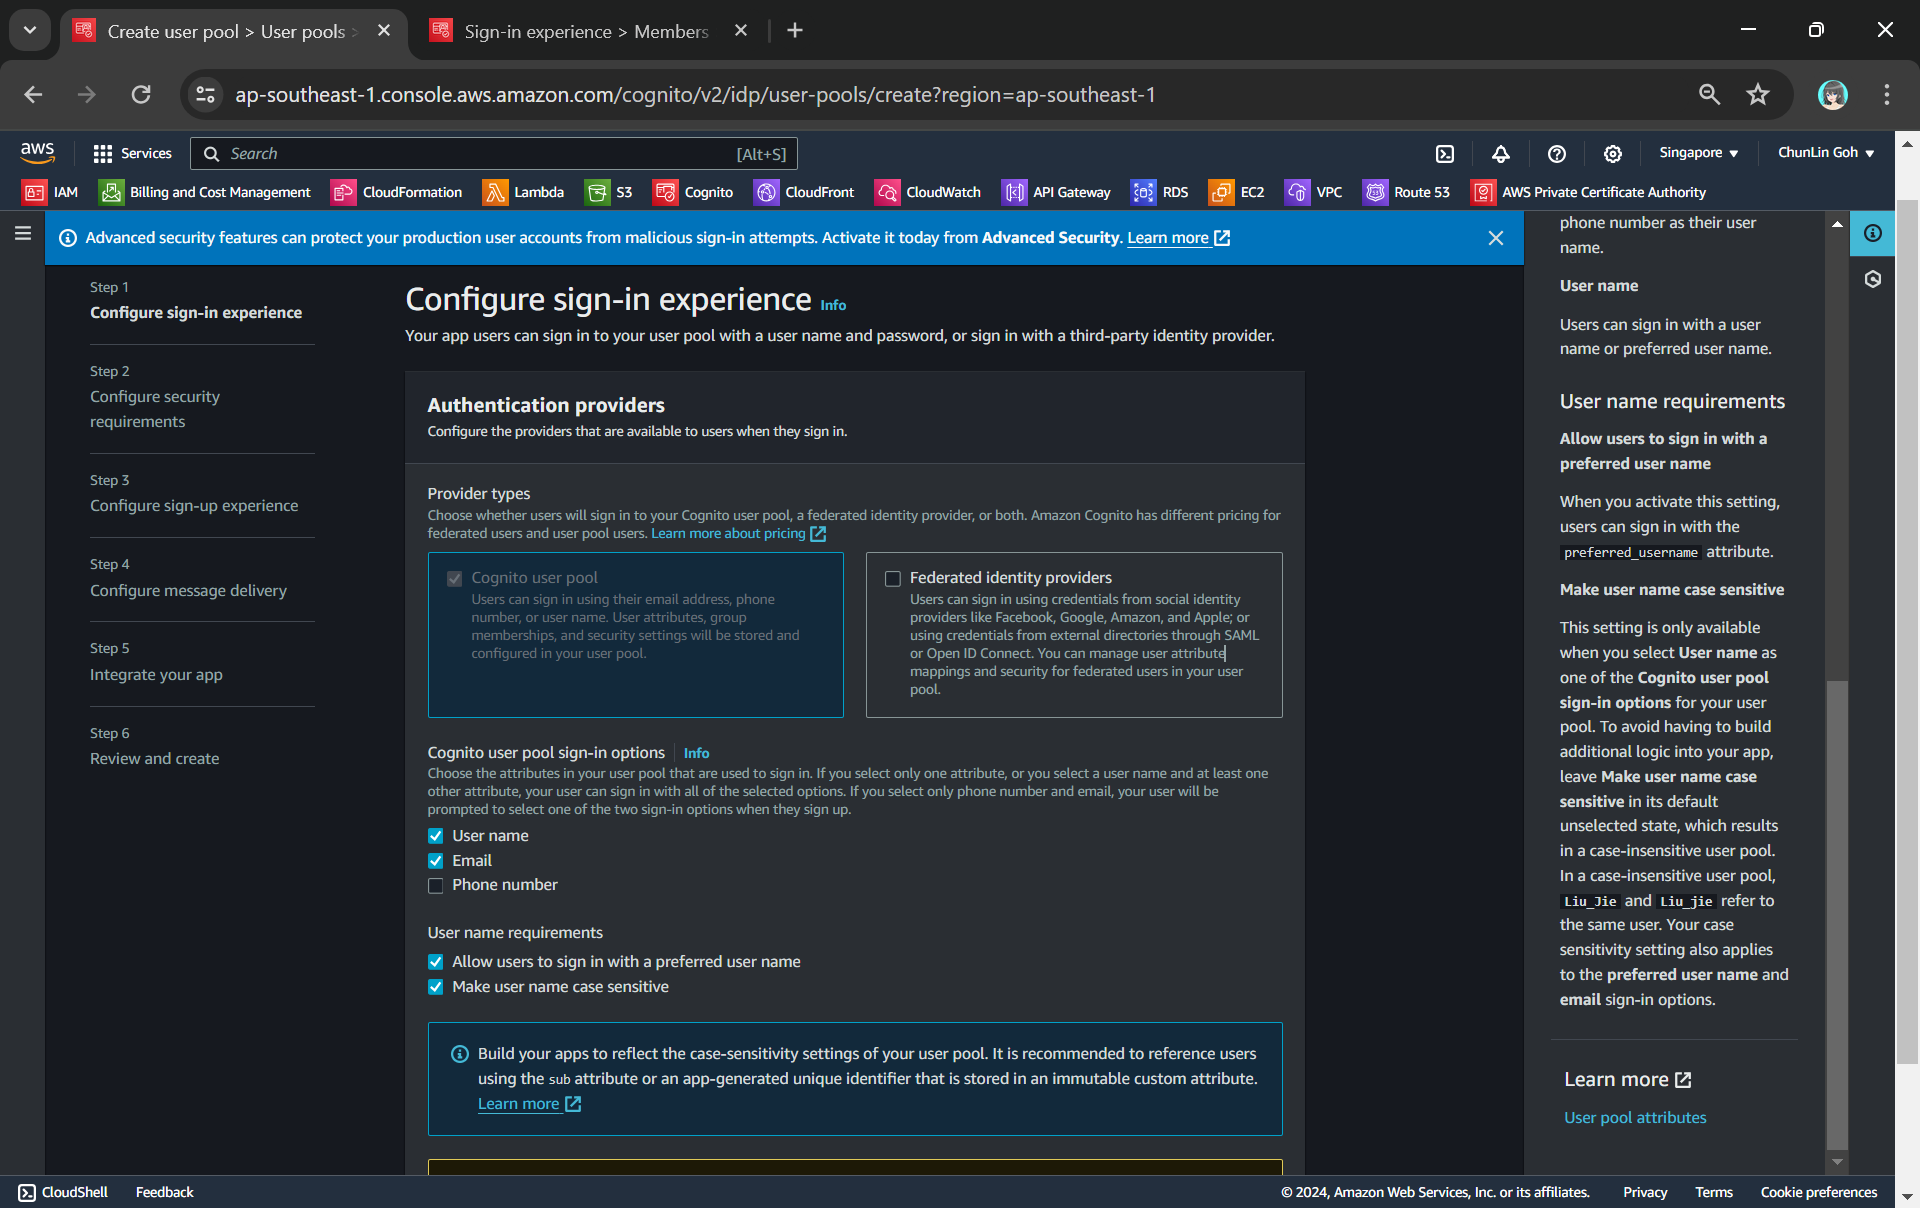
To setup Cognito, firstly, we need to configure the User Pool by specifying sign-in options. User pool is a managed user directory service that provides authentication and user management capabilities for our apps. It enables us to offload the complexity of user authentication and management to AWS.
Configuring sign-in options and user name requirements.
Please take note that Cognito user pool sign-in options cannot be changed after the user pool has been created. Hence, kindly think carefully during the configuration.
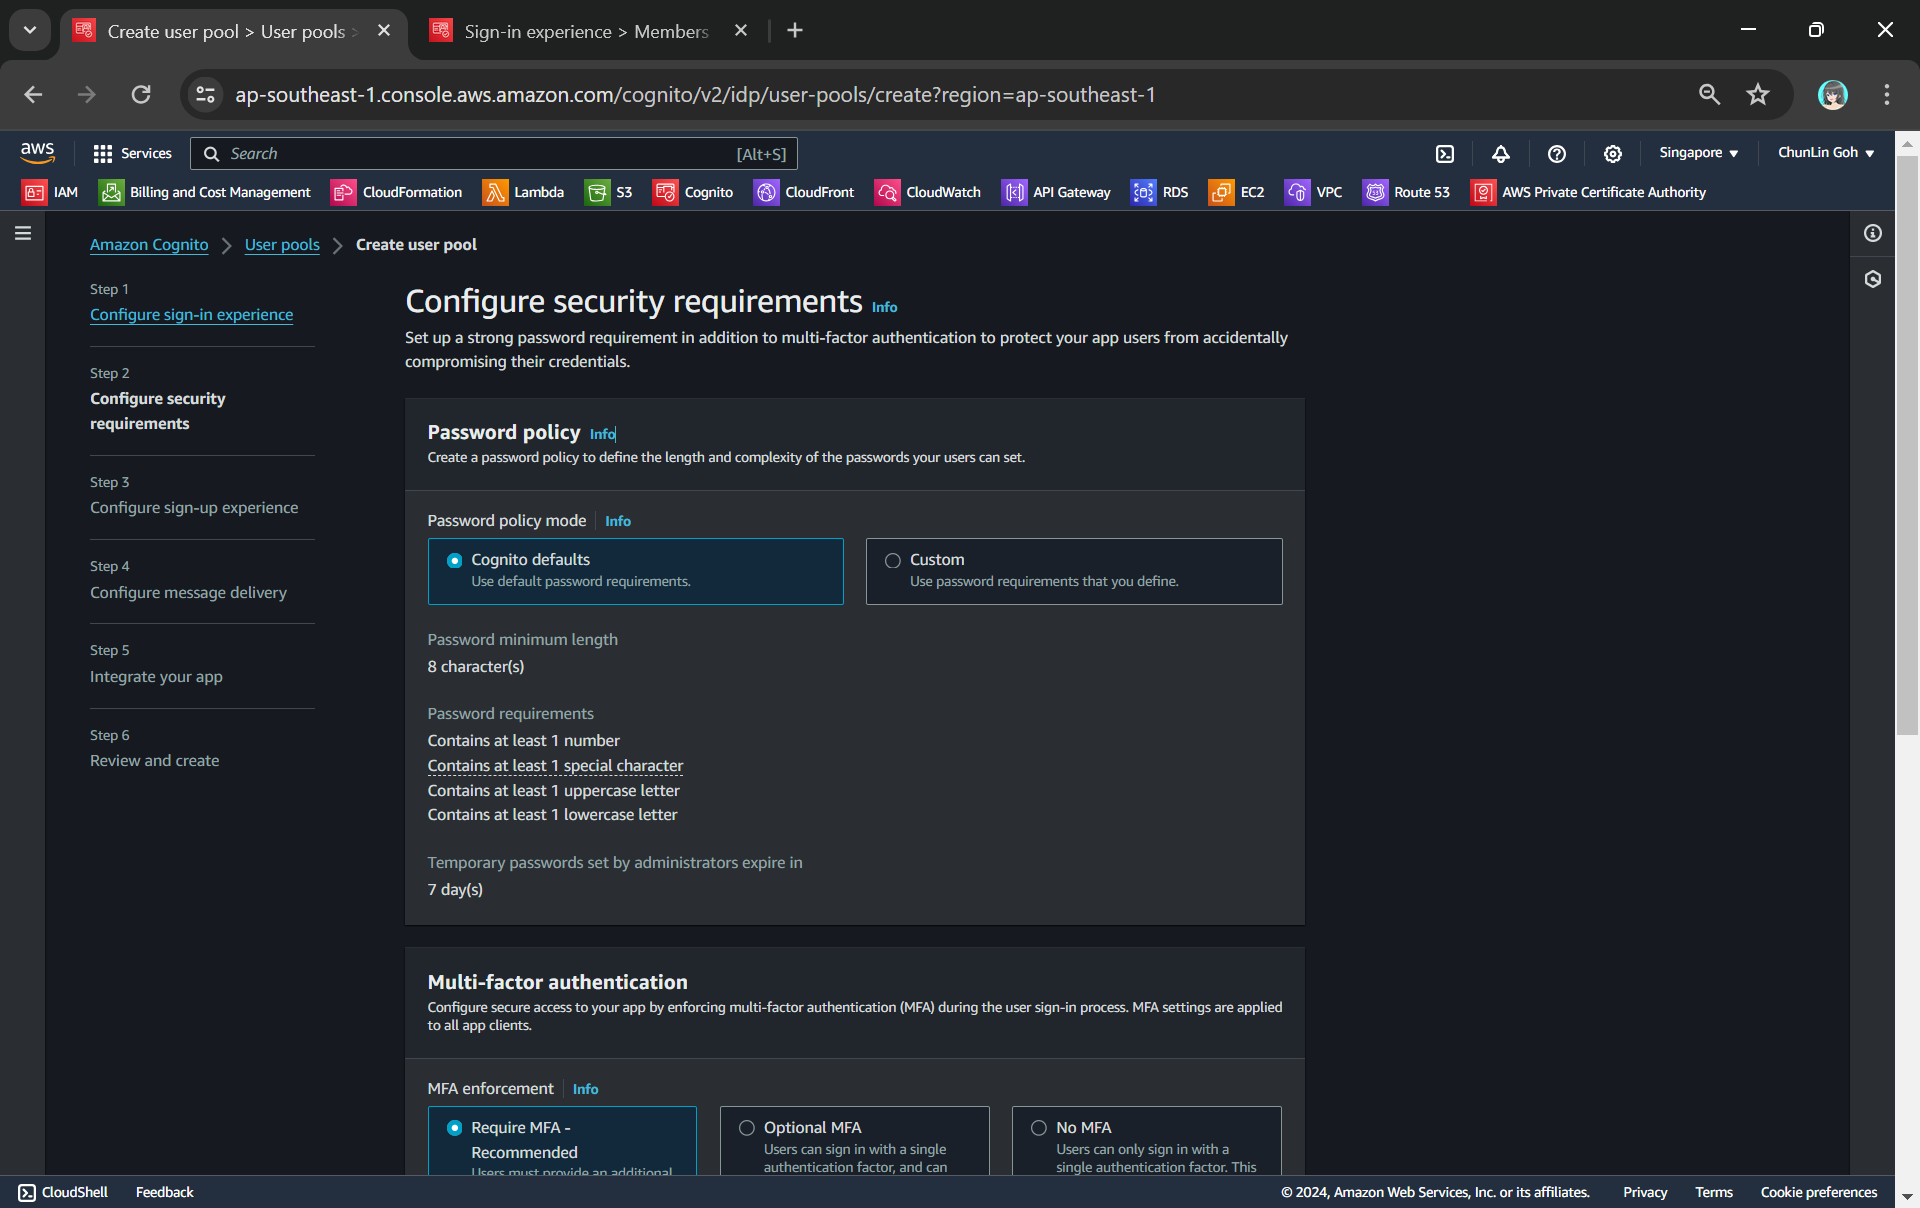
Configuring password policy.
Secondly, we need to configure password policy and choose whether to enable Multi-Factor Authentication (MFA).
By default, Cognito comes with a password policy that ensures our users maintain a password with a minimum length and complexity. For password reset, it will also generate a temporary password to the user which will expire in 7 days, by default.
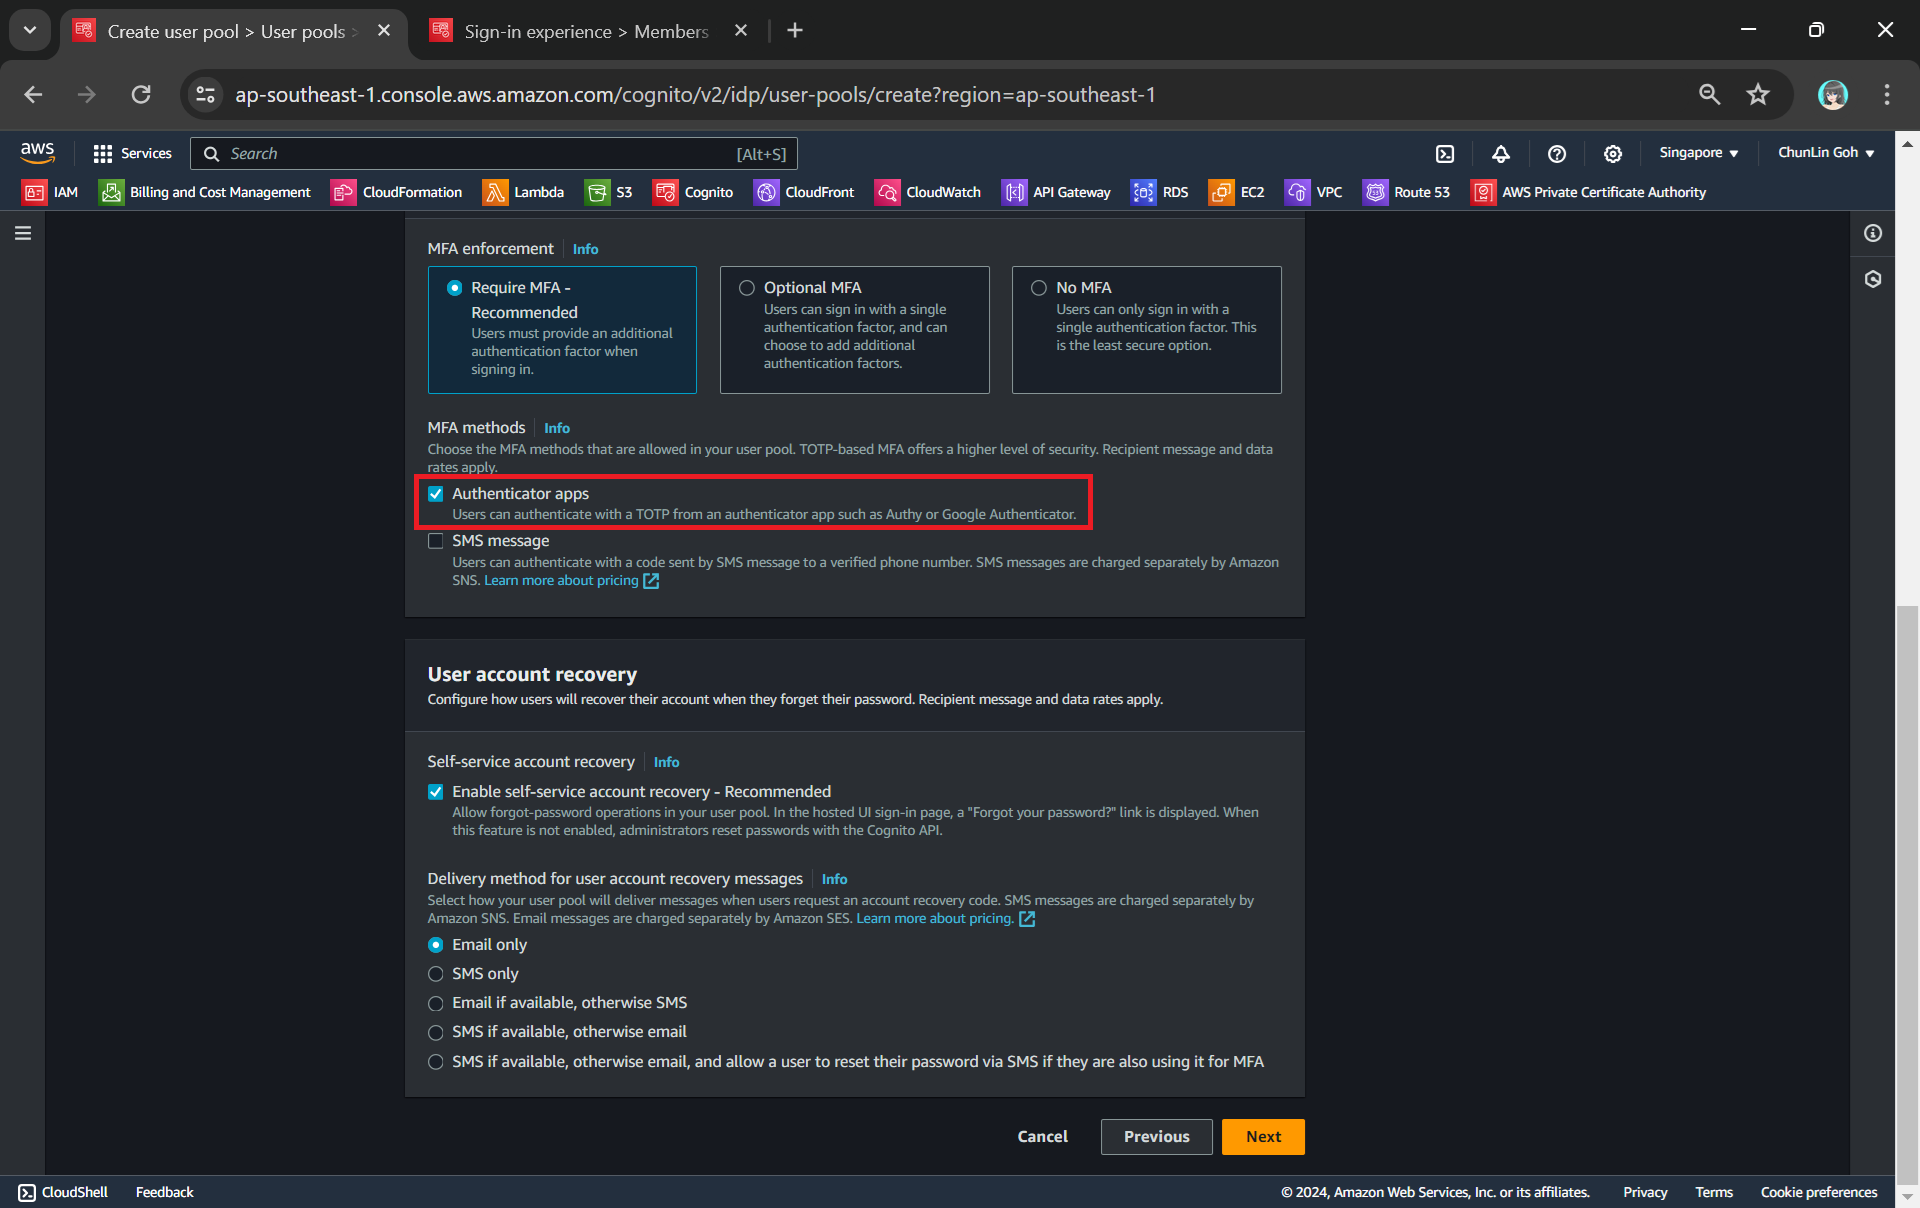
MFA adds an extra layer of security to the authentication process by requiring users to provide additional verification factors to gain access to their accounts. This reduces the risk of unauthorised access due to compromised passwords.
Enabling MFA in our Cognito user pool.
As shown in the screenshot above, one of the methods is called TOTP. TOTP stands for Time-Based One-Time Password. It is a form of multi-factor authentication (MFA) where a temporary passcode is generated by the authenticator app, adding a layer of security beyond the typical username and password.
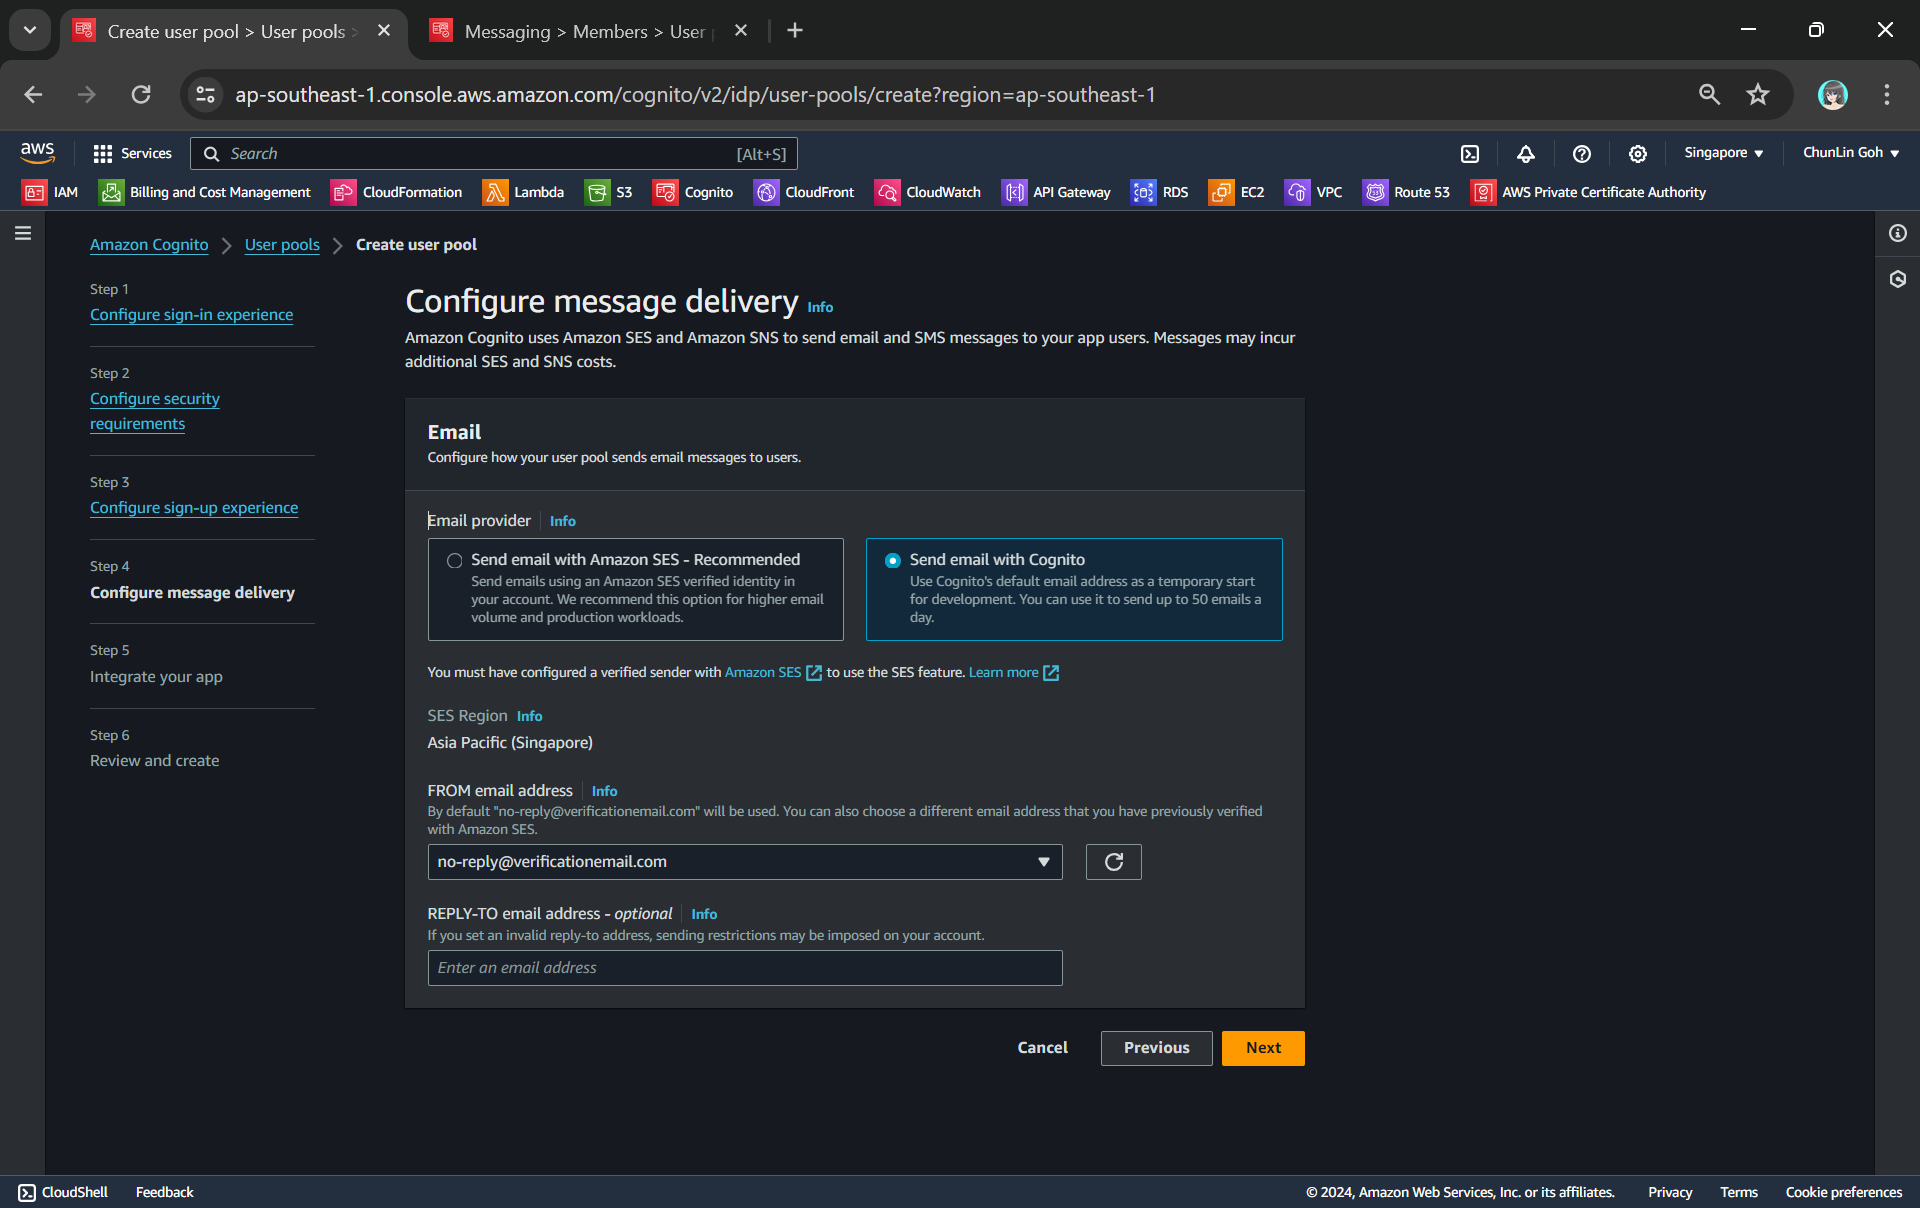
Thirdly, we will be configuring Cognito to allow user account recovery as well as new user registration. Both of these by default require email delivery. For example, when users request an account recovery code, an email with the code should be sent to the user. Also, when there is a new user signing up, there should be emails sent to verify and confirm the new account of the user. So, how do we handle the email delivery?
We can choose to send email with Cognito in our development environment.
Ideally, we should be setting up another service known as Amazon SES (Simple Email Service), an email sending service provided by AWS, to deliver the emails. However, for testing purpose, we can choose to use Cognito default email address as well. This approach is normally only suitable for development purpose because we can only use it to send up to 50 emails a day.
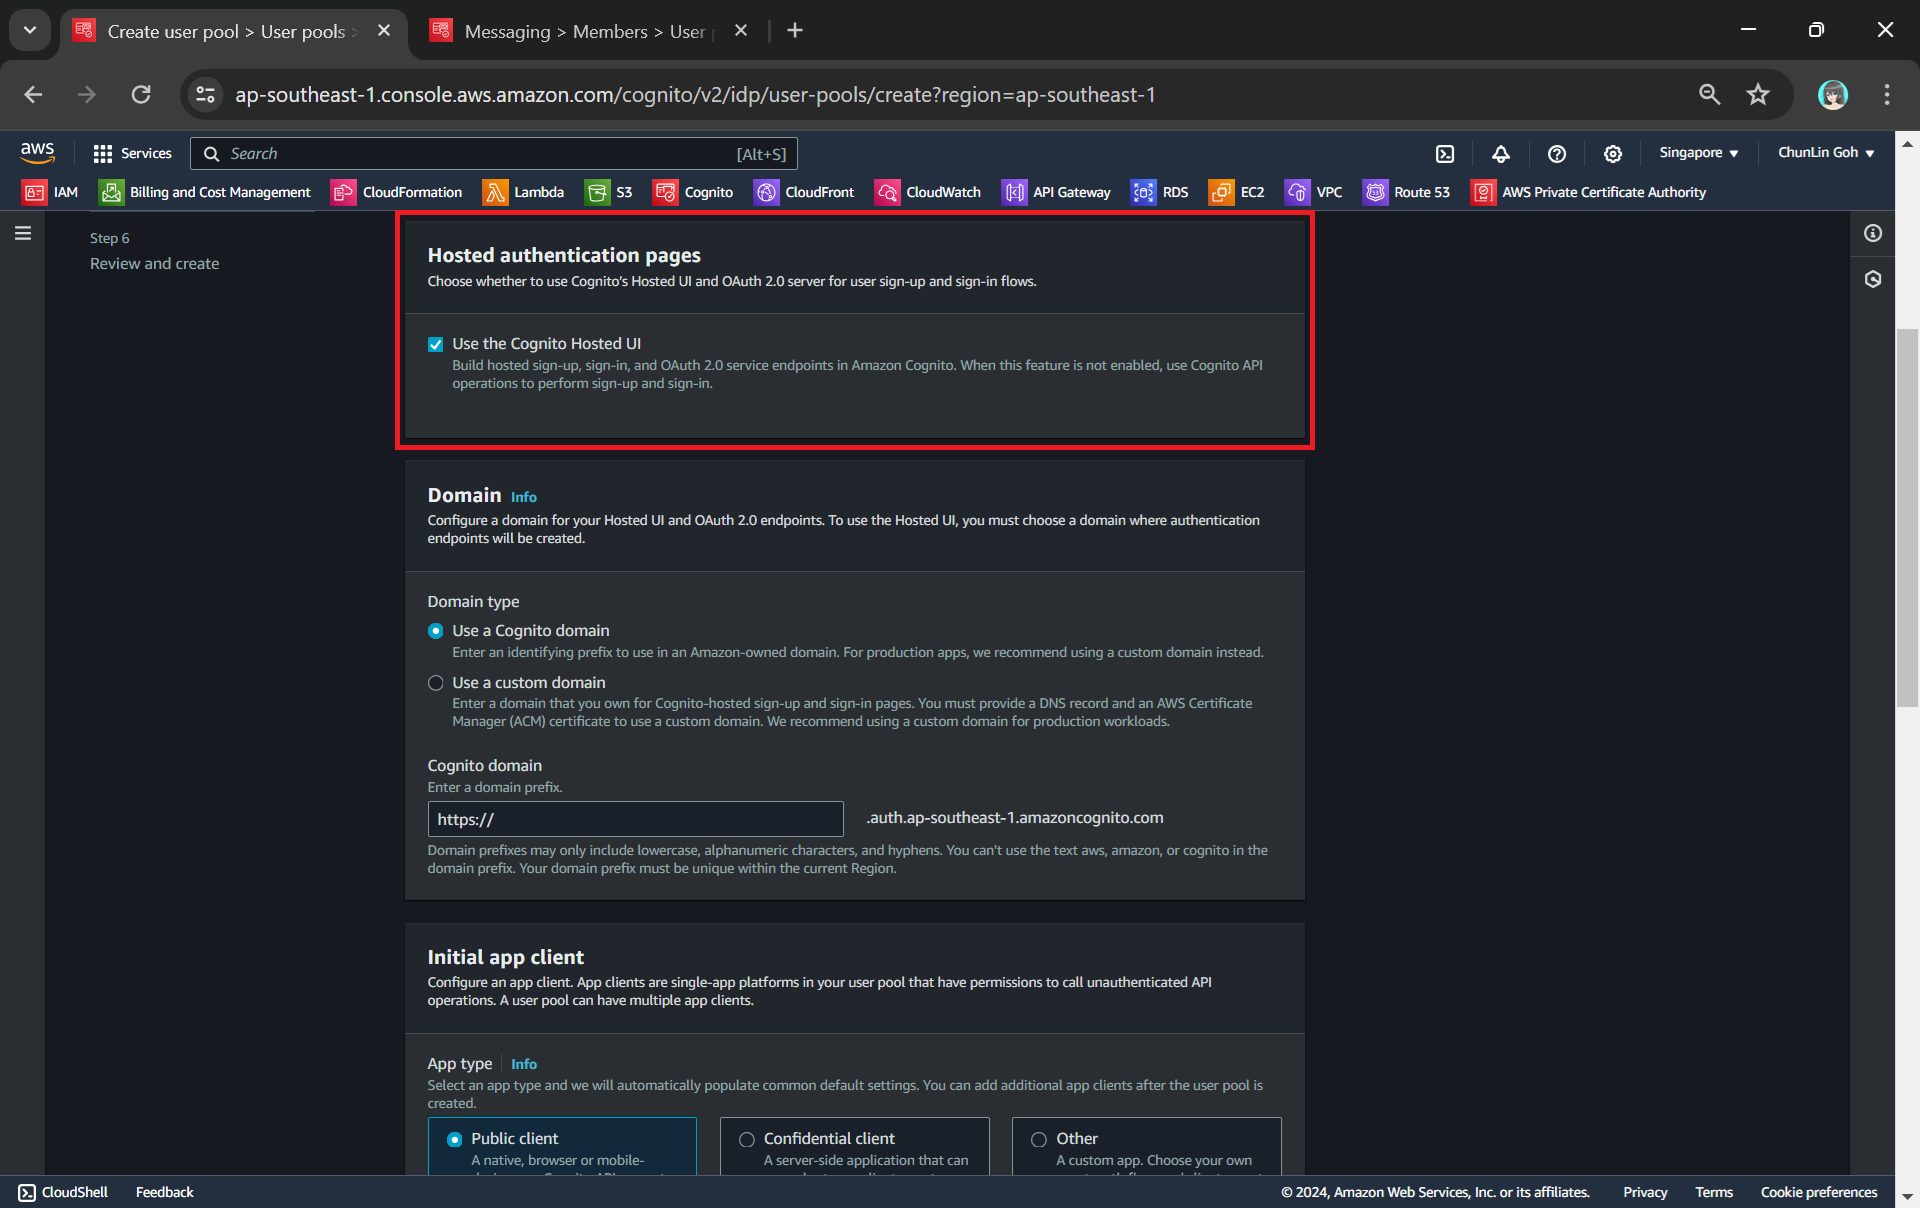
Finally, we will be using the hosted authentication pages for user sign-in and sign-up, as demonstrated below.
Using hosted UI so that we can have a simple frontend ready for sign-in and sign-up.
Step 2: Register Our Web App in Cognito
To integrate our app with Cognito, we still need to setup the app client. An App Client is a configuration entity that allows our app to interact with the user pool. It is essentially an application-specific configuration that defines how users will authenticate and interact with our user pool. For example, we have setup a new app client for our medical records app as shown in the following screenshot.
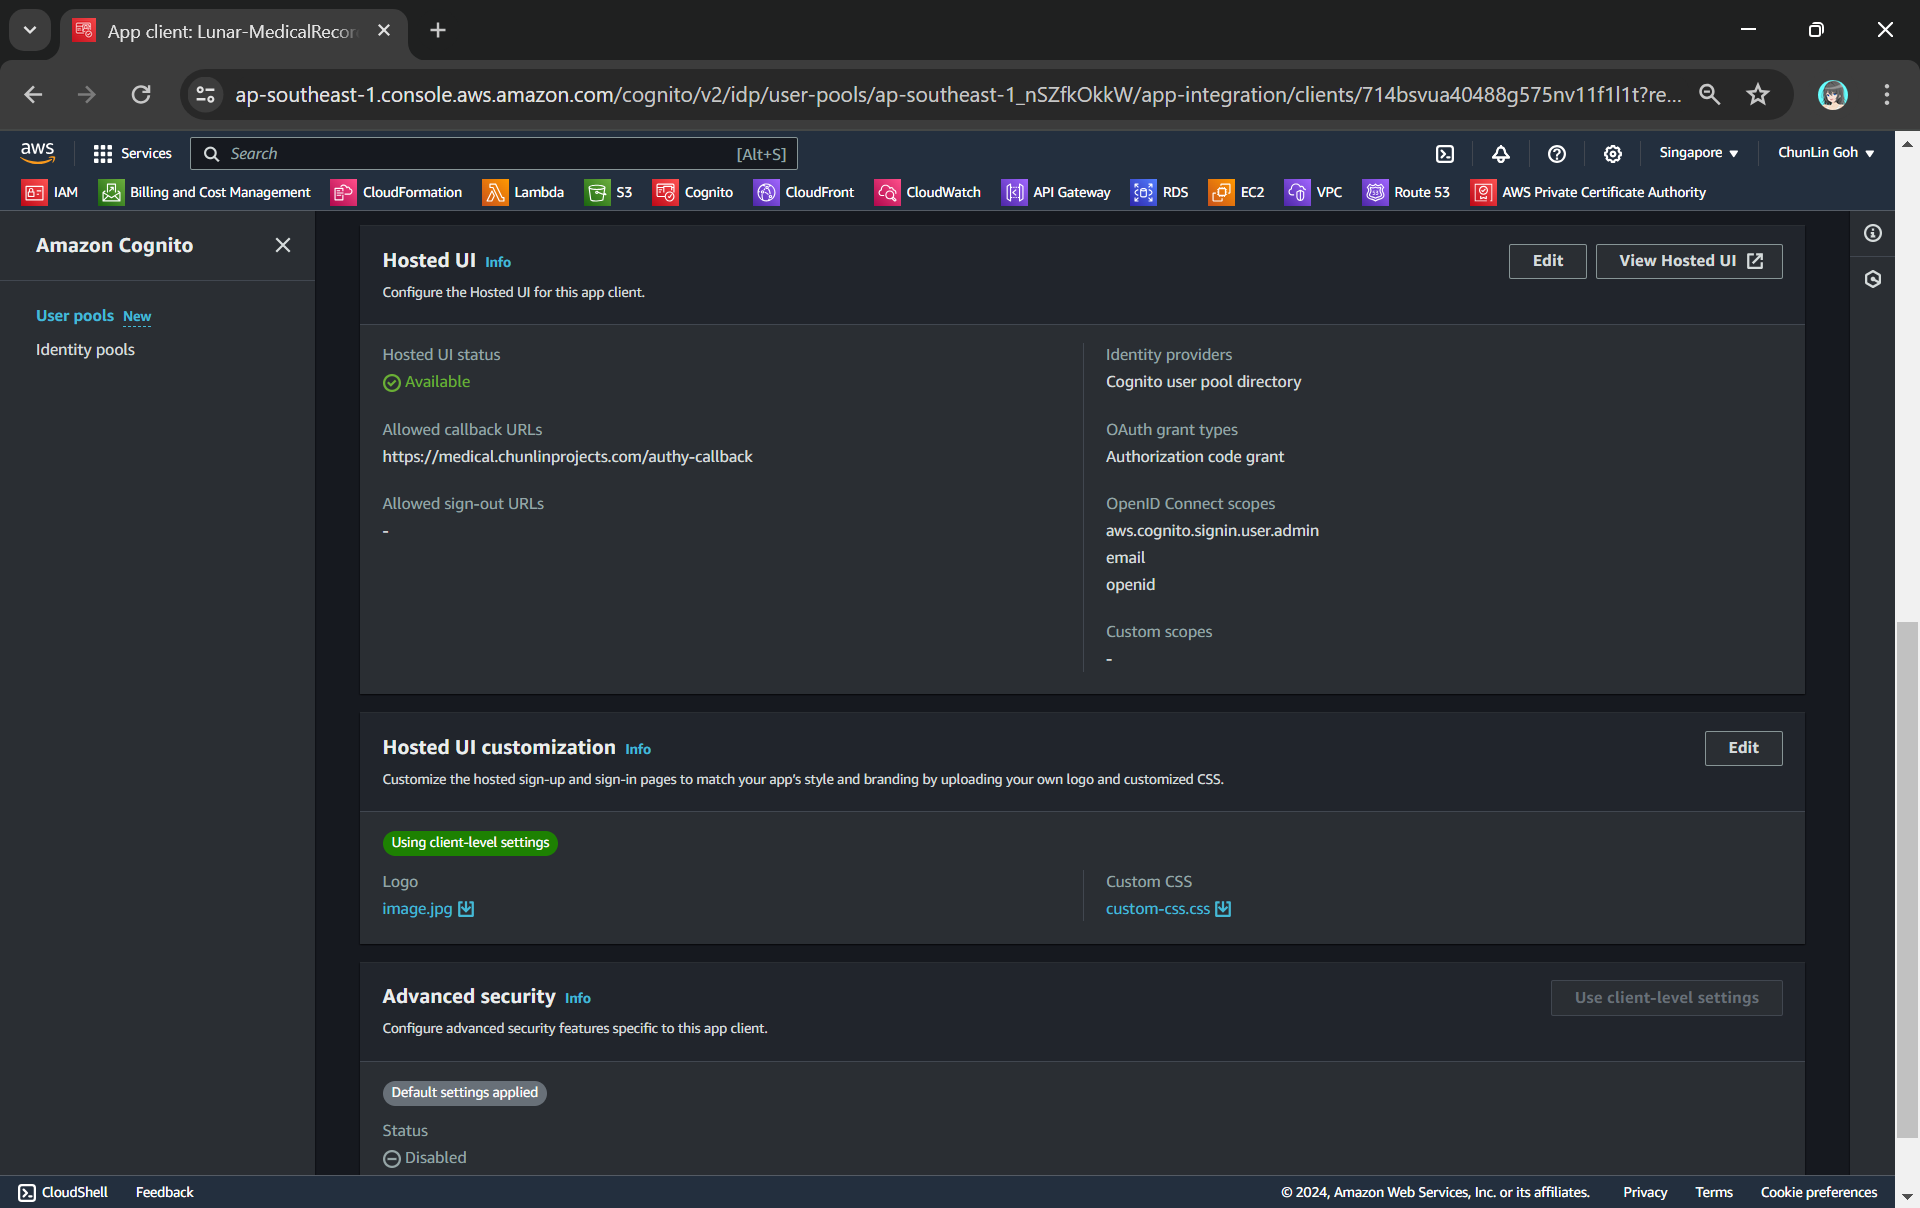
We customise the hosetd UI with our logo and CSS.
As shown in the screenshot above, we are able to to specify customisation settings for the built-in hosted UI experience. Please take note that we are only able to customise the look-and-feel of the default “login box”, so we cannot modify the layout of the entire hosted UI web page, as demonstrated below.
The part with gray background cannot be customised with the CSS.
In the setup of the app client above, we have configured the callback URL to /authy-callback. So where does this lead to? It actually points to a new Lambda function which is in charge of the authentication.
Step 3: Retrieve Access Token from Cognito Token Endpoint
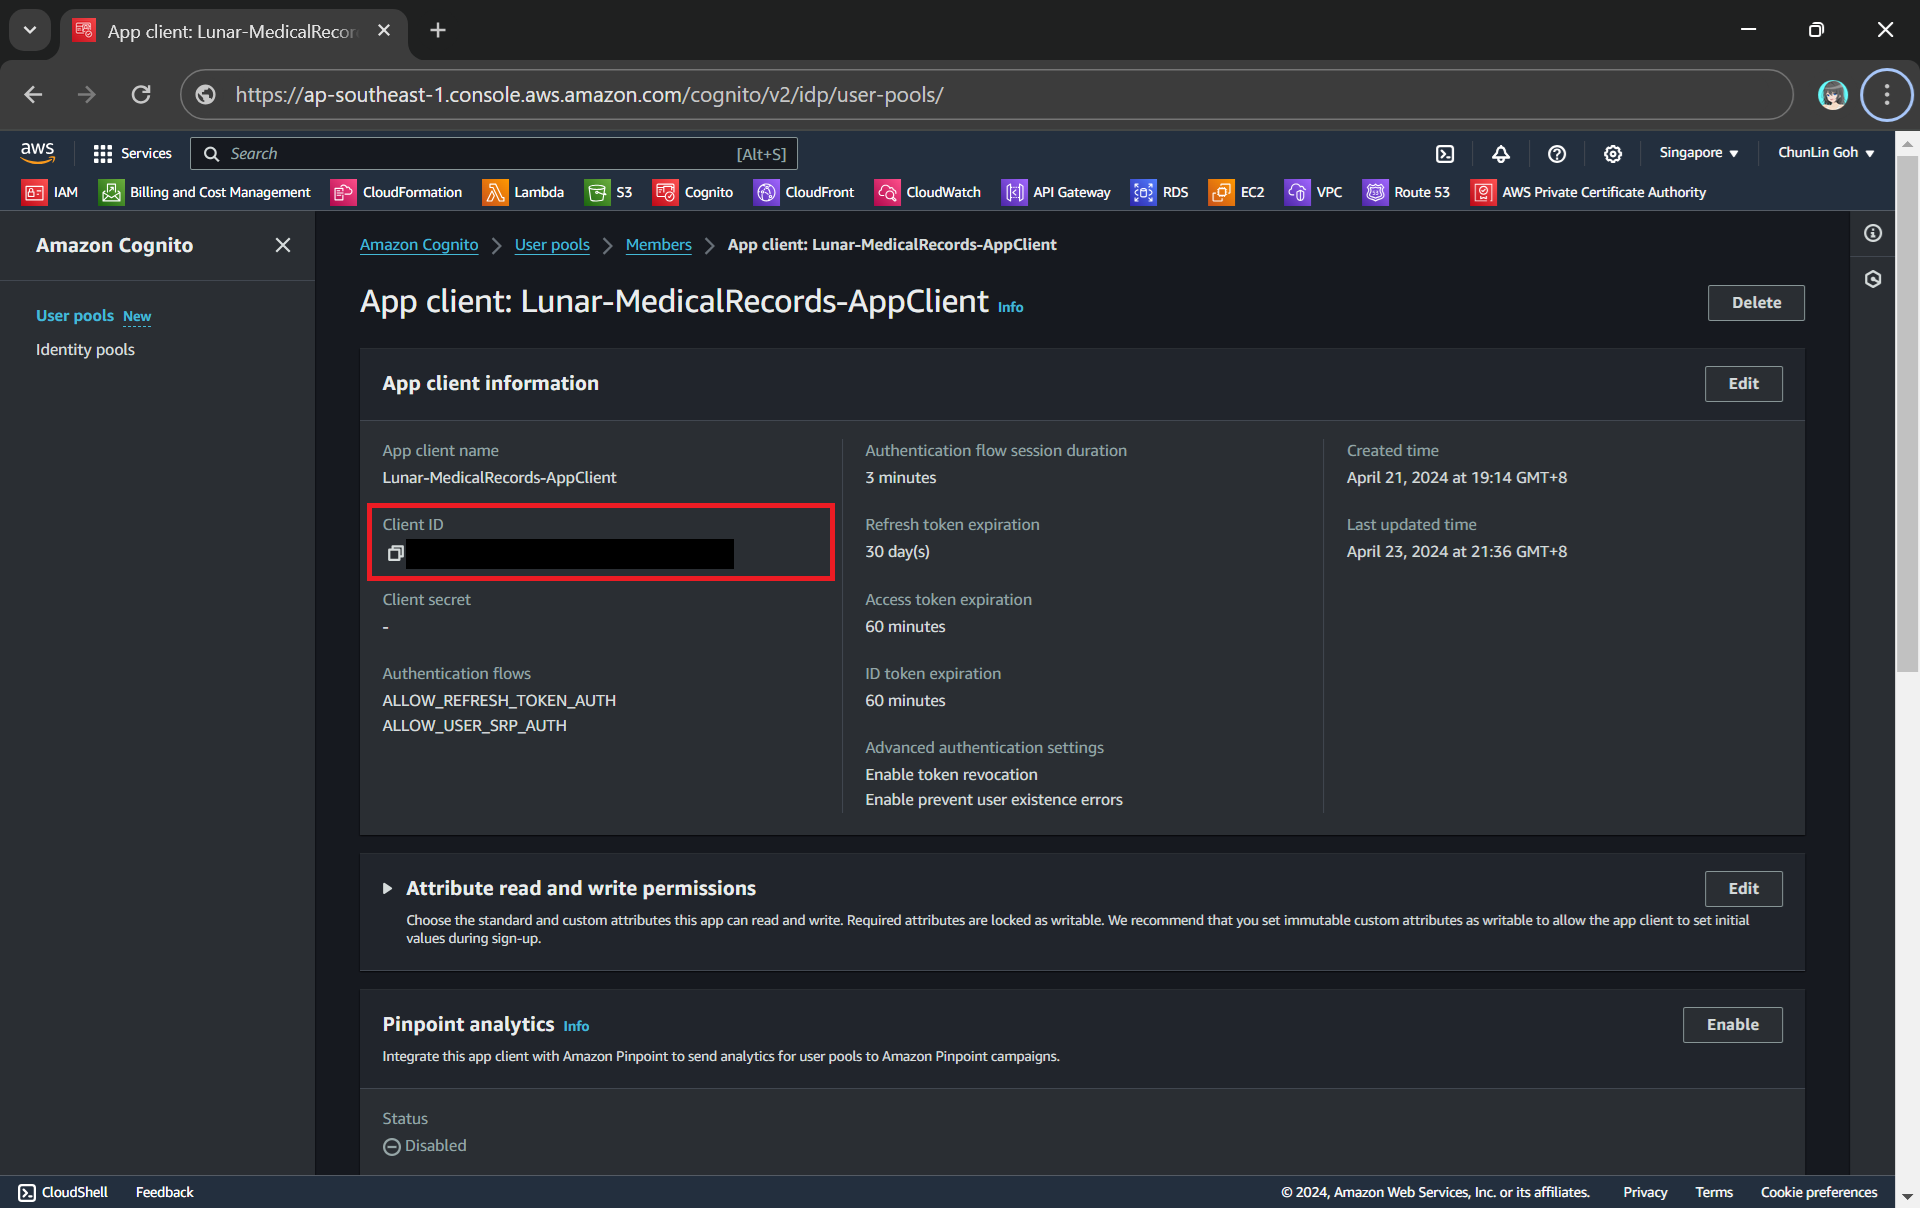
Here, Cognito uses the OAuth 2.0 authorization code grant flow. Hence, after successful authentication, Cognito redirects the user back to the specified callback URL with an authorisation code included in the query string with the name code. Our authentication Lambda function thus needs to makes a back-end request to the Cognito token endpoint, including the authorisation code, client ID, and redirect URI to exchange the authorisation code for an access token, refresh token, and ID token.
Client ID can be found under the “App client information” section.
token_url = "https://lunar-corewebsite.auth.ap-southeast-1.amazoncognito.com/oauth2/token" client_id = "<client ID to be found in AWS Console>" callback_url = "https://medical.chunlinprojects.com/authy-callback"
A successful response from the token endpoint typically is a JSON object which includes:
access_token: Used to access protected resources;
id_token: Contains identity information about the user;
refresh_token: Used to obtain new access tokens;
expires_in: Lifetime of the access token in seconds.
Hence we can retrieve the medical records if there is an access_token but return an “HTTP 401 Unauthorized” response if there is no access_token returned.
if 'access_token' not in tokens: return { 'statusCode': 401, 'body': get_401_web_content(), 'headers': { 'Content-Type': 'text/html' } }
The function get_401_web_content is responsible to retrieve a static web page showing 401 error message from the S3 bucket and return it to the frontend, as shown in the code below.
For the get_web_content function, we will be passing the access token to the Lambda that we developed earlier to retrieve the HTML content from the Object Lambda Access Point. As shown in the following code, we invoke the Lambda function synchronously and wait for the response.
In the Lambda function lunar-medicalrecords-frontend, we will no longer need to hardcode the object key as chunlin.json. Instead, we can just retrieve the user name from the Cognito using the access token, as highlighted in bold in the code below.
... import boto3
cognito_idp_client = boto3.client('cognito-idp')
def lambda_handler(event, context): if 'access_token' not in event: return { 'statusCode': 200, 'body': get_homepage_web_content(), 'headers': { 'Content-Type': 'text/html' } }
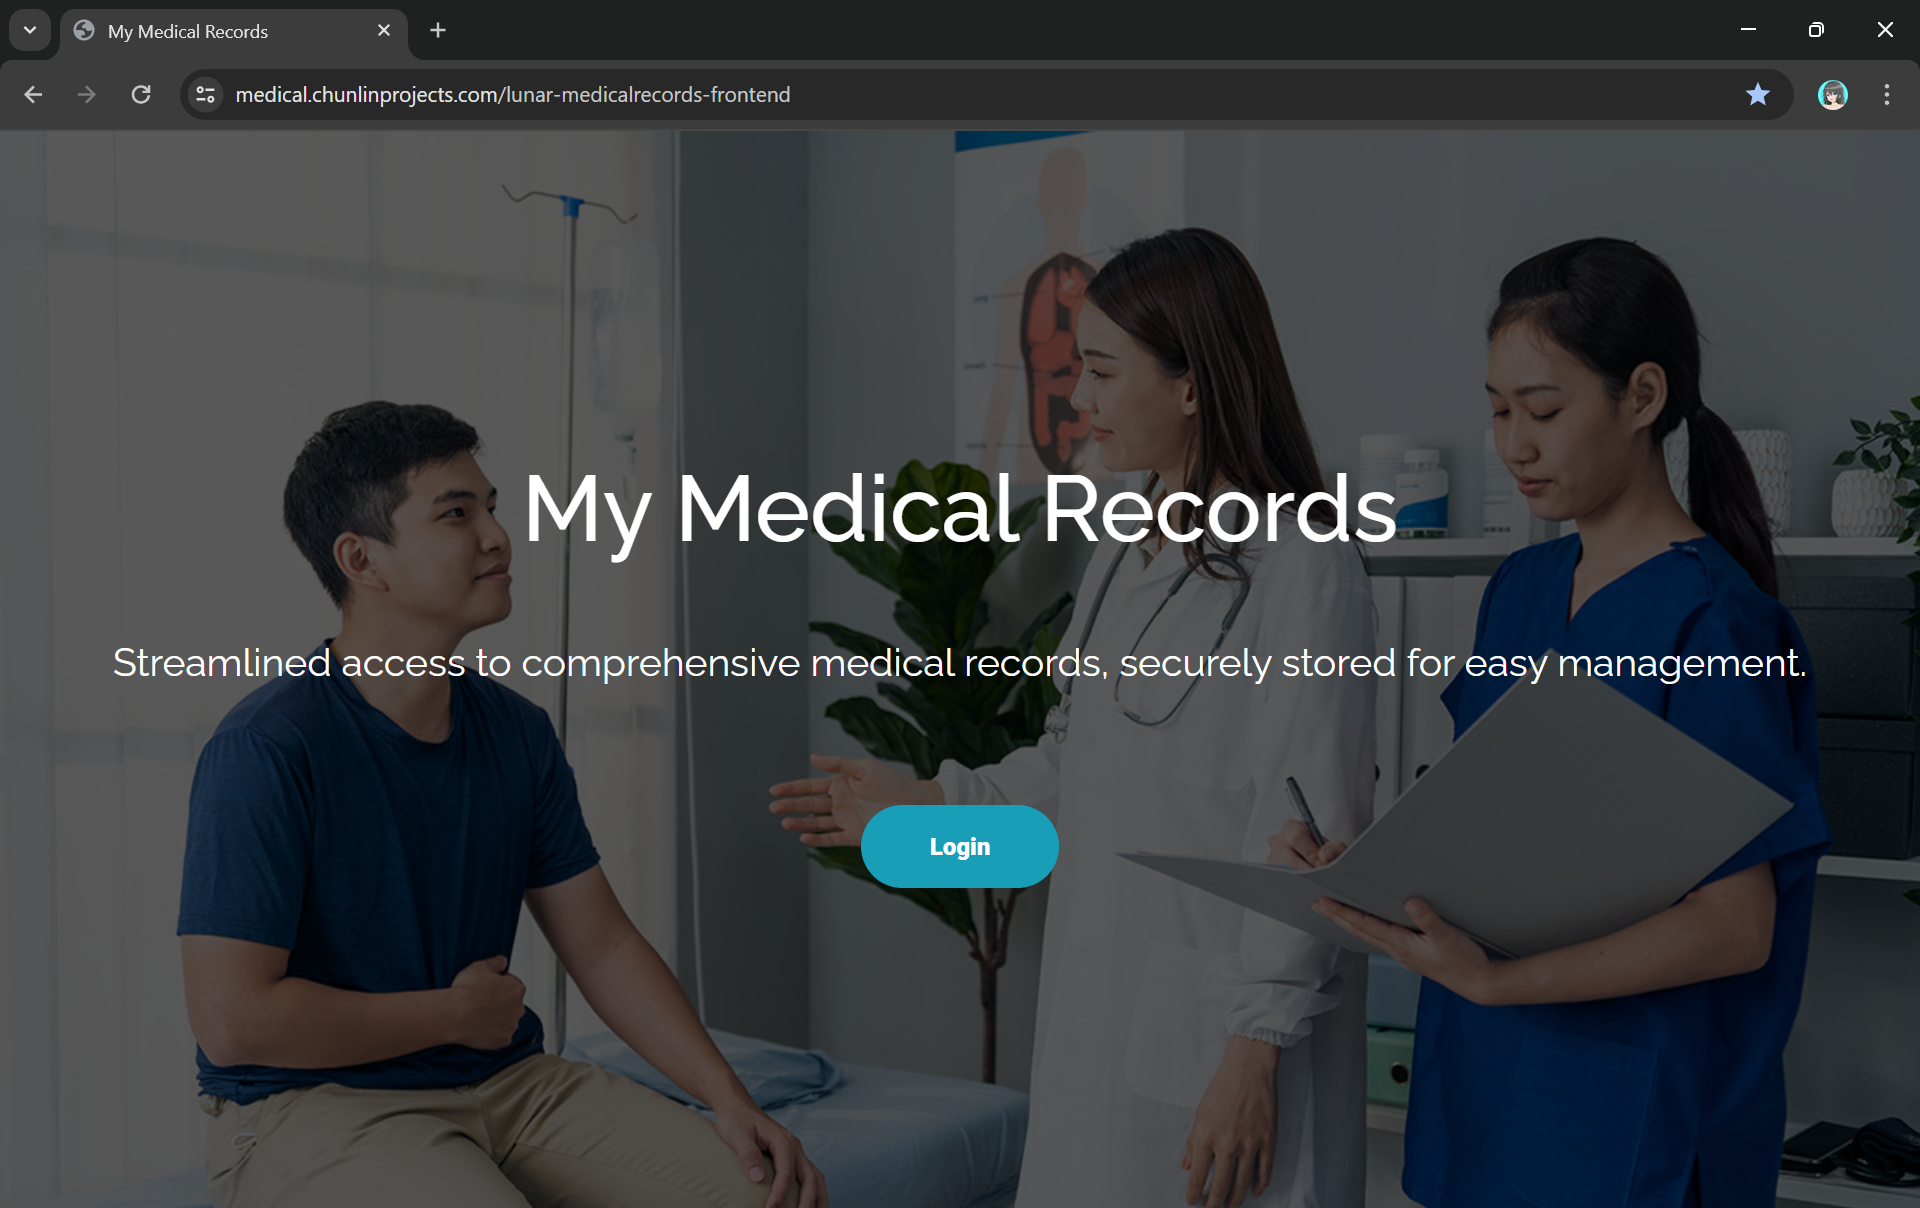
The get_homepage_web_content function above basically is to retrieve a static homepage from the S3 bucket. It is similar to how the get_401_web_content function above works.
The homepage comes with a Login button redirecting users to Hosted UI of our Cognito app client.
Step 5: Store Access Token in Cookies
We need to take note that the auth_code above in the OAuth 2.0 authorisation code grant flow can only be used once. This is because single-use auth_code prevents replay attacks where an attacker could intercept the authorisation code and try to use it multiple times to obtain tokens. Hence, our implementation above will break if we refresh our web page after logging in.
To solve this issue, we will be saving the access token in a cookie when the user first signs in. After that, as long as we detect that there is a valid access token in the cookie, we will not use the auth_code.
In order to save an access token in a cookie, there are several important considerations to ensure security and proper functionality:
Set the Secure attribute to ensure the cookie is only sent over HTTPS connections. This helps protect the token from being intercepted during transmission;
Use the HttpOnly attribute to prevent client-side scripts from accessing the cookie. This helps mitigate the risk of cross-site scripting (XSS) attacks;
Set an appropriate expiration time for the cookie. Since access tokens typically have a short lifespan, ensure the cookie does not outlive the token’s validity.
Thus the code at Step 3 above can be improved as follows.
def lambda_handler(event, context): now = datetime.now(timezone.utc)
if 'cookies' in event: for cookie in event['cookies']: if cookie.startswith('access_token='): access_token = cookie.replace("access_token=", "") break
In our earlier post about setting up AWS Lambda, we understood that for Lambda which will be invoked by HTTP requests, we normally need API Gateway to handle incoming HTTP requests and route them to the appropriate Lambda function. Hence, the API Gateway is often used as a complementary service to manage and expose our Lambda functions to the outside world.
By default, AWS provides a custom domain name in the form of api-id.execute-api.region.amazonaws.com, as shown in the screnshot below.
This Lambda is deployed in Singapore and thus it is ap-southeast-1 for the region.
Usually, we would like to expose our API Gateway through a domain name that we own, rather than using the default domain provided, in order to enhance the visibility, security, and professionalism of our API, while also providing greater flexibility and control over its configuration and branding. In this article, we will show one of the available approaches.
Domain Registrar
We must have a registered Internet domain name before we can set up custom domain names for our API Gateway.
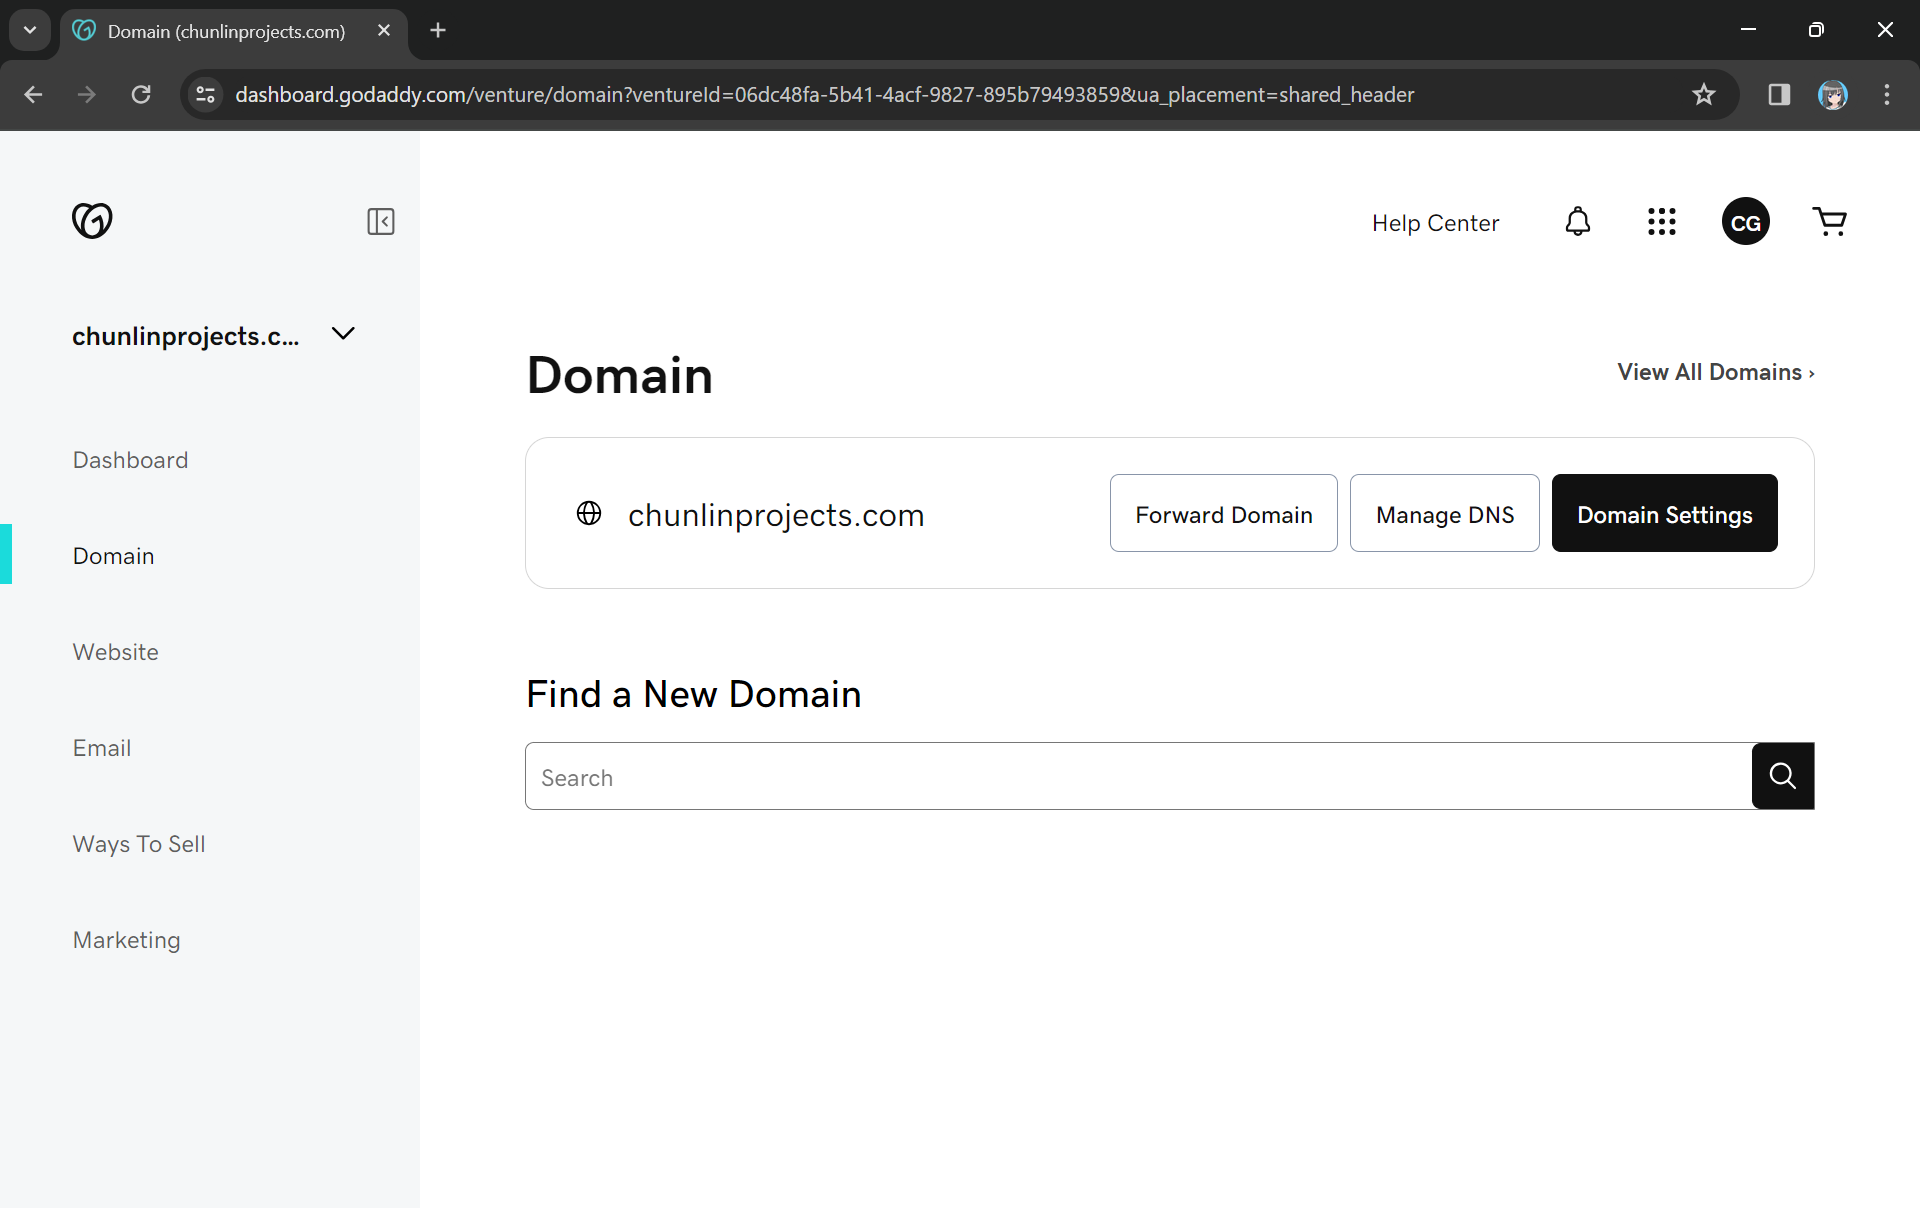
Previously, I have registered a domain name, chunlinprojects.com, on GoDaddy, one of the world’s largest domain registrars. Hence, I decided to create a subdomain called poker.chunlinprojects.com and then use it for my API Gateway.
My personal domain, chunlinprojects.com, on GoDaddy.
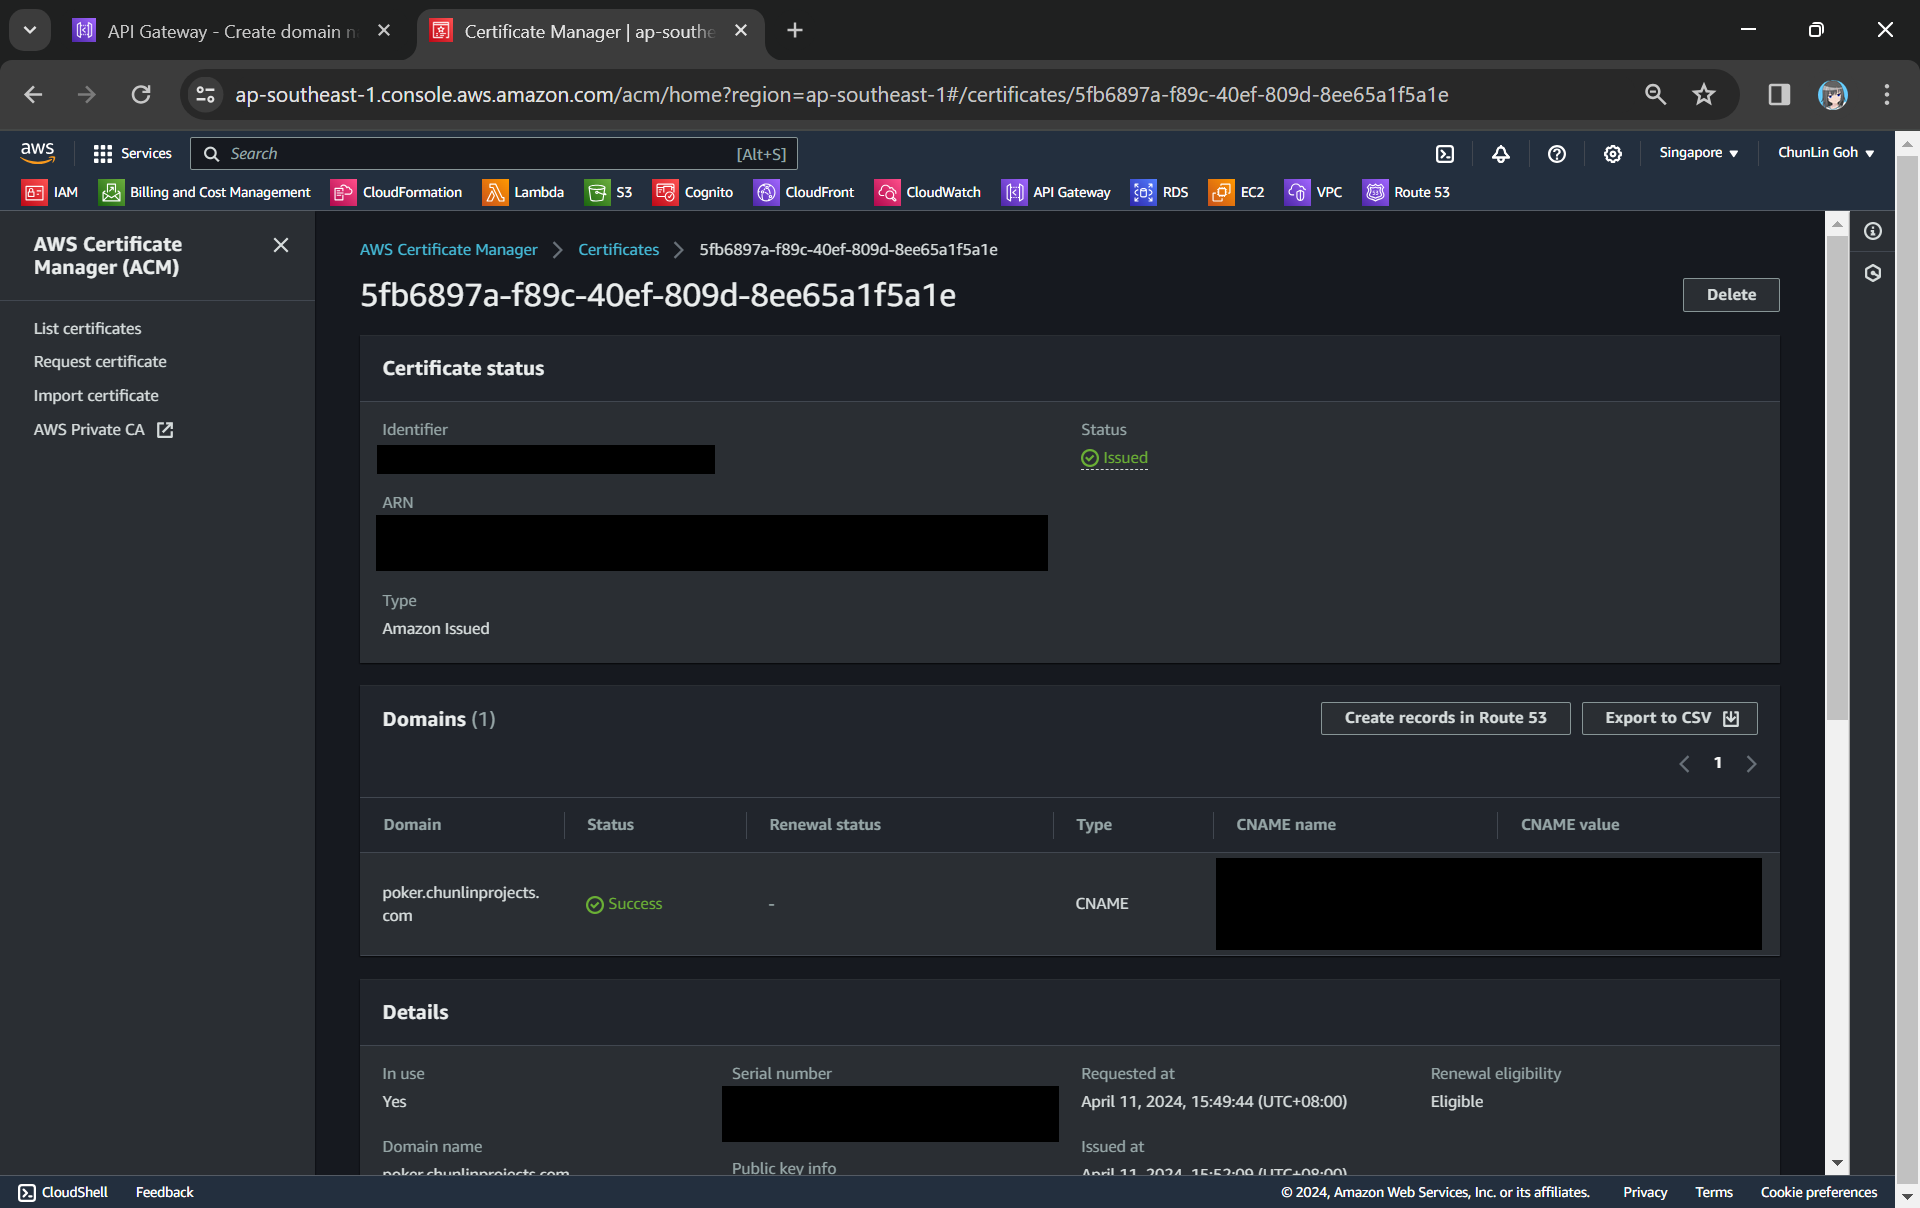
In the certificate request page, we need to specify the domain name. In my case, it should be poker.chunlinprojects.com. Once it is done, we will need to add a CNAME record to our domain registrar. Its status will only be “Success” after we have added the CNAME record successfully, as shown in the screenshot below.
We need to add the CNAME record under the “Domain” section to our domain registrar.
Route 53
As shown in the screenshot above, it is also possible to add the CNAME record to Route 53. So what is this Route 53 about?
Route 53 is Amazon Domain Name System (DNS) web service. It allows us to manage the DNS records for your domain, including A records, CNAME records, TXT records, and more. This is similar to what we can do on GoDaddy, so why do we need Route 53?
Route 53 is a better option because Route 53 provides a user-friendly interface for adding, updating, and deleting these records. In addition, Route 53 supports alias records, which can be used to map our custom domain directly to the API Gateway endpoint. Alias records work similarly to CNAME records but with the advantage of being resolved by Route 53 without incurring additional DNS lookup costs. This can improve the performance and reliability of our API Gateway by reducing latency and DNS resolution times.
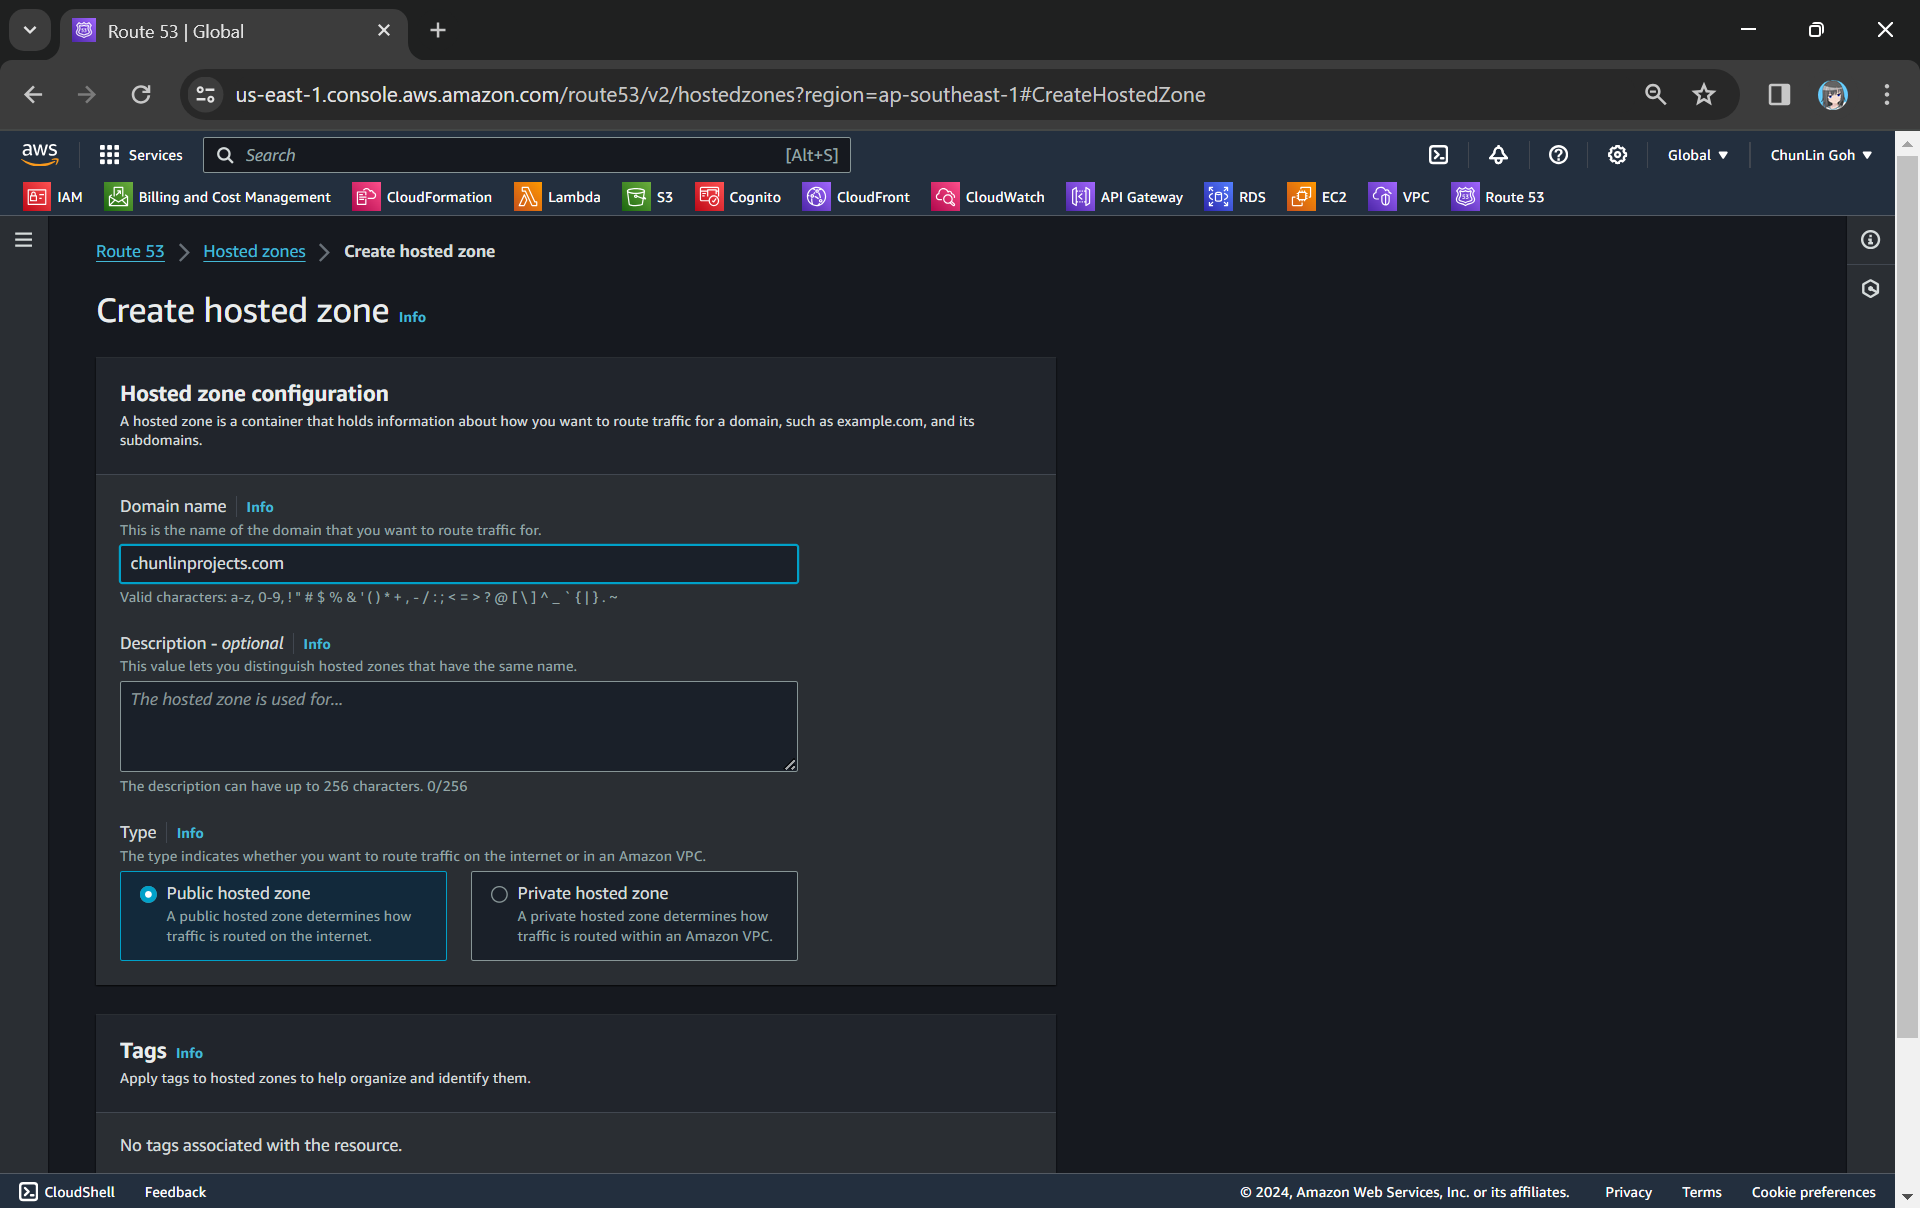
To setup Route 53 for our custom domain, we first need to create a Hosted Zone in Route 53 for our domain, as shown in the screenshot below.
Creating a new hosted zone for our custom domain.
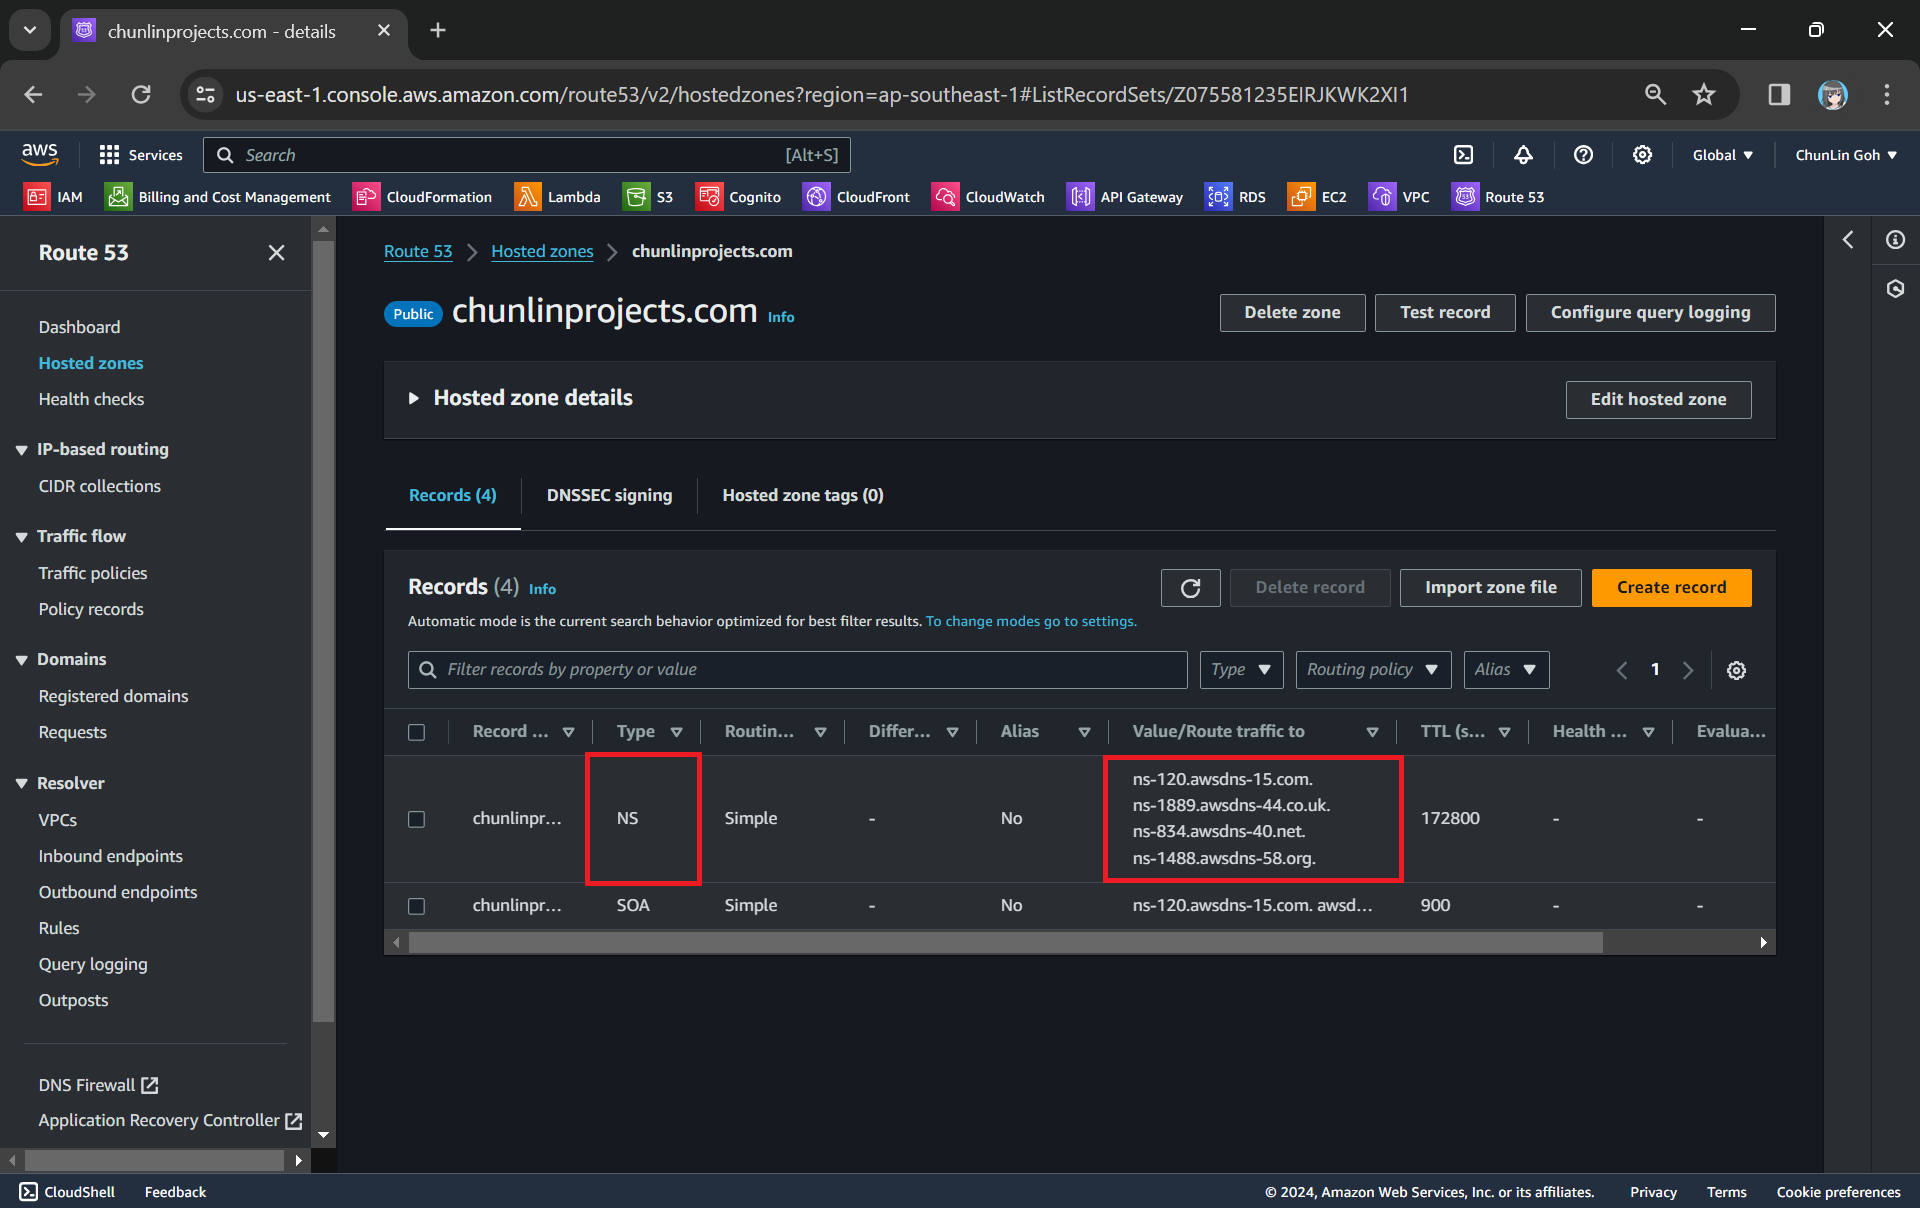
After getting the hosted zone created, we will be able to get the list of name servers that we can use, as shown in the following screenshot.
NS (Name Server) records in Route 53 are used to specify the name servers responsible for answering DNS queries for our domain.
Since we want to use Route 53 name servers for DNS resolution, we need to update the (NS) records in GoDaddy DNS settings to point to the Route 53 name servers.
The name servers in GoDaddy for my domain have been updated to use Route 53 ones.
Now we can add the CNAME record earlier in our Route 53 hosted zone too.
The CNAME record required by the ACM certificate has been added to Route 53.
Custom Domain Name in API Gateway
After we have both ACM and Route 53 setup completely, we can move on to configure our custom domain name for the API Gateway.
The ACM certificate we created earlier will be available as one of the options.
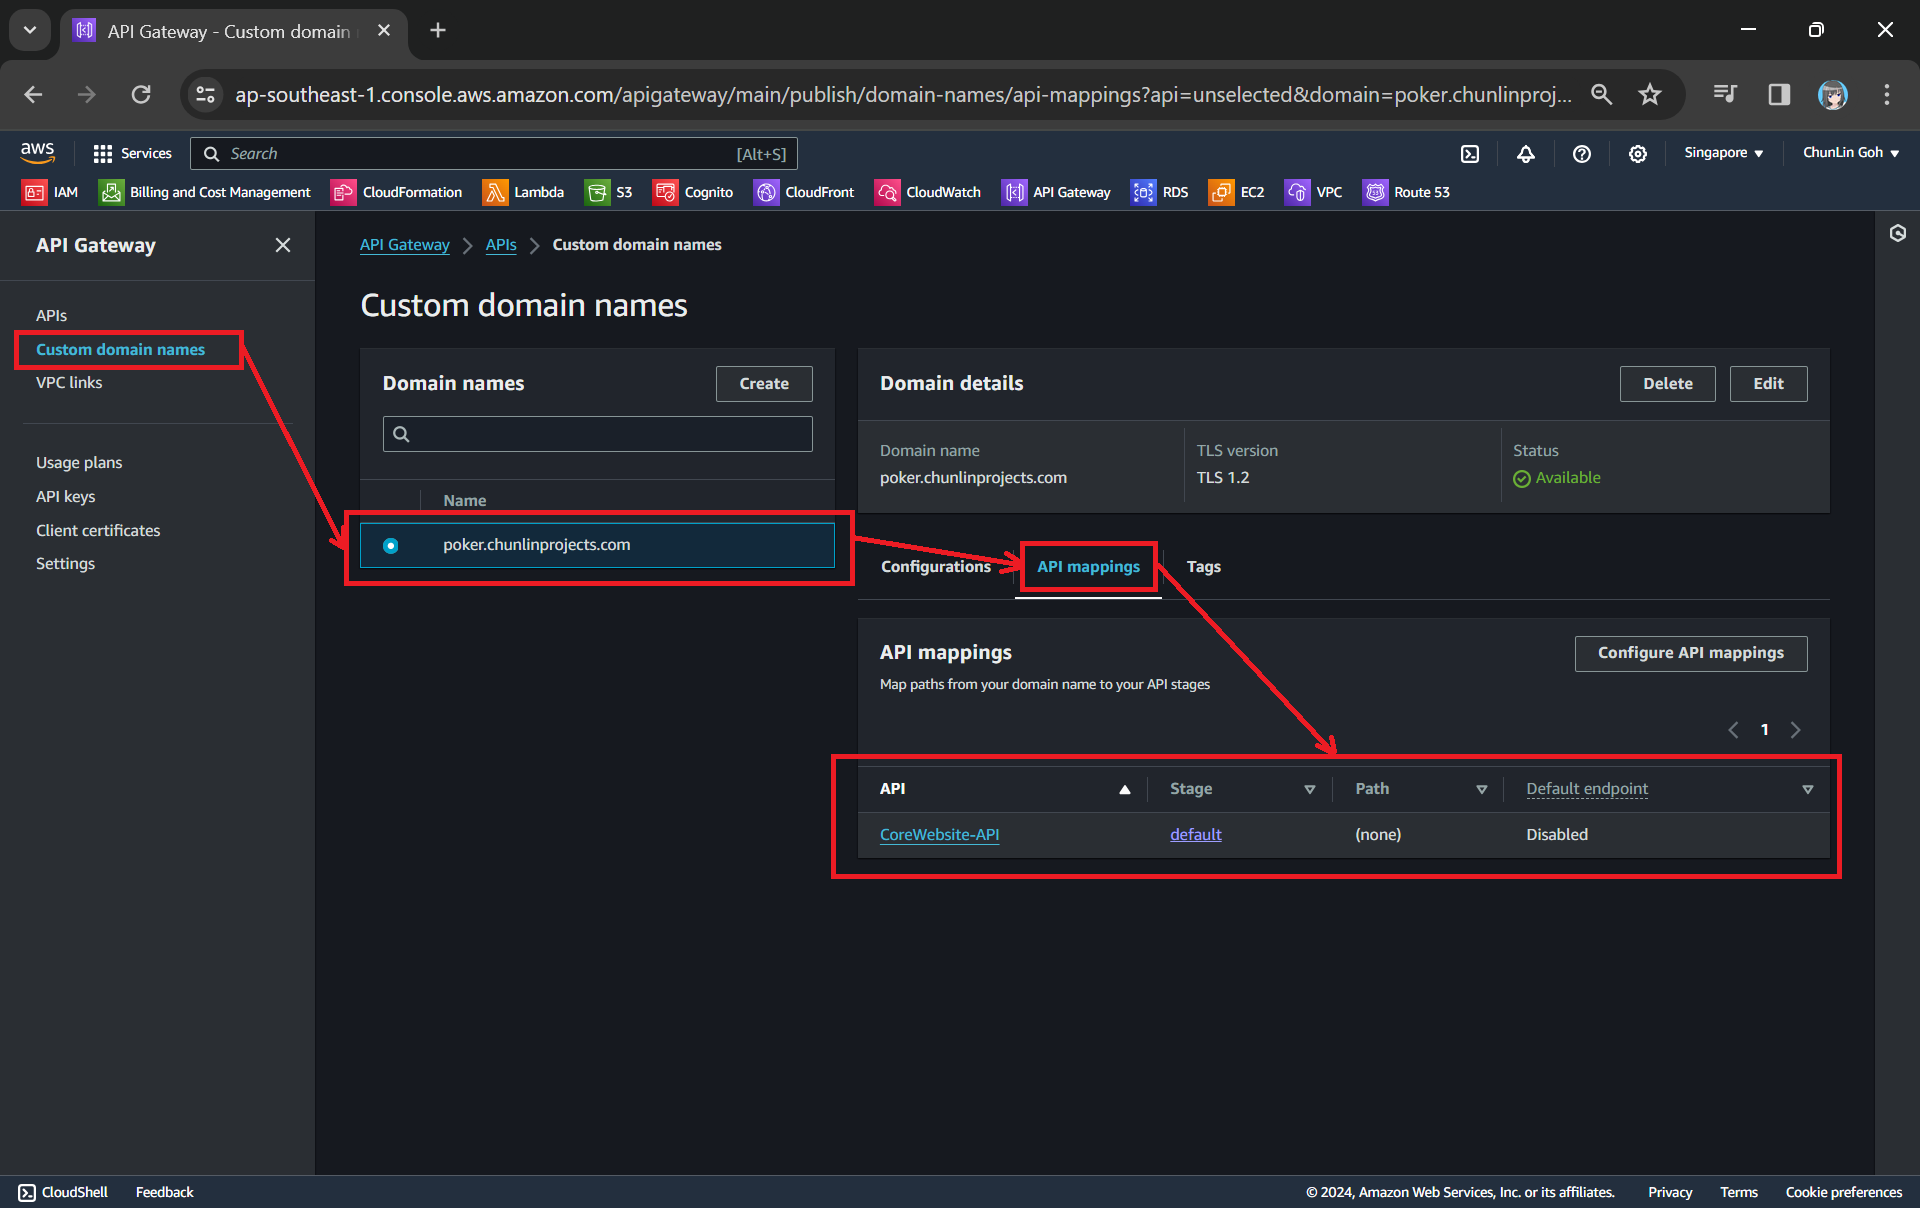
Next, we use API mappings to connect API stages to the custom domain name. For more information about how API mapping is configured, please read the official AWS documentation.
We have mapped the custom domain to the API Gateway that we created.
If you ever encounter an error message saying “Not Found” as shown in the screenshot below, it is possible that the API mapping is not done properly or there is a typo in the Path.
Error message: { “message”: “Not Found” }
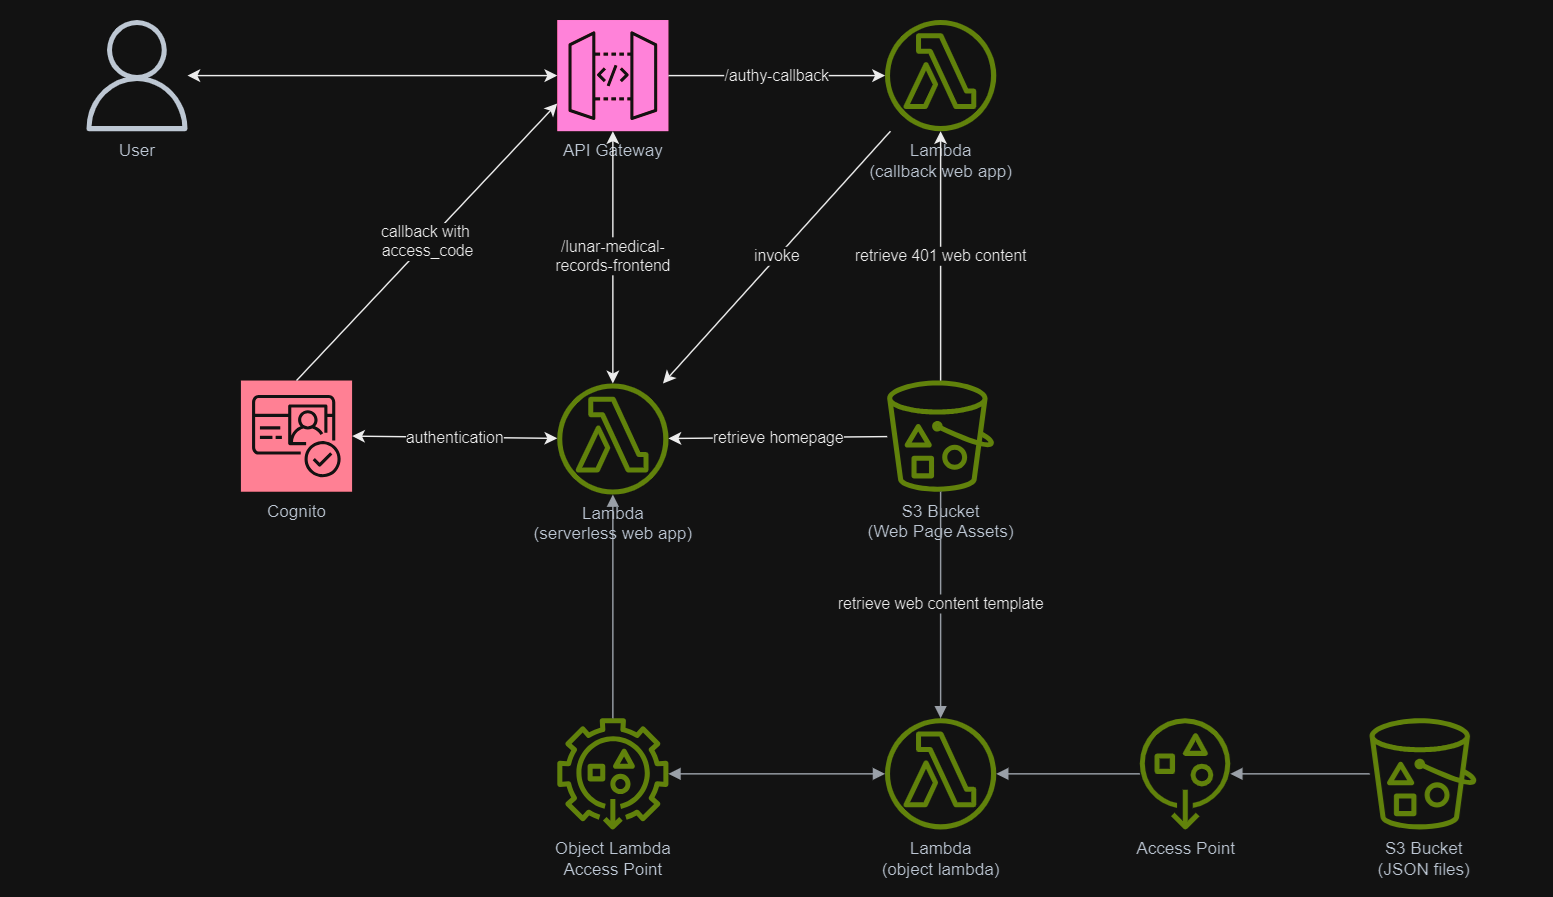
The entire infrastructure that we have gone through in this article basically can be described in the following diagram.
There is always a common scenario that requires cloud engineers to configure infrastructure which allows developers to safely and securely connect to the RDS or Aurora database that is in a private subnet.
For development purpose, some developers tend to create a public IP address to access the databases on AWS as part of setup. This makes it easy for the developers to gain access to their database, but it is undoubtedly not a recommended method because it has huge security vulnerability that can compromise sensitive data.
Architecture Design
In order to make our database secure, the recommended approach by AWS is to place our database in a private subnet. Since a private subnet has no ability to communicate with the public Internet directly, we are able to isolate our data from the outside world.
Then in order to enable the developers to connect remotely to our database instance, we will setup a bastion host that allows them to connect to the database via SSH tunnelling.
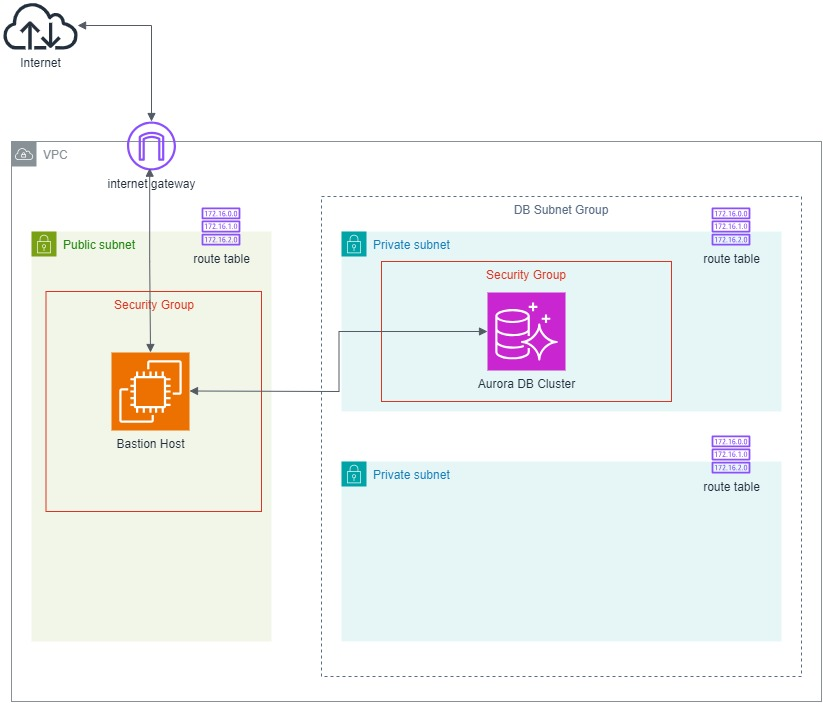
The following diagram describes the overall architecture that we will be setting up for this scenario.
We will be configuring with CloudFormation template. The reason why we use CloudFormation is because it provides us with a simple way to create and manage a collection of AWS resources by provisioning and updating them in a predictable way.
Step 1: Specify Parameters
In the CloudFormation template, we will be using the following parameters.
When we use a VPC, we have control over our virtual networking environment. We can choose our own IP address range, create subnets, and configure routing and access control lists.
A bastion host, also known as a jump server, is used as a bridge between the public Internet and a private subnet in a network architecture. It acts as a gateway that allows secure access from external networks to internal resources without directly exposing those resources to the public.
This setup enhances security by providing a single point of entry that can be closely monitored and controlled, reducing the attack surface of the internal network.
In this step, we will be launching an EC2 instance which is also our bastion host into our public subnet which is defined as follows.
This public subnet will be able to receive public connection requests from the Internet. However, we should make sure that our bastion host to only be accessible via SSH at port 22.
BastionSecurityGroup: Type: AWS::EC2::SecurityGroup Properties: GroupName: !Sub '${AWS::StackName}-bastion-sg' GroupDescription: !Sub 'Security group for ${AWS::StackName} bastion host' VpcId: !Ref VPC
CidrIp defines the IP address range that is permitted to send inbound traffic through the security group. 0.0.0.0/0 means from the whole Internet. Thus, we can also make sure that the connections are from certain IP addresses such as our home or workplace networks. Doing so will reduce the risk of exposing our bastion host to unintended outside audiences.
In order to enable resources in our public subnets, which is our bastion host in this case, to connect to the Internet, we also need to add Internet Gateway (IGW). IGW is a VPC component that allows communication between the VPC and the Internet.
For outbound traffic, a route table for the IGW is necessary. When resources within a subnet need to communicate with resources outside of the VPC, such as accessing the public Internet or other AWS services, they need a route to the IGW.
A destination of 0.0.0.0/0 in the DestinationCidrBlock means that all traffic that is trying to access the Internet needs to flow through the target, i.e. the IGW.
Finally, we can define our bastion host EC2 instance with the following template.
Step 4: Configure Private Subnets and Subnet Group
The database instance, as shown in the diagram above, is hosted in a private subnet so that it is securely protected from direct public Internet access.
When we are creating a database instance, we need to provide something called a Subnet Group. Subnet group helps deploy our instances across multiple Availability Zones (AZs), providing high availability and fault tolerance. Hence, we need to create two private subnets in order to successfully setup our database cluster.
Even thought resources in private subnets should not be directly accessible from the internet, they still need to communicate with other resources within the VPC. Hence, route table is neccessary to define routes that enable this internal communication.
In this article, as shown in the diagram above, one of the private subnets is not used. The additional subnet makes it easier for us to switch to a Multi-AZ database instance deployment in the future.
After we have defined the two private subnets, we can thus proceed to configure the subnet group as follows.
DBSubnetGroup:
  Type: 'AWS::RDS::DBSubnetGroup'
  Properties:
    DBSubnetGroupDescription:
      !Sub 'Subnet group for ${AWS::StackName}-core-db DB Cluster'
    SubnetIds:
      - !Ref PrivateSubnet1
      - !Ref PrivateSubnet2
    Tags:
      - Key: Project
        Value: !Ref ProjectName
Step 5: Define Database Cluster and Instance
As mentioned earlier, we will be using Amazon Aurora. So what is Aurora?
Five years after that, in 2019, Aurora Serverless was generally available in several regions such as US, EU, and Japan. Aurora Serverless is a flexible and cost-effective RDBMS option on AWS for apps with variable or unpredictable workloads because it offers an on-demand and auto-scaling way to run Aurora database clusters.
The ServerlessV2ScalingConfiguration property is specially designed for Aurora Serverless v2 only. Here, we configure the minimum and maximum capacities for our database cluster to be 0.5 and 1 ACUs, respectively.
Step 6: Allow Connection from Bastion Host to the Database Instance
Finally, we need to allow the traffic from our bastion host to the database. Hence, our database security group template should be defined in the following manner.
DatabaseSecurityGroup: Type: AWS::EC2::SecurityGroup Properties: GroupName: !Sub '${AWS::StackName}-core-database-sg' GroupDescription: !Sub 'Security group for ${AWS::StackName} core database' VpcId: !Ref VPC
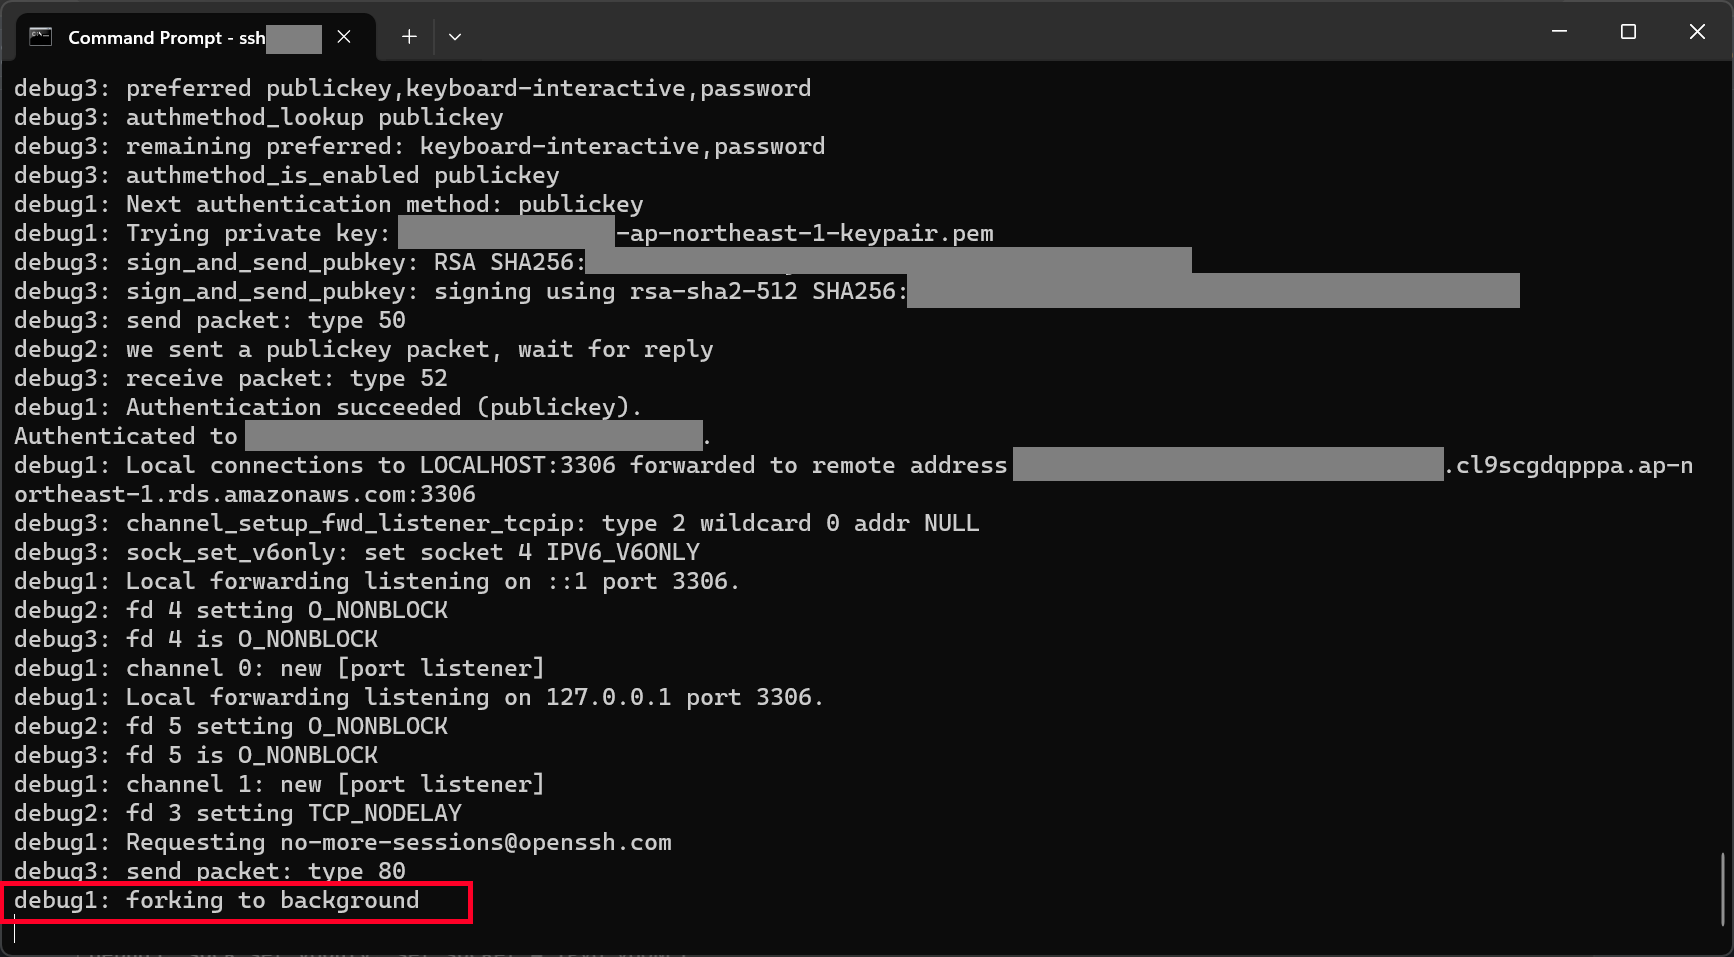
The -L option in the format of port:host:hostport in the command above basically specifies that connections to the given TCP port on the local host are to be forwarded to the given host and port on the remote side.
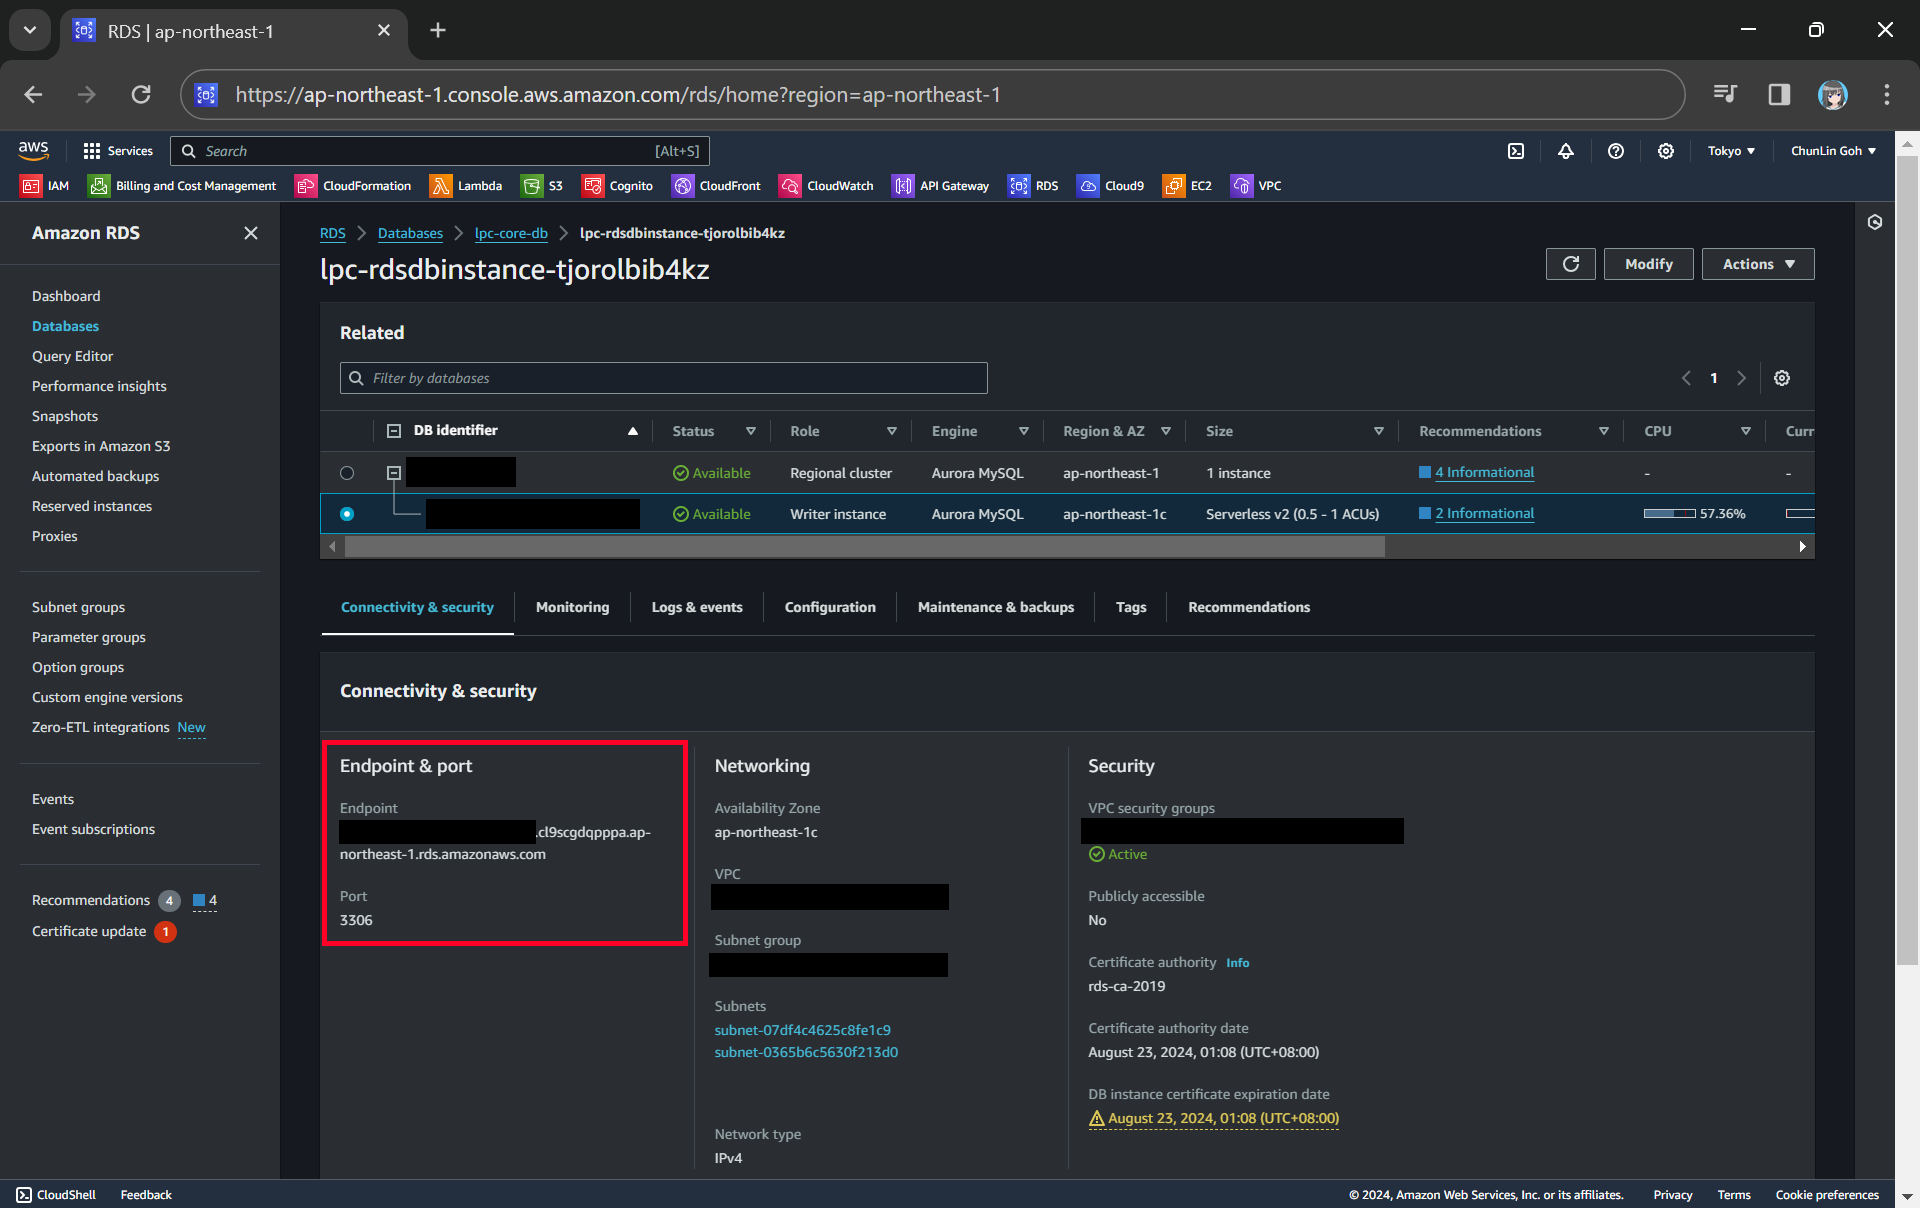
We can get the endpoint and port of our DB instance from the AWS Console.
With the command above, we should be able to connect to our database instance via our bastion host, as shown in the screenshot below.
We can proceed to connect to our database instance after reaching this step.
Now, we are able to connect to our Aurora database on MySQL Workbench.
Connecting to our Aurora Serverless database on AWS!
WRAP-UP
That’s all for how we have to configure the infrastructure described in the following diagram so that we can connect to our RDS databases in private subnets through a bastion host.
I have also attached the complete CloudFormation template below for your reference.
# This is the complete template for our scenario discussed in this article. --- AWSTemplateFormatVersion: '2010-09-09' Description: 'Setup and Access Private RDS Database via a Bastion Host'