I like to explore interesting new technologies. I also love to learn more from the materials available on Microsoft Virtual Academy, Google Developers channel, and several other tech/dev events.
It is quite common that we need our users to input date and time on the web pages. For example, when you search for flight schedules, you normally need to tell the search engine your journey period.
The Datepicker offered by jQuery UI is normally what people will use in their website. It offers a user-friendly way for the user to input a date from a popup calendar. However, it has a disadvantage. Datepicker doesn’t come with an interface for users to input the time. Workaround is normally to provide two more drop-down boxes for user to choose the hour and minute. However, this means that users have to click more times to input both date and time.
In the sample code above, the step defines the gap (in terms of minutes) between two time selections in the plugin. The value of minDate is set to 0 so that the earliest date the user can choose is today.
That’s all. Now you can use the plugin in a text field for user to input both date and time.
@Html.EditorFor(model => model.IncidentTime,
    new {
        htmlAttributes = new {
            @class = "form-control date_field",
            @placeholder = "Incident Date & Time",
            @style = "max-width: 100%"
        }
    }
)
DateTimePicker enables us to specify both date and time in a user-friendly way.
The time picker will then only show the 13 options specified in the code above. If user doesn’t pick any of the time option, then by default the chosen time will be 9am.
In case you would like to hide the time picker, you can do so by setting timepicker to false.
Some users sent their feedback to me about the visibility of time picker on the plugin. To them, the time picker is not so obvious. Hence, I change to use a brighter background colour in one of the class definition in jquery.datetimepicker.css.
I tried it out in my MVC project. Basically, what I do is just use one of the examples as reference, and then include one JS library (Suggestion from the author: Use ‘jssor.slider.mini.js’ (40KB for jQuery Plugin) or ‘jssor.slider.min.js’ (60KB for No-jQuery Version) for release) and some other JavaScript codes together with some inline CSS. I don’t want to talk much about it here because, hey, they have hosted the code and samples on GitHub for public to download!
Jssor Slider with thumbnail navigator is one of the available templates that I like.
“Given an address, how do I get its latitude and longitude?”
I had been finding the solution for this problem for a long time until I discovered the API from Google Maps, the Geocoding Service.
Recently, I found out that my kampung was actually searchable on Google Maps Street View.
Geocoding
According to the definition given in the Geocoding Service, geocoding is the process of converting human-readable address into geographic coordinates, such as latitude and longitude. Sometimes, the results returned can also include other information like postal code and bounds.
To do a latitude-longitude lookup of a given address, I just need to pass the a GeocodeRequest object Geocoder.geocode method. For example, if I want to find out the latitude and longitude of Changi Airport, I just do the following in JavaScript.
https://maps.googleapis.com/maps/api/js?libraries=places


var geocoder = new google.maps.Geocoder();
if (geocoder) {
    geocoder.geocode(
        { address: "Changi Airport" },
        function (result, status) {
            if (status != google.maps.GeocoderStatus.OK) {
                alert(address + " not found!");
            } else {
                var topPick = result[0]; // The first result returned

                var selectedLatitude = topPick.geometry.location.lat();
                var selectedLongitude = topPick.geometry.location.lng();

                alert("Latitude: " + selectedLatitude.toFixed(2));
                alert("Longitude: " + selectedLongitude.toFixed(2));
            }
        }
    );
} else {
    alert("Geocoder is not available.");
}
The above method is recommended for dynamic geocoding which will response to user input in real time. However, if what is available is a list of valid addresses, the Google Geocoding API will be another tool that you can use, especially in server applications. The Geocoding API is what I tried out in the beginning too, as shown in the C# code below.
var googleURL = "http://maps.googleapis.com/maps/api/geocode/json?address=" +
    Server.UrlEncode(address) + "&sensor=false";

using (var webClient = new System.Net.WebClient())
{
    var json = webClient.DownloadString(googleURL);
    dynamic dynObj = JsonConvert.DeserializeObject(json);
    foreach (var data in dynObj.results)
    {
        var latitude = data.geometry.location.lat;
        var longitude = data.geometry.location.lng;
        ...
    }
}
The reason of using dynamic JSON object here is because the Geocoding API returns many information, as mentioned earlier, and what I need is basically just the latitude and longitude. So dynamic JSON parsing allows me to get the data without mapping the entire API to a C# data structure. You can read more about this on Rick Strahl’s post about Dynamic JSON Parsing with JSON.NET. He also uses it for Google Maps related API.
The reason that I don’t use the Geocoding API is because there are usage limits. For each day, we can only call the API 2,500 times and only 5 calls per second are allowed. This means that in order to use the API, we have to get the API Key from Google Developer Console first. Also, it is recommended for use in server applications. Thus I change to use the Geocoding Service.
Where to Get the Address?
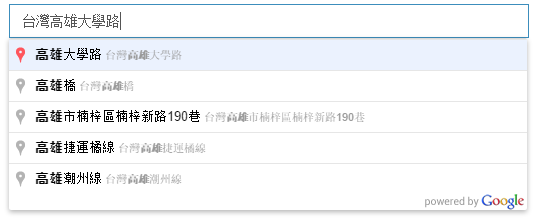
This seems to be a weird question. The reason why I worry about this is because it’s very easy to have typos in user input. Sometimes, having a typo is an address can mean two different places, for example the two famous cities in Malaysia, Klang and Kluang. The one without “u” is located at Kuala Lumpur area while the one with “u” is near to Singapore.
In the code above, I restricted the places which will be suggested by the Place Autocomplete to be only places in Taiwan (tw). Also, what I choose in my code above is “address”, which means the Place Autocomplete will only return me addresses. There are a few Place Types available.
The interesting thing is that even when I input simplified Chinese characters in the LocationName textbox, the Place Autocomplete is able to suggest me the correct addresses in Taiwan, which are displayed in traditional Chinese.
If I search Malaysia places (which are mostly named in Malay or English) with Chinese words, even though the Place Autocomplete will not show anything, the Geocoder is still able to return me accurate results for some popular cities.
Google Place Autocomplete can understand Chinese!
I also notice that if I view the source of the web page, there will be an attribute called “autocomplete” in the LocationName textbox and its value is set to false. However, this should not be a problem for Place Autocomplete API to work. So don’t be frightened if you see that.
Isn’t it good if it can show the location of the address on Google Map after keying in the address in the textbox? Well, it’s simple to do so.
Remember the script to look for Changi Airport latitude and longitude above? I just put the code in a function called showLatLngOfAddress which accepts a parameter as address. Then call it when the LocationName loses focus.
In addition, I add a few more lines of code to showLatLng to draw a marker on the Google Map to point out the location of the given address on a map.
var marker = null;

function showLatLngOfAddress(address) {
    ...

    var topPick = result[0];

    ...

    //center the map over the result
    map.setCenter(topPick.geometry.location);

    //remove existing marker (if any)
    if (marker != null)
    {
        marker.setMap(null);
    }

    //place a marker at the location
    marker = new google.maps.Marker(
    {
        map: map,
        position: topPick.geometry.location,
        animation: google.maps.Animation.DROP,
        draggable: true
    });
}
Finally, I not only make the marker to be draggable, but also enable it to update the latitude and longitude of the address when it is dragged to another location on the map.
I tried to search “Kluang” using Bing Maps API, it returned me two locations. One was in Malaysia and another one was near to Palembang in Indonesia! Wow, cool! On the other hand, Google Places returned me only the Kluang in Malaysia.
Visual Studio Online (VSO) is a Team Foundation Server (TFS) hosted on the Microsoft Azure and offered as software development team collaboration tool that works with popular IDEs like Visual Studio and Eclipse.
In my team, we are sharing our codes on Visual Studio Online (VSO) using a Git repository.
I actually would like to share the stories about how my team works with VSO and Git. However, due to the fact that our codes are not supposed to be shown to the public, so I decide to not write anything about it. Thus, I am just going to share a few VSO-related tutorials that I found useful.
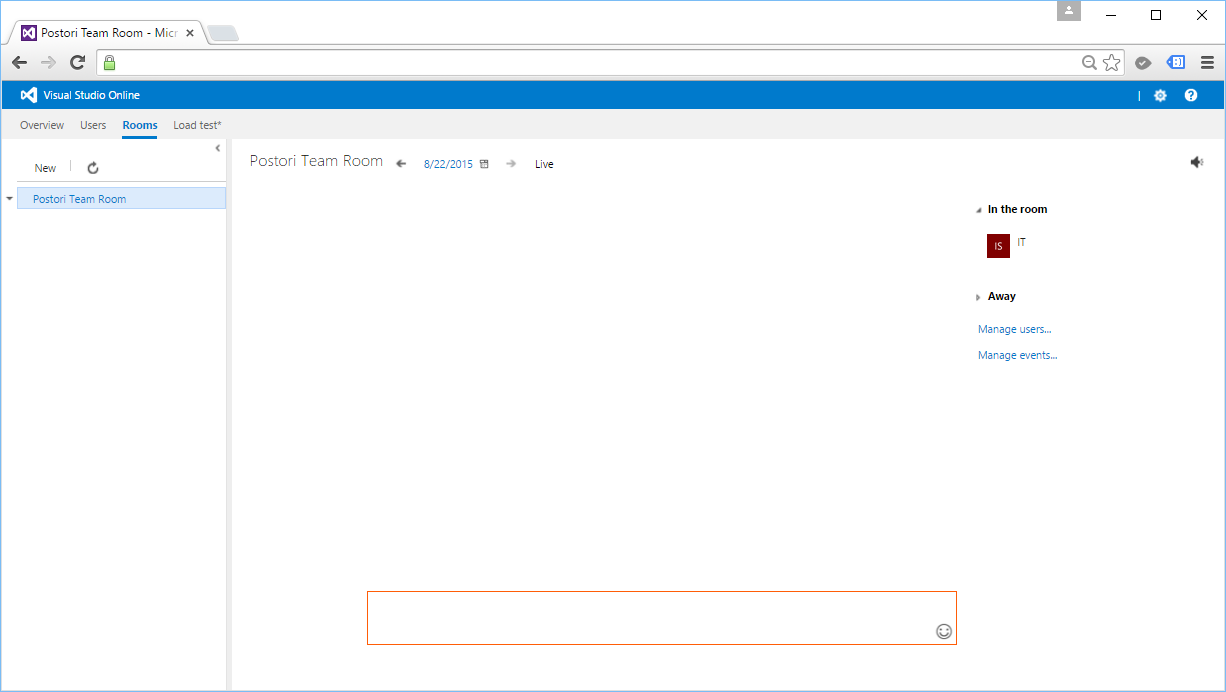
Another feature that we have tried is Team Room. Currently, we are already using Skype and Whatsapp. So, we don’t use Team Room in the end because we don’t want to trouble ourselves just to have another way of communicating with each other. We are just a team of 4-5 programmers anyway. =)
After deploying our web application, it’s not the end of the story. There are still many tasks to do. One of them is to analyze and optimize our new website. Normally, I start with testing my website in Google PageSpeed Insights to understand about the website performance issues.
Oops, my new website only gets 57/100.
Unfortunately, as shown in the screenshot above, my new website seems having a poor performance. Before finding out the ways to improve the performance, I would like to share what the 3 passed rules are.
Yup, the first thing that affects our web page loading is of course the server response speed. Google recommended to keep the server response time under 200ms.
My homepage loads about 600ms but PageSpeed Insights still let me pass. =)
Redirects will increase the loading time of the web page because there will be more HTTP request-response cycle.
In the old days when responsive design was still not popular, redirect is the way we used to bring users from desktop view to the mobile view of our website. So, when users first came in from “www.example.com”, they would be brought to “www.example.com/mobile/index.aspx”.
However, sometimes we still need to do redirects in our website, especially when we have a new web page to replace the old one. We may do redirects also when we are changing the domain name of our website.
301 (Permanent Redirect): The requested resource has been assigned a new permanent URI and any future references to the resource should be done using the new URI;
302 (Temporary Redirect): The requested resource resides temporarily under different URI.
One of the key principles of prioritizing visible content is to make sure the above-the-fold content is able to be loaded first.
What does “Above-the-fold Content” (ATF) mean? I found some very interesting explanation about it. ATF Content typically means the content above where the newspaper is folded horizontally. In web design context, ATF Content refers to any content we immediately see without scrolling when the page is first loaded.
Hence, in order to make sure ATF Content to be loaded first, we must have an inline part of the CSS which is responsible for styling the ATF Content.
By default, Bundling will select “.min” file for release when both “style1.css” and “style1.min.css” exist. In debug mode, then it will select non-“.min” version. This is important because Bundling seems to have problem with bootstrap.css.
/* Minification failed. Returning unminified contents.
    (3272,1): run-time error CSS1019: Unexpected token, found '@import'
    (3272,9): run-time error CSS1019: Unexpected token, found 'url("https://fonts.googleapis.com/css?family=Roboto:300,400,500,700")'
    (3278,83211): run-time error CSS1019: Unexpected token, found '@-webkit-keyframes'
    (3278,83255): run-time error CSS1035: Expected colon, found '{'
    (3278,83406): run-time error CSS1019: Unexpected token, found '@keyframes'
    ...
    (3672,3): run-time error CSS1062: Expected semicolon or closing curly-brace, found '0%'
    (4246,11): run-time error CSS1036: Expected expression, found ';'
*/
So one of the solutions suggested on Stack Overflow is to include both bootstrap.css and bootstrap.min.css in the same “Content” folder so that Bundling+Minification will not try (and then fail) to minify bootstrap.css itself. Instead, it will just pickup the existing bootstrap.min.css. However, we don’t need to change anything to the C# code above, so it still looks the same.
One disadvantage of doing so is that if there is any changes done to the bootstrap.css, we have to manually minify it and update the bootstrap.min.css because Minification will not do minification for us but it will just pickup the bootstrap.min.css.
For JavaScript, we will do the same to add multiple JS files into the bundle.
The {version} wildcard above will automatically pick the appropriate version of jQuery available in the “Scripts” folder. Hence, we can happily use NuGet to update jQuery to a newer version without changing our C# code.
In the ASP .NET MVC template, there are actually two JavaScript bundles, “~/bundles/jquery” and “~/bundles/jqueryval”. The reason of doing Bundle Partitioning is to make sure the page doesn’t get the resources that it doesn’t need.
Minify HTML
To minify HTML and Razor views, there are a few options.
Another one is using ASP .NET HTML Minifier which can be included as part of the build process so that the files are minified before being deployed in Visual Studio. The simple command tool is open source and the project can be found on Github.
It’s great that nowadays all the modern browsers support and automatically negotiate Gzip compression for all HTTP requests. Hence, enabling Gzip compression is able to reduce the size of transferred response.
Fetching resources over the network is slow. Hence, it is always a good idea to cache our static resources by setting an expiry date in the HTTP headers for static resources.