When my applications were hosted on Windows Azure Virtual Machines (VM), we stored the images uploaded via our web applications in the hard disks of the VMs (except the temporary disk). However, when we started load balancing, we soon encountered a problem that the uploaded images were only found in one of the VMs. So we needed to find a centralized storage for those images.
Recently, when we are using Azure PaaS (aka Cloud Service), even without load balancing, we already encounter the same issue. That is simply because the hard drives used in Cloud Service instances are not persistent. Hence, a persistent file storage on the cloud is needed.

Blob Storage
Azure Blob Storage, according to Azure Documentation, is a service for storing large amount of unstructured data that can be accessed everywhere via HTTP or HTTPS. Hence, it is an ideal tool that we can use as the persistent image cloud storage.
There are two types of blob, Page Blob and Block Blob. Page Blob is commonly used for storing VHD files for VMs because it is optimized for random read and write operations.
For most of the files uploaded, it’s recommended to store as Block Blobs because large files will be split into smaller blocks and then uploaded concurrently. Hence, Block Blob is designed to give us faster upload and better throughput, which is great for image upload.
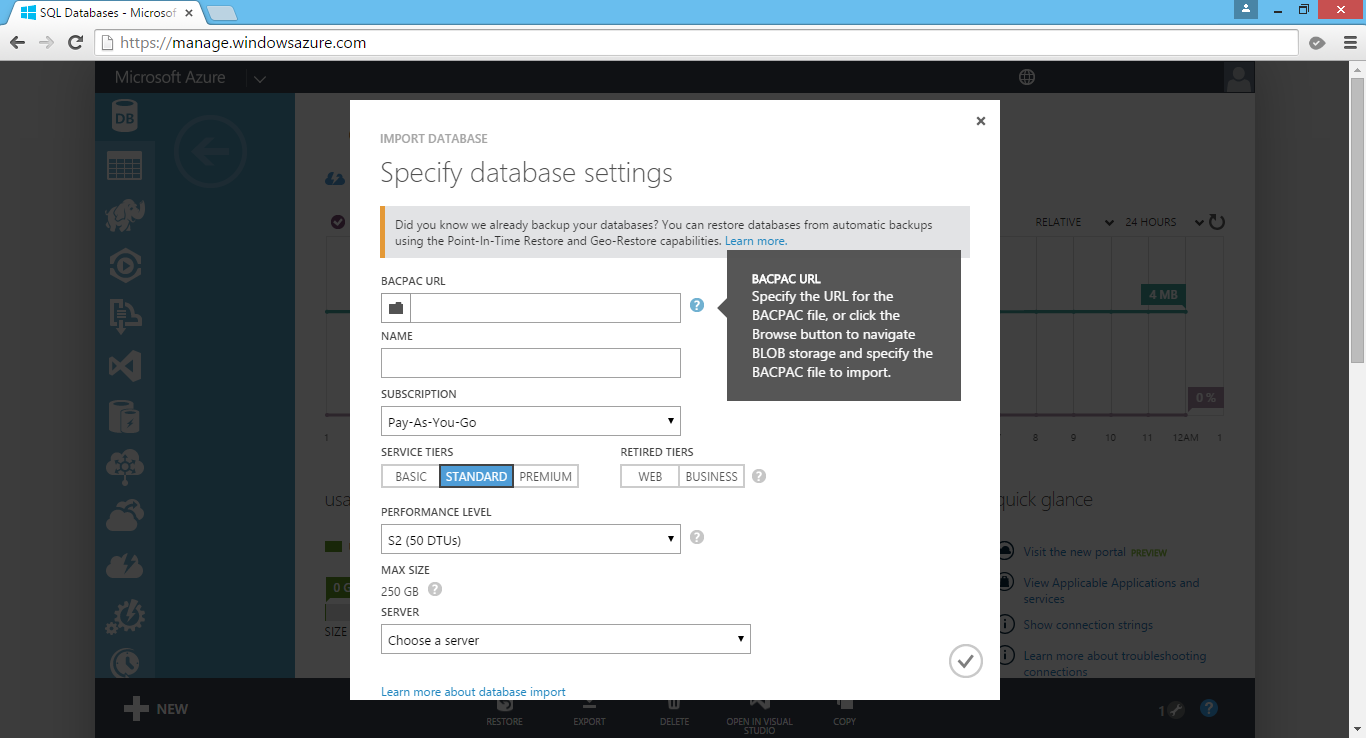
The maximum size for a Block Blob is 64 MB. Hence, if the uploaded file is more than 64 MB, we must upload it as a set of blocks; otherwise, we will receive status code 413 (Request Entity Too Large). For my web applications, there is no need for uploading an image which is more than 5MB most of the time. Hence, I can just limit the size of images before the user uploads them.
HttpPostedFileBase imageUpload;
...
if (imageUpload.ContentLength > 0 && imageUpload.ContentLength <= 5242880)
{
    //warn the user to resize the image
}
Let’s Try Uploading Images
I’m going to share how to upload more than one image to the Azure Blob Storage from an ASP .NET MVC 5 application. If you are going to upload just one image, simply remove the for loop and change List to just DBPhoto in the codes below.
First of all, I create a class to handle upload to Azure Storage operation.
public class AzureStorage
{
    public static async Task UploadAndSaveBlobAsync(
        HttpPostedFileBase imageFile, CloudBlobContainer container)
    {
        string blobName = Guid.NewGuid().ToString() +
            Path.GetExtension(imageFile.FileName);

        CloudBlockBlob imageBlob = container.GetBlockBlobReference(blobName);
        using (var fileStream = imageFile.InputStream)
        {
            await imageBlob.UploadFromStreamAsync(fileStream);
        }

        return imageBlob;
    }
}
So, in my controller, I have the following piece of code which will be called when an image is submitted via web page.
[HttpPost]
[ValidateAntiForgeryToken]
public async Task Create(
    [Bind(Include = "ImageUpload")] PhotoViewModel model)
{
    var validImageTypes = new string[] { "image/jpeg", "image/pjpeg", "image/png" };

    if (ModelState.IsValid)
    {
        if (model.ImageUpload != null && model.ImageUpload.Count() > 0)
        {
            var storageAccount = CloudStorageAccount.Parse
                (WebConfigurationManager.AppSettings["StorageConnectionString"]);

            var blobClient = storageAccount.CreateCloudBlobClient();
            blobClient.DefaultRequestOptions.RetryPolicy =
                new LinearRetry(TimeSpan.FromSeconds(3), 3);

            var imagesBlobContainer = blobClient.GetContainerReference("images");
            foreach (var item in model.ImageUpload)
            {
                if (item != null) {
                    continue;
                }

                if (validImageTypes.Contains(item.ContentType) &&
                    item.ContentLength > 0 && item.ContentLength <= 5242880)
                {
                    var blob = await AzureStorage.UploadAndSaveBlobAsync(item, imagesBlobContainer);
                    DBPhoto newPhoto = new DBPhoto();
                    newPhoto.URL = blob.Uri.ToString();
                    db.DBPhoto.Add(newPhoto);
                }
                else
                {
                    // Show user error message
                    return View(model);
                }
            }
            db.SaveChanges();
            ...
        }
        else
        {
            // No image to upload
        }
    }
    return View(model);
}
In the code above, there are many new cool things.
Firstly, it is the connection string to Azure Blob Storage, which I store in StorageConnectionString in web.config. The format for secure connection string is as follows.
DefaultEndpointsProtocol=https;AccountName=;AccountKey=;

Secondly, it’s LinearRetry. It is basically a retry policy which states how many times the program will retry and how much time needed between retries. In my case, it will only wait for 3 seconds after each try up to 3 tries.
Thirdly, I get the URL of the image on the Azure Blob Storage via blob.Uri.ToString() and store it into the database table. The URL will be used later for displaying the image as well as deleting the image.
Fourthly, I actually check to see if model.ImageUpload has null entries. This is because if I submit the form without any image to upload, model.ImageUpload has one entry. Not zero, but one. The only one entry is actually null. So if I don’t check to see whether the entry in model.ImageUpload is null, there will be an exception thrown.
The controller has such a long code. Luckily the code needed in the model and view is short and simple.
For the model PhotoViewModel, I have the following.
public class PhotoViewModel
{
    ...

    [Display(Name = "Current Images")]
    public List AvailablePhotos { get; set; }
}
For view, it is easy to allow selecting multiple files in the same view page. The “multiple = “true”” is to make sure more than one file can be selected in the File Explorer. You can omit this attribute if you only want at most one file being selected.
@Html.LabelFor(model => model.ImageUpload, new { style = "font-weight: bold;" })
@Html.TextBoxFor(model => model.ImageUpload, new { type = "file", multiple = "true" })
@Html.ValidationMessageFor(model => model.ImageUpload)
Image Size and HttpException
The image upload function looks fine. However, when images having size larger than a certain size is uploaded, HttpException will be thrown.

In order to prevent DOS attacks which upload huge files to the server, IIS by default only allows files which have size less than 4MB to be uploaded. Hence, although I earlier put a check to prevent image larger than 5MB to be uploaded, the exception will still be thrown if an image of size between 4 to 5MB is uploaded.
What if we just change the if clause above to allow only at most 4MB of image being uploaded? This won’t work because the exception is already thrown before the if condition is reached.
Then, can we just increase the IIS limit from 4MB to, let’s say, 100MB or something bigger? Sure. This can work. However, it still doesn’t stop someone uploads something bigger than the limit. Also, it makes attackers easier to exhaust your server with big files. Hence, expanding the upload size restriction is not really a full solution.
If you are interested, there are many good articles online discussing about this problem. I highlight some interesting ones below.
- Use HttpModule to Handle File Uploads;
- Use RIA (Rich Internet Application) Services in Silverlight (Seriously, we are talking about Silverlight in year 2015?);
- SubStatusCode = 13 in IIS 7;
- Catch the Exception in Global.asax.
I don’t really like the methods listed above, especially the 3rd and 4th options. It’s already too late to inform the user when the exception is thrown. Could we do something at client side before the images are being uploaded?
Luckily, we have File API in HTML 5. It allows to loop through the files in JavaScript to check their size. So, after the submit button is clicked, I will call a JavaScript method to check for the size of the images before they are being uploaded.
function IsFileSizeAcceptable() {
    if (typeof FileReader !== "undefined") {
        var filesBeingUploaded = document.getElementById('ImageUpload').files;
        for (var i = 0; i < filesBeingUploaded.length; i++) {
            if (filesBeingUploaded[i].size >= 4194304) { // Less than 4MB only
                alert('The file ' + filesBeingUploaded[i].name + ' is too large. Please remove it from your selection.');
                return false;
            }
        }
    }
    return true;
}

Remove from Azure Blob Storage
It’s normal that files uploaded to storage will be removed later. So how are we going to implement this feature in our ASP .NET MVC 5 application?
First of all, I added the following code to my AzureStorage.cs.
public static async Task DeleteBlobAsync(Uri blobUri, CloudBlobContainer container)
{
    string blobName = blobUri.Segments[blobUri.Segments.Length - 1];
    CloudBlockBlob blobToDelete = container.GetBlockBlobReference(blobName);

    await blobToDelete.DeleteAsync();
}
Secondly, I just pass in the Azure Storage URL of the image that I would like to remove and then call the DeleteBlobAsync method.
Uri blobUri = new Uri();
await AzureStorage.DeleteBlobAsync(blobUri, imagesBlobContainer);
Then the image will be deleted from the Azure Storage successfully.
Global.asax.cs and Blob Container
In order to have my application to create a blob container automatically if it doesn’t already exist, I add a few lines in Global.asax.cs as follows.
var storageAccount = CloudStorageAccount.Parse(
    WebConfigurationManager.AppSettings["StorageConnectionString"]);
var blobClient = storageAccount.CreateCloudBlobClient();
var imagesBlobContainer = blobClient.GetContainerReference("images");
if (imagesBlobContainer.CreateIfNotExists())
{
    imagesBlobContainer.SetPermissions(new BlobContainerPermissions
        {
            PublicAccess = BlobContainerPublicAccessType.Blob
        });
}
Write a Console Program to Upload File to Azure Storage
So, how is it done if we are developing a console application, instead of web application?

The codes below show how I upload an html file from my local hard disk to Azure Blob Storage. Then I can share the Azure Storage URL of the file to my friends so that they can read the web page.
Similar to what I do in web application, this is how I connect to the Storage account via https.
var azureStorageAccount = new CloudStorageAccount(
    new StorageCredentials("", ""), true);
This is how I access the container.
var blobClient = new CloudBlobClient(azureStorageAccount.BlobStorageUri, azureStorageAccount.Credentials);
var container = blobClient.GetContainerReference("myfiles");
Then the next thing I do is just upload the local file to Azure Storage by specifying the file name, content type, etc.
CloudBlockBlob blob = container.GetBlockBlobReference("mysimplepage.html");
using (Stream file = System.IO.File.OpenRead(@"C:\Users\ChunLin\Documents\mysimplepage.html"))
{
    blob.Properties.ContentType = "text/html";
    blob.UploadFromStream(file);
}
Yup, that’s all. =)
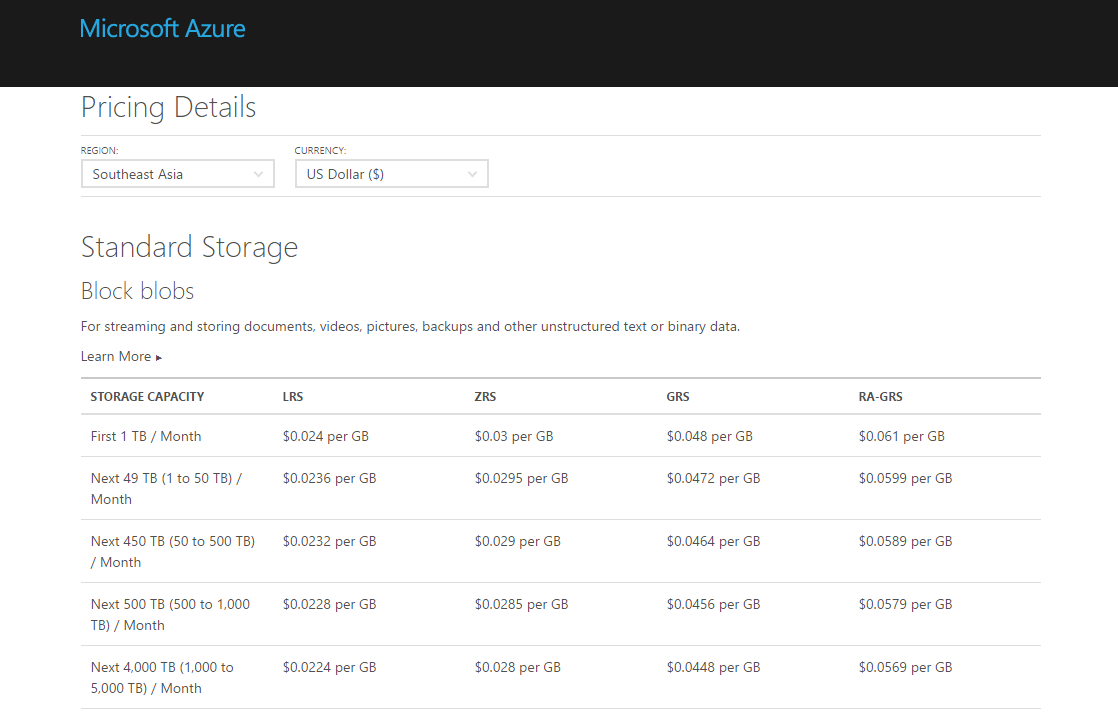
Pricing
Hosting your files on cloud storage is sure convenience. However, Azure Blob Storage is not free. The following table shows the current pricing of Azure Block Blob Storage in South East Asia region. To get the latest pricing details, please visit Azure Storage Pricing page.
Summer 2015 Self-Learning Project
This article is part of my Self-Learning in this summer. To read the other topics in this project, please click here to visit the project overview page.