I like to explore interesting new technologies. I also love to learn more from the materials available on Microsoft Virtual Academy, Google Developers channel, and several other tech/dev events.
KOSD, or Kopi-O Siew Dai, is a type of Singapore coffee that I enjoy. It is basically a cup of coffee with a little bit of sugar. This series is meant to blog about technical knowledge that I gained while having a small cup of Kopi-O Siew Dai.
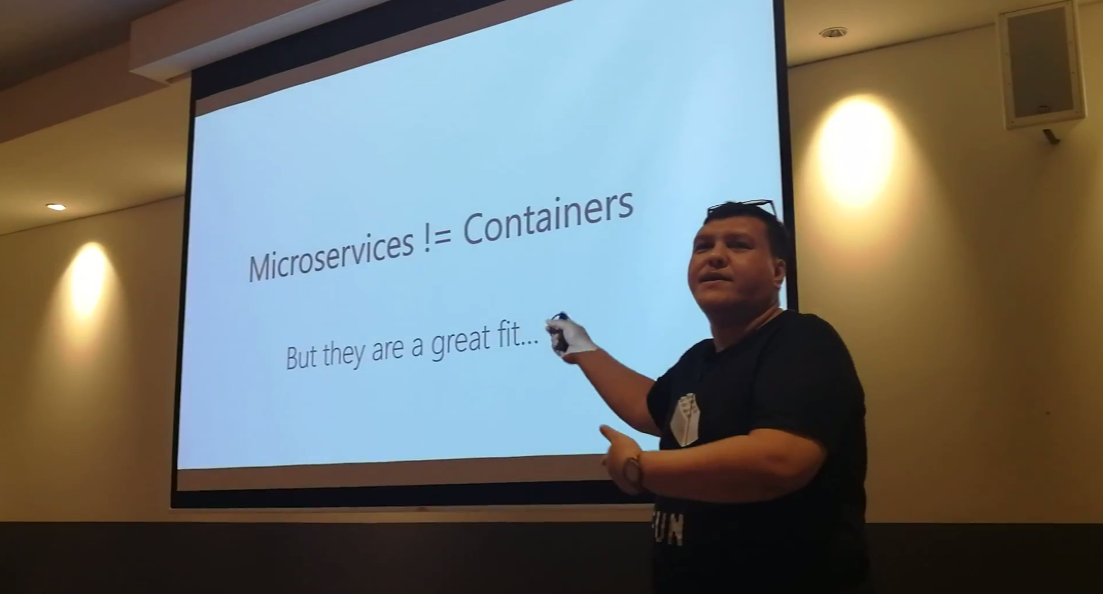
Riza’s talking about Containers. Yes, microservices are not containers!
Learning Motivation
In the beginning of Riza’s talk, he mentioned GO-JEK, an Indonesia ride-hailing phone service. Due to their rapid growth, the traditional monolithic architecture can no longer support their business. Hence, they switched to use a modern approach which includes moving apps to containers.
Hence, after the meetup, I was very excited to find out more about micro-services and Docker containers. With the ability of .NET Core to be cross-platform, as a Azure lover, I am interested to find out more how I can deploy ASP .NET Core web app to a container in Azure. So, I decided to write this short article to share with my teammates about this that they can learn while drinking a cup of coffee.
Creating New Project with Docker Support
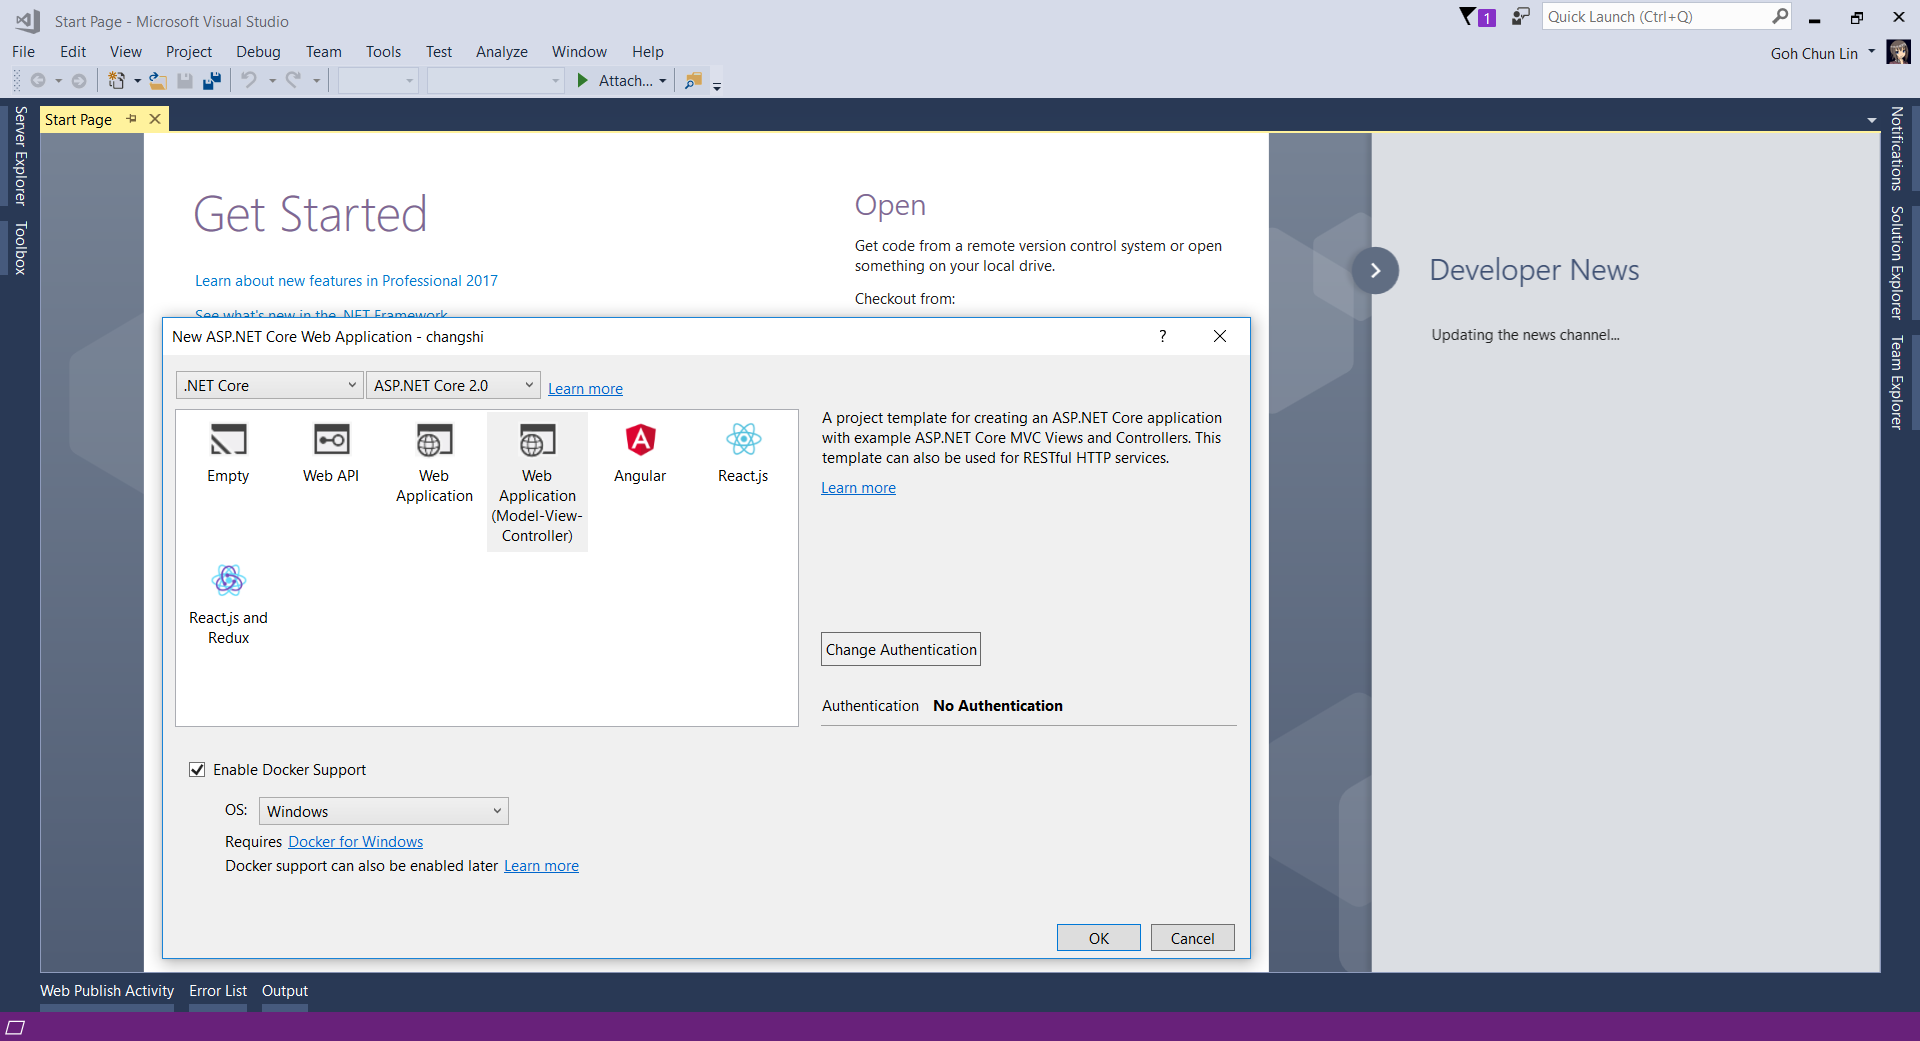
Since I am trying it out as personal project, I choose to start it with a new ASP .NET Core project. Then in the Visual Studio, I can easily turn it to be a Docker supporting app easily by checking the “Enable Docker Support” option.
Enable Docker Support
For existing web application projects, we will not have the screen above. Luckily, it is still easy to add Docker Support to an existing ASP .NET Core project on Visual Studio.
Enabling Docker Support in existing projects.
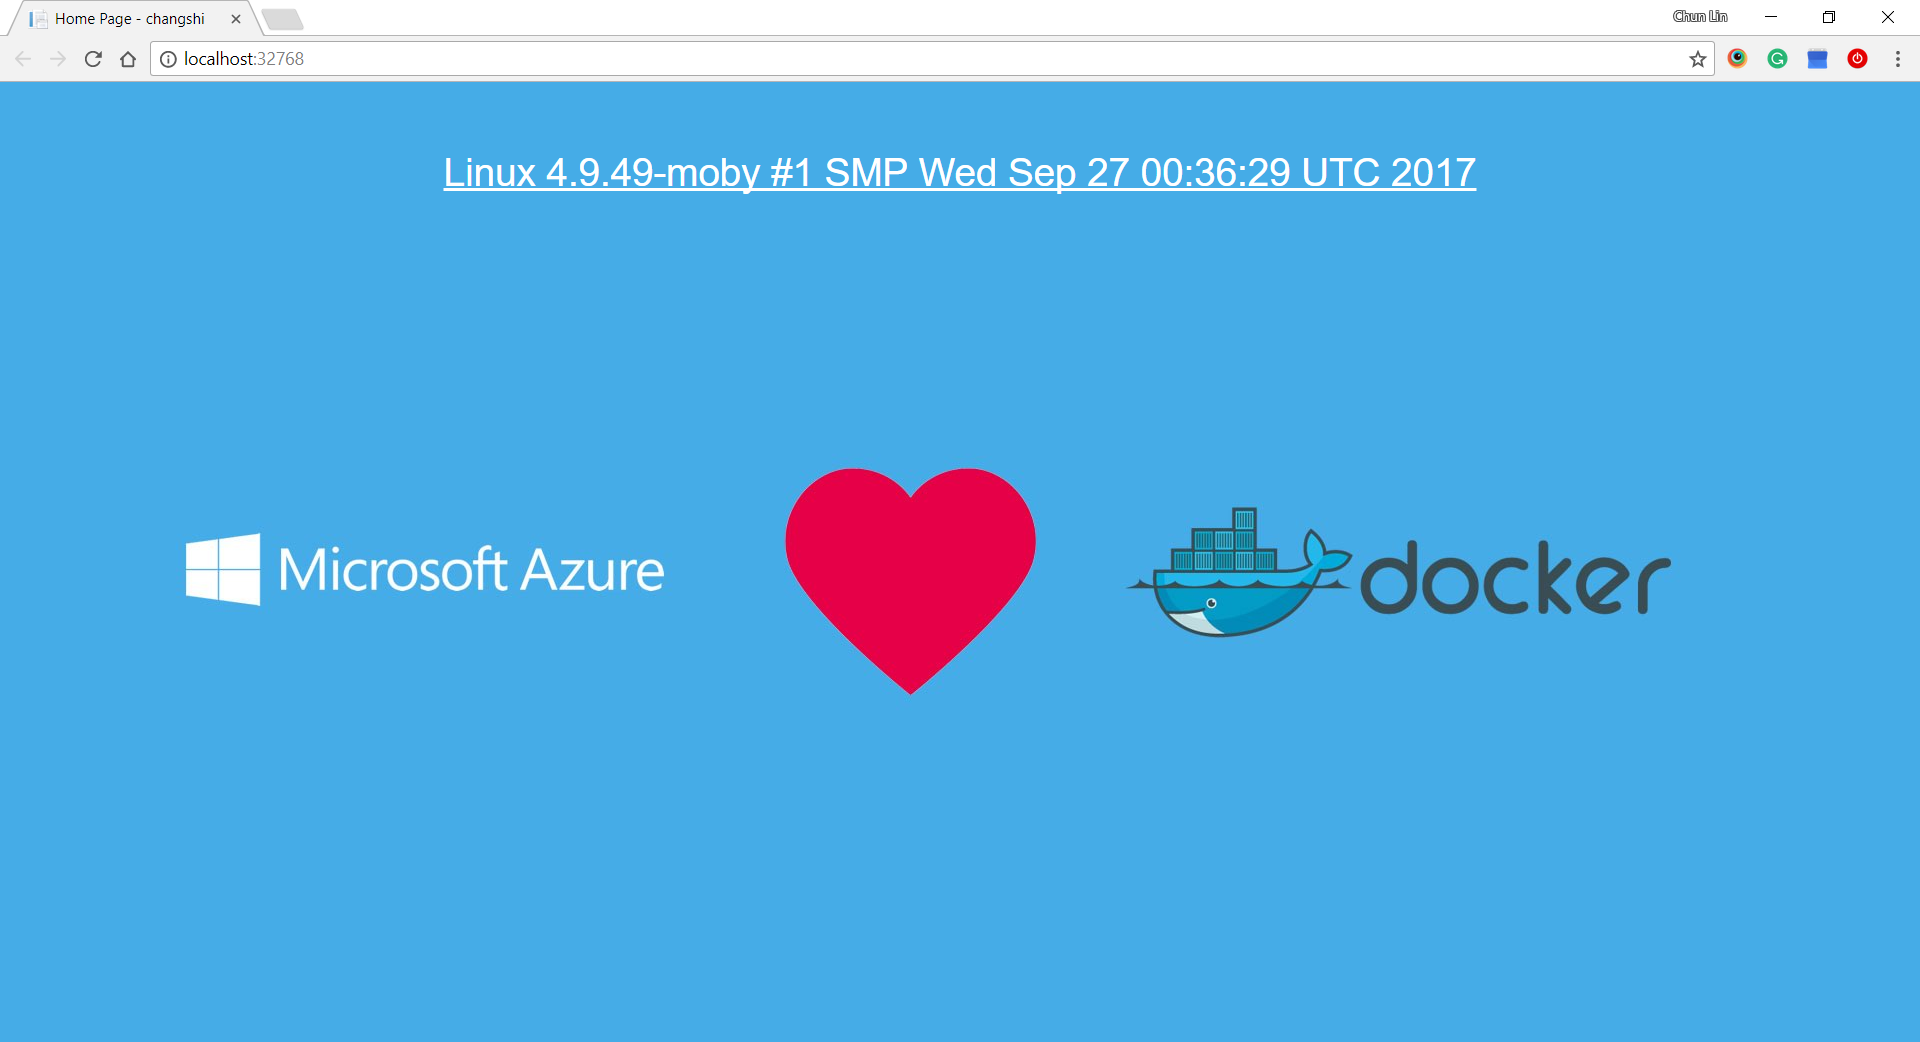
Then by clicking on the “F5” button to run the project, I manage to get the following screen (The background is customized by me). The message is displayed using the following line.
Yay, we managed to run the web app inside a Linux container locally.
Publishing to Microsoft Azure with Continuous Delivery
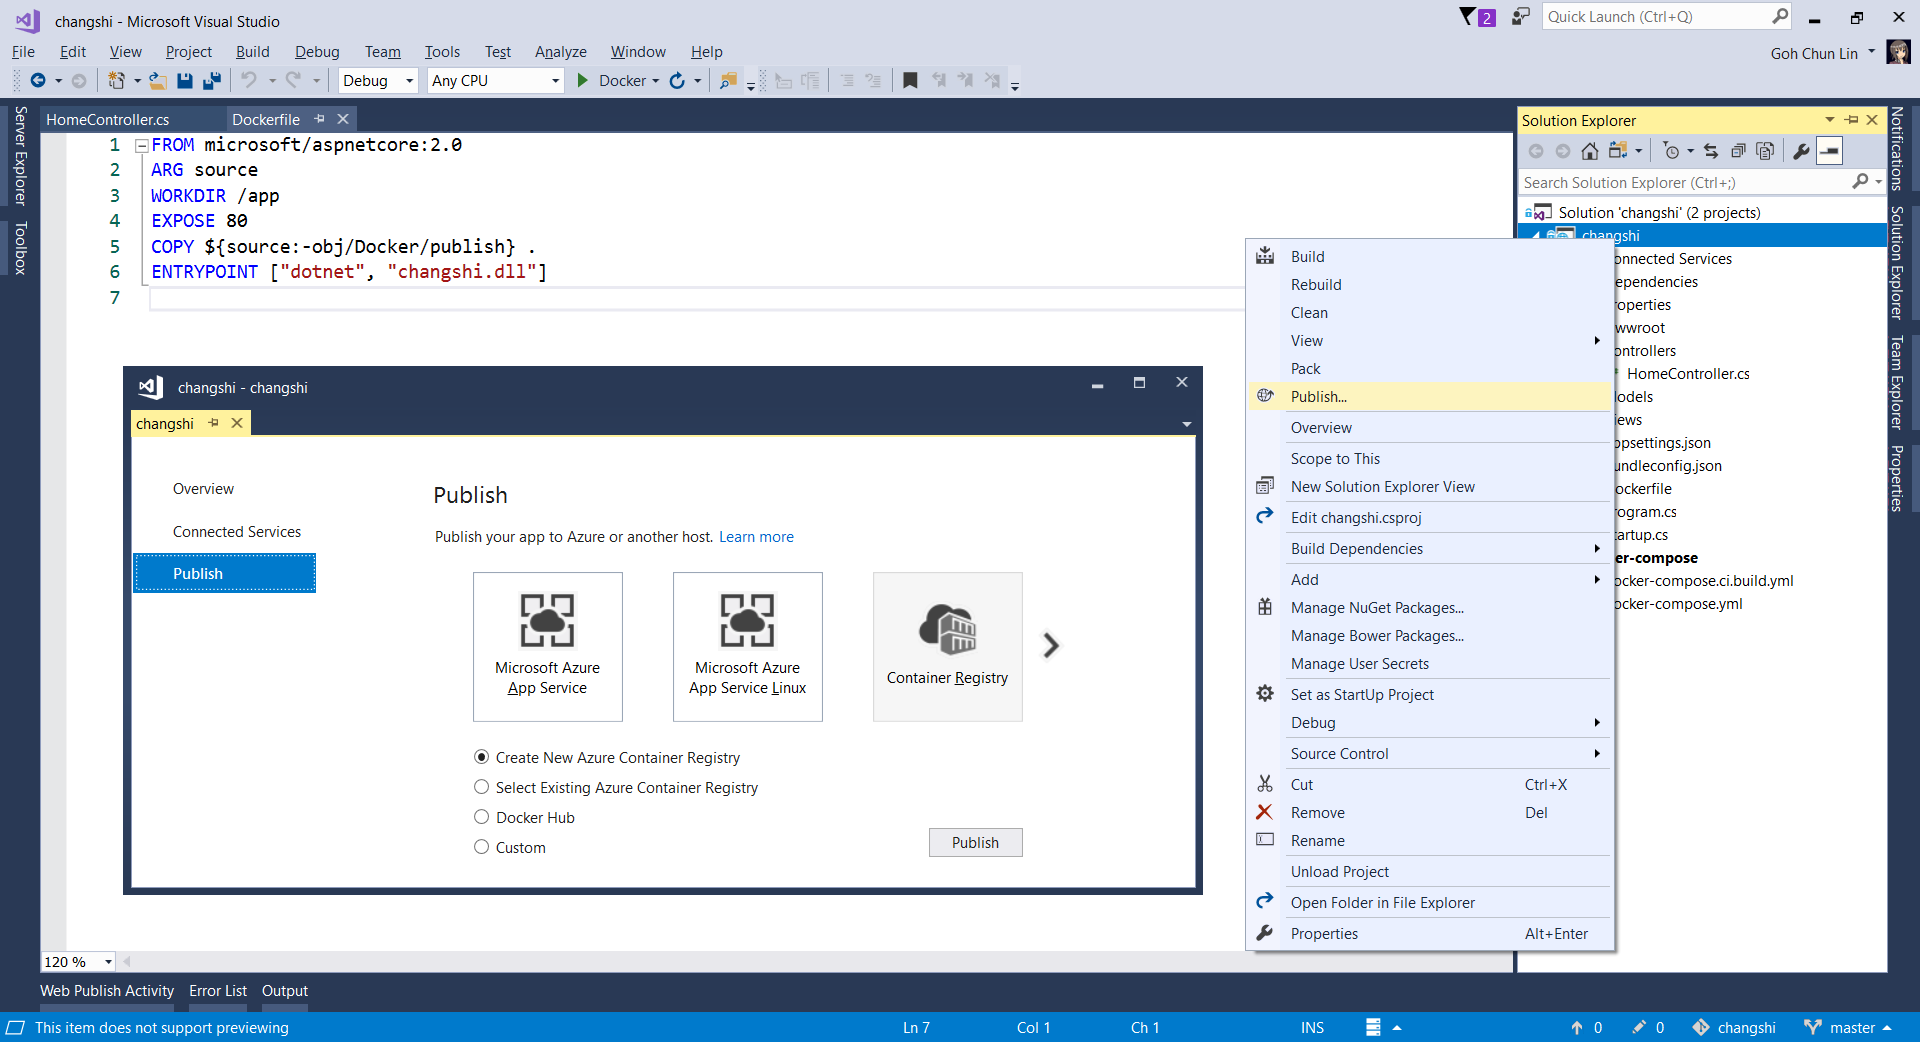
Without Continuous Delivery, we also can easily right-click the web application to publish it to the Container Registry on Azure.
Creating a new Azure Container Registry which will have the Docker image published to.
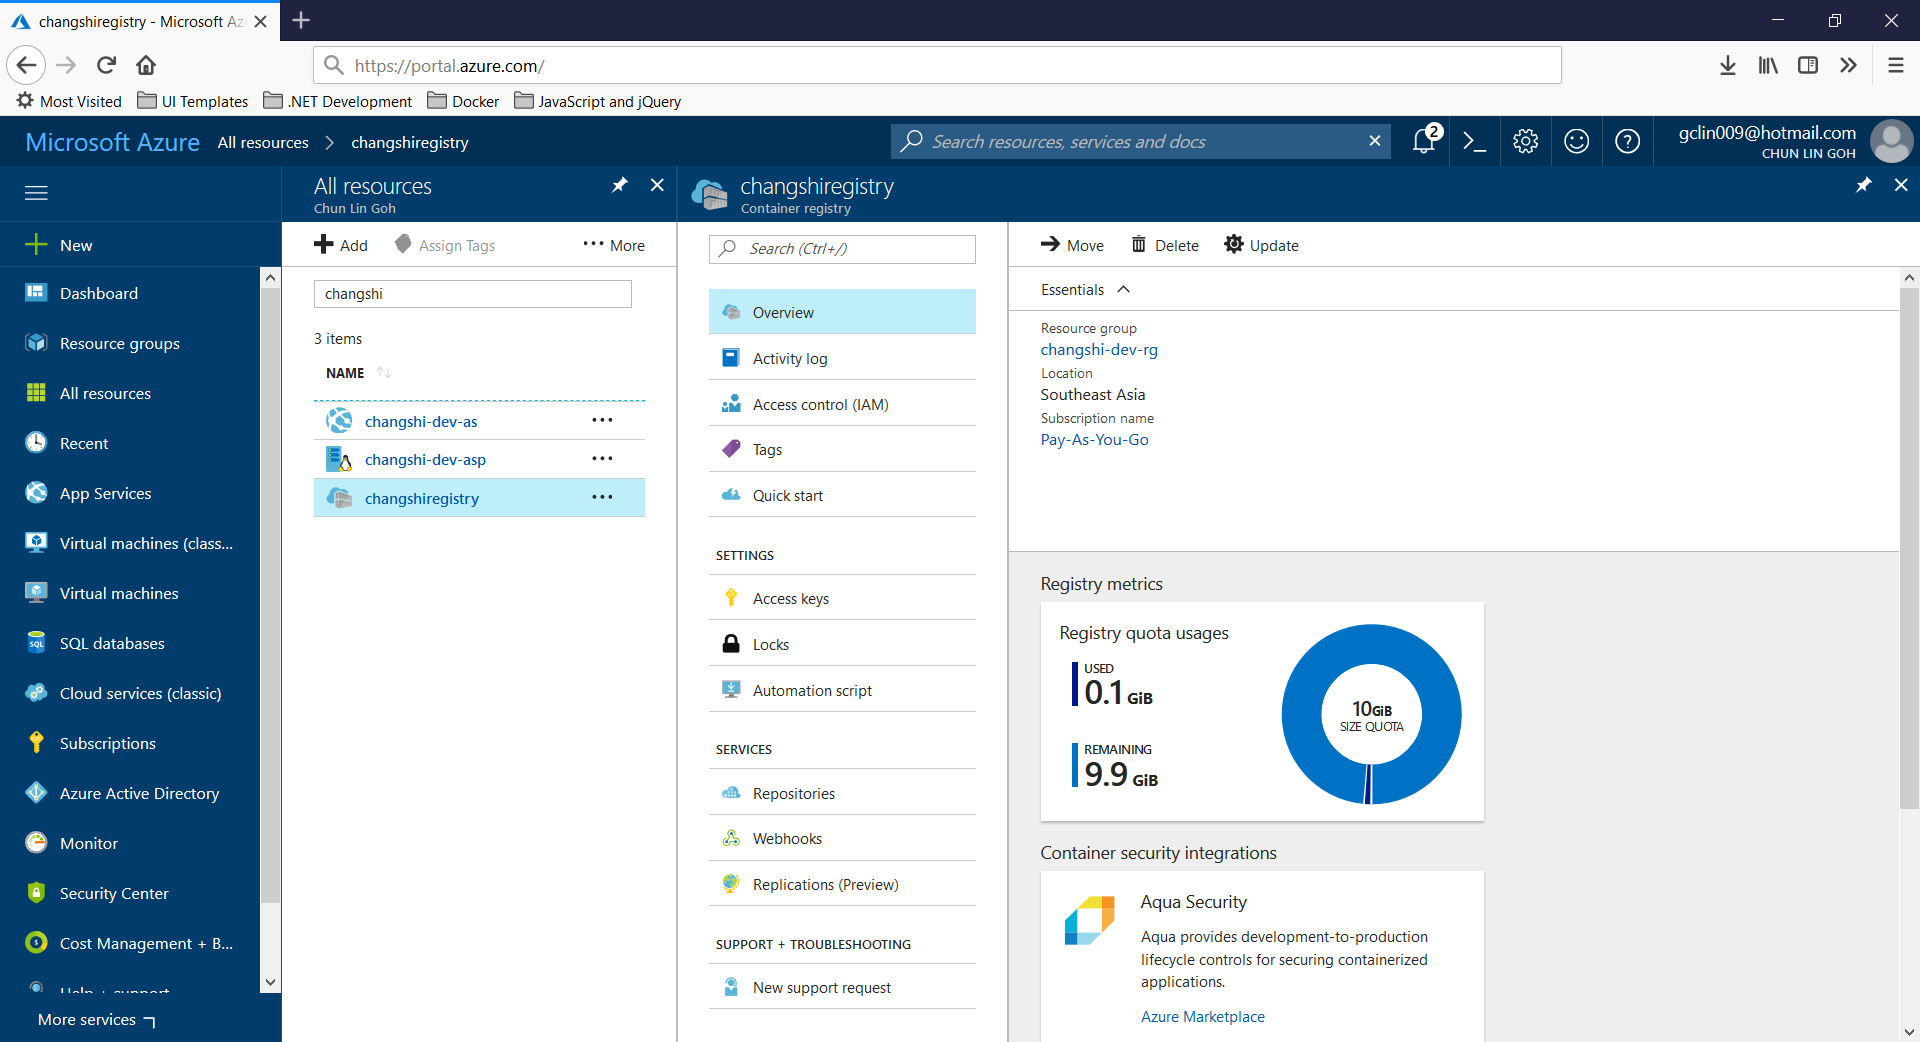
Then, on Azure Portal, we will see three new resources added. Firstly, we will have the Container Registry.
Then, we will also have an app service site which is running the image downloaded from the Container Registry. Finally, we have an App Service Plan which needs to be at least B1 because free and shared SKUs are not available for apps running on Linux (The official Microsoft documentation says we should have the VM size of the App Service Plan to be S1 or larger though).
Container Registry for my new web app, Changshi.
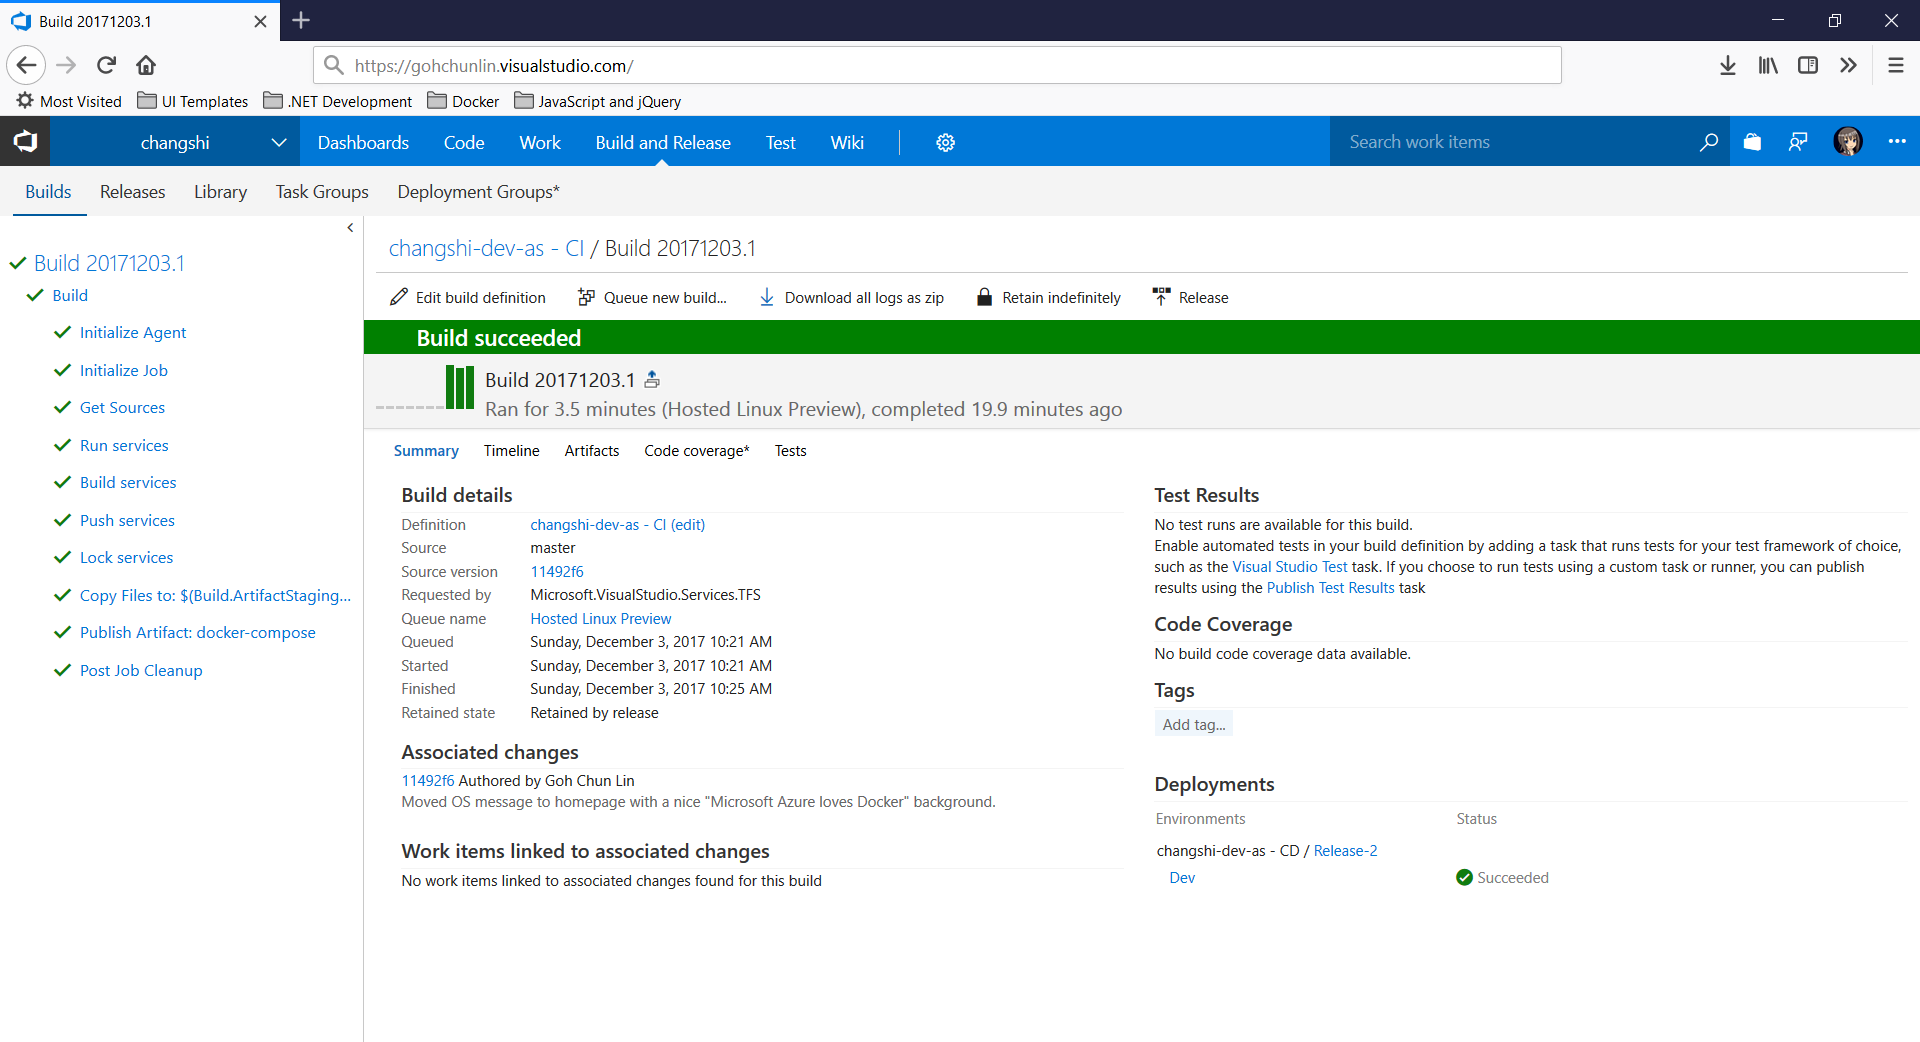
To enable Continuous Delivery, I choose to use Github + Visual Studio Team Services (VSTS). By doing so, build and release will be automatically started whenever I check in code to Github.
Build history and details on VSTS.
Yup, this is so far what I have tried out in my first step of playing with containers. If you are interested, please check out the references listed below.
This morning, my friend messaged me a Chinese article about how to do clustering with Linux + .NET Core + Nginx. As we are geek first, we are going to try it out with different approaches. While my friend was going to set up on RaspberryPi, as a developer who loves playing with Microsoft Azure, I proceed to do load balancing of Azure Web Apps in different regions with Nginx.
Setup Two Azure Web Apps
Firstly, I deployed the same ASP .NET Core 2 web app to two different Azure App Services. One of them is deployed at Australia East; another one is deployed at South India (Huuray, Microsoft opens Azure India to the world in April 2017!).
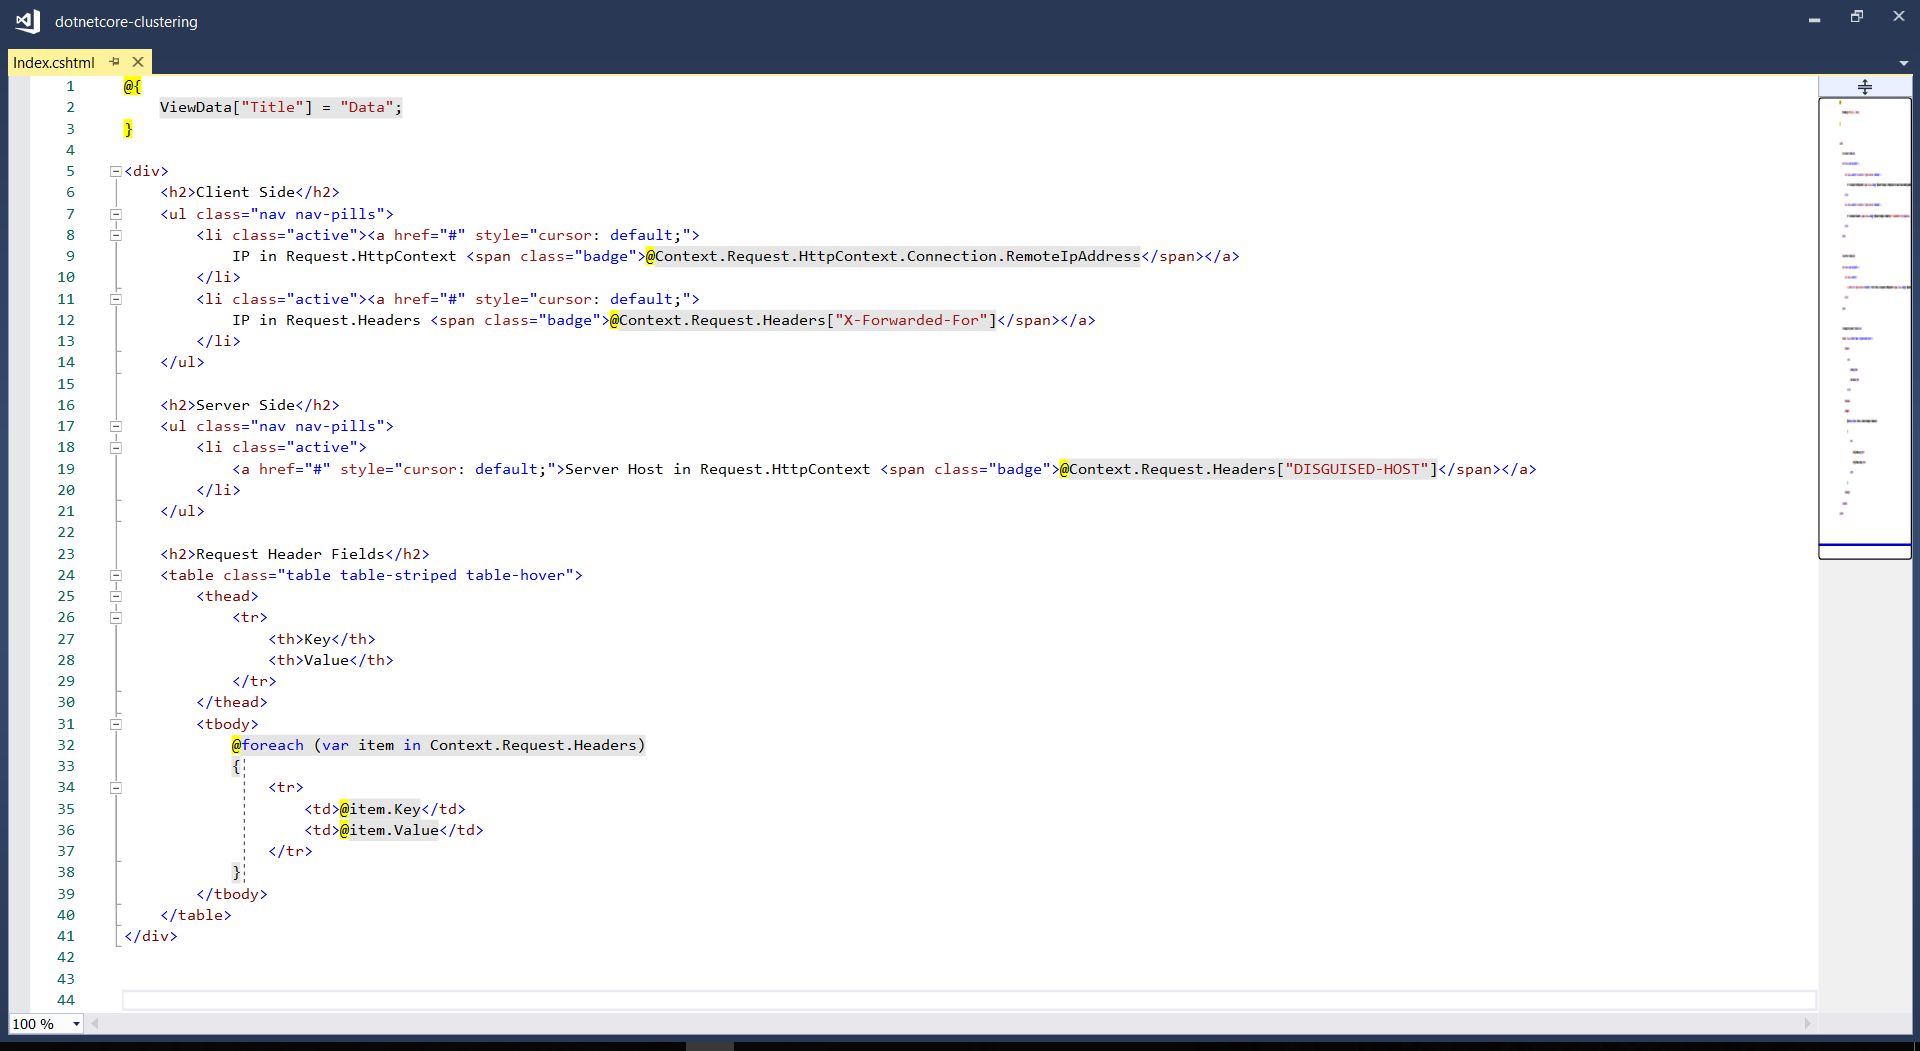
The homepage of my web app, Index.cshtml, is as follows to display the information in Request.Headers.
Since WordPress cannot show the HTML code properly, I show the code as an image here.
In the code above, Request.Headers[“X-Forwarded-For”] is used to get the actual visitor’s IP address instead of the IP address of the Nginx load balancer. To allow this to work, we need to have the following codes added in Startup.cs.
After that, I installed Nginx by using the following command.
sudo apt-get install nginx
After installing it, in order to test whether Nginx is installed properly, I visited the public IP address of the virtual machine. However, it turns out that I couldn’t visit the server because the port 80 by default is not opened on the virtual machine.
Hence, the next step I need to do is opening port using Azure Portal by adding a new inbound security rule for the port 80 and then associate it to the subnet of the virtual network of the virtual machine.
Then when I revisited the public IP of the server, I could finally see the “Welcome to Nginx” success page.
Nginx is now successfully running on our Ubuntu server!
Mission: Load Balancing Azure Web Apps with Nginx
As the success page mentioned, further configuration is required. So, we need to edit the configuration file by first opening it up with the following command.
sudo nano /etc/nginx/sites-available/default
The first section that I added is the Cache Configuration.
The proxy_cache_path is about in which directory the cache should be stored at. The levels=1:2 means that the cache will be stored in a single-character directory with a two-character subdirectory. The keys_zone parameter defines a my_cache cache zone which can store 20MB of keys at most but with the maximum size of the actual data to be 500MB. The inactive=60m means the maximum inactive time cache can be stored, which is 60 minutes in this case.
Next, upstream needs to be defined as follows.
# Cluster sites configuration
upstream backend {
    server dotnetcore-clustering-web01.azurewebsites.net fail_timeout=30s;
    server dotnetcore-clustering-web02.azurewebsites.net fail_timeout=30s;
}
For the default server configuration, we need to make a few modifications to it.
Now, we just need to restart the Nginx with the following command.
sudo service nginx restart
Then when we visit the Ubuntu server again, we will realize that we sort of able to reach Azure Web Apps but not really so because it says 404!
Oops, the Nginx routes the visitor to 404 land.
Troubleshooting 404 Error
According to another article which is written by Issac Lázaro, he said this was due to the fact that Azure App Service uses cookies to do ARR (Application Request Routing), hence we need to have the Ubuntu server to pass the header to the web apps by modifying our Nginx configuration to the following.
Then when we refresh the page, we shall see the website is loaded correctly with the content will be delivered from either web01 or web02.
Yay, we make it!
Yup, that’s all about setting up a simple Nginx to load balance multiple Azure Web Apps. You can refer to the following articles for more information about Nginx and load balancing.
KOSD, or Kopi-O Siew Dai, is a type of Singapore coffee that I enjoy. It is basically a cup of coffee with a little bit of sugar. This series is meant to blog about technical knowledge that I gained while having a small cup of Kopi-O Siew Dai.
Code reviews are a best practice for software development projects but it’s normally ignored in startups and SMEs because
the top management doesn’t understand the value of doing so;
the developers have no time to do code reviews and even unit testing.
So, in order to improve our code quality and management standards, we decided to introduce the idea of code reviewing by enforcing pull requests creating in our deployment procedure, even though our team is very small and we are working in a startup environment.
Firstly, we set up two websites on Azure App Service, one for UAT and another for the Production. We enabled Continuous Deployment feature for two of them by configuring Azure App Service integration with our Git repository on Visual Studio Team Services (VSTS).
Secondly, we have two branches in the Git repository of the project, i.e. master and development-deployment. Changes pushed to the branches will automatically be deployed to the Production and the UAT websites, respectively.
In order to prevent that our codes are being deployed to even the UAT site without code reviews, we created a new branch known as the development branch. The development branch allows all the relevant developers (in the example below, we call them Alvin and Bryan) to pull/push their local changes freely from/to it.
Once any of the developers is confident with his/her changes, he/she can create a new pull request on VSTS.
Creating a new pull request on VSTS.
We then proceed to make use of the new capability on VSTS, which is to set policies for the branches. In the policy setting, we checked the option “Require a minimum number of reviewers” to prevent direct pushes to both master and development-deployment branches.
Enabled the code review requirement in each pull request to protect the branch.
So for every deployment to our UAT and Production websites, the checking step is in place to make sure that the deployments are all properly reviewed and approved. This is not just to protect the system but also to protect the developers by having a standardized quality checking across the development team.
This is the end of this episode of KOSD series. If you have any comment or suggestion about this article, please shout out. Hope you enjoy this cup of electronic Kopi-O Siew Dai. =)
There are some startups and SMEs hosting their databases on AWS. However, most of them choose to use Amazon EC2 because doing so is similar to running a SQL Server on-premise at data centres. So, to them, it’s something that they are familiar with back in the old days. However, doing so actually increases their cost of hosting services on AWS. The companies also need to hire experts to do database administration such as database backup and recovery and OS patching.
Starting from May 2014, Amazon RDS also provides a highly available database solution with the synchronous Multi-AZ replication for MS SQL. Multi-AZ deployments for MS SQL database instances use SQL Server Mirroring.
Asia Pacific (Sdyney): Supported for DB instances in VPCs only;
Asia Pacific (Tokyo): Supported for DB instances in VPCs only;
South America (São Paulo): Supported for all DB instance classes except m1/m2.
It’s quite unfortunate that Singapore Region is one of them.
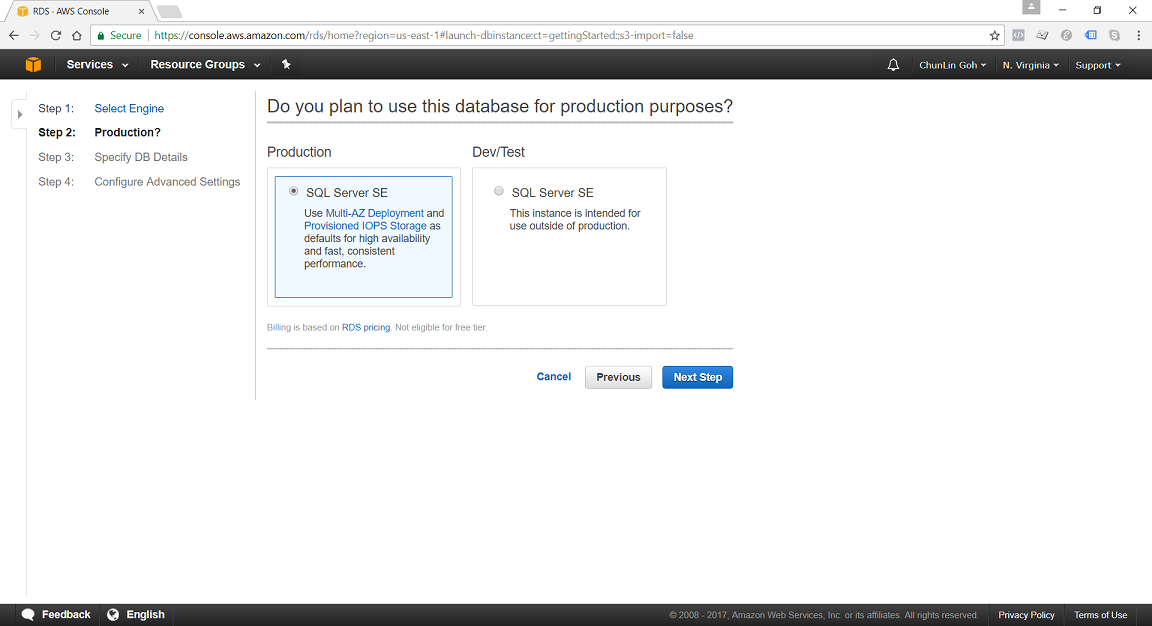
In N. Virginia Region, we’re able to specify to use Multi-AZ Deployment in Production SQL Server SE.
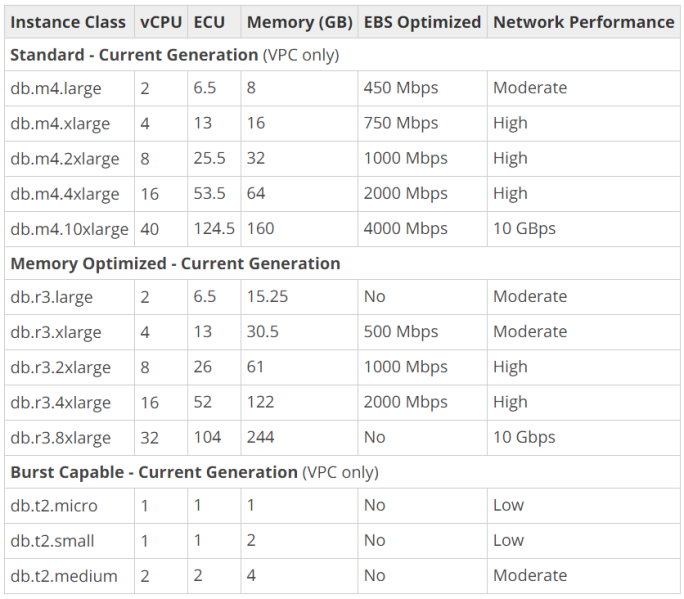
DB Instance Class
We can specify the DB Instance Class that allocates the computational, network, and memory capacity required by planned workload of the database instance.
Standard (db.m4) instances offer a balance of compute, memory, and network resources, and are a good choice for many applications.
Memory Optimized (db.r3) instances are designed to deliver fast performance for workloads that process large data sets in memory. The instances are well suited for the applications, such as high performance relational databases, in-memory analytics, and enterprise applications (for example, Microsoft SharePoint).
Burst Capable (db.t2) instances are instances that provide baseline performance level with the ability to burst to full CPU usage.
General Purpose (SSD) storage, aka gp2, offers cost-effective storage which is suitable for a broad range of database workloads. Hence, it’s ideal for small to medium-sized databases. It provides baseline of 3 IOPS/GB and ability to burst to 3,000 IOPS for extended periods of time. Its volume can range from 20GB to 4TB for MS SQL database instances. However, provisioning less than 100 GB of General Purpose (SSD) storage for high throughput workloads could result in higher latencies upon exhaustion of the initial General Purpose (SSD) I/O Credit balance.
Provisioned IOPS (SSD) storage, aka io1, is suitable for I/O intensive database workloads which pay attention to storage performance and consistency in random access I/O throughput. It provides flexibility to provision I/O ranging from 1,000 to 30,000 IOPS. MS SQL can have provisioned IOPS volumes between 100GB (Express/Web edition) or 200GB (Standard/Enterprise edition) and 4TB.
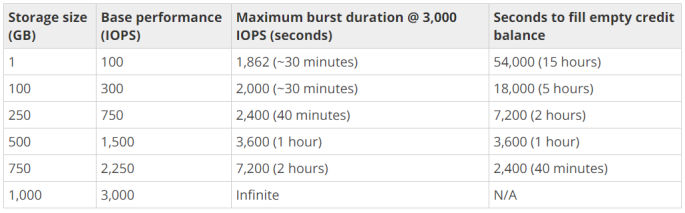
For General Purpose (SSD) storage, the DB instance has an initial I/O Credits balance of 5.4 million. When the storage requires more than the base performance I/O level, it uses I/O credits in the credit balance to burst to the required performance level, up to a maximum of 3,000 IOPS. If the storage uses all of its I/O credit balance, its maximum performance will remain at the base performance level until I/O demand drops below the base level and unused credits are added to the I/O credit balance at the baseline performance rate of 3 IOPS/GB of volume size. Hence, we can use the formula below to calculate the Burst Duration.
Thus, for production application that requires fast and consistent I/O performance, it’s recommended to use Provisioned IOPS (SSD) storage that is optimized for I/O intensive, online transaction processing workloads that have consistent performance requirements. Note that we cannot decrease storage allocated for a DB instance.
For MS SQL Server, Amazon RDS does not currently support increasing storage. Hence, we need to provision storage based on anticipated future storage growth. If we predict it wrongly, then we need to increase the storage of an existing SQL Server DB instance by first exporting the data, creating a new database instance with increased storage, and then importing the data into the new database instance.
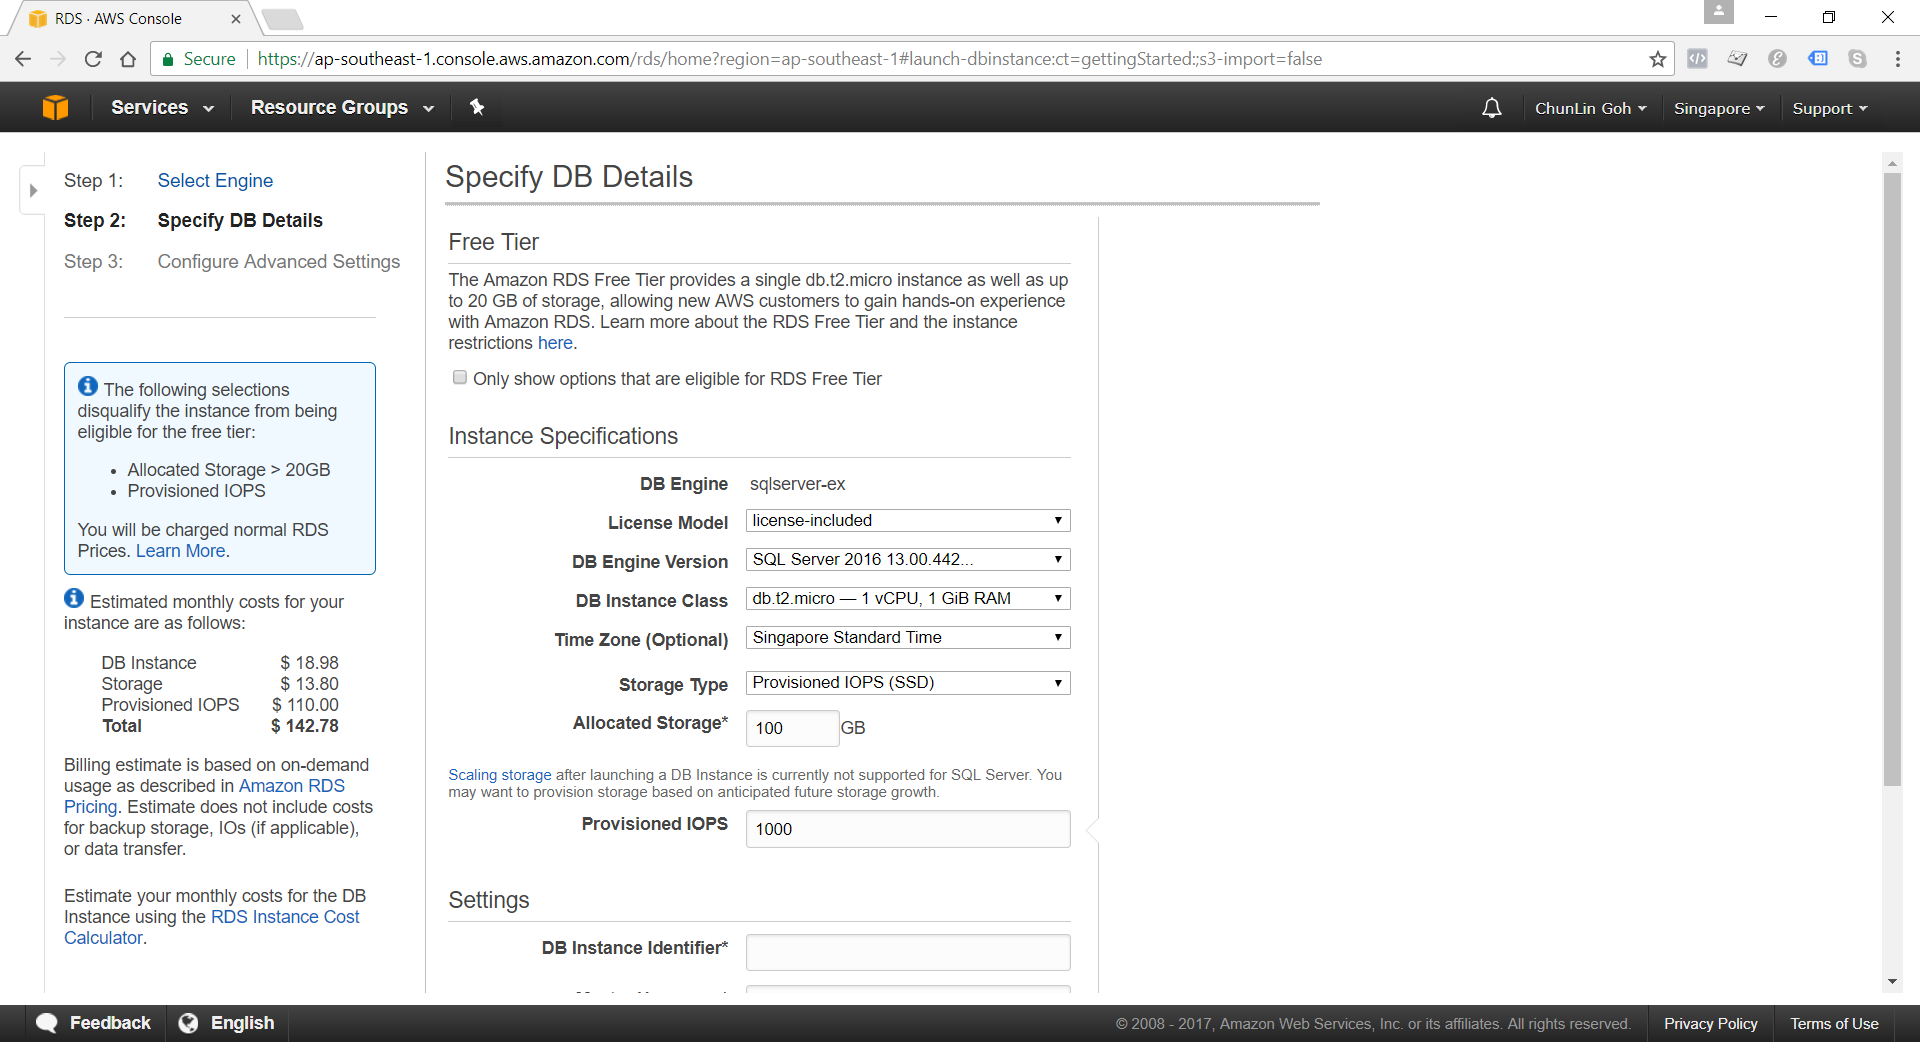
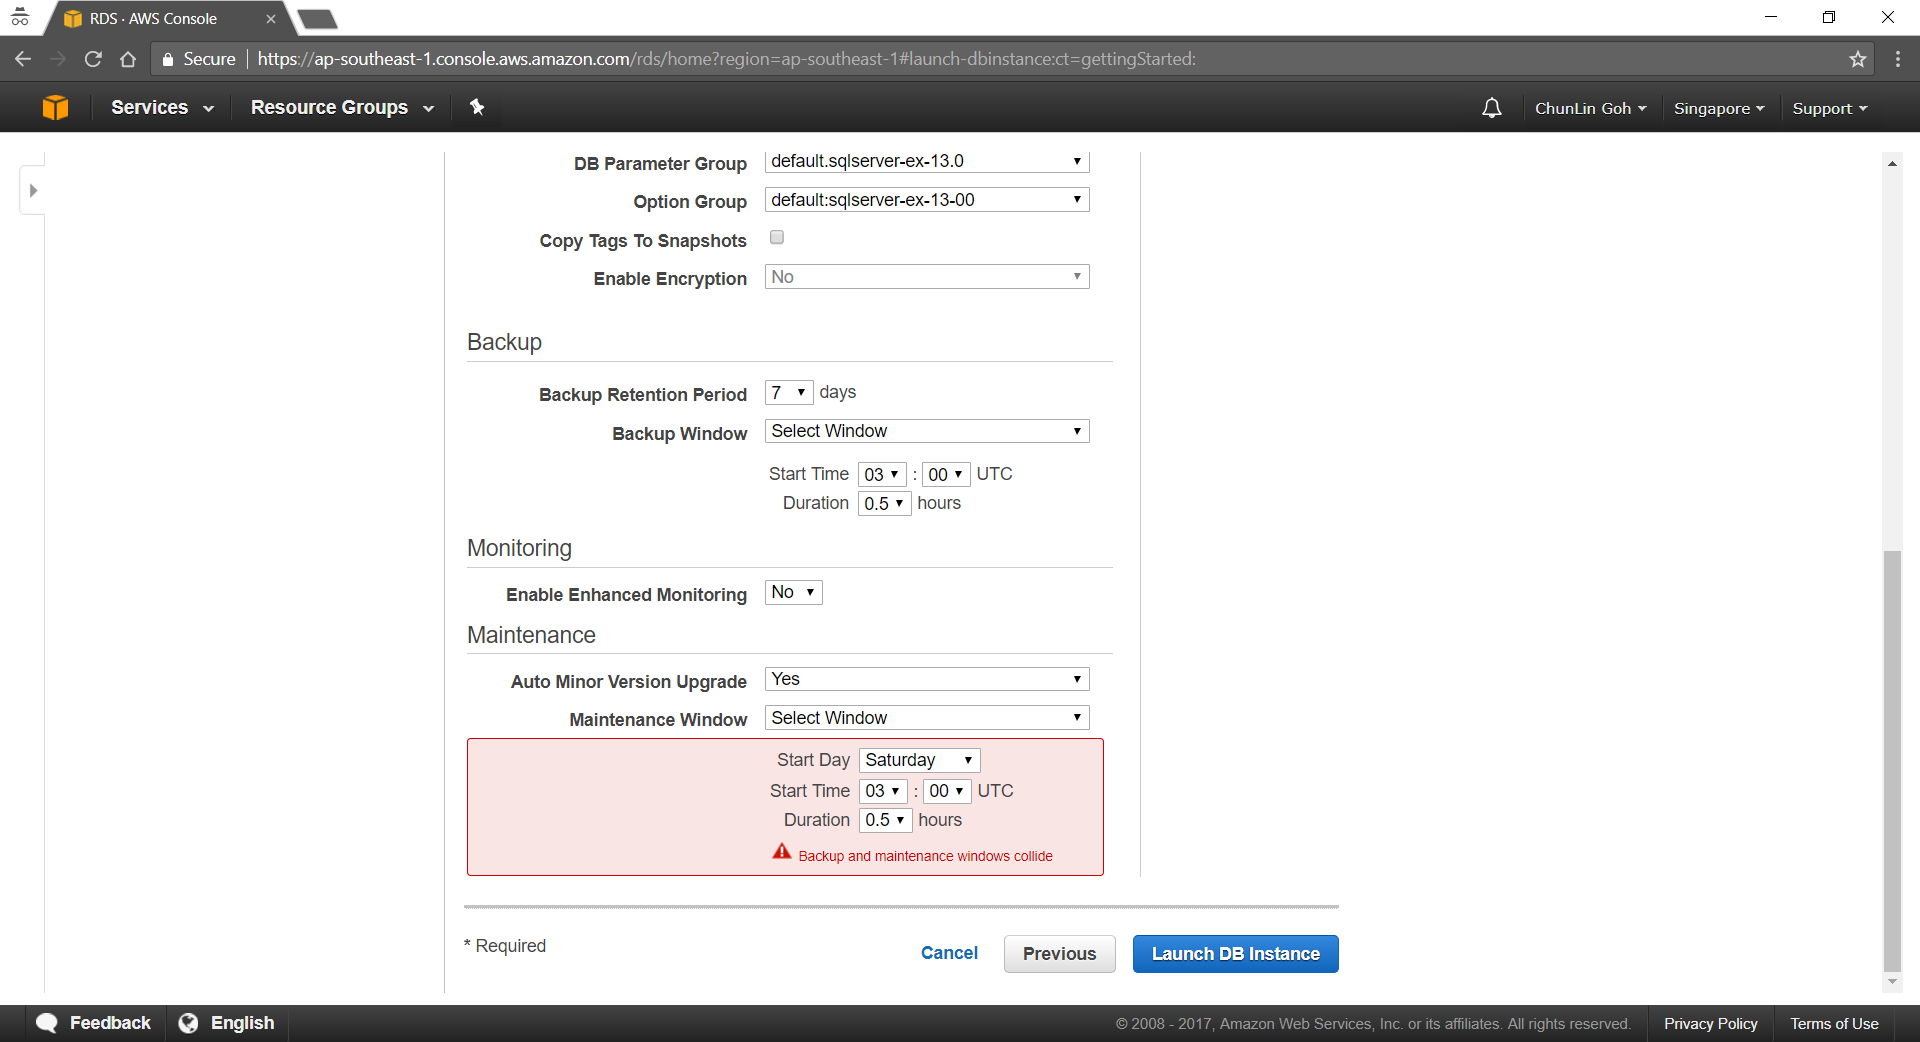
Specifying Database Instance Specification
After understanding key concepts above, we can then proceed to setup our database instance.
Although there is Free Tier available but allocating storage > 20GB or adding provisioned IOPS will disqualify the databse instance from being eligible for the Free Tier.
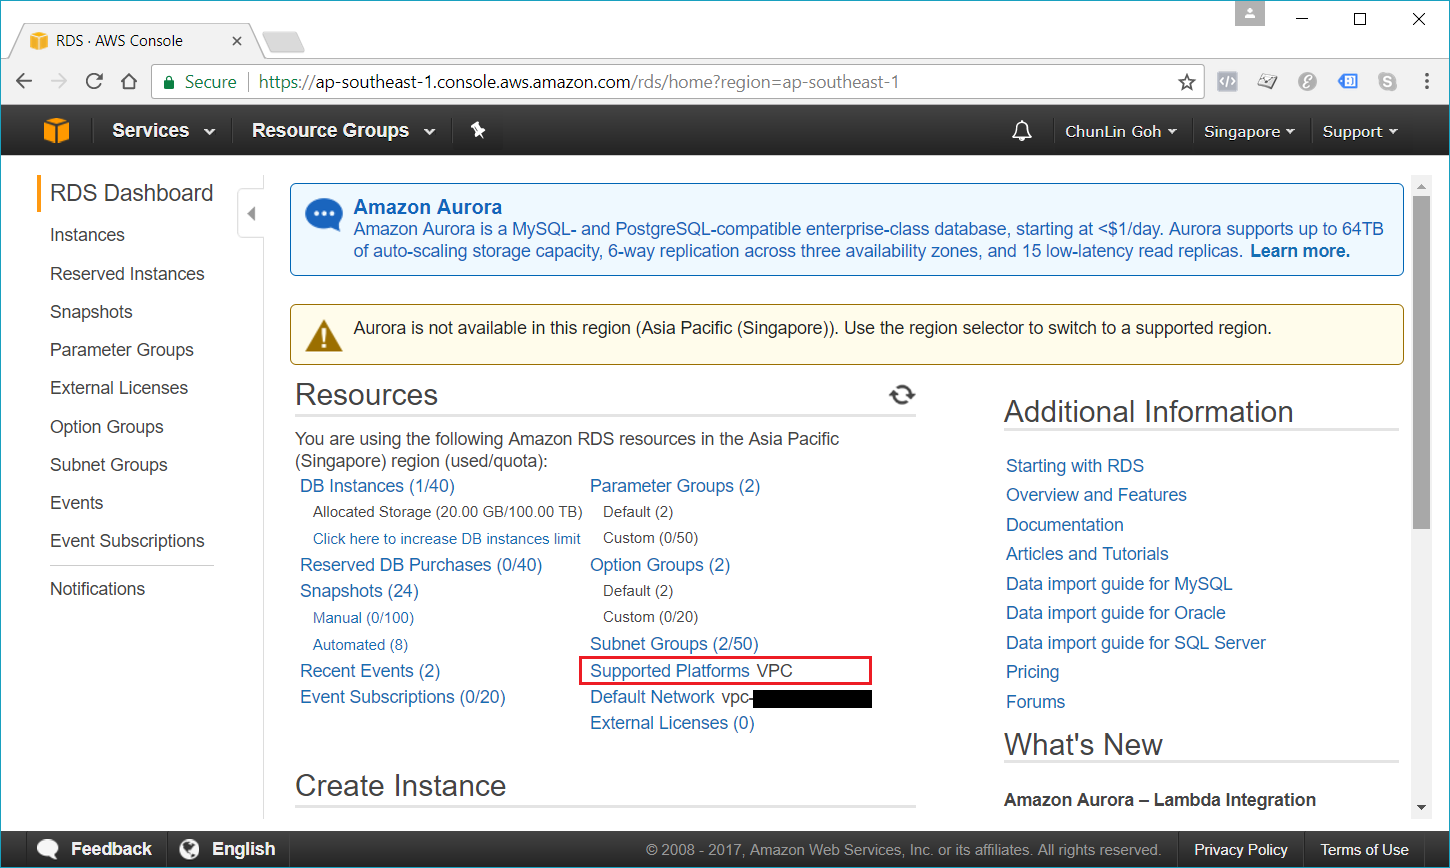
Nowadays, if we are creating a database instance in a region that we have not used before, we normally are already on the EC2-VPC platform.
We are already on EC2-VPC platform.
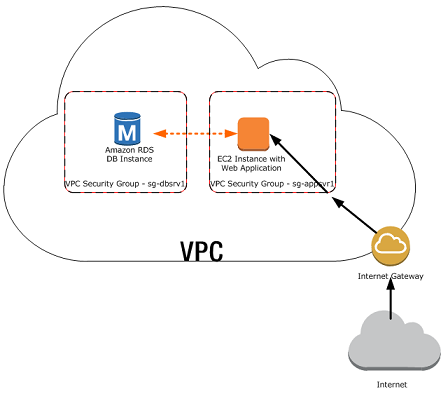
There are many scenarios for accessing a database instance in a VPC. Today, I will only focus on having an EC2 web server to access the database instance in the same VPC.
A database instance in a VPC accessed by an EC2 instance in the same VPC (Source: AWS Documentation)
In such scenario, Amazon RDS database instance normally needs to be available to the web server, and not to the public Internet. Hence, we can create a VPC with both public and private subnets. The web server will be hosted in the public subnet so that it is accessible by the public. The database instance is hosted in the private subnet so that it won’t be available to the public Internet, providing greater security.
The Security Group used to restrict access to the database instances can have a custom rule that allows TCP access using the port 1433 and an IP address we will use to access the database instance for development or other purposes. In addition, we also need to set the Public Accessible option to Yes first (It is recommended to set the option to No for production database instance to limit the potential thread with no public routes).
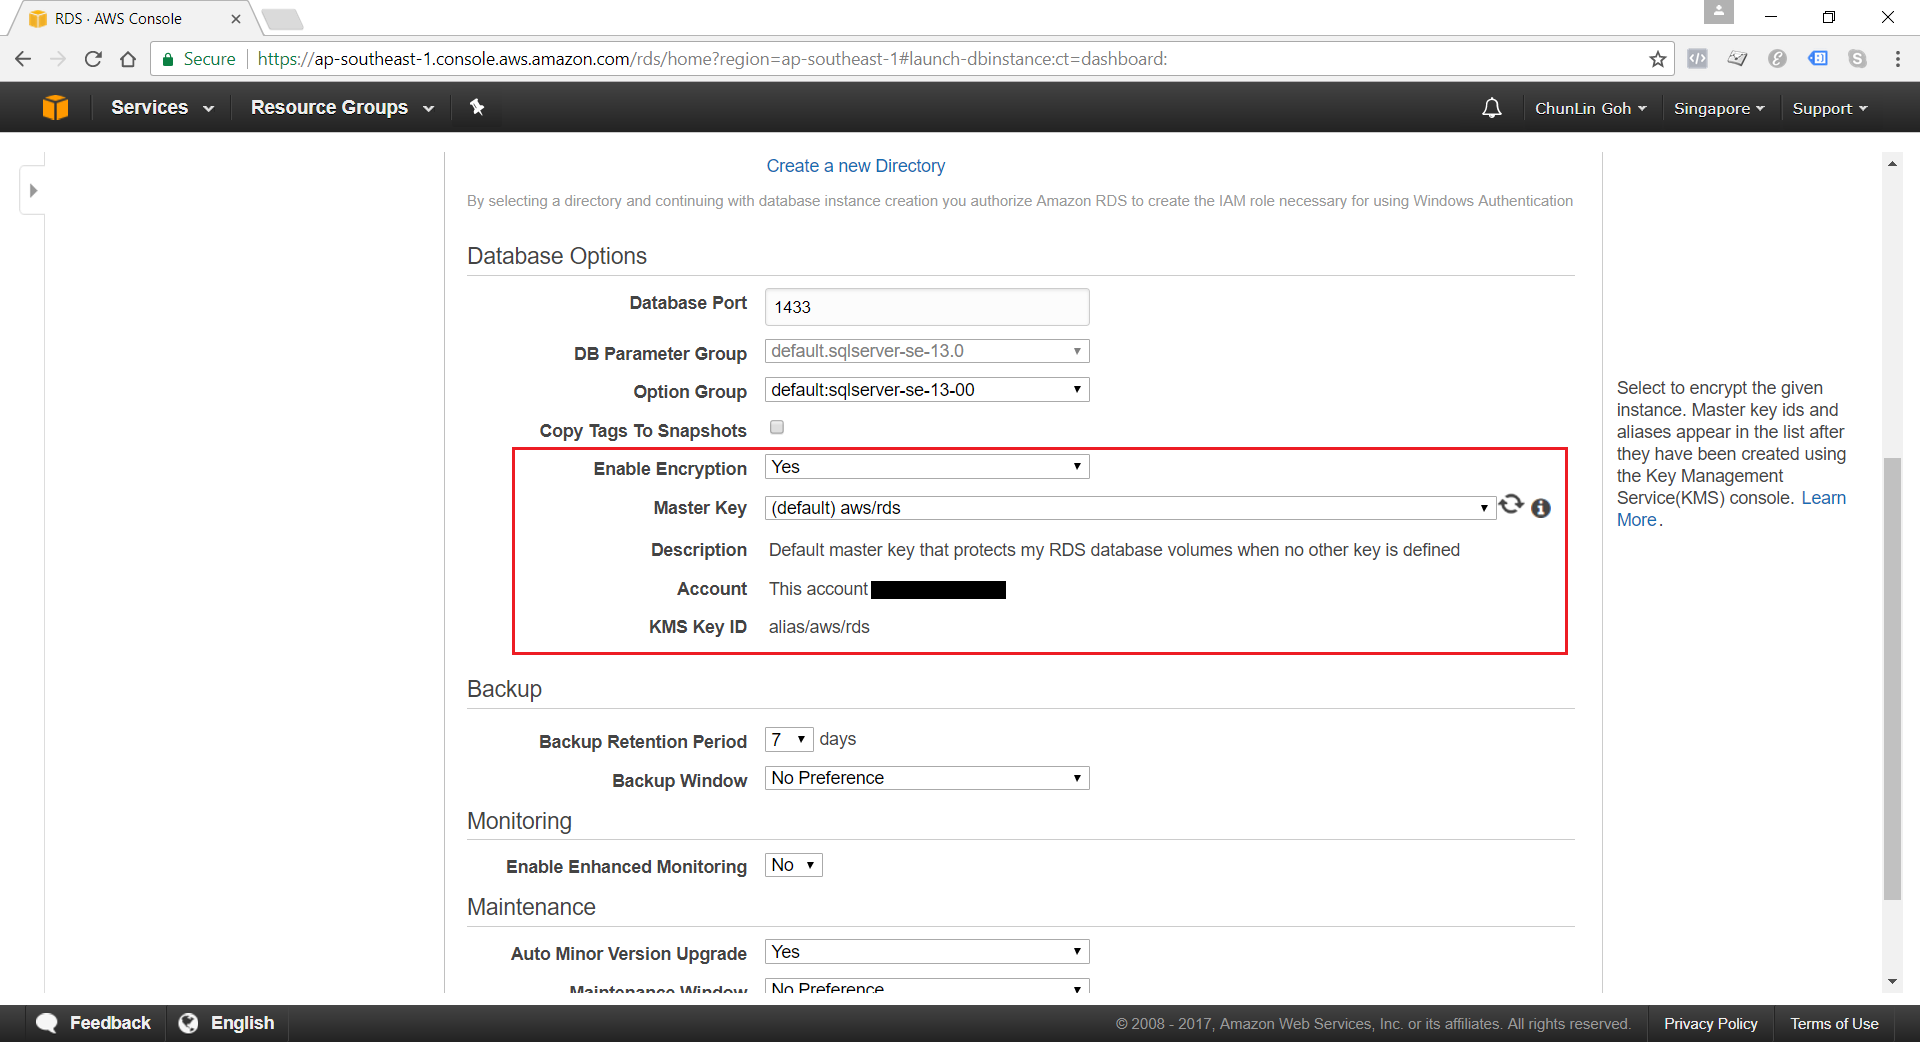
Encryption of Database Instances using Key Management Service (KMS)
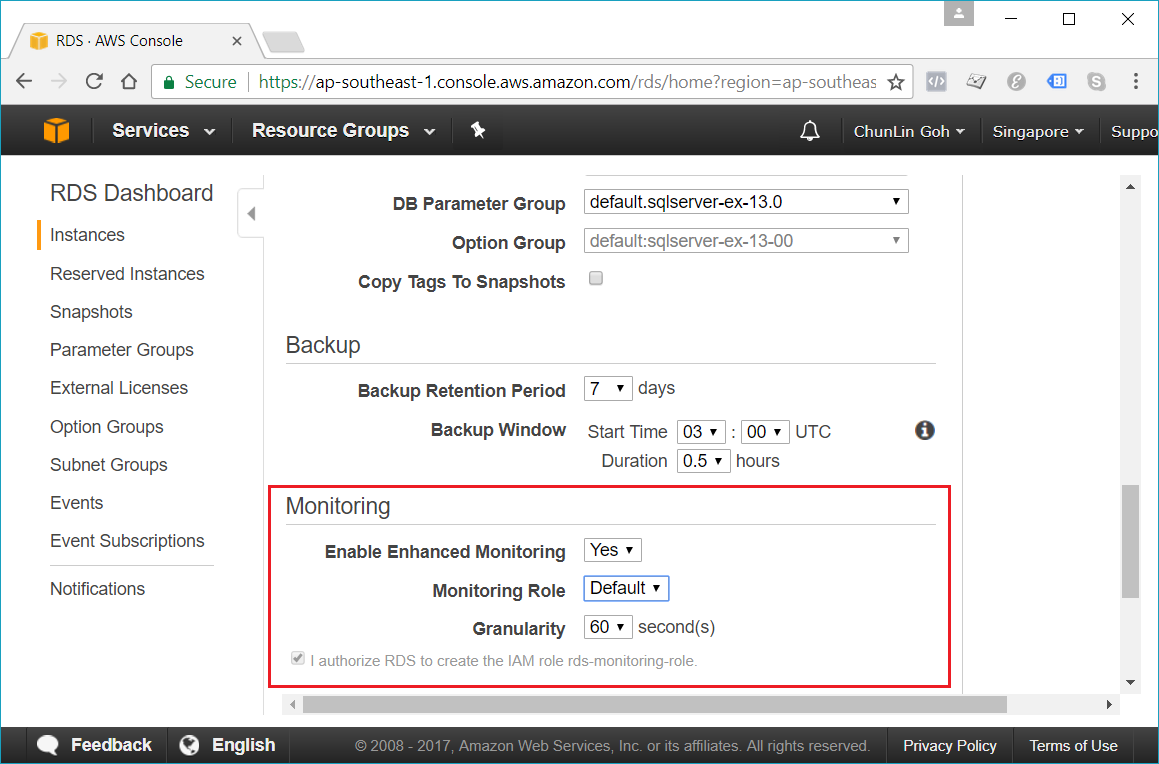
Enhanced monitoring requires permission to act on our behalf to send OS metric information to CloudWatch Logs.
Conclusion
It’s true that AWS allows us to deploy our MS SQL Server database on either Amazon RDS and Amazon EC2. However, it’s very crucial to analyze our needs and our application before deciding which one to use. In general, it is still recommended to consider Amazon RDS first so that developers can focus on high-level tasks and business logic implementation.
That’s all for my first trip to Amazon RDS. As a frequent user of Microsoft Azure, I never host MS SQL Server on AWS platform. So, if there is any mistake made in this article, kindly feedback to me. Thanks in advance!