I like to explore interesting new technologies. I also love to learn more from the materials available on Microsoft Virtual Academy, Google Developers channel, and several other tech/dev events.
During the Labour Day holiday, I had a great evening chat with Marvin, my friend who had researched a lot about Artificial Intelligence and Machine Learning (ML). He guided me through steps setting up a simple ML experiment. Hence, I decided to note down what I had learned on that day.
The tool that we’re using is Azure Machine Learning Studio. What I had learned from Marvin is basically creating a ML experiment through drag-and-dropping modules and connecting them together. It may sound simple but for a beginner like me, it is still important to understand some key concepts and steps before continuing further in the ML field.
Azure ML Studio
Azure ML Studio is a tool for us to build, test, and deploy predictive analytics on our data. There is a detailed diagram about the capability of the tool, which can be downloaded here.
Before we began, we need to understand why we are using ML for?
Here, I’m helping a watermelon stall to predict how many watermelon they can sell this year based on last year sales data.
Step 1: Preparing Data
As shown in the diagram above, the first step is to import the data into the experiment. So, before we can even start, we need to make sure that we have at least a handful of data points.
Daily sales of the watermelon stall and the weather of the day.
Step 2: Importing Data to ML Studio
With the data points we now have, we then can import them to ML Studio as a Dataset.
Datasets available in Azure ML Studio.
Step 3: Preprocessing Data
Firstly, we need to perform a cleaning operation so that missing data can be handled properly without affecting our results later.
Secondly, we need to “Select Columns in Dataset” so that only selected columns will be used in the subsequent operations.
Step 4: Splitting Data
This step is to help us to separate data into training and testing sets.
Step 5: Choosing Learning Algorithm
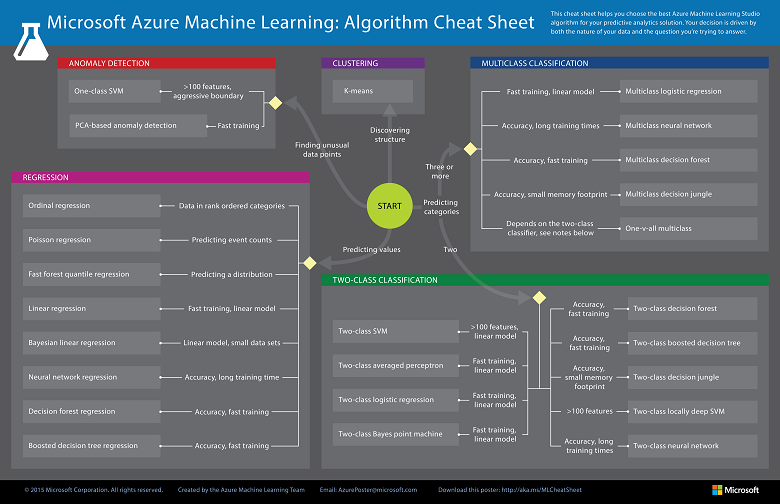
Since we are now using the model to predict number of watermelons the stall can sell, which is a number, we’ll use Linear Regression algorithm, as recommended. There is a cheat sheet from Microsoft telling us which algorithm we need to choose based on different scenarios. You can also download it here.
Learning algorithm cheat sheet. (Image Credits: Microsoft Docs)
Step 6: Partitioning and Sampling
Sampling is an important tool in machine learning because it reduces the size of a dataset while maintaining the same ratio of values. If we have a lot of data, we might want to use only the first n rows while setting up the experiment, and then switch to using the full dataset when you build our model.
Step 7: Training
After choosing the learning algorithm, it’s time for us to train the data.
Since we are going to predict the number of watermelons sold, we will select the column, as shown in the following screenshot.
Select the one column that we need to predict in Train Model module.
Step 8: Scoring
Do you still remember that we split our data into two sets in Step 4 above? Now, we need to connect output from Split Data module and output from Train Data module to the Score module as inputs. Doing this step is to score prediction for our regression model.
Step 9: Evaluating
We finally have to generate scores over our training data, and evaluate the model based on the scores.
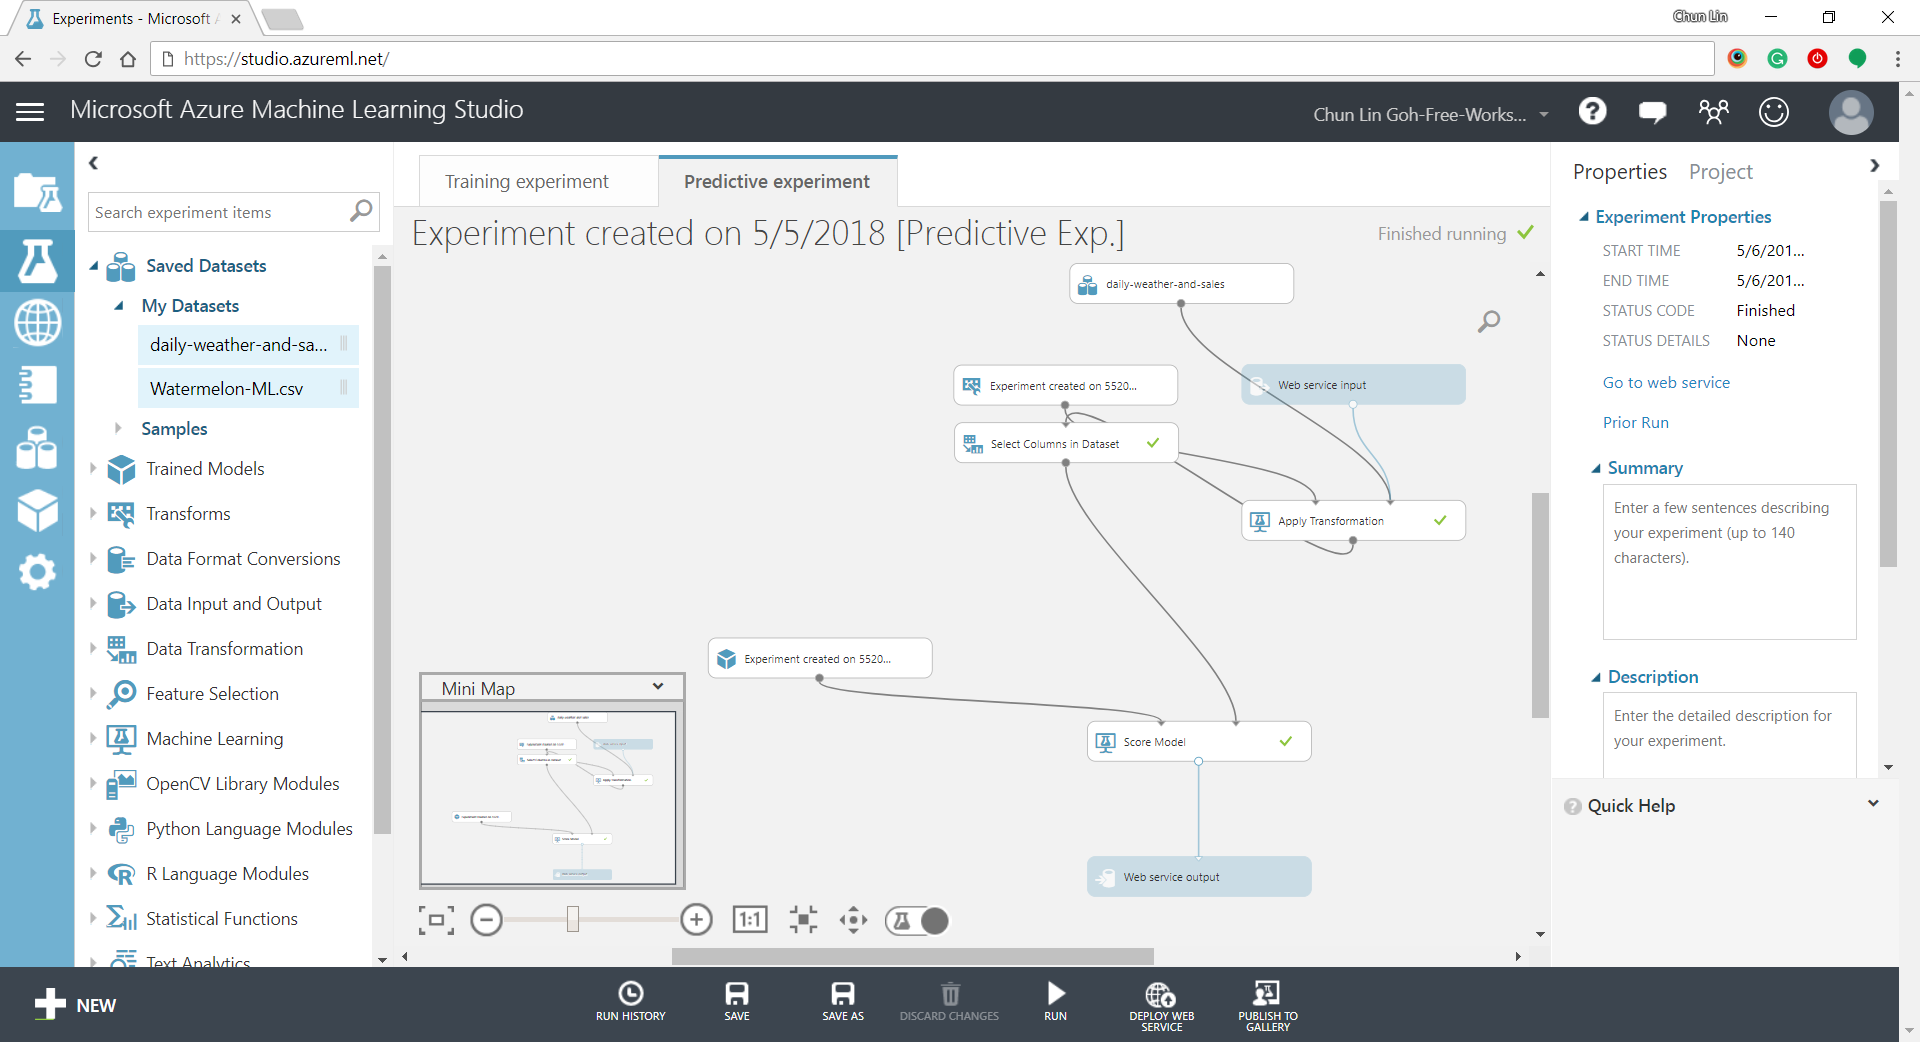
Step 10: Deploying
Now that we’ve completed the experiment set up, we can deploy it as a predictive web service.
Generated predictive experiment.
With that deployed, we then can easily predict how many watermelons can be sold on a future date, as shown in the screenshot below.
Yes, we can sell 25 watermelons on 7th May if the temperature is 32 degrees!
Conclusion
This is just the very beginning of setting up a ML experiment on Azure ML Studio. I am still very new to this AI and ML stuff. If you spot any problem in my notes above, please let me know. Thanks in advance!
KOSD, or Kopi-O Siew Dai, is a type of Singapore coffee that I enjoy. It is basically a cup of coffee with a little bit of sugar. This series is meant to blog about technical knowledge that I gained while having a small cup of Kopi-O Siew Dai.
Last week, one of our web apps seemed to be running slow. Thus, we decided to diagnose the web app which was hosted on Azure App Service. Fortunately, there is a smart chatbot in Azure App Service that helps us to troubleshoot our web app.
The diagnostics chatbot can be found under “Diagnose and solve problems” page of the web app. The chatbot suggested that it can help us with checking the following issues.
Web App Down;
Web App Slow;
High CPU Usage;
High Memory Usage;
Web App Restarted;
TCP Connections.
“Diagnose and solve problems” option is available under each Azure App Service.
In addition, it also provides a set of Diagnostic Tools for famous software stacks on Azure App Services, such as ASP .NET Core, ASP .NET, Java, and PHP.
Available Diagnostics Tools for each of the software stack of the web app.
Health Checkup
The chatbot says quite many things in the first run. So if we continue to scroll down to the bottom, we will realize that the Diagnostics chatbot also recommends us to run a Health Checkup on our web app first to give us a summary about its requests, errors, performance, CPU usage, and memory usage.
For example, the following graph shows that my web app was experiencing HTTP server errors where a report about the errors was attached. In the report, it listed down errors happened during that period of time with affected URLs.
Sometimes, if there is a common solution available to the problems, troubleshooting steps will be listed down to help us to better fix the errors too.
The “App Performance” diagram basically shows us how much the server took to respond in the period of time. If the web app is performing slow, sometimes it will recommend us to collect a memory dump to identify the root cause of the issue.
The “CPU Usage” has diagram showing the overall CPU usage per instance. If there is any high CPU detected in the last 24 hours, there will be a warning displayed too.
For “Memory Usage” tab, it will provide us diagrams to show the following numbers.
Page Operations: A rate at which the disk was read to resolve hard page faults per second.
Overall Percent Physical Memory Usage: The overall percent memory in use by both system and the application on each instance.
Application Percent Physical Memory Usage: The percent physical memory usage of each application on an instance.
Committed Memory Usage: Amount of committed memory, in MB. Committed memory is the physical memory which has space reserved on the disk paging file(s).
TCP Connections Analysis
TCP Connections Analysis is one of the analysis that are not part of the Health Checkup. We can find it under “Availability & Performance” in the chatbot. It basically provides charts showing number of outbound TCP connections per instance in the period of time.
Is My App Restarted?
If we would like to find out if our web app was restarted in a period of time, we can click on the “Web App Restarted” button in the chatbot to find out when and why our web app is restarted.
So yes, changing application settings will cause the web app to restart.
Connection Strings Checking
There is one more feature that I’d like to highlight is the diagnostic tool that helps to validate all the connection strings configured in our web app. It helps us to identify success vs. failing connection from the instance.
Conclusion
There are still more features available in the Azure App Service Diagnostics chatbot. I only list down features and tools that I use most in my daily development life. So, if you are also on your way to be DevOps, feel free to discover more yourself!
KOSD, or Kopi-O Siew Dai, is a type of Singapore coffee that I enjoy. It is basically a cup of coffee with a little bit of sugar. This series is meant to blog about technical knowledge that I gained while having a small cup of Kopi-O Siew Dai.
It’s quite common that Business Analyst will always ask for the permission to access the databases of our systems to do data analysis. However, most of the time we will only give them read-only access. With on-premise MS SQL Server and SQL Management Studio, it is quite easily done. However, how about for those databases hosted on Azure SQL?
Login as Server Admin
To make things simple, we will first login to the Azure SQL Server as Server admin on SQL Management Studio. The Server Admin name can be found easily on Azure Portal, as shown in the screenshot below. Its password will be the password we use when we create the SQL Server.
Identifying the Server Admin of an Azure SQL Server. (Source: Microsoft Azure Docs)
Create New Login
By default, the master database will be the default database in Azure SQL Server. So, once we have logged in, we simply create the read-only login using the following command.
CREATE LOGIN <new-login-id-here>
    WITH PASSWORD = '<password-for-the-new-login>'
GO
Alternatively, we can also right-click on the “Logins” folder under “Security” then choose “New Login…”, as shown in the screenshot below. The same CREATE LOGIN command will be displayed.
Adding new login to the Azure SQL Server.
Create User
After the new login is created, we need to create a new user which is associated with it. The user needs to be created and granted read-only permission in each of the databases that the new login is allowed to access.
Firstly, we need to expand the “Databases” in the Object Explorer and then look for the databases that we would like to grant the new login the access to. After that, we right-click on the database and then choose “New Query”. This shall open up a new blank query window, as shown in the screenshot below.
Opening new query window for one of our databases.
Then we simply need to run the following query for the selected database in the query window.
CREATE USER <new-user-name-here> FROM LOGIN <new-login-id-here>;
Please remember to run this for the master database too. Otherwise we will not be able to login via SQL Management Studio at all with the new login because the master database is the default database.
Grant Read-only Permission
Now for this new user in the database, we need to give it a read-only permission. This can be done with the following command.
Repeat the two steps above for the remaining databases that we want the new login to have access to. Finally we will have a new login that can read from only selective databases on Azure SQL Server.
KOSD, or Kopi-O Siew Dai, is a type of Singapore coffee that I enjoy. It is basically a cup of coffee with a little bit of sugar. This series is meant to blog about technical knowledge that I gained while having a small cup of Kopi-O Siew Dai.
KOSD, or Kopi-O Siew Dai, is a type of Singapore coffee that I enjoy. It is basically a cup of coffee with a little bit of sugar. This series is meant to blog about technical knowledge that I gained while having a small cup of Kopi-O Siew Dai.
Last year, Riza shared a very interesting topic twice during Singapore .NET Developers Community in Microsoft office. For those who attended the meetups, do you still remember? Yes, it’s about IdentityServer.
IdentityServer 4 is a middleware, an OpenID Connect provider built to spec, which provides user identity and access control in ASP .NET Core applications.
In my example, I will start with the simplest setup where there will be one Authenticate Server and one Application Server. Both of them in my example will be using ASP .NET Core.
How an application uses JWT to authenticate a user.
In the Authenticate Server, I register the minimum required dependencies in ConfigureServices method of its Startup.cs as follows.
I won’t be talking about how IdentityServer works here. Instead, I will be focusing on the “AddDeveloperSigningCredential” method here.
JSON Web Token (JWT)
By default, IdentityServer issues access tokens in the JWT format. According to the abstract definition in RCF 7519 from Internet Engineering Task Force (IETF) , JWT is a compact, URL-safe means of representing claims between two parties where claims are encoded as JSON objects which can be digitally signed or encrypted.
In the diagram above, the Application Server receives the secret key used in signing the JWT from the Authentication Server when the app sets up its authentication process. Hence, the app can verify whether the JWT comes from an authentic source using the secret key.
During development, we normally don’t have cert prepared yet. Hence, AddTemporarySigningCredential can be used to auto-generate certificate to sign JWT. However, this method has a disadvantage. Every time the IdentityServer is restarted, the certificate will change. Hence, all tokens that have been signed with the previous certificate will fail to validate.
Anyway, as documented, we are only allowed to use AddDeveloperSigningCredential in development environments. In addition, AddDeveloperSigningCredential can only be used when we host IdentityServer on single machine. What should we do when we are going to deploy our code to the production environment? We need a signing key service that will provide the specified certificate to the various token creation and validation services. Thus now we need to change to use AddSigningCredential method.
Production Code
For production, we need to change the code earlier to be as follows.
X509Certificate2 cert = null;
using (X509Store certStore = new X509Store(StoreName.My, StoreLocation.CurrentUser))
{
    certStore.Open(OpenFlags.ReadOnly);
    var certCollection = certStore.Certificates.Find(
        X509FindType.FindByThumbprint,
        Configuration["AppSettings:IdentityServerCertificateThumbprint"],
        false);

    // Get the first cert with the thumbprint
    if (certCollection.Count > 0)
    {
        cert = certCollection[0];
    }
}

services.AddIdentityServer()
     .AddSigningCredential(cert)
     .AddInMemoryIdentityResources(...)
     .AddInMemoryApiResources(...)
     .AddInMemoryClients(...)
     .AddAspNetIdentity();
We use AddSigningCredential to replace the AddDeveloperSigningCredential method. Now, AddSigningCredential requires a X509Certificate2 cert as parameter.
Key-in and remember the password for the private key;
Import the certificate to the Current User Certificate Store on developer’s local machine by double-clicking on the newly generated .pfx file. We will be asked to key in the password used in Step 4 above again.
Importing certificate.
Now, we need to find out the Thumbprint of it. This is because in our production code above, we are using Thumbprint to look for the cert.
Thumbprint and Microsoft Management Console (MMC)
To retrieve the Thumbprint of a certificate, we need help from a tool called MMC.
Using MMC to view certificates in the local machine store for current user account.
We will then be able to find the new certificate that we have just created and imported. To retrieve its Thumbprint, we first need to open it, as shown in the screenshot below.
Open the new cert in MMC.
A popup window called Certificate will appear. Simply copy the value of the Thumbprint under the Details tab.
Thumbprint!
After keeping the value of the cert thumbprint in the appsettings.Development.json of the IdentityServer project, we can now build and run the project on localhost without any problem.
Deployment to Microsoft Azure Web App
Before we talk about how to deploy the IdentityServer project to Microsoft Azure Web App, do you realize how come in the code above, we are looking cert only My/Personal store of the CurrentUser registry, i.e. “StoreName.My, StoreLocation.CurrentUser”? This is because this is the place where Azure will load the certificate from.
So now, we will first proceed to upload the certificate as Private Certificate that we self-sign above to Azure Web App. After selecting the .pfx file generated above and keying-in the password, the cert will appear as one of the Private Certificates of the Web App.
To upload the cert, we can do it in “SSL certificates” settings of our Web App on Azure Portal.
Last but not least, in order to make the cert to be available to the app, we need to have the following setting added under “Application settings” of the Web App.
WEBSITE_LOAD_CERTIFICATES setting is needed to make the cert to be available to the app.
Brock also provided a link in the discussion to his blog post on how to create signing cert using makecert instead of OpenSSL as discussed earlier. In fact, during Riza’s presentation, he was using makecert to self-sign his cert too. Hence, if you are interested about how to use makecert to do that, please read his post here: https://brockallen.com/2015/06/01/makecert-and-creating-ssl-or-signing-certificates/.
Conclusion
This episode of KOSD series is a bit long such that drinking a large cup of hot KOSD while reading this post seems to be a better idea. Anyway, I think this post will help me and other beginners who are using IdentityServer in their projects to understand more about the framework bit by bit.
There are too many things that we can learn in the IdentityServer project and I hope to share what I’ve learnt about this fantastic framework in my future posts. Stay tuned.