I like to explore interesting new technologies. I also love to learn more from the materials available on Microsoft Virtual Academy, Google Developers channel, and several other tech/dev events.
In the afternoon, I received a message from my colleague in Marketing Team asking whether we could purchase an SSL certificate for the company blog which is powered by WordPress on Azure. There is almost no complete online tutorial on how to do this, hence I decided to write one.
Purchasing SSL Certificate and Binding it to Azure Web App
We can now easily purchase a SSL certificate from Azure Portal with less than USD 70 and enjoy auto renewal by default. By following the steps I documented on my Github page, we can easily bind the certificate to the WordPress site which is running as Azure Web App.
After that, we need to set the HTTPS Only option to be “On” so that all HTTP traffic will be redirected to HTTPS.
Updating WordPress Address and Site Address
After that, we need to proceed to the wp-admin to update the addresses. By default, for WordPress sites running as Azure Web Apps, the two fields, i.e. WordPress Address and Site Address, will be greyed out, as shown in the following screenshot.
We have no choice but to update HTTP to HTTPS in the URLs in the wp-config.php in wwwroot directory that we can download via FTP. The two lines that we need to update to use HTTPS are stated below.
//Relative URLs for swapping across app service deployment slots define('WP_HOME', 'https://'. filter_input(INPUT_SERVER, 'HTTP_HOST', FILTER_SANITIZE_STRING));
define('WP_SITEURL', 'https://'. filter_input(INPUT_SERVER, 'HTTP_HOST', FILTER_SANITIZE_STRING));
Updating wp-config.php
At this point of time, we will realize we can no longer enter the wp-admin web page. There will be saying our site is being redirected too many times or there is a redirect loop, as shown in the following image.
define('FORCE_SSL_ADMIN', true);
// in some setups HTTP_X_FORWARDED_PROTO might contain
// a comma-separated list e.g. http,https
// so check for https existence
if (strpos($_SERVER['HTTP_X_FORWARDED_PROTO'], 'https') !== false)
    $_SERVER['HTTPS']='on';
Yup, after doing all these, we have our blog secured.
This afternoon, I decided to take a look at Orchard Core, an open-source CMS (Content Management System) built on top of an ASP .NET Core application framework.
Since it is open-source, I easily forked its repository from Github and then checked out its dev branch.
After waiting for less than one minute to get all the Nuget packages restored in the project, I set OrchardCore.Cms.Web as the default project. Then I tried to run it but it failed with tons of errors. One of the major errors is “Assembly location for Razor SDK Tasks was not specified”. According to online discussion, it turns out that .NET Core 2.2 is needed.
After downloading the correct SDK, the projects are now successfully built with the following web page pops out as a result.
Take note that, as shown in the screenshot above, when I fill in Table Prefix, it will throw me exception saying that “SqlException: Invalid object name ‘OrchardroadDocument’” during the setup stage, as shown in the following screenshot.
Hence, the best way to proceed is to not enter anything to the Table Prefix textbox. Then we will be able to setup our CMS successfully. Once we log in to the system as Super User, we can proceed to configure the CMS.
Yup, this concludes my first attempt with the new Orchard Core CMS. =)
“It became clear that we needed to support the Linux operating system, and we had already taken some rudimentary steps towards that with Azure.”
This is what Satya Nadella, Microsoft CEO, said in his book Hit Refresh. With the change he announced, today we can host a WordPress site easily on Microsoft Azure with the App Service on Linux option. Currently, my team has made use of this function on Azure to host our WordPress sites.
Satya Nadella announcing the partnership. (Image Credit: The Verge)
This morning, I received a message from teammate with the following screenshot asking how to get rid of the following red messages.
Memory issues on WordPress!
This only happened after we installed a new theme called G5Theme for our WordPress site. The theme that we are using is called G5Plus Mowasalat.
So how do we approach this problem. Even though the three red lines are linked to the same “Increasing memory allocated to PHP“, there are fundamentally two places that we need to change.
Firstly, we need to add the following line to increase the WP_MEMORY_LIMIT to 128M in wp-config.php.
define('WP_MEMORY_LIMIT', '128M');
Released with WordPress 2.5, the WP_MEMORY_LIMIT option allows us to specify the maximum amount of memory that can be consumed by PHP.
The file is located under /site/wwwroot directory, as shown in the FTP screenshot below.
This is where wp-config.php is located.
Changing this will only remove the first two red lines.
For the issue highlighted by the third red line, we need to update the max_input_vars value in .htaccess file which is located at the same directory with the following line.
Adding this will remove the final red line and everything will be shown green.
Hola! All are green.
KOSD, or Kopi-O Siew Dai, is a type of Singapore coffee that I enjoy. It is basically a cup of coffee with a little bit of sugar. This series is meant to blog about technical knowledge that I gained while having a small cup of Kopi-O Siew Dai.
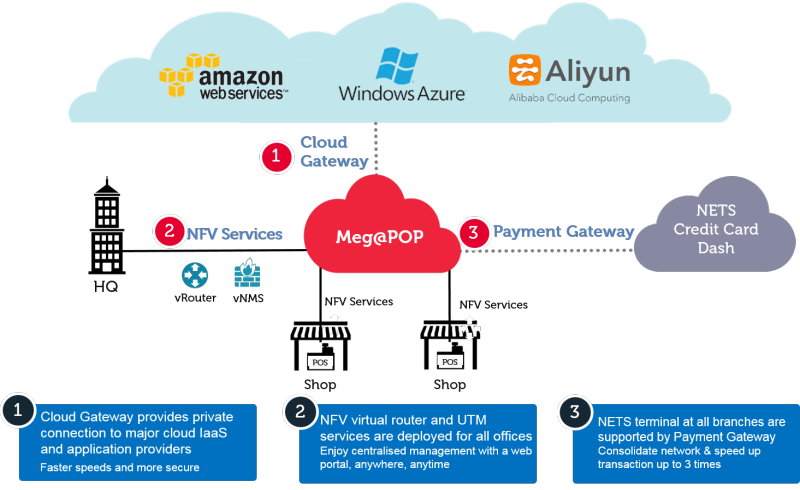
One thing that I’d like to highlight here is that Singtel Meg@POP also offers connection to major cloud providers, such as Alibaba Cloud, Amazon Web Services, and Microsoft Azure, via their Cloud Gateway. Hence, if we have our services hosted on the cloud and our systems would like to talk to the applications running behind Singtel Meg@POP, we need to understand how to configure our cloud infrastructure to connect to the Singtel Meg@POP.
How Meg@POP works with the public clouds. (Source: Singtel Meg@POP)
In this article, I will be sharing my journey of setting up our VM on Microsoft Azure to link with Singtel Meg@POP via ExpressRoute.
Hence, to connect with Singtel Meg@POP, Singtel staff recommended us to subscribe to the ExpressRoute on Microsoft Azure before they could provision the Meg@POP service.
It is better to consult with Singtel side before we proceed to subscribe ExpressRoute. In the first step of subscribing, we need to provide information such as Provider and Peering Location. After discussing with the friendly Singtel sales manager from the Business Segment, we managed to get the correct values to setup the ExpressRoute circuit.
Creating new ExpressRoute circuit on Azure Portal to connect to Singtel Meg@POP.
Step 2: Provisioning Meg@POP
Once the circuit is created successfully, we need to provide the Service Key of the circuit to Singtel staff. The Service Key can be found in the Overview section of the circuit, as shown in the screenshot below.
Service Key of ExpressRoute circuit.
After we emailed the Service Key to Singtel, we needed to wait for them to provision Meg@POP. The whole process took about 21 days for our case. Finally we received a confirmation email from them saying that Singtel had commissioned the service and we could proceed to link our virtual network in Microsoft Azure to the ExpressRoute circuit.
Now, under the Peerings section of the ExpressRoute circuit, we shall see something as follows.
Primary and secondary subnets are provisioned for Azure private peering.
Step 3: Creating Virtual Network on Azure
This is a step that we need to be careful. Before we proceed to create the VNet, we need to understand from the service provider that we are connecting to whether they only provision a certain subnet for us to use to connect.
For our case, the service provider that we are connecting to told us to use 10.10.1.0/24 subnet. Hence, when we are creating VNet, we need to use that as Address Space.
Also, please take note that the Address Range for the subnet that we are going to put our virtual machine in later needs to be smaller than the Address Space of the VNet specified above. Otherwise later we will not have address left for the Virtual Network Gateway. Hence, in our case, I choose 10.10.1.0/25.
Creating VNet with a subnet having only 128 addresses.
Step 4: Creating Virtual Machine
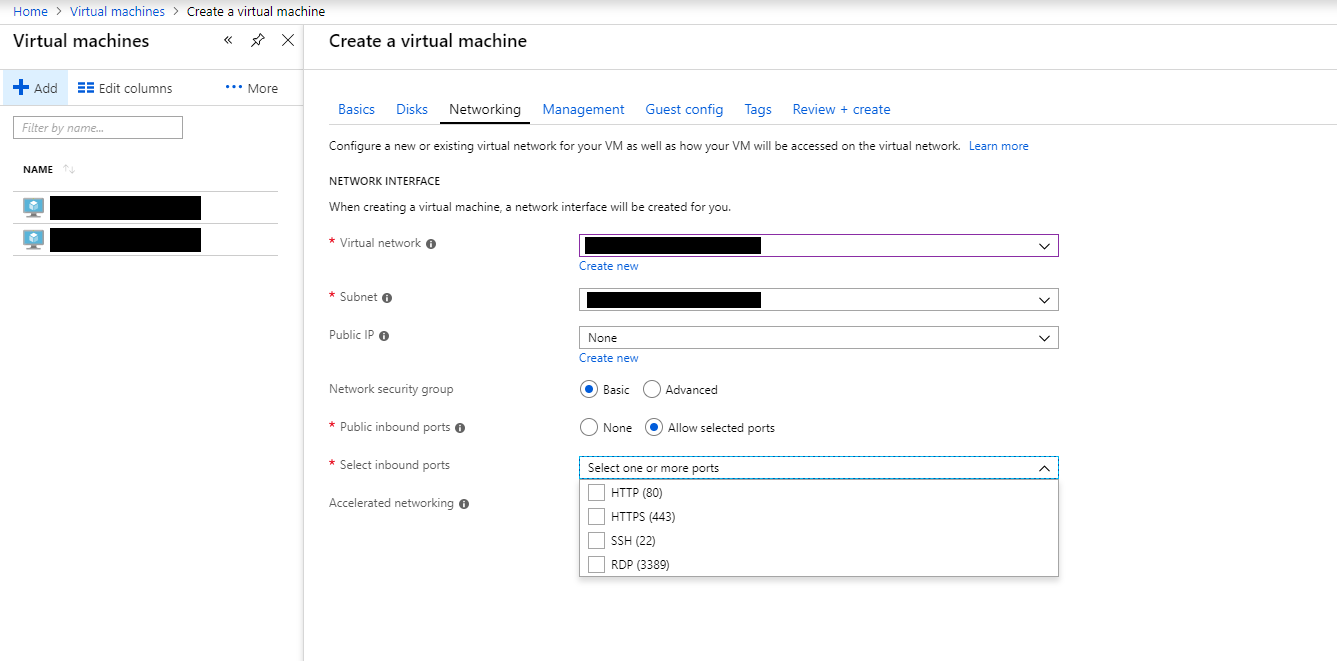
Next, we proceed to create a new VM. In the Networking tab, we are required to configure VNet for the VM.
In this step, we need to choose the VNet and Subnet that we just created in Step 3. After that, for the convenience of direct RDP into the VM, we also need to set a Public IP and make sure Public inbound ports include RDP 3389 port
Configuring the network interface of a VM.
Step 5: Opening Inbound and Outbound Ports
After the VM is setup successfully, we then need to proceed to configure the inbound and outbound port rules for the VM. This step is only necessary if we are asked to use certain ports to communicate with service hosted behind the Meg@POP.
This step can be easily done in the Network Security Group of the VM.
Inbound and outbound security rules applied for a VM.
Step 6: Creating Virtual Network Gateway
We now need to create the Virtual Network Gateway with its subnet in one go.
There is one important step where we need to make sure we choose “ExpressRoute” as the Gateway Type, as shown in the screenshot below.
Remember to choose ExpressRoute as the Gateway Type!
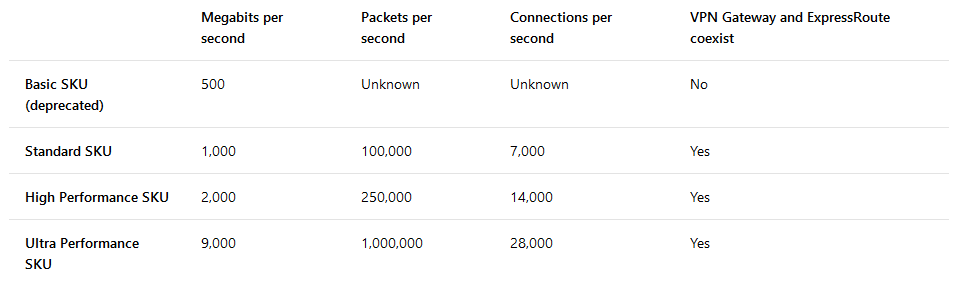
For the Gateway SKU, we are given three options: Standard, High Performance, Ultra Performance. As a start, we choose the Standard SKU which costs the least among three.
Estimated performances by different gateway SKUs. (Source: Azure ExpressRoute)
Finally after choosing the VNet for the gateway, we will be prompted to specify the Address Range for the Gateway Subnet. In our case, I make it to be a bit smaller, which is 10.10.1.0/28.
Step 7: Creating Connection between ExpressRoute and VNet
Finally, we have to link up our VNet with the ExpressRoute.
To do so, we simply head to the Connections section of the ExpressRoute circuit to add the Virtual Network Gateway to it.
The table shows one connection successfully added to the circuit.
Conclusion
End results.
Yes, that’s all. This learning process took me about two weeks to learn. Hence, if you spot any mistakes in my article, please let me know. Thank you in advance.