I like to explore interesting new technologies. I also love to learn more from the materials available on Microsoft Virtual Academy, Google Developers channel, and several other tech/dev events.
I first learned about goroutine and channel when I was attending the Golang meetup in GoJek Singapore. In the talk “Orchestrating Concurrency in Go” delivered by the two GoJek engineers Abhinav Suryavanshi and Douglas Vaz, they highlighted the point “concurrency is not same as parallelism” in the very beginning of their talk.
Using goroutines is very simple because we only need to add the keyword go in front of any function. This remind me of the async/await in C# which is also concurrent. Async/await in C# implies that if we make a chain of function calls, and the last function is an async function, then all the functions before it have to be async too. On contrary, there is no such constraint in Golang. So when we do concurrency in Golang, we don’t really have to plan on what’s going to be asynchronous ahead of time.
Applying Goroutines
In the web application we built earlier, we introduce a new feature where users can pick the music categories that they are interested at, then it will insert relevant videos into the playlist.
We have six different music categories to choose.
The codes to do the suggestion is as follows.
for i := 0; i < len(request.PostForm["MusicType"]); i++ {
    if request.PostForm["MusicType"][i] != "" {
        go retrieveSuggestedVideos(request.PostForm["MusicType"][i], video, user)
    }
}
Now, if we select all categories and press the Submit button, we will see the videos to be added not following the selection order. For example, as shown in the following screenshot, the Anime related videos actually come after the Piano videos.
A lot suggested videos added to the list.
YouTube Data API
If you are interested at how the relevant videos are retrieved, it is actually done with the YouTube Data API as follows.
Learning about containers is essentially a huge topic but for beginners, there needs to be something small to help them get started. Hence, in this article, we will focus only on the key concepts of containers and the steps to containerize the program and deploy it to Azure Web App.
As explained in the book “How to Containerize Your Go Code“, containers isolates an application so that container thinks it’s running on its own private machine. So, a container is similar to a VM but it uses the OS kernel on the host rather than having its own.
The Dockerfile starts with a FROM command that specifies the starting point for the image to build. For our project, we don’t have any dependencies, so we can start from scratch. So what is scratch? Scratch is basically a special Docker image that is empty (0B). That means there will be nothing else in our container later aside from what we put in with the rest of the Dockerfile.
The reason why we build from scratch is because not only we can have a smaller image to build later, but also our container will have smaller attack surface. This is because the less code there is within our container, the less likely it is to include a vulnerability.
The EXPOSE 80 command is telling Docker that we need to open the port 80 because the web server is listening on port 80. Hence, in order to access our program from outside the container through HTTP, we need to define it in the Dockerfile that we need the port 80 to be always opened.
The next three COPY commands are basically copying firstly the GoLab executable into the root directory of the container and secondly the two directories, public and templates into the container. Without the HTML, CSS, and JavaScript, our web app will not work.
Now you may wonder why the first COPY command says GoLab instead of GoLab.exe. We shall discuss it later in this article.
After that, we use ENV command to set the environment variables that we will be using in the app.
Finally we have the line CMD [“/GoLab”] to directs the container as to which command to execute when the container is run.
Since the container is not a Windows container, the code that runs inside the container thus needs to be a Linux binary. Fortunately, this is really simple to obtain with the cross-compilation support in Go using the following command.
$ $env:GOOS = "linux"
$ go build -o GoLab .
Thus, in the Dockerfile, we use GoLab file instead of GoLab.exe.
We can now proceed to build the container image with the following command (Take note of the dot in the end of line).
$ docker image build -t chunlindocker/golab:v1 .
The -t flag is for us to specify the name and tag of the container. In this case, I call it chunlindocker/golab:v1 where chunlindocker is the Docker ID of my Docker Hub. Naming in such a way later helps me to push it to a registry, i.e. the Docker Hub.
My Docker Hub profile.
If we want to build the image with another dockerfile, for example Dockerfile.development, we can do it as follows.
Once the docker image is built, we can see it listen when we perform the list command as shown in the screenshot below.
Created docker images.
Now the container image is “deployable”. That means we can run it anywhere with a running docker engine. Since our laptop has Docker installed, so we can proceed to run it locally with the following command.
$ docker container run -P chunlindocker/golab:v1
If you run the command above in the Terminal window inside VS Code, you will see that the command line is “stuck”. This is because the container is already running on local machine. So what we need to do is just open another terminal window and view all the running containers.
The docker ps command by default only shows running containers.
To help humans, Docker auto generates a random name with two words and assigns it to the container. We can see that the container we created is given a random name “nifty_elgama”, lol. So now our container has a “human” name to call. If you want to remove the container later, you not only need to Ctrl+C to stop it, but to totally remove it, you need to use the rm command as follows.
$ docker container rm nifty_elgama
The PORTS column shown in the screenshot is important because it tells us how ports exposed on the container can be accessed from the host. So to test it locally, we shall visit http://localhost:32768.
So our next step is to upload it to a container registry so that later it can be pulled onto any machines, including Azure Web Apps, that will run it. To do so, we do push the image we built above to Docker Hub with the following command.
$ docker push chunlindocker/golab:v1
Successfully push our new container image to Docker Hub.
So, now how do we deploy the container to Azure?
Firstly, we need to create a Web App for Containers on the Azure Portal, as shown in the screenshot below.
Creating Web App for Containers.
The last item in the configuration is the “Configure Container”. Clicking on that, we will be brought to the following screen where we can then specify the container image we want to use and pull it from Docker Hub.
We will be deploying single container called chunlindocker/golab:v4 from Docker Hub.
You can of course deploy a private container from Docker Hub by choosing “Private” as Repository Access. Then Azure Portal will prompt you for Docker Hub login credential for it to pull image from Docker Hub.
Once the App Service is created, we can proceed to read the Logs under “Container Settings”. Then we can see the container initializing process.
Logs about the container in App Service.
After that we can proceed to fill up the Application Settings with the environment variables we have in the web application and then we are good to go.
The website is up and running on Azure Web App for Containers.
Unit Testing is a level of automated software testing that units which can be modular parts of the program are tested. Normally, the “unit” refers to a function, but it doesn’t necessary always be so. A unit typically takes in data and returns an output. Correspondingly, a unit test case passes data into the unit and check the resultant output to see if they meet the expectations.
Unit Testing Files
In Golang, unit test cases are written in <module>_test.go files, grouped according to their functionality. In our case, when we do unit testing for the videos web services, we will have the unit test cases written in video_test.go. Also, the test files need to be in the same package as tested functions.
Necessary Packages
In the beginning, we need to import the “testing” package. In each of our unit test function, we will take in a parameter t which is a pointer to testing.T struct. It is the main struct that we will be using to call out any failure or error.
In our code video_test.go, we use only the function Error in testing.T to log the errors and to mark the test function fails. In fact, Error function is a convenient function in the package that combines calling of Log function and then the Fail function. The Fail function marks the test case has failed but it still allows the execution of the rest of the test case. There is another similar function called FailNow. The FailNow function is stricter and exits the test case once it’s encountered. So, if FailNow function is what you need, you have to call the Fatal function which is another convenient function that combines Log and FailNow instead of the Error function.
Besides the “testing” package, there is another package that we need in order to do unit testing for Golang web applications. It is the “net/http/httptest” package. It allows us to use the client functions of the “net/http” package to send an HTTP request and capturing the HTTP response.
Test Doubles, Mock, and Dependency Injection
Before proceeding to writing unit test functions, we need to get ready with Test Doubles. Test Double is a generic term for any case where we replace a production object for testing purposes. There are several different types of Test Double, of which a Mock is one. Using Test Doubles helps making the unit test cases more independent.
In video_test.go, we apply the Dependency Injection in the design of Test Doubles. Dependency Injection is a design pattern that decouples the layer dependencies in our program. This is done through passing a dependency to the called object, structure, or function. This dependency is used to perform the action instead of the object, structure, or function.
Currently, the handleVideoRequests handler function uses a global sql.DB struct to open a database connection to our PostgreSQL database to perform the CRUD. For unit testing, we should not depend on database connection so much and thus the dependency on sql.DB should be removed. The dependency on sql.DB then should be injected into the process flow from the main program.
To do so, firstly, we need to introduce a new interface called IVideo.
Secondly, we make our Video struct to implement the new interface and let one of the fields in the Video struct a pointer to sql.DB. Unlike in C#, we have to specify which interface the class is implementing, in Golang, as long as the Video struct implements all the methods that IVideo has (which is already does), then Video struct is implementing the IVideo interface. So now our Video struct looks as following.
type Video struct {
    Db             *sql.DB
    ID             int    `json:"id"`
    Name           string `json:"videoTitle"`
    URL            string `json:"url"`
    YoutubeVideoID string `json:"youtubeVideoId"`
}
As you can see, we added a new field called Db which is a pointer to sql.DB.
Now, we can create a Test Double called FakeVideo which implements IVideo interface to be used in unit testing.
// FakeVideo is a record of favourite video for unit test type FakeVideo struct { ID int `json:"id"` Name string `json:"videoTitle"` URL string `json:"url"` YoutubeVideoID string `json:"youtubeVideoId"` CreatedBy string `json:"createdBy"` }
// GetVideo returns one single video record based on id func (video *FakeVideo) GetVideo(userID string, id int) (err error) { jsonFile, err := os.Open("testdata/fake_videos.json") if err != nil { return }
switch request.Method { case "GET": err = handleVideoAPIGet(writer, request, video, user) case "POST": err = handleVideoAPIPost(writer, request, video, user) case "PUT": err = handleVideoAPIPut(writer, request, video, user) case "DELETE": err = handleVideoAPIDelete(writer, request, video, user) }
if err != nil { util.CheckError(err) return } } }
So now we pass an instance of the Video struct directly into the handleVideoAPIRequests. The various Video methods will use the sql.DB that is a field in the struct instead. At this point of time, handleVideoAPIRequests no longer follows the ServeHTTP method signature and is no longer a handler function.
Thus, in the main function, instead of attaching a handler function to the URL, we call the handleVideoAPIRequests function as follows.
Now we are good to write unit test cases in video_test.go. Instead of passing a Video struct like in server.go, this time we pass in the FakeVideo struct, as highlighted in one of the test cases below.
if writer.Code != 200 { t.Errorf("Response code is %v", writer.Code) }
var videos []models.Video json.Unmarshal(writer.Body.Bytes(), &videos)
if len(videos) != 2 { t.Errorf("The list of videos is retrieved wrongly") } }
By doing this, instead of fetching videos from the PostgreSQL database, now it will get from the fake_videos.json in testdata.
Testing with Mock User Info
Now, since we have implemented user authentication, how do we make it works in unit testing also. To do so, in auth.go, we introduce a flag called isTesting which is false as follows.
// This flag is for the use of unit testing to do fake login
var isTesting bool
Then in the TestMain function, which is provided in testing package to do setup or teardown, we will set this to be true.
So how do we use this information? In auth.go, there is this function profileFromSession which retrieves the Google user information stored in the session. For unit testing, we won’t have this kind of user information. Hence, we need to mock this data too as shown below.
Without user authentication, we cannot secure our web services and protect our users’ privacy on our application. Hence, it is important to introduce ways to authenticate users in our Golang web application now.
In this article, we will focus only on authenticating users on our Golang web application with Google Sign-In in Google Identity Platform.
Configure OAuth on Google Cloud Platform
We first need to create a Project on Google Cloud Platform (GCP).
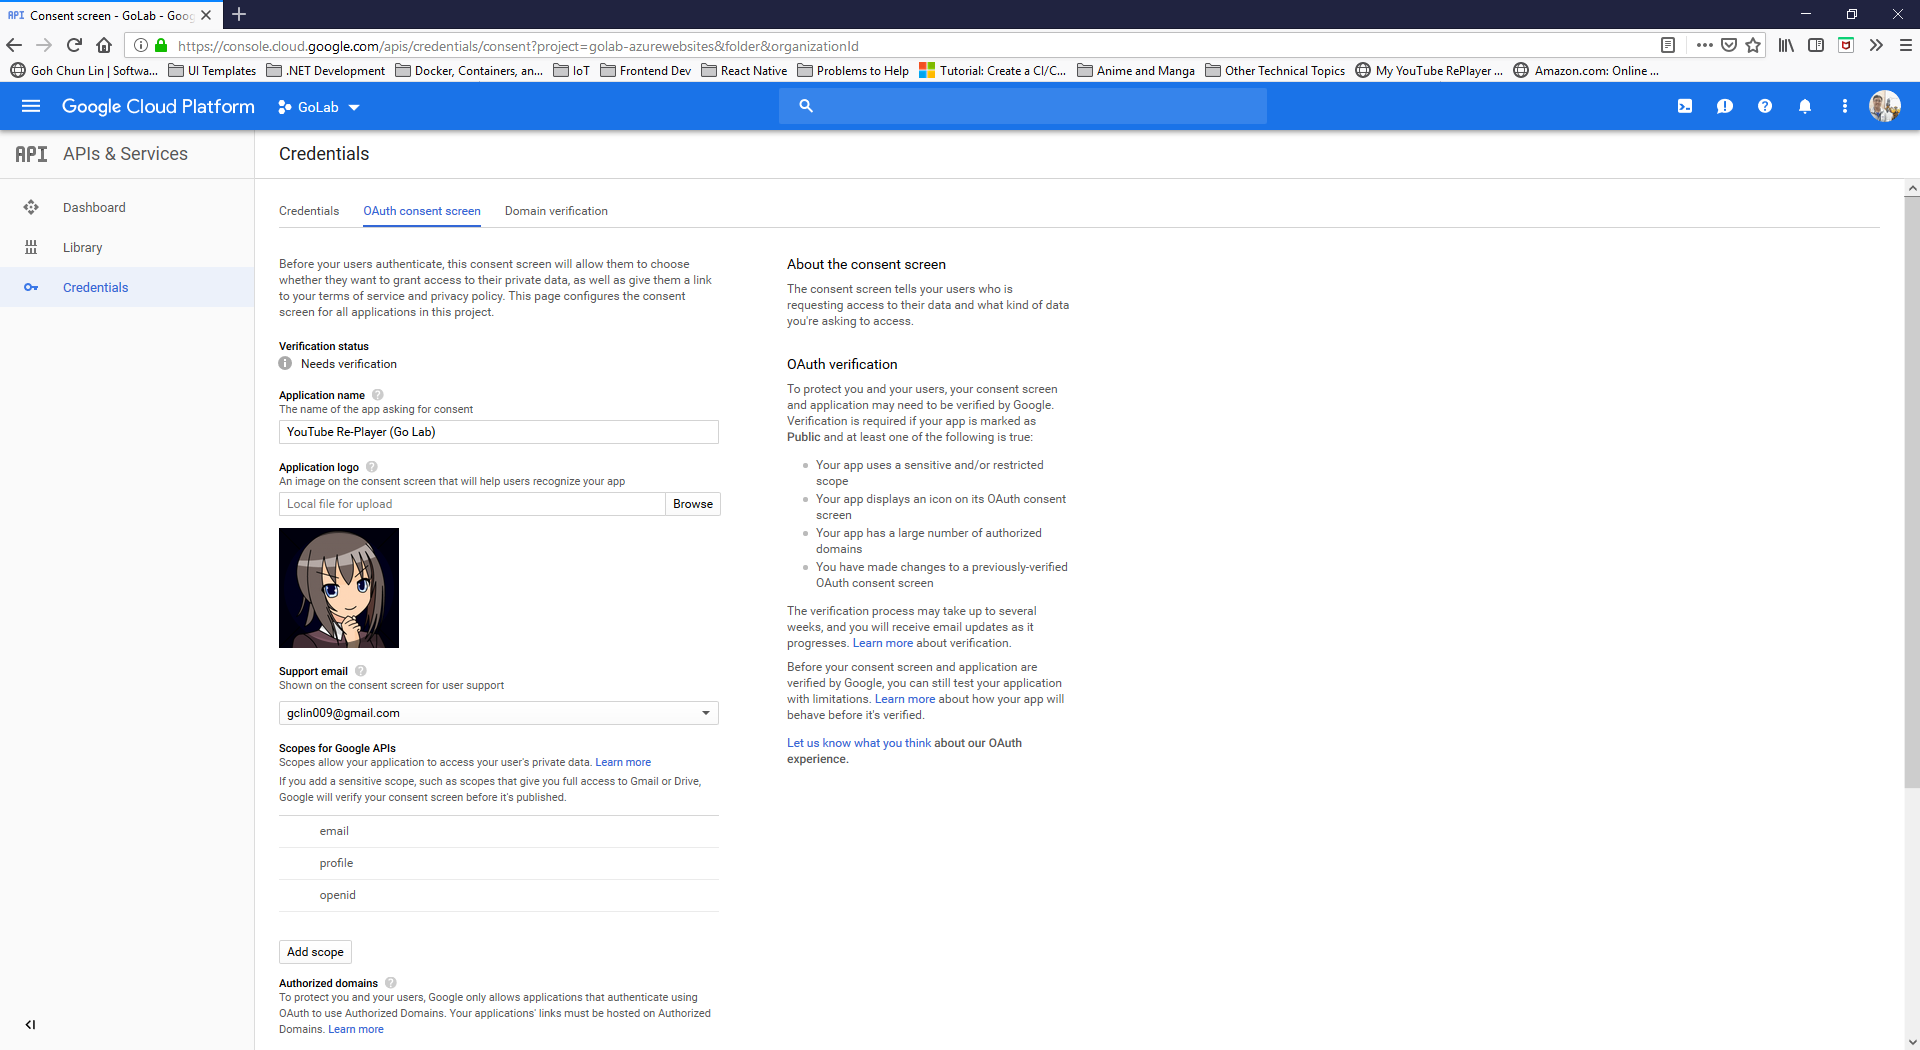
After the Project is created successfully, we need to proceed to OAuth Consent Screen to enter the information of our Golang web application, as shown in the following screenshot.
Setting up the OAuth consent screen for our Golang web application.
As you should have noticed by now, we are using OAuth because OAuth authentication system from Google makes it easy to provide a sign-in flow for all users of our application and provides our application with access to basic profile information about authenticated users.
Currently, Google only allows applications that authenticate using OAuth to use Authorized Domains which are required for redirect or origin URIs. Another thing to take note is that Authorized Domains must be a Top Private Domain. Hence, even though azurewebsites.net is a top level domain but it is not privately owned, so we cannot use the default Azure Web App URL. We thus need to assign a domain which is owned by us.
After entering all the information, we can then submit for verification. Interestingly, the verification step is not compulsory. We can choose to just save the information without submitting it for verification. However, users of unverified web applications might get warnings based on the OAuth scopes we’re using. This is how Google protects users and their data from deceptive applications.
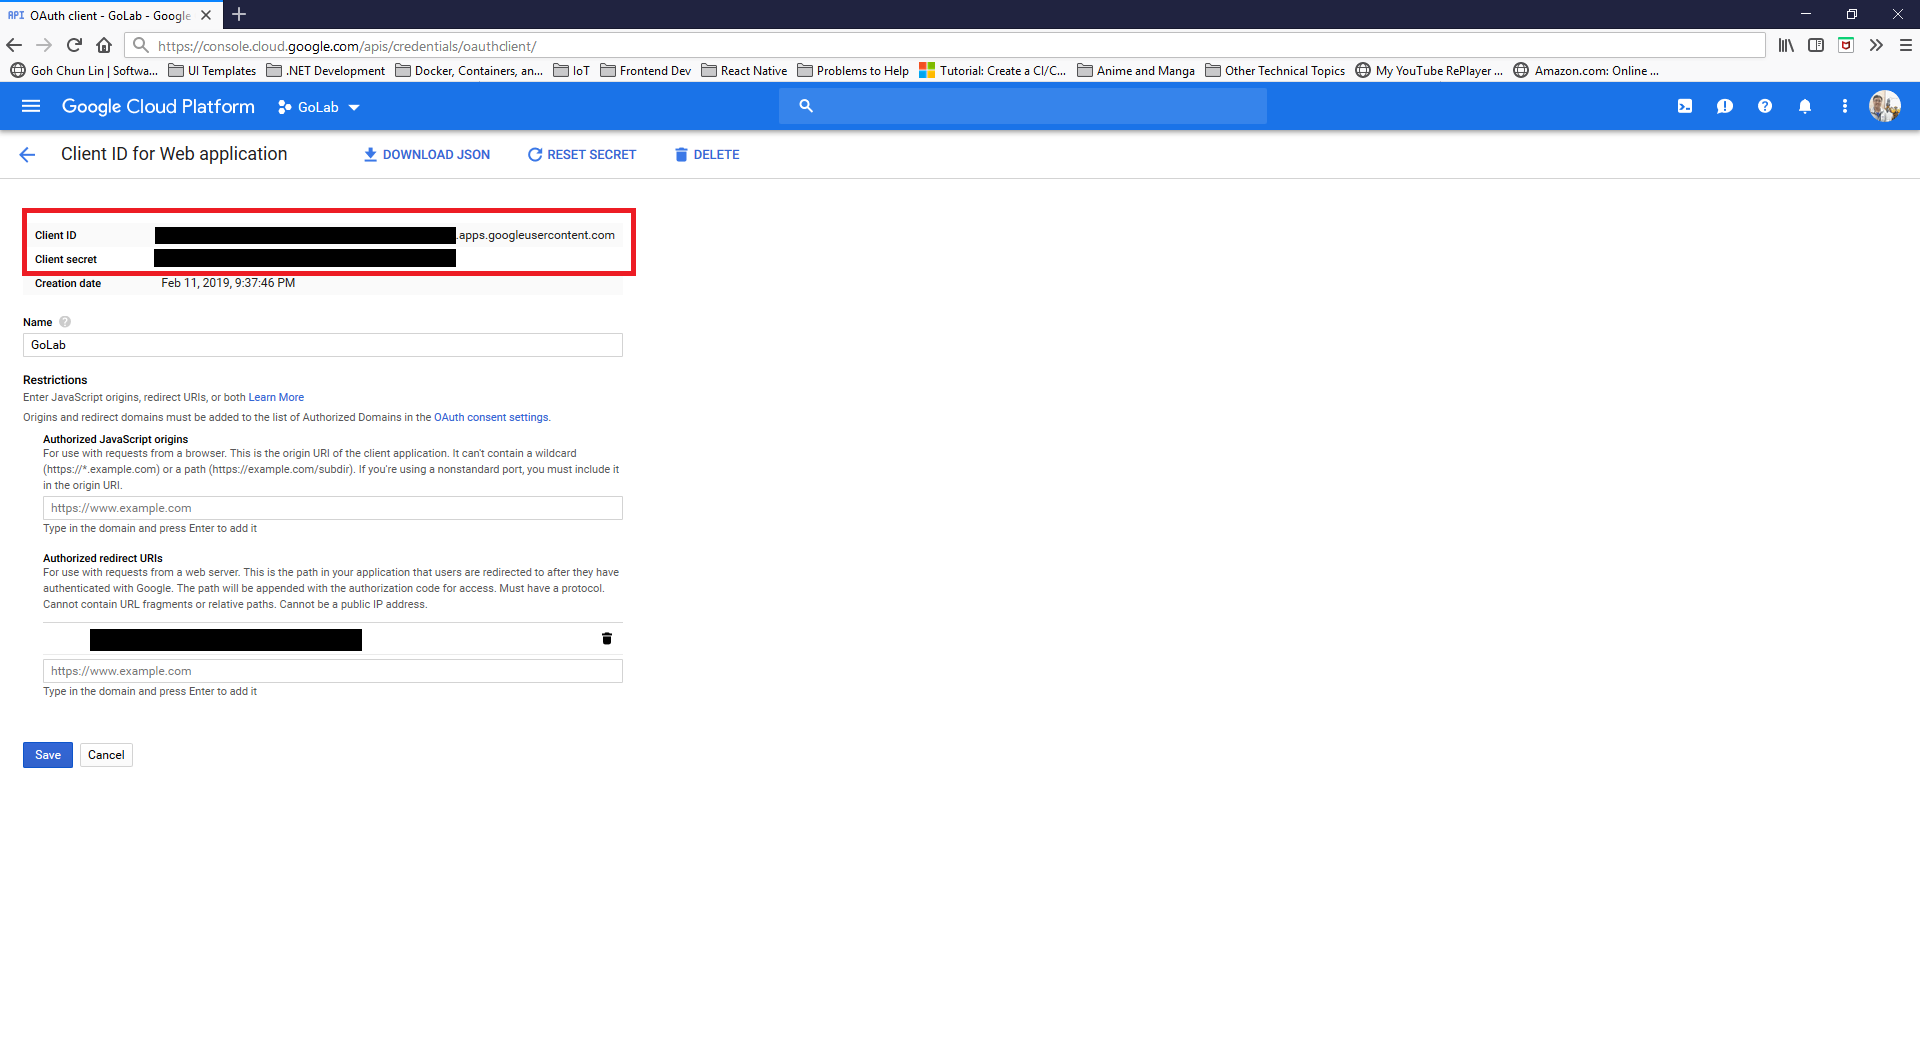
We will then be able to get both Client ID and Client Secret of our OAuth client for later use, as shown in the screenshot below.
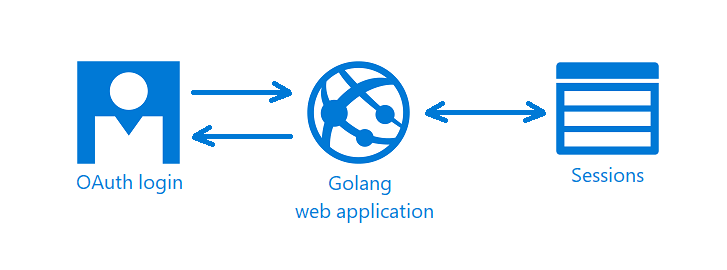
There is Sessions in the graph above because we need a way to store information about the current user. To do so, we make use of the CookieStore implementation to store session data in a secure cookie.
There are basically two new files need to be introduced.
Firstly, we have auth.go which is in charge of handling login/logout requests, handling callback from the OAuth, fetching user profile, and validating redirect URL to make sure there will be no attempts to redirect users to a path not existing within the web application.
Secondly, we have config.go which has all the configuration needed for the OAuth client on our web application. The two main functions are as follows. So this is the part when the Client ID and Client Secret from the GCP will be used.
func init() { // To enable user sign-in OAuthConfig = configureOAuthClient(os.Getenv("OAUTH_CLIENT_ID"), os.Getenv("OAUTH_CLIENT_SECRET"))
Our index handler will be changed to the following where it will show the homepage asking for user to login if the user is not yet logged in. Otherwise, it will bring the user to the page with the player.
func index(writer http.ResponseWriter, request *http.Request) { user := profileFromSession(request) if user == nil {
Users can login to our Golang web application through Google Sign-In.
Updates of Web Service
We also need to update the functions that we have done earlier for HTTP methods so that each of the functions will check for the user profile first. So we need to change the function handleVideoAPIRequests() to include the following code.
if user == nil { err = errors.New("sorry, you are not authorized") writer.WriteHeader(401)
return }
... } }
The response will be HTTP 401 Unauthorized if the user profile is not found.
If the user profile is found, then we will use the updated code to retrieve only the videos added by the current user. For example, when we are updating the info of a video record, we will need to also make sure the video record belongs to the current user, as shown in the following code.
func handleVideoAPIPut(...) (err error) {
    ...

    err = video.GetVideo(user.ID, videoID)
    if err != nil {
        // update the video record
    }
}
That means, the GetVideo function needs to be updated as well, as shown below, so that it can retrieve only video related to the currently logged-in user.
// GetVideo returns one single video record based on id func (video *Video) GetVideo(userID string, id int) (err error) { sqlStatement := "SELECT id, name, url FROM videos WHERE created_by = $1 AND id = $2;"