I like to explore interesting new technologies. I also love to learn more from the materials available on Microsoft Virtual Academy, Google Developers channel, and several other tech/dev events.
Few days ago, my teammate would like to learn how to use MS SQL Server. However, he only has a Macbook and MS SQL Server doesn’t run on macOS. Hence, I decided to write him a quick setup guide on how to do that with the help of container.
🎨 Microsoft introduced SQL Server on Linux in 2016. 🎨
Docker
We need to run Docker on our Mac machine. Since my teammate is new to Docker, he can simply choose a rather straight-forward path for this, which is to use Docker Desktop on Mac. Kindly take note of the system requirement before proceed to install it.
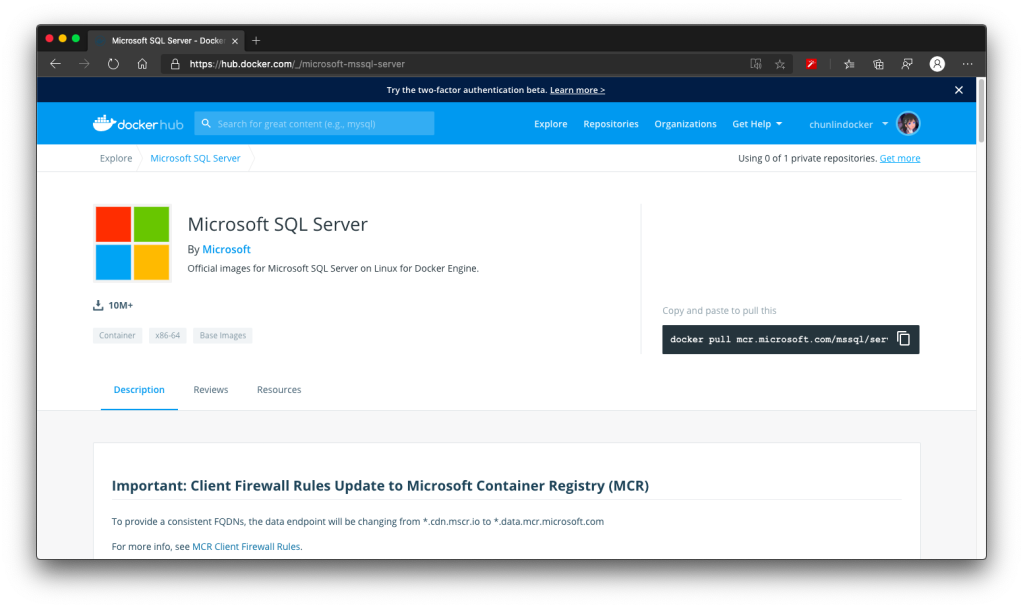
Once the Docker is up and running, we can proceed to pull the image of SQL Server 2019 from the Docker Hub.
We can run the following command in Terminal window to start the database server. Here we are using 1501 as the port. Take note that, we need to replace the password with our password which meets the following guideline:
at least 8 characters;
including uppercase, lowercase letters, base-10 digits and/or non-alphanumeric symbols.
In the command above, there are two environment variables.
Firstly, it is the environment variable “ACCEPT_EULA”. Setting it to Y means that we accept the End-User Licensing Agreement of the product. So far I still couldn’t find the EULA of the Microsoft SQL Server 2019. If you know, please drop me a message in the comment section. Thanks!
Secondly, it is the “SA_PASSWORD” which is used to set the password that we will later use to connect to the SQL server later as the database admin (userid = “sa”).
Actually, there is another environment variable which is not set here. It is the MSSQL_PID, i.e. the product ID of the SQL Server. By default, it is the Developer edition. If we would like to use Express or Enterprise edition, we can specify it here.
To visualise and manage our data in the databases, we need to use tools such as SQL Server Management Studio (SSMS). However, SSMS is only for Windows (AMD or Intel). So, on macOS, we have to choose another cross-platform alternative, which is Azure Data Studio. Azure Data Studio is usable on Windows and Linux too.
Now we can connect to the SQL Server from Azure Data Studio as shown below. Take note that the Server is “localhost,1501” and it is using comma, not dot, between the word localhost and the port number.
🎨 Connecting to the Microsoft SQL Server from Azure Data Studio. 🎨
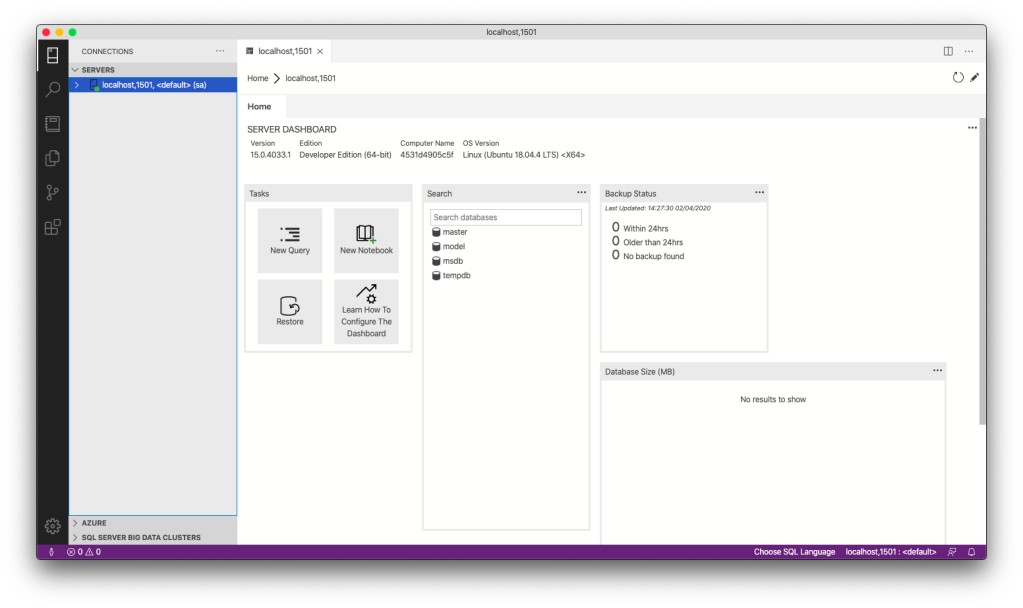
If the connection is successful, we shall be able to see the Server Dashboard as shown below.
🎨 Server Dashboard in Azure Data Studio. 🎨
That’s all. Now we can have MS SQL Server running on our Mac machine for local testing and development.
KOSD, or Kopi-O Siew Dai, is a type of Singapore coffee that I enjoy. It is basically a cup of coffee with a little bit of sugar. This series is meant to blog about technical knowledge that I gained while having a small cup of Kopi-O Siew Dai.
Starting from end of last year, I have been working on several UWP projects at work. Few days ago, I’m glad to have the opportunity to borrow a Surface Dial from Riza.
Surface Dial is a revolutionary input device. It was introduced by Microsoft in the 2016 together with Surface Studio. Most of the time, it works awesome on Surface devices. However, that doesn’t mean we can’t use it with our Windows desktop or laptop. As a secondary input device, it can be used together with our mouse or touch. Developers are also welcomed to customize the abilities of the Surface Dial on their UWP apps.
In this article, I will be sharing on how we can use Surface Dial to support a quick menu of commands in an UWP app.
Installing Surface Dial
First of all, we need to make sure our Windows device is on (Yes, UWP currently can only work on Windows machines). Then we need to turn on the Bluetooth on the machine. If our PC doesn’t come with the Bluetooth hardware installed, we can easily add it by purchasing a Bluetooth USB dongle.
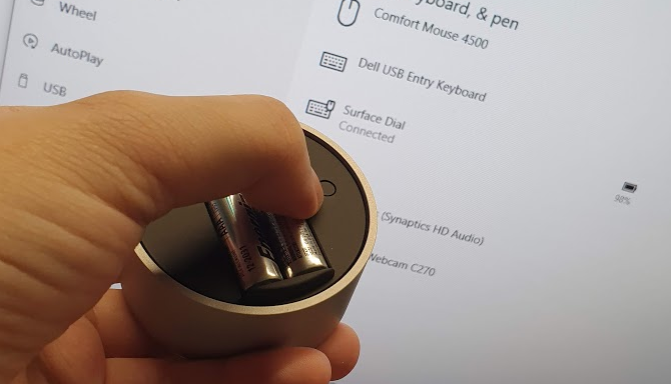
After that, we need to turn our Surface Dial on by removing the cover of its bottom and then pressing the button next to the batteries, as shown in the photo below.
🎨 Added Surface Dial to my PC. 🎨
Now we can find the Surface Dial on the “Bluetooth & other devices” window. We can proceed to add it to our PC.
Adding Menu on Surface Dial
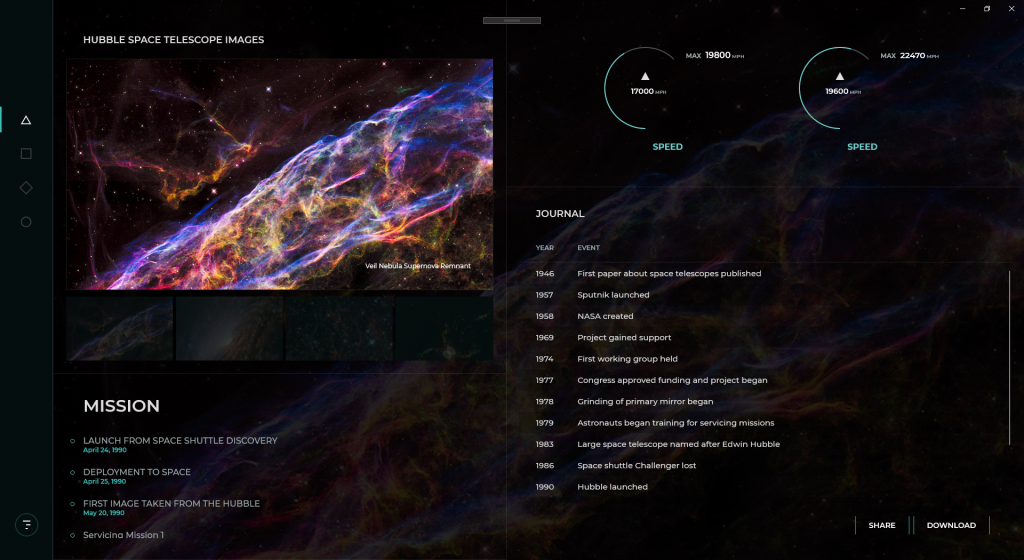
For those who attended my sharing in Microsoft Insider Dev Tour 2019 in Kuala Lumpur and Johor Bahru last year, the following UWP app should be familiar to you.
🎨 The UWP demo app done by Justin Liu for Microsoft Insider Dev Tour. 🎨
Now we will proceed to add Surface Dial menu to this page.
In the code-behind of the page, we will have the following global objects.
// Create a reference to the RadialController.
radialController = RadialController.CreateForCurrentView();
// Set rotation resolution to 1 degree of sensitivity.
radialController.RotationResolutionInDegrees = 1;
What does setting RotationResolutionInDegrees mean here? The value actually is the minimum rotation value required for the RotationChanged event to be fired. So, by setting it to 1, every one degree of rotate on the Surface Dial, the RotationChanged event will be triggered. Also, by default, when the RotationChanged happens, the Surface Dial will vibrate. So it is like massaging your hand when you’re rotating the Surface Dial that has its RotationResolutionInDegrees set to 1.
Then we can proceed to add our menu items to the Surface Dial. Here, we use a font glyph for the custom tool.
However, please take note that, by default, there are built-in menu items for the Surface Dial. So we need to remove them to prevent squeezing in too much menu items to the Surface Dial UI and thus making it harder to control.
To remove the built-in menu items, we just need to reset in the configuration of the Surface Dial. Another thing to take note is that the Surface Dial menu must have at least one menu item, else the default menu items will be restored.
Now there is a funny thing is that if we remove all the built-in menu items before we add our customized menu items, i.e swapping the position of the two blocks of codes above, then we will realize that the default menu items will be restored and our customized menu items will be appended to the default ones, as shown in the screenshot below.
🎨 Oh my tian, the buttons on the Surface Dial menu are so crowded! 🎨
Finally, if we want to handle the events fired from the Surface Dial, for example when users click on it or rotate it, we can use the following handlers.
Please take note that the ButtonClicked event is not triggered when a menu item is selected. Instead we need to do as follows to handle the menu item chosen event.
imageGallery.Invoked += ImageGallery_Invoked;
Result
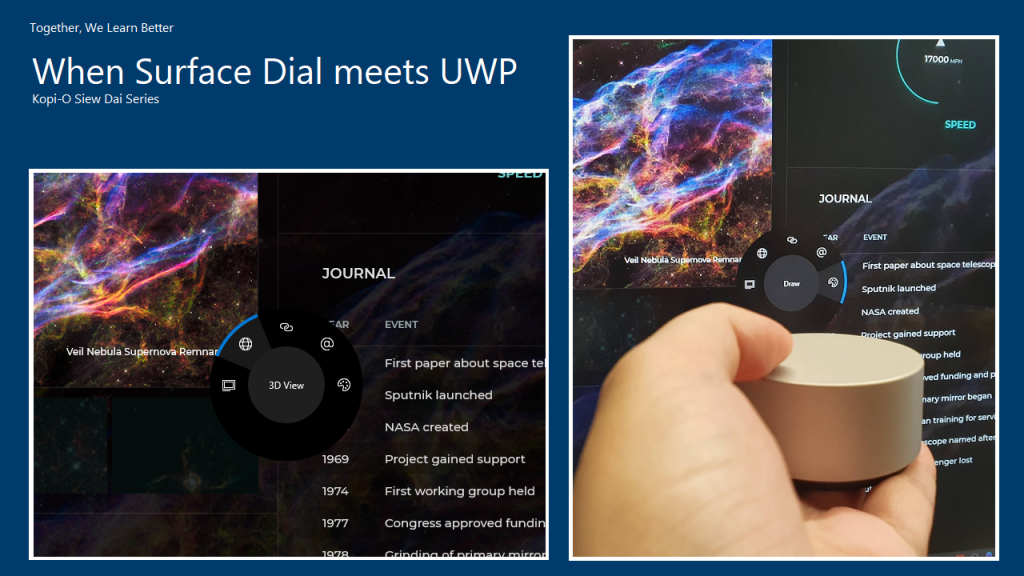
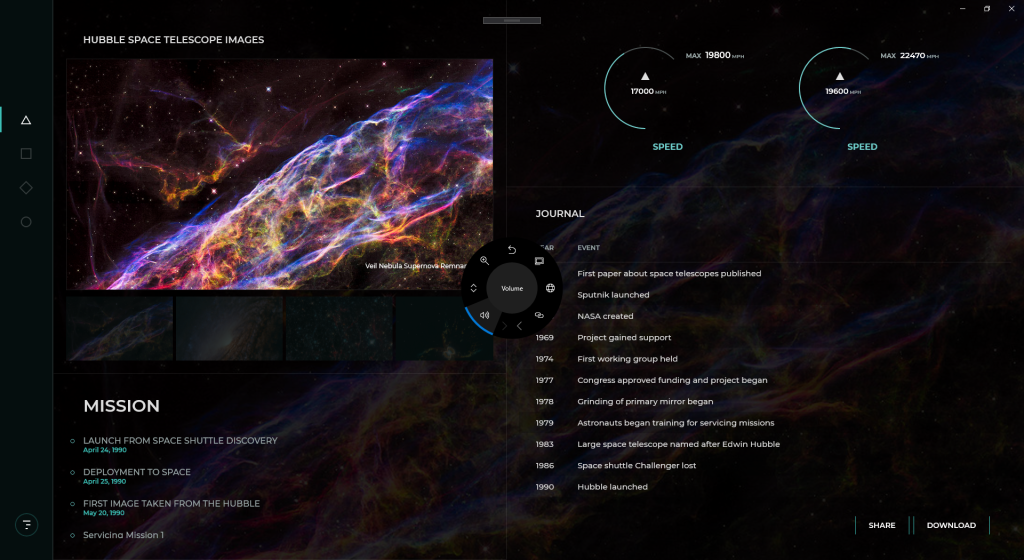
So, now, with all these few lines of codes, we can have a beautiful Surface Dial control on our UWP app, as shown in the following photo. Yay!
KOSD, or Kopi-O Siew Dai, is a type of Singapore coffee that I enjoy. It is basically a cup of coffee with a little bit of sugar. This series is meant to blog about technical knowledge that I gained while having a small cup of Kopi-O Siew Dai.
Dapr is an open-source, portable, and event-driven runtime which makes the development of resilient micro-service applications easier.
In addition, Dapr is light-weight and it can run alongside our application either as a sidecar process or container. It offers us some capabilities such as state management, which will be demonstrated in this article today, pub-sub, and service discovery which are useful in building our distributed applications.
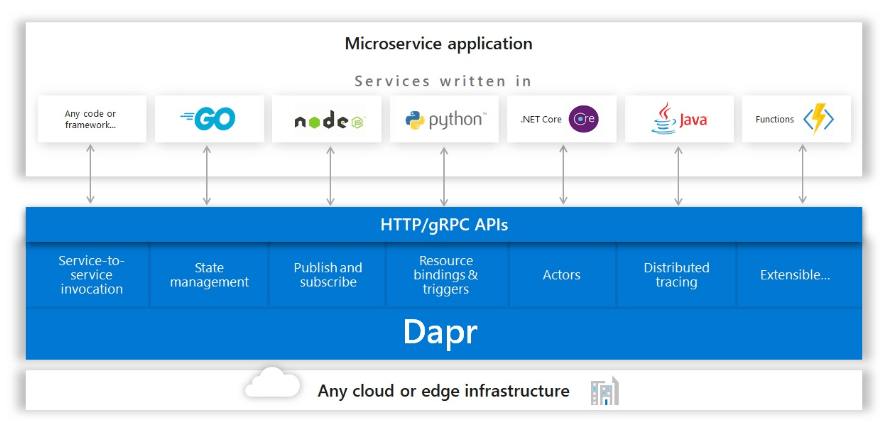
🎨 Dapr building blocks which can be called over standard HTTP or gRPC APIs. (Image Credit: Dapr GitHub Project) 🎨
Dapr makes developer’s life better when building micro-service application by providing best-practice building blocks. In addition, since building blocks communicate over HTTP or gRPC, another advantage of Dapr is that we can use it with our favourite languages and frameworks. In this article, we will be using NodeJS.
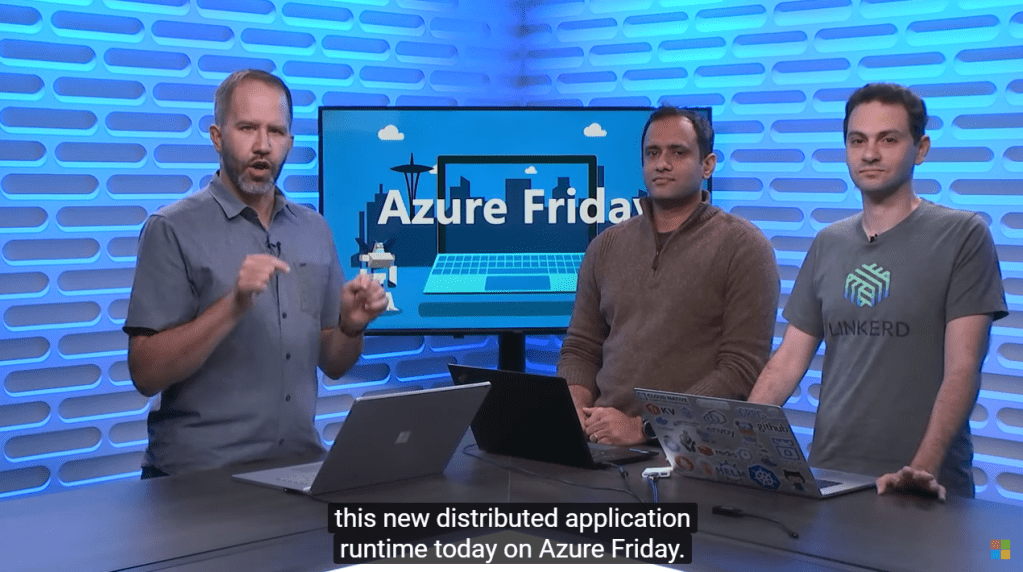
🎨 Yaron explains how developers can choose which building blocks in Dapr to use. (Image Source: Azure Friday) 🎨
In this article, we will be using only the state management feature in Dapr and using one of them doesn’t mean we have to use them all.
Getting Started
We will first run Dapr locally. Dapr can be run in either Standalone or Kubernetes modes. For our local development, we will run it in Standalone mode first. In the future then we will deploy our Dapr applications to Kubernetes cluster.
In order to setup Dapr on our machine locally and manage the Dapr instances, we need to have Dapr CLI installed too.
Before we begin, we need to make sure we have Docker installed on our machine and since the application we are going to build is a NodeJS RPG game, we will need NodeJS (version 8 or greater).
After having Docker, we can then proceed to install Dapr CLI. The machine that I am using is Macbook. On MacOS, the installation is quite straightforward with the following command.
For the project, we have two folders in the project root, which is backend and game.
🎨 Project structure. 🎨
The game project is just a normal NodeJS project where all the relevant codes of the html-rpg is located in the public folder. Then in the app.js, we have the following line.
app.use(express.static('public))
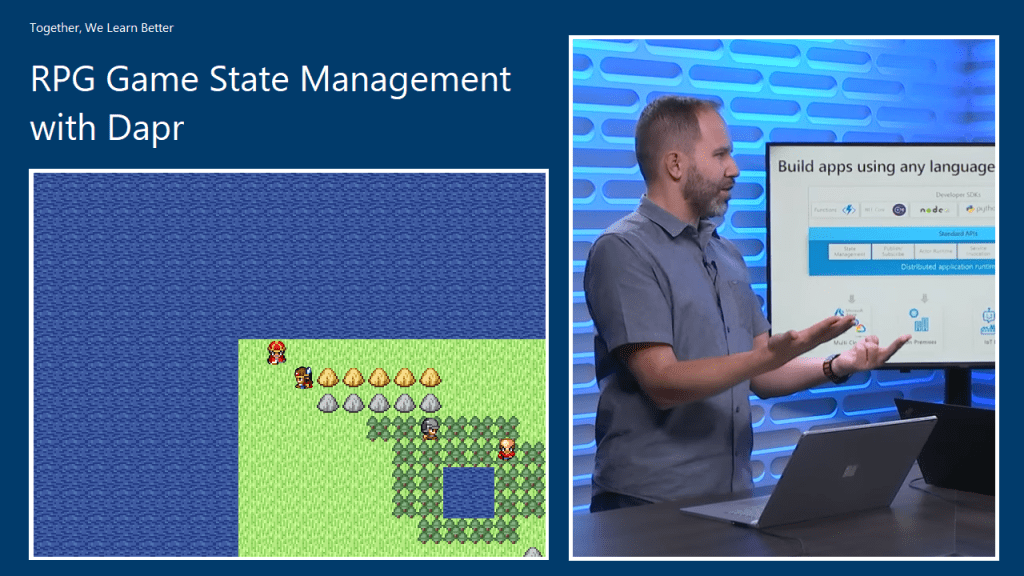
🎨 Four character types (from top to bottom): King, player, soldier, and minister. 🎨
We also update the code of html-rpg so that whenever the player encounters the soldier or the minister face-to-face, the player HP will drop 10 points. To do so, we simply send HTTP POST request to the Dapr instance which is listening on port 4001 (will explain where this port number comes from later).
...
var data = {};
data["data"] = {};
data["data"]["playerHp"] = map.playerHp;

// construct an HTTP request
var xhr = new XMLHttpRequest();
xhr.open("POST", "http://localhost:4001/v1.0/invoke/backend/method/updatePlayerHp", true);
xhr.setRequestHeader('Content-Type', 'application/json; charset=UTF-8');

// send the collected data as JSON
xhr.send(JSON.stringify(data));
...
In the backend project, we will have the code to handle the /updatePlayerHp request, as shown in the code below.
The code above will get the incoming request and then persist the payer HP to the state store.
CosmosDB as State Store
By default, when we run Dapr locally, Redis state store will be used. The two files in the components directory in the backend folder, i.e. redis_messagebus.yaml and redis.yaml are automatically created when we run Dapr with the Dapr CLI. If we delete the two files and run Dapr again, it the two files will still be re-generated. However, that does not mean we cannot choose another storage as state store.
The four required values above can be retrieved from the CosmosDB page on the Azure Portal. There is, however, one thing that we need to be careful, i.e. the Partition Key of the container in CosmosDB.
🎨 Partition Key is a mandatory field during the container creation step. 🎨
When I was working on this project, I always received the following error log from Dapr.
== APP == Failed to persist state: Internal Server Error
I had a great discussion with Yaron on GitHub and he agreed to update the documentation to highlight the fact that we must use “/id” as the partition key.
So, after correcting the partition key, I finally can see the state stored on CosmosDB.
🎨 CosmosDB reflects the current HP of the player which has dropped from 100 to 60. 🎨
The topic that I delivered in the event is “Development and DevOps of Desktop Apps with .NET Core 3.0”. It is a 45-minute talk combining the content from the following three talks.
From coding, converting, to deploying. (Image Credit: .NET Conf 2019)
If you watch the videos above, the total length is about 70 minutes. So covering three of them in a 45-minute talk is a challenge to me. Luckily, I have Sabrina to help me out by co-speaking with me.
If you have watched our session, you will realise it’s quite different from the official .NET Conf. In this post, I am going to brief you through about my thoughts and development process of our talk content.
Let’s Hashtag Together!
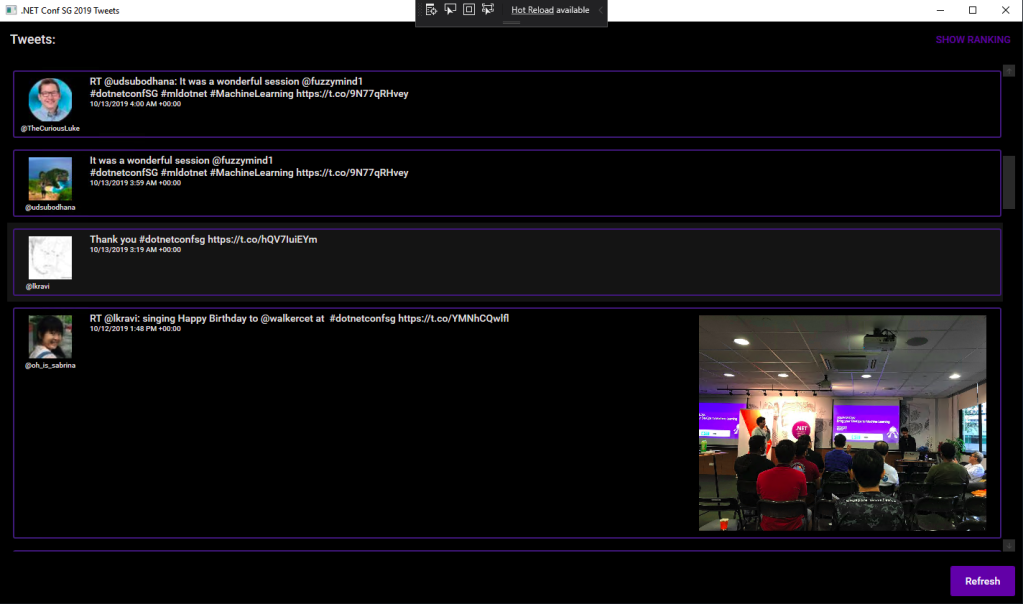
In order to make the conference to be more engaging, after discussing with Sabrina, I came out with a desktop app which will shows the recent tweets having #dotnetconfsg hashtag, which looks like the following.
Participants tweeting about our sessions.
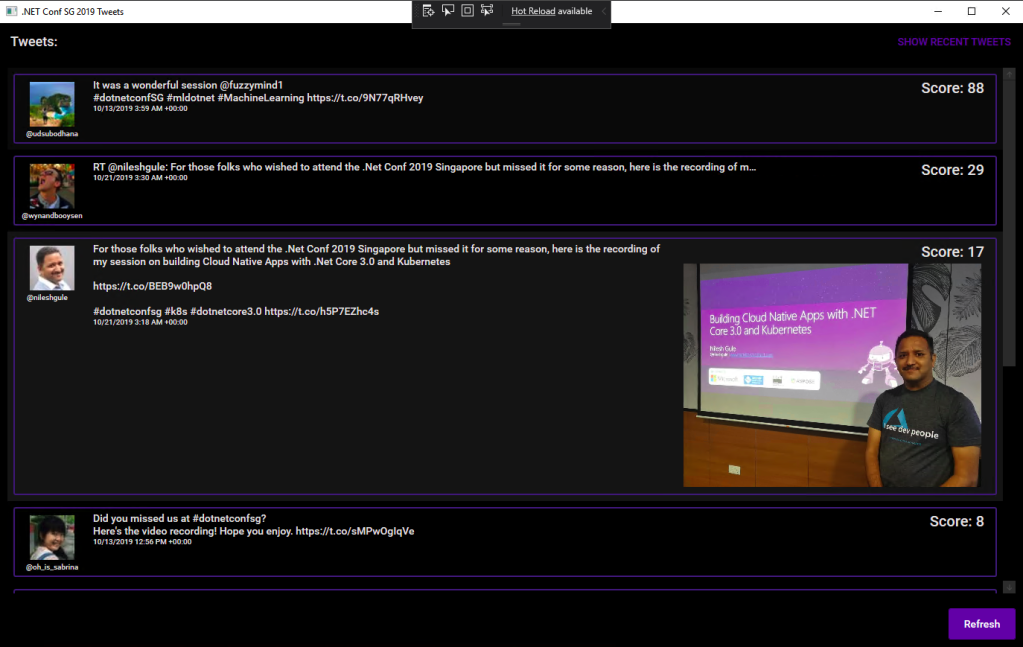
To make this “game” more interesting, I announced that the top four participants who earn the highest scores would receive prizes from me. The formula to calculate the score is basically
+1 point for one tweet;
+5 point for one retweet of the tweet;
+5 point for one like of the tweet.
Throughout the conference, we thus had seen a huge number of tweets about our event and speakers. Some of them even tweeted with great photos (I should have given 5 points for great photos too).
In our talk, we used this desktop app as our sample. The app is built in .NET Framework 4.7. Sabrina started the demo with showing how we can modernise it to a .NET Core desktop app. I then covered a bit about Hot Reload, the runtime tools (the small little black bar on top of locally launched WPF app), and DevOps part of desktop app.
I am using the Tweetinvi library to retrieve the tweets easily. I originally tried calling the Tweeter APIs directly from C# and it’s a painful experience. Instead of wasting resources on researching the Tweeter APIs, I change to use Tweetinvi because it allows me to easily get the tweets in just two lines of codes.
To improve the GUI, I use the Material Design in XAML Toolkit. So, I can easily change the WPF application to have dark mode. This is very important to me because I realise light mode isn’t displayed well on the projected screen during the event. So, it now looks as shown in the following screenshot.
New look with Material Design.
By clicking on the “Show Ranking” button at the top-right corner, we can easily tell the scores received by the participants.
The participants are sorted according to the score they receive.
Migrating to .NET Core 3.0
Now with many third-party libraries used in our WPF application, is the desktop app still compatible with .NET Core? Well, to answer this question, there is a tool from Microsoft called Portability Analyzer can give us a detail report on the set of APIs referenced in our apps that are not yet available in NET Core 3.0.
After downloading it and using it to check our application above, we received the following report.
This says that our WPF application is 100% portable to the .NET Core.
The Excel report comes with three tabs, i.e. Portability Summary (the one shown above), Details (empty), and Missing assemblies. There is one item in the report Missing assemblies though, as shown below.
However, if we proceed to use try-convert to migrate our WPF application from .NET Framework to .NET Core, it will be a successful conversion, as shown in the screenshot below.
Converted a .NET Framework project to .NET Core 3.0.
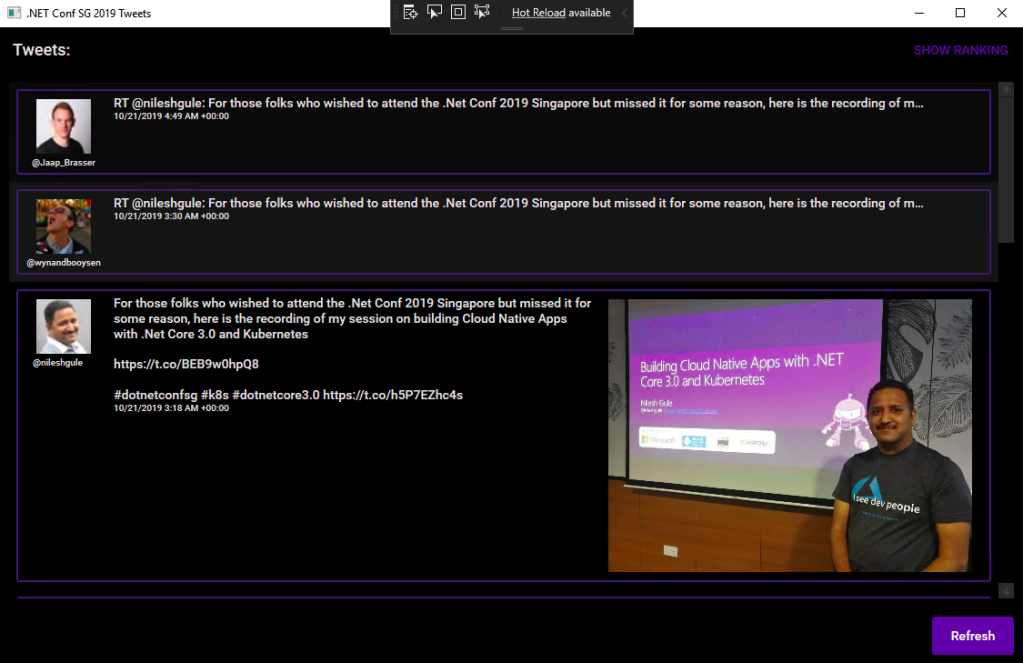
The following screenshot shows how the app looks like after being migrated to .NET Core 3.0. Nothing significant is changed. If you would like to find out what have been changed, please visit the commit of this project on GitHub.
This is a WPF app in .NET Core 3.0.
XAML Islands
There is another thing that I shared in my talk is about XAML Islands. In fact, I talked about XAML Islands in Microsoft Insider Dev Tour too when I was sharing about WinUI.
Microsoft Insider Dev Tour (Image Credit: Microsoft Malaysia – Insider Dev Tour Kuala Lumpur)
XAML Islands is a feature that allows us to host UWP controls in non-UWP desktop applications. The reason of having it is to improve the UX of existing Win32 apps by leveraging UWP controls.
Although the documentation says it is enabled only starting from Windows 10, version 1903. However, if you are using version 1809, XAML Islands feature is also available already, just that not yet stable. So, the best choice is still using version 1903 and above.
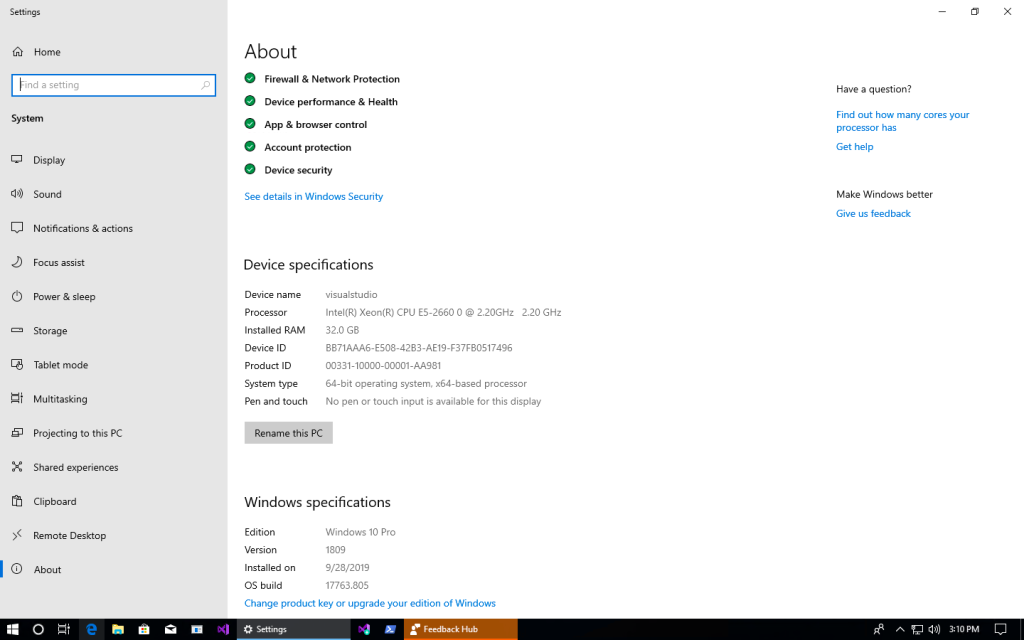
In my presentation, since I was using the Windows 10 image hosted on Microsoft Azure VM, the best version I could get is 1809.
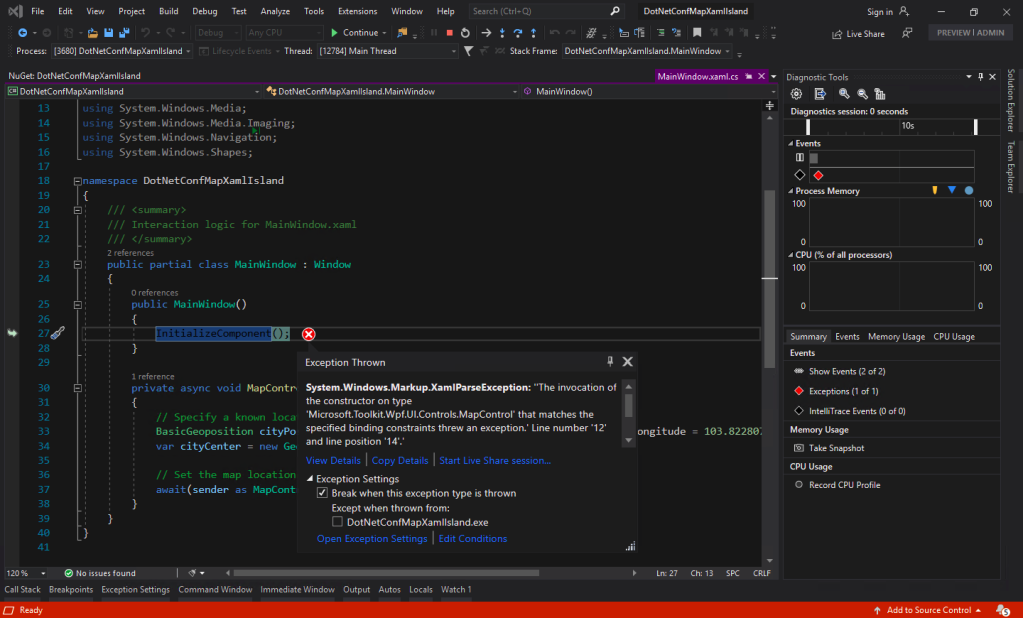
You may ask why I am using version 5.1.1 of the Microsoft.Toolkit.Wpf.UI.Controls. On the day of .NET Conf Singapore, the version 6.0 (Preview 9.1) of it is already out. However, when I try to use the library, it threw the exception, as shown in the screenshot below.
Oops, app crashes with Microsoft.Toolkit.Wpf.UI.Controls 6.0 (Preview 9.1).
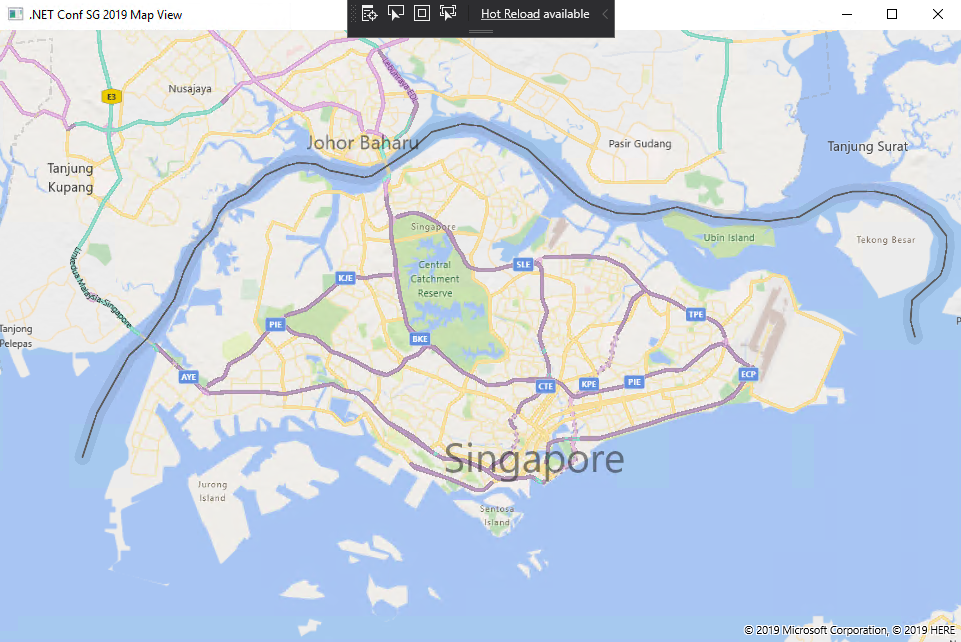
I could only demonstrated how I used the MapControl in a WPF app with XAML Islands.
Such a beautiful map displayed on WPF app!
Creating Build Pipeline in Azure DevOps
Now, with the codes of our WPF application on GitHub, we can create a Build pipeline for the app on Azure DevOps. This is not a new feature but it is nice to see how we can now build a .NET Core WPF app on Azure DevOps.
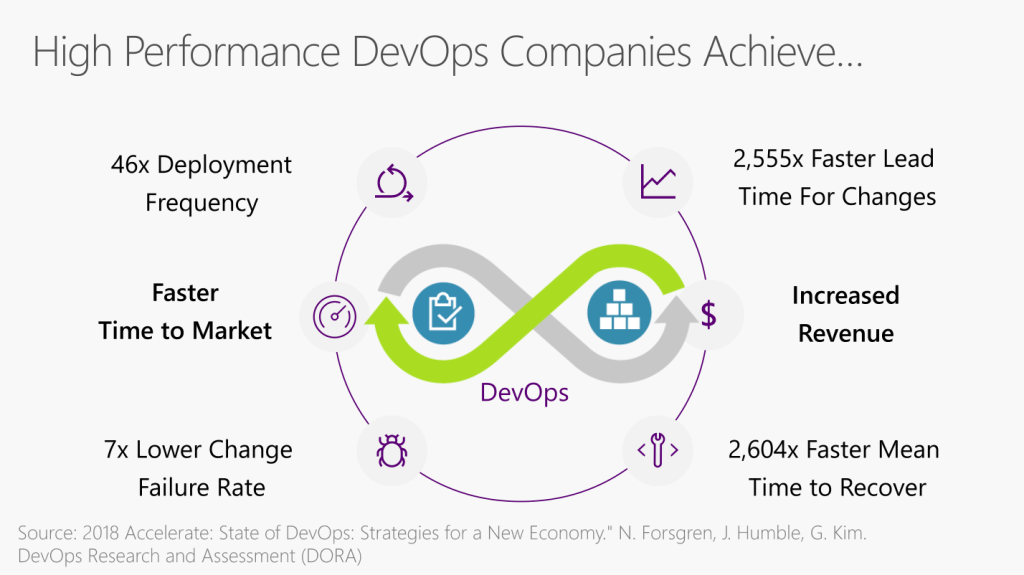
Benefits of DevOps (Image Credit: .NET Conf 2019)
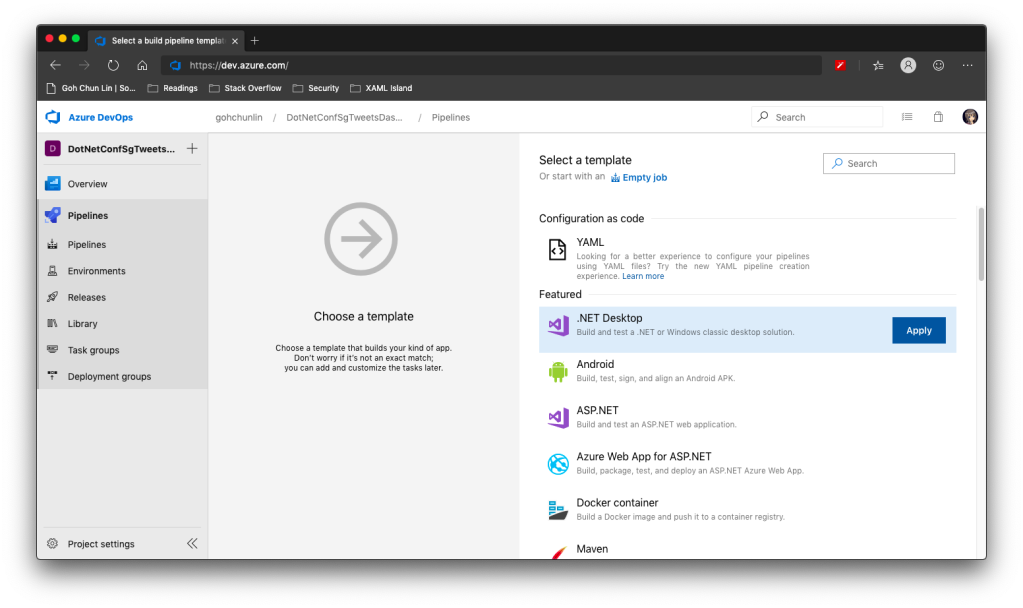
There is a template available on Azure DevOps to build .NET Desktop app.
We can apply this template to build .NET Desktop app on Azure DevOps.
However, before we proceed to start the build, we need to make a few changes to it.
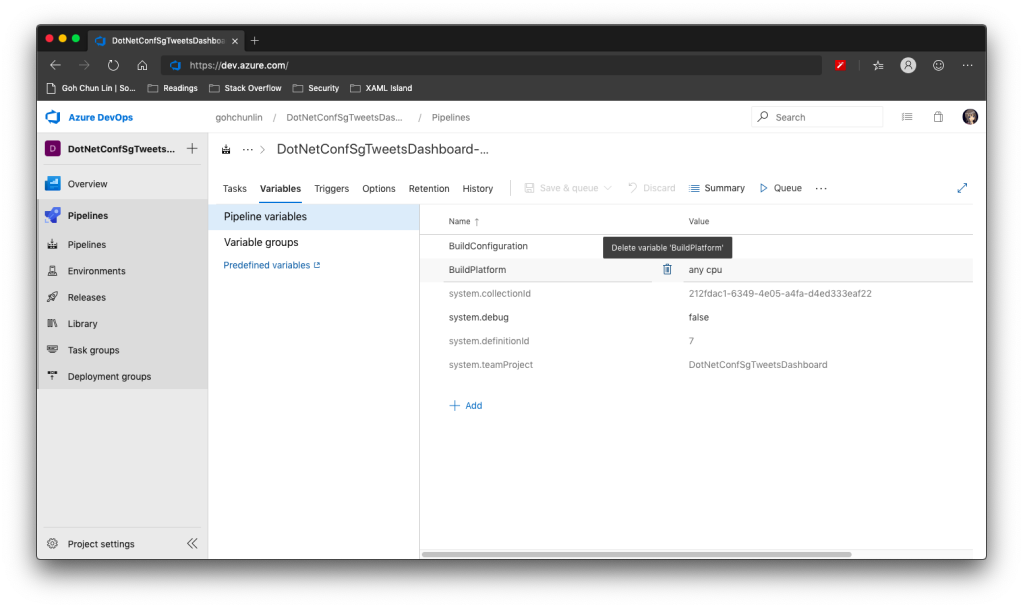
Since we will be using dotnet publish later, so the BuildPlatform variable is not necessary and can be removed.
Removing BuildPlatform variable from the pipeline.
Instead, we need to add a new variable called DOTNET_SKIP_FIRST_TIME_EXPERIENCE and set it to true. This is to speed up the build process because by default when we run any .NET Core SDK command on Azure DevOps, it does some caching. However, now we are running this on a hosted build agent, so this caching will never be useful because the agent will be discarded right after the build is completed. Thanks Daniel Jacobson for highlighting this in his video.
Daniel Jacobson (right) explains about Azure DevOps and .NET Core SDK commands. (Image source: YouTube video)
After that, we need to remove all the default steps because we need to start from scratch for .NET Core.
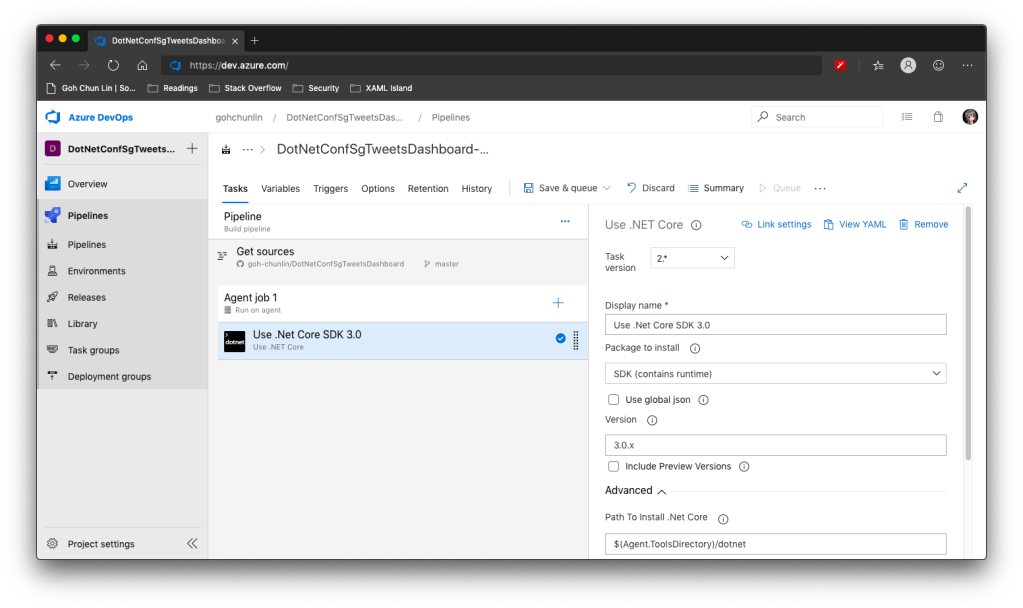
The first step is to install .NET Core SDK 3.0. Remember to state “3.0.x” as the version otherwise if there is a minor update to .NET Core 3.0, we will still be using the outdated one to build.
Step 1: Use .NET Core SDK 3.0
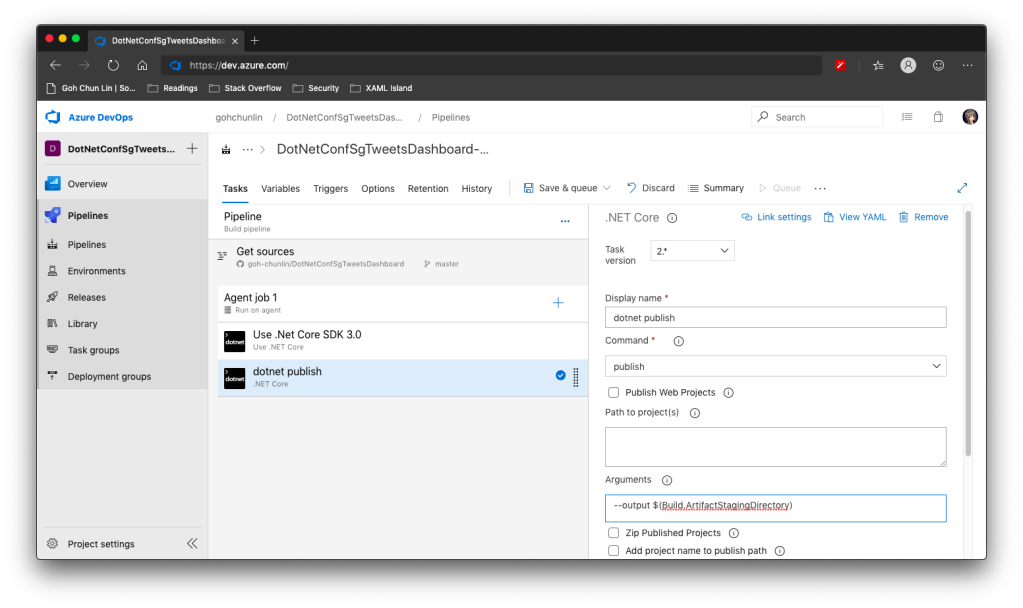
After that, we are going to do dotnet publish.
Starting with .NET Core 2.0, we don’t have to run dotnet restore because it’s run implicitly by all commands that require a restore to occur. Also dotnet publish will build the project, so we do not need to run dotnet build.
Since this is a WPF project, so we have to uncheck the “Publish Web Projects” checkbox, together with the other two checkboxes “Zip Published Projects” and “Add project name to publish path”, as shown in the screenshot below.
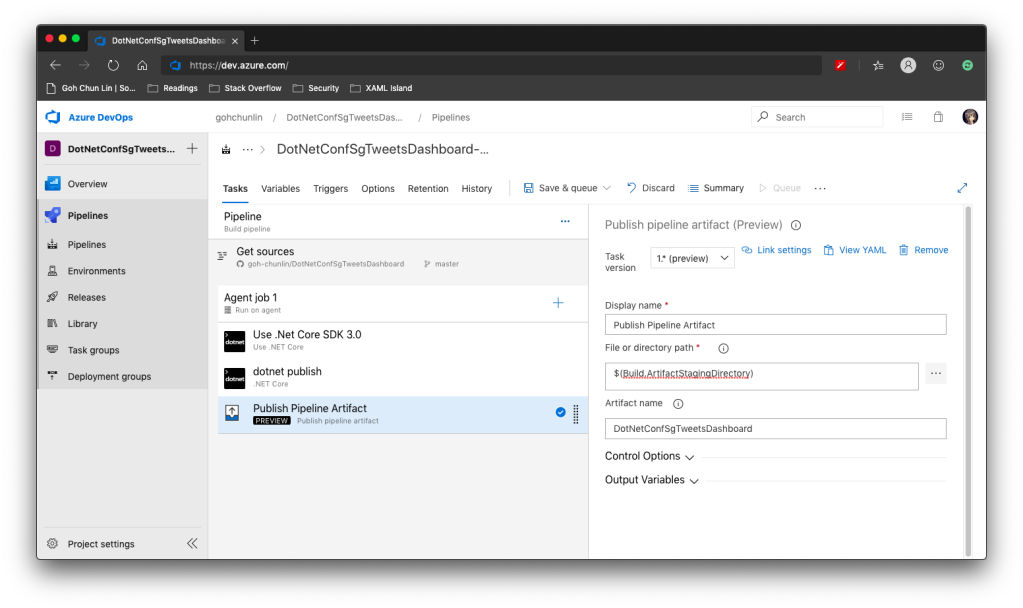
Now we proceed to add the next step, which is to publish the artifact. Here we specify $(Build.ArtifactStagingDirectory) as the path of the directory to publish. Then we also specify a user friendly name for the artifact.
Step 3: Publish Pipeline Artifact
Now we can click the “Save & queue” to run this pipeline.
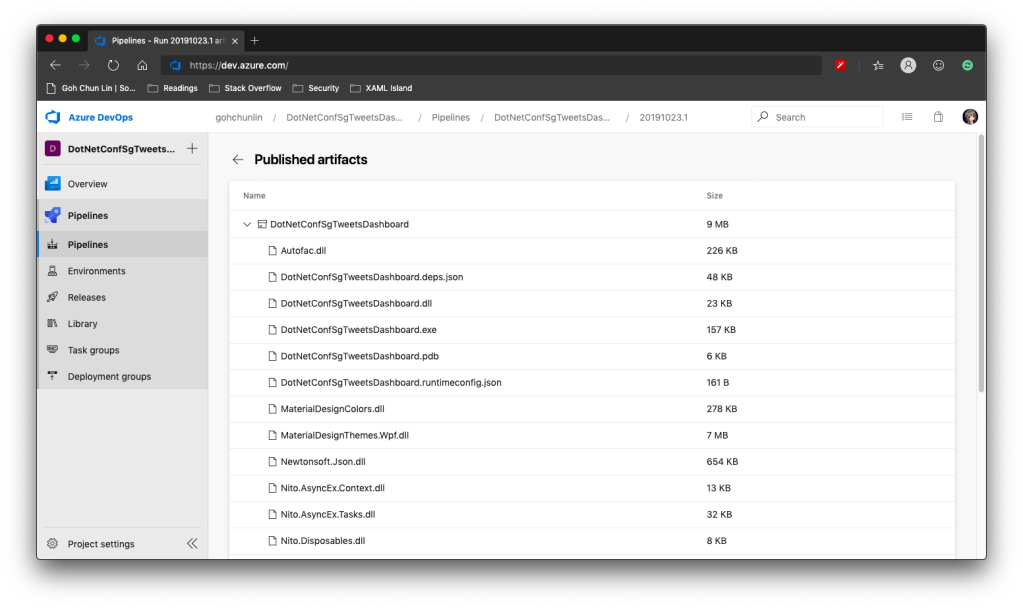
In the published artifact, we will see the following.
Published artifact in our first attempt.
Wow, there are a lot of DLLs! The .exe file alone is only 157KB.
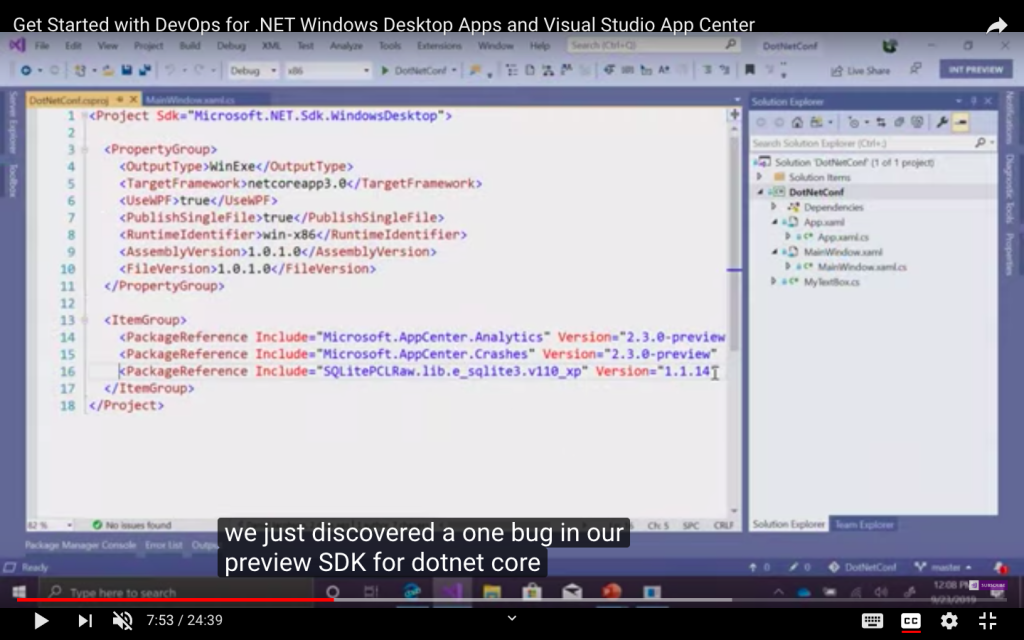
Fortunately, starting from .NET Core 3.0, as long as we specify the following in our csproj file, it will produce a single .exe file.
<PublishSingleFile>true</PublishSingleFile>
However, there is one more thing to take note is that if we miss out the <RuntimeIdentifier>, there will be an error NETSDK1097 which says, “It is not supported to publish an application to a single-file without specifying a RuntimeIdentifier. Please either specify a RuntimeIdentifier or set PublishSingleFile to false.”
<RuntimeIdentifier>win-x86</RuntimeIdentifier>
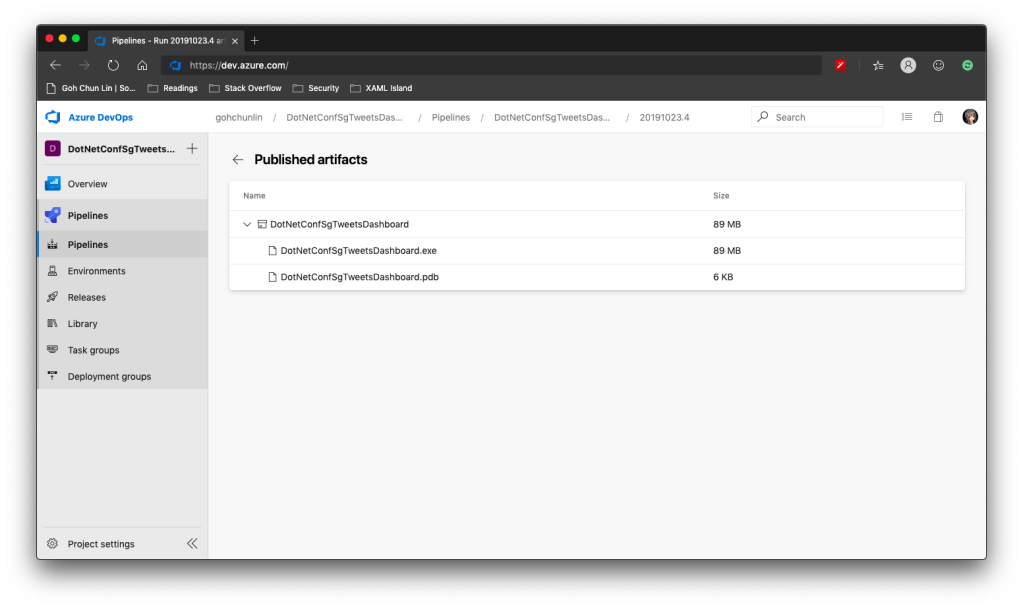
With this change, when we run the Build pipeline again, we get the following.
Published artifact with <PublishSingleFile>.
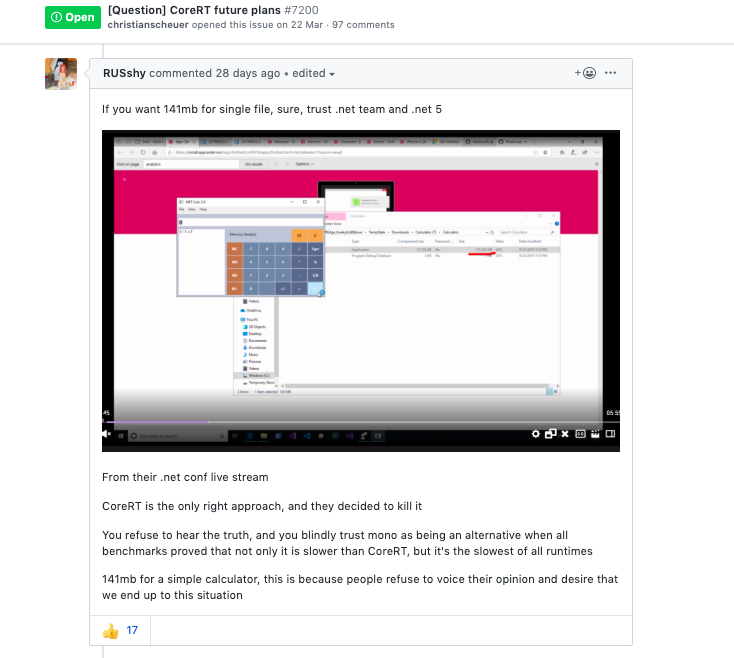
We now only have one .exe file but its size has grown from 157KB to 145MB!
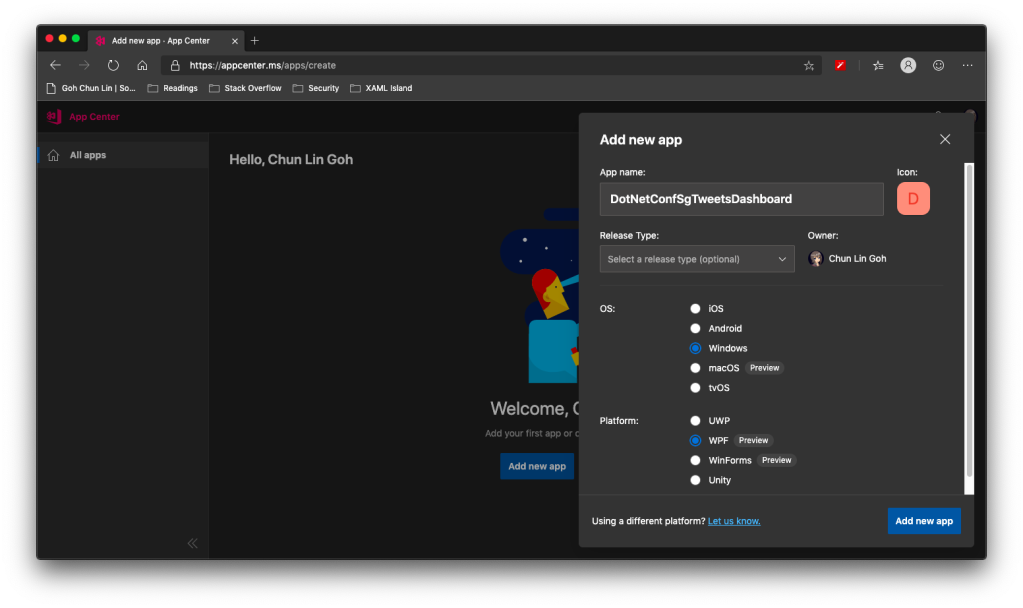
WinForms and WPF are now available on VS App Center but still in preview.
So, the artifact generated in Azure DevOps Build pipeline cannot be automatically delivered to VS App Center even after .NET Conf 2019. We now have to do it manually.
Firstly, we need to download the actifact as a zipped file in Azure DevOps.
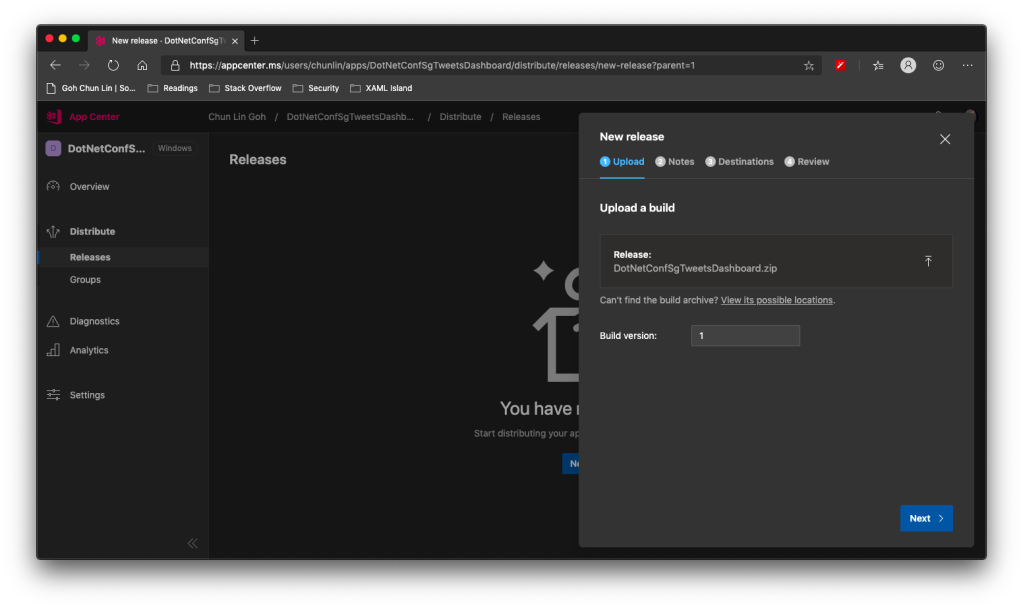
Secondly, we need to upload the zipped file to the VS App Center in its Releases tab, as shown in the following screenshot.
Setting Build version to 1 because this is our first release of the app.
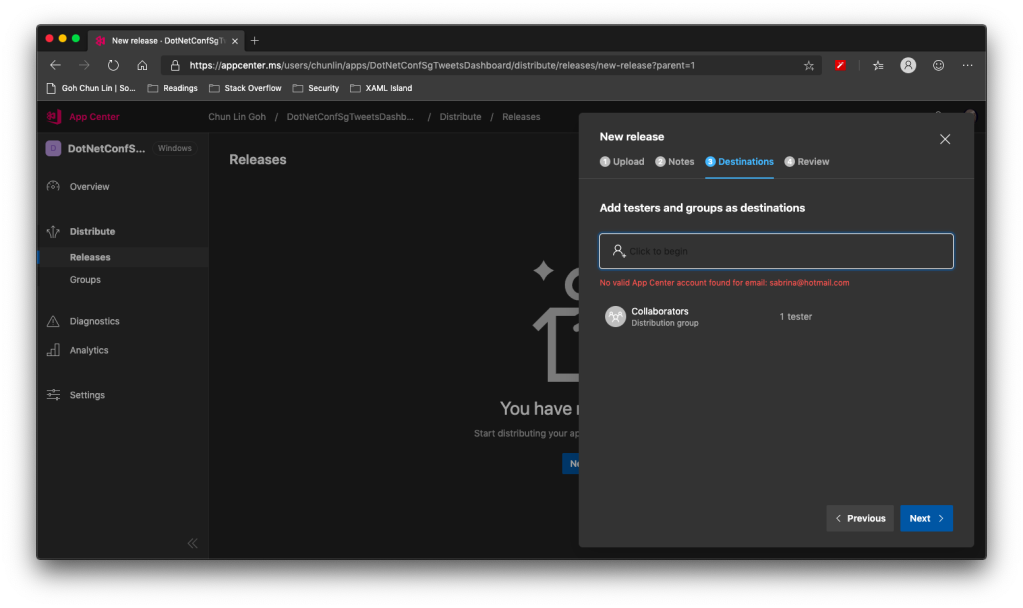
After keying the release notes, we will be landed on a page to choose who we should distribute the app to. Normally they are our developers, business analysts, and testers. Here, in my example, I only have one group called Collaborator and I am the only one in the group.
We are not allowed to add those who are not in our App Center as testers.
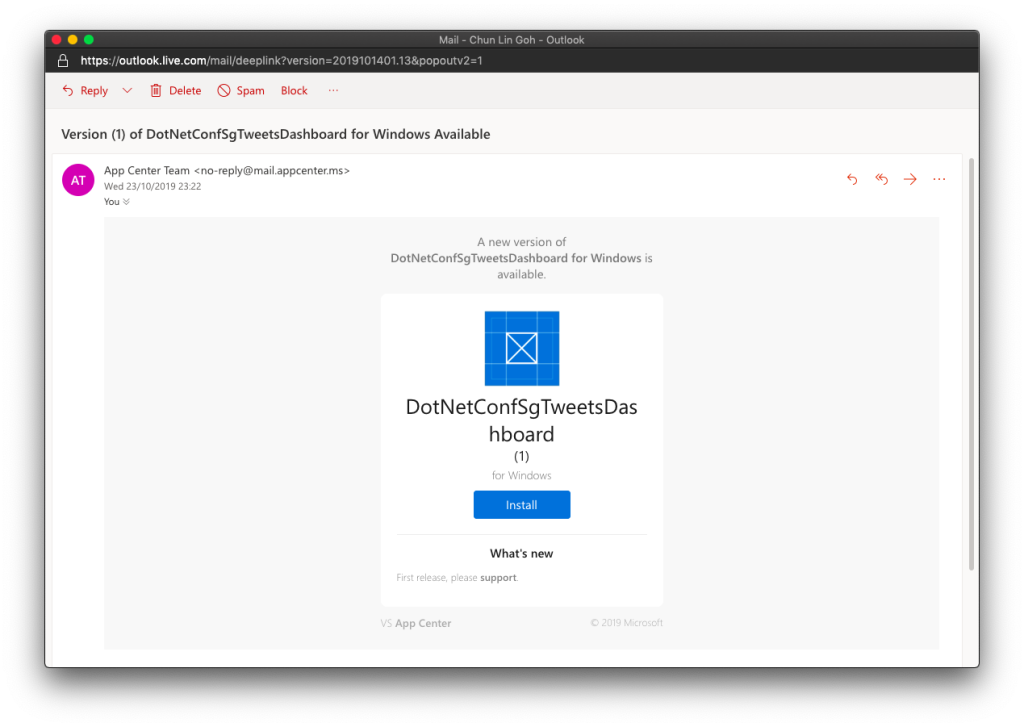
Finally, we will hit the “Distribute” button to release our app to testers. As tester, I will receive the email notifying about the new release.
Yay, new release available for in-house testing.
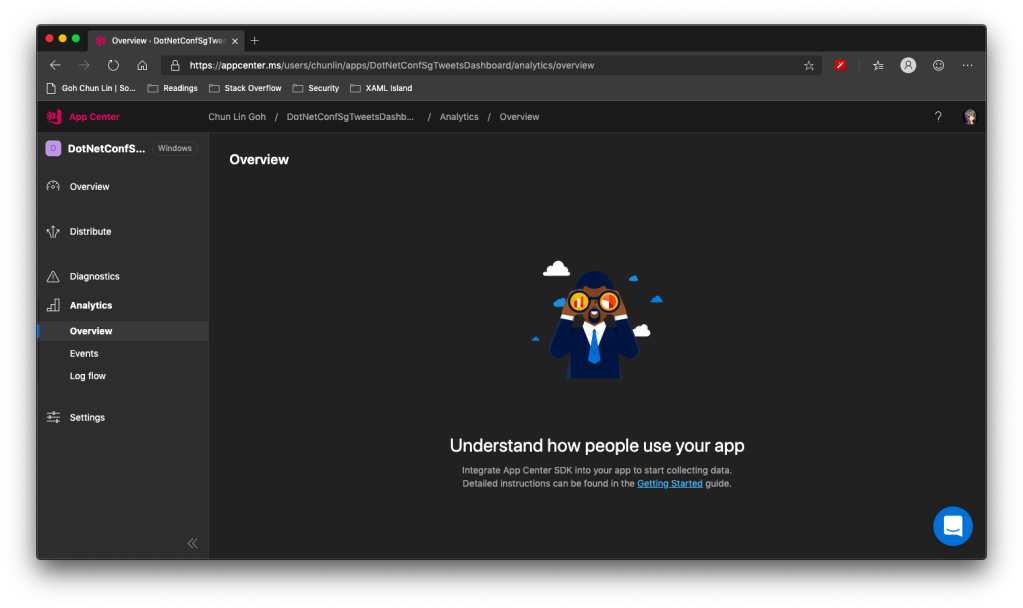
Analytics with App Center SDK
We can also integrate our WPF desktop app with App Center SDK to further collect data to find out how people use our app as well as the crashes in our app.
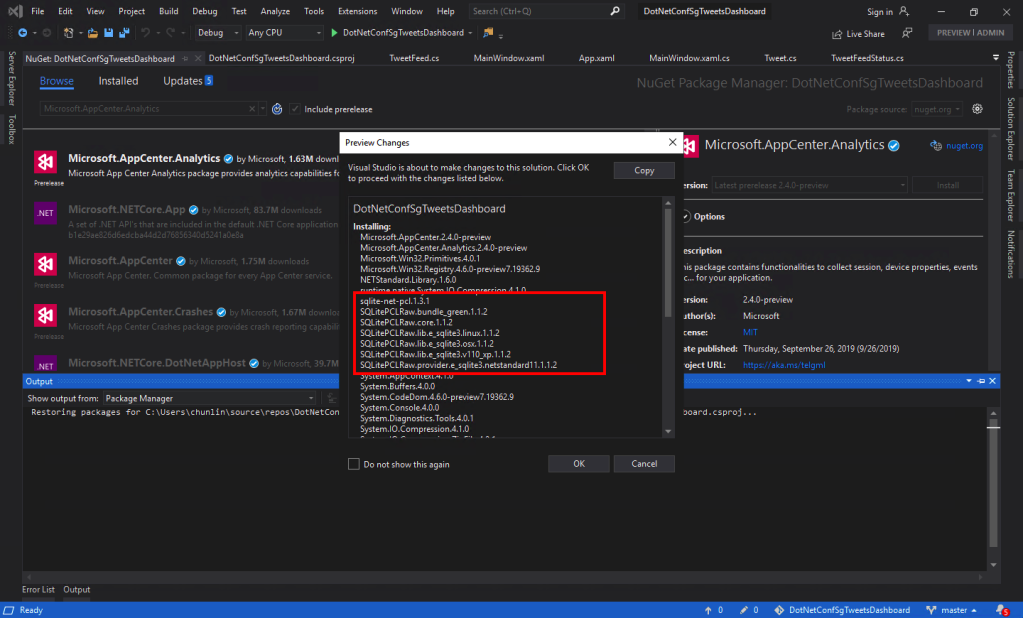
To do so, firstly, we need to install the following two Nuget packages. As the support for WPF SDK is still in preview, please remember to check the “Include prerelease” checkbox.
Microsoft.AppCenter.Analytics;
Microsoft.AppCenter.Crashes.
SQLitePLCRaw is being installed when we install the App Center SDK.
Now we can proceed to put the following code in the first window that will be launched in our app. In my case, it is the MainWindow. So, right after the InitializeComponent() is called, the following codes will be executed.
Yup, if you have noticed earlier when we’re installing the App Center SDK, SQLitePCLRaw was being installed also. Just because of the bug in the SDK, this line was not added to the project file and thus we have to manually reference it. Hopefully this bug gets fixed soon.
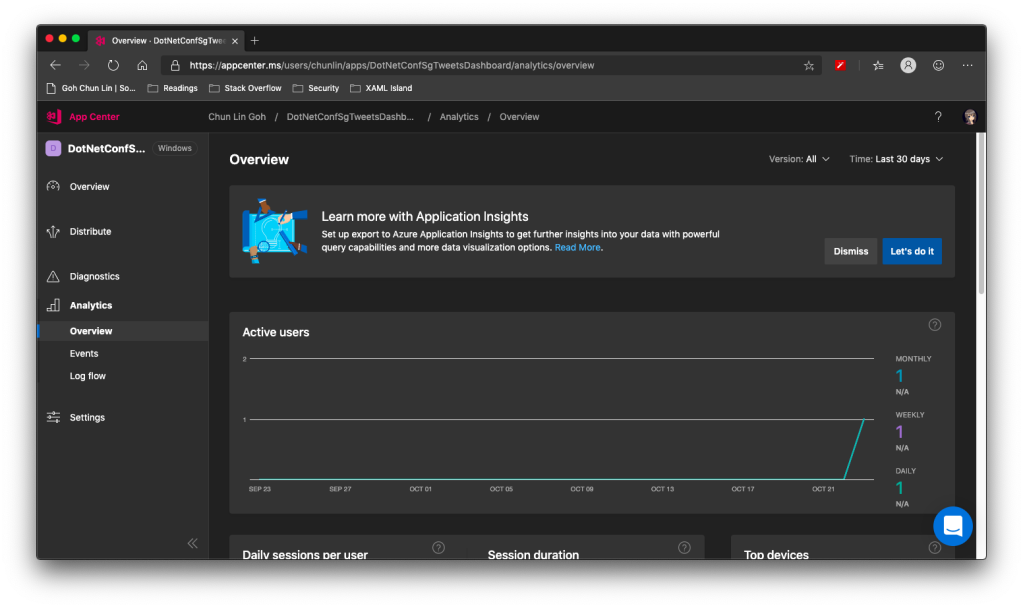
Now when we launch our WPF app again, the nice dashboard will show there is 1 user. Yay!
+1 active user in our app!
Conclusion
That’s all so far for what I’d like to share in addition to what I have shared in .NET Conf Singapore 2019.