Throughout my career, I have been given data-related tasks such as getting the number of products sold in each category, retrieving a list of drivers of a certain trucking company, calculating the gross profit of the week, etc. The data is always spread across varied locations. They can be stored in JSON files, CSV files, relational databases, or even event streams. Of course, I can write a C# program or Python script to solve those tasks. However, could it be that there is no better solution to such problems?
Recently, I came across this tool called OctoSQL. It is a query tool that allows us to join, analyse, and transform data from multiple data sources using SQL. Hence, for those of you who are dealing with data from multiple sources in different ways, OctoSQL can definitely be helpful to you, especially you have SQL background.
Setup and Configuration
To setup OctoSQL, we can simply download the executable file in the Release page of the OctoSQL GitHub project. After that, we can specify the path to the OctoSQL executable in the PATH system environment variable. Once we have done that, then when we run the following command, we shall be able to see the help page of the OctoSQL.

After that, we need to specify a data source configuration path in a system environment variable OCTOSQL_CONFIG so that in our future commands, we don’t need to keep specifying the same path to the configuration file.
Genshin Impact as Sample Data
I will use the data from my favourite game Genshin Impact here so that it’s more fun for me to explain.
In Genshin Impact, there are seven gods, and each takes charge of a different elemental domain. The seven elements are: Pyro (fire), Geo (earth), Dendro (grass), Cryo (ice), Electro (lightning), Anemo (wind), and Hydro (water). Every character makes use of one of these elements in battle.

Each of the characters can bring a weapon to the battle. Currently, there are 5 weapon types in Genshin Impact such as Swords, Bows, Polearms, Claymores, and Catalysts. Normally the weapon will have a Base ATK and some other attributes, as shown in the screenshot below.

Now, I will proceed to show a few ideas on how we can use this tool to make our data processing and analysing life easier.
Use Case #1: Single JSON File
Let’s say we have a JSON file called characters.json with game characters and their info, we would like to find out the highest Base HP of each Element. Hence, we will have our config file as follows.
dataSources:
  - name: characters
    type: json
    config:
      path: "C:\\Users\\gclin\\source\\repos\\OctoSQLSamples\\characters.json"
      arrayFormat: true
Currently, OctoSQL accepts JSON in the form of either one record per line without commas or JSON list of records. By default, it is expecting JSON file is having one record per line. Hence, since our JSON file is a file containing a JSON array, we need to specify arrayFormat to be true in the configuration file.

Next, we can find out who are the characters having the highest Base HP in his/her own element group, as shown below, using nested query and inner join.

Use Case #2: When JSON Meets CSV
Data is not always given to us in the same format. Hence, sometimes we will have situations where we need to do data analysis based on data in, for example, JSON and CSV. So, now let’s assume that we have the character’s weapon data stored in a CSV file. We will then have to update the config file as follows.
dataSources:
  - name: characters
    type: json
    config:
      path: "C:\\Users\\gclin\\source\\repos\\OctoSQLSamples\\characters.json"
      arrayFormat: true
  - name: weapons
    type: csv
    config:
      path: "C:\\Users\\gclin\\source\\repos\\OctoSQLSamples\\weapons.csv"
By default, OctoSQL assumes that the CSV file is using comma as delimiter and has a header row.
Now we can find out the maximum Base ATK for each of the elements.

Use Case #3: JSON with PostgreSQL on Azure
Now, let’s assume that we are not given the CSV file. Instead, the data sits in a PostgreSQL database on the Microsoft cloud.

Could we easily do a table join between these two data sources, i.e. JSON and PostgreSQL? The answer is yes. We simply need to change the config file as follows, where we input the URL of the PostgreSQL server on Azure together with user info, database name, and the table name.
dataSources:
  - name: characters
    type: json
    config:
      path: "C:\\Users\\gclin\\source\\repos\\OctoSQLSamples\\characters.json"
      arrayFormat: true
  - name: weapons
    type: postgres
    config:
      address: "genshin-impact.postgres.database.azure.com:5432"
      user: "chunlin@genshin-impact"
      password: "<password here>"
      databaseName: "postgres"
      tableName: "weapons"

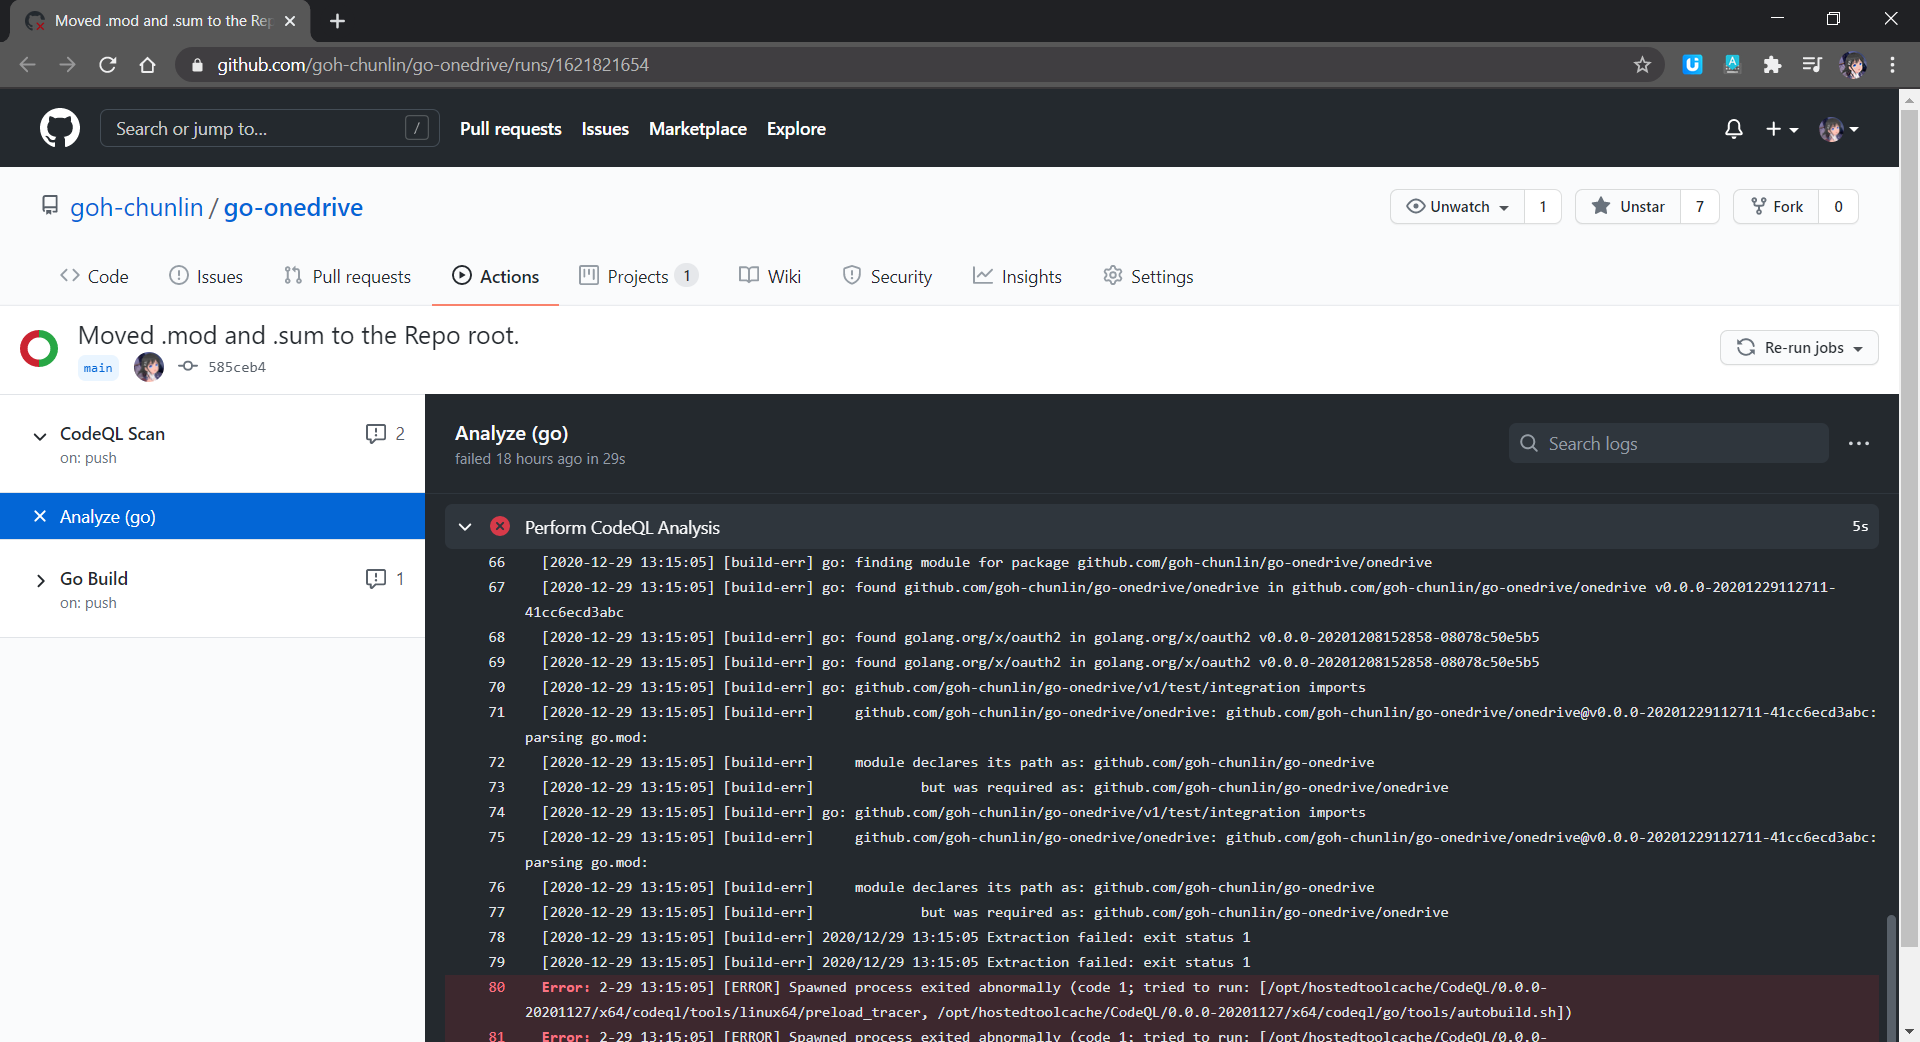
Interestingly, when I try to run a more complicated nested SQL, OctoSQL currently doesn’t return any result.

Query Plan in DOT Language and Graphviz

In OctoSQL, we can describe its query plan in DOT Language, a graph description language. For example, the DOT Language below describes a directed graph G of three nodes A, B, and C.
digraph G {
    A -> B -> C;
    A -> C;
}
Using the Graphviz, a package of open-source tools initiated by AT&T Labs Research, we can visualise the graph described in the DOT Language.
In OctoSQL, DOT Language is also used to describe the query plan. As shown in the following screenshot, it is a query plan for a simple query SELECT * FROM weapons w. We are using WebGraphviz here to display the corresponding graph.