Singtel Meg@POP IP VPN is a new service provided by Singtel, the largest mobile network operators in Singapore. According to its official website, it is designed for retail businesses with multi-sites and it can provide a more secure network as compared to Internet VPN. It leverages MPLS (Multi-Protocol Label Switching) technology, which bypasses the Internet and reduces exposure to cyberthreats.
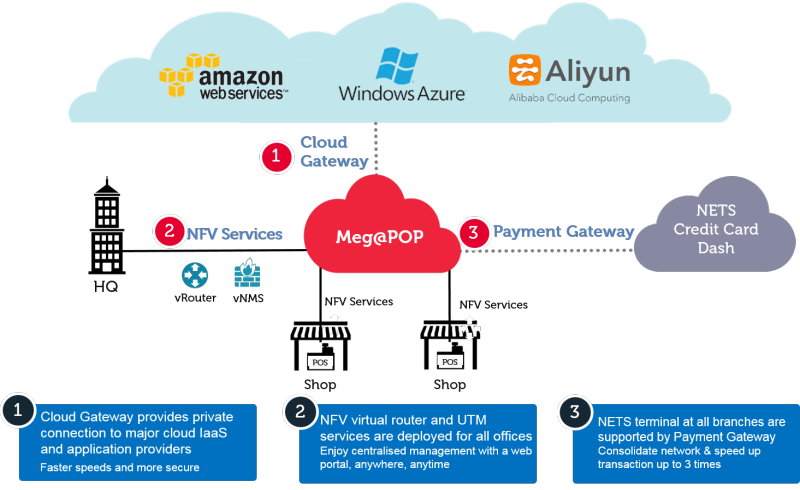
One thing that I’d like to highlight here is that Singtel Meg@POP also offers connection to major cloud providers, such as Alibaba Cloud, Amazon Web Services, and Microsoft Azure, via their Cloud Gateway. Hence, if we have our services hosted on the cloud and our systems would like to talk to the applications running behind Singtel Meg@POP, we need to understand how to configure our cloud infrastructure to connect to the Singtel Meg@POP.
In this article, I will be sharing my journey of setting up our VM on Microsoft Azure to link with Singtel Meg@POP via ExpressRoute.
Step 1: Subscribing ExpressRoute Service
Azure ExpressRoute is for us to create private connections between Azure datacentres and on-premise infrastructure. One good thing about ExpressRoute is that it does not go over the public Internet and thus it is able to offer a more reliable and faster Internet connection.
Hence, to connect with Singtel Meg@POP, Singtel staff recommended us to subscribe to the ExpressRoute on Microsoft Azure before they could provision the Meg@POP service.
It is better to consult with Singtel side before we proceed to subscribe ExpressRoute. In the first step of subscribing, we need to provide information such as Provider and Peering Location. After discussing with the friendly Singtel sales manager from the Business Segment, we managed to get the correct values to setup the ExpressRoute circuit.

Step 2: Provisioning Meg@POP
Once the circuit is created successfully, we need to provide the Service Key of the circuit to Singtel staff. The Service Key can be found in the Overview section of the circuit, as shown in the screenshot below.

After we emailed the Service Key to Singtel, we needed to wait for them to provision Meg@POP. The whole process took about 21 days for our case. Finally we received a confirmation email from them saying that Singtel had commissioned the service and we could proceed to link our virtual network in Microsoft Azure to the ExpressRoute circuit.
Now, under the Peerings section of the ExpressRoute circuit, we shall see something as follows.

Step 3: Creating Virtual Network on Azure
This is a step that we need to be careful. Before we proceed to create the VNet, we need to understand from the service provider that we are connecting to whether they only provision a certain subnet for us to use to connect.
For our case, the service provider that we are connecting to told us to use 10.10.1.0/24 subnet. Hence, when we are creating VNet, we need to use that as Address Space.
Also, please take note that the Address Range for the subnet that we are going to put our virtual machine in later needs to be smaller than the Address Space of the VNet specified above. Otherwise later we will not have address left for the Virtual Network Gateway. Hence, in our case, I choose 10.10.1.0/25.

Step 4: Creating Virtual Machine
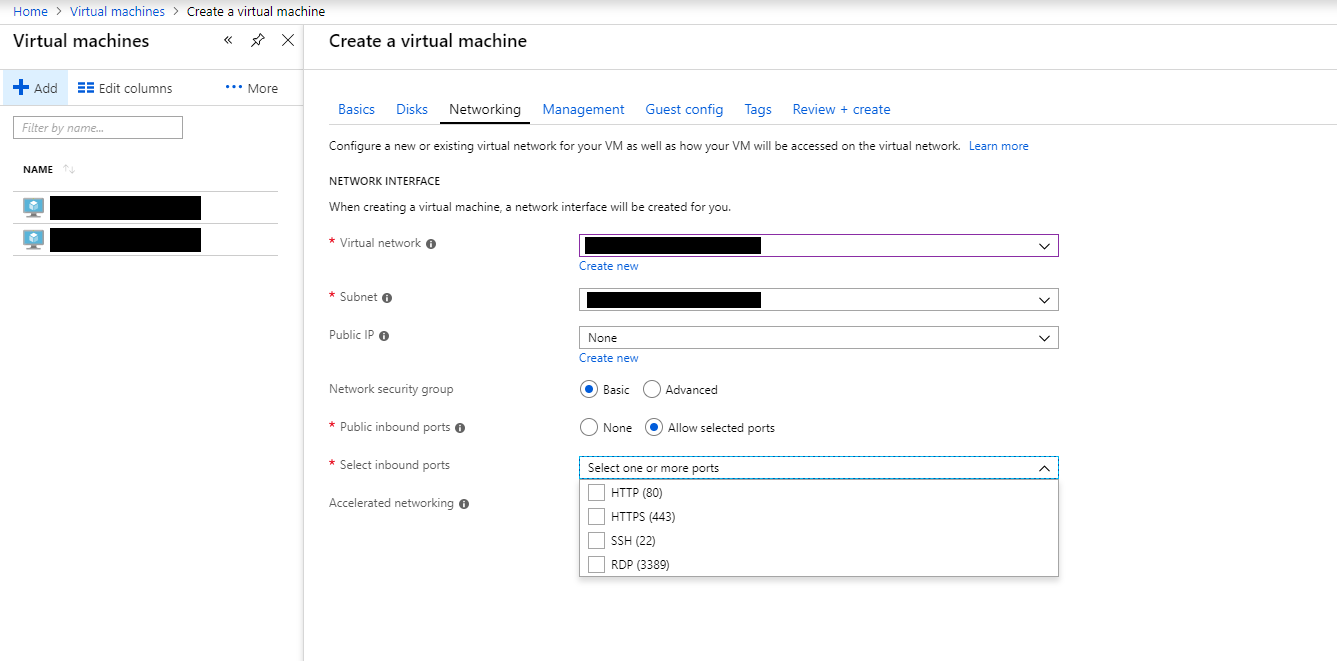
Next, we proceed to create a new VM. In the Networking tab, we are required to configure VNet for the VM.
In this step, we need to choose the VNet and Subnet that we just created in Step 3. After that, for the convenience of direct RDP into the VM, we also need to set a Public IP and make sure Public inbound ports include RDP 3389 port
Step 5: Opening Inbound and Outbound Ports
After the VM is setup successfully, we then need to proceed to configure the inbound and outbound port rules for the VM. This step is only necessary if we are asked to use certain ports to communicate with service hosted behind the Meg@POP.
This step can be easily done in the Network Security Group of the VM.

Step 6: Creating Virtual Network Gateway
We now need to create the Virtual Network Gateway with its subnet in one go.
There is one important step where we need to make sure we choose “ExpressRoute” as the Gateway Type, as shown in the screenshot below.

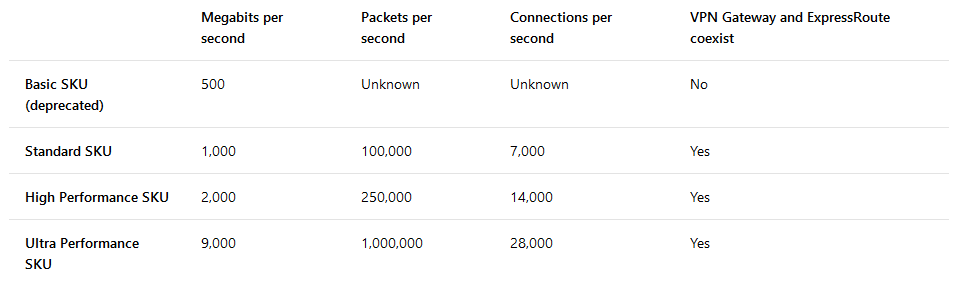
For the Gateway SKU, we are given three options: Standard, High Performance, Ultra Performance. As a start, we choose the Standard SKU which costs the least among three.
Finally after choosing the VNet for the gateway, we will be prompted to specify the Address Range for the Gateway Subnet. In our case, I make it to be a bit smaller, which is 10.10.1.0/28.
Step 7: Creating Connection between ExpressRoute and VNet
Finally, we have to link up our VNet with the ExpressRoute.
To do so, we simply head to the Connections section of the ExpressRoute circuit to add the Virtual Network Gateway to it.

Conclusion

Yes, that’s all. This learning process took me about two weeks to learn. Hence, if you spot any mistakes in my article, please let me know. Thank you in advance.
If you would like to learn more about this, there is a very good tutorial video on Channel 9 about this too which they talk about Hybrid Networking! I learnt most of the knowledge from that tutorial video so I hope you find it useful as well. =)
Together, we learn faster!