With different challenges emerging every other day, startups nowadays have to innovate and operate rapidly in order to achieve exponential growth in a short period of time. Hence, my friends working in startups always complain about the abuse of 4-letter word “asap”. Every task they receive always come with one requirement: It must be done asap. However, as pointed out in the book Rework by Jason Fried from Basecamp, when everything is expected to be done asap, nothing in fact can be really asap. So, how are startups going to monetize their ideas fast enough?
To answer the question, this year IBM Connect Singapore highlighted two cloud platforms, SoftLayer and Bluemix, which help to assist startups to build and launch their products at speed.
IBM Connect 2015 at Singapore Resorts World Sentosa
William Lim sharing story about Global Private Network.
What excites me during the event is the concept of Bare Metal Server. With Microsoft Azure and Amazon Web Services (AWS), users do not get predictable and consistent performance especially for I/O intensive tasks when their applications are running on virtual-machine based hosting. In order to handle I/O intensive workloads, IBM SoftLayer offers their users a new type of server, Bare Metal Server.
A Bare Metal Server is a physical server which is fully dedicated to one single user. Bare Metal Server can be setup with cutting-edge Intel server-grade processors which can then maximize the server processing power. Hence, for those startups that would like to build Big Data applications, they can make use of Bare Metal Server from SoftLayer to perform data-intensive functions without worrying about latency and overhead delays.
Bluemix, PaaS from IBM
As a user of Microsoft Azure Cloud Service (PaaS), I am very glad to see the Bluemix, PaaS developed by IBM, is also being introduced in the IBM Connect event.
Amelia Johasky, IBM Cloud Leader (ASEAN), sharing how Bluemix works together with three key open compute technologies: Cloud Foundry, Docker, and OpenStack.
One of the reasons why I prefer PaaS over IaaS is because in a startup environment, developers always have too many todos and too little time. Hence, it is not a good idea to add the burden of managing servers to the developers. Instead, developers should just focus on innovation and development. In the world of PaaS, tons of useful libraries are made available and packaged nicely which allows developers to code, test, and deploy easily without worrying too much about the server configuration, database administration, and load balancing. (You can read about my pain of hosting web applications on Azure IaaS virtual machines here.)
After the IBM Connect event, I decide to try out Bluemix to see how it’s different from Azure Cloud Service.
The registration process is pretty straightforward. I started with the Web Application Template. In Bluemix, there are many programming languages supported, including the latest ASP .NET 5, the new open-source and cross-platform framework from Microsoft team!
Many web development platforms are available on Bluemix!
I like how Bluemix is integrated with Git. It allows us to create a hosted Git repository that deploys to Bluemix automatically. The entire Git setup process is also very simple with just one click of the “Git” button. So every time after I push my commits to the repository, my app will be automatically updated on the server as well. Cool!
Bluemix enables us to deploy our web apps with Git.
You can click on the button below to try out my simple YouTube related web app deployed on Bluemix.
Bluemix is underlined by three key open compute technologies, i.e. Cloud Foundry, Docker, and OpenStack. What I have played with is just the Cloud Foundry part. In Bluemix, there is also an option to enable developers to deploy virtual machines. However, this option is currently beta and users can only have access to it if they are invited by IBM. Hence, I haven’t tried their VM option.
When my applications were hosted on Windows Azure Virtual Machines (VM), we stored the images uploaded via our web applications in the hard disks of the VMs (except the temporary disk). However, when we started load balancing, we soon encountered a problem that the uploaded images were only found in one of the VMs. So we needed to find a centralized storage for those images.
Recently, when we are using Azure PaaS (aka Cloud Service), even without load balancing, we already encounter the same issue. That is simply because the hard drives used in Cloud Service instances are not persistent. Hence, a persistent file storage on the cloud is needed.
There are two types of blob, Page Blob and Block Blob. Page Blob is commonly used for storing VHD files for VMs because it is optimized for random read and write operations.
The maximum size for a Block Blob is 64 MB. Hence, if the uploaded file is more than 64 MB, we must upload it as a set of blocks; otherwise, we will receive status code 413 (Request Entity Too Large). For my web applications, there is no need for uploading an image which is more than 5MB most of the time. Hence, I can just limit the size of images before the user uploads them.
HttpPostedFileBase imageUpload;
...
if (imageUpload.ContentLength > 0 && imageUpload.ContentLength <= 5242880)
{
    //warn the user to resize the image
}
Let’s Try Uploading Images
I’m going to share how to upload more than one image to the Azure Blob Storage from an ASP .NET MVC 5 application. If you are going to upload just one image, simply remove the for loop and change List to just DBPhoto in the codes below.
First of all, I create a class to handle upload to Azure Storage operation.
public class AzureStorage
{
    public static async Task UploadAndSaveBlobAsync(
        HttpPostedFileBase imageFile, CloudBlobContainer container)
    {
        string blobName = Guid.NewGuid().ToString() +
            Path.GetExtension(imageFile.FileName);

        CloudBlockBlob imageBlob = container.GetBlockBlobReference(blobName);
        using (var fileStream = imageFile.InputStream)
        {
            await imageBlob.UploadFromStreamAsync(fileStream);
        }

        return imageBlob;
    }
}
So, in my controller, I have the following piece of code which will be called when an image is submitted via web page.
[HttpPost]
[ValidateAntiForgeryToken]
public async Task Create(
    [Bind(Include = "ImageUpload")] PhotoViewModel model)
{
    var validImageTypes = new string[] { "image/jpeg", "image/pjpeg", "image/png" };

    if (ModelState.IsValid)
    {
        if (model.ImageUpload != null && model.ImageUpload.Count() > 0)
        {
            var storageAccount = CloudStorageAccount.Parse
                (WebConfigurationManager.AppSettings["StorageConnectionString"]);

            var blobClient = storageAccount.CreateCloudBlobClient();
            blobClient.DefaultRequestOptions.RetryPolicy =
                new LinearRetry(TimeSpan.FromSeconds(3), 3);

            var imagesBlobContainer = blobClient.GetContainerReference("images");
            foreach (var item in model.ImageUpload)
            {
                if (item != null) {
                    continue;
                }

                if (validImageTypes.Contains(item.ContentType) &&
                    item.ContentLength > 0 && item.ContentLength <= 5242880)
                {
                    var blob = await AzureStorage.UploadAndSaveBlobAsync(item, imagesBlobContainer);
                    DBPhoto newPhoto = new DBPhoto();
                    newPhoto.URL = blob.Uri.ToString();
                    db.DBPhoto.Add(newPhoto);
                }
                else
                {
                    // Show user error message
                    return View(model);
                }
            }
            db.SaveChanges();
            ...
        }
        else
        {
            // No image to upload
        }
    }
    return View(model);
}
In the code above, there are many new cool things.
Firstly, it is the connection string to Azure Blob Storage, which I store in StorageConnectionString in web.config. The format for secure connection string is as follows.
Secondly, it’s LinearRetry. It is basically a retry policy which states how many times the program will retry and how much time needed between retries. In my case, it will only wait for 3 seconds after each try up to 3 tries.
Thirdly, I get the URL of the image on the Azure Blob Storage via blob.Uri.ToString() and store it into the database table. The URL will be used later for displaying the image as well as deleting the image.
Fourthly, I actually check to see if model.ImageUpload has null entries. This is because if I submit the form without any image to upload, model.ImageUpload has one entry. Not zero, but one. The only one entry is actually null. So if I don’t check to see whether the entry in model.ImageUpload is null, there will be an exception thrown.
The controller has such a long code. Luckily the code needed in the model and view is short and simple.
For the model PhotoViewModel, I have the following.
public class PhotoViewModel
{
    ...

    [Display(Name = "Current Images")]
    public List AvailablePhotos { get; set; }
}
For view, it is easy to allow selecting multiple files in the same view page. The “multiple = “true”” is to make sure more than one file can be selected in the File Explorer. You can omit this attribute if you only want at most one file being selected.
@Html.LabelFor(model => model.ImageUpload, new { style = "font-weight: bold;" })
@Html.TextBoxFor(model => model.ImageUpload, new { type = "file", multiple = "true" })
@Html.ValidationMessageFor(model => model.ImageUpload)
Image Size and HttpException
The image upload function looks fine. However, when images having size larger than a certain size is uploaded, HttpException will be thrown.
There is no way that having exception would be fun too! (Image Credit: Tari Tari)
What if we just change the if clause above to allow only at most 4MB of image being uploaded? This won’t work because the exception is already thrown before the if condition is reached.
Then, can we just increase the IIS limit from 4MB to, let’s say, 100MB or something bigger? Sure. This can work. However, it still doesn’t stop someone uploads something bigger than the limit. Also, it makes attackers easier to exhaust your server with big files. Hence, expanding the upload size restriction is not really a full solution.
If you are interested, there are many good articles online discussing about this problem. I highlight some interesting ones below.
I don’t really like the methods listed above, especially the 3rd and 4th options. It’s already too late to inform the user when the exception is thrown. Could we do something at client side before the images are being uploaded?
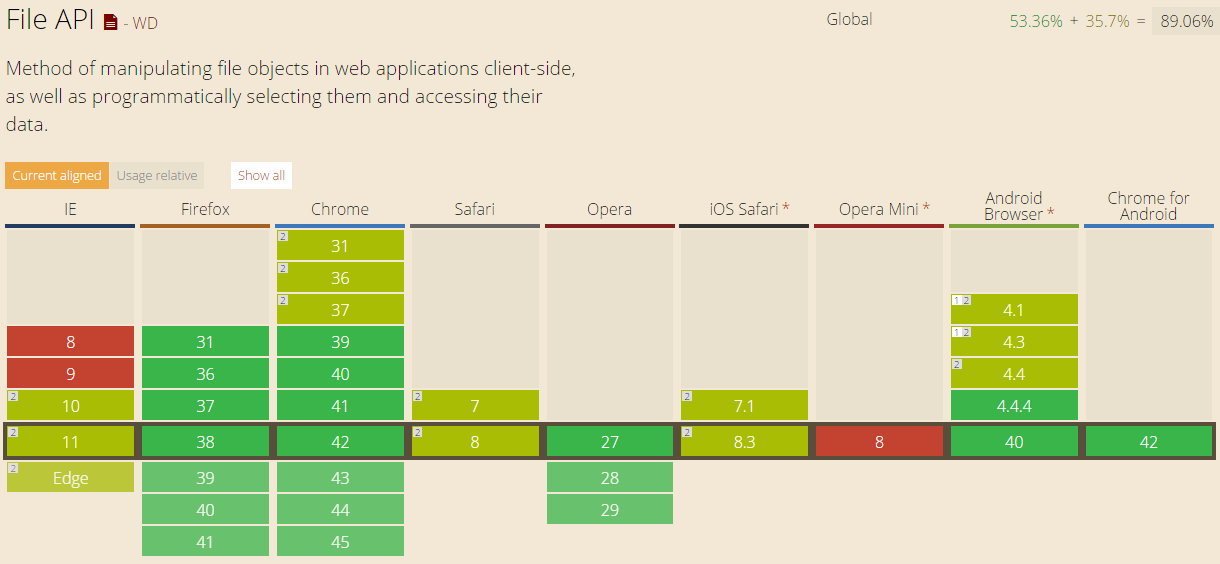
Luckily, we have File API in HTML 5. It allows to loop through the files in JavaScript to check their size. So, after the submit button is clicked, I will call a JavaScript method to check for the size of the images before they are being uploaded.
function IsFileSizeAcceptable() {
    if (typeof FileReader !== "undefined") {
        var filesBeingUploaded = document.getElementById('ImageUpload').files;
        for (var i = 0; i < filesBeingUploaded.length; i++) {
            if (filesBeingUploaded[i].size >= 4194304) { // Less than 4MB only
                alert('The file ' + filesBeingUploaded[i].name + ' is too large. Please remove it from your selection.');
                return false;
            }
        }
    }
    return true;
}
Secondly, I just pass in the Azure Storage URL of the image that I would like to remove and then call the DeleteBlobAsync method.
Uri blobUri = new Uri();
await AzureStorage.DeleteBlobAsync(blobUri, imagesBlobContainer);
Then the image will be deleted from the Azure Storage successfully.
Global.asax.cs and Blob Container
In order to have my application to create a blob container automatically if it doesn’t already exist, I add a few lines in Global.asax.cs as follows.
var storageAccount = CloudStorageAccount.Parse(
    WebConfigurationManager.AppSettings["StorageConnectionString"]);
var blobClient = storageAccount.CreateCloudBlobClient();
var imagesBlobContainer = blobClient.GetContainerReference("images");
if (imagesBlobContainer.CreateIfNotExists())
{
    imagesBlobContainer.SetPermissions(new BlobContainerPermissions
        {
            PublicAccess = BlobContainerPublicAccessType.Blob
        });
}
Write a Console Program to Upload File to Azure Storage
So, how is it done if we are developing a console application, instead of web application?
Windows Azure Storage NuGet Package needs to be installed first.
The codes below show how I upload an html file from my local hard disk to Azure Blob Storage. Then I can share the Azure Storage URL of the file to my friends so that they can read the web page.
Similar to what I do in web application, this is how I connect to the Storage account via https.
var azureStorageAccount = new CloudStorageAccount(
    new StorageCredentials("", ""), true);
This is how I access the container.
var blobClient = new CloudBlobClient(azureStorageAccount.BlobStorageUri, azureStorageAccount.Credentials);
var container = blobClient.GetContainerReference("myfiles");
Then the next thing I do is just upload the local file to Azure Storage by specifying the file name, content type, etc.
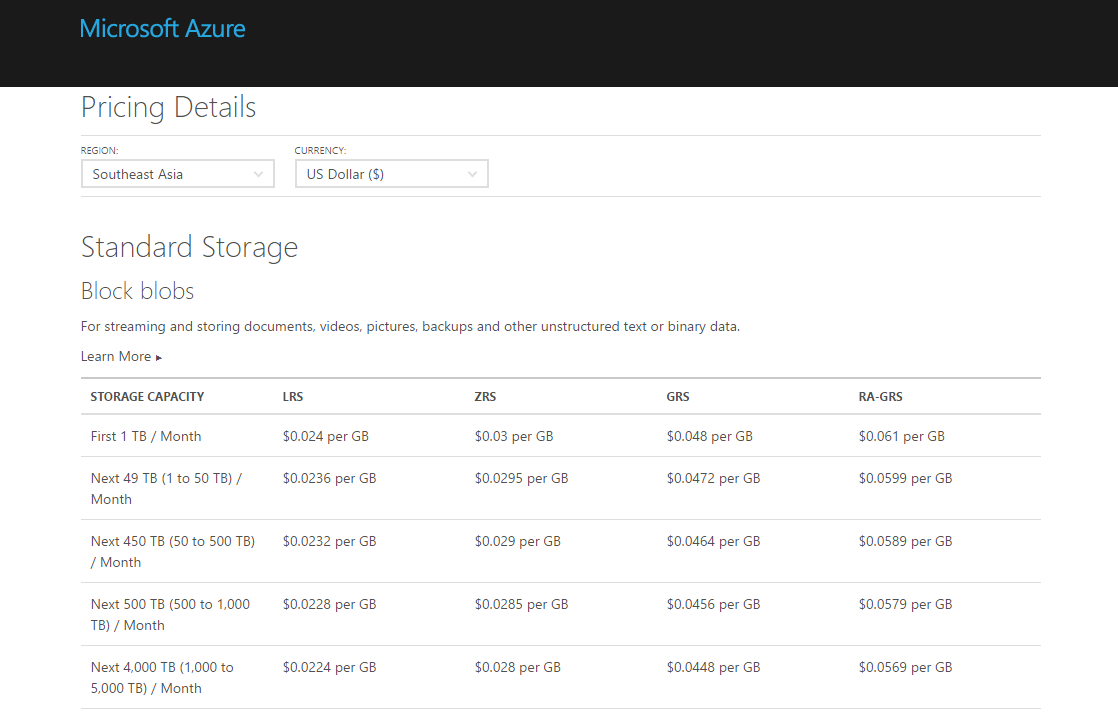
Hosting your files on cloud storage is sure convenience. However, Azure Blob Storage is not free. The following table shows the current pricing of Azure Block Blob Storage in South East Asia region. To get the latest pricing details, please visit Azure Storage Pricing page.
It is quite common that we need our users to input date and time on the web pages. For example, when you search for flight schedules, you normally need to tell the search engine your journey period.
The Datepicker offered by jQuery UI is normally what people will use in their website. It offers a user-friendly way for the user to input a date from a popup calendar. However, it has a disadvantage. Datepicker doesn’t come with an interface for users to input the time. Workaround is normally to provide two more drop-down boxes for user to choose the hour and minute. However, this means that users have to click more times to input both date and time.
In the sample code above, the step defines the gap (in terms of minutes) between two time selections in the plugin. The value of minDate is set to 0 so that the earliest date the user can choose is today.
That’s all. Now you can use the plugin in a text field for user to input both date and time.
@Html.EditorFor(model => model.IncidentTime,
    new {
        htmlAttributes = new {
            @class = "form-control date_field",
            @placeholder = "Incident Date & Time",
            @style = "max-width: 100%"
        }
    }
)
DateTimePicker enables us to specify both date and time in a user-friendly way.
The time picker will then only show the 13 options specified in the code above. If user doesn’t pick any of the time option, then by default the chosen time will be 9am.
In case you would like to hide the time picker, you can do so by setting timepicker to false.
Some users sent their feedback to me about the visibility of time picker on the plugin. To them, the time picker is not so obvious. Hence, I change to use a brighter background colour in one of the class definition in jquery.datetimepicker.css.
I tried it out in my MVC project. Basically, what I do is just use one of the examples as reference, and then include one JS library (Suggestion from the author: Use ‘jssor.slider.mini.js’ (40KB for jQuery Plugin) or ‘jssor.slider.min.js’ (60KB for No-jQuery Version) for release) and some other JavaScript codes together with some inline CSS. I don’t want to talk much about it here because, hey, they have hosted the code and samples on GitHub for public to download!
Jssor Slider with thumbnail navigator is one of the available templates that I like.
“Given an address, how do I get its latitude and longitude?”
I had been finding the solution for this problem for a long time until I discovered the API from Google Maps, the Geocoding Service.
Recently, I found out that my kampung was actually searchable on Google Maps Street View.
Geocoding
According to the definition given in the Geocoding Service, geocoding is the process of converting human-readable address into geographic coordinates, such as latitude and longitude. Sometimes, the results returned can also include other information like postal code and bounds.
To do a latitude-longitude lookup of a given address, I just need to pass the a GeocodeRequest object Geocoder.geocode method. For example, if I want to find out the latitude and longitude of Changi Airport, I just do the following in JavaScript.
https://maps.googleapis.com/maps/api/js?libraries=places


var geocoder = new google.maps.Geocoder();
if (geocoder) {
    geocoder.geocode(
        { address: "Changi Airport" },
        function (result, status) {
            if (status != google.maps.GeocoderStatus.OK) {
                alert(address + " not found!");
            } else {
                var topPick = result[0]; // The first result returned

                var selectedLatitude = topPick.geometry.location.lat();
                var selectedLongitude = topPick.geometry.location.lng();

                alert("Latitude: " + selectedLatitude.toFixed(2));
                alert("Longitude: " + selectedLongitude.toFixed(2));
            }
        }
    );
} else {
    alert("Geocoder is not available.");
}
The above method is recommended for dynamic geocoding which will response to user input in real time. However, if what is available is a list of valid addresses, the Google Geocoding API will be another tool that you can use, especially in server applications. The Geocoding API is what I tried out in the beginning too, as shown in the C# code below.
var googleURL = "http://maps.googleapis.com/maps/api/geocode/json?address=" +
    Server.UrlEncode(address) + "&sensor=false";

using (var webClient = new System.Net.WebClient())
{
    var json = webClient.DownloadString(googleURL);
    dynamic dynObj = JsonConvert.DeserializeObject(json);
    foreach (var data in dynObj.results)
    {
        var latitude = data.geometry.location.lat;
        var longitude = data.geometry.location.lng;
        ...
    }
}
The reason of using dynamic JSON object here is because the Geocoding API returns many information, as mentioned earlier, and what I need is basically just the latitude and longitude. So dynamic JSON parsing allows me to get the data without mapping the entire API to a C# data structure. You can read more about this on Rick Strahl’s post about Dynamic JSON Parsing with JSON.NET. He also uses it for Google Maps related API.
The reason that I don’t use the Geocoding API is because there are usage limits. For each day, we can only call the API 2,500 times and only 5 calls per second are allowed. This means that in order to use the API, we have to get the API Key from Google Developer Console first. Also, it is recommended for use in server applications. Thus I change to use the Geocoding Service.
Where to Get the Address?
This seems to be a weird question. The reason why I worry about this is because it’s very easy to have typos in user input. Sometimes, having a typo is an address can mean two different places, for example the two famous cities in Malaysia, Klang and Kluang. The one without “u” is located at Kuala Lumpur area while the one with “u” is near to Singapore.
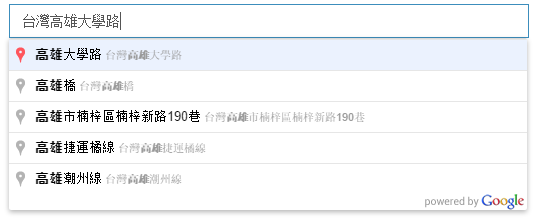
In the code above, I restricted the places which will be suggested by the Place Autocomplete to be only places in Taiwan (tw). Also, what I choose in my code above is “address”, which means the Place Autocomplete will only return me addresses. There are a few Place Types available.
The interesting thing is that even when I input simplified Chinese characters in the LocationName textbox, the Place Autocomplete is able to suggest me the correct addresses in Taiwan, which are displayed in traditional Chinese.
If I search Malaysia places (which are mostly named in Malay or English) with Chinese words, even though the Place Autocomplete will not show anything, the Geocoder is still able to return me accurate results for some popular cities.
Google Place Autocomplete can understand Chinese!
I also notice that if I view the source of the web page, there will be an attribute called “autocomplete” in the LocationName textbox and its value is set to false. However, this should not be a problem for Place Autocomplete API to work. So don’t be frightened if you see that.
Isn’t it good if it can show the location of the address on Google Map after keying in the address in the textbox? Well, it’s simple to do so.
Remember the script to look for Changi Airport latitude and longitude above? I just put the code in a function called showLatLngOfAddress which accepts a parameter as address. Then call it when the LocationName loses focus.
In addition, I add a few more lines of code to showLatLng to draw a marker on the Google Map to point out the location of the given address on a map.
var marker = null;

function showLatLngOfAddress(address) {
    ...

    var topPick = result[0];

    ...

    //center the map over the result
    map.setCenter(topPick.geometry.location);

    //remove existing marker (if any)
    if (marker != null)
    {
        marker.setMap(null);
    }

    //place a marker at the location
    marker = new google.maps.Marker(
    {
        map: map,
        position: topPick.geometry.location,
        animation: google.maps.Animation.DROP,
        draggable: true
    });
}
Finally, I not only make the marker to be draggable, but also enable it to update the latitude and longitude of the address when it is dragged to another location on the map.
I tried to search “Kluang” using Bing Maps API, it returned me two locations. One was in Malaysia and another one was near to Palembang in Indonesia! Wow, cool! On the other hand, Google Places returned me only the Kluang in Malaysia.