As we all know, a picture is worth 1,000 words. More and more, we see developers utilising images as the core of their app. Images play an important role in application navigation, usability, and branding. Hence, sharing images across all platforms, i.e. iOS, Android, and Windows 10, is often a task we need to work on. Today, I will share about how we do just that with Embedded Images.
Distributing images across different platforms with Embedded Images is recommended when identical images are used on each platform, and is particularly suited to creating components, as the image is bundled with the code. In this post, I will demo how we can do that in a new Xamarin.Forms blank project.
Let’s say we would like to show some images in the first screen of our app for each of the platforms. We will first have a folder called Images to store all those images. Then, we need to proceed to set the Build Action of the images to be “Embedded resource”.
Right-click the selected images and then select “Properties” to modify their Build Action.
[ContentProperty(nameof(Source))]
public class ImageResourceExtension : IMarkupExtension
{
    public string Source { get; set; }

    public object ProvideValue(IServiceProvider serviceProvider)
    {
        if (Source == null) return null;

        Assembly assembly = typeof(ImageResourceExtension).Assembly;
        var imageSource = ImageSource.FromResource(Source, assembly);

        return imageSource;
    }
}
Here we use the overload of ImageSource.FromResource that specifies the source assembly in which to search for the image so that it can work on the Release mode of UWP on Windows 10.
Now we can use this extension in the XAML, as shown below, in MainPage.xaml.
The highlighted sections are the parts newly added. At this point of time, we’re still not sure the name of the image. So our app now should not show any image at that part. To find out the actual image names, we can add a debugging code (which we should remove in production) in the ImageResourceExtension class as follows.
[ContentProperty(nameof(Source))]
public class ImageResourceExtension : IMarkupExtension
{
    ...

    public object ProvideValue(IServiceProvider serviceProvider)
    {
        ...

        foreach (var res in assembly.GetManifestResourceNames())
        {
            System.Diagnostics.Debug.WriteLine("found resource: " + res);
        }

        ...
    }
}
When we debug our app, the following should be shown in the Output window.
found resource: CPEI.Images.Genshin-Impact-Pic01.png
found resource: CPEI.Images.Genshin-Impact-Pic02.png
found resource: CPEI.Images.Genshin-Impact-Pic03.png
found resource: CPEI.Images.Genshin-Impact-Pic04.png
found resource: CPEI.Images.Genshin-Impact-Pic05.png
found resource: CPEI.Images.Genshin-Impact-Pic06.png
So now we know the name for each of the images. We simply update the Source in the XAML code above to correctly show the image, for example
Yay, the selected image is now displayed on our UWP app.
Access Embedded Images from Code Behind
Instead of XAML, we can access the embedded images from code behind too. For example, if we want to change the image above randomly through a click of button, we can have the following code in the click event of the button.
private void Button_Clicked(object sender, EventArgs e)
{
    Random rnd = new Random();
    int imageIndex = rnd.Next(1, 7);

    MainImage.Source = ImageSource.FromResource(
        $"CPEI.Images.Genshin-Impact-Pic{imageIndex:00}.png",
        typeof(MainPage).Assembly);
}
Yay, we now can choose embedded images to be displayed in frontend from code behind.
Android and iOS
Since embedded images are shipped with those images embedded in the assembly as a resource, the images can be also displayed on Android, as demonstrated below.
Debugging our Xamarin.Forms app on Android emulator.
In order to test our app on the iOS platform, it’s easier if we choose to build our iOS app project on a Mac machine directly. Visual Studio for Mac offers the support for debugging Xamarin.iOS applications both in the iOS simulator and on iOS devices.
Recently due to the coronavirus pandemic, ordering food from online platform becomes one of the popular choices here. Drivers will deliver the food to us without us leaving our house to pickup the food from the restaurants.
The drivers are all equipped with a smart phone that will send I’m not sure how those online food ordering platforms design their backend system to track the drivers. However, today I’d like to suggest how we can build such driver tracking system with Azure Event Hub and Stream Analytics.
The Traditional Approach
Previously, the approach that I took to build such system by building a Web API which provides endpoints for the mobile devices (assuming to be only Android and iOS) to send the GPS data to. Then our Web API will save the data to CosmosDB, which is a good choice for any serverless application that needs low order-of-millisecond response times.
However, this approach is costly in terms of hosting and maintainability, especially with the expensive CosmosDB even though there is now a free tier available for CosmosDB starting March 2020. Also it is not scalable unless we spent extra time working on the infrastructure to load balance the Web APIs and the reporting servers.
So, let’s see how we can use the robust Azure services and Microsoft tools to help us build a better tracking system.
Eventing in Azure
As we all know, GPS reporting of drivers in delivery industry needs real-time processing and the volume of data is always huge to a certain level that there are millions of events happening in every second.
Hence, in this article, I’d like to share with you all an alternative, which is cheaper (unfortunately, not free) and more scalable with higher maintainability.
🎨 Alternative solution for driver tracking system with Eventing in Microsoft Azure. 🎨
In this approach, we will be using tools such as Event Hub, Stream Analytics, and Power BI. There is also Azure Function needed for iOS side which I will explain why later in this article.
Event Hub
As shown in the diagram above, we remove the needs of building the API endpoints and maintaining a reporting module ourselves. Instead, we have Event Hub, a serverless Big Data streaming platform and event ingestion service which can provide real-time event processing and is able to stream million of events per second. Since it’s a serverless setup, we don’t need to provision server resources to handle the events and we also don’t have to pay for large upfront infrastructure cost.
🎨 One of my event hubs that is receiving geolocation data from the mobile devices. 🎨
Since Event Hub is an open multi-platform, it accepts a range of input methods. So later we shall see how data can be sent to Event Hub from both Android app and iOS app directly.
Event Hub Namespace Throughput Unit
There is a very interesting property in Event Hub Namespace called the Throughput Unit (TU), which is the amount of work that we want to assign to the namespace.
1 TU gives us 1MB/s ingress or 1,000 events/s and 2MB/s outgress or 2,000 events/s. We can scale our namespace up to 20 TUs.
🎨 Scaling the event hub namespace by its TU. 🎨
In the screenshot above, we can see that there is also a functionality to auto-inflate our namespace which will auto scale-up the TU to a defined limit. This is good for handling sudden peak in volume. However, take note that there is no auto-deflate, so once the TU goes up, we need to use another way to scale it down when the peak is over.
One more thing to take note here is that the TU is shared among the Event Hubs under the namespace.
Capture in Event Hub
By default, Event Hub can store the data for one day. We can adjust it to be the maximum, which is 7 days (in Standard pricing tier only). This is to remind us that Event Hub should not be used as a data storage.
However, with the easy integration of Event Hub with the Azure Stream Analytics, Event Hub can serve as input of the Stream Analytics and output the data to places such as Power BI for data analysis and visualisation or SQL / Azure Storage for data storage.
In addition, we can also enable the Capture function in Event Hub. Capture will automatically persist the data to Azure Storage with no administrative cost. This is the easiest way to load streaming data into Azure without the need of Stream Analytics. The captured streaming data will be stored in the AVRO format which has the data serialised in a compact binary format.
🎨 Viewing the captured streaming data in Azure Storage on the portal. 🎨
Mobile Clients
Now with the Event Hub setup, we will proceed to discuss how we can send data from our mobile devices to the Event Hub.
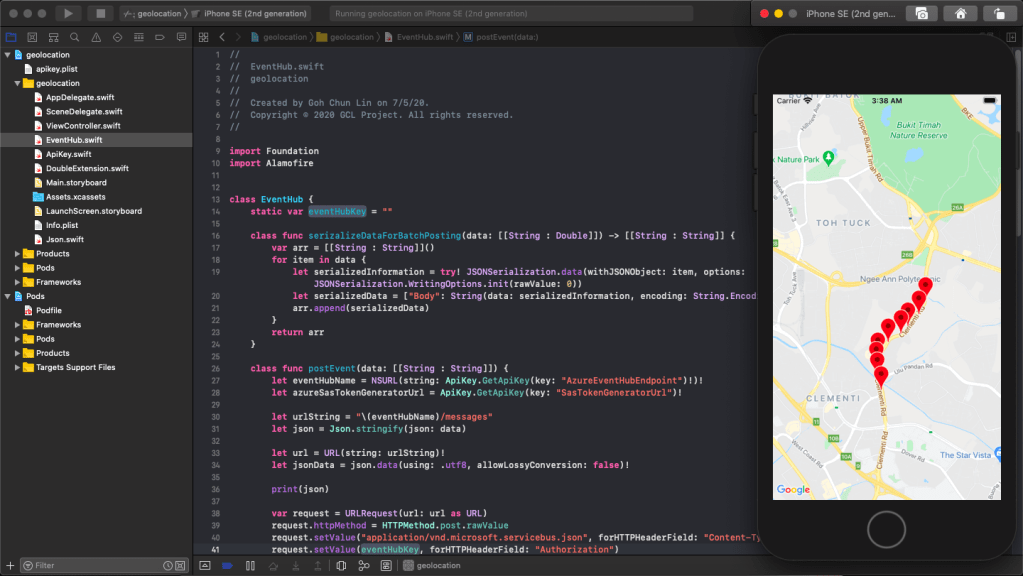
🎨 “Driving” on iOS Google map. 🎨
Unfortunately, there are very little documentation about how to do this online, especially on Kotlin/Swift + Event Hub. Hence, I hope this article can help somebody out there who are interested in similar approach.
Since during the coronavirus pandemic, we are advised not to leave our house so how do I test in such a situation? I thus decide to cheat a bit here. Instead of using the actual mobile location, I will be running my apps on the emulator/simulator. What the apps do is then collecting the latitude and longitude of the points that I click on the app and send them to the Event Hub.
In the system, we have both Android and iOS mobile devices that will send GPS data of the users to the Event Hub. For the Android, I will be using Kotlin because it’s the modern recommended way of developing Android app.
Having said that, I will still be using the existing Java client library for Event Hub from the repository. However, there are a few configurations we need to take care of in order to use this Java library.
Firstly, we will add the dependency to the project as follows in the build.gradle of the app.
Another thing why we choose Event Hub is that it allows us to send data in batches. The following function shows how to send data in batch to the Event Hub.
private fun sendLatitudeAndLongitudeDataToAzure() {
    var producer = EventHubClientBuilder()
        .connectionString(BuildConfig.AZURE_EVENT_HUB_CONNECTION_STRING, BuildConfig.AZURE_EVENT_HUB_NAME)
        .buildProducerClient()

    val batch = producer.createBatch()

    recentLatitudeAndLongitudeRecords.forEach {
        batch.tryAdd(EventData(it))
    }

    if (batch.count > 0) {
        producer.send(batch)
    }

    producer.close()
}
The variable recentLatitudeAndLogitudeRecords is a collection of all recent latitude and longitude data collected by the device. In my demo code, which is not shown above, I make it to hold 10 records. So in just one send command, 10 geolocation records will be sent altogether to the Event Hub. The devices thus do not need to make multiple connections to the server to send multiple records.
I only highlighted the key points here for programming an Android app in Kotlin to connect to the Azure Event Hub. The complete demo code is available on GitHub for those who want to find out more about how we can integrate Event Hub in Android projects.
We should be glad that there is still Event Hub documentation and library available for Android platform because for iOS, there is basically nothing, not even an Event Hub SDK for iOS from Microsoft.
🎨 Barack Obama served as the 44th president of the United States from 2009 to 2017. (Image Credit: CBS News) 🎨
Since there is no Event Hub SDK for iOS, we have to use its REST APIs instead. For using Event Hub REST APIs, we first need to programmatically generate a SAS (Shared Access Signature) token in order to call the APIs.
This is where the Azure Function comes into picture. In Luis’ blog post, he setup an Azure Web App to host a NodeJS application which will generate SAS token. To be more cost effective, we will be using Azure Function with a short and sweet C# code as shown in the Microsoft documentation.
With this, then we can then use Alamofire, an HTTP networking library, to make a request to the Azure Event Hub. To send batch data, we first need to make sure the message body to have a valid JSON payload, which is something as follows.
[
{"Body": "<stringify of the record 01 JSON object to send>"},
{"Body": "<stringify of the record 02 JSON object to send>"},
...
]
We then also need to make sure we have set the Content-Type header to “application/vnd.microsoft.servicebus.json”. For more details, please refer to the Microsoft documentation on sending batch data.
Of course, here I also highlight only the key points to successfully send event data in batch from iOS using Swift 5 to Azure Event Hub. If you would like to find out more, I have my entire demo project for this available on my GitHub repository, please review it.
🎨 Running the app which is sending data to the Event Hub on iPhone simulator. 🎨
Stream Analytics
With the events sent from the mobile devices to the Event Hub, we now can link the Event Hub with the Stream Analytics. Take note that Stream Analytics is just one of the many ways of pulling data from the Event Hub. For example, if you are familiar with Apache Storm, you can link it up with that too.
Consumer groups enable multiple consuming applications to each have a separate view of the event stream, and to read the data stream independently. Hence, it is recommended to create a new consumer group for each Stream Analytics Job.
The Stream Analytics accepts multiple inputs and multiple outputs with multiple queries. In our scenario, we have one input from the Event Hub and two outputs to two different datasets on the Power BI.
One dataset is to show all the data points collected by the mobile devices. We will use this dataset to plot the places visited by the drivers on a map. Another dataset will be showing the number of points collected in each mobile device.
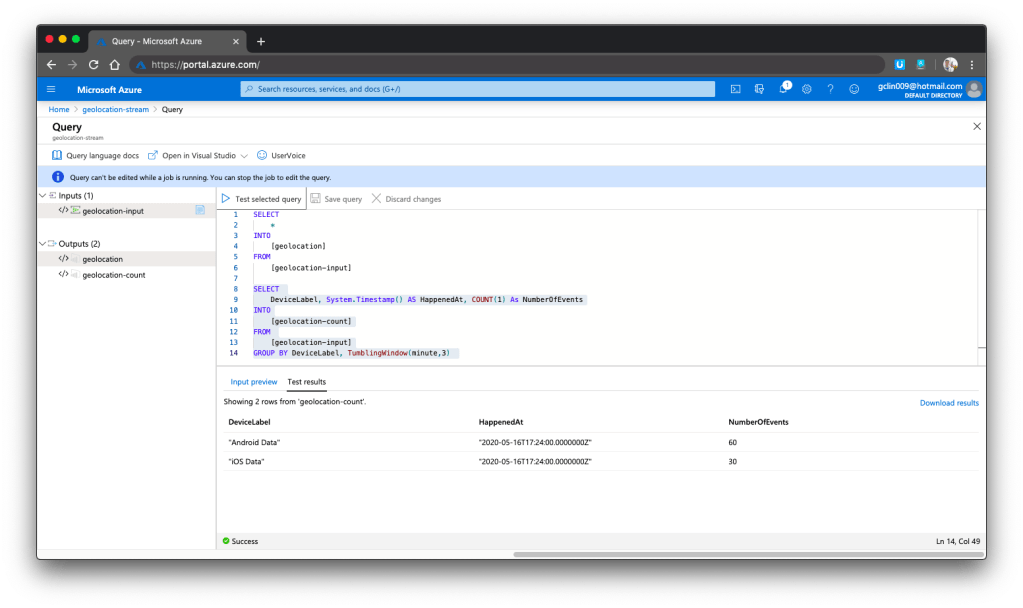
Hence, we have the following queries in our Stream Analytics.
SELECT *
INTO [geolocation]
FROM [geolocation-input]

SELECT DeviceLabel, System.Timestamp() AS HappenedAt, COUNT(1) As NumberOfEvents
INTO [geolocation-count]
FROM [geolocation-input]
GROUP BY DeviceLabel, TumblingWindow(minute,3)
We can now test run the queries above on the Azure Portal, as shown in the screenshot below.
🎨 We can choose to test only the selected query and view its test results. 🎨
Here, there are additional two things that I’d like to highlight.
Firstly, the data format that we sent to Event Hub is very important. Sometimes it is possible that the Event Hub can receive the messages but due to the wrong format in the messages, Stream Analytics cannot take them as inputs and there will be warning shown in the Overview page of the Stream Analytics.
In Power BI, with our setup above in the Stream Analytics, it should now show two datasets.
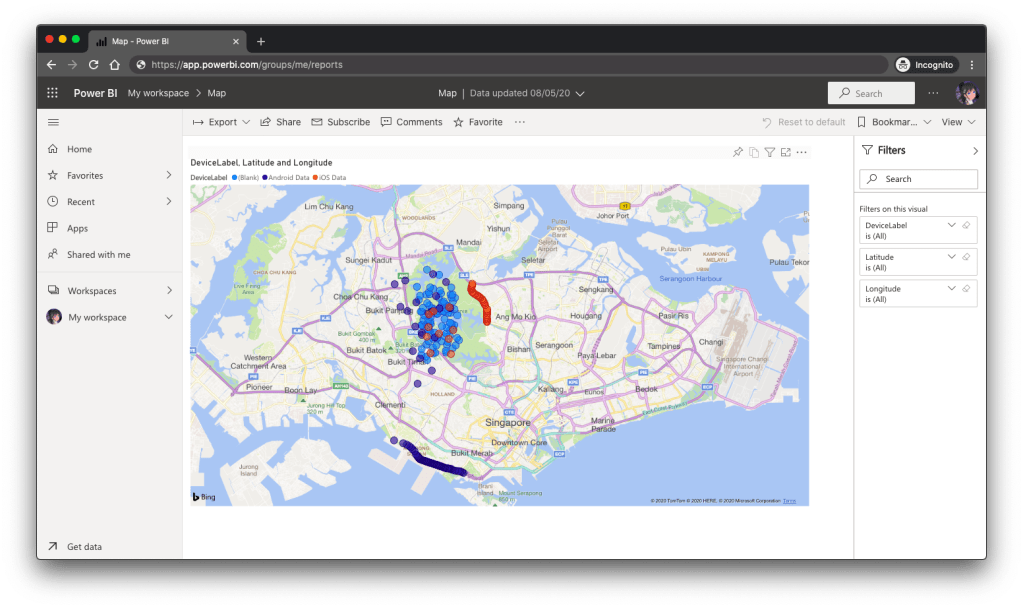
Firstly, we have the map in Power BI using the first dataset to show the location of the drivers. There are some data points having blank Device ID because it is a new field I added after I setup the first dataset in the Stream Analytics.
🎨 Map showing the driver locations using results returned from the first query in Stream Analytics. 🎨
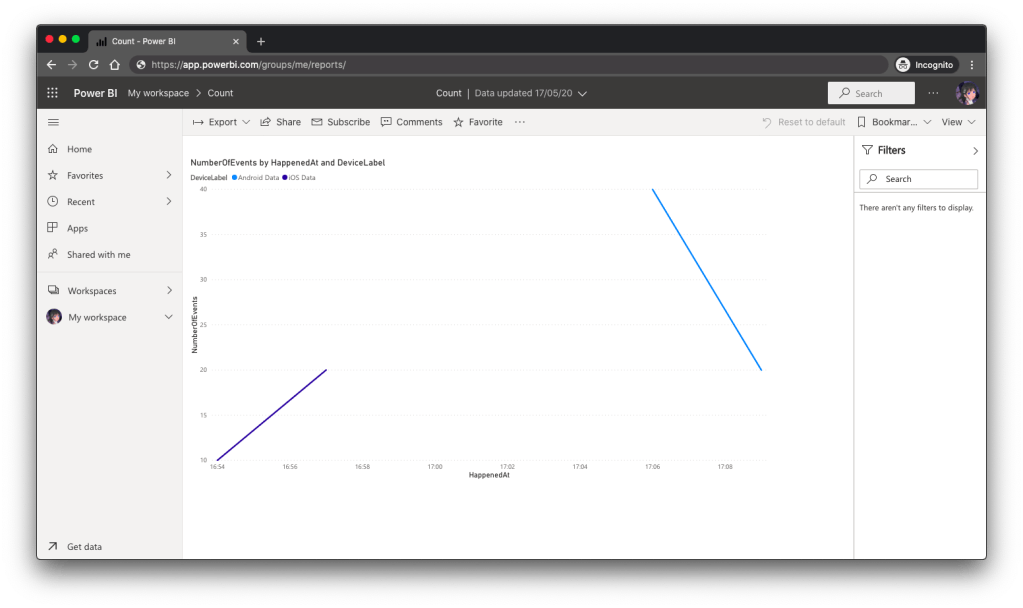
Secondly, we can also visualise the results returned from the second dataset using the Line Chart in Power BI, as shown below.
🎨 The second driver starts work after the first driver. 🎨
Conclusion
So, what do you think about my alternative above? In fact, there are other ways of doing this as well. There is one more alternative that requires Azure Time Series Insights service which I will be researching. Hopefully I can have time to blog about it soon.
If you have any other better solution, feel free to let me know in the comment section. I may not have time to try all of them out but it may help other developers to find out more alternatives. Thank you in advance!
🎨 If you have a good suggestion to share, let’s discuss over a meal. 🎨